
HOLIDAY DONATION DRIVE - SUPPORT MSW - DO YOUR PART TO KEEP THIS GREAT FORUM GOING! (Only 27 donations so far out of 49,000 members - C'mon guys!)
×

RickyGene
-
Posts
147 -
Joined
-
Last visited
Content Type
Profiles
Forums
Gallery
Events
Everything posted by RickyGene
-
 Great workmanship. Look forward to more. I have this same kit. Rick
- 14 replies
-
- 2
-

-
- sherbourne
- caldercraft
- (and 1 more)
-
I have no words! There are builders, then there are the craftsman and then you have the artisans. You sir fit all of them.

-
A most excellent choice for your next project. You also have a nice boat slip to bring your build to life. Might I make a suggestion. A slight warp can be dealt with pretty easily. But yours looks really worse for wear. Fire a e-mail off to Model Expo and I bet they will replace with a flat one. I have never had them not respond to a request for replacement. I too had to learn the hard way with a warped FK after thinking I had fixed it, resulting in that build being shelved. Looking forward to your build. Rick
-
Have the frame/ribs/false deck glued up. Starting to glue up the decking. One of the things I do not like is the decking material does not run the length of the deck. So one must cut each plank 60mm, I use a pencil to color one side of the plank and one end. Then glue to deck. This takes a lot of time, but pays off in the end. The angled planks need to be cut down a tad to rep 2' wide planks, not too sure if I will do this since it too would entail a lot of time. I still can not find the down load cord to my camera, so tomorrow, a trip to Wallie World to buy a cheap one and finally put some build photos up...….hoora
-
Hello Morgan, I have really enjoyed your build thread and look forward to more. For some time I have look @ De Agostini and have steered clear of. You know the saying, ignorance is bless! But after reading many threads of De Agostini ship builds here on the site. I had to give one the go. So many evenings looking, trying to decide which one, they made the decision easy for me. I ended up pulling the trigger on their HMS Sovereign of the Seas. They were offering a summer sale, 1USD got the 1st pk w/Stage 1 to 11. Then I got a 25% off the rest of the next 11 months subscription. Needless to say, this would be the most difficult project I have even thought about trying. But witnessing your build has give me the nerve to tackle. I am currently working on the HMS Terror, have received the 1st pack and will not start until I complete the current build. I figure I should have at least 6 packs by then, maybe? Anyhow, I will be following your work. Rick
- 50 replies
-
- 2
-
-
- soleil royal
- first build
- (and 1 more)
-
You now have another fan. Your re-take on the build after the 1st attempt shows that giving up is not a option when learning and building wood ships. Will follow along as you continue your journey with this most excellent example of what one can do when they put their mind to it. Rick😎
-
Great work on a nice kit. This will be my next build. Hope I can do her the justice you have. Rick
-
Funny you should ask this. On my current build I did just that. But you need to use plenty of glue and work fast. After I glued all the ribs, I then added glue to the false deck and started @ the front to the rear, setting each rib into the corresponding deck slot. Weight added on top of the deck and left to dry for 24 hours. Everything straight and level. No issues with a rib not lining up. Worked for me. Rick
-
Ah, the Connie. What American does not love this ole gal. I have a couple of times, started to order this kit and then think, hey you have the Marine Models version that is the same scale but with a solid hull, well 2 really, one is Bass Wood, the other Mahogany of which I will mount as a Lift Model on a Board. I also lucked up and acquired a piece of wood from her during the last refit. I still do not know exactly where I will use, but a part of the real will be apart of the build! Your hull looks great. As you already know, most of the kit is Bass Wood. Might I make a suggestion, if you can, look at acquiring Box Wood. You will love how the stuff works and does not split or crack. I also like Holly and Pear. I lucked up and several years placed a large order with sadly now, Hobby Mill. I really miss that fella, he was a 1st class act. Anyway, you will be surprised at just how clean and sharp the wood looks. My plain was until I found out how hard and the dust can kill ya, use ebony, Box and Pear on mine if I ever get around to the build. But please do not take what I am saying as neg against Model Shipways supplied wood, it is all good. But if you every venture out from just what comes in a kit, you will see what I am talking about. Looking forward to more of your build. Rick😎
-
Great job on the Whale Boat. Last year while in DC I went to the Smithsonian Museum of American History. In the back is a section dealing with Transportation. And this includes models of ships. The models there are just gorgeously done and as accurate as they are beautiful. Most dealt again as I said w/transportation. Now when I rounded one corner my jaw dropped to the floor. There behind glass was a real and used New England Whale Boat. I spent a hour photographing this treasure. You see, I do not have a Model Shipways version, but I have a Marine Models solid hull model from 1960's that is pristine. I have had the chance to side by side compare these two and I am amazed how just how close they are, then again, Model Shipways did acquire the rights Marine Models. I have the original USS Constitution as well and I have 2 hull blanks for her and one is solid mahogany. Anyway, what I wanted to point out is, you would never believe just how close the Model Shipways is to the real deal. That includes all the little details as well. You will notice I said I photographed this piece of History. I down loaded to my then Computer the 1st of this year, she died along w/photos I can never replace. You can bet when I go back to DC, I will again go to that Museum, as well as some other Museums and this time I will use the digital for color, but I will have my ole trusty 35mm film along too, BW photos can show details crisper. There were some very un-noticed details I was able to get in those photos. But believe me, the Model Shipways is as close as to the real deal as anyone could have designed. Most excellent build by the way. Loved that little sewing machine. By the way, I have the same tool organizer. Rick
- 45 replies
-
- 1
-
-
- new bedford whaleboat
- model shipways
- (and 1 more)
-
Good choice. And Model Shipways has their own Connie too. Will be watching for that longboat thread. Rick
-
My favorite vessel, go figure😍. I remember fondly building this one and then the 1/96 version. I have tucked away a Marine Models Connie, a solid hull kit from back in the day. When I purchased it, I lucked up and got a piece of wood from the ship, during the last refit of her. I will use this piece of wood in the build of the Connie. Keep up the good work. Rick PS: Have a piece of wood from the HMS Victory too.
-
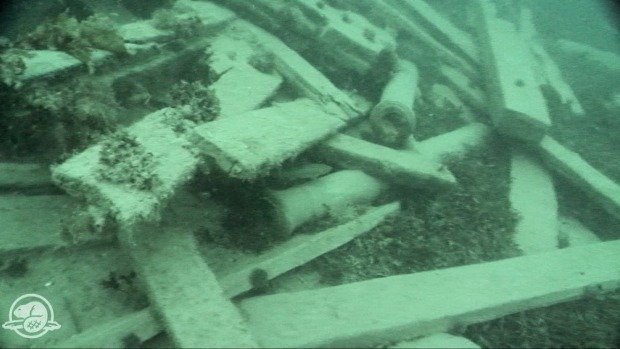
sir francis haddock, I thought I would share a little detail I came across today that blew my socks off. I had seen a drawing of the 1845 fit for the HMS Terror and noticed them, but wrote it off. Then I came across a photo today of the Terror on the ocean floor after being discovered and look what was laying on the deck timbers. Easy enough little detail one could add if so wished. I should be posting some photos soon of where I am at in my build. Rick

-
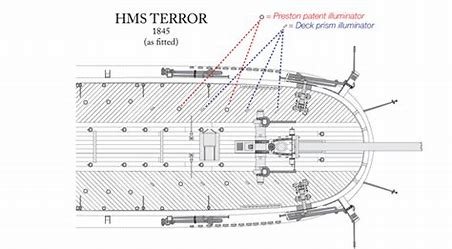
Ok, enough about anchor chains. Now another dilemma...….you ready for this. When the HMS Terror was located and divers photographed the deck, look what the camera showed. Two cannon barrels!!!!!!! Now there is a print of the bow/deck area I have found and look what is at the front of the ship.

-
Oh please do not be sorry sir. You and Jim have took the time to help. That is more important than the question. Thank you kier and if ever I can be of help. Rick
-
Yes, I too found photos showing anchor chain wound around the windless. The windless appears to be made with the pawls to grip and wind the chain around the drum head. Did not see a capstan, but that does not mean it is not there. So now I know a windless is used for hauling in the anchor chain of a vessel. So since the chain is part of the kit, and there was chain on the deck of the mini-series as designed my the same guy that OcCer used his drawings. Chain it is. Thank you Jim,
-
And one more detail.

-
I do again have a nagging question about that anchor chain. You will notice as I have there are no drawings that show what was used on the vessel for the raising/lowering the anchors. But, you do notice a windless and a capstan, of which pardon my ignorance, but were these not used for hauling in and out rope?

-
Thank you kier, I hope to do her justice. I have deviated from the recommended order of construction on the frame. I like to attach the FK/Ribs/Deck all at the same time. For me this seems to rid the issue of alignment, rib to deck. Keeps everything nice and straight/level. I can not find my down load cord for the camera today? Senior moments, you gotta luv'em. But will load up some photos as soon as I can. The next thing is adding the planking to the deck. The instructions or whatever you want to call the Videos, would have you apply the planking to the false deck before installing. Well as I have already said, that won't be. FD is glued to frame. And the pattern is correct as shown, but the plank sizes are not. The center board is made up of 3ft wide boards and the angled herringbone pattern is 2ft wide. I will go with this instead of all planking representing 3ft wide boards.

-
Wow, these days you can purchase so many little goodies for this kit. I built way back when in the early 80's. Looking forward to more of your build. Rick
-
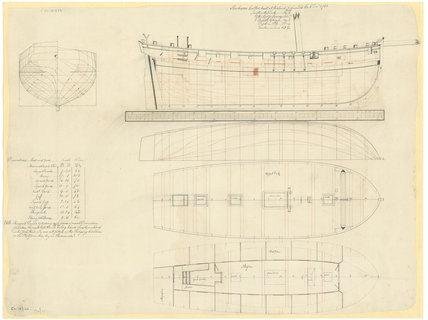
Here are drawings of Mattew Betts, HMS Terror. You can clearly see how this vessel was selected for this refit for the duty of Artic Exploration.
.thumb.jpg.8cf921e8a4bbe8a72be83f86c80b18a8.jpg)
.thumb.jpg.381d0367c22160e5422e421fb19dedfc.jpg)
-
This will be my 1st time building a OcCer kit. I am well pleased with the kit and the detail as provided by OcCer. As with any build one is striving to learn knew skills and methods of construction. It has been quite awhile since I built a POF kit. But I have retired and have plenty of time on my hands to build. I have several large kits stored away but, I did not want to jump back in with a build taking years to complete. I also am a sucker for anything with History. I had already watched the AMC mini-series and this past Spring stumbled across Mattew Betts Blog on the HMS Terror. Then I saw the available kit and just had to have a go. So this shall my attempt at building what was considered at the time, one of two, most advanced ships in the World. You see, she was the fore runner to what we now call a Ice Breaker. In 1845, Commanded by Sir John A. Franklin and accompanied by the HMS Erebus, these ships embarked on the quest to navigate the Northwest Passage. They were the 1st ships fitted out with Steam Engines. Literally Steam Locomotives adopted as a engine to power the vessel during waning winds. The vessels were stocked with supplies for a 3 year voyage. The HMS Terror was adopted from a Bomb Ketch that fired/shelled Ft McHenry, the inspiration for our National Anthem the Star Spangled Banner. These ships/crews never completed the task, look at it this way. What they were trying to do was tantamount to our sending Man to the Moon. So as you can see, there is a lot of History behind this powerfully built vessel. On the 26th September 2016, 168 years after her disappearance, the HMS Terror was discovered. Nothing about where the missing crewman has been discovered as of yet. I don't know about you, but I love a good mystery. I also recommend you Google and read Mattew Betts Blog. Much to glean and his plans were used to design the OcCre kit. So into the breech we go. Rick

-
You just gotta love HULU. I am watching AMC's Mini Series The Terror. Have the ability to stop the show anywhere and study details of the ship. The same fella that Occre used his drawings of the HMS Terror was also on the set when the ships were constructed for the series. And right there on the deck are those chains, so chains it is. Am making notes and little sketch's of details not present on the kit. And there are several areas that those details can be used. Have found what I was seeking about dyes, and that will be the way too go. Now the next thing to figure out, is the added metal plates as comes in the kit. They are very stiff, so looking @ alternate material for this detail. I have a large spare parts box of fittings and I plan to change the way the deadeyes are attached/stropped. All these ideas and have not glued the 1st piece yet. Rick PS: Thanks for the video.
-
Hope this is the right place to put this, if not please put into proper area of the Forum. First let me say for quite some time I have look at the kits as offered by DeAgostini and wondered just how well does this system work of parting out a kit over a period or another word for subscription. This past weekend a special was being run on a kit I have for many years wanted to build but, seemed to always pass up on. So when I saw the summer special as offered, pulled the trigger and subscribed to the HMS Sovereign Of The Seas. This Monday a e-mail was received letting me know my 1st pkg was on the way. Today @ 4:00 the UPS Driver dropped said pkg off, containing stage 1 thru stage 11. Well packaged/boxed, all pieces accounted for and in excellent condition. So lets see, I ordered this past Saturday and received this Tuesday. Not too bad, not at all. Carefully packaged and the Postage cost more than the contents. Postage was $9.00 and the 1st Pack cost me $1.00. And I get a 25% discount on the balance of the purchase. Now I don't know about anyone else, but this makes me a happy fat camper. Now I am well aware that anything dealing with being shipped over a period of time can have a hick-up now and again, life. But as for a start, these guys get my thumbs up. I see other purchases coming after this one. Sure you do pay a little more but, that's over a period and not all @ one time......😁. And the parts received are mouth watering to say the least. Do have a question? Who is the mfg of this kit......1/84 SOS. I know it is not AL, is it Sergal? So, if you are not sure about making a purchase from Model Space, give them a try. Rick
-
Any up-dates my friend. Thought you would like to know the FK/Ribs are now in the build slip. I have read and re-read your thread and I have decided to start now this same wonderful kit. I again will ask a question I asked before hoping someone would reply. I have some wonderful Pear and Boxwood, I am undecided about using or use the material that comes w/the kit. If I use the supplied wood for the 2nd planking, I will color. What I want is for the planking to remain evident and not just a slick sided paint job. So again, I am looking at either India Ink and or black dye for the areas that require black. I will as you shared use the pencil method to replicate the deck caulking but here I will digress and use boxwood for the decking and deck hardware. I also will replace the chain for the anchors w/heavy cord for the cables. I just have a hard time seeing that chain run down the deck and not demolish everything in it's way. If this is correct for the chain, please someone let me know. Looking forward to your progress. Rick😎

.jpg.ac00008483c9d156cad722c13186fb63.jpg)
.jpg.5992c9ad2874ac1ca7efb3bc54ff9348.jpg)