
CiscoH
-
Posts
230 -
Joined
-
Last visited
Content Type
Profiles
Forums
Gallery
Events
Everything posted by CiscoH
-
 DB789 I don't want to hijack your log with Tangent Questions but maybe you know. I've read it was normal in big vessels with plenty of space to mix carronades and long guns, but was it common on such small vessels? I could see it being a positive (hit the target from a distance with the long guns, then batter them with the carronades at short range before boarding) or a negative (jacks of all trades can be bad at both tasks). And having written that last sentence both options sound improbable- I thought privateers usually preyed on unarmed shipping where threat alone was enough to induce Heaving To. If you encountered anything big you ran like heck, so maybe having many gun ports and only 4 cannons was plenty; more just weighed you down and made you slower. What are the odds you encounter another vessel exactly the same size and armament where having more cannons would be beneficial? Personally I like the look of your current plan of every gunport filled, even if recoil from the stem cannons would probably wreck the bits. cisco
 -
Frigate Diana by RossR - OcCre - 1:85
CiscoH replied to RossR's topic in - Kit build logs for subjects built from 1751 - 1800
They do look really good and I had to laugh that after all that work they're not the right scale. We've all been there. But when you make them again smaller it'll go twice as fast -
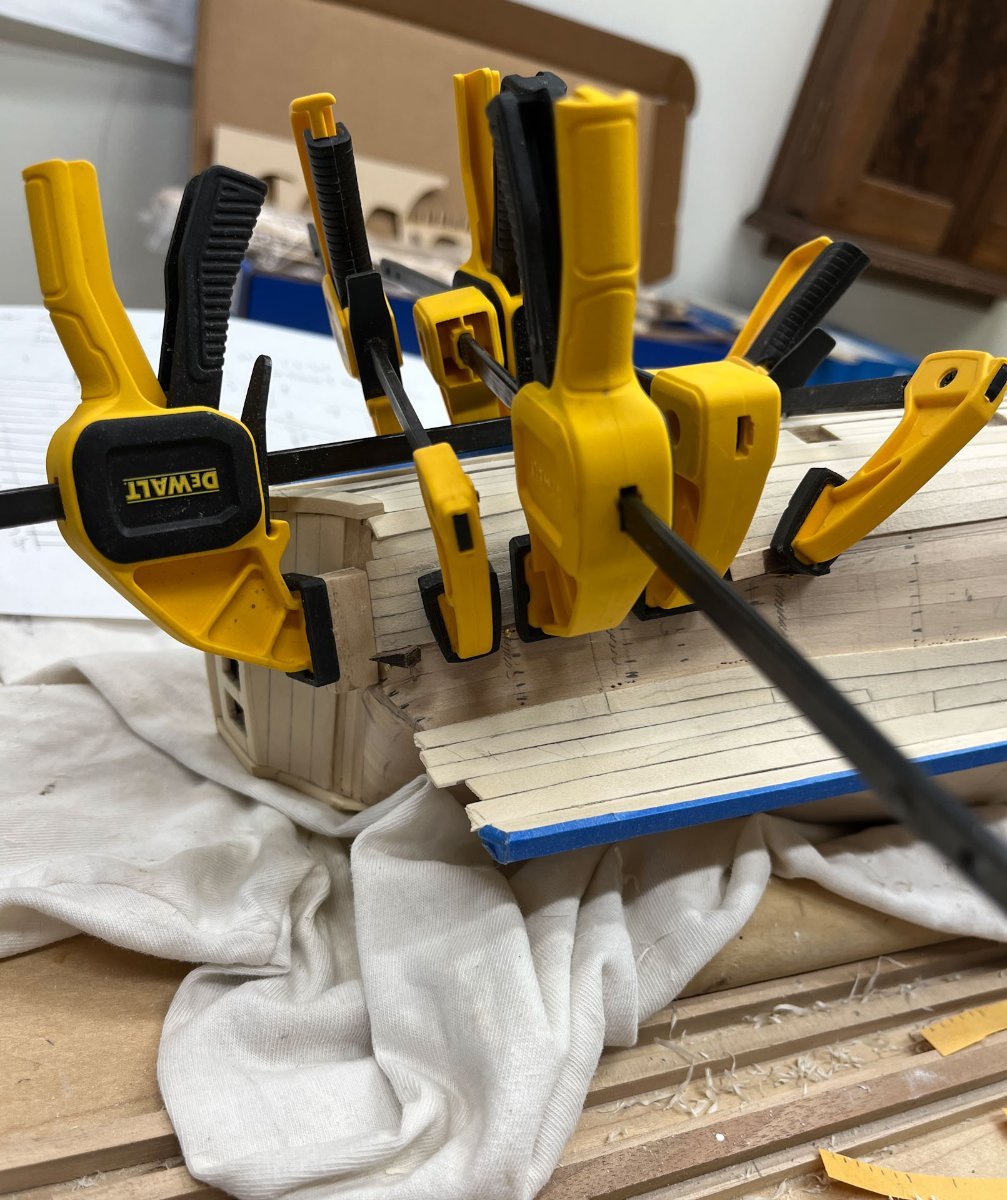
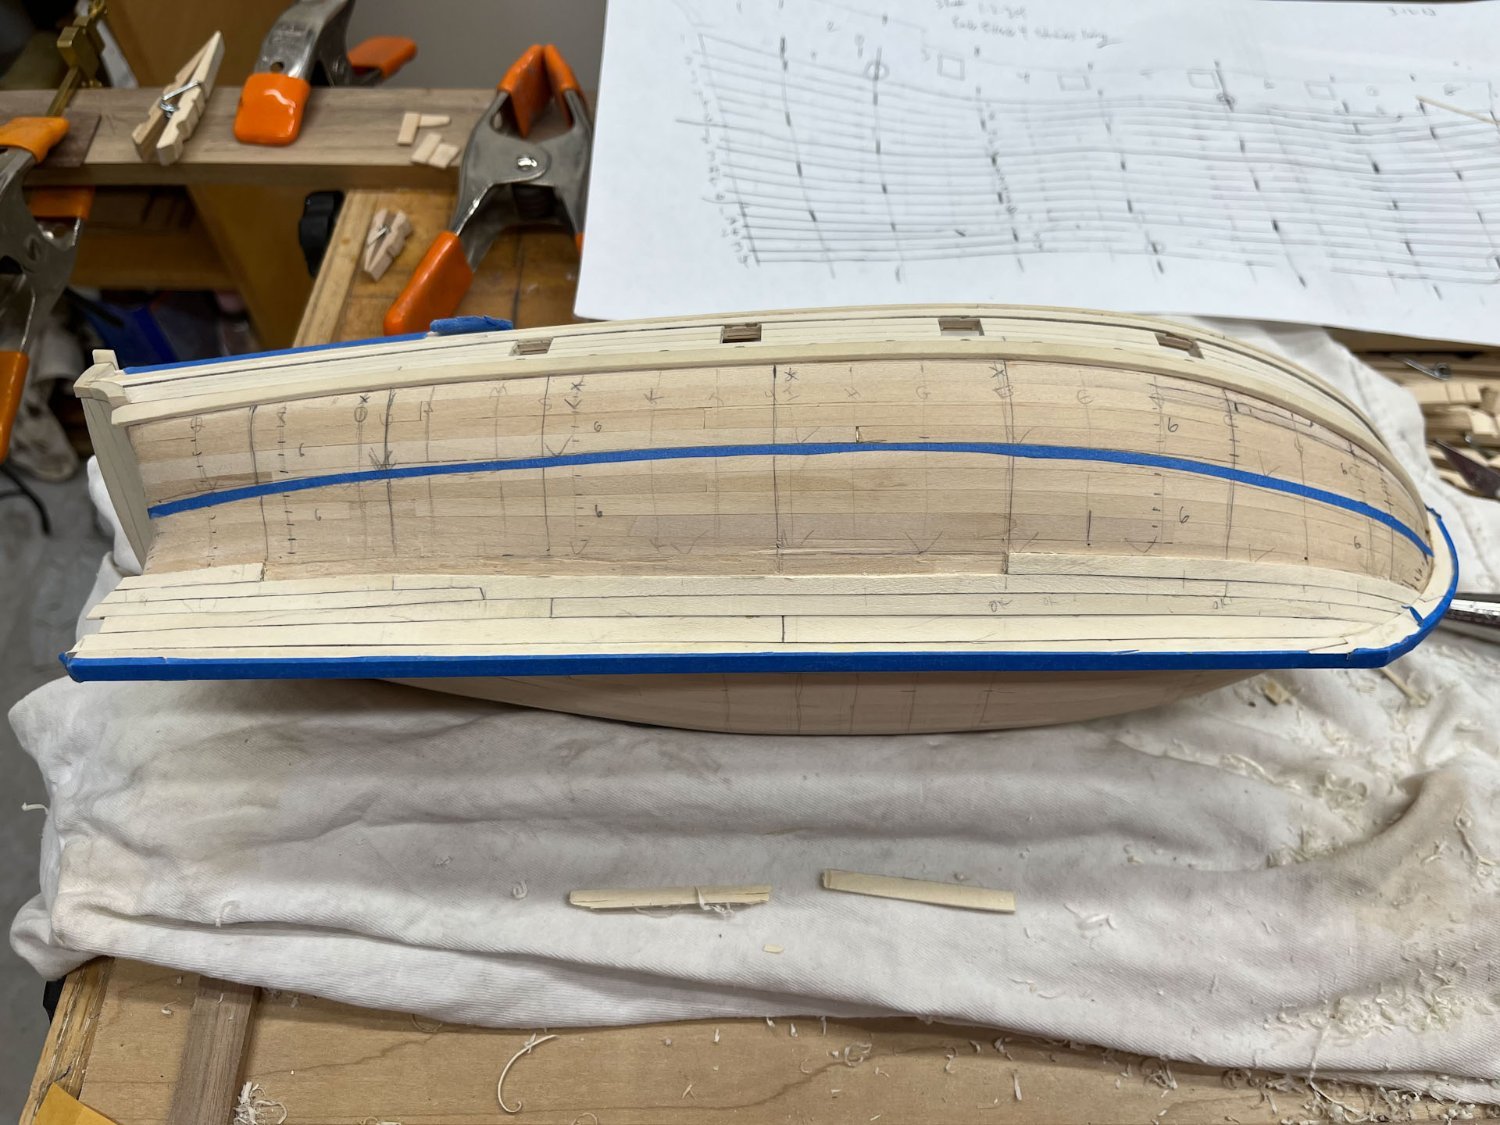
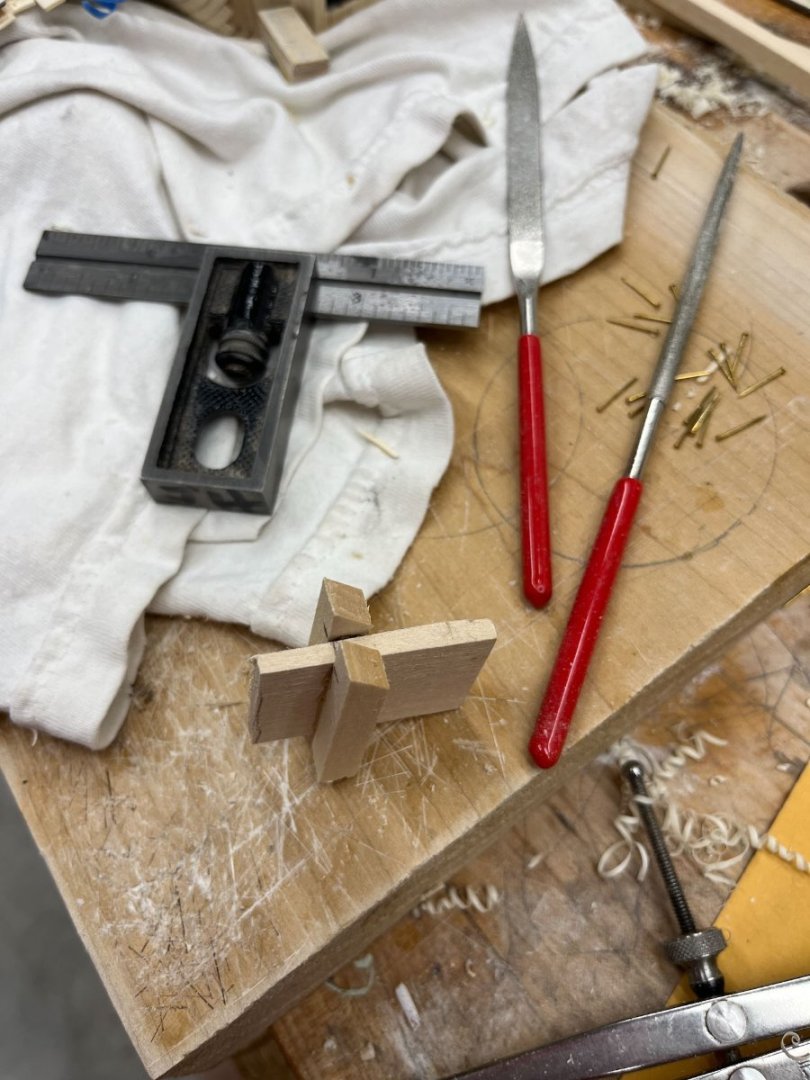
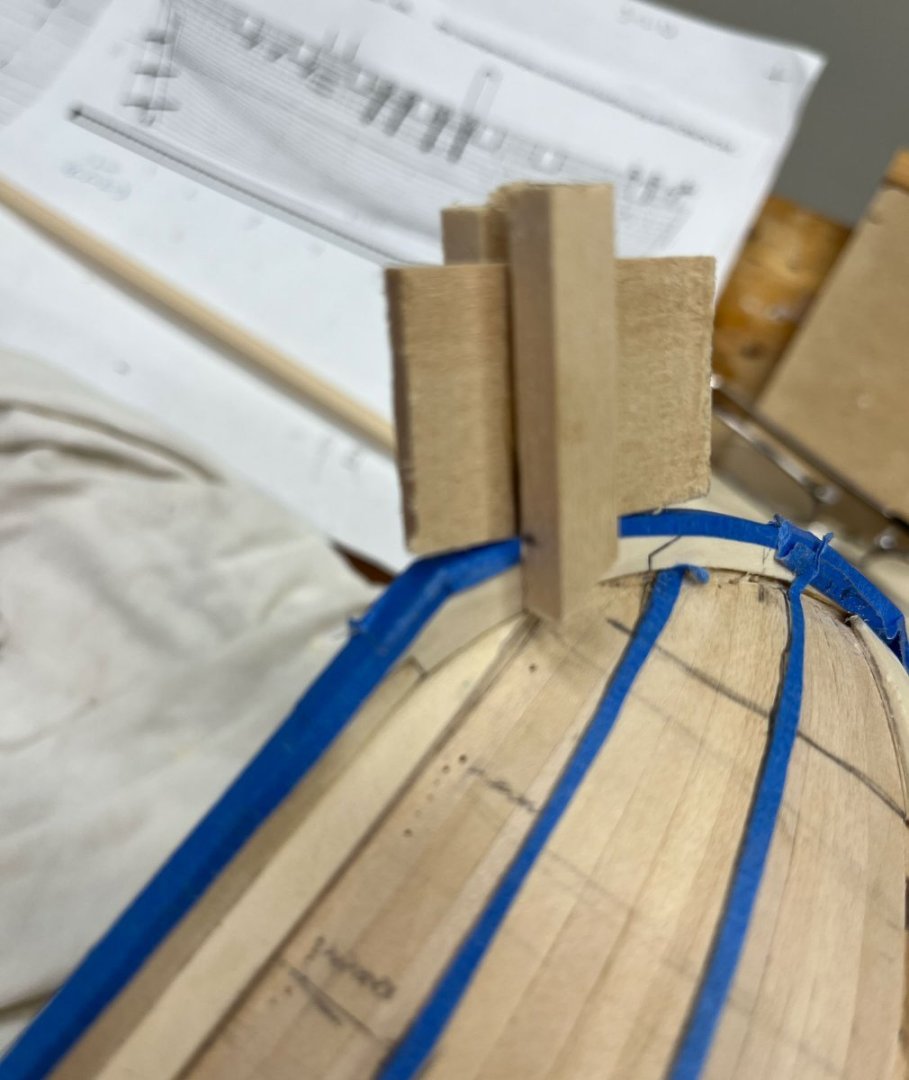
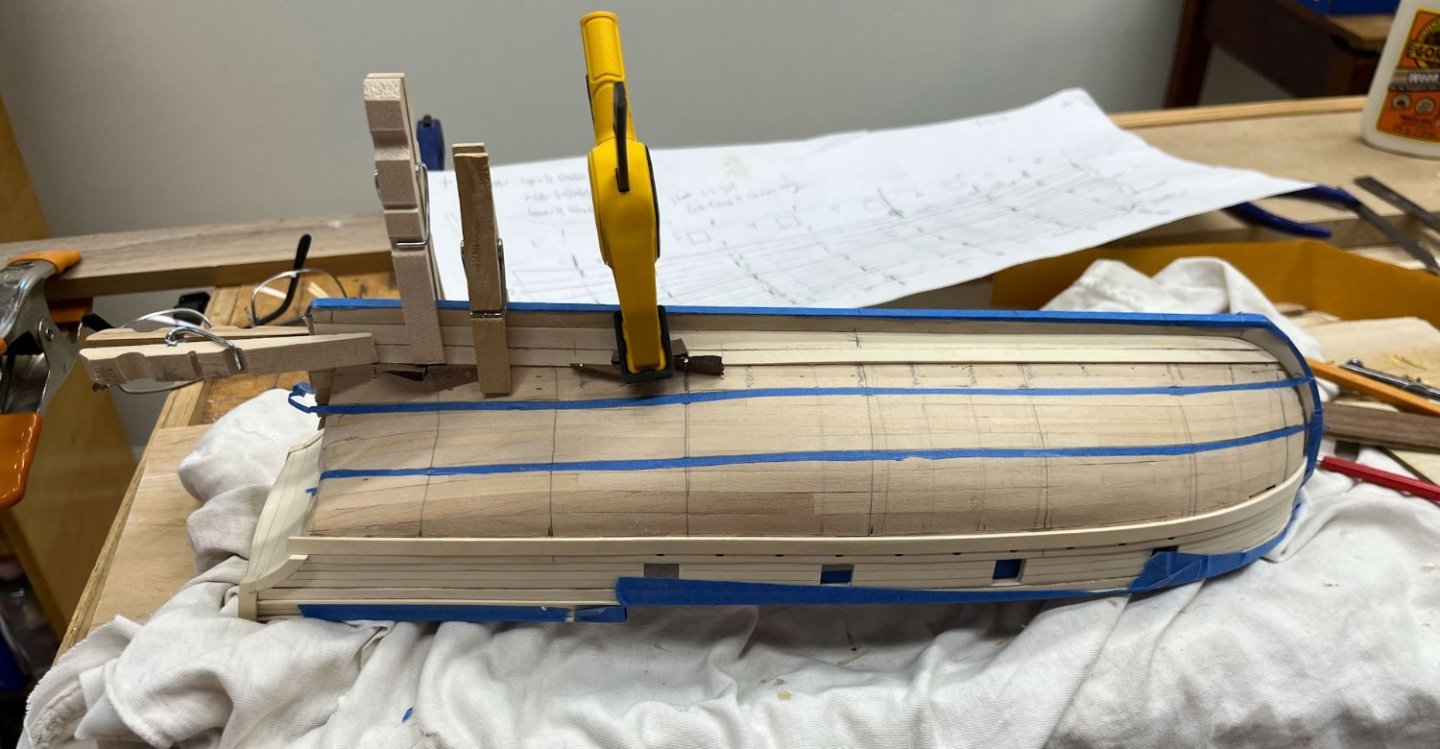
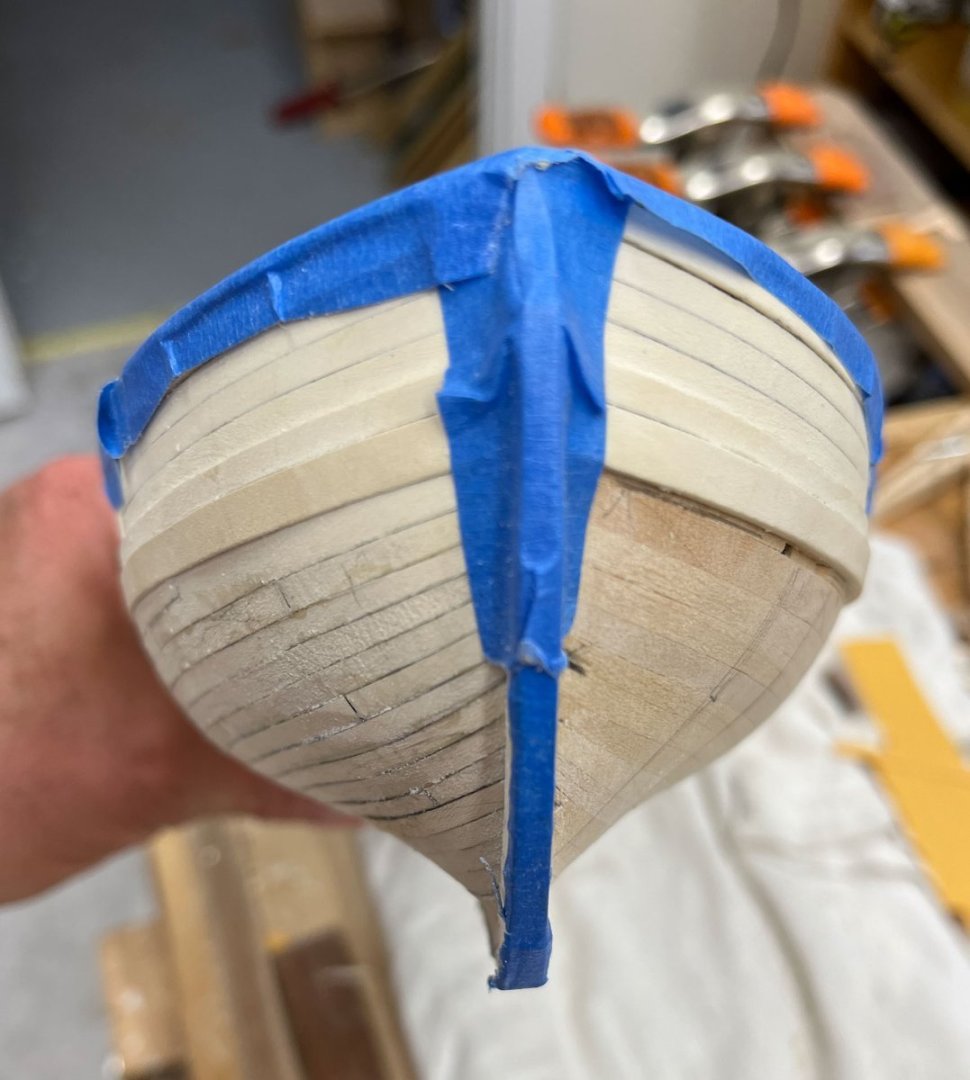
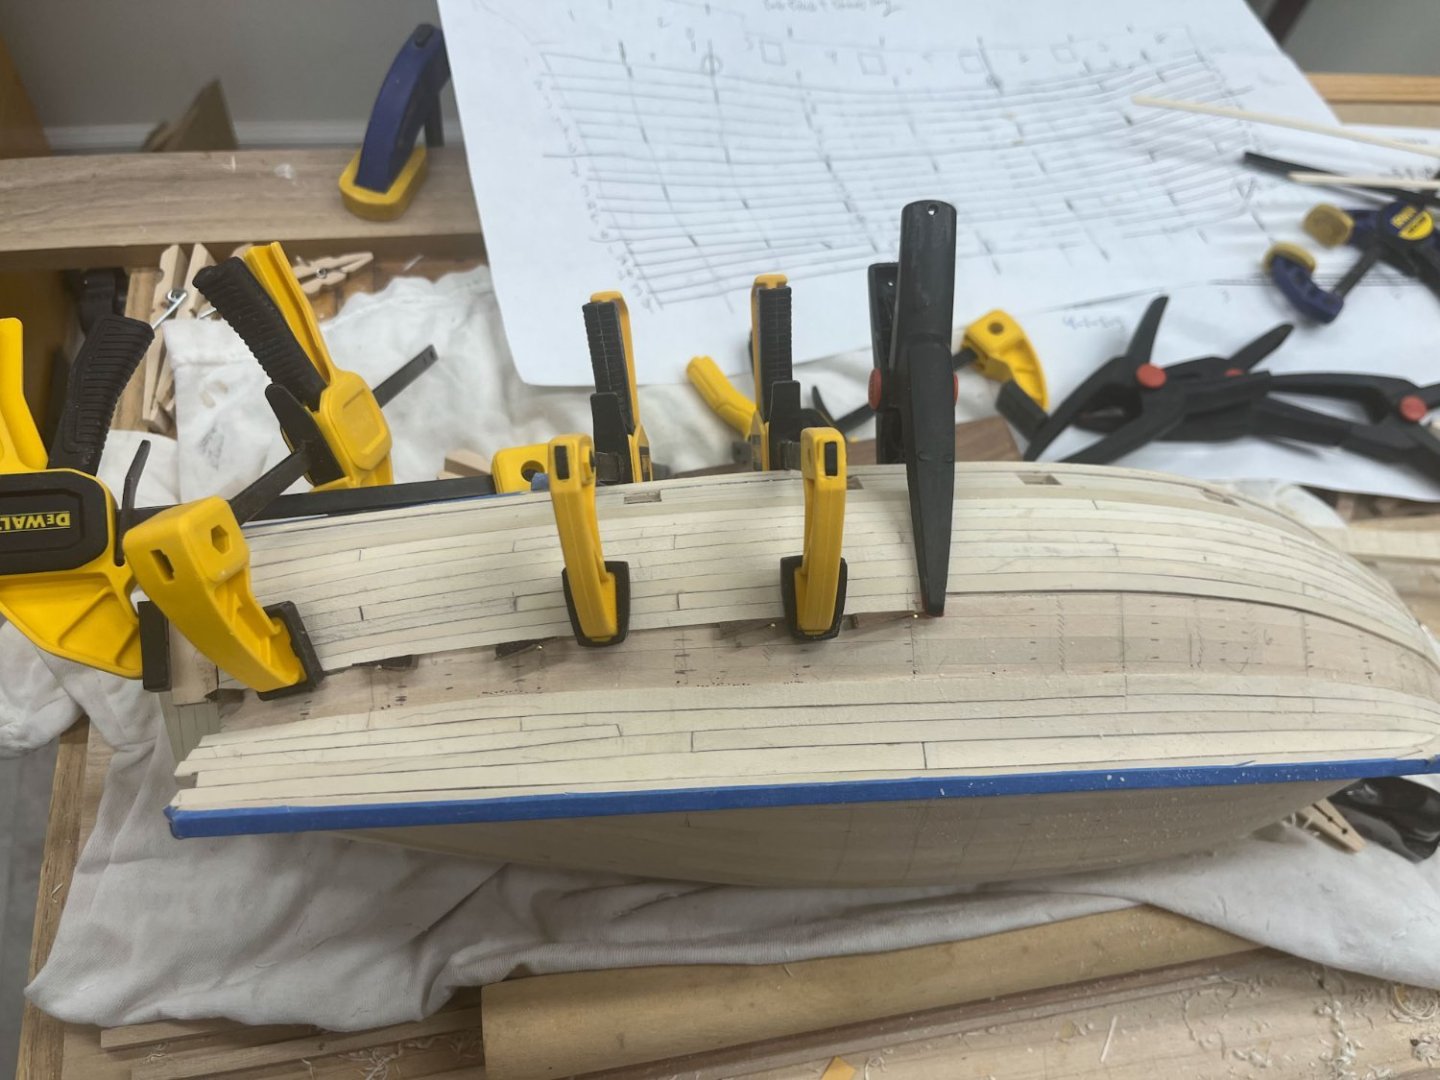
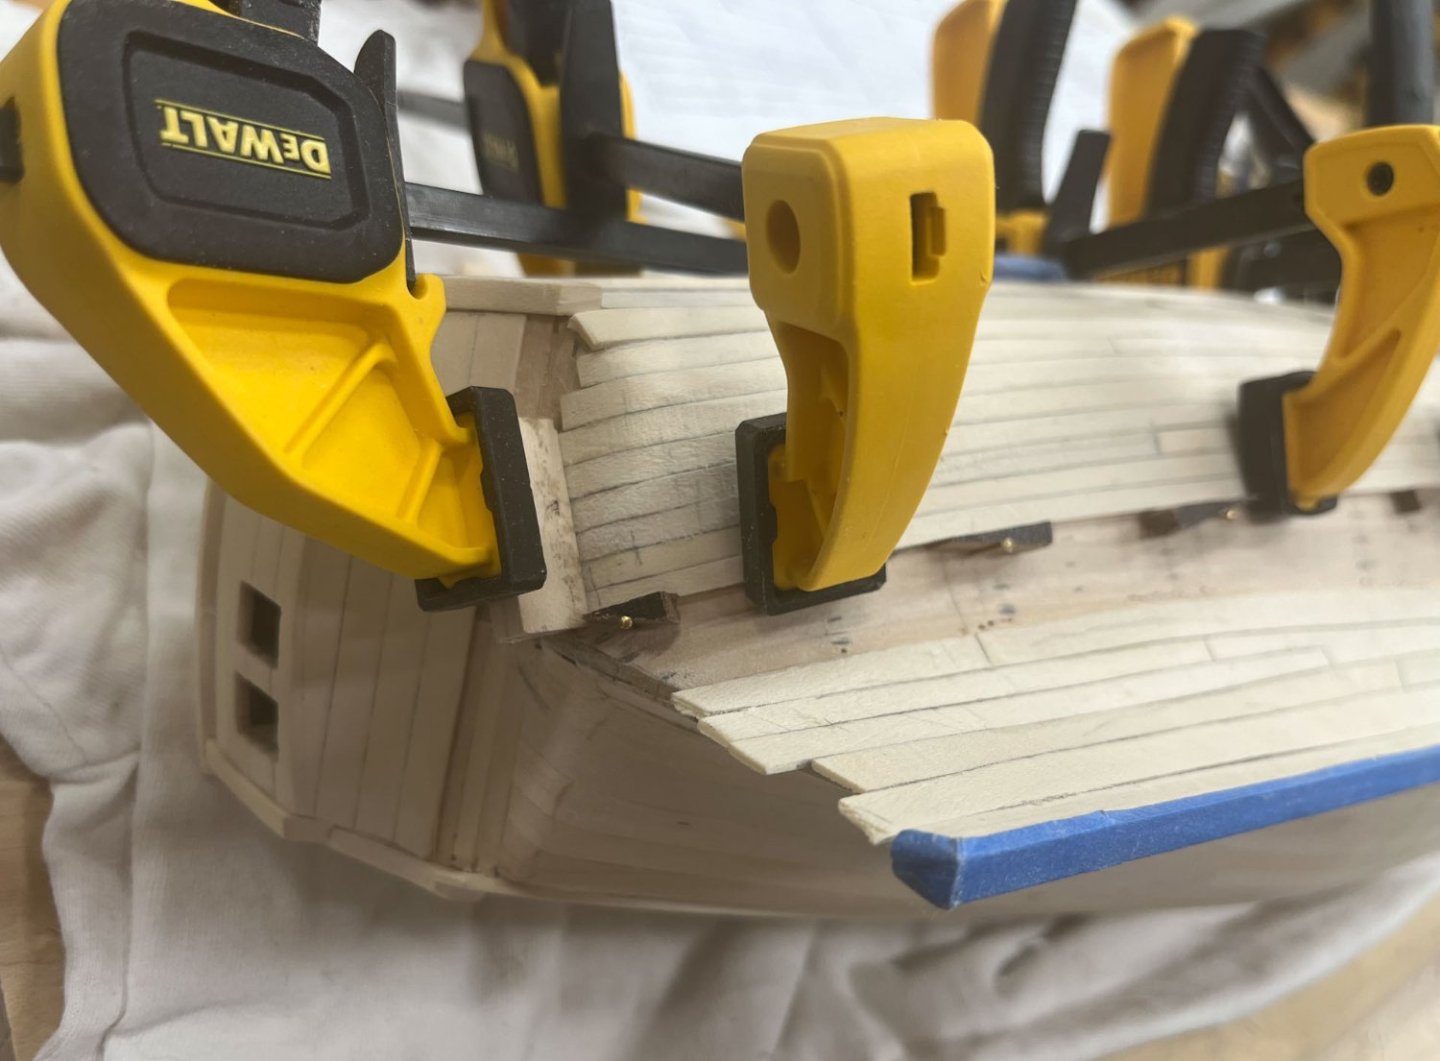
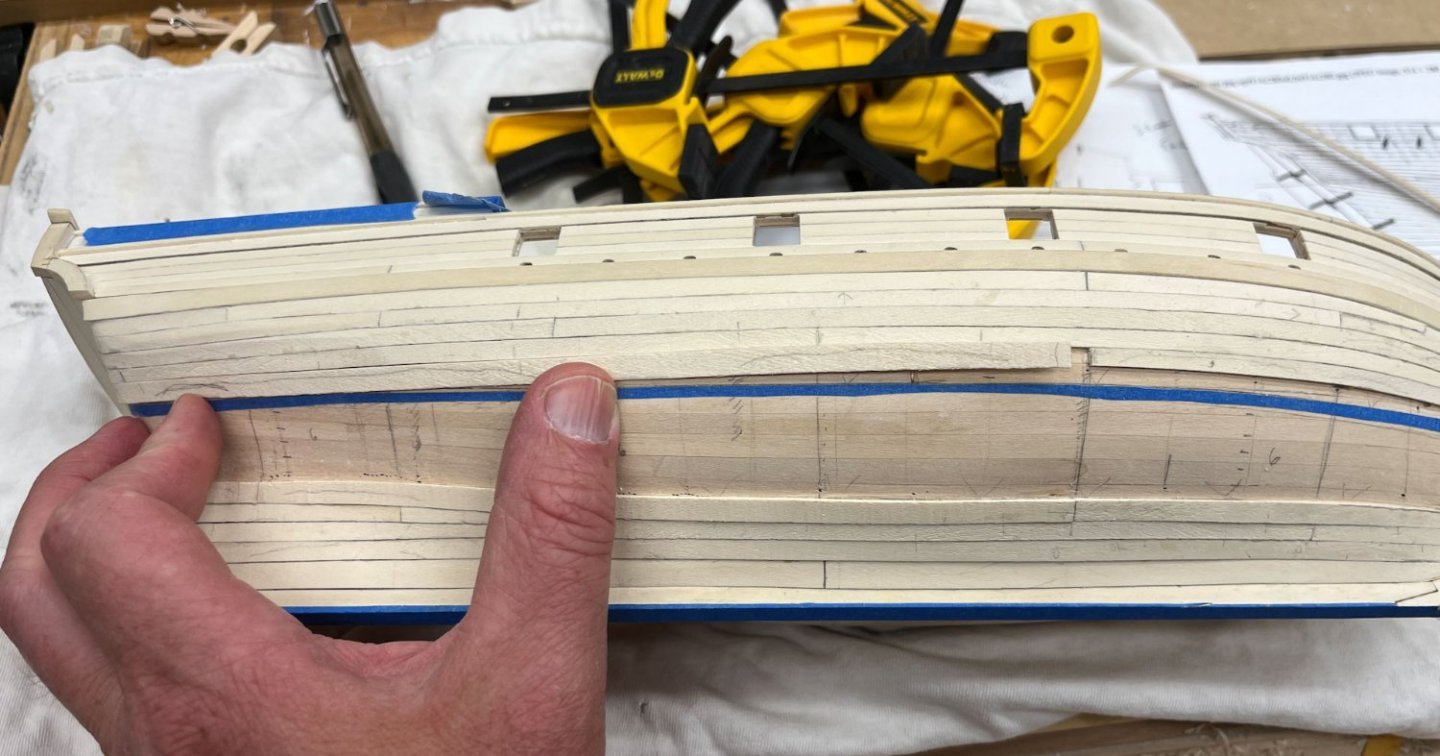
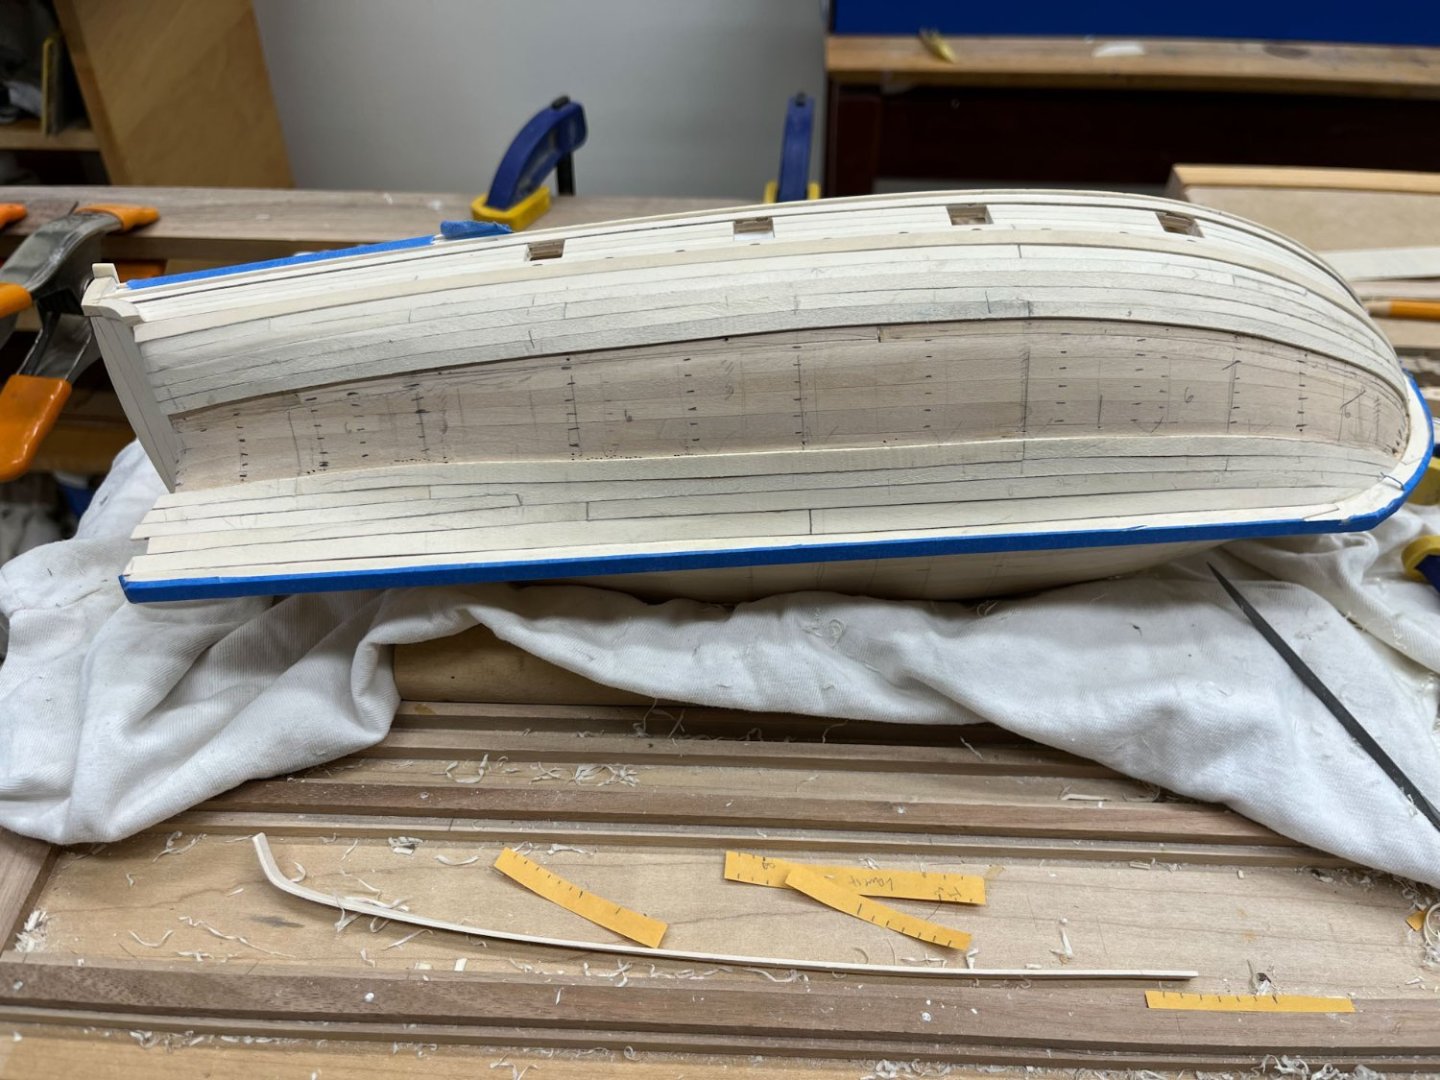
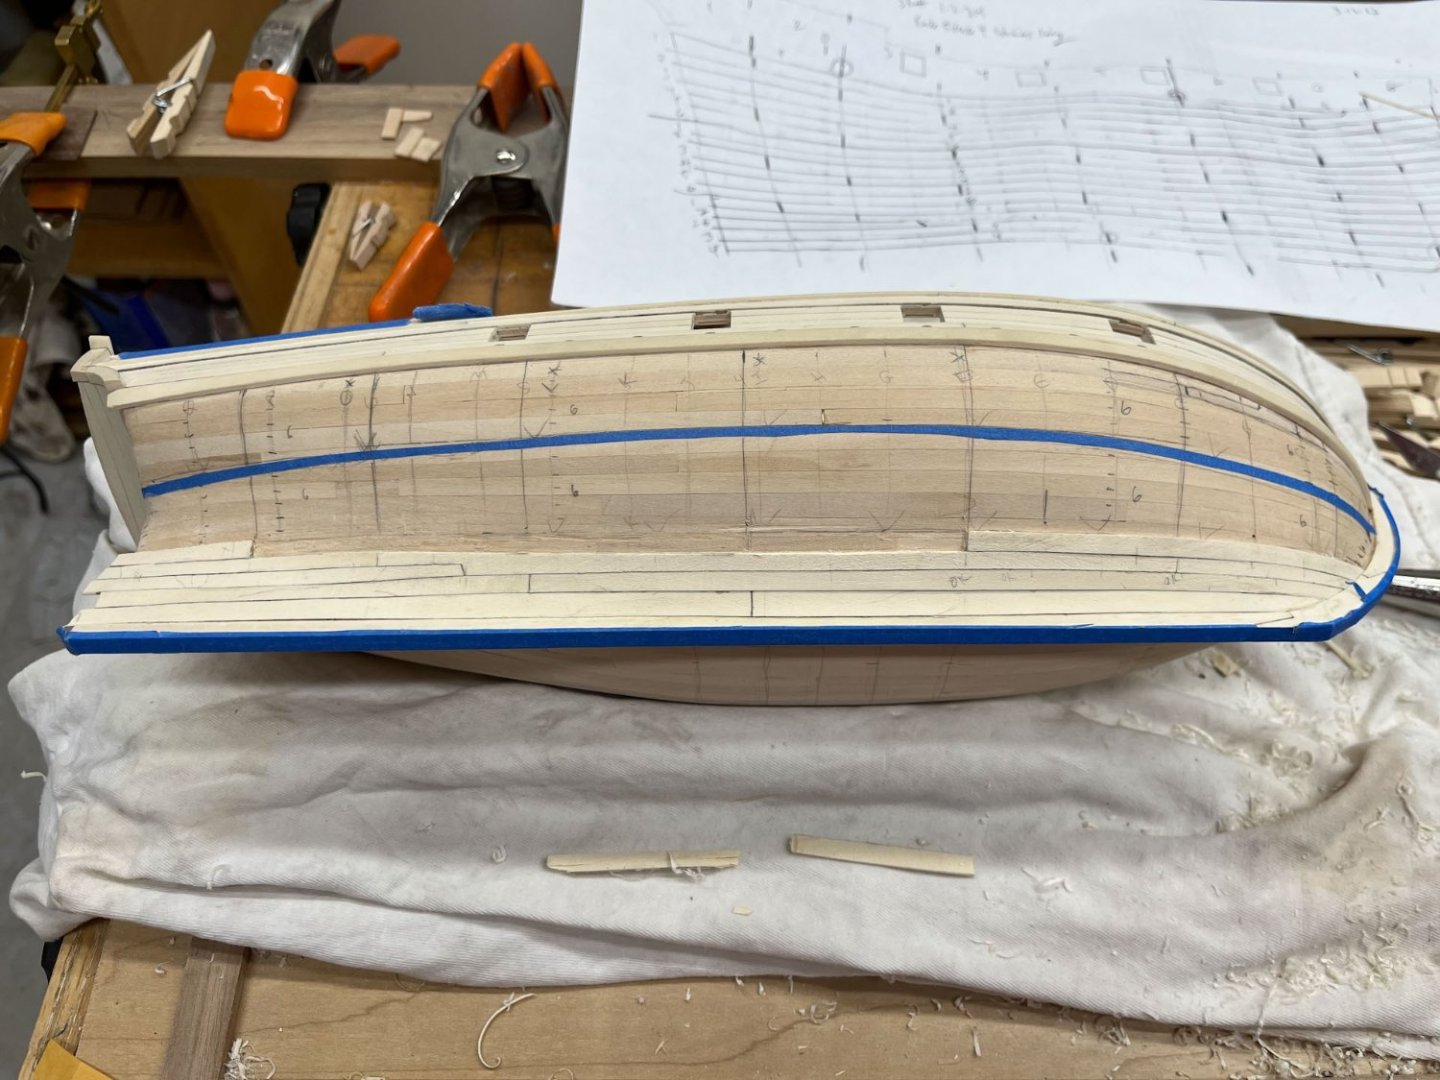
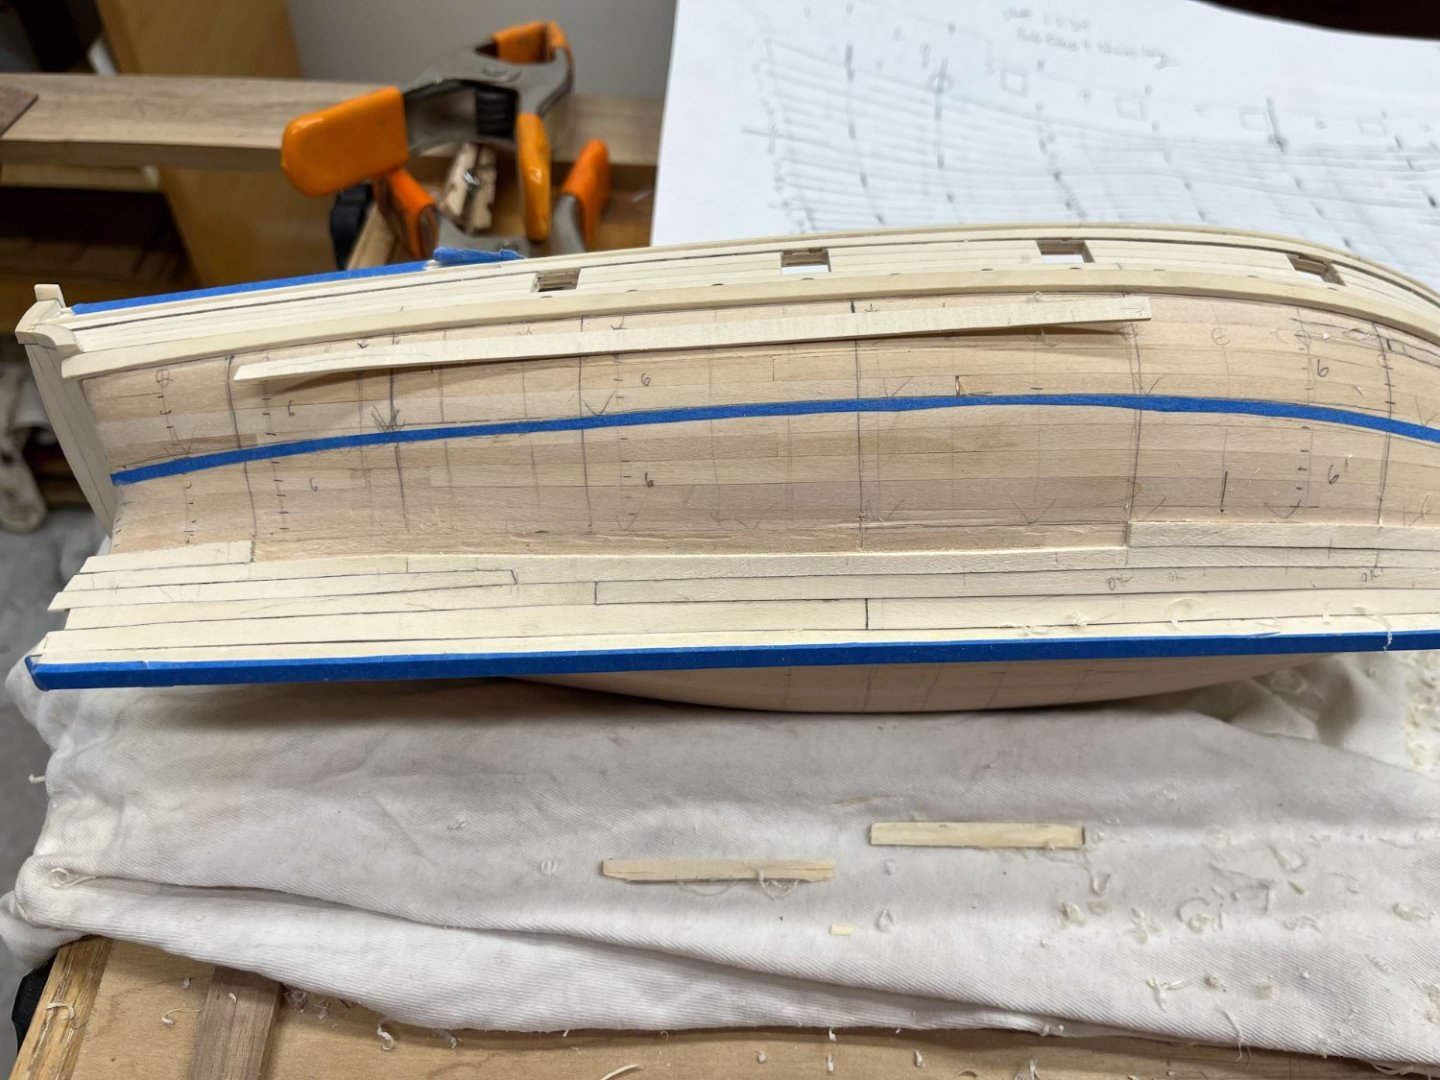
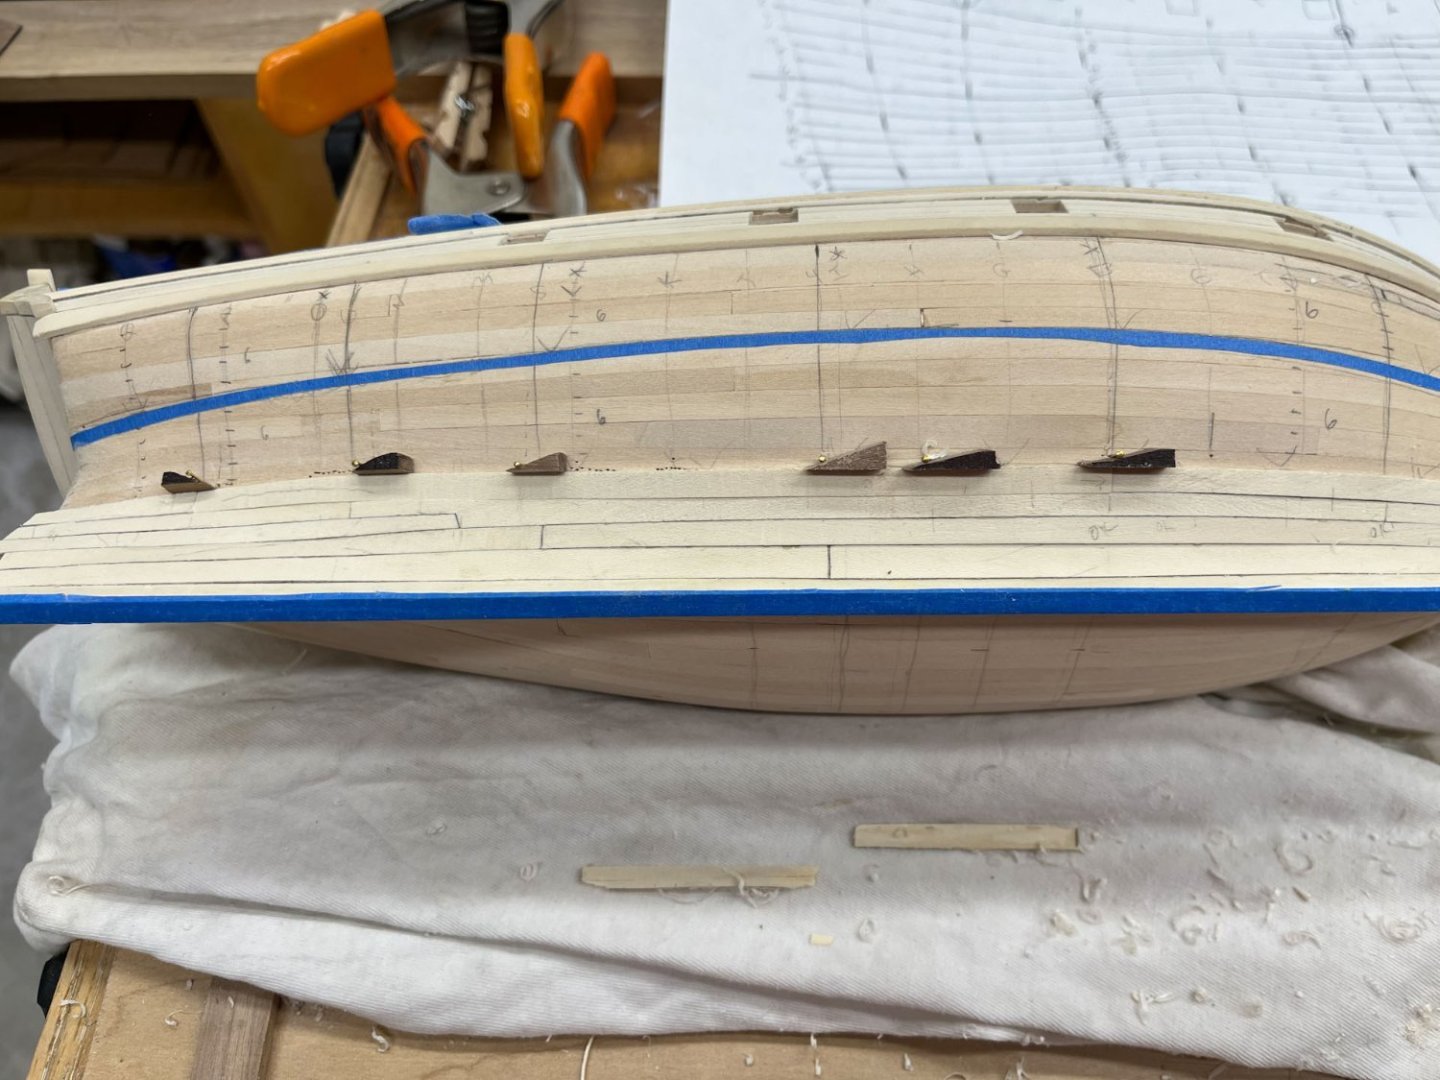
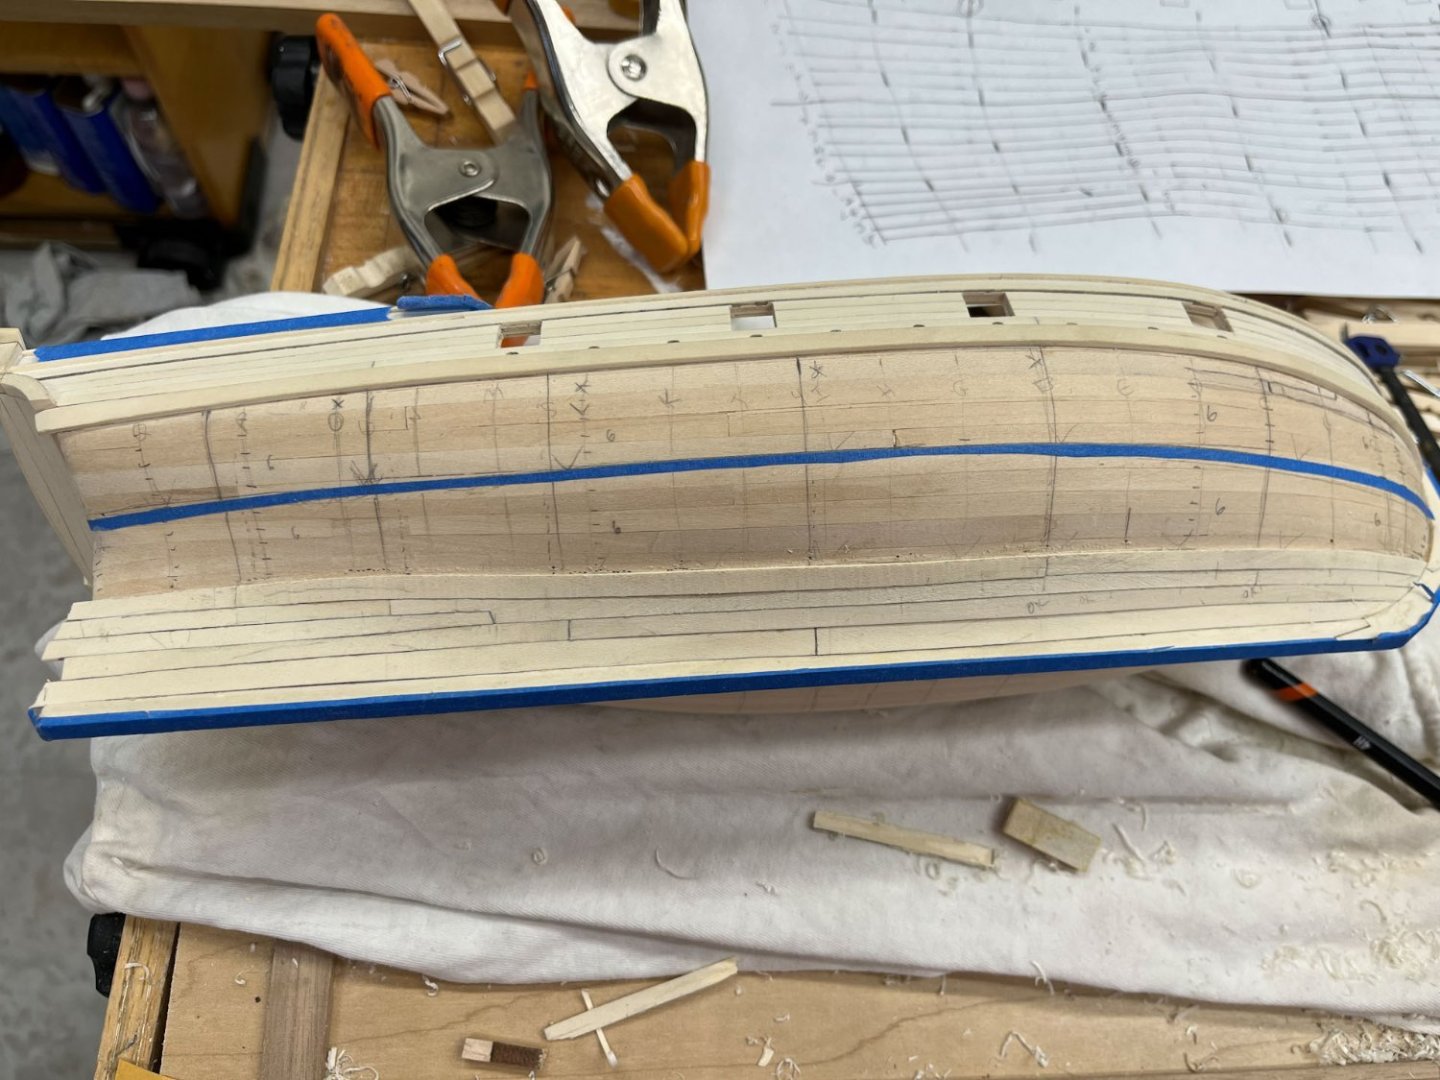
Good Sunday morning readers. Wife's out riding the horse, kids are asleep or at least quiet upstairs, time for an update. I'm starting on the port side planking. I'm again making it in 3 bands and I used my previous method of running thin strips of blue tape lined up with the starboard side planking. Once I had the blue tape running fair I compared it to the starboard side, using a compass and tick strips to make sure both runs were reasonably close. This process led to a new question- how do I line up the planks at the stem so they look relatively even on both sides. I usually eyeball stuff, sometimes to my detriment, so I decided to make a jig. In carpentry I've heard this called a "preacher," I think because it could be imagined as 2 hands held together. But it does work well as a second opinion. Pretty simple device, made of scraps. I put in the garboard first which I believe is often wider than the other planks. As i noted before I made my lower starboard planks probably too wide overall, especially compared to the upper strakes which were much thinner. But rather than do another planking scheme on the port side I decided to do my best matching the widths so the hull planking is symmetrical. Full commitment to "no, i meant to do it that way." Here is the preacher on the starboard side. Sorry if its a little out of focus. You can hopefully see the point of the preacher is just touching the top section of the garboard where it goes into the stem rabbit. And here is the port side. Again I apologize for out of focus pics, but in real life it was clear I needed to remove a little more of the top of the port garboard. I did so with my little Veritas chisels and judicious sanding until the 2 sides matched. Presently I am gluing the next strake, figuring widths with the usual paper tick strips and comparing to the same plank other side with a small drafting compass. You can see I'm using my standard pins, wedges, and gentle clamping which works very well for me. Still using Gorilla yellow glue. This plank had a significant twist which I set in with a hairdryer off the model before final sanding to fit. My kids have been quiet for too long; time to see what they've been up to thanks for reading, enjoy your Sunday cisco

-
i am building model shipways Armed Virginia Sloop and also using Bob Hunt’s practicum and ran into a similar? issue. i think the supplied waterway in the kit was thicker stock than it said in the plans which threw off all the subsequent bulkhead inner planks installed above the waterway. not sure if that applies to your question. i didnt sweat the angle between the waterway and the bulkhead because the above bulkhead plank covered any small gaps. looking great so far cisco
-
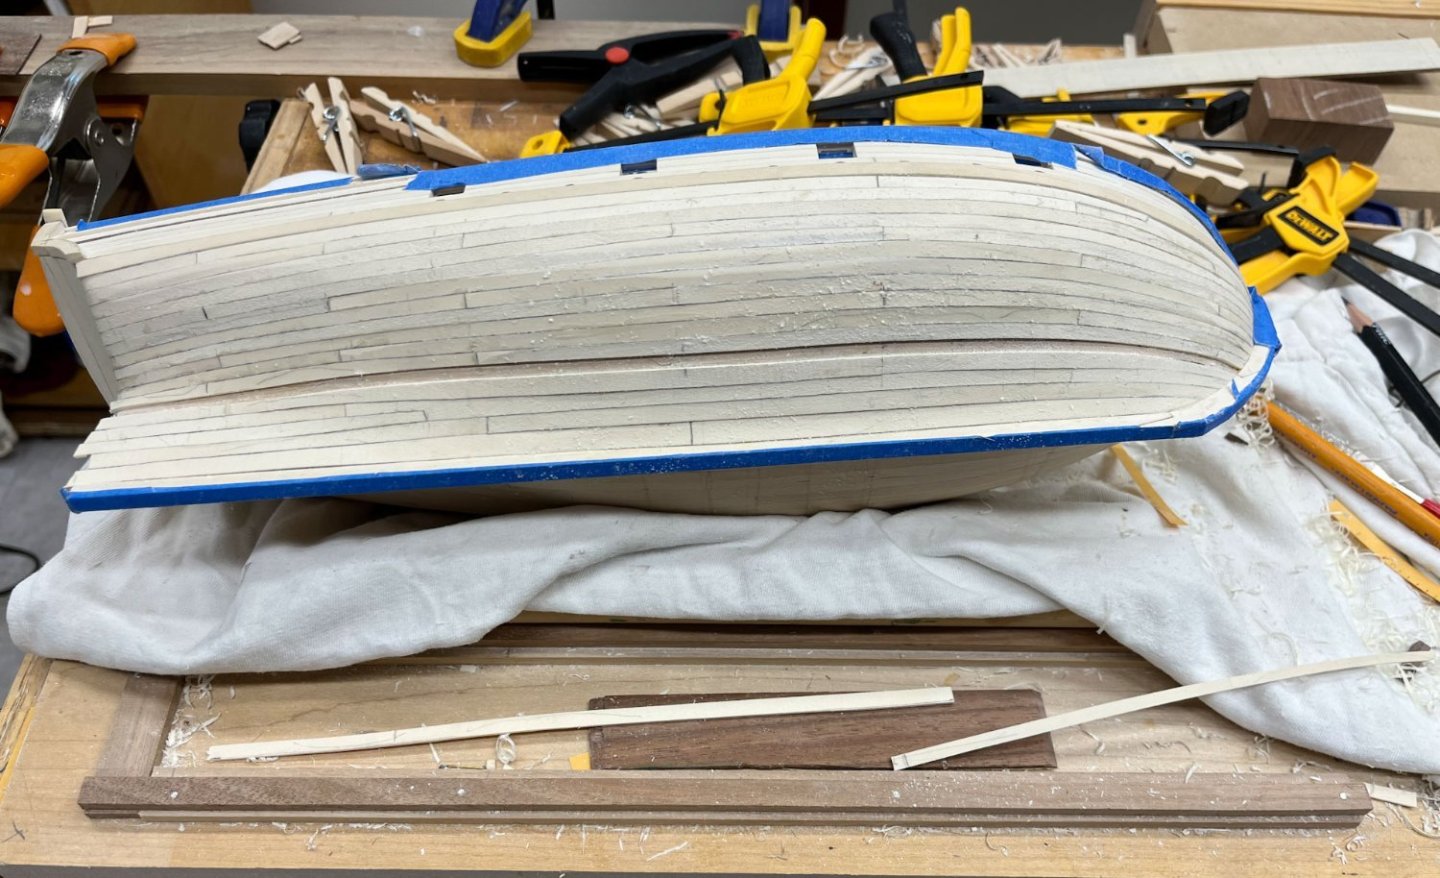
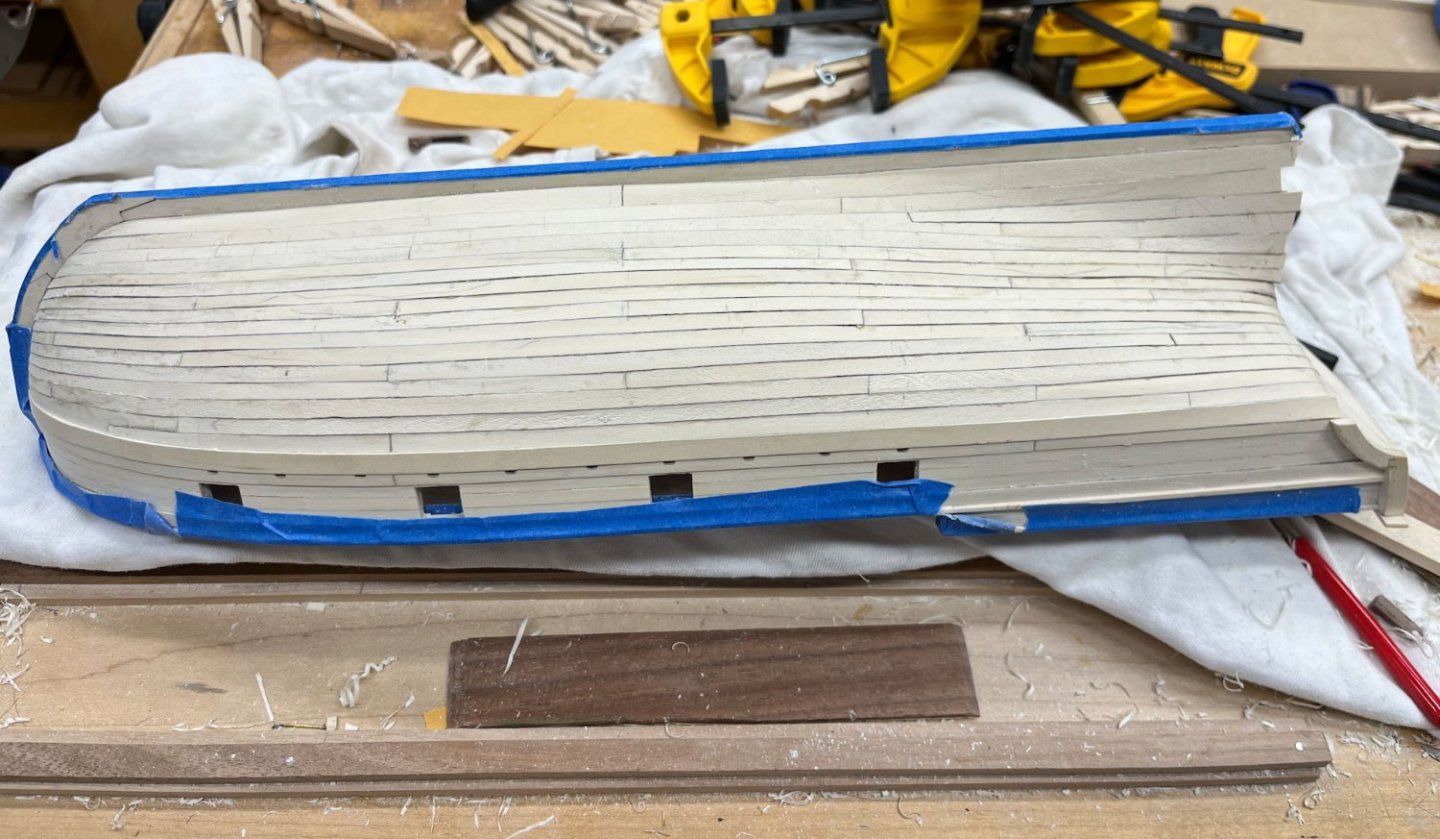
At last I have finished second planking on the starboard side! If my AVS was a real ship her timbers would be fully seasoned and the shipwrights long since starved to death. Hopefully the port side will go a little faster. Below I have 1 strake left; in this case the planking plan calls for it being divided into 2 planks. The front one is already done, the stern one is being fitted. I fit the butt joint first and worked my may sternwards; miniplane to pretty close, sand a little off, fit, when its hard to push in sand a litttttttle more and not too much, keeping in mind the glue will swell the plank a little. In the future I will try to have my last plank be more towards the garboard where its flatter. Here the rudder end of the final stern plank had to fitted into a tight curved space that flared at the end. Live and learn; it fit snug at the end. And here is the final result. I stole Cheerful's planking plan so it follows very closely. I'm leaving it as-is so the inevitable dings after I'm done the other side can be sanded out at the end. I still wish I hadn't finished the upper rails so well; I'm sure I've inflicted clamp marks presently hidden under the blue tape. Some water and the travel iron usually steams them out ok though. Heres the stem shot. I think it looks pretty good. I find it funny that even though in this shot the stem planking curves upwards, to fit them they had to be steam bent to curve downwards. Some sort of optical delusion. And the stern. I left the planking long so I could use a straightedge to cut across the bottom of the counter; even if I cover the transition with a thin molding strip I didn't want gaps. I am going to wait until both sides are planked before trimming the rudder planking flush. Then I'll add the sternpost last. Time will tell if this was a good decision. And now I'm off with the wife to drive the kids to camp. Have a great weekend everyone! Cisco

-
I like the waterways 👍
-
beautiful work Katsumoto you probably said it some posts back. who makes your rigging line? its nice and not shiny and looks very realistic
- 204 replies
-
- 1
-

-
- kitbashing
- Woodcarving
- (and 4 more)
-
that 45 degree sanding thinger is pretty clever. i would have done it by eye and gotten a rounded uneven rabbit.
-
Looking great Tom. i’ve only built the 18th century whaleboat so far which had basic rigging (and only one mast) so i dont have extensive rigging experience. but on that model i did all my lashings without glue so the stay lengths could be adjusted as i went. friction was plenty to hold tension and i didnt end up with a wonky mast pulled out of true so it worked well for me. the supplied rigging rope was polyester (i think) and so far seems immune to humidity changes. my parents came back from Iceland 2 weeks ago with your viral friend. the current strain seems to be much less virulent and they did fine. hope you do as well cisco
-
well heck. after reading this post of course i had to order the book. it arrived yesterday, perfect timing for some relaxed 4th of july reading. thanks bobcat for the review it is much appreciated
-
HMS SUSSEX 1693 by 8sillones
CiscoH replied to 8sillones's topic in - Build logs for subjects built 1501 - 1750
Yes -
Good Afternoon fellow modelers. This wasn't a very productive month for me - too much going on. For starters I flew out to Estes Park Colorado with 5 of my college running buddies to celebrate our collective 50th birthdays. A week of hiking each day at 7500-10,000 feet altitude, mountain biking, an insane Frisbee golf course on the side of a mountain, and a vacation from our grown-up selves. An amazing trip but sadly far from any ships. In the below pic I am most of the way to Black Lake and trying not to slide down the snow embankment into the river. My AVS has added 2 strakes I think. 4.5 to go on this side. I haven't sanded the starboard side yet so the planks look a bit rough. In hindsight I wish I had left some final sanding on the upper rails. I flip the ship around a lot and am probably dinging it up with all my clamps. Another thing I noticed; a lot of thinner planks look more realistic than fewer bigger ones. I tried to divide up the hull up into similar sized bands but some of the planks near the garboard are a bit wider than the upper ones. Something to keep in mind for the future. and thats it for today. Cisco

-
Frigate Diana by RossR - OcCre - 1:85
CiscoH replied to RossR's topic in - Kit build logs for subjects built from 1751 - 1800
now Thats a great wife -
thats a great workshop. it appears a lot bigger on the inside, a cool trick. great luck on your build cisco
-
great build log Dan! i love the idea, however historically ambiguous, of an armed Hoy. your fabrication skills are impressive. cisco
-
Happy Sunday everyone. Its beautiful here in Middletown Delaware. Dan I got to say hi briefly at the meeting. You were neck deep in management stress at the time. Hopefully I'll get to talk to you more next year. Not much progress this week, too many other spring responsibilities. I am slowly (very slowly) working my way towards finishing the upper planking belt. There are 6 rows in this belt and I managed to mess up the 5th by not paying attention. I put in the front plank no problems and left it a little overlong so I could trim it back later. And then I waited a few days and forgot I hadn't trimmed it yet and measured the next plank. So once the original plank was trimmed back my second plank was too short. And it was one with the stern bend so it wasn't amenable to being skootched forward a bit to make it fit. So I had to make an entire new plank, which was ok just annoying. Luckily I could use the short plank for the next row, it fit the transom bend fine. Then I re-marked the hull with new tick strips. Most of my previous marks had become off a little bit. And i realized I missed a butt joint in my last strake; it should have been next to my index finger in the above picture. I'll add it later with a simple incised line highlighted with pencil. One more strake in this belt. At the bottom of the above pic you can see the plank I cut too short and my new tick strips; in the below pic I have shortened it to the correct length, fitted it, and clamped it in place with my usual wedges and Dewalt setup. No gaps! I hope. Thats it for today. I noticed that the planks in my lower belt are a bit wider than the ones in my upper belt, something to ponder for the port side. Stay tuned for next week's mistakes! Cisco

-
but on the up side i got to read from your first post all the way to today. its great seeing many years work all at once. keep up the posts they are very good thanks cisco
-
Frigate Diana by RossR - OcCre - 1:85
CiscoH replied to RossR's topic in - Kit build logs for subjects built from 1751 - 1800
your shellac finish looks so good! deep vibrant colour without obscuring the wood. a while ago you asked how long mixed shellac lasts. its usually a few weeks, maybe a month or 2. eventually it gets gummy and wont fully dry out when put on a surface. anyway, great looking hull. thanks for posting cisco -
pre-ordered👍🏽
-
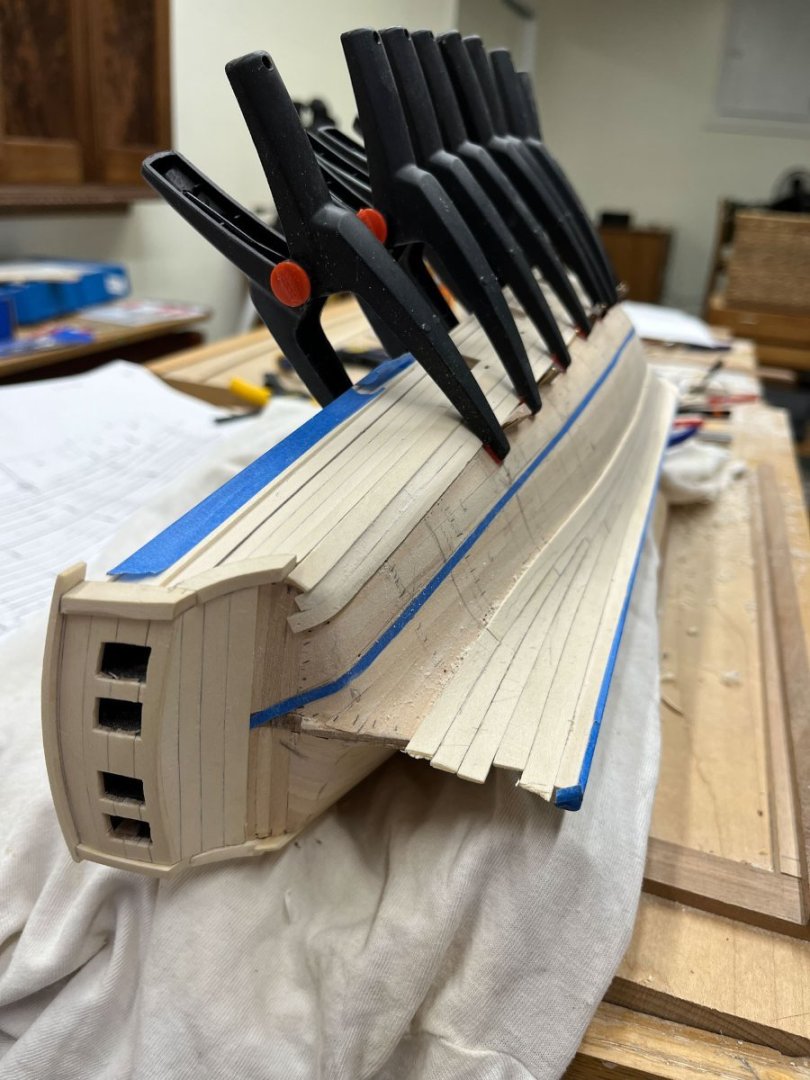
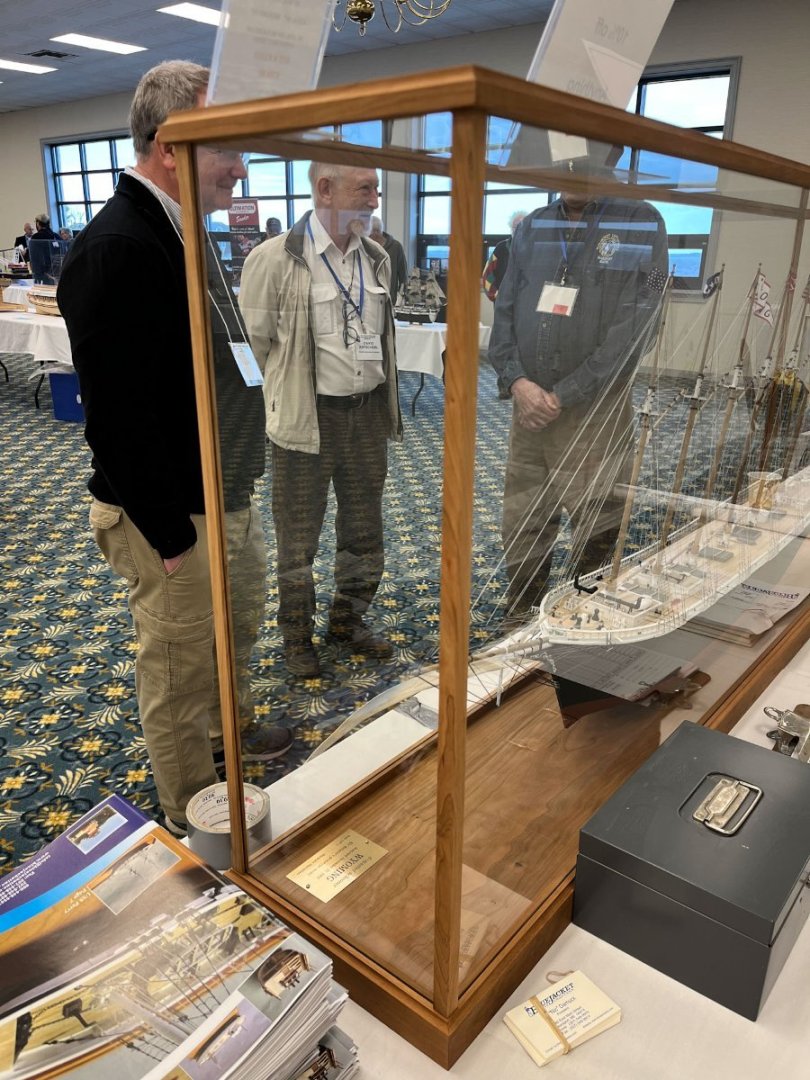
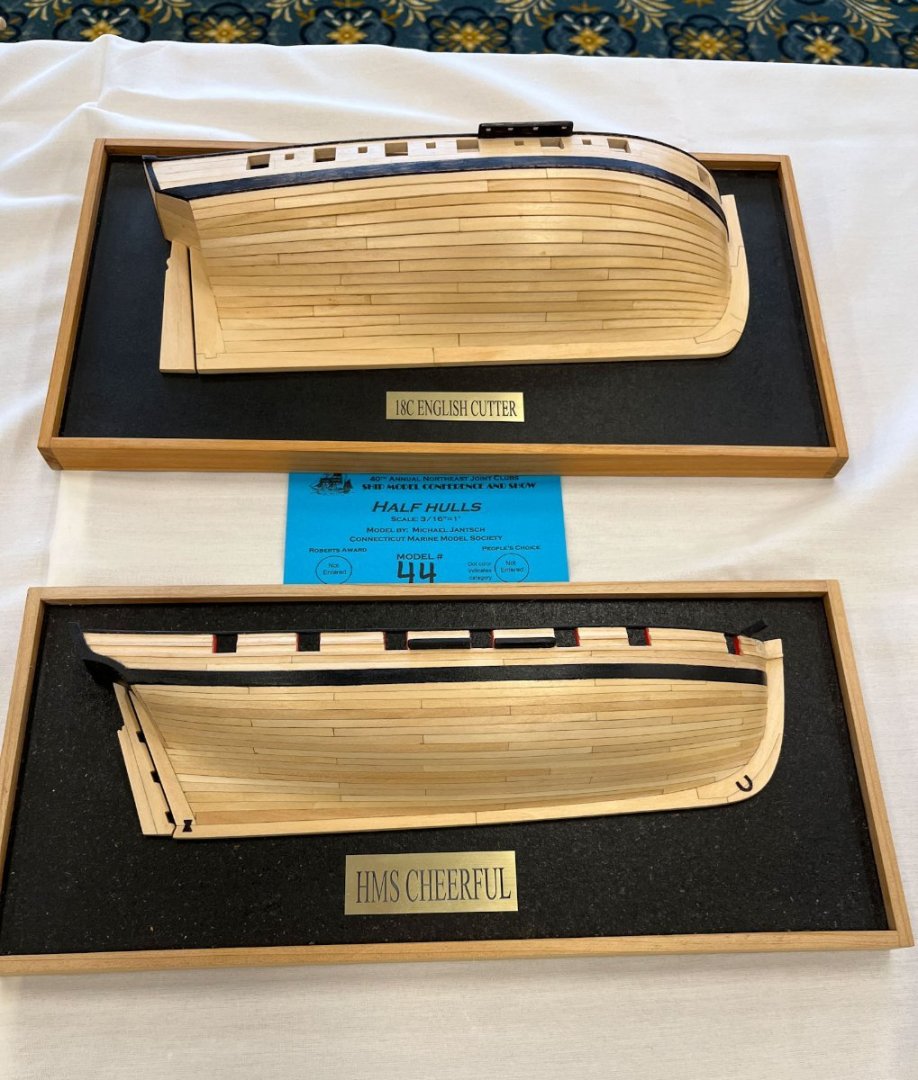
Thanks for the kind words Alistair and B.E. They are appreciated! Last weekend my fellow shipbuilder Jason Long and I made the 5 hour car trip to Connecticut for the 40th Annual Joint Clubs Meeting. Despite raining all the way up and most of the way home it was great fun to rub shoulders with lots of accomplished builders and see some truly amazing models. We decided to go out for lunch to The Yolk Cafe which had to be the most colourful local hangout I have ever been to. And the end presentation talk was fascinating, especially the final ship he talked about that appears on greek pottery exactly as it looked on the sea floor. I think the lady who goes by Shiphotographer took pictures of all the models and she usually posts them so I didn't take too many photos. I liked BlueJacket's case, which it turns out they sell. Its very clean and minimal, with classic molding. I noticed when downloading my pic that David Antscherl was in the background; that was totally by accident. I also really liked the two half hulls; the top one was clinker built! At my present skill level I build clinker style by accident only. My AVS proceeds slow and steady as I work through the top band. I am finding it somewhat challenging to get tight seams and butt joints. Not helping is my planking stock, which I cut myself. The edges have to be squared up and I haven't found a perfect method yet doing it by hand. Also I am constantly out thinking myself making the edges too angled one way or another. The holly, being a white wood with minimal grain, can be really hard to see edges. And I will never do a 2 layer planking again; not having easy access to the bulkheads makes clamping more difficult. Clearly I have many excuses. Here's where I am as of this morning: I recently ordered Dave's Hayling Hoy book which I find great reading. But on page 80 he states "Shaped planks should lie on the frame without stress and not require pins or other methods of forcing into place." So I have a little way to go until my learning curve starts to flatten out. Have a great weekend! Cisco
-
I saw the model in person (hope I've got the right model/builder) on Saturday. No flaws anywhere! And set up next to Chuck's Winchelsea. A bold, and warranted, move.
- 642 replies
-
- 3
-
-
- winchelsea
- Syren Ship Model Company
- (and 1 more)
-
Alistair what did you use for caulking on the holly main deck? I have been using pencil which is a subtle line; yours looks more pronounced thx cisco
-
Yessir Aliluke. I am using water based polyurethane (that won't yellow even though the wood eventually will to some extent) to have the clearest finish possible. I am visualizing an entire ship made from holly, as close to a bone ship model as I can get with wood. It may look good, it may look "interesting...", we'll see. And if I get frustrated i can always fall back on thick coats of black paint to hide all my sins.
-
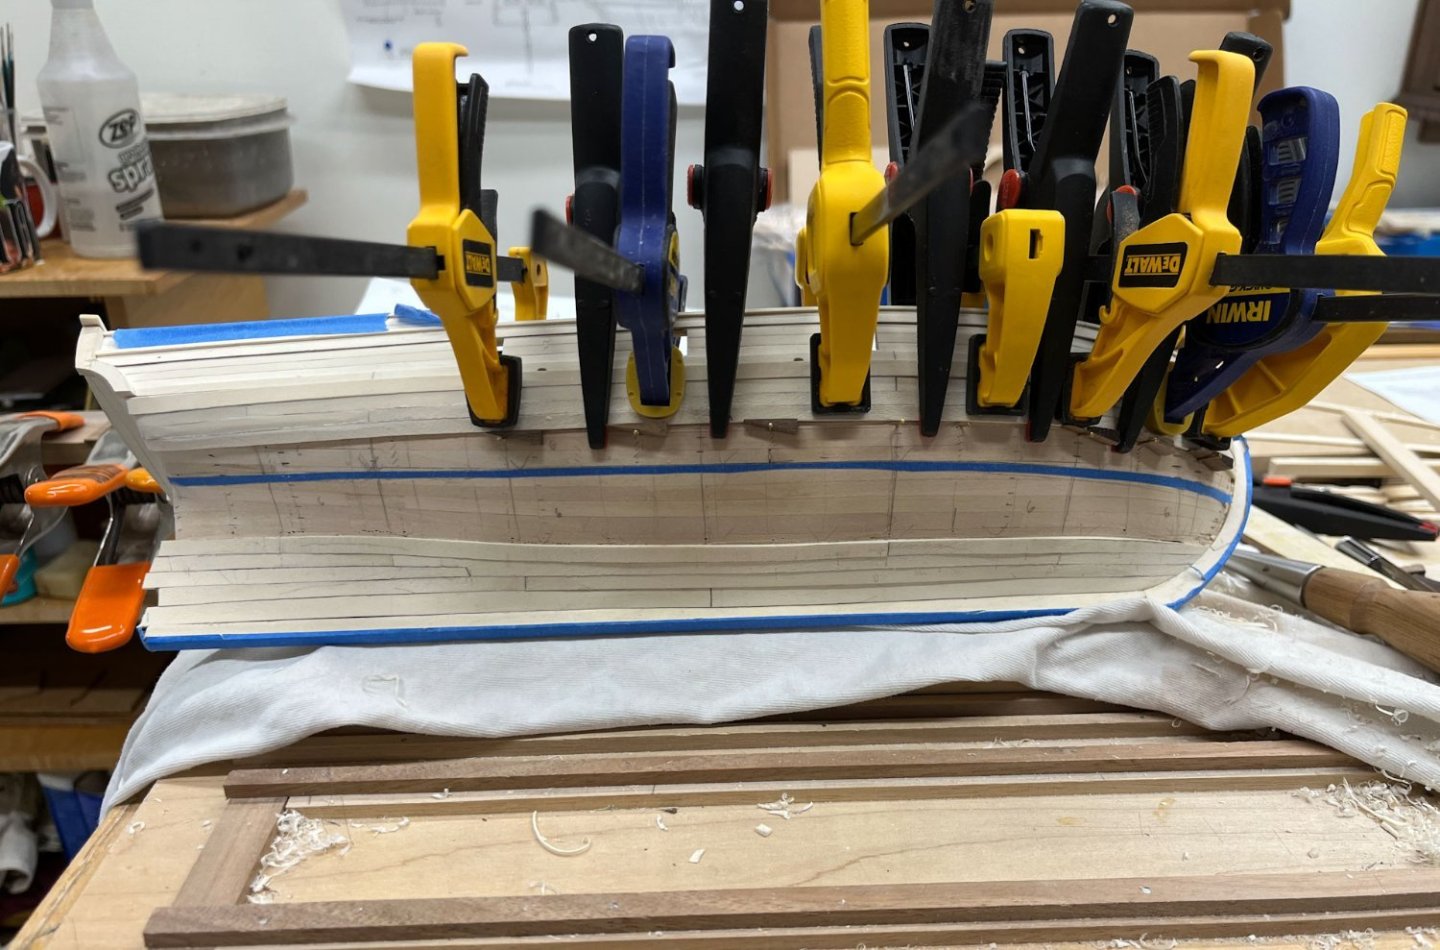
Thanks for the positive feedback Ron, and for getting me to page 4. I'm not anywhere near your level but its something to aim for. Good Morning fellow shipbuilders. This week I have 5 almost identical pictures which I promise I won't do again. It was an instructive week though. First off I finished my lower belt and was feeling pretty good. I stayed very close to all my pre-penciled tick-strip widths and managed the stern stealer without gaps. The planks are slightly different thicknesses due to me hand-slicing from various pieces of stock and haven't been sanded yet so your eye picks up on the penciled overhangs, making them look like gaps. No gaps so far. Life was good until I realized my 3 butt shift planking pattern was, looking at my model in the above pic, a 2 butt shift. Looking at my planking plan, which I kept right next to the model so I wouldn't screw it up, I realized I screwed it up. The butt joints of the topmost plank on the plan was correct, but not on my model. Leave it be or deconstruction? After a day to feel sorry for myself I decided to pull it. After cutting a new butt-joint in the proper place (this meant luckily I wouldn't have to re-do the stem section) I got my denatured alcohol and a qtip and selectively painted the middle of the offending plank. I was worried the alcohol would be a mass destruction event and all the surrounding planks would release which thankfully didn't seem to happen. I did have a little trouble with the edge joint which came a way ragged in some areas and had to be smoothed with a file. I was worried about making this middle plank which has to be the exact correct length. In the past I seemed to trim them a little too long, or more often they fit perfect until I put glue on, then the planks seemed to magically get longer. So I aimed for a tight fit, sneaking up by filing a tiny bit off at the butt ends at a time. I also couldn't perfectly smooth the few ragged areas where the planks edge-glued together so had to file the mirror shape into the new plank's edges at 2 areas. The stern end of the new plank had a curve and a twist in the same section which I did first by edge bending with a travel iron, then twisting with a blowdrier. Somehow this worked; in the past the blowdrier usually let me add a twist but straightened out any previous bends. Guess the planking gods were feeling merciful. Wedges are as always my friend. There are a lot of holes because I couldn't find the underlying bulwarks right away. Pins in planks only are too wobbly. And here it is after drying, butt joints in the correct place. The replacement plank was a little thicker than the plank below it so there is a shadow line enhanced by my overhead lighting. Not a gap or bulge. Cause I ainte redoing this. Now have to pack up the family and off to breakfast with my parents. Next I start the upper belt, as per Dan's recommendation. Anyone coming to the 40th annual show in CT I will see you there. Jason (JLong) and I are carpooling up the night before. Have a happy Sunday and thanks for reading and leaving positive comments and politely overlooking the dumb stuff I've done. Cisco

-
thanks Paul. the pin and wedge system shown above works better for me than anything else i’ve tried. also still not to page 4 drat it all