
CiscoH
-
Posts
384 -
Joined
-
Last visited
Content Type
Profiles
Forums
Gallery
Events
Everything posted by CiscoH
-
 Impressive sail tutorial Jason! also it didnt look like there were enough notes in the NYPD Blue theme song.
 -
looks great! i’ve personally always preferred the look of cannons/carronades when they are tied up for travel, whatever thats called, like you did here, as opposed to having the ropes coiled up on the deck.
-
HM Cutter Alert 1777 by muratx - scale 1:48
CiscoH replied to muratx's topic in - Build logs for subjects built 1751 - 1800
beautiful! -
Brig Le FAVORI 1806 by KORTES - 1:55
CiscoH replied to KORTES's topic in - Build logs for subjects built 1801 - 1850
hope you can re-use some of the planks Kortes -
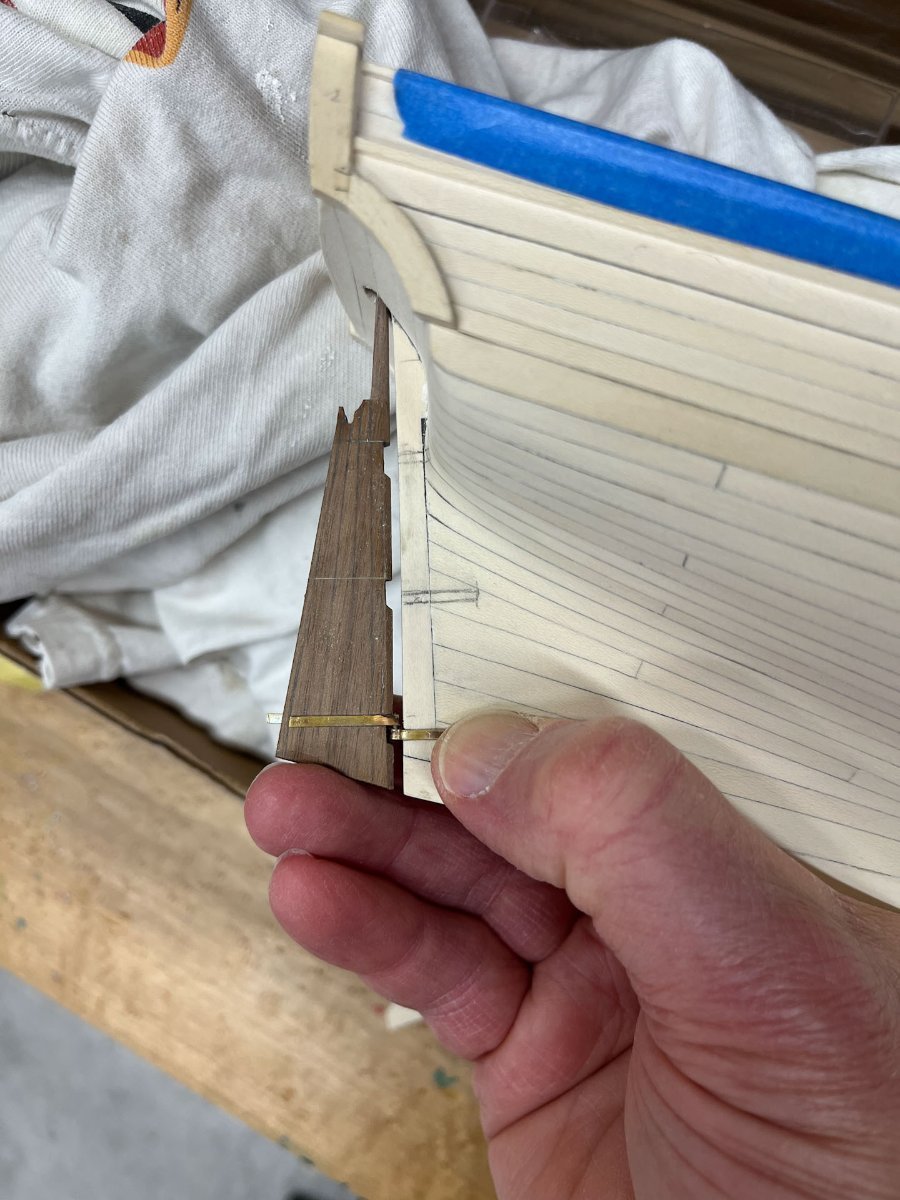
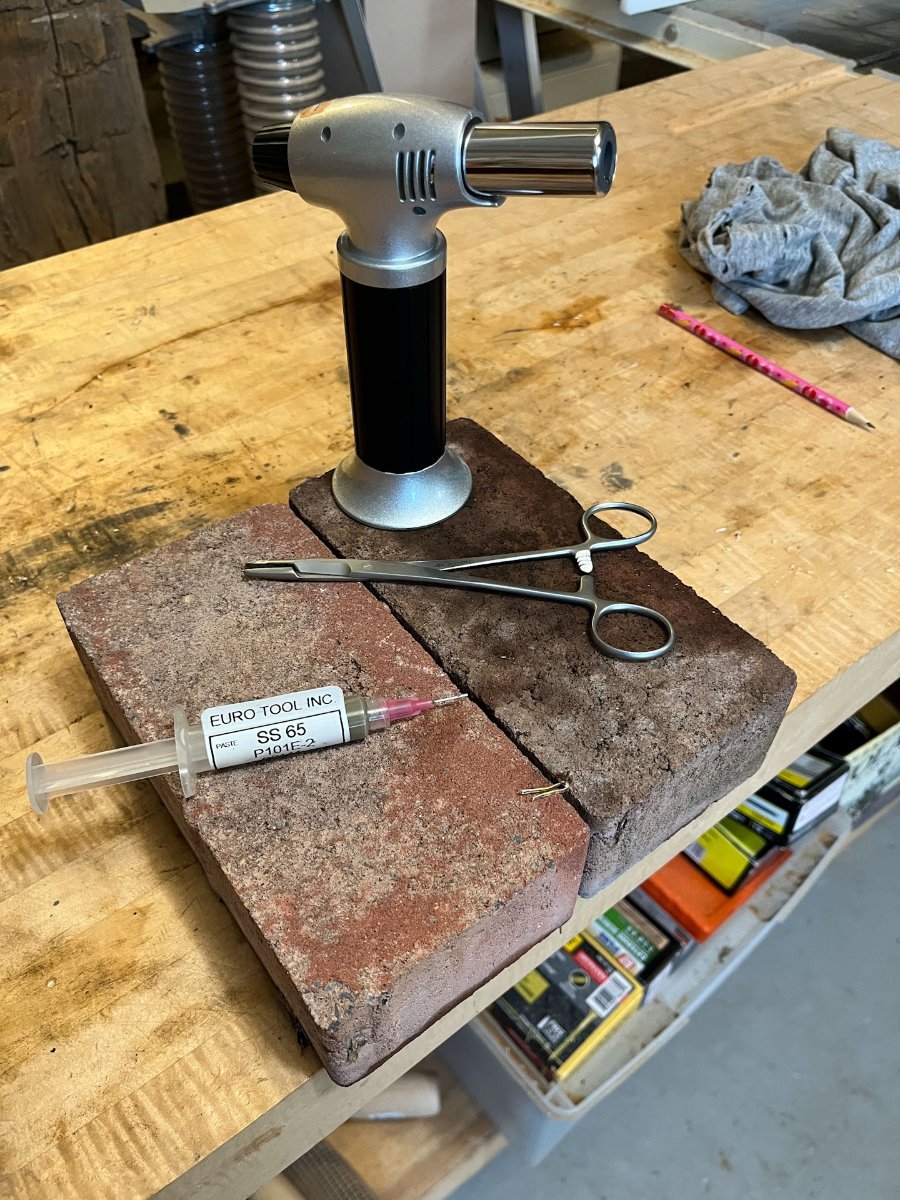
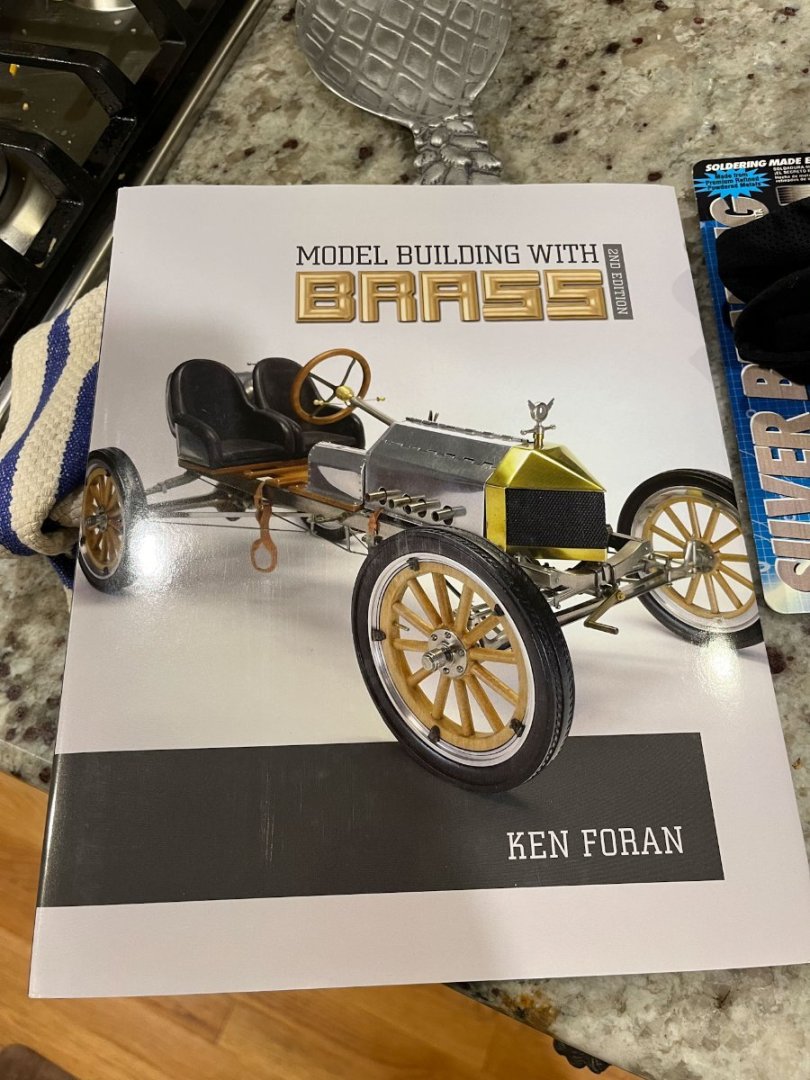
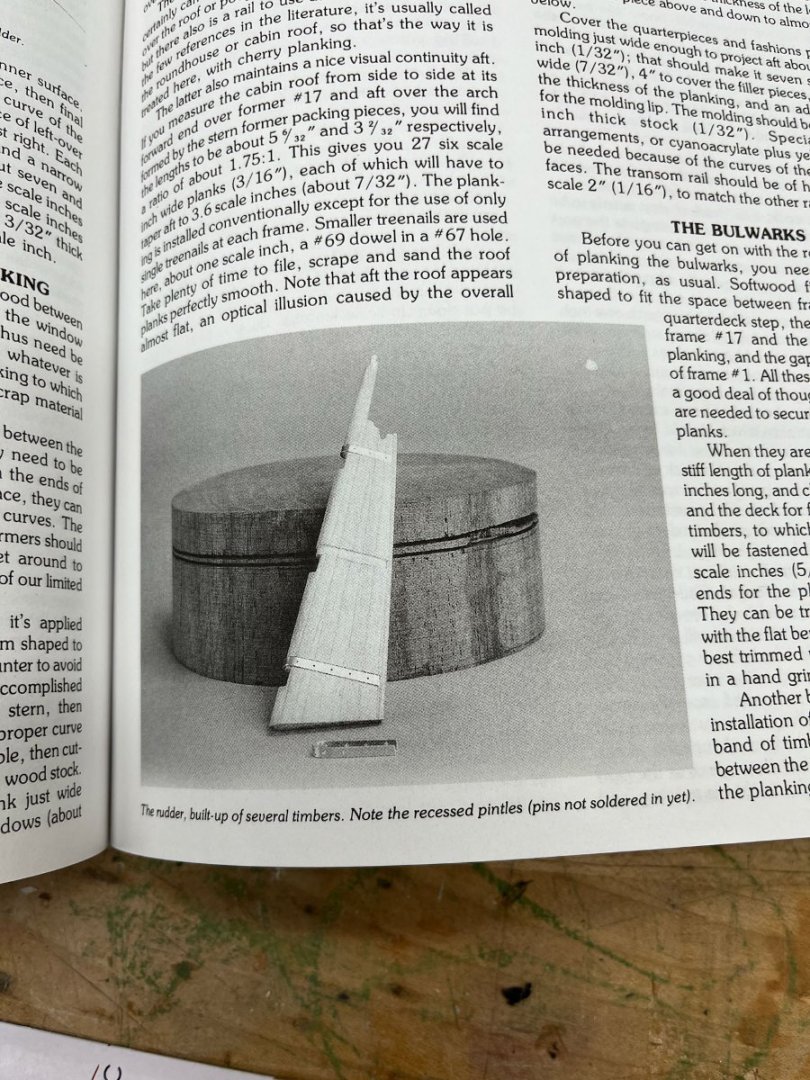
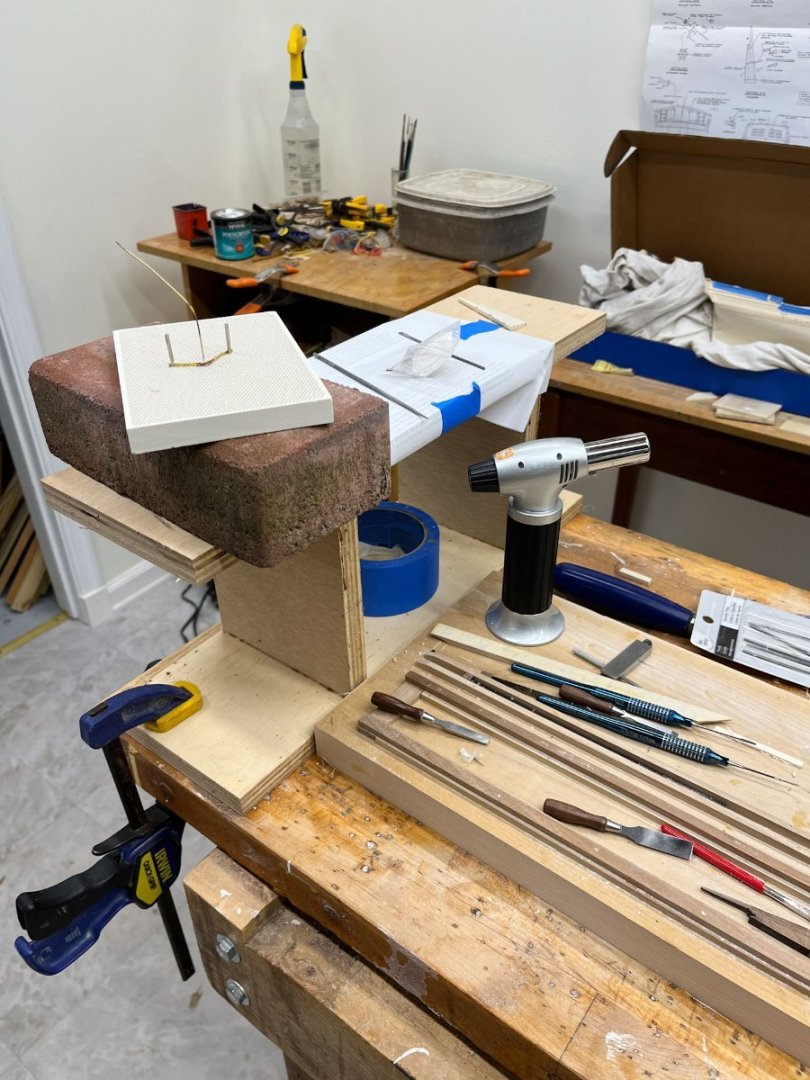
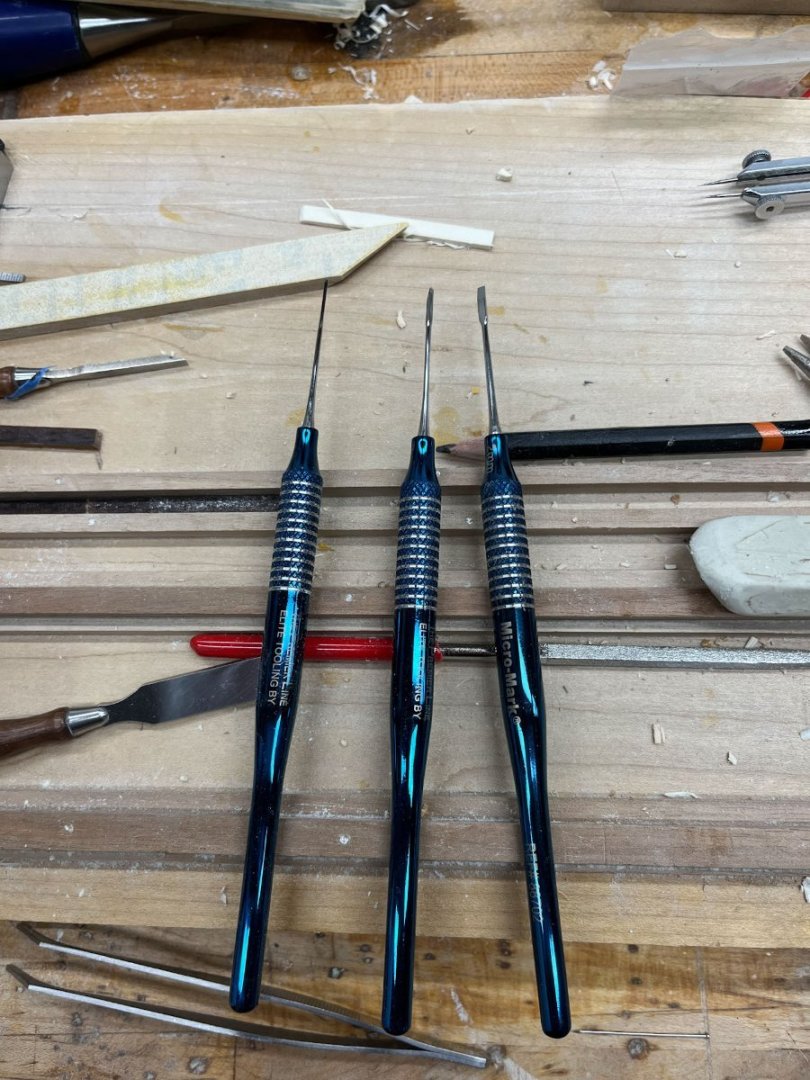
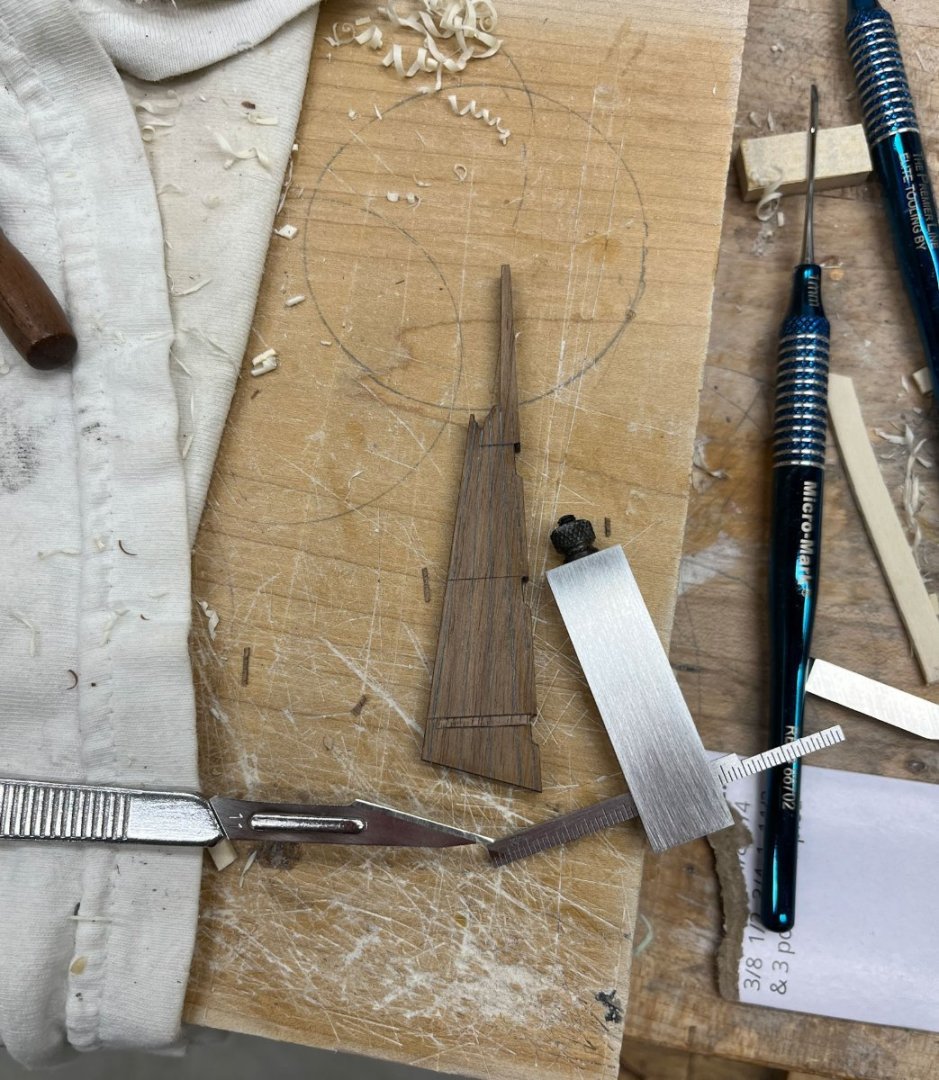
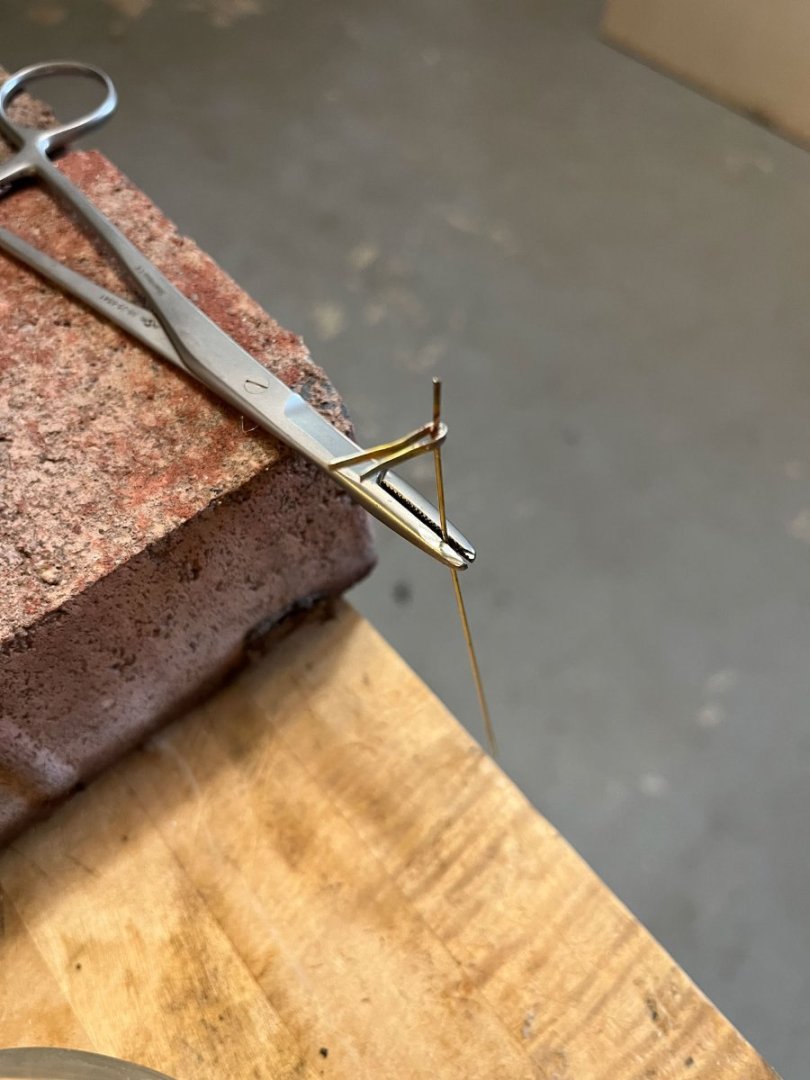
Good late Tuesday evening everyone. Way overdue for an update. I have been working on the rudder. First off I changed my workbench. I always stand to work, mostly from habit. And when you are trying to do microwork your neck gets cricky. So I had the genius idea to raise a portion of my bench by clamping on a I-shaped extension which I normally use to hold carvings. Worked great, and I taped some paper on as a clean work surface. And as you can see I got my ceramic stone with little metal pegs; way better than the bricks I was using. I tried silver soldering in the house tonight and no appreciable smoke or flames. So in moderation it seems ok to work indoors. Also the garage is in the 30s at present. Last time I made a test gudgeon which went pretty well. This time I made a test pintle. Here is my setup. Putting the ceramic brick onto a real brick provided more than adequate heat isolation; nothing caught fire. I've lived in fear of soldering for ages and it seems to be laughably simple. Sand the parts with 200 grit, soak briefly in 99% isopropyl alcohol, handle with tweezers afterwards, make sure the metal parts to be soldered are touching, apply a dab of silver solder/flux paste, heat in little circles around the part being soldered, and after 3-5 seconds the paste melts and voila! its stuck together. This was my second successful attempt, of 2 attempts. Here is my pintle threaded onto the gudgeon held in place with finger power on the kit's rudder. I have to deepen the mortises the pintles sit in; they are too shallow and the pintle protrudes too much. But the hinge works freely. A small step forward. Here's the kit rudder held against the hull to check space between the sternpost and the rudder. Too wide at present. And here's my holly rudder (the bottom part isn't trimmed flush yet), which I think looks pretty good. Like the rest of my build I used pencil to accentuate the individual planks. The kit plans show the rudder made of 4 large planks and a thinner backing plank, which is what I did. Later I checked Dr Feldman's book and saw he made his rudder from 7 planks (!). I think he drew or scribed them but regardless too fiddly for my tastes; I'm sticking with what I've built. Thats where I'm at. Desperately trying not to screw up anything where I have to remake then entire rudder so taking it slow. 2 other notes. One, I bought the Micromark fine chisels for the carving class I went to. The gouges were, sorry, utter crap, but I had been using the chisels and liked them. Not anymore. The steel is really soft so the ends bend too easily. When I tried to resharpen them they formed a long thin burr that flopped about and refused to come off. Too expensive to throw out but basically useless. I do really like the length and shape of the handles though. Second, in my mad pursuit of soldering excellence, I purchased the below book on the recommendation of a post on this site. Its a mixed bag- the author has made some amazing models of insane complexity from sheet and tube brass; beautiful eye candy. But 99% of the book is showing step by step advanced construction; it assumes you already know how to solder. So if you are looking for an intro book this isn't it. Thats it for tonight. Next up is brass blackening, a subject that seems to be as controversial and full of competing advice as soldering. I can no longer remember what system I used for my little 18th century whaleboat but all my results had spots and flakiness. I ended up using black paint which worked fine but I want to push the envelope. Dangerous chemicals here I come. thanks for reading; Cisco


-
very impressive. thats a handy mother in law; a good choice on your part
-
I think the smaller holes are oar ports. these ships apparently could be rowed, if you were desperate enough. great planking and paint job
- 152 replies
-
- 1
-

-
- Flirt
- Vanguard Models
- (and 1 more)
-
i have those sanders and felt they worked well. i used the rounded end to sand the inner curve of the bulwarks. the sandpaper wears quickly but its easy to rotate the sandpaper strip forward a half inch to expose new parts of the strip. i mainly used the finer grits
-
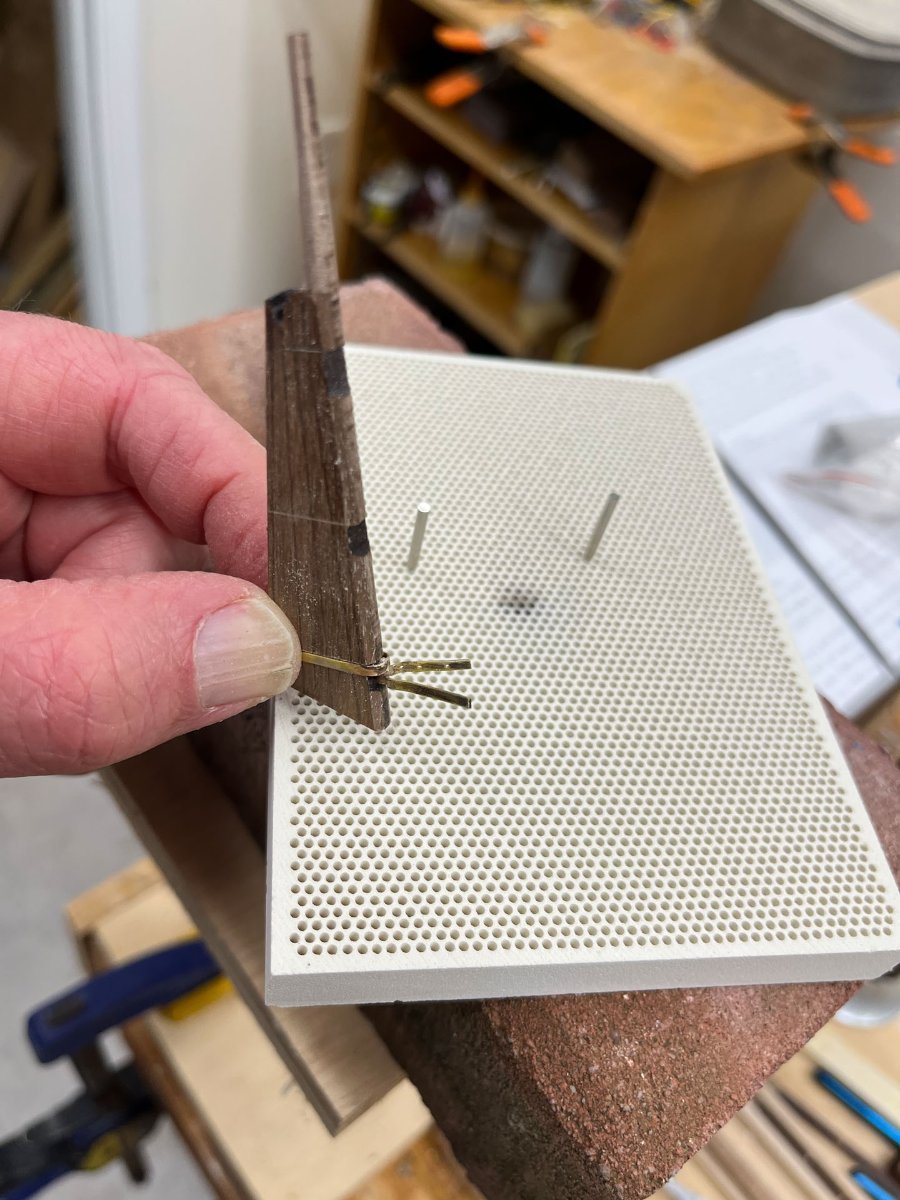
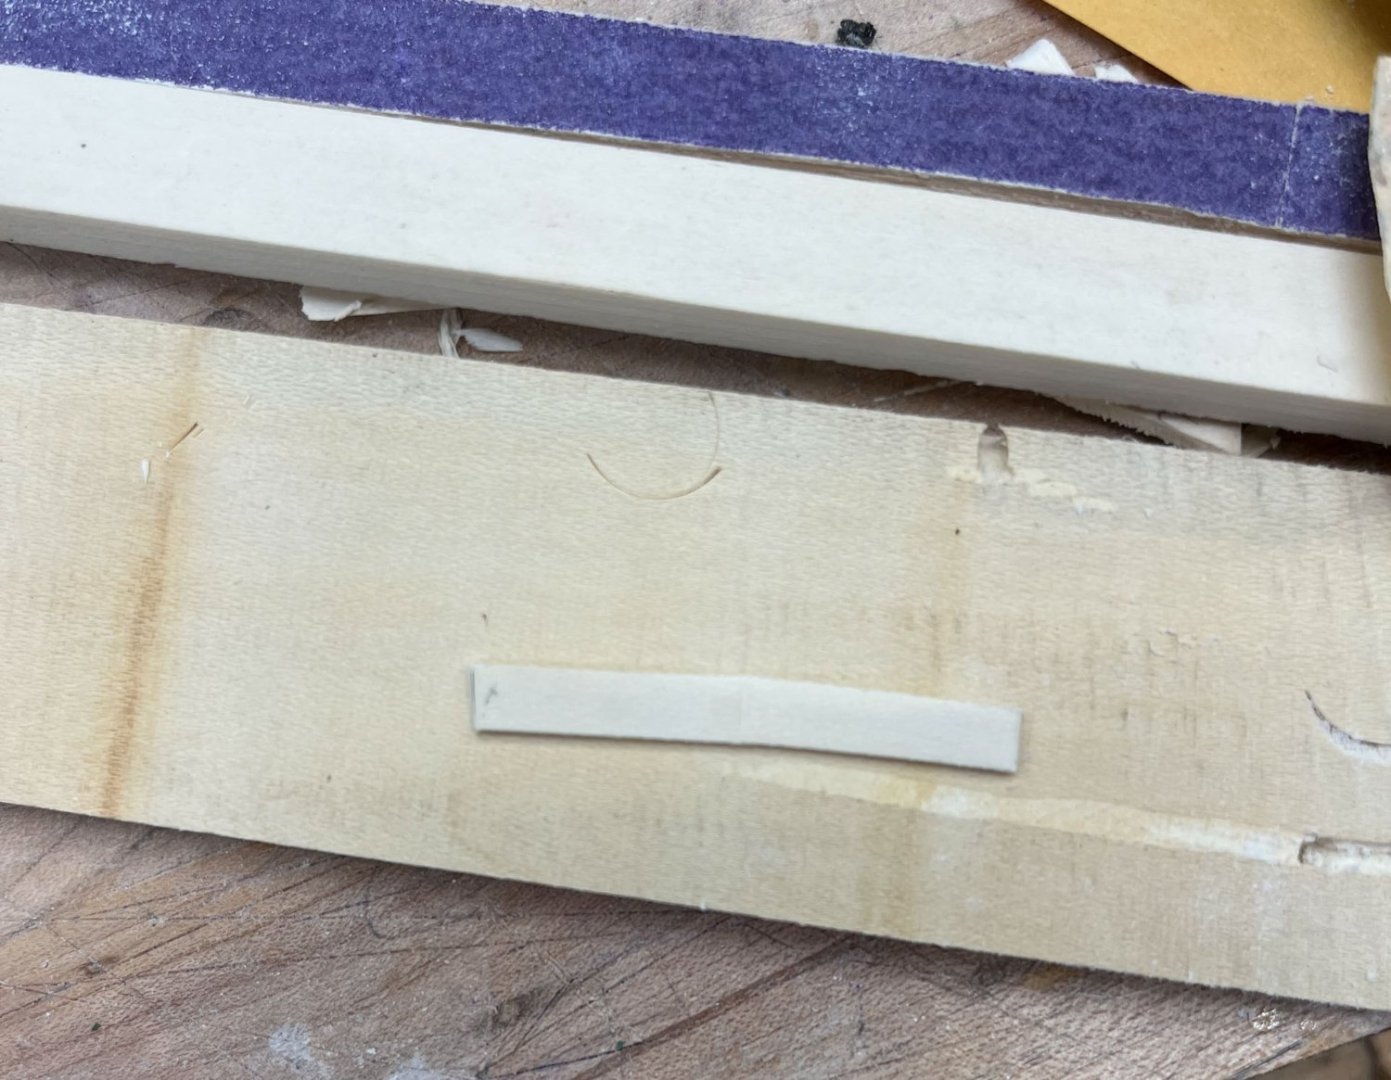
A brief update - no picture sorry - the brass wire did not solder itself to the gudgeon - I had to twist it some but eventually worked the brass strip and firmly soldered/attached brass tube off the wire. It was a very solid; a beautiful gudgeon. RossR I haven't started the blackening process yet but I will keep in mind your advice. It seems that cleaning is critical to all these chemical/solder reactions. and a few posts ago you asked how thick the final holly layer was- between 1/16" and 1/8", which usually would be plenty for light sanding. But in this case I was essentially doing final shaping of the hull and sanded through. the veritas chisels work really well and i use the 2 smaller ones all the time. they have to be sharp though. Aliluke- I am using the walnut rudder as a practice piece only. The final rudder will be constructed of holly.
-
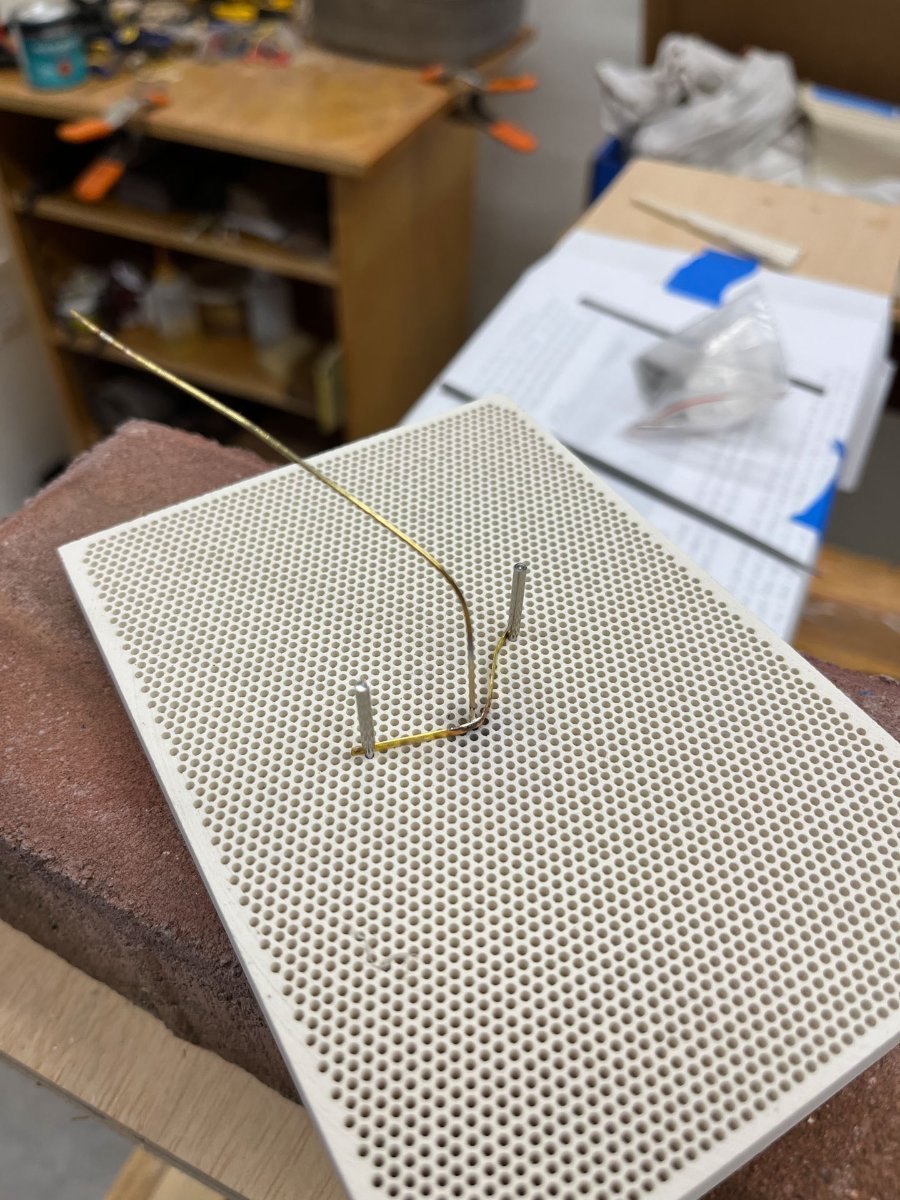
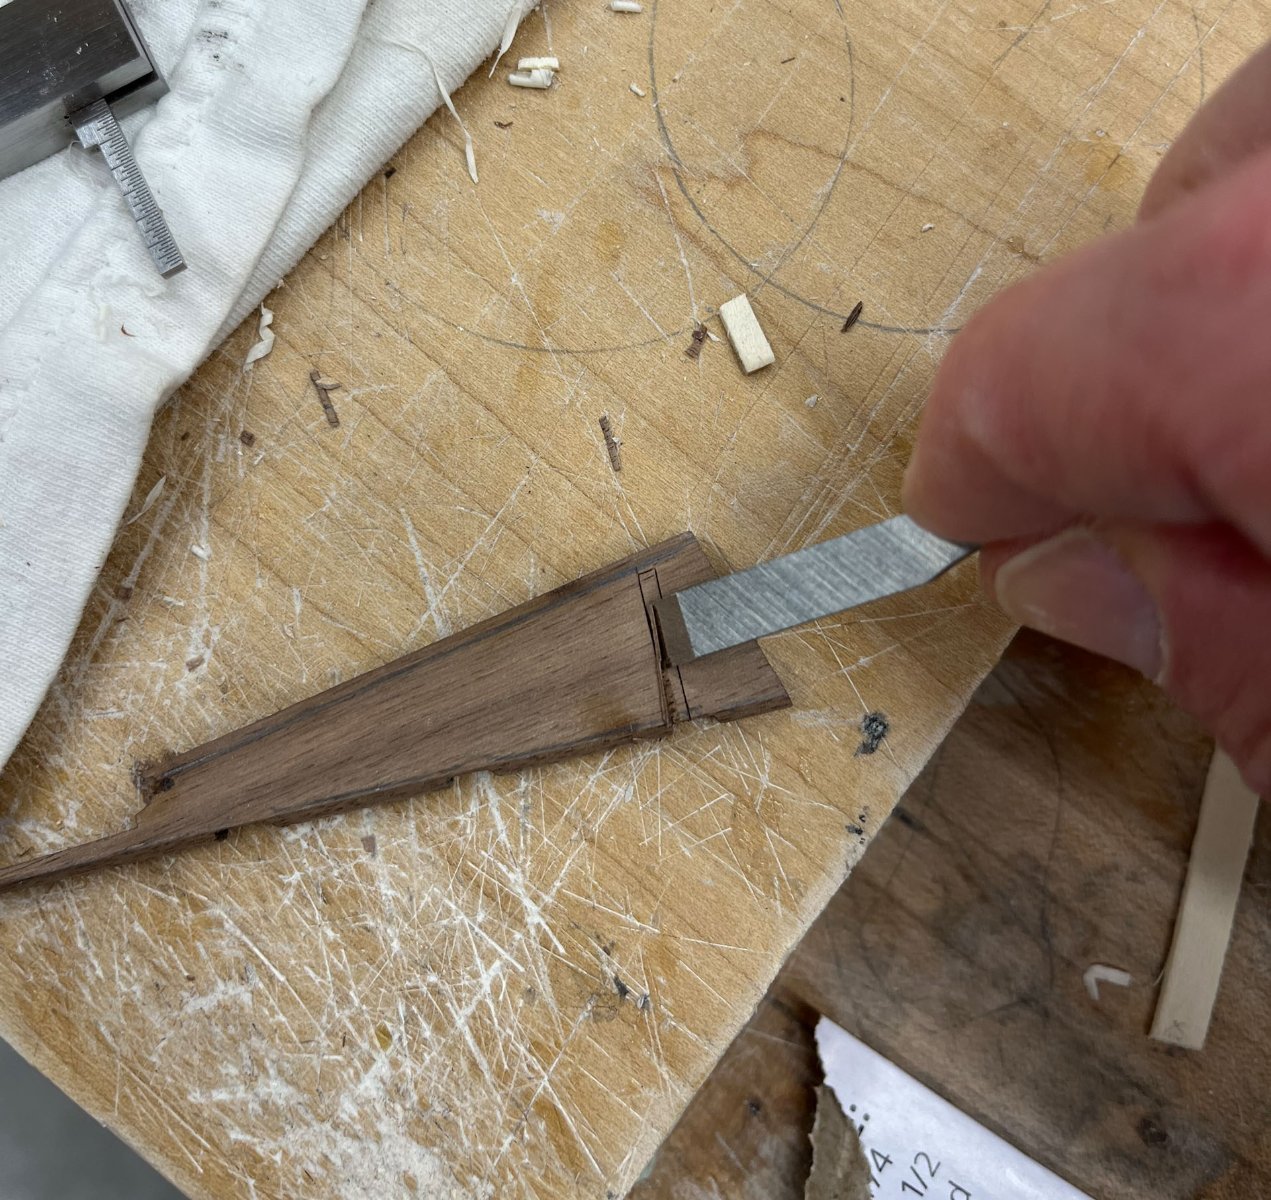
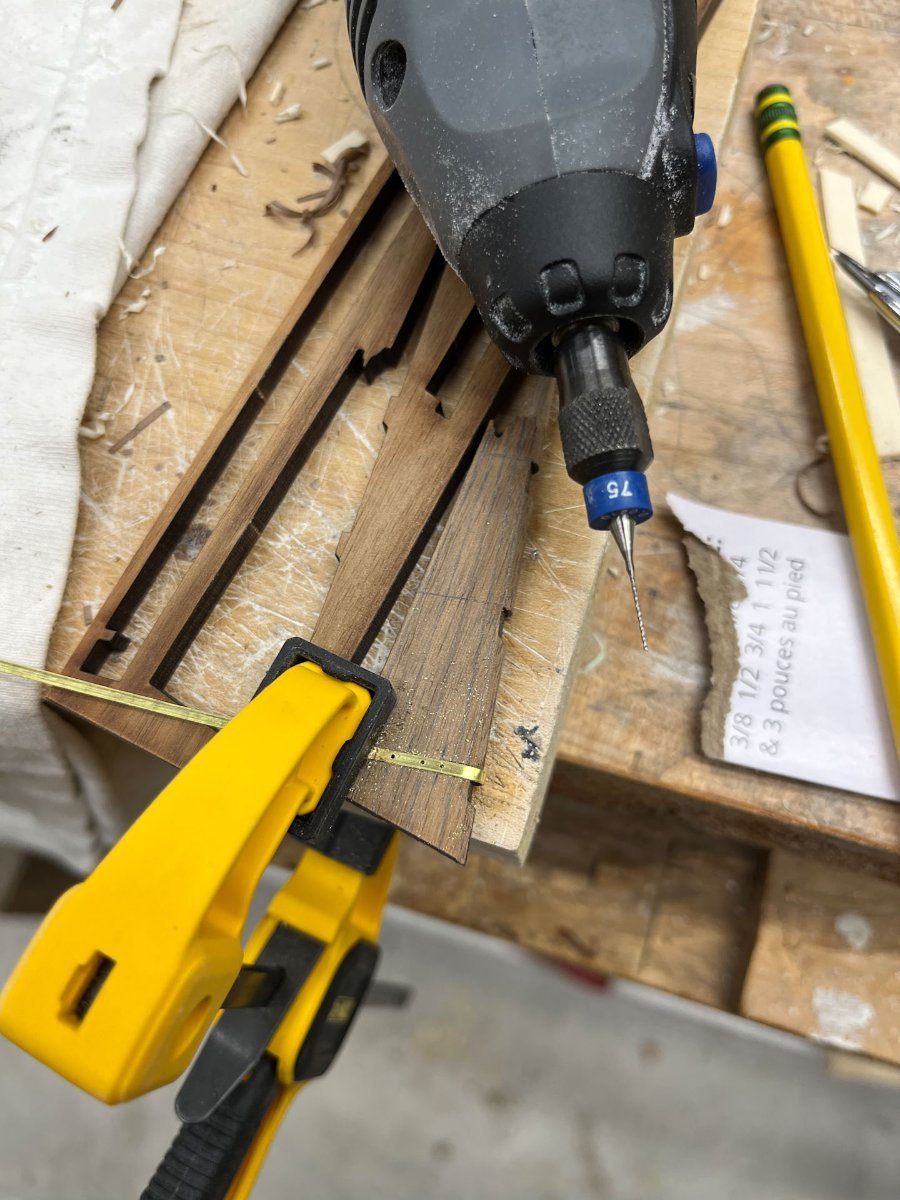
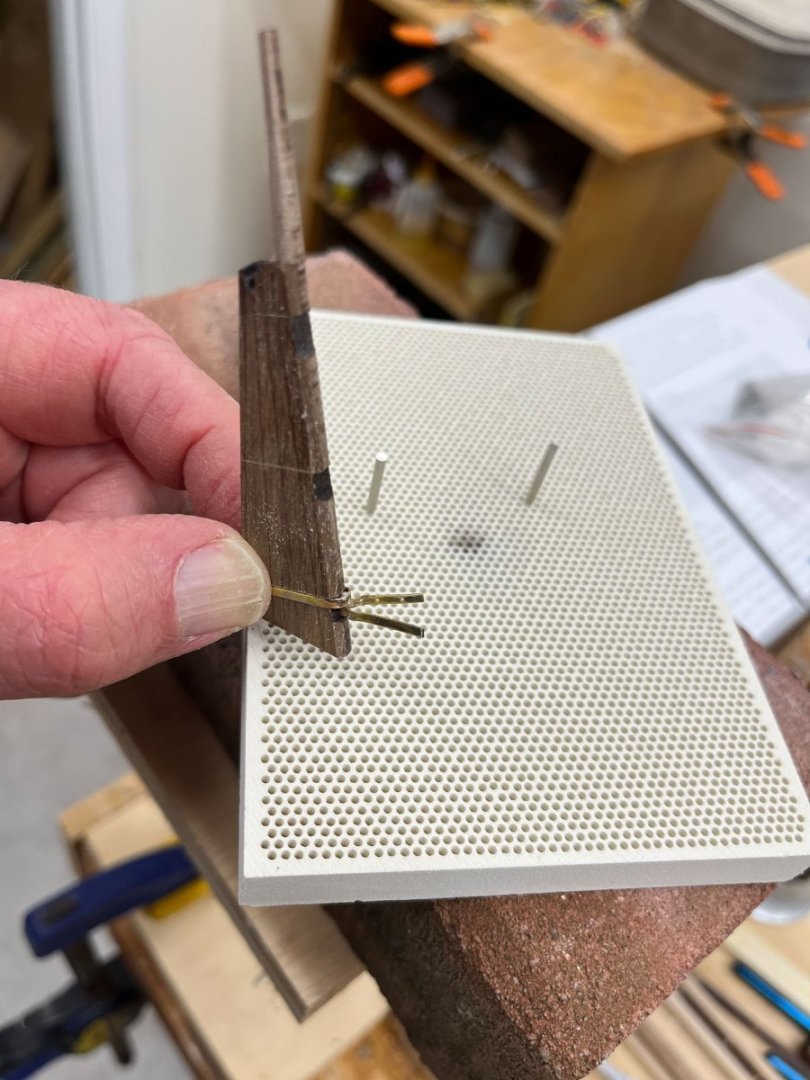
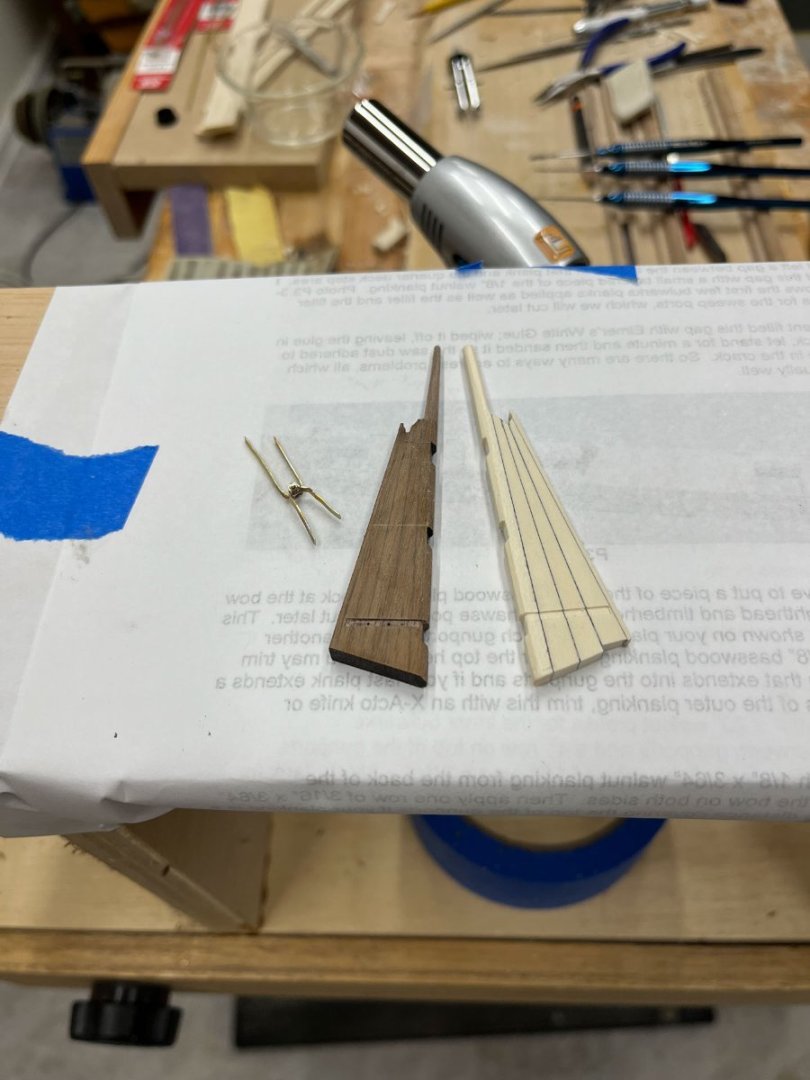
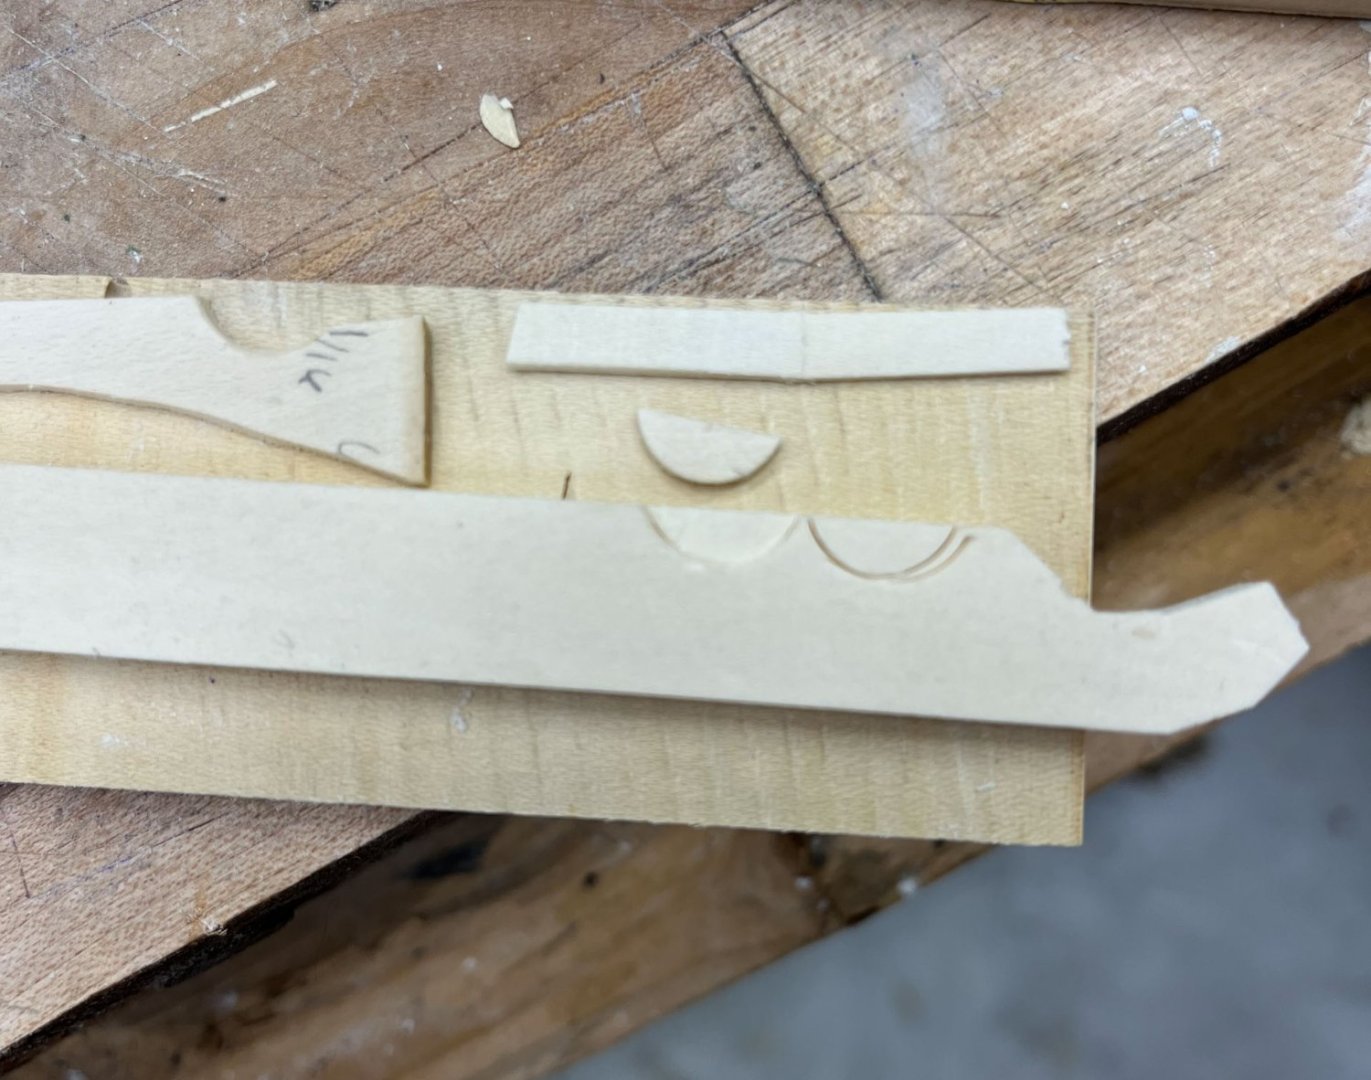
Good afternoon all. Its 40 degrees, overcast, and finally not raining. A good day to stay inside. The last week has been spent practicing placing the pintles and gudgeons. And researching soldering, a daunting subject with almost too much information and opinions. When I build Chuck's 18th century longboat the soldering went poorly, to say the least. By the end I was melting the brass, and the few intact pieces I didn't melt stubbornly refused to stay stuck together. Epoxy saved saved my bacon then, but now it is time to revisit and maybe conquer my fear of soldering. The practicum has you do all the pintles and gudgeons much further along; after the deck planking and furniture is finished. I don't think I can roll the hull around like I want to at that point, so I decided to do it now instead. I will replace the stock walnut rudder with a multi-plank holly rudder. But in the meantime the walnut rudder makes a great practice piece. I read somewhere that the pintles and gudgeons are supposed to be recessed flush into the hull. I felt they would be more secure regardless. I used my small square to draw a 90 degree line across the rudder, then used the brass strip that came with the kit to mark the width. I cut the lines with my scalpel freehand. Then I used a combination of my Veritas and Micromark minichisels to clean out the waste. Worked very well. It was easy to go too deep; I wanted the brass strip to be flush, not below the surface level. That wasn't too bad. Next up was drilling the bolt holes in the pintle. I don't have a mill (yet) so I did it by hand First I dimpled the holes with an awl, then used my dremel set for slow speed and a carbide drill bit to make the holes. (In the past I found it impossible to drill brass with normal hardware store bits; these are from Drill Bit City and work amazingly.) The brass strip has to be securely clamped otherwise it likes to move. I needed both hands to control the dremel (both elbows on the workbench for stability and a light touch). I was practicing here, but I plan to put a bolt hole in the center of each of the planks that make up the rudder. And then I was out of excuses and it was time to confront soldering. I read a lot on MSW. And re-read the pertinent sections of David Antscherl's FFM. I boiled my plan down to the following- 1) brass. No silver or copper. 2) silver solder. many people seemed to feel "regular" soldering is plenty strong enough so I might revisit this. But the few successful solderings I had in the past pulled apart pretty easily and I don't know if it was poor technique or simple limitations of low temperature solder. 3) so I was set on silver soldering (even more confusing because many low temp solders have silver in them. I meant the higher temp silver solder). A post by Greg Herbert from a while ago here on MSW extolled the virtues of Eurotools silver solder paste with flux mixed in, so i ordered some. I got soft and medium. 4) a lot of what I read said technique and preparation were critical. I sanded my brass with 320 sandpaper, and after sanding washed all parts in isopropyl alcohol. From here forward I only handled the pieces with stainless steel, no fingers. 5) also from what I read silver solder doesn't fill gaps so whatever you're soldering has to touch. The force of my torch blew some of my previous attempts off the bench, never to be found again. So the pieces have to be both touching and securely held in place. 6) And finally, I did it outside in the garage. It made an unholy stink last time. In my previous attempts I used a pen-type torch. Watching Utube videos made me think a upright torch would be easier to work with so I got one. It was much easier. My first attempt was to make the gudgeon. The kit comes with some brass wire but no tubing, so I bough some brass tube 1/16 x 0.014. After cutting off a tiny piece of the tubing I quickly realized it was a major pain to hold the pieces still. The only way I could get the tubing to stay in place was by threading the brass wire through the tube and wrapping the brass gudgeon strip around the tube. I deliberately didn't sand or wash the wire with isopropanol so it wouldn't stick. My ceramic tile for soldering is still in the mail so I used some bricks instead. Awkward but they worked. Then a dab of solder paste. It comes with short needle-like screw on cap which look like you can squirt small amounts of the solder but its way too thick. I ended up using the needle cap as a spoon to deposit the solder. Below is my setup. Its hard to see the actual gudgeon its so small. Try #1: I made sure everything was secure and heated in small circles AROUND the part, not directly on it like I did last time. After a bit the brass shifted and I was hopeful. But no, the force of the torch had moved it. Nothing was stuck together and the silver solder paste was still present. I went and got my granny glasses to see better. Try #2: I re-washed the parts in isopropanol and re positioned them. New silver solder paste on top, just a dab. Heated it in little circles around the piece. It did nothing for a bit, then suddenly the solder paste liquified and the pieces seemed to pull together. This seemed more promising. Success! sort of. Even though I didn't sand or wash the brass wire it still was soldered solid to everything else. In the future I may try soldering the brass strips to the whole brass tubing, then cut the tubing flush. My previous soldering I am sure the tubing would have broken free but this joint seems very solid. But still, not too bad. My fear of soldering has lessened. I need to figure out methods of holding the tiny pieces in position but thats doable. Up next is blackening. In my previous attempts the blacking came off with the slightest touch so I ended up painting the brass. But thats enough for this week. Thanks for reading Cisco


-
Boy that looks nice great job
-
super clean work as always Ron
-
your longboat looks great. especially the paint job. i am equally impressed you are allowed to build in the kitchen.
- 50 replies
-
- 2
-
-
- 18th century longboat
- model shipways
- (and 1 more)
-
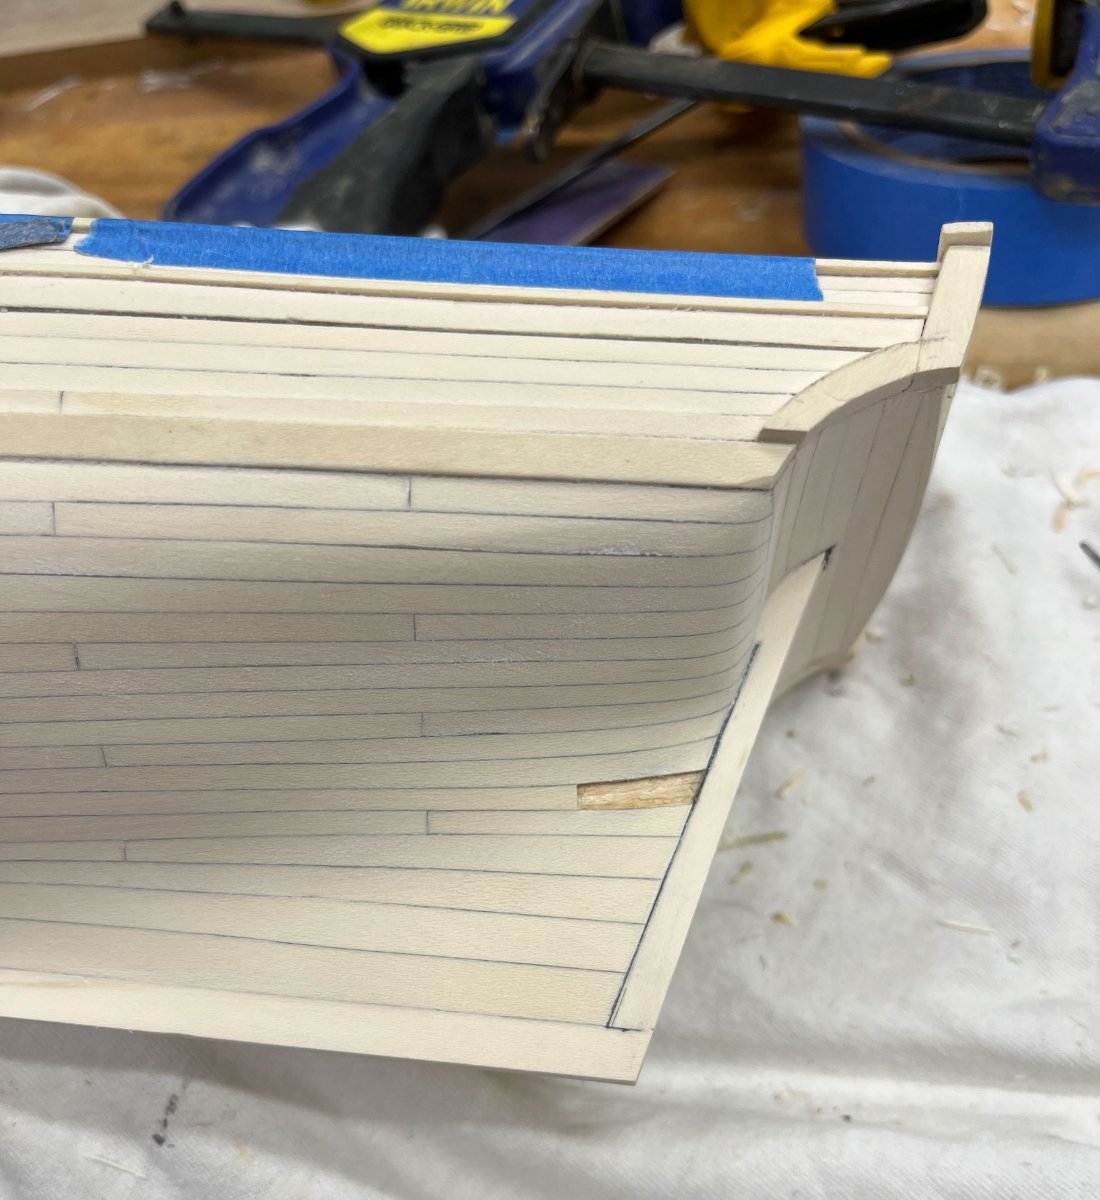
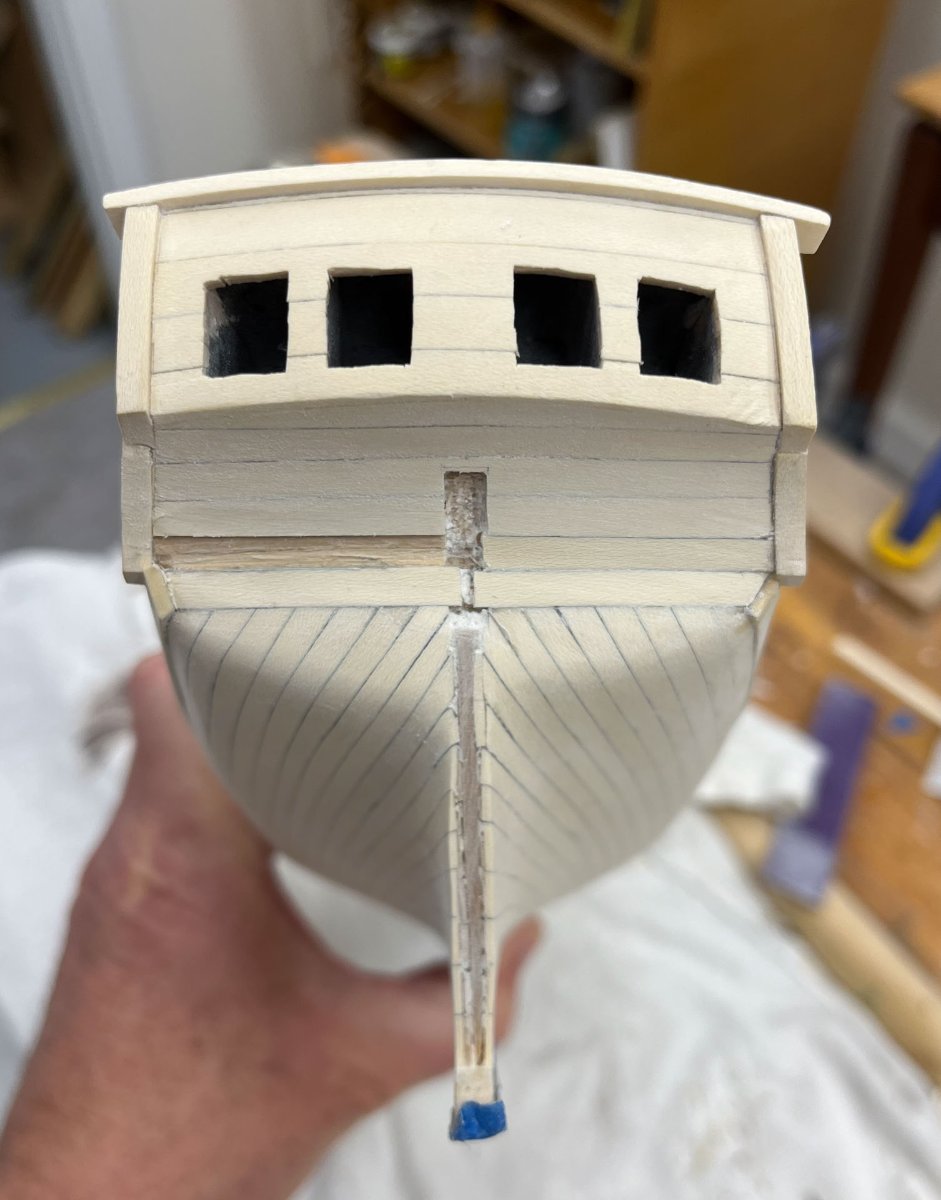
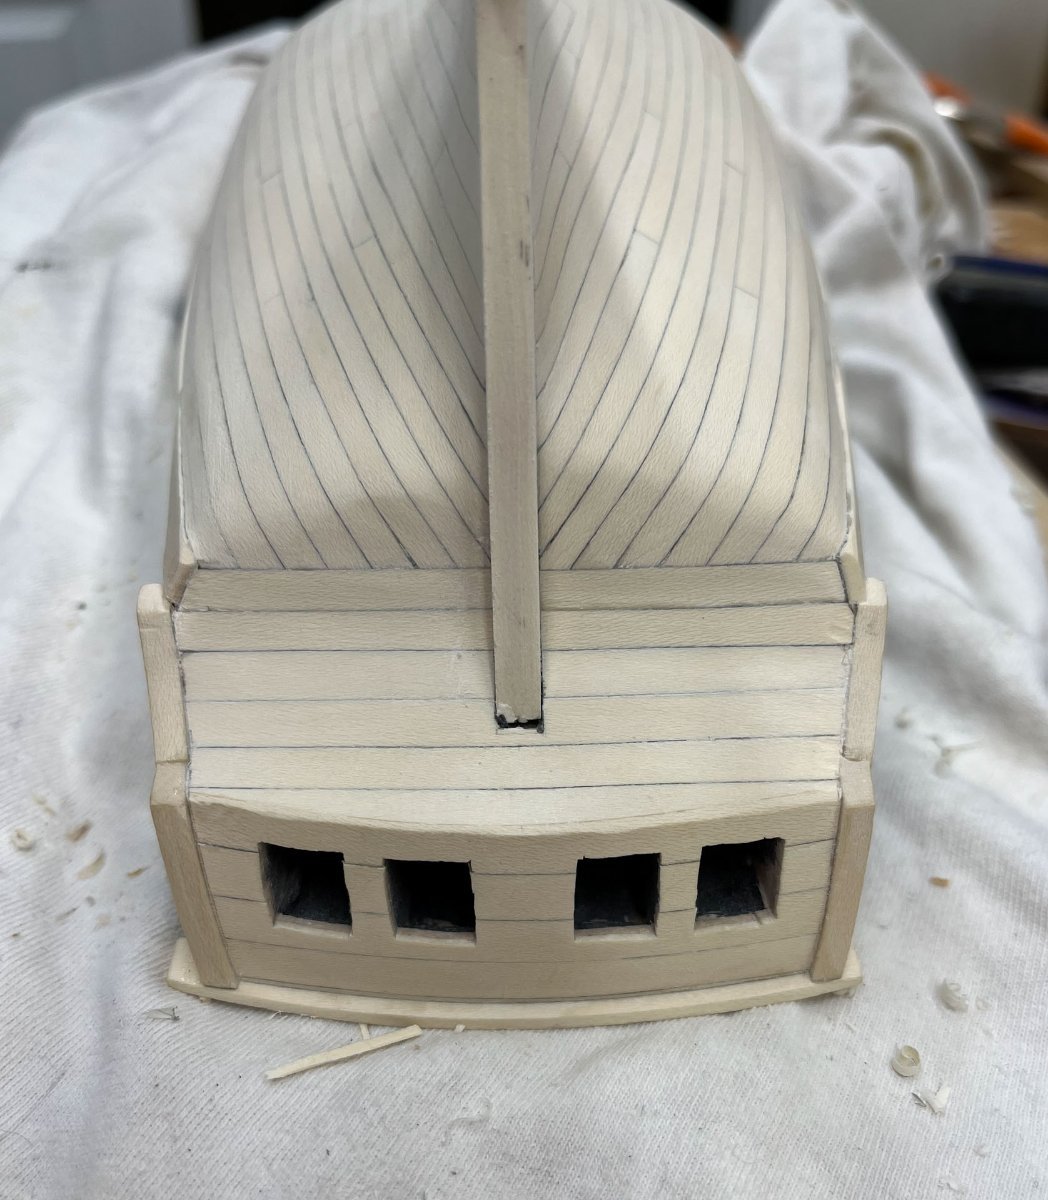
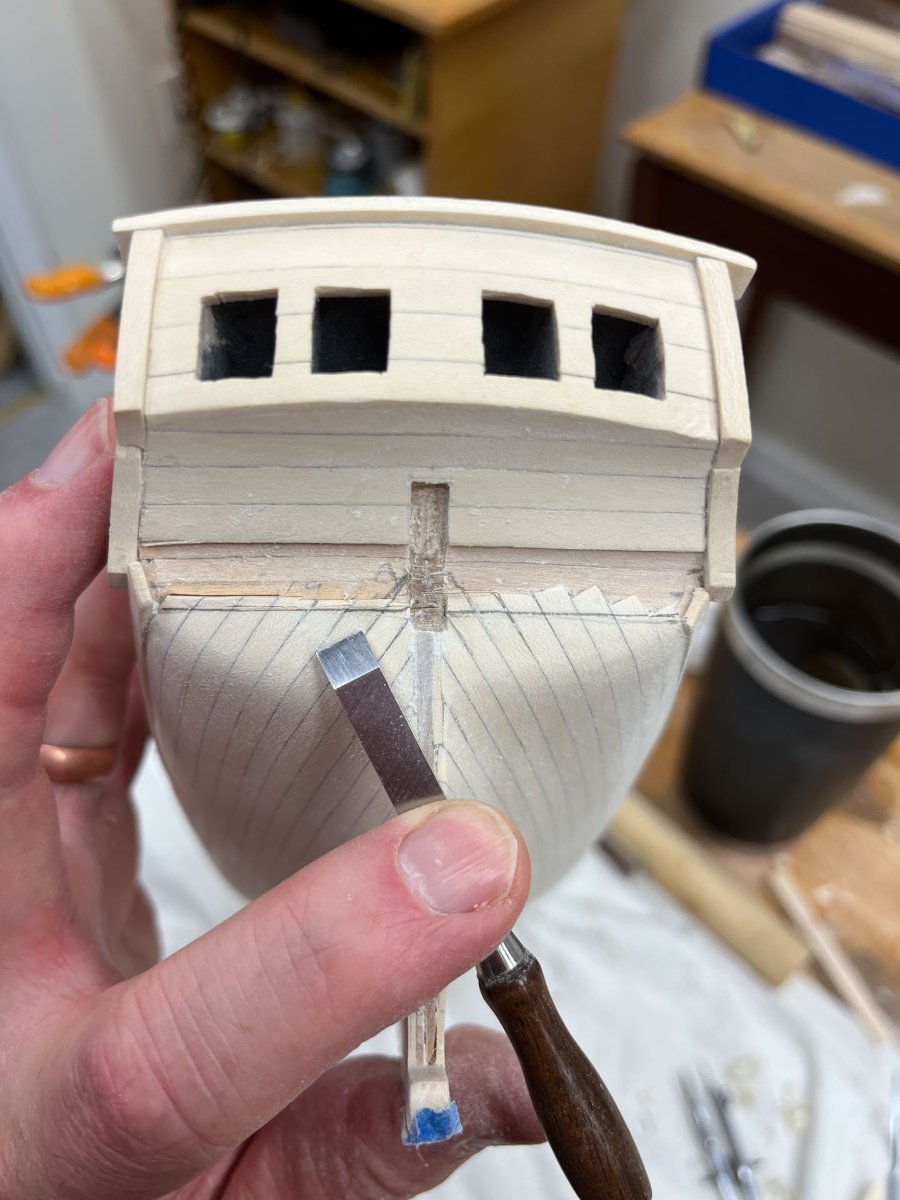
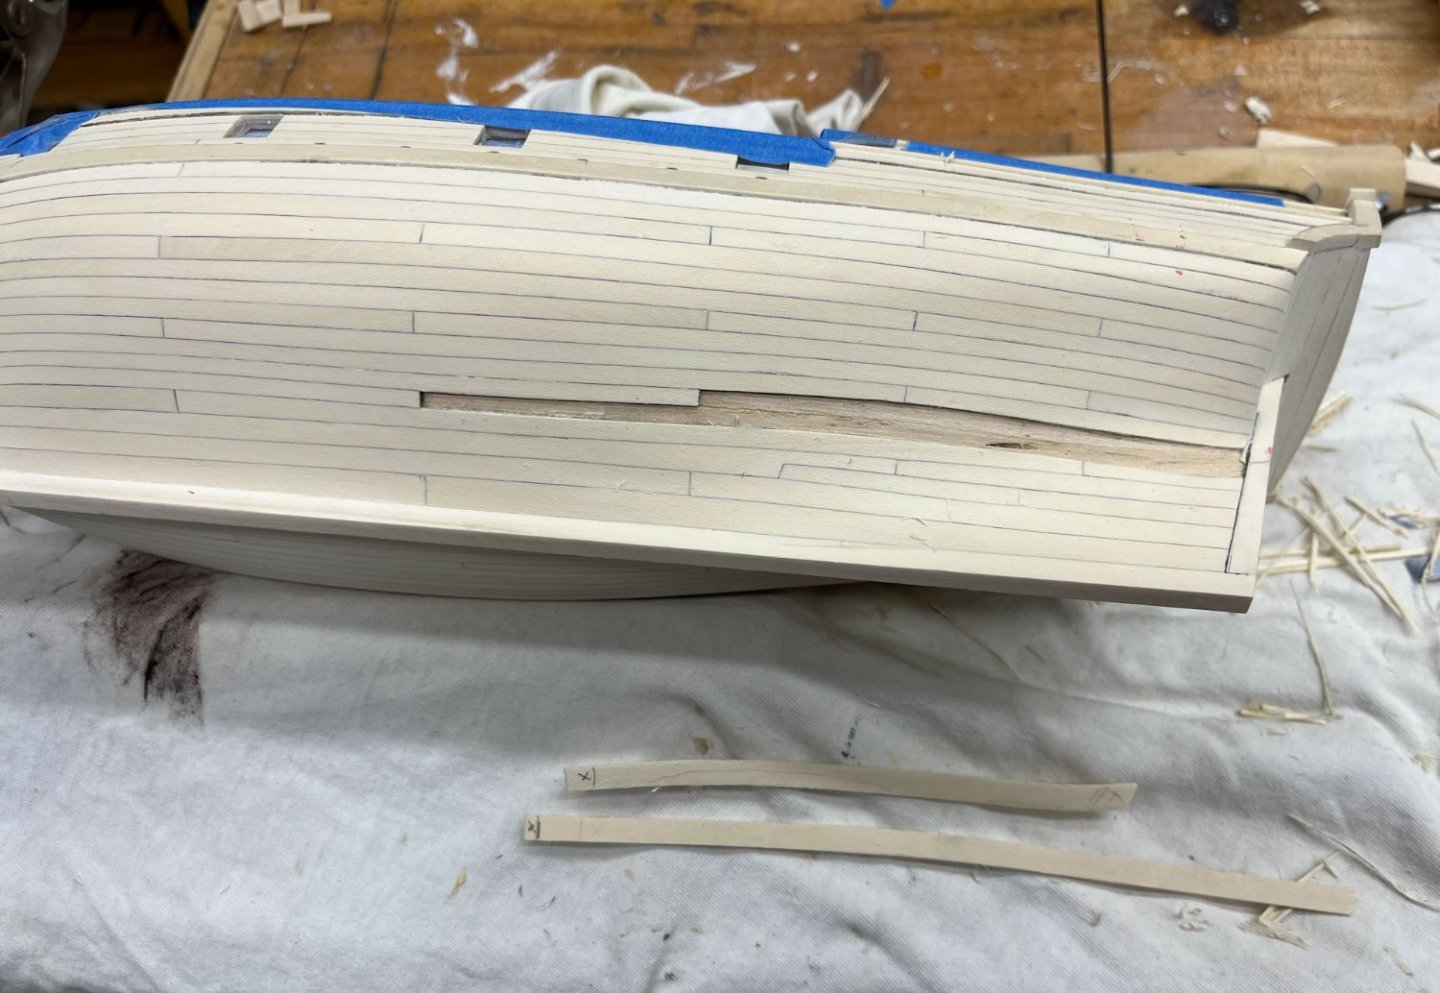
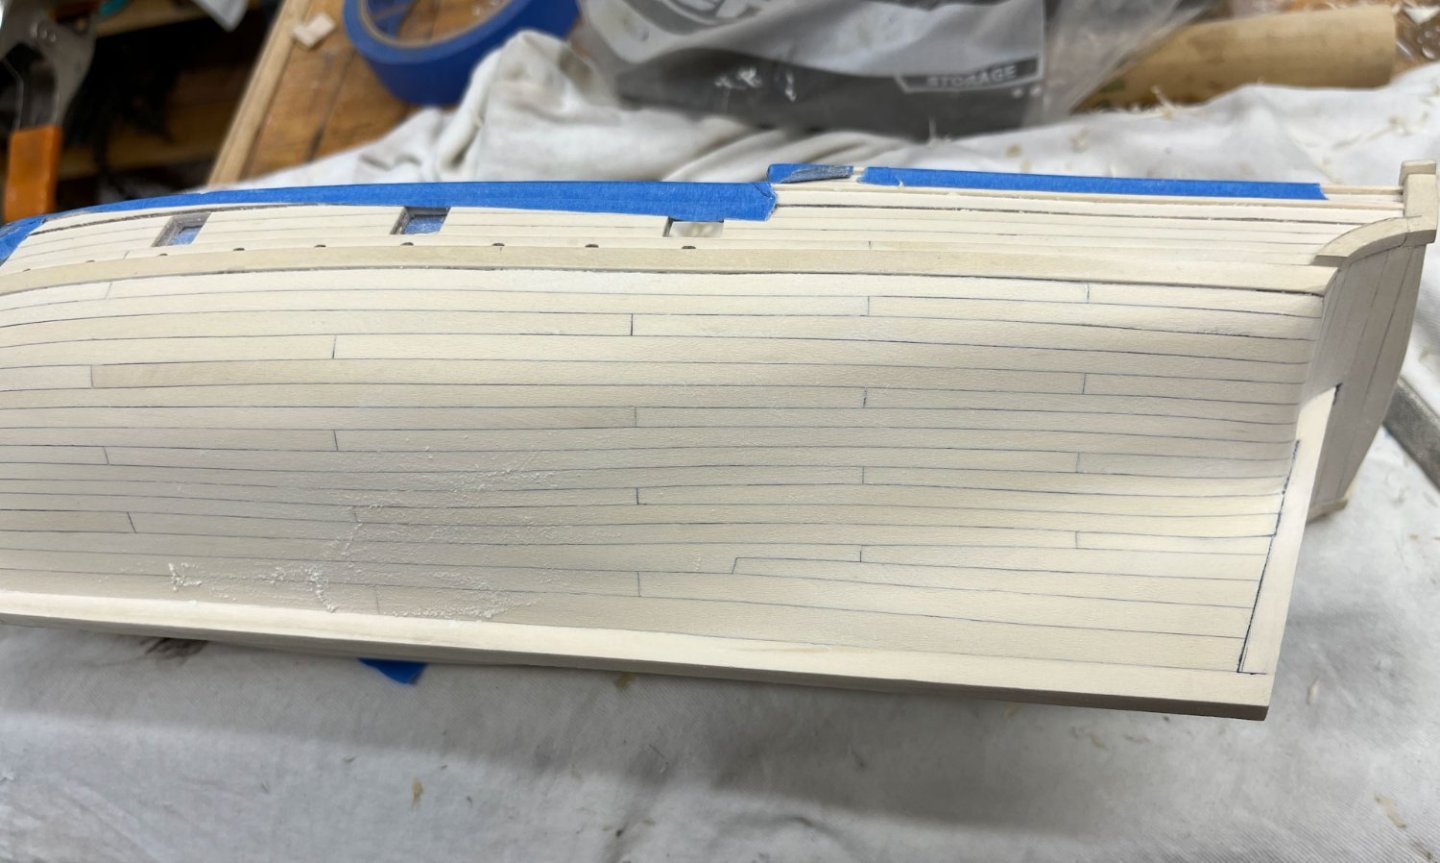
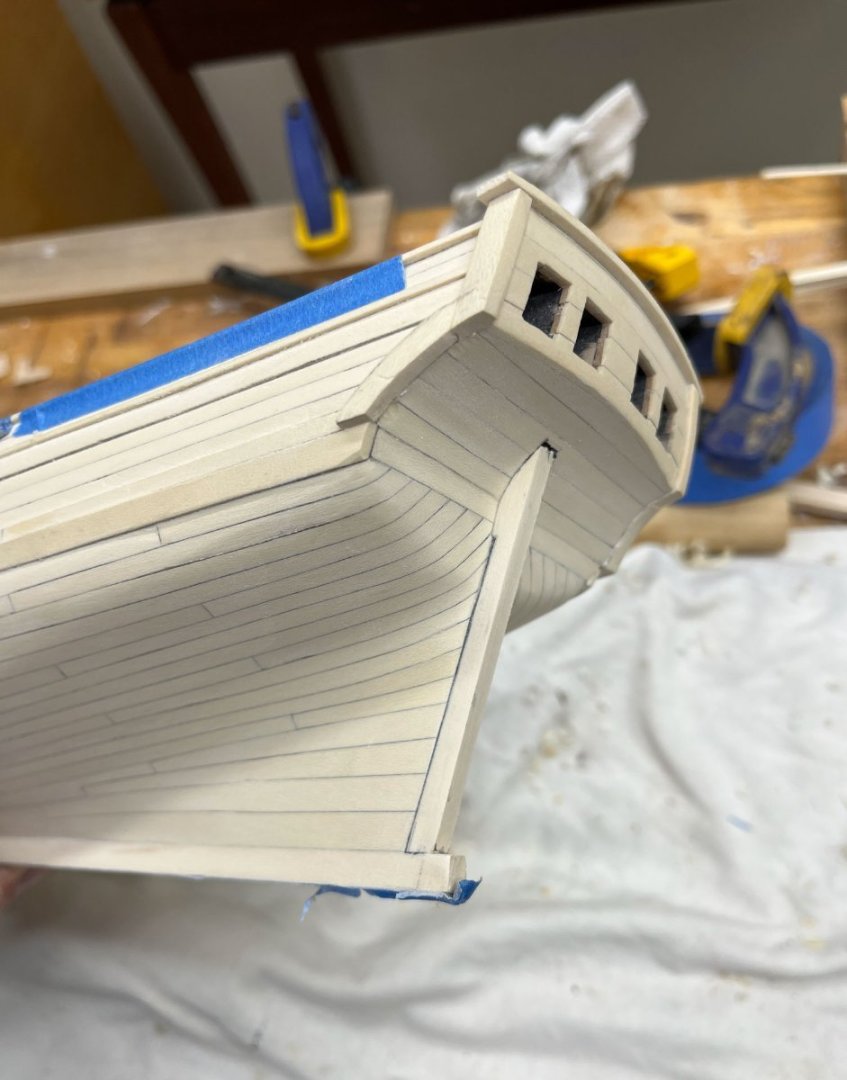
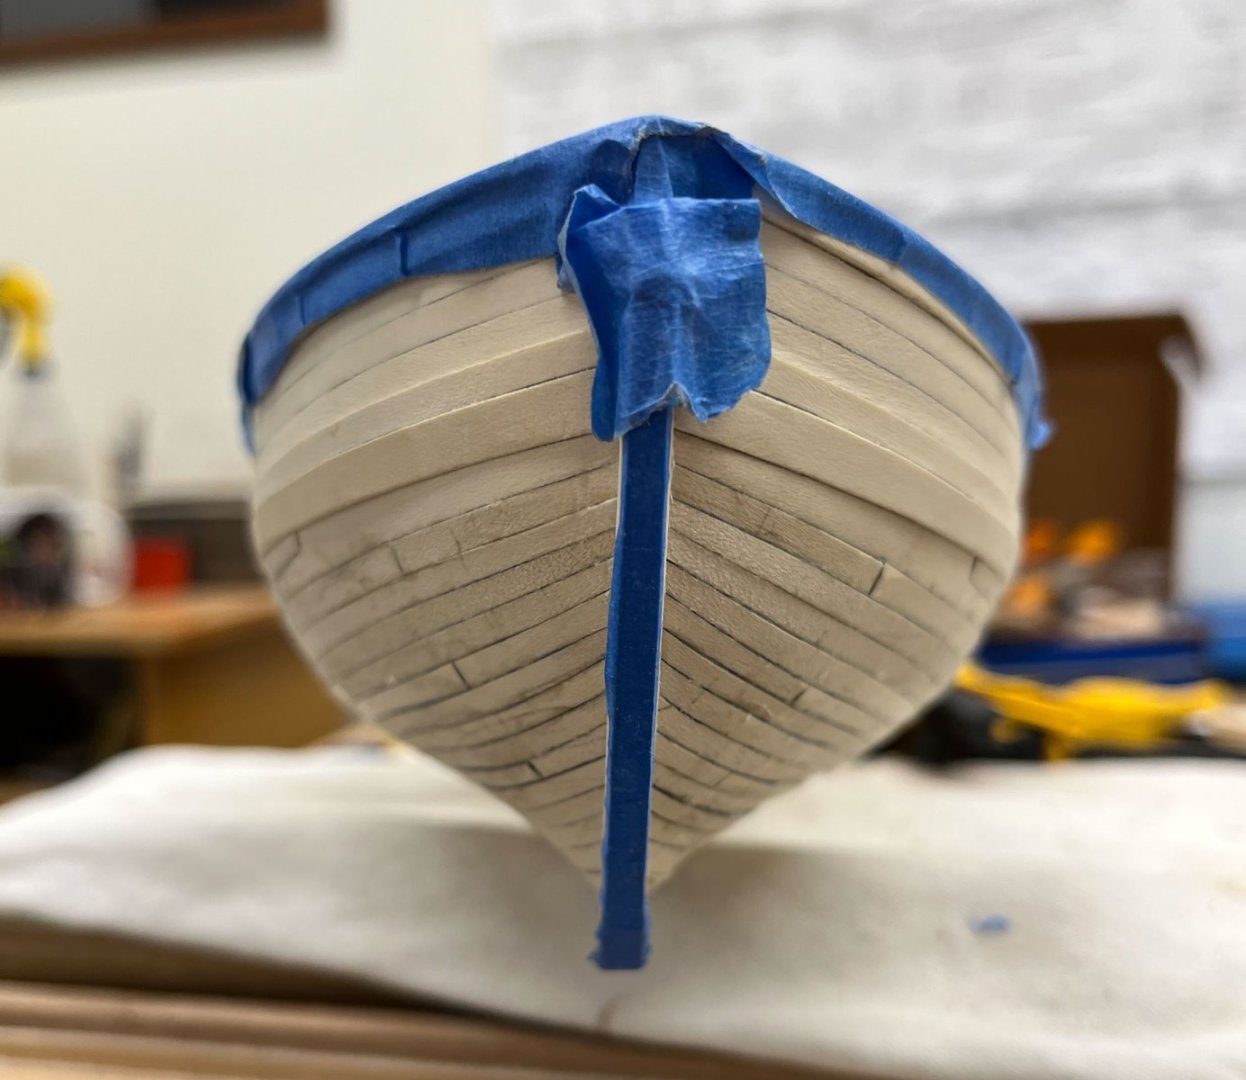
Thank you guys for all the likes and good feedback! Gregory the wood is Holly. My aim is to make a white "bone-like" ship. As Aliluke says. But in my rush to move on to the next step, finally, I flew too high and messed up. I was sanding juuuuust a little more... and sanded through the stern planking. Its the dark smudge midway up the stern planking right where it inserts onto the sternpost. I couldn't leave it this way so I attempted some fixes. First, I tried painting it. Holly is white, so maybe I could hide it with white/yellow paint. Here I put a first layer of primer on and it looked awful. I also worried that even if I could get a good match the holly would yellow over time and make the paint more obvious. My buddy Jason (JLong) who was over last weekend wondered about a covering patch made of white glue and holly sawdust, but based on how bad the paint looked I didn't think this would work either. Next I tried cutting a semi-circular patch with one of my chisels. I couldn't get a tight fit and gave that up too. Then I tried a butt-joint repair on a scrap of holly. Thats the slightly "V" shaped piece of wood above the semicircular patch above. I found a butt joint was still visible but a mitered butt joint became almost invisible (below). So maybe a save. I cut out the sanded-through section. Notice this forms a wedge/trapezoid shape, not a nice rectangle. You can't easily tell but the top portion and to a lesser extent the bottom of the trapezoid piece is curved, not straight. I made my patch but couldn't get a tight it on all 4 sides. Make one side fit and it changed the other 3 sides. I especially couldn't form a tight butt/miter so the patch stood out. Which is exactly what I didn't want. So. Nothing for it but tear out the entire plank. The plank above it was also pretty thin, and I figured I'd sand through it while leveling the replacement plank, so it went too. Above pic I had removed the 2 old planks and roughly shaped the replacements. These were slowly sanded down until they fit as best I was able. Then I glued first the top plank, then after it dried final fitted the lower plank and glued it in. Here they are after the clamps came off. The blue tape is to minimize glue squeezeout. And here they are after sanding. I need to make the repaired sternpost/plank junction a slight amount wider so it matches better, but otherwise I call that good enough. So a long entry to get exactly back to where I started have a great Week between Christmas and New Years. Don't oversand like I did Cisco


-
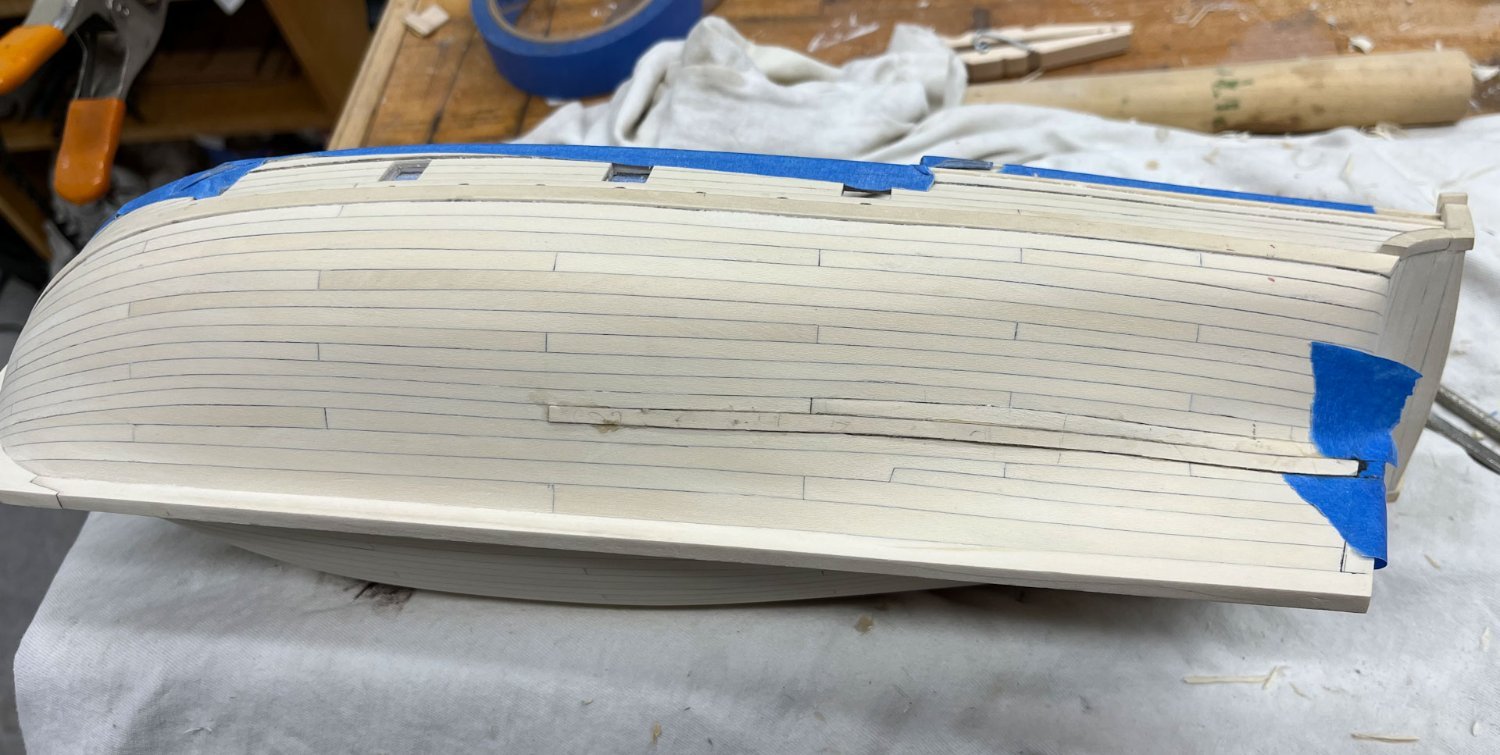
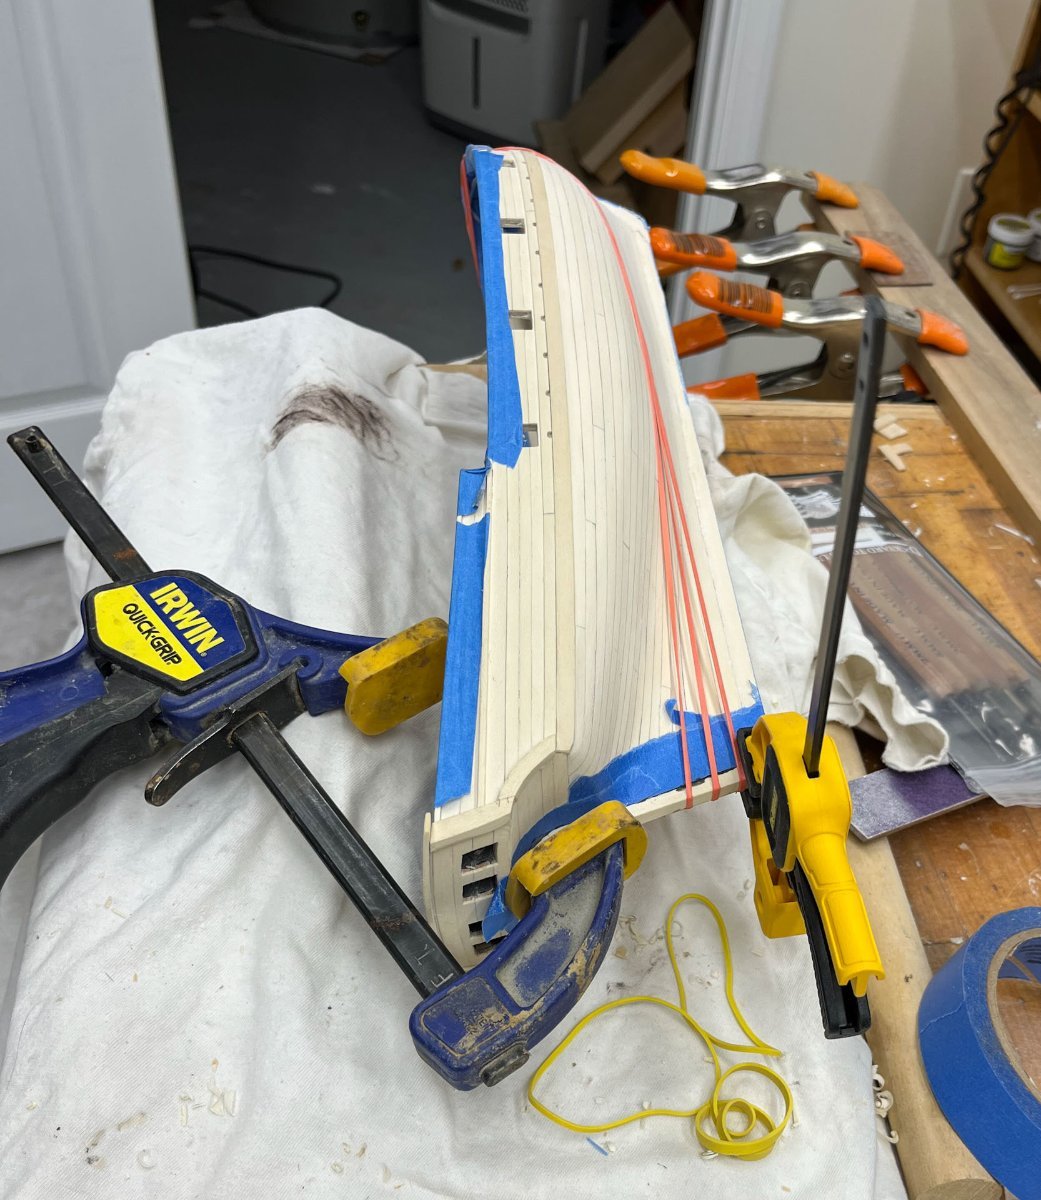
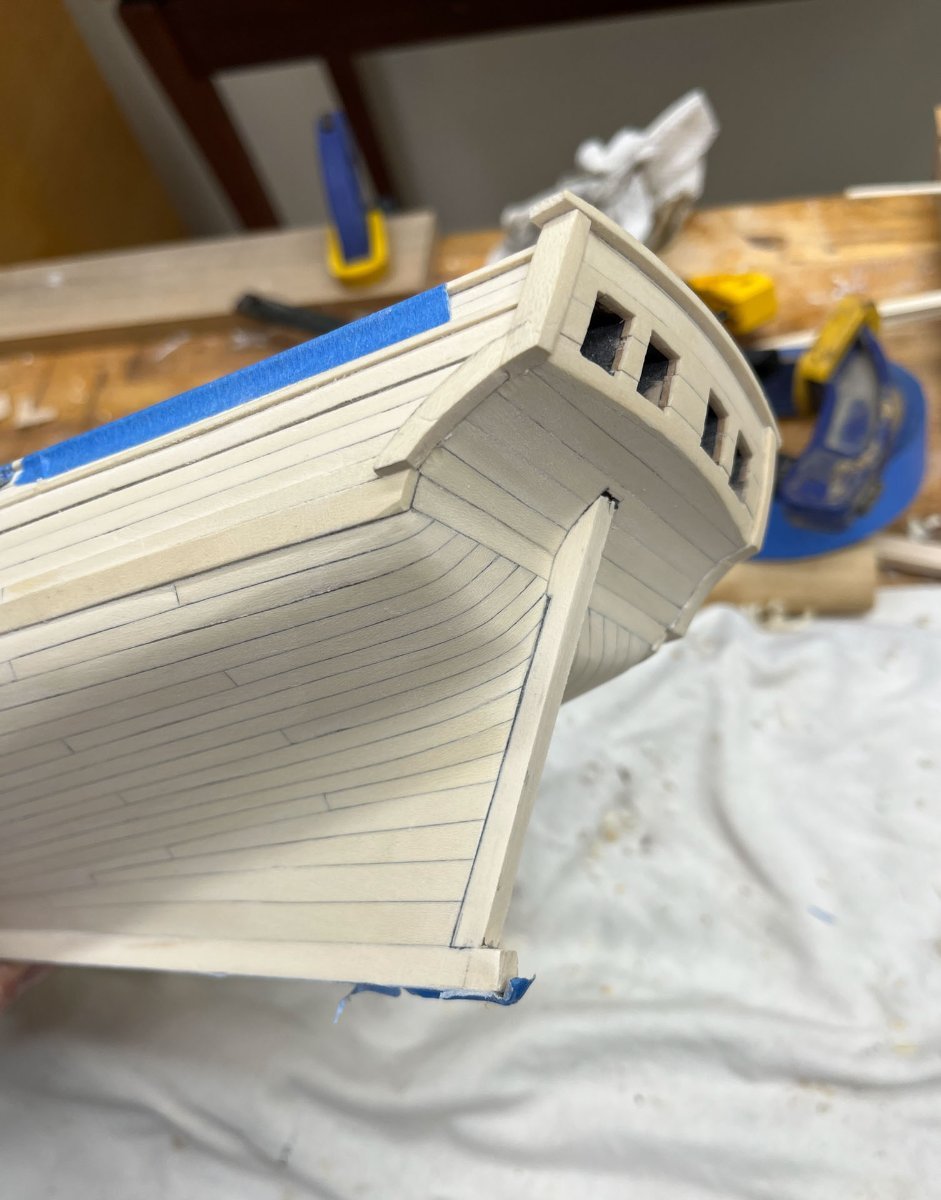
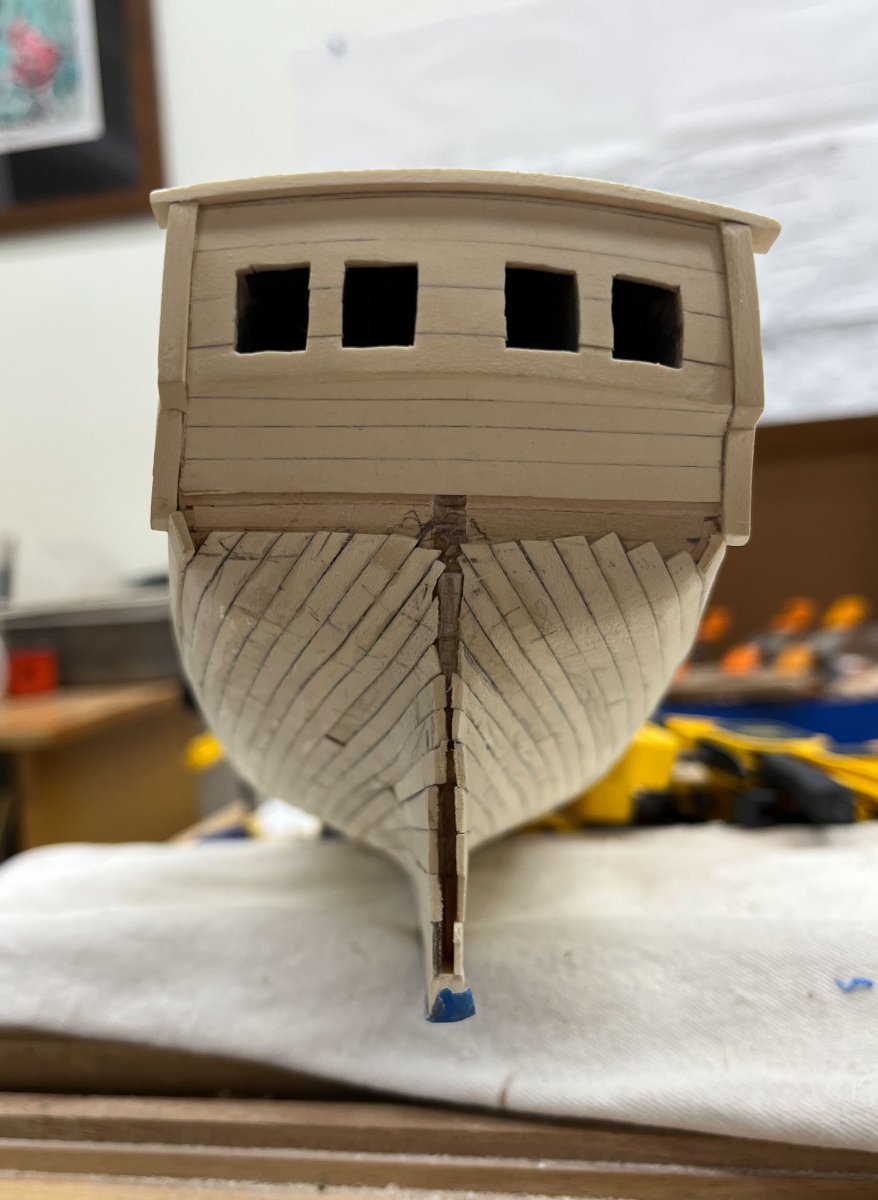
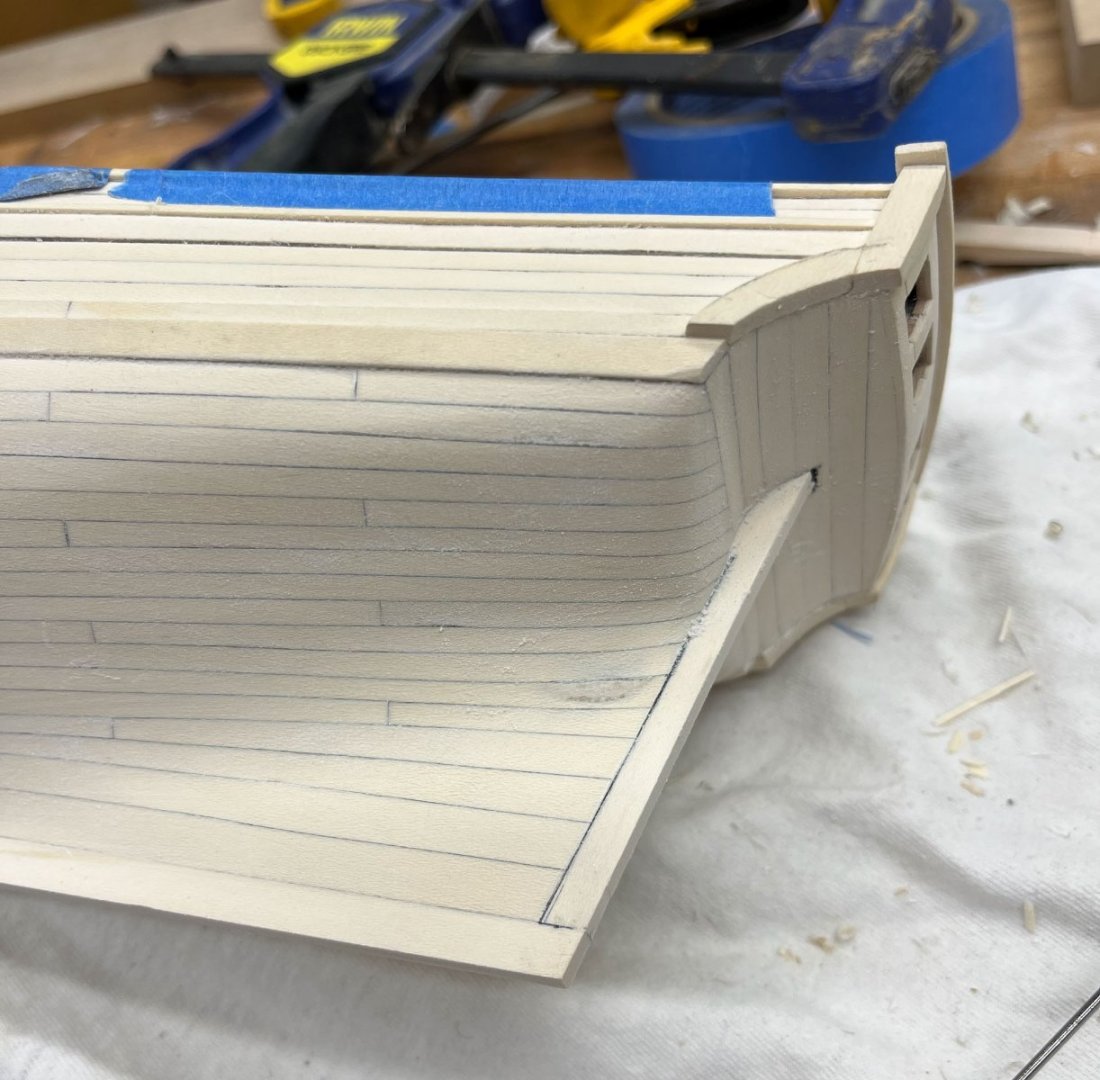
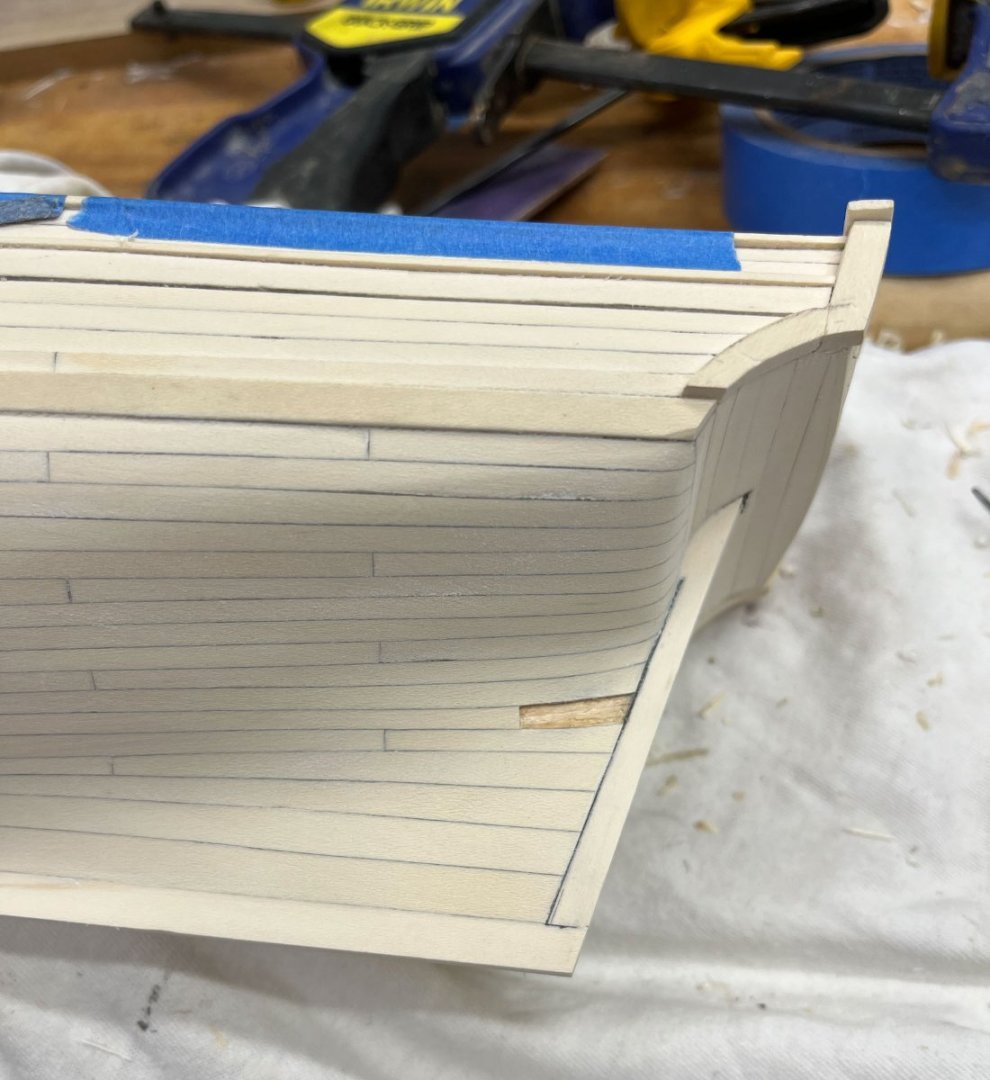
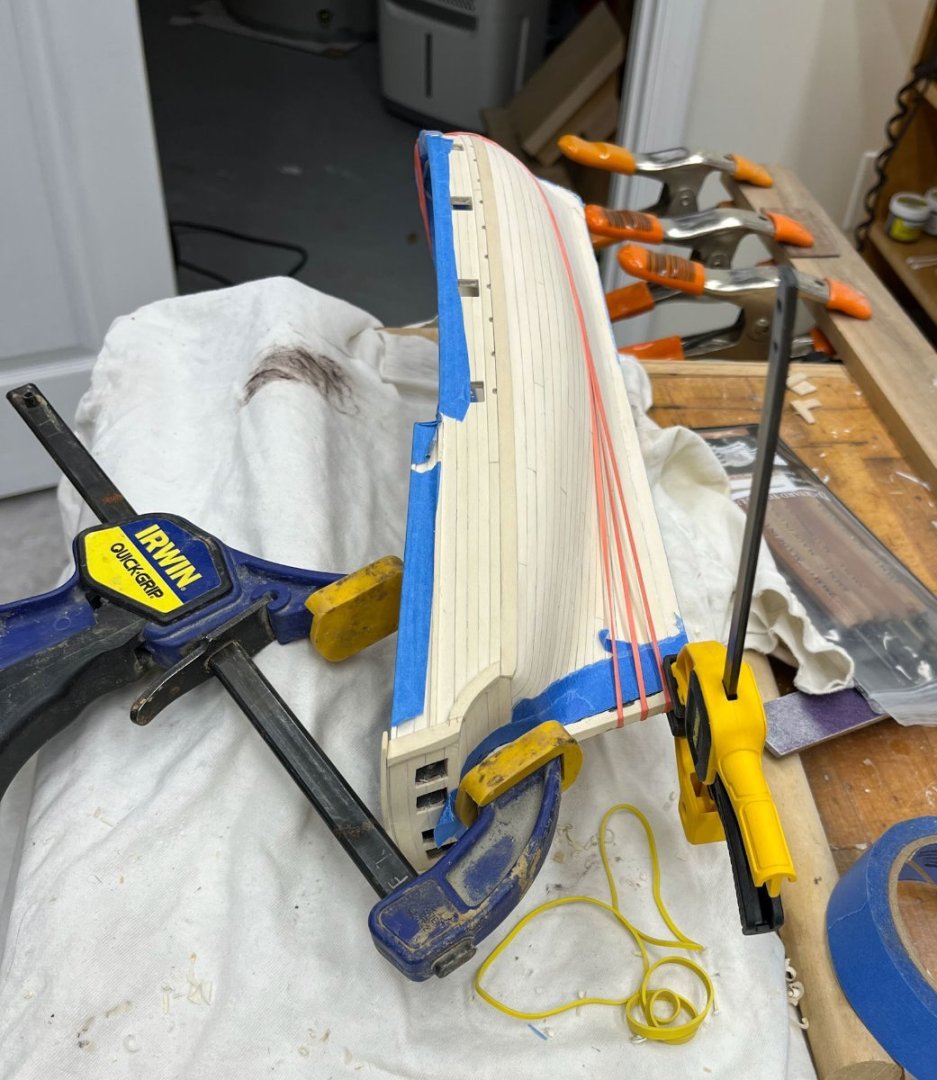
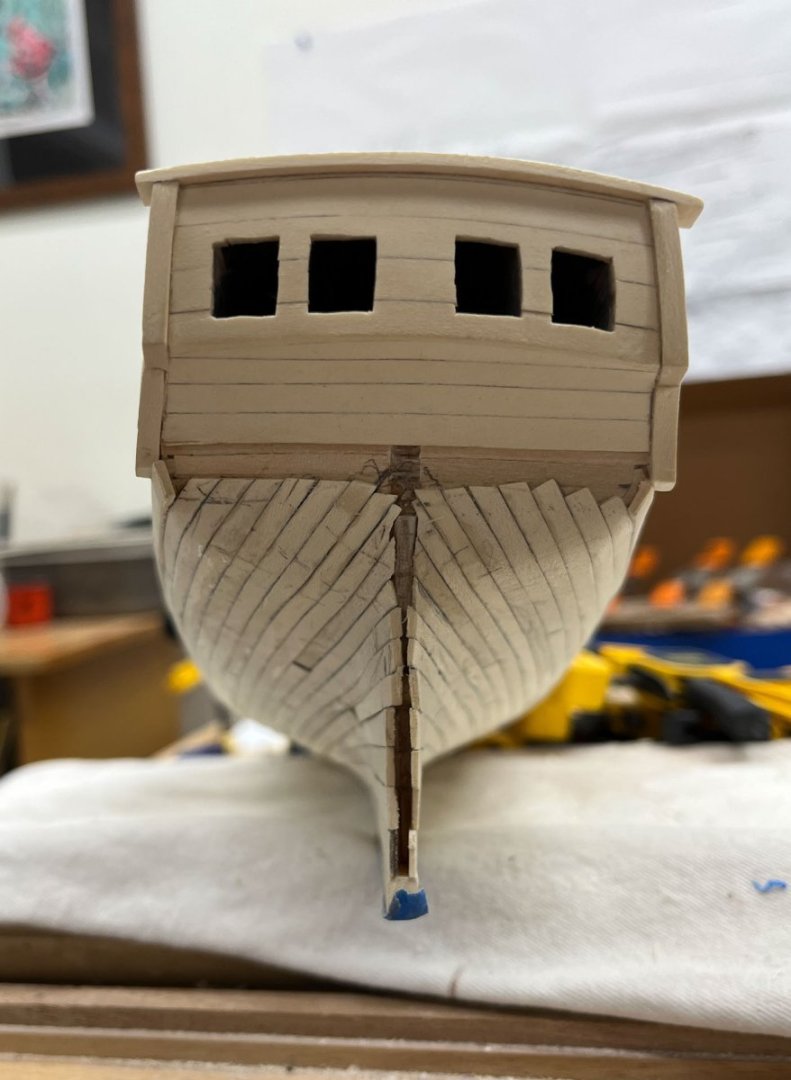
Good Sunday morning The last week was spent working on the stern planking - counter transition. High stress! I only added 4 pieces of wood, 5 if you count the sternpost, but a very visible joint I wanted to get right. My goal was No Gaps and no excuses. I had run the stern planking long. Usually I find it easier to trim an overlong group of planks back to a common line, versus trying to get each separate plank to end perfectly. I scribed the line with a compass, freehand cut along this line with a scalpel, and then trimmed to the scalpel cut with one of the Lee Valley chisels. If you look at the bottom of the left counter plank you can see a split that ended up falling off. This made the space underneath it into a trapezoid- wider at one end. I figured it wouldn't be noticeable and filled the space with planks the same width. After sanding the joint space where the split had been looked wide and it kept bugging me. So I decided to dig out the plank. I am usually happy when I decide to fix stuff, instead of leaving it good enuff. Except when I make it worse. This plank came out pretty easy so all good. I attempted to sand it a little straighter and put in a new plank which I feel fit better. Then I glued on the stem. There was some joint space so I used a mix of finely sanded holly dust, graphite from the pencil I use to simulate joints, and yellow glue. It filled the gaps well. I blue taped around the stem which worked well to minimize squeezeout. At this point there is a lot less wood remaining to sand out mistakes. And here is the result. It needs some more 220 sanding but overall I'm happy. And a side shot highlighting the sternpost/planking junction. The holly dust/graphite/glue filled the gaps and made them look even. Next up is final 220 sanding and a few coats of water based polyurethane. I think the rudder follows but I haven't read the next chapter yet. If I don't post before then, Merry Christmas to those of you celebrate it cisco


-
Brig Le FAVORI 1806 by KORTES - 1:55
CiscoH replied to KORTES's topic in - Build logs for subjects built 1801 - 1850
beautiful! -
thats a Great video; thank you for posting the link
-
I use a hairdryer to twist planks and it so far works well. Another upside is the heat dries the plank and if anything shrinks it. I also have used hot water (heat a glass of water in the microwave until its hot to the touch and then just leave the plank in the water for 10 min). You have to clamp the plank in place and leave it overnight to dry. i always worry if it hasn’t fully dried it may shrink and open gaps in the future. But i’m working with holly which is very forgiving. regardless thats a nice planking job you did cisco
-
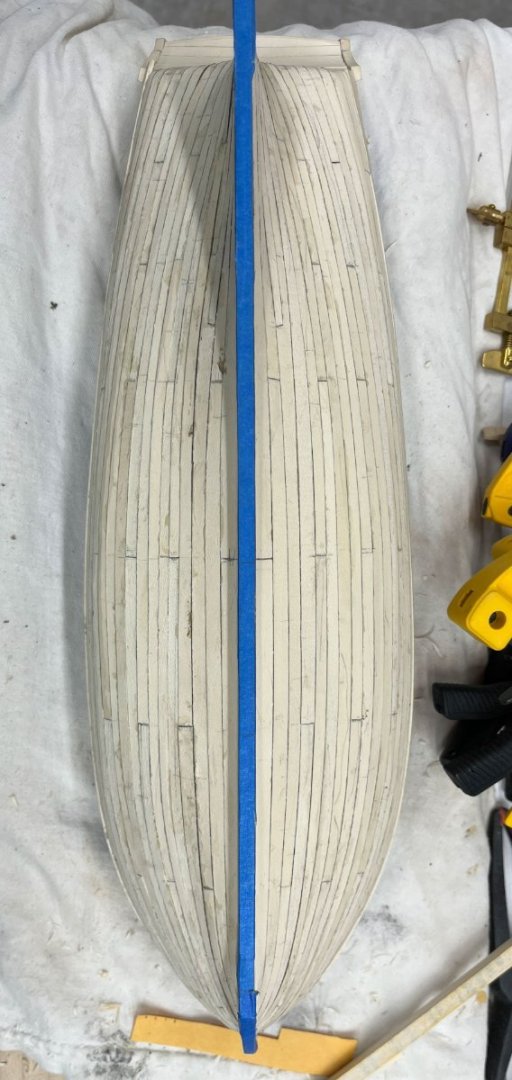
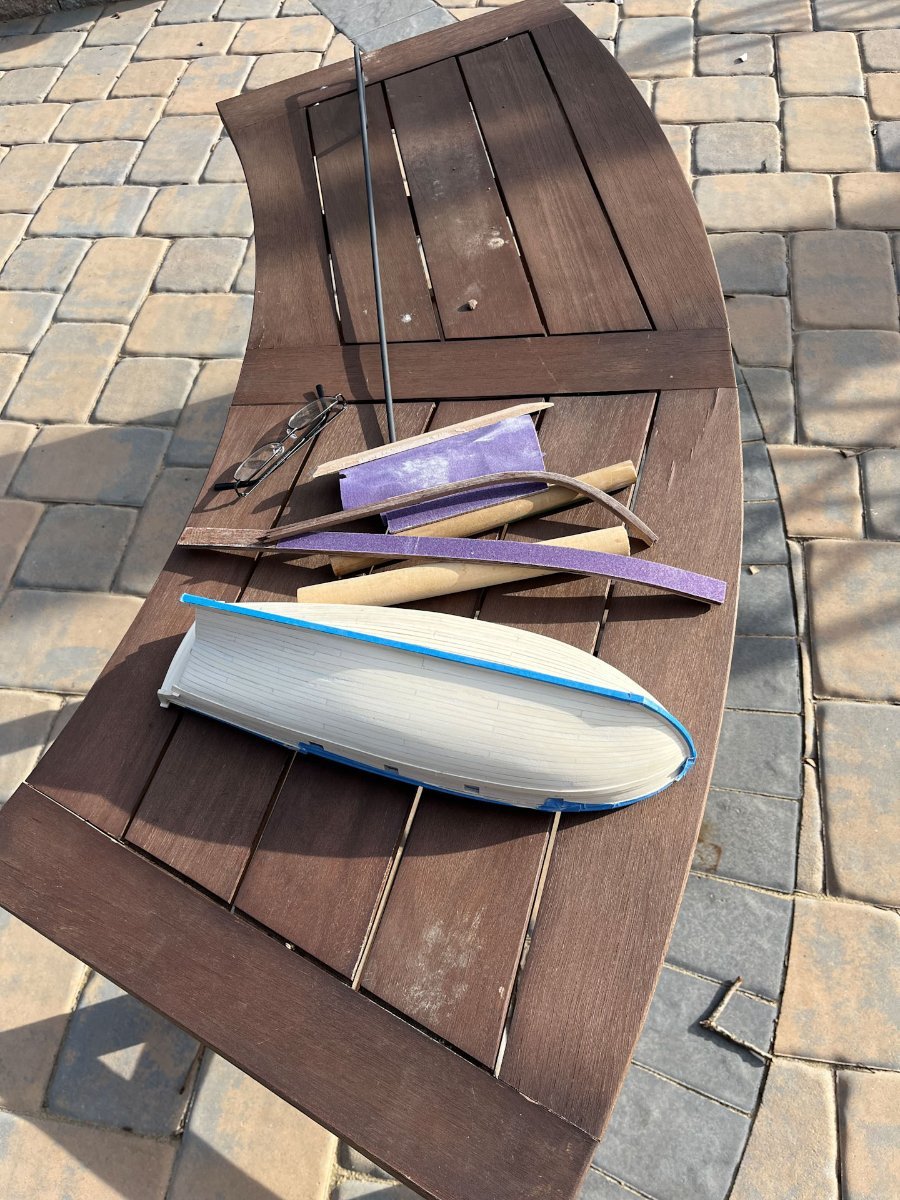
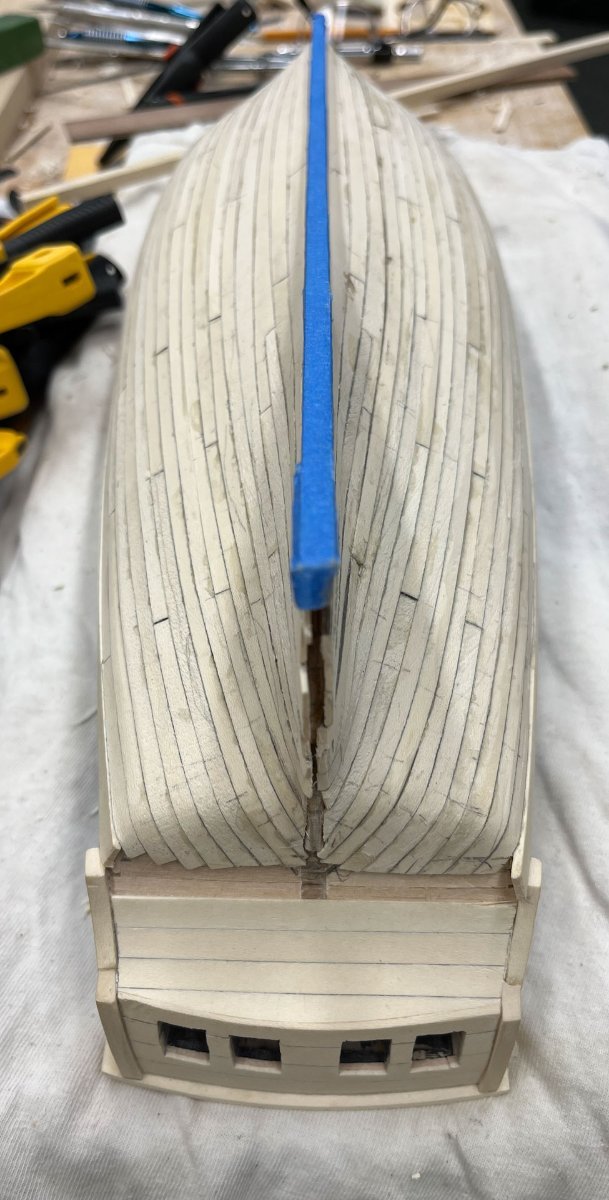
Good Thursday evening folks Thank you Dan and Chuck for the encouragement To celebrate the end of planking I decided to clean up my bench and sharpen everything pointy. Always feels good to organize. And now sanding the hull. I started in the basement workshop with all my various odd shaped sanding sticks and dowels. All the unequal thickness planking I had installed came back to haunt me; 220 grit was going to take months. And after a few minutes, unsurprisingly, I was generating way too much dust to stay indoors. This is what I started with: I changed my sandpapers to 100 grit and went outside. Way better as the breeze took the dust downwind and raking sunlight made it much easier to see progress. Here I am almost finished with 100 grit port side. And here is where I am now; both sides mostly finished to 100 grit. I have been trying to smooth out any waviness so further grits are getting rid of coarse scratches only and not shaping. The sun washes out contrast but it looks a darn sight better than where I started. And now more sanding. And after that even more. Have a great evening all cisco


-
your “heart to stem” connection is very realistic something to strive for great job
- 562 replies
-
- 2
-

-
-
- vanguard models
- alert
- (and 2 more)
-
The sample chapter looked to be up to Grant and Seawatch's usual high standards; lots of close-ups and detail. Will be worth the wait I think
-
Peter- how did you transfer transfer your points from 1:75 -> 1:50? Did you just eyeball where each line crossed a grid? or maybe use a measuring device like an architectural ruler? thanks cisco
-
i am hoping to make some of my ship’s furniture from either bone or possibly Elforyn so i am following closely. thank you for posting
-
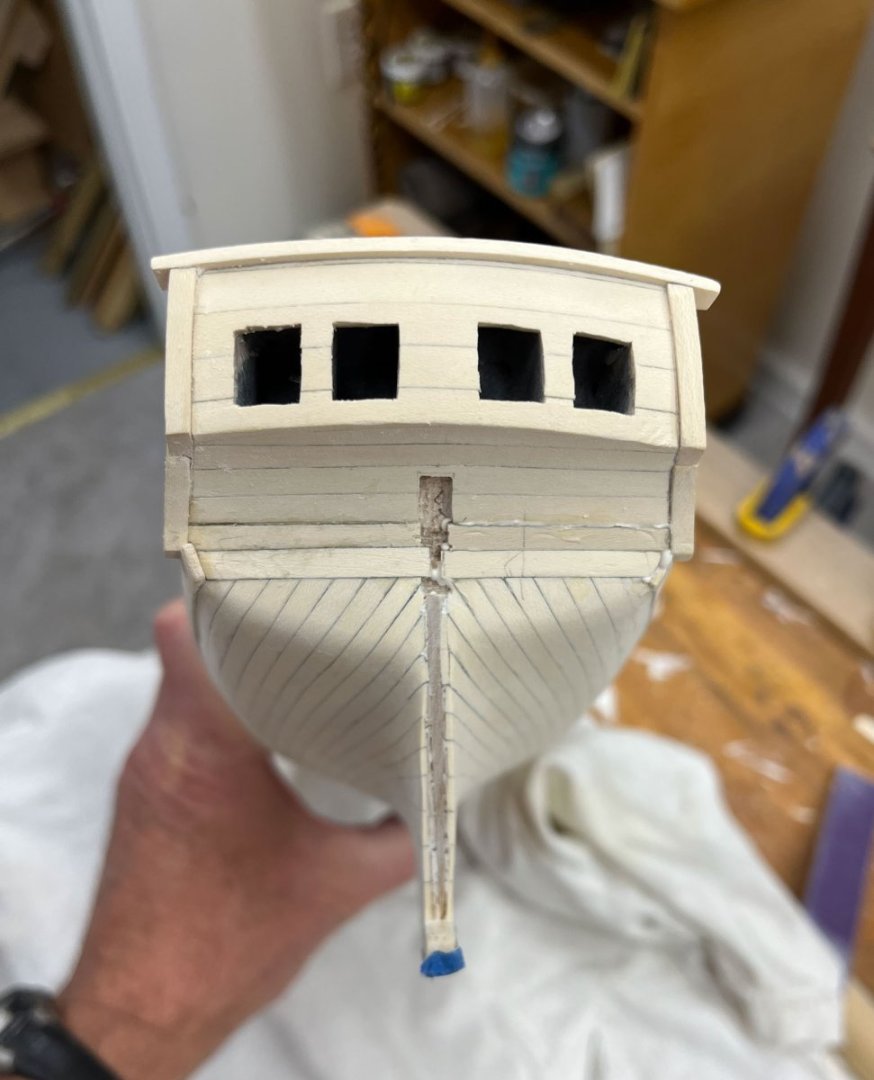
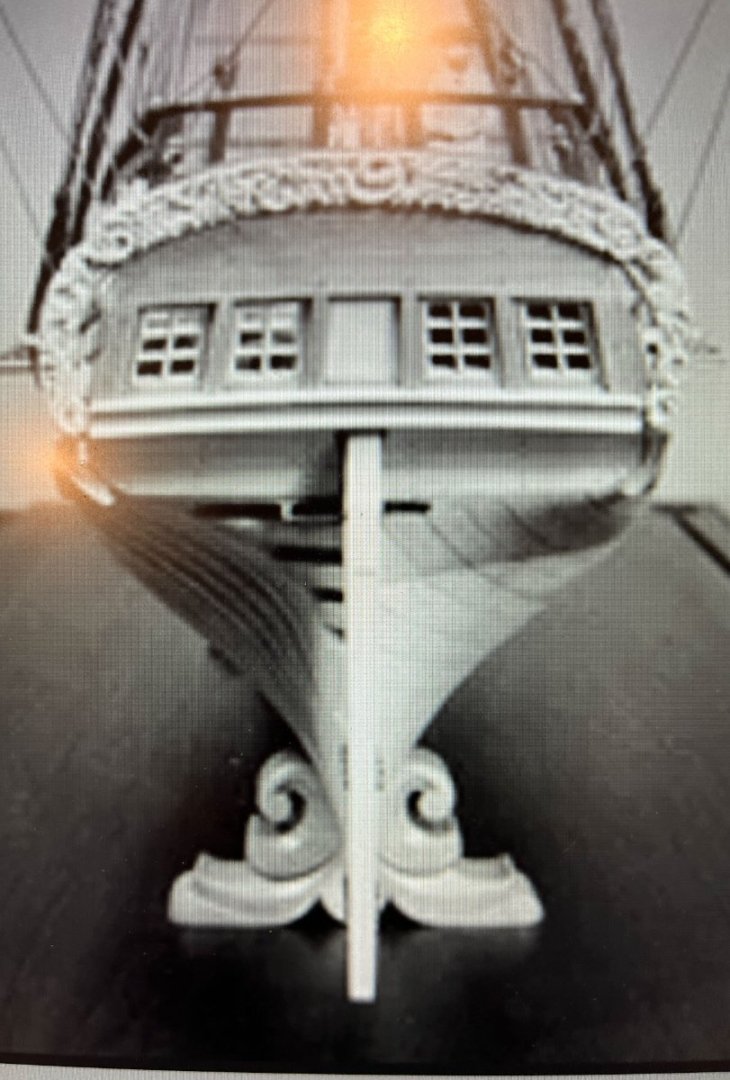
Here's another part of my previous post that wouldn't go through. It seems to be letting me post it in smaller bits so I apologize for the out-of-order chronology. Dan- I was aiming for symmetry so both side's butt joints matched, while following Chuck's Cheerful exterior planking plan. Someday I'll try to free wheel an exterior planking plan, but not on this model. I have the Dodds and Moore book, an amazing read, but not the Michael Ruhlman. One thing I don't ever skimp on is ordering more books, so thank you I'll get it. Aliluke- thanks for the enthusiasm. If i can get my AVS half as clean as yours I'll be happy. Here's the stem at present: and the stern: On the horizon is mounting and basing. I have spent a lot of time thinking about what would look best. I have always liked the carved dolphins that were used as bases a lot but felt that level of detail would look unbalanced, as there isn't going to be any carving on the ship. A while ago while browsing for a future project (I'm planning on a plank on frame) a picture of Rattlesnake by Harold Hahn (I think) on The Lumberyard's website had always stood out to me, both as a beautiful model but especially for the carved cradles. Nice sweeping c - curves. Both more appropriate to a simpler model like this than the feral-looking dolphins, and more in reach of my carving skills. I'm not sure about the baseboard yet; its going to wait until I'm finished the ship proper, but I want something very traditional. I personally like the very thin bases with inlaid tops, a strong mitered border, and small turned feet. So it'll be some version of that. Thanks for reading and to those of you who celebrate it, Happy Thanksgiving. Cisco
-
Here's my finished second planking. I still have to sand a lot off but I'm pretty happy with it. This is a test post to see if I can avoid the sql error thats been fighting me posting all day.