
CiscoH
-
Posts
384 -
Joined
-
Last visited
Content Type
Profiles
Forums
Gallery
Events
Everything posted by CiscoH
-

Any update on a Byrnes successor
CiscoH replied to woodartist's topic in Modeling tools and Workshop Equipment
I just made a small grating by hand. this has convinced me i really need a good tablesaw. i’m a big proponent of Buy it Once so was hoping for a Brynes as well -
i’m missing one of them, vol 2 i think. once i confirm which one i’m in for Digital Now Book Later
-
your sails look great! the cookie-ship’s rigging has some errors
-
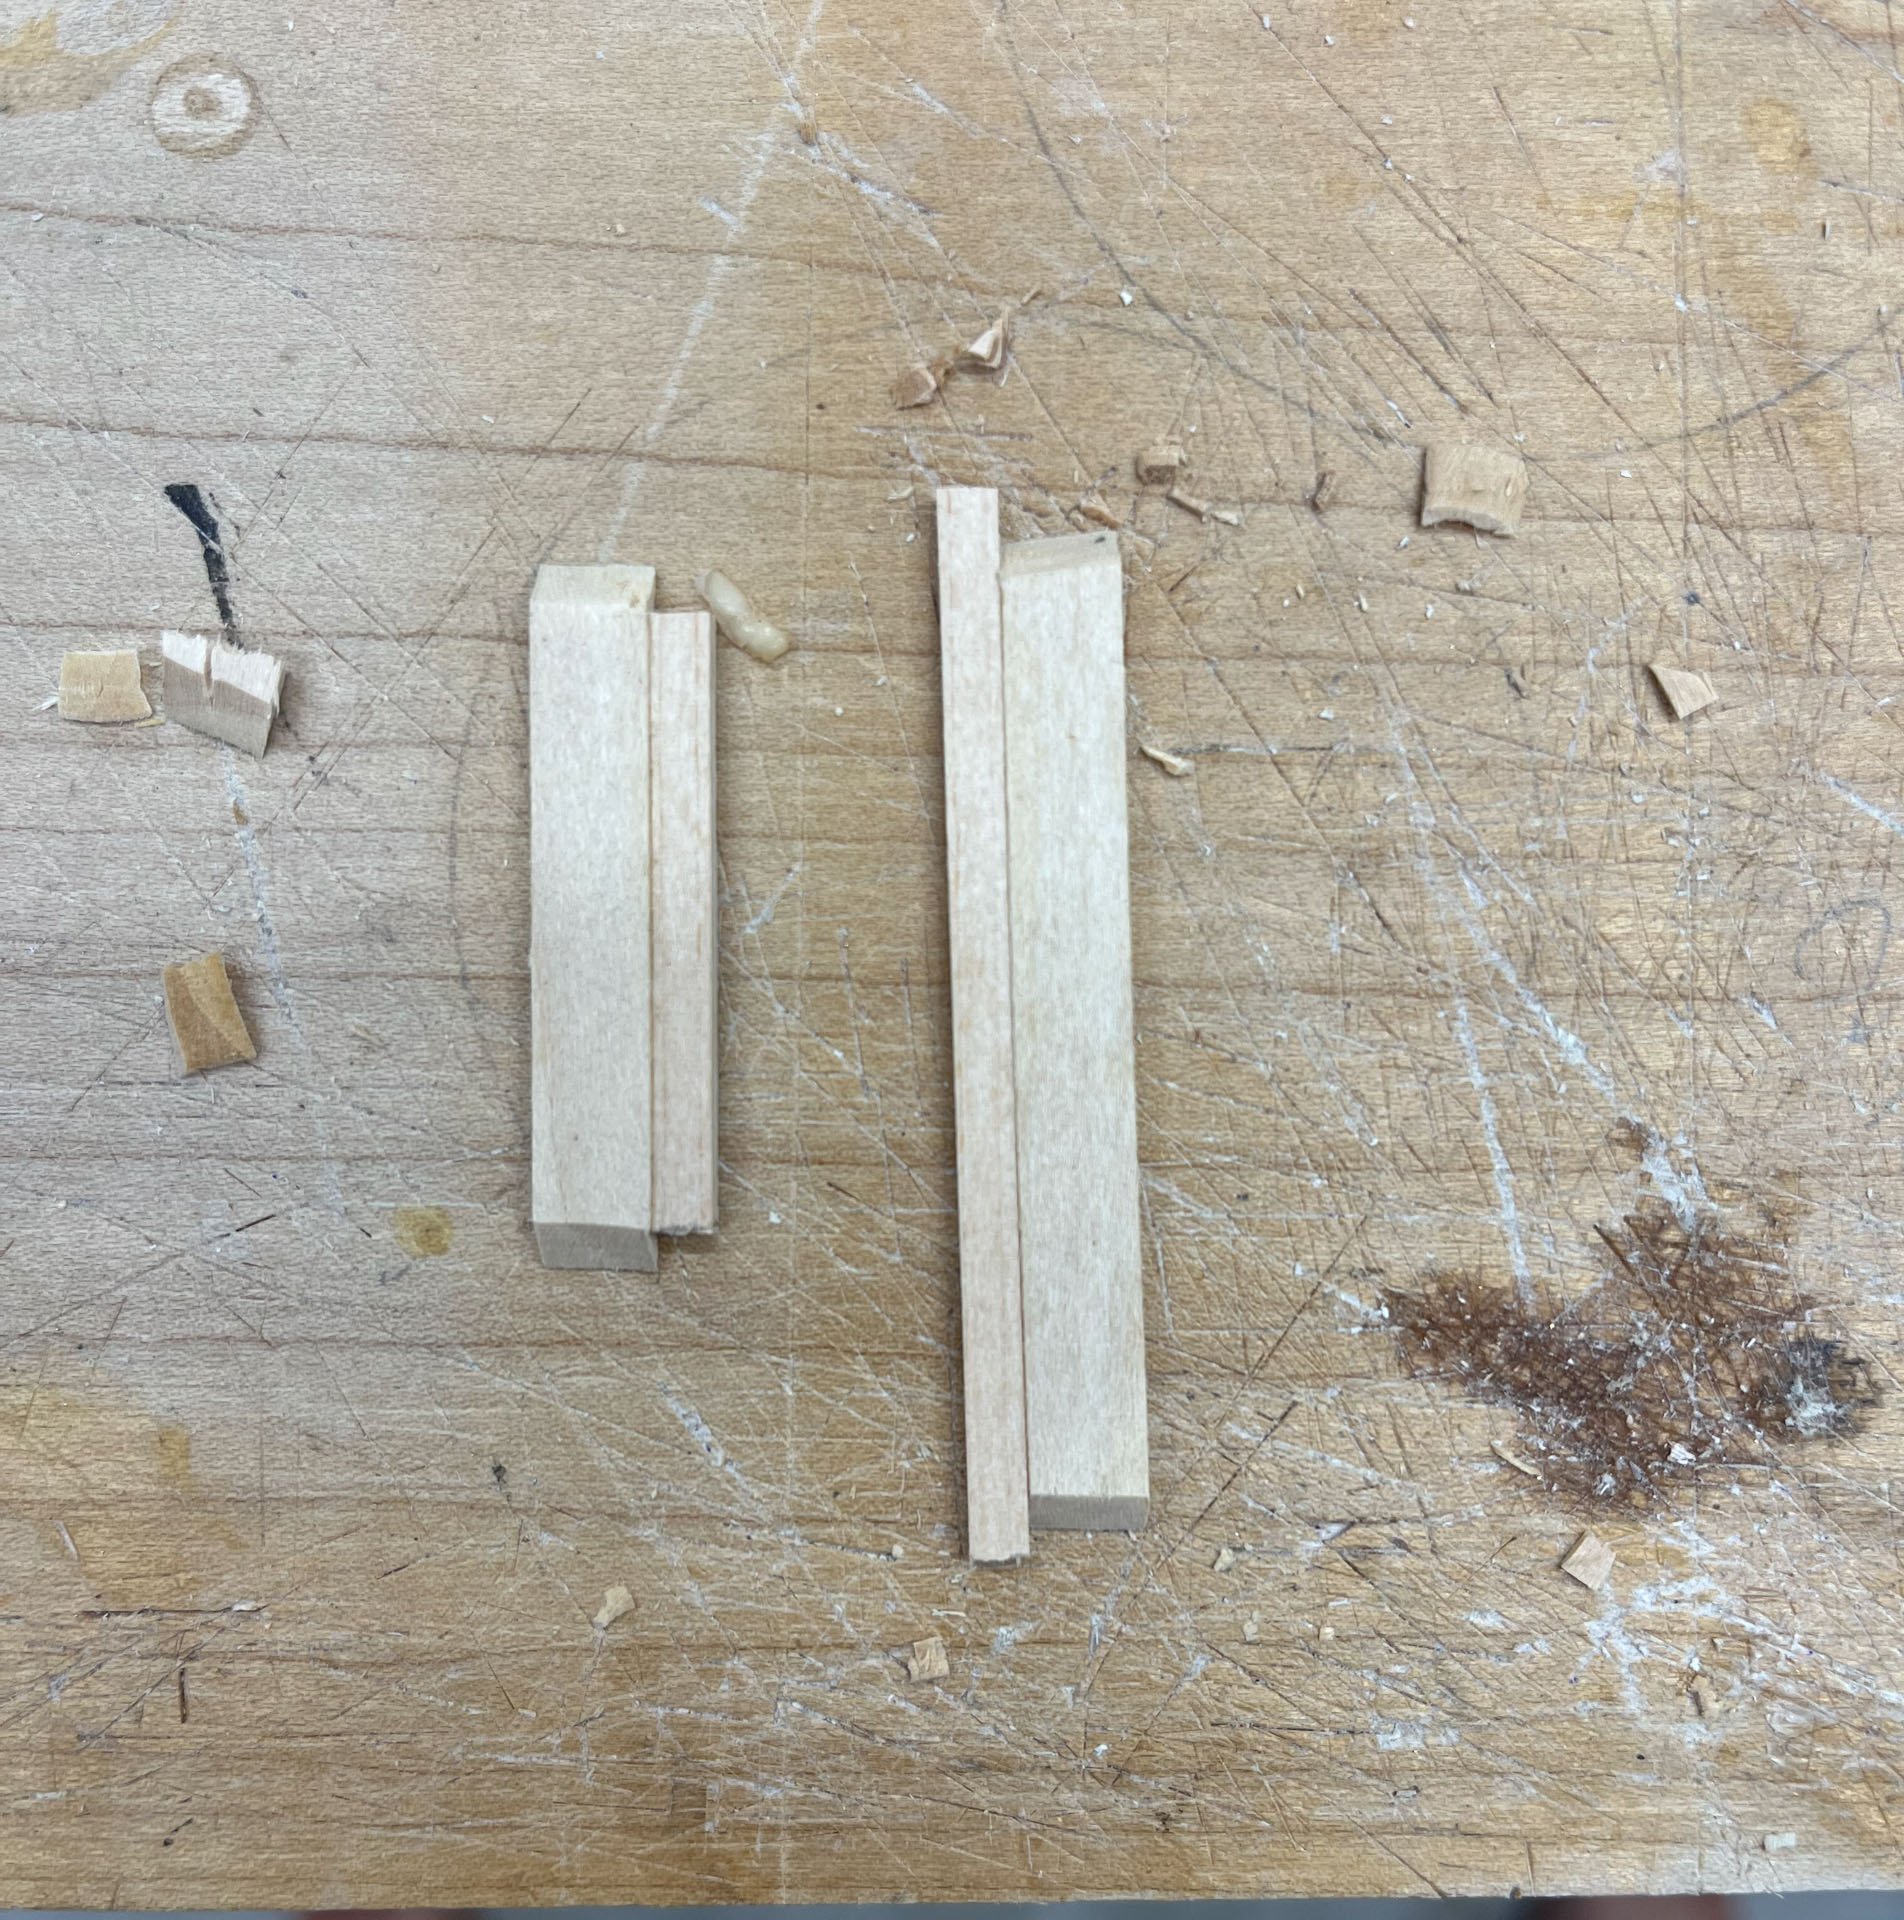
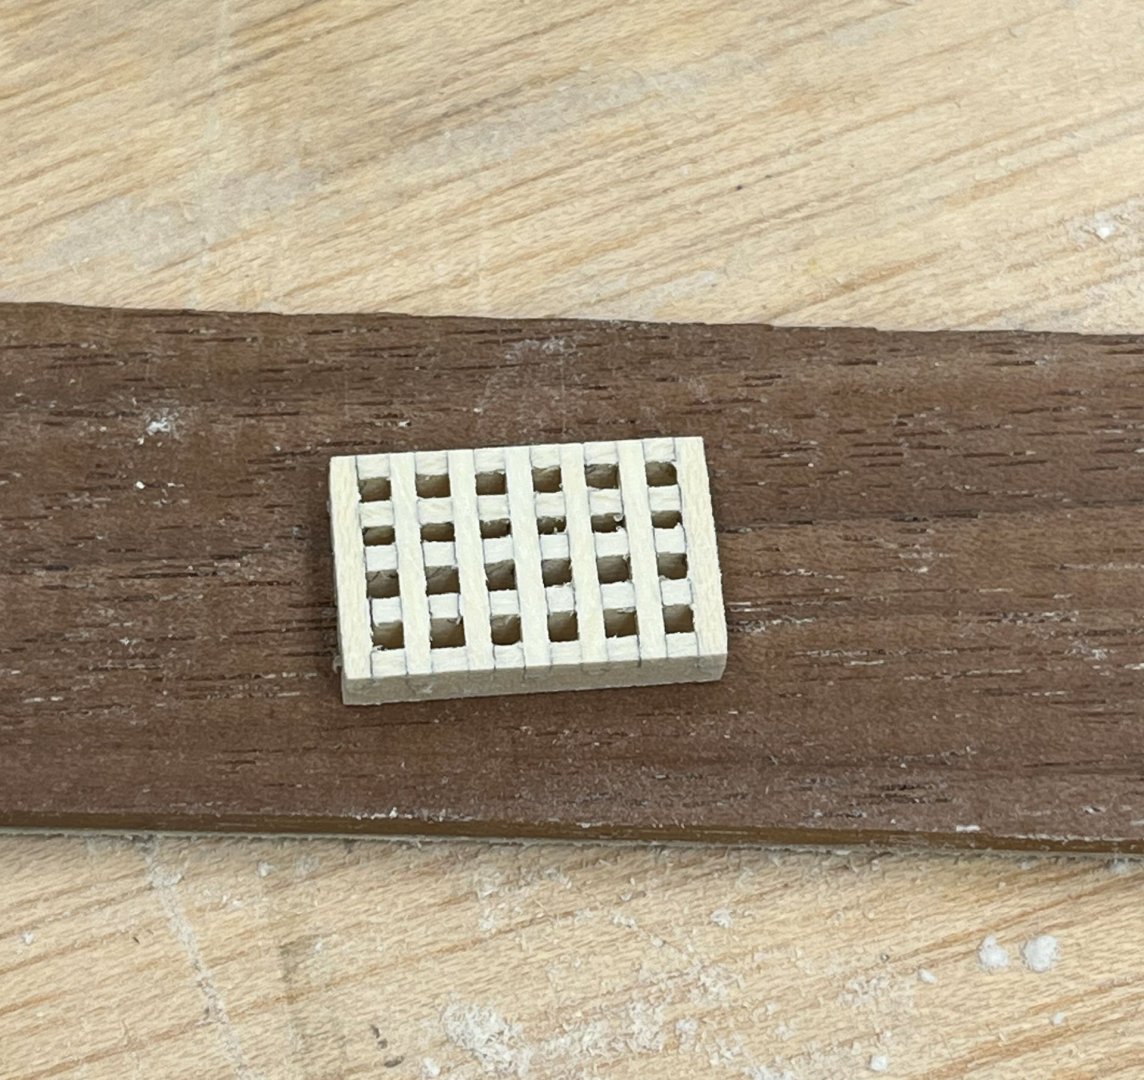
thanks Ron. I am able to truthfully report theres a good reason you don’t see anyone doing gratings by hand.
-
I wrote Moonbug but i meant Mugje or however you spelled it. Yes they are in Amsterdam gawking at scenery and annoying cyclists. i think today they are going to Brussels. thanks Thukydides. i want to figure out how to do things by hand before i get power tools. i do full scale woodworking as my other hobby and learned hand tools first and i think it was very helpful.
-
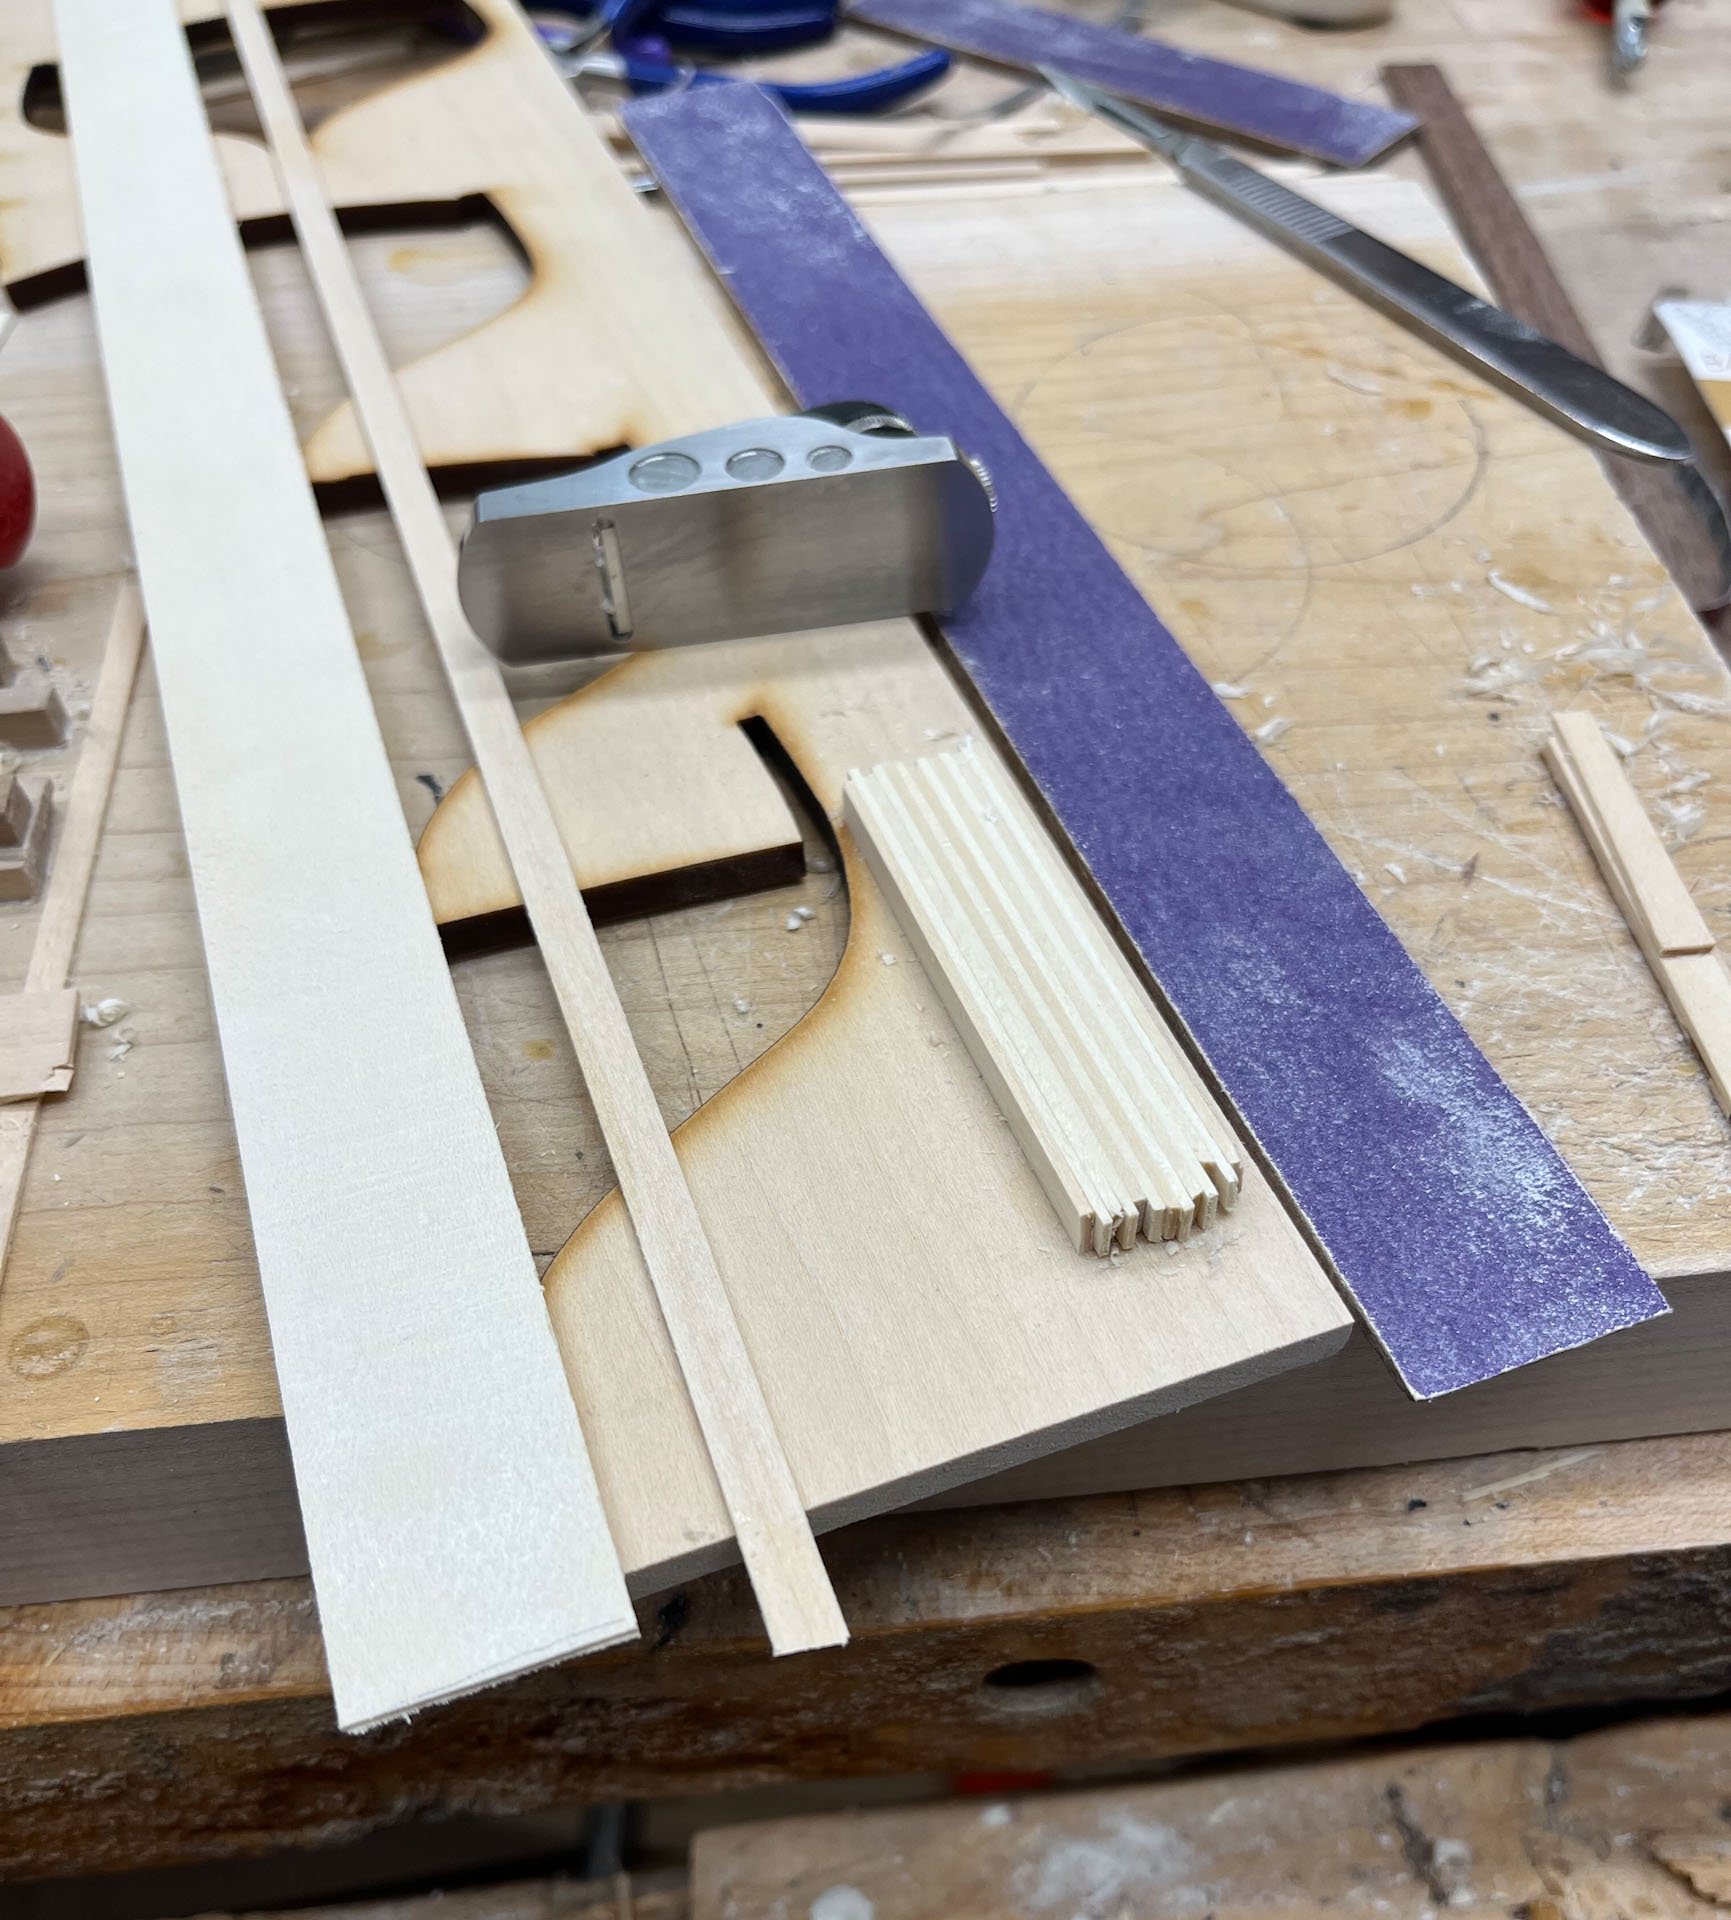
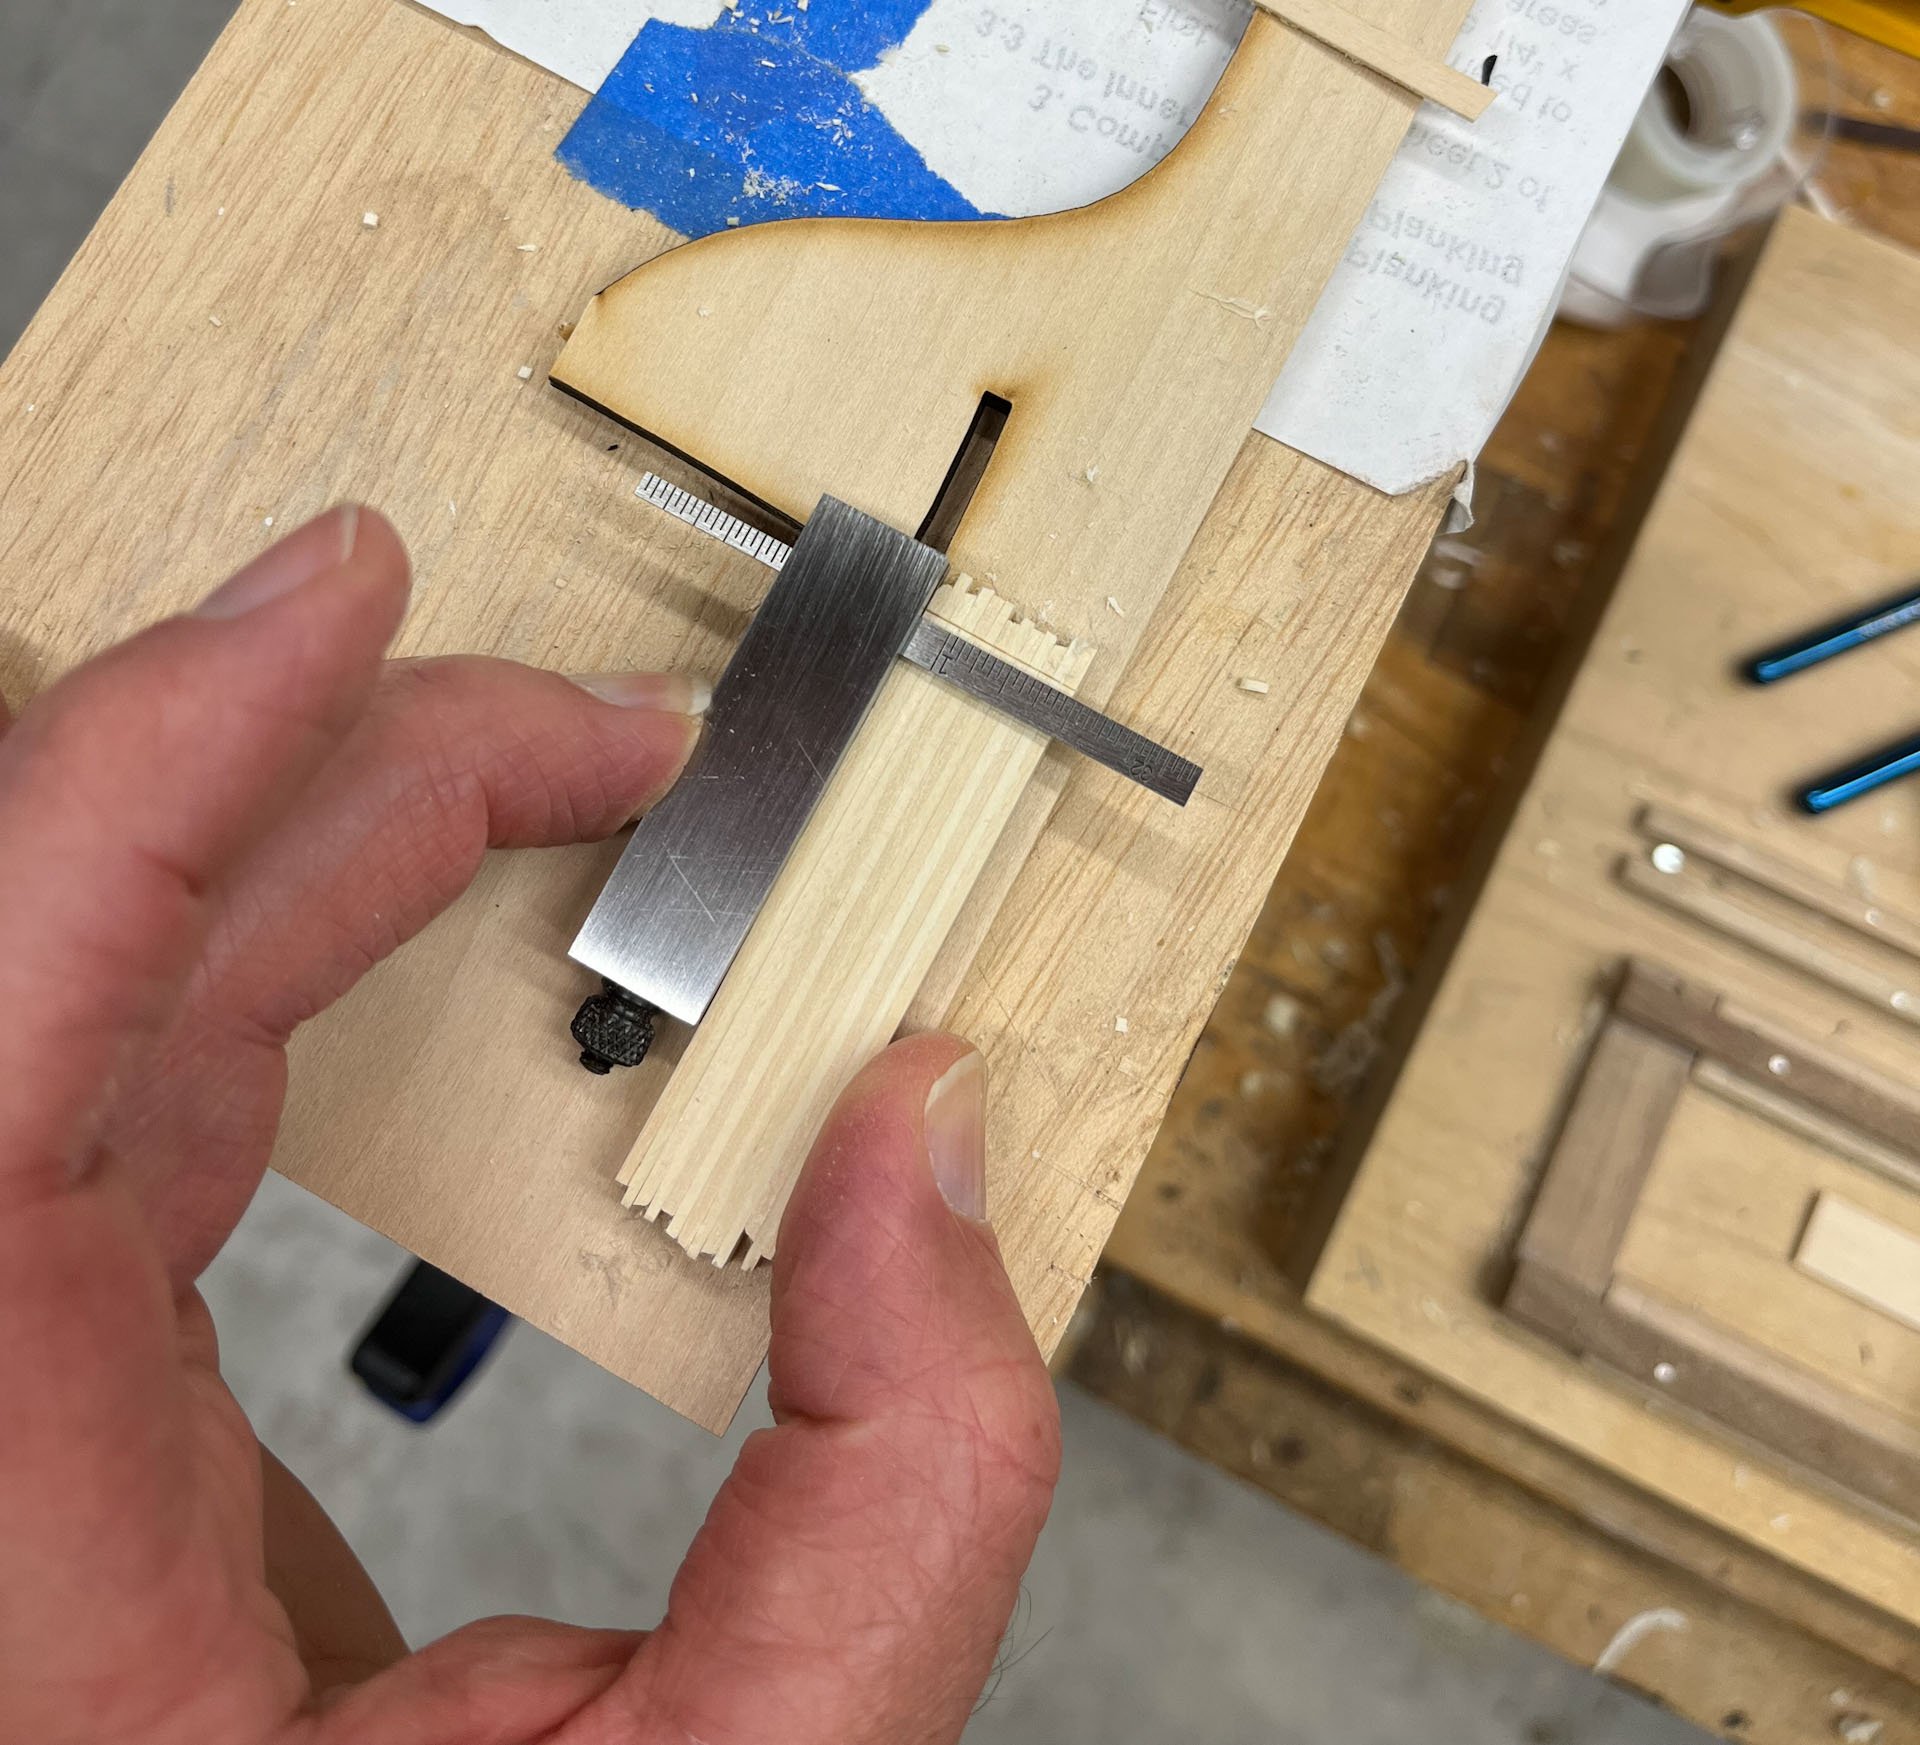
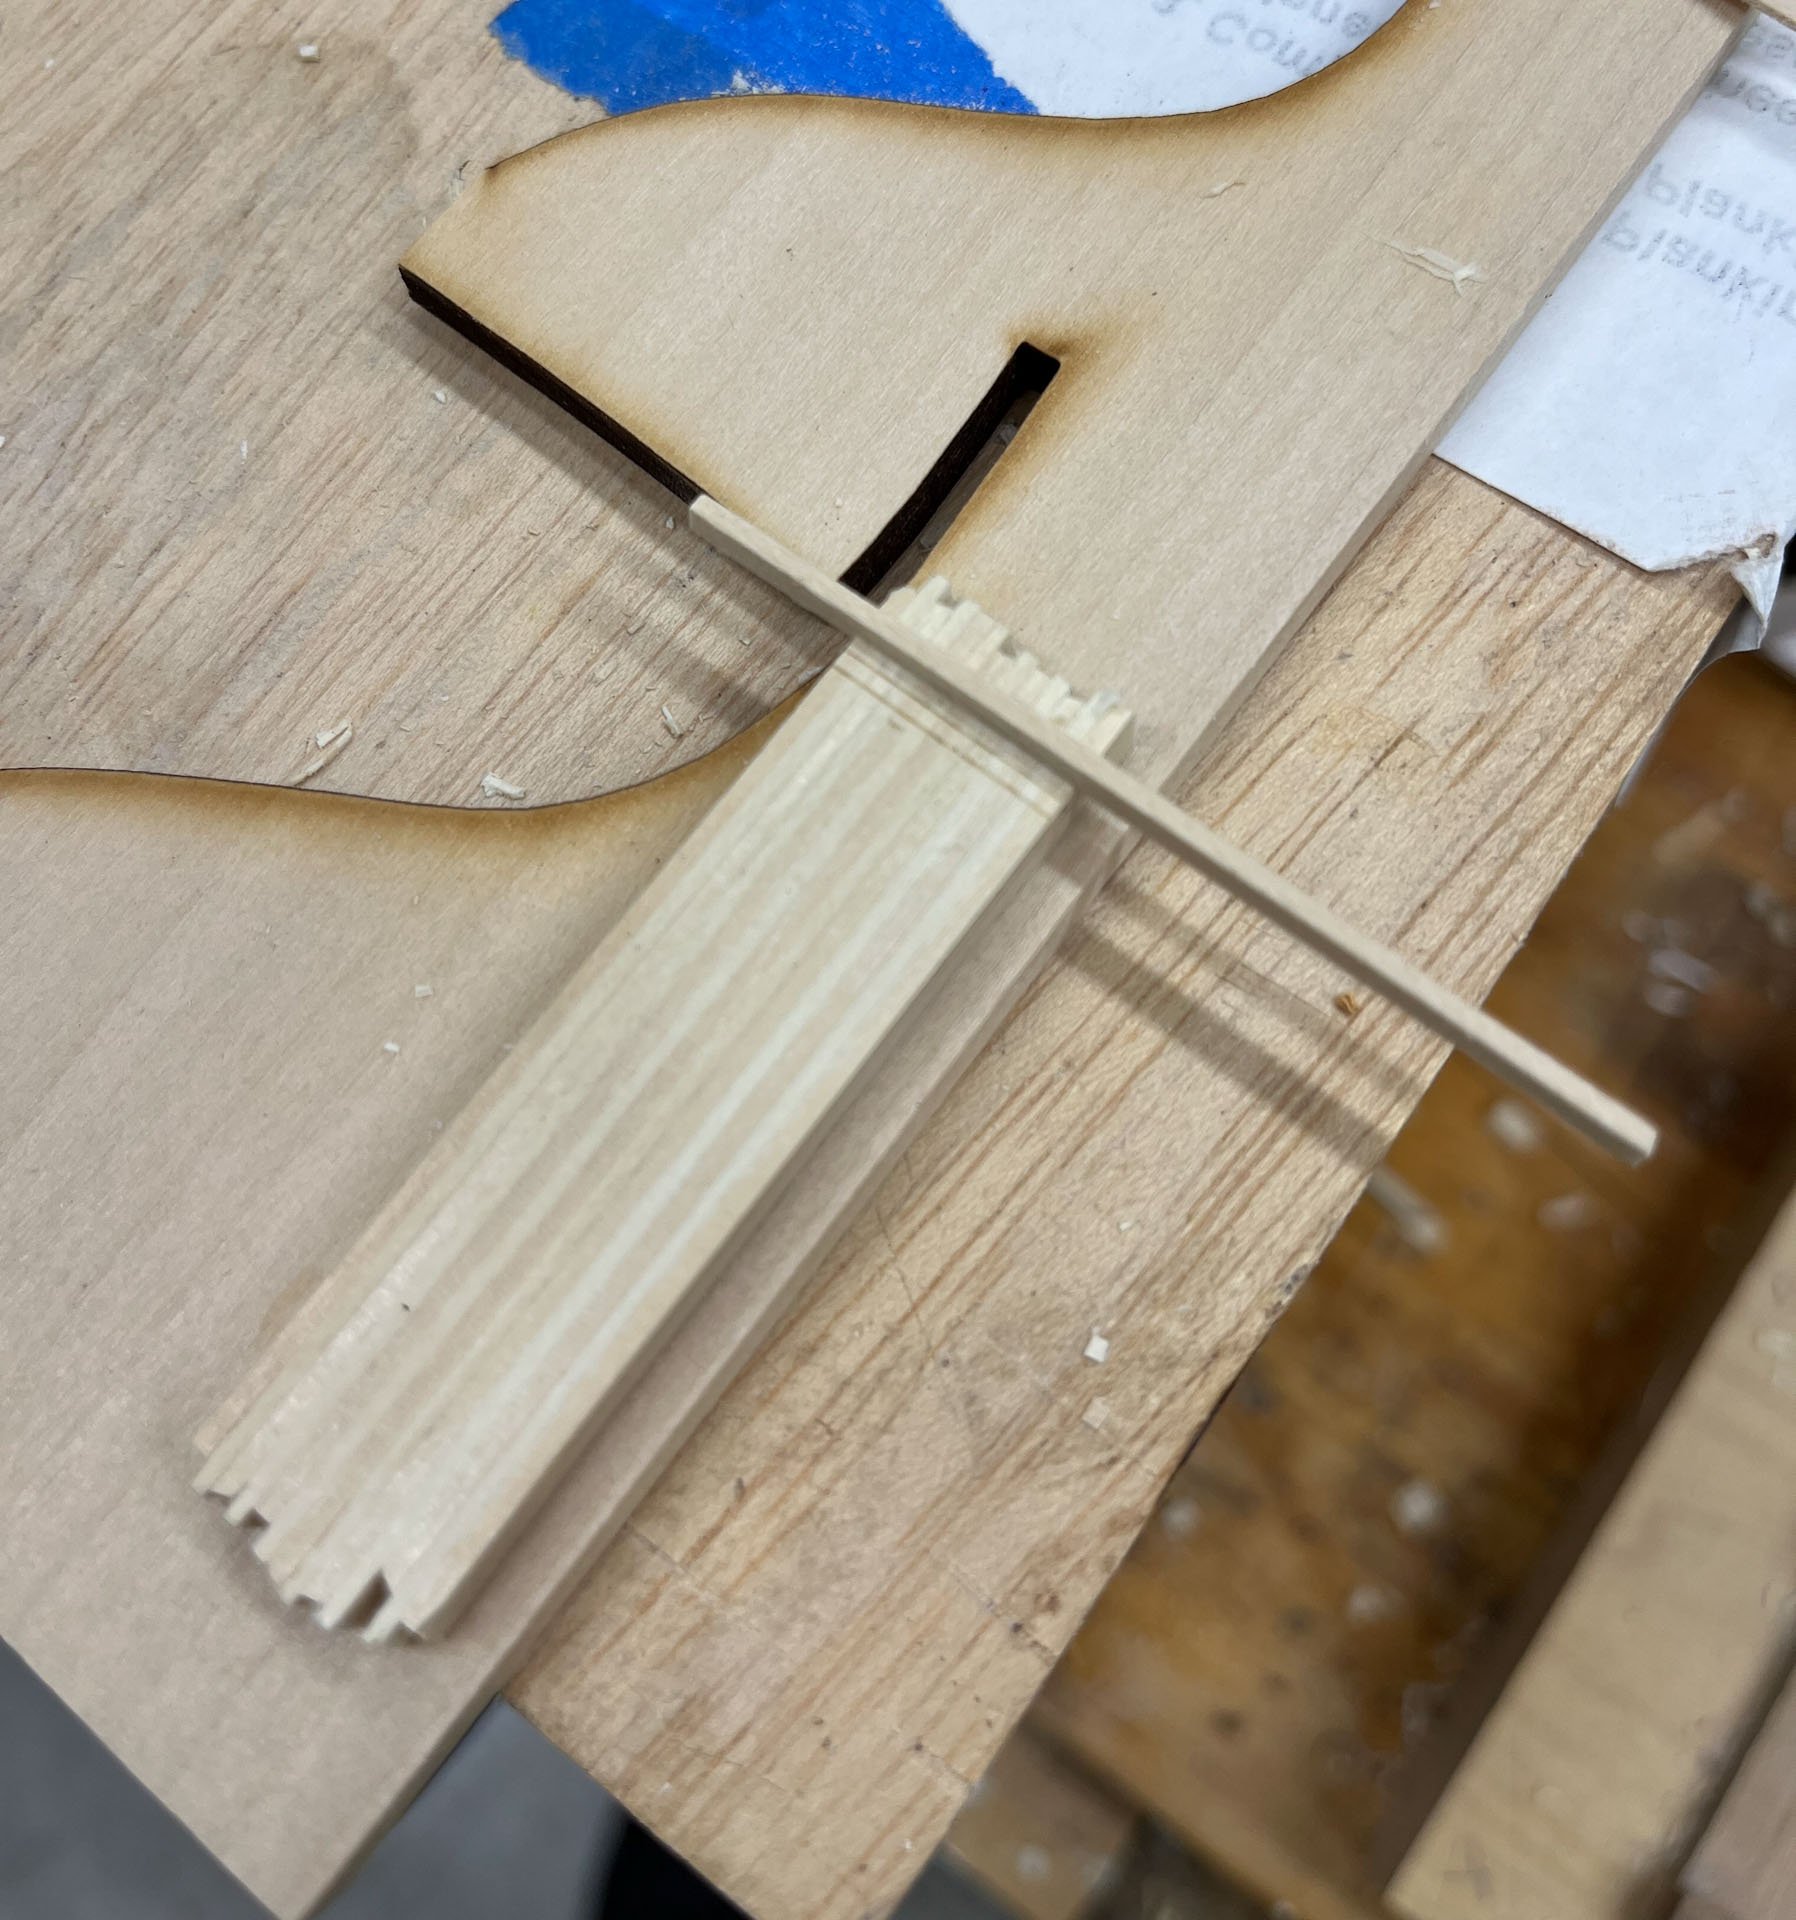
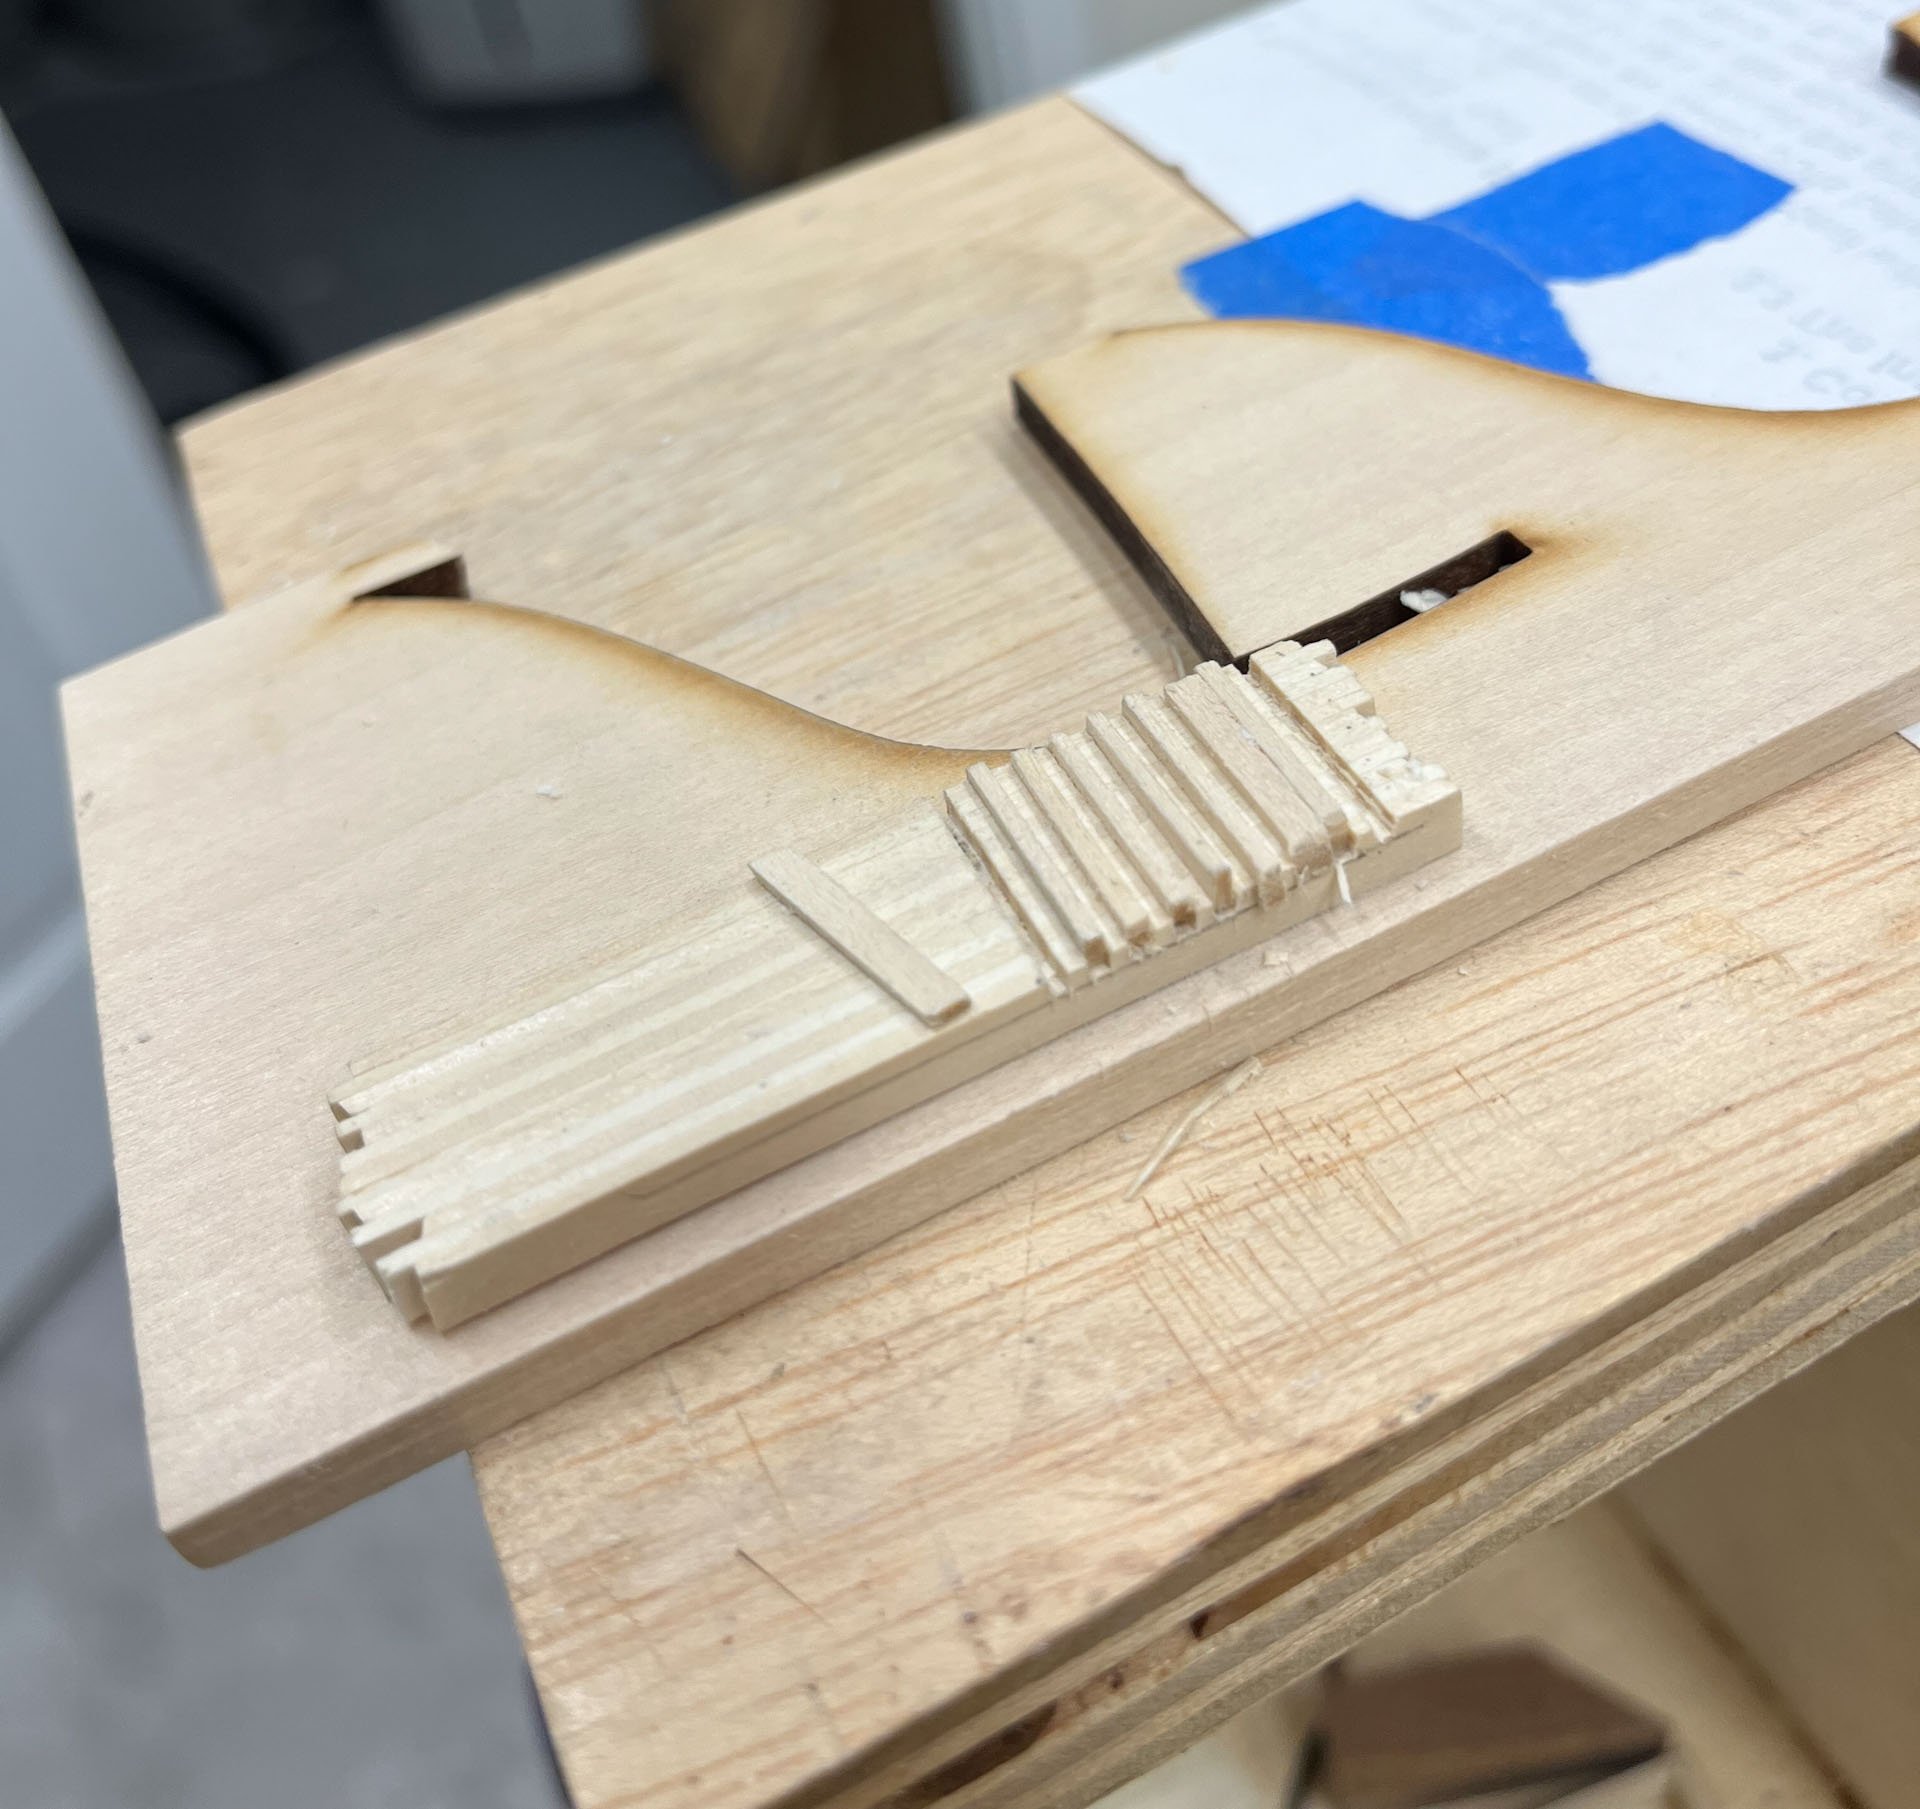
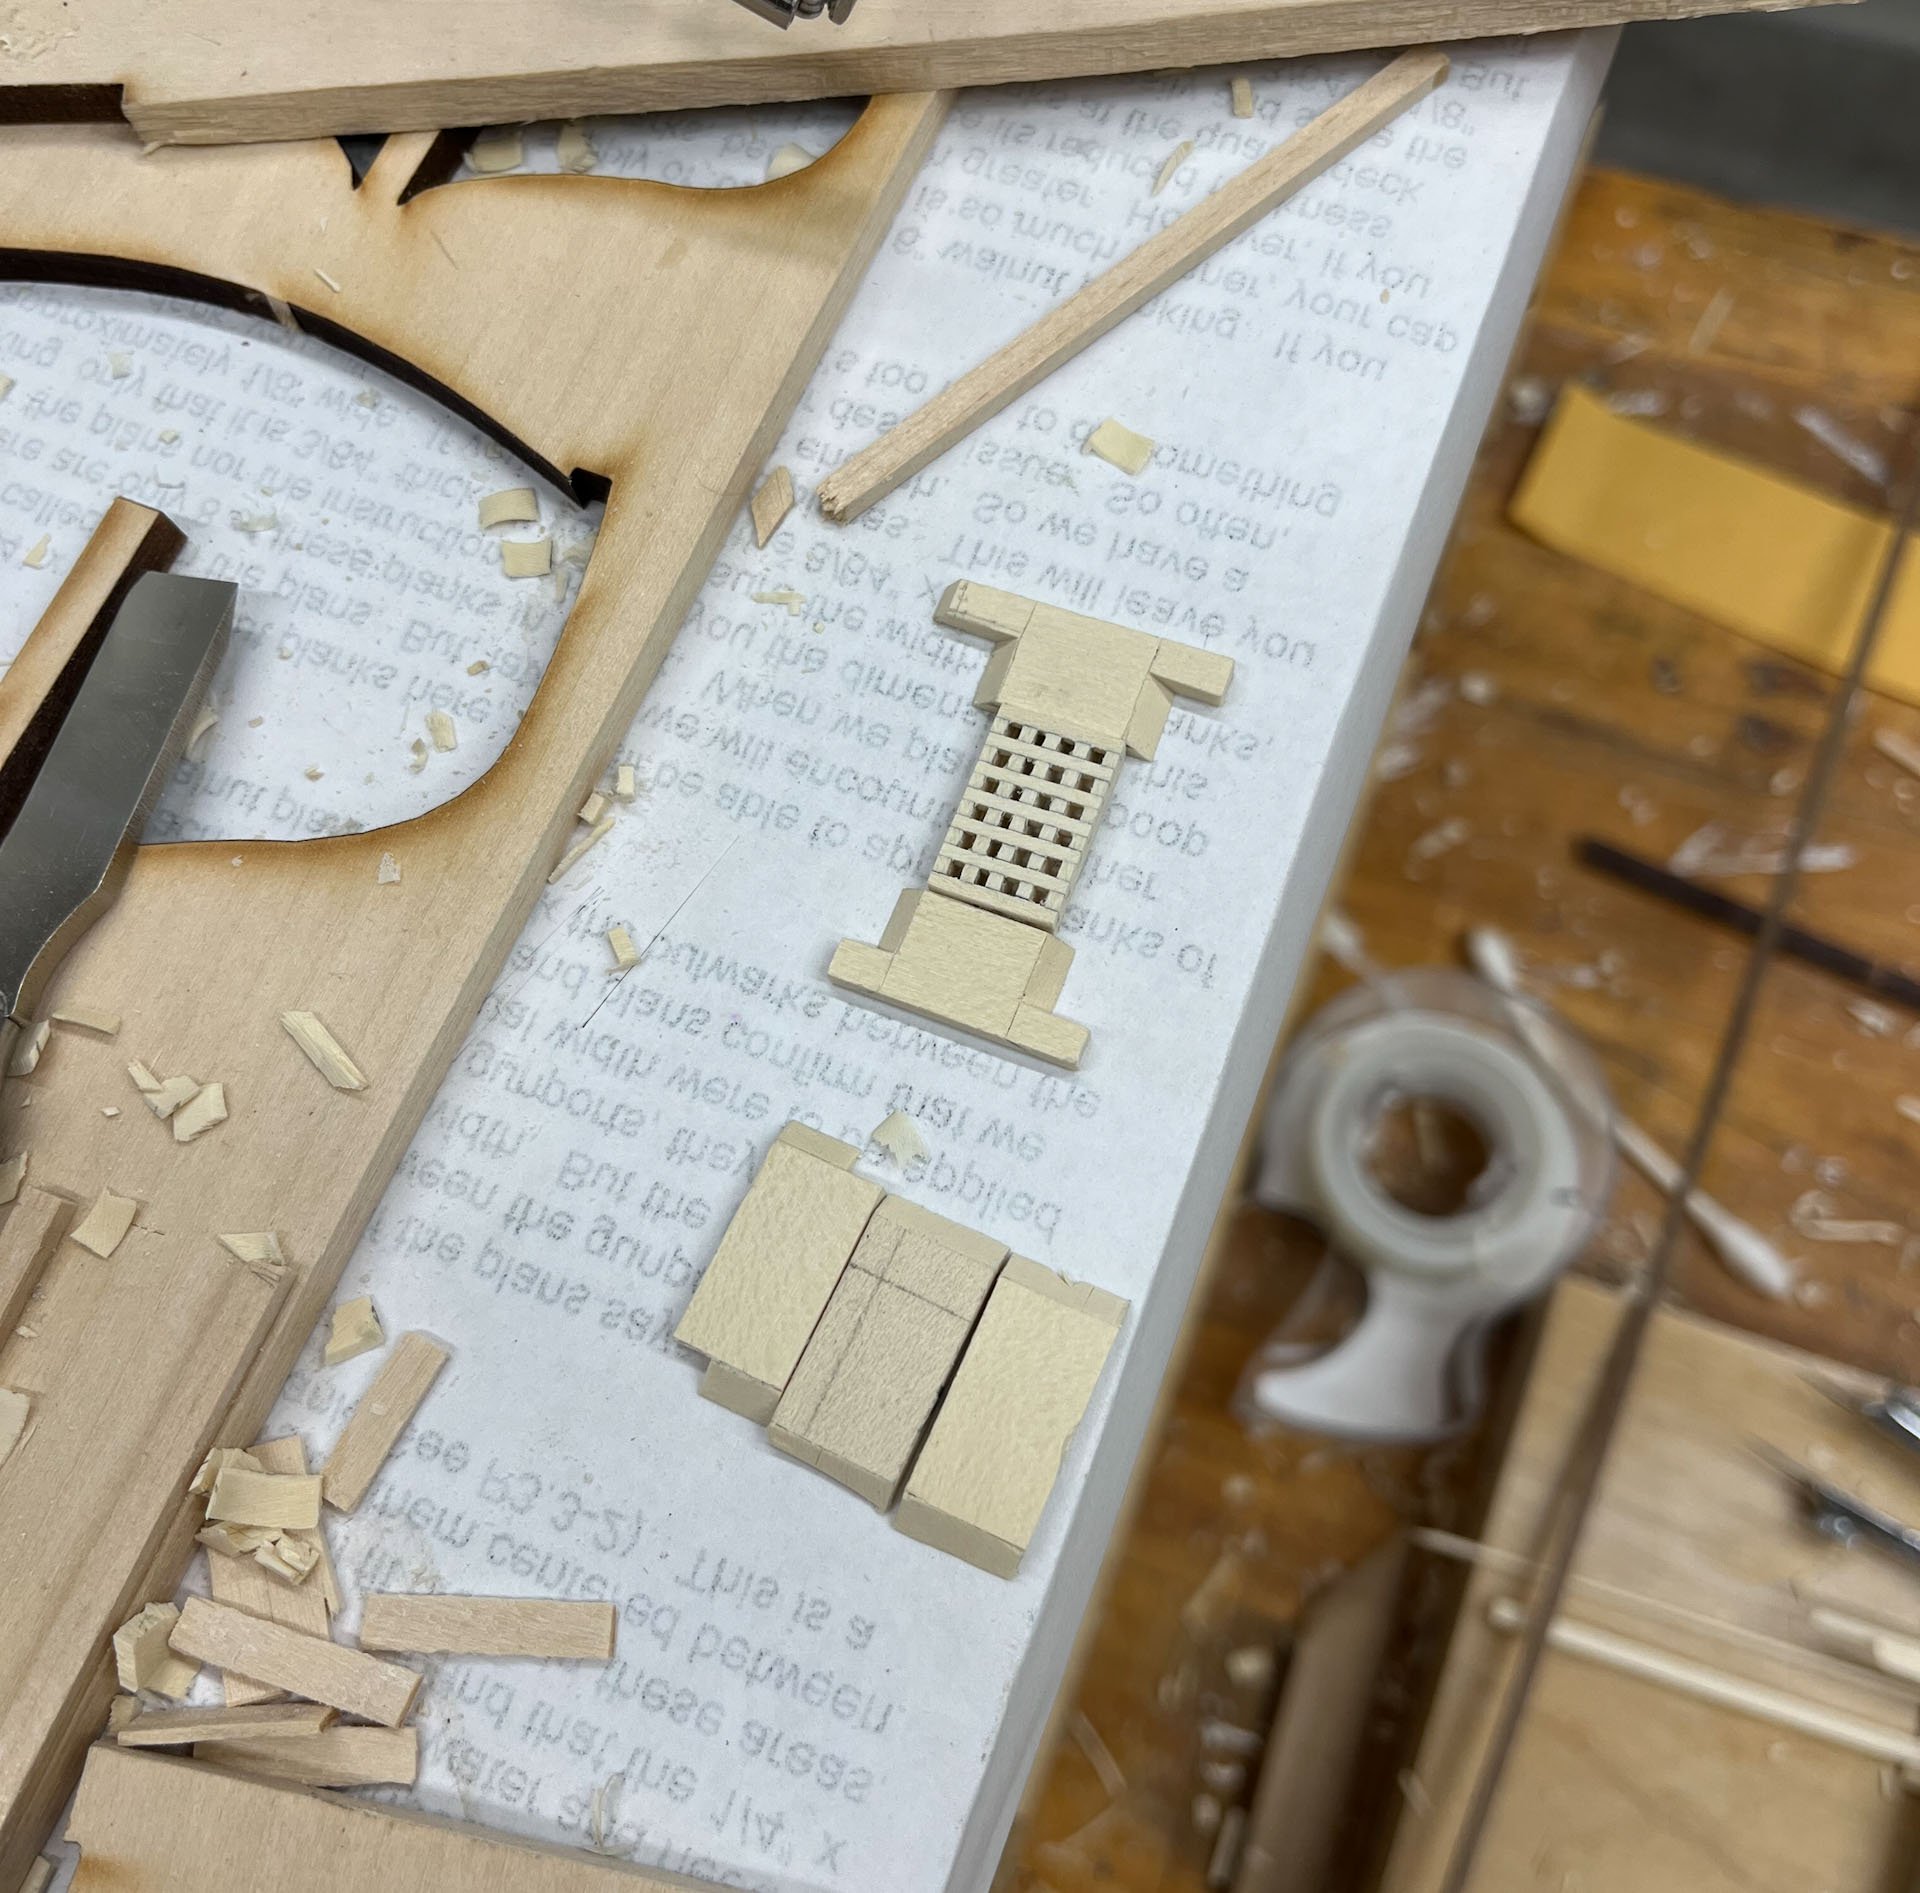
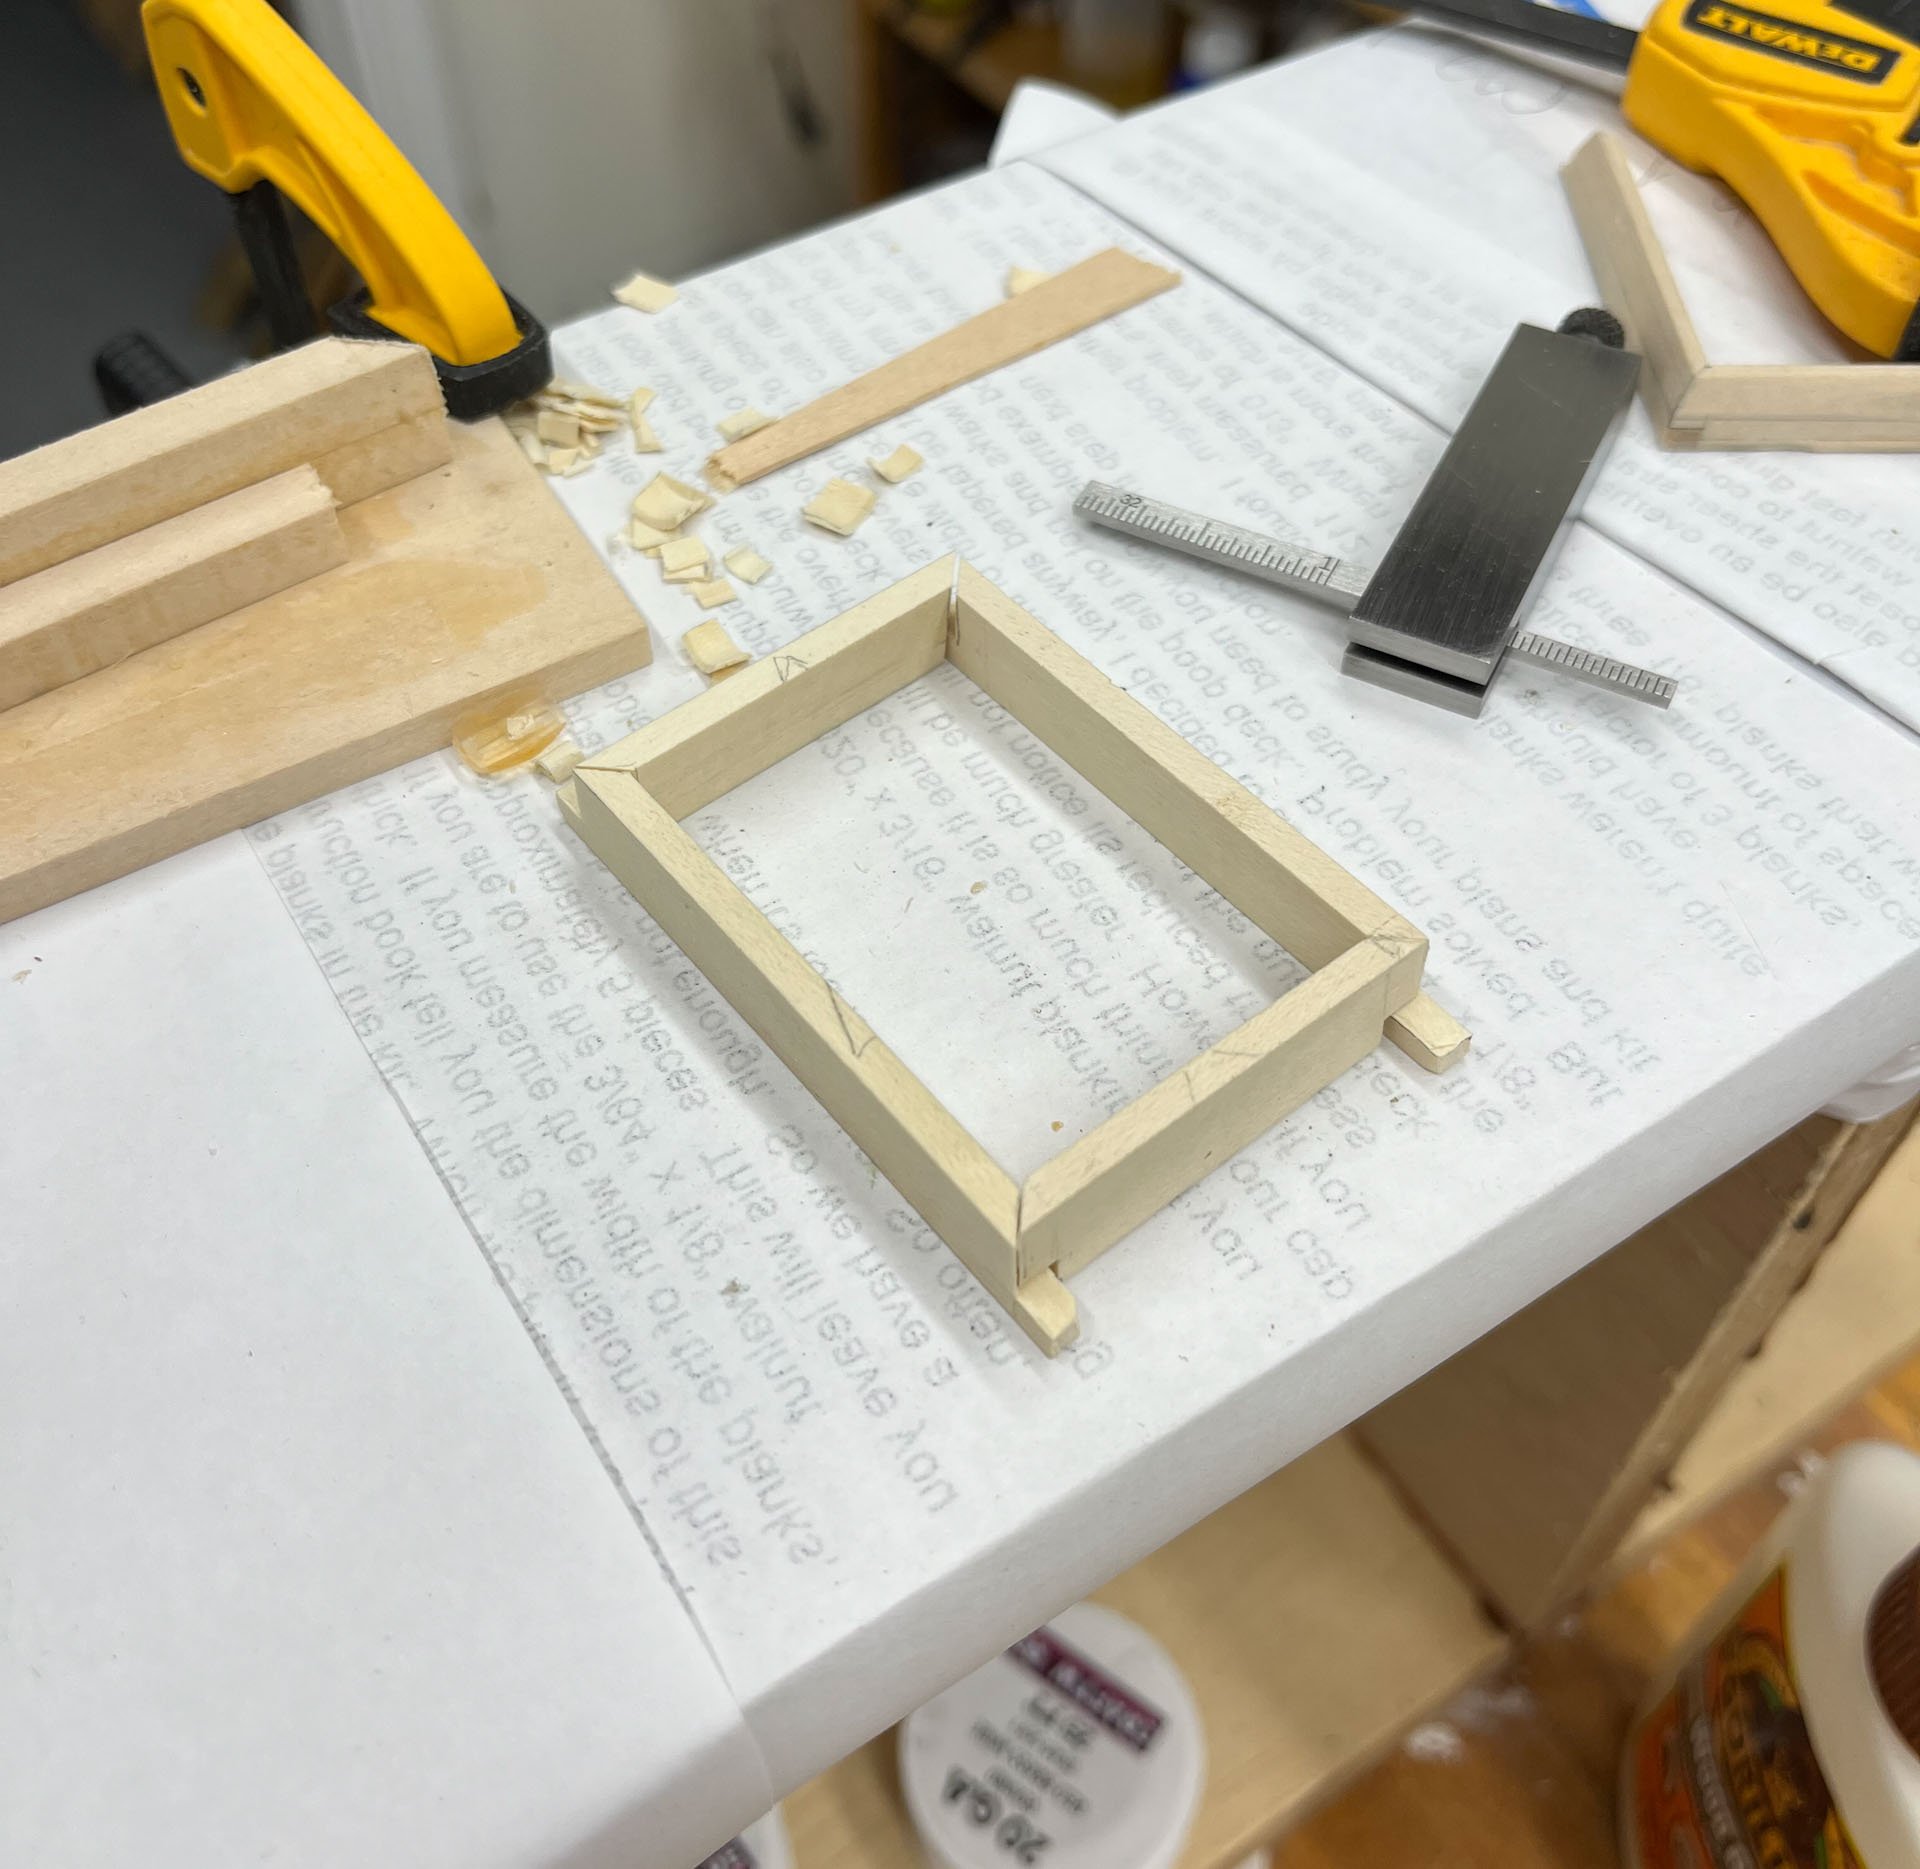
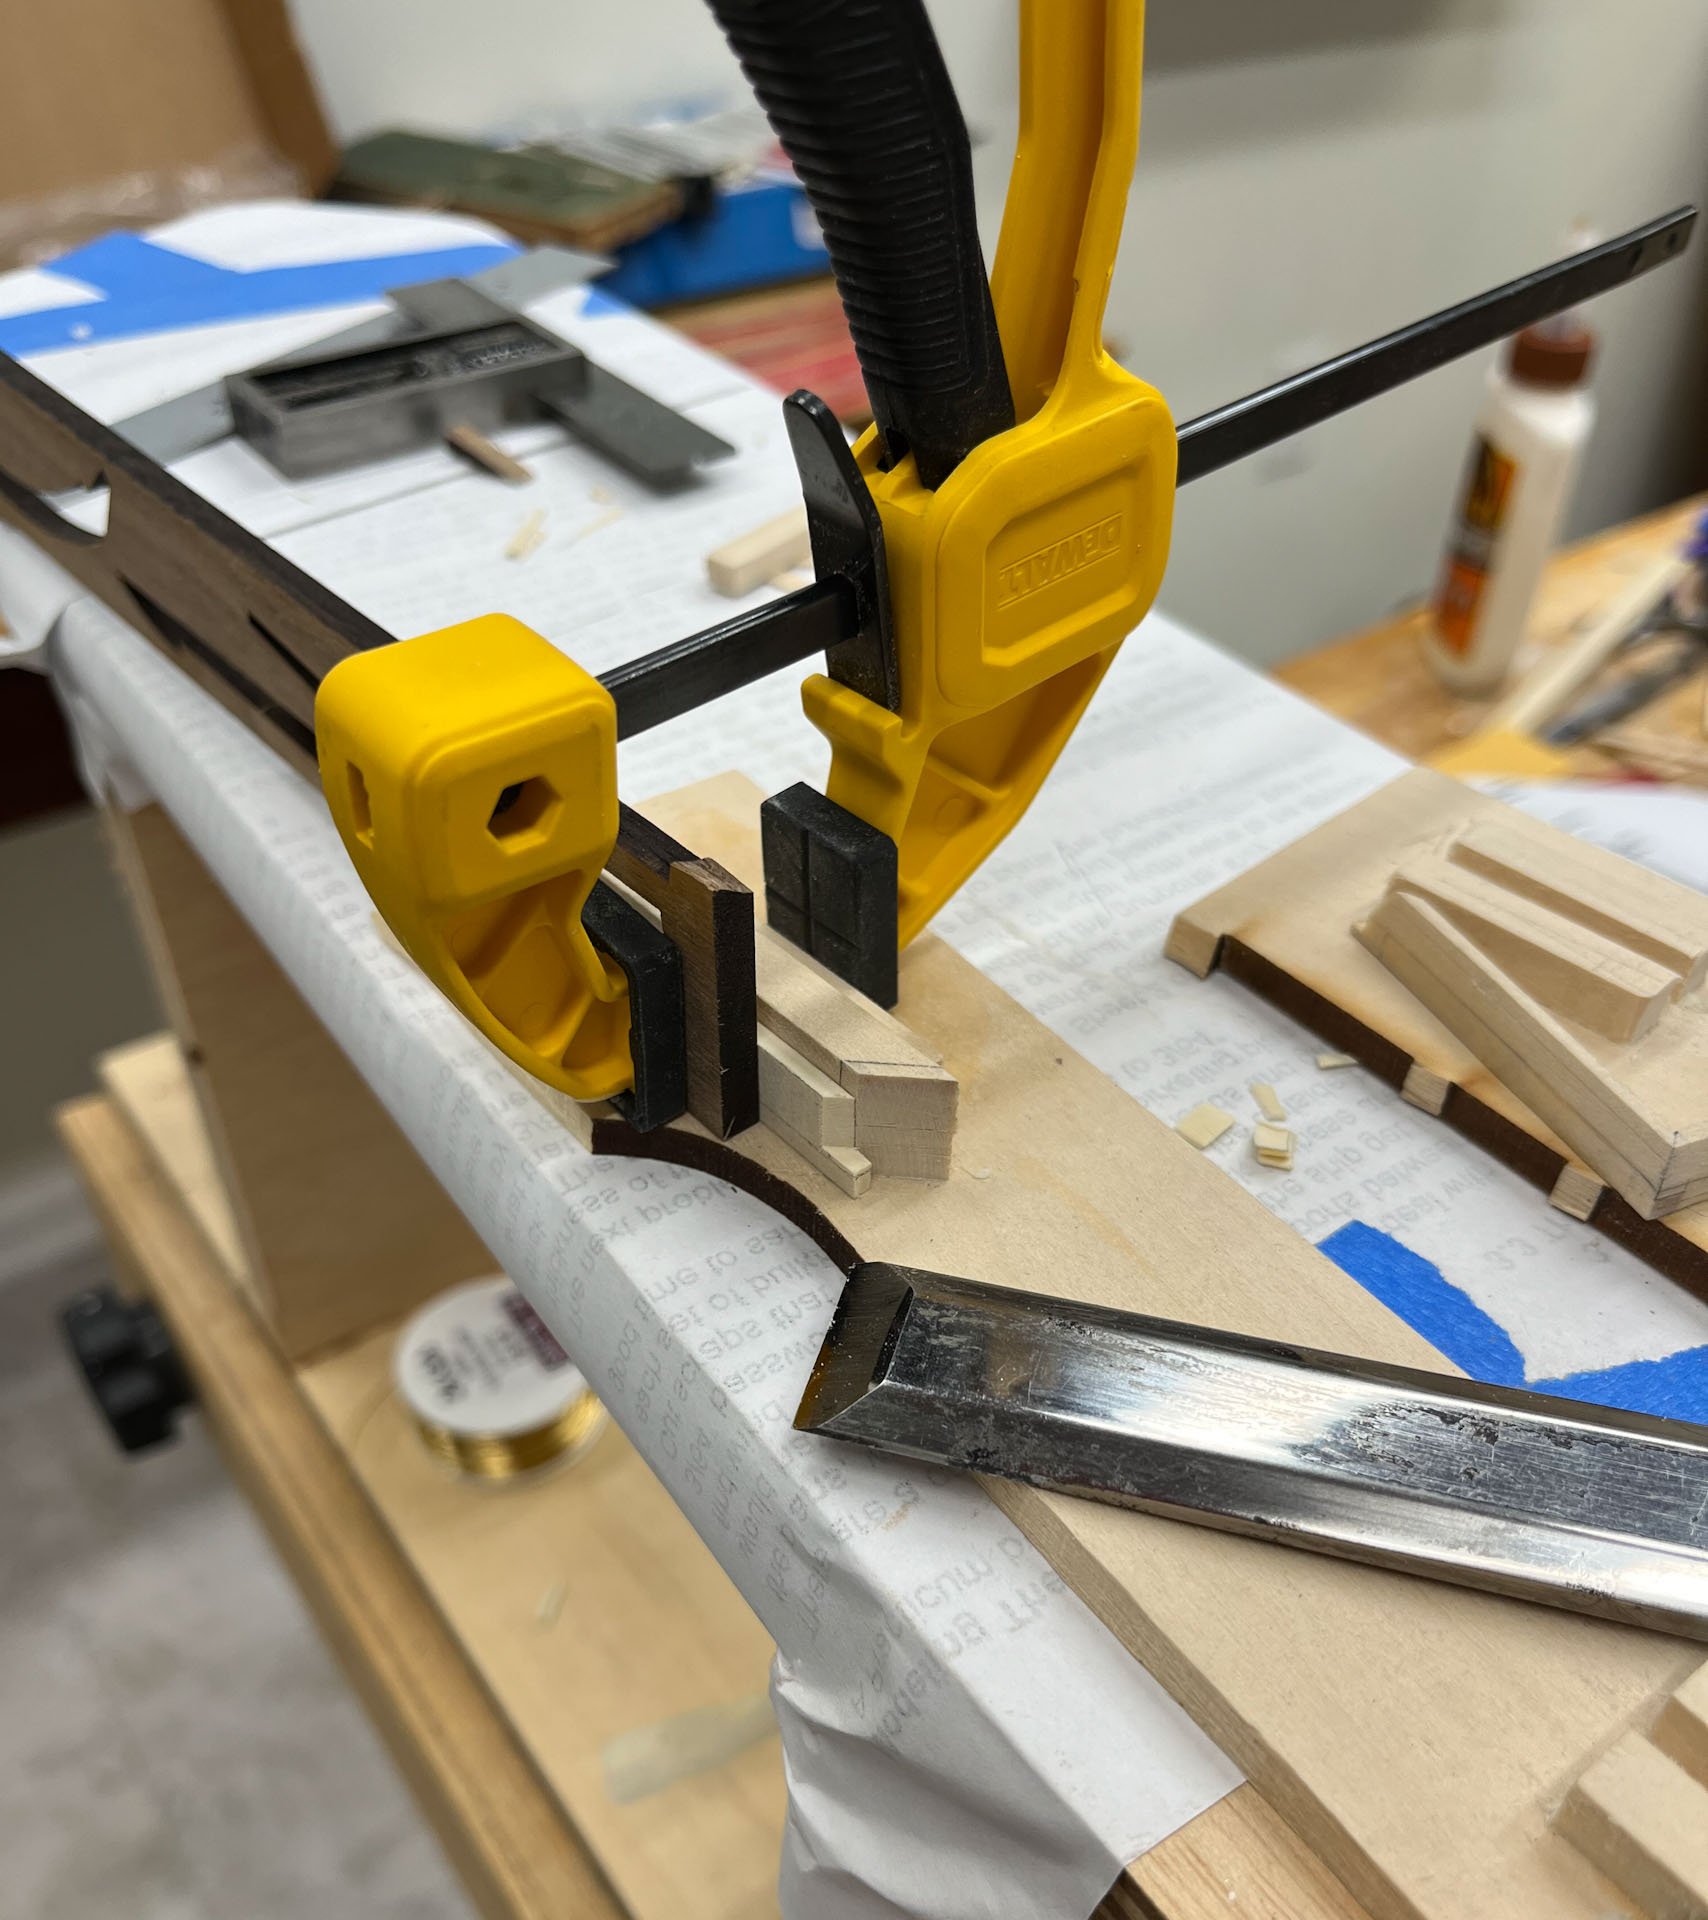
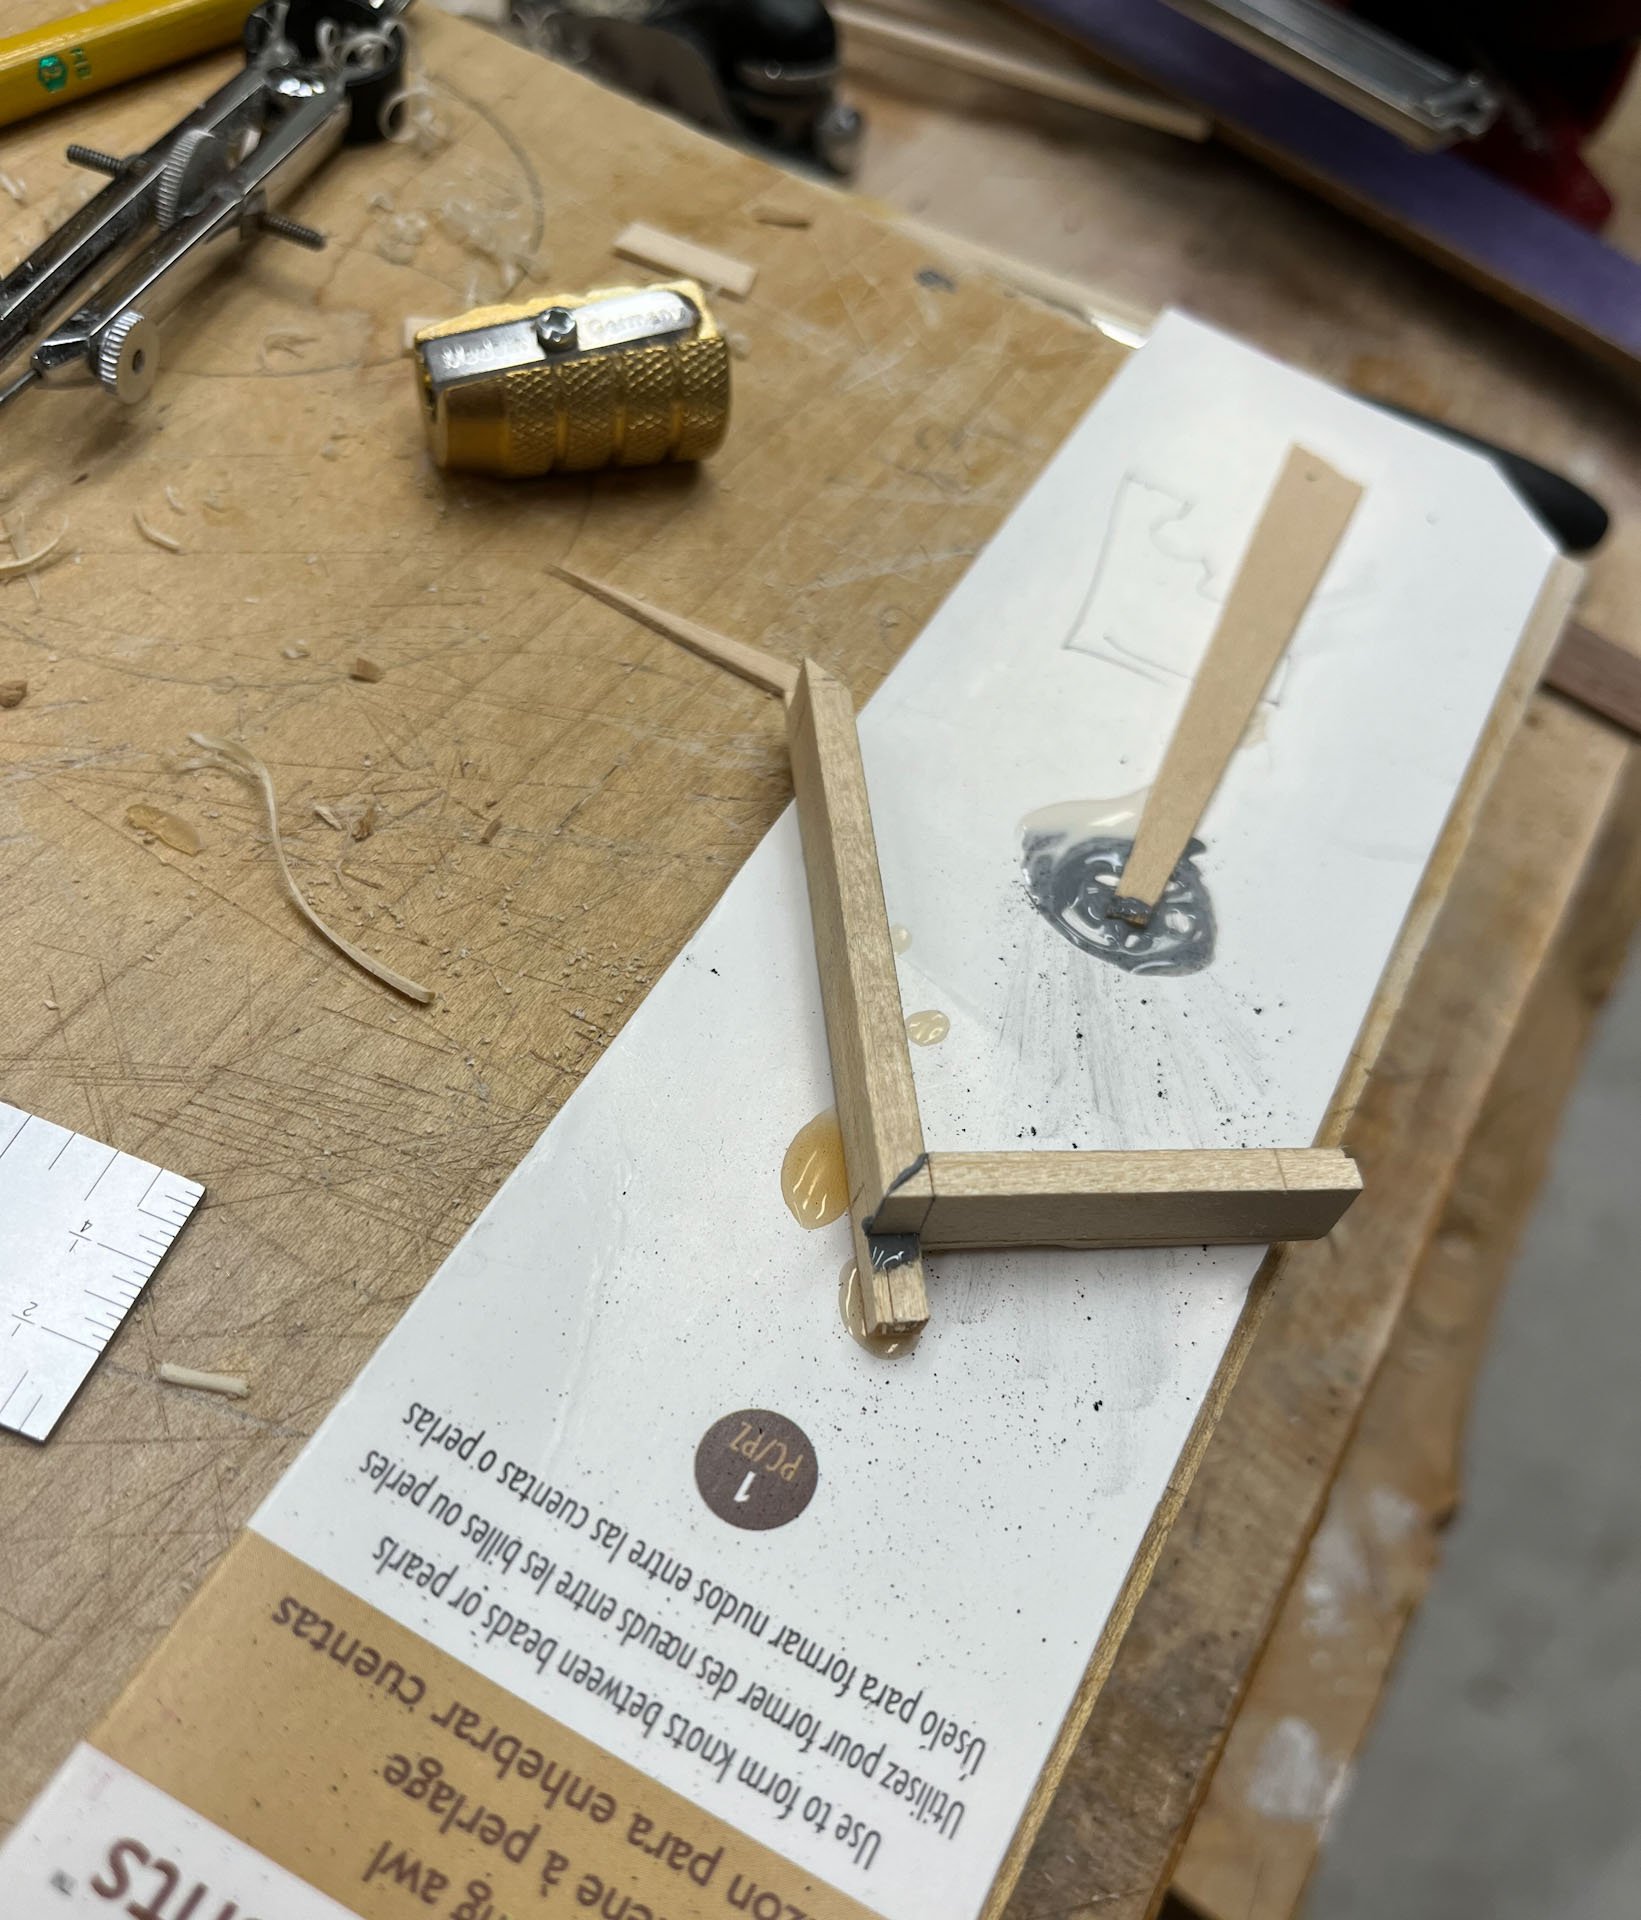
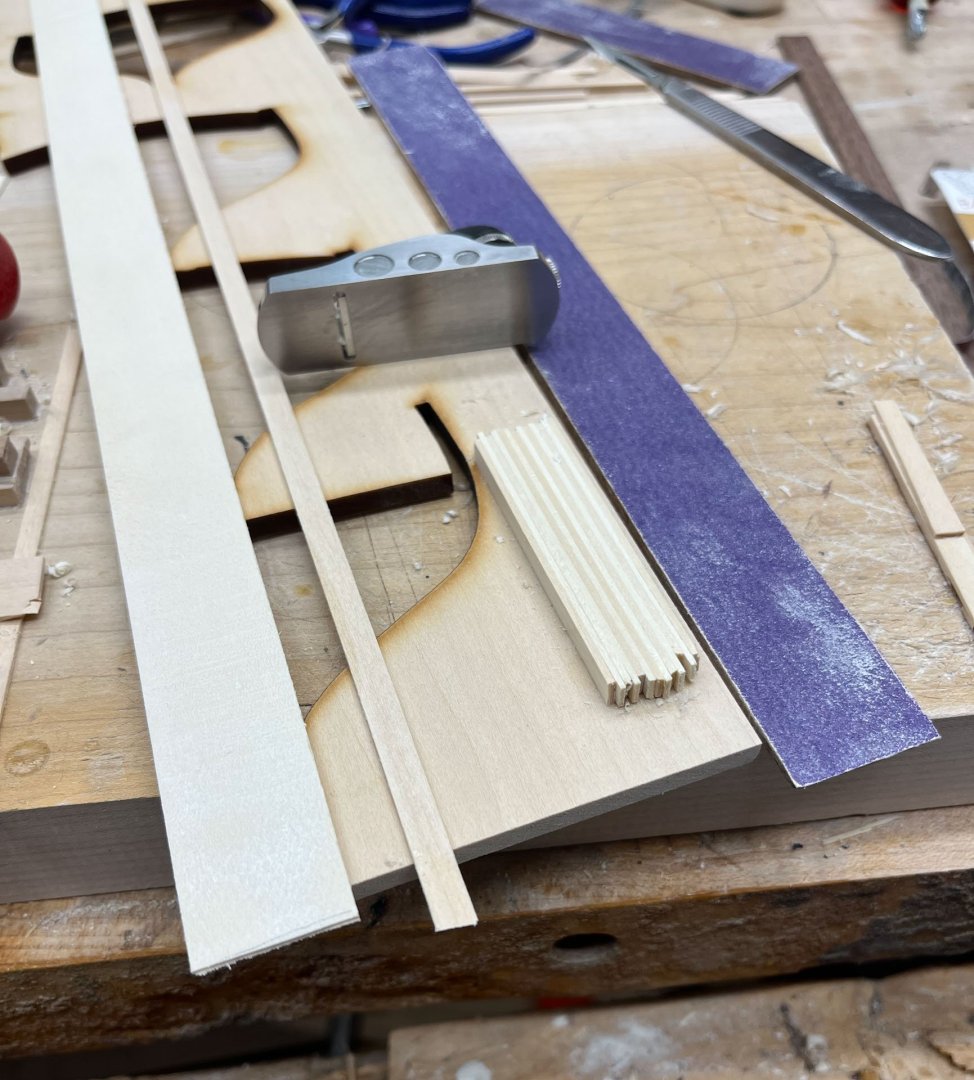
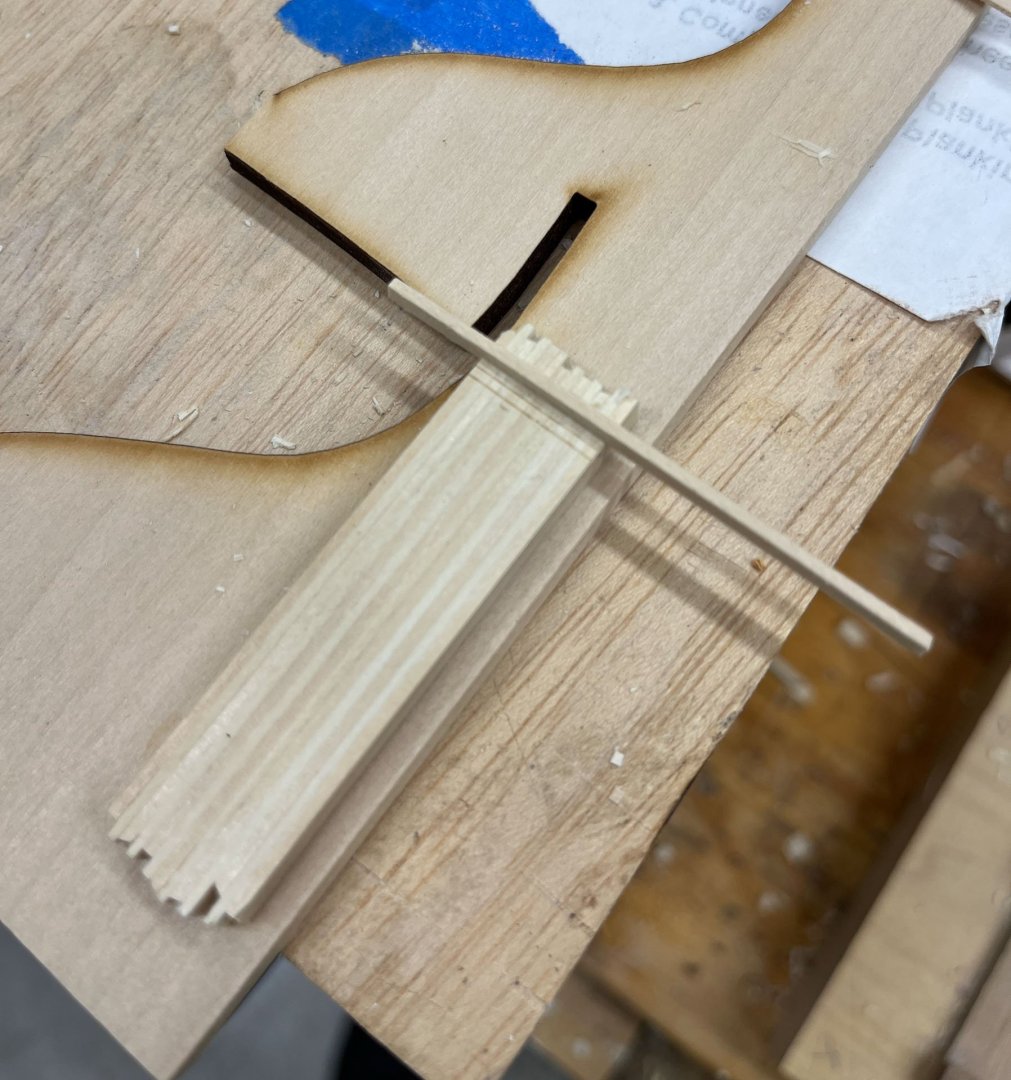
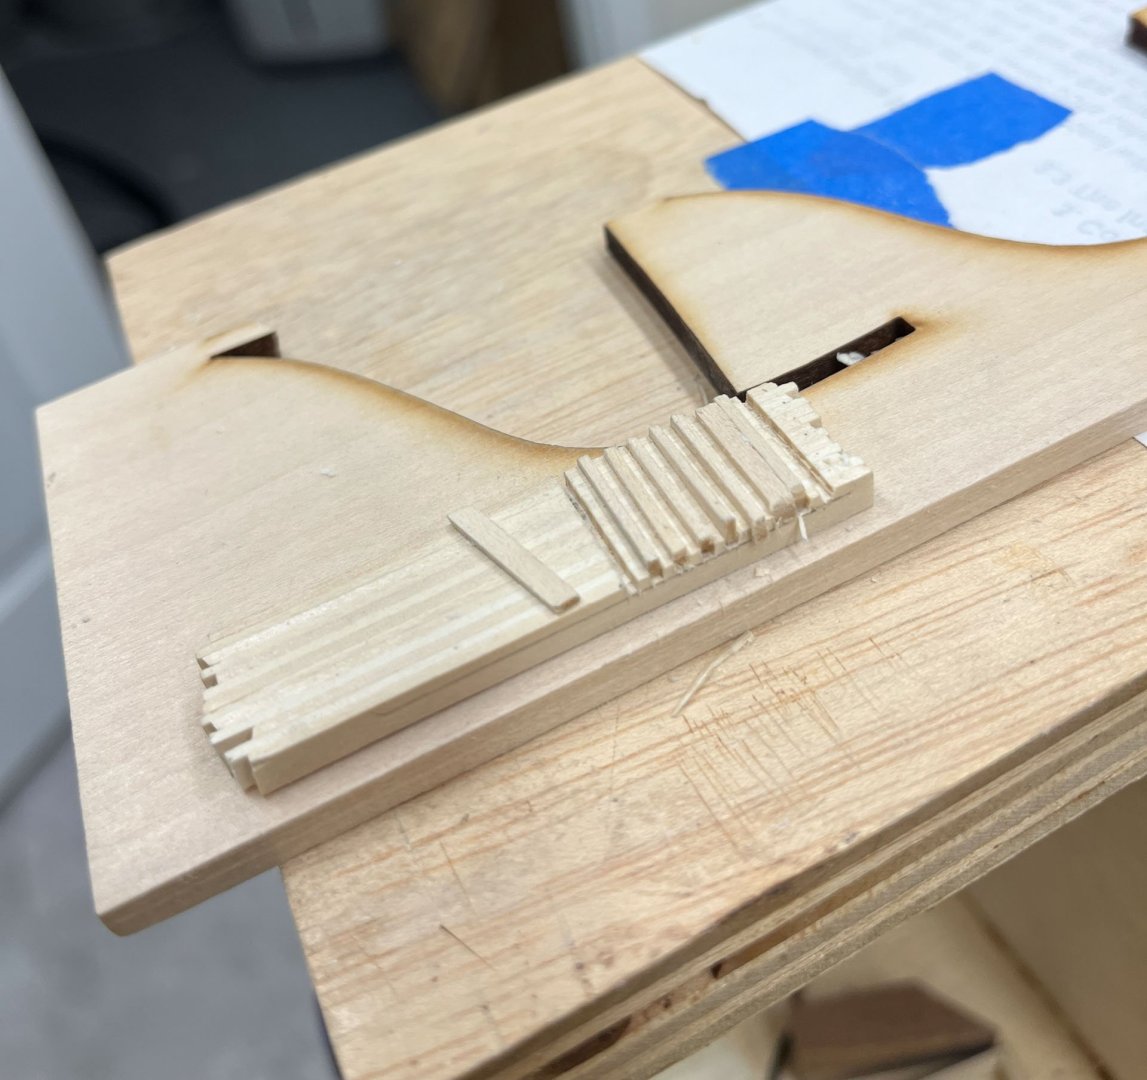
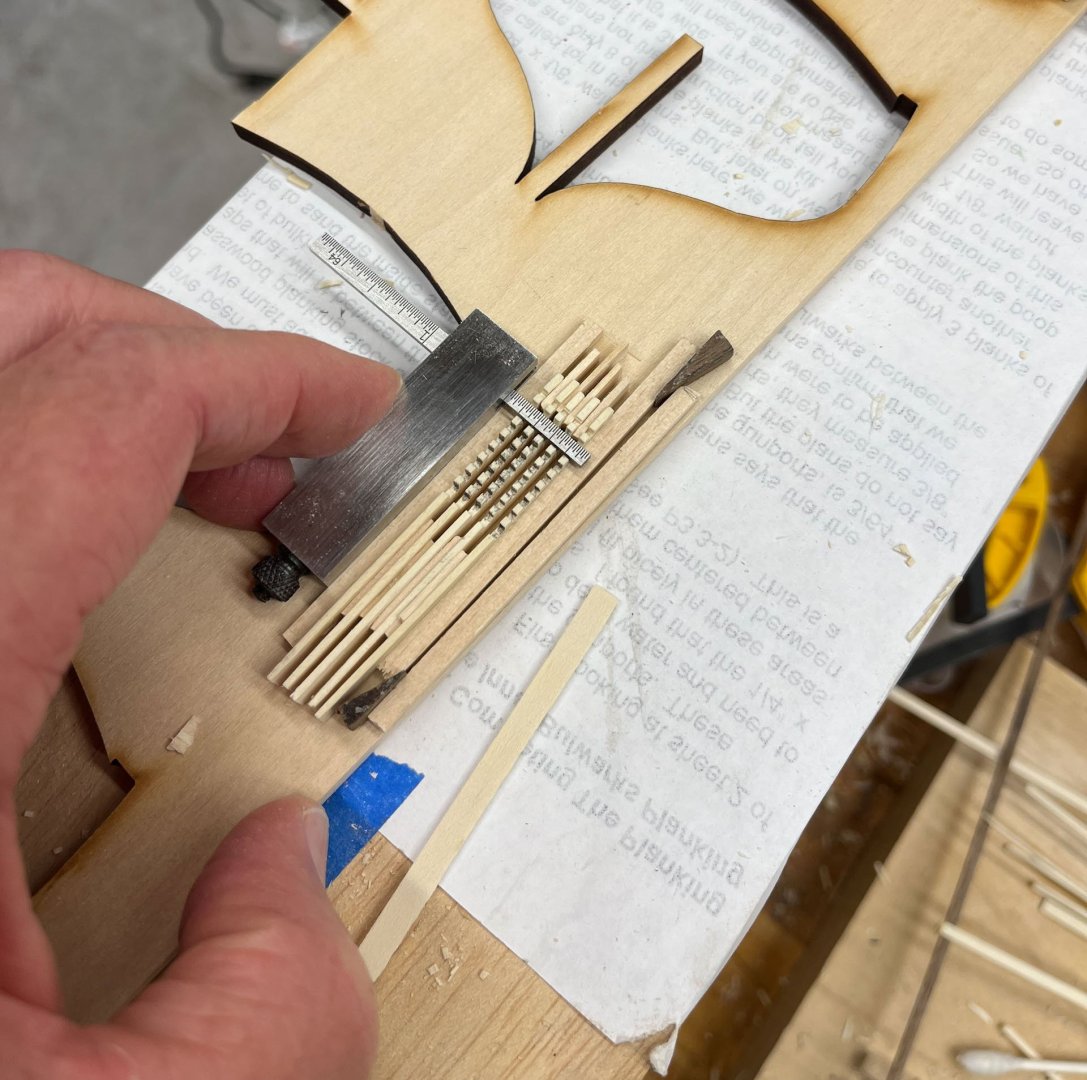
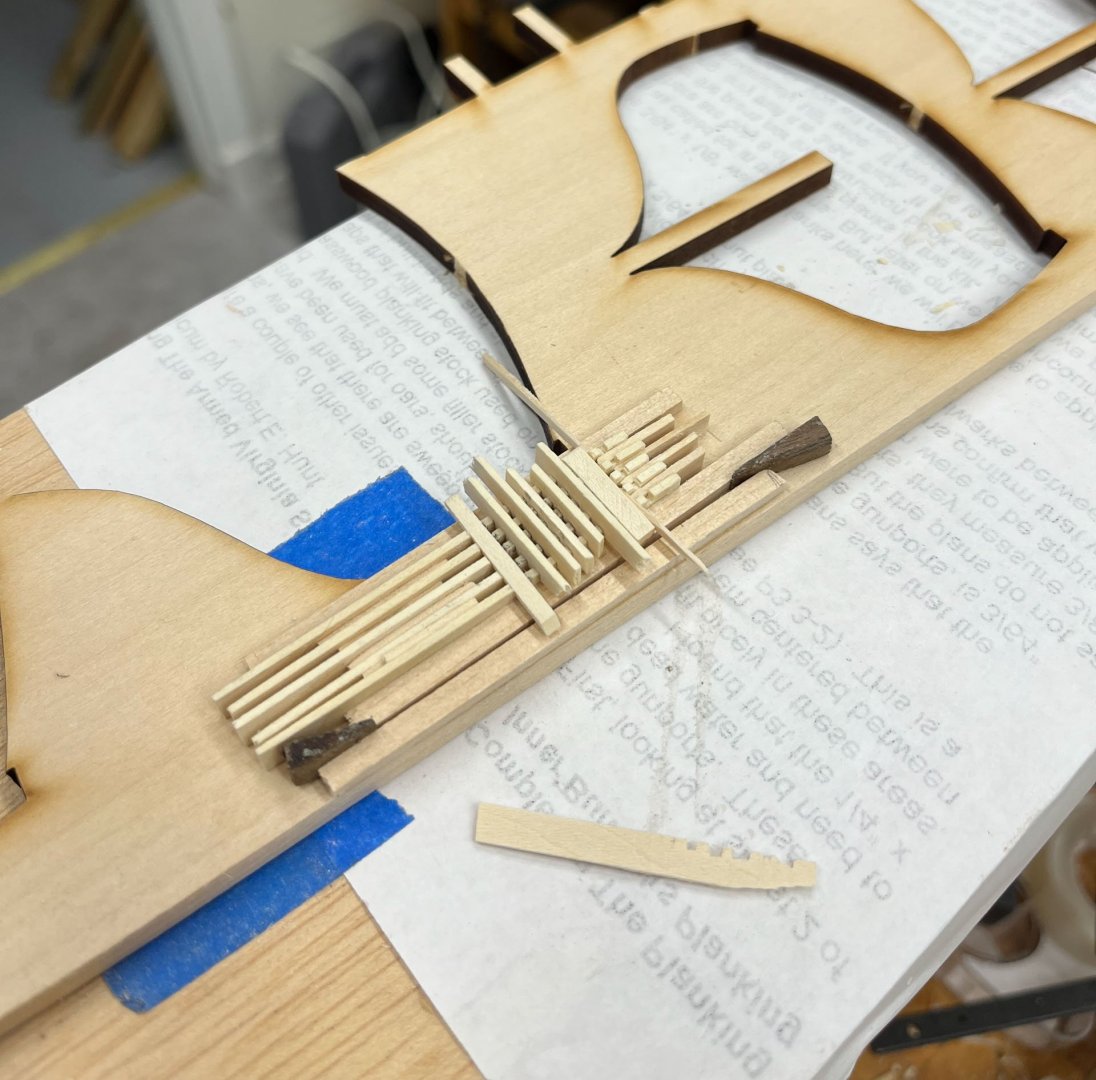
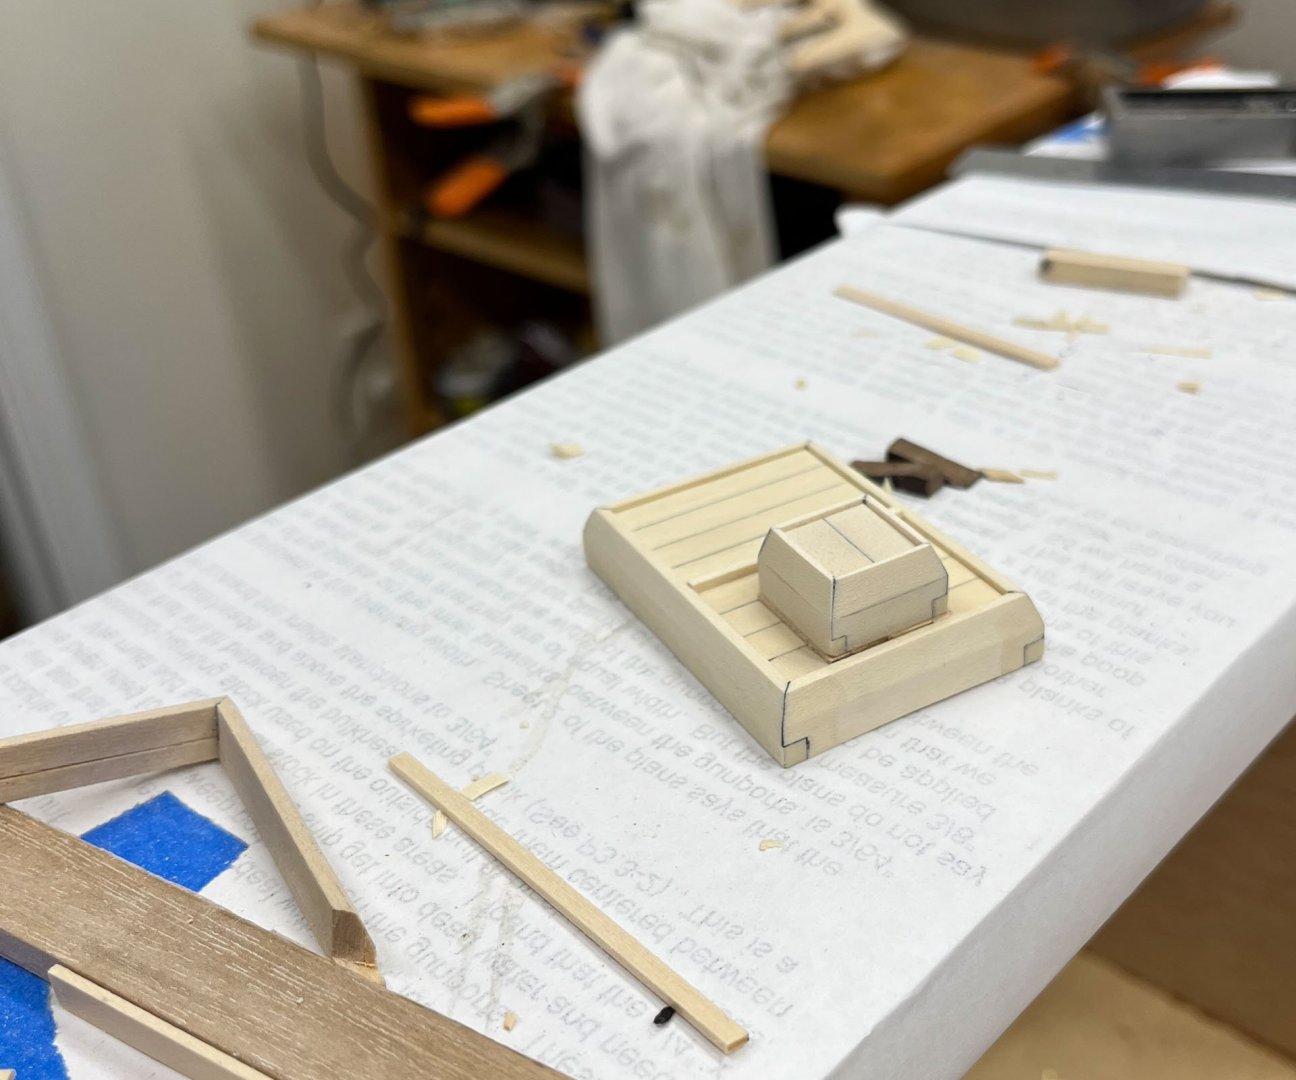
Thanks for the positive energy Ronald. I greatly appreciate it. Today, Friday night, my wife and daughter are away at a Taylor Swift concert, my son is visiting his cousins, so I am home alone with the dogs, cats, and fish. We are all relaxing, except for the dogs, who don't like July 5th fireworks. Today's update concerns making the AVS' (not sure how the possessive works there) single grating. I don't have a mini-tablesaw and I didn't use the kit supplied basswood grating as I wanted mine to be made of holly. There was a lot of thinking involved in this one... I did a test run with a basswood version, which I won't show, that influenced the current version. First I planed then sanded my holly stock to about 2/64s inch thick, matching the thickness of the slats on the kit plans. Next I wanted to cut slots crosswise. In my test piece I found it was easy to make the slots not straight, or to end up rounding one end when I tried to file them square, especially if the stack of strips i was cutting across was narrow. To help with all these issues, and because all my clamping techniques didn't work well, I made a packet of strips, alternating holly and basswood, and glued them all together and to the baseboard, with white elmers glue. Then I planed the tops flat. Below is this step; the holly stock I started with and the kit basswood strip is to the left. Next I needed to mark my slots. I used my smallest square and a scalpel blade to make the first mark, then used pieces of 2/64 stock (the width of the slats) and pieces of 3/64 stock (the width of the holes) to mark each successive slat. I found that the scalpel left a deep line that was relatively easy to cut to with a veritas mini-chisel, then I carefully cleaned out each slot with a tiny chisel and sometimes with a small file. Because a chisel is in essence a wedge that exerts pressure sideways, to keep the "teeth" from popping out I pressure fit a strip of basswood into each slot only (no glue) as I made each one. This worked remarkably well and I didn't pop off a single tooth. Below I have filled one slot and marked the next. Here I have filled all the slots except the last one. The empty big slot at the top was rejected and turned into a test run. Then I soaked the whole thing in isopropyl alcohol and finally it reluctantly came apart. I should have taken the cross fillers out before soaking, they immediately swelled up and stuck, so I had to leave the packet out for a day to dry so I could remove them, then re-soak for 24hrs. Miraculously nothing broke. Below I have taken the now free strips of holly, used small pieces of 3/64" basswood as spacers above and below where the grating will be (I didn't want to glue the spacers in), used my square to even all the pieces up, and used wedges to hold the strips in place. I used pencil to highlight the joints. Next I inserted a variety of holly strips crosswise (whatever scraps I had that would fit, this stage isn't pretty), and attached the strips with white elmers glue applied with a toothpick. Way easy to get glue blobs that would be tough to remove so i went very sparing on the glue. Here it is drying. And after it dried I cut off the edges, did some sanding to bring the thickness down, and presto here is my grating: It still has some dust on it but overall I am very happy both with the final product and that I am done making gratings. Below I am attempting to make the coaming. I made the port and starboard sides fine, then screwed up 3 different times in 3 different ways on the fore and aft sides (pieces at the bottom of the picture) so called it a night. Maybe time to consider a tablesaw? thanks for reading Cisco


-
Gunboat Philadelphia 1776 by tmj
CiscoH replied to tmj's topic in - Build logs for subjects built 1751 - 1800
you have achieved exactly the effect you were looking for. really nice planking/caulking effect -
is the lightbox used to better see gaps between pieces? and if so are you simply looking straight down over the joints?
-
super precise work! thank you for posting your methods and not just the finished product
- 419 replies
-
- 2
-

-
- Victory Models
- Pegasus
- (and 2 more)
-
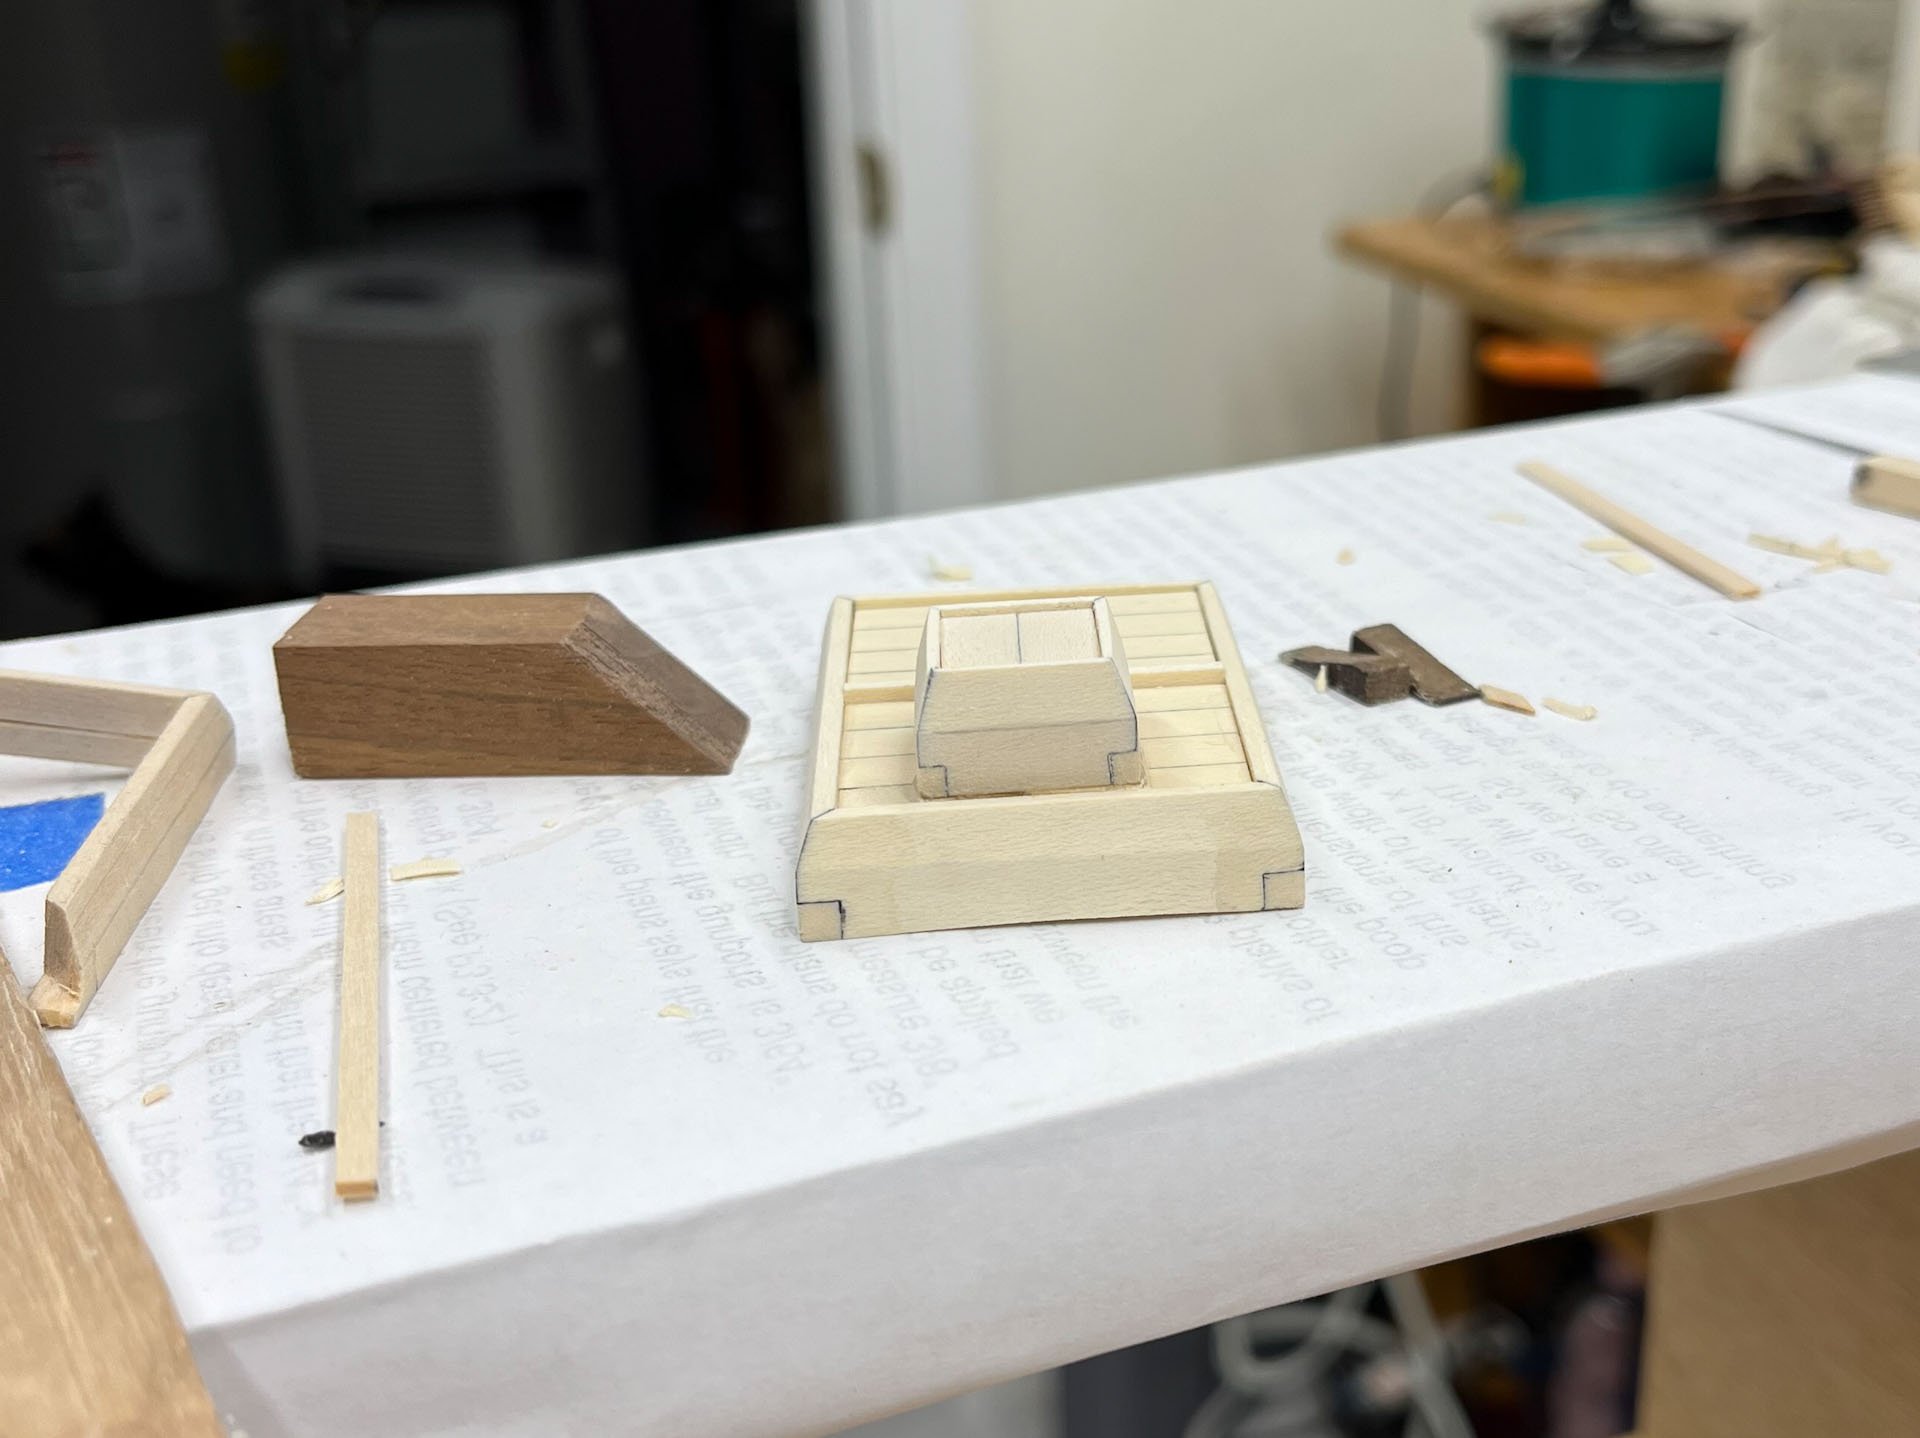
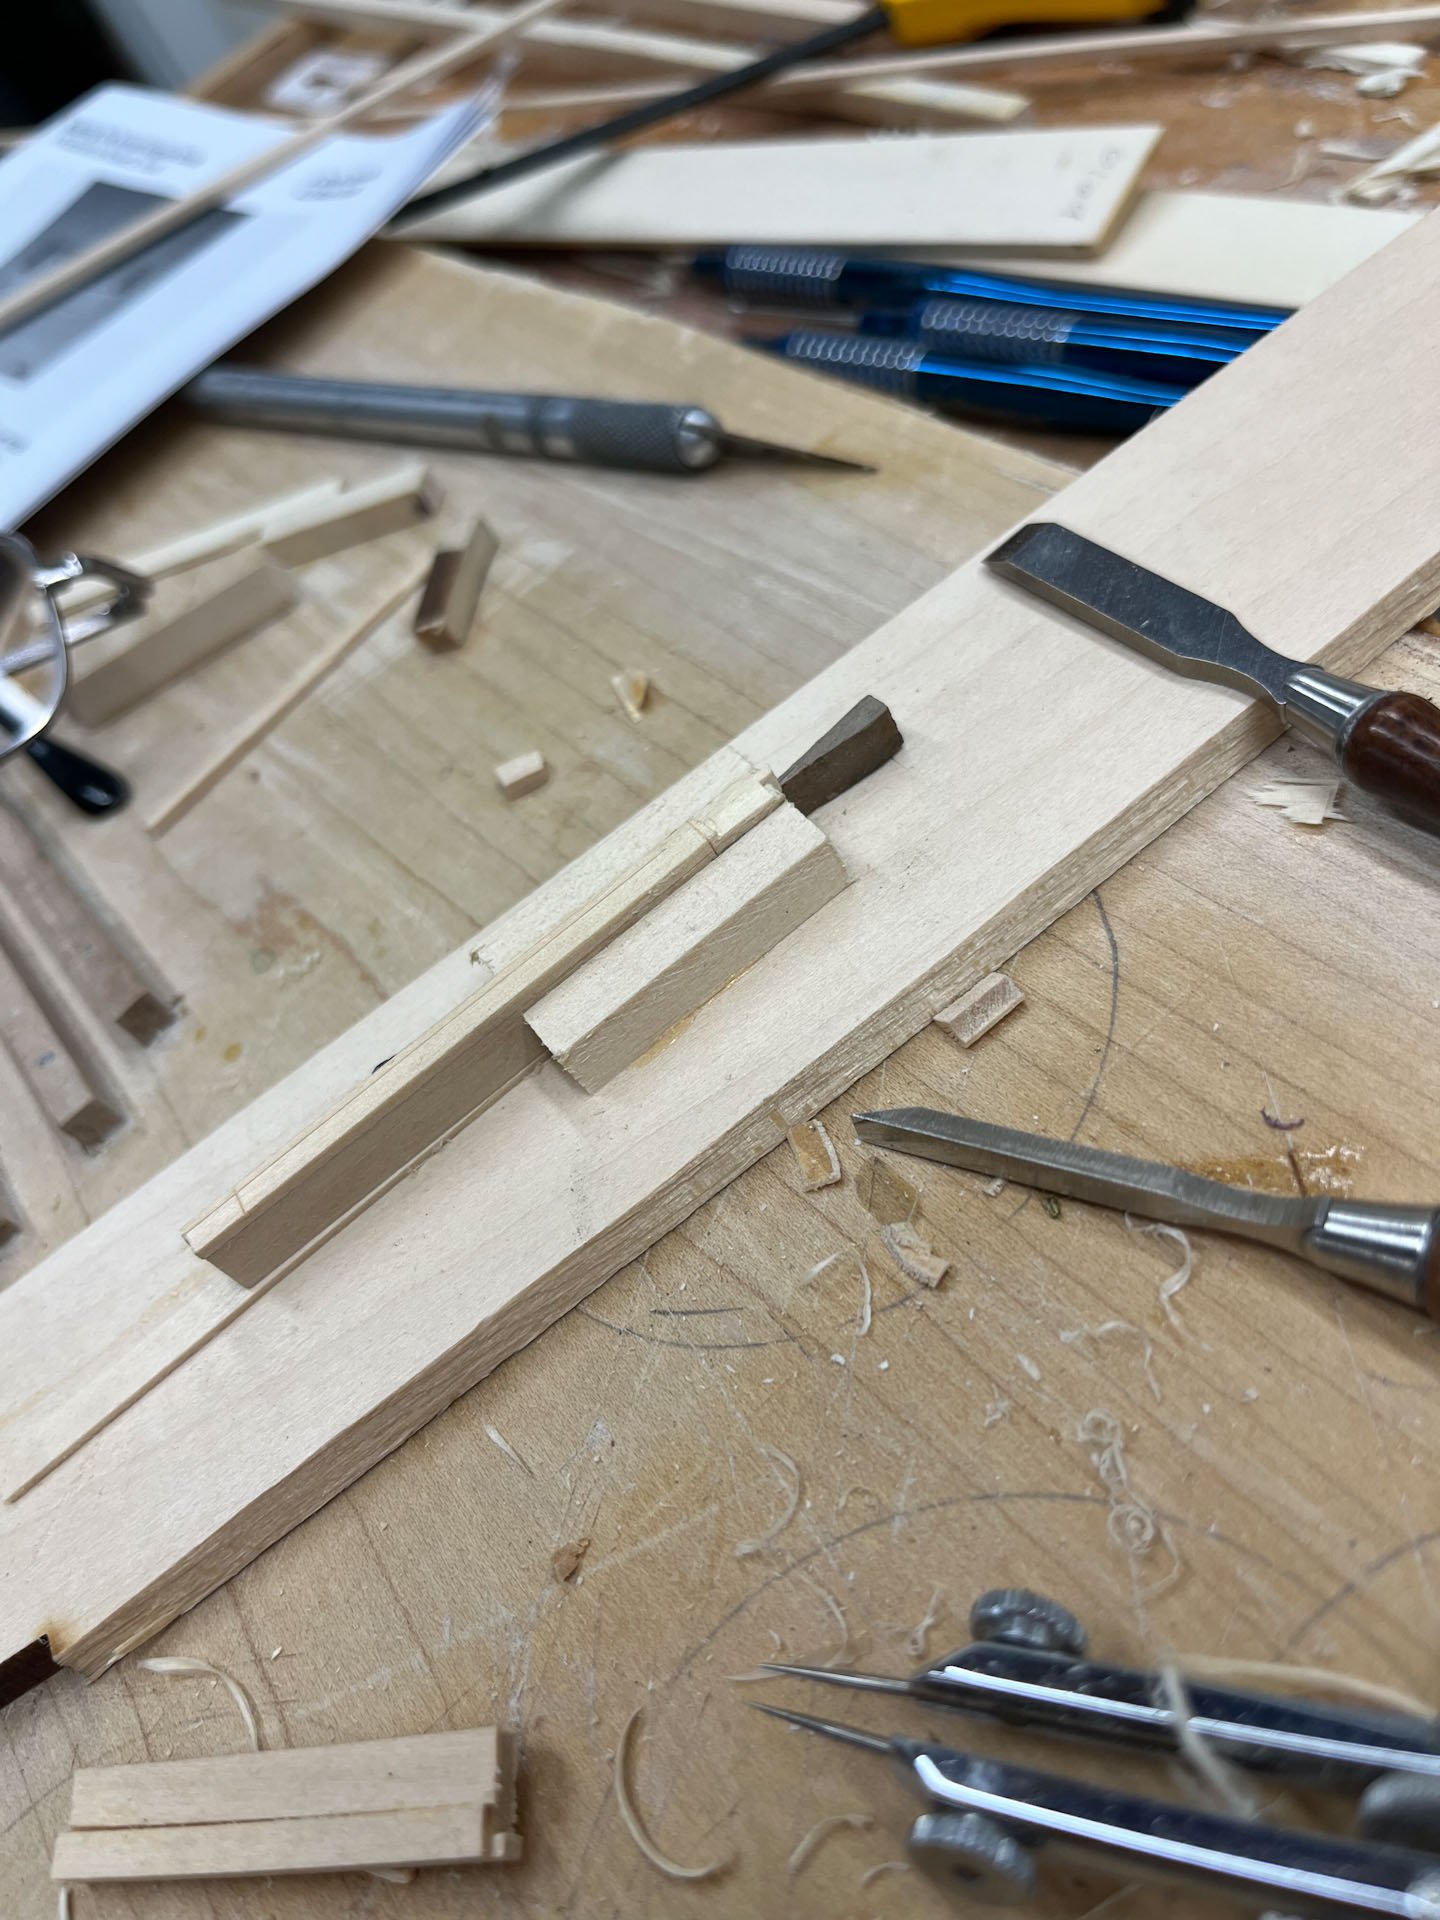
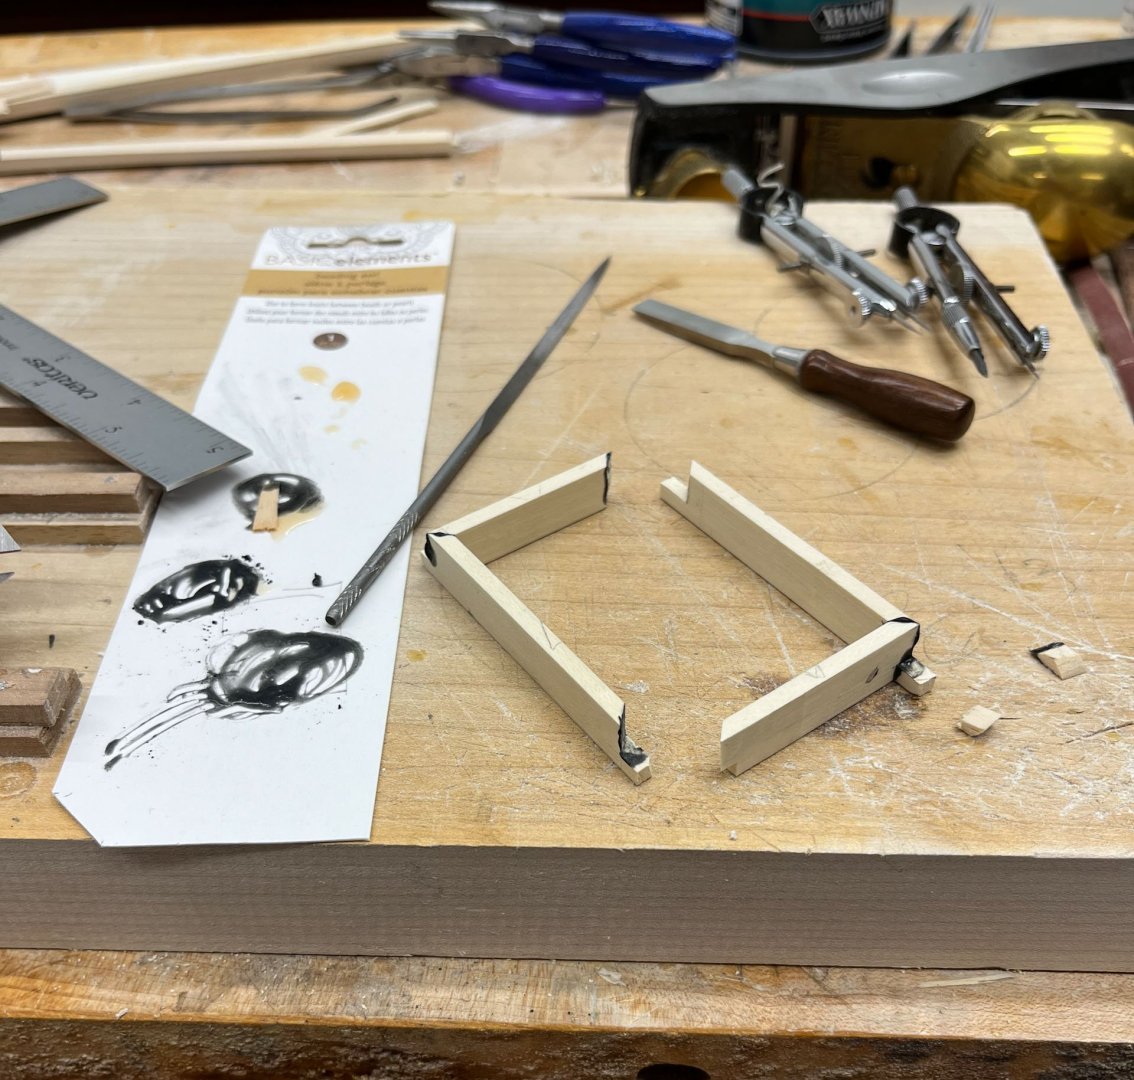
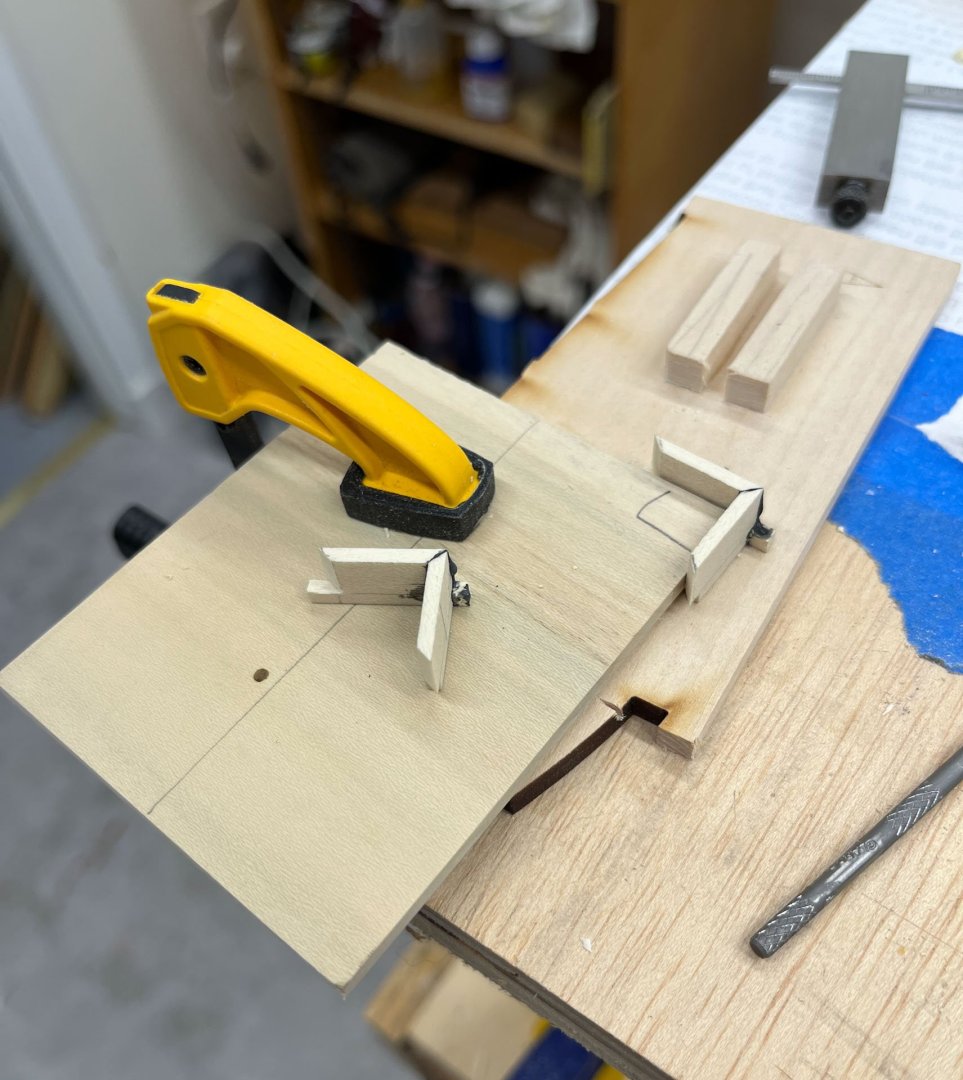
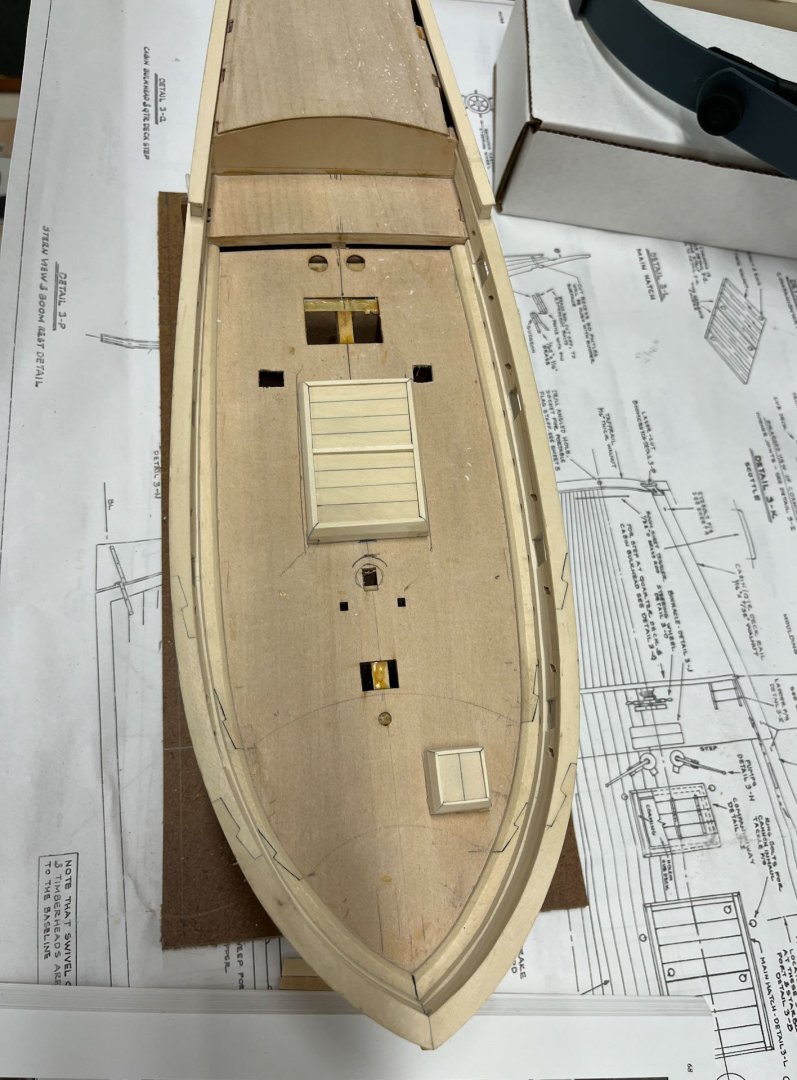
good evening fellow modelers. Here in Delaware its been hot, humid, a/c killing weather for the last few days. A thunderstorm went through and now its looking a little cooler. Long overdue for an update. Gregory no offense was taken or implied. In hindsight I think the standard lap joins look better from the normal viewing distance than my mitered half-lap joints. But its too late now I ainte redoing them. Dan, I still have a single grating to do and I'm following your advice and making the grating first, then fitting the frame. Thats next update. Last few weeks I have been working on the coamings with hatches, of which the AVS has 2. I made my test piece in my last post and it went well. After thicknessing my holly stock so it matched the plans I made all 4 sides. My updated miter guide worked well but it still took some fussing. It is very challenging clamping pieces this small so they don't shift. Here I am sneaking up on the 45 degree cut. I glued various paired thicknesses of wood to my working board and used them as guides to mark the height of the lap joints (you can see one of these in the top of the above picture to the right). It is impossible to photograph but I used a pencil to mark the lap first, then a scalpel blade held flat against my jig to incise the lap over the pencil mark, and then took progressive tiny shavings with my chisel until I could see the shiny "scribe" the scalpel left on each side. When I tried using files I seemed to round the joints more than I wanted so this was mostly done with edged weapons. Below is the next step with all 4 sides finished. Seemed ok. For all you woodworkers out there you can see my penciled on triangle which was really helpful. You can also see at some point I accidentally flipped the right side piece so the mark ended up on the bottom. Then I glued it into 2 halves and let them dry. I used my usual yellow gorilla glue with #2 pencil graphite mixed in. If you look above you may notice some glue on the left non-attached sides. This is because I glued the left side pieces together to the wrong ends. Isopropyl alcohol to the rescue; luckily I noticed something was wrong with the halves when I tried to dry-fit them. I made another mistake with the first coaming, this one not so easy to fix. Once glued together I realized i had a trapezoid, not a rectangle. I had glued the joints so the miters looked tight but hadn't checked for square. I guess my perfect 45 degree miters weren't. My buddy Jason (JLong) was here last weekend and said no one would ever notice it except me. Next up was the smaller coaming, or the "scuttle" as the practicum calls it. It made me miss working on the big one; it was a lot harder to hold stock this short. This time I also glued the 2 halves first, making sure it was the correct sides this time, and made a 90 degree jig to increase the odds of ending up with a rectangle and not another trapezoid. It went better. And here are the 2 coamings. The little one still has some pencil marks that will be removed and some final sanding but I call it not too bad. And here they are on the deck. The model shipways directions show both hatch planking oriented athwartships; the pacticum shows the smaller coaming hatch in a fore-aft position. Dr Feldman shows his small coaming fore-aft so thats how I did it as well. I also liked how the practicum added a presumably removable center divider for the large coaming, and I liked the recessed look. I didn't do a divider for the small coaming. And here they are in place on the deck. The light is making the model appear much darker than it really is. And thats it. Next up is making the single small grating and the companionway. Also the ring hardware. Have a great evening all Cisco


-
Book on planking
CiscoH replied to Fraser1945's topic in Building, Framing, Planking and plating a ships hull and deck
I learned a ton reading Chuck's planking directions for his Cheerful build/kit. They are free and can be found at https://syrenshipmodelcompany.com/resources/ChapterchapFour.pdf -
masterfully accomplished! how did you hold these tiny pieces while carving?
-
i really like your copper plates technique. makes them stand out beautifully
-
Marc - it has been my experience that sharpies fade to a clear grey color in about 2 years (we use them in our medicine logs at work all the time). i think you said you painted over and if so not as issue. beautiful build
- 2,699 replies
-
- 4
-

-
-
- heller
- soleil royal
- (and 9 more)
-
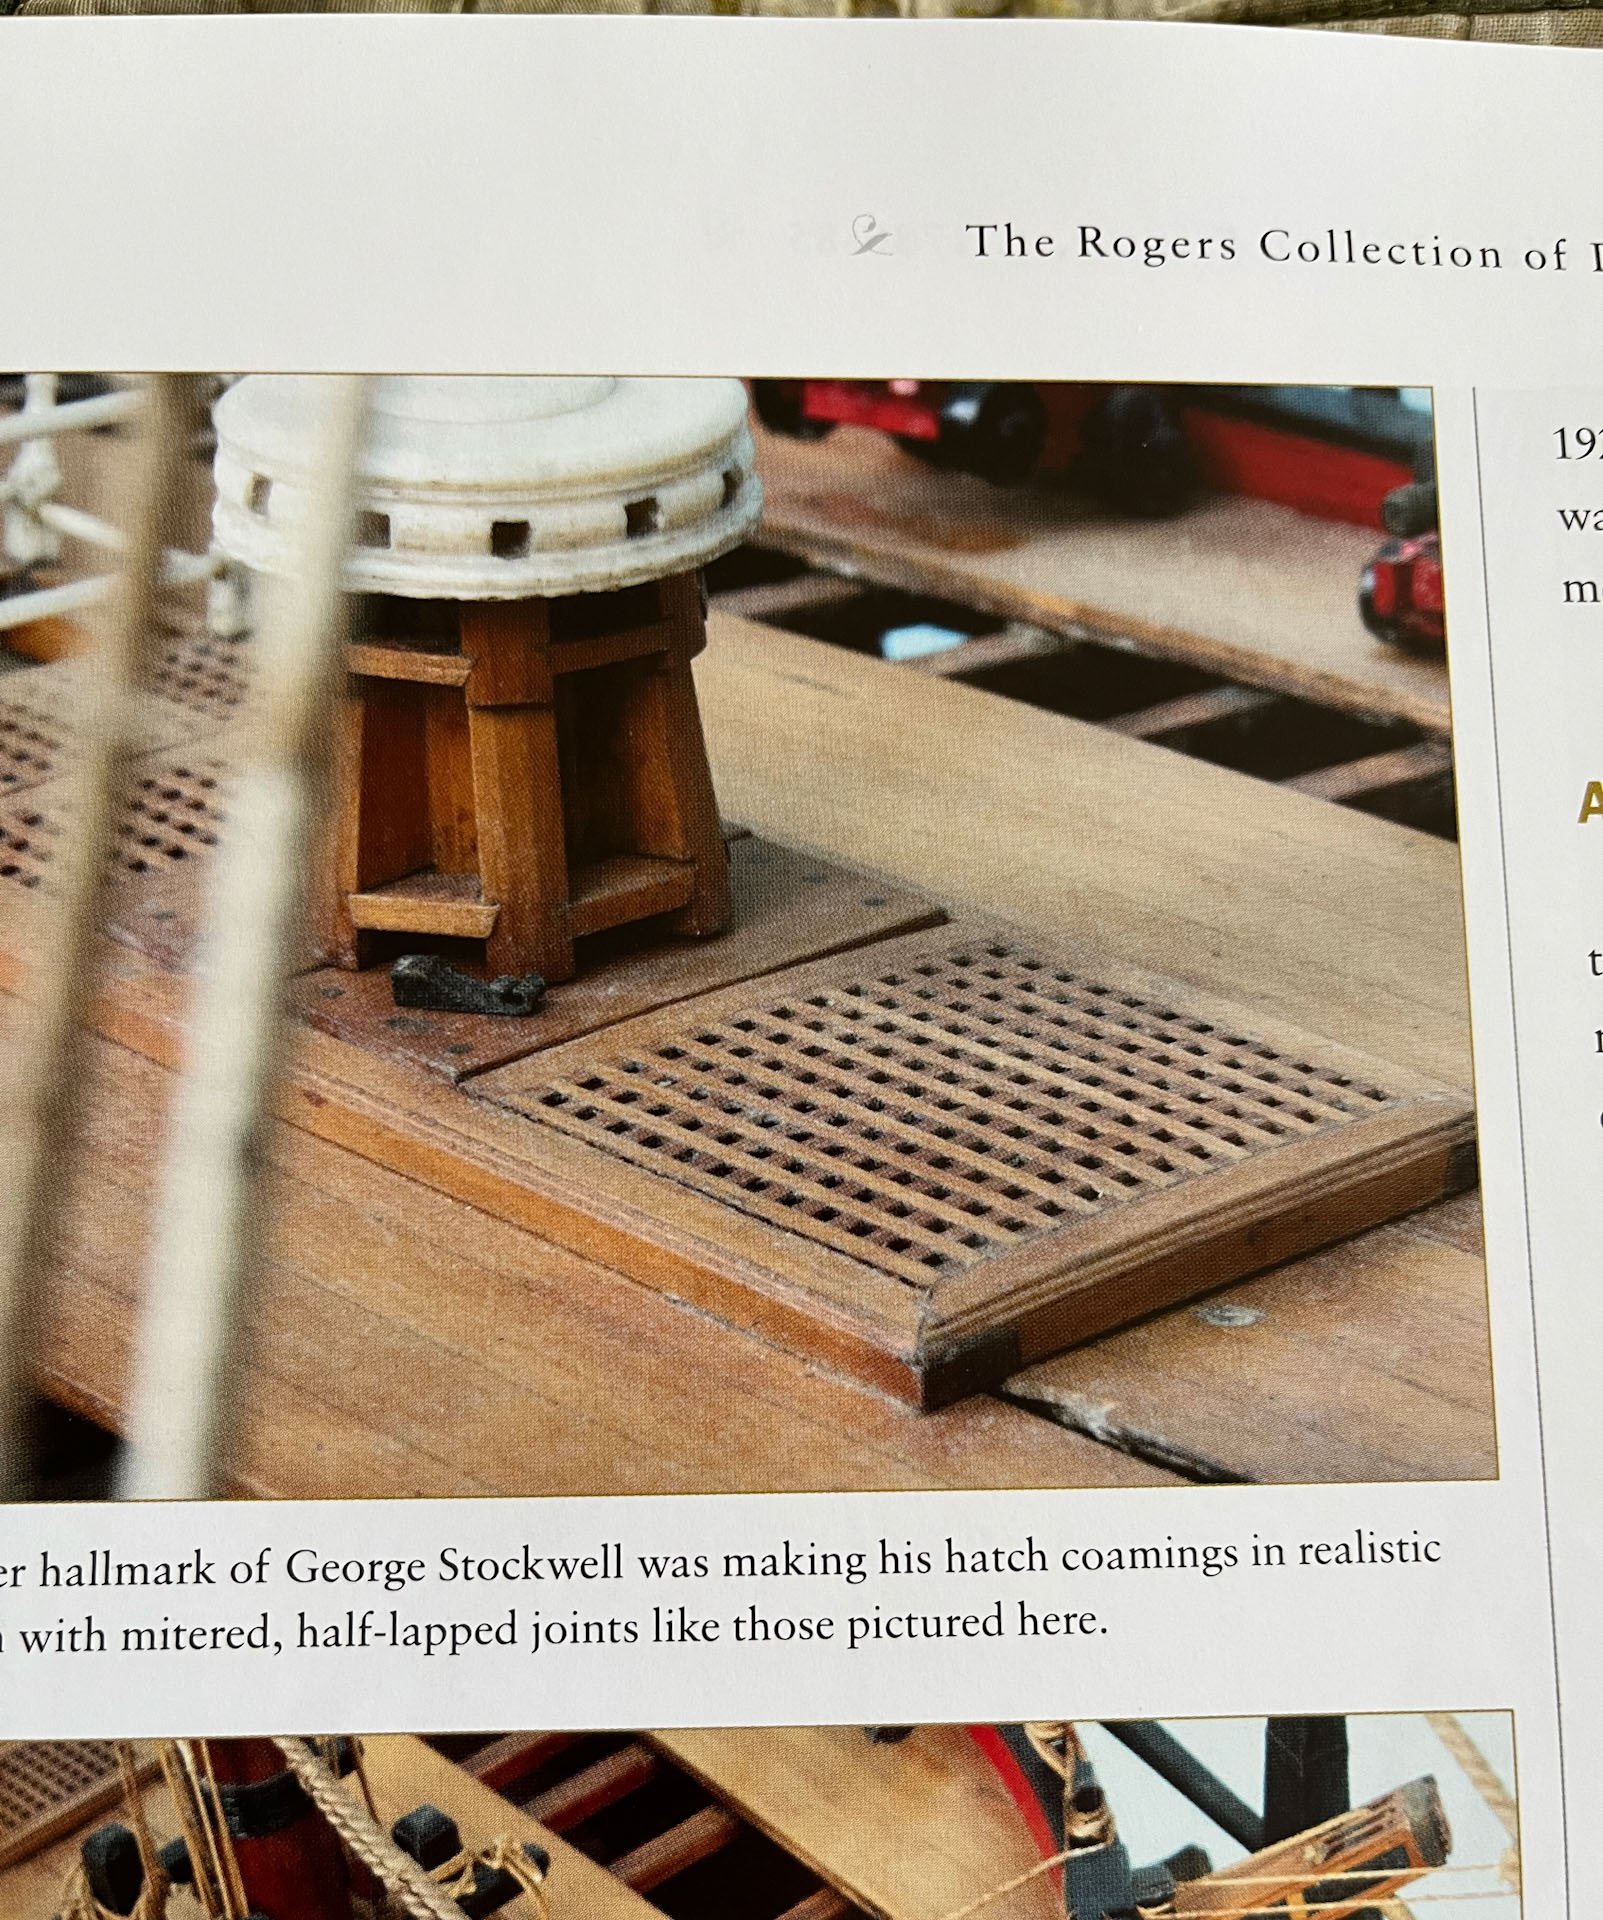
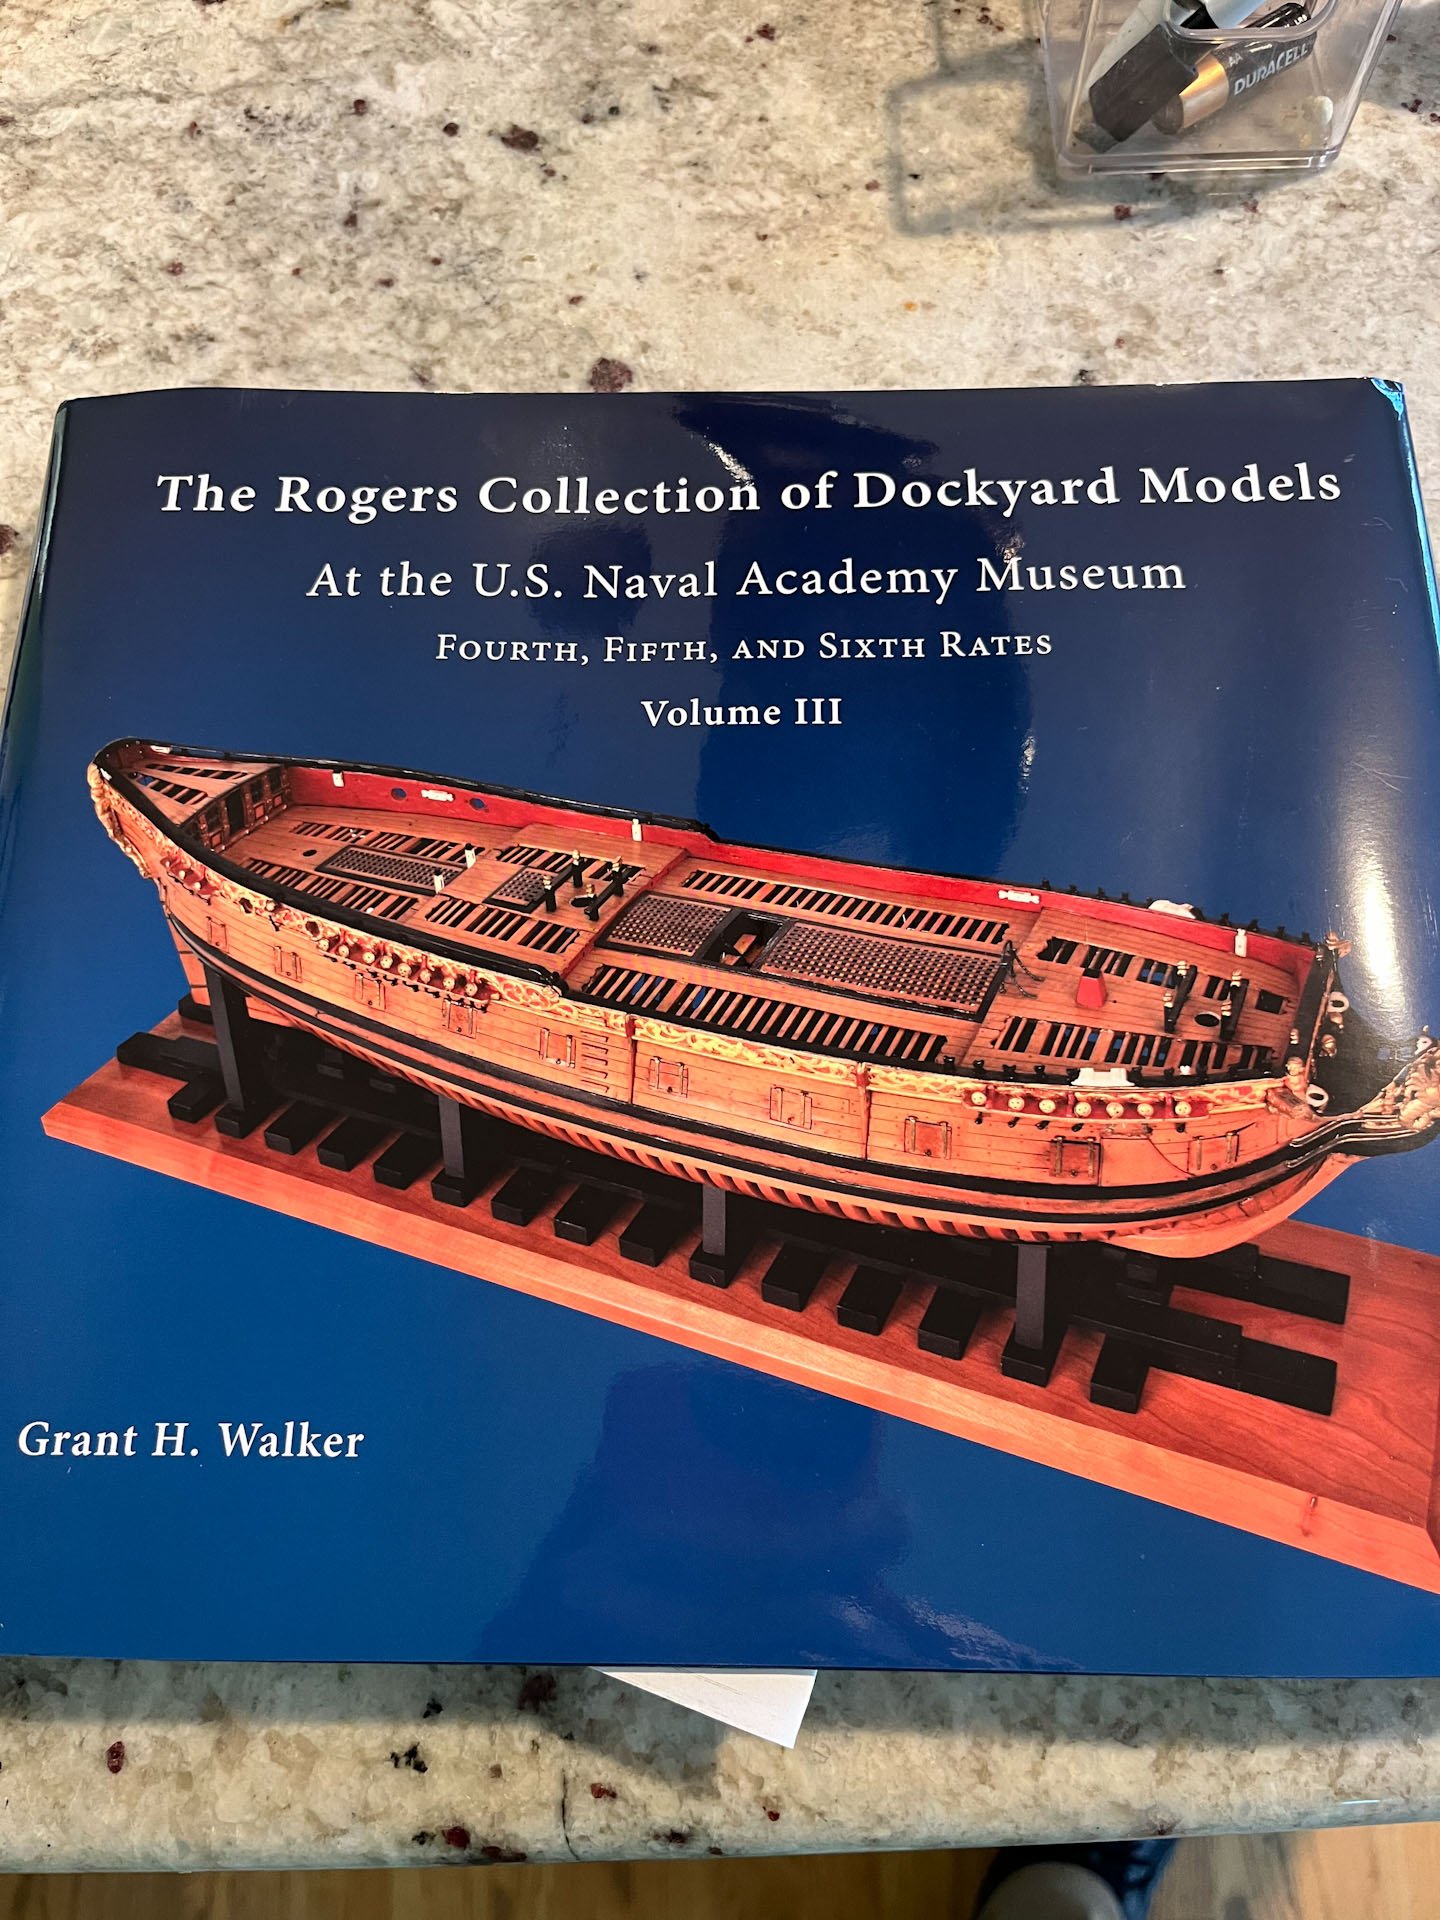
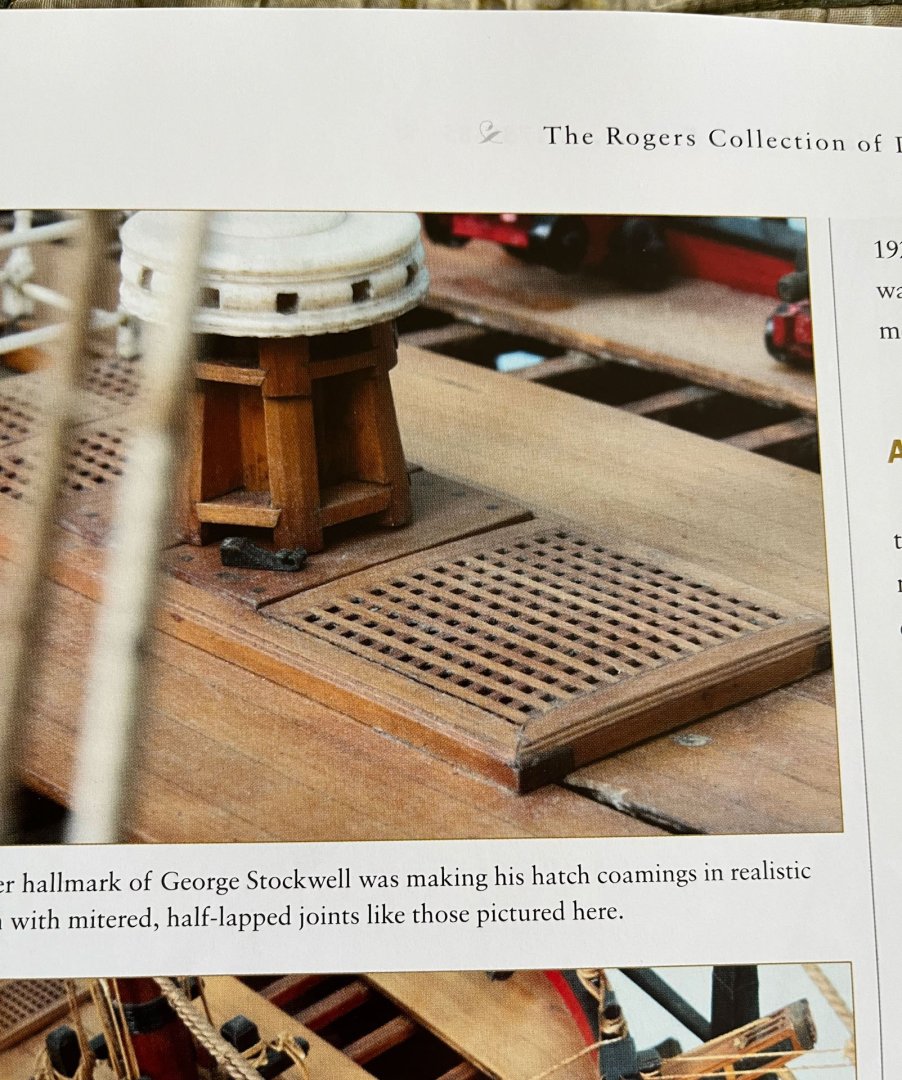
Gregory- as per Rogers Collection of Dockyard Models V3 by Gran Walker, pg 322, George Stockwell was a ship modeler from Sheerness who was active 1750s-1800. Apparently one of his hallmarks is the mitered half-lapped hatch coamings. Its not clear if this was an accurate representation of hatch coamings (if so its seems like not many contemporary modelers fitted their models this way) or an affectation. I don't know enough either way to have a weighty opinion; to me it simply looks cool. And since the AVS is a made up ship I'm enjoying trying whatever strikes me. If I hadn't done the half lapped miters I would have done Chuck's Cheerful version as you posted above. I already copied his hull planking plan in place of the kit's version.
-
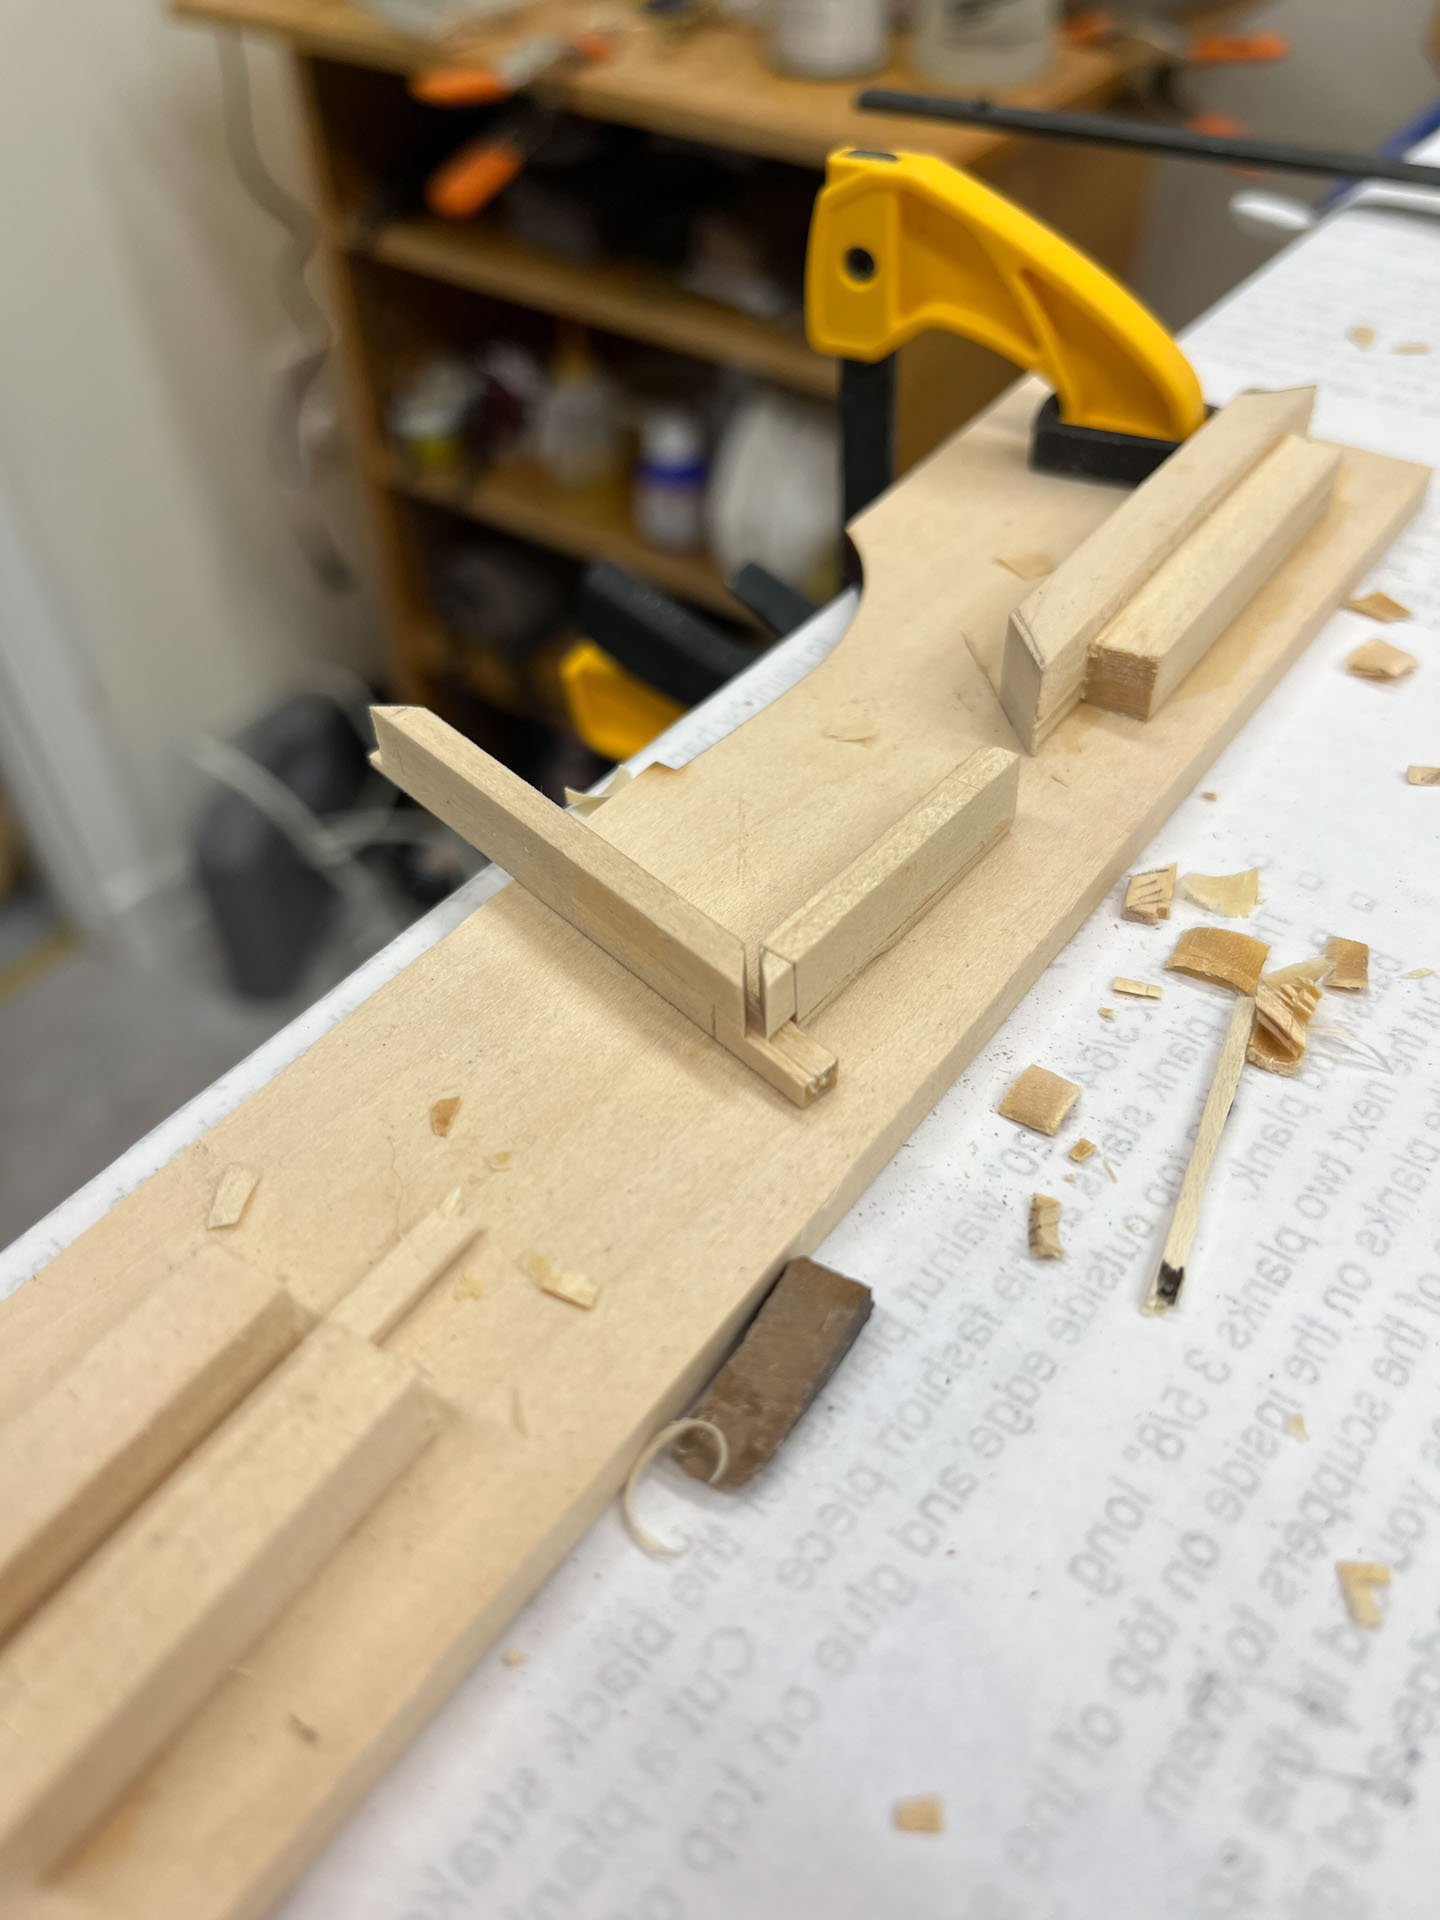
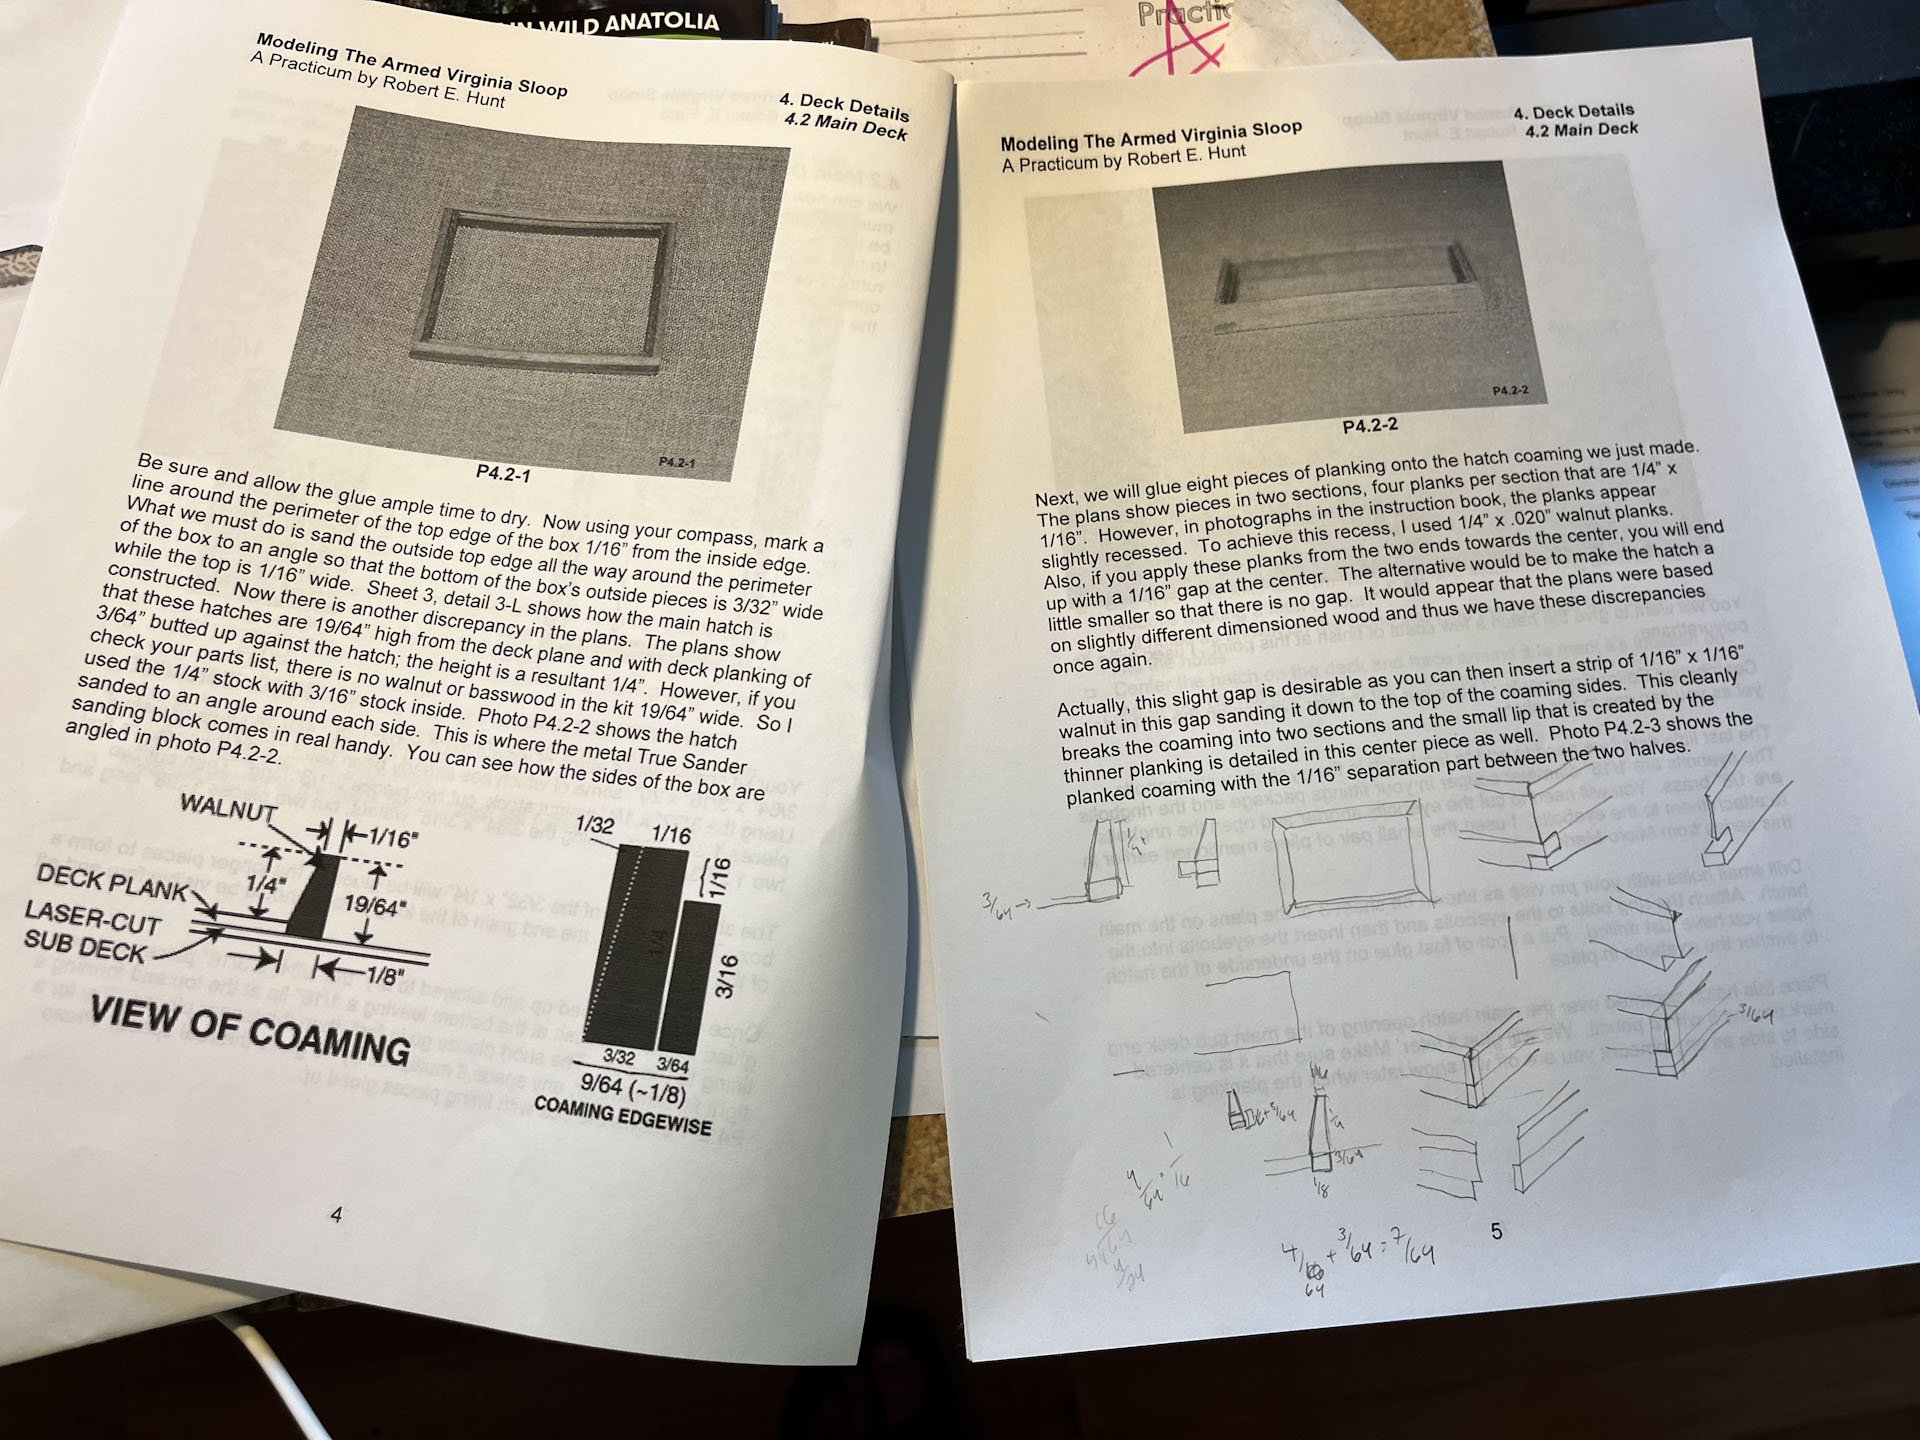
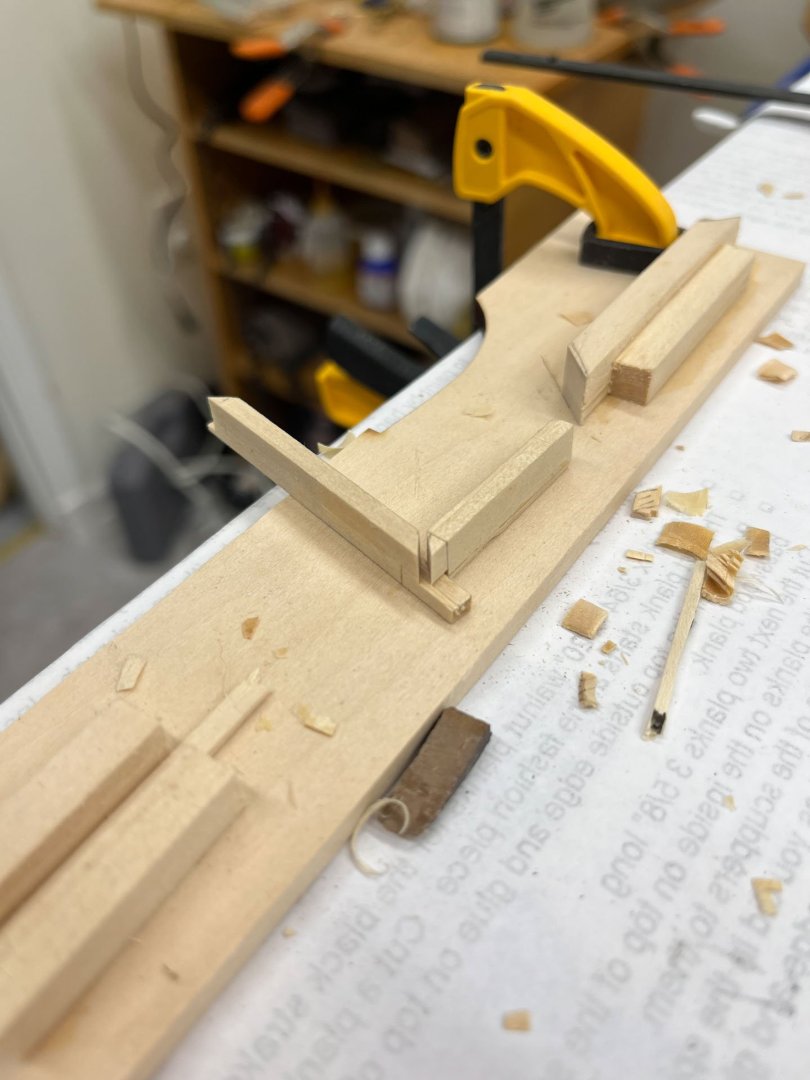
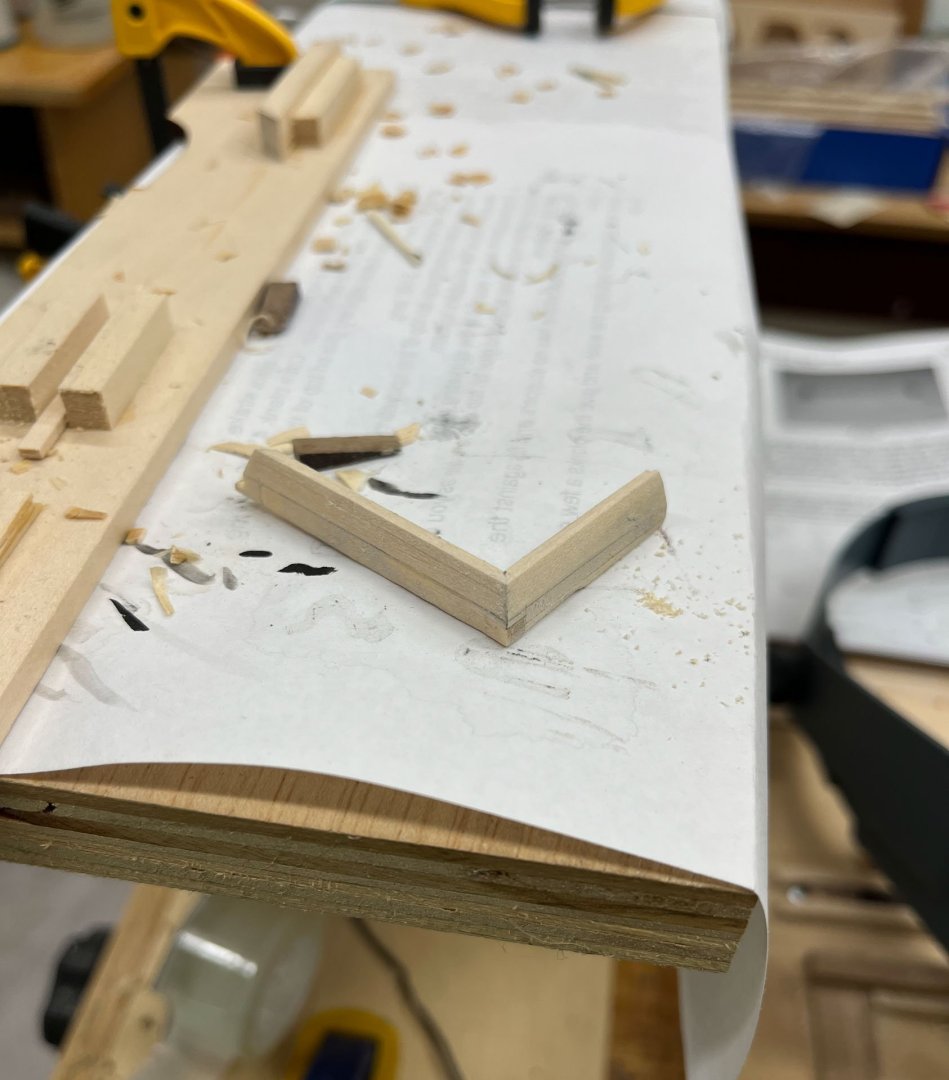
Happy Memorial Day all. Here in Delaware it is, once again, raining. A good excuse to plunge into my next project - the main deck hatch coaming. I haven't built anything like this before. My Robert Hunt practicum shows 2 ways to make it- the default is with butt joints and looks straightforward. Those with a bit more confidence could do mitered joints. Hmmm... But then I happened on a picture in Grant Walker's Volume 3 and it all went to heck. Mitered half-lapped joints? sweet. The George Stockwell coamings above are lower, whereas the one I'm attempting to make are tall and tapering but I thought I could figure it out. Right from the outset I was having trouble visualizing what the joint pieces would look like. My cartoons mostly confused me even more and looking at them now I realize I initially added an extra butt joint. Even with revisions I was still not clearly visualizing the joints and especially how to make them. The coaming is supposed to stick up 1/4" above the deck, and my deck planking will be 3/64" thick, so my wood stock will be 1/4" + 3/64" = whatever that adds up to. I wanted some of the butt joint to be visible above the decking so I decided to extend it 7/64" high and start the taper a 64th above. This was a lot of thinking and measuring with calipers and math. Below is my first test pieces, made from the kit's limewood. These were not measured and only served to help me visualize the shape of the joints. I glued various pieces of stock wood together; there wasn't an exact match in the kit. I also have the hand powered Ultimation Sander (which works very well) and I used it to make the 45 degree miters on the short pieces (left) below. It can't be used for the long pieces (right) below as the butt joint part of the coaming stick out. The practicum and the pictures in Grant Walker's book both show the endgrain of the butt joint being oriented fore-aft so thats what I did as well. Miters are challenging at any scale; I needed to cheat, so I made some jigs. The sections in David Anscherl's and Greg Herbert's various book about making lites was very helpful. I am still making test pieces here and I didn't take pictures of every step but I will do a better job with the actual holly stock. Below I glued 2 pieces of rectangular wood to my board and put 2 pieces of thin strip below the test stock to raise it up so exactly 7/64" stuck up out of the jig. Some walnut wedges kept it from shifting. I had used my smallest square and a scalpel previously to incise the edges of the butt joint; then I used the edge of my chisel held flat on the jig to incise a fine line on both sides which defined the rest of the butt joint. Then I gradually chiseled out the waste. This made a very square and flat joint. As before these test pieces are made up of several glued up smaller pieces. Below you can see my miter jig. I clamped the long piece of coaming to the jig and holding a flat chisel against the jig used it to cut the miters. I didn't take pics of this process but I will next time. and here's another pic of the joint All good so far. I glued it together with yellow glue mixed with a little graphite, same as I have previously done on my scarf joints. And finally I drew some lines with my compass marking out the taper and first chiseled then refined the coaming's taper with sanding sticks. The camera kept insisting my fingers were more interesting than the wood joint I was holding, sorry about that. And there is my ever first mitered butt joint. Next up is preparing my holly stock and doing it for real. Thanks for reading Cisco


-
USS Constitution by mtbediz - 1:76
CiscoH replied to mtbediz's topic in - Build logs for subjects built 1751 - 1800
looks great i’m on hatches in my build as well. in the time it took me to make jigs to build 1 test corner of a hatch you completly built all of yours! And they look perfect -
simply amazing
-
i would vote natural, red trim with natural, or red. But i think any of the example colour schemes would look great
-
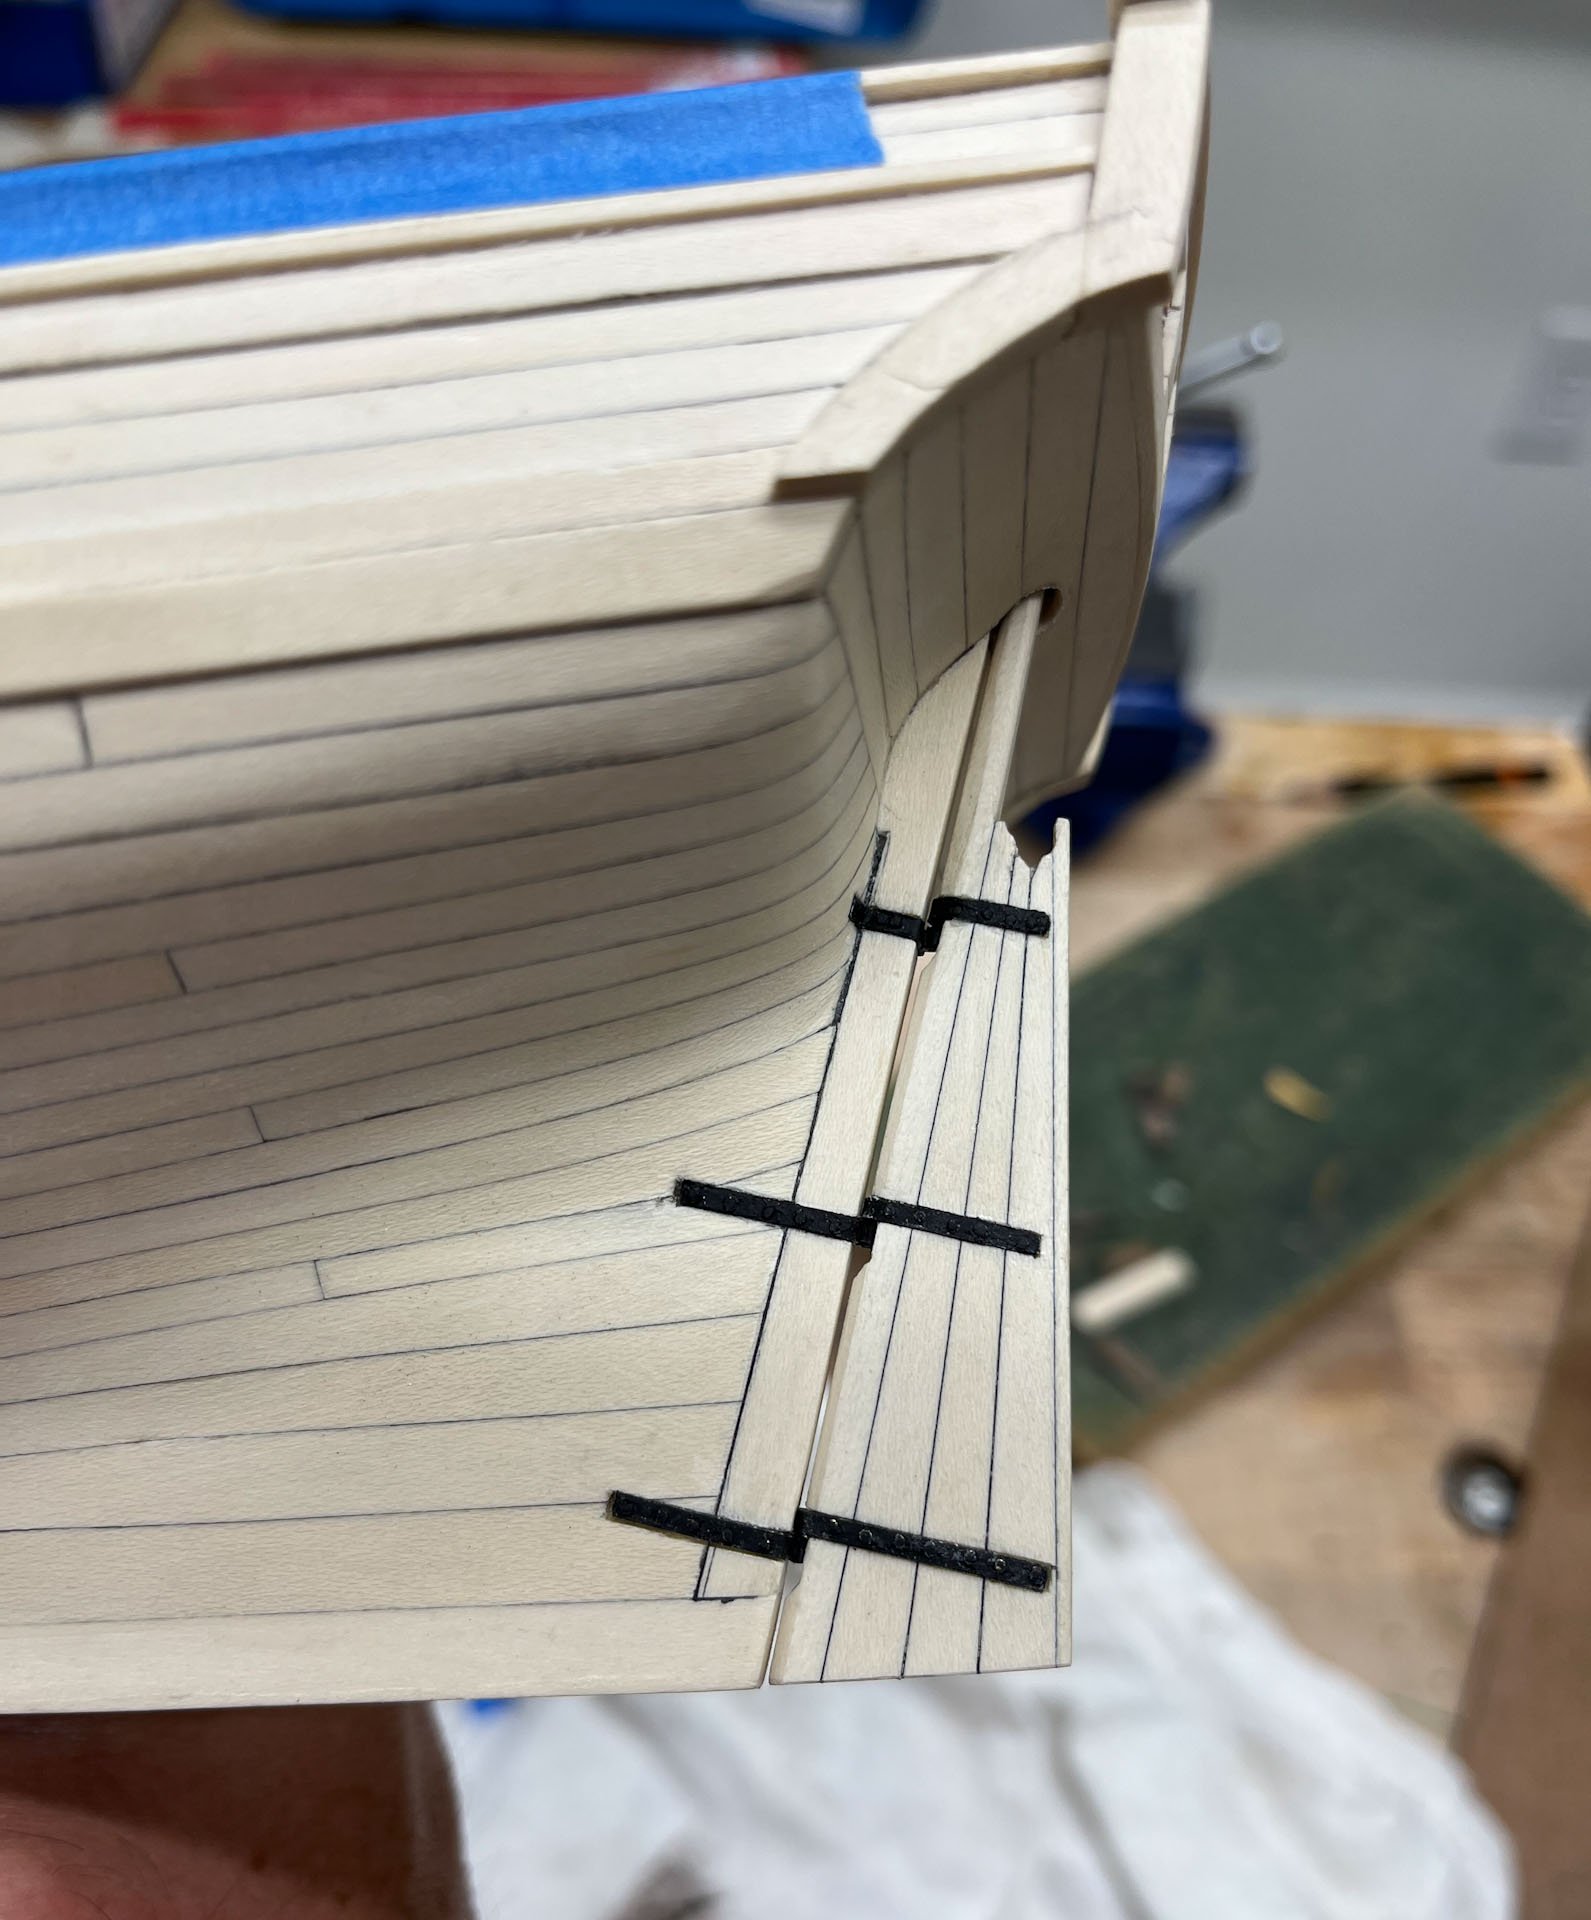
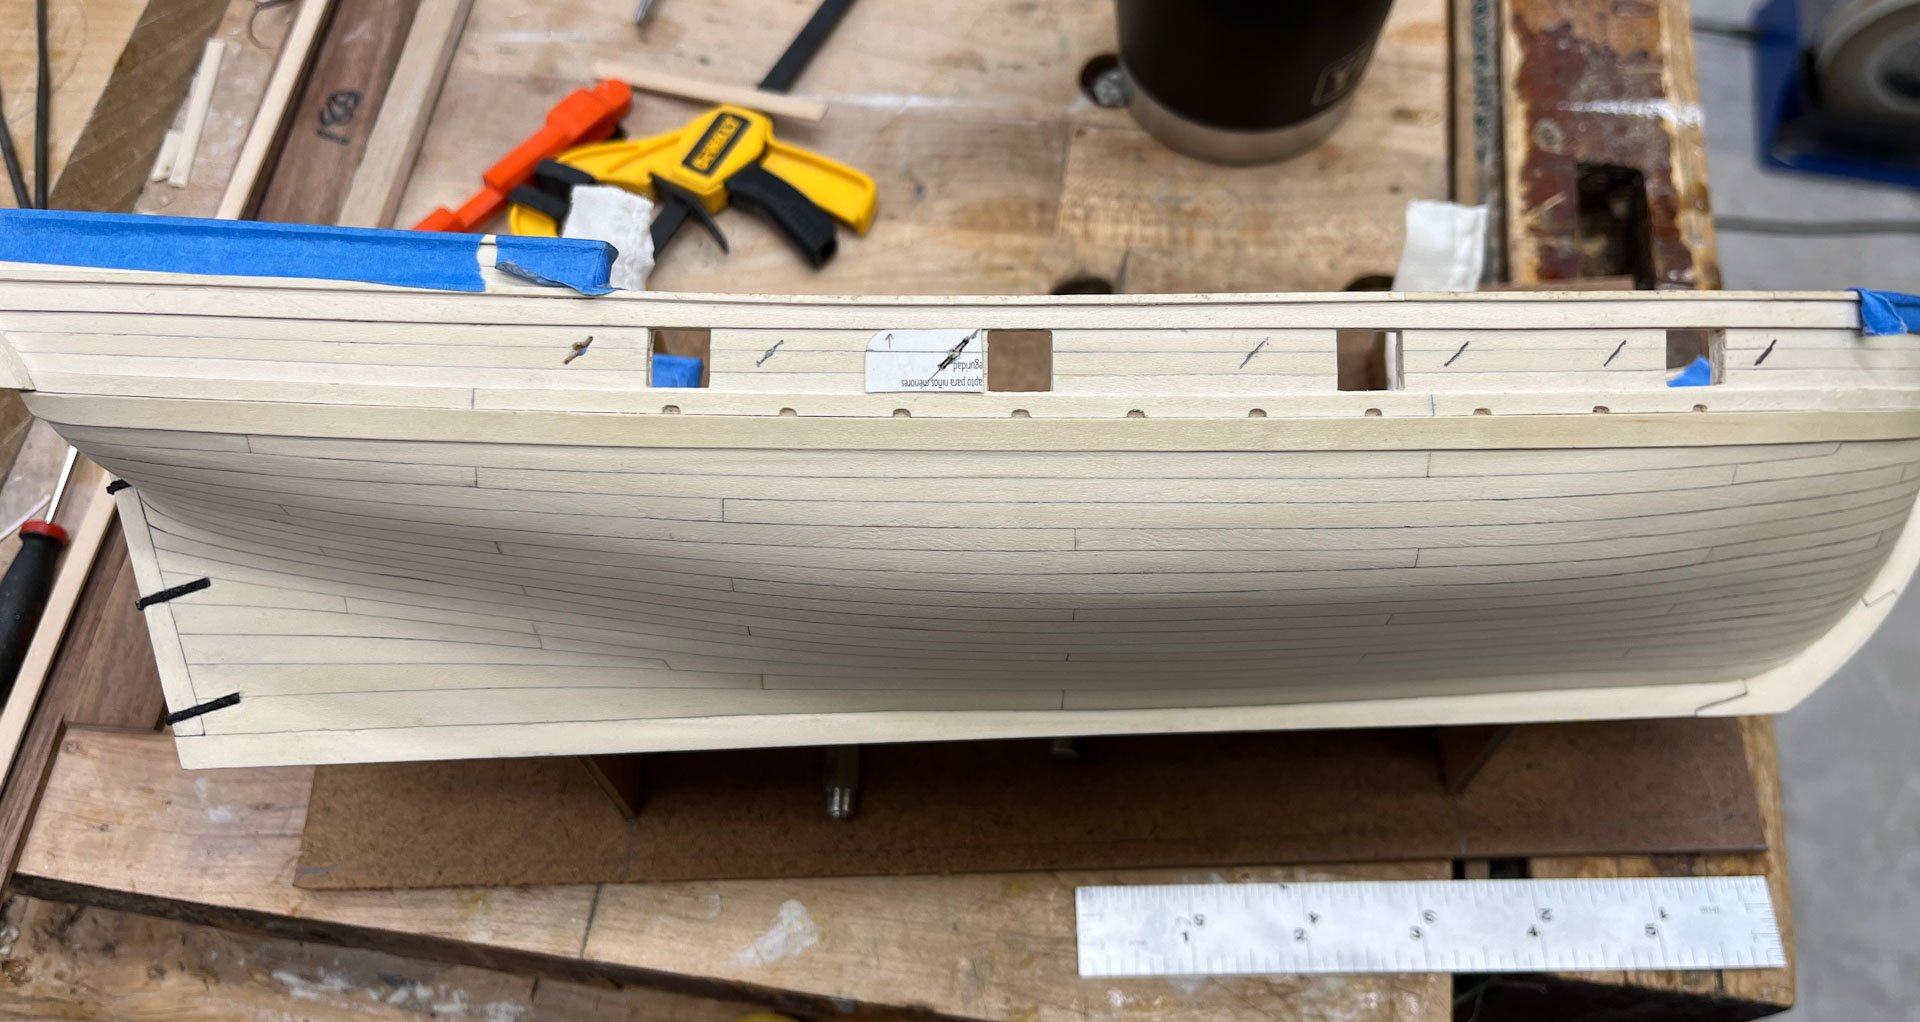
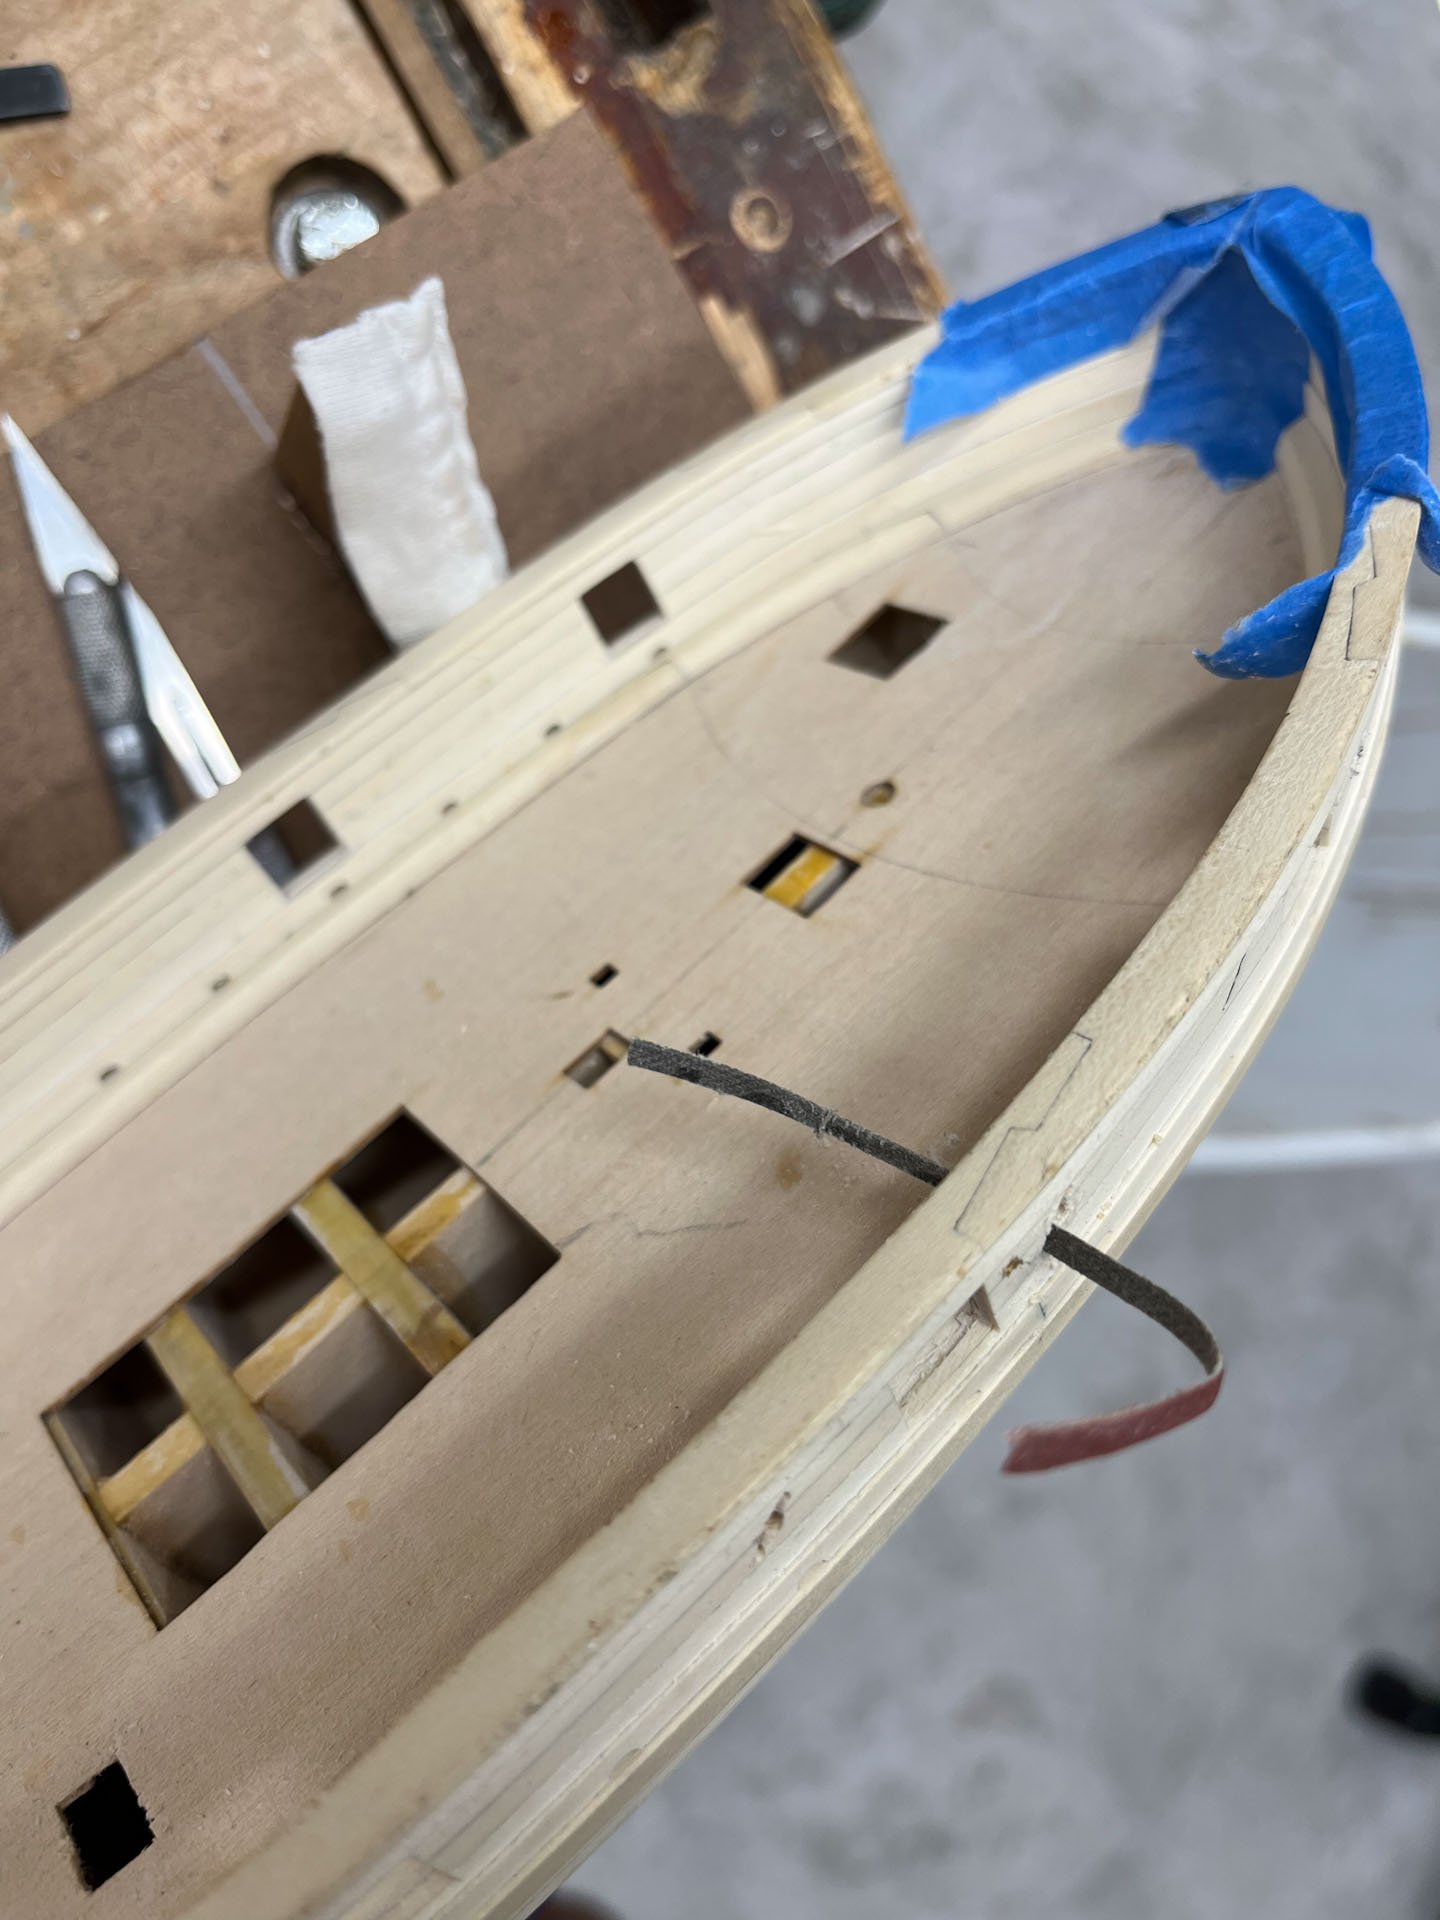
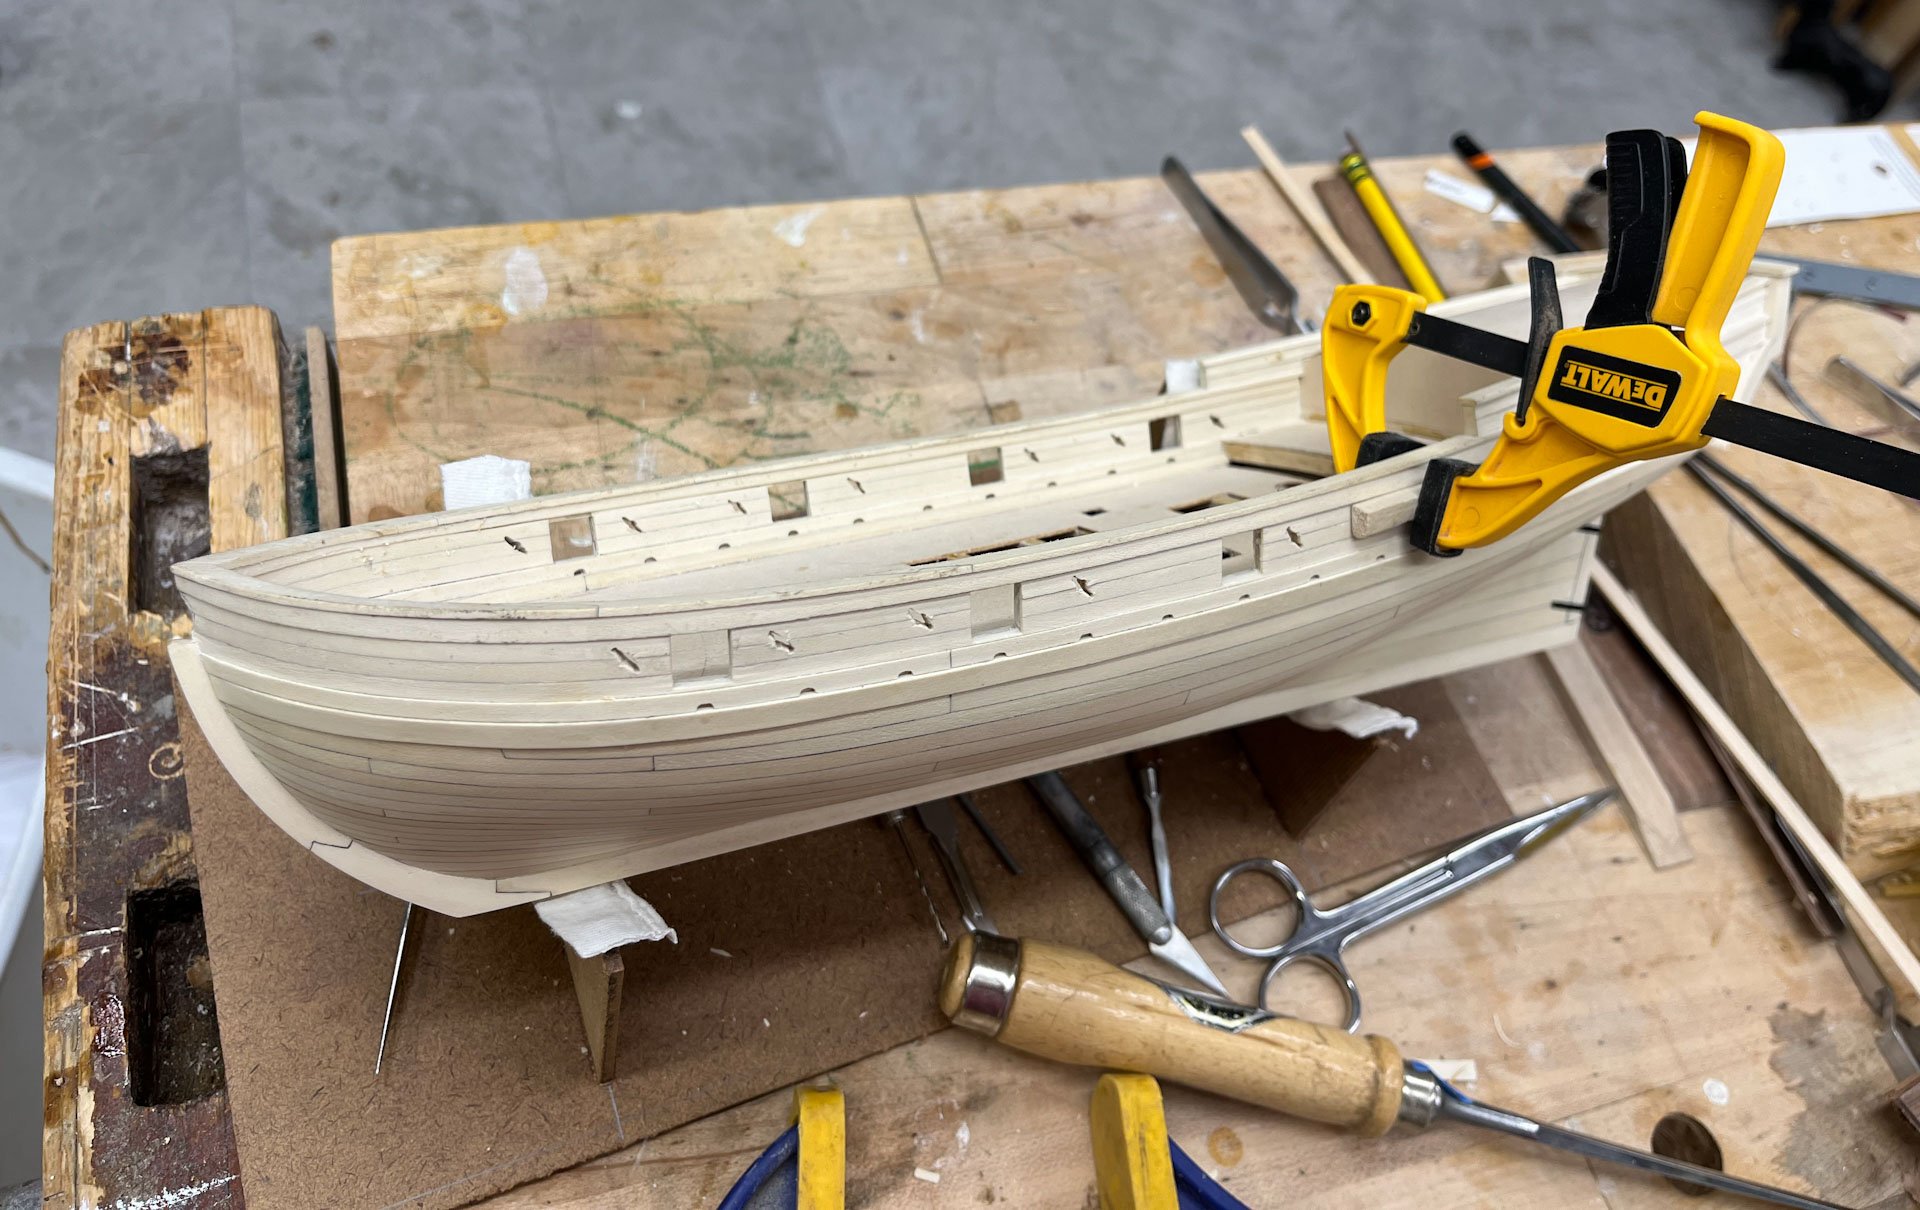
Good early afternoon all. Its spring here in Delware, everything is growing, it won't stop raining, time for an update. I finished the rudder. After all my trials trying to blacken the brass strips I ended up painting. Abbadon black, which covers very well. Paint definitely obscures some detail but I'm going to live with it. After all that work drilling holes, and as I suspected would happen, its hard to see the bolt heads. I do think my stern/rudder gap is satisfyingly small, the rudder does swing side to side, and I will take it as a win and Finally Move On. There will be a touch-up painting later on but for now I removed the rudder and stored it in a hopefully-safe-but-not-so-safe-that-I-can't-find-it-later location. I had planned to build the ship's base and brackets next but hadn't been able to work up much enthusiasm. So instead I built a work/storage cradle, a much simpler task. It holds the ship quite securely (we have "hey lets knock this over" cats who don't respect anything or anyone) and I don't know why I didn't make one before. Next up per the Lauk Street Practicum is making the oar ports. These are a nice feature that reminds you of the smaller size of this model and I like the diagonal placement. Each port is located about 1/4" from a gunport. I cut out a strip of cardboard, drew a 45 degree triangle and cut out a strip the correct length of the port. Push the template up against the sheer strake and draw the line. For the port side I flipped the template over. Easy. Then drill holes- smaller ones at each end and a bigger one in the middle. I clamped a piece of backing wood to the inner bulwarks while drilling to minimize tearout, which mostly worked. The small bits go right through the backing wood no problem so watch your fingers; I poked myself twice by holding too close to where I was drilling. Then I used a combination of my smallest Veritas chisel, a new scalpel blade, my smallest round file, and cloth backed sandpaper I cut into very thin strips to further refine the holes. Of some concern is the condition of the deck railing, which has been covered with blue tape for months. It has some dents and some tape adhesive "grunge" to be dealt with. I do NOT want to remake these so It'll be very light coats of alcohol to dissolve the glue residue followed by gentle water and my trusty mini-iron (usually used for plank bending) to see if I can swell out the dents. I said it before; I should have waited to put the deck railings on. Or at the very least not sanded them down to finished width until I was done handling the hull so much. Next time... I did pop a short, not well attached, piece of inner bulwark planking out while drilling, which I am gluing back into position below. And thats where my AVS stands today. And finally, reading material. I have been going 1 chapter a night for a while in Grant Walker's new book; it is amazing. Heavily researched, lots of great close-up shots of the exterior and endoscopic shots of the interiors as well. Can't recommend it enough. And he talks about an upcoming 4th volume... Ok thats it, have a peaceful evening. thanks for reading cisco


-
Man thats beautiful!
-
Ron it was great to finally meet the person behind such a sweet build! Your Oneida is even more impressive in person. cisco (john)
-
gorgeous work Matthias