Mahuna
-
Posts
1,504 -
Joined
-
Last visited
Content Type
Profiles
Forums
Gallery
Events
Everything posted by Mahuna
-
 Look real good, Bob. I'm with Mark and John - would like some details on how they were made.
- 348 replies
-
- 4
-

-
- pequot
- cable ship
- (and 1 more)
-
Hi Hamilton When you get the 1/8" bandsaw blade you'll have much better luck on the curves. Any curves that are too tight for that blade can be cleaned up using a jewelers saw, or simply by sanding of filing. I would recommend cutting everything slightly outside the lines and refining the shape by final sanding or filing. I originally used rubber cement, but later switched to glue sticks (I use Elmer's school glue). The paper can be removed by wetting it and then scraping it off with a razor blade.
-
Hi Druxey The sweeps look great - your painting of the dolphins is outstanding. I like the second option - vertical - best, but either looks really good.
- 641 replies
-
- 4
-
-
- greenwich hospital
- barge
- (and 1 more)
-
Hi Bill I was able to pick up a used Sherline mill and lathe with a bunch of accessories a couple of years ago, and I'm extremely pleased with the setup. I upgraded the mill with the 10,000 RPM package and would recommend it (although it's not absolutely necessary). One accessory I highly recommend is the Sensitive Drilling Attachment.
-
Wow - she looks fantastic, Patrick. I especially like the paint job - at that scale it's superb. Milestones are always happy times.
-
Hi Elijah - thanks for the comment. One of the good things about working in wood is that most errors/problems can be corrected if found early enough.
- 649 replies
-
- 5
-
-
- dunbrody
- famine ship
- (and 2 more)
-
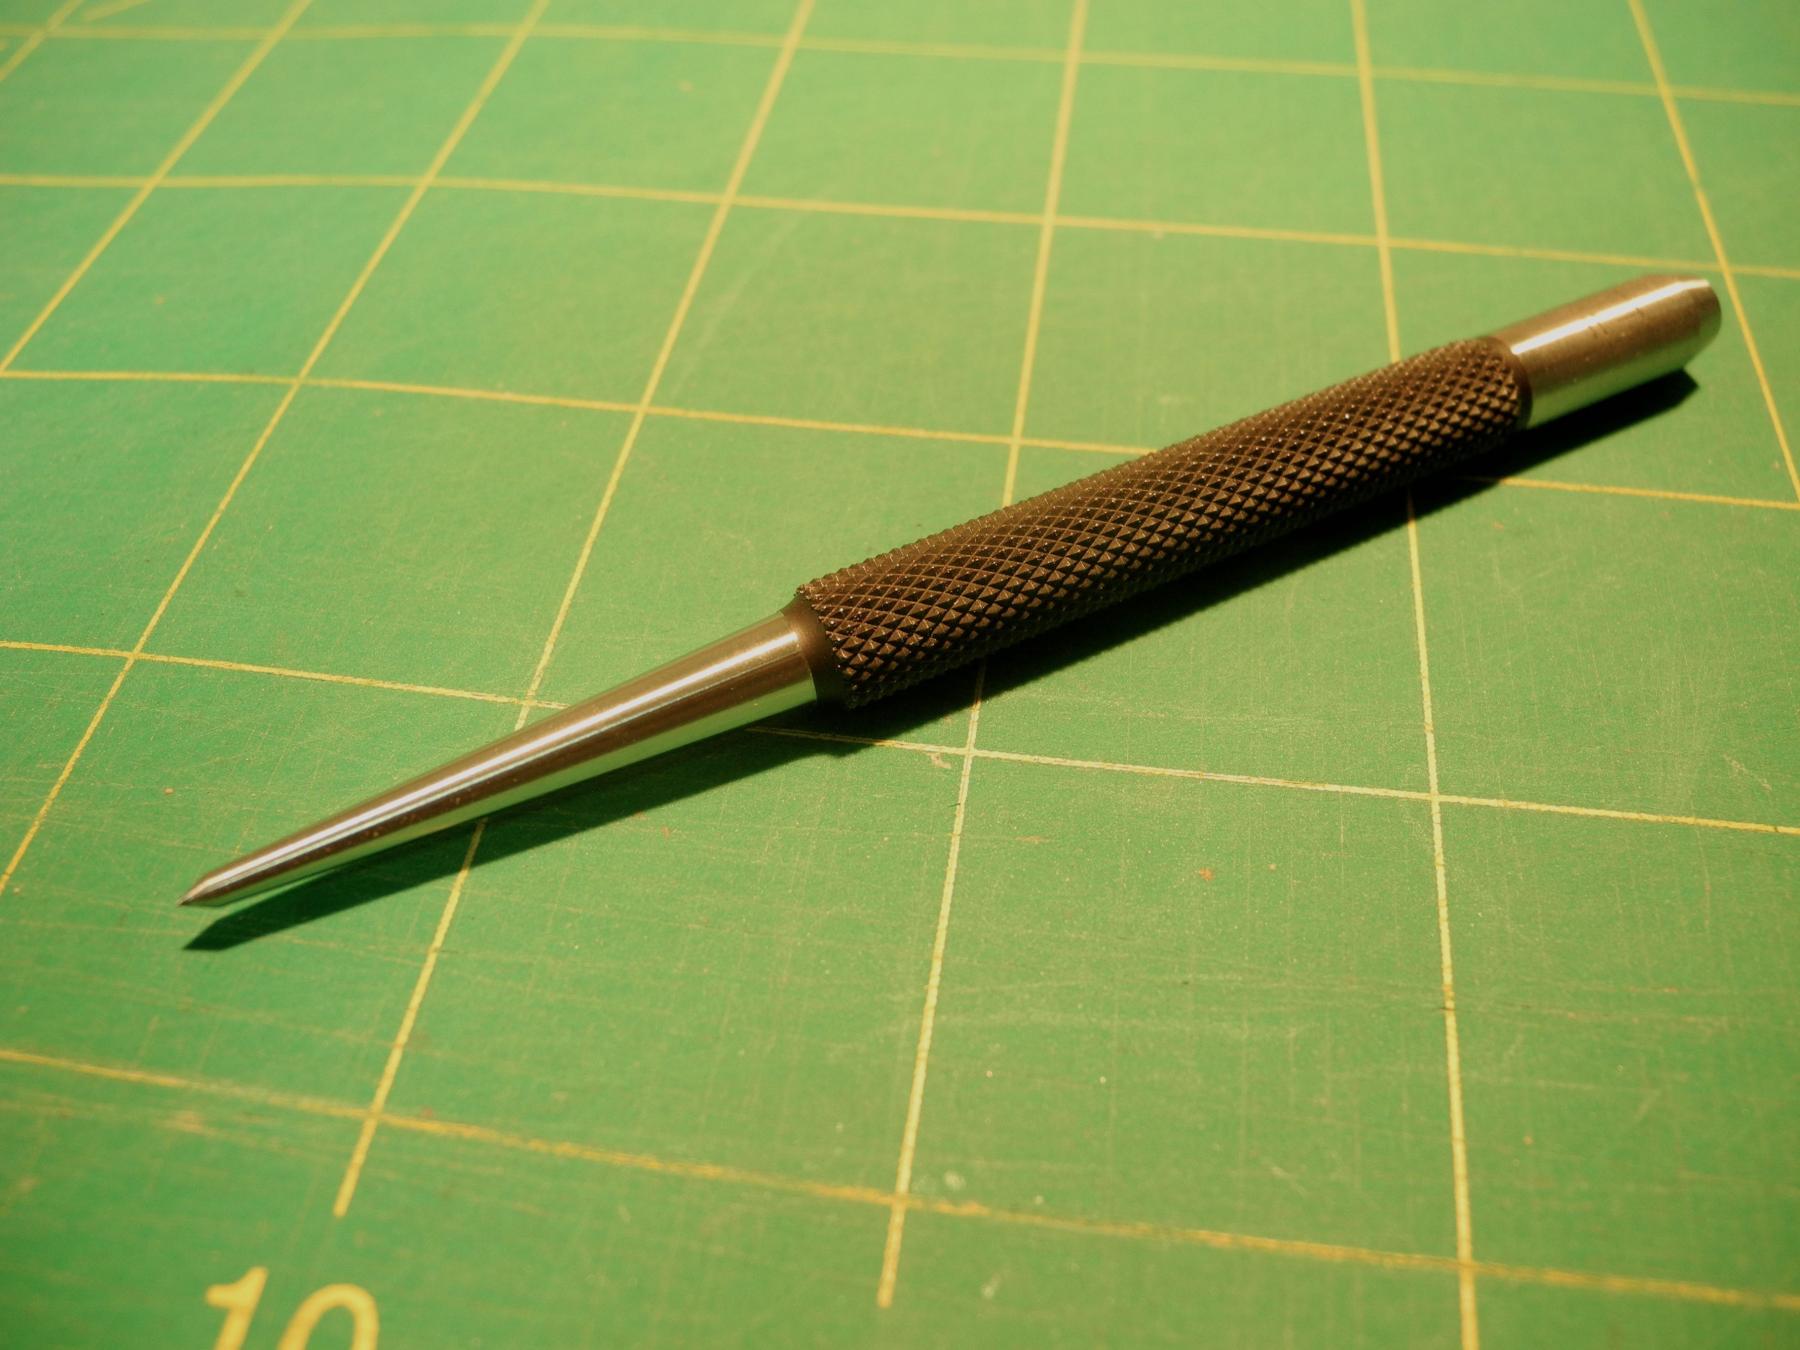
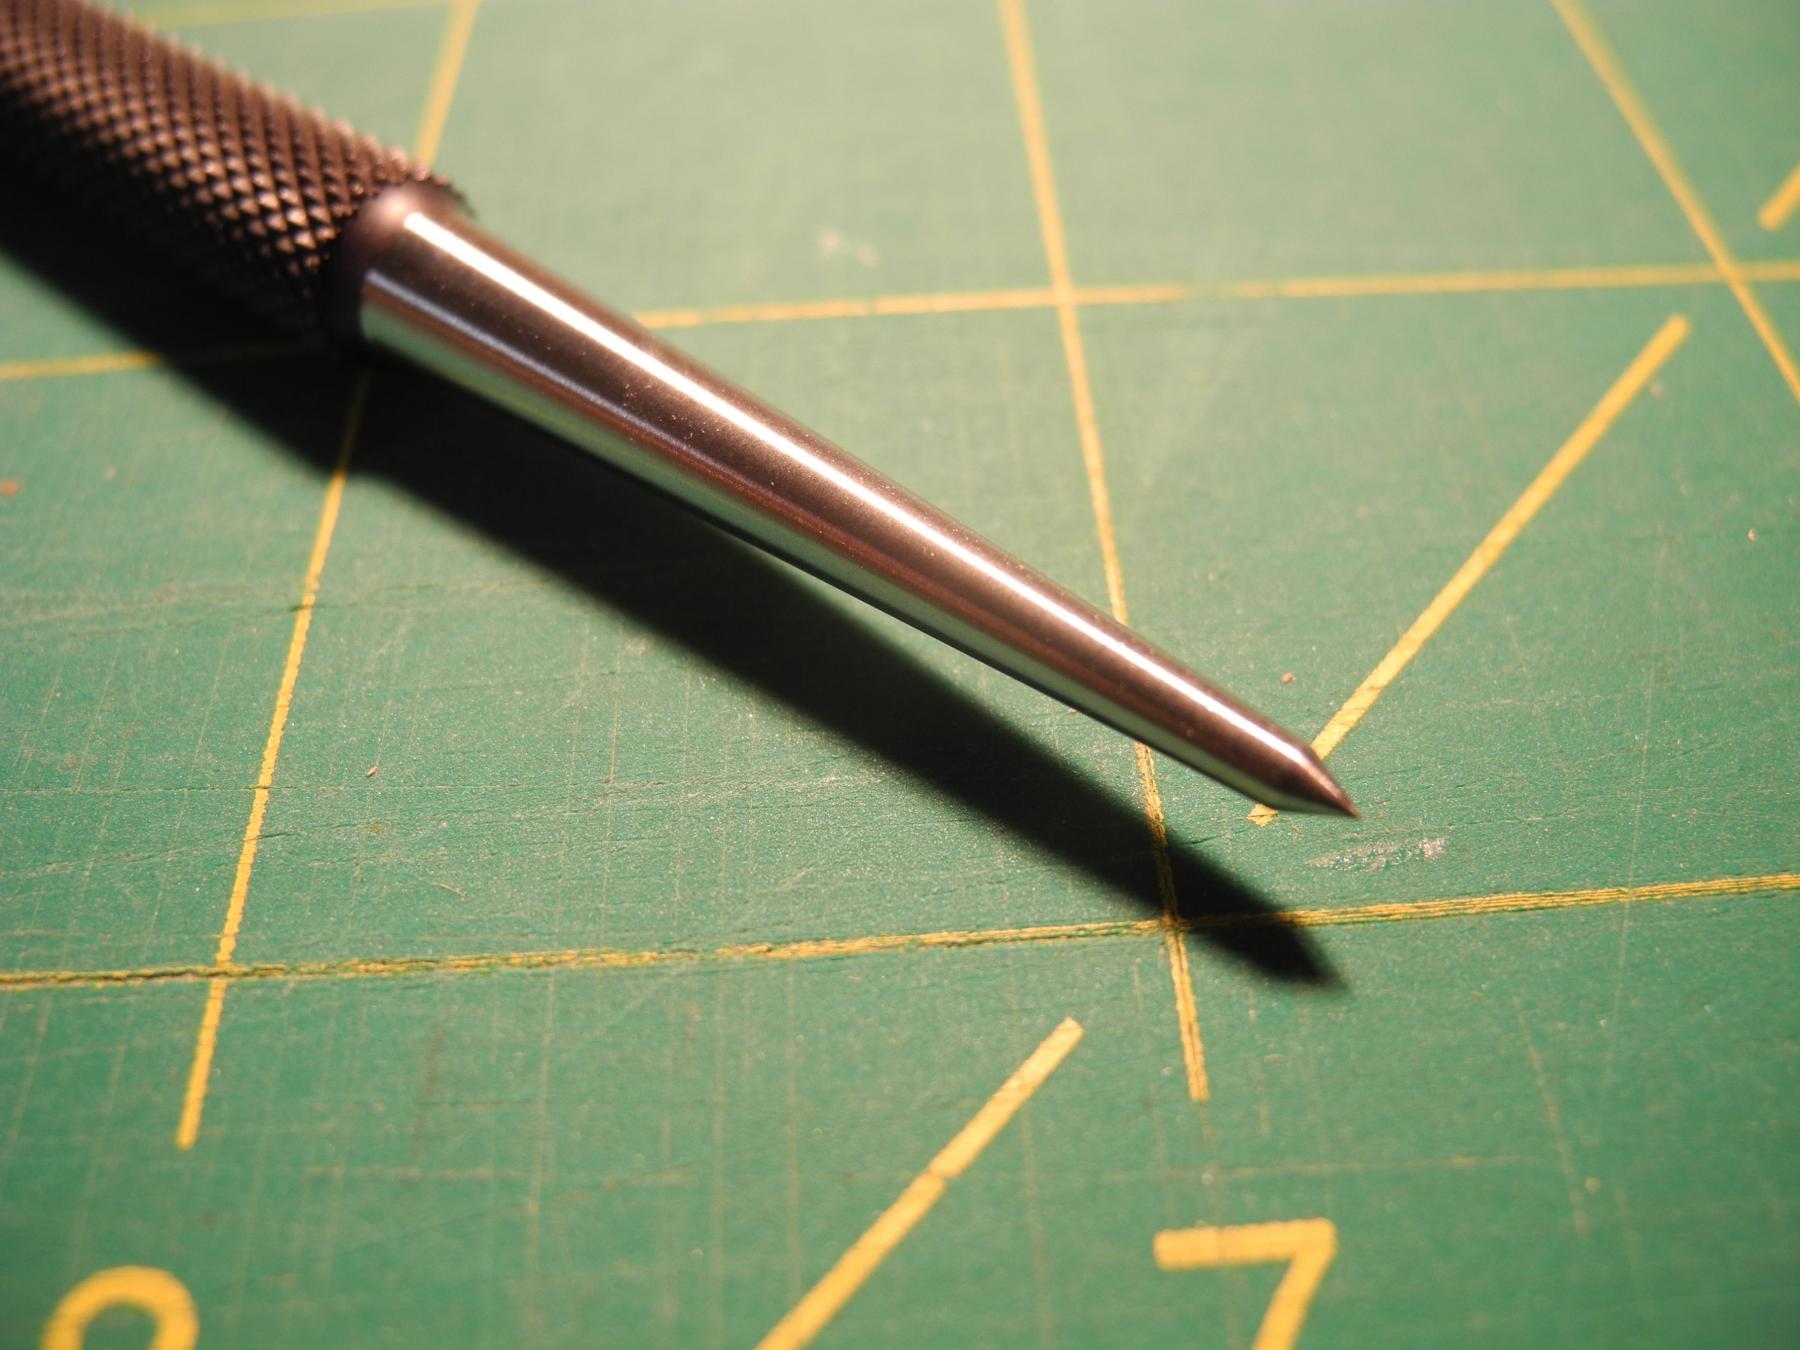
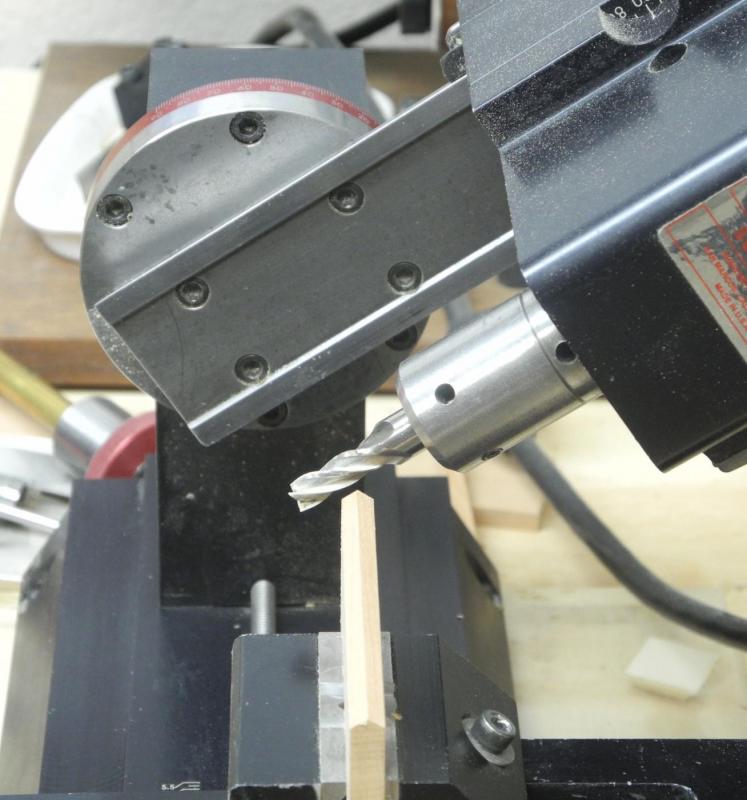
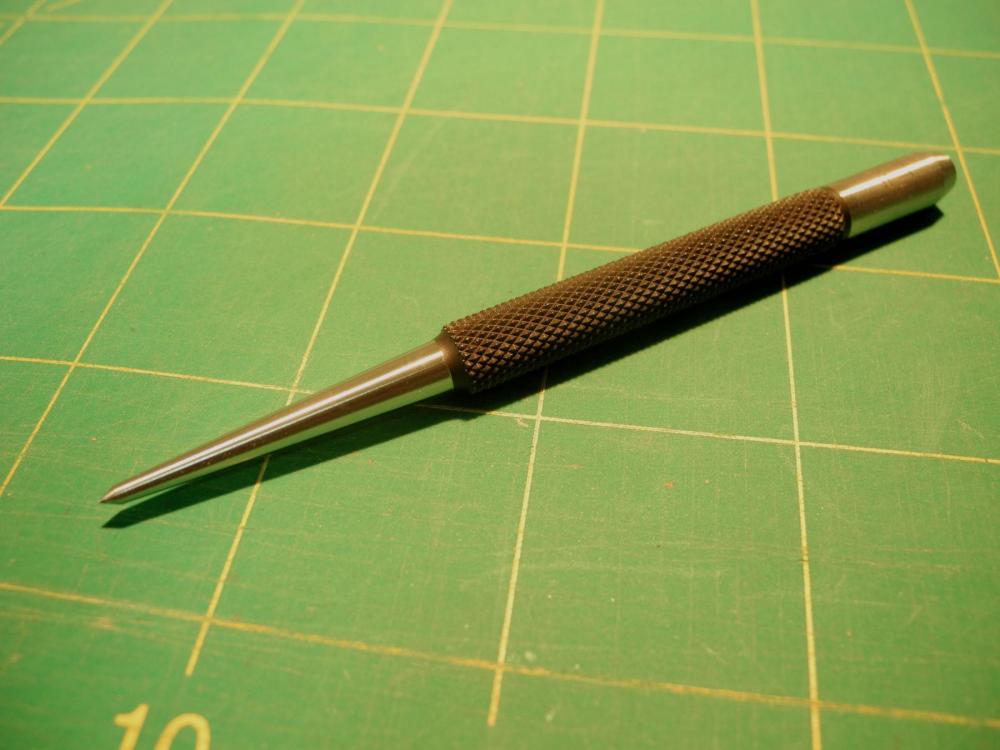
I needed to mill a few more timbers for making chocks, so i thought I'd show the setup I use. I have a Rotary Column Attachment on my Sherline Mill. This allows me to tilt the column right or left to as much as a 90 degree angle. After establishing the correct angle I mount a piece of the appropriate sized stock in the vise and mill along one side of the stock. I then reverse the stock in the vise and mill it again. After milling the stock I slice off an appropriate sized piece on my table saw. Each piece is long enough to get about a dozen chocks out of it. After tilting the column I use a dial indicator to make sure it's back at the true vertical position. I also thought I'd show a new tool I found - a Starrett 816A Prick Punch. The point is longer than a center punch and very sharp. It allows me to use one tool for marking the pinning holes for drilling, rather than the two tools I showed in an earlier post. My friends all know I love to find new tools!


- 649 replies
-
- 18
-
-
- dunbrody
- famine ship
- (and 2 more)
-
Hi Brian - good catch! The frame was glued in place and I didn't see that gap (forest and trees kind of thing?). The problem was caused by the bottom of the floor not being level, so that when I adjusted the frame to be perpendicular this gap opened. I've removed it and fixed the problem. I probably would have seen the gap eventually, but most likely that would have been when I couldn't do much about it except to use filler. This is the frame that everyone will see, so it would have been pretty bad. Once again we have an illustration of the real value of posting a build log. Thanks for being my Quality Assurance department - you're really good at it!
- 649 replies
-
- 4
-
-
- dunbrody
- famine ship
- (and 2 more)
-
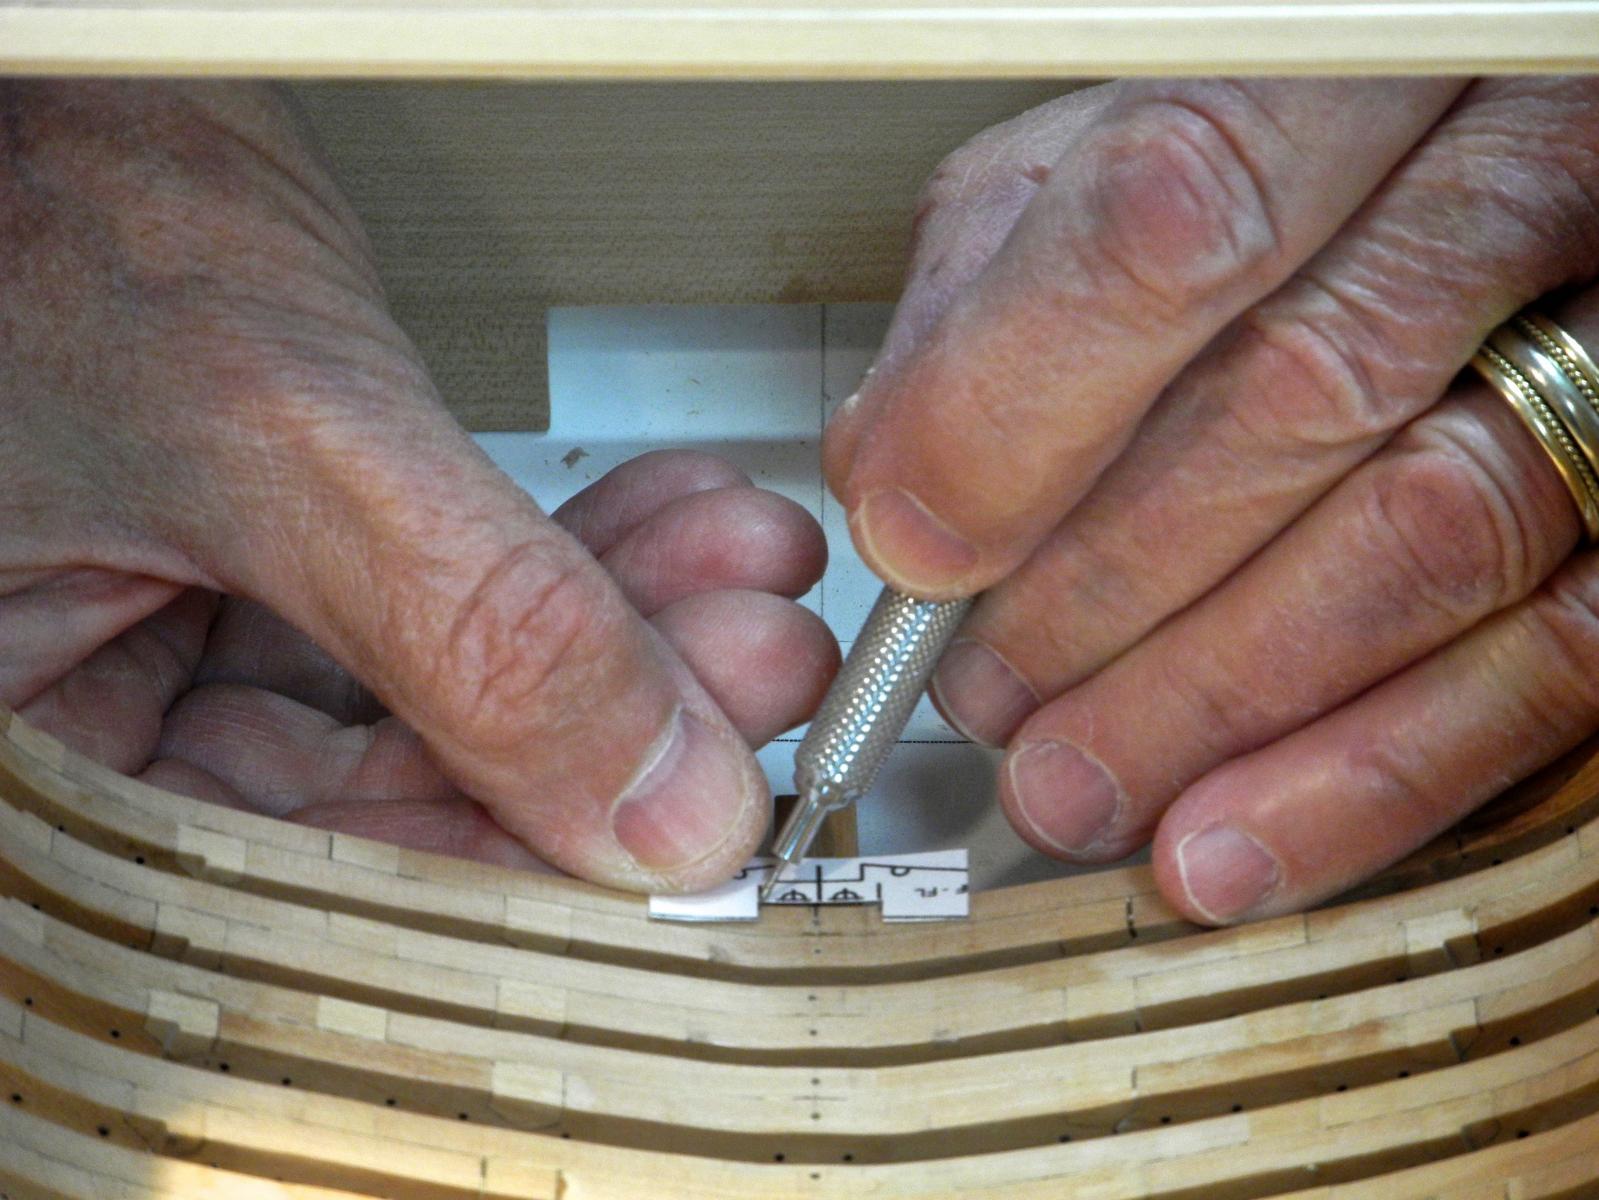
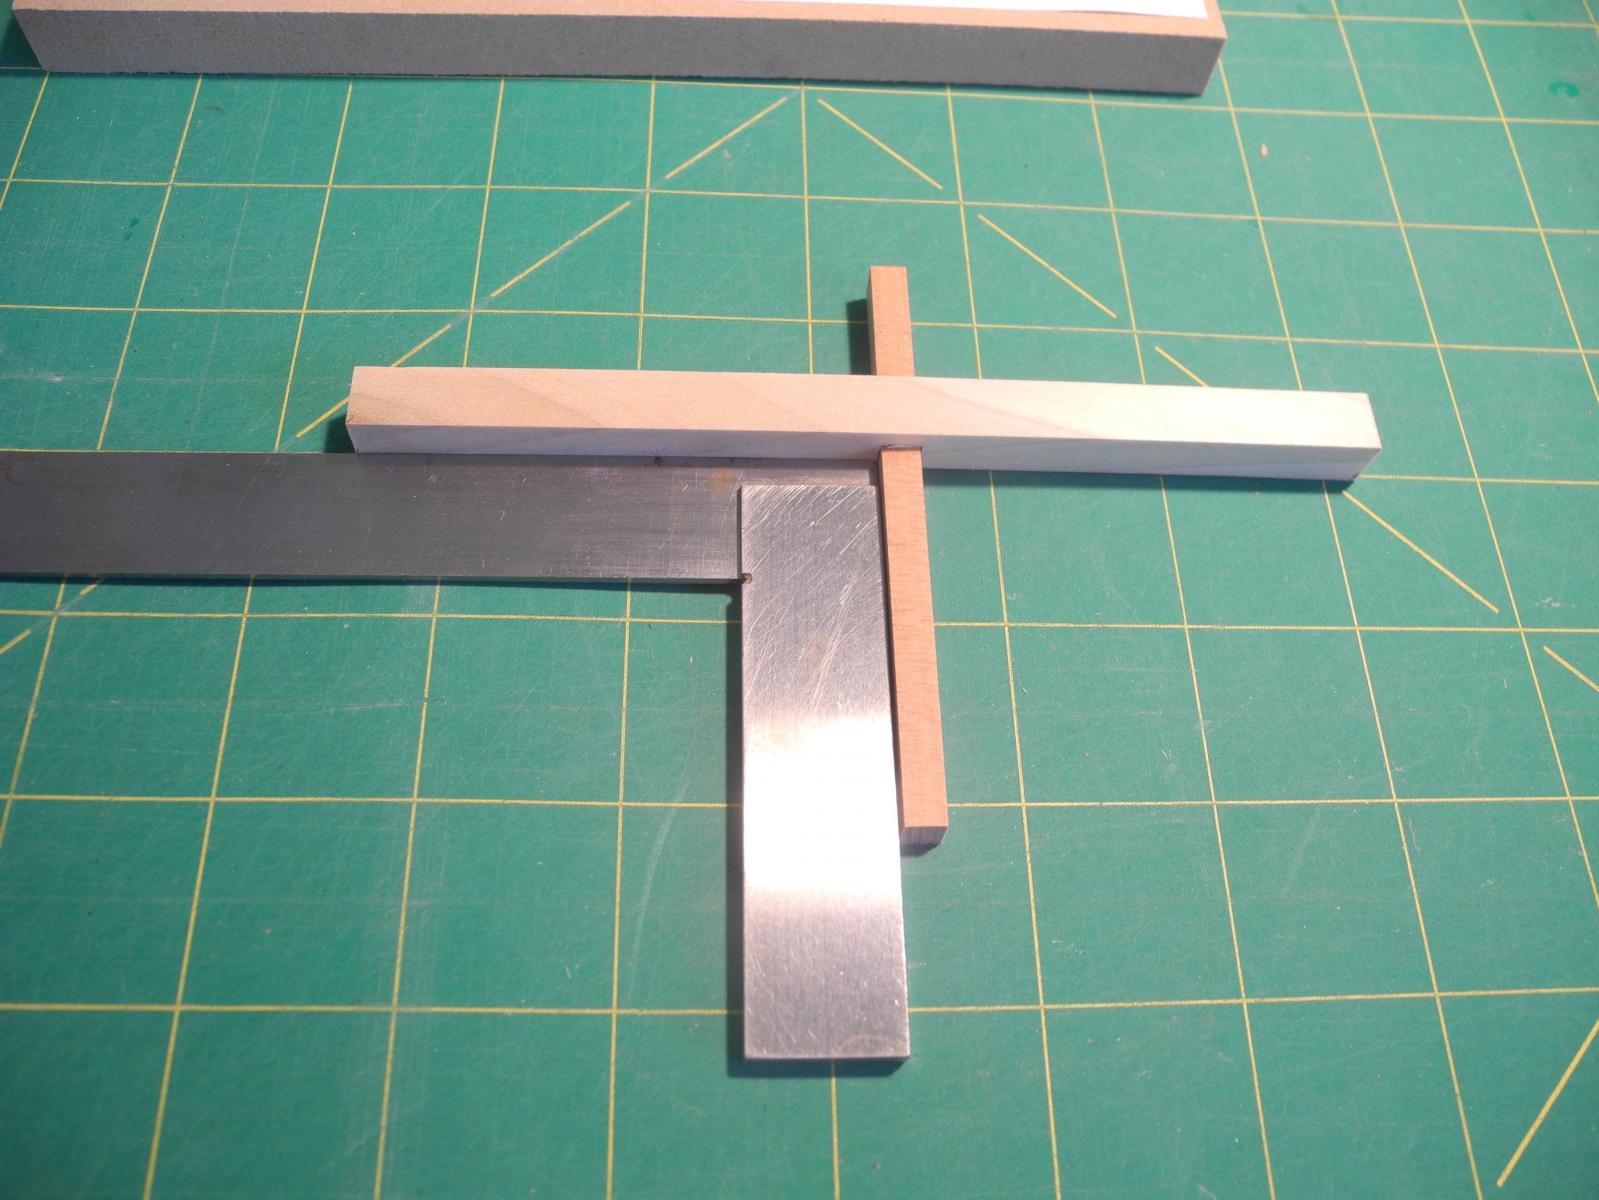
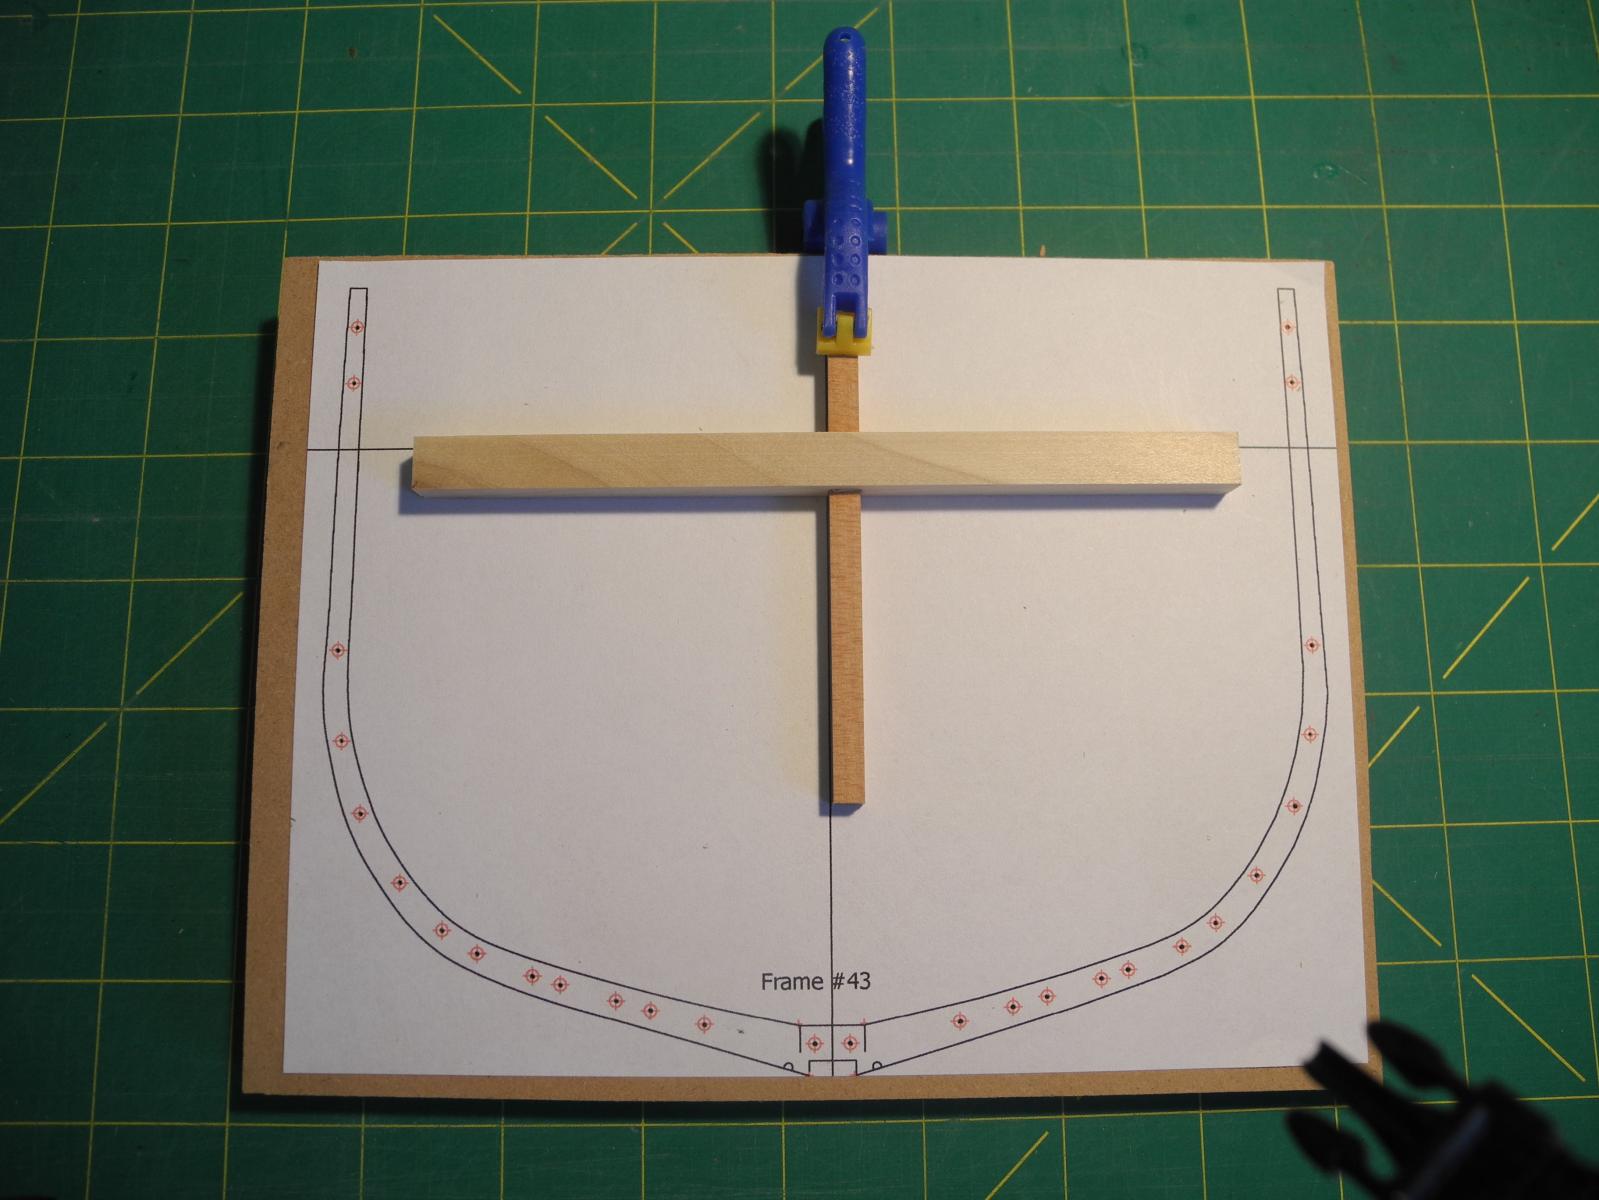
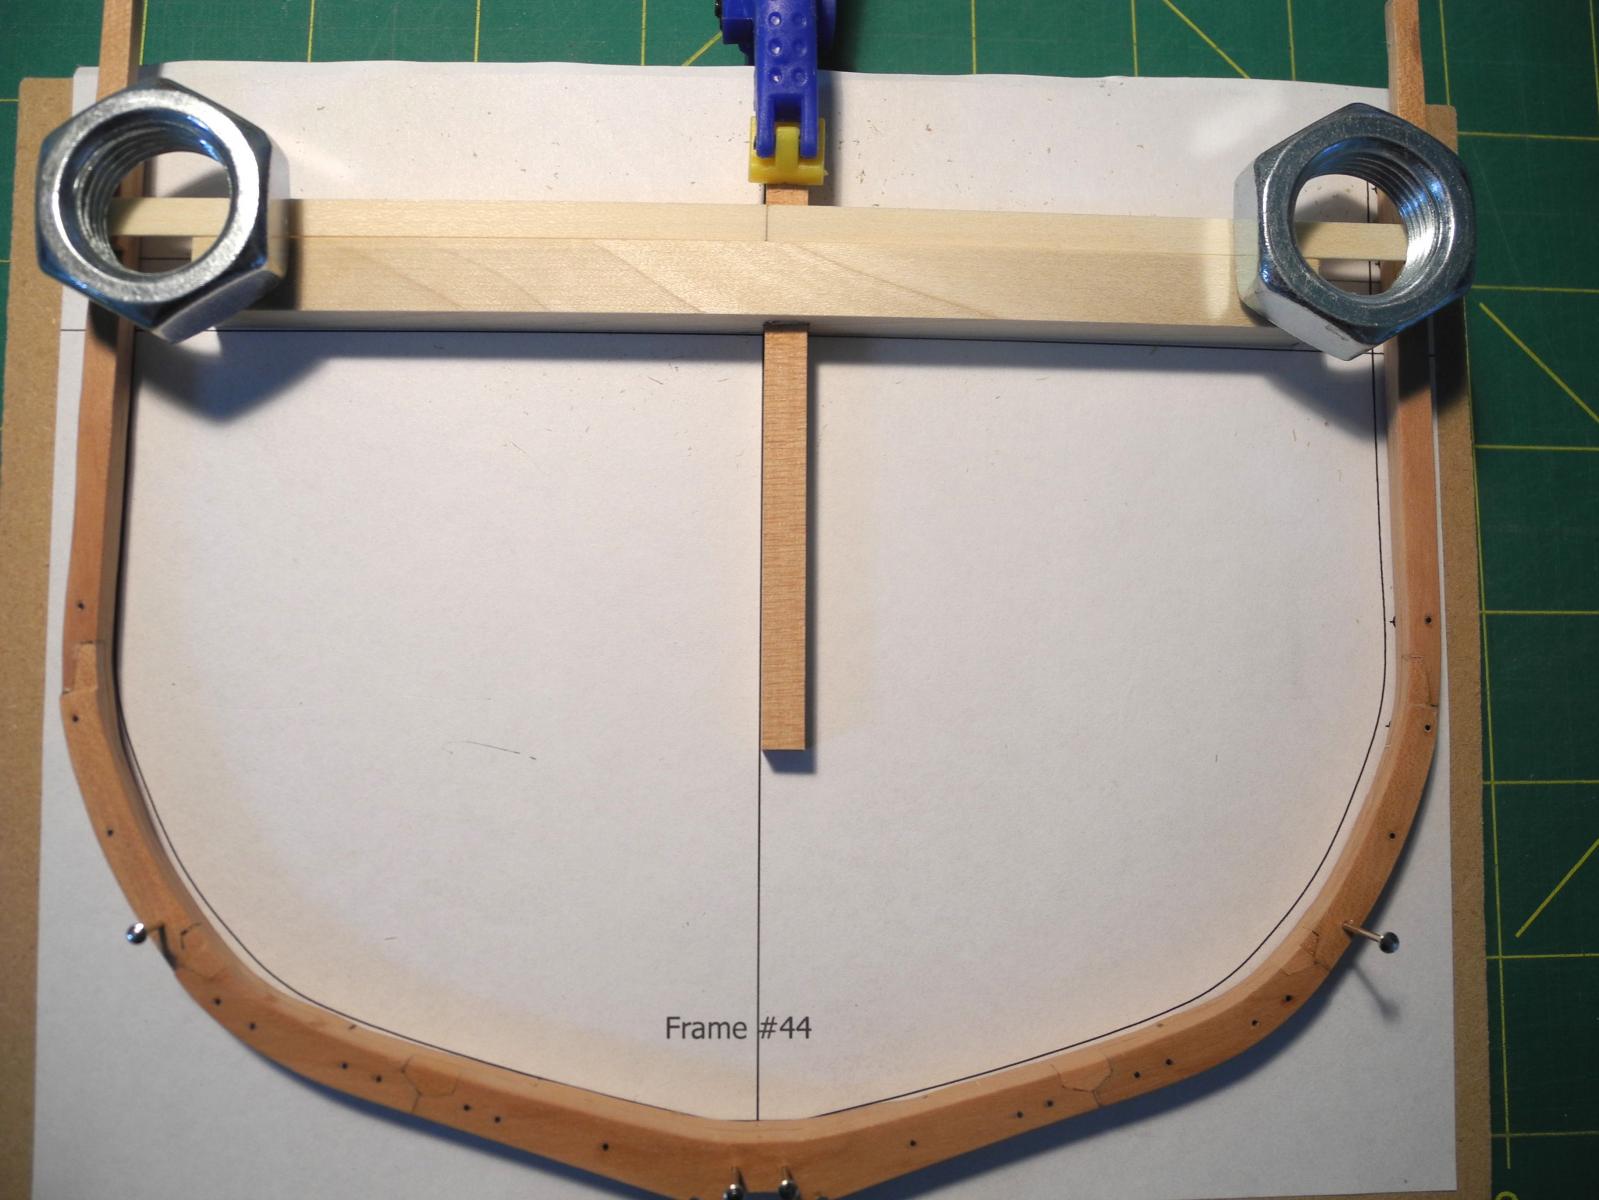
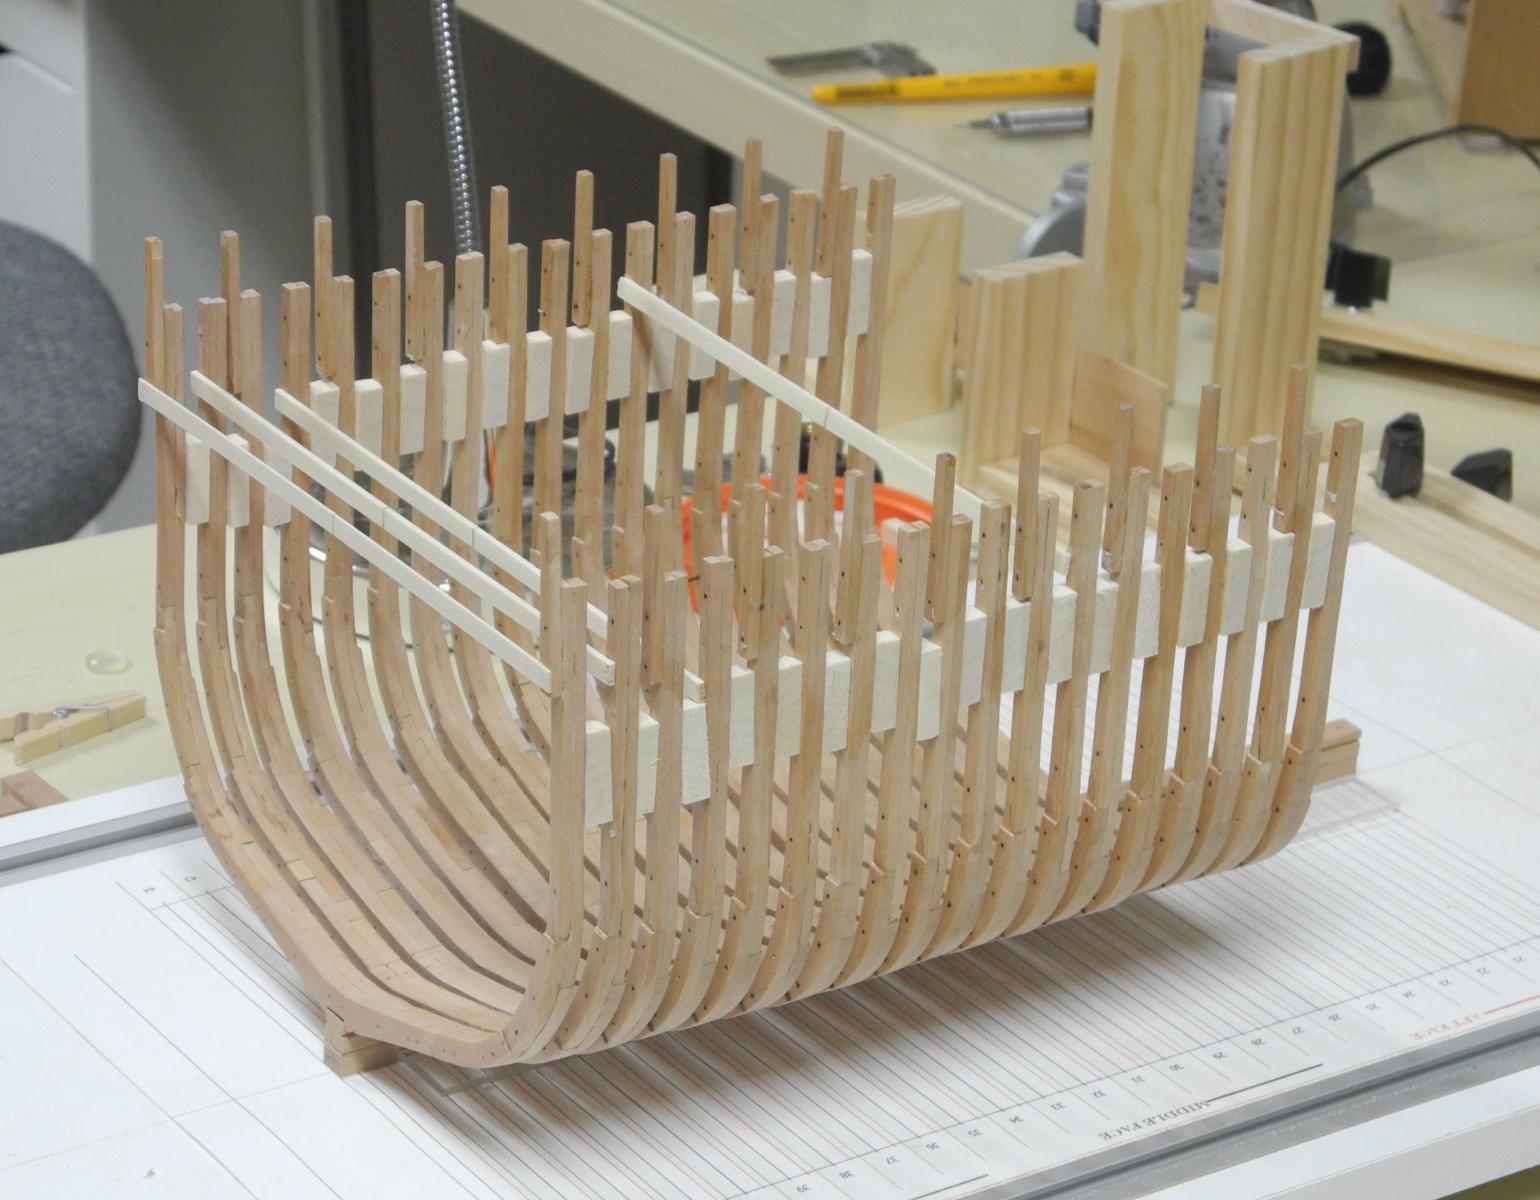
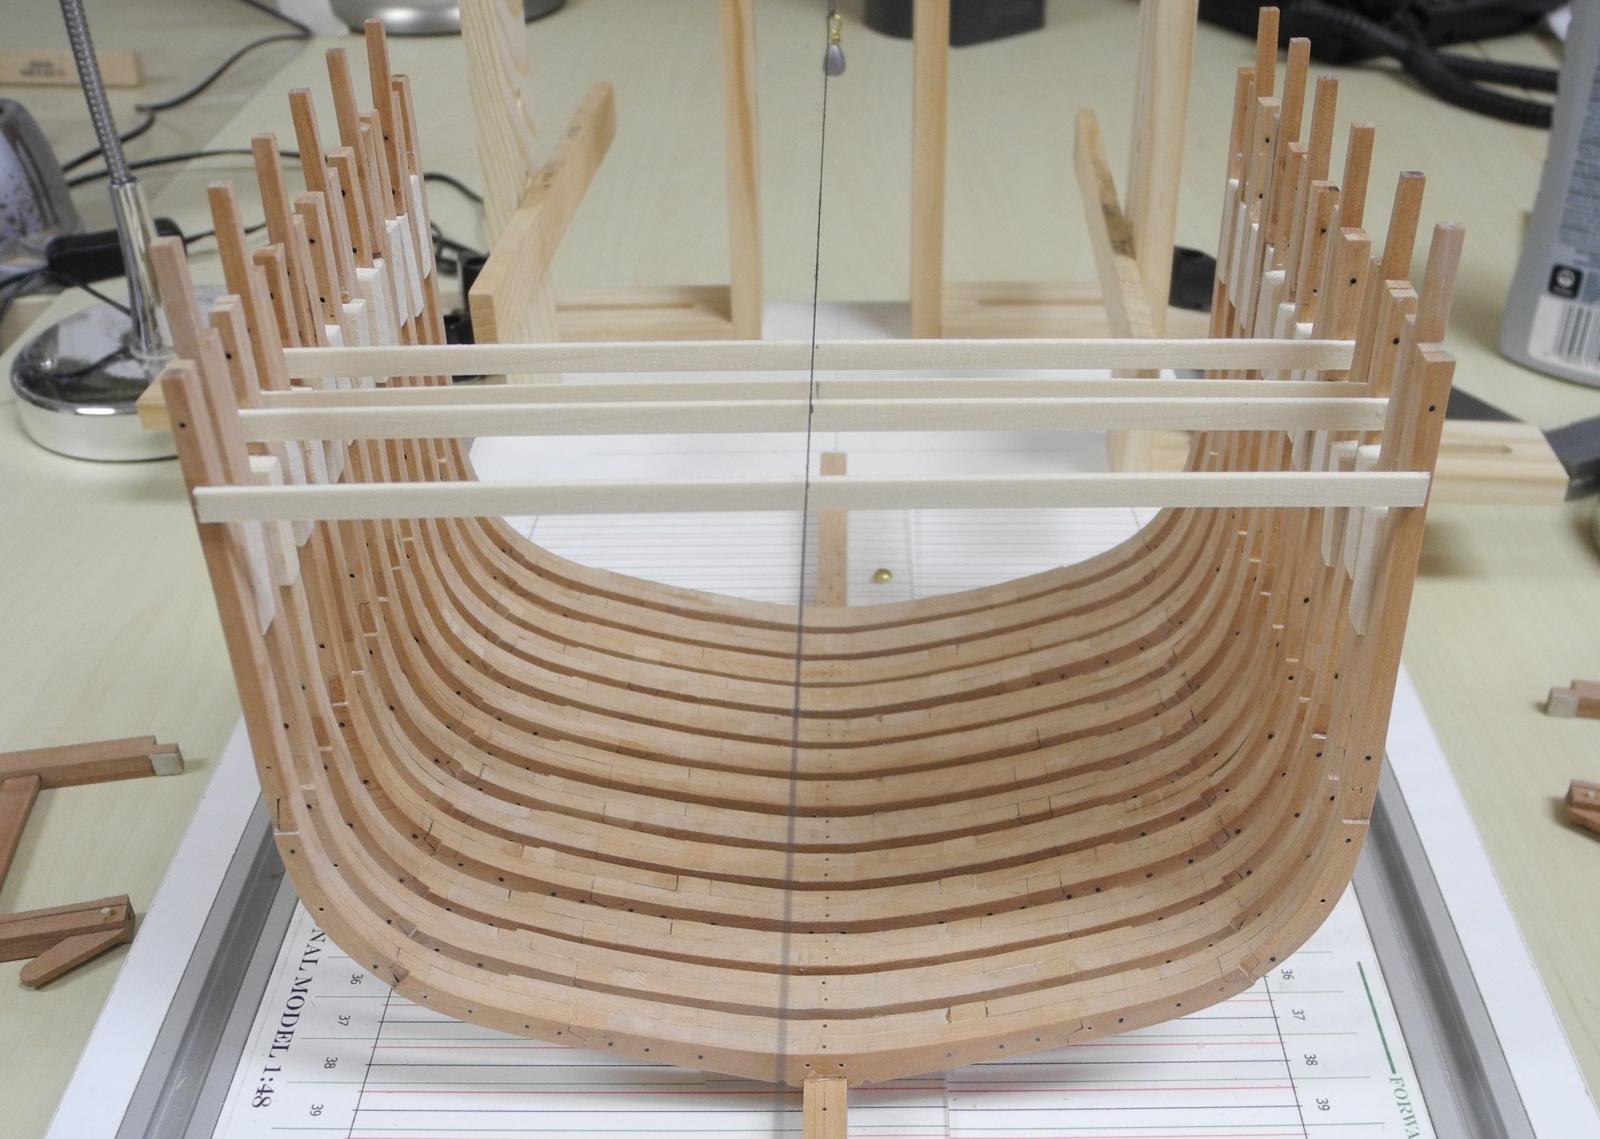
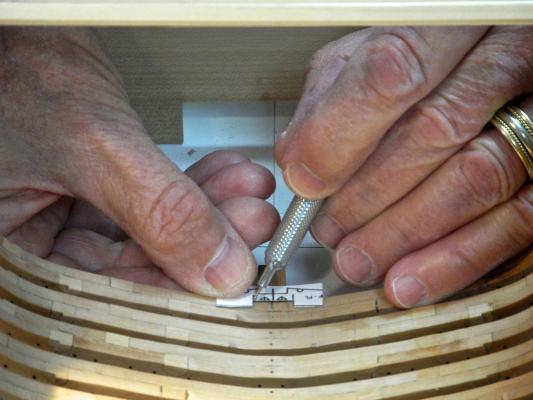
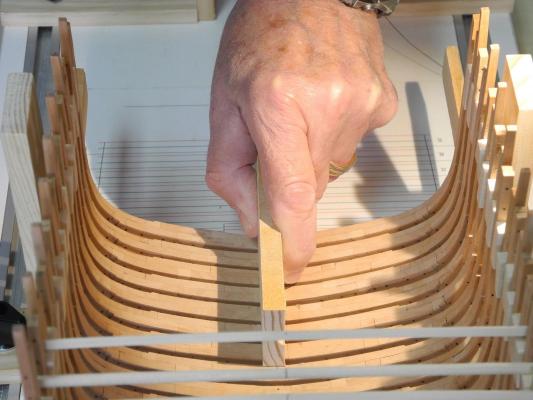
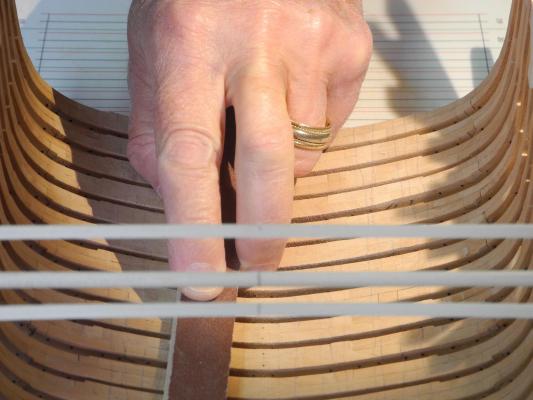
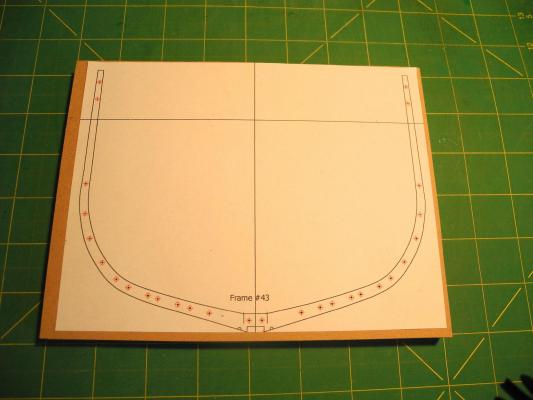
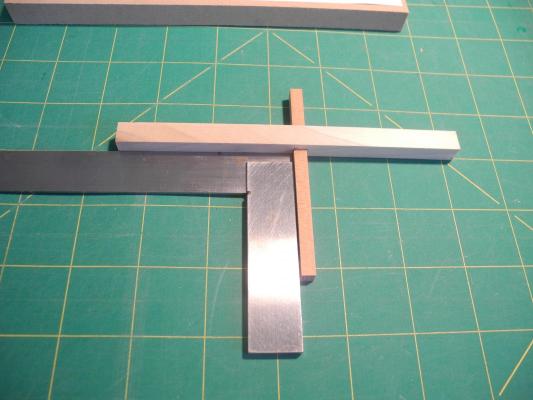
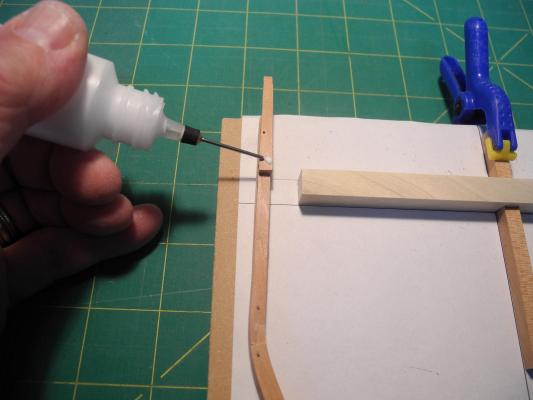
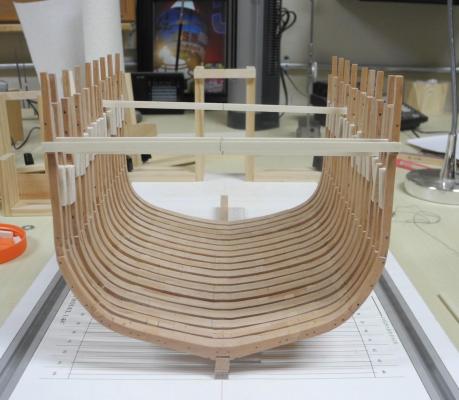
Part 14 – Installing the Frames – cont’d Construction and installation of the frames has been continuing. I also decided to start making the adjustments that will be needed while it’s still easy to get to the mid-most frames. The first adjustment is leveling the Cutting Down Line so that the keelson and sister keelsons will properly sit on top of the frame floors. This was already done in the early part of the construction of each frame, but I’ve found that the amount of wetting that has to be done to remove the glued-on plans causes the wood to swell somewhat, so that this area is no longer level. In order to accurately mark the boundaries of the Cutting Down Line, I made a template by printing the bottom of a frame on a piece of card stock. After marking the centerline on the forward-most frame I used this template to mark the boundaries of the Cutting Down Line. This was repeated on the aftmost frame, then lines were drawn to mark the boundary along all of the frames. Then it was a simple matter of sanding between these lines. Another adjustment is to start fairing the inside of the frames that have already been installed. At the moment I’m only fairing the frames up to about the end of the second futtock, which is in the area of the turn of the bilge. Because the frame-holding fixture shown in the following photo is used to secure the frames, this lower area is stable enough to sand. I use a fairly long (about 8 inches) sanding stick that allows me to cross 6 or 8 frames at once. I made some light pencil marks on all of the frames, and will sand until all of the pencil marks are gone. This is a process that will take some time, so I’m only doing it intermittently. Because of the flexing of the keel and shoe combination, I’ve decided that I need to leave some cross-spalls in place to ensure that I can level the hull during construction. The installation of some of the early cross-spalls was inconsistent – although the centerline was properly marked, some of the spalls were lower than they should be. So I decided to make some changes to the way I install spalls. The first change is to include a horizontal line across the frame plan to indicate the bottom of the spall. The following photo of a pinning template shows this line. I then made a jig with a horizontal bar that will be used to position the bottom of the spall, and a vertical bar that will be used to set the centerline position on the spall. The left edge of the vertical bar is aligned with the centerline on the pinning template, and the top of the horizontal bar is aligned with the line for the bottom of the spall. A drop of glue is then placed where each end of the spall will mate with the frame. The spall is then put in place and the spall’s centerline is aligned with the left edge of the vertical bar (I’m re-using spalls, so they are already marked for a centerline). Large nuts are used as weights to secure the spall while the glue is setting (now I just need to add something to make it a Smiley-Face). And now the reason for my Smiley-Face: I reached one of my milestones today – I completed the installation of frame 44 – the forward-most frame of the model. 18 frames are now installed – 8 more to go. Thanks everyone!


- 649 replies
-
- 25
-
-
- dunbrody
- famine ship
- (and 2 more)
-
Great work Patrick - if she looks this great in close-ups she's probably AWESOME to look at in a natural setting.
-
Continuing great work Ed, even the re-do's! I do agree with your comment on the look of the deadeyes, although on most full-size ships I've seen (not many, I'll admit) the deadeyes are fairly worn-looking. However, the rest of the work on your model is so crisp that I do understand why you'd want to improve the finish on the deadeyes.
- 3,618 replies
-
- 4
-
-
- young america
- clipper
- (and 1 more)
-
Hi Tony While what you say is absolutely true, the Irish emigrants on these ships started out in very bad shape from malnutrition and typhus. Here's an excerpt from an article on the History Place on the Irish Famine and the 'coffin ships' ( http://www.historyplace.com/worldhistory/famine/index.html ) During the trans-Atlantic voyage, British ships were only required to supply 7 lbs. of food per week per passenger. Most passengers, it was assumed, would bring along their own food for the journey. But most of the poor Irish boarded ships with no food, depending entirely on the pound-a-day handout which amounted to starvation rations. Food on board was also haphazardly cooked in makeshift brick fireplaces and was often undercooked, causing upset stomachs and diarrhea. Many of the passengers were already ill with typhus as they boarded the ships. Before boarding, they had been given the once-over by doctors on shore who usually rejected no one for the trip, even those seemingly on the verge of death. British ships were not required to carry doctors. Anyone that died during the sea voyage was simply dumped overboard, without any religious rites. Belowdecks, hundreds of men, women and children huddled together in the dark on bare wooden floors with no ventilation, breathing a stench of vomit and the effects of diarrhea amid no sanitary facilities. On ships that actually had sleeping berths, there were no mattresses and the berths were never cleaned. Many sick persons remained in bare wooden bunks lying in their own filth for the entire voyage, too ill to get up. Another big problem was the lack of good drinking water. Sometimes the water was stored in leaky old wooden casks, or in casks that previously stored wine, vinegar or chemicals which contaminated the water and caused dysentery. Many ships ran out of water long before reaching North America, making life especially miserable for fevered passengers suffering from burning thirsts. Some unscrupulous captains profited by selling large amounts of alcohol to the passengers, resulting in "totally depraved and corrupted" behavior among them.
- 649 replies
-
- 12
-
-
- dunbrody
- famine ship
- (and 2 more)
-
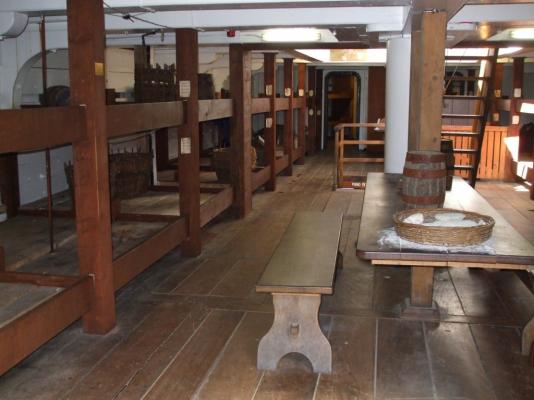
Rich Here's a little more - this is a photo from the accommodation deck on the replica ship . These are the platforms the emigrants had as living quarters - typically a family of four on a platform. It looks fairly neat and clean, but imagine what the actual conditions were like - the platforms shown in the photo held about 48 people, only a part of the accommodation deck. The entire population was near 200 emigrants on average.
- 649 replies
-
- 15
-
-
- dunbrody
- famine ship
- (and 2 more)
-
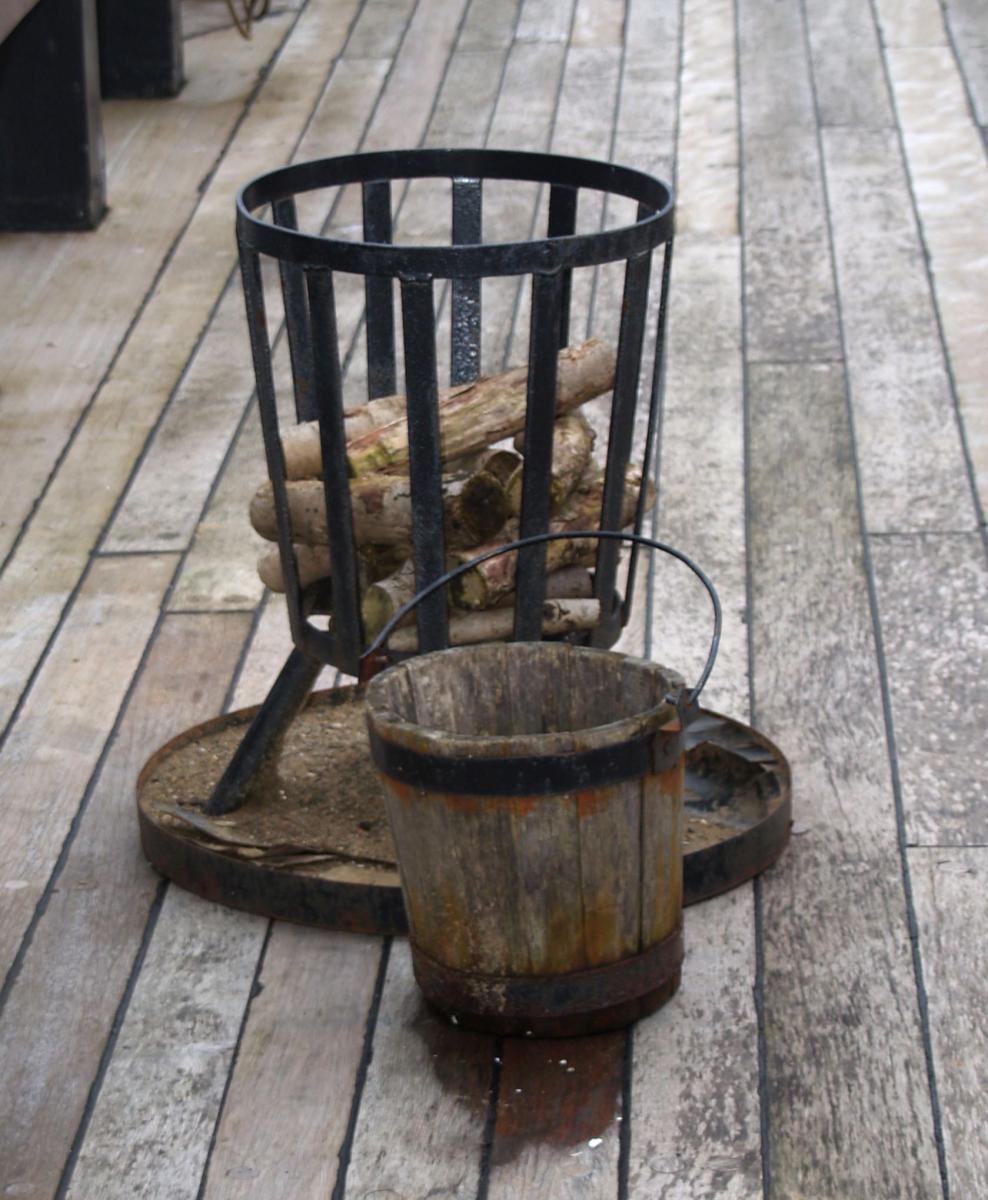
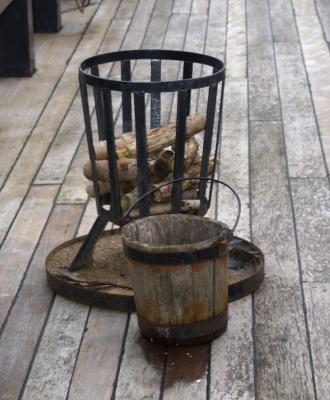
Hi Rich: This is from the Dunbrody website: "Lasting up to six weeks, the Atlantic crossing was a terrible trial for those brave, or desperate, enough to attempt it. Packed cheek by jowl below decks, the steerage passengers barely saw the light of day. Allowed up on deck for no more than one hour a day, in small groups, they would gather around open stoves to cook. When their time was up, it was back down into the dark, dank hold. During the regular storms the hatches were battened down, and the passengers would subsist on hard-tack biscuits. Hygiene was notoriously poor aboard most ships. With nothing more than buckets for toilets, and only sea-water to wash with, disease was rampant. Cholera and Typhus accounted for a great many deaths. Those who died were buried at sea. With death rates commonly reaching 20%, and horror stories of 50% dying, these vessels soon became known as ‘Coffin Ships’ “ Here's a photo of the cooking setup and a 'slop bucket' from the replica ship in New Ross. Not an enjoyable cruise.
- 649 replies
-
- 14
-
-
- dunbrody
- famine ship
- (and 2 more)
-
Hi Patrick I looked at Mary Jean II, and she's awesome. Can't wait to see how you model the equipment in the exercise room, and the young beauties seen around the ship.
-
Congratulations on the future book Druxey! I'll be looking for it.
- 641 replies
-
- 4
-
-
- greenwich hospital
- barge
- (and 1 more)
-
Thanks Glenn. I'm enjoying your build log and appreciate your comments.
- 649 replies
-
- 4
-
-
- dunbrody
- famine ship
- (and 2 more)
-
Thanks Elijah - although at this point I'm glad I limited it to a sectional model. Thanks John. Thanks Bob - things are going OK.
- 649 replies
-
- 4
-
-
- dunbrody
- famine ship
- (and 2 more)
-
Hi Druxey - I don't think there are any significant alignment issues. I assume installation of ribbands will cure any that exist, or will at least point out if there is any surgery required (re-installation of a frame).
- 649 replies
-
- 4
-
-
- dunbrody
- famine ship
- (and 2 more)
-
Hi Brian - looks good. Glad to see you're making progress - much better than working!
-
Very nice small work, Druxey. I imagine any sanding is done very carefully.
- 641 replies
-
- 4
-
-
- greenwich hospital
- barge
- (and 1 more)
-
Thanks Brian. Fortunately I had the car, so I was able to deal with it. Just glad it wasn't one of those times where I was without a car - would have been 911 time (you're too far away).
- 649 replies
-
- 4
-
-
- dunbrody
- famine ship
- (and 2 more)
-
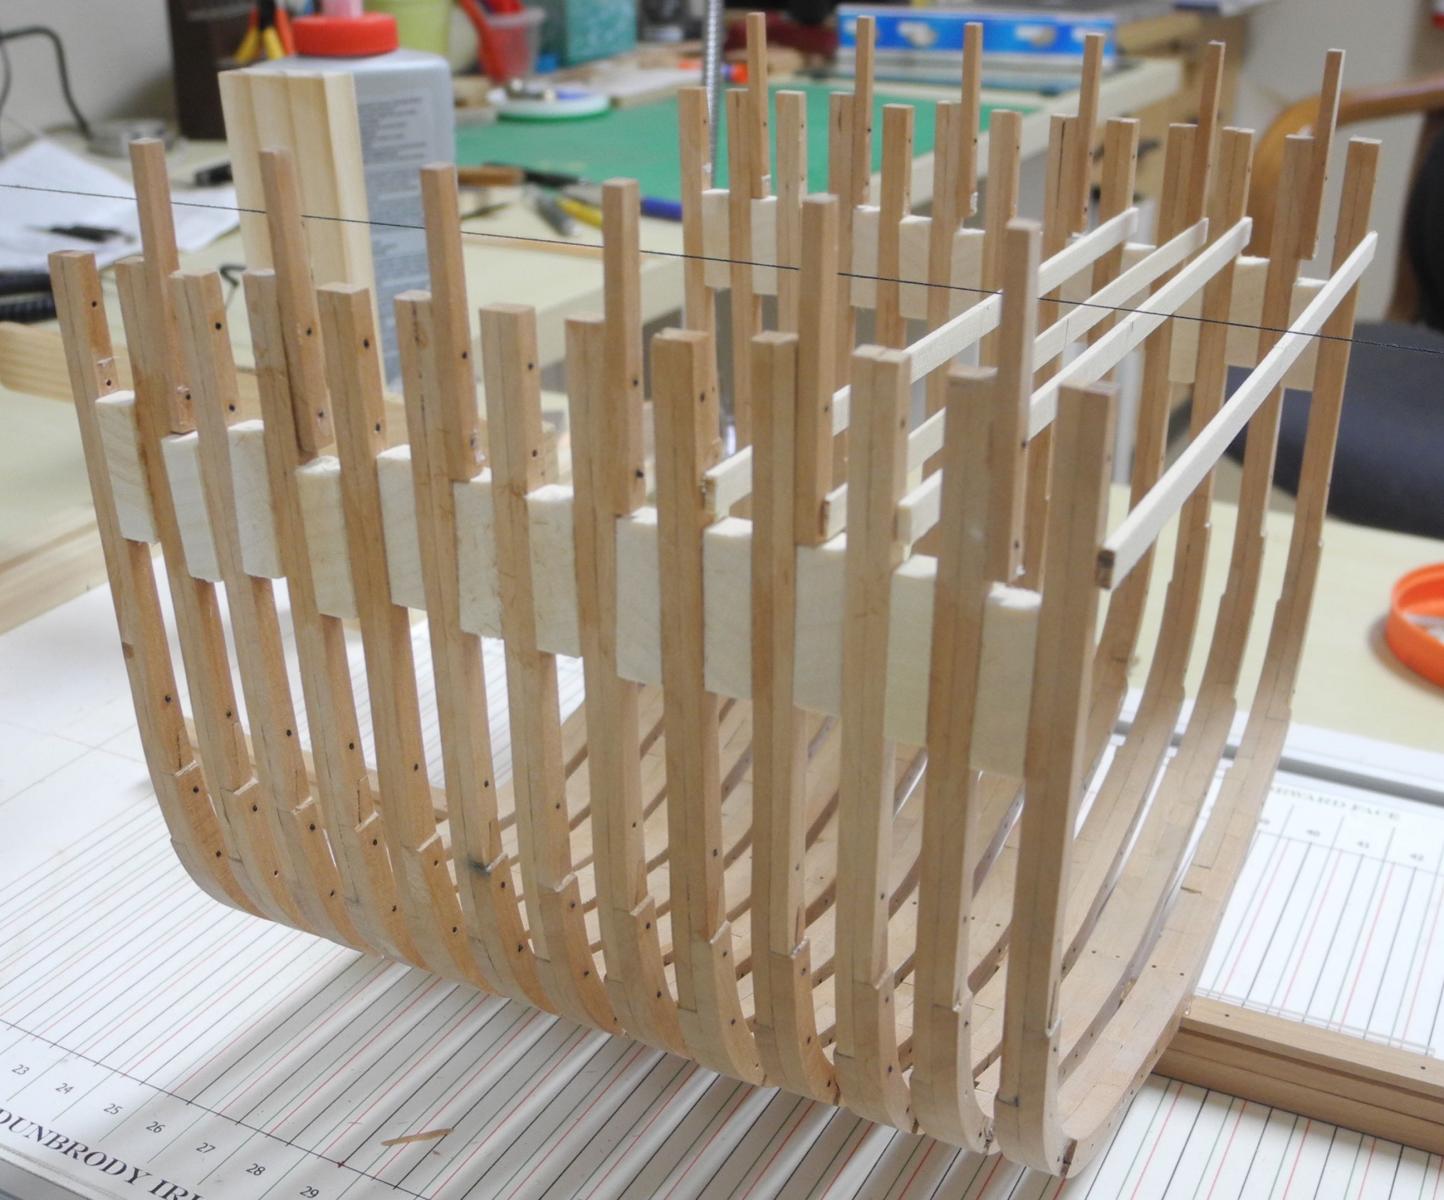
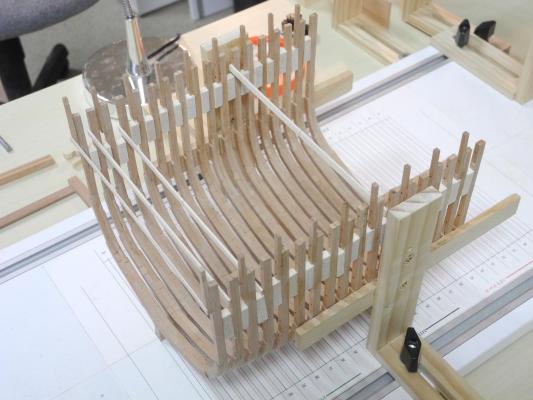
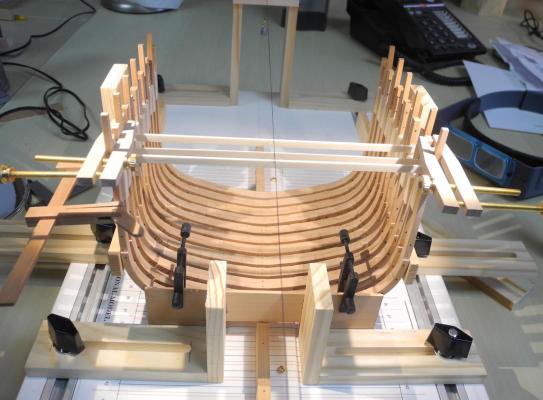
Part 13 – Installing the Frames – cont’d My last post was last Sunday, and I was pleased with the progress so far. Well, I guess I spoke too soon – on Monday evening I had a medical issue that took me out of the shop for most of the week. I’m back at work on Dunbrody now, and have made some more progress. By Monday I had 13 frames installed. I noticed that the last frame to be installed was slightly narrower on top, so I needed to come up with a way to spread out the tops. After glueing in the filler blocks behind this frame, I then used a couple of long clamps to align it with the frame preceding it. I was surprised by the lack of alignment, since I’ve been using the pin indexing approach. After trying to determine why the top was not correct, I think the answer lies in the scarf joints being too tight at the point where the top timber will want to pivot. The clamping mentioned above appears to have corrected the problem, and from now on I’ll be making sure all the joints are properly fit before glueing. Here’s the current state of the build: I’m trying to make sure I have enough frames lofted so that the building activity isn’t slowed. I have another frame almost ready for installation, two more in the construction phases, and 4 frames lofted. It’s probably time to start planning how to secure the frames via ribbands, so that will likely be the subject of a post in the next few days. Thanks everyone!


- 649 replies
-
- 23
-
-
- dunbrody
- famine ship
- (and 2 more)