HOLIDAY DONATION DRIVE - SUPPORT MSW - DO YOUR PART TO KEEP THIS GREAT FORUM GOING! (83 donations so far out of 49,000 members - C'mon guys!)
×


Mahuna
-
Posts
1,504 -
Joined
-
Last visited
Content Type
Profiles
Forums
Gallery
Events
Everything posted by Mahuna
-
 Hi Matti - I just found your log and I'm very impressed with your work. I plan to follow along from here on.
 -
Hi Ron: I would be very interested in the thread.
-
Hi Mark: Looks like you've made some good progress. Can you bring this model to our next meeting?
-
Looks like a great start, Gary. I'll be following along.
-
Best wishes for the holidays, Patrick. I see you have good taste in watches as well as ships.
-
I continue to be amazed at the attention to detail in your work. Beautiful!
- 3,618 replies
-
- 6
-

-
- young america
- clipper
- (and 1 more)
-
Dust collection and extraction
Mahuna replied to Trussben's topic in Modeling tools and Workshop Equipment
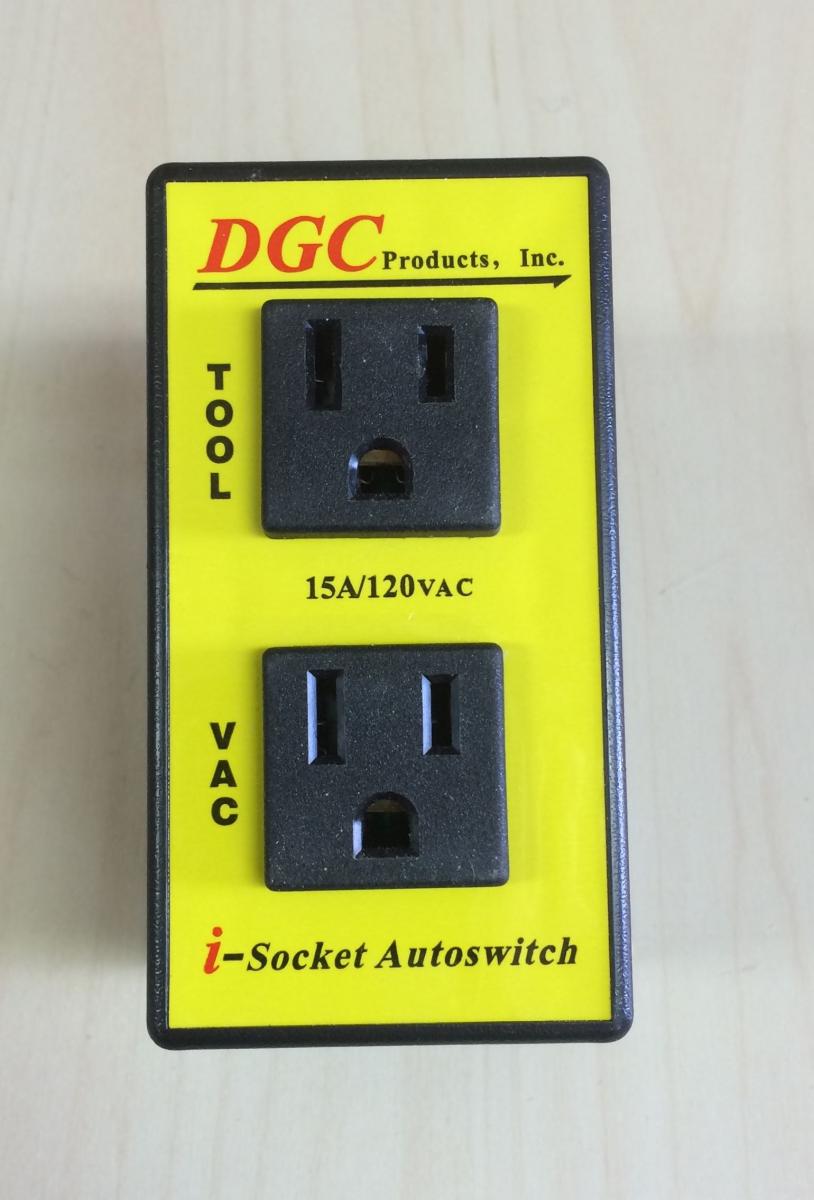
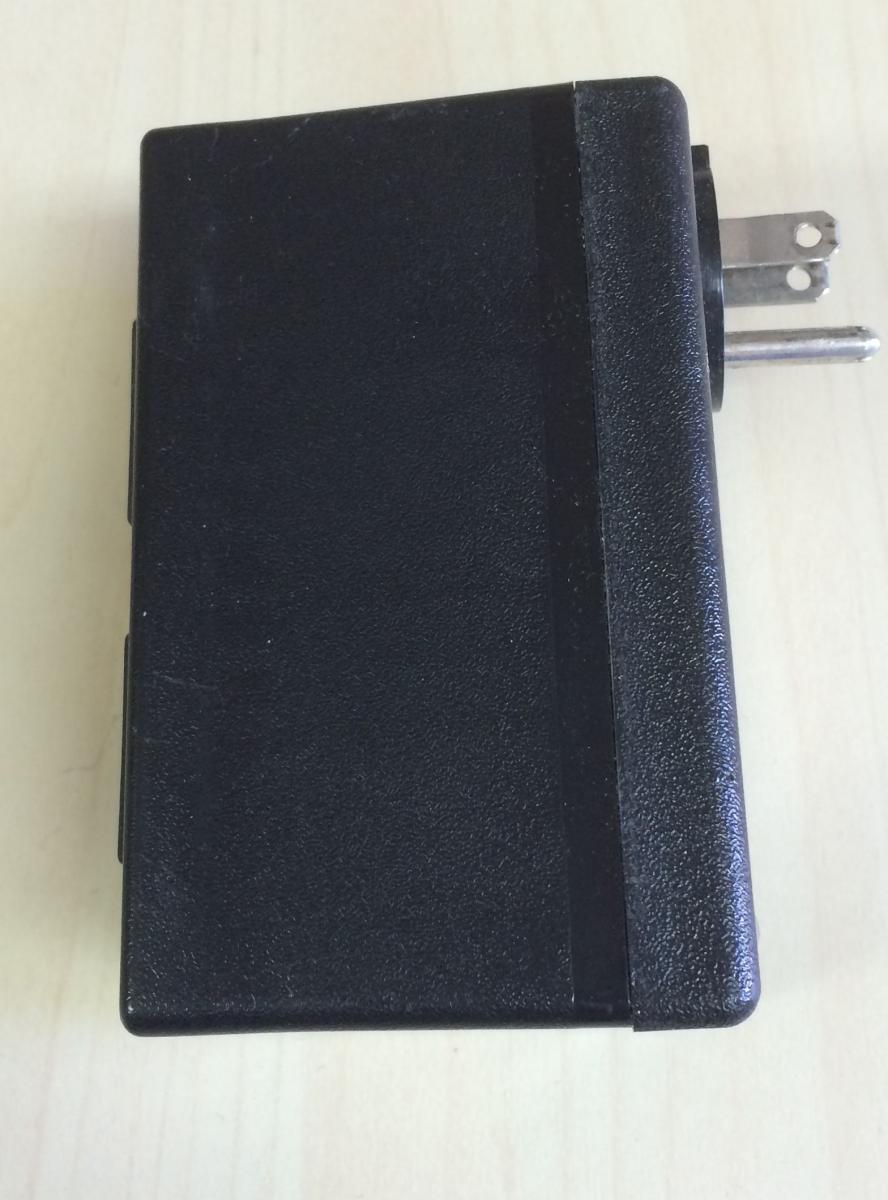
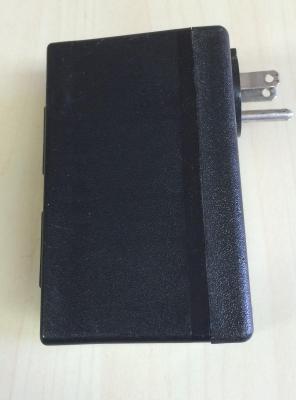
I use the device shown in the attached photos. Plug the tool into the appropriate outlet (marked 'TOOL'), and the vac into the other outlet. Set the power switch of the vac to ON. When you start your power tool the vac also starts. When you turn off the tool the vac continues to run for several seconds to clear any residual dust, then powers down. This way you don't need to hear the vac running when you don't need it.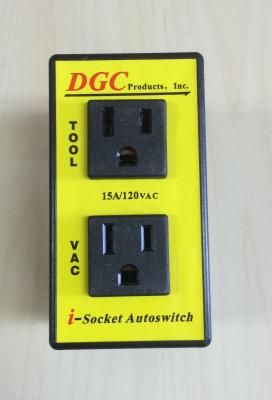
-
It will be very interesting to see how they came out.
-
Hello Ian Thanks for looking in to my Paragon build. I've looked through your log and you're doing an excellent job. A few days ago there was an exchange about scrapers. Lee Valley tools sells a set of small scrapers I find very useful: http://www.leevalley.com/US/Wood/page.aspx?p=32672&cat=1,310,41069&ap=1 The site also contains a PDF of instructions on how to sharpen scrapers (click on the 'Inst' link) Cheers.
- 191 replies
-
- 4
-
-
- victory
- caldercraft
- (and 1 more)
-
Thanks John - glad you looked in. Thank you too, Patrick. I admire your work and getting a compliment from you is special. Thanks, Bob. When I visit in January I'm hoping we could discuss drafting. I hope to have some progress on drafting frames for Kathryn or Dunbrody or both by then, and would value your input.
-
Great work Ed, as usual. I'm surprised you used CA instead of epoxy when looking for a strong bond.
- 3,618 replies
-
- 5
-
-
- young america
- clipper
- (and 1 more)
-
Thanks George. For a preview of the Dunbrody sectional model, take a look at the thread I started for planning the build.
-
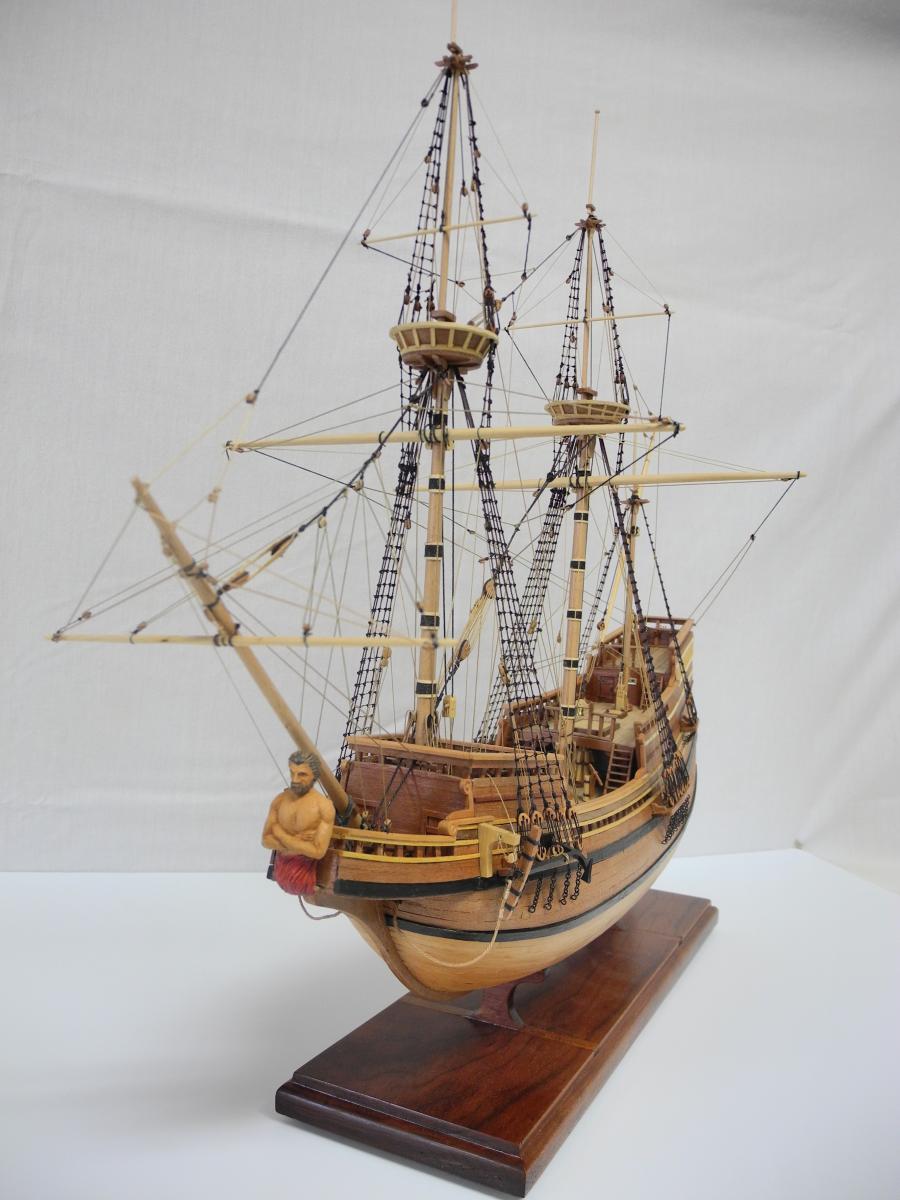
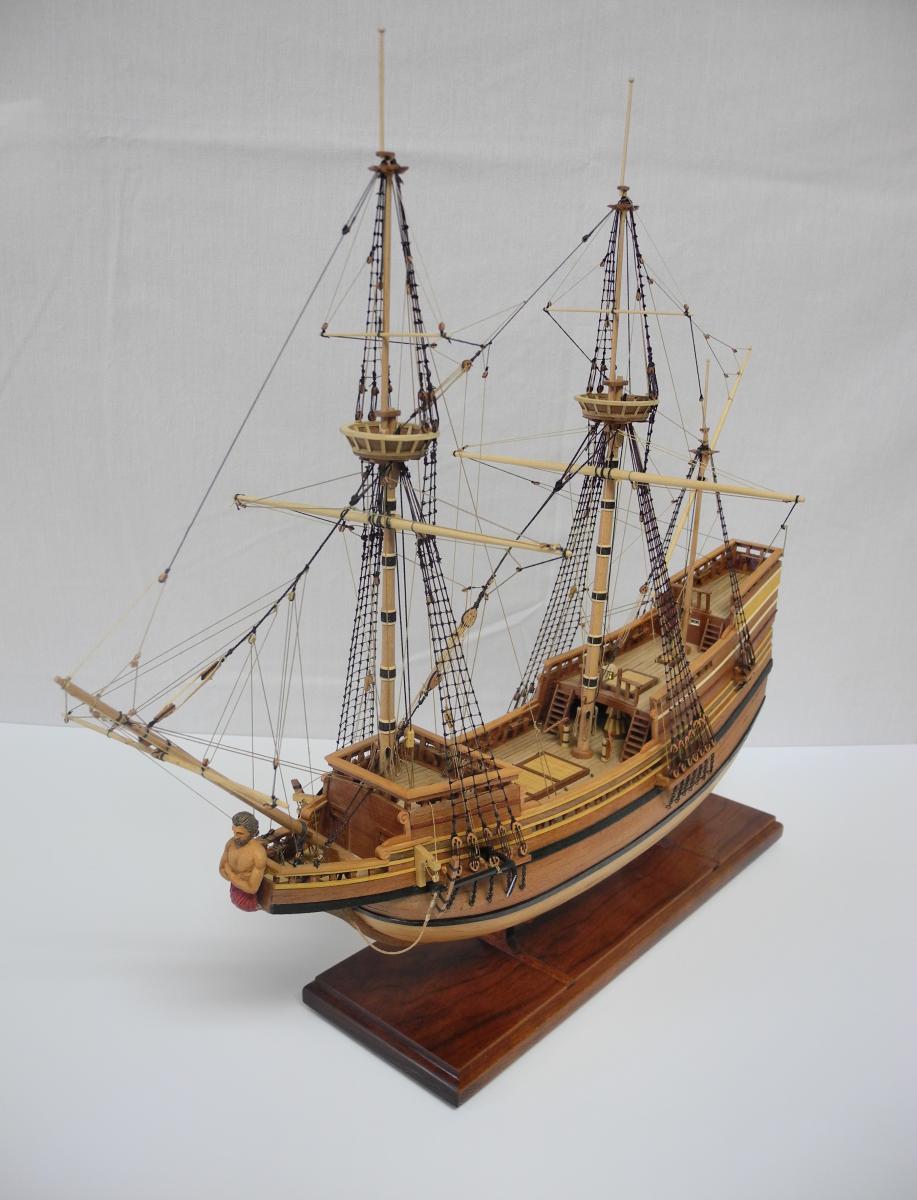
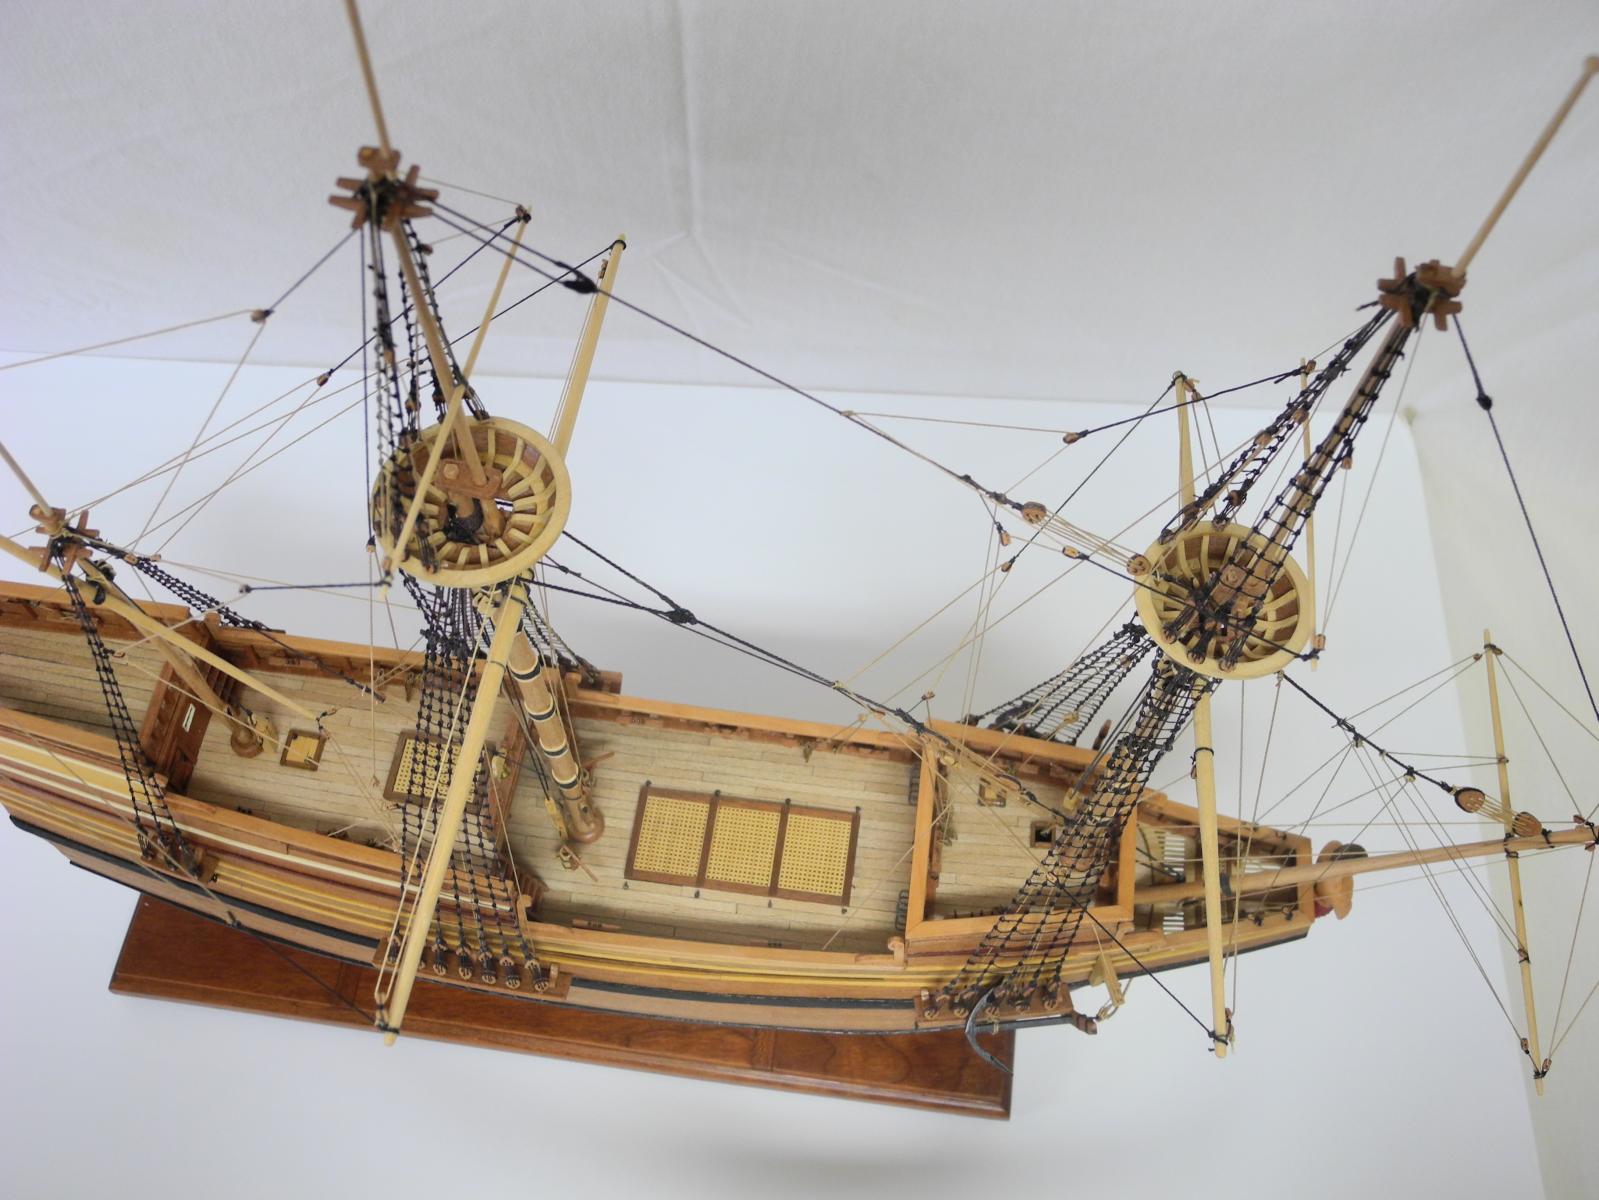
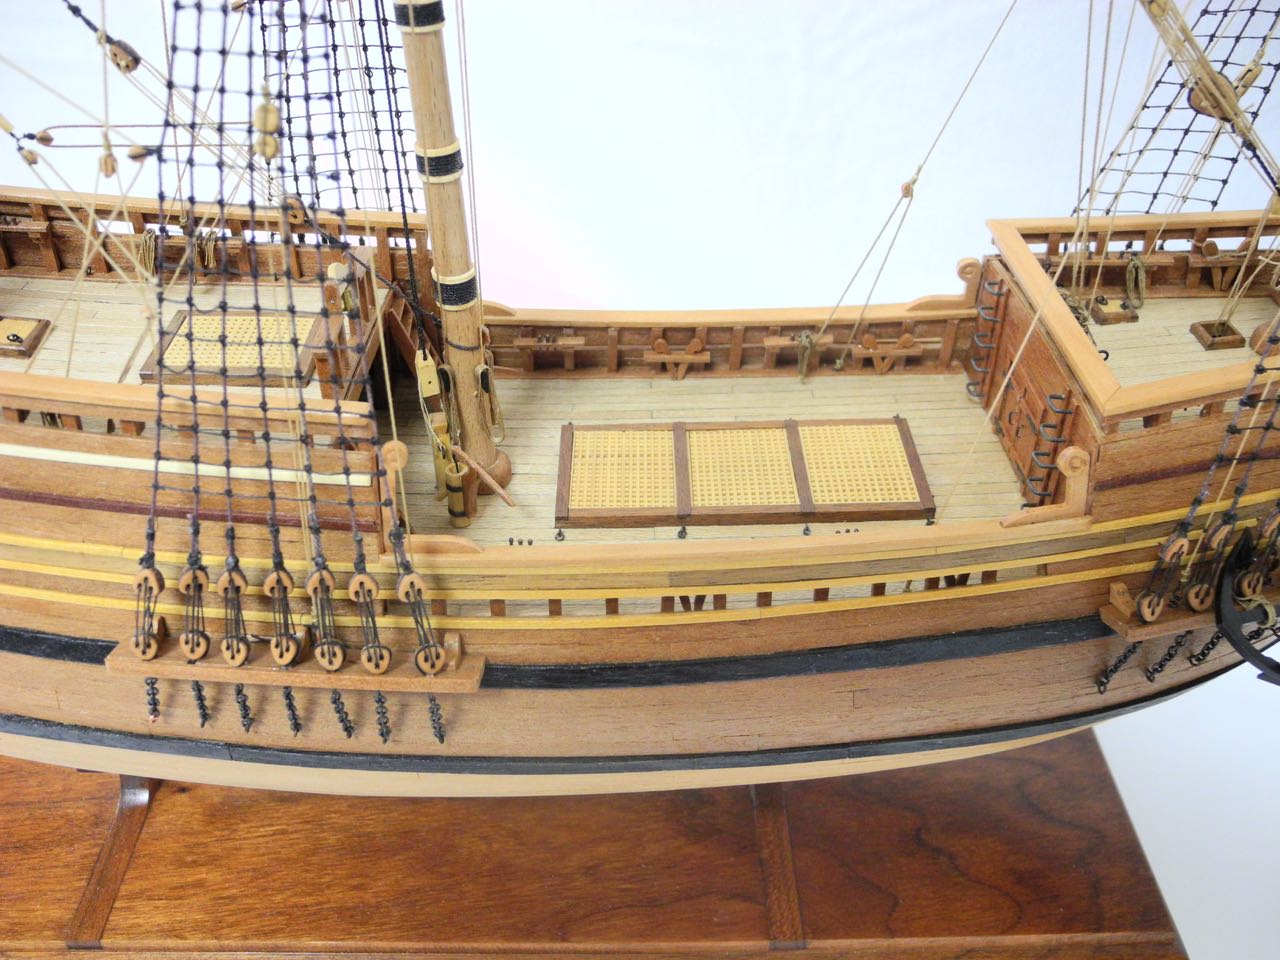
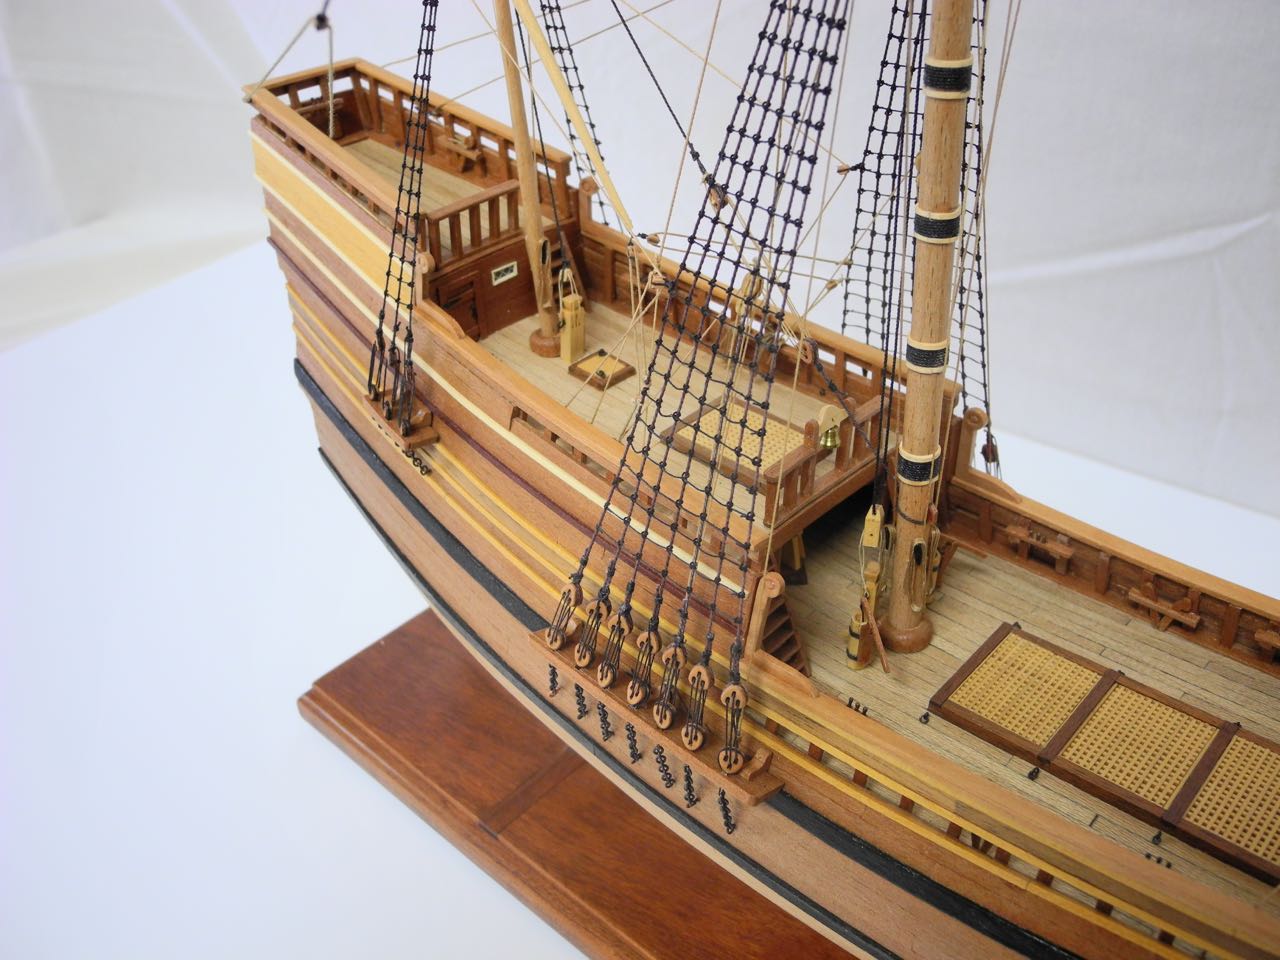
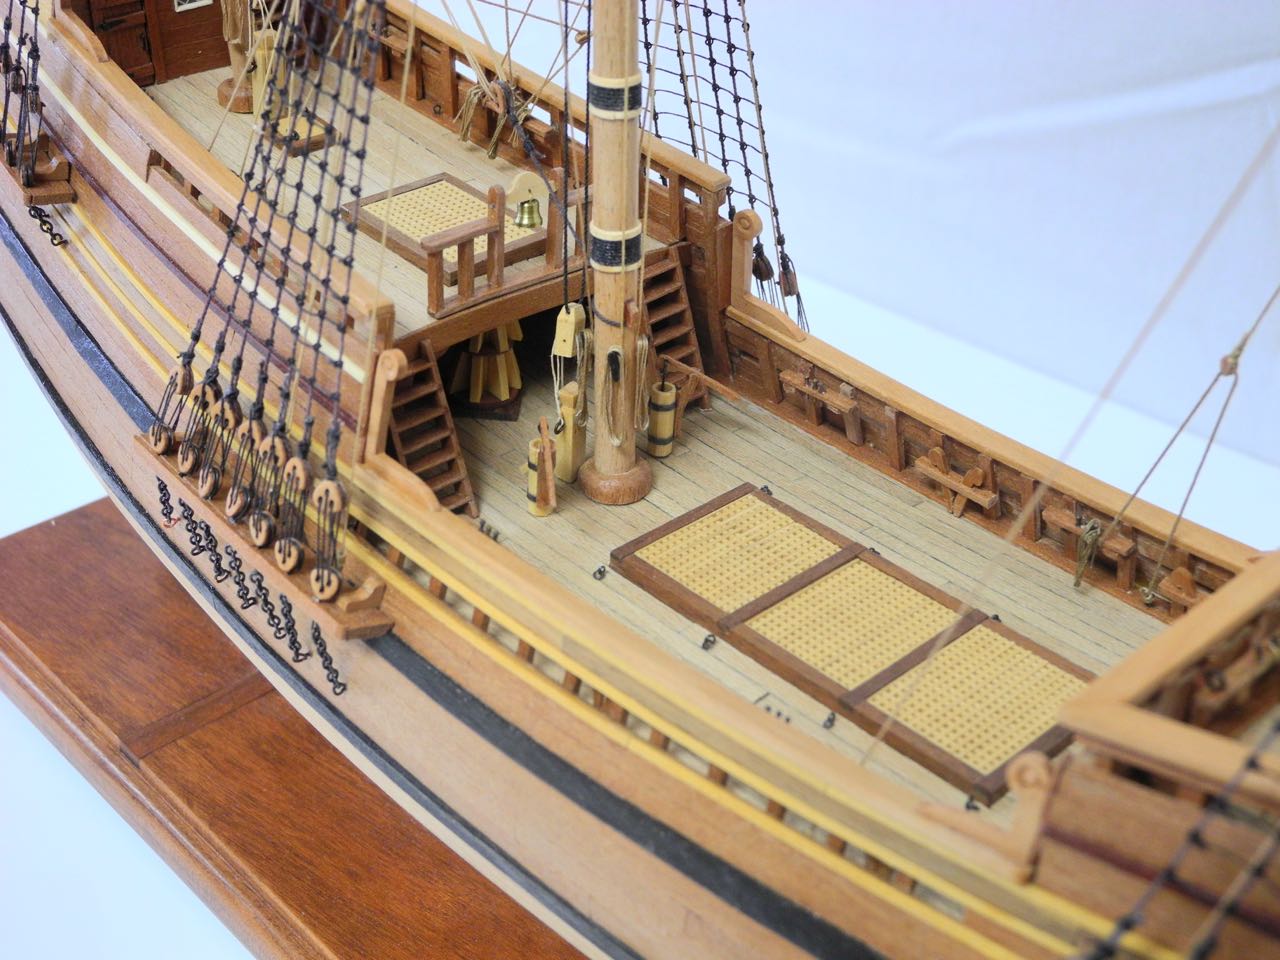
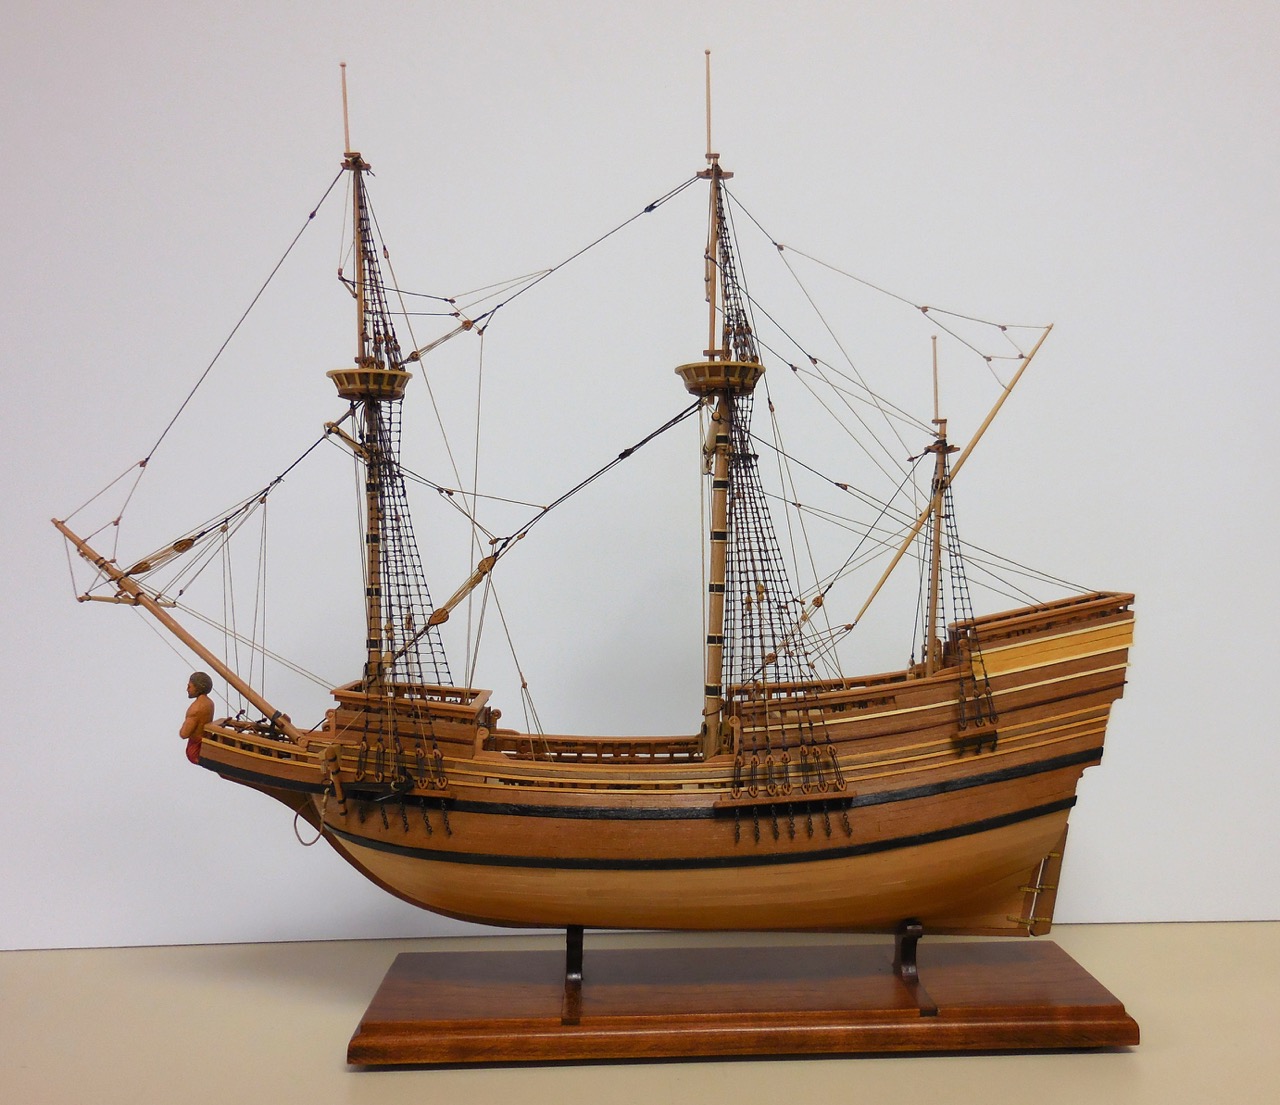
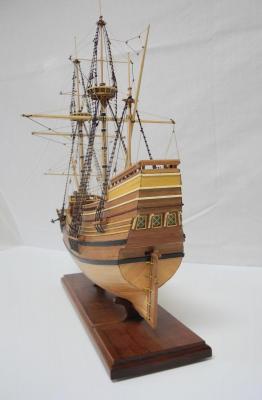
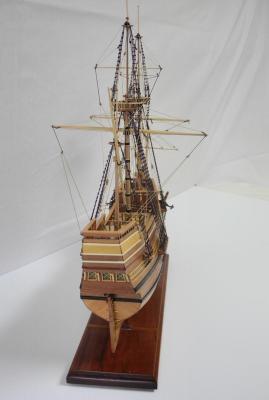
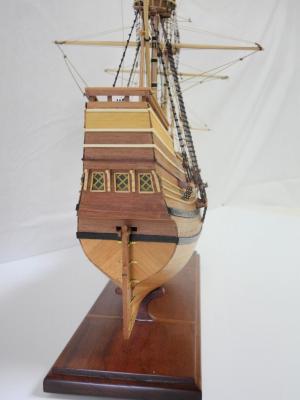
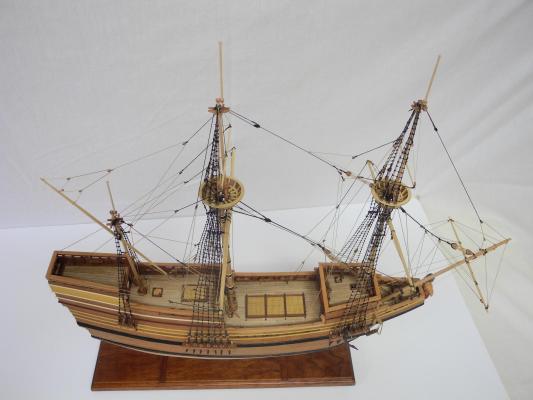
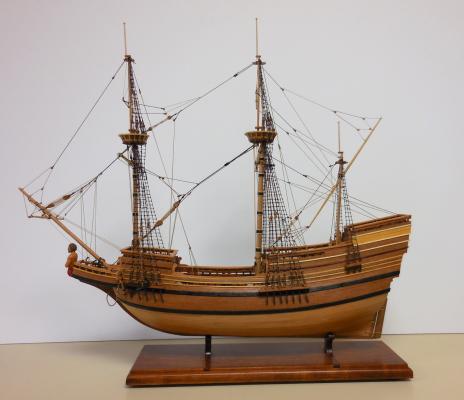
I'd like to thank everyone for looking in, for the 'likes' and especially for taking the time to comment. I'm currently doing some planning for one of my next projects - a sectional model of the Dunbrody. Also in the plans is a scratch build of the Skipjack Kathryn - a pretty unique oyster dredging workboat from the Chesapeake Bay. I'm hoping to work on both of those projects concurrently. To pull off both of these builds I'll need to develop some drafting skills, so it will be a little while before I start build logs for those. In the meantime, here are some photos of the finished Paragon, from various angles:


- 170 replies
-
- 16
-
-
Excellent work, Ron! I can see you've put a lot of thought and effort into rendering the drawings. When (if) I get around to modeling one from brass I'll definitely be referring to your drawings.
-
Thanks Bob. By the way - been thinking about a trip up to see you. Will probably be after the holidays.
-
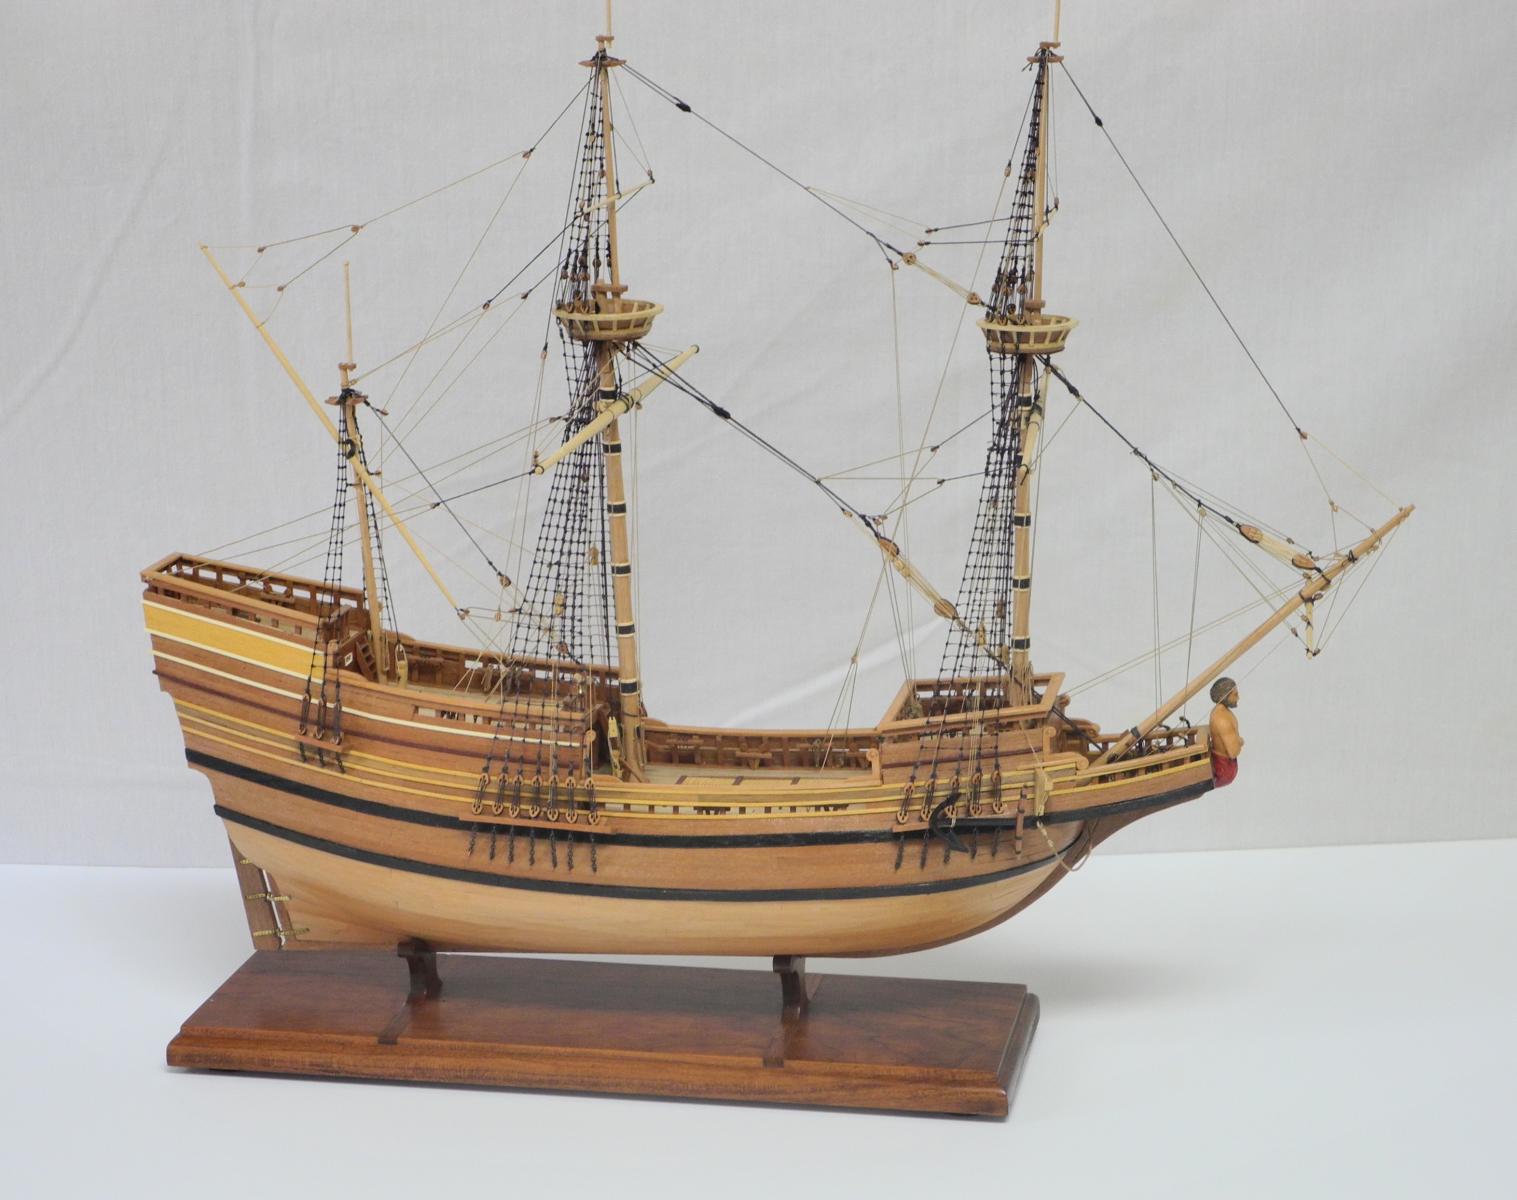
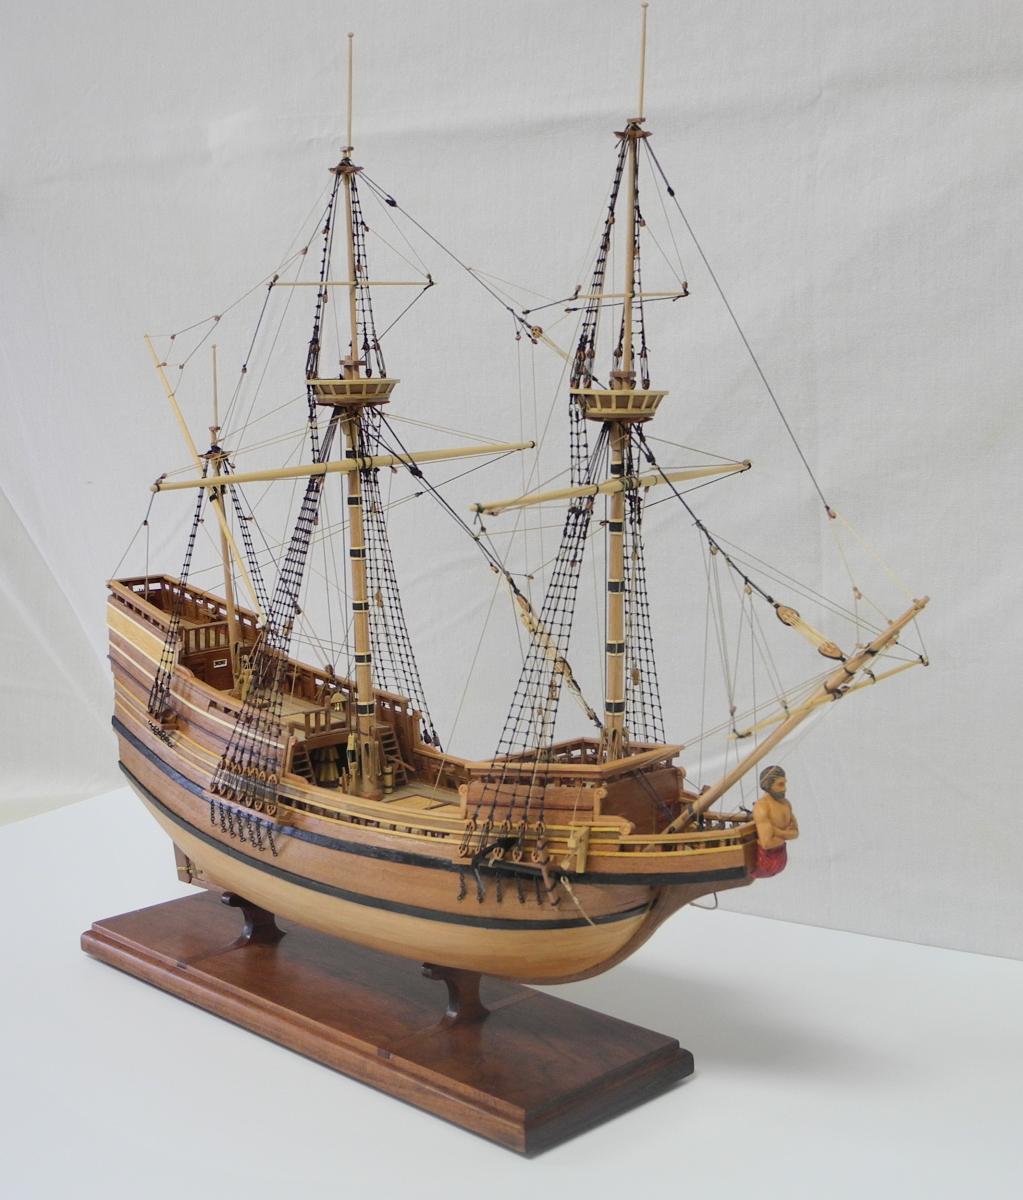
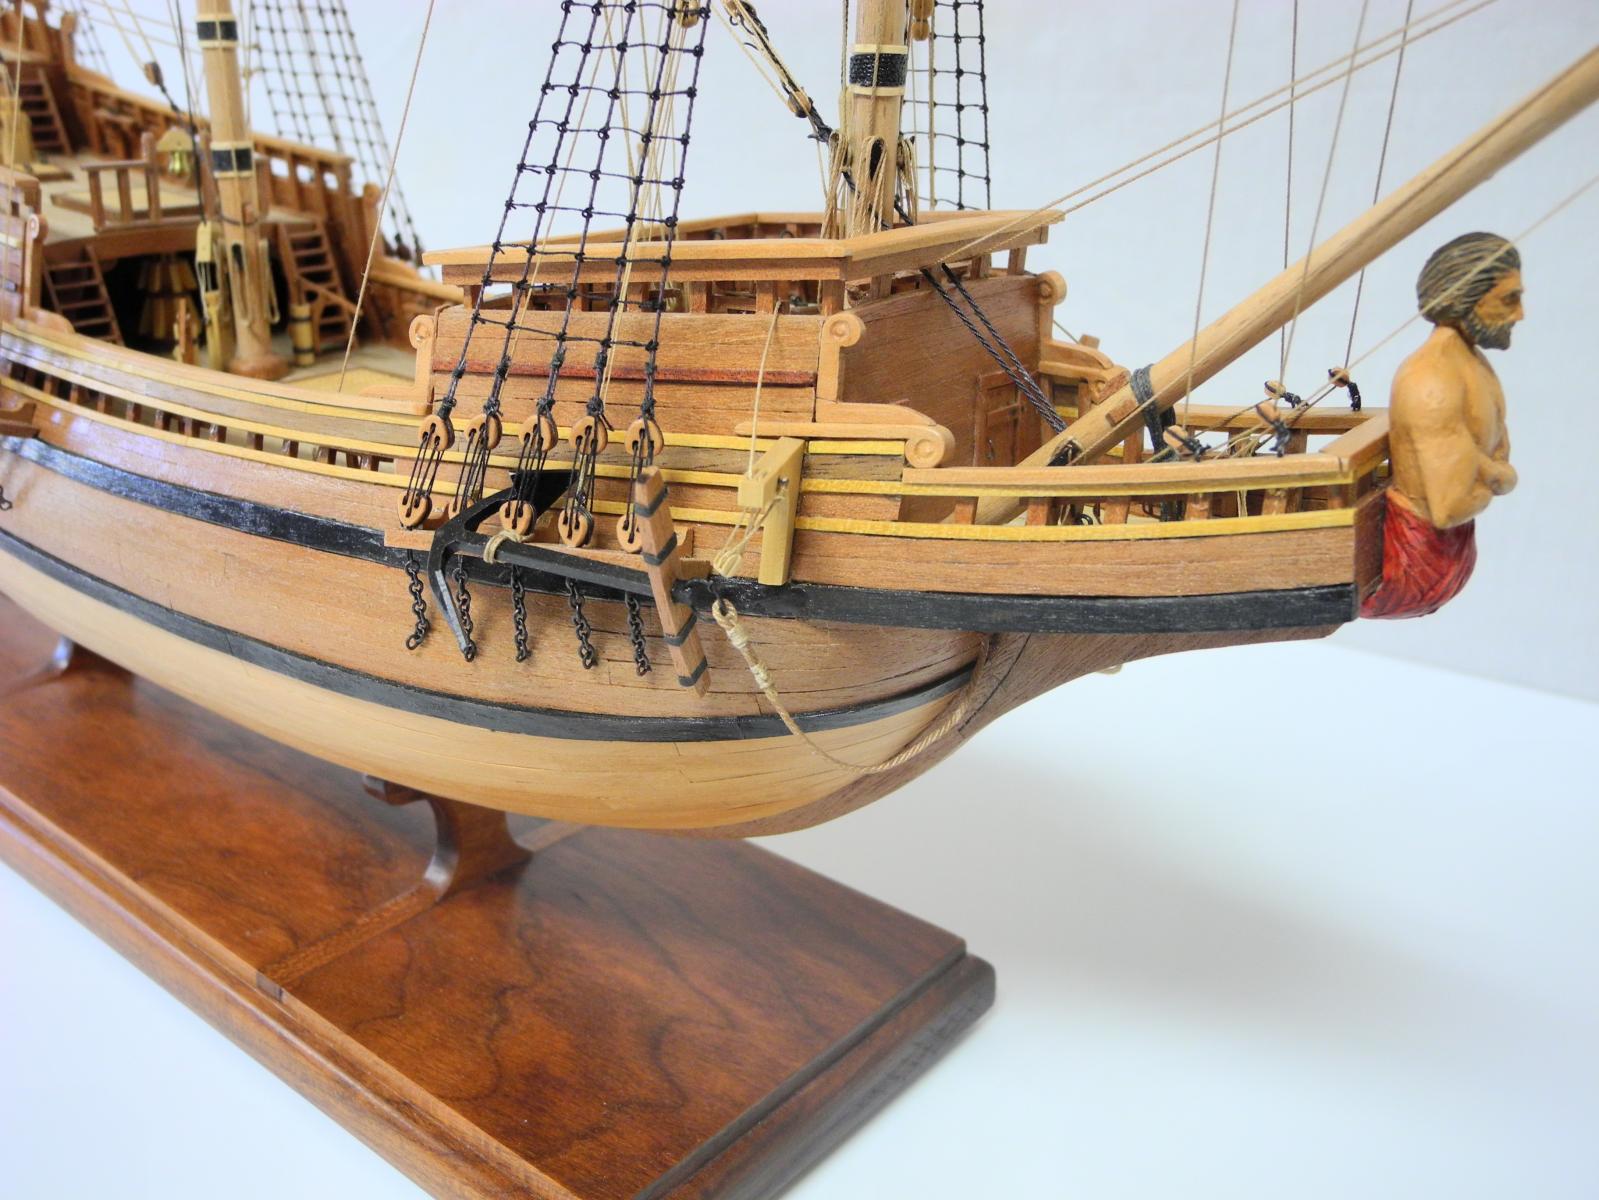
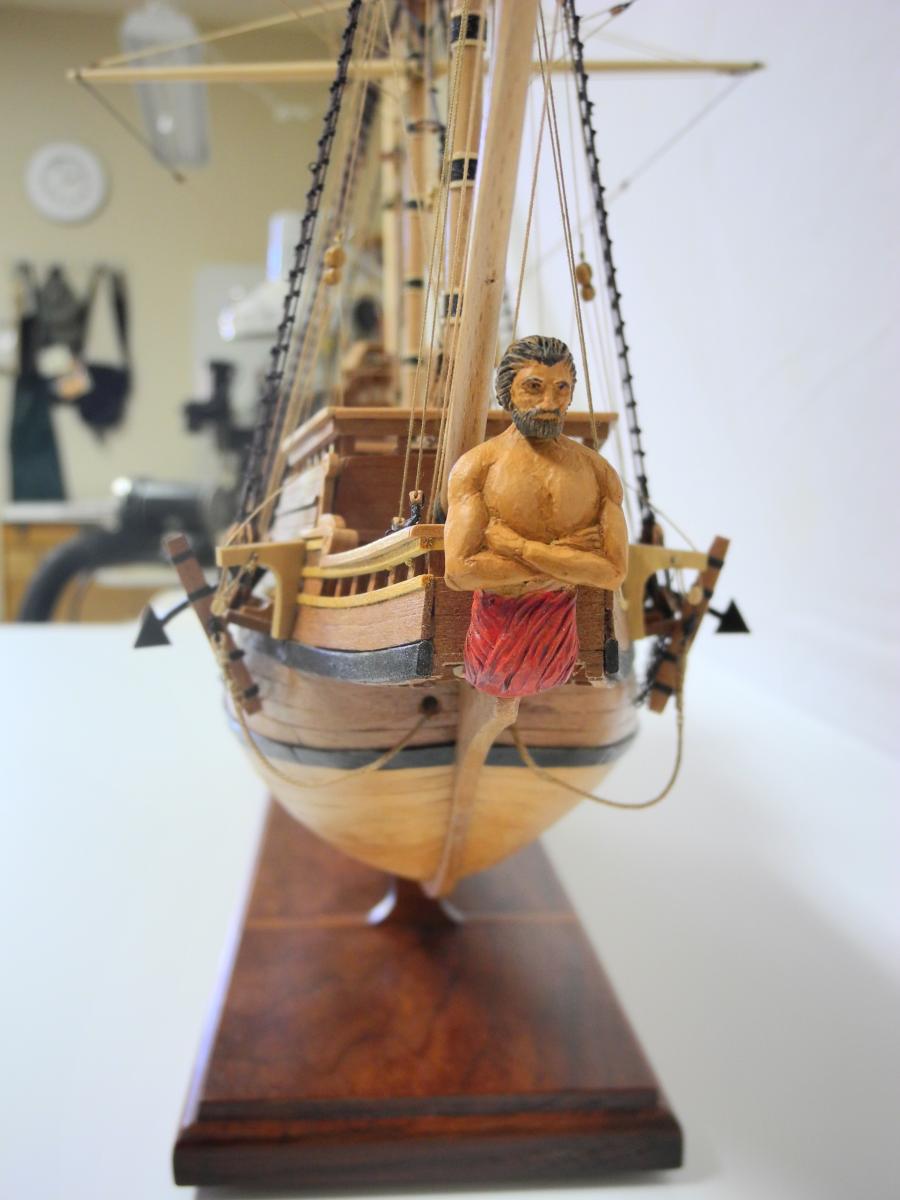
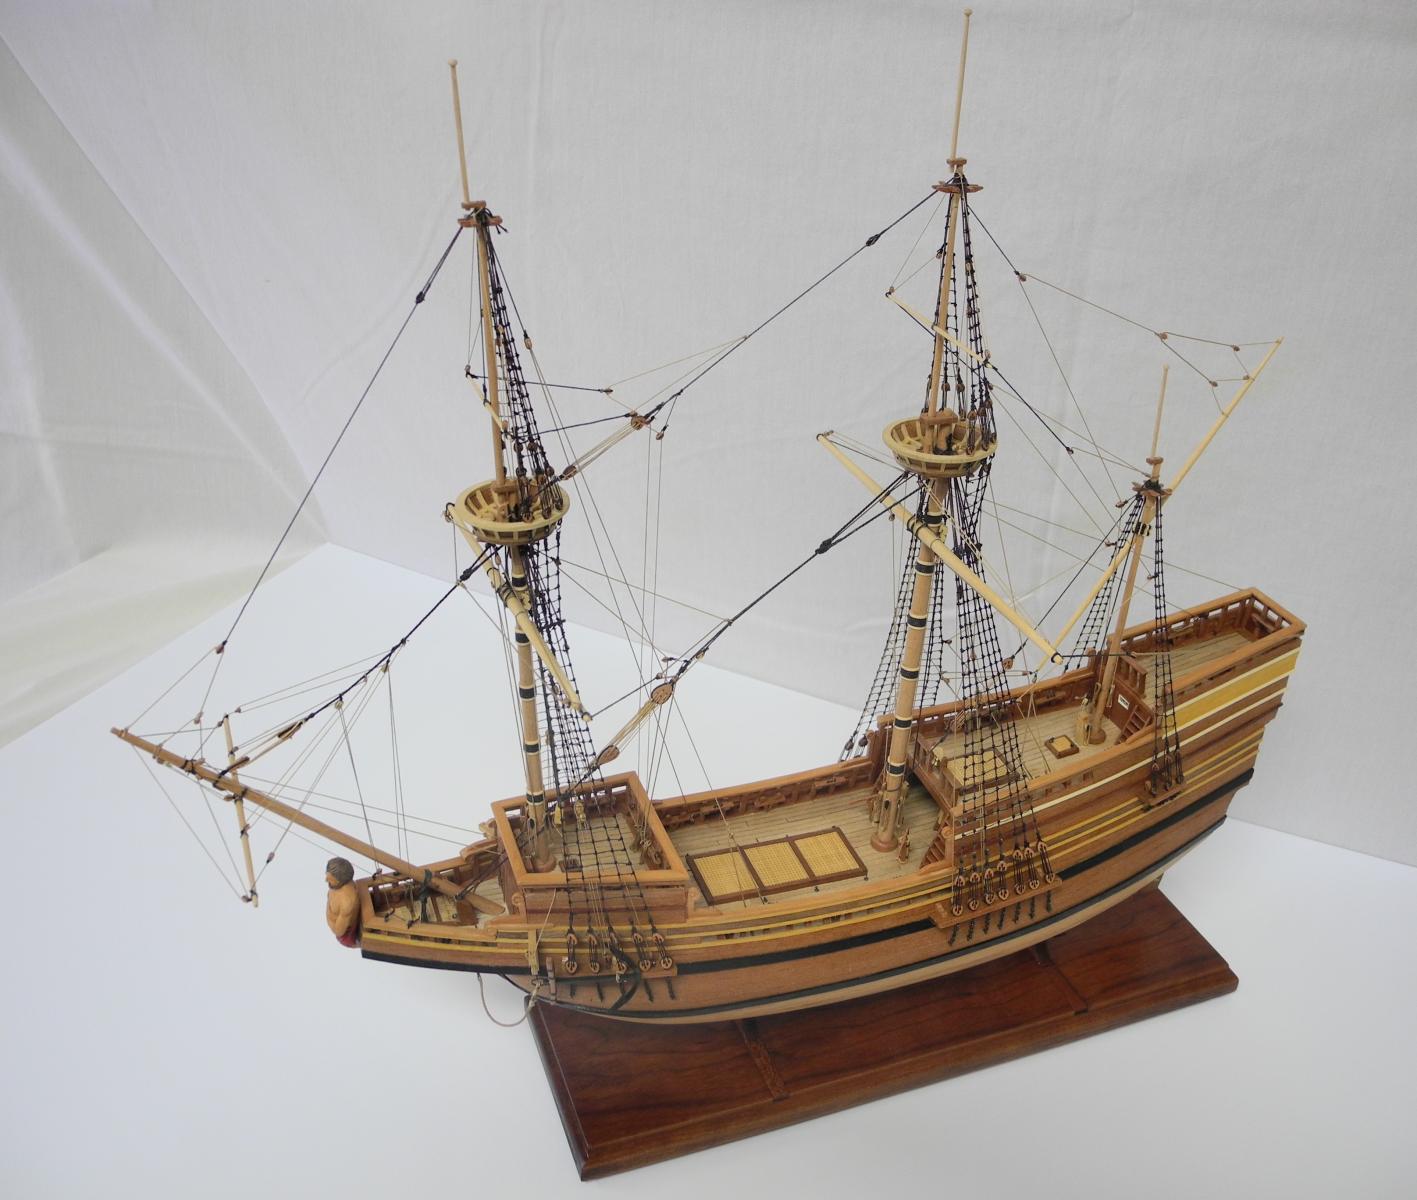
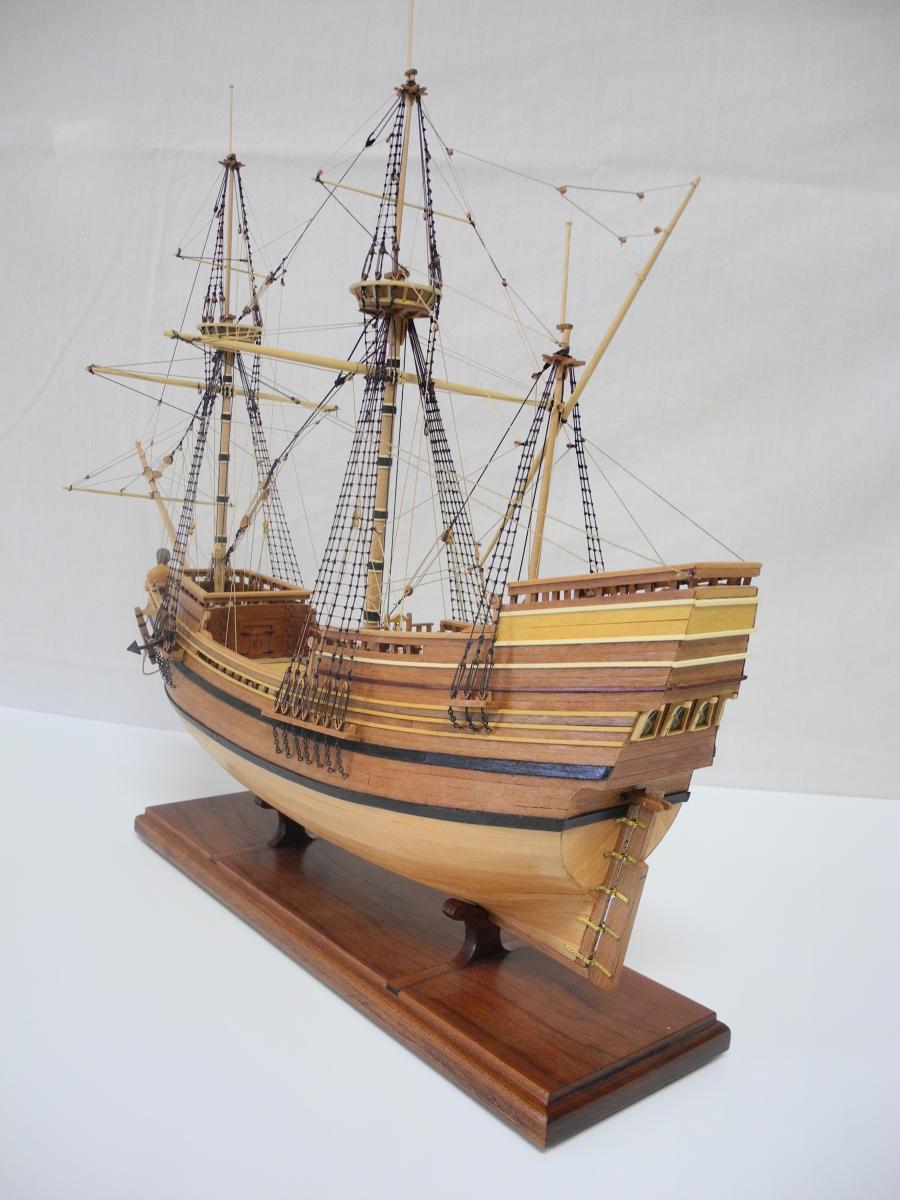
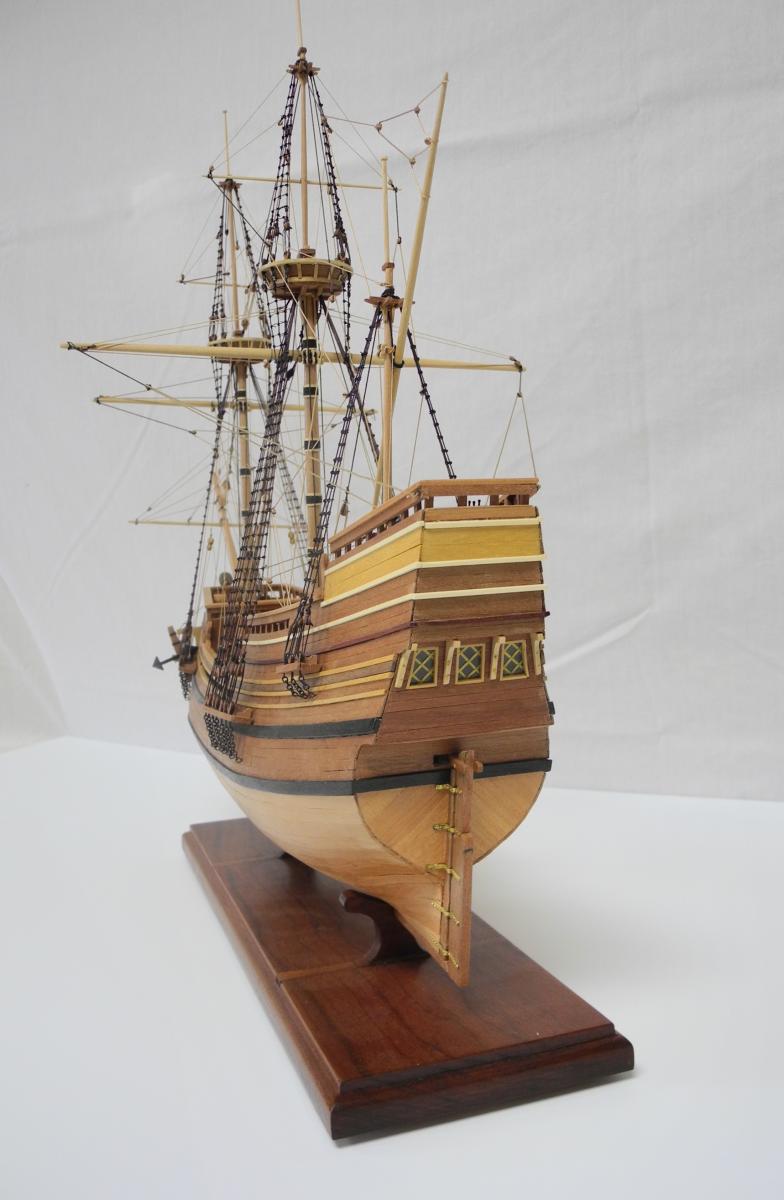
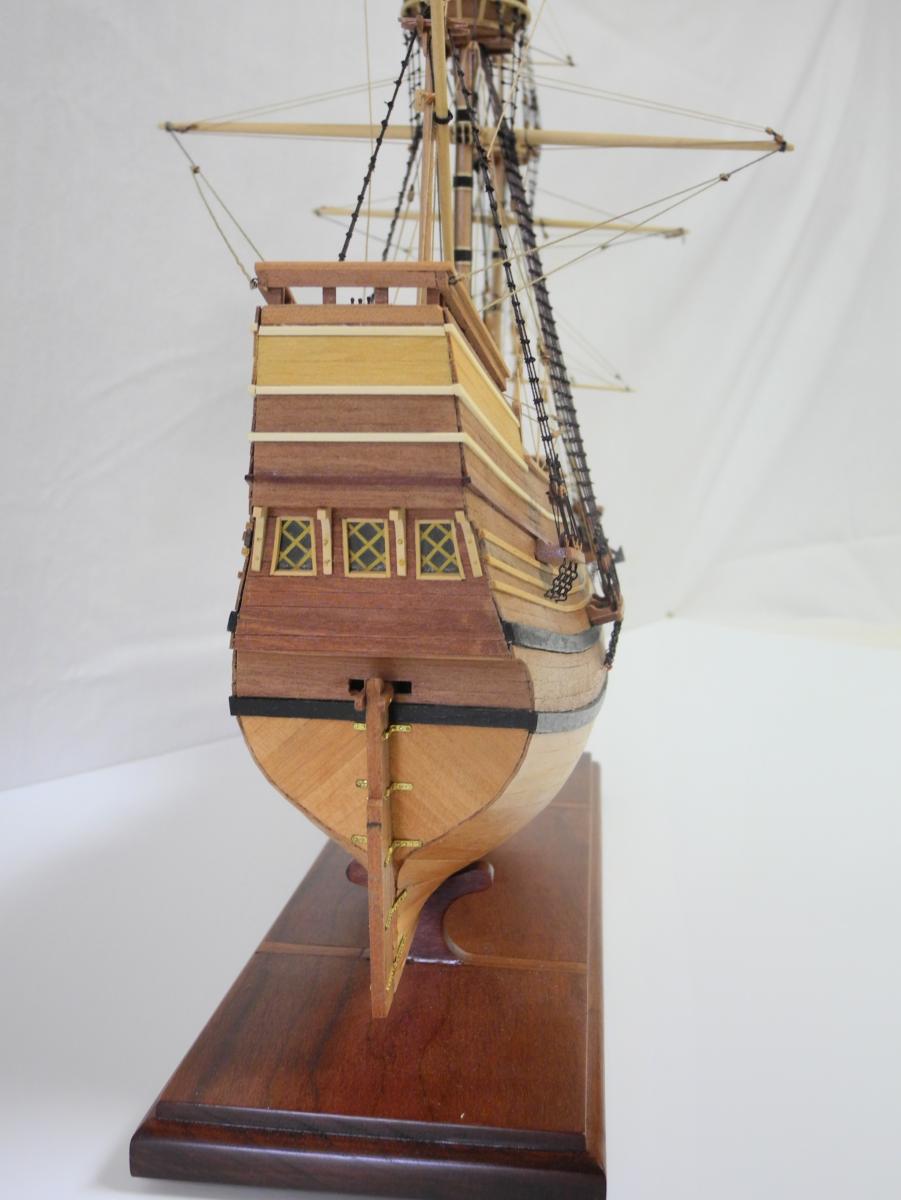
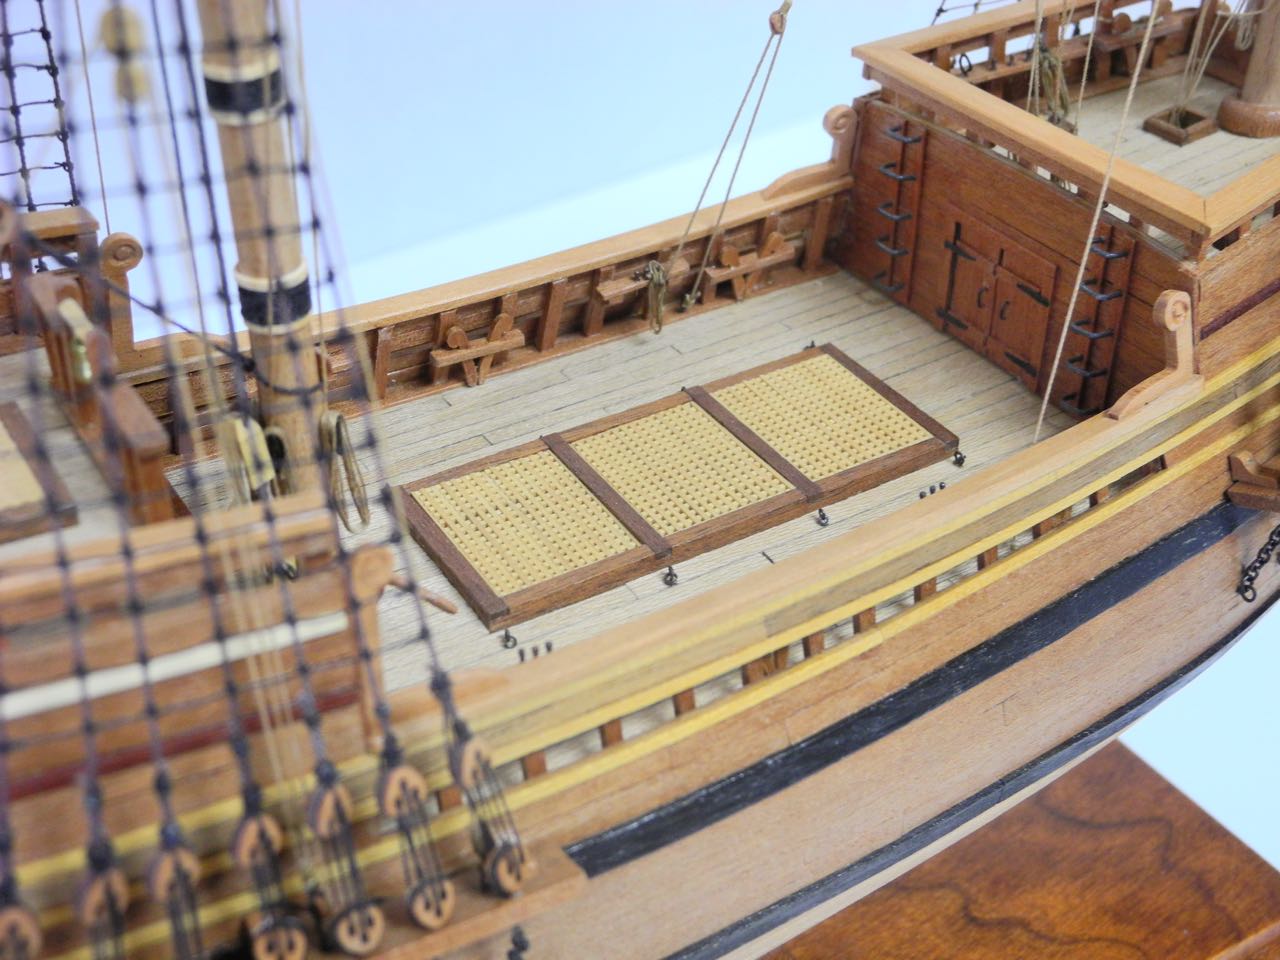
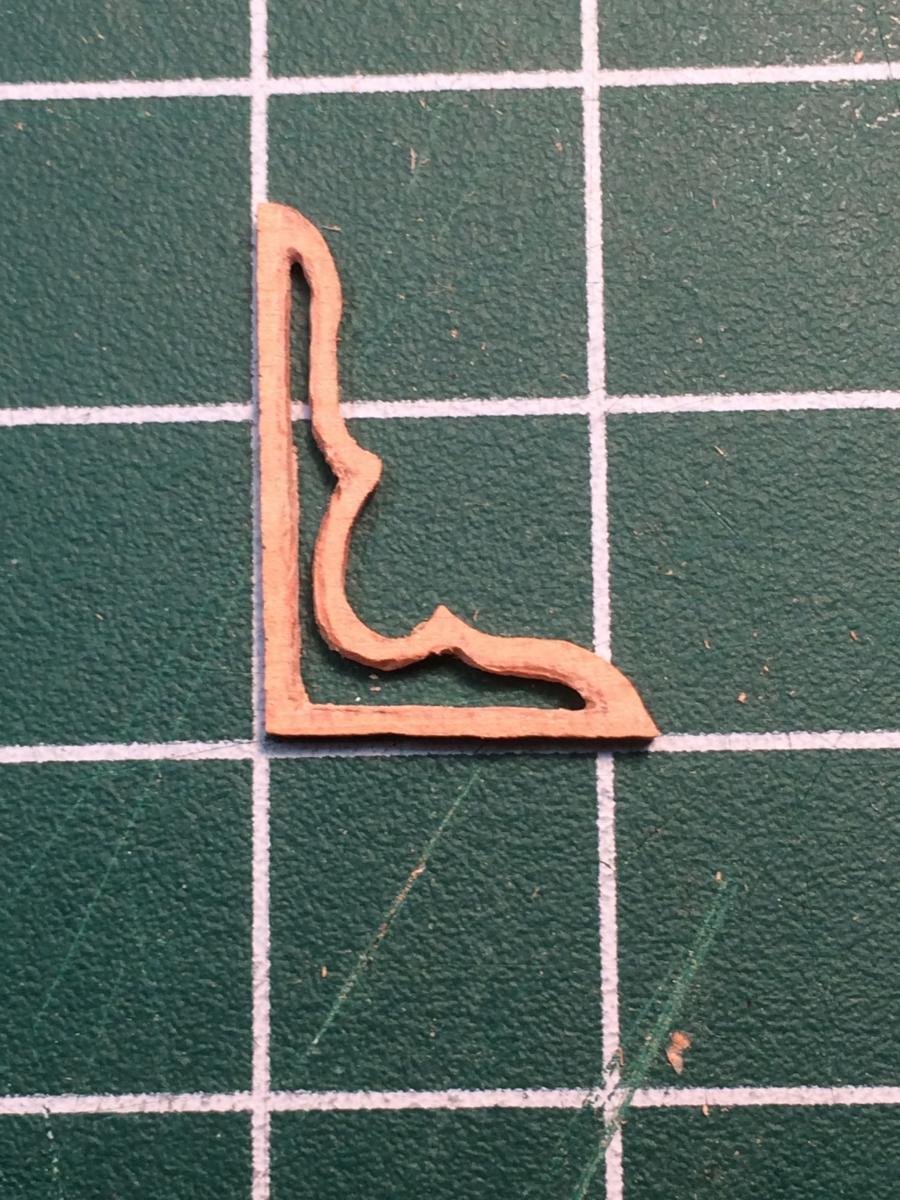
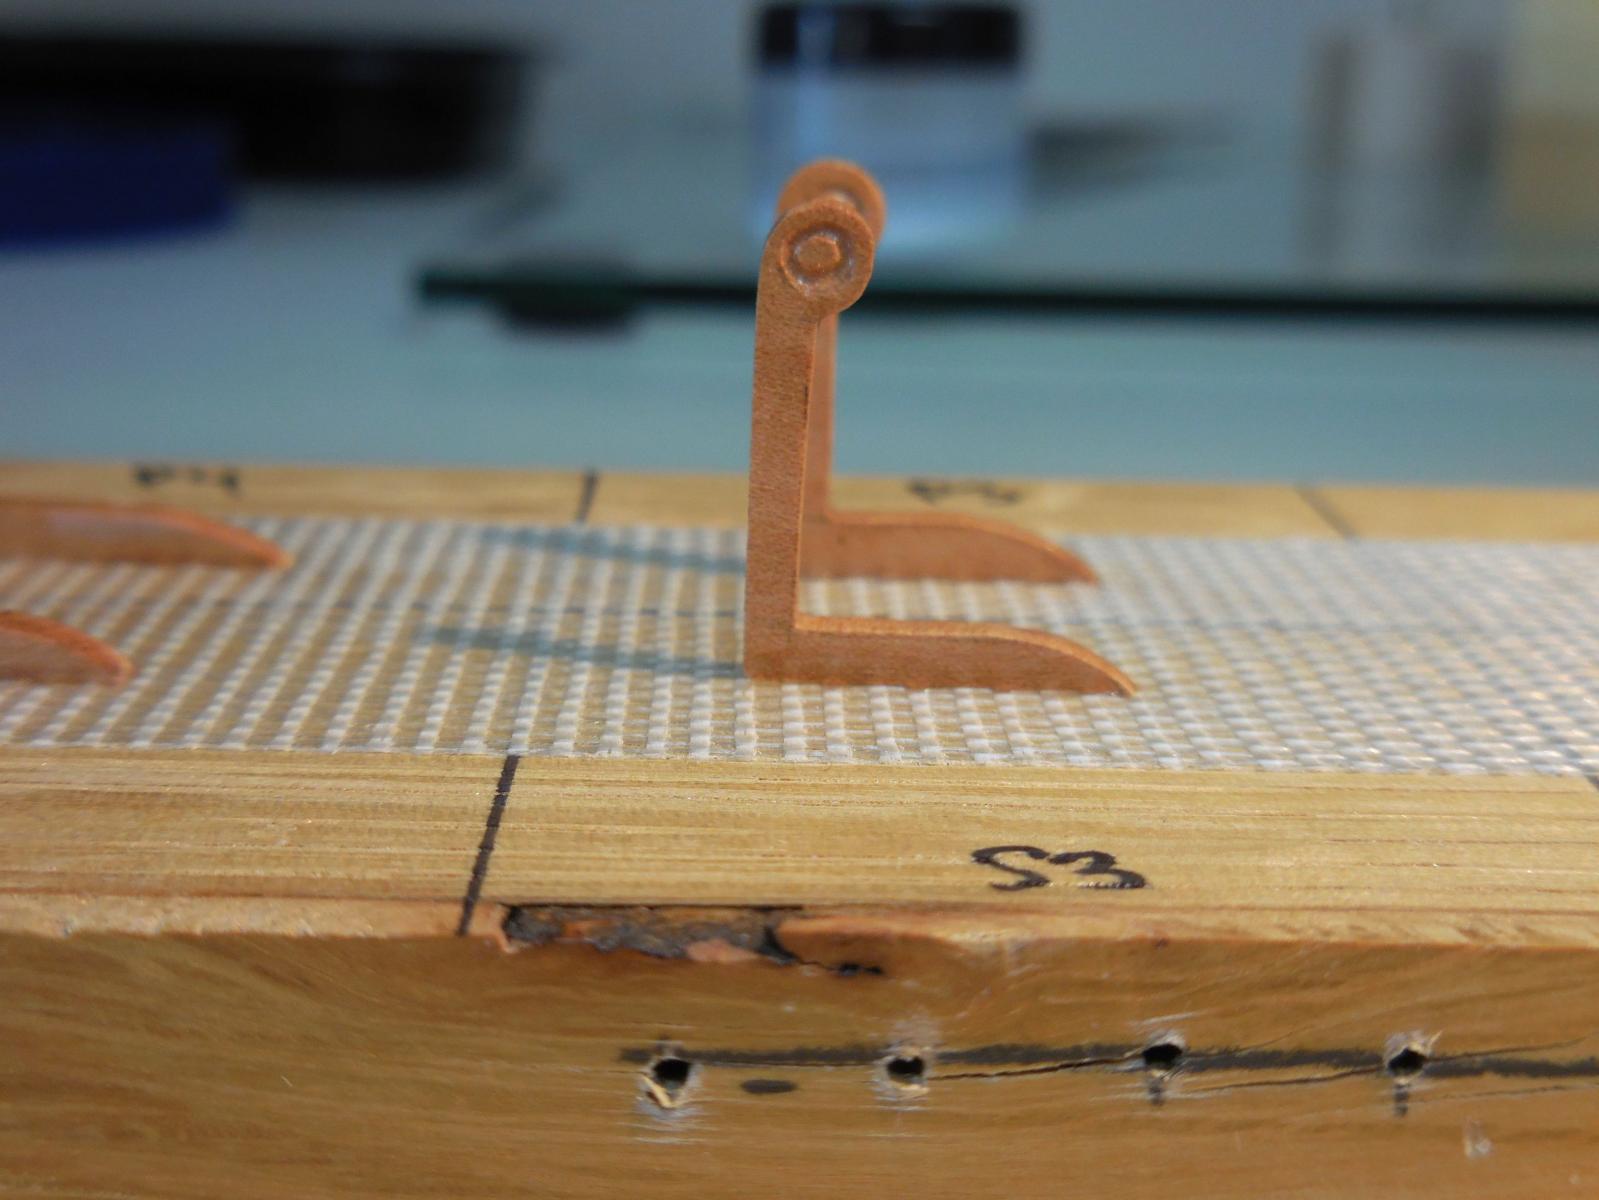
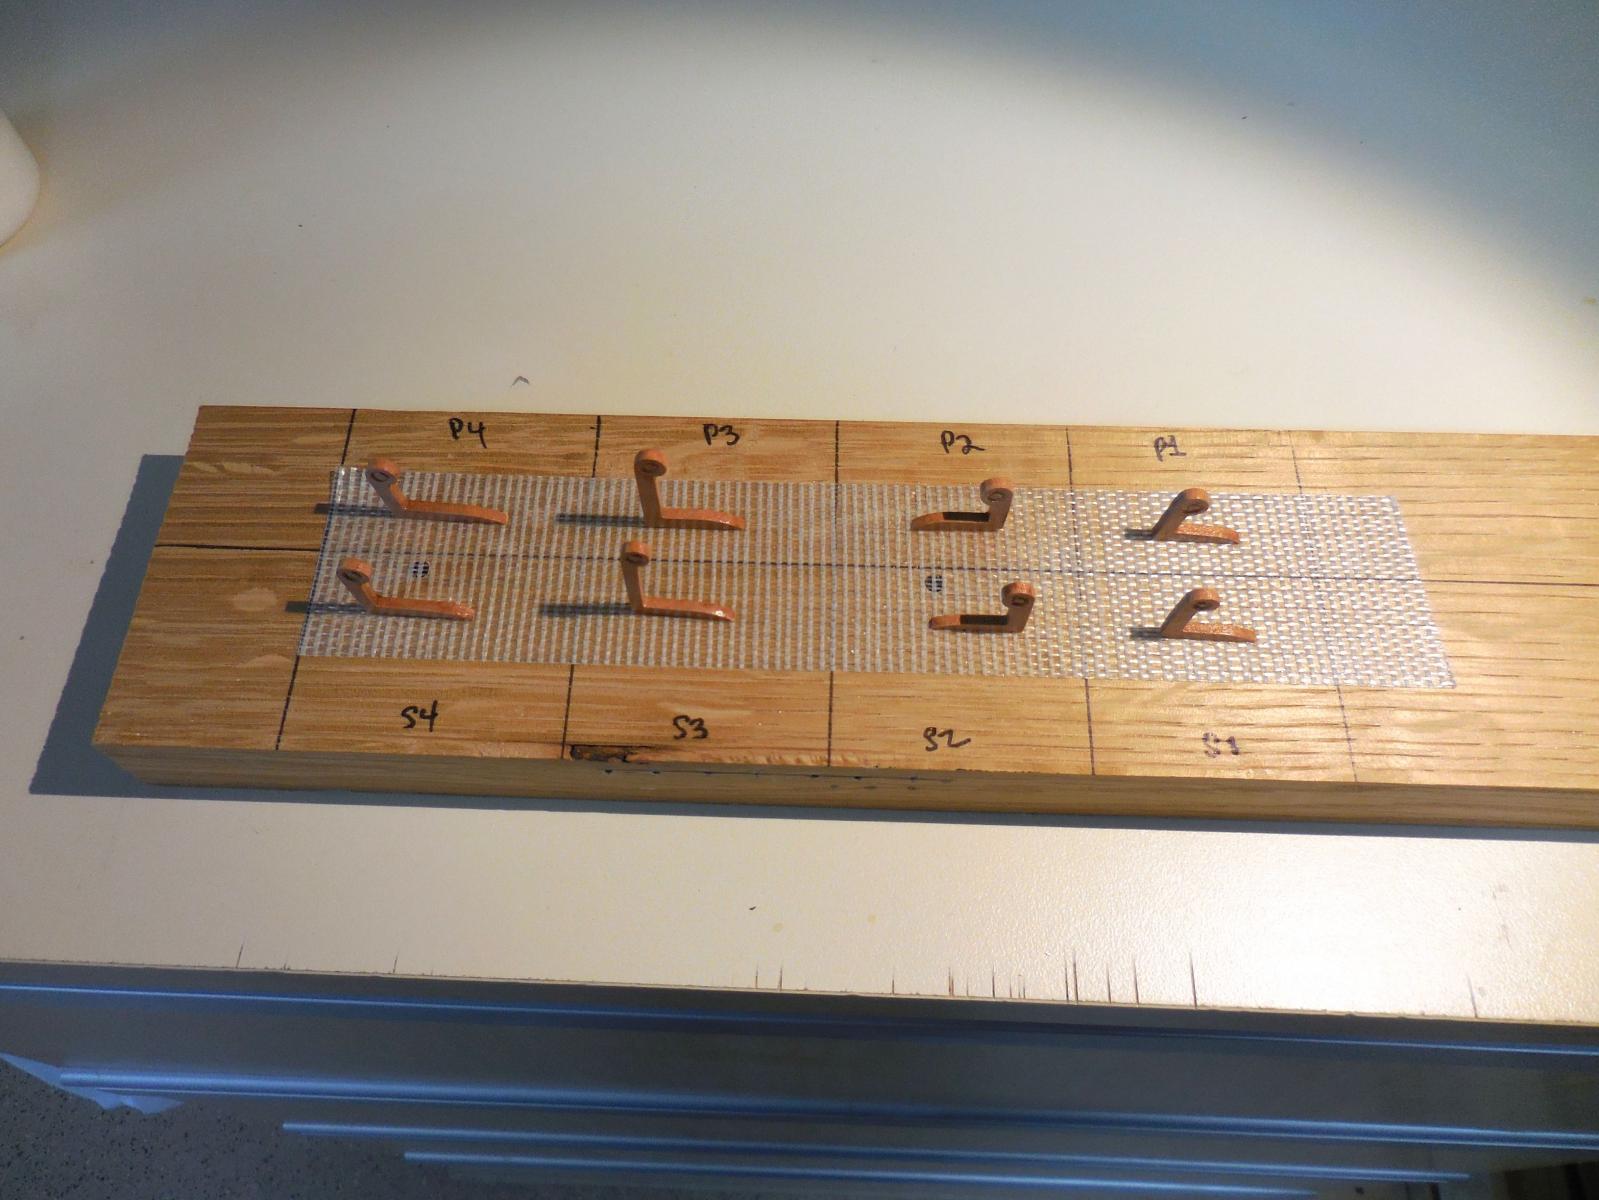
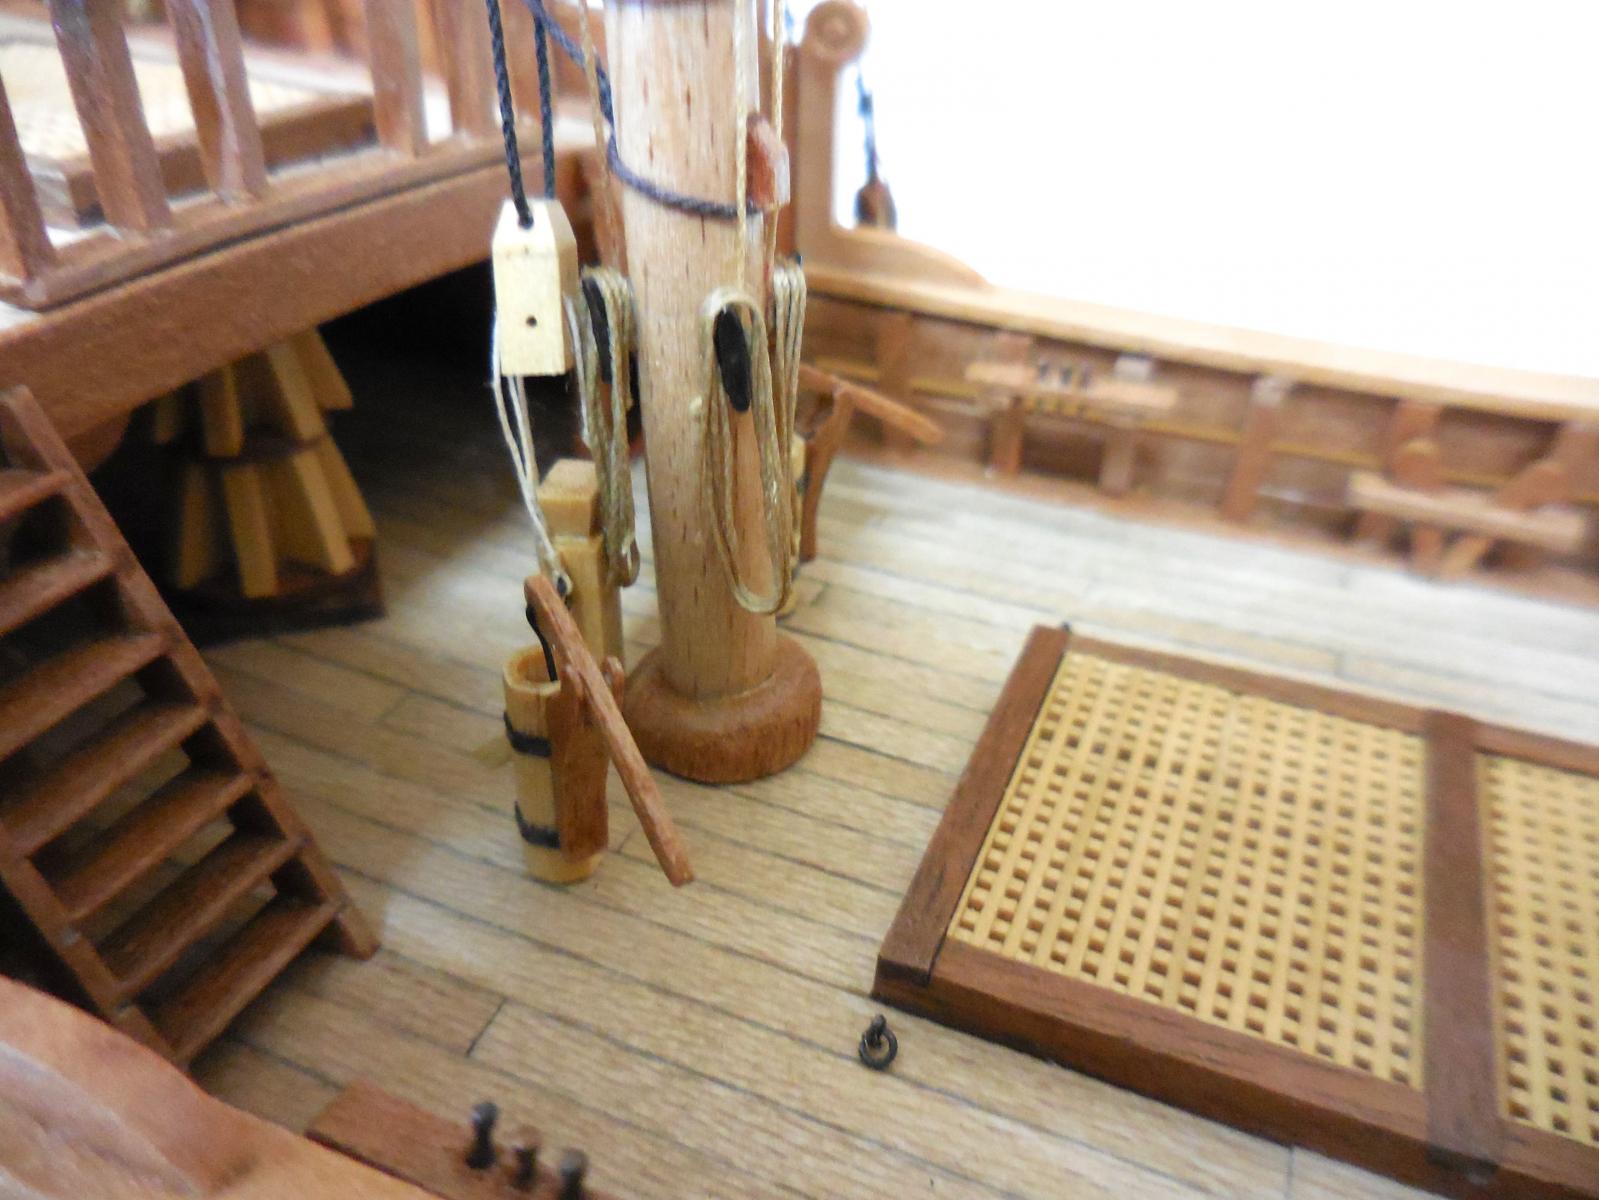
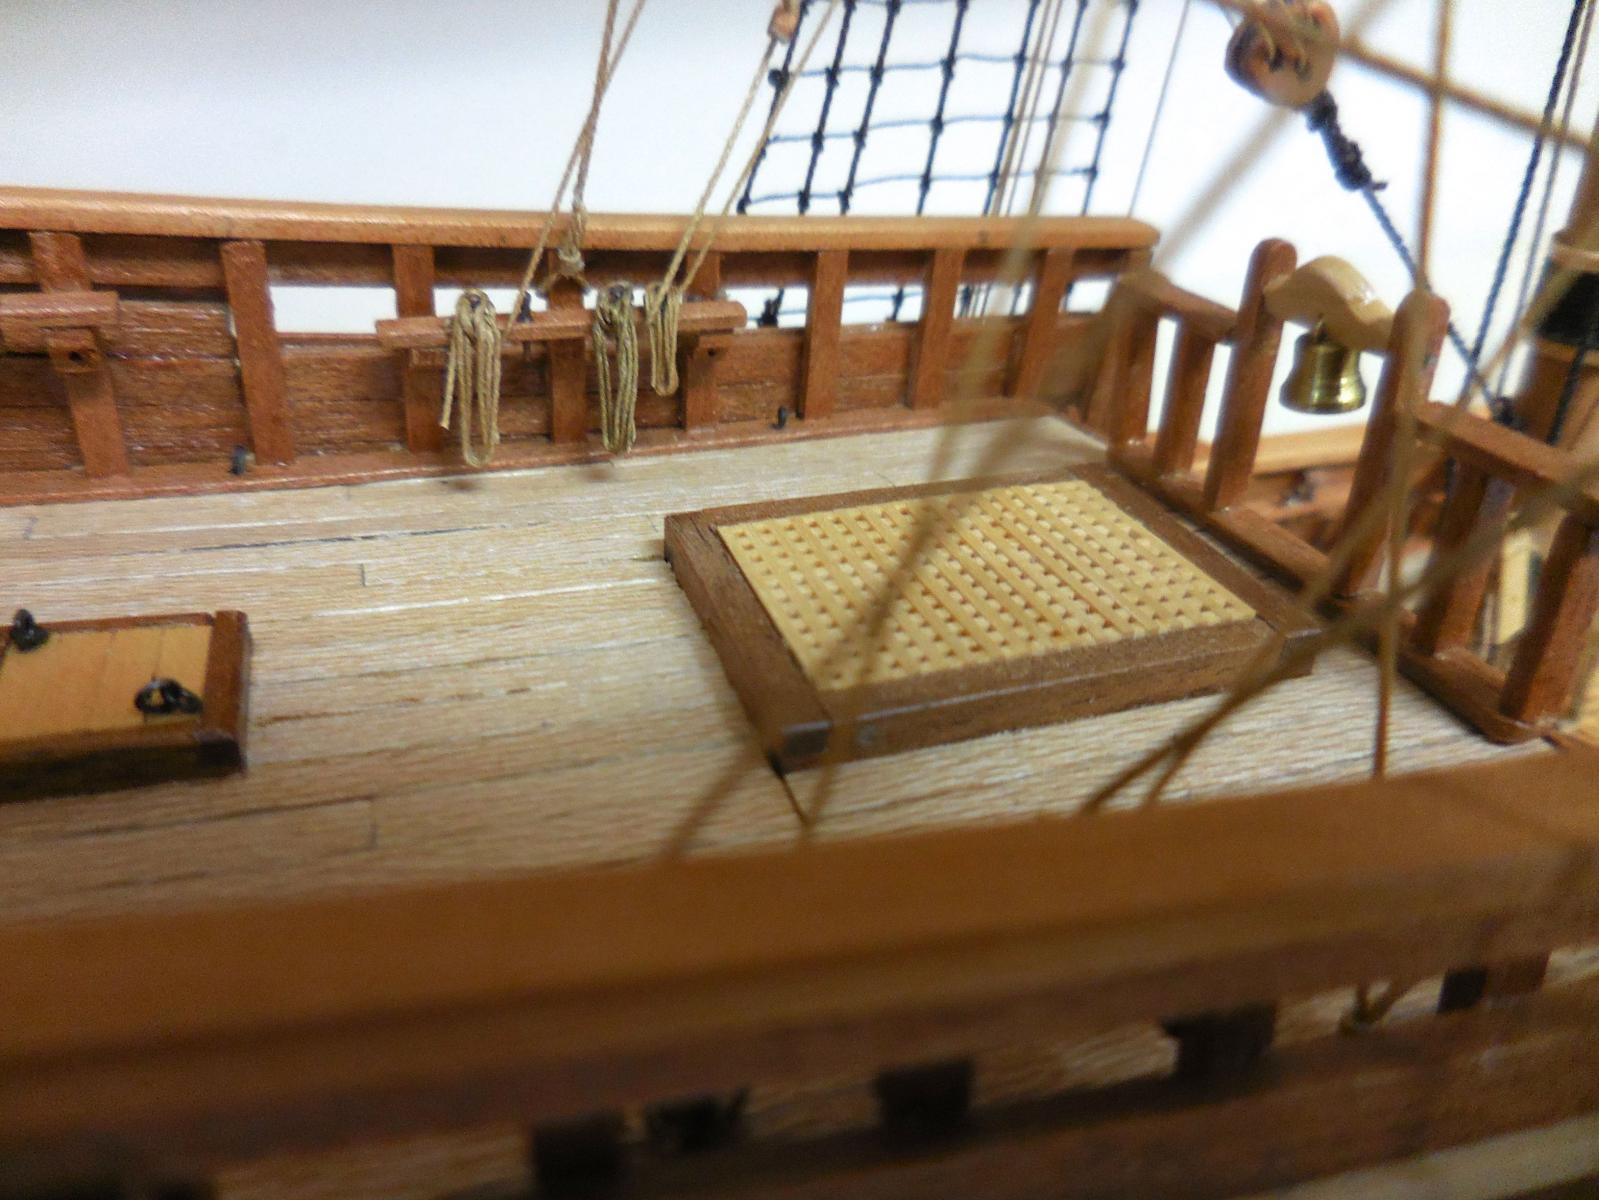
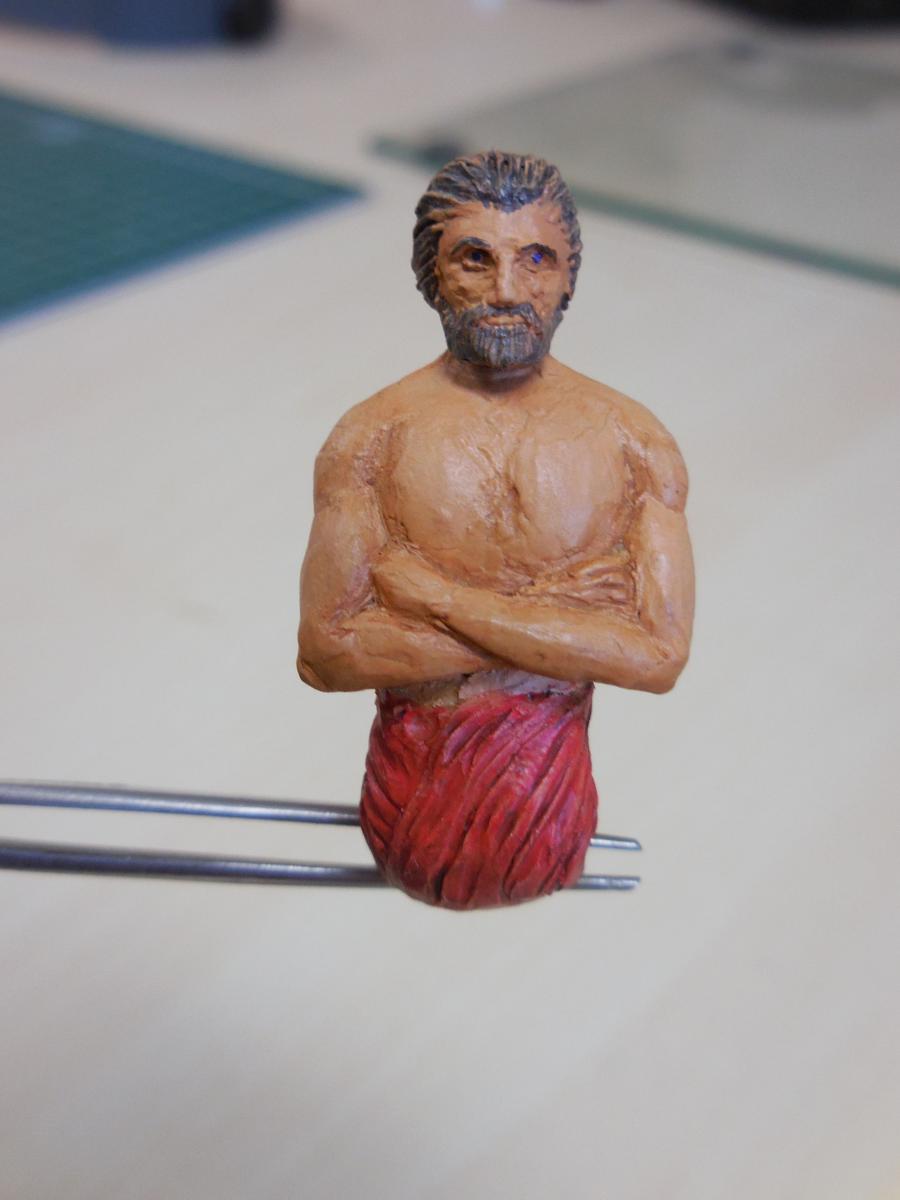
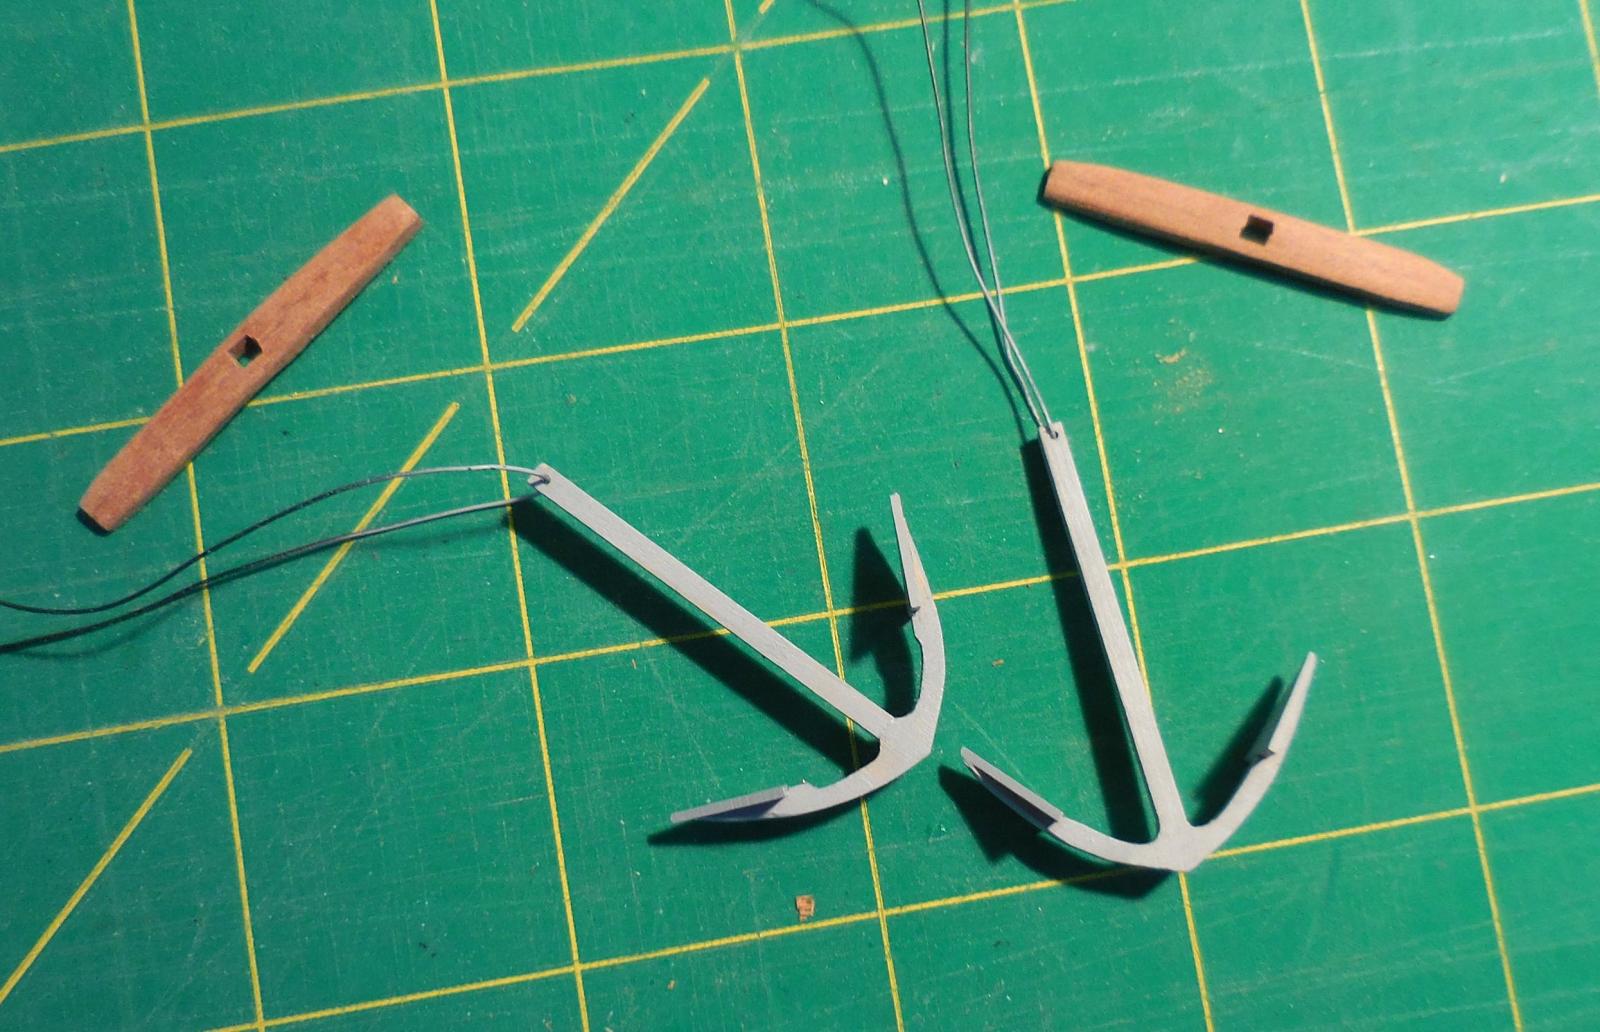
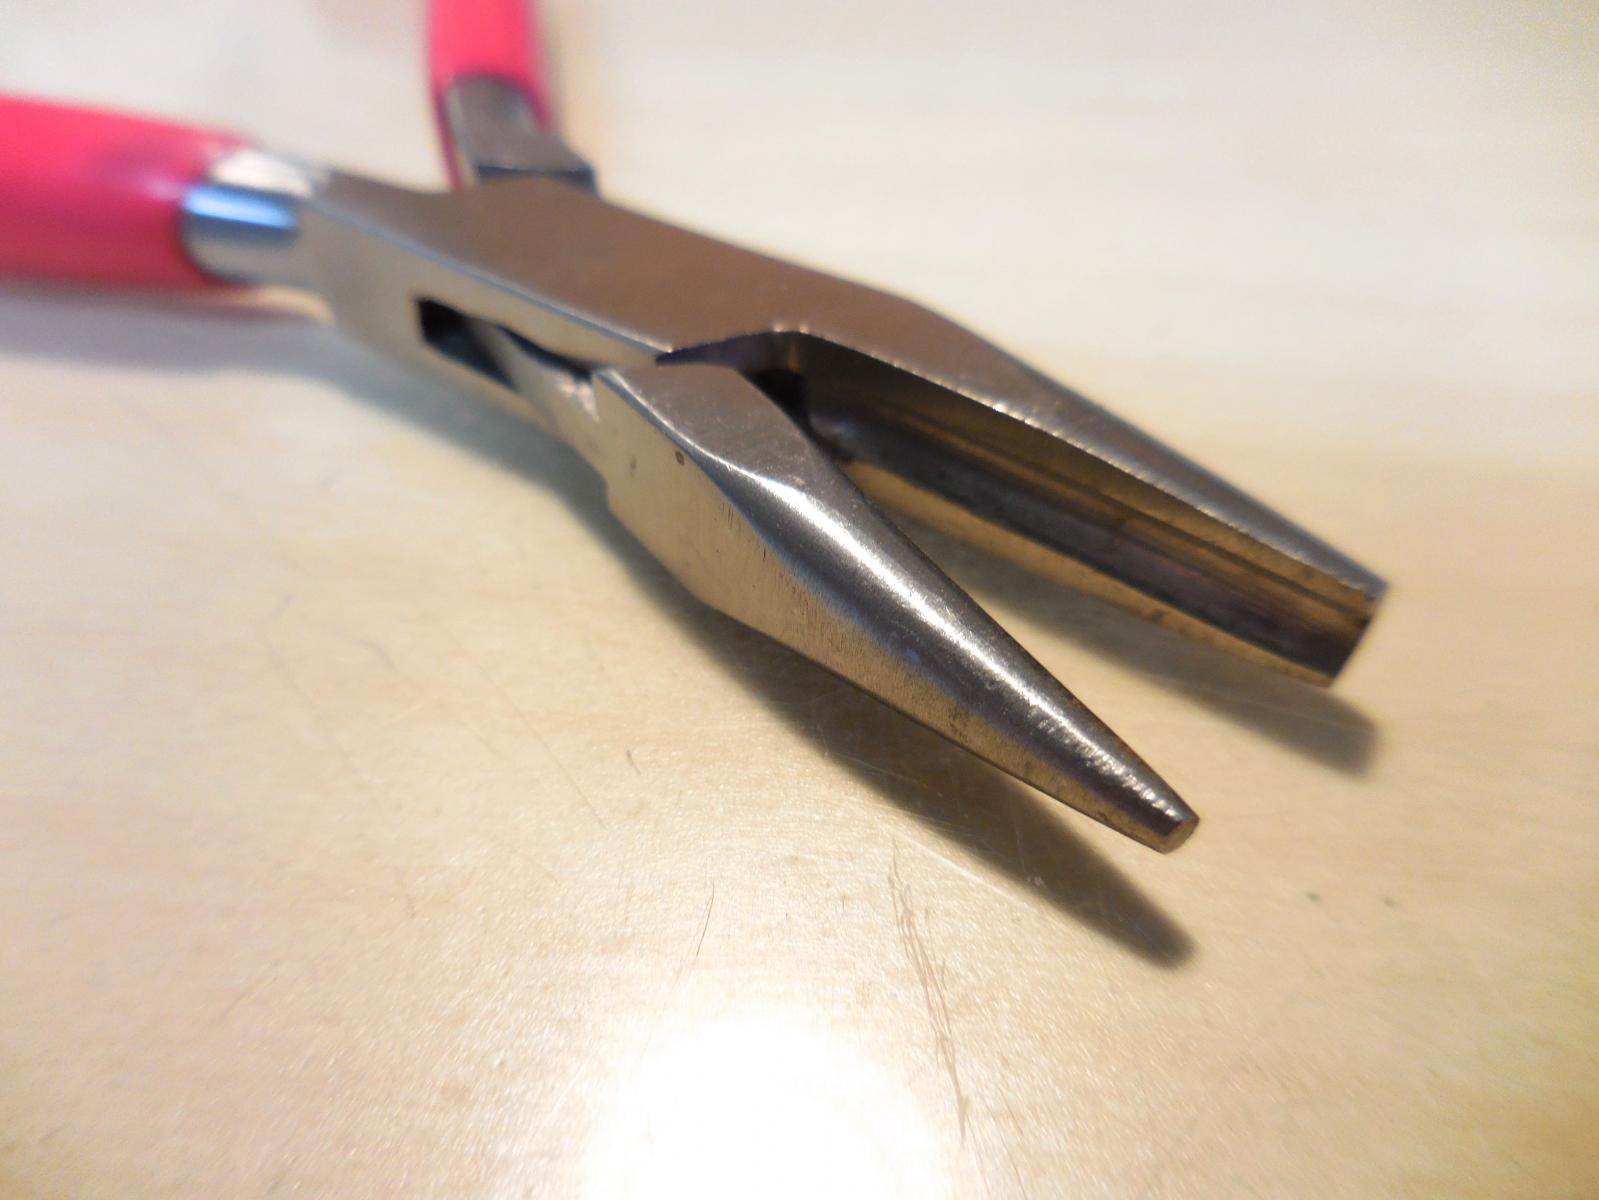
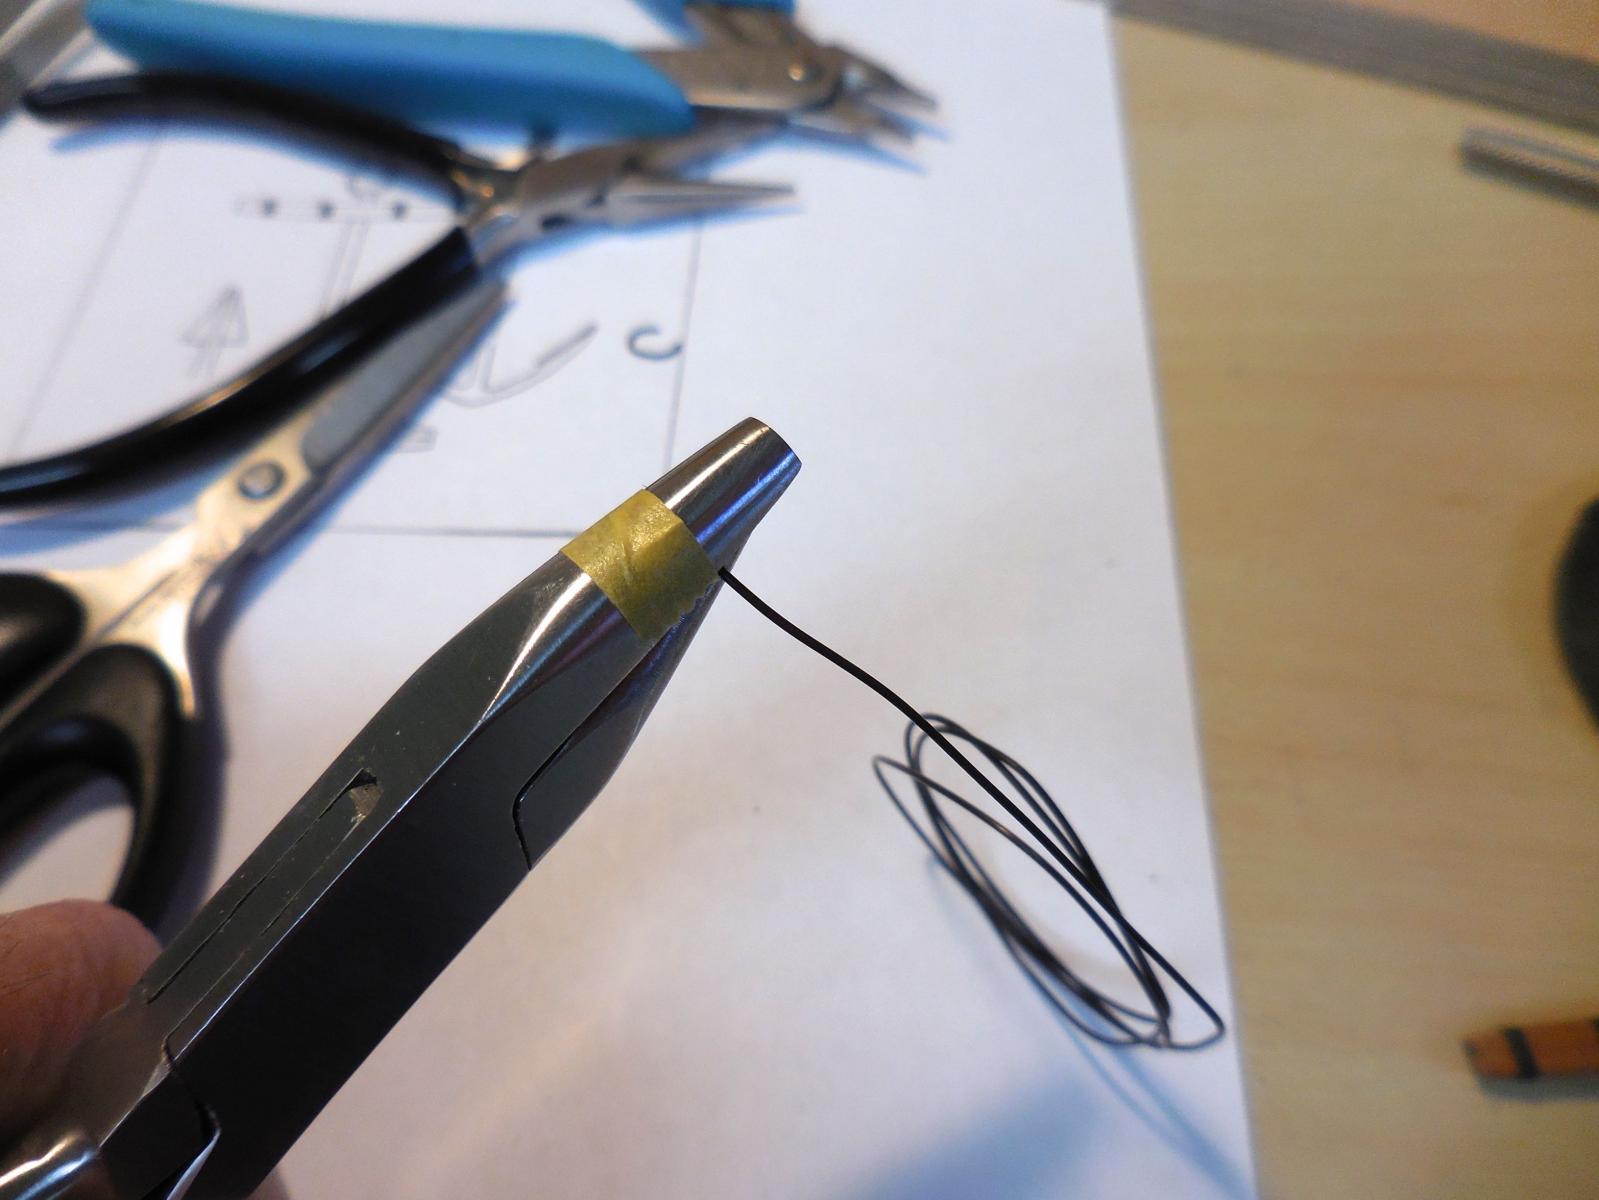
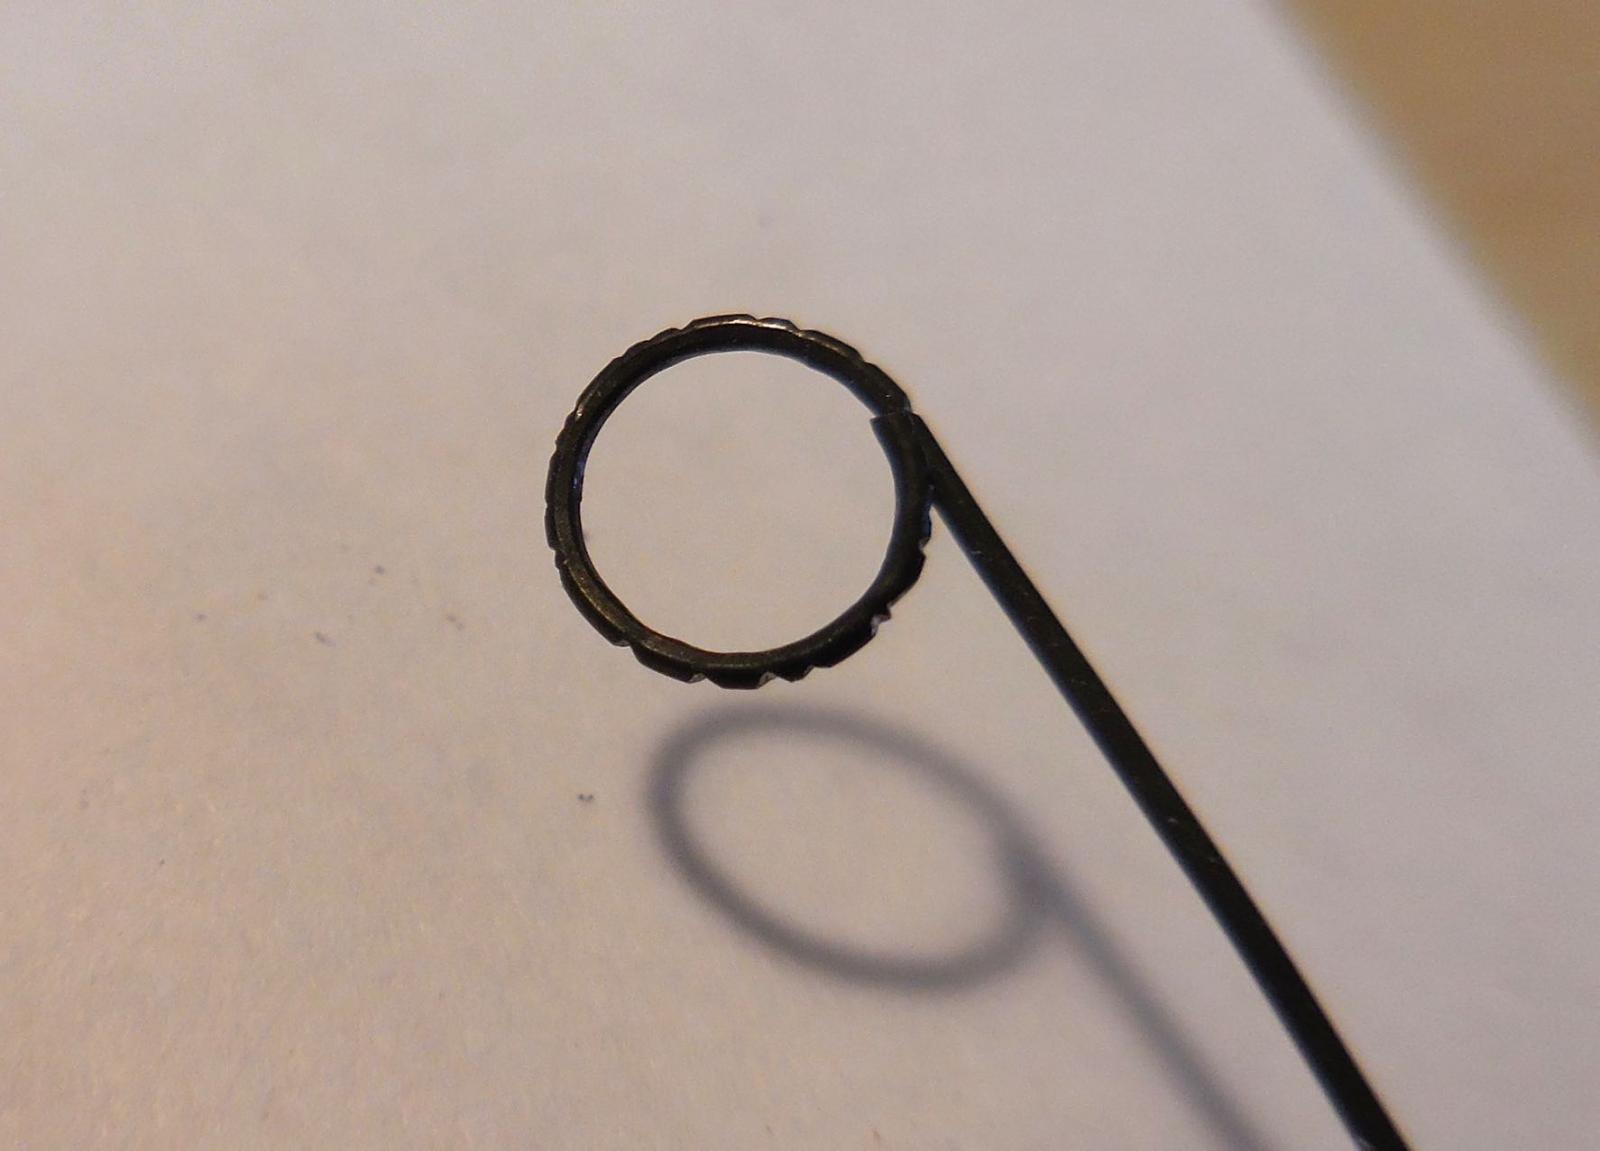
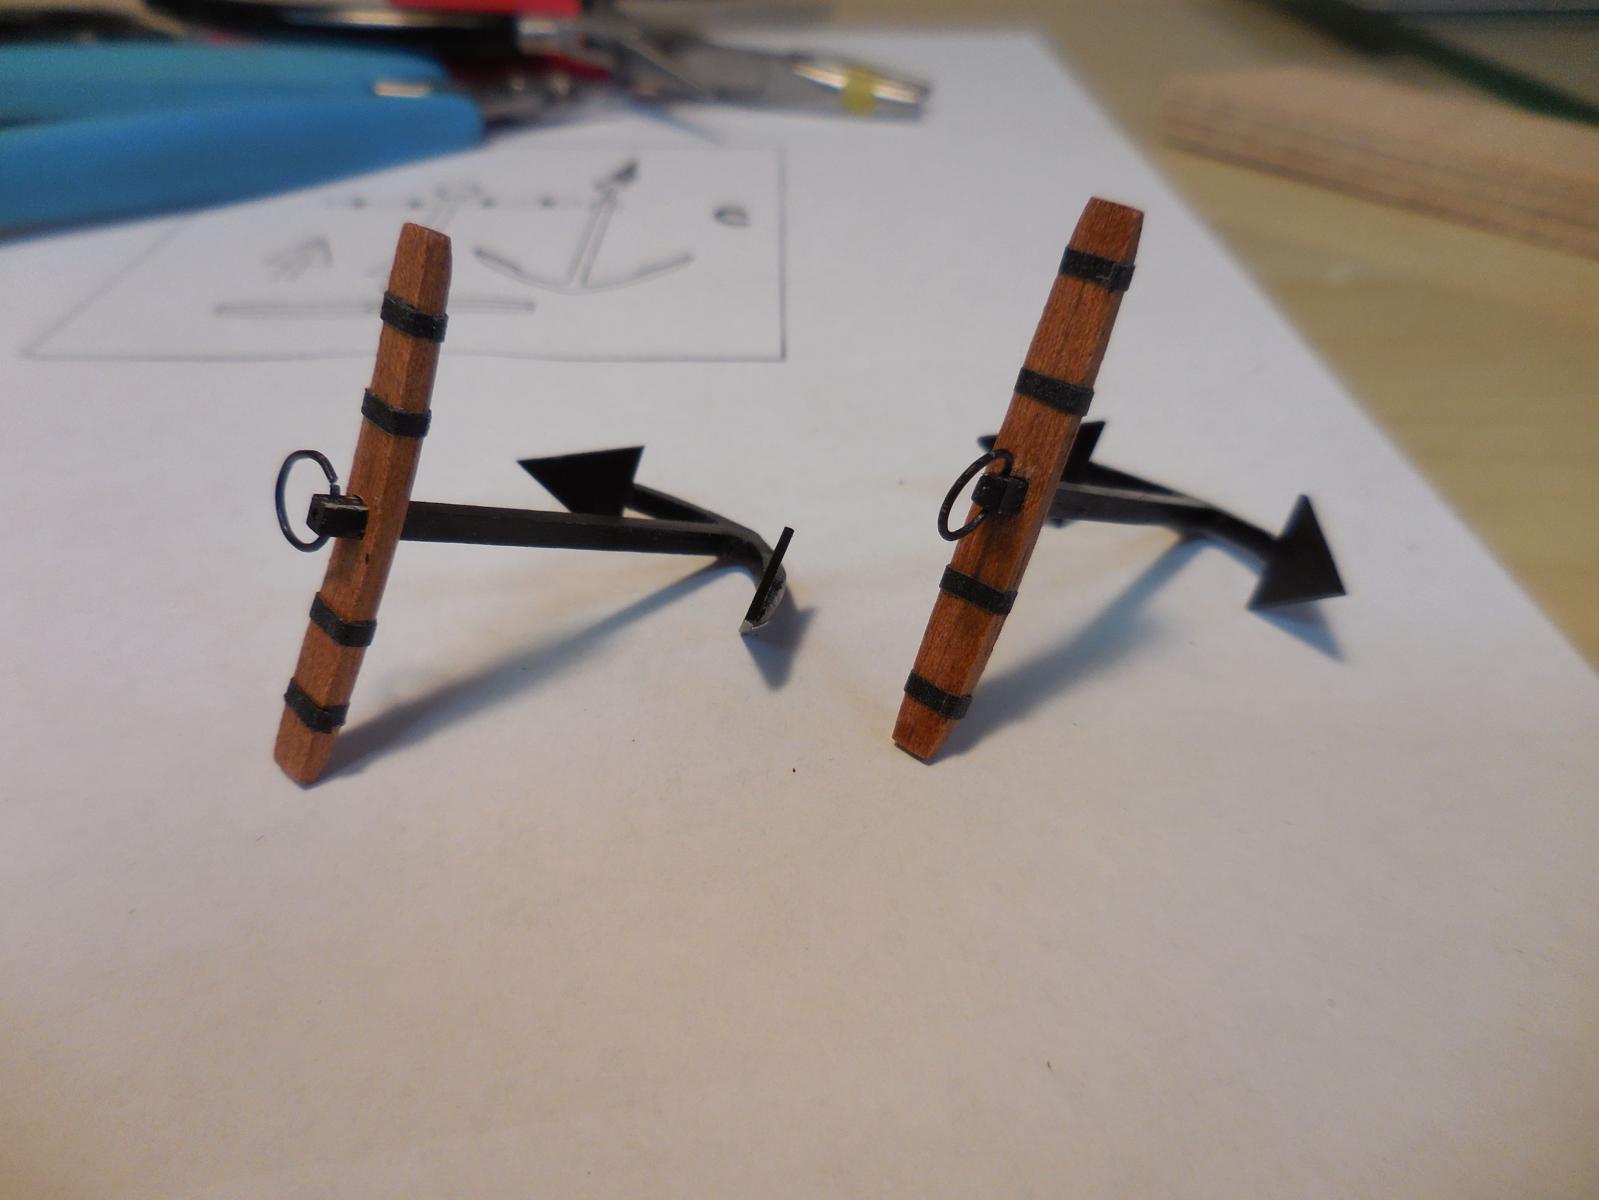
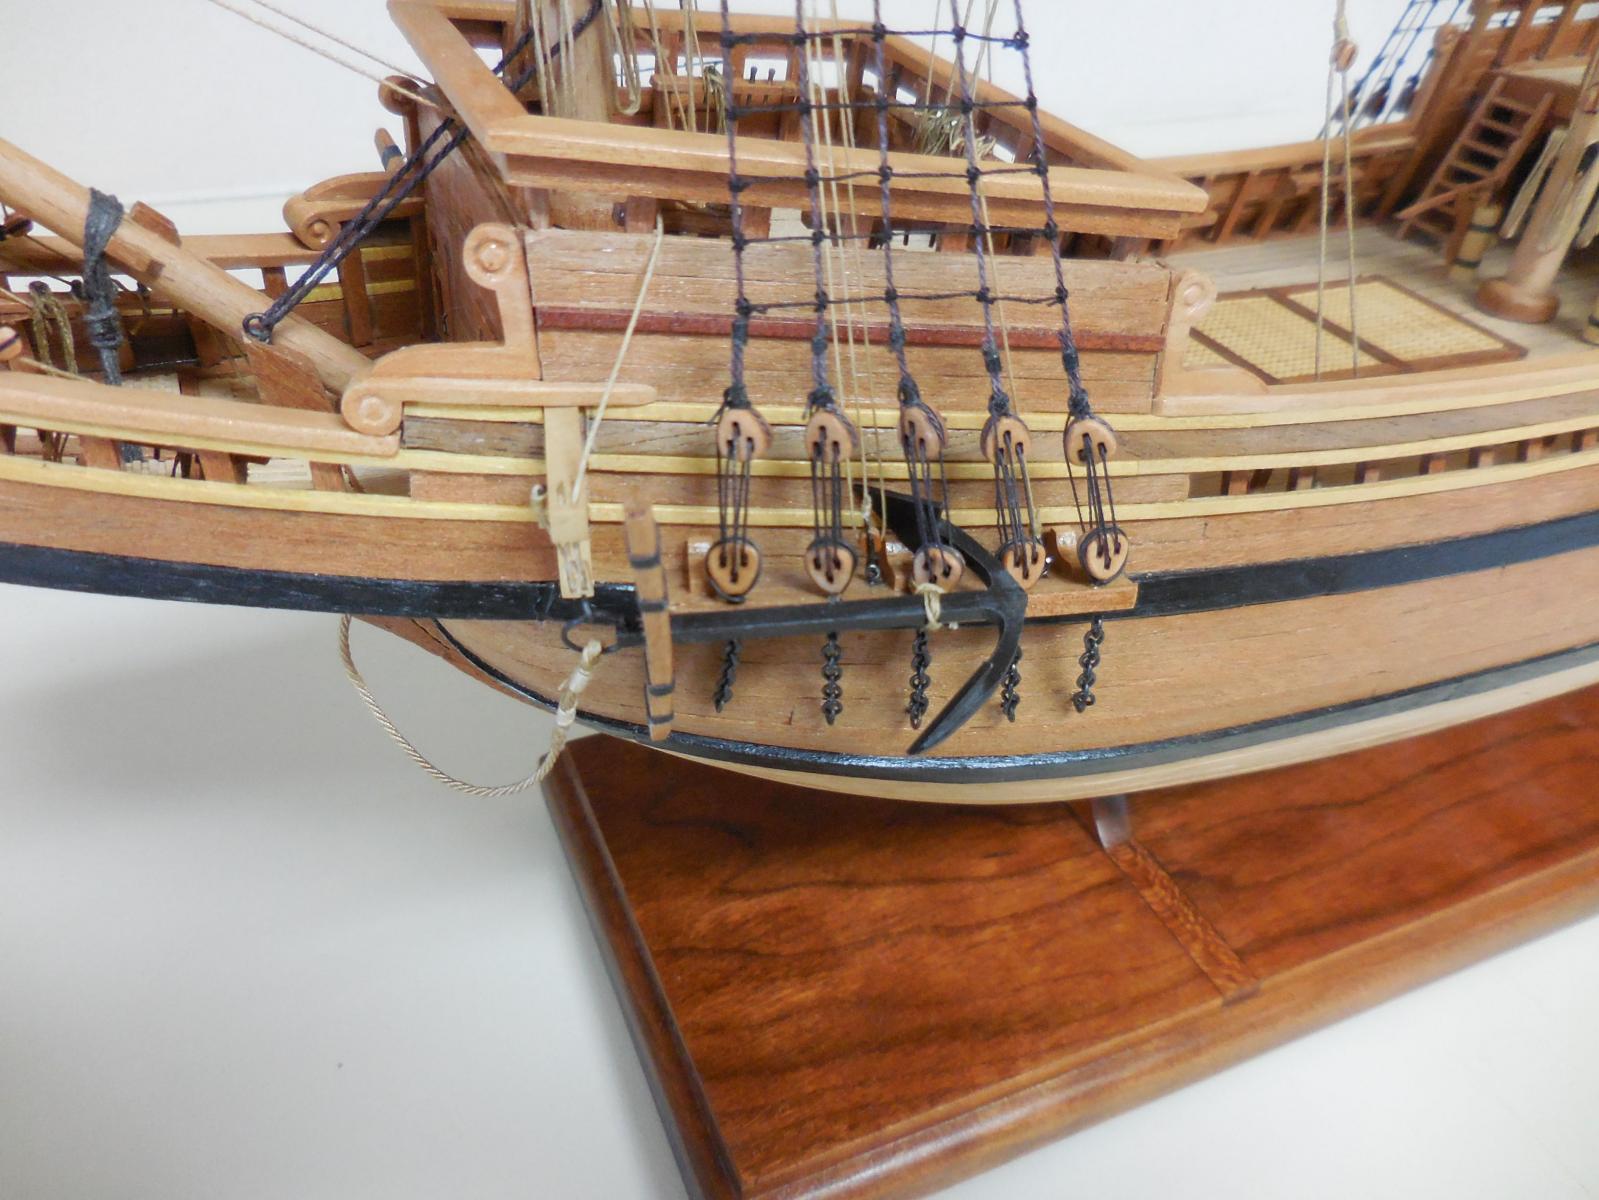
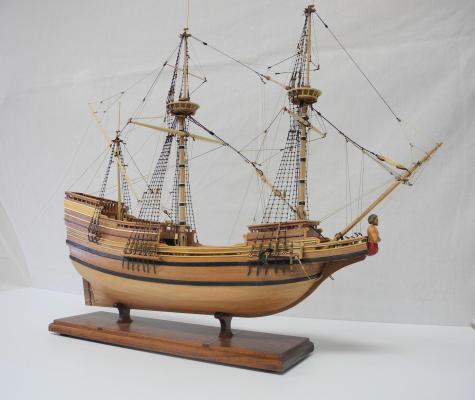
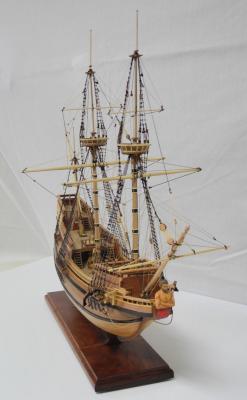
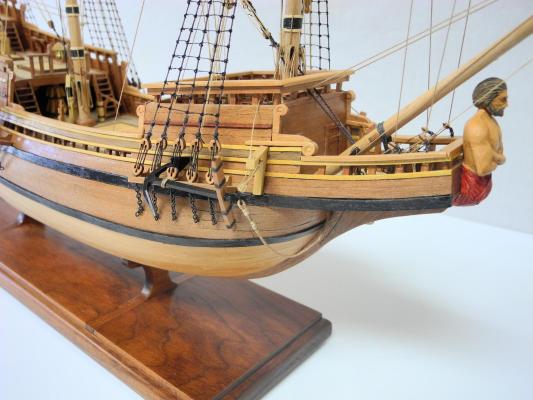
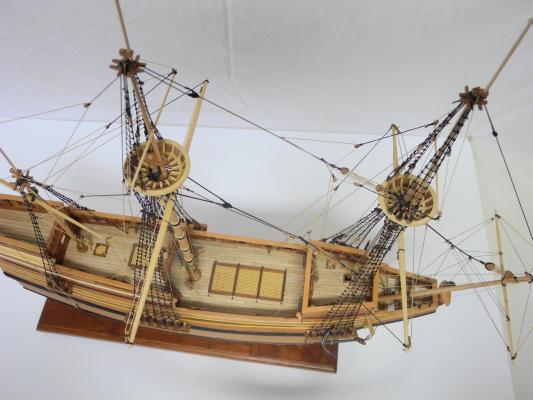
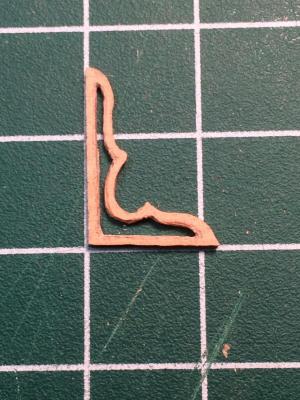
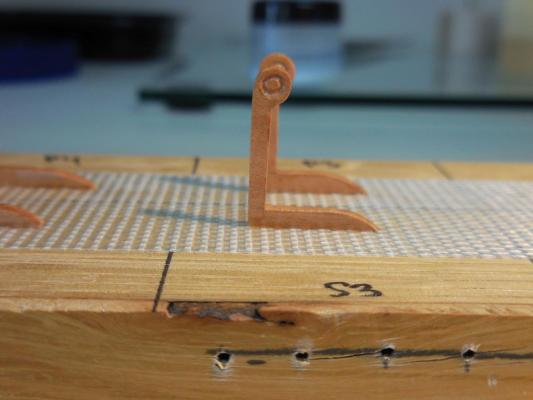
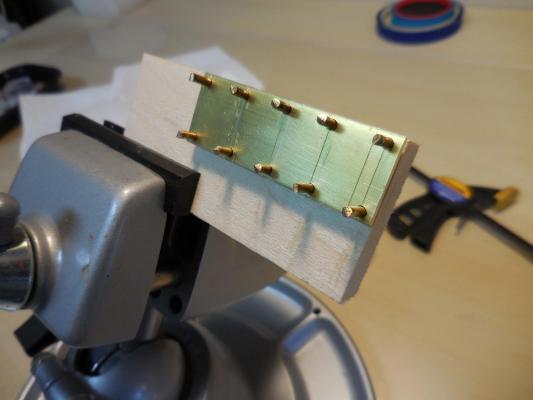
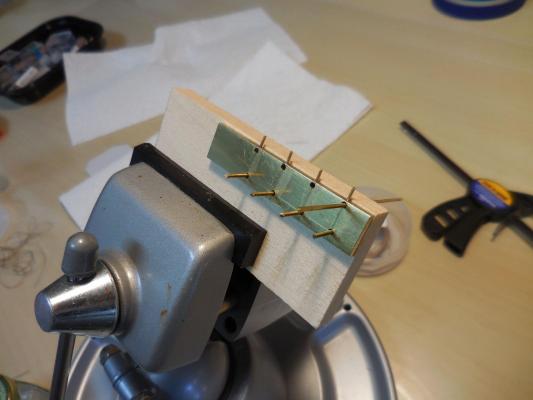
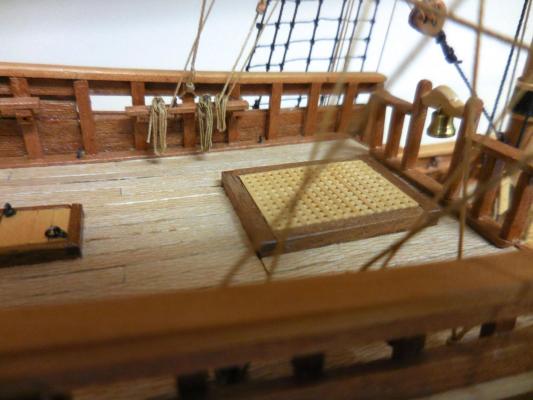
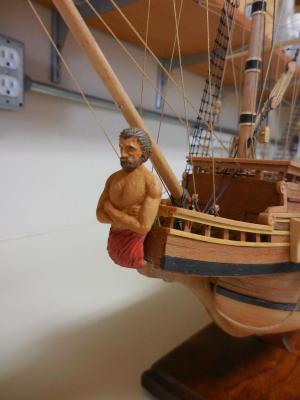
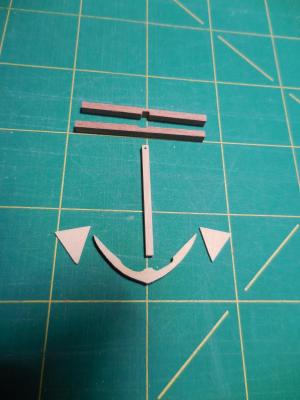
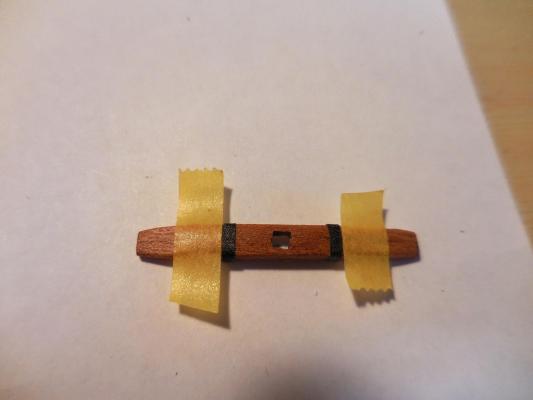
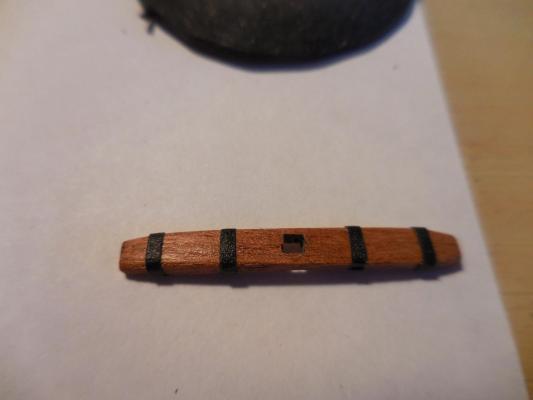
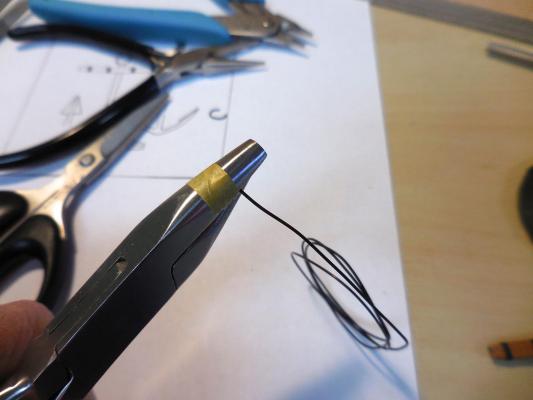
Paragon – a Modified Mayflower Part 23 – Finishing Touches It has taken me longer to finish Paragon than I thought at the last post. Family matters played a part, but I also started working on one of my next projects. The first of the remaining items was to create some decorative pieces to add a finished look to the exposed edges of the bulwarks. At first I planned to make these fairly ornate and whimsical, as in the following photo. After making (and breaking) a few of these over a few days, I decided I didn’t really like the effect when they were on the ship, so I decided to make the pieces less whimsical and more in line with the ‘scroll’ work already on the Beakhead. There were four areas on the ship I wanted to use these on, and each area needed one on each side. Each one of these 8 pieces needed to be fit to the location, and I needed to keep track of which went where, so I used carpet tape on a block marked with the position of each piece to hold them for finishing. Next up was making some rope coils for the belaying pins and cleats. Since these coils were to be soaked in diluted white glue, I tried several approaches to keep the wet lines from adhering to the jig. I settled on making the jigs out of brass. The pins are epoxied into a wood block, and the holes in the brass strip align with the pins. When the coils are dry the brass strip is slid off the pins and the coils are easily removed. I also decided to use diluted matte medium rather than glue on the lines. The jig for the coils around the cleats was pretty straightforward. I tried different jigs for making coils for the belaying pins, and wasn’t happy with all of the coils being wrapped around the belaying pin. I finally developed a jig which allowed the coils to be formed into loops with the only last couple of loops going around the pin. To me this looked more realistic. In the photo, the longer pin is used to form the basic coils, and is then removed so that the final loops can be brought under the coil and over the top vertical pin, which is soldered into the brass strip. The following photo shows two of the new coils on the left and an older coil (with all loops around the pin) on the right. The touch-up on the figurehead simply consisted of giving him eyes (I used a blue .005 drafting pen), and a few shadows to make the musculature and fabric rolls a little more realistic. Once the figurehead was in place I was very pleased with the effects of the shadowing. Finally, the anchors needed to be made. I tried several approaches using brass or copper, and wasn’t happy with the results. I settled on making the anchors from wood. I used Pau Marfim – also known as Guatambu – in place of metal. This is a hard wood very similar to boxwood. The main pieces were from 7/64 sheet, and the flukes were made from 1/32. The wood stocks were from African Pear. After the pieces were shaped, I primed the ‘metal’ pieces. I polyed the wood stocks, then used 1/16 black crepe artist’s tape to make the metal bands for the stocks. I used masking tape to position the spacing for the bands. The rings were made using a jeweler’s ring-making pliers. After experimenting with different size rings, I used a piece of masking tape to help me keep the rings in the correct position on the pliers. I used coated 24 gauge wire. The pliers made small dents in the coating of the rings, but I was able to fill in the dents with paint. Pretty happy with the anchors. And Very Happy that we’re FINISHED. I’ll try to get some better shots of the finished ship, and will post them sometime soon


- 170 replies
-
- 16
-
-
My first reaction is that I think with the limited amount of soldering we do as hobbyists the smoke is not a major concern. Technicians who solder all day long are the ones who would be most concerned. However, I would use a small fan and position it to blow the smoke away from the soldering area - it will dissipate quickly, especially in a well-ventilated room. I don't think spending that amount of money is warranted. I also found a brief video on Instructables that shows making a 'smoke absorber' - actually just a small fan that pulls the smoke away from you. http://www.instructables.com/id/Smoke-Fume-Absorber/
- 1 reply
-
- 3
-
-
Hi Ian A good review of bench top bandsaws can be found at the following link: http://www.woodworkersjournal.com/benchtop-band-saw-reviews/
-
Bob: If you haven't added the following yet, I'd recommend: Parallel Bars Edge and Center Finders Dial Indicator Calipers that will read to .001" A set of machinist's squares A good source for accessories is Little Machine Shop (LittleMachineShop.com). Their prices are better than MicroMark, and they have a wider selection of products. They also sell some good introductory videos.
-
Hi Ed: I'm very impressed with the amount of work you can accomplish in a relatively short time. Since I saw Young America at Mystic you've added quite a bit of detail. Do you attribute part of your productivity to the level of drafting you've done prior to the building?
- 3,618 replies
-
- 4
-
-
- young america
- clipper
- (and 1 more)