-
Posts
7,424 -
Joined
-
Last visited
Content Type
Profiles
Forums
Gallery
Events
Everything posted by Mirabell61
-
Thank you ED, You are very wellcome to drop in to this log alltimes, and I`m very honored to receive these Kind comments from a master builder as you are. I just love the wonderful modeling craftmanship, knowledge and Performance skill, like you Show in your "Young America" extreme clipper Nils
- 2,625 replies
-
- kaiser wilhelm der grosse
- passenger steamer
-
(and 1 more)
Tagged with:
-
Thanks for your comment Peter, and so much for sharing These wonderful historic Photos. There is a book on the market author: Eberhard Mertens, "Deutsche Lloyd Schnelldampfer" which I did`nt invest in yet, due to my Budget, but I presume you may have it... Where did you find These pics ?, and mentioning there were even plenty more, Oh, you realy made me so curious now, would very much appreciate if you kindly would be able to drop some now and then, together with your visits to my log .... there are so many Details to be seen on those pics, like the outcuts for the anchor chains in the second forecastle wave-breaker, I was just wondering how I could / should do that Cheers Nils
- 2,625 replies
-
- kaiser wilhelm der grosse
- passenger steamer
-
(and 1 more)
Tagged with:
-
Congrats Dan, to completing "The Queen Anne`s Revenge", a very beautiful built ship with lovely Details, I do hope it reached it`s destinated Museum safe and Sound... Nils
- 241 replies
-
- queen annes revenge
- pirate
-
(and 2 more)
Tagged with:
-
Hi Dan, I just read your introduction to this ship, very interesting to get an Impression of your intensive research (well done !) on this ship and it`s last fatal journey. Trust this will be a very ambitious and by no means easy Task, but certainly you shall be keellaying this italian Beauty asap, Will stay tuned and watching to this interesting build log and wish you all the best with your ongoing research. BTW. I share your doubts for the Sub waterline hull shape, it`s a bit too much "Pear-shape" cross section in my opinion on that Frame plan, whereby the pic of the launching from the slip Shows a much more slender hull like it must have been for 1951 fashions Nils
- 108 replies
-
- andrea doria
- ocean liner
-
(and 1 more)
Tagged with:
-
Denis, thank you very much, your offer to help out with these hole-rivets is much appreciated, I`ll let you know if further requirement arrises.... Did I understand right, you`re planing the tallship "Danmark" up your sleeve, that will be great Nils
- 2,625 replies
-
- kaiser wilhelm der grosse
- passenger steamer
-
(and 1 more)
Tagged with:
-
thanks very much Patrick, Nils
- 2,625 replies
-
- kaiser wilhelm der grosse
- passenger steamer
-
(and 1 more)
Tagged with:
-
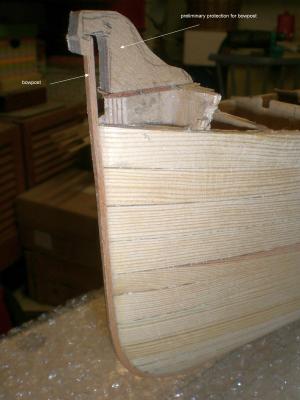
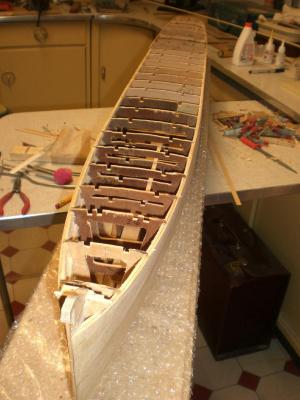
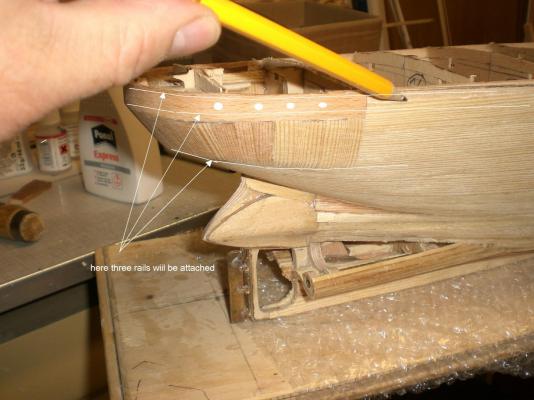
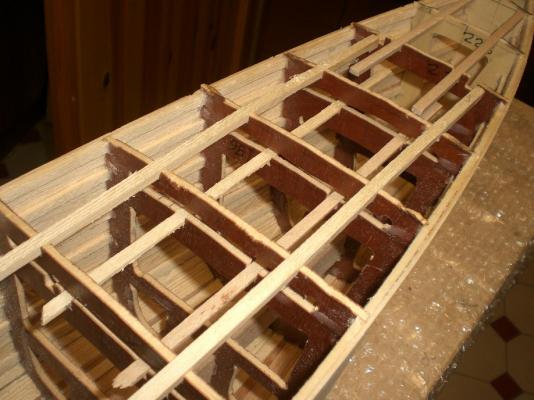
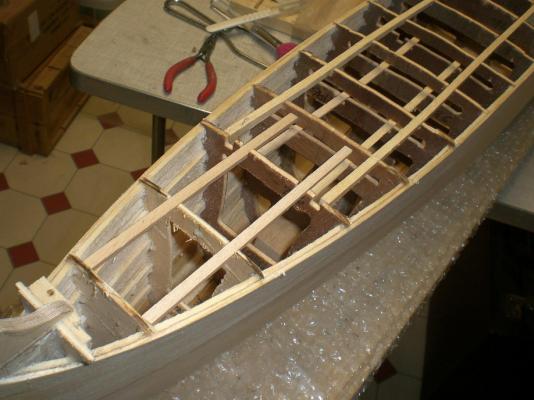
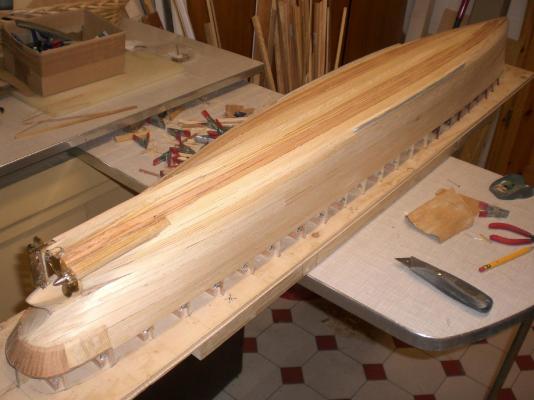
Build log part 11 some progress on building the hull.... Nils this is no convertion to a viking longboat, but temporary protection to the prolonged bowpost until the upper bow bulwark is ready for attaching my wife asks me this morning, if I`m sure the ship is not much too narrow... All the overstanding frame hights have been cut off between the second and the third rail (stern) I need enough place for attaching the decoration and the name, and homeport. For providing adequate space for the portholes around the poop and perhaps some "eyebrows" over the portholes, I had to increase the hight of this (round the stern) plank accordingly as well as a good transition of the sheer in foreward direction these are preliminary deck-stringers, for dry fit. There will be a pit right down to the lower deck, just behind the later forecastle bulwark
- 2,625 replies
-
- kaiser wilhelm der grosse
- passenger steamer
-
(and 1 more)
Tagged with:
-
Many thanks Mark, appreciate your tip for portholes Simulation, that is actualy the solution I`m going after by using hollow rivets DIN 7340 Form "B" I also found an in diameter suitable solid Nylon cable (like used for a rotating grass cutter) to slice / cut the glassing inlays from. Hope ist works well.... Nils
- 2,625 replies
-
- kaiser wilhelm der grosse
- passenger steamer
-
(and 1 more)
Tagged with:
-

Cutter Cheerful 1806 by rafine - FINISHED
Mirabell61 replied to rafine's topic in - Build logs for subjects built 1801 - 1850
Bob, your build sequences look clear, straight foreward and very well executed. You`ve got a real "gem" of a cutter on your slipway... Would it be worth a thought to do the hull below the wales in lapstrake planking ? (like Lee had Chosen for his cutter "Alert" ) Nils- 525 replies
-
- cheerful
- Syren Ship Model Company
-
(and 1 more)
Tagged with:
-
beautiful build Clarence, those metal paddle wheels look great Nils
- 39 replies
-
Hi Rod, thats a fine kit, especially those metal parts are eyecatchers,..... In your post #1, pic 6 it is showing etched, rivet-plates, is this including plates for the hull as well ? Your build Looks very well done to date... Nils
-
Hey Crackers !, I`m very much flattered with such fine comment of yours, stay tuned and enjoy.... Nils
- 2,625 replies
-
- kaiser wilhelm der grosse
- passenger steamer
-
(and 1 more)
Tagged with:
-
Thanks very much Denis, I`m just searching the web / Ebay in order to find suitable hollow rivets from which I intend to make the appr. 400 brass hull portholes from. Think I`ve just found something this afternoon, We`ll see.... Nils
- 2,625 replies
-
- kaiser wilhelm der grosse
- passenger steamer
-
(and 1 more)
Tagged with:
-
Hi Peter, the scuppers look nice, flush with the wales, how did you blend out the (tubes ?) on the deckside ? Nils
- 293 replies
-
- pickle
- caldercraft
-
(and 1 more)
Tagged with:
-
Jason, beautiful rigging at foretop and fore Yards, well done ! Nils
- 800 replies
-
- snake
- caldercraft
-
(and 1 more)
Tagged with:
-
Thank you very much Martin and Grant, Martin, tho òl deckhand is enjoying every day of his pensioneer`s life Grant, thanks Grant, that`s a good Feeling to hold the hull free in Hand turn it around, and observe it from all sides.... it`s so great knowing that fellow modelers from all corners of the world find interest in what I am doing. it gives me very much motivation. Thanks so much for your appreciations.... Nils
- 2,625 replies
-
- kaiser wilhelm der grosse
- passenger steamer
-
(and 1 more)
Tagged with:
-
Thank you so much for your Kind words Pete - Bob - John - Lee- and all the "likes".... Pete, It all requires the time it takes, and many ideas for the continuing sequences come as I do the progress Bob, thanks for your appreciation, I`m glad you like it. I Need quite some space in hight for fitting on those "golden" ornaments to the round Stern transom, and for putting adequate portholes just under the aft deck-Counter, so I might need to increase the deckbeam hight on the aft-ship a bit John, trust the hull will be the less difficult part of this build. For all the superstructure I have`nt made any scetches or plans yet, will probably do them to suit the build sequences as they come Lee, Thanks for your words Lee, I think it may be wise to connect the upper decklines to the sides first, in order to get a better looking transition for the plating Job and when integrating the rails..... Nils
- 2,625 replies
-
- kaiser wilhelm der grosse
- passenger steamer
-
(and 1 more)
Tagged with:
-
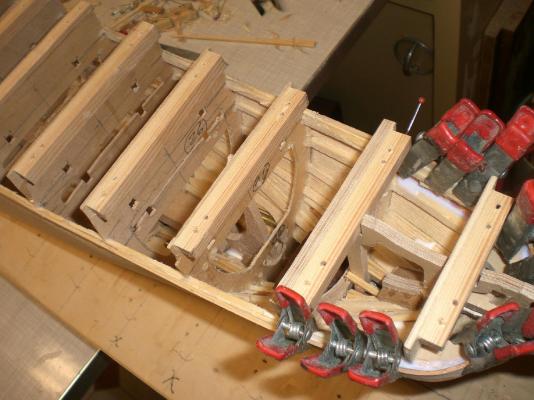
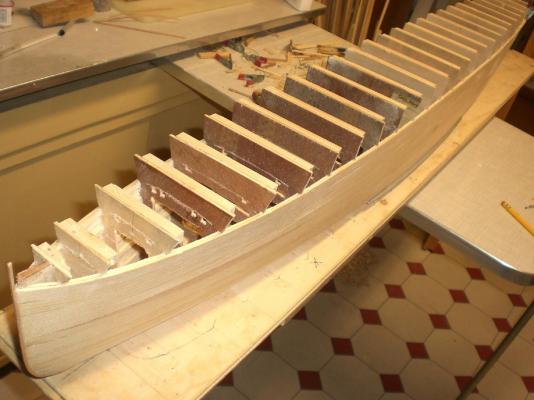
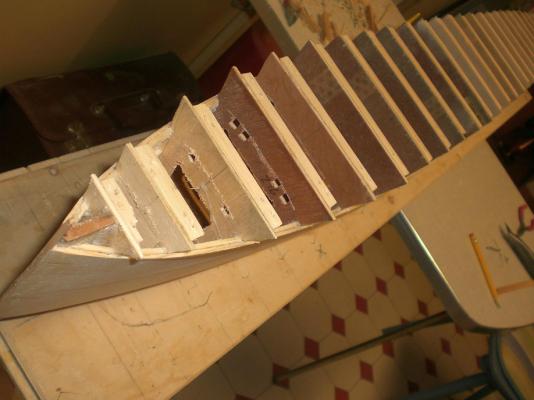
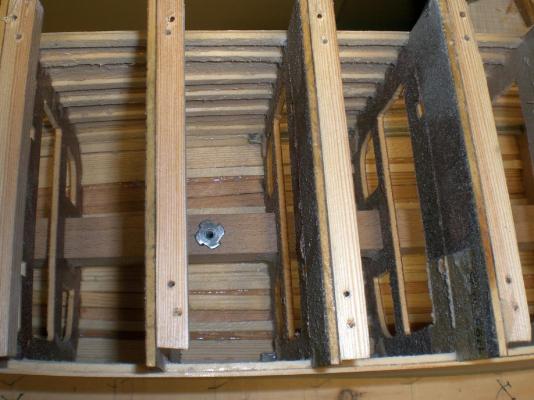
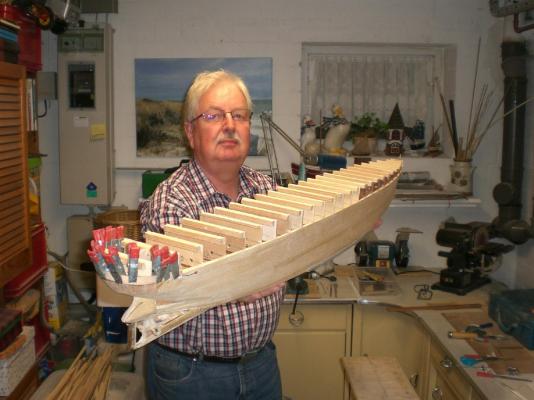
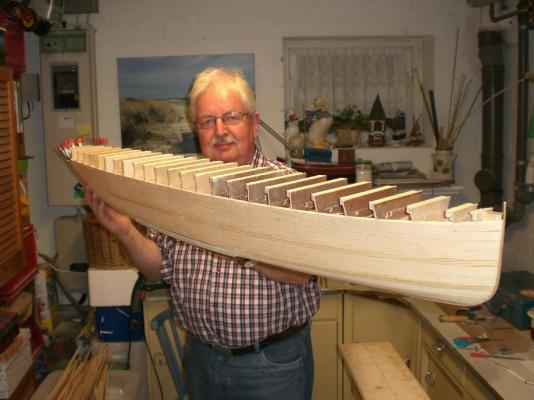
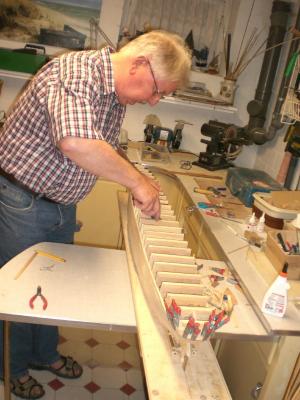
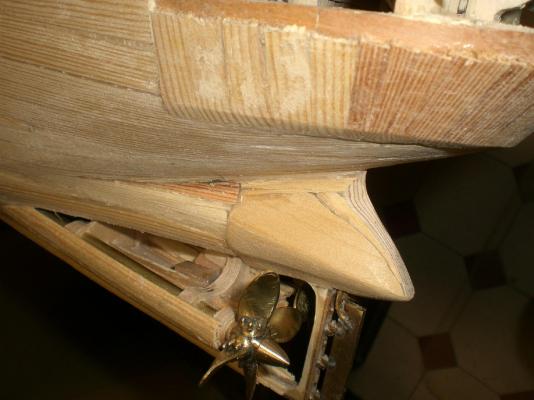
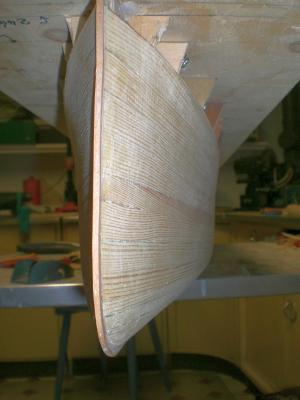
Many thanks Patrick and Mick, and all the "like this" button activators... Patrick, Thanks for your appreciation, I took her off the board this afternoon and was delighted of the work so far, a straight symetric and light hull like it should be. All the overstanding frame hights will be removed (cut off) and the upper deck stringers put on. The slot places are integrated alrteady when I cut the frames I am including some pics of this milestone moment.... Mick, Thanks for your words ,.. For plating I shall use self-adhesive aluminium foil stripes which will be ponced from the rear side to resemble the riveting Before the plating comes on, there is still some filler application work to be done, and several semi-round rails must be attached to the ouside hull skin. removed from the board and put on the upper end-cap plank 180° around the stern. Stb aft view... stb front view view into the aft ship hull. The outcuts for the deck stringers can be seen here the "deck-beam" upper lnes are pre cut, so only the outer sides of the frames need to be cut. In this way the decks will have a positive curvature in width direction one of the three lock-nut devices for the stand`s pedestal-spindles (through the keel and anchored in the "backbone" ) removing some old hardened glue drops out of the hull
- 2,625 replies
-
- kaiser wilhelm der grosse
- passenger steamer
-
(and 1 more)
Tagged with:
-
Build log part 10 bow post and vertical stern planking put on... Nils the upper portion of the stern rounding will be horizontal planking The upper propshaft housings still need to be planked, and the whole stern area requires fairing and blending for smooth transitions afterwards the bow post (beech wood) where the plates are riveted to later on, gives the nostalgic touch to the rather sharp bow its time to take the hull off the board now....
- 2,625 replies
-
- kaiser wilhelm der grosse
- passenger steamer
-
(and 1 more)
Tagged with:
-
Patrick, reminds me a bit of the upper cabin Level of a luxurious 747 Special Fitting out for 1st class.... wonderful work Nils
-
Thank you for dropping in Christian, and for your comment, you`re always welcome... Nils
- 2,625 replies
-
- kaiser wilhelm der grosse
- passenger steamer
-
(and 1 more)
Tagged with:
-
Thanks Denis, yes, I did the fairing outside under the car port, was a strong wind, that blew away the dust. Am quite pleased with my triangle vibratory sander, in appr 2 hours the sanding was done. Some of the few pits and scars in the Planks will be treated with filler Nils
- 2,625 replies
-
- kaiser wilhelm der grosse
- passenger steamer
-
(and 1 more)
Tagged with:
About us
Modelshipworld - Advancing Ship Modeling through Research
SSL Secured
Your security is important for us so this Website is SSL-Secured
NRG Mailing Address
Nautical Research Guild
237 South Lincoln Street
Westmont IL, 60559-1917
Model Ship World ® and the MSW logo are Registered Trademarks, and belong to the Nautical Research Guild (United States Patent and Trademark Office: No. 6,929,264 & No. 6,929,274, registered Dec. 20, 2022)
Helpful Links
About the NRG
If you enjoy building ship models that are historically accurate as well as beautiful, then The Nautical Research Guild (NRG) is just right for you.
The Guild is a non-profit educational organization whose mission is to “Advance Ship Modeling Through Research”. We provide support to our members in their efforts to raise the quality of their model ships.
The Nautical Research Guild has published our world-renowned quarterly magazine, The Nautical Research Journal, since 1955. The pages of the Journal are full of articles by accomplished ship modelers who show you how they create those exquisite details on their models, and by maritime historians who show you the correct details to build. The Journal is available in both print and digital editions. Go to the NRG web site (www.thenrg.org) to download a complimentary digital copy of the Journal. The NRG also publishes plan sets, books and compilations of back issues of the Journal and the former Ships in Scale and Model Ship Builder magazines.


