HOLIDAY DONATION DRIVE - SUPPORT MSW - DO YOUR PART TO KEEP THIS GREAT FORUM GOING! (Only 13 donations so far - C'mon guys!)
×


Mirabell61
-
Posts
7,407 -
Joined
-
Last visited
Content Type
Profiles
Forums
Gallery
Events
Everything posted by Mirabell61
-
 Hi La Don, you`ve been quirte busy with the planking Job, good work, the Planks follow the curvature of the Frames very nicely, and the Stern Portion Looks great Nils
 -
Mike, those mast tops look super, also the stopper pins for the block strops under the platforms are great Nils
-
Good work Martin, the hull is looking better with every posted progress of yours.... Nils
- 467 replies
-
- 1
-

-
- fly
- victory models
- (and 1 more)
-
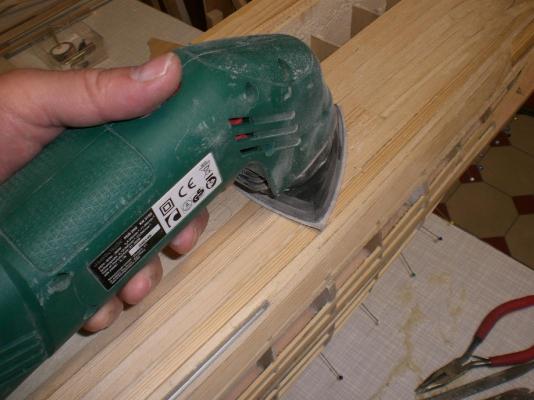
Thanks Popeye, is your belt sander (a hand held sander) like for instance Proxon offers in their program.... or a stationary combination one ? I also tried my hand held, electronic speed regulation triangle vibrition sander, it works well depending on grit size of the grinding patches. But that also creates tons of dust..., but at least it`s quite good to controll on the surface Nils
- 2,625 replies
-
- 14
-
-
- kaiser wilhelm der grosse
- passenger steamer
- (and 1 more)
-
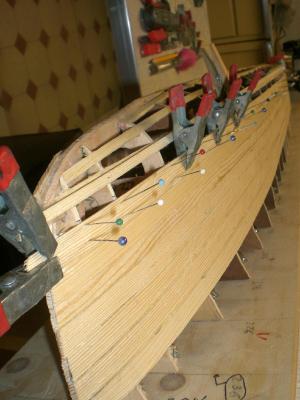
Thank you Nigel and Patrick, and the "likes"... Nigel, I`m quite glad that pics of models of this ship, made by others, were able to be presented here on MSW as well, so that the lines on the final ship can be seen, next to the old black / white photographs I had.... Patrick, yes, thanks, you`re realy feeling with me, but it`s still some way of thorrow fairing and filler application work ahead, before the plating can go on. The wooden surface has to be top smooth, otherwise it would show up every dent, every scratch, and unenenness, when the self-adhesive metal foil is rubbed down on the wooden surface. Fortunately I still have some of the aluminium foil I used on the other ships. Hope it will still be enough to cover this new hull as well. I was hoping to hold the ordered spoke-shave for trials in Hands, but we have postal workers srtike in greater Hamburg Region in the moment with millions of letter and parcel delivery backlog Nils
- 2,625 replies
-
- 7
-
-
- kaiser wilhelm der grosse
- passenger steamer
- (and 1 more)
-
Bruce , your Clipper looks fantastic, I`m with DanO, you have created a masterpiece, very well done !! Nils
-
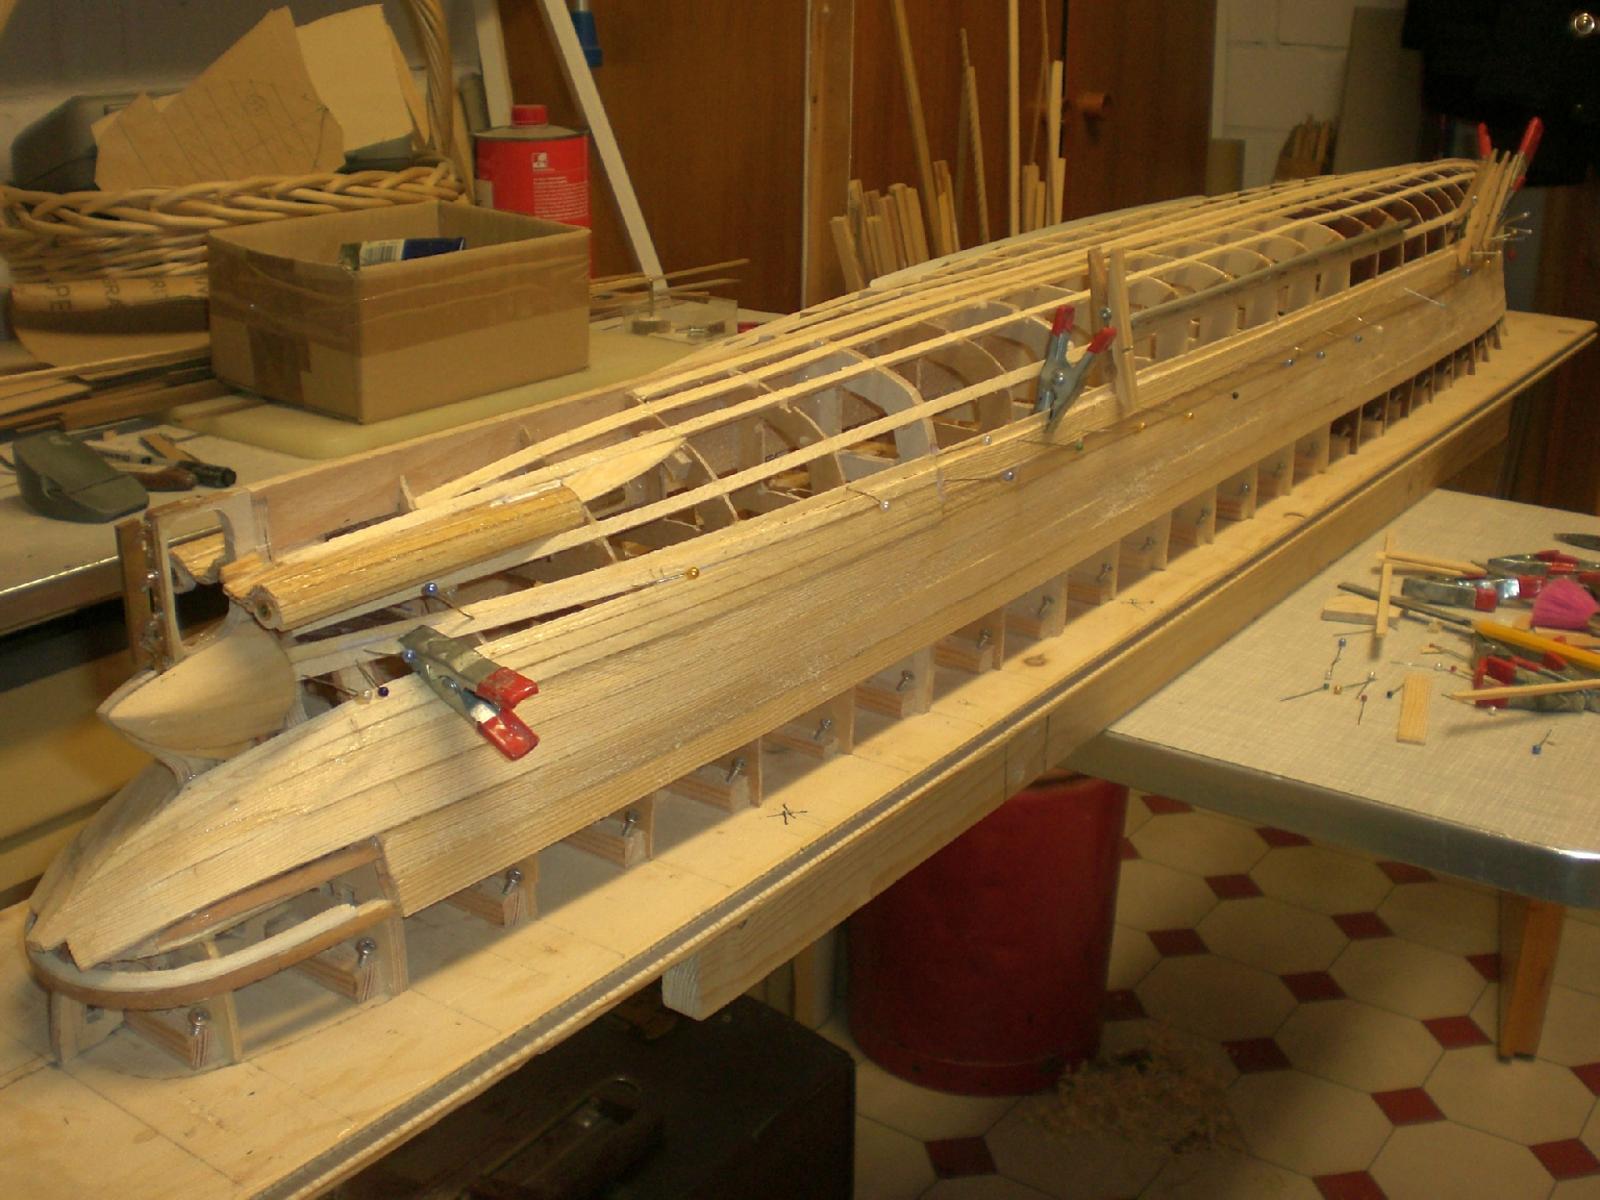
some progress on planking..... Nils whilst the stb side is still being followed up..... and the glue not dry yet..... the port side has already integrated the bilge keel and is around the port bilge bend as all planks are also glued edge to edge in longitudinal direction (single layer planking), it shows here, the advantage of building-in stringers, because the pegs, pins and clamps can easily be fixed in the right places...., and they serve as fine Framework to glue on
- 2,625 replies
-
- 31
-
-
- kaiser wilhelm der grosse
- passenger steamer
- (and 1 more)
-
THE 74-GUN SHIP by Jeronimo
Mirabell61 replied to Jeronimo's topic in - Build logs for subjects built 1751 - 1800
Hello Karl, that is a wonderful ship for a great Project of yours, Keellaying is already under way as I understand. Wishing you much fun and success with this build, certainly this will be another masterpiece under your skilled Hands, no doubt.... Nils -
very fine looking hull Peter, the yellow and black color giving matches beautiful together Nils
- 293 replies
-
- 1
-
-
- pickle
- caldercraft
- (and 1 more)
-
Hi La Don, beautiful build so far, nice and clean, Looks great... Nils
-
HMS Alert 1777 by Jaekon Lee - 1/64
Mirabell61 replied to Jaekon Lee's topic in - Build logs for subjects built 1751 - 1800
Wonderful work Lee, I ca`nt see enough of this super build a precious Little gem, I would like to hold in Hands, turn it around, and look at it from all sides.... The open stb side and the lapstrake planked port side give this model a very Special and unique note The black colored glue for (caulking) deckplanking is a smart idea and Looks great Nils -
many thanks mmdd, for explaining the Background to the lovely models of This ship. Congrats to "Qvartet", I dip my hat, the four gentlemen have created a fantastic build of this wonderful ship. I see I was right with presuming the subject an over 100 years old model (and in scale 1:50, what a "beast")..., hopefuly the University may find a Sponsor to enable an authentic restoration of the "sleeping Beauty"...? Nils
- 2,625 replies
-
- 2
-
-
- kaiser wilhelm der grosse
- passenger steamer
- (and 1 more)
-
Congratulations to the young Family, having a Baby in summertime is great. All the best for mom and dad and the Little one.... Nils
-
Crackers, thanks for your kind comment, I think I wo`nt be able to perform professional standards as those 3 super models are comprising, as the bar is set very high, but the way they are done is very encouraging for me to do best I can Nils
- 2,625 replies
-
- 1
-
-
- kaiser wilhelm der grosse
- passenger steamer
- (and 1 more)
-
Hi Mmdd, lovely Pictures of a super built model. This is very tempting and sure is a great help, many thanks. Would you have enough pics to start a real Build log, this model is worth its own log here at MSW ? Absolute Museum Quality. How did you do the stunning golden Stern decoration ? that Looks great ! Nils
- 2,625 replies
-
- 2
-
-
- kaiser wilhelm der grosse
- passenger steamer
- (and 1 more)
-
Good work Per, hull planking, deck- and deckbeam timbers and gratings, all looks very neat, wish you further good success with the HMS Fly Nils
-
Thank you very much Bob, I`ll try to get everthing smooth and rounded, without applying too much of filler material. If I knock gently to the relatively thin outside skin it is as if I were building the resonanz corpus of a violin or so... (light, stiff, tight, hard). Expect the whole hull to be a lightweight construct when I take it from the "slip board". The hull must be smooth enough afterwards to enable an optimal metal plating Nils
- 2,625 replies
-
- 4
-
-
- kaiser wilhelm der grosse
- passenger steamer
- (and 1 more)
-
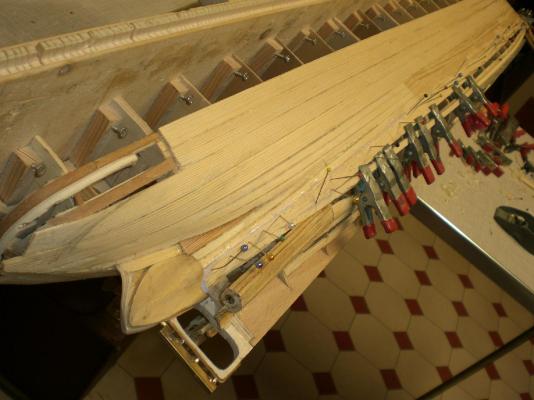
Peter, thank you very much for explaining your hull building method for Titanic and KWdG. I also had a good look at your Hohenzollern hull, and fully understand the method. You have created a shallow but hollow space between inner and outer strip-planking, and all is held well together by the 2nd layer of planking, which also smooths out possible slight curvature deviations of the outer skin. Well done ! It is a smart method to save weight (like the prefabricated walls of wooden Homes). The wood -layer shaping of the stern portions, like your pic shows, is self explaining Nils
- 2,625 replies
-
- 7
-
-
- kaiser wilhelm der grosse
- passenger steamer
- (and 1 more)
-
Many thanks - S.Coleman - Nigel - Pete, and all the "likes".... S. Coleman, yes, it`s a bit tricky, but I think it will look quite good afterwards... Nigel, I`m thinking of applying a minimum bit of polyester filler, where the wooden skin may become a little thin during fairing. Larry`s suggestion to use a spoke shave is still in my mind, but not for the narrow curves... Pete, thanks for your nice comment... Nils
- 2,625 replies
-
- 4
-
-
- kaiser wilhelm der grosse
- passenger steamer
- (and 1 more)
-
good work Nigel, you sure are upgrading that kit (quarter Badge) window, looks great Nils
-
Congrats Bob, that sloop looks fantastic, well done !! Nils
-
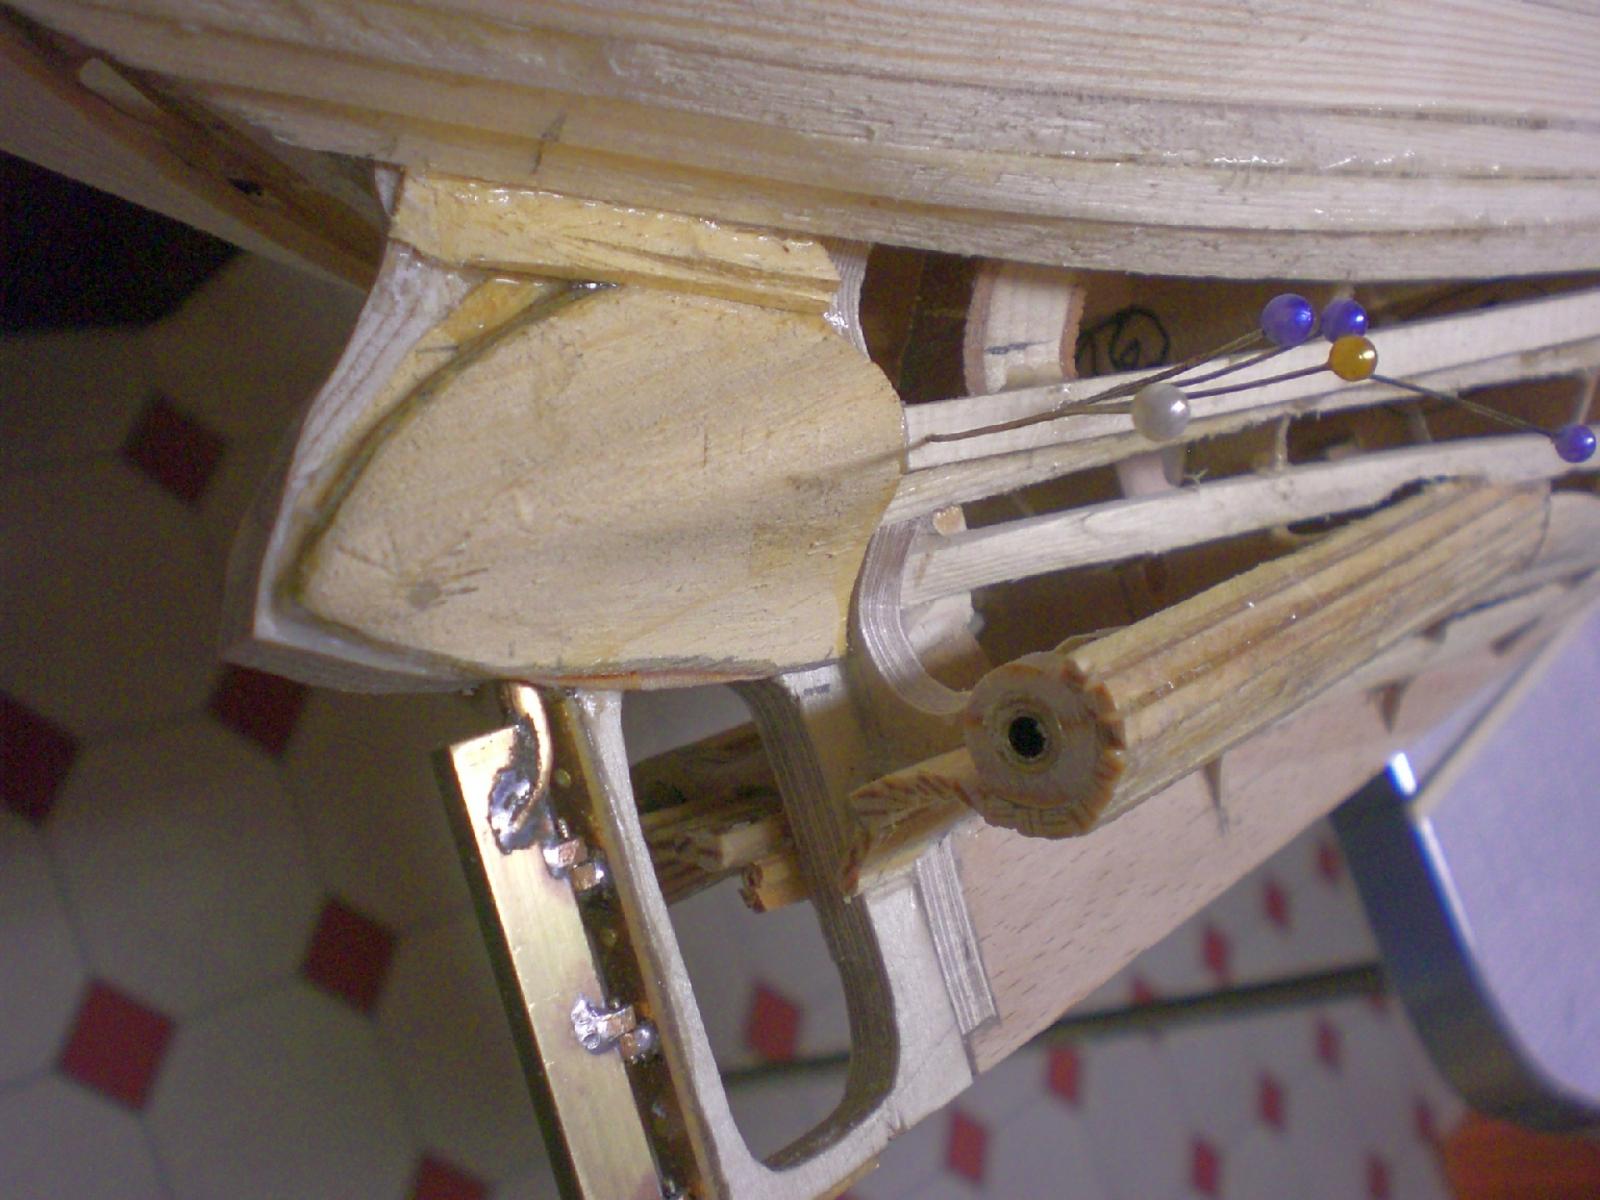
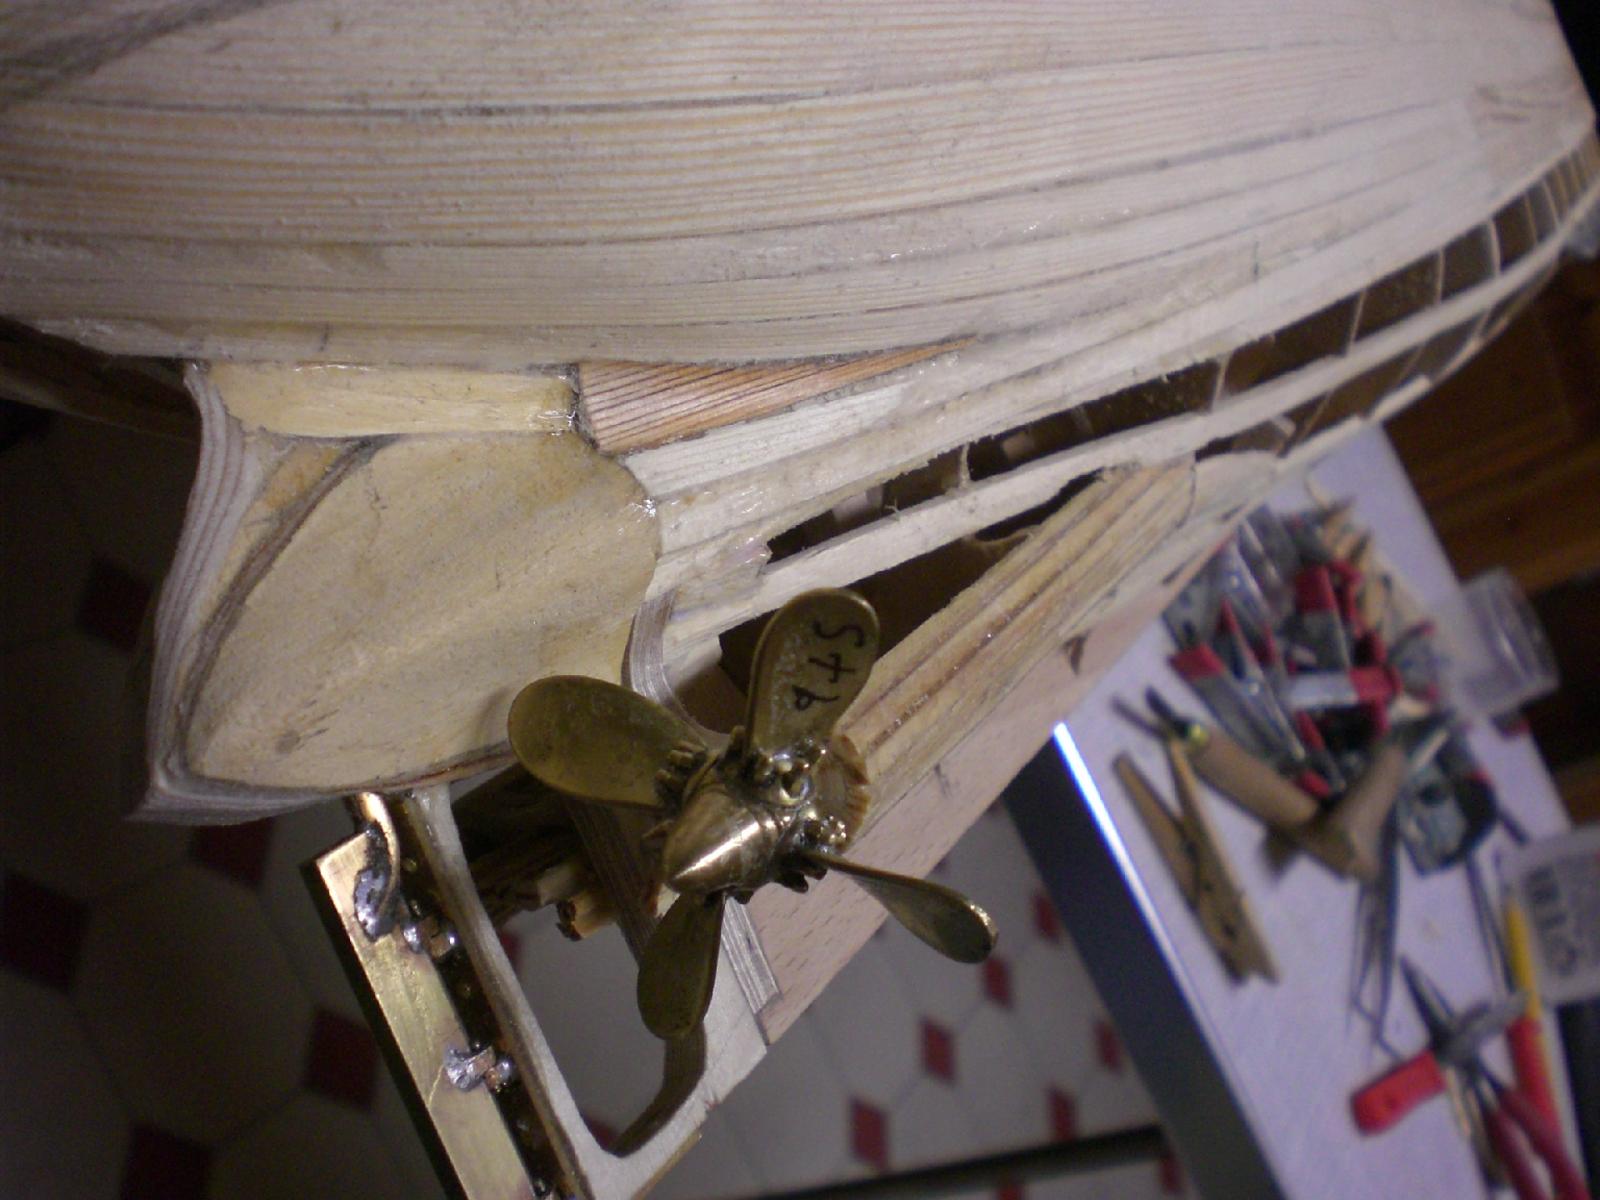
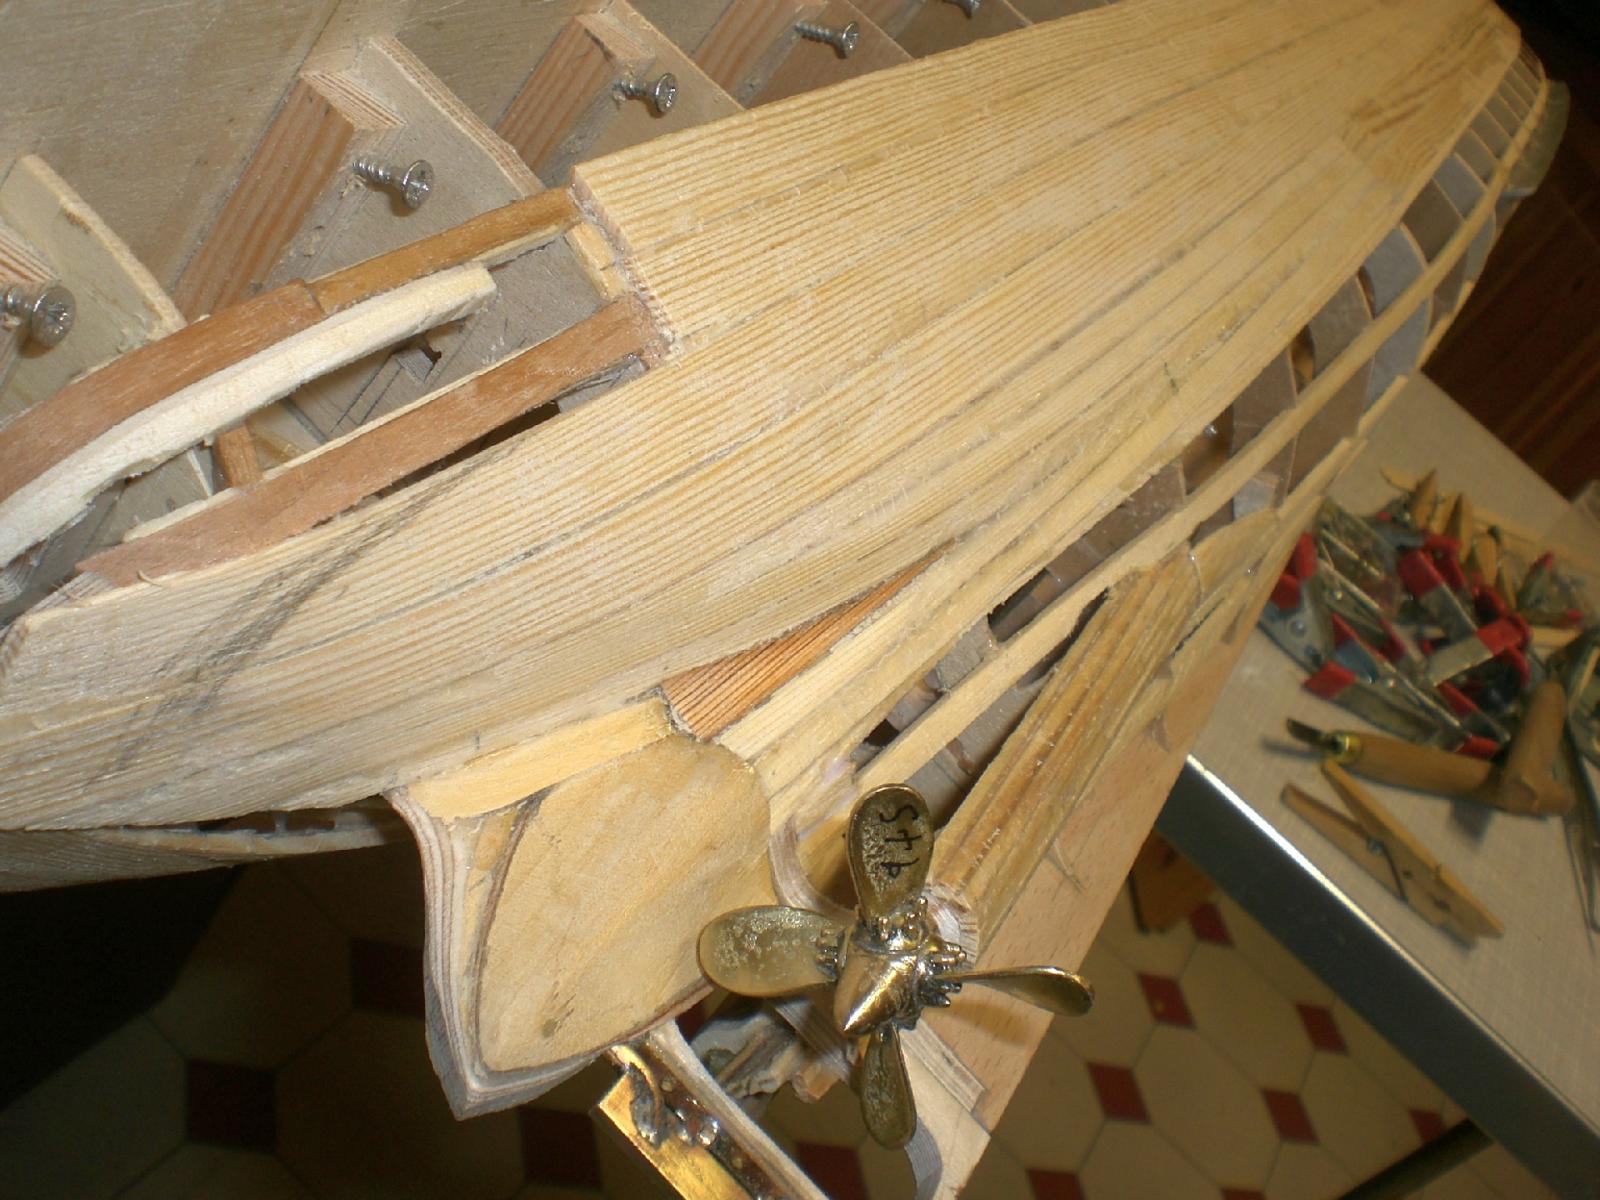
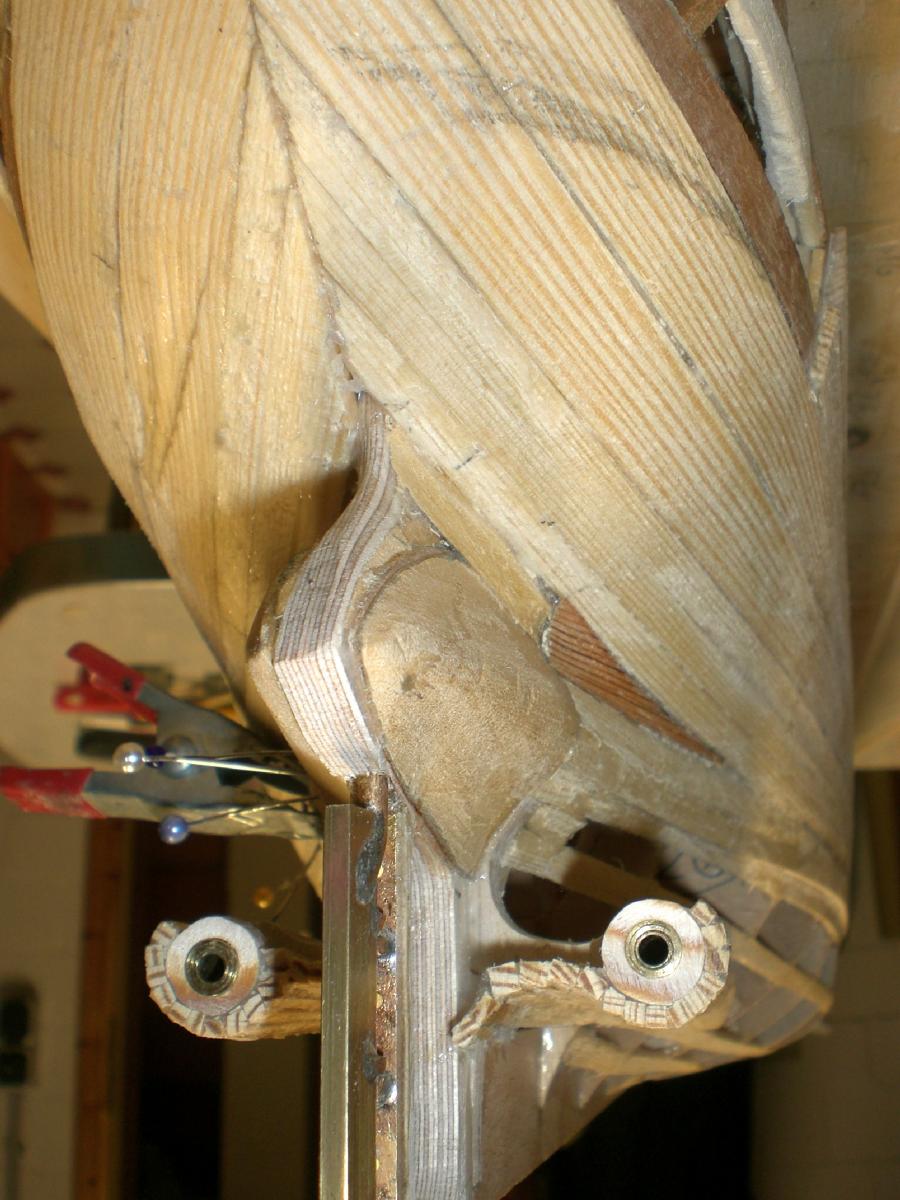
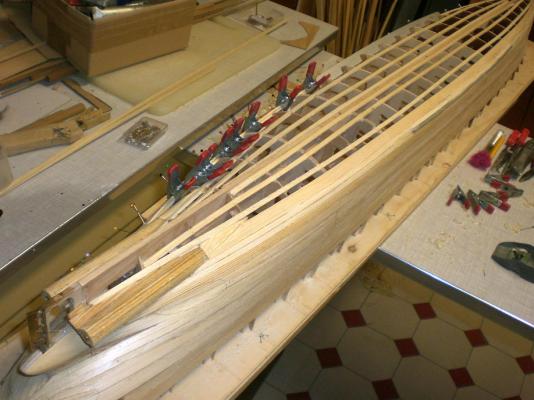
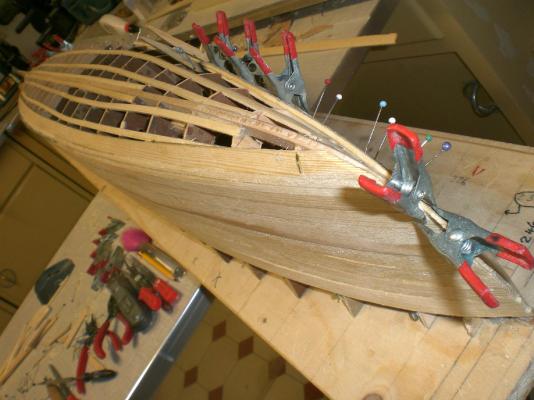
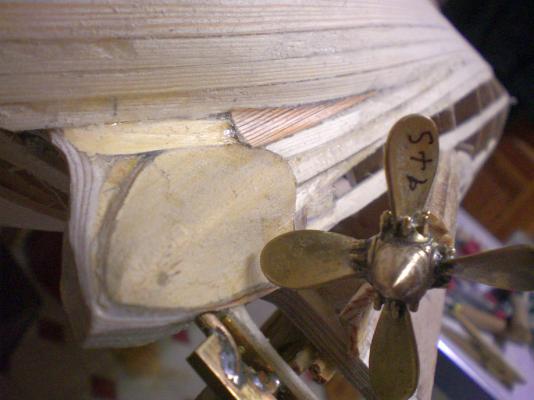
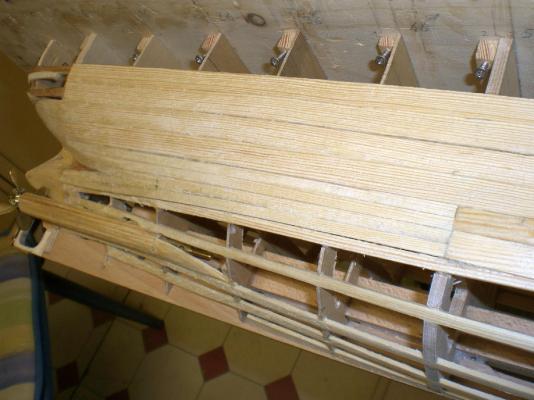
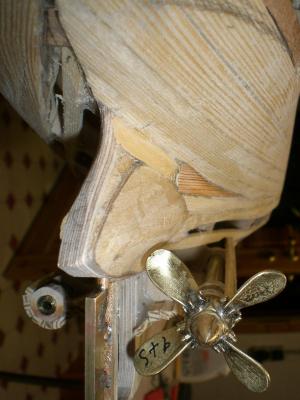
Build log part 9 slowly the streamline underwater- hull is developing as planed, after fairing it may need a little filler material here and there to get the surface and the spheric areas for smooth transitions...... Nils The last attached planks are only 5 mm wide. the next horizontal planks will have to match with the curvature of the propshaft housings here two steelers are fitted, whereby the darker colored wood one is spheric shaped. The small wood piece obove the tailcone half is a bit of filler wood the four 5 mm planks- portion here matches with the 13mm + 8 mm wide planks onwards to the bow The upper stern area will be timmed for vertical planking from the aft sheer downwards Starboard side so far OK, now the port side is brought to the same status the lines can now be seen clearly, and still the whole hull is safely mounted to the "slipway" board, I will take it off when the planking is completed


- 2,625 replies
-
- 25
-
-
- kaiser wilhelm der grosse
- passenger steamer
- (and 1 more)
-
beautiful Build, very nice work on planking and oars as well as the Fitting out Details.. Nils