


Ras Ambrioso
-
Posts
603 -
Joined
-
Last visited
Content Type
Profiles
Forums
Gallery
Events
Posts posted by Ras Ambrioso
-
-
While browsing the forum I came upon your Spitfire build. Dan, I don't know what to say that other have already posted. I am building boats now but I am a fanatic of aviation and the Spitfire is one of my favorites. I have never assembled a card model and your post is showing me what can be done for reality. I just put an order on E-bay for one of the Spitfire 5V from Halsenki. I will use your post as a guide.
Excellent work, congratulations
- Canute, popeye the sailor and Egilman
-
 3
3
-
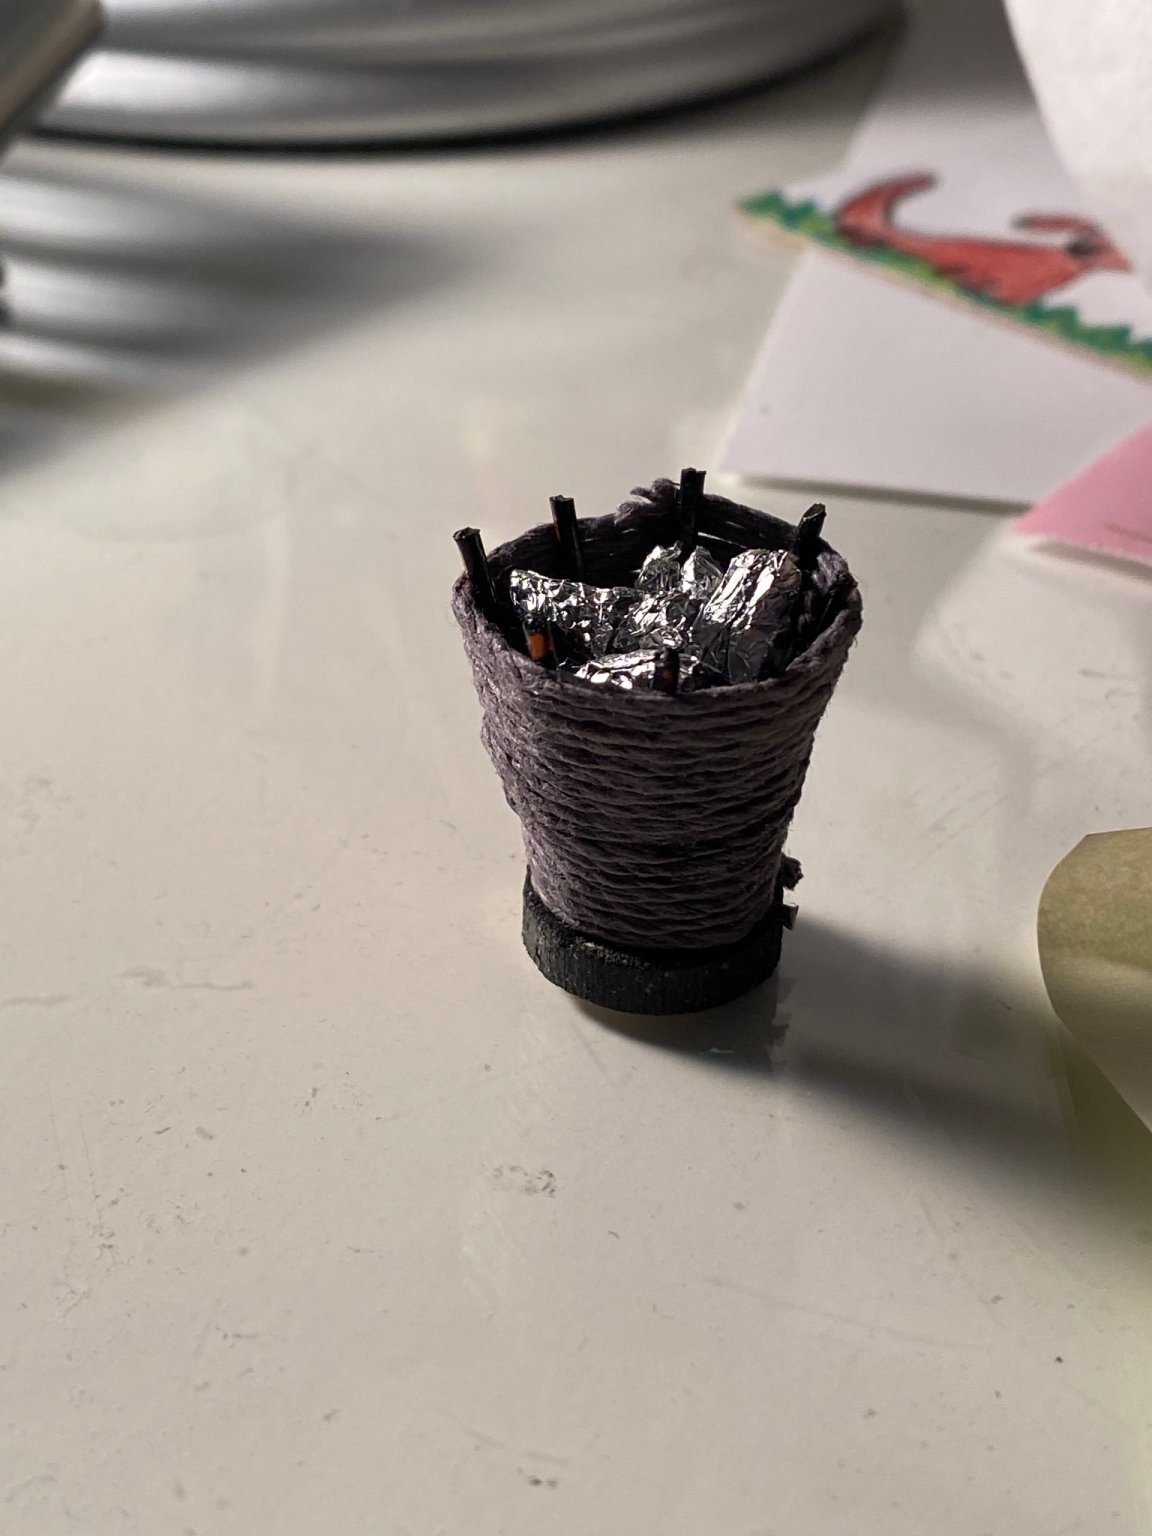
Thanks for the comments guys. The top of the cran in the picture is out of focus but I did cringed the tails. I will take another picture closer to the top of the basket. It is fun to do all these experiments.
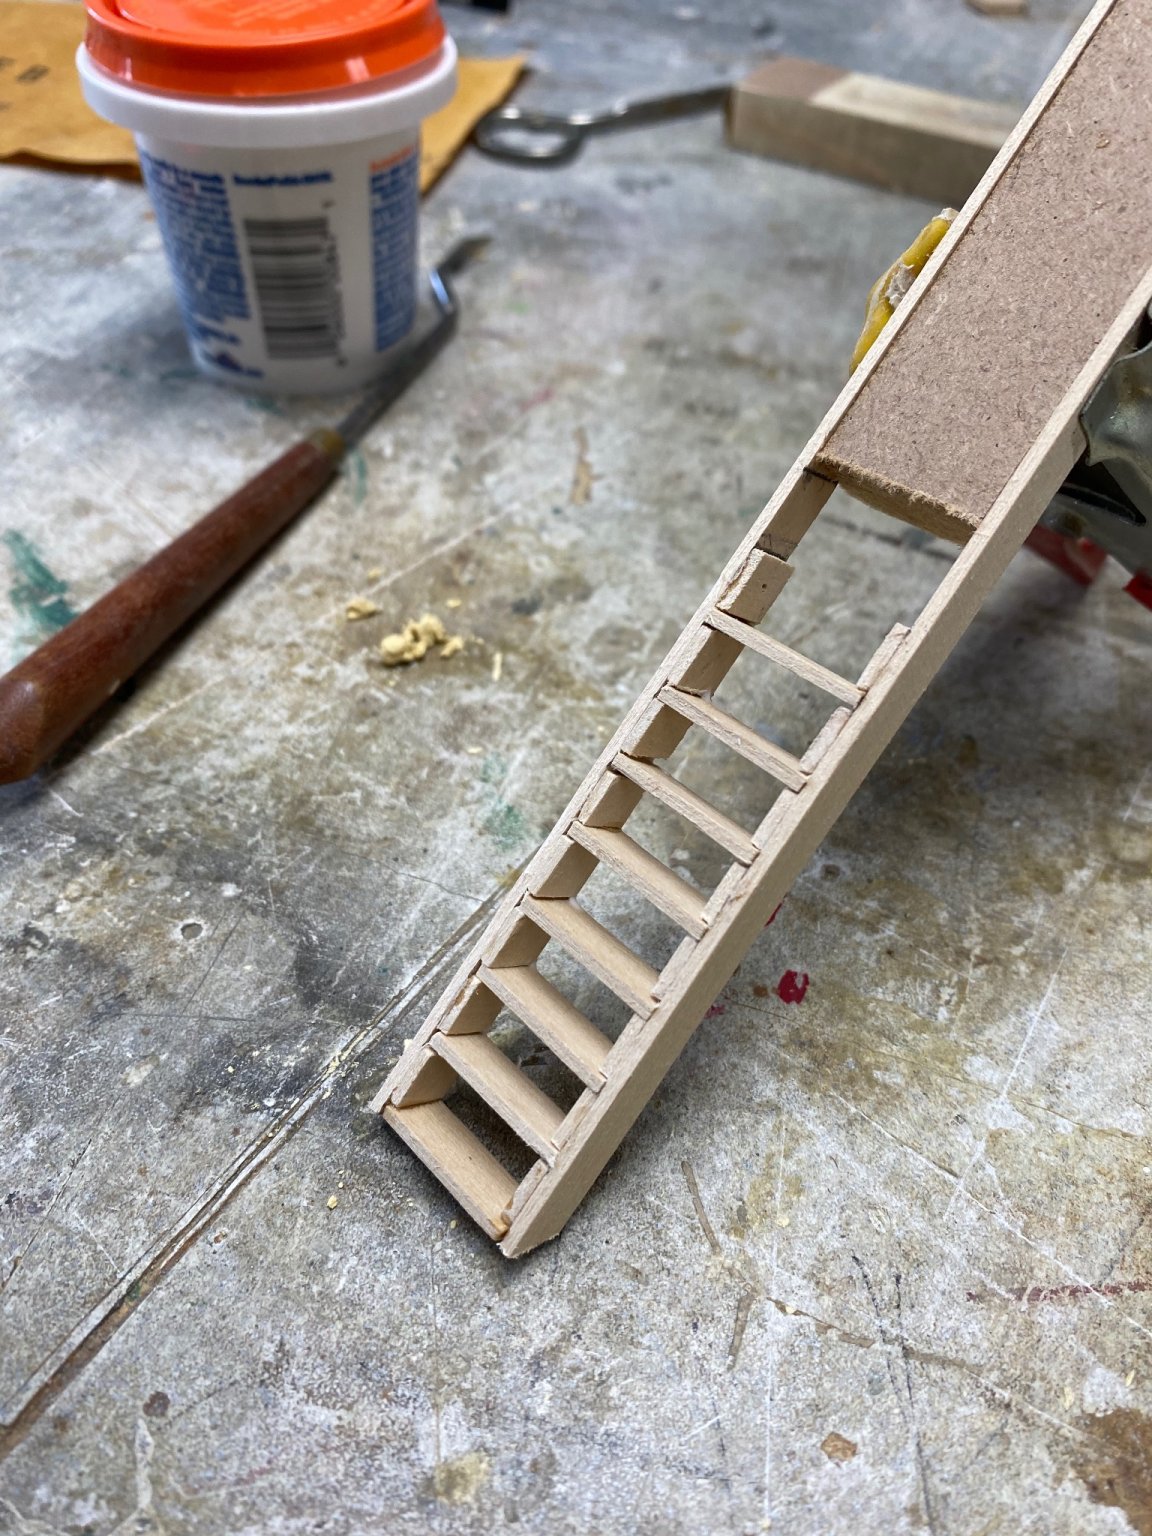
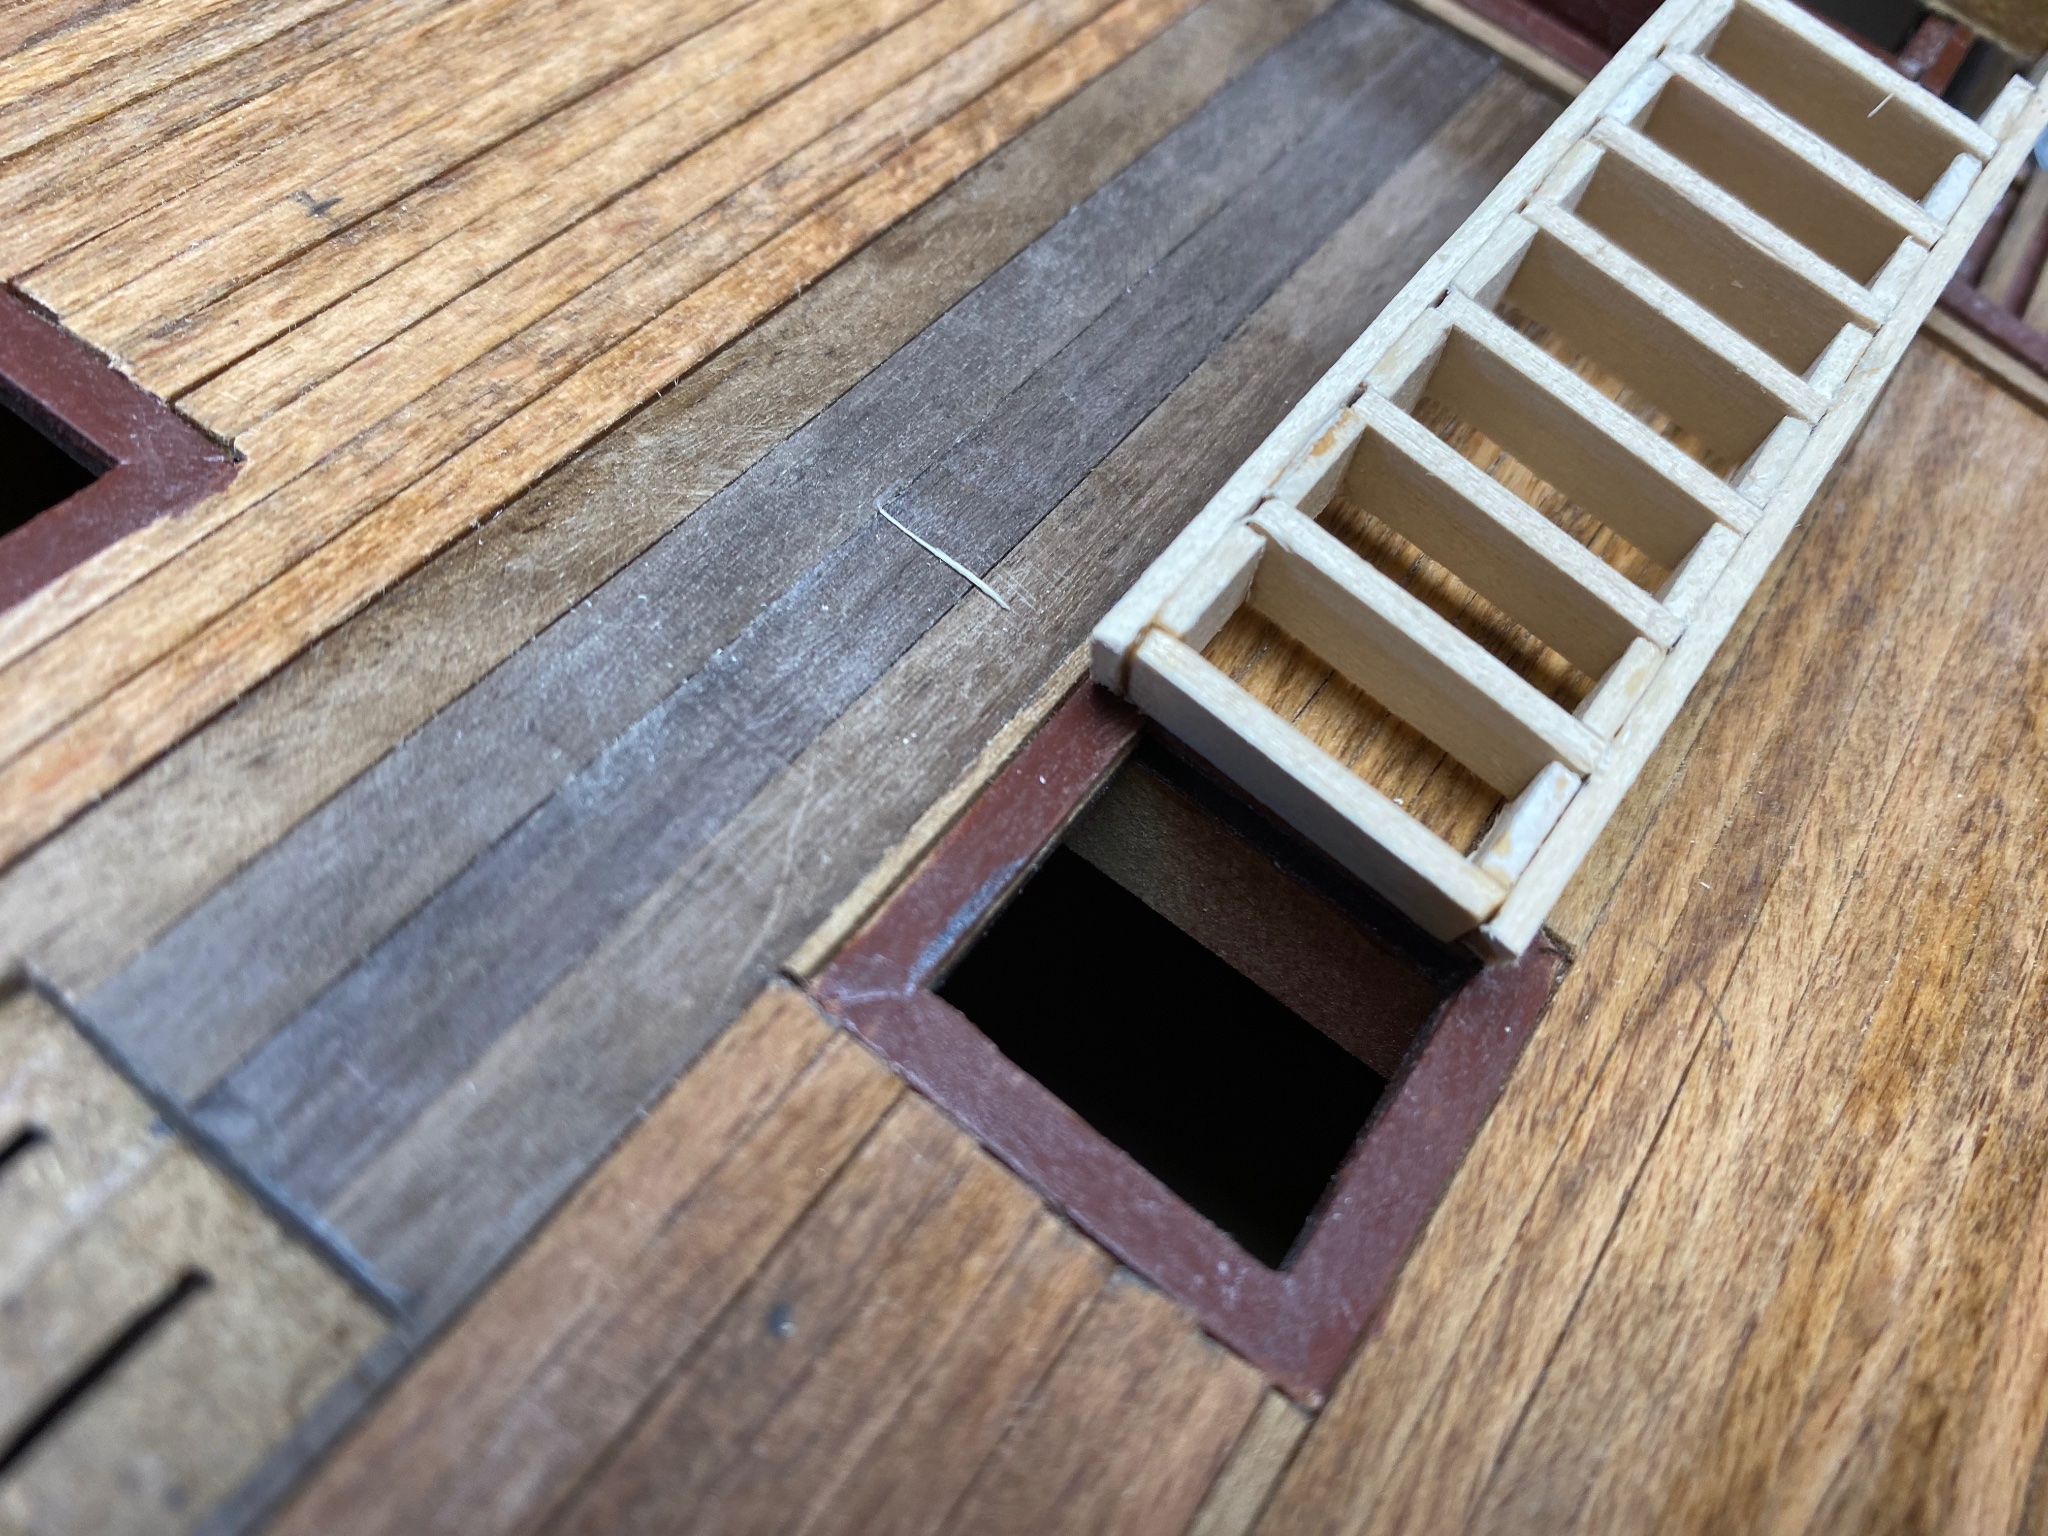
For the main build, today I was getting the hull ready for the top planking doing a little more sanding and filling. Then I decided to take a break and work on the final detailing. The project this time was to build the ladder to get to the hold from the fore hatch. I thought of making a jig but decided on a different system. I measure the opening in the deck 20 mm. I established the angle of the ladder and measure the height if the ladder. I then cut two strips, leftover from the base planking, and marked the steps. Then I cut little pieces at the right angle and glued them between steps. Then I cut the 8 steps precisely at 20 mm. I assembled my ladder between a piece of wood measuring exactly 20 mm. I was so happy.

Finally, I took the ladder off the mandrel and presented to the hatch opening
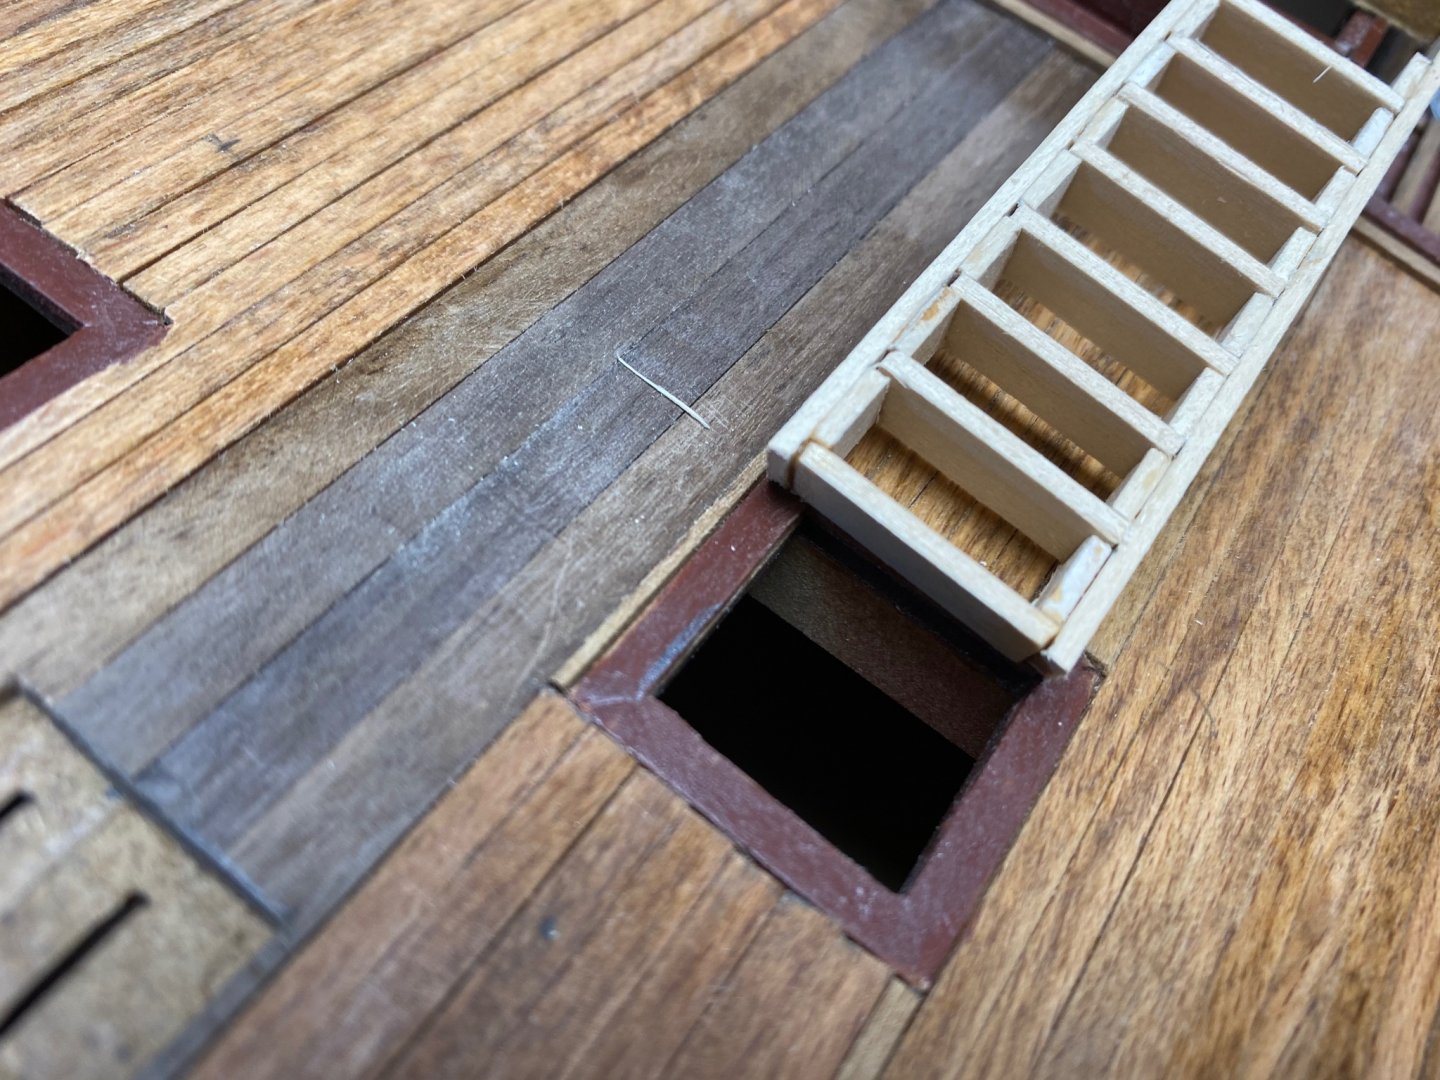
Holy cow. The I forgot to deduct the 3mm thickness of the ladder rails. The finished ladder is 23mm wide. BobGarcia says: "Measure once, cuss twice". So right.
But no big loss. I am going to enlarge the reach hatch that appear awfully narrow in the kit. I will carefully will measure the width so my ladder fits. Then I will make another ladder 22mm wide. And that is the lesson for today
- egkb, Rik Thistle and G.L.
-
3
-
Valeriy, you continue to amaze me. Could you brief us on how you do the plating?
-
Peter you have me crawling the floor laughing. Your post is one of the finest I've read.
Now, seriously, your post interested me because, as a matter of fact, I was talking to my neighbor about this pop-pop boats. I live in an adult (old people) "independent living facility". Because of the Covid, we have been literally isolated for a whole year. All our activities were cancelled and if it wasn't for my wife, who is an adventurer, I would have died of boredom.
Since the beginning of the year the facility has started to open up a bit and now we are planning our summer entertainment. Before Covid we have common activities that included video bowling, pool playing, horse shoe tossing and, specially for old folks, we were having pine wood car derbies. These were small cars ran in a wood track. We built the track in our shop and made car kits for the people to build their own cars. So this year we were talking about reviving these races and, to do something new, we are planning on running little boat races in our swimming pool. We talked about making kits of either the pop-pop boat or paddle boats powered by rubber bands. This week we are meeting with our general manager to see about the allocation of funds to develop this project.
And again, congratulations for doing this with you grandson. I have seven grandkids and none of them have shown the slightest interest in any of the things I like to do.
-
-
While I wait for the glue to dry, I continue my search for "silver darlings" (herrings) to fill my "cran" baskets. As I mentioned before I found aluminum foil to be a great medium to provide the silvery look. Today I tried to perfect the method by adding some black paint to the silver "fish". It didn't work beacuse the paint won't stick to the aluminum foil. Then I tried the back side of the foil, which is matte. Success. Following are the steps I took to build my "catch".
First: make a little strip of foil
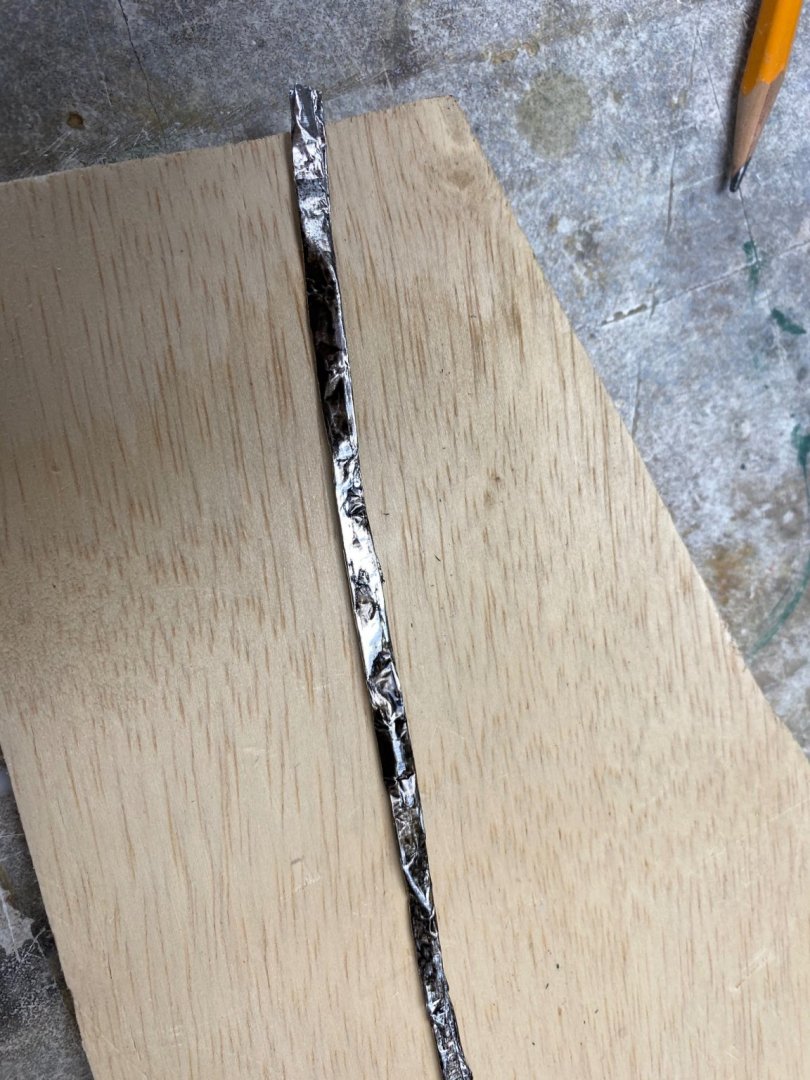
Then, using an Xacto gouging tool, I cut first the head and then the tail. I cut in succession, which means, that the head of one fish is the tail of the next one across the aluminum foil strip. Then with a small needle nose plier or, better yet, your nails you pinch the fish at the tail. The results follows
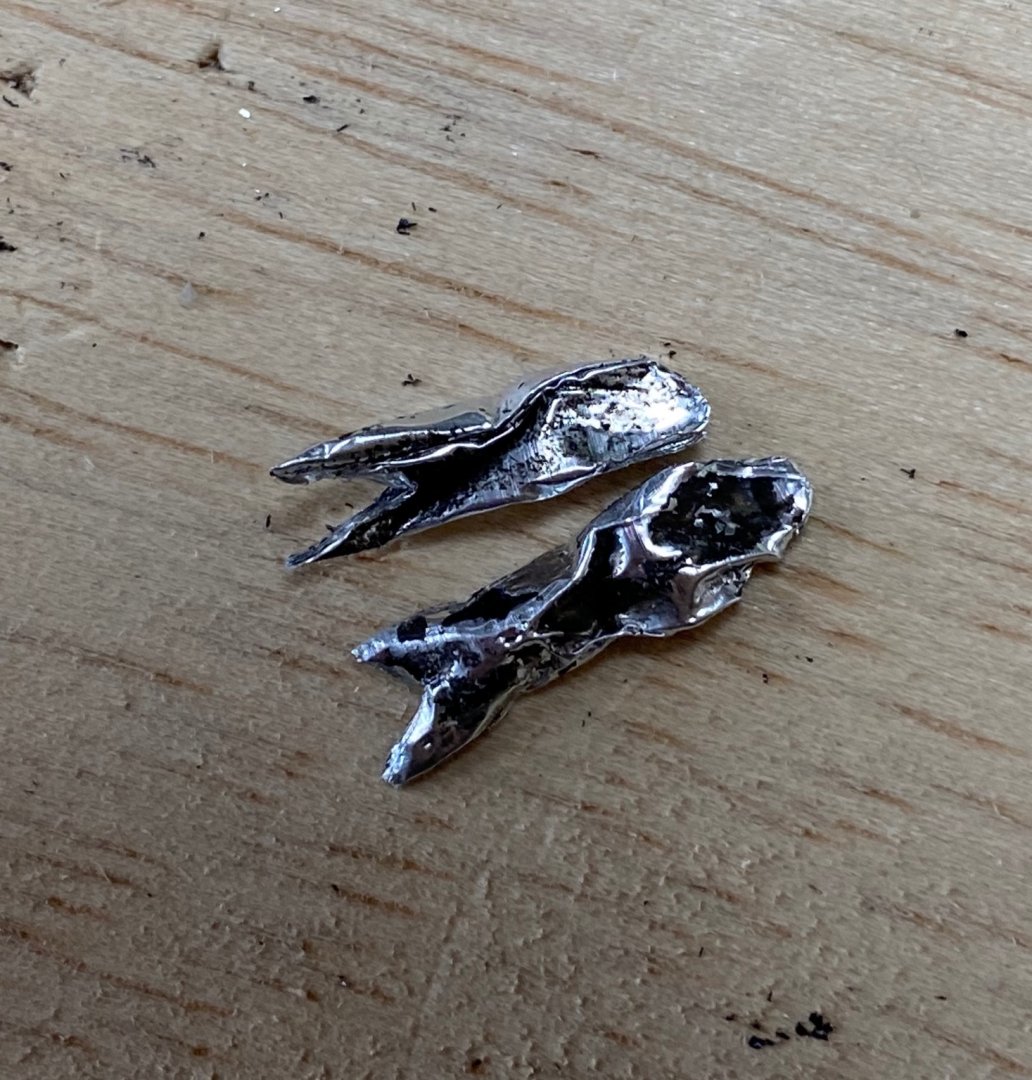

What do you all think
-
-
wefalk:
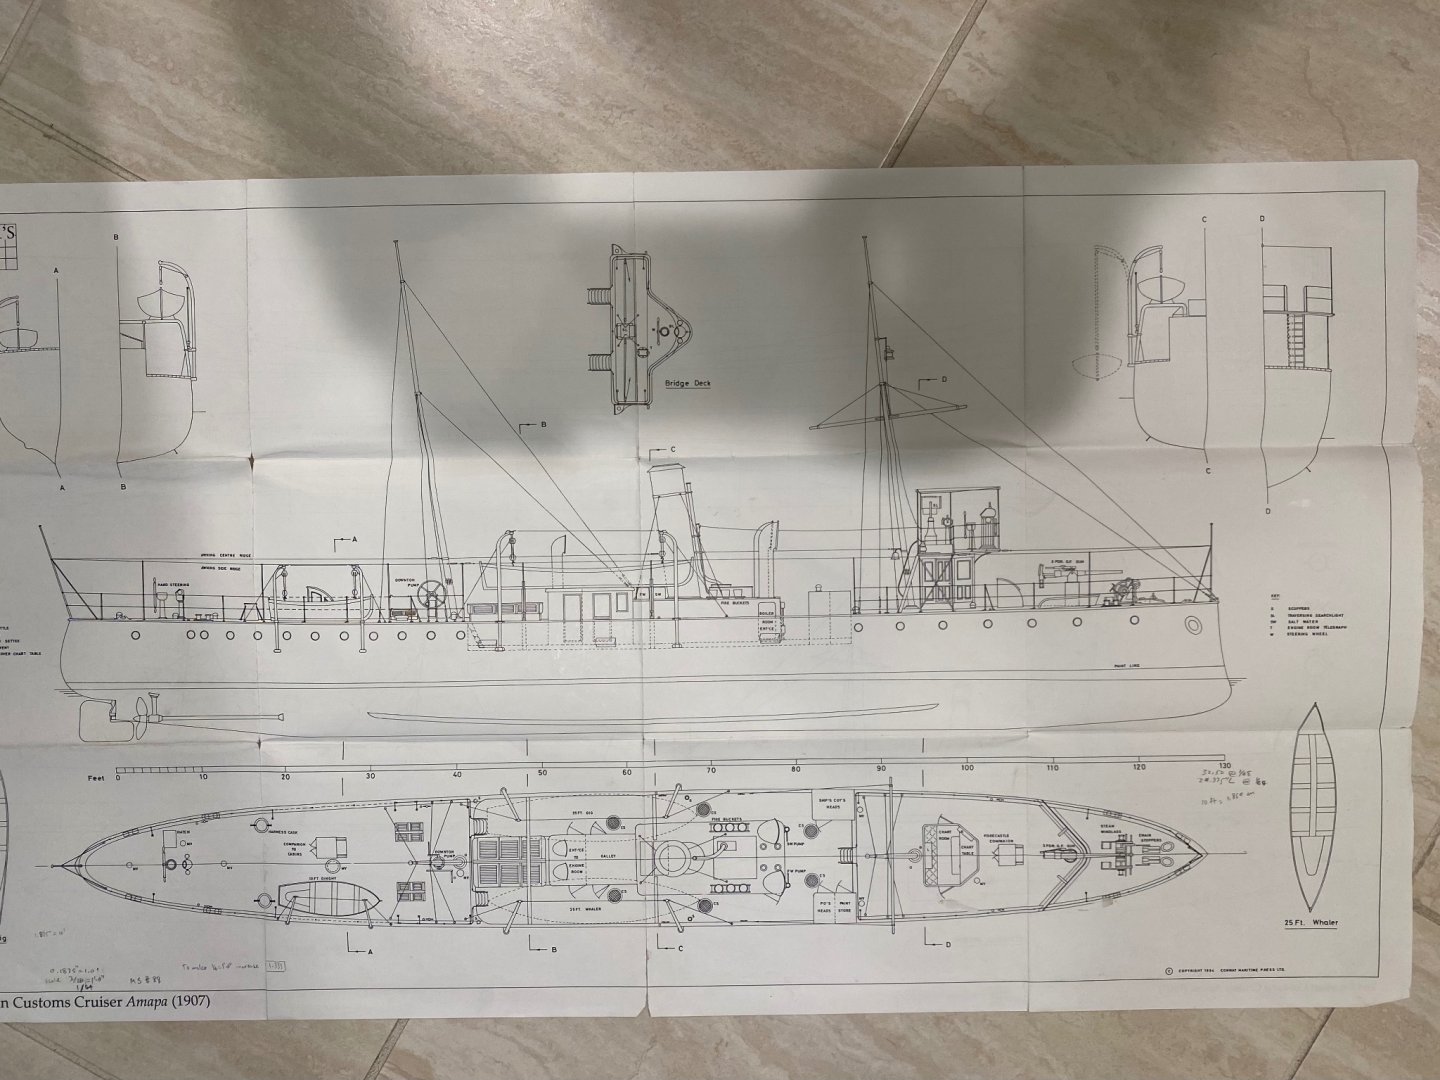
I hope Valeriy won't object. In answering your question about the Brazilian gunboat, I lived for awhile in the Hague and subscribed to the Model Shipwright Magazine. They provided a plan and a brief description of a selected ship in every issue. I saved these plans for the day when I had enough time to devote to my hobby. The plans show the Brazilian Custom Steamer Amapá that was built by Yarrow Scotstoun in the UK in 1904 and issued to the customs authorities in 1907. It is a simple ship model in 1/64 scale with plenty of detail that will allow me to see if I can follow Valeriy's methods.
Sorry Valeriy, I love your work. I will try to do soldering as good as you do.
-
I am enthralled by your work. I hope you don't mind me taking notes. My next model is a 1907 Brazilian gunboat and I am going to use some of your techniques. I will continue to follow your build in awe of your mastery. Good job.
- FriedClams, Keith Black, mtaylor and 3 others
-
6
-
Alan:
Those clips work great on the flatter part of the hull but, when the hull starts curving they don't provide sufficient pressure. In going though the planking of my Fifie I finally found the best tool: plastic headed board push pins. I tried the little nails but they are a pain to hold and hammer in. I have two pin pushers but, the nail's head provided on the kit were too big.
Eamonn:
You are correct. They are called the silver darlings, that's where I got the idea. I am now looking at providing a little shape to fake the head and tail. We will see. I am retired and have all the time in the world to do things.LOL
-
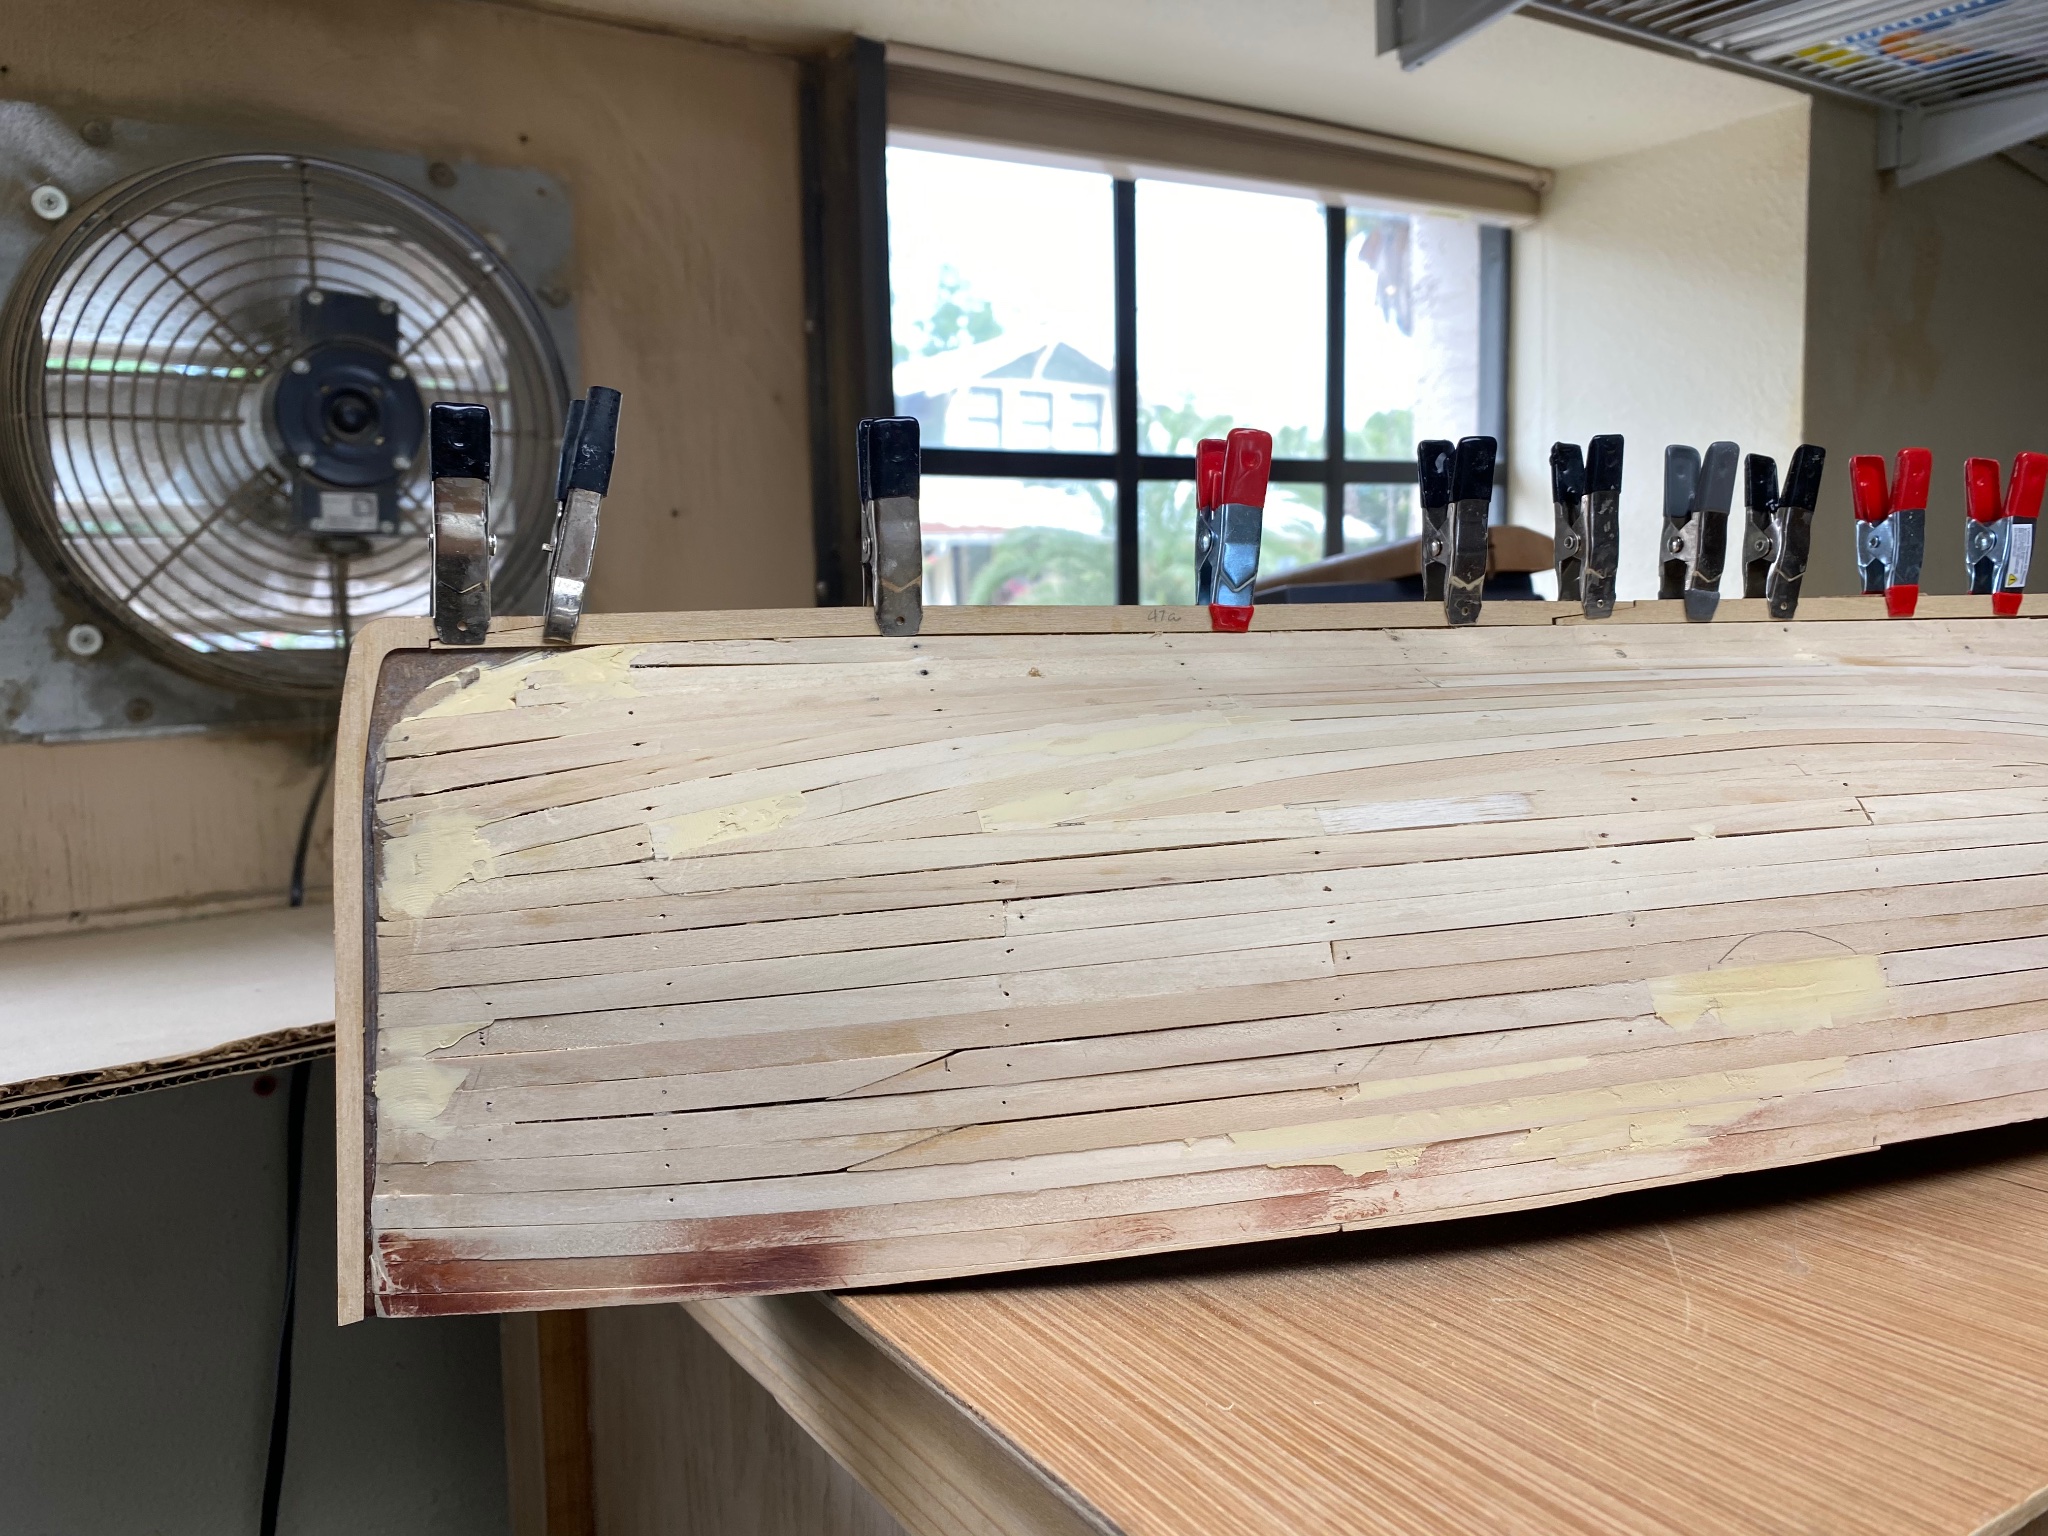
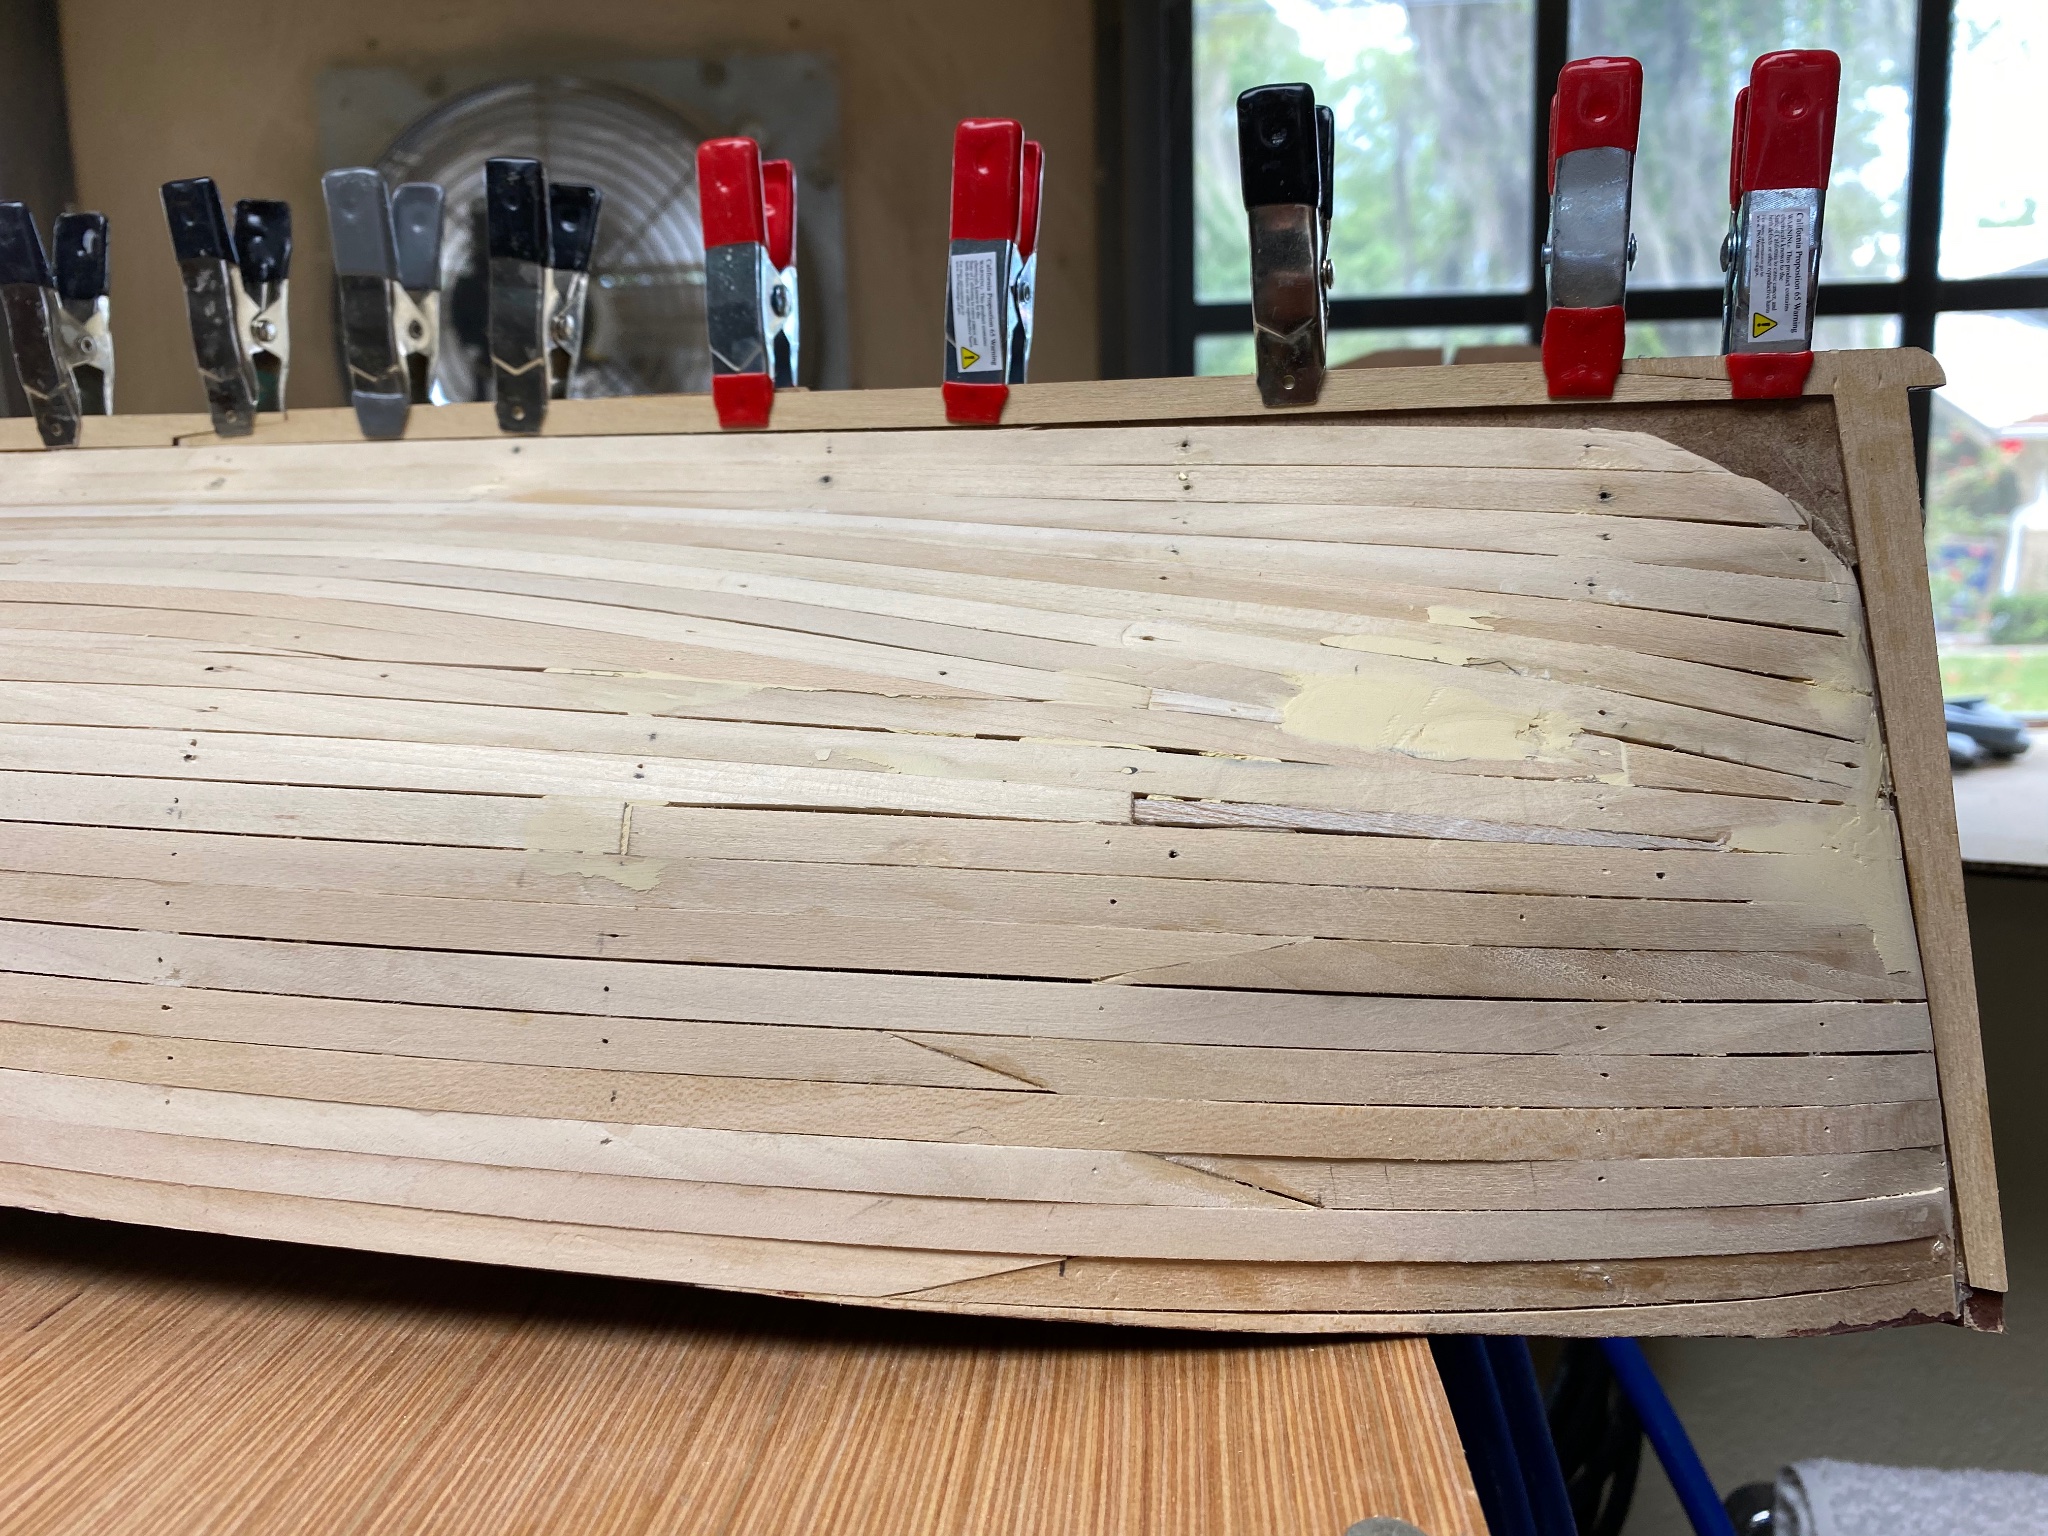
Today I finished the raw base planking for my Fifie. Nothing to be proud of since I used all the procedures available and wound up needing a lot of cheaters at the end. Now I got a lot of filling and sanding ahead. For those that are starting to build this model, I have a few pointers to pass on. The first one is of course read the instructions. I did, and I also read the experiences of some of our master builders in this forum. Second: is to note that the material furnished is shorter that the boat's hull length. Therefore it is necessary to splice the planks or do alternate joints. I started with the splicing but found more convenient to do butt joints. Also, this method, makes easier to bend the planks. Third: and most important, fair the frames and then mark the planking belts using battens. Fourth: use the spiling method to shape the planks. I didn't, and made a mess. My advise is to lay no more than four of the full width planks on each side alternating from the top down and from the bottom up. Then start shaping the planks. And the last one: feather the end of the planks at the bow and the stern.
This is the result of missing on some of the above points:
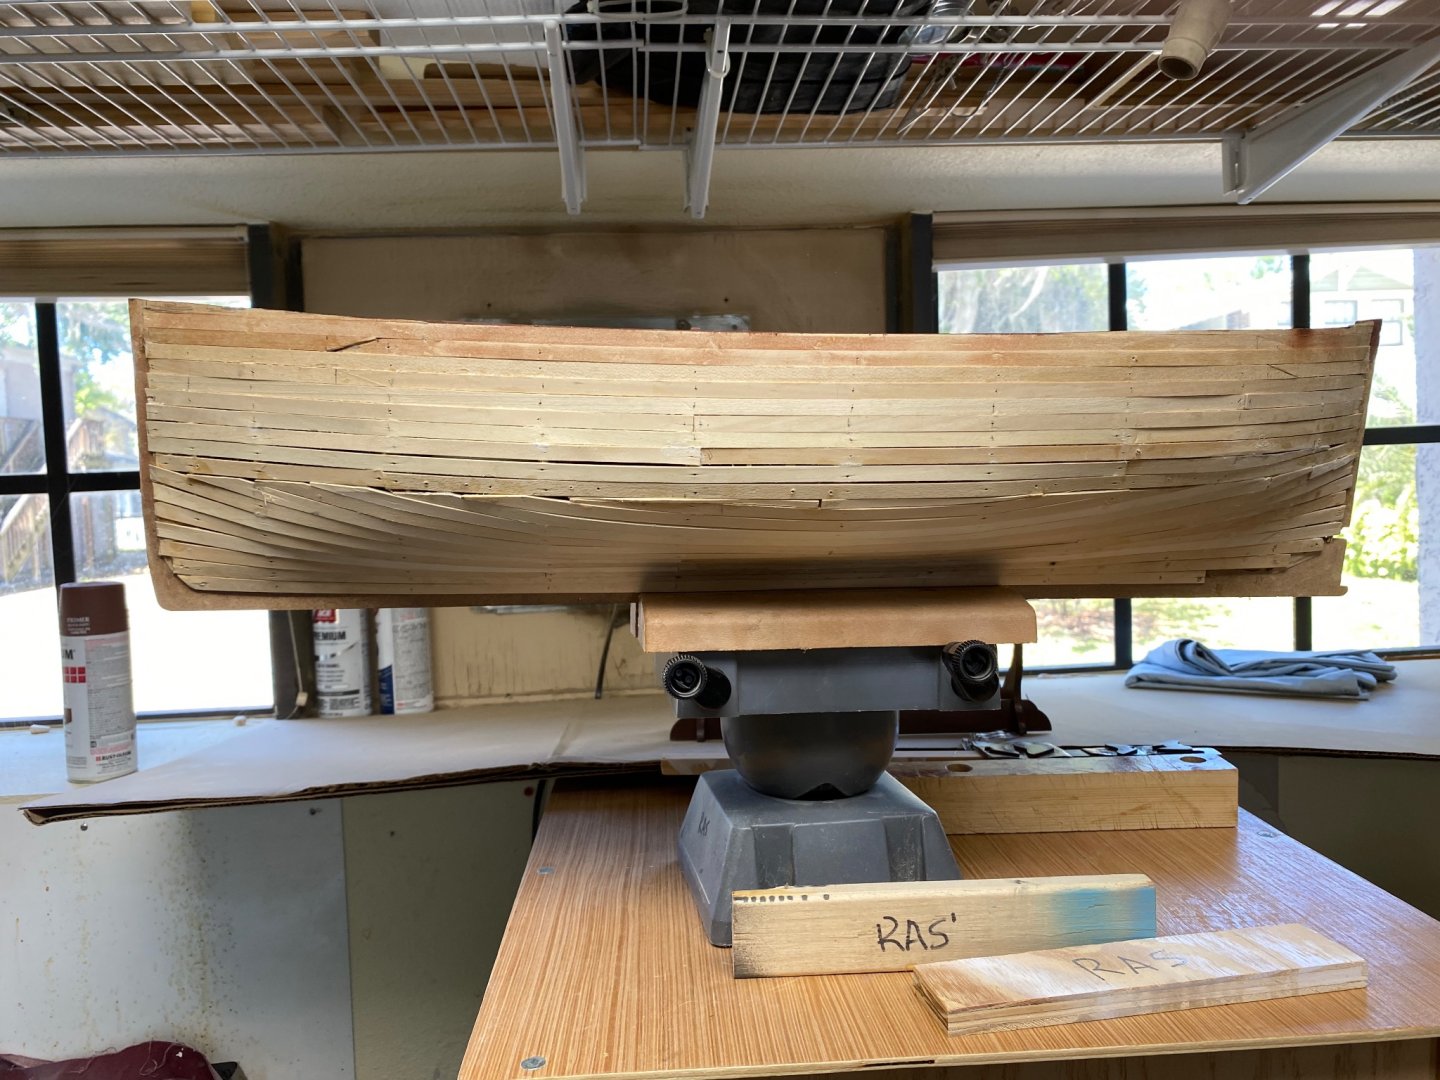
The bottom looks like the half of viking ship and the frames were not totally faired. But, I promise, I will do better on my next build. Now we start filling, shaping and sanding.
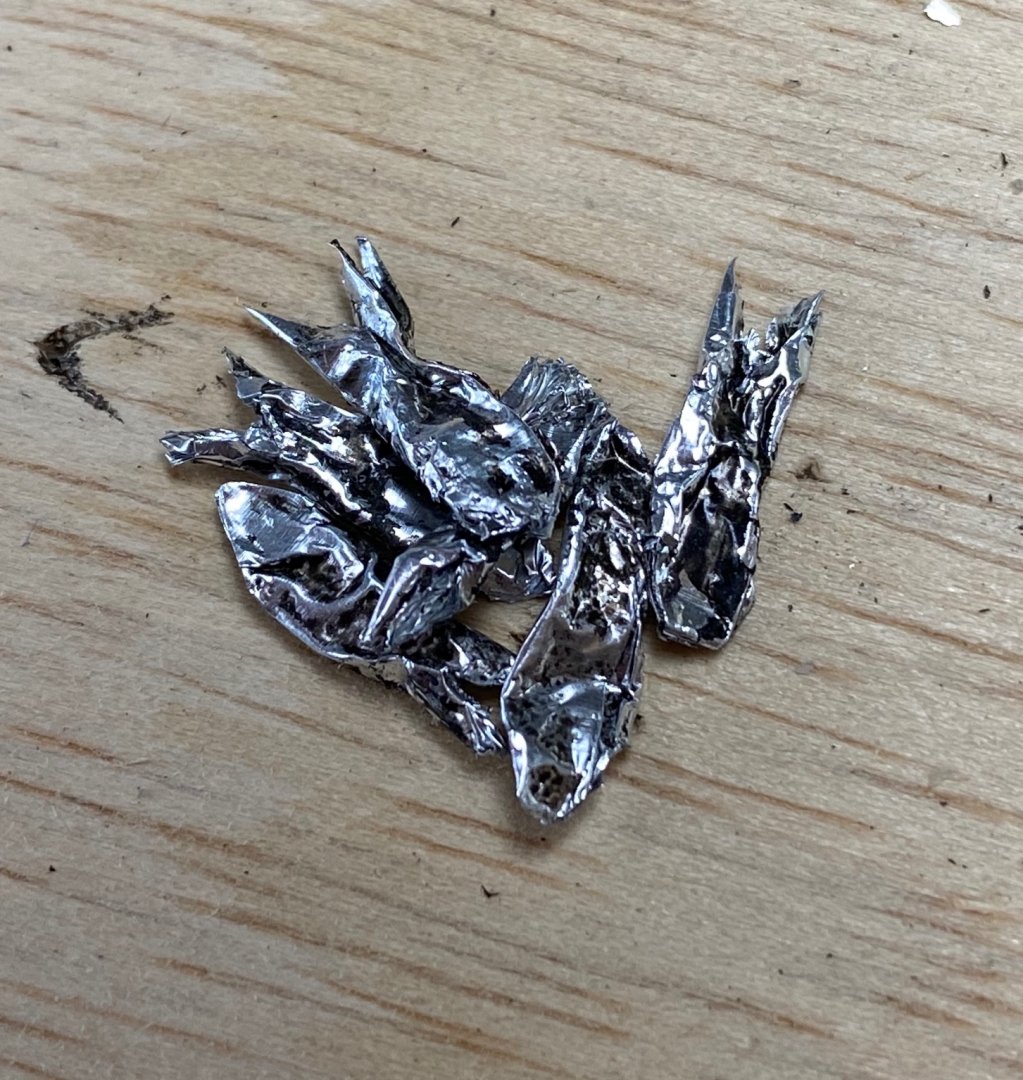
In between planks I kept trying to make scale herrings to go in the cran baskets. Tried several methods since I don't own a Cricut machine. While watching TV the other night I dug into the candy jar and pulled a few Hershey kisses. As I unwrapped I them I noticed the wrinkles in the aluminum paper wrapping. I rolled and flattened the aluminum into a tiny bar and I saw herrings. I cut a few and following is the results.

I am going to give them black smears with a black marker to tone down the shininess.
What do you think?
-
Mario, after the paint, your planking doesn’t look too bad. I am building a Fifie and have trouble planking it. i blame the poor fairing of the frames. But, in reality, these boats were built by poor people and I’m sure their planking wasn’t that smooth. So, keep up the good work and I’ll be following your progress.
-
-
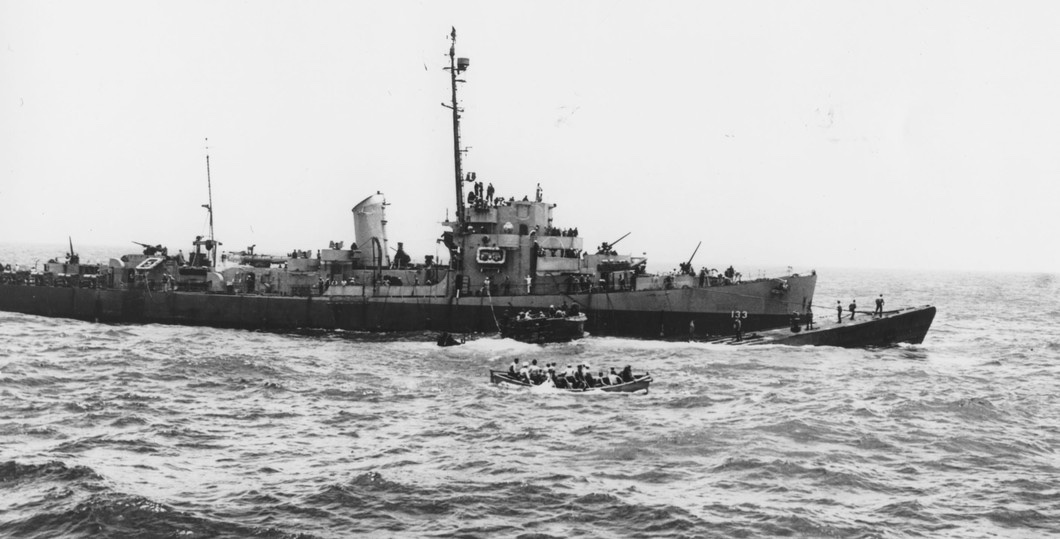
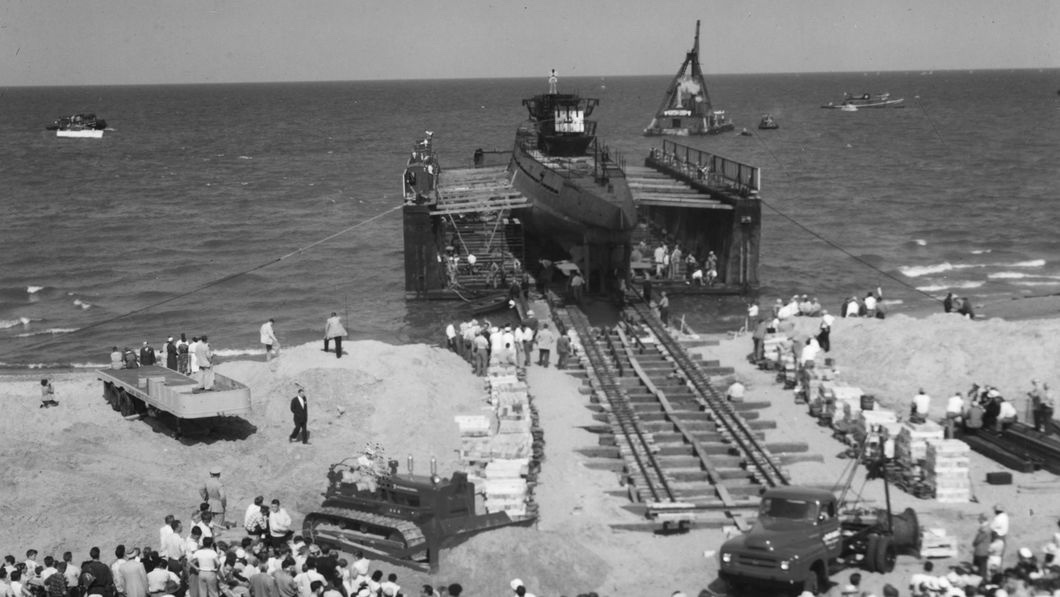
I didn't know about the British capture. The journey of U505 from the Atlantic to the Museum in Chicago is an extraordinary event. When the sub reached the Chicago river, across from the Museum, it had to be raised from the water and rolled almost half a mile over the the streets of Chicago. The first photo is the capture and the second of the dry dock that was built to get it out of the water and the tracks that ran all the way to the Museum.
-
That's a fantastic job Yves. I am also a fan of submarines specially the type VII. Until very recently I had a plastic model in 1/144 scale in my shop but it did not survive my downsizing move. I will follow this built and perhaps try something like this. BTY, I have visited what I think was U550 that is displayed in the Museum of Industry in Chicago. This was, I think, the only sub capture intact during WWII and taken across the Great Lakes to settle in Chicago. A great story.
-
I am on it. Great kit. Maybe ,after I finish my wood Fifie, I'll take this plastic model for a try. Incidentally, years ago, I built the 1/72 Airfix version of the S38 and it was one of my favorites until my sons took it to play in the pool. What I really liked about that kit was the crew. On your model at 1/35 scale the crew will look outstanding. Good job so far and I will be following you.
- popeye the sailor, mtaylor, Canute and 1 other
-
4
-
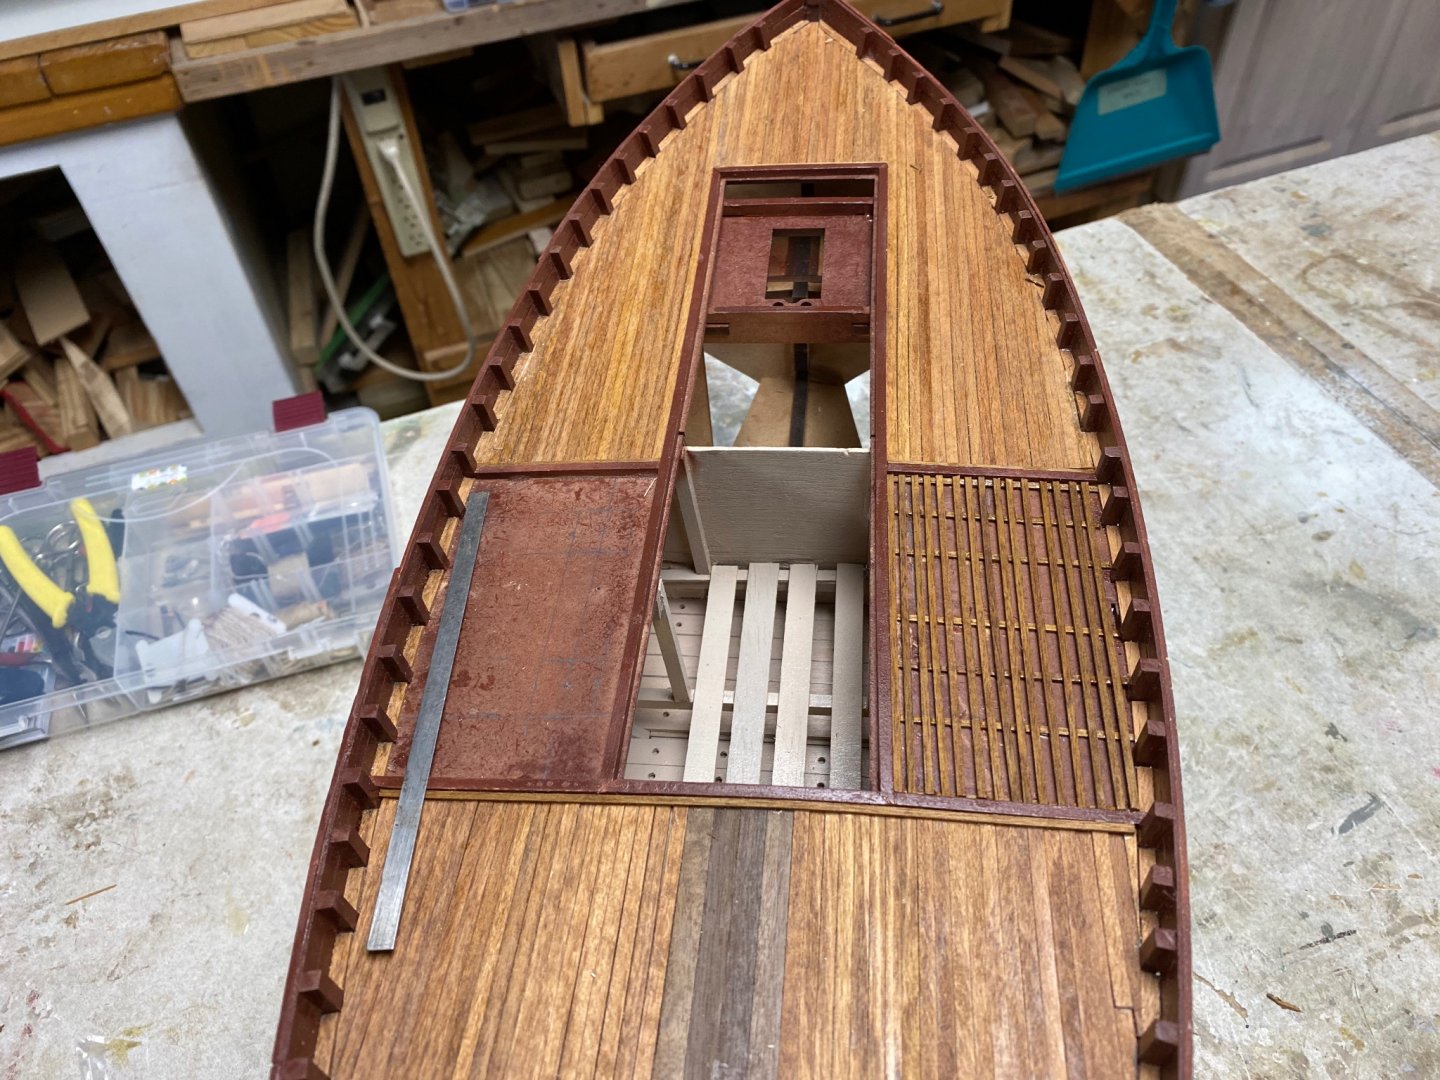
Again have to say it: fantastic job on the door
-
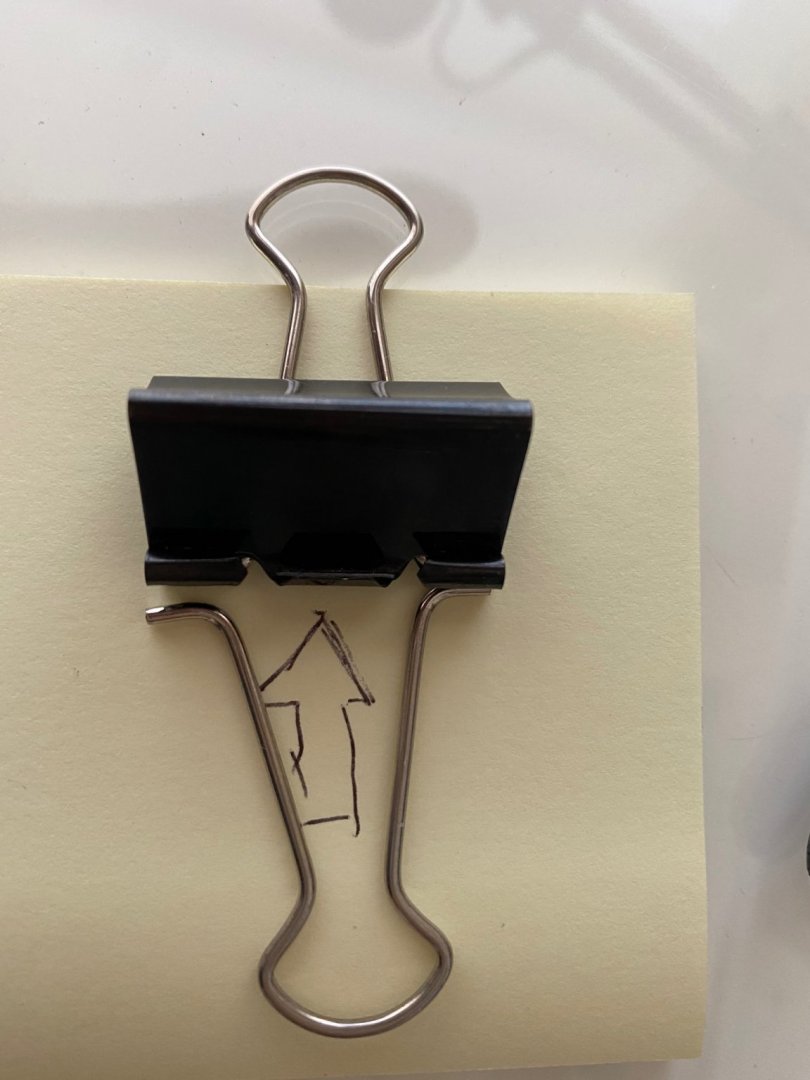
Eamonn...the clip shot was supposed to be a still photo . I take those pictures with my phone and the darn thing is too sensitive to my blunt fingers. I wind up shooting a video instead of a photo. Anyway, the clips are great and easy to make. All you need is two office paper clips. You have to disassemble one to remove the levers and this will give you two separate levers. You may have to use a plier to open up the center of the clips body as shown with the arrow. Then you slip the single lever in the other whole clip. It will snap in place. I am writing this and trying to get picture to show you but I can only find large clips and their levers are shorter that the base of the clip. The ones I use in the shop were made with smaller size clips so, you will have to check. The photos here will show the larger clip disassembled.

Did a little more planking today but my eagerness to start planking made me cut corners in the fairing of the frame and I have been having trouble getting the planks to settle in the proper place. Had to use fillers and cheaters all along. Today I completed the seven planks. This includes two planks on on each side of the garboard. I plan to continue planking from the end towards the center. Having fun, though.
-
Boy, I am envious. Love your hold detail. But tell us about your door. I guess that you took a photo of a door with the poster and glued it to the balsa door. Great idea, in my book, for other details that cannot be fully seen on the finished model. Then I certainly see you work real fast and the planking looks flawless. Compare that to mine which is going to require a lot of sanding and filling to match your. Congratulations and I will be following you.
-
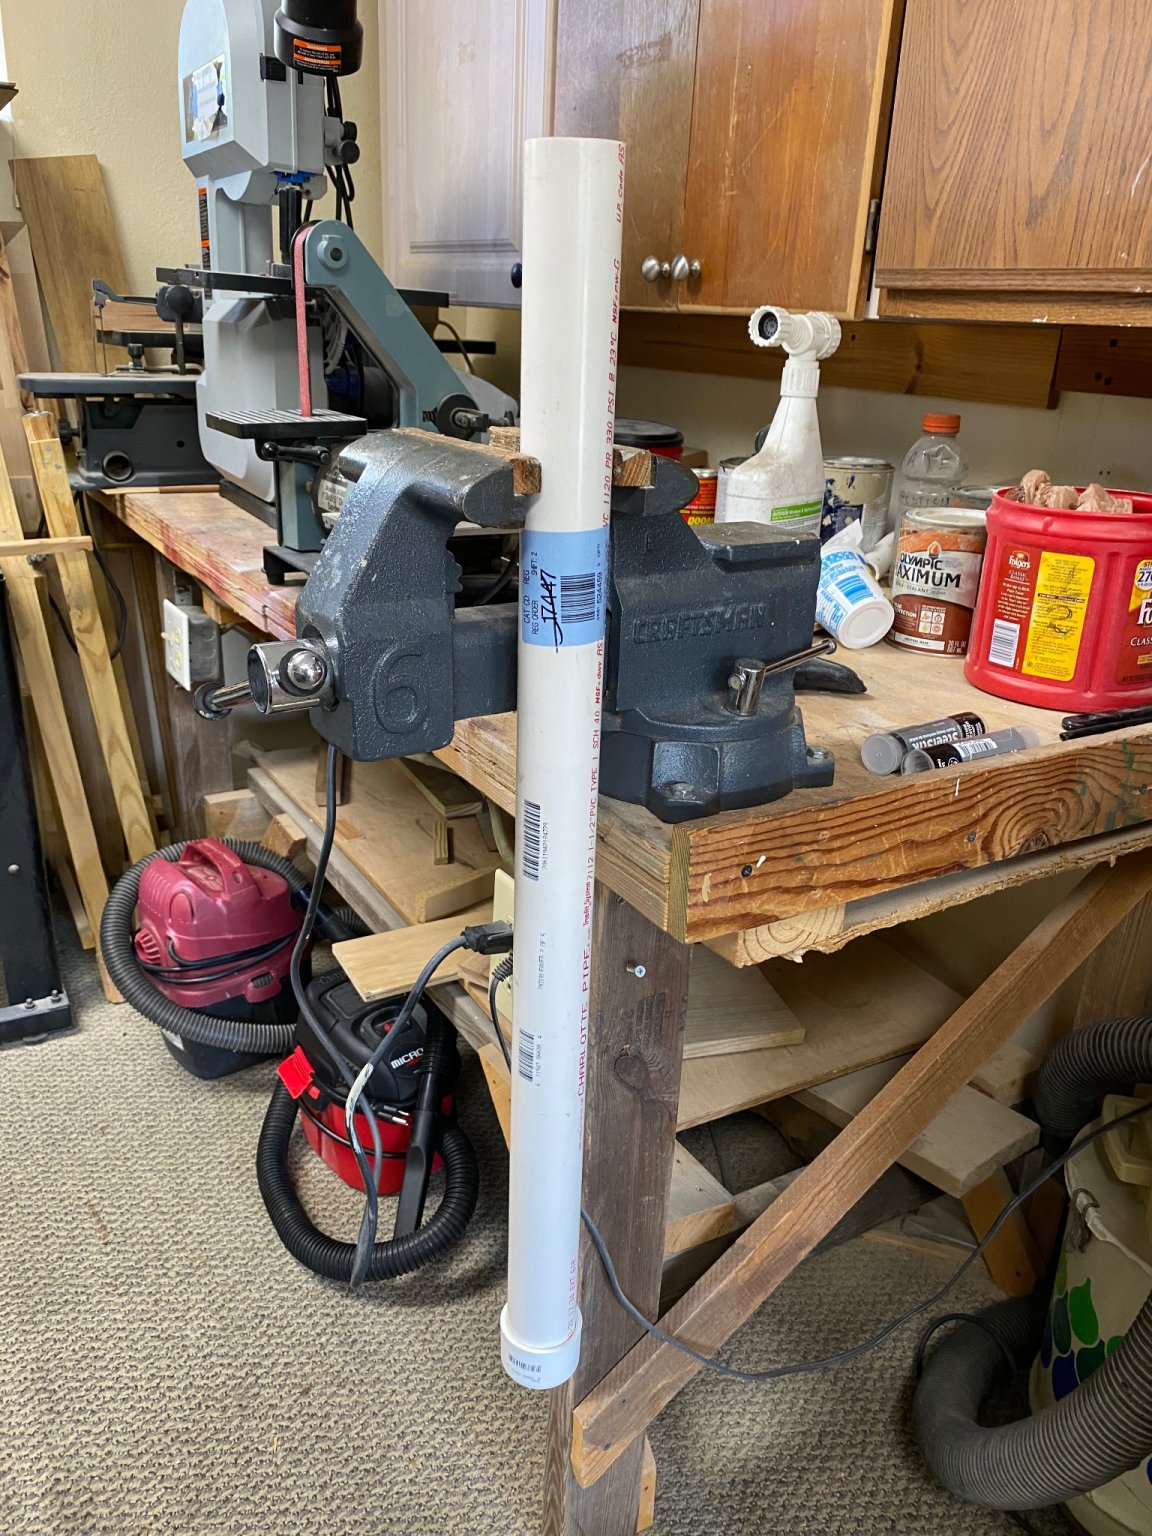
As I continued the planking I felt it was going to be necessary to soak the planks for half an hour before doing the big bends. As I I told you on previous posts, I live in a community and our wood shop has no bathtubs. The planks for the fifie are 30" long so I devised the following "soaker". A long piece of 1-1/2" PVC pipe with the corresponding cap. I filled it with water, inserted the planks and, lo and behold, they popped out. Senior moment, of course. Then, as smart as I am, I took the paper cup you see in the bench behind the vise, and capped the top. Problem solved.

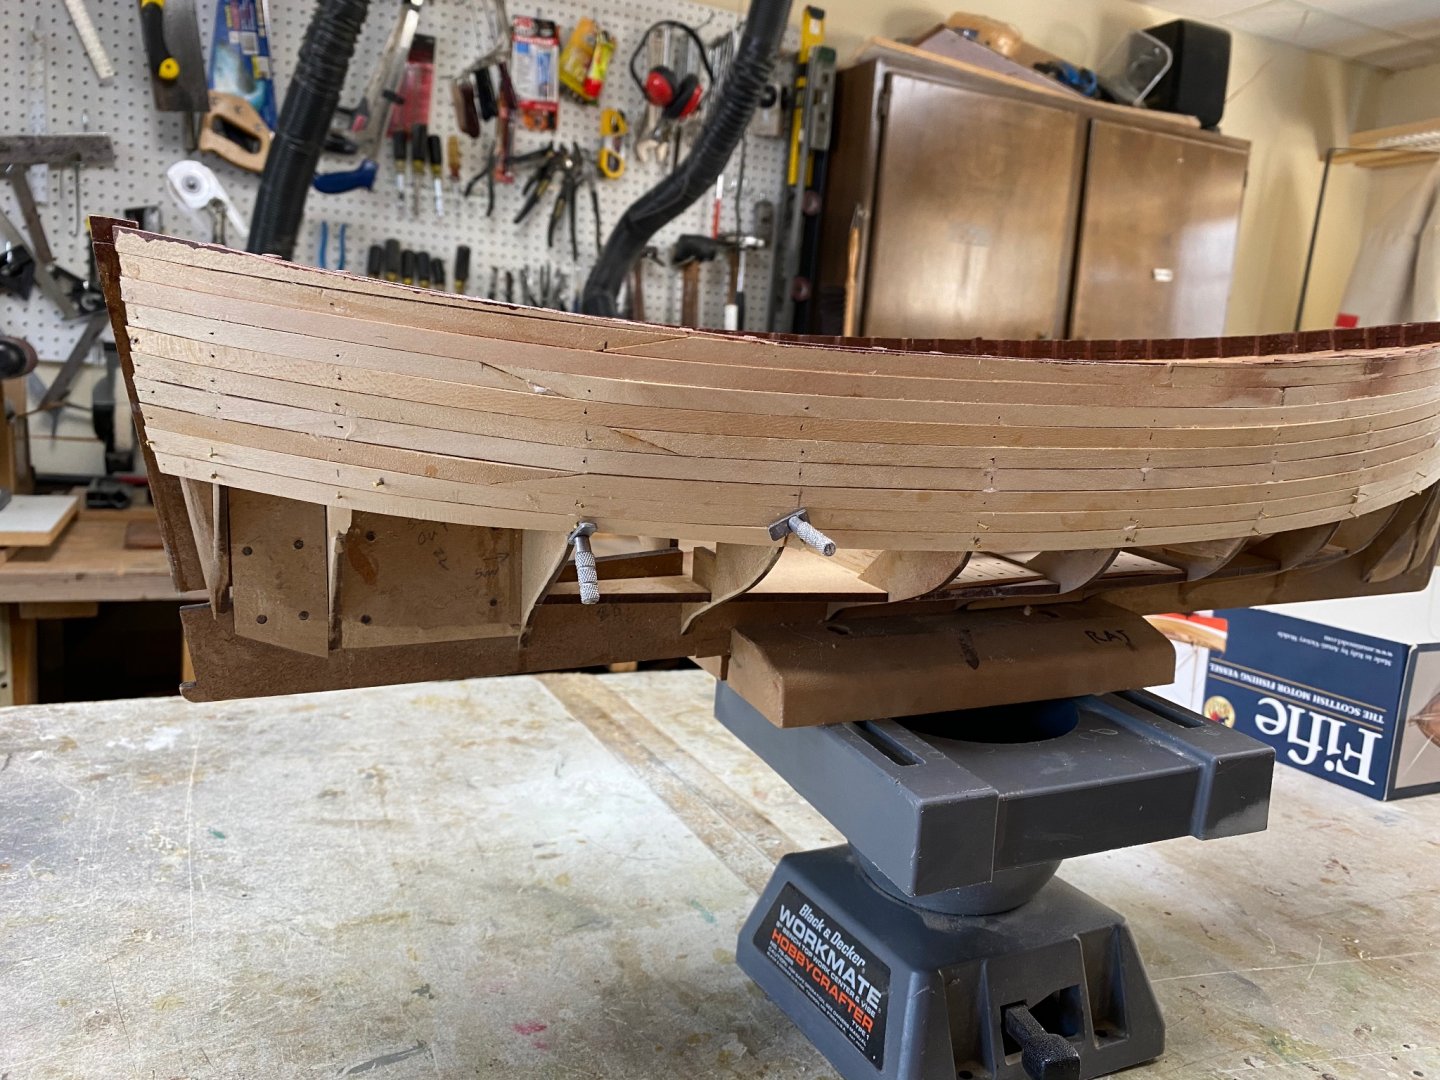
Now back to the serious business of planking. I have read time and time again about the need to fair the frames before planking. I though I've done it but found that, as the planking closed on the first bilge, I had to provide either fillers or sanding at the frames. I marked the location of the frames on the plank and pre started the mini nails. Then I laid the soaked plank on the frames and, in addition to the nails, used the magic clamps, shown below, whose design I borrowed from one of you fellows in this forum. They worked like a charm.
Then, this is the result of my labor today. Looks ugly but sanding and filler will do the miracle
-
Thanks for the compliment egkb. Yes she is big and we live in a small apartment in a senior facility. I do my building in the facilities workshop. Once I finish this model I will probably loan it to the building for display in the lobbies. My office looks like a museum and the rest of apartment can only handle three models and it is full. Before starting the models I thought of building model airplanes so that I could hang them from the ceiling. LOL.
By the way I started planking yesterday. Did 4 planks in 2 hours. Slow progress.
- egkb, Rik Thistle and BobG
-
3
-
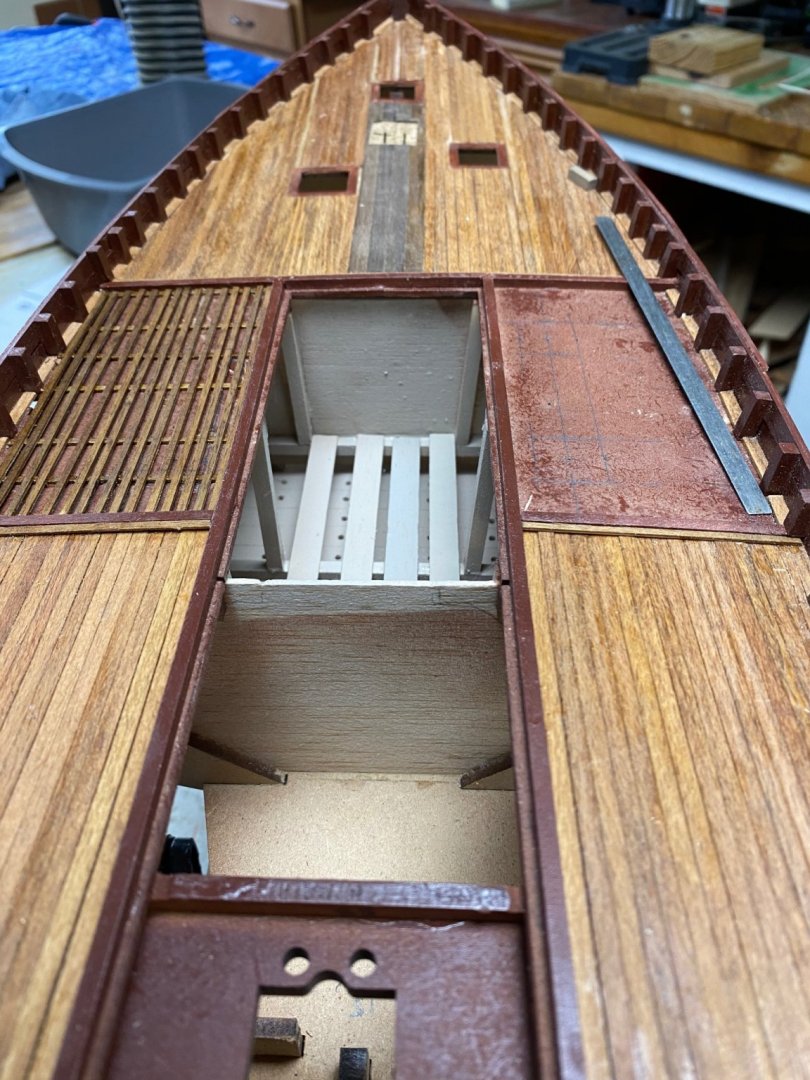
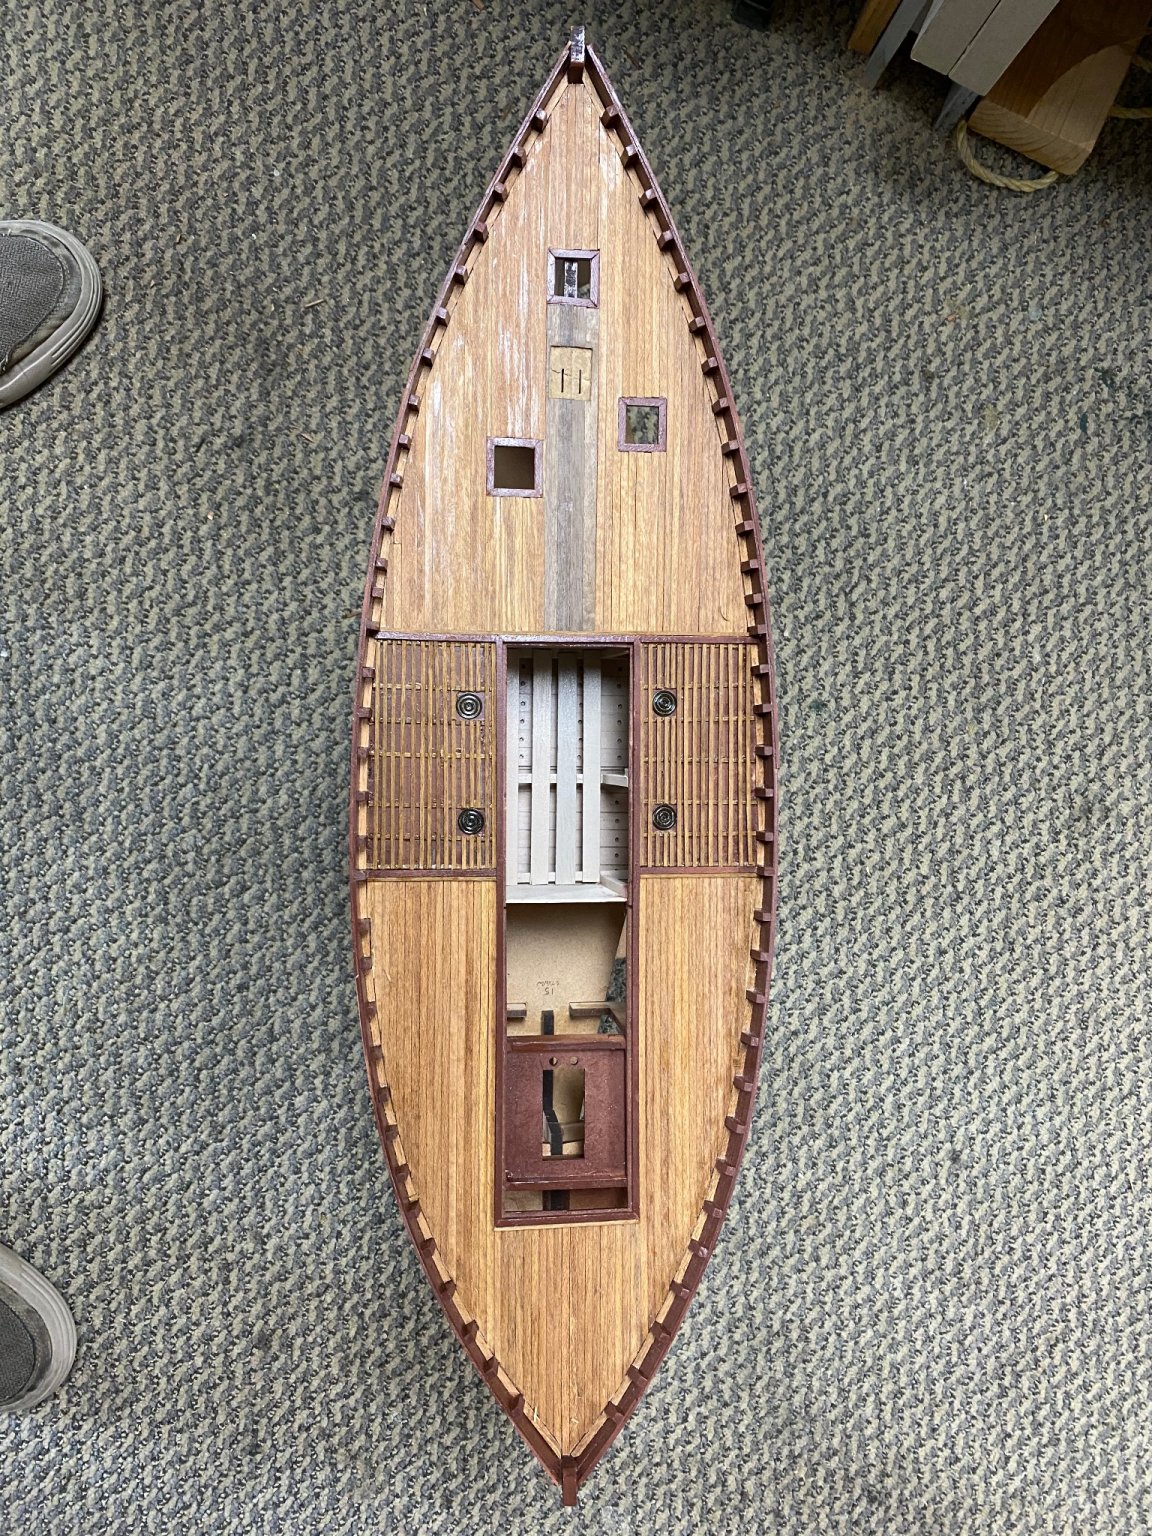
The deck is finished. On with the planking


- Mike_In_RI, JpR62, yvesvidal and 3 others
-
6
-
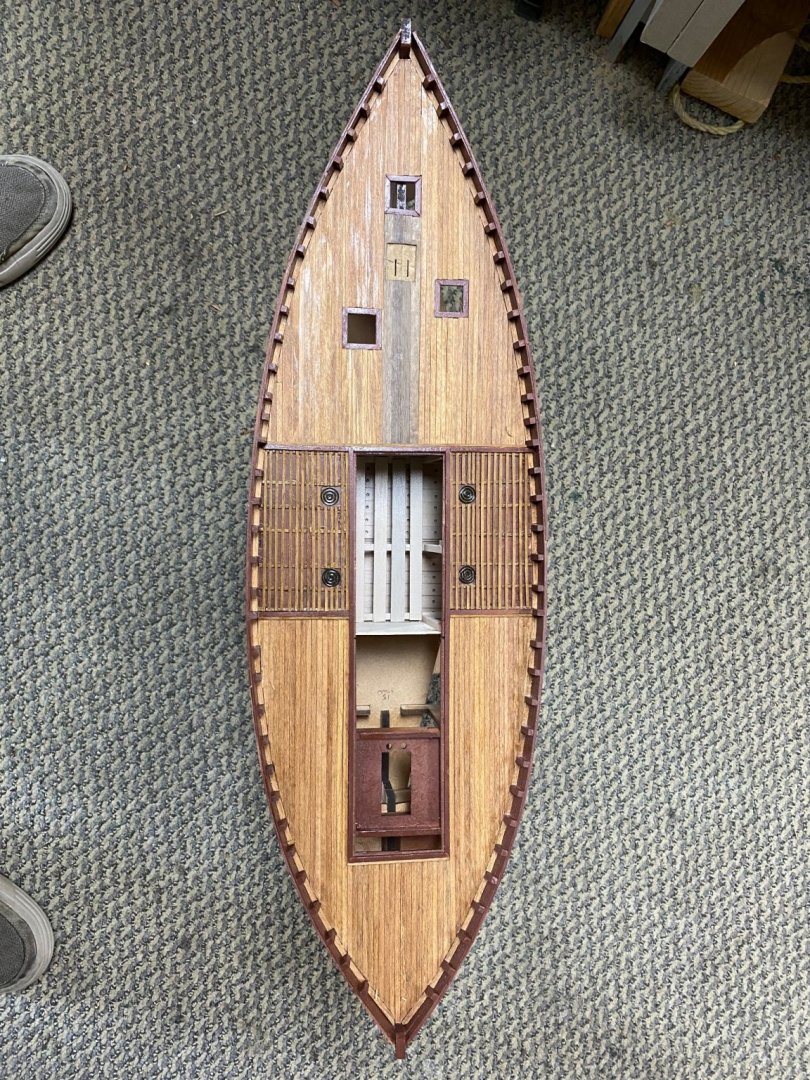
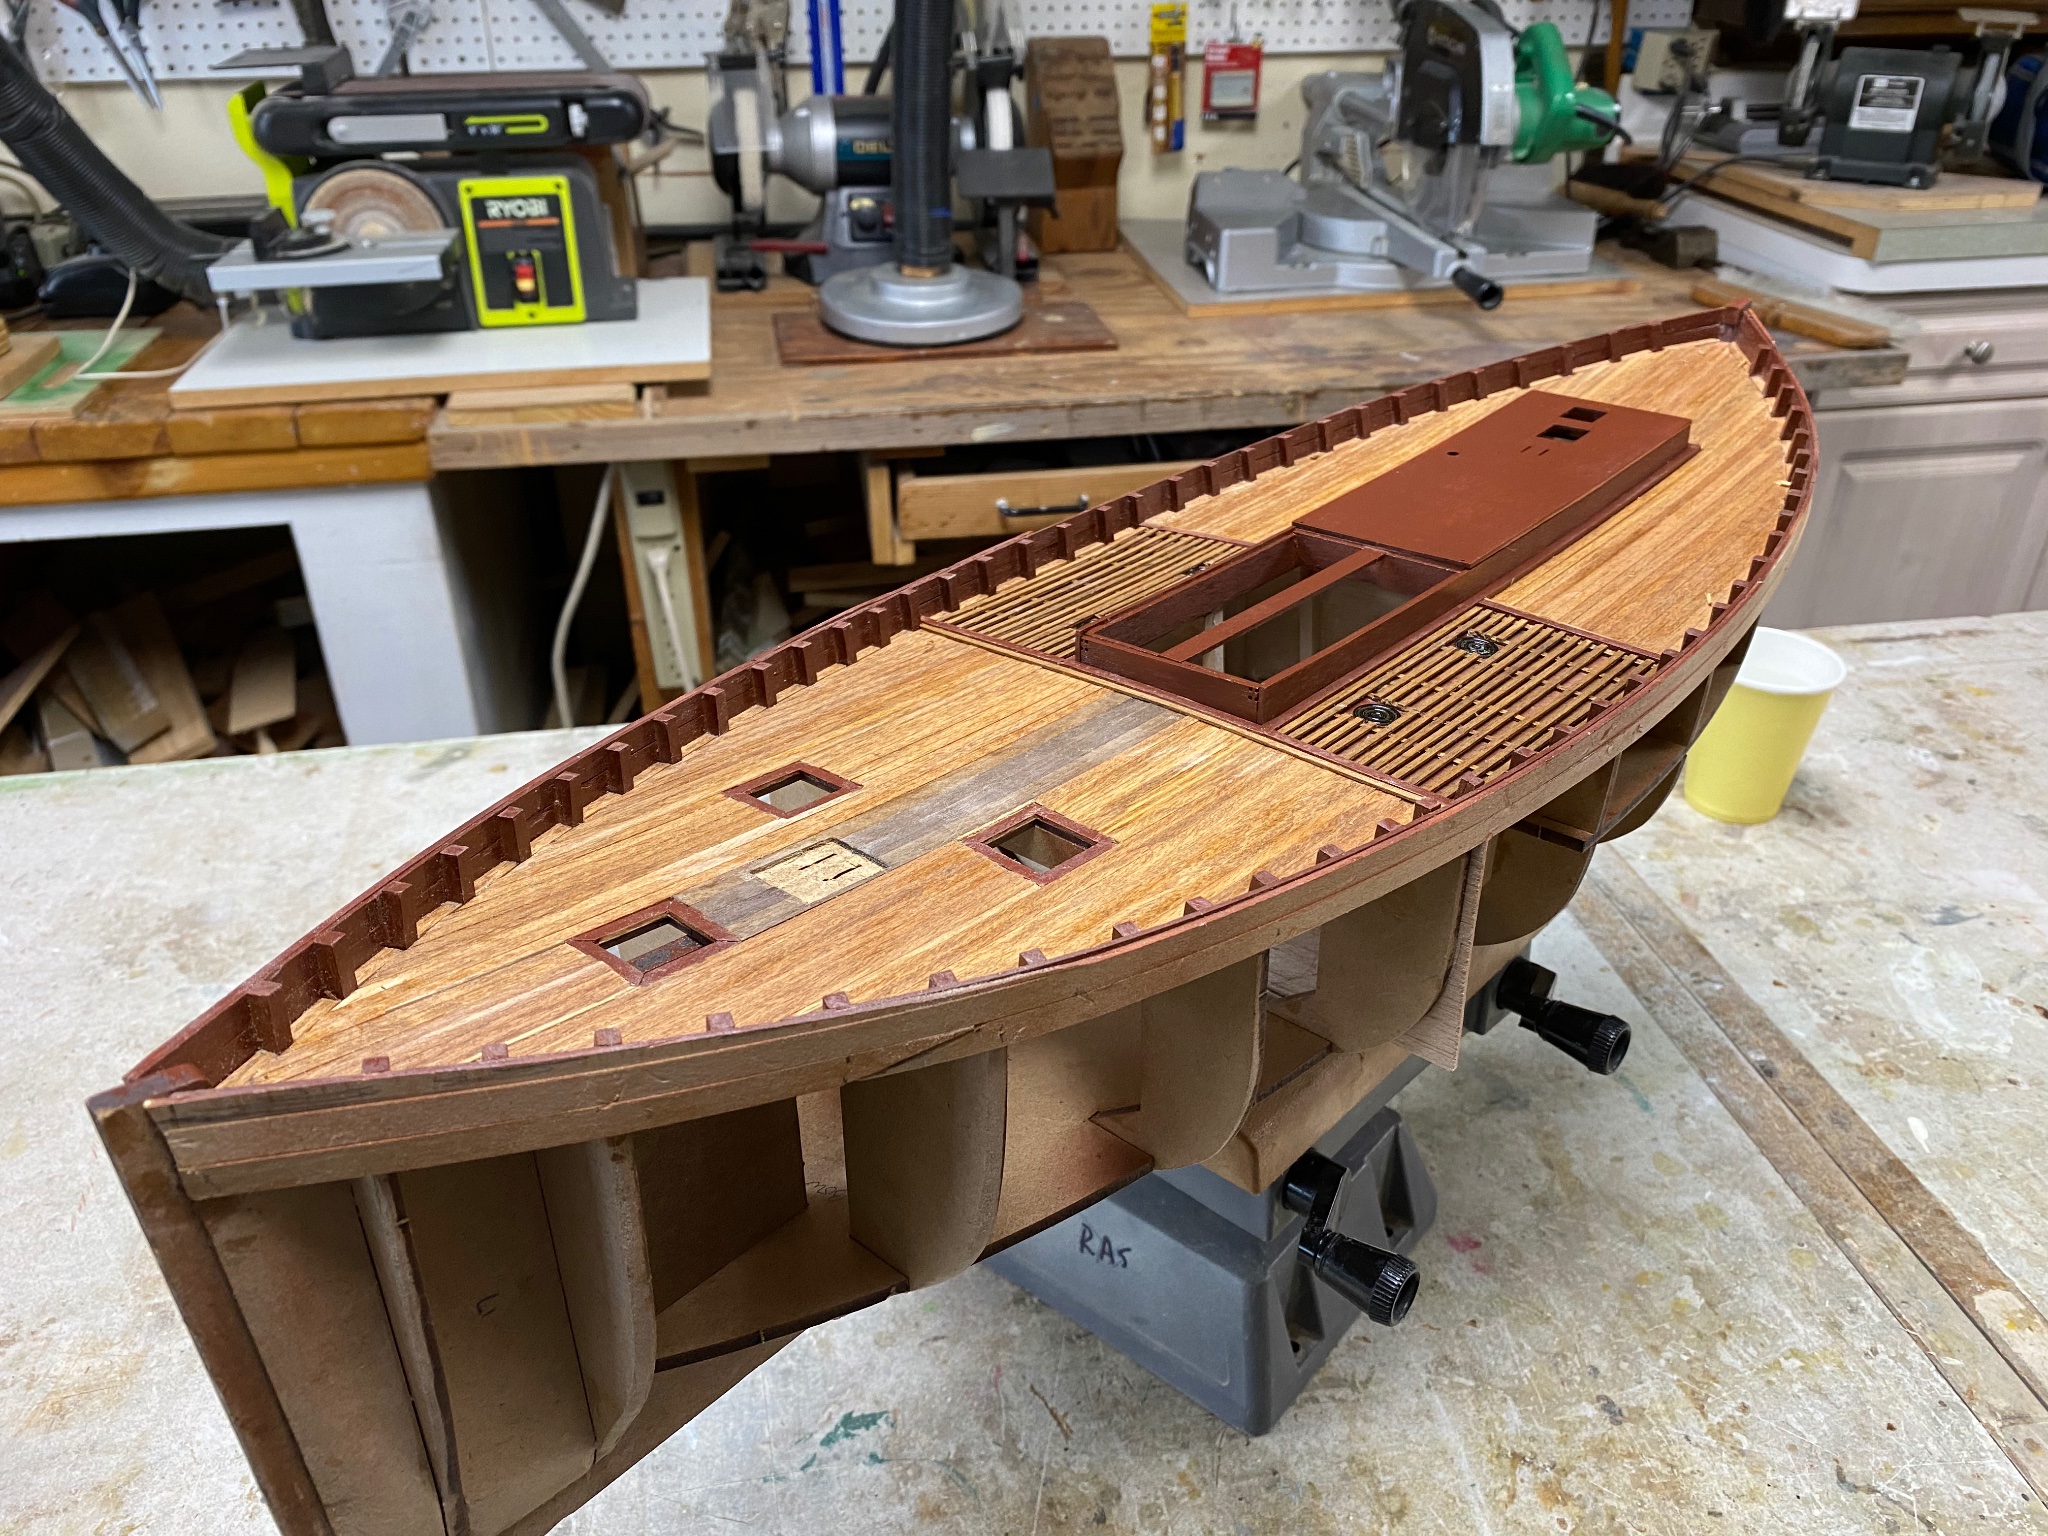
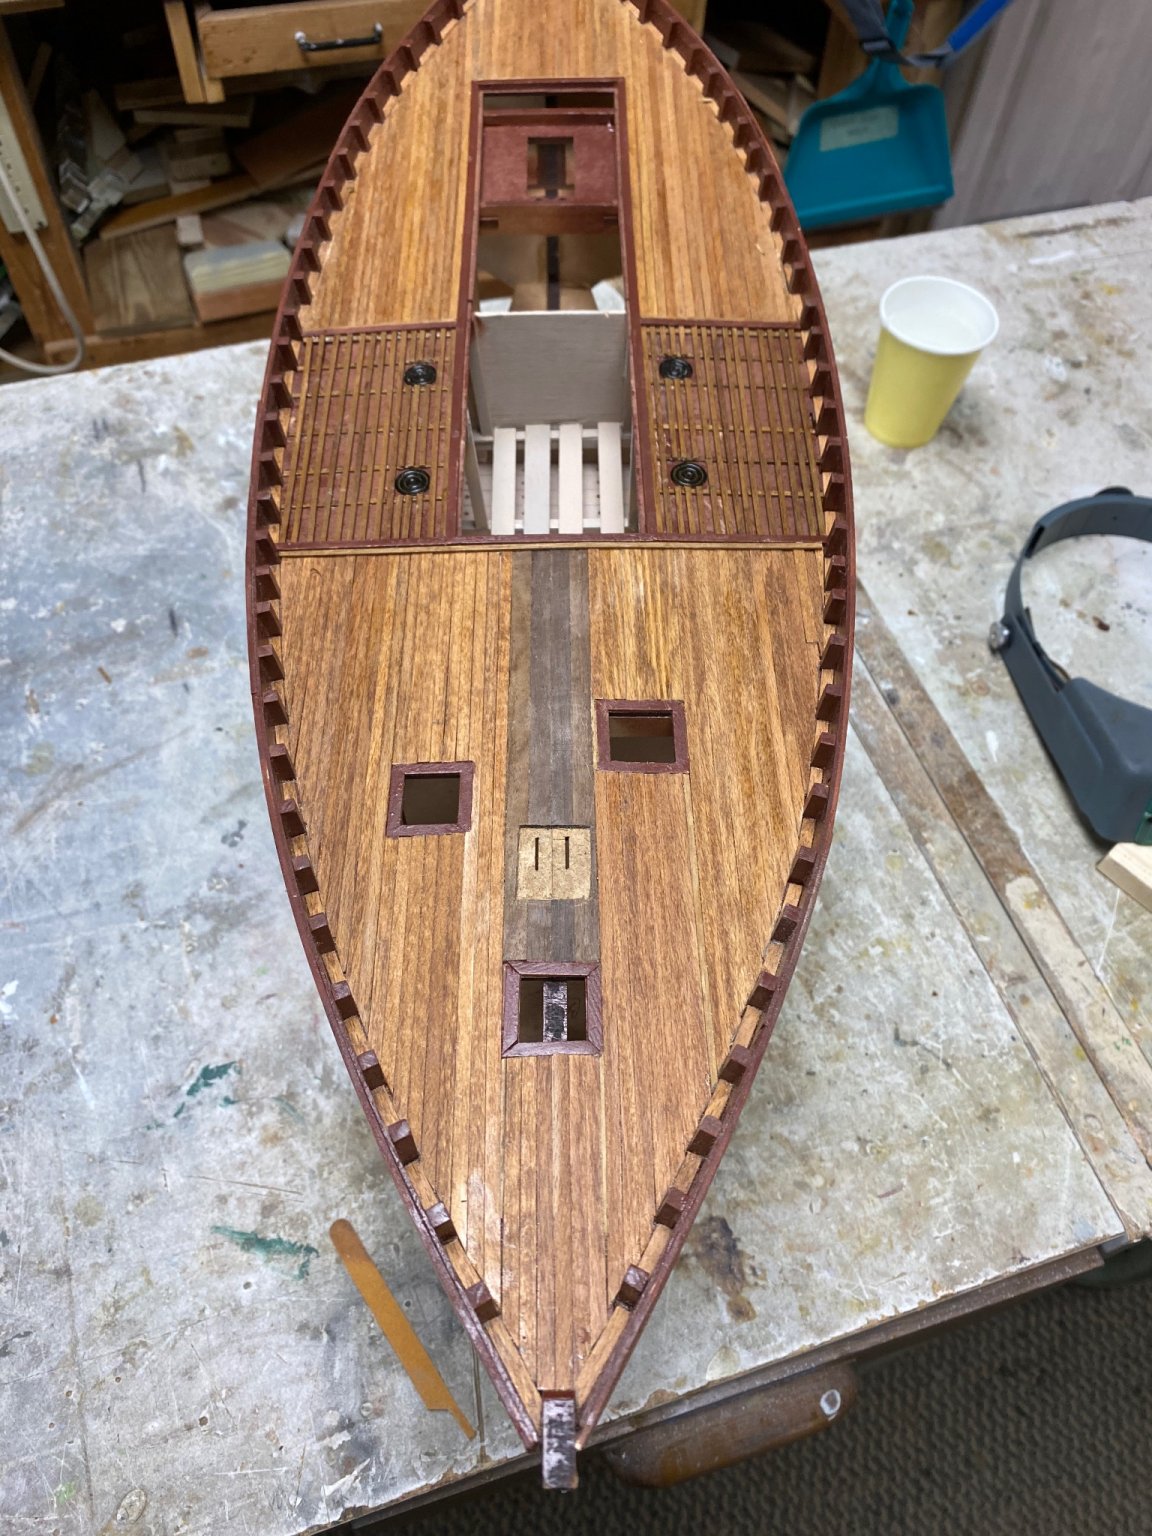
Before I proceed with the hull planking there was one last thing to do to the deck. That is the midship slated part of the deck with the fish scuttles. I hesitated between PVA and CA to glue the slats. I finally decided on CA because my shaking old fingers were going to mess up the spacing of the slats. The result is the following photo. It didn't come out perfect but I am doing this for fun. Took me four hours to get those slats in a fairly even separation.
-
Well, deck planking successfully completed. Do not mind a couple of booboos but I am still learning the tricks of the POF building. Still need to add the framework for the fish scuttles. Enjoy
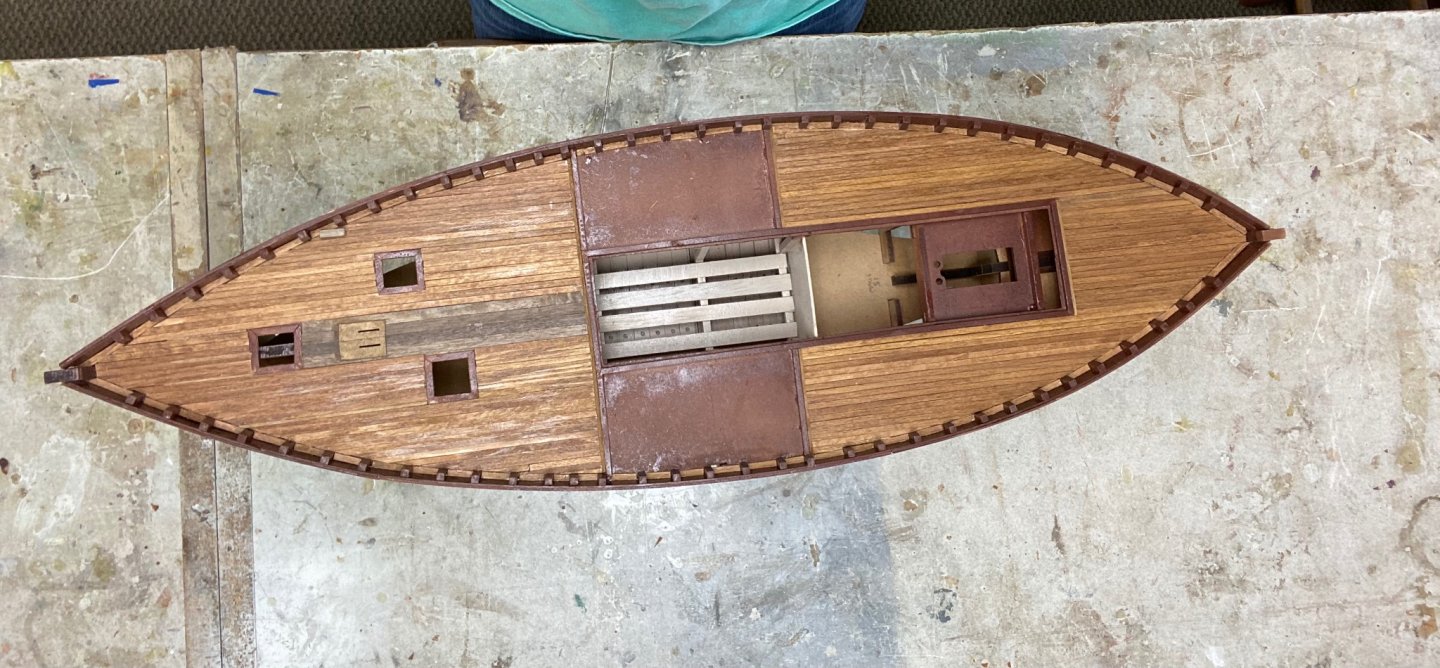
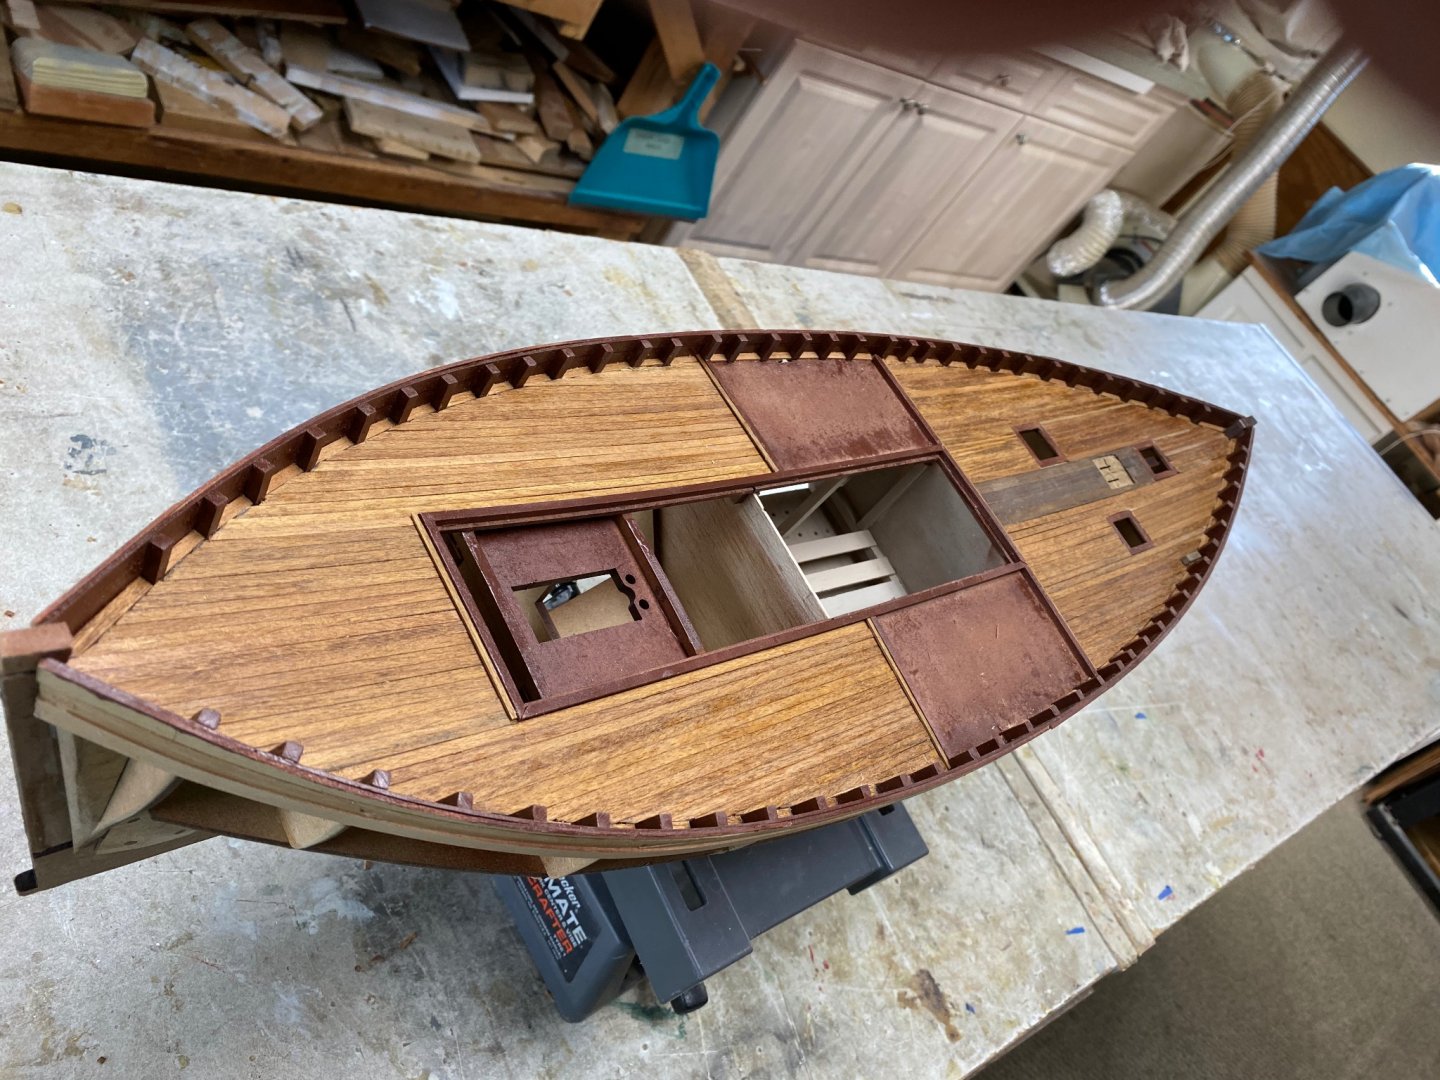
Next chapter is the first hull planking and, in between, I will try to make a cran basket.
- Rik Thistle and egkb
-
2


Varyag 1901 by Valeriy V - FINISHED - scale 1:75 - Russian Cruiser
in - Build logs for subjects built 1901 - Present Day
Posted
Valeriy: thanks for your reply. I found the data for the electrolyzed plating