


Kevin-the-lubber
-
Posts
1,232 -
Joined
-
Last visited
4 Followers


Recent Profile Visitors
3,170 profile views


-
 Canute reacted to a post in a topic:
MV Europic Ferry 1967 by Ian_Grant - 1/96 Scale - 3D-Printed - Ferry
Canute reacted to a post in a topic:
MV Europic Ferry 1967 by Ian_Grant - 1/96 Scale - 3D-Printed - Ferry
-
Canute reacted to a post in a topic:
MV Europic Ferry 1967 by Ian_Grant - 1/96 Scale - 3D-Printed - Ferry
-
 Well, I guess it's following what used to happen on the real thing in that respect. There were sometimes enormous gaps between sections.
- 24 replies
-
- 1
-
-
- ferry
- Europic Ferry
- (and 1 more)
-
Ian_Grant reacted to a post in a topic:
MV Europic Ferry 1967 by Ian_Grant - 1/96 Scale - 3D-Printed - Ferry
-
That looks like it’s printing well, Ian. I use a product called 3DLac to help things stick to the plate. Some say it’s just hair lacquer but a 100ml bottle lasts a very long time and it definitely works. I also turn up the plate temp by 10 degrees if the room feels on the cold side. At least filament is so cheap now that it’s more lost time than money when you get spaghetti. How well do the seams line up? Or are you wanting the ‘canned’ effect these ships have in real life?
- 24 replies
-
- 2
-
-
- ferry
- Europic Ferry
- (and 1 more)
-
Kevin-the-lubber reacted to a post in a topic:
USS Kearsarge by gak1965 - BlueJacket Shipcrafters - 1:96
-
Kevin-the-lubber reacted to a post in a topic:
Scaledecks.com & Scaledecks.eu ... getting no reply?
-
Kevin-the-lubber reacted to a post in a topic:
Blocks, cannons and ships boats
-
Canute reacted to a post in a topic:
Metallic paint questions....
-
Scaledecks.com & Scaledecks.eu ... getting no reply?
Kevin-the-lubber replied to Zacharias's topic in Plastic model kits
Have you tried contacting them via ebay? It looks like they’ve stopped using their Ionos websites (which may have included email accounts as part of the package) without taking the sites down, maybe they are just selling off stock and winding down. With a 100% customer rating on eBay I wouldn’t have any concerns about their honesty. -
thibaultron reacted to a post in a topic:
Danish cannons for 3D printing
-
Kevin-the-lubber changed their profile photo
-
TJM reacted to a post in a topic:
Danish cannons for 3D printing
-
Danish cannons for 3D printing
Kevin-the-lubber replied to TJM's topic in 3D-Printing and Laser-Cutting.
Beautiful work! Have you tried increasing the anti-aliasing and blur settings in the slicer? It can soften the layer lines quite a lot. -
Mark P reacted to a post in a topic:
Blocks, cannons and ships boats
-
cotrecerf reacted to a post in a topic:
Blocks, cannons and ships boats
-
scrubbyj427 reacted to a post in a topic:
Blocks, cannons and ships boats
-
Kevin-the-lubber reacted to a post in a topic:
HMS Bellona 1760 by SJSoane - Scale 1:64 - English 74-gun - as designed
-
Canute reacted to a post in a topic:
Blocks, cannons and ships boats
-
I’m so glad you said that Greg, it makes me feel so much better about the paucity of finished models in my workshop! Clearly I’m a process man. Marc, that lovely discourse, coupled with something you wrote earlier, makes me think of very fine Persian rugs. I was once told there is always at least one mistake in there, even if it’s deliberate, because it’s that slight irregularity that gives the piece life. That’s one thing I don’t like about my 3D-engineered objects, but at least there are opportunities to breathe life into things through the painting.
- 2,699 replies
-
- 3
-
-

-
- heller
- soleil royal
- (and 9 more)
-
Filament Dryers for 3D Printing
Kevin-the-lubber replied to Kevin-the-lubber's topic in 3D-Printing and Laser-Cutting.
I parked my Ender 3 Pro FDM printer for a long while when I first started using resin, but bit by bit I started using it again for parts where the priority was strength, including tool-making. The key was being able to get consistently good results and of all the upgrades I made, buying the dryer was the most important. I use a large Elegoo Neptune 4 Plus for arty stuff and this, coupled with the Creality dryer, is as straightforward as the resin process, very plug'n'play. The only settings I ever change now are filament type, nozzle size, supports on/off, brim on/off. (I mostly use OrcaSlicer). Otherwise, it just does what it's supposed to. While I made a deck for my Cutty Sark model using FDM, I wouldn't really see me using it for anything 'on show' as I don't enjoy sanding, but it would probably be very good for frames etc for a scratch build. -
3D Printing Cannons in Resin
Kevin-the-lubber replied to thibaultron's topic in 3D-Printing and Laser-Cutting.
Just something on the health and safety front. When resin printing barrels (or any tube) with a closed end, you need to take care that there isn't wet, uncured resin still in the barrel of the finished part. The smaller the barrel, the more likely it is that there'll be uncured resin deep inside and it's surprising how short the tube can be with this still occurring. Closed tubes act as a suction cup and hang on to wet resin on the print lift stroke. I design & print gun barrels as a two part assembly i.e. an open tube barrel with a separate breech. I also make the tube wall fairly thin, to maximise the opportunity for resin to drain. The flare helps - I print with the muzzle facing the plate, using short supports to keep the aperture clear of the plate.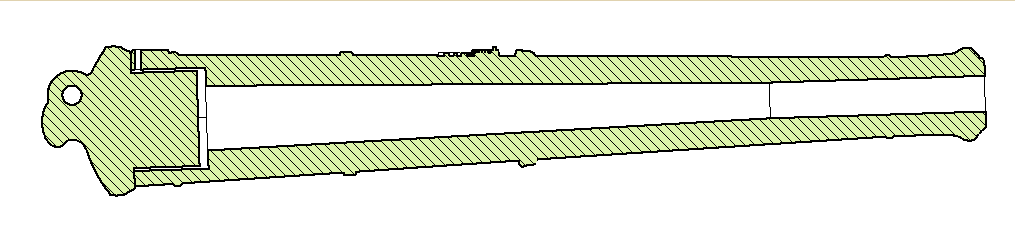
-
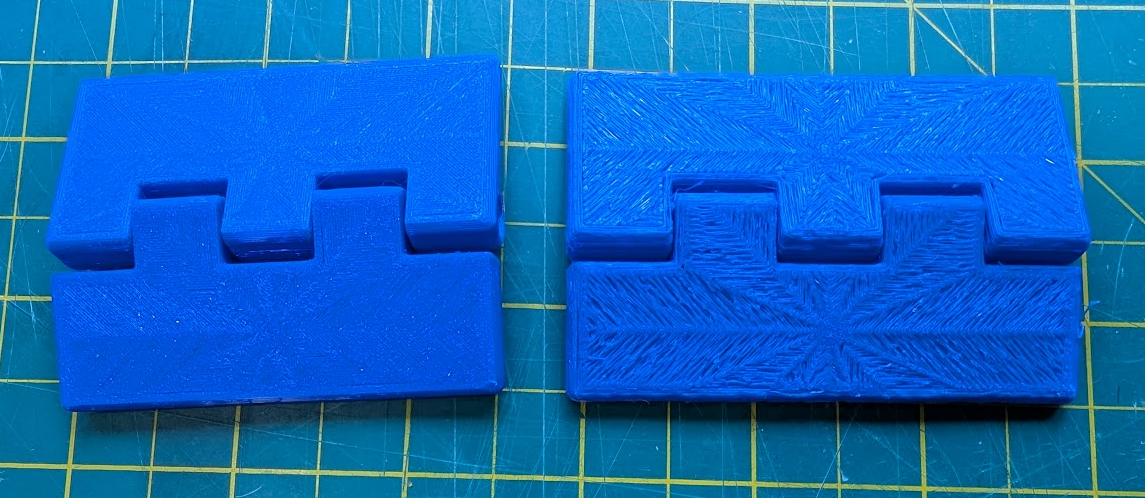
I thought it might be helpful to anyone new to FDM (filament) 3D printing to show the value of using a filament dryer. When I began 3D printing I would regularly become bemused, confused and maddened when I'd load a brand new spool of filament, print something beautifully, then go to reprint the next day only to get garbage. I spent hours and hours fiddling with the slicer settings, taking advice from anyone and everyone on the web to change this or that parameter, really just chasing my tail. I then bought a filament dryer and my FDM printing experience changed overnight. On the very rare occasions when I have a sticking failure or get spaghetti, the first thing I do is re-dry that reel because it almost always immediately fixes the problem. I had previously tried drying my filaments in the oven, using the lowest possible setting, only to semi-fuse them, so I'd recommend skipping that learning exercise! I use the dryer all the time i.e. I keep it running while printing. As I have two FDM's and sometimes have both running simultaneously, I have two dryers; one is the basic Sunlu S1, the other is the more expensive Creality Space Pi. While the Sunlu is okay, the Creality is better as it tells you what the humidity is inside the box, so you get a good idea whether your filament is dry enough for printing. Anything below about 20 % humidity is good. On to the illustration. This is a quick'n'dirty tool I needed and I figured on using up the leftovers of a roll of PLA than has been sitting around for months if not years. It's sliced for a quick print, I didn't need a fine finish. I didn't dry it out first, largely to see whether storing part-used reels in an airing cupboard does anything useful. It doesn't. So, on the right, un-dried filament, on the left, the same after about an hour of pre-drying.
-
Thanks! At 1:100 the screw is 0.6mm diameter and really is a thread, not just a series of rings. The level of detail available with resin printing is incredible.
-
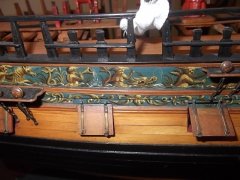
Many thanks for the kind review Steven! What a strange cannon photo! If they really looked like that I wouldn't dream of selling them. For info, the guns bought by Steven are 1:100 scale, as are those in this photo. Even at 1:64 you would struggle to see layer lines, but of course, even with a lot of anti-aliasing, very small resin-printed parts will show layers if magnified enough. Re' blocks, I think the colour variation across the piece might give an impression of translucence but it is actually a deliberate effect.


-
Kevin-the-lubber reacted to a post in a topic:
Amerigo Vespucci by Bill97 - OcCre - 1/100
-
Yes, I need to make another few kits when I have time. For that matter, I really need to find the time to pick up on the CS again, have another look at making half-furled sails.
-
Wonderful work once more, especially the winches. I also became afraid to glue things in place, because I’ve never managed to hold a complete picture, in my mind of the rigging sequence. Consequently I’ve always been worried that this or that would make rigging really difficult.
-
3D design and printing can certainly turn into a big rabbit hole, but I suspect you probably need to be inclined towards rabbit-holing anyway. I think the learning curve for resin is long and gentle, as you’ll get good prints right out of the box. Most of the learning is about making good prints great I.e designing for printing, object orientation, print supports, and using all those settings that are mostly ignored. Printers are marketed like sports cars, the emphasis is always on speed - but like many cars, printers perform better if you just slow down!
-
Really interesting thread, amazing how quickly Meshy has developed and I suspect it may allow me to duck the learning curve for Blender that I’ve been putting off since forever. The thread touches on many things relating to 3d and I hope my 2 cents worth around some of these are helpful; I have several resin printers, all of them Elegoo. No particular reason other than price, consistently good reviews and good personal experience. Like you, Chuck, I have three machines constantly on the go. I now use the Saturn 3 Ultra because I don’t like the complexity or cost of the tilting vat of the ultra 4, but that’s not what I wanted to talk about. For those thinking of buying a printer, it’s worth looking on eBay for good used models, as a toe in the water. The qualitative difference in prints from my Mars bought 5 years back and my Saturn 3 Ultra’s is so negligible as to be largely irrelevant, and you can pick up a good used printer for £50. Don’t touch anything that needs a new screen, nor anything that has resin all over it. I use wash and cure machines to do a three-wash routine, and would recommend them, but each to their own. I absolutely don’t and won’t run resin printers in my office; they are in my workshop, where I have fume extraction etc. I learned that the hard way a few years back, hospitalised with pneumonia. A tip for those in colder climates: a heated cabinet is invaluable. Resin doesn’t print well below about 22/23 degrees C. Slicers: I mostly use the original Chitubox free version, because it gives me wireless connection to the printers, which the newer version doesn’t. But I also use free or included-with-purchase versions of Voxeldance, Lychee and Elegoo’s own slicer Satelite, as and when I think that’s the better tool. Some of these have Boolean functionality. I don’t use that because I’m fairly adept with F360. If you are using Boolean in a slicer, you can use the dimensions function and ‘move’ tool to position the objects precisely in relation to each other. Does 3D printing turn it all into a ‘press the button and sit back’ thing? No. I’d bet my shirt that anyone reading this is not the type of person who buys a model kit and has it painted and assembled inside a month. We all like to bash, scratch, embellish, get creative. A 3D printer is just your own, personal, pseudo-injection-moulder. You’ve still got to make everything work as part of your build. The meshy outputs are a case in point. As impressive as they are, you could still spend hours and hours improving them, either on the software side or the printed output. Not so different to plastic kits. Besides which, I may be wrong but I don’t think it’s yet possible to generate an STL from meshy with the dimensional accuracy we mostly work to. So, it’s really, really good for organic shapes but perhaps less so for precision engineering.
-
Kevin-the-lubber reacted to a post in a topic:
Soleil Royal by Hubac's Historian - Heller - An Extensive Modification and Partial Scratch-Build
-
That makes a lot of sense. I certainly get a much finer metallic look with pens and they are my default now. I also really like that I don’t have the setup and cleanup of airbrushing, not to mention the risk of clogging, and I get pretty good mileage from them too. By the way, I buy spare tips for mine. Very cheap and it means I can cut, crush, shape tips if I want.

