NAZGÛL
-
Posts
1,365 -
Joined
-
Last visited
Content Type
Profiles
Forums
Gallery
Events
Everything posted by NAZGÛL
-
 Thanks for the nice comment Frank! Your weathering is truly inspirational and your model is so nice! It looks like a ship, not a model. /Matti
 -
Yeah, I use epoxy for some stuff like resin. But only when I have to, I find the fumes nasty, but the bonding is great for sure. /Matti
-
Thank you so much, darksider, Im glad you like it! Working on the lower parts of the galleries, so far so good. Ill post an update later on. /Matti
-
Very nice result, Michael! /Matti
-
Do some experimenting first as allways, and if you need to sand it, do it right away. It goes from hard to rock solid after a few minutes. /Matti Edit: I felt that I should make a warning if anyone wanted to try this. Mixing CA with baking soda makes a pretty strong reaction. Do be careful and dont get any on your fingers, CA glue alone is bad, having that and baking soda on your skin is not a good idea. So be careful, done right its a great help to get quick hard bonds, filling and less fumes. I only use this when I have to at my Vasa, as I rather have the slow drying effect with white glue to get control and time to adjust stuff. But some parts needs CA to get there nicely, like my gun port mod or the plastic details against wood.
-
There are similarities in their history then, as Vasa was a very expencive ship, costing a fortune to build, while the country struggled to survive. Making a ship of this size was also something the admirality did not suggest, they wanted smaller vessels, more fitted to the duties in the baltic. There are historians suggesting that Gustav II Adolf allready was planning to become emperor (something he was not far from becoming when he died in the battle of Lützen 1632), and would need ships like Wasa to continue his fight for power. This is speculative of course, but interesting. I like that you will add the extra deck to her! /Matti
-
Missed this thread until now, and boy she looks really really great! I love your paintjob and realism!, well done! /Matti
- 389 replies
-
- 1
-

-
- supply
- caldercraft
- (and 1 more)
-
That is looking so good Nigel! I love the color nuances and feel youre giving her. Really great combo of clean assembly and realistic feel. Sovereign is such a nice ship. Did she have gilded sculptures when she was new or polychrome like Vasa? When Vasa was built they only used gold on the most important parts and details as it was expensive. Sweden was poor at that time and much money went to the wars. At that time we also had another preference in style. If I got it right the Vasa style is medieval and renaissance, perhaps early baroque. Sculptures in our church from that time are the same style, and in my local church there are a group of sculptures from the same time as Vasa, looking very close to hers). In Southern Europe the stylistic gold on a solid color was prefered. Was it the same for the ships of Britain? (Prince Royal, 1610, looks polychrome on a painting of her by Vroom.) /Matti
-
Oh yeah, thats really looking great! Very nice look youre getting by the choice of woods, Mark. I put on a layer of baking soda to make the CA dry in only seconds and that way it makes no fumes. I just did that on my Vasa when I glued close to the windows as the fumes makes the glass look frosted. Afterwards I just blow the powder away. /Matti
-
Thanks Michael, your posts are most apreciated! It is, and of course Ive read your thread many times to see how you did in your build also. Thanks for the likes also! /Matti
-
Cheers for the kind words, Nigel! /Matti
-
Thanks Chris and Lawrence! it feels great to start adding details. /Matti
-
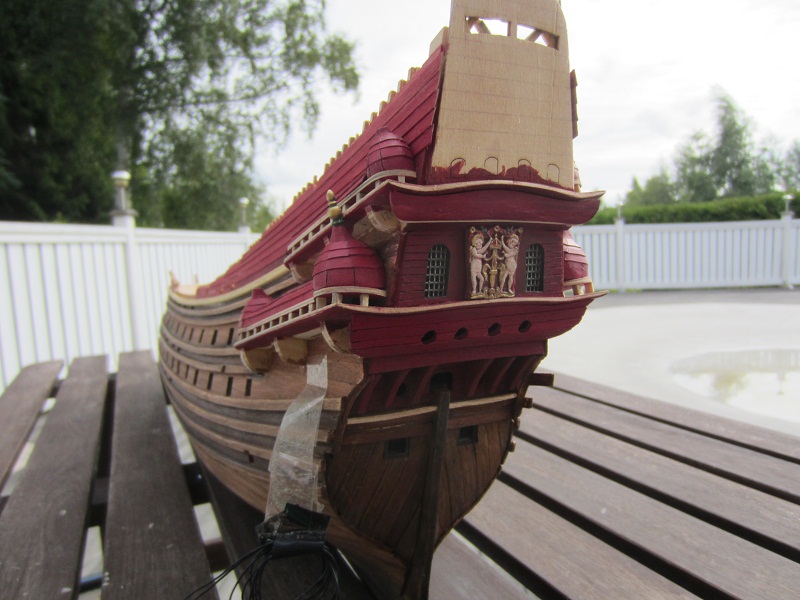
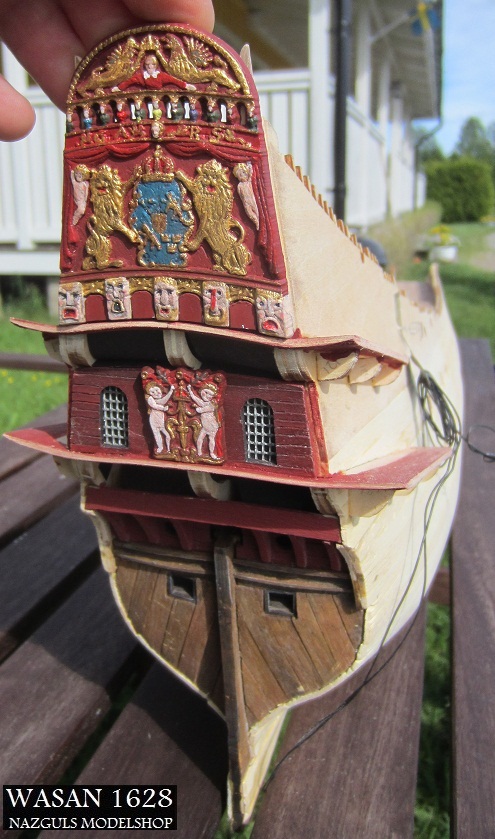
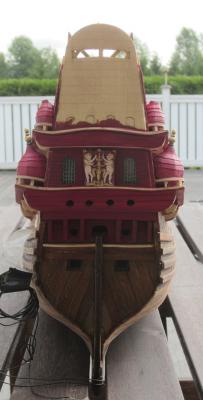
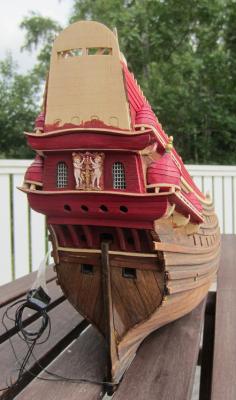
Thanks Brian! Gettig the stern parts done. There are many lines and curves meating there, so it was some work to get them set up right. You can also see how the red behaves change in different lightning. Very dynamic and vibrant, and I think it will work well with painted sculptures on. I also could glue the Vasa sign and puttys between the windows. That felt rater good as it means Im getting closer to the stage I enjoy most: painting. I also lightly washed the yellow whales and parts to make it look uniform with the rest of the paintjob. That did a lot for realism and sense of scale. Next step is the lower parts on the galleries. /Matti

-
In my opinion its a great kit. Shapewise its fine, and the sculptures, while small, are really nice. The gratings are bad though. I dont understand why they did them like that when the rest is so well made. The kit is idealized and symmetrical, most obvious if you look at the hull planking under it. The bow planks under are wrong and doesnt share the lines of the real ship and the way the dutch built their ships. The gunports are also idealized, and all are the same size and in nice lean rows. The original have larger gunports for the bottom deck and smaller the upper. And the sizes varies a lot for many ports. They are quite wonky in their placement also. I dont like idealized models, but I understand why Revell went that route and that one have to be a rivet counter to even care. I agree that it would have been great if it been in a bigger scale, but one gets a very descent kit for a bargain price and when one starts painting those sculptures, one forgets about shortcomings and starts to appreciate its strenghts even more. Its the best kit so far when it comes to the sculptures. Its hard to judge the lion on the gunports, the gunports vary in size, and Revells doesnt. Looking forward to see what you do with your build! /Matti
-
That turned out great, well done on the stain! /Matti
-
This is really great! It put a big smile on my face. /Matti
- 33 replies
-
- 1
-
-
- trinkstein
- frigate
- (and 2 more)
-
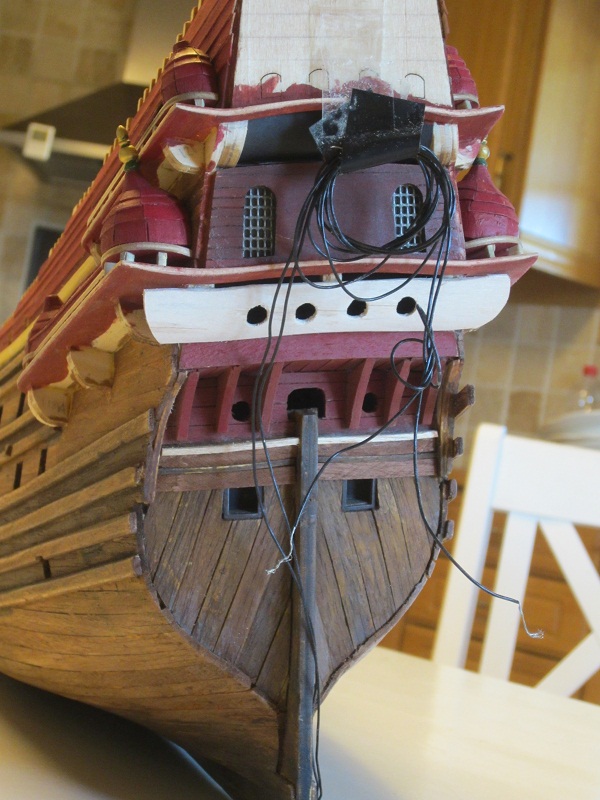
Ferit, I want to try and see how it would look with the dark red against all figures. It will be pretty much covered with it could make a cool effect, but if not I will add a coat of the new nuance. Nigel, thanks. I wanted to avoid drilling the holes after the planks was glued in place, as I have to be careful with the stuff I installed for lighting her. Gunports, yeah, from what Ive read she were supposed to have carried 4 swiwel guns there, but she didnt have them installed on her maden voyage. I know they had big problems getting all the canons finished for her, (it was a huge task) so maybe thats the reason. Thanks Mark! I will soon join you in painting figures. Cheers Lawrence, Its very strong. After bending it so much, I reinforced it with CA glue an baking soda on the inside and in small cracks, and it makes it strong. I do that with plastic models, and it works like a charm on wood Did the top part last night, its the same but more shaping work to fit all lines but no holes. Ill update when Ive got both finished. /Matti
-
Hey all! Did the stern parts. As I wanted to have holes below the windows and think the original kit design seems really fragile, I made it in one piece that I will plank. I glued the lower one in place. I will shape the planks so there will be no gap at the top. /Matti

-
That is looking sooo nice Mark! Excellent look! My mum and my wifes parents seem busier than ever after they got retired. Always something going on. The difference seems to be that everything they do is FUN! /Matti
-
Wow, those details make it look so nice! You have great talent for wood sculping! And happy birthday buddy! /Matti
-
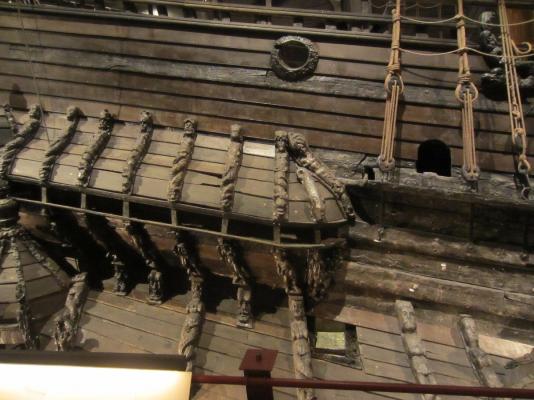
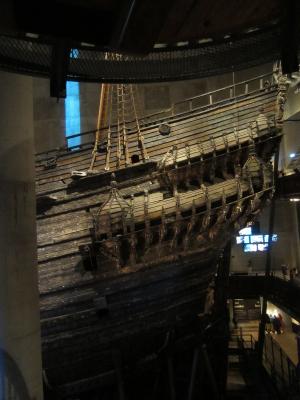
Thanks Mark, I hope so! Ouch about that accident Mark T! Good that you made another. Thanks for the heads up on the tricky plastic. I agree, the museum people are great and helpfull. I also met two of the guys that made and painted the 1/10 model, (they work at the maritme museum close to the Vasa museum) and they are also very nice and share how they do things. /Matti
-
Thanks for the nice comments! They mean a lot to me! Joe thanks, and I hope I can get them good. Nigel, cheers. Yes you are right, I will have some work to get the lower parts there. I wanted to get the towers and top sides in place first and work from there. If I need to "cheat" or adjust a little to get the galleries set up right, it will be least obvious on the lower parts. (Well thats what I hope anyway ) Thank you Wayne! Im glad you like it! Mark, thanks! Yeah I hear you about the risks. Ive scratched styrene stuff before and heating it then, but it would be typical if thats the thing I messed up! I usually use a heating gun that can be adjusted to low heat and practice on parts like sticks from the sprue and first learn at what distance to hold the plastic at and how the plastic reacts. Boiling water can work aswell, but harder to get control over IMO and its easy to snap them. Actually its a stress not to have any spare parts. I messed up one or two of the towers, and could use spare ones. There were no extra plastic parts in my spare part kit though... /Matti
-
Ah thats a nice idea. Billing boats plastic sculptures are unnumbered on sprues, and you have to look at a plan to find what goes where. /Matti
-
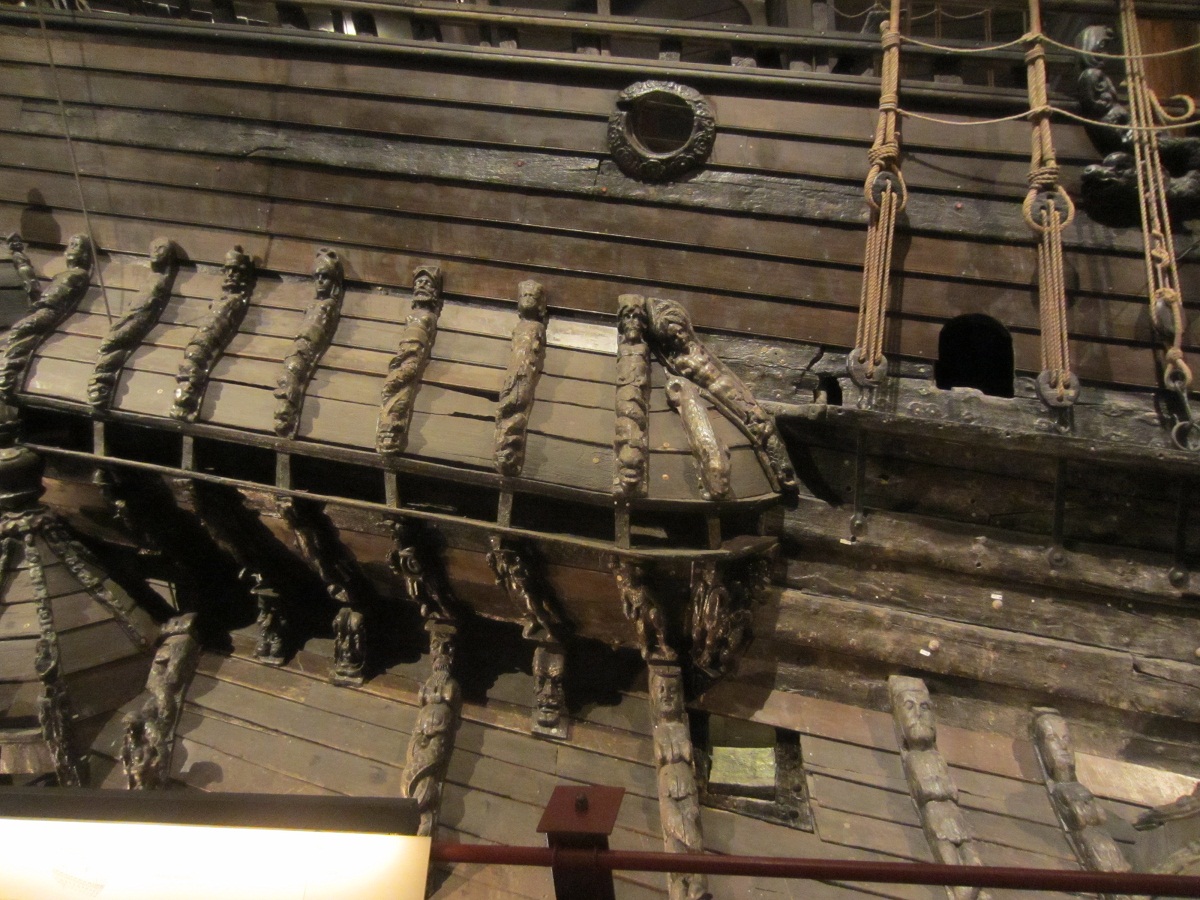
No problem Jan, Im happy to share them. Im happy with the BB. I think I read somewhere that Fred Hocker recomended the BB for wood models, and I started to look at pics and that helped me make up my mind. The gunports needs to be moded though, as the glue on plates are not up to the rest of the nice model. The shape is really good on it, and sculptures are not bad from what Ive seen so far. I couldnt get the small sculptures on the deck to fit perfectly, so I had to alter them a little. Akterspegeln is nice in my opinion. After reading the Landstöm book it seems to me that BB designed their sculptures and some details on his paintings. His work is pretty close to the real thing so its not bad. (Landströms book is very inspirational and good for anyone interested in Vasa or how they built ships at that time. Any fan of blue and gold Vasas will like it also, because when he wrote the book in the eightes, it was a well known fact that she was blue!) Like I mentioned earlier Im a bit worried about getting the sculptures to fit the towers as I did mine a bit different compaired to the pics in the instructions and box cover. Good thing is that you are supposed to bend and shape the sculptures at round shapes like the galleries and towers, so I can bend the to the shape I made. Im also considering to leave the top towers without sculptures like the real ship is today, like an homage. i havent decided yet. /Matti

-
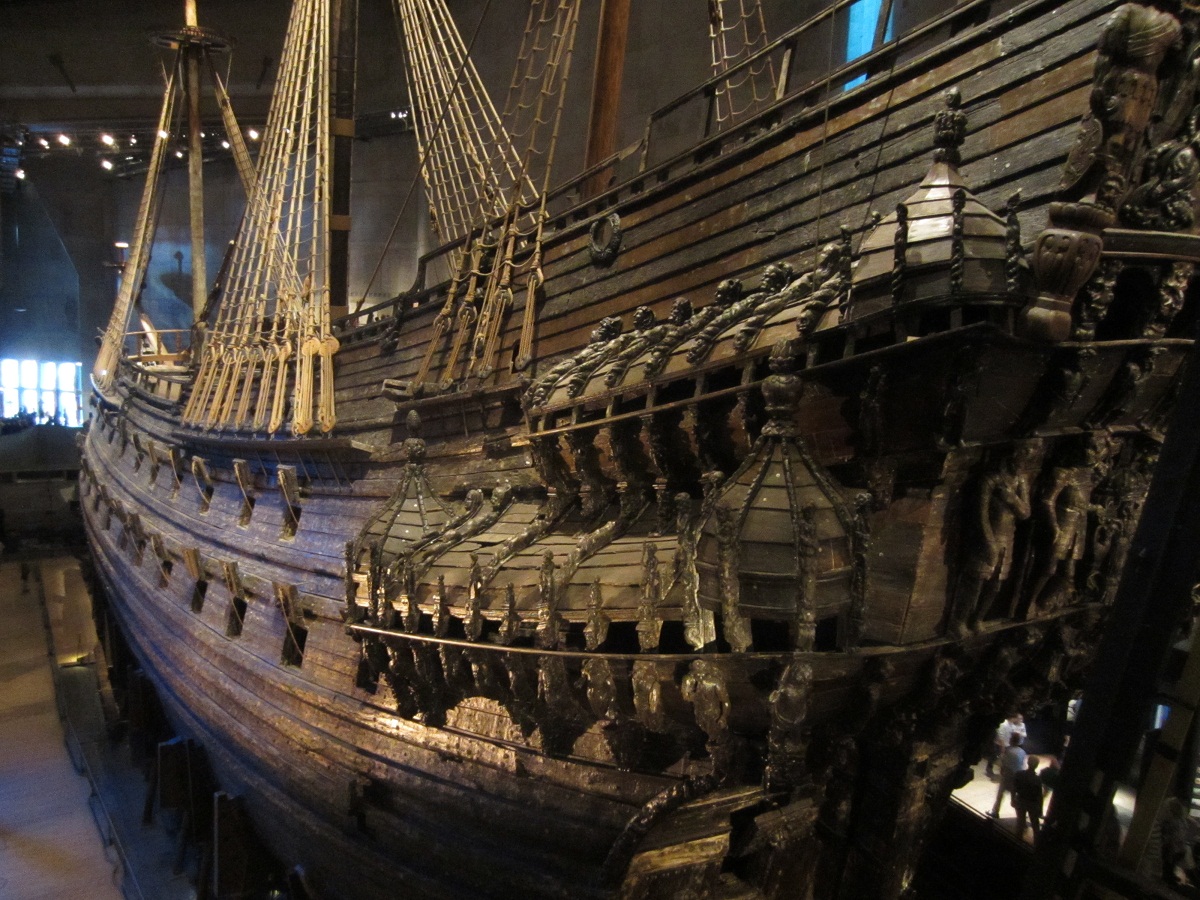
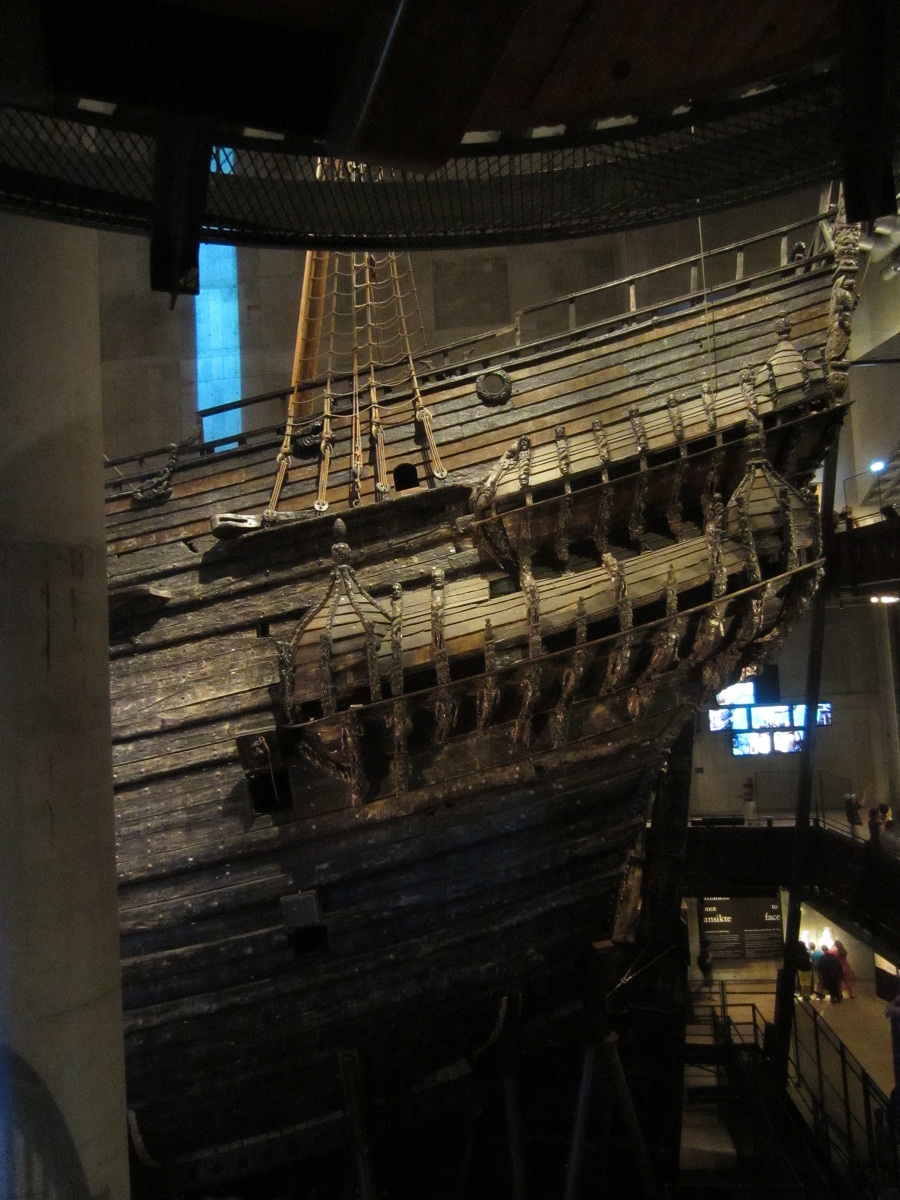
Cheers for the nice comments guys! For me the planking lines on the original galleries are beautiful, and together with the towers they look almost organic and makes me think of dragon scales. I wanted to try and get some of that on my model. /Matti