


Glen McGuire
-
Posts
1,840 -
Joined
-
Last visited
Content Type
Profiles
Forums
Gallery
Events
Posts posted by Glen McGuire
-
-
Beautiful work, Grant! What are the dimensions of your base?
- Old Collingwood, mtaylor, Canute and 5 others
-
 8
8
-
What a challenging (and interesting) project! But I know you are up to the task, Steven.
- Keith Black and mtaylor
-
2
-
-
18 minutes ago, Keith Black said:
Hey, buddy, I do hope you're going to try/test your water techniques on scrape pieces first. I don't know how folks do it but I've seen "water" clinging to the sides of a submarine as it sounds. Water clinging to the Kraken's tentacles would be a hot look but I'd think you want to make sure your technique is fool proof because the very last thing in the world would be to ruin the Kraken.
Yes, yes, and yes!
18 minutes ago, Keith Black said:You're making me want get back into clay
Wait, what??? "Back into clay"??? Does that mean that you could have been giving me tips all along on how to deal with that messy junk??? I did choose the air-dry stuff though. I kept imagining myself sticking that thing in the oven, not hearing the timer going off, and returning to find a black, smoldering mess.
14 minutes ago, Knocklouder said:use Australian ginger beer, it like water I hear. Lol 😆
Careful now. We don't want @mtaylor adding more comments about making love in a canoe. 😳
- FriedClams, Knocklouder, Ian_Grant and 2 others
-
 5
5
-
On 3/16/2023 at 3:38 AM, O.B.one said:
Nowhere on earth is there another one like this. Well done mate
Maybe I missed it, are you going to pour resin over the white bit to make it look like water?
Thanks, O.B.one! And yes, I am going to add water to the base. However, I've never done water outside a bottle before, so I have not figured out exactly what my approach will be. I've found some videos that use paint over aluminum foil that turned out nice, so I may go that route.
- Keith Black and FriedClams
-
2
-
Love the hair clip clamps! Such a great idea. Gonna get some of those today.
- Old Collingwood, Egilman, mtaylor and 4 others
-
7
-
Thank you Ian, Bob, Mark, Pat and Keith for the comments. The beast stretched me well beyond what I thought my abilities were going in. And double thanks to Keith for his comment early on:
On 1/7/2023 at 3:40 PM, Keith Black said:Oh no, can't make a stinkin' penguin but we bloody well can make a frigging bottle guzzling, viking chewing, scare the knickers off ya Kraken!
That gave me a good laugh but was also extra motivation to try and pull this off!!
- FriedClams, GrandpaPhil, BANYAN and 1 other
-
4
-
With visions of impaled penguins forever floating around in my head, the strangest build log on MSW continues! Thanks again to @gsdpic for bestowing that honor upon this effort!
I spent the last week experimenting with paint schemes and techniques for the kraken. Again, I'm trying my best to make something that resembles the Jules Verne description from 20,000 Leagues Under the Sea. He describes the kraken's color as such:
"Its unstable color would change with tremendous speed as the animal grew irritated, passing successively from bluish gray to reddish brown."
I decided that in my rendition, the beast is pissed off because his prey is inside the bottle and he cannot easily get to it. So I worked on a shade of reddish brown that I thought would display the appropriate level of irritation. Since his color is fluid, I used varying thicknesses of the paint to give slightly different shades of the reddish brown. I also added some subtle streaks of dark bluish gray that are more visible on the close up shots below. Another step was using the same dark bluish gray to color the inside of each sucker which added some depth to their appearance. The last thing I did was add a heavy coat of gloss varnish to give everything a wet, slimy look.
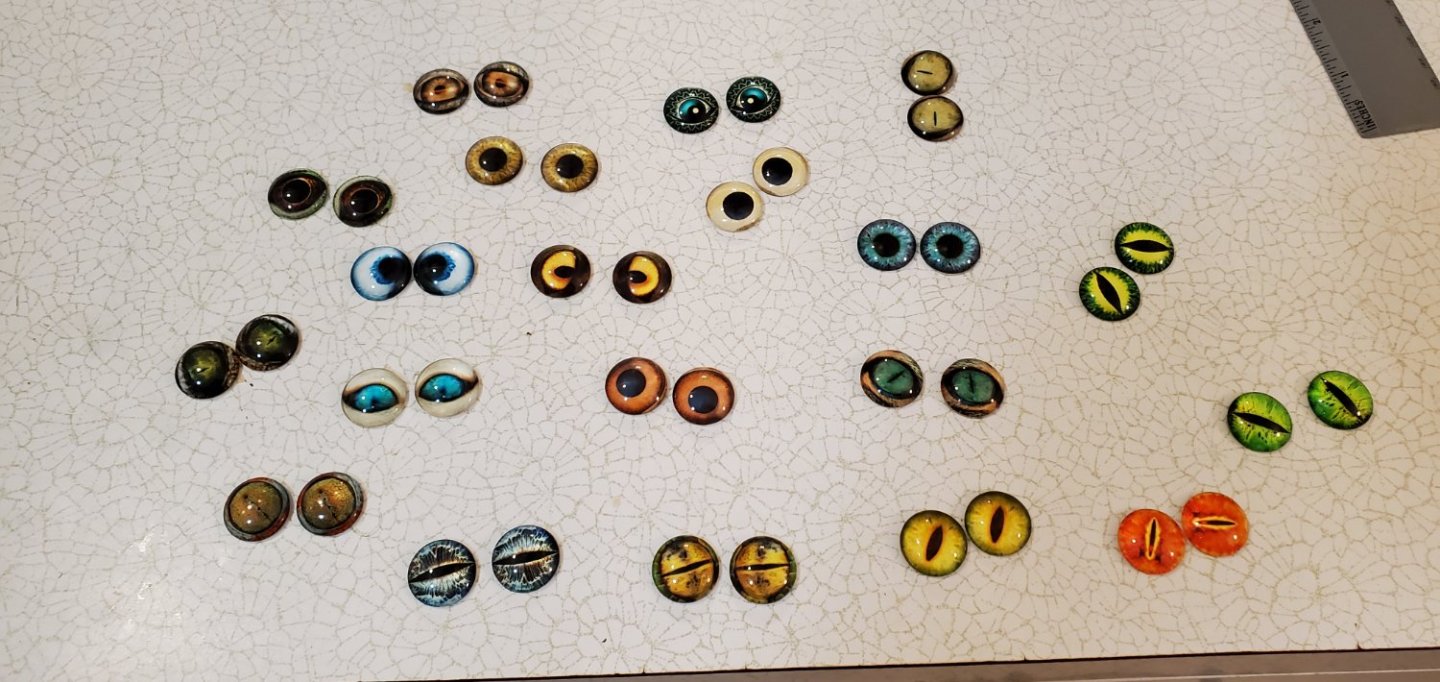
After I finished painting the whole beast, my color consultant friend selected the eyes from the 20 pairs to choose from. I liked her decision.
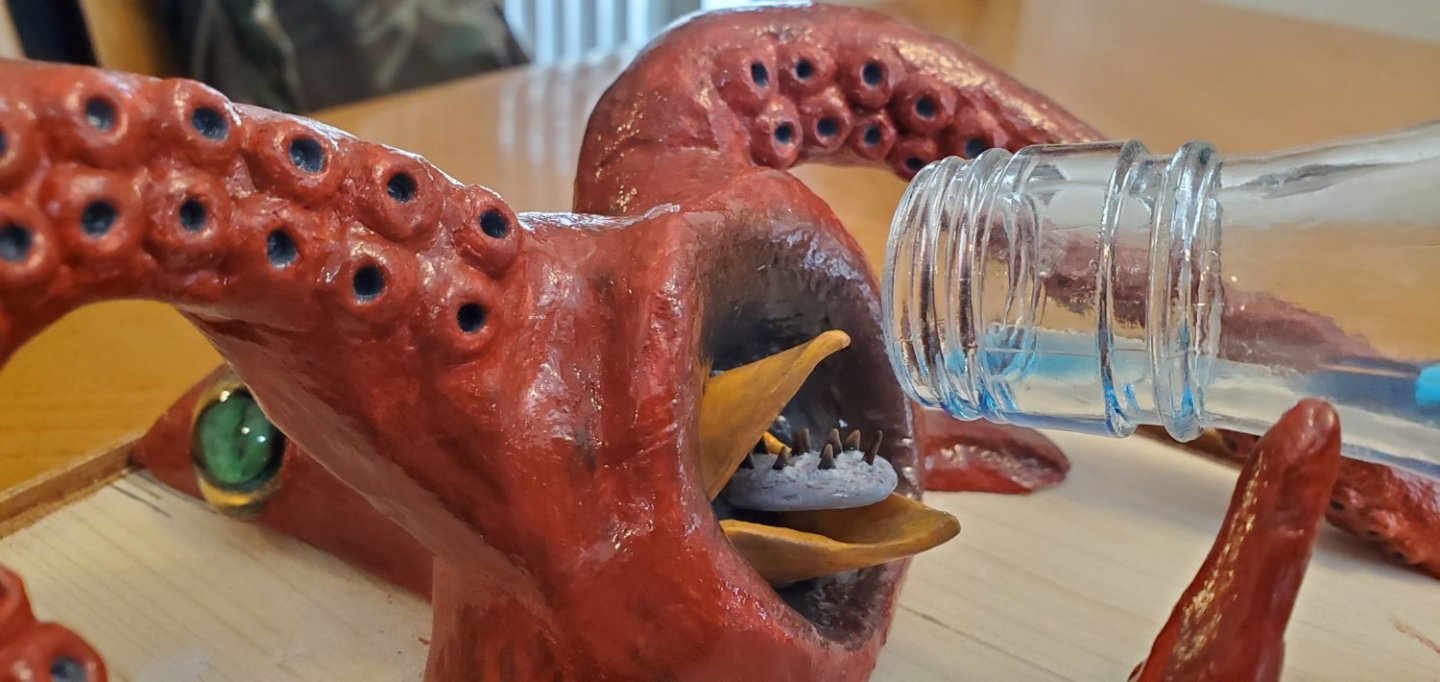
I probably spent the most painting time on the open maw that surrounds the beak and tongue. For that, I wanted a shading gradient that went from the reddish brown of the outer skin to the dark, bluish gray of his color when calm. I also redid the tongue completely, making it larger with a few more teeth and changing the color. The previous red just got lost in everything.
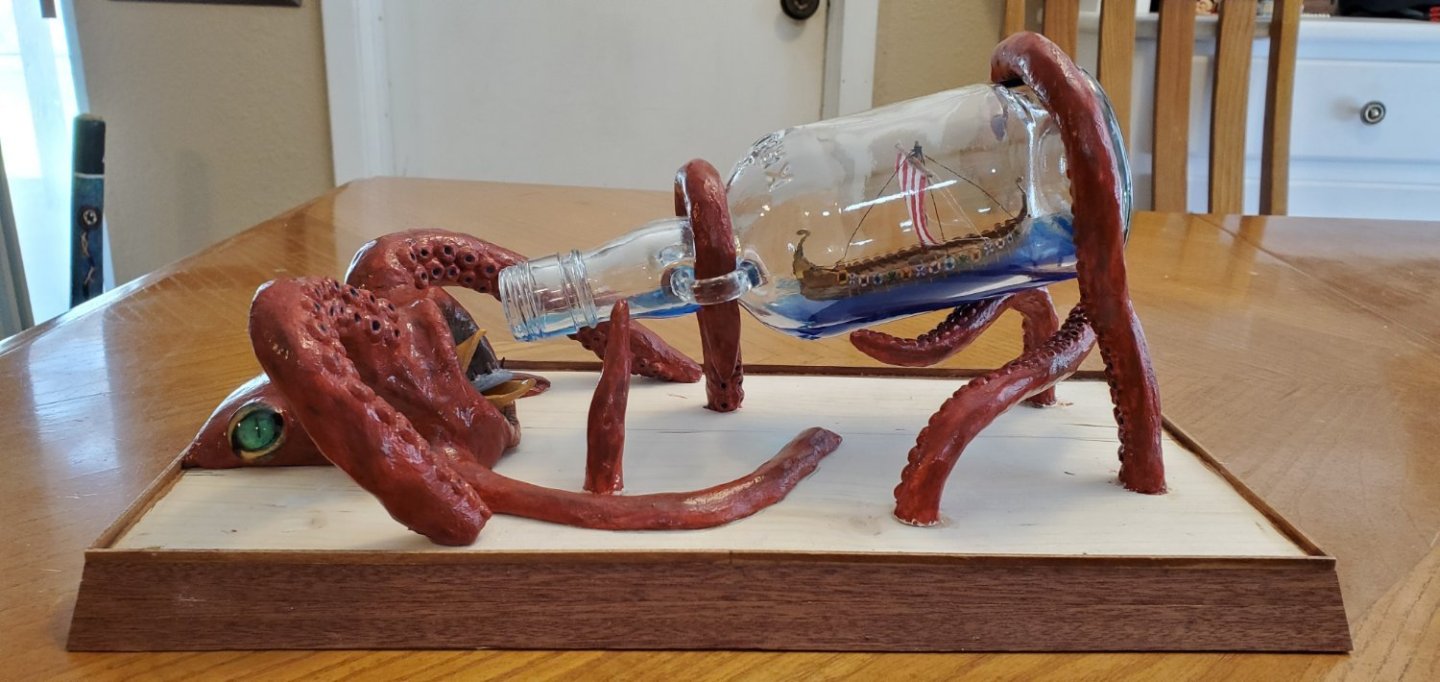
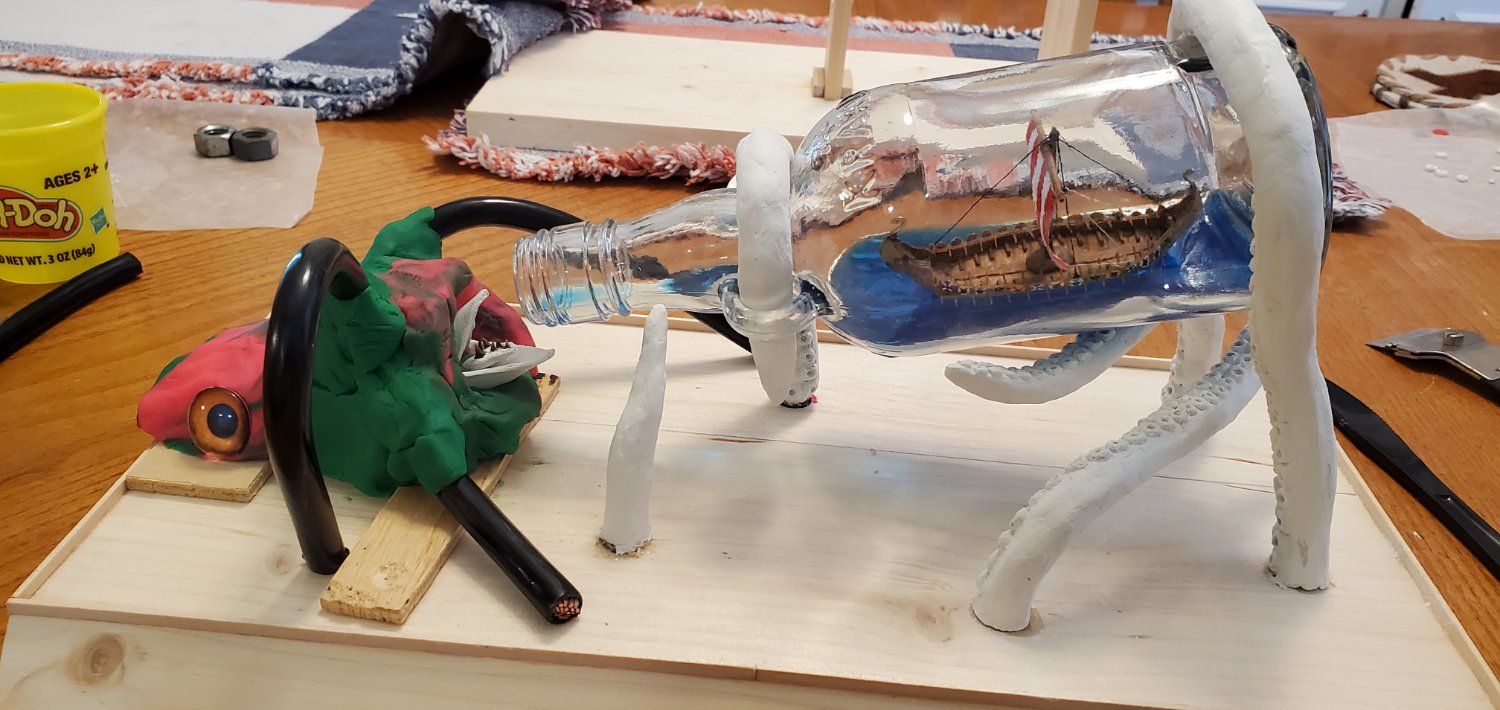
I also decided to add two more tentacles that will barely protrude above the water's surface (no suckers visible). The first is the long curving tentacle on the near side that goes towards the middle. The second is a short stub that disappears quickly into the water on the far side on the beast's mouth. I want the whole thing to appear as an angry swarm of tentacles fighting with the bottle.

Here's what the whole thing looks like from the end zone seats. When my color consultant friend saw it from this angle, she said, "WOW, it really does looks like a giant squid!"
The beast is finally done (along with my short-lived sculpting career)! On to the final chapter of this Quixotic saga - the water effects.
- Prowler901, FriedClams, gjdale and 11 others
-
6
-
 8
8
-
Just found your build log for this. I'm on board to watch another interesting project! Do you have a pic of the bottle this will reside in?
- Knocklouder and mtaylor
-
2
-
-
Welcome Joe! You have found the best website on the entire interweb!!
- mtaylor, Ryland Craze, Keith Black and 1 other
-
4
-
On 3/12/2023 at 4:39 PM, O.B.one said:
It's here if you need it.... 😄
Thanks so much O.B.one! You are just as much help as Knocklouder!!! 🤣
- Knocklouder, mtaylor, Keith Black and 3 others
-
1
-
5
-
On 3/12/2023 at 4:39 PM, O.B.one said:
Hope this help
Once again, I have no words!! 😬😬😬
- Knocklouder, Ian_Grant, FriedClams and 2 others
-
3
-
2
-
Ladder looks fantastic, Phil!
- mtaylor and GrandpaPhil
-
1
-
 1
1
-
-
7 hours ago, Ian_Grant said:
Last spring we had a "derecho" (no I had never heard the term either)
Interesting, Ian. The only thing I know about "derecho" is that it's Spanish for "right". Never heard of it applying to weather.
7 hours ago, FriedClams said:Excellent work Glen! It's imaginative and whimsical and I hope you're enjoying building it as much as we are watching you do so. I think we often take our modeling too seriously and this build is a refreshing change from that.
Thanks, Gary! Yes, I'm definitely enjoying this build. But I think I'm enjoying the comments even more! Particularly this one from Keith...
6 hours ago, Keith Black said:Penguin Kraken!
OMG, Keith!! You are kraken me up!!
Somebody please make him stop!!!!! 🤣
- GrandpaPhil, mtaylor, Keith Black and 4 others
-
2
-
5
-
21 minutes ago, O.B.one said:
I found it is best to get it to a point to where it looks good, then accept, and try not to improve. Often trying to improve ended up in ruining it.
Such good advice, and for a lot of things, not just ship models! Thanks for the comments, O.B. One. I've been trying to follow the Jules Verne - 20,000 Leagues Under the Sea description of the Kraken. It's been years since I watched any of the Pirates of the Caribbean movies. I may have to revisit those this weekend.
- Keith Black, FriedClams and mtaylor
-
3
-
@GrandpaPhil Thanks for checking in, Phil!!
4 hours ago, BANYAN said:I am sure you understood I was simply 'stirring the porridge' so to speak
Hey Pat, I do give thoughtful consideration to all suggestions. Except, of course, @Keith Black and his penguins! 🤣
3 hours ago, gsdpic said:Hope you managed ok through the ice as well.
I've got the biggest live oak in the neighborhood in my front yard (trunk is about 3' in diameter) and somehow it escaped with only minor damage - maybe 6 medium size branches split off. Really dodged a bullet there as it shades the whole house from the afternoon sun. Lost power for 3 days, but no complaints. Things could have been so much worse.
- GrandpaPhil, gsdpic, Keith Black and 3 others
-
5
-
1
-
Excellent work on those deadeyes, Keith!
- Keith Black, Paul Le Wol, FriedClams and 2 others
-
4
-
1
-
@BANYAN By the way, Pat, I have not ruled out your spear idea yet. I will revisit when I get further along with the Kraken head.
- mtaylor, FriedClams, Keith Black and 1 other
-
4
-
2 hours ago, Ian_Grant said:
where did you get the eyes in the end....?
Hey Ian, I got 20 pairs of 20mm eyes to choose from off Amazon for $7. I have not decided on the exact pair yet. Waiting to see what the whole beast looks like after painting to decide which eyes will look best.
 1 hour ago, gsdpic said:
I thought you were going to say "...and I had nightmares all night".
")
Looks good. Definitely the strangest build log on MSW right now.
The nightmares are every night, Gary! As far as this being the strangest build log on MSW right now, that's probably the highest compliment I've ever received!! 😃😃😃
On another note - seeing that you are also from Austin, how did your trees fare after the ice storm last month?
- FriedClams, gsdpic, mtaylor and 2 others
-
5
-
7 hours ago, BANYAN said:
That's looking so good Glen; you could get a second job in movie model making.
Thanks, Pat! But I think my sculpting career is going to start and end with this thing. I made the mistake of looking at it for too long right before I was going to bed last night and decided the tentacles were not oriented properly. So I broke them off and spent a couple of hours repositioning them, smudging stuff in all the cracks, and smoothing things out. Ugh! The more I work with clay, the more I like wood!
-
Beautiful work on your Avos, Przemek. Welcome to MSW!!
- mtaylor and Keith Black
-
2
-
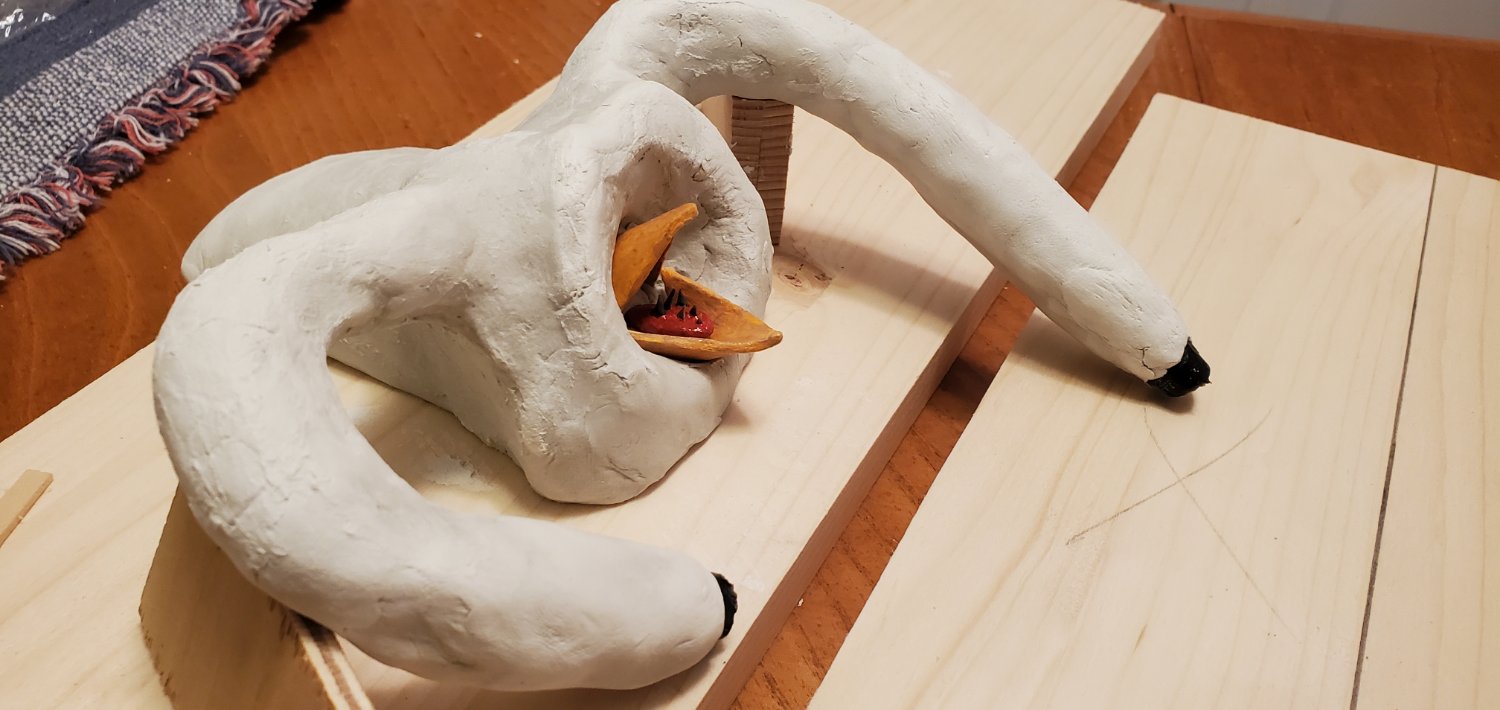
The crux of this project begins - making a reasonable looking Kraken head and mouth surfacing just out of the water. I decided to start with the mouth. From Jules Verne's description in 20,000 Leagues Under the Sea, he described the mouth as such:
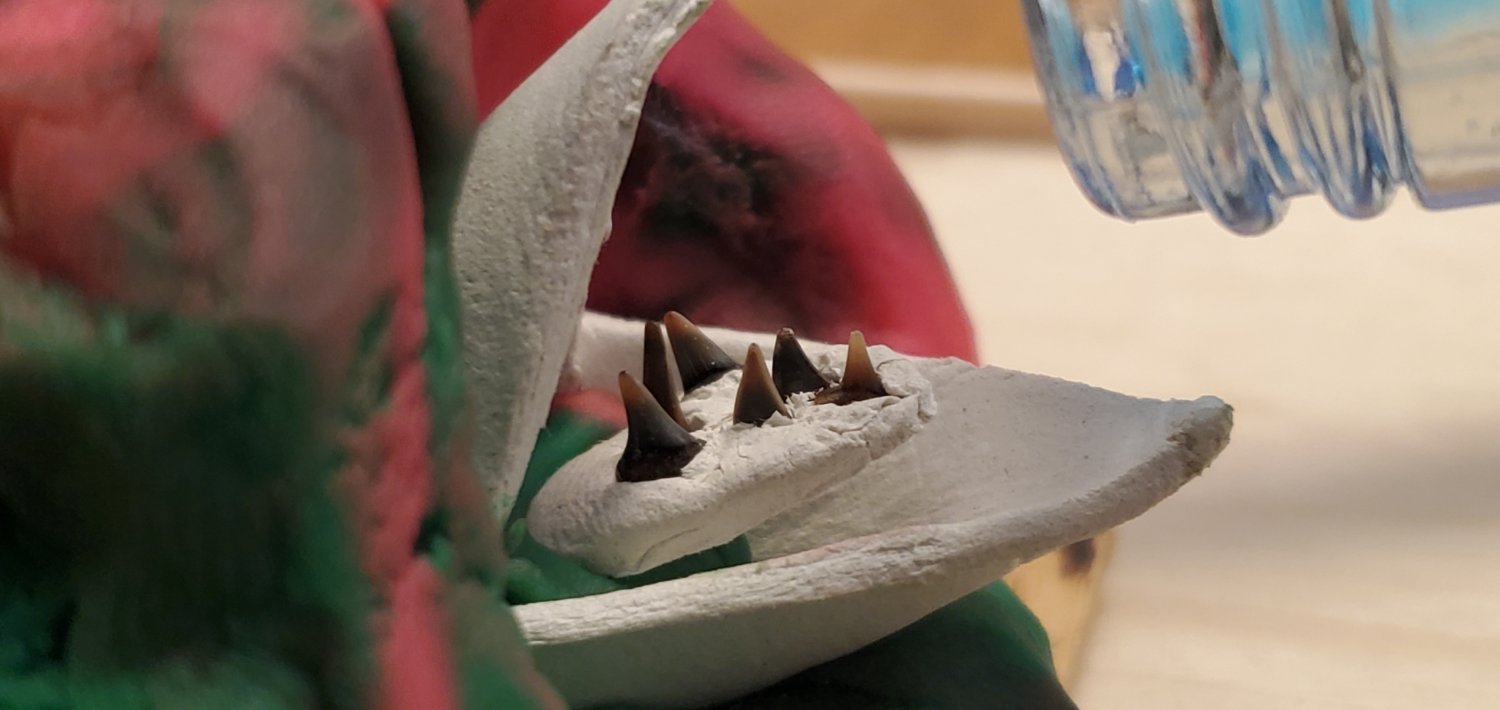
"The monster’s mouth—a beak made of horn and shaped like that of a parrot—opened and closed vertically. Its tongue, also of horn substance and armed with several rows of sharp teeth, would flicker out from between these genuine shears."
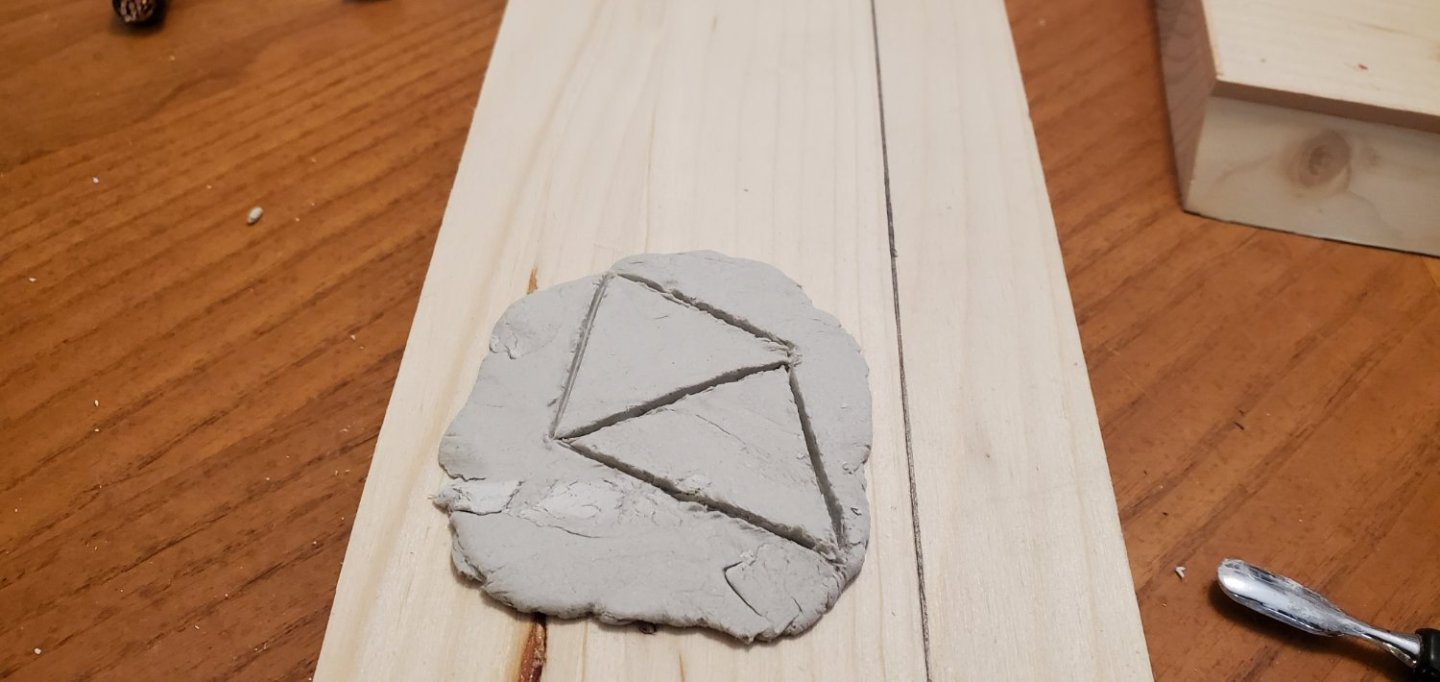
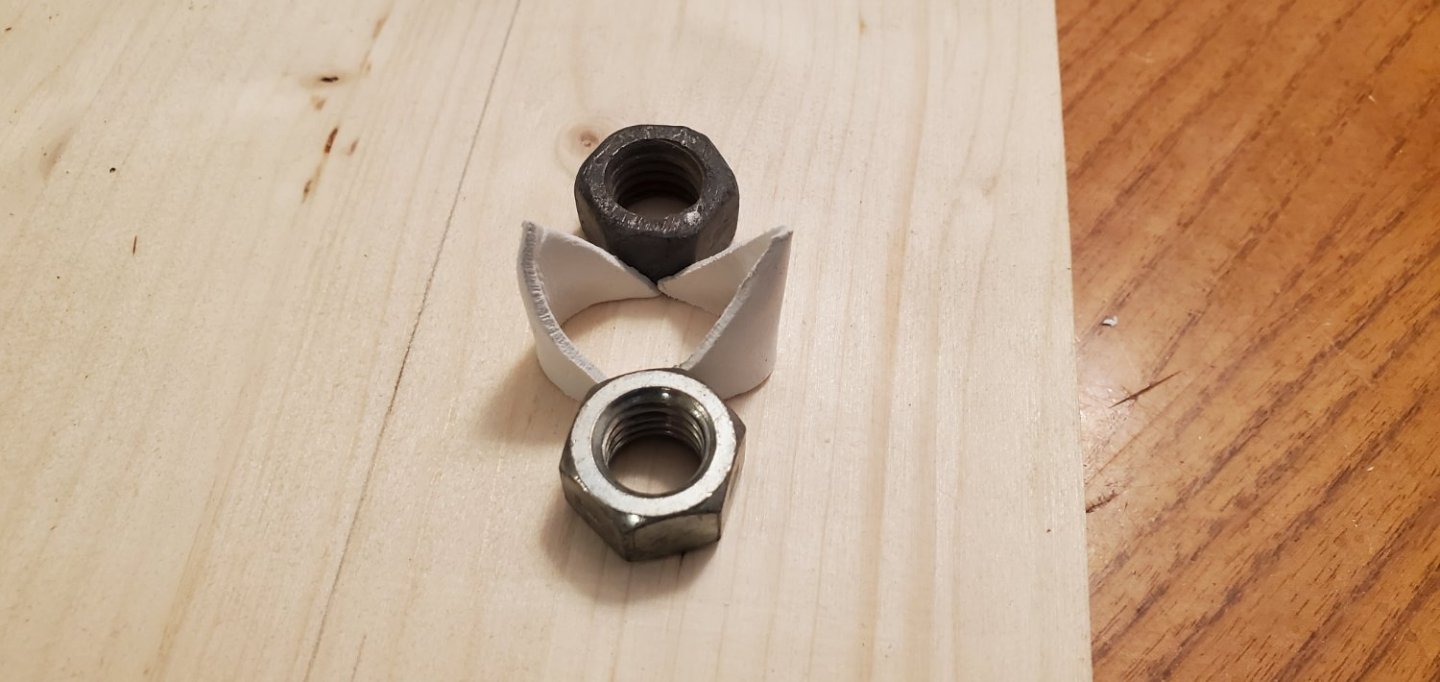
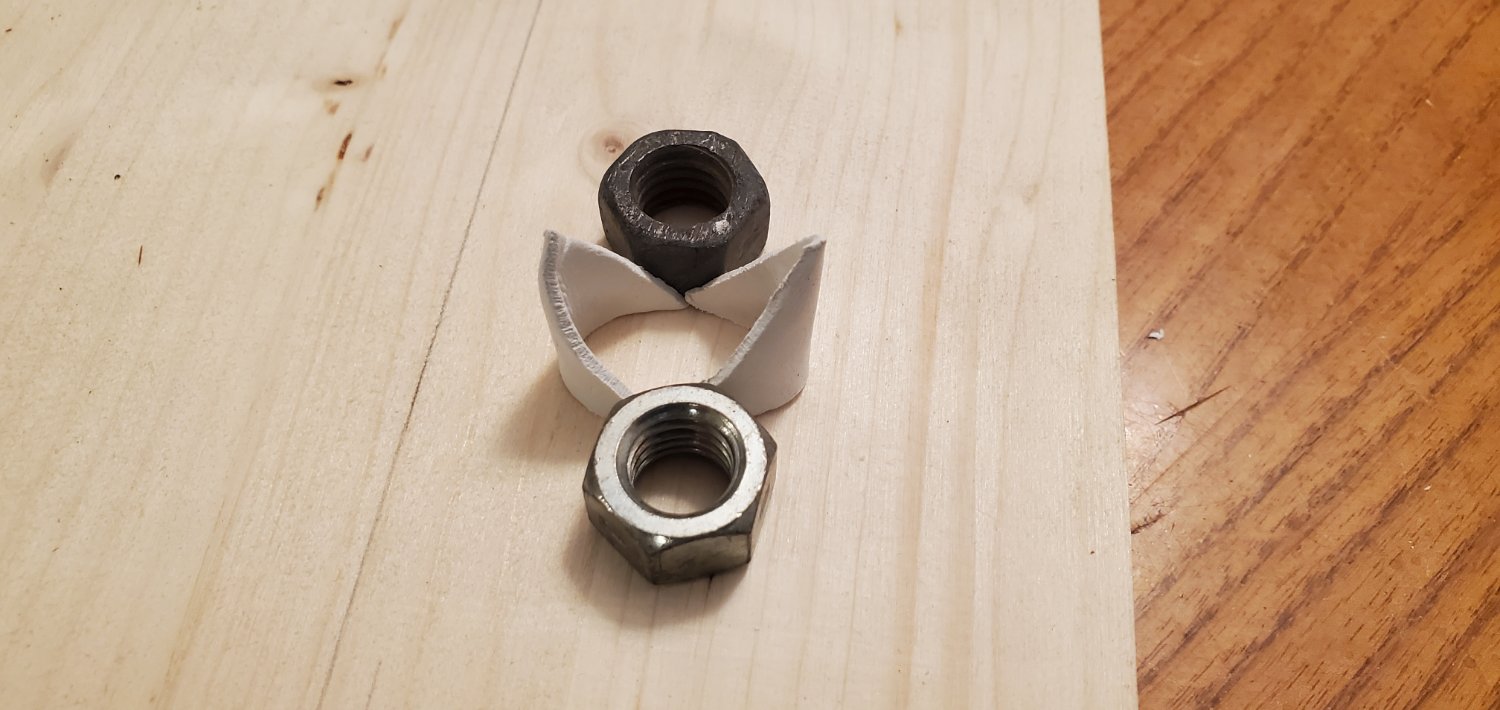
For the "beak", I cut a couple of triangles from a thin layer of clay and folded the 2 ends toward each other to form the upper and lower halves.
For the tongue, I was trying to figure out what to use for the "rows of sharp teeth" when an idea hit me. In 2015, my son and I took a vacation to the DC area and spent a couple of days driving down the southern coastline of Chesapeake Bay. We ended up spending most of a day swimming at a beach near the Calvert Cliffs. My son found dozens of these tiny shark teeth that had washed ashore. We found out later that these were prehistoric teeth and very common for that area. He had kept a bunch of the teeth and I thought they might be perfect for my Kraken. So I picked several of the smaller ones and stuck them in a clay tongue.

Next, I decided to get a couple of cans of Play Doh to shape a rough Kraken head rather than wasting the more expensive modeling clay in case things totally bombed.

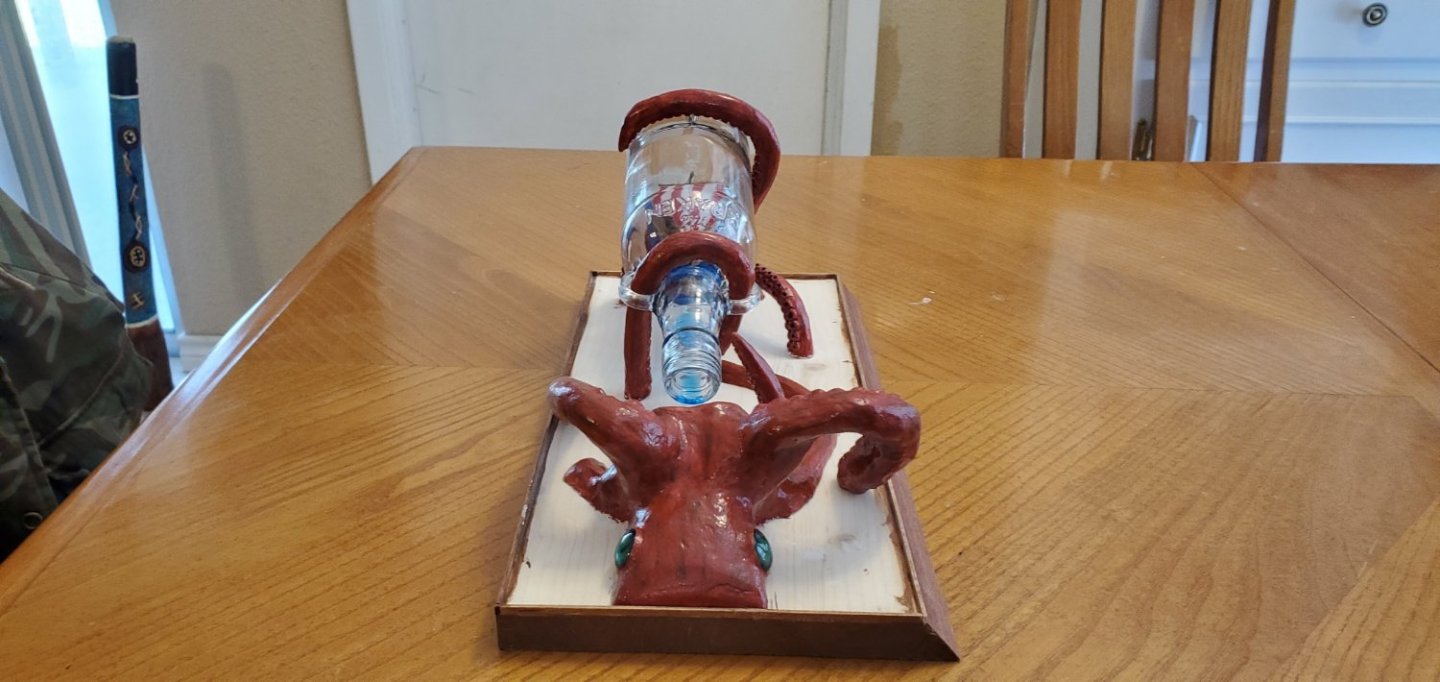
I thought it was passable, so decided to forge ahead and start shaping the real thing. Here's where it is now. I will let it dry and then figure out what it needs to get to its final shape. Definitely some smoothing out. Maybe beef up the "shoulders' where the tentacles come out of the body. The 2 attached tentacles are not tapered at the ends as they will simply disappear into the water.

- O.B.one, Prowler901, GrandpaPhil and 11 others
-
14


Roman Quadrireme Galley by Ian_Grant - 1/32 Scale - RADIO
in - Subjects built Up to and including 1500 AD
Posted
LOL! Never heard that one before. 🤣