


Glen McGuire
-
Posts
1,293 -
Joined
-
Last visited
Content Type
Profiles
Forums
Gallery
Events
Posts posted by Glen McGuire
-
-
32 minutes ago, Keith Black said:
How will you get the ice glued down once placed? Will you insert Aurora before gluing down the ice? Sorry for the questions, Glen.
Keith - I appreciate the questions because they are the same ones I'm trying to answer as this thing moves along! I come up with these ideas of how I want things to look but don't really have any idea how to do it until it's time. That's the challenge being a newbie modeler trying to do this from scratch. I have no instructions or plan!! But that's also what makes this so much fun!
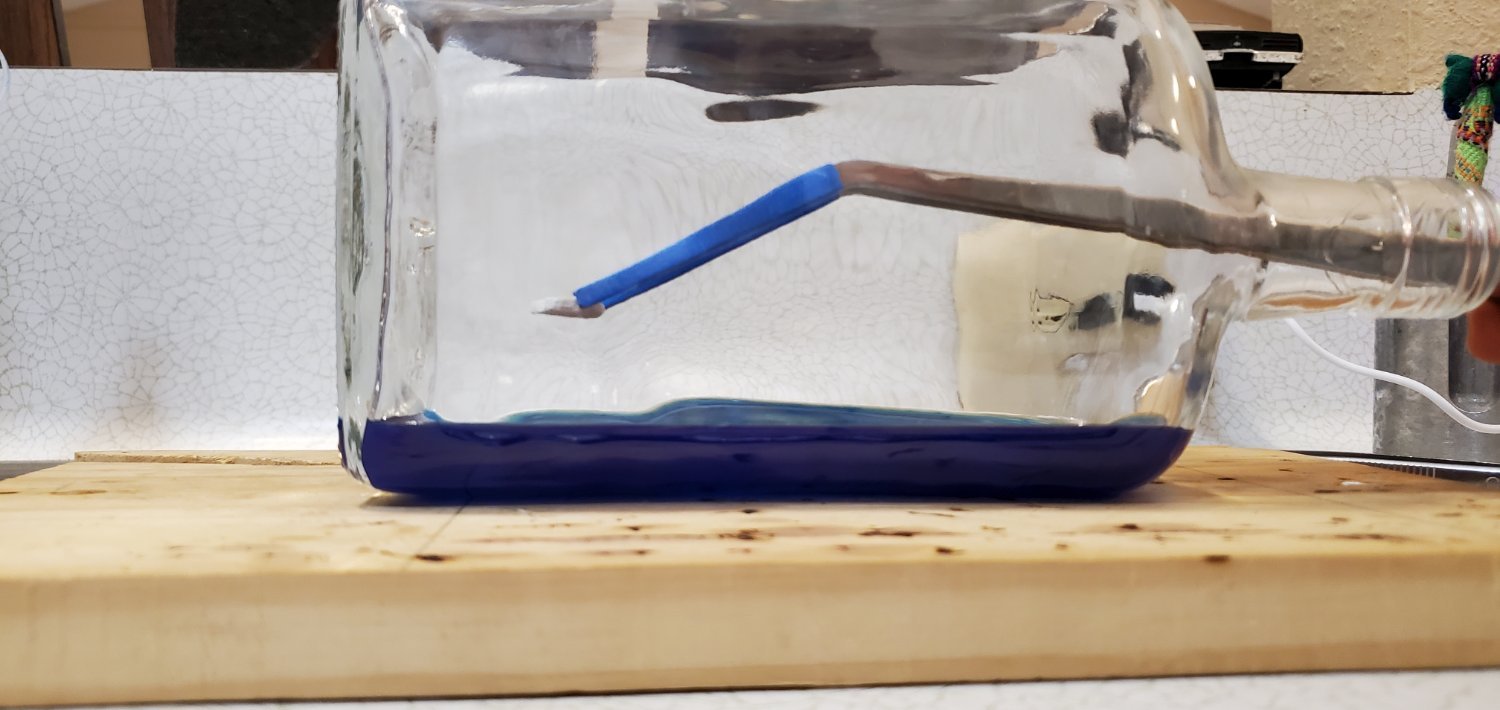
So here's what I'm thinking - first, take a small piece of wood that's the size of the ship's bottom and place it where I want the ship to go. Next, dab some 30 minute epoxy on the bottom of each ice piece and place them inside the bottle around the piece of wood. After all the ice is in place and the epoxy dry, remove the wood and replace with the ship.
After reading you question, I went and did a short test since I had not actually tried the long tweezer/ice idea yet. It went ok as you can see in the pic below. It's going to be tedious with so many ice pieces, but should work. I may err on the side of somewhat bigger pieces just so I don't have so many to deal with. Plus, those long tweezers are pretty large - they handle larger things better than smaller ones. I will do some testing with different size pieces and then make a final decision on what to do.

-
Thanks, Mike and Keith!
Keith, I hear you about the slush but I think it's beyond my capabilities. It's going to be hard enough for me to get those pieces in their proper place by dropping them in with long tweezers. I'm definitely going to do some unglued, practice drops!
Below is kind of what I have in mind. Probably a little more space between the pieces of ice and no slushy stuff in between.
And yes, almost time for the big push. Anxious moments ahead!!! 😳
- Ian_Grant, gjdale, Landlubber Mike and 1 other
-
 4
4
-
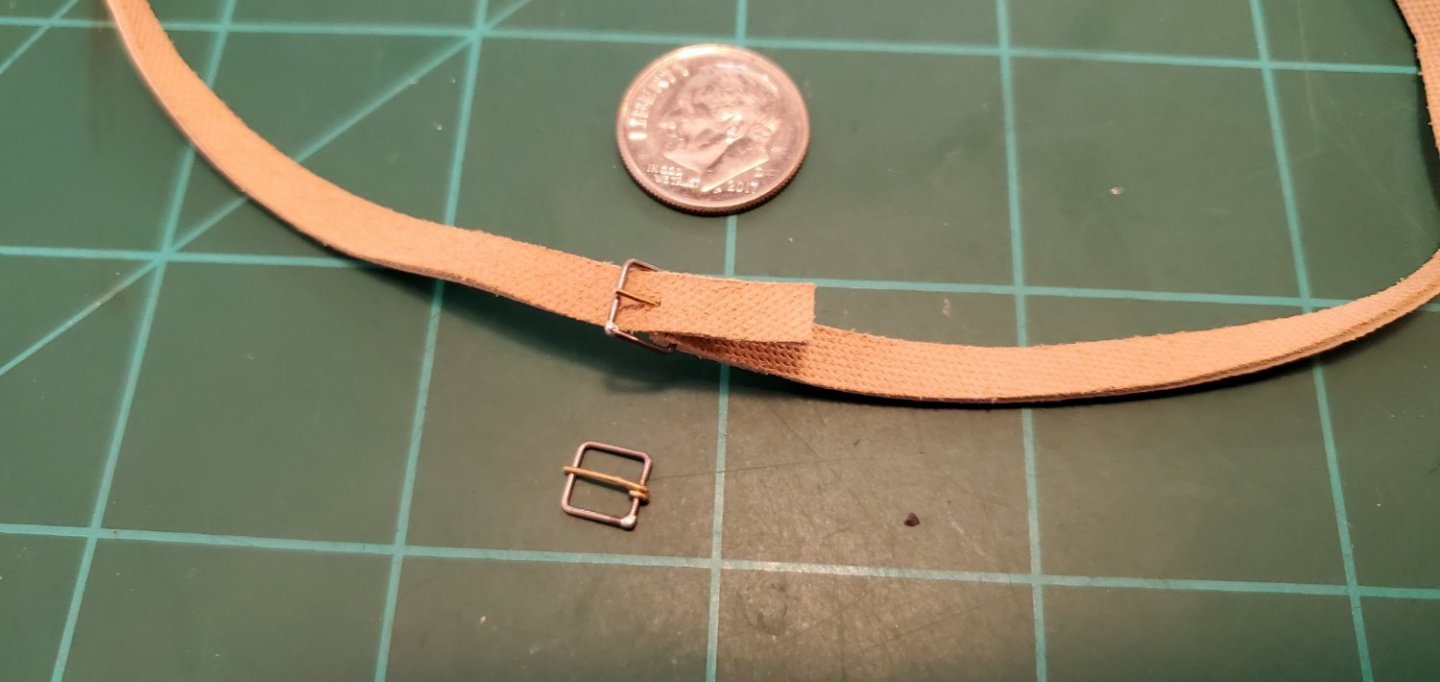
It takes 72 hours for max hardening of the resin. In the meantime, I decided to jump ahead and work on the very last step of the whole project - how to secure the bottle to the sledge.
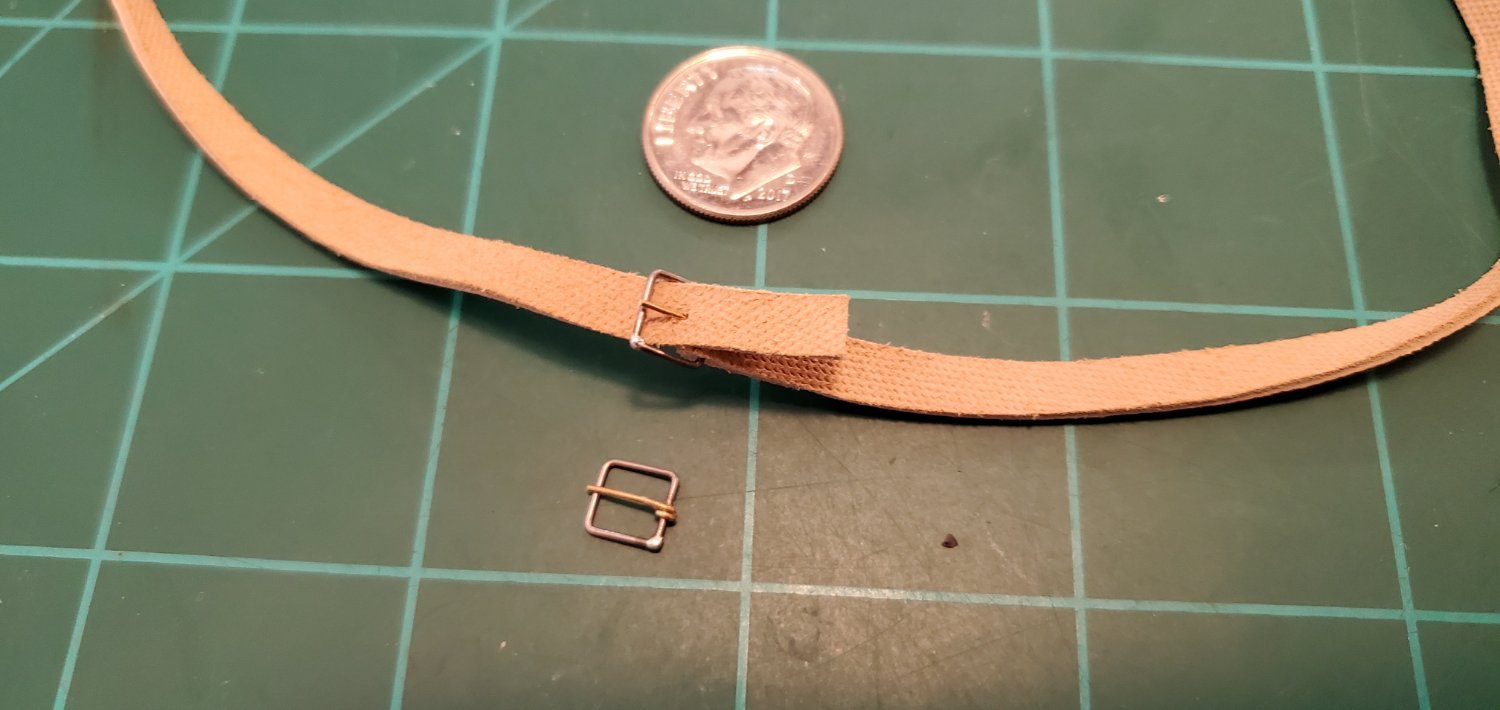
The Museum Discovery Centre of Sydney, Australia has one of the sledges from Mawson’s Australiasian Antarctic expedition. On their website they have a picture of the sledge with a bunch of straps which they describe as follows, “Leather straps are wound around the top rails. These have holes and buckles and were used to secure the load while in transit. The leather appears to be vegetable-tanned cowhide.”
I decided to try and secure my bottle to the sledge in the same manner. I found some strips of deerskin leather that I thought would work well for the strap. For the buckles, I bent some .025” music wire into a rough square and soldered the joint for the frame. For the prong, I used some soft brass wire of the same diameter so I could attach by twisting the end around the frame. Looks like this will work ok.

- BANYAN, Keith Black, mtaylor and 4 others
-
7
-
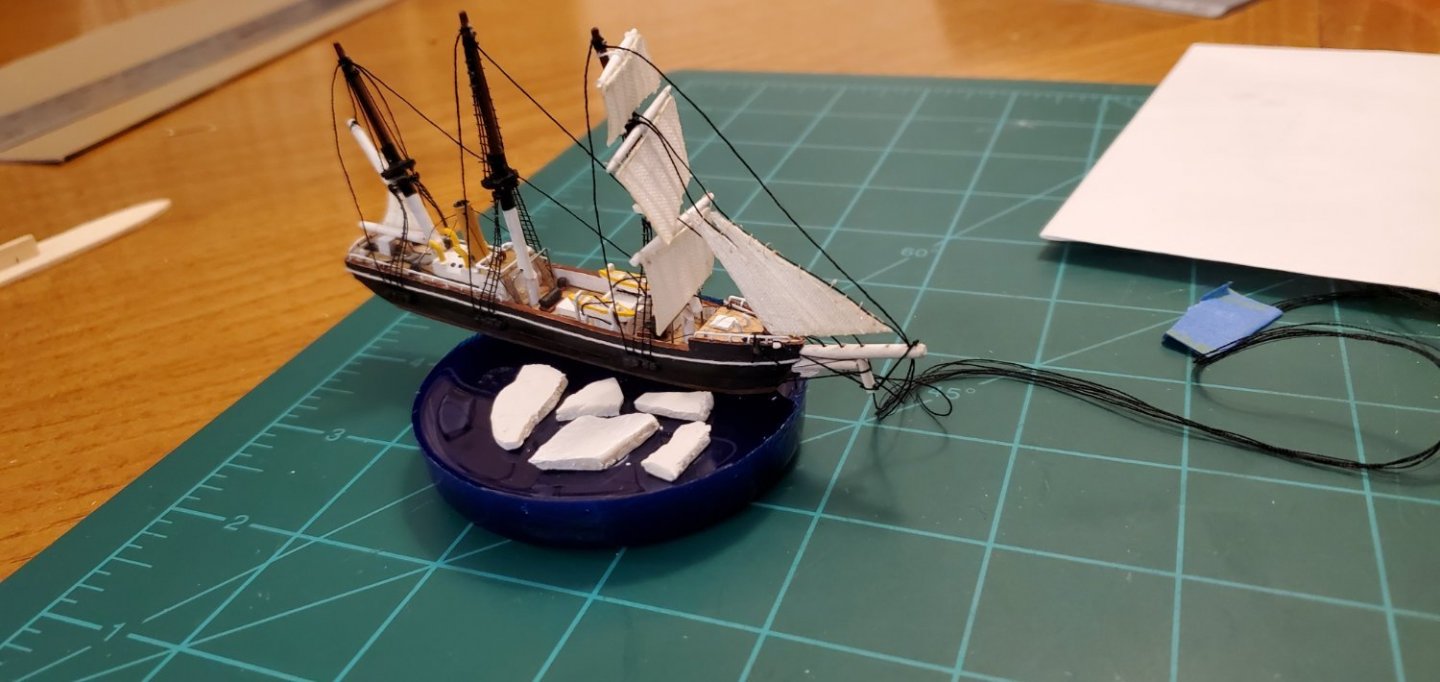
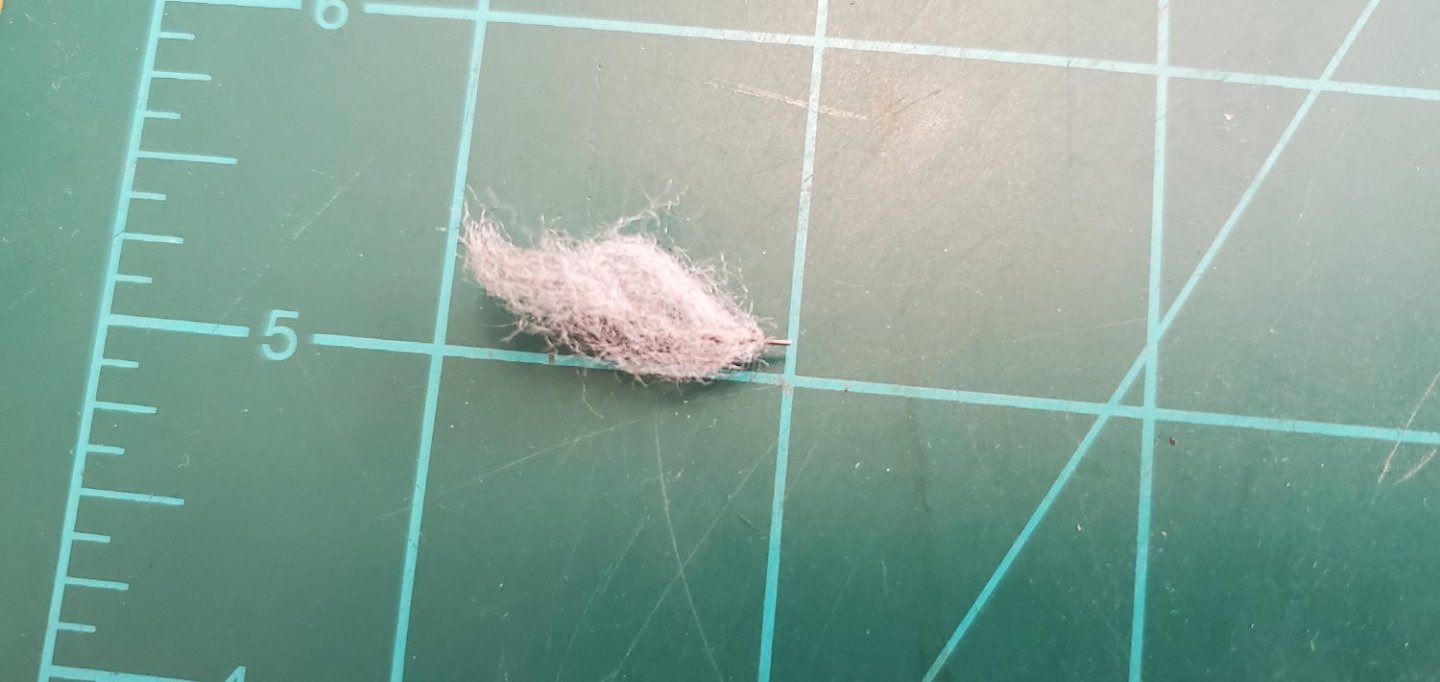
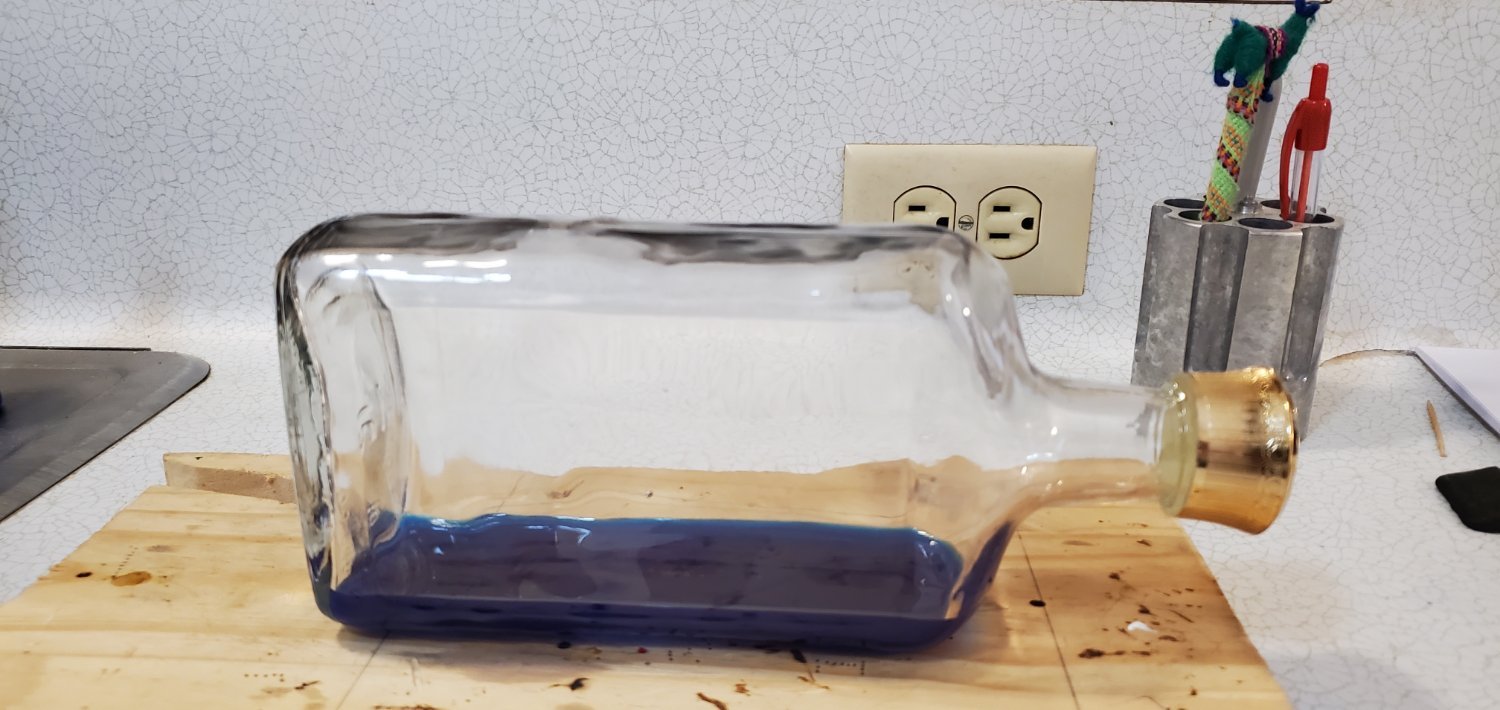
I finished up my YouTube U classes on epoxy resin and did a test run in a red solo cup. I also rolled out a small piece of white modeling clay and cut it into a few pieces for broken pack ice. When the test resin was dry, I popped it out of the cup and placed the ice and ship on top to see what kind of look I had. The ice looks a little thick and maybe the pieces are too large, but overall I think I’m on track. So I went ahead and poured the resin into the bottle for real and set it aside.

- Landlubber Mike, Keith Black, gjdale and 2 others
-
4
-
 1
1
-
Hey Mark, in my short modeling career, I've lost track of how many things I've messed up, glued wrong, pried off, cleaned up, re-glued, etc. I learned early on that you cannot do this hobby without being creative and constantly solving problems to get past obstacles.
This is just another one for you to conquer.
You got this!!! And I predict that when you are done, the only people that will ever know you messed up are those of us on this thread!
- Dave_E, Canute, Edwardkenway and 4 others
-
7
-
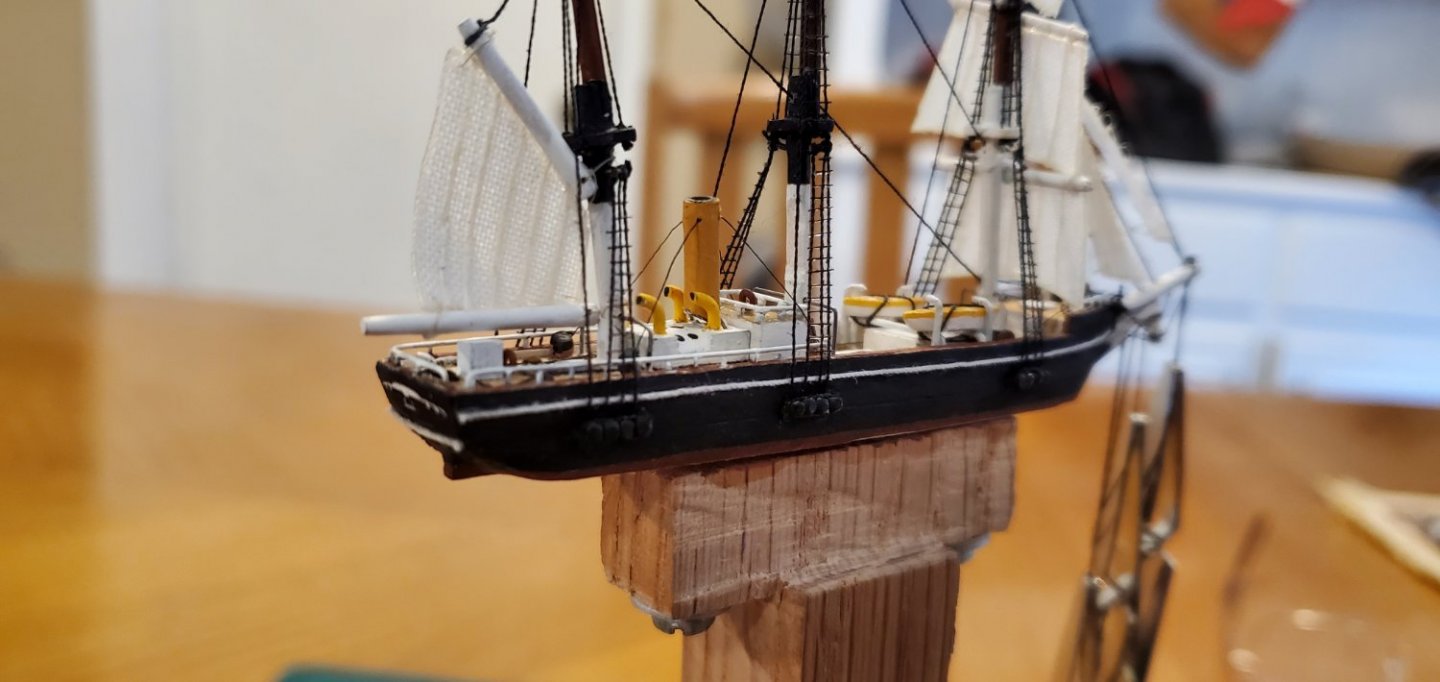
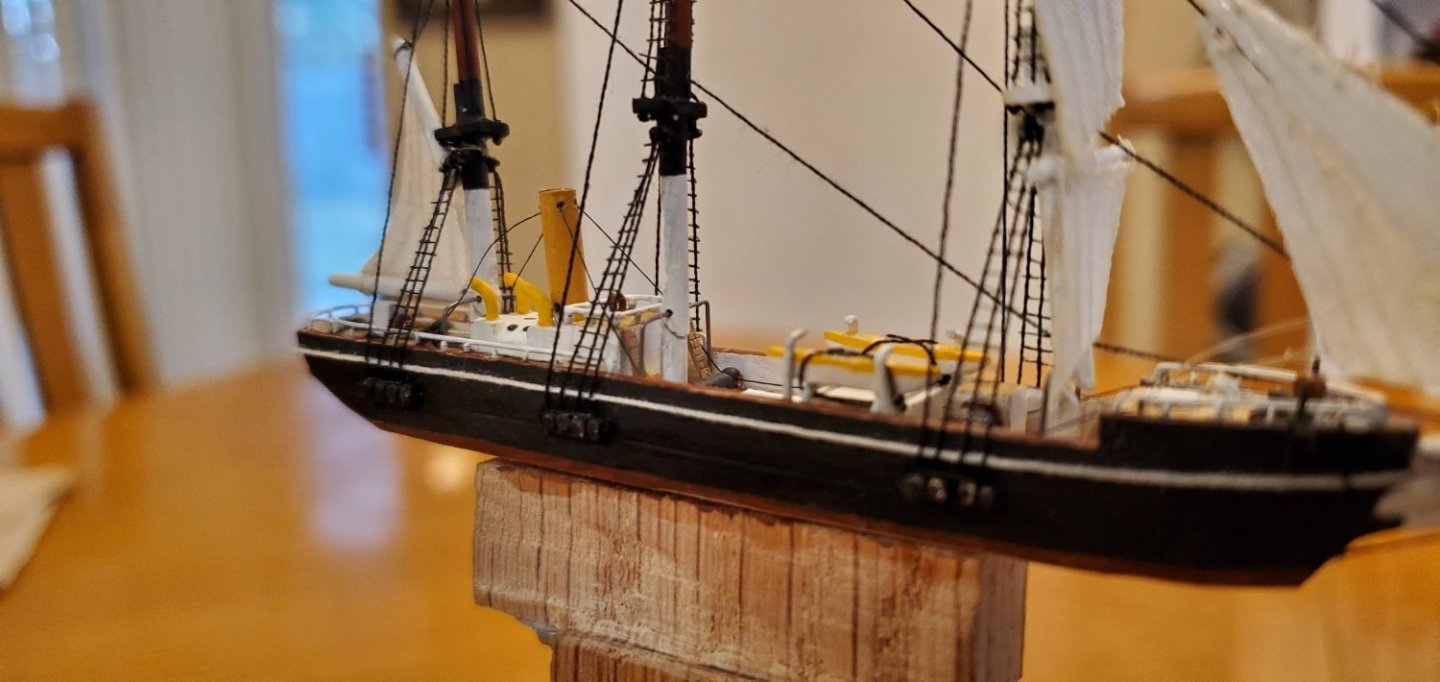
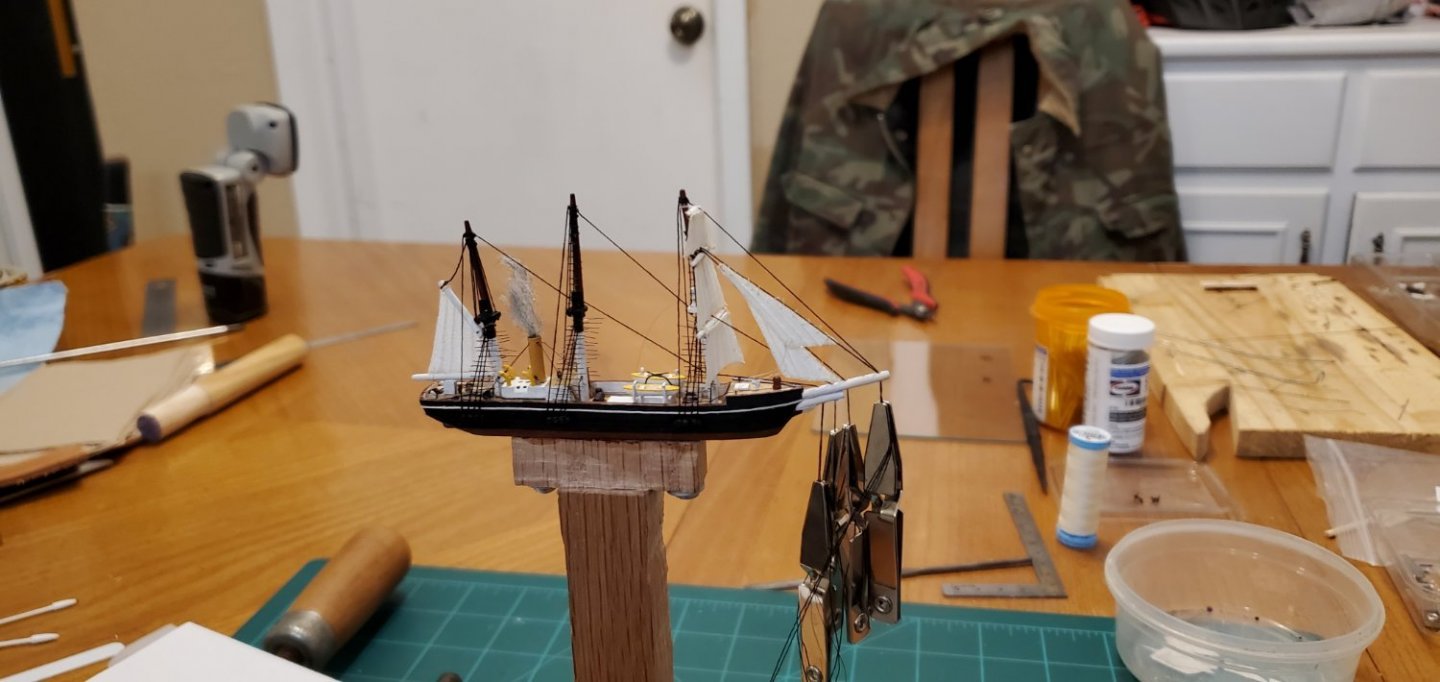
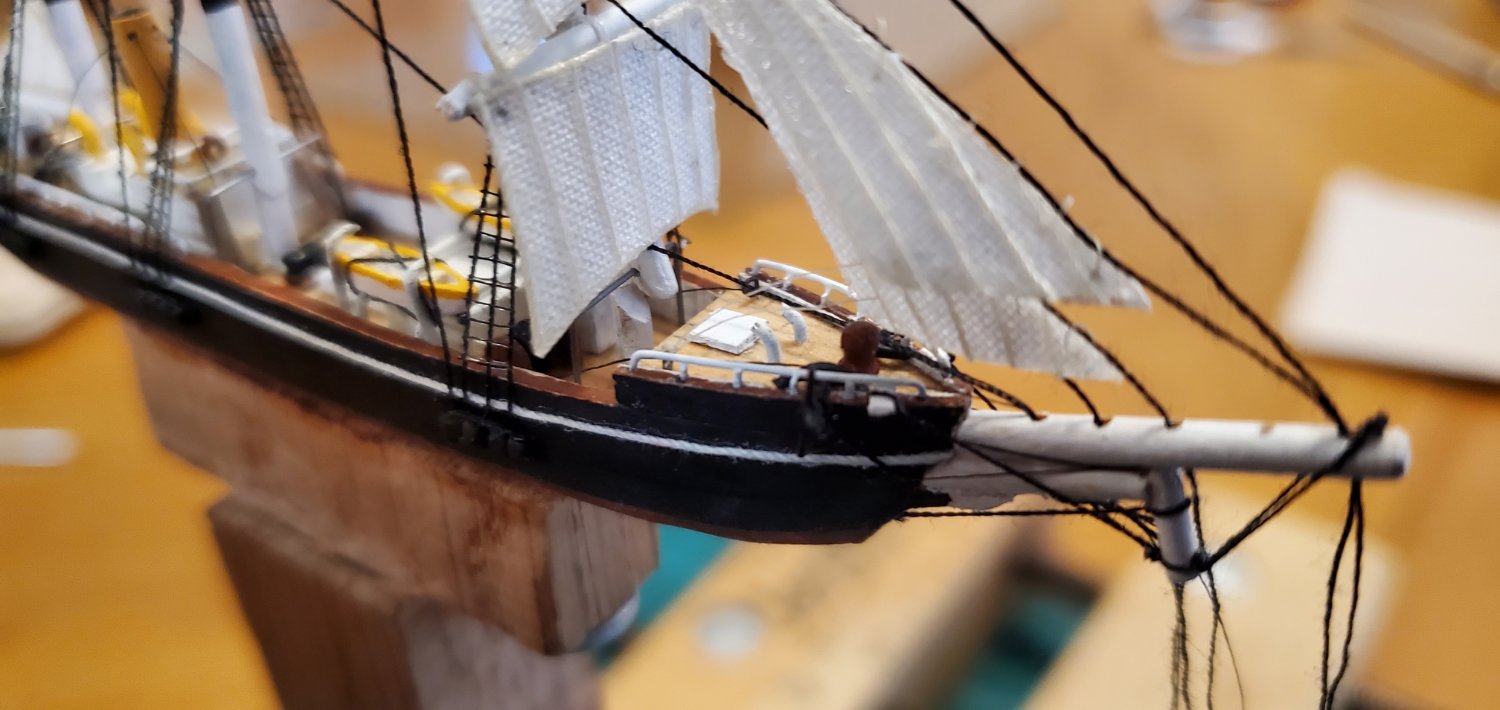
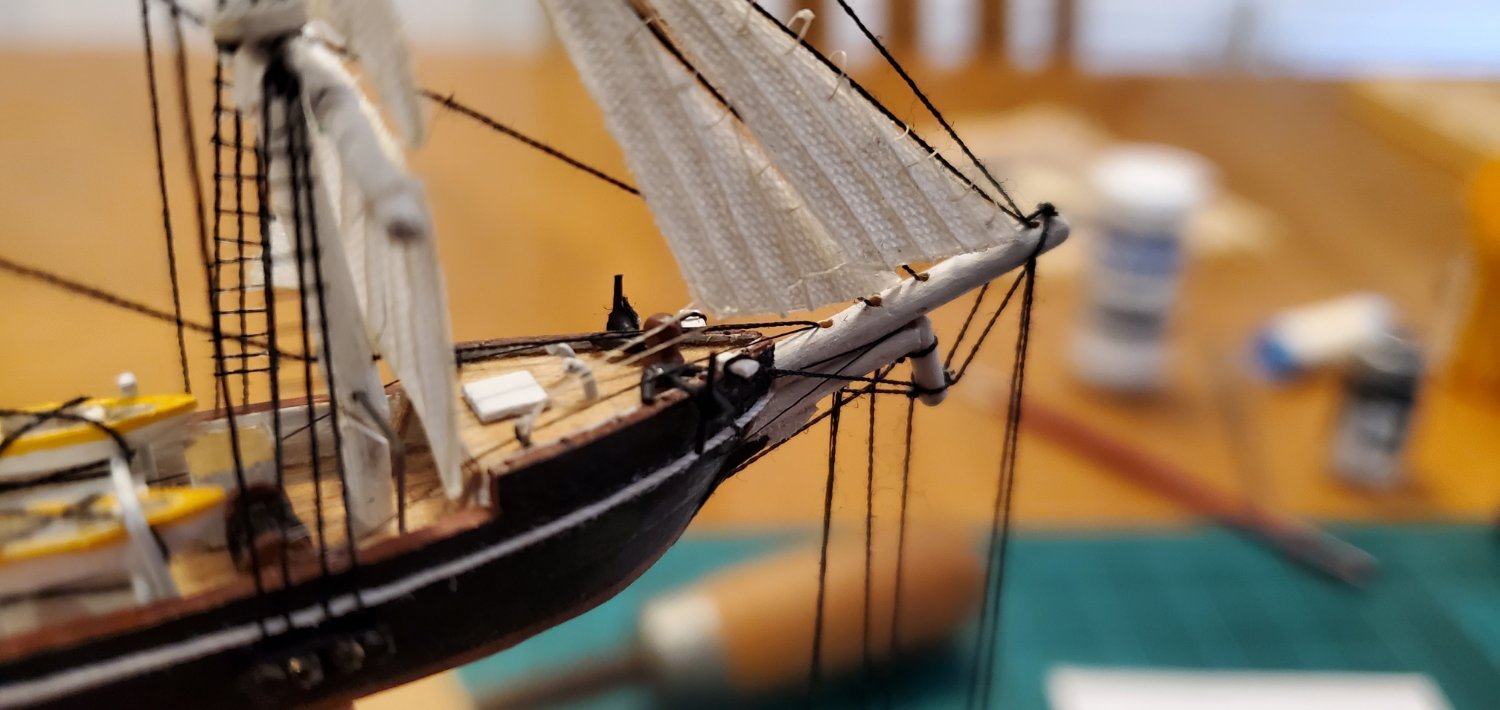
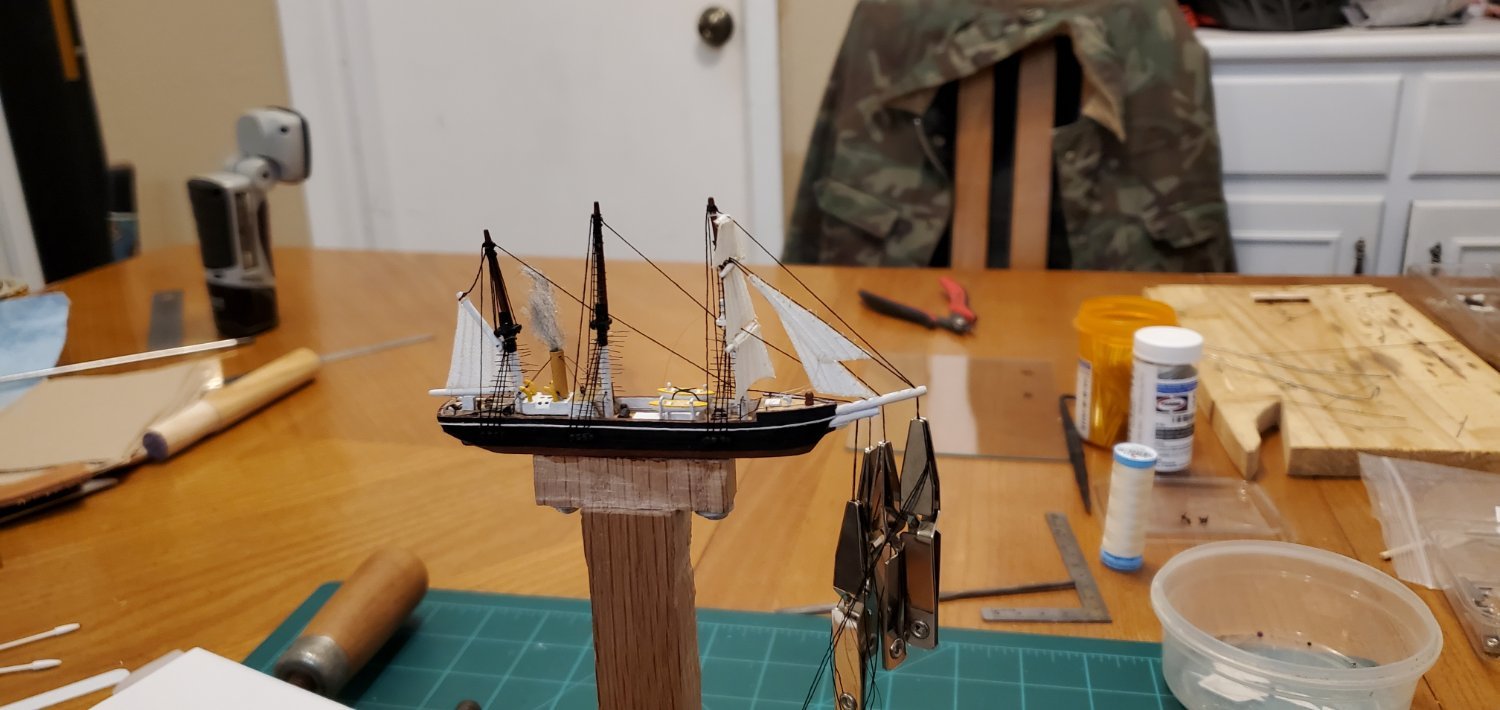
The railings continued to give me fits but I finally got it worked out. The tiny RJ45 wire and other small strands of copper did not work. Just too flimsy. So I went back to the .015” music wire. I tried cutting a straight piece for the rail and soldering all the stanchions to it. Fail. If I used enough solder to make the joints strong, the joints looked fat and wrong. If I used a tiny bit of solder for a clean-looking joint, it was too weak to hold when inserted into the pre-drilled holes. So the solution I came up with was to take a straight piece of music wire for the rail and bend down the ends for the front and back stanchions. I glued it in place and it was solid. I then inserted all the in-between stanchions with a touch of CA glue on their tops. Certainly not perfect, but as good as I can do. As Dirty Harry said, a man’s got to know his limitations.
As for the smoke, I did one last test smash and ¾ insertion with the smoke in place. The railings were fine and the smoke survived. It will still be a delicate operation to avoid distorting the smoke when raising the smoke stack and masts, but I believe that will be far easier than trying to insert it after the ship is in the bottle.
So the ship build is complete! Next up is making the ocean and pack-ice. I’m going to try epoxy resin this time for the ocean. I’ve never worked with it before so it’s back to YouTube U and the practice bench.


-
This is going to be so cool to watch from the start. In my short history of ship modeling, I'm getting to be a real fan of these steam/sail ships and how unique they are.
Let 'er rip, Phil!!
- Keith Black, Canute, mbp521 and 2 others
-
5
-
1 hour ago, Roger Pellett said:
Might it be possible to hide a thin piece of piano wire in the smoke plume with the bottom anchored in the smoke stack?
Hey Roger - you nailed it! That's exactly what I'm trying to do. As soon as I finish with the railings, I'm gonna put the smoke in as you suggest and give the whole thing another test smash to see if it looks like the smoke will survive. I need to be able to position the smoke where nothing has to lay on top of it and also where none of the lines grab it when I raise the masts. Plan B is to thread the needle and place it inside the smoke stack after the ship is inside the bottle.
One way or another, it's gonna get in there!
- G.L., Ian_Grant, Landlubber Mike and 3 others
-
6
-
Thanks, Keith! Regarding the fate of the brandy, I did sample it. And let me tell you, there's a reason it only cost $8. 😝
I had to go watch a video on using a housing spreader since I've never rebuilt a differential before. Now I understand your comparison with SIBs. Dang, that would certainly be a handy tool for me and my habit of making things too fat for the bottle!
- Keith Black, Ian_Grant, mtaylor and 1 other
-
 4
4
-
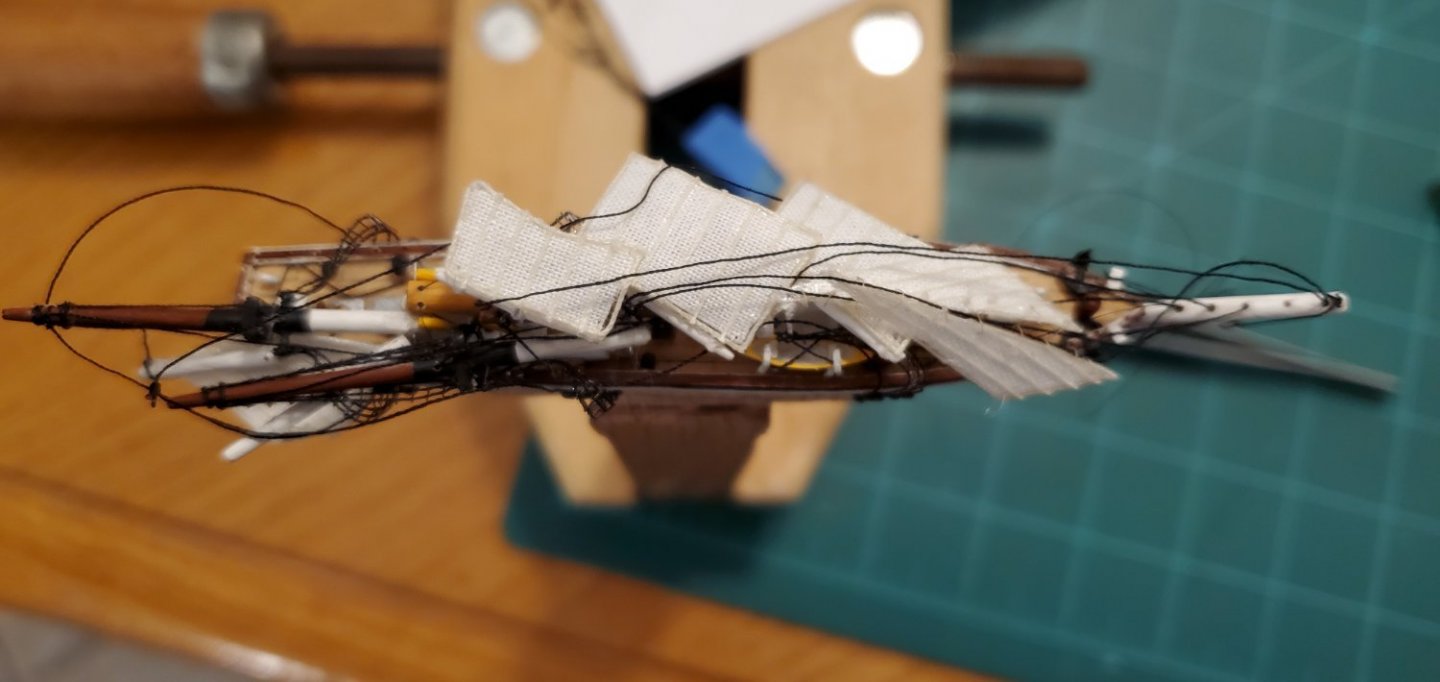
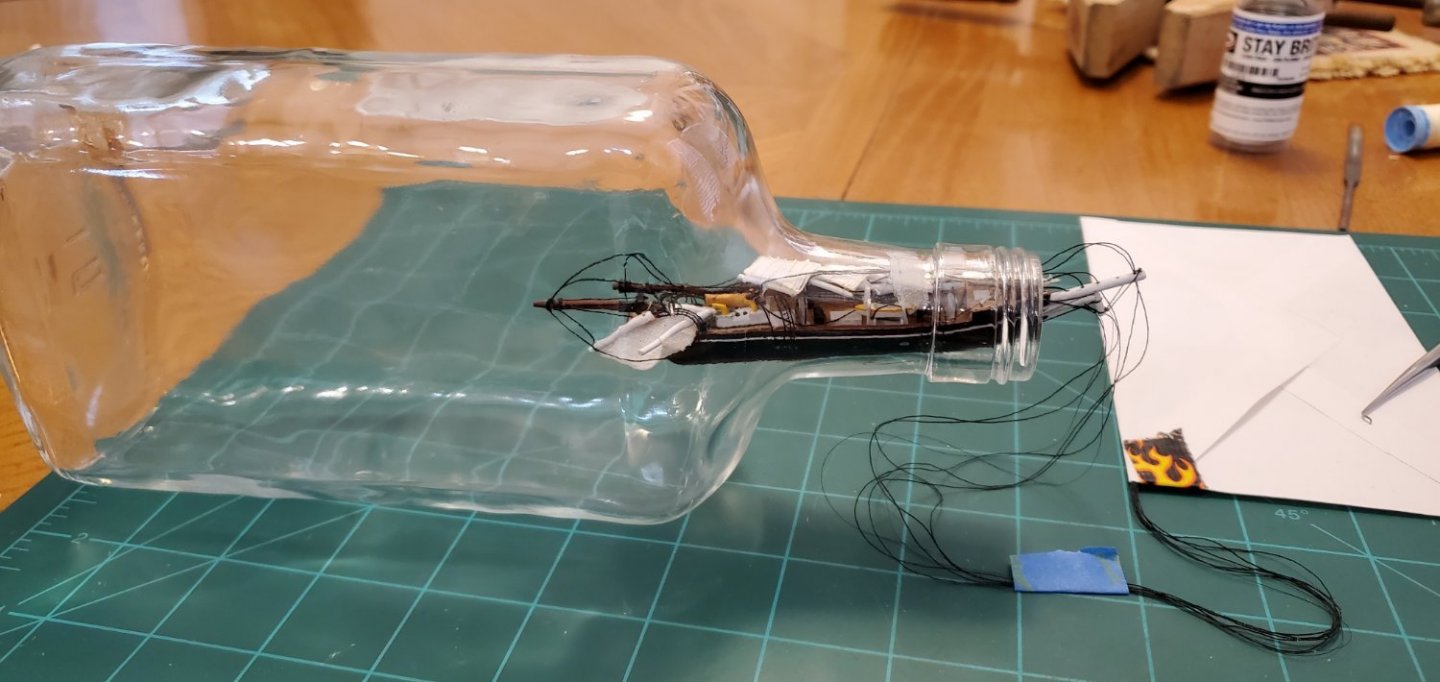
Now, the only thing left for the ship build is the handrails. But before I launched into that, I decided it was time for a test smash and see if I had any chance of fitting all of this inside the 11/16” neck of my chosen bottle. And….
Nope. Not even close. Crapola! So I shaved the bottom of the hull to just a hair below the waterline. That helped some but not enough.The only other thing to look at was the masts since they are the highest points when everything is smashed down. I had made the wire part of the mast hinges the width of the deck. This allowed me to stagger the masts so they would lay side by side when laid over instead of being on top of each other. I also had “lanes” cleared so the masts would lay as flat as possible. After looking at all that from bow to stern, I could not come up with anything to give me more room other than removing all the deck structures and lowering them.
Time for a big decision. Do I take a ton of time to rework the whole deck structure or do I jump in the truck and make a quick trip to Total Wine and find a different bottle? That decision was even easier than the kid in the commercial who picks Charles Barkley for the pickup basketball game!
I found a bottle of $8 brandy that looked like it had a bigger neck. When I got the bottle home and emptied it, the opening wasn’t as large as I was hoping. It was only 1/16” larger in diameter than my other bottle. Uh oh.
However, turns out that was all the room I needed!! I did another test smash and the ship was a snug fit, but a fit nonetheless. They say football is a game of inches, I guess SIBs are a game of tiny fractions of an inch.
- GrandpaPhil, Ryland Craze, BANYAN and 6 others
-
6
-
3
-
The rework on the guy wire, whale boats, and fore sail was successful and not too time consuming. Two steps forward and one back. Next up was putting the little anchors in place. They are probably a bit oversized but I don’t think they are too egregious. After that, it was making the dolphin striker and fitting it with its chains and cables (black thread/fly tying thread in this case).

-
2 hours ago, gjdale said:
I hit the “like” button not because you found some problems, but because you have a plan to fix them. I know you’ll do an excellent job on them too.
Thanks, Grant. They are pretty minor problems compared to the last build when I snapped the foremast inside the bottle! It's always something, isn't it!
You starting on that Amati Hannah sometime soon?
- mtaylor and Keith Black
-
2
-
8 hours ago, Keith Black said:
Glen, I think the 'smoke' turned out much more realistic, I like it. Won't you be able to push the smoke plume up once the lot is inside the bottle?
Thanks, Keith. I will definitely do a test smash with the smoke in place to see if I if it looks like it will survive. That would certainly be my preference but I don't have high confidence in it working. We will see! Thanks again for the gray yarn suggestion. Definitely more realistic and pretty easy to work with.
Unfortunately, I've got other problems to deal with too. I cut one of the guy wires while clipping the ends of the ratlines so I gotta redo that. Ugh. When I lay down the foremast, the mast top hits the whale boats instead of fitting between them. So I gotta remove the whale boats and narrow them quite a bit. Ugh. The mizzen mast pull thread is hitting the bottom of the fore sail so I gotta pull that sail off and shorten it. Ugh.
It's rework time in the central Texas shipyard.
- gjdale, mtaylor and Keith Black
-
1
-
 2
2
-
With @Keith Black and my son conspiring to make this build even harder for me by not only requiring smoke but also making it the right color, I took some time to work on that again while the ratline glue was drying. 😵
Keith – I think your idea of using gray yarn worked out well! Let me know what you think.
I don’t think the smoke will survive the being smashed down for bottle insertion, so I’m gonna have to figure out how to put it in place after everything else is set up inside the bottle.
- Landlubber Mike, mtaylor, Ian_Grant and 6 others
-
9
-
-
Joe - Thank you for the tip on the Deluxe Material plastic putty. I will explore that.
And thank you even more for the additional information on Shackleton, including Churchill's opinion of his endeavors. That is entertaining!
I'm still a beginner at this ship building hobby but the deeper I get into it, the more I appreciate that it's not just about building a ship. Each ship has a history. I'm beginning to understand that this hobby is just as much about learning the history of the ship and maybe feeling like you have become just a small part of that history.
-
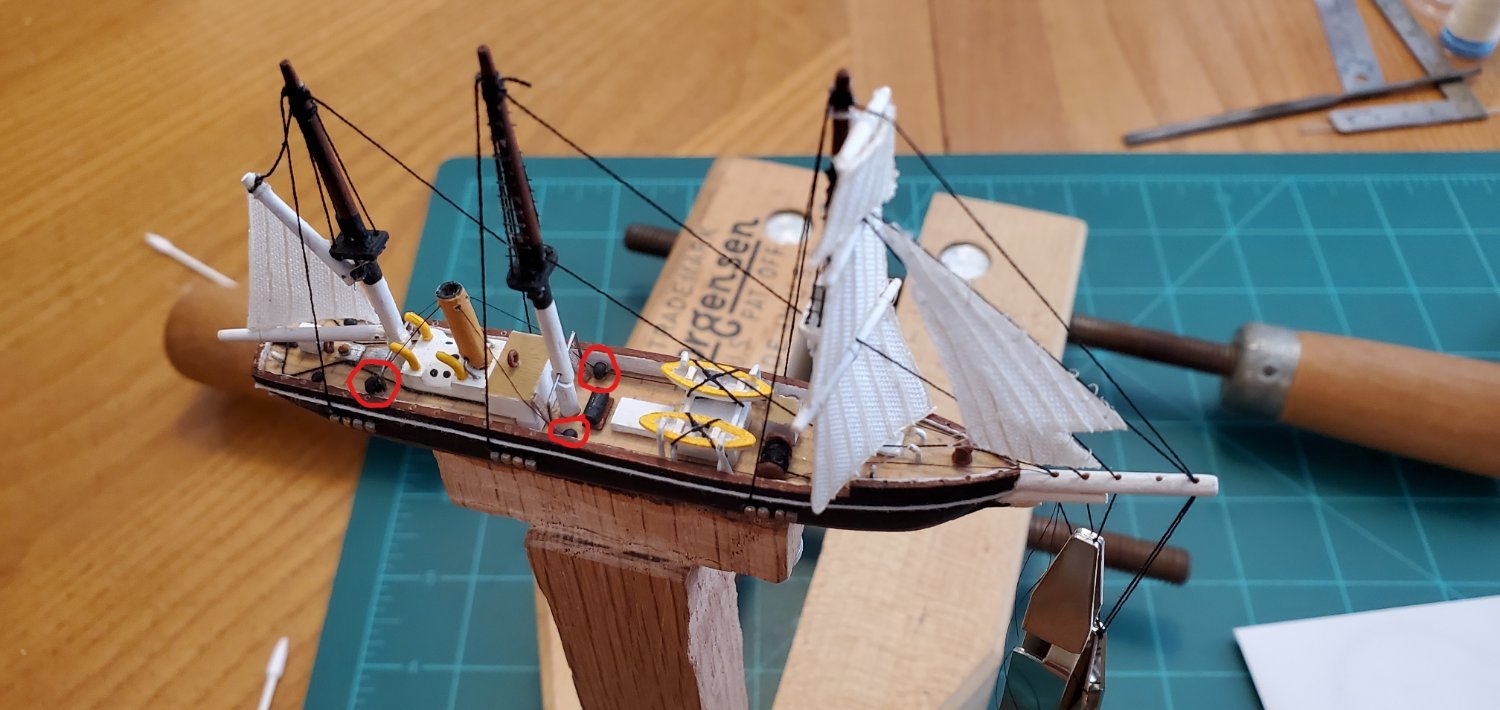
@Keith Black – By the way, Keith, your suggestion about those tiny beads came in handy when I was trying to figure out how to handle the smokestack guy wires/pull threads. I ended up using the beads to anchor the rearward guy wires and to provide routing for the forward pull threads. From my pictures of the Aurora, I cannot tell how the real guy wires were actually secured to the ship, but when I installed the beads and painted them black, they look kind of like large bollards. So I think the look is ok. And they work perfectly!
Also, MUCH respect to your wife for being able to work with those infuriating little beads. They are tiny, hard, slick, and just maddening. My floor is littered with who knows how many of those horrid things that dropped from my tweezers. And I cannot find any of them. But I somehow got 4 in place on my ship (3 circled in the pic below), so I ‘m happy!

-
The posts above are yet another example of why MSW is such a great forum. There are so many fascinating people that frequent this site.
Update on the build - progress is slow but steady. Since the last post I added all the stays as well as the jib sail and flying jib. I also added the guy wires for the smokestack. I used the thin fly-tying thread for the guy wires. The rearward 2 threads are stays. The forward 2 will be used as pull-threads for raising the smokestack after the ship is inside the bottle.

- Keith Black, mtaylor, G.L. and 4 others
-
7
-
Hey Joe, thank you so much for the additional info and posting these pictures. How incredible and fascinating. I understand that the leaders of those big expeditions spent 1/2 their time trying to secure funding for the enterprise, but this offers some rare insight into some of the actual details that most of us would never come to realize.
Yes, please alert us when you finalize a museum or museums where your artifacts will be on display.
Also, I just put 2 and 2 together. When I saw the logo on your post, I thought I recognized it from somewhere. I did some digging around and realized I had stumbled across your website of miniature ship models when I was first looking around trying to find images and information about the SY Aurora. You do some really incredible work! In fact, after I saw your model of the Endurance, I decided that I wanted to try and have a similar setting by displaying my Aurora inside the bottle surrounded by broken pack ice. I'm still not sure how I'm going to pull that off, but I don't have to worry about that for a while!
For anyone else following along, I highly recommend checking out https://www.josephlavender.com/.
- mtaylor, Rik Thistle and Keith Black
-
3
-
7 hours ago, Joe100 said:
In my collection I have items used on his sledge during the Nimrod Furthest South expedition, and items relating to the Rowett Expedition.
Whoa! That is amazing! Do you any pictures of your artifacts posted anywhere? I would LOVE to see some of them. And can you tell me what museums will be displaying some of your collection?
- mtaylor and Keith Black
-
2
-
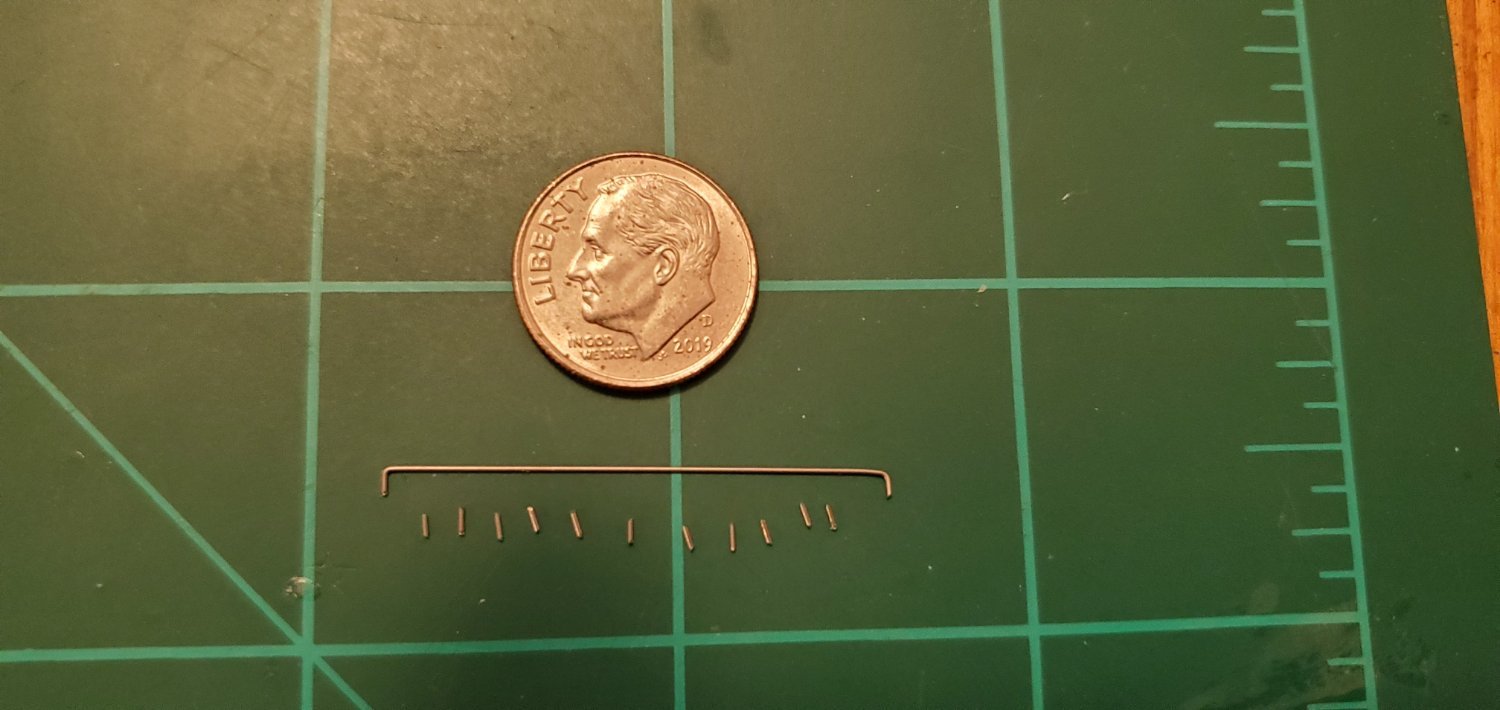
45 minutes ago, Landlubber Mike said:
It's made of foam board using the crinkled aluminum foil technique.
Mike, can you describe this technique in more detail of or point me to where I can see more info on it?
-
-
23 minutes ago, Landlubber Mike said:
I use them to help pin the first planking
Thanks, Mike. That makes sense. And probably explains why there are so many of them!
- mtaylor and Keith Black
-
2
-


SY Aurora by Glen McGuire - FINISHED - 1/500 - BOTTLE
in - Build logs for subjects built 1851 - 1900
Posted
Keith - Hmmmmm. I'm with Mark, I think that vacuum tool could have a lot of uses for a lot of things including SIBs. Hmmmmmm again.