Glen McGuire
-
Posts
1,984 -
Joined
-
Last visited
Content Type
Profiles
Forums
Gallery
Events
Everything posted by Glen McGuire
-
 A very interesting subject and kit, Ferrus. I've done one SIB with Chinese junk ships and have another SIB currently in work with a Japanese ship as the subject. I find the ancient Chinese and Japanese ships fun (and challenging) to build because of their unique hull shapes, deck structures, and sails. Really nice start with the weathering process of the hull. This should be a great tutorial for your friend. Looking forward to see your work here.
 -
Agree with Keith B and Wefalck. appreciate the update and look forward to you resuming work when possible.
-
Oh duh! Wipe on poly. I should have figured that out since I use it frequently. 🙄 Thanks for the explanation!
-
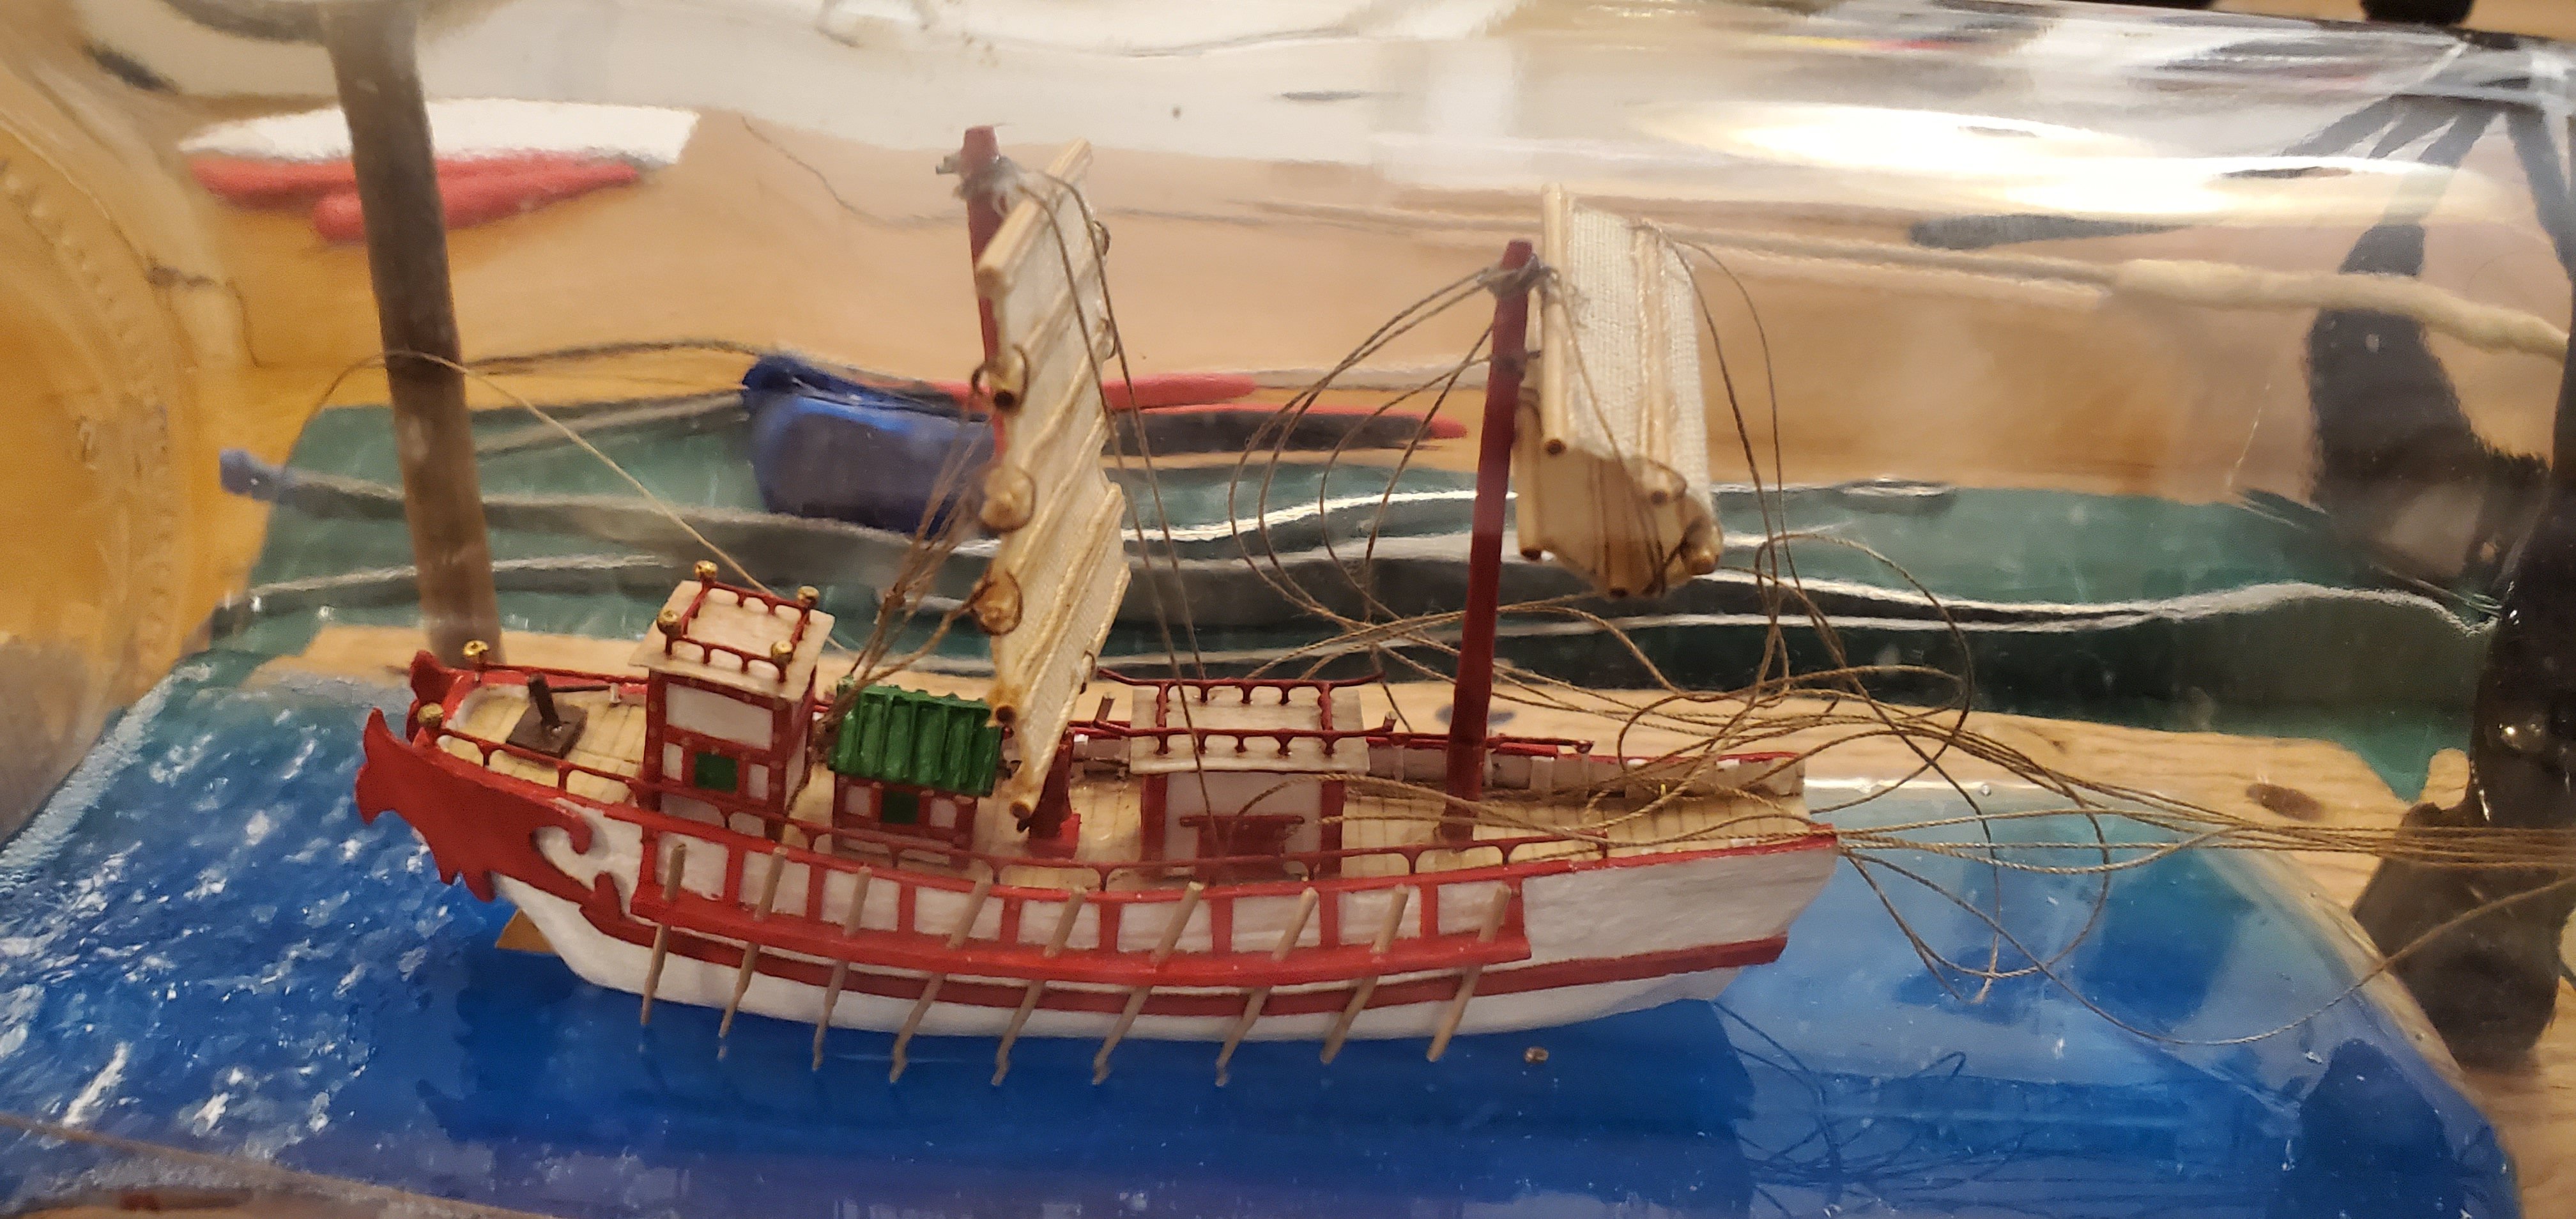
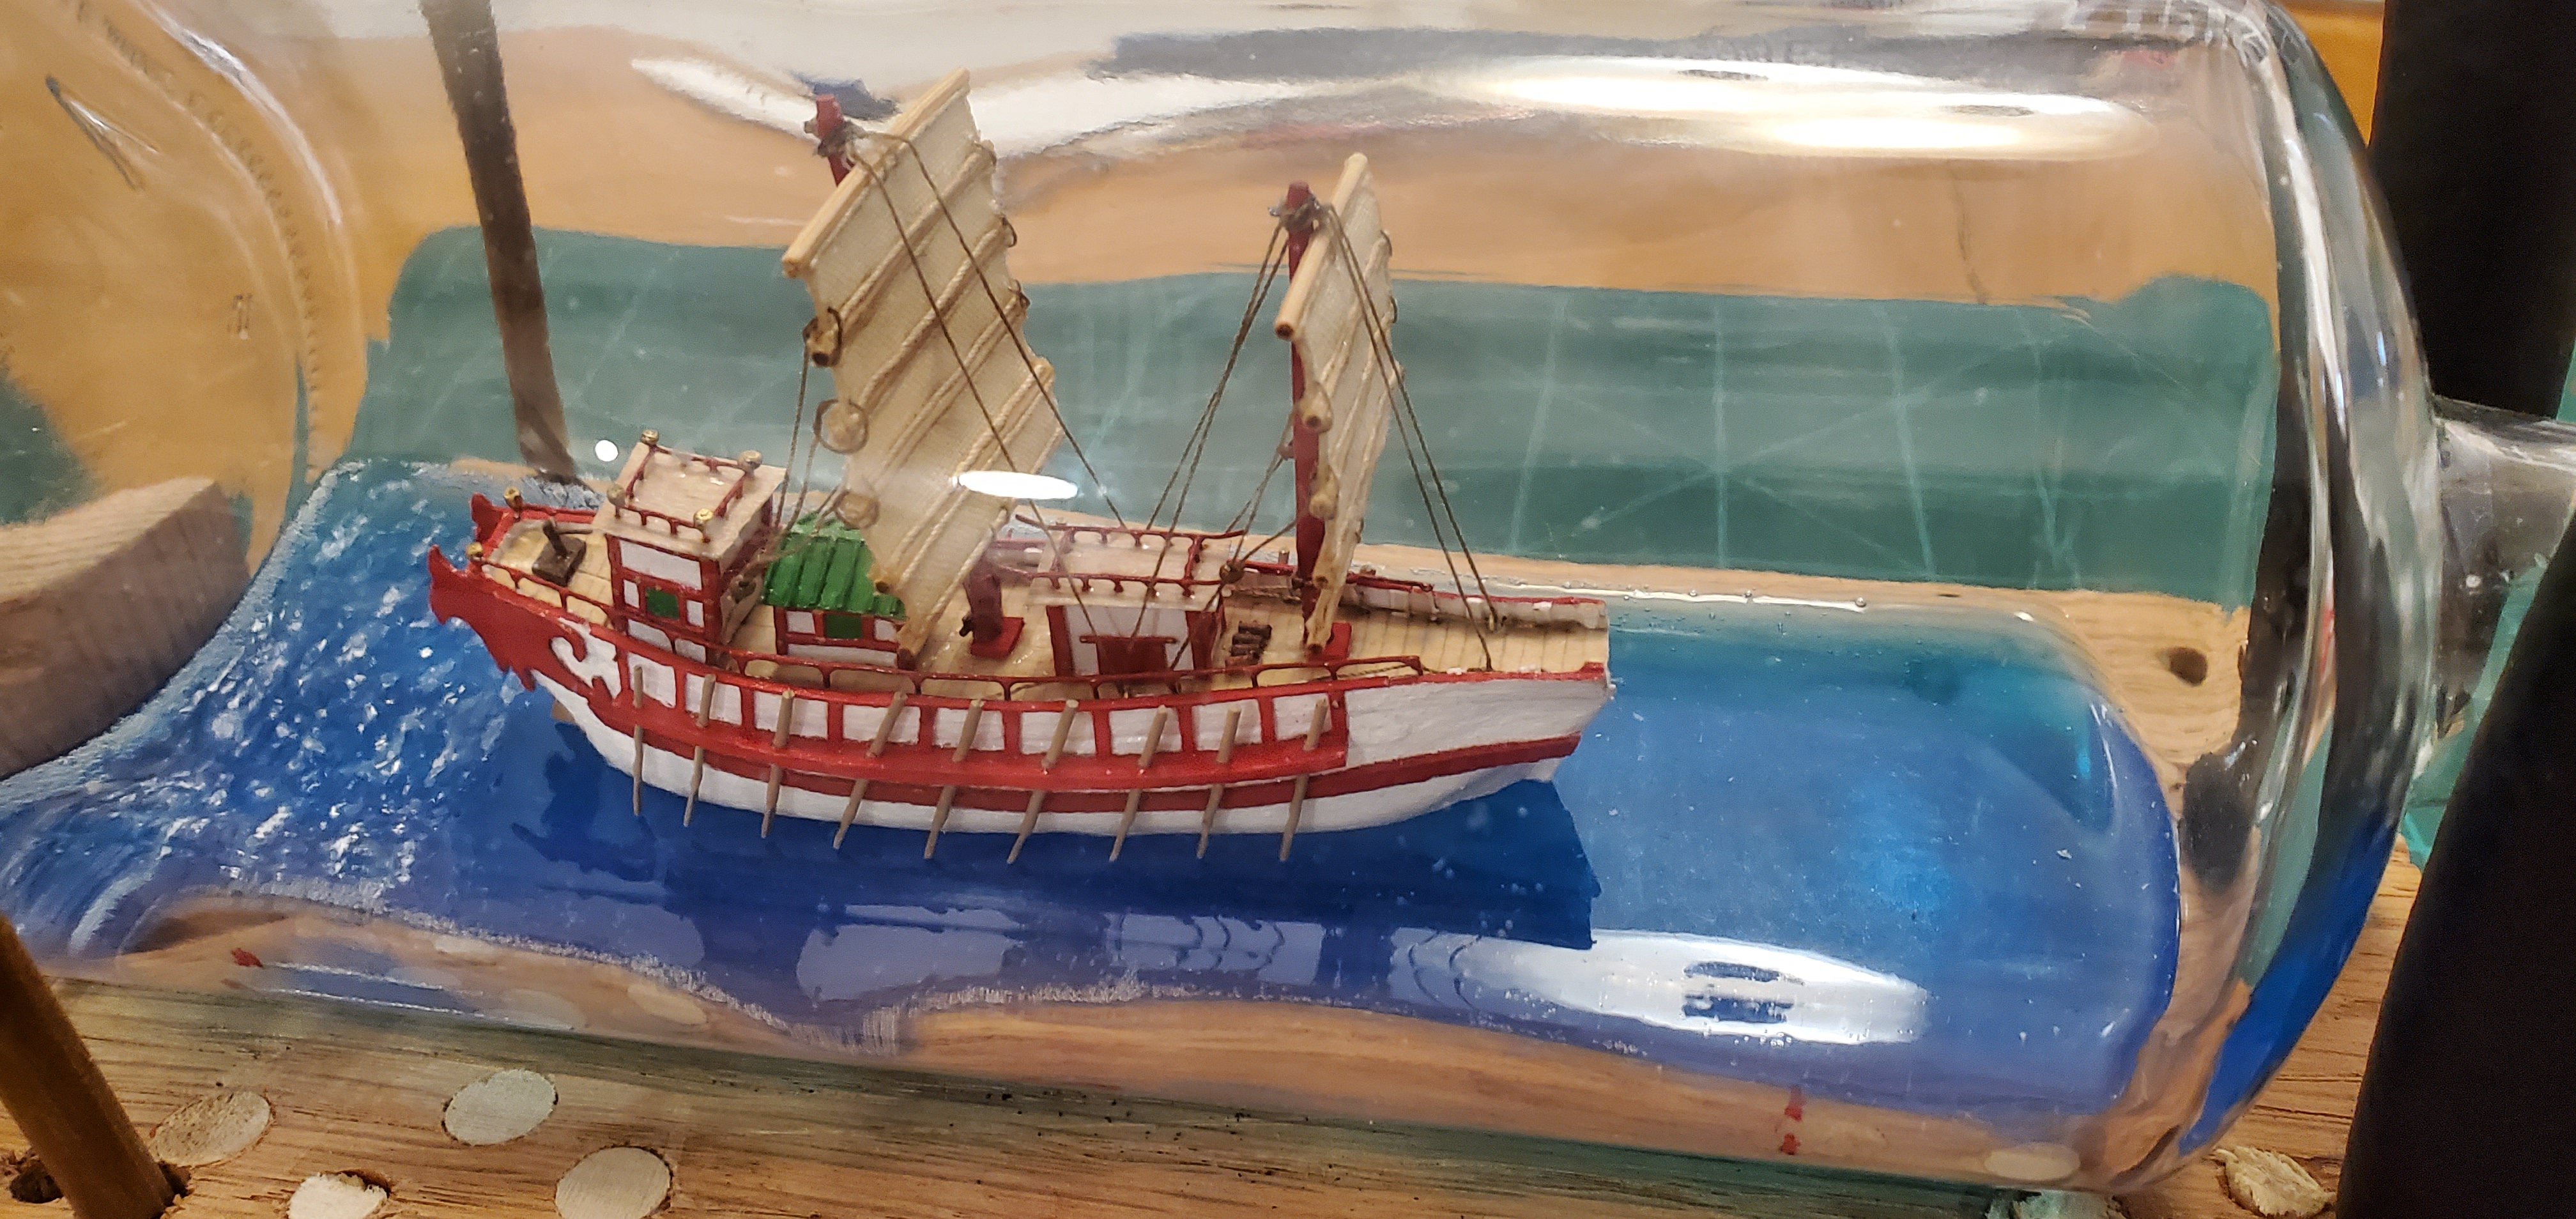
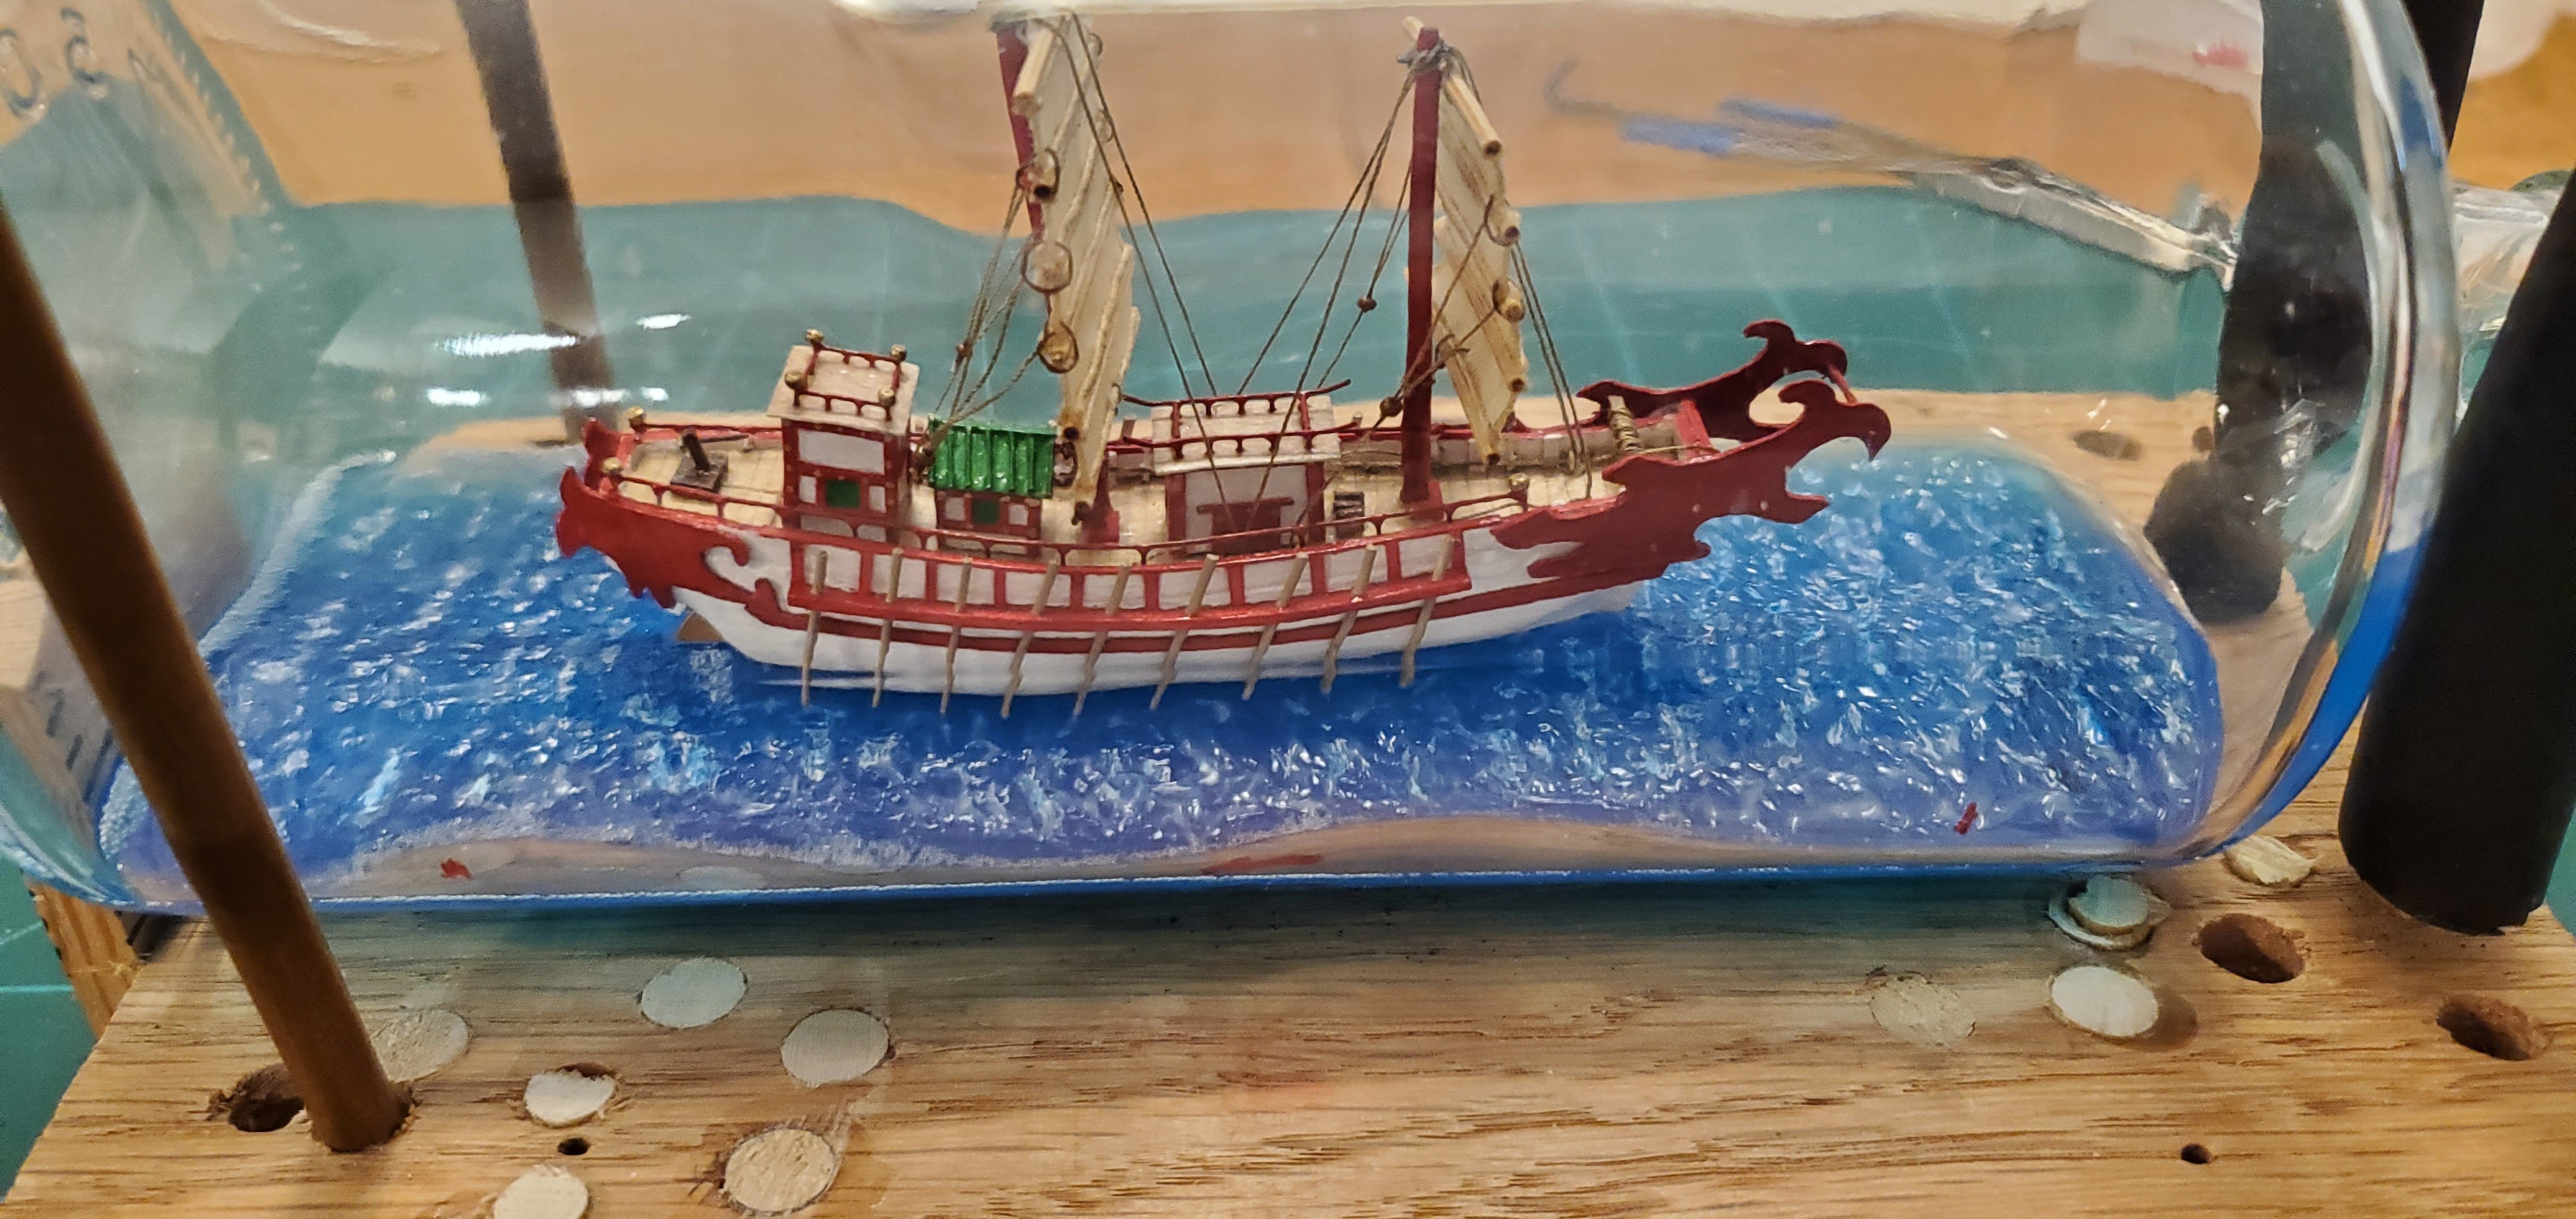
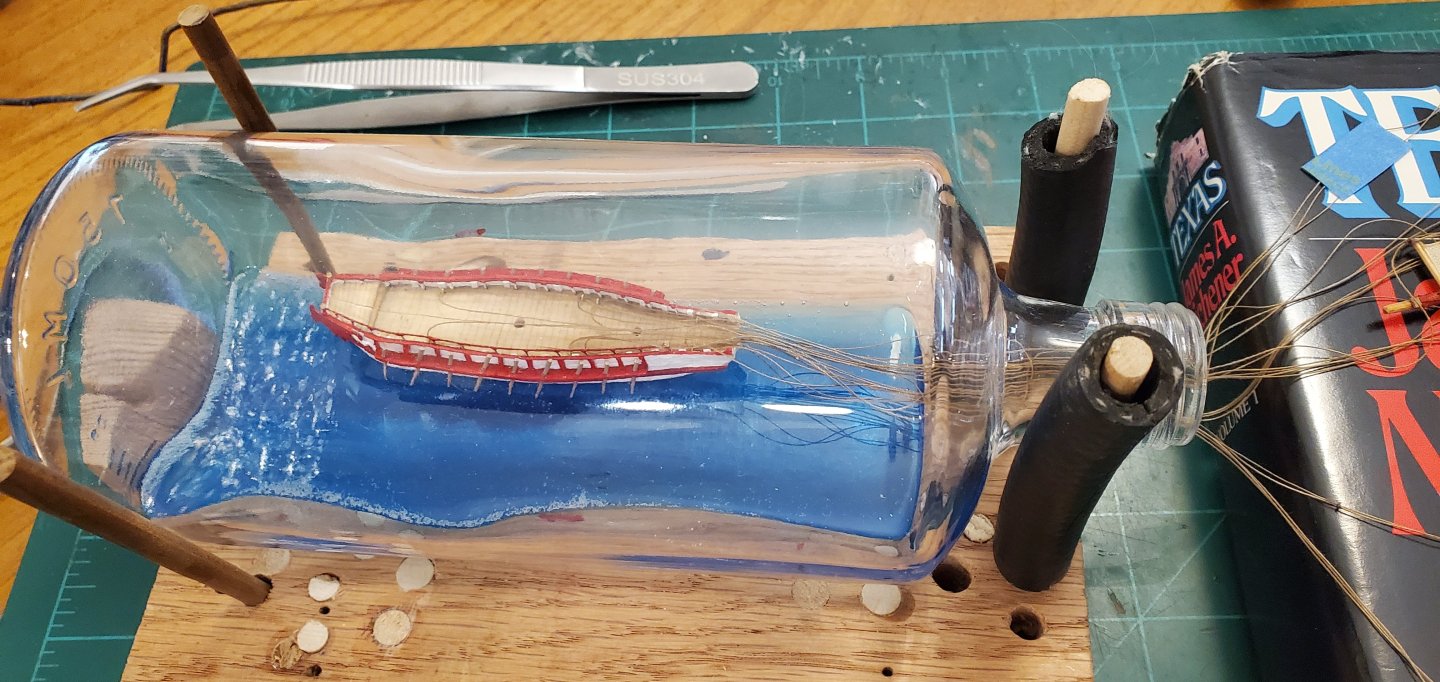
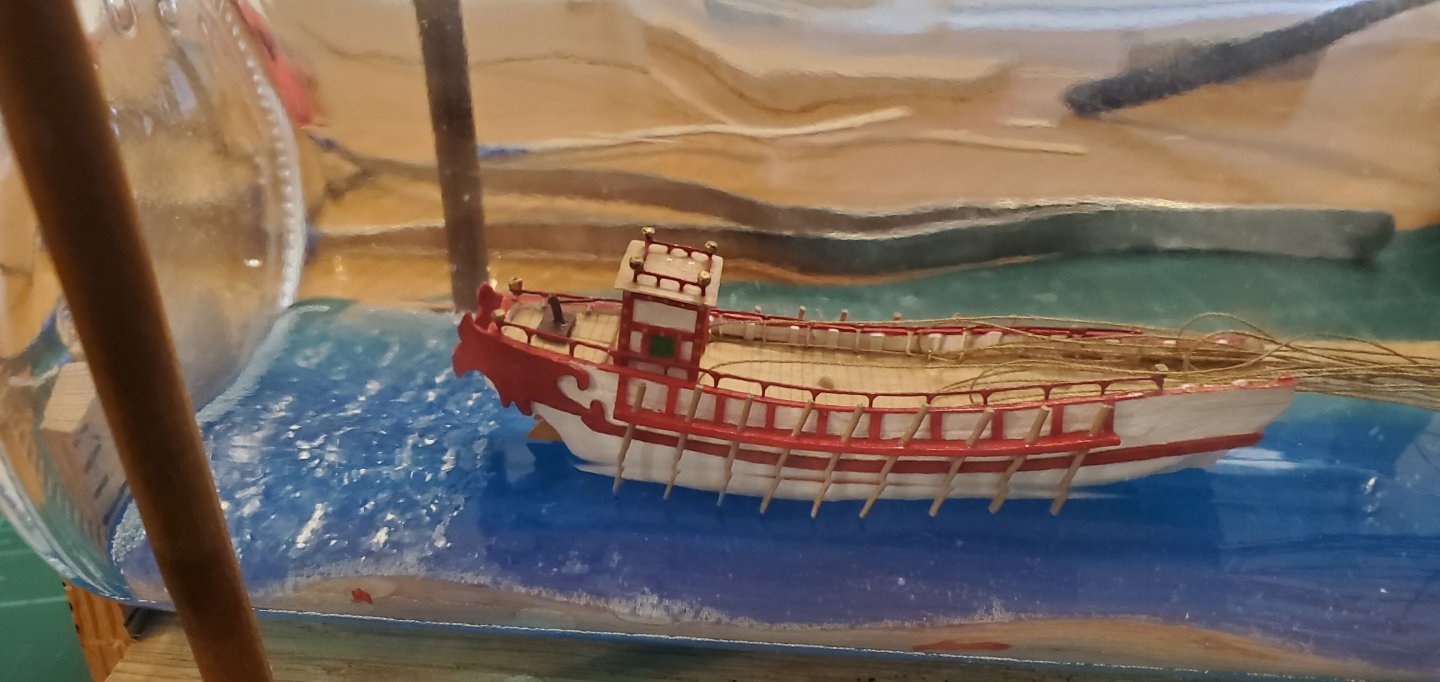
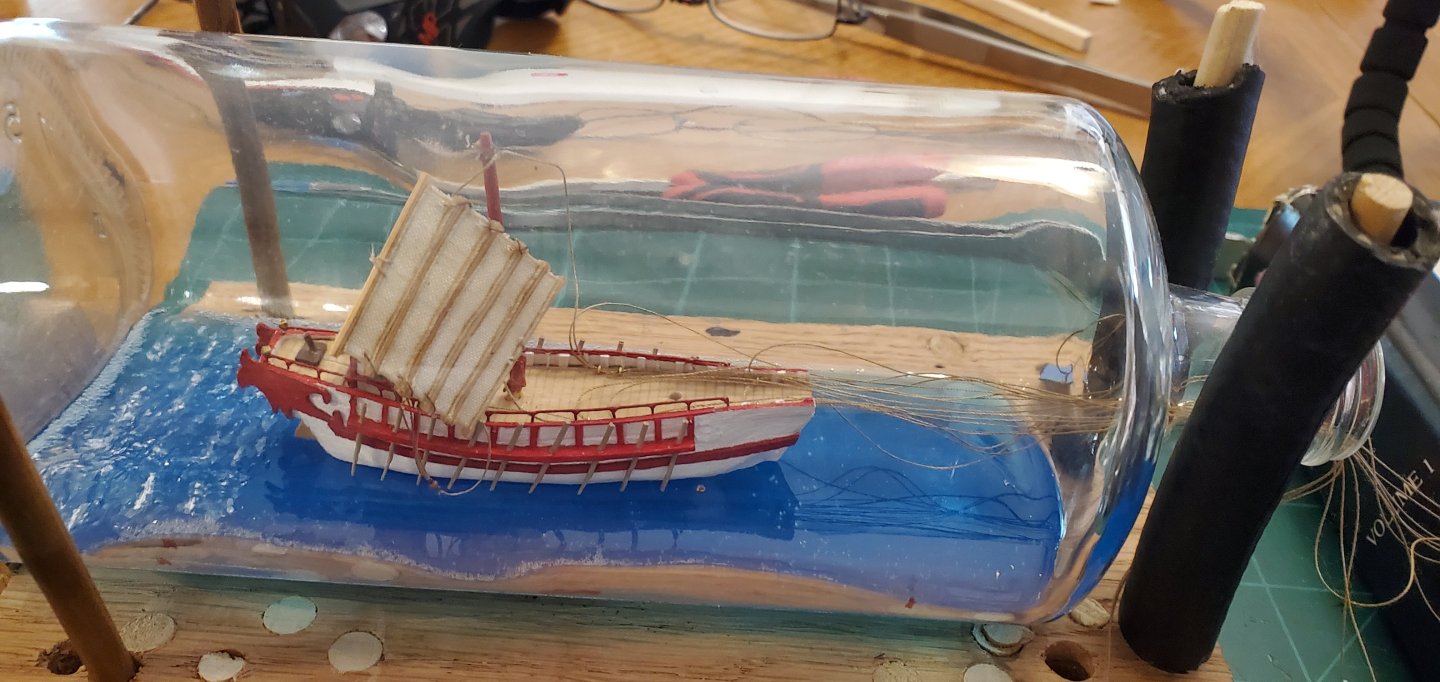
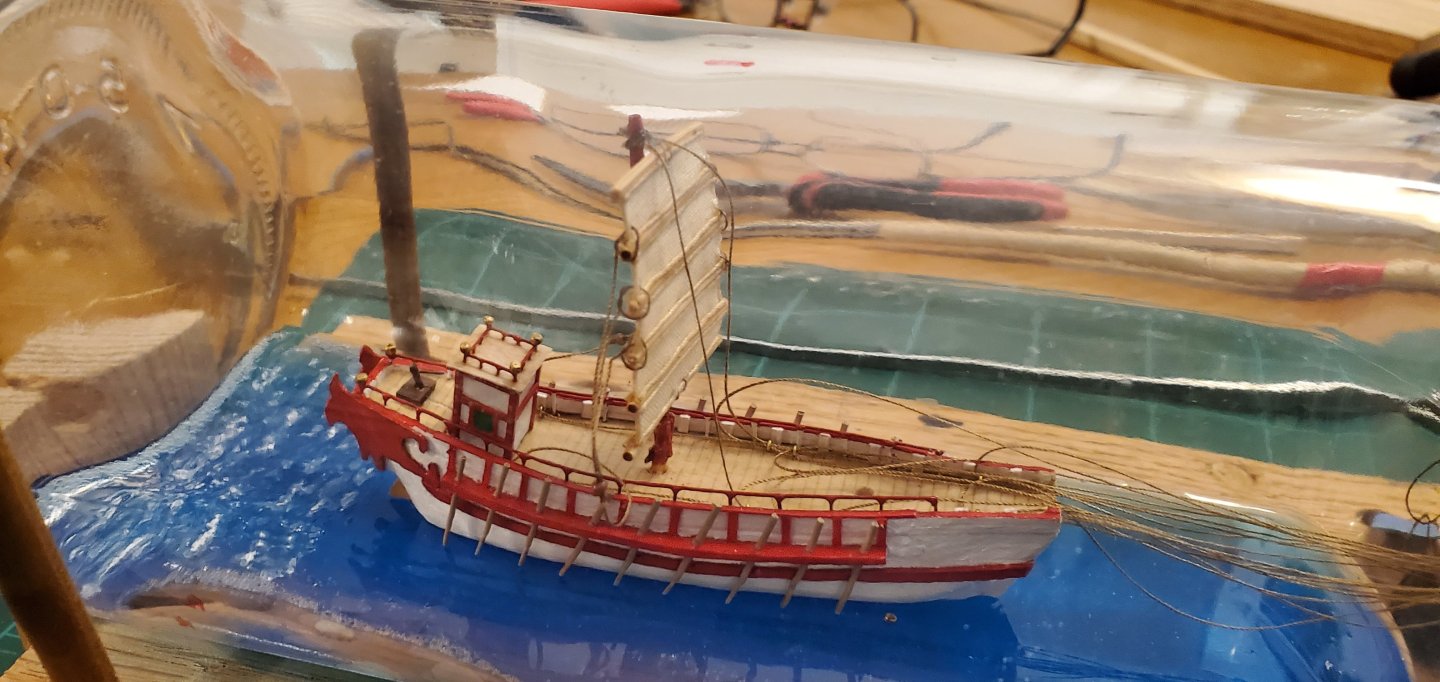
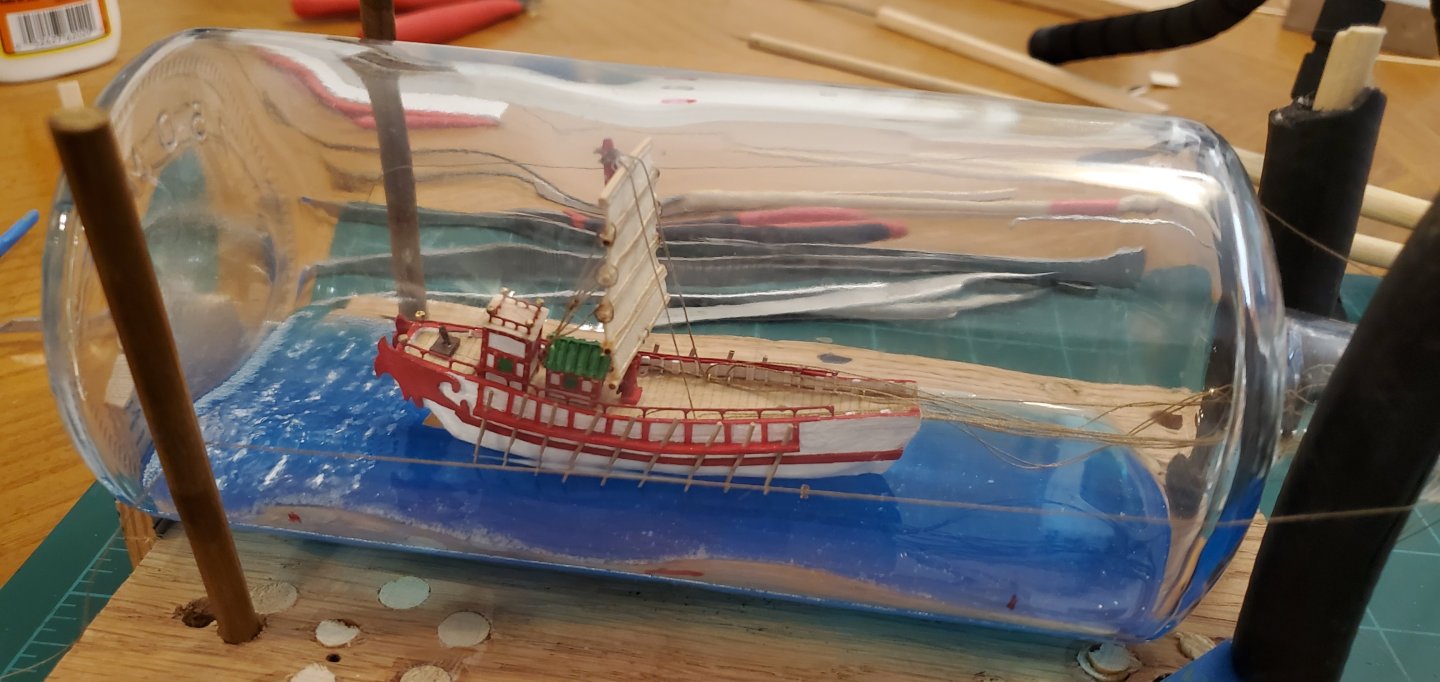
Thank you @Thukydides! The insertion process was a doozy. It took me 8 or 9 hours to get the ship assembled inside the bottle and another 3 or 4 to get the water effects finished up (not counting drying time). There were quite a few self-inflicted wounds that caused the process to take so long. But it the end, we got er done! I took some videos of much of the ordeal. So if anyone wants to see how the sausage was made, here's the 12 hour process condensed down to three 8 - 9 minute videos. Part 1 - https://www.youtube.com/watch?v=2NnI9r-tPeQ Part 2 - https://www.youtube.com/watch?v=6_T9eUPj0f0 Part 3 - https://www.youtube.com/watch?v=UXudxchH3-Y Here's the picture version of the process, starting with the 2 halves of the hull ready for insertion. You can see the rigging lines as described in the post above - attached to the sails/masts, running thru the eye pins on the hull halves, then back out of the bow where the ends will remain outside the bottle after hull insertion. Here's the 2 halves of the hull joined up inside the bottle. Rigging lines are nice and tidy. You may notice that I actually textured the water behind the ship BEFORE insertion. Wow! What a concept! It only took me 3 years of doing this stuff to figure that out. Tiller and first deck house installed. Now the real first test - installing the main mast and tensioning the rigging. Lines still nice and tidy. I got the main mast installed ok, and without tangling the rigging lines, but managed to detach the top of the sail from the top of the mast. Ugh. However, using a new tool in the tool box (a barbecue skewer), I was able to push the sail into place and glue it to the top of the mast. It's not tied on, but I globbed enough CA glue on it to keep it secure. Then I realized I'd made another unforced error. I was so anxious to try and get that first mast/sail assembly in place that I forgot to install the little Monopoly house that goes in front of the larger house (Monopoly hotel?) already in place. So I had to thread the needle and fit the little house between the rigging lines and into place. Quite a bit of difficulty doing that (as you can see in the video), but I eventually got there. I got the 2nd Monopoly hotel into place with no difficulty. Then the horror show began. It took me 2 long tries to get the fore mast into place. At one point, I ended up pulling it back out of the bottle, untangling the lines, and re-inserting. On the second try, I finally managed to get the mast in the deck hole, but made a gawd-awful mess of the rigging lines. It took 3 or 4 hours to get the rigging lines for the fore mast/sail untangled, tensioned, and tied off. Ugh. But in the end, the mule finally won out. That ended day 1 of the process. Moving to day 2 of the process and smooth sailing the rest of the way! Day 2 was spent completing the water effects and adding the ornamental carving on the bow. I had textured the water behind the boat before insertion. Now it was just a matter of adding the texture around the sides and in the front. I wanted to texture the water first so I wouldn't have to mess with reaching underneath the ornamental carving and risk knocking it off or damaging it. For texturing, I dabbed on some clear acrylic medium gloss gel to make gentle waves. After it dried, I added some touches of white paint to many of the wave tops for whitecaps. After that dried, I went back over many of the whitecaps with Tamiya clear blue paint. It has a transparent quality and is a shade lighter than my epoxy resin base. It had the dual effect of softening the whitecaps and adding a lighter blue color to the tops of the waves giving a layered effect of blue coloring, much like real waves (although kind of hard to see thru the camera lens). And with that, the insertion process was complete! Only one thing left to do - celebrate with a tipple of Bundaberg courtesy of Pat (a.k.a @BANYAN). Mini-Dimples heard me busting out the Bundaberg and decided to make an appearance. She rates the ship and the rum 2 horns up!


- 106 replies
-
- 21
-

-

-
- Kentoshi-Sen
- bottle
- (and 1 more)
-
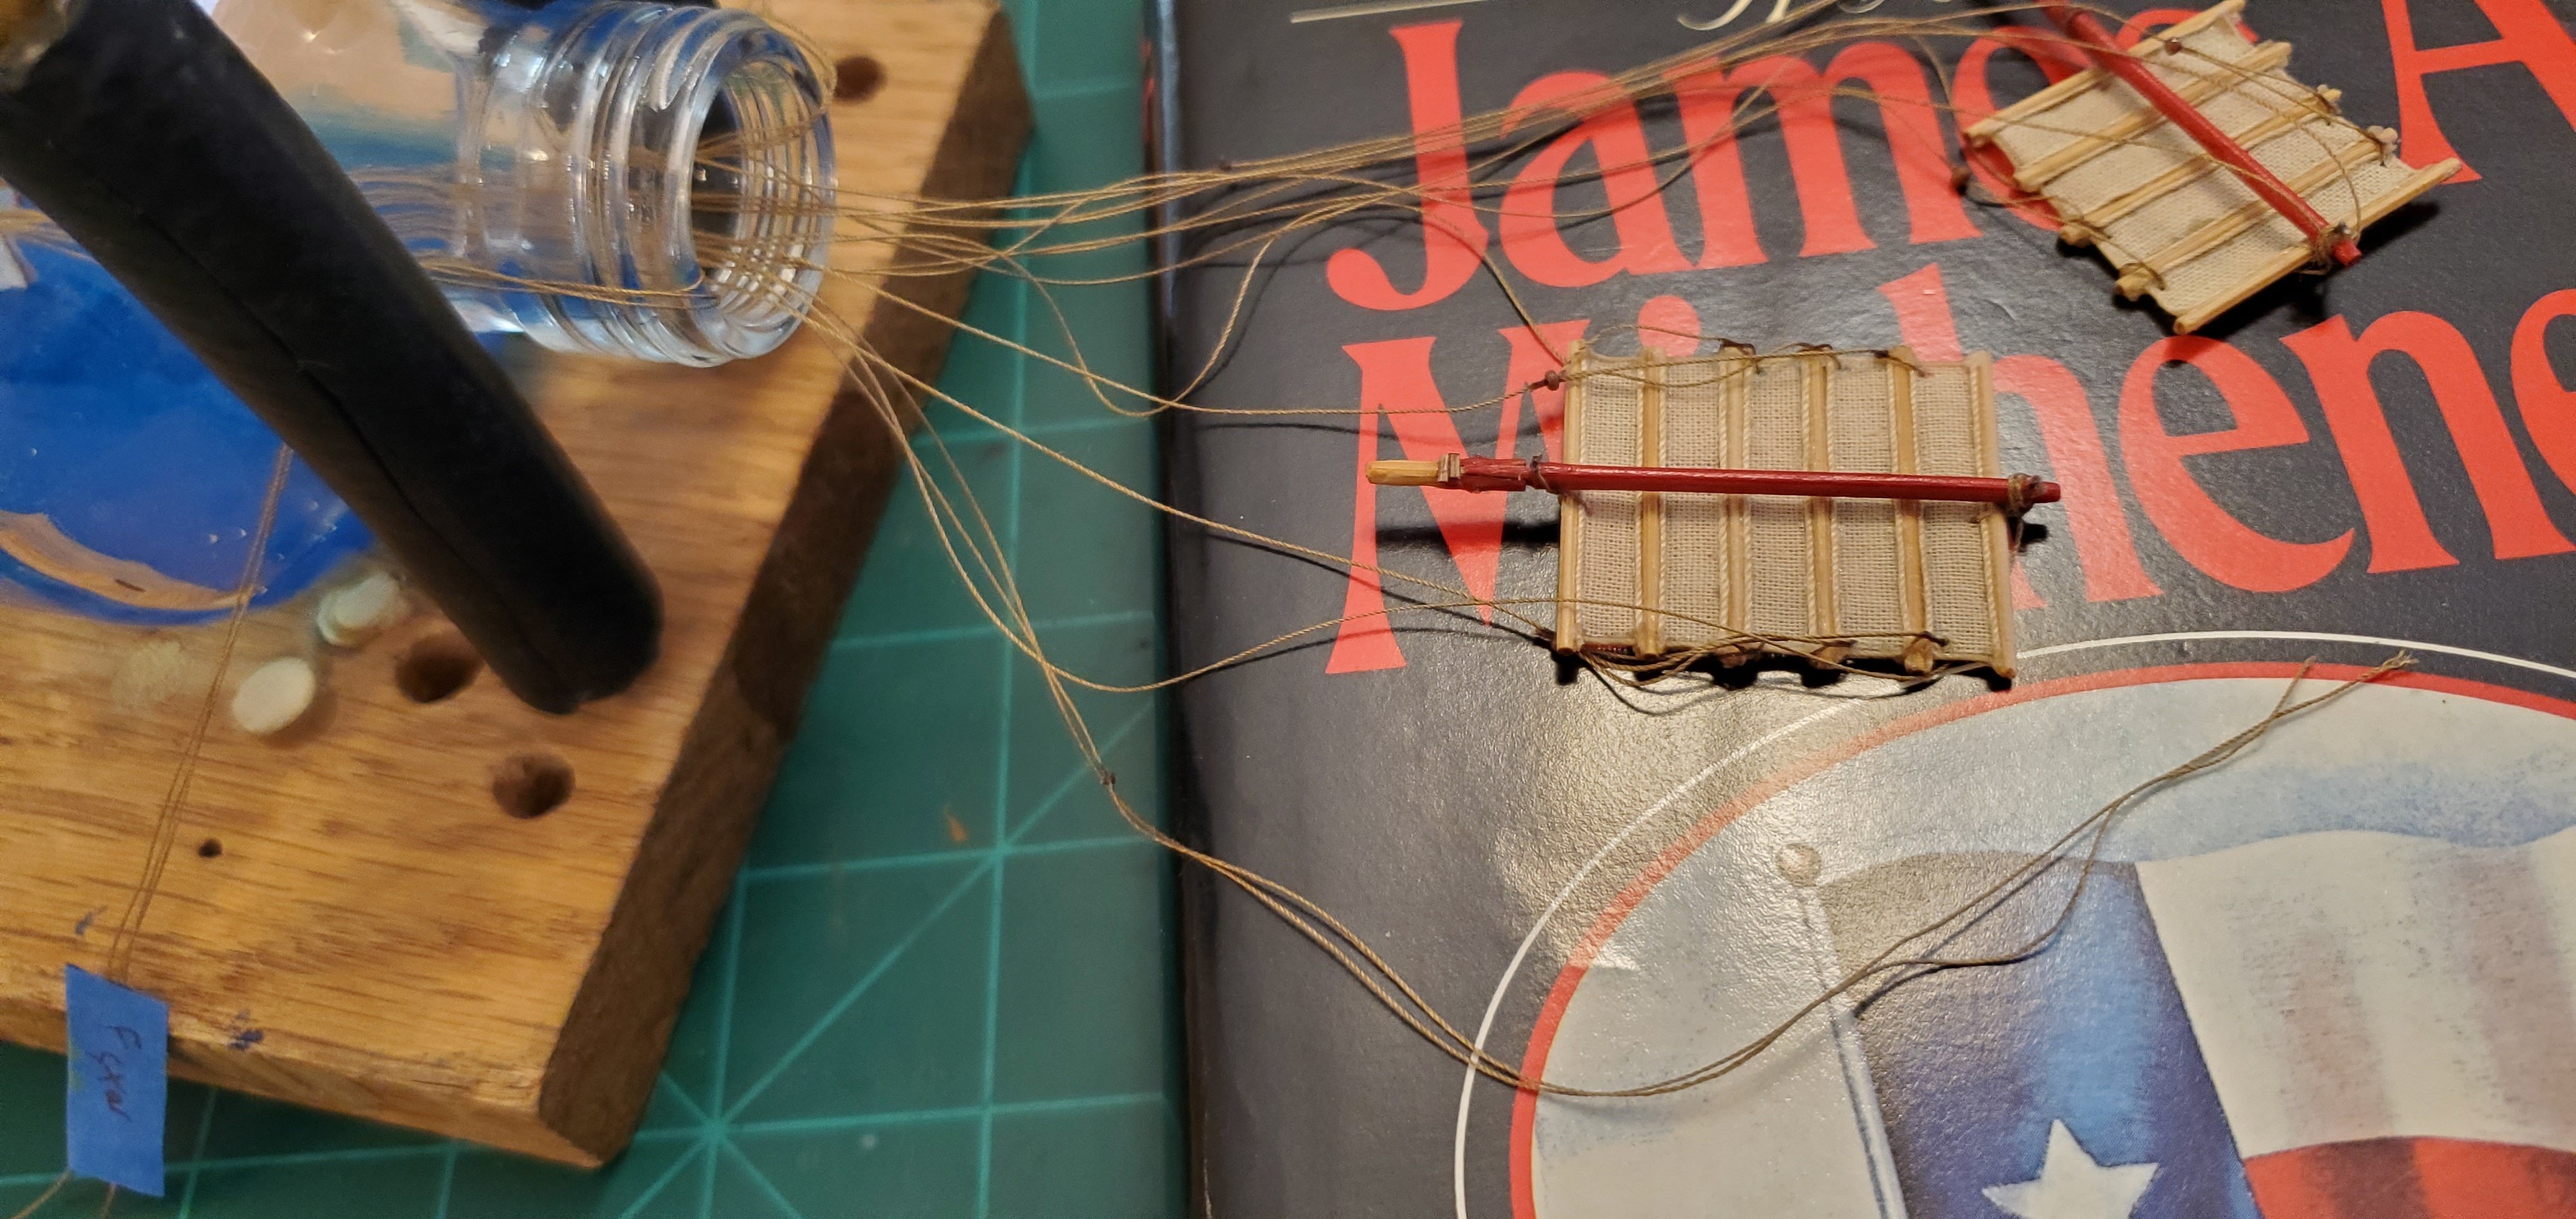
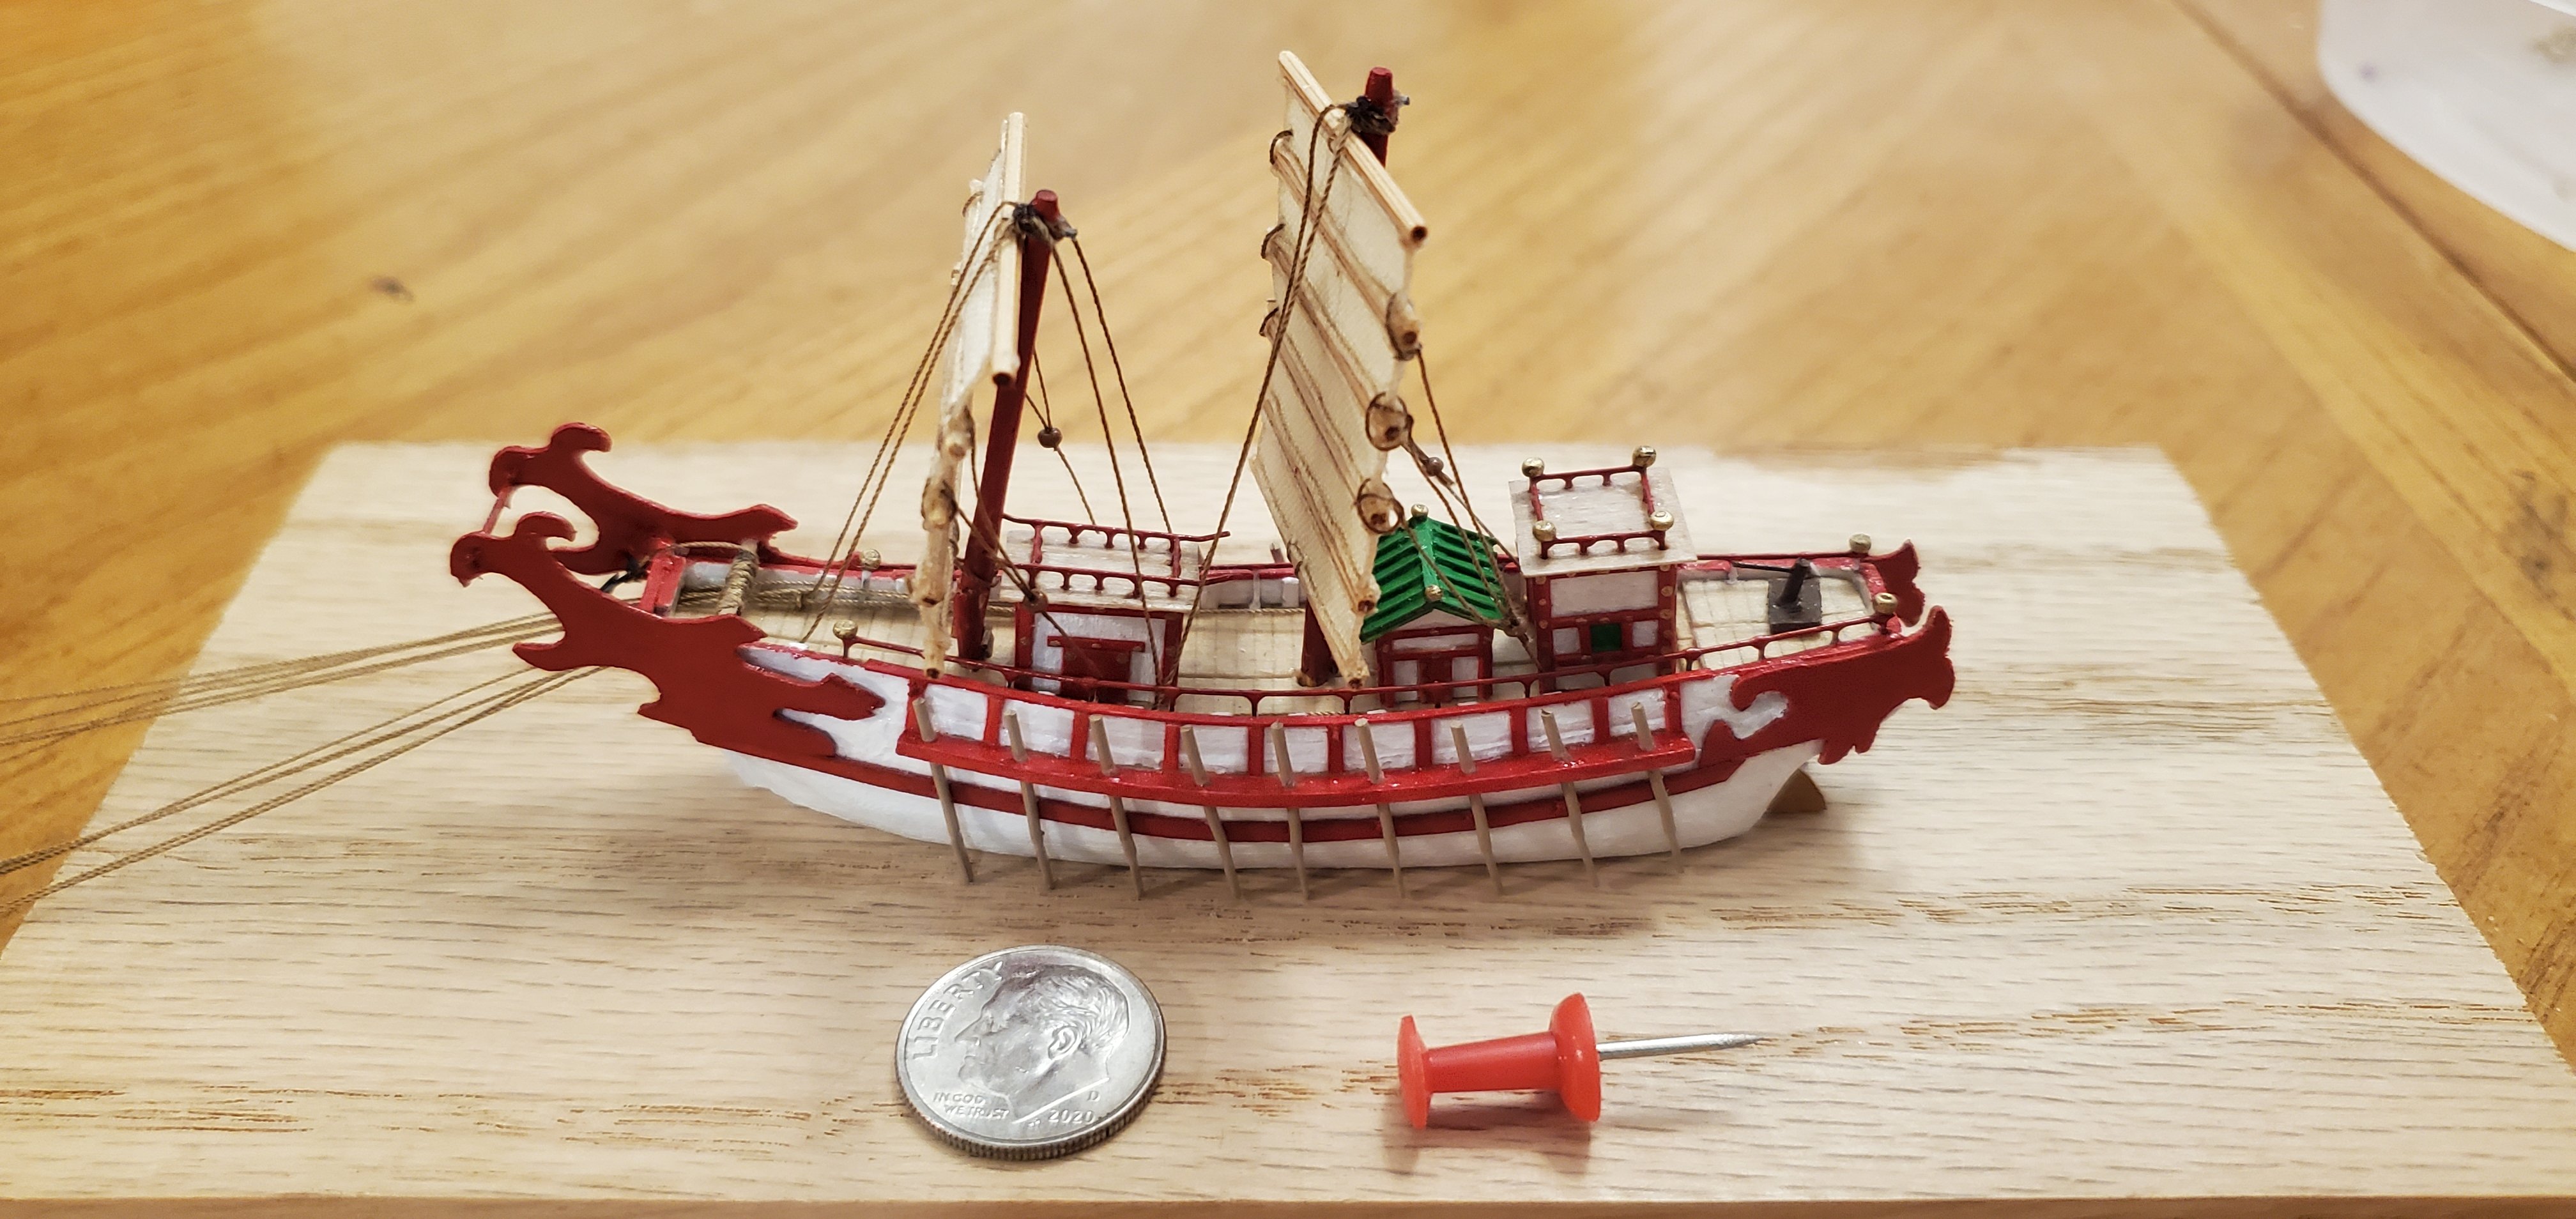
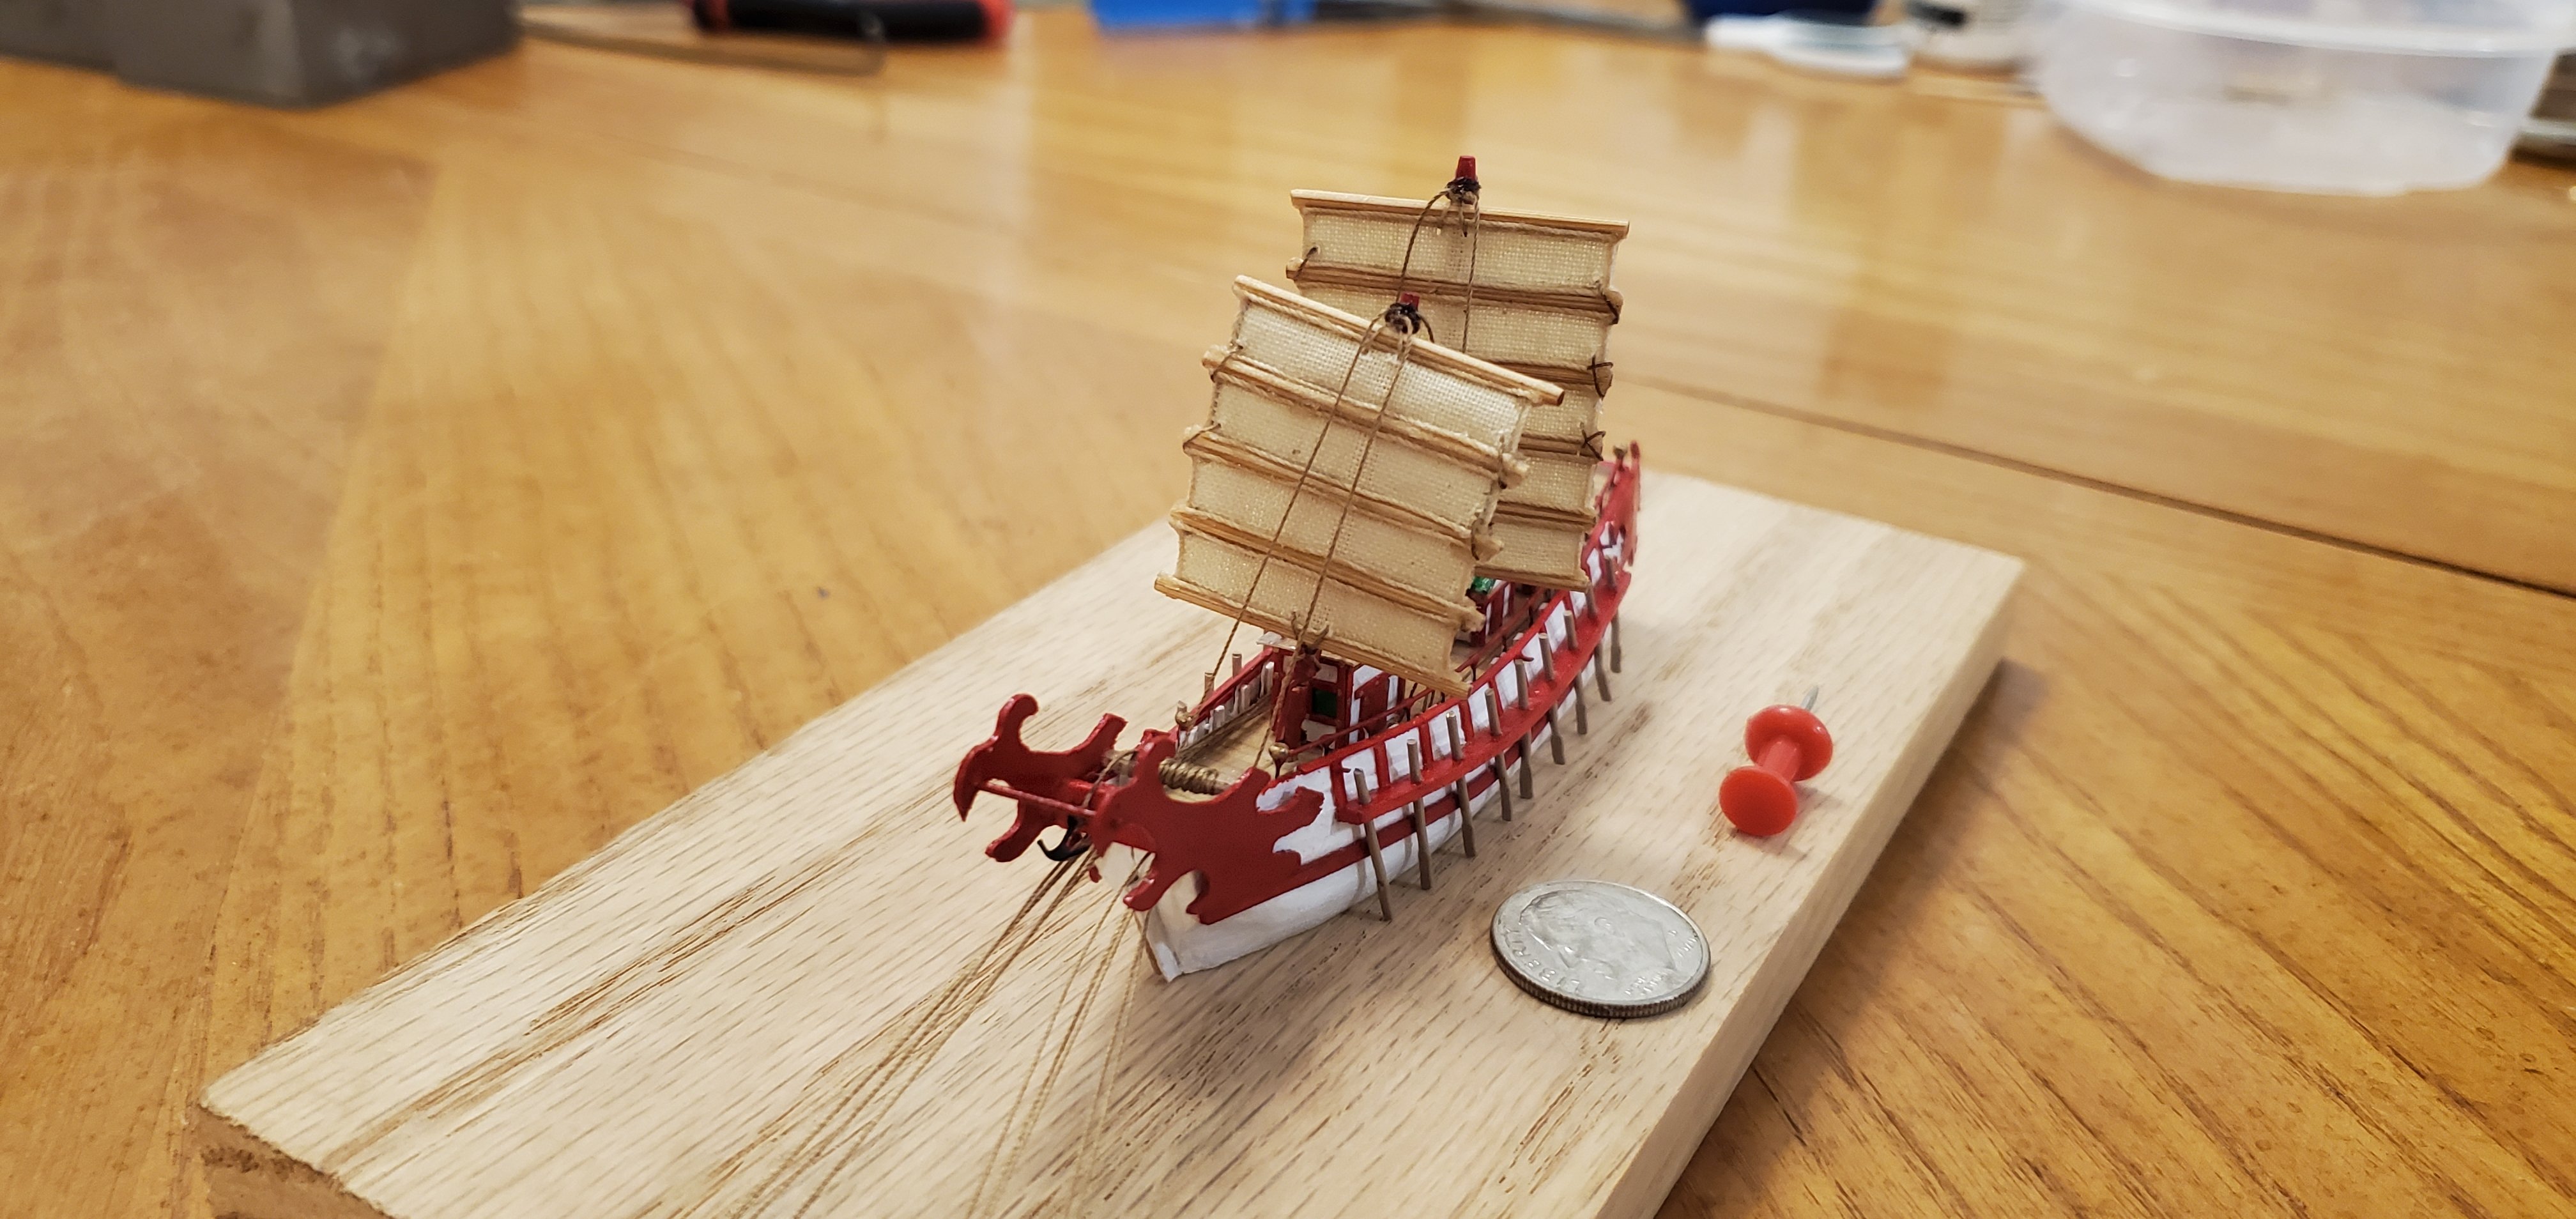
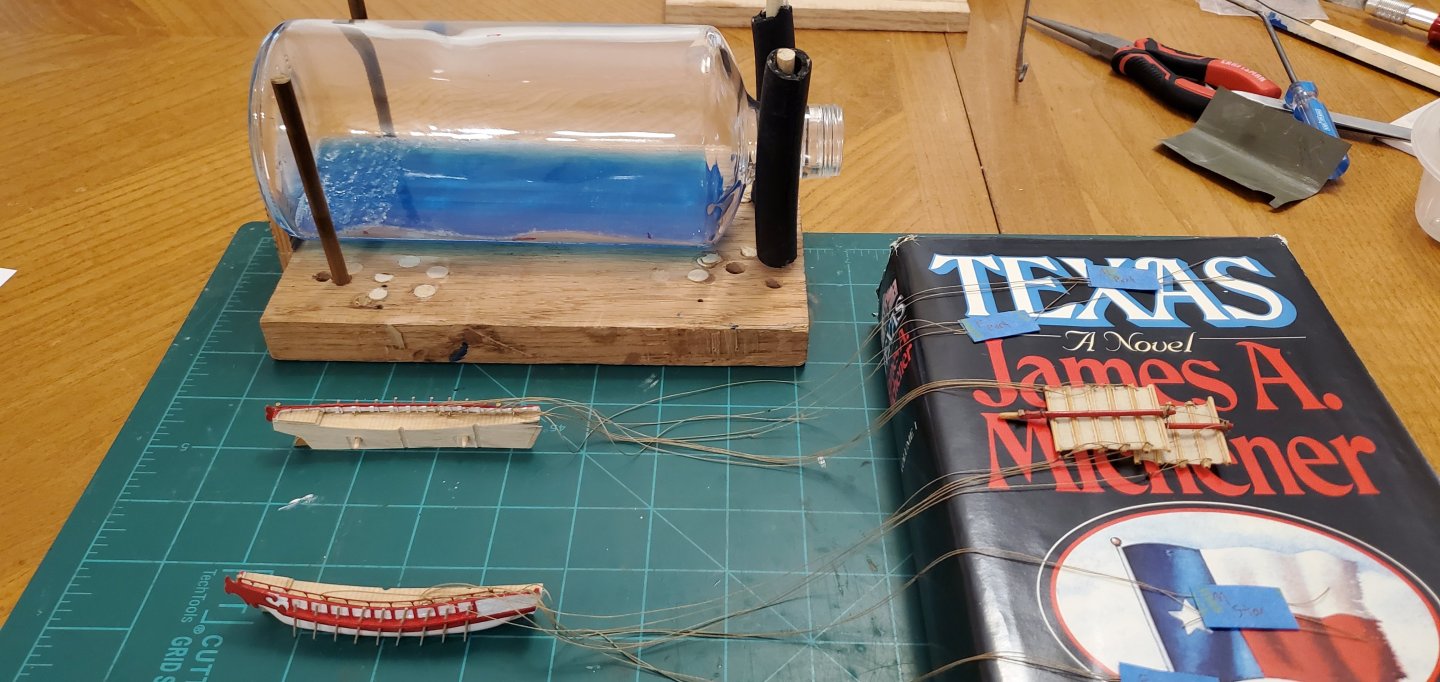
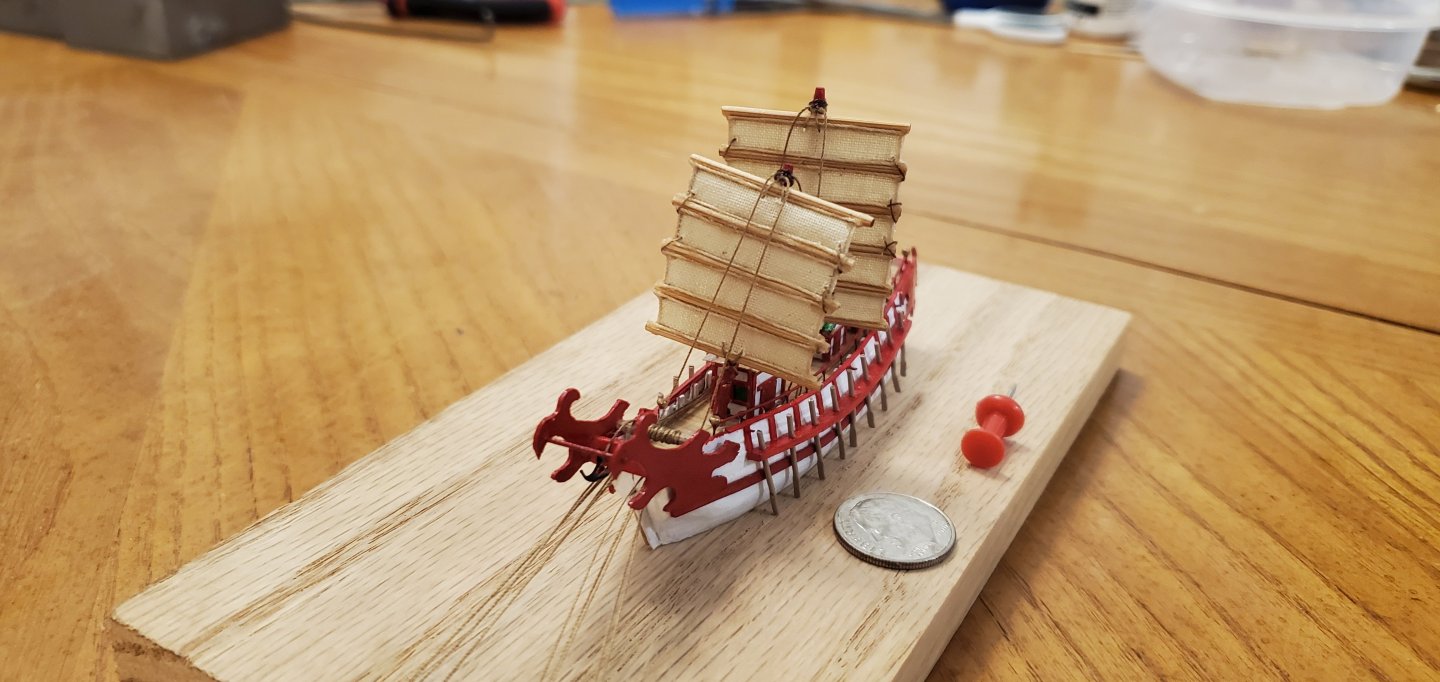
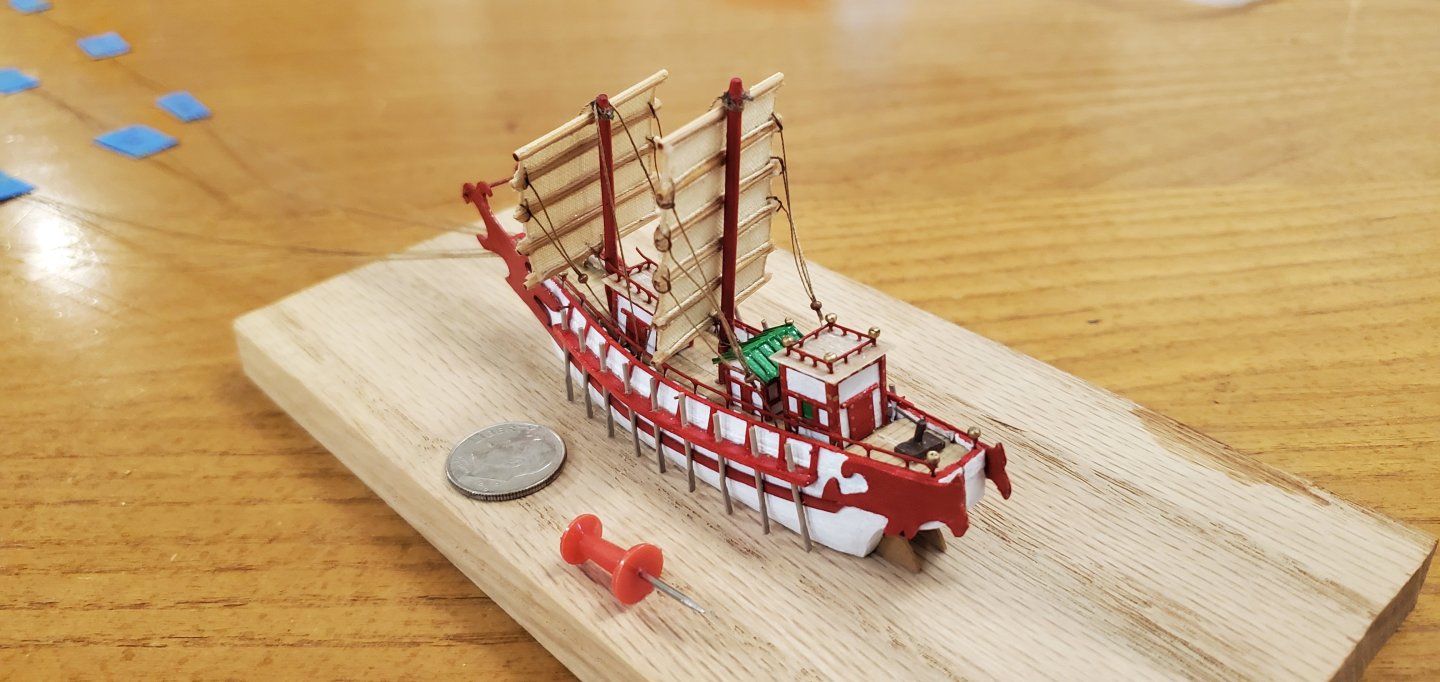
@lraymo - Thank you for the kind words! Almost time for the moment of truth! But how to manage the rigging was driving me nuts. The problem being that, because of the 3 large deck houses, the masts/sails had to be installed after the hull was in the bottle - meaning that the rigging could not be tied off to the ship in advance. The masts/sails would have to have their rigging attached before insertion. After insertion, all the lines would have to be tensioned and tied off inside the bottle. So the plan I came up with was to put a series of eye pins on each half of the deck just inside the bulwark. One end of the rigging lines would be attached to the masts/sails. The lines would then run thru the eye pins on each half of the hull and back out the bow. I would insert the 2 halves of the hull into the bottle with the rigging lines running thru the eye pins and then join the hull halves inside the bottle (careful to keep the rigging lines from falling in between the halves of the hull). To insert the mast/sail assembly, I would push it into the bottle while simultaneously pulling the other ends of the rigging lines thru the eye pins trying not to tangle things up during the process. If everything went well, I would be able to drop the end of the mast into it's hole in the deck, raise the mast, tension all the rigging lines, then cut them off. Arnold says... Before I got started, I figured I'd better take some pics of the ship with everything dry-fit in place. In the next post, I'll show how the insertion process went.


- 106 replies
-
- 19
-
-
-
- Kentoshi-Sen
- bottle
- (and 1 more)
-
Very handy tools! I also use them to square things up. Also, what is WOP?
-
Agree with Ken and Jim about the nice tension on the chains. That had to be harder than you make it sound to get it just right. Also, if you're looking to kill 2 birds with one stone, here's a suggestion for the onboard animal and broom.

- 732 replies
-
- 11
-

-
-
- Lula
- sternwheeler
- (and 1 more)
-
It looks lie a small bit of chatter from a planer, but as Wefalck said, it's hard to diagnose from the picture. What does the other side of the board look like?
- 312 replies
-
- 4
-
-
- Chile
- Latin America
- (and 6 more)
-
He should be. That is extraordinary work, Steve.
-
Excellent job on the planking, Paul. That's as good as I've seen.
-
This discussion reminds me of a quote from Antarctic explorer Douglas Mawson, aboard the SY Aurora on one of its voyages to the ice. He described the scene on the deck as follows, “The piles of loose gear presented an indescribable scene of chaos. The deck was so encumbered that only at rare times was it visible.”
- 732 replies
-
- 5
-
-
- Lula
- sternwheeler
- (and 1 more)
-
Of course you know what I would recommend for the ship's animal, don't you Keith!
- 732 replies
-
- 8
-
-
-
- Lula
- sternwheeler
- (and 1 more)
-
Magnificent work, Bryan! the paraphernalia inside the boat really add some nice detail. Well done!!
-
Here's my answer to that question, Pat - everything/nothing!
- 301 replies
-
- 5
-
-
- Constitution
- Bluejacket Shipcrafters
- (and 1 more)
-
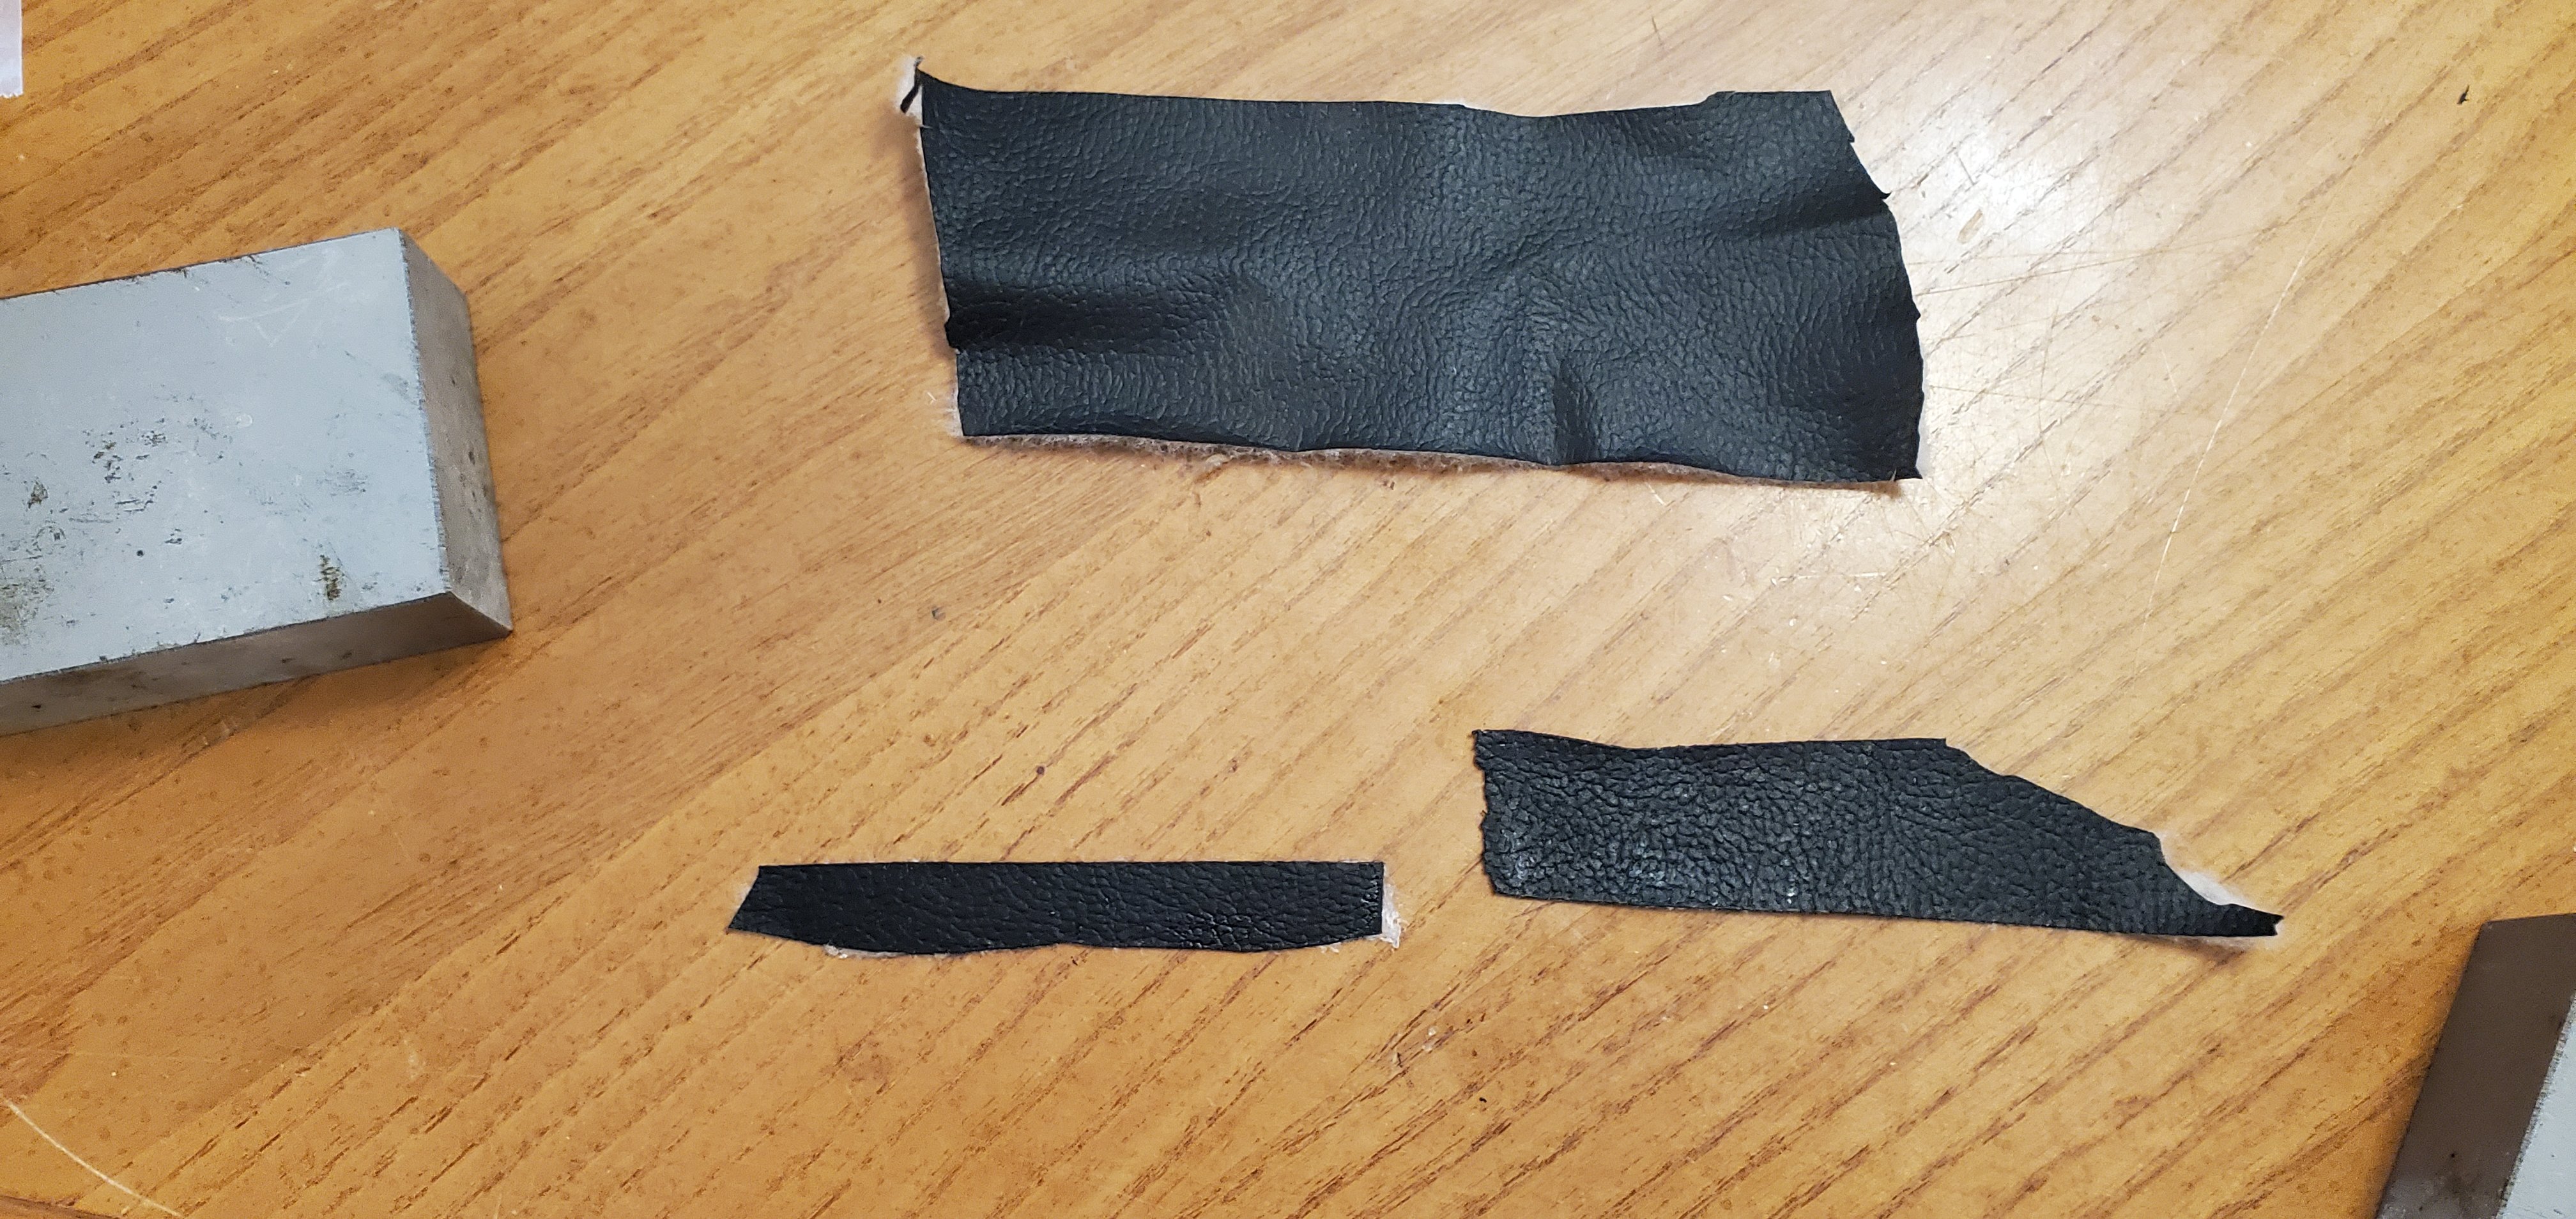
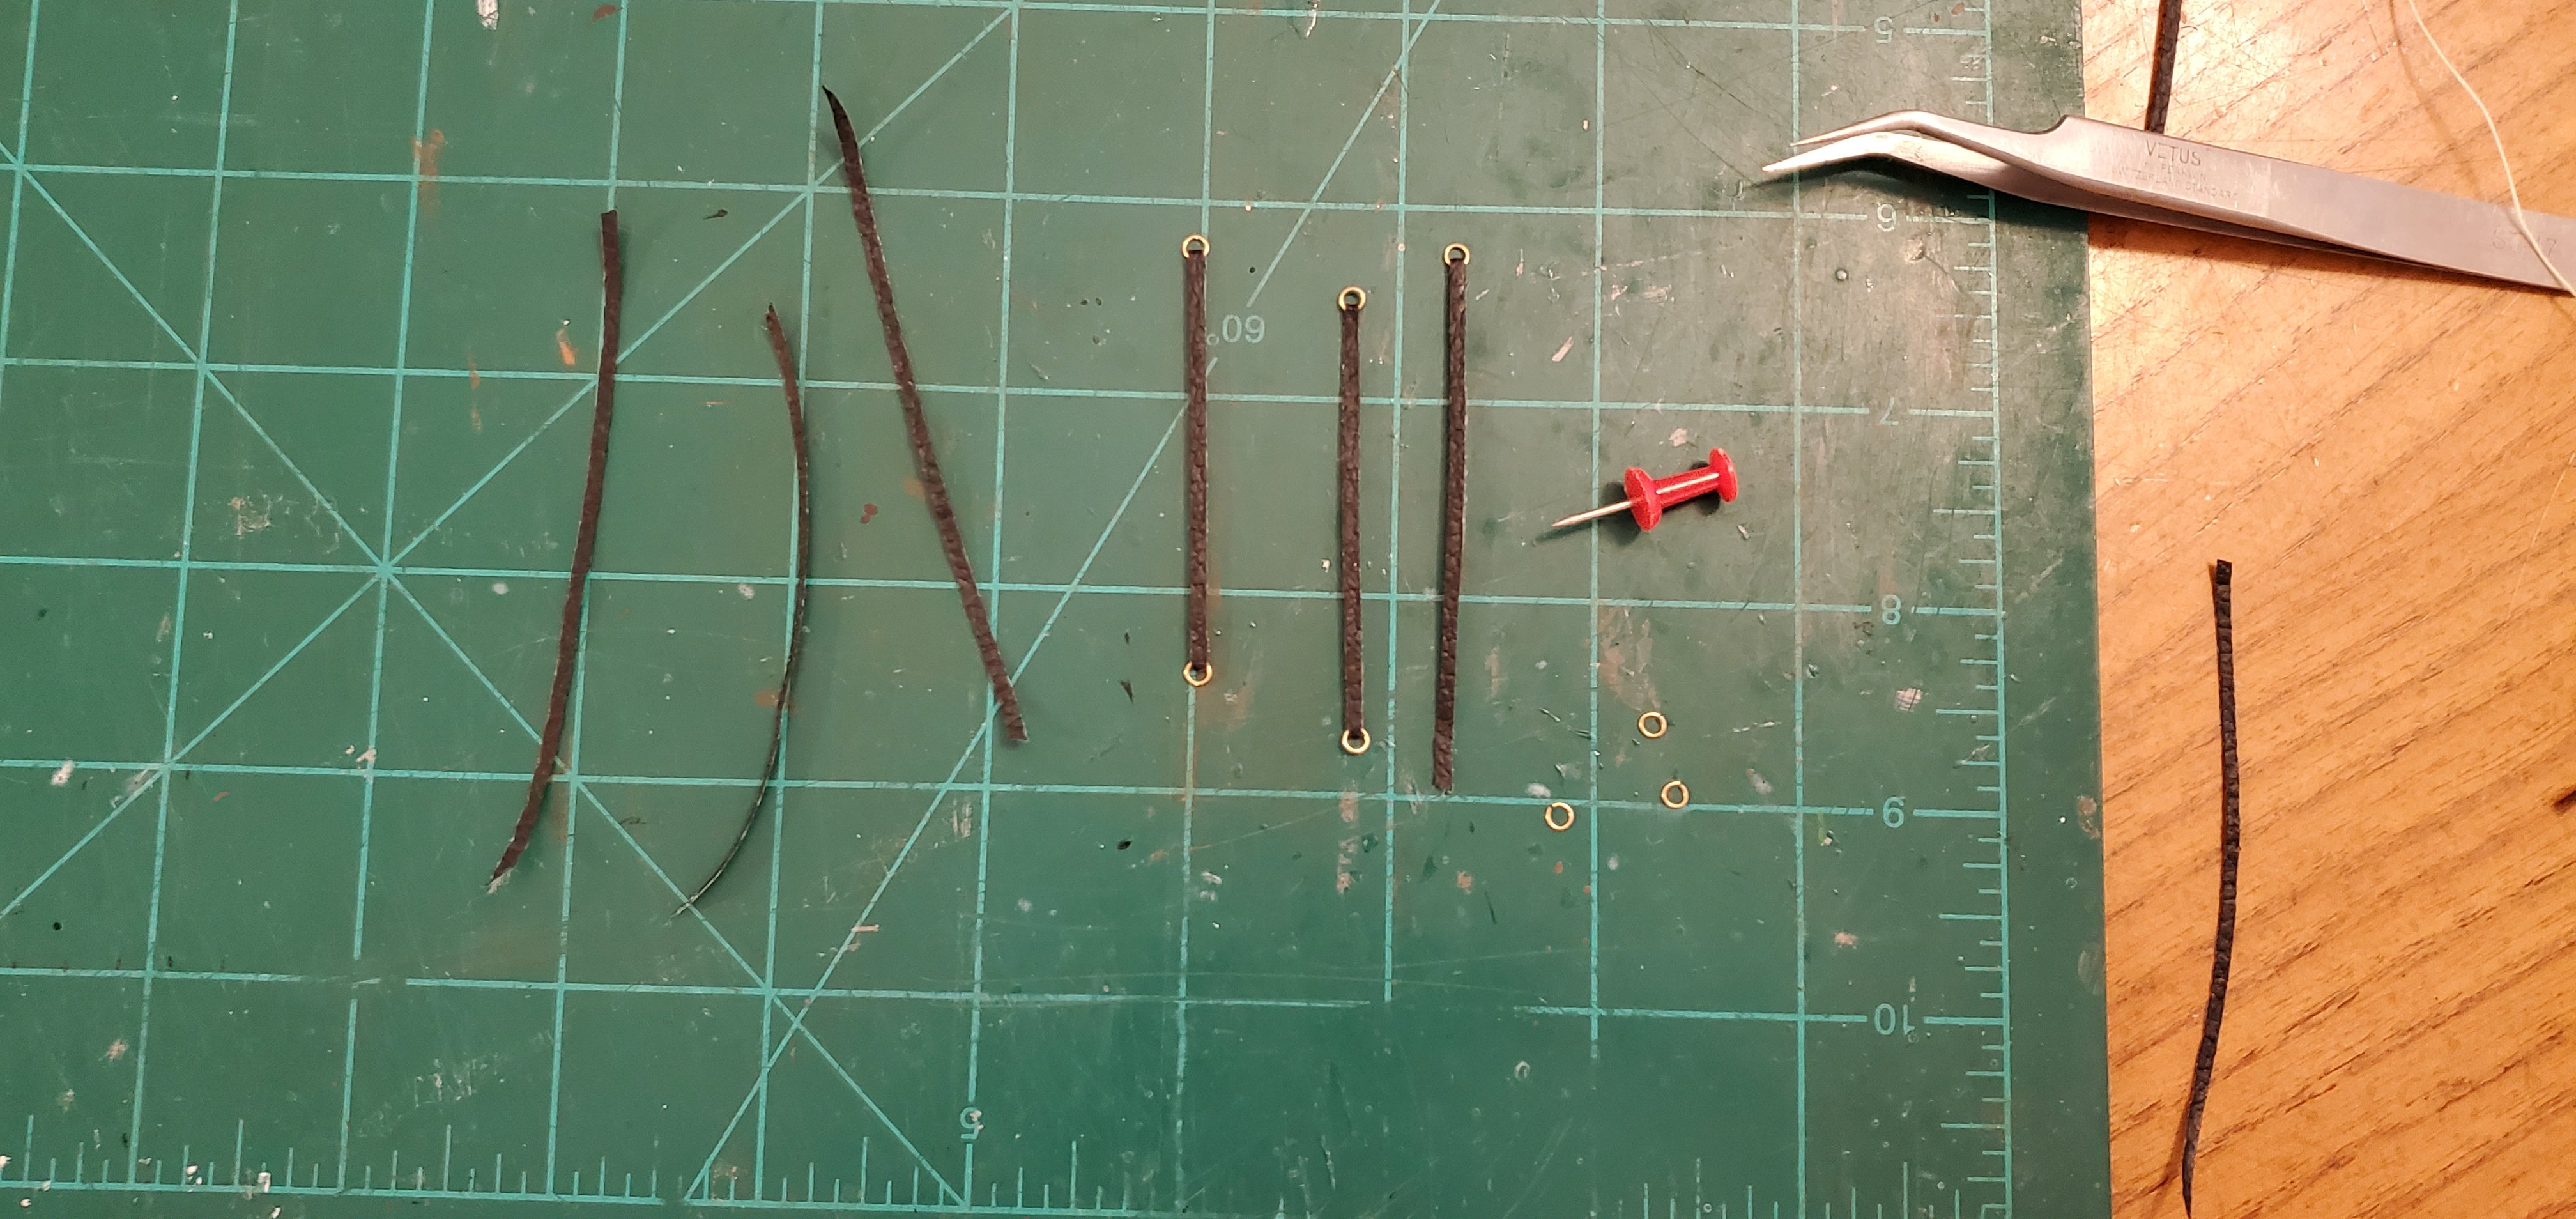
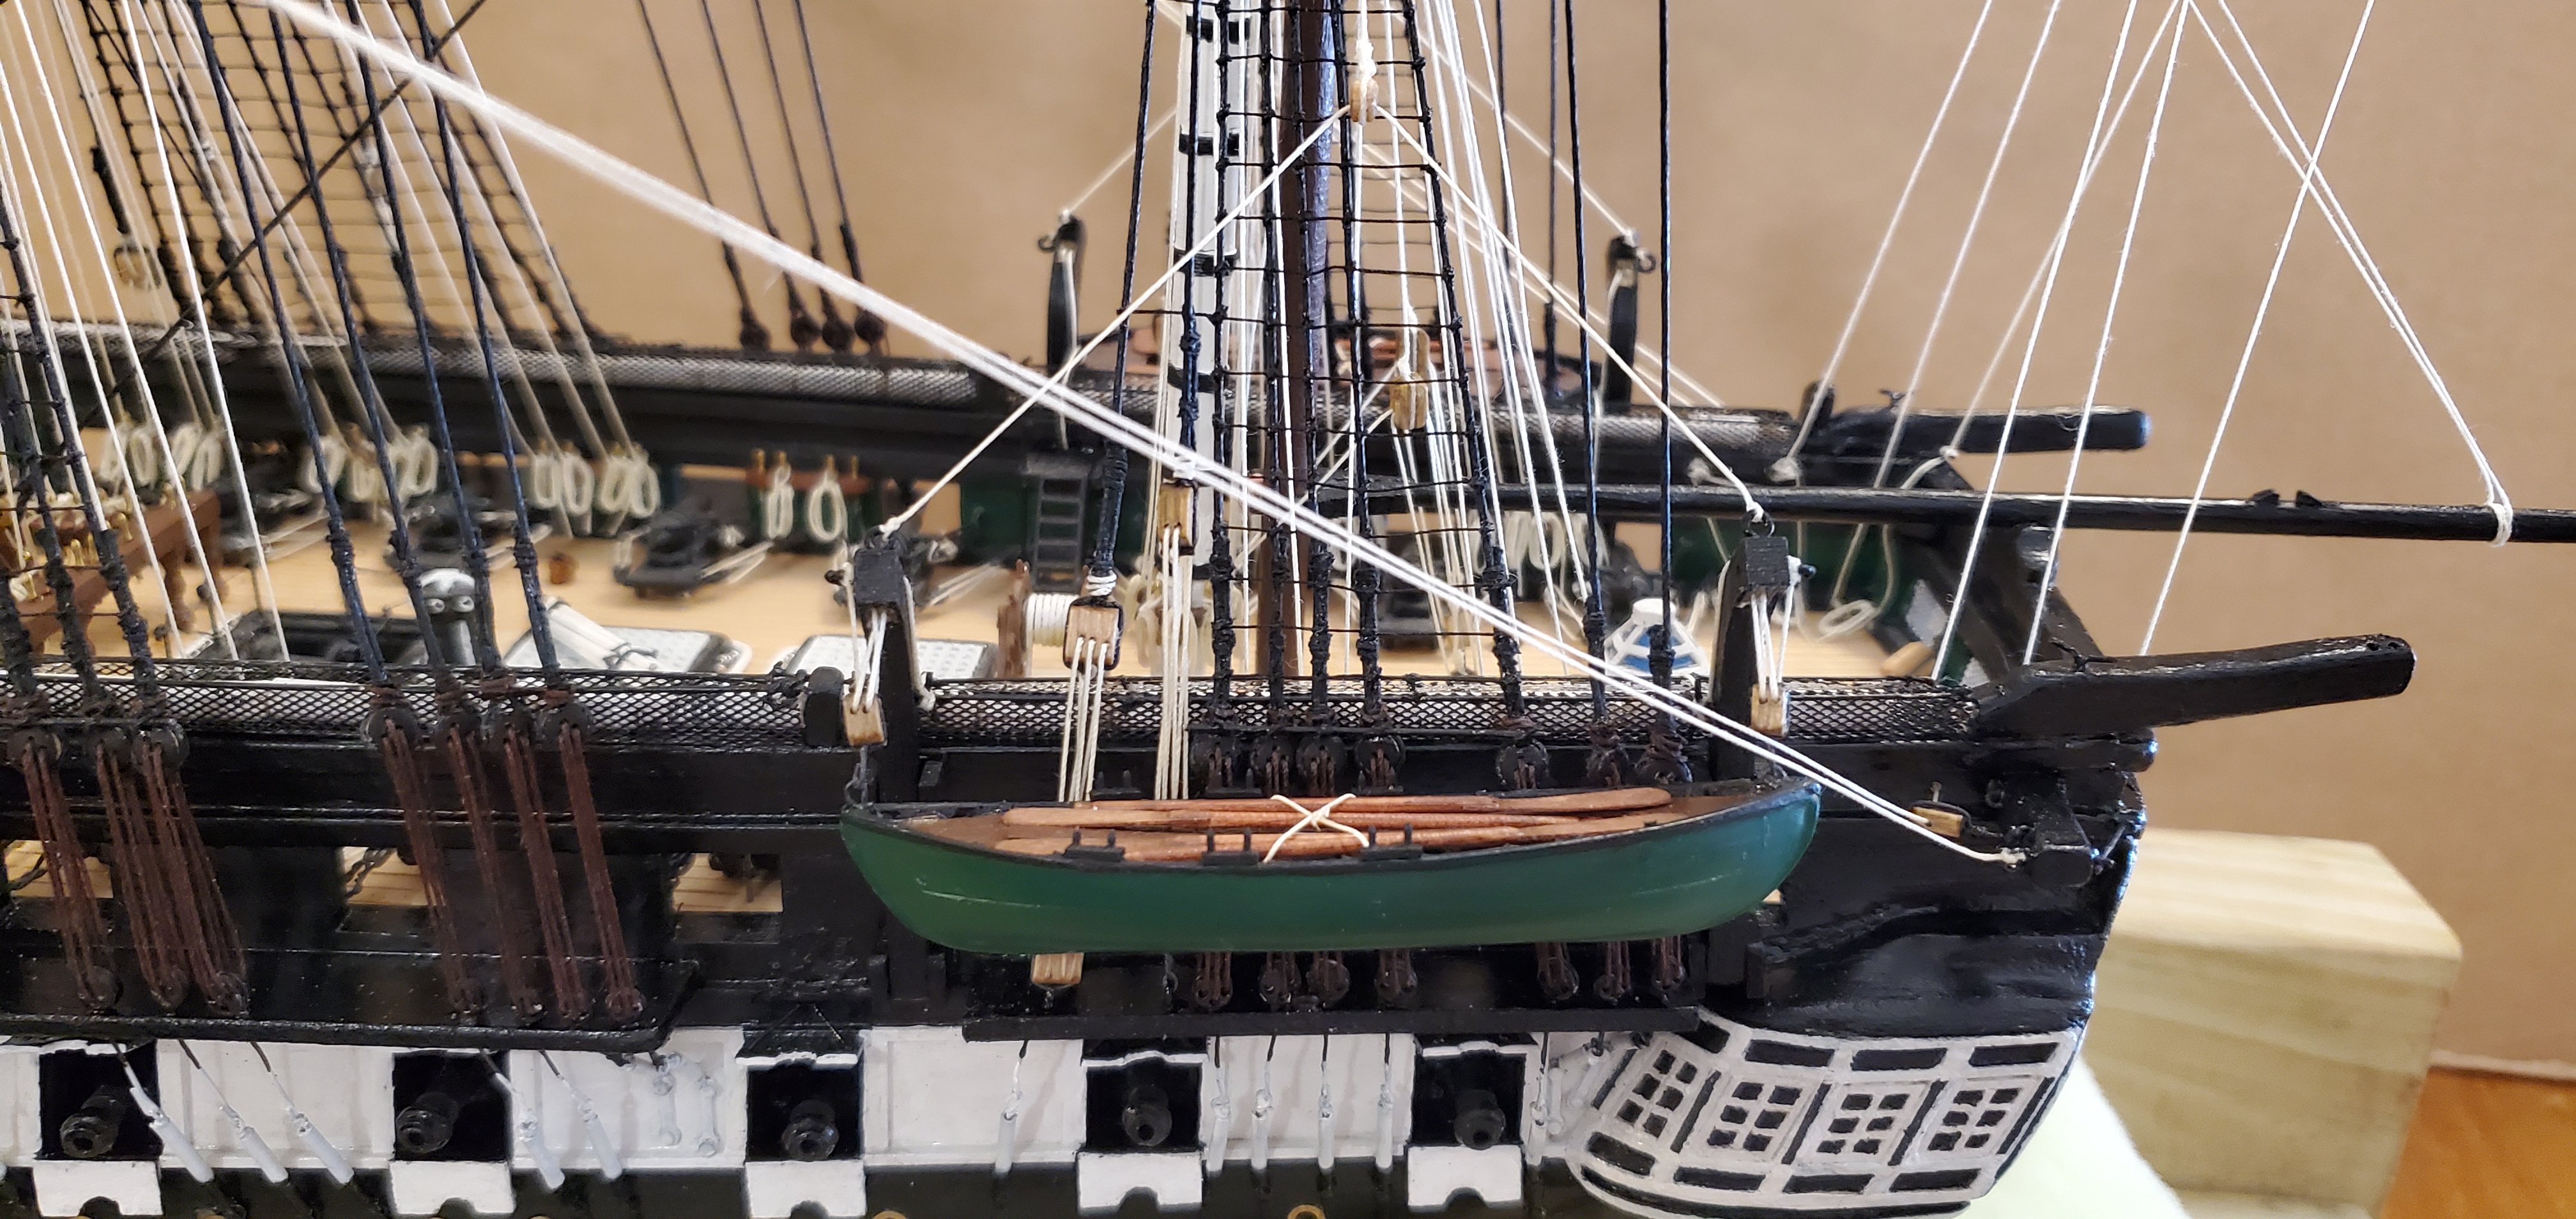
While finishing up the hanging of the whale boats, I learned another new term - gripes. And I'm not referring to all the complaining I was doing while tying off 2000 ratline knots. 😫 While perusing other Constitution build logs, I found out that a gripe is a leather strap (or cord of some kind) used to secure whale boats hanging from their davits. So I needed to find some very thin leather, preferably black, lying around the house. The victim of my scavenger hunt turned out to be a black leather recliner I've had since maybe the Reagan administration. I flipped it over and cut off several pieces of overlap from the stapling underneath. There was some white fuzzy stuff glued to the back which I sanded off. I cut some small strips, but the leather was so thin the edges immediately curled. Not good. So I tried brushing a thin layer of CA glue on the backside and flattening it between a folded piece of wax paper while it cured. It actually worked out perfecto! The glue stiffened the strip enough to keep it from curling when cut, but it still had enough flexibility to wrap around the body of the whale boat. Then I added some small rings to each end. Here are a couple of pics of the whale boats hung and strapped in place.


- 301 replies
-
- 13
-
-
-
- Constitution
- Bluejacket Shipcrafters
- (and 1 more)
-
I give you a thumbs up even though I haven't got a clue what you were talking about that entire 2nd paragraph!!
-
No way I would have been able to make it without @BANYAN's Bundy!
- 301 replies
-
- 4
-
-
-
- Constitution
- Bluejacket Shipcrafters
- (and 1 more)
-
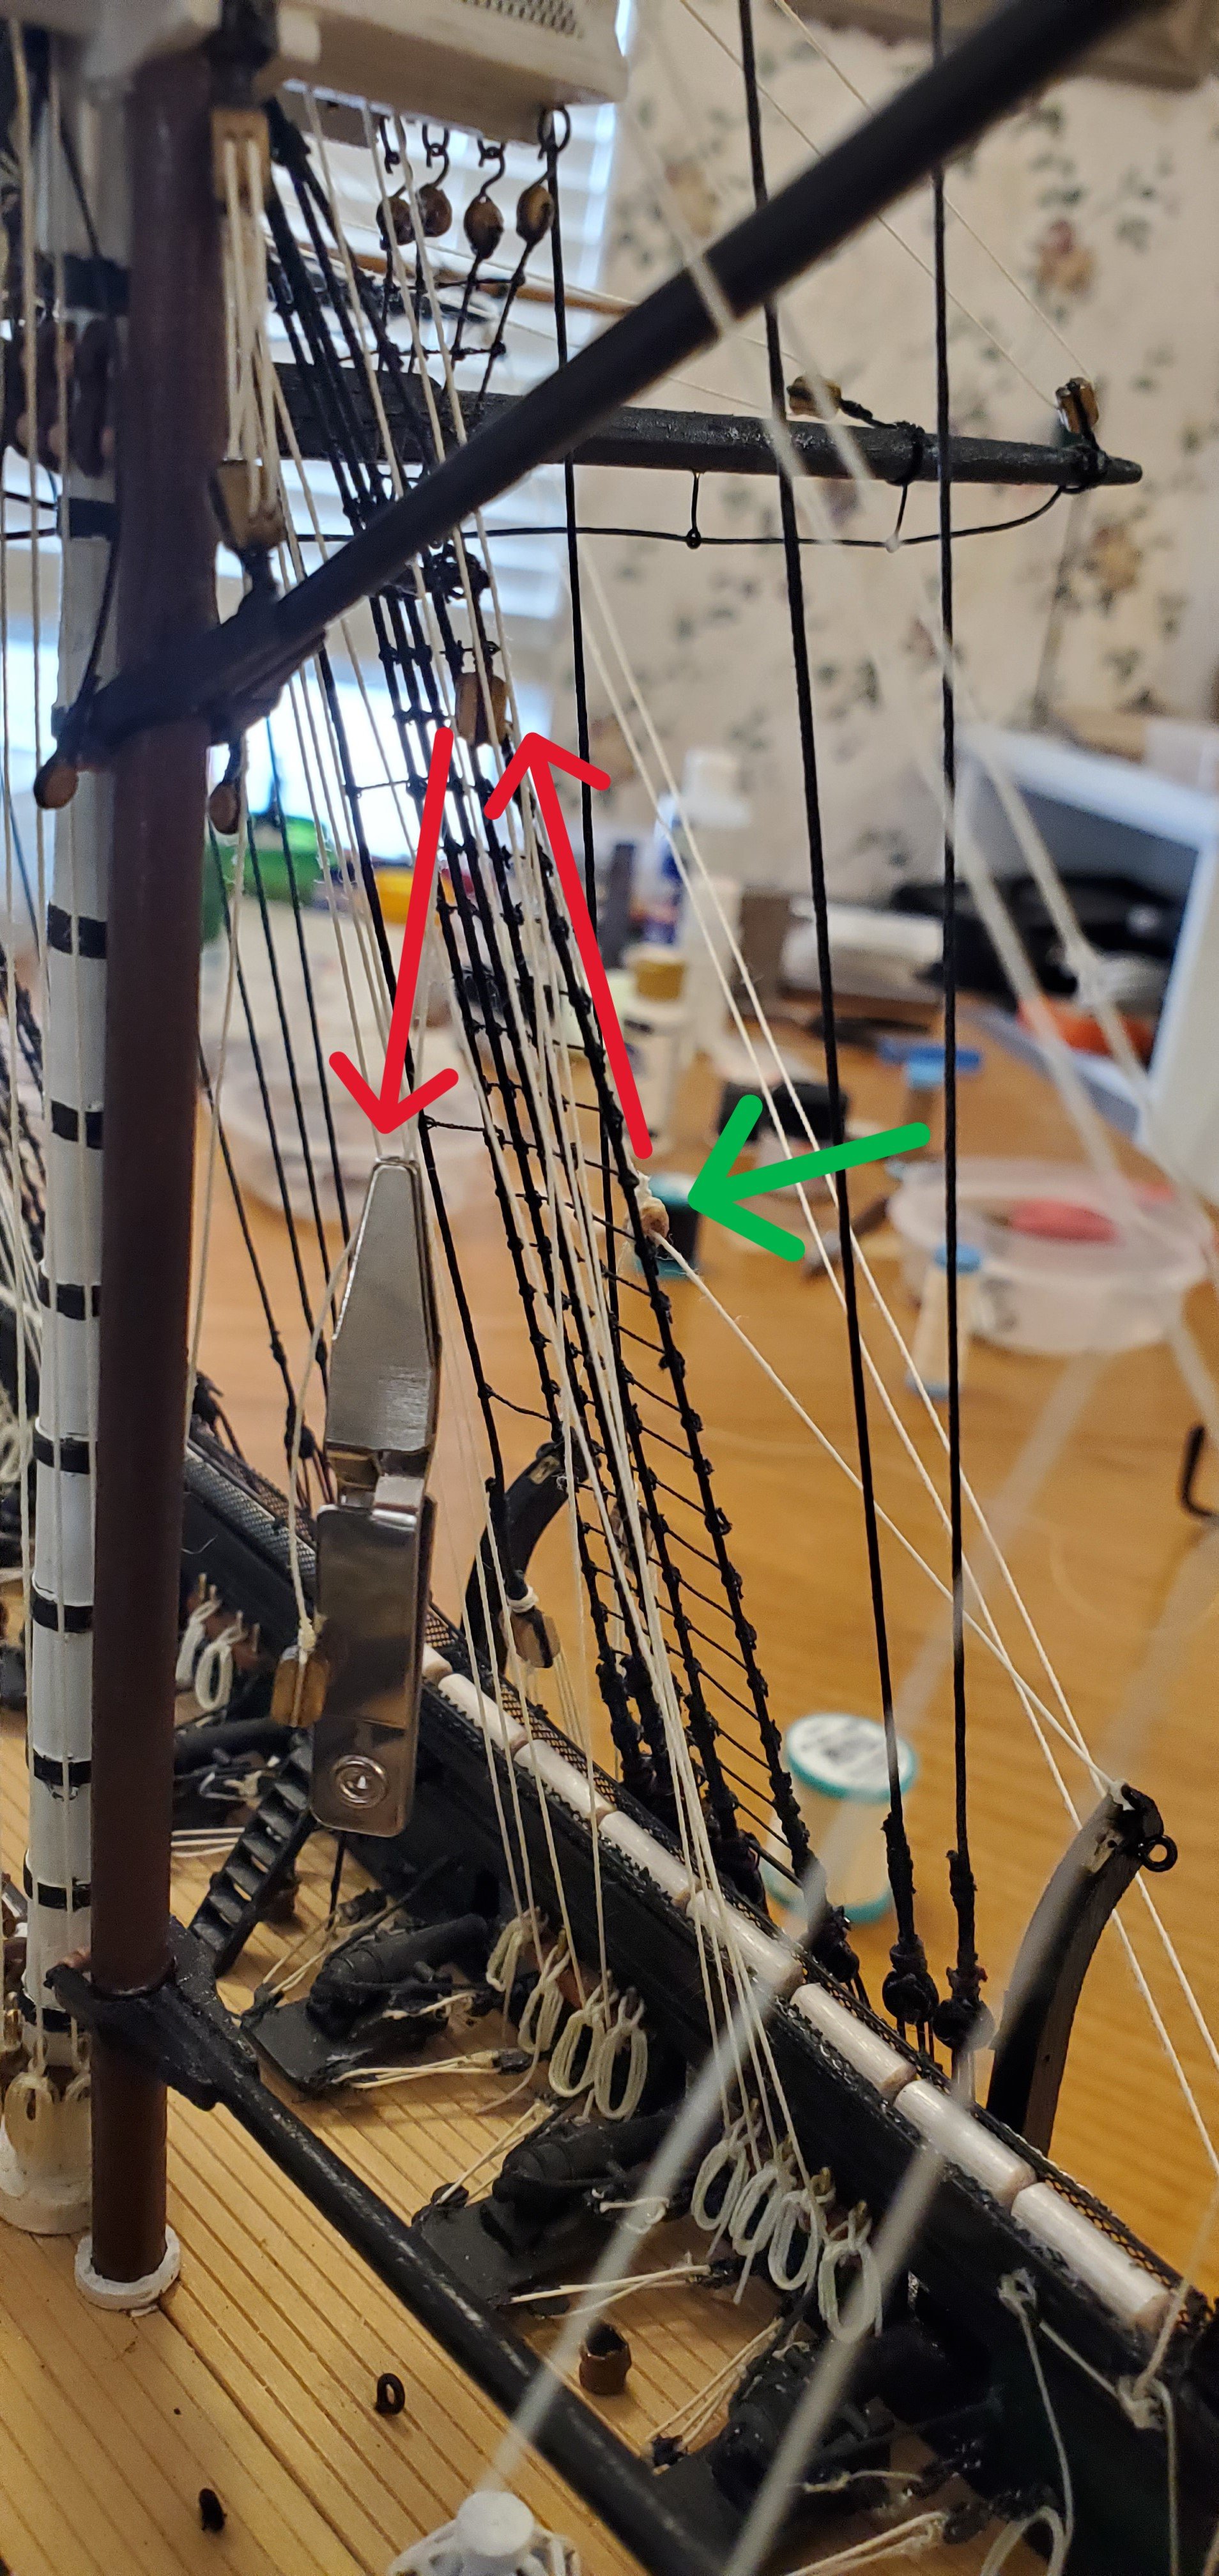
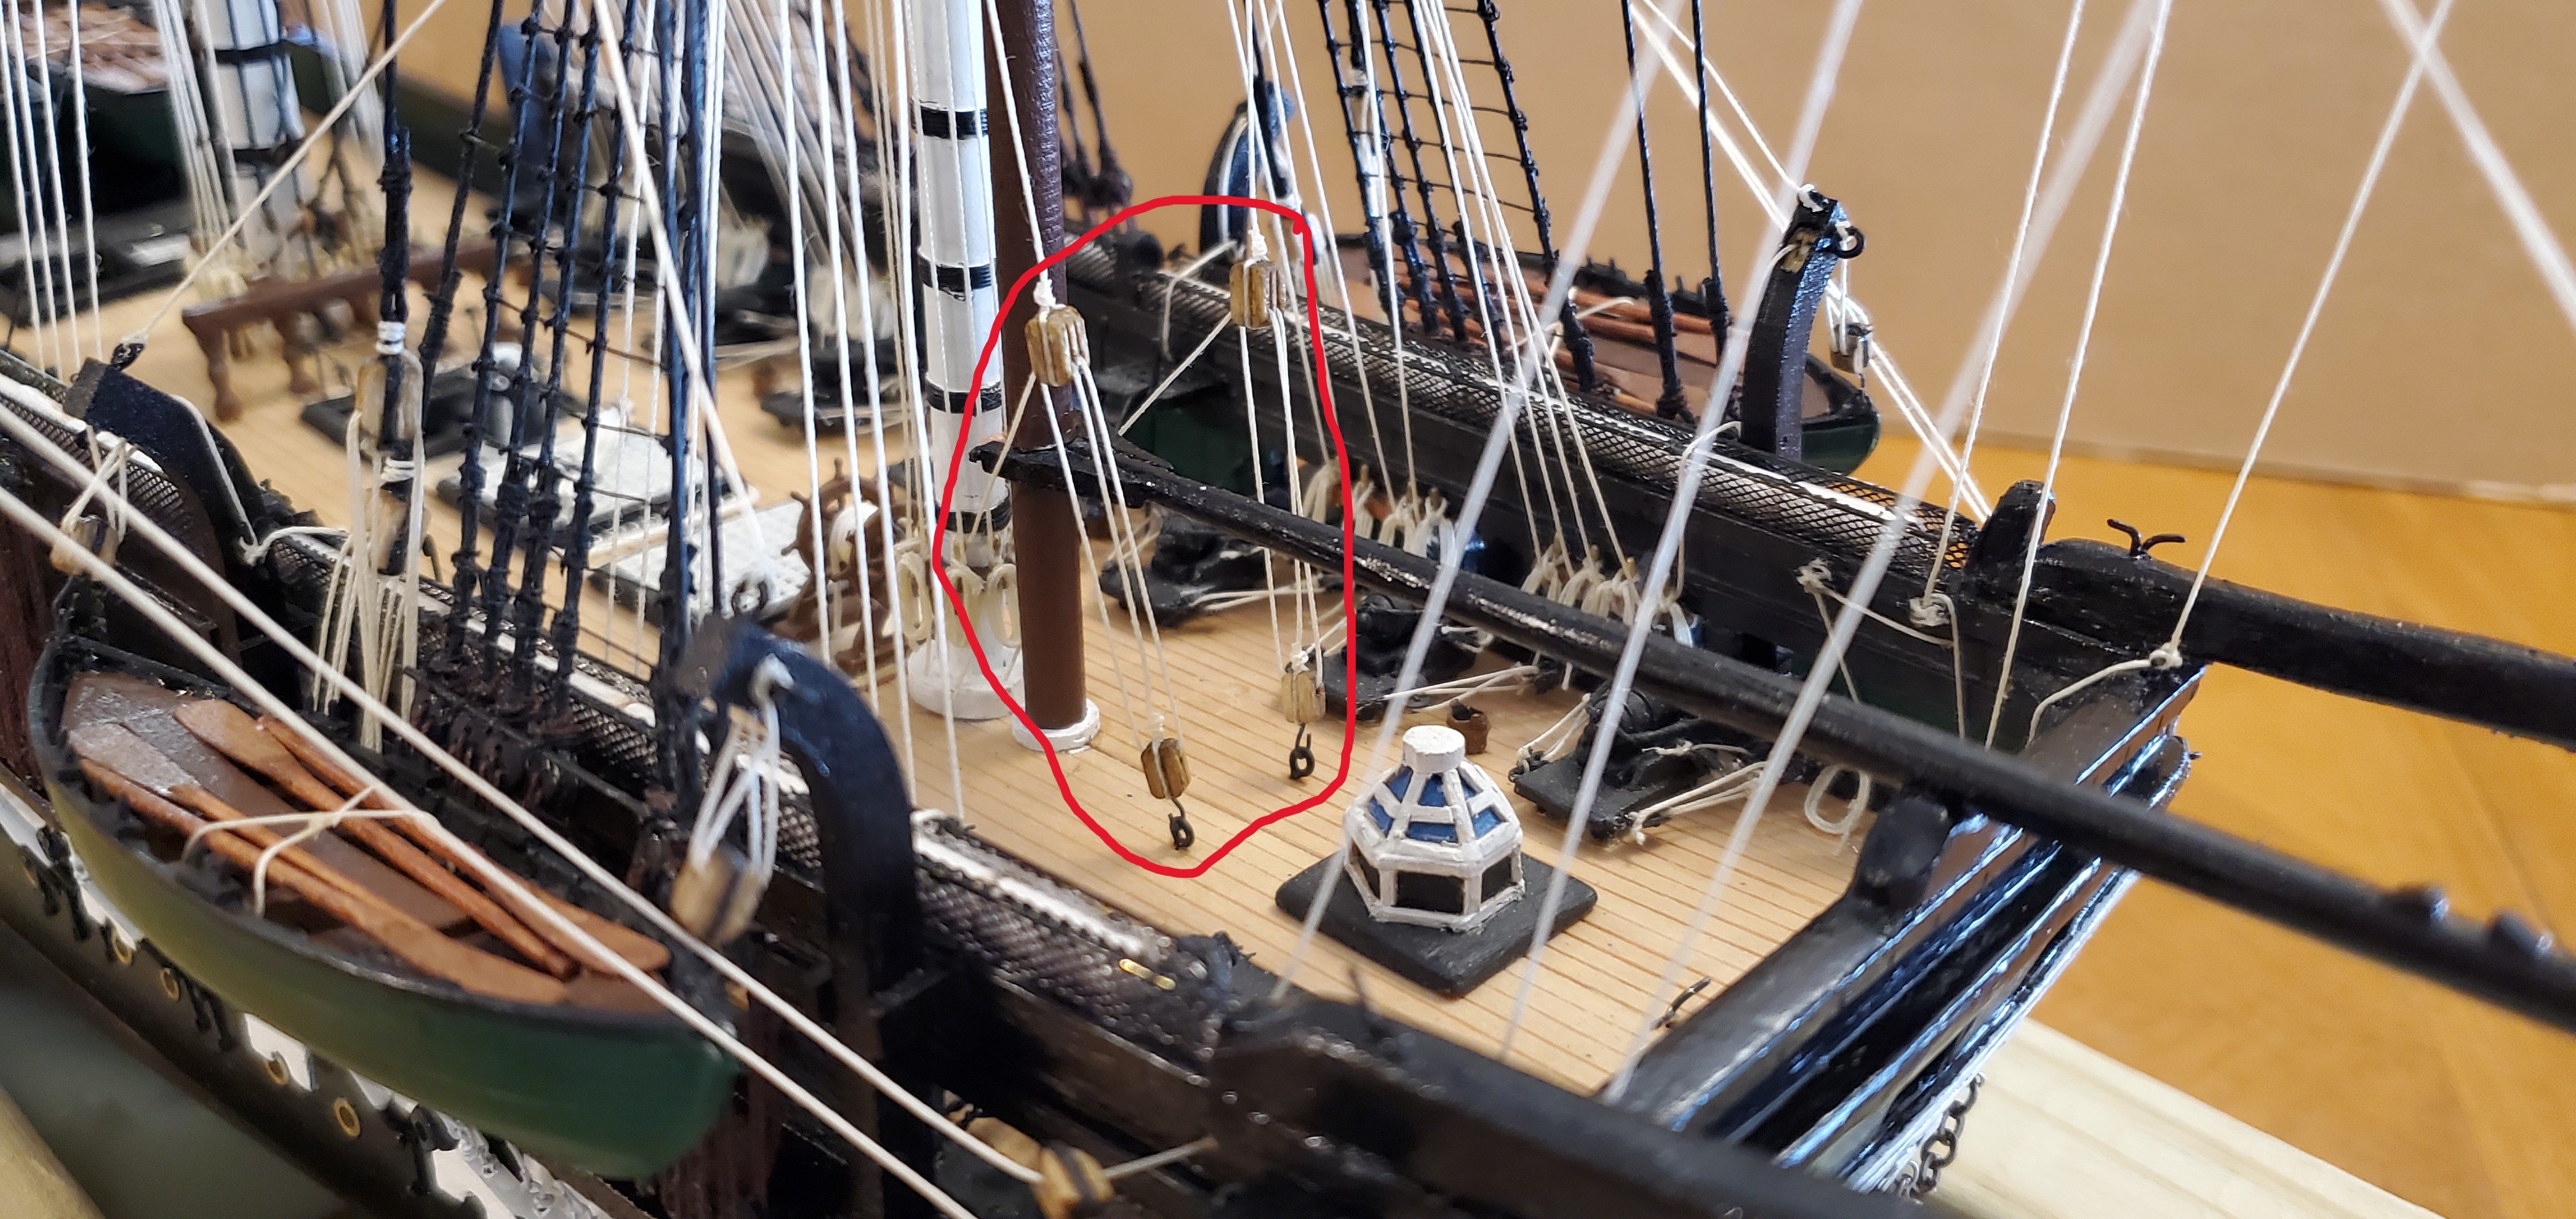
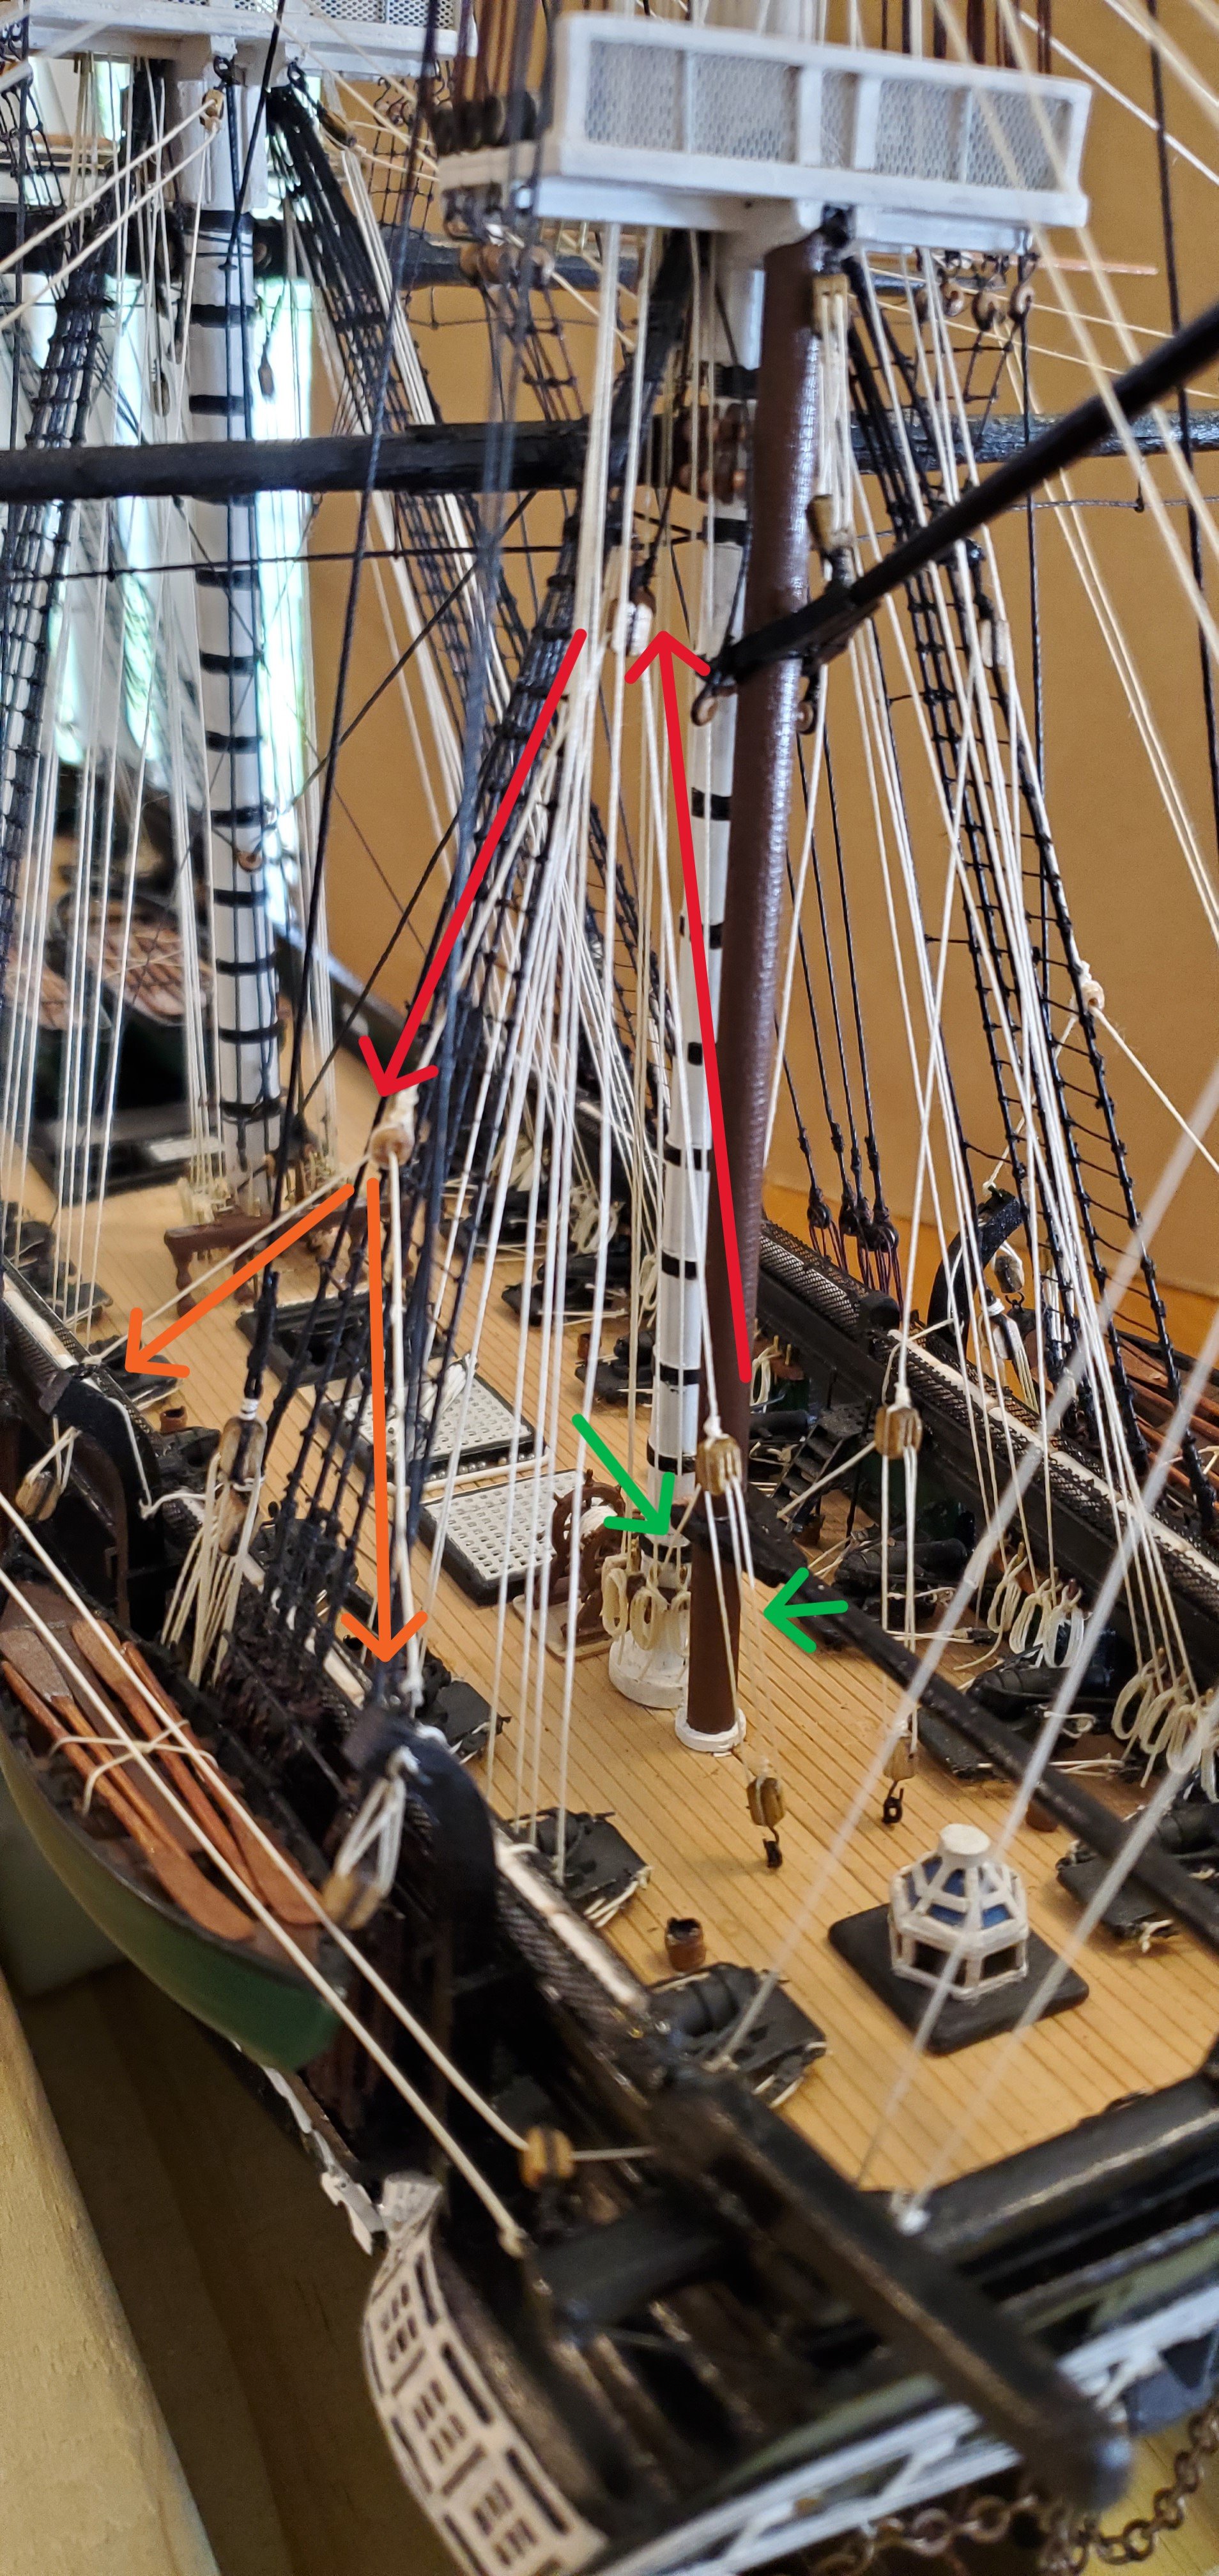
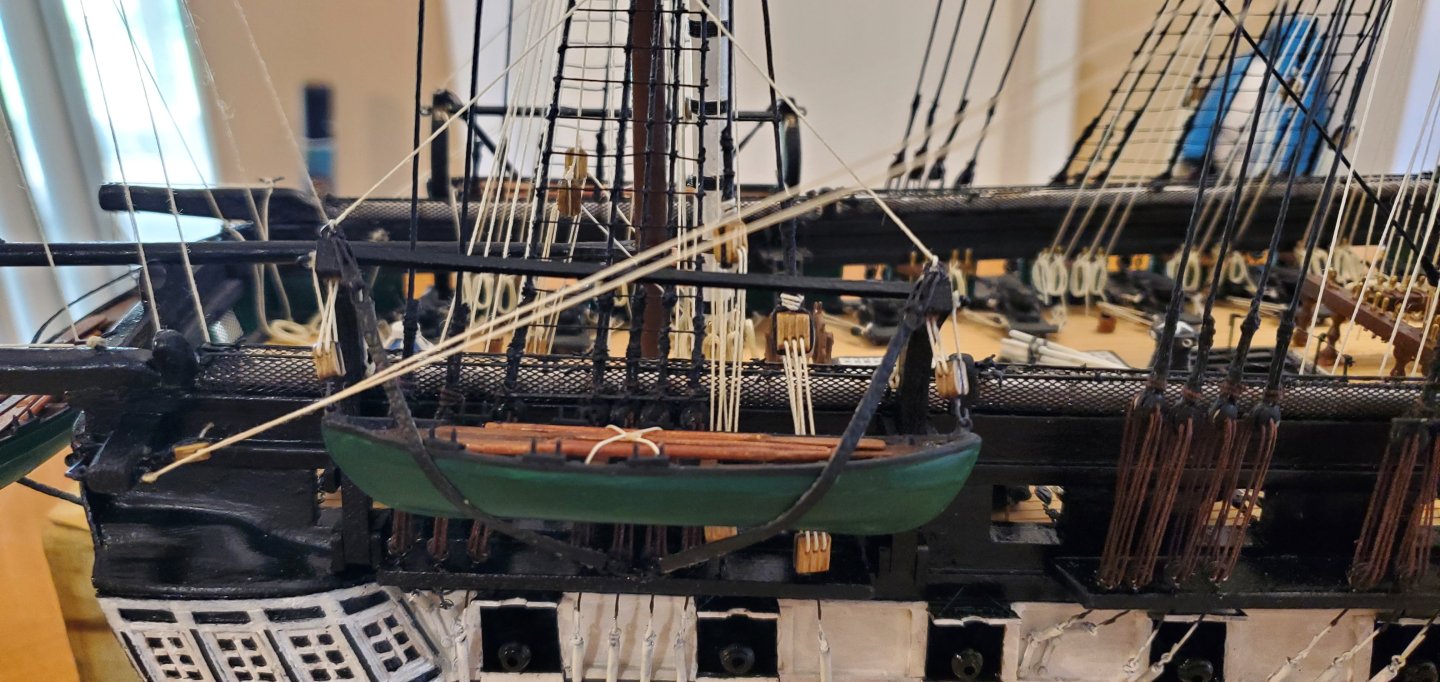
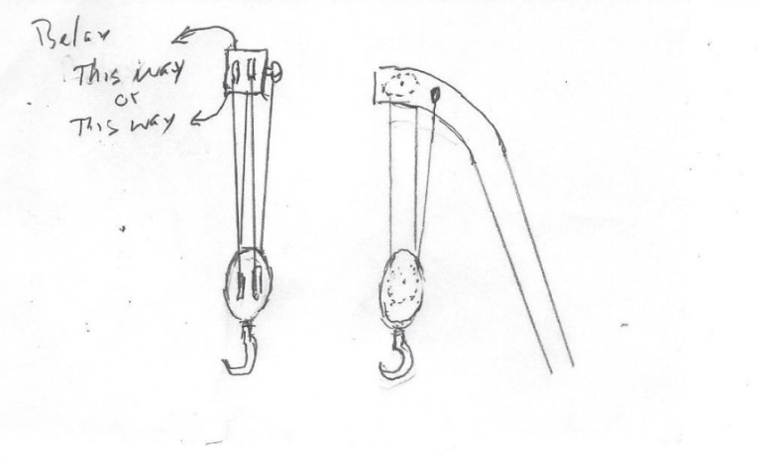
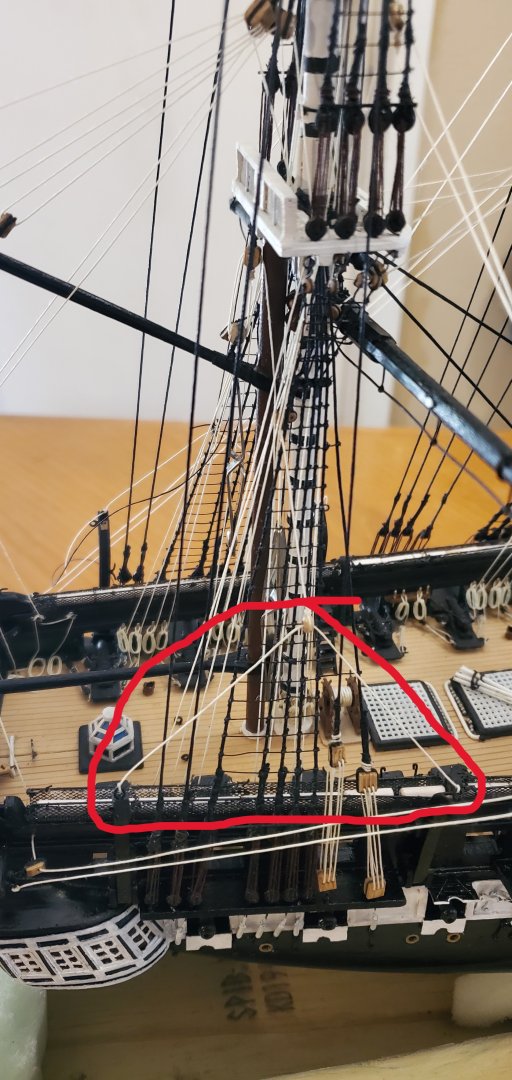
Thanks to all for the interesting and educational discussion on flag direction above. With that issue resolved, time to rig the davits and hang the whale boats. The Bluejacket instructions do not address the davit rigging, so I used @xken's superb build log for guidance. The first thing I did was run a line connecting the eyehooks on the top end of each davit (circled in red below). I ran the line through a bullseye which is seized to another line that goes to the deck and is used to raise and lower the davits. The line that is seized to the bullseye (green arrow below) runs up thru a double block which is tied into the shrouds and then runs down to a lanyard that will tie into the empty eyehooks seen in the deck. At the time, I did not install the lanyard. I just tensioned the assembly with a small clamp. I would add the lanyard and tighten everything up after hanging the whale boats. Time to hang the whale boats. I was pretty much clueless as to how to do the small rigging between the end of the davit and the boat. I knew I had to rig a line through the double block mortised into the end of the davit and the double block hooked to the end of the whale boat, but I couldn't figure out how to do it. Shout out to Henry (a.k.a. @popeye2sea) for coming to the rescue. He sent me a sketch that cleared things up. I post the sketch below in case anyone else is as clueless about the rigging as I was. Here's the whale boat hung from the davits. After that, I circled back to install the lanyards on the deck and tighten everything up. The working end of the lanyard is tied off to the pinrail on the mizzen mast. Here's a picture of the entire davit rigging with arrows highlighting the 3 separate lines required for the rigging assembly.


- 301 replies
-
- 14
-
-
-
- Constitution
- Bluejacket Shipcrafters
- (and 1 more)
-
That is good to hear, Lynn. Onward thru the fog!!
-
Ain't that the truth! Except for me it's the whole build and not just points in the build!
-
Hey Lynn. Reading through your posts here. it seems like you have a lot of doubt about whether or not you have the skills to finish this build. From what I've seen going thru this log and your Pram and Dory logs, you absolutely can do this! The first skill you need for this or any other ship model is tenacity. My sense is that you've got plenty of that. All the other skills come with practice and it's obvious that you are getting better with each step of each build. One thing I found early on (I've been doing this stuff for 4 years now so I'm still a relative newbie compared to the real pros out here), when you are working on a particular detail of a ship, you get so focused on that detail that every single flaw, even the tiniest one, jumps out at you. You think it looks horrible and everyone that looks at your work will think the same thing. But in reality, when you're finished with the build, all those flaws that you thought were so egregious at the time just melt away when you're looking at the completed ship. Trust me, our ships looks a whole lot better than we builders think they do while we are working on them! I also get the feeling that some parts of this build make you feel like they are pushing you to your limits. But you never know what you are capable of until you try something you've never done before. So I sincerely hope that you will continue to push yourself and continue to work on this project. You really have done a nice job so far, Lynn. I am 100% sure that you can finish it!
-
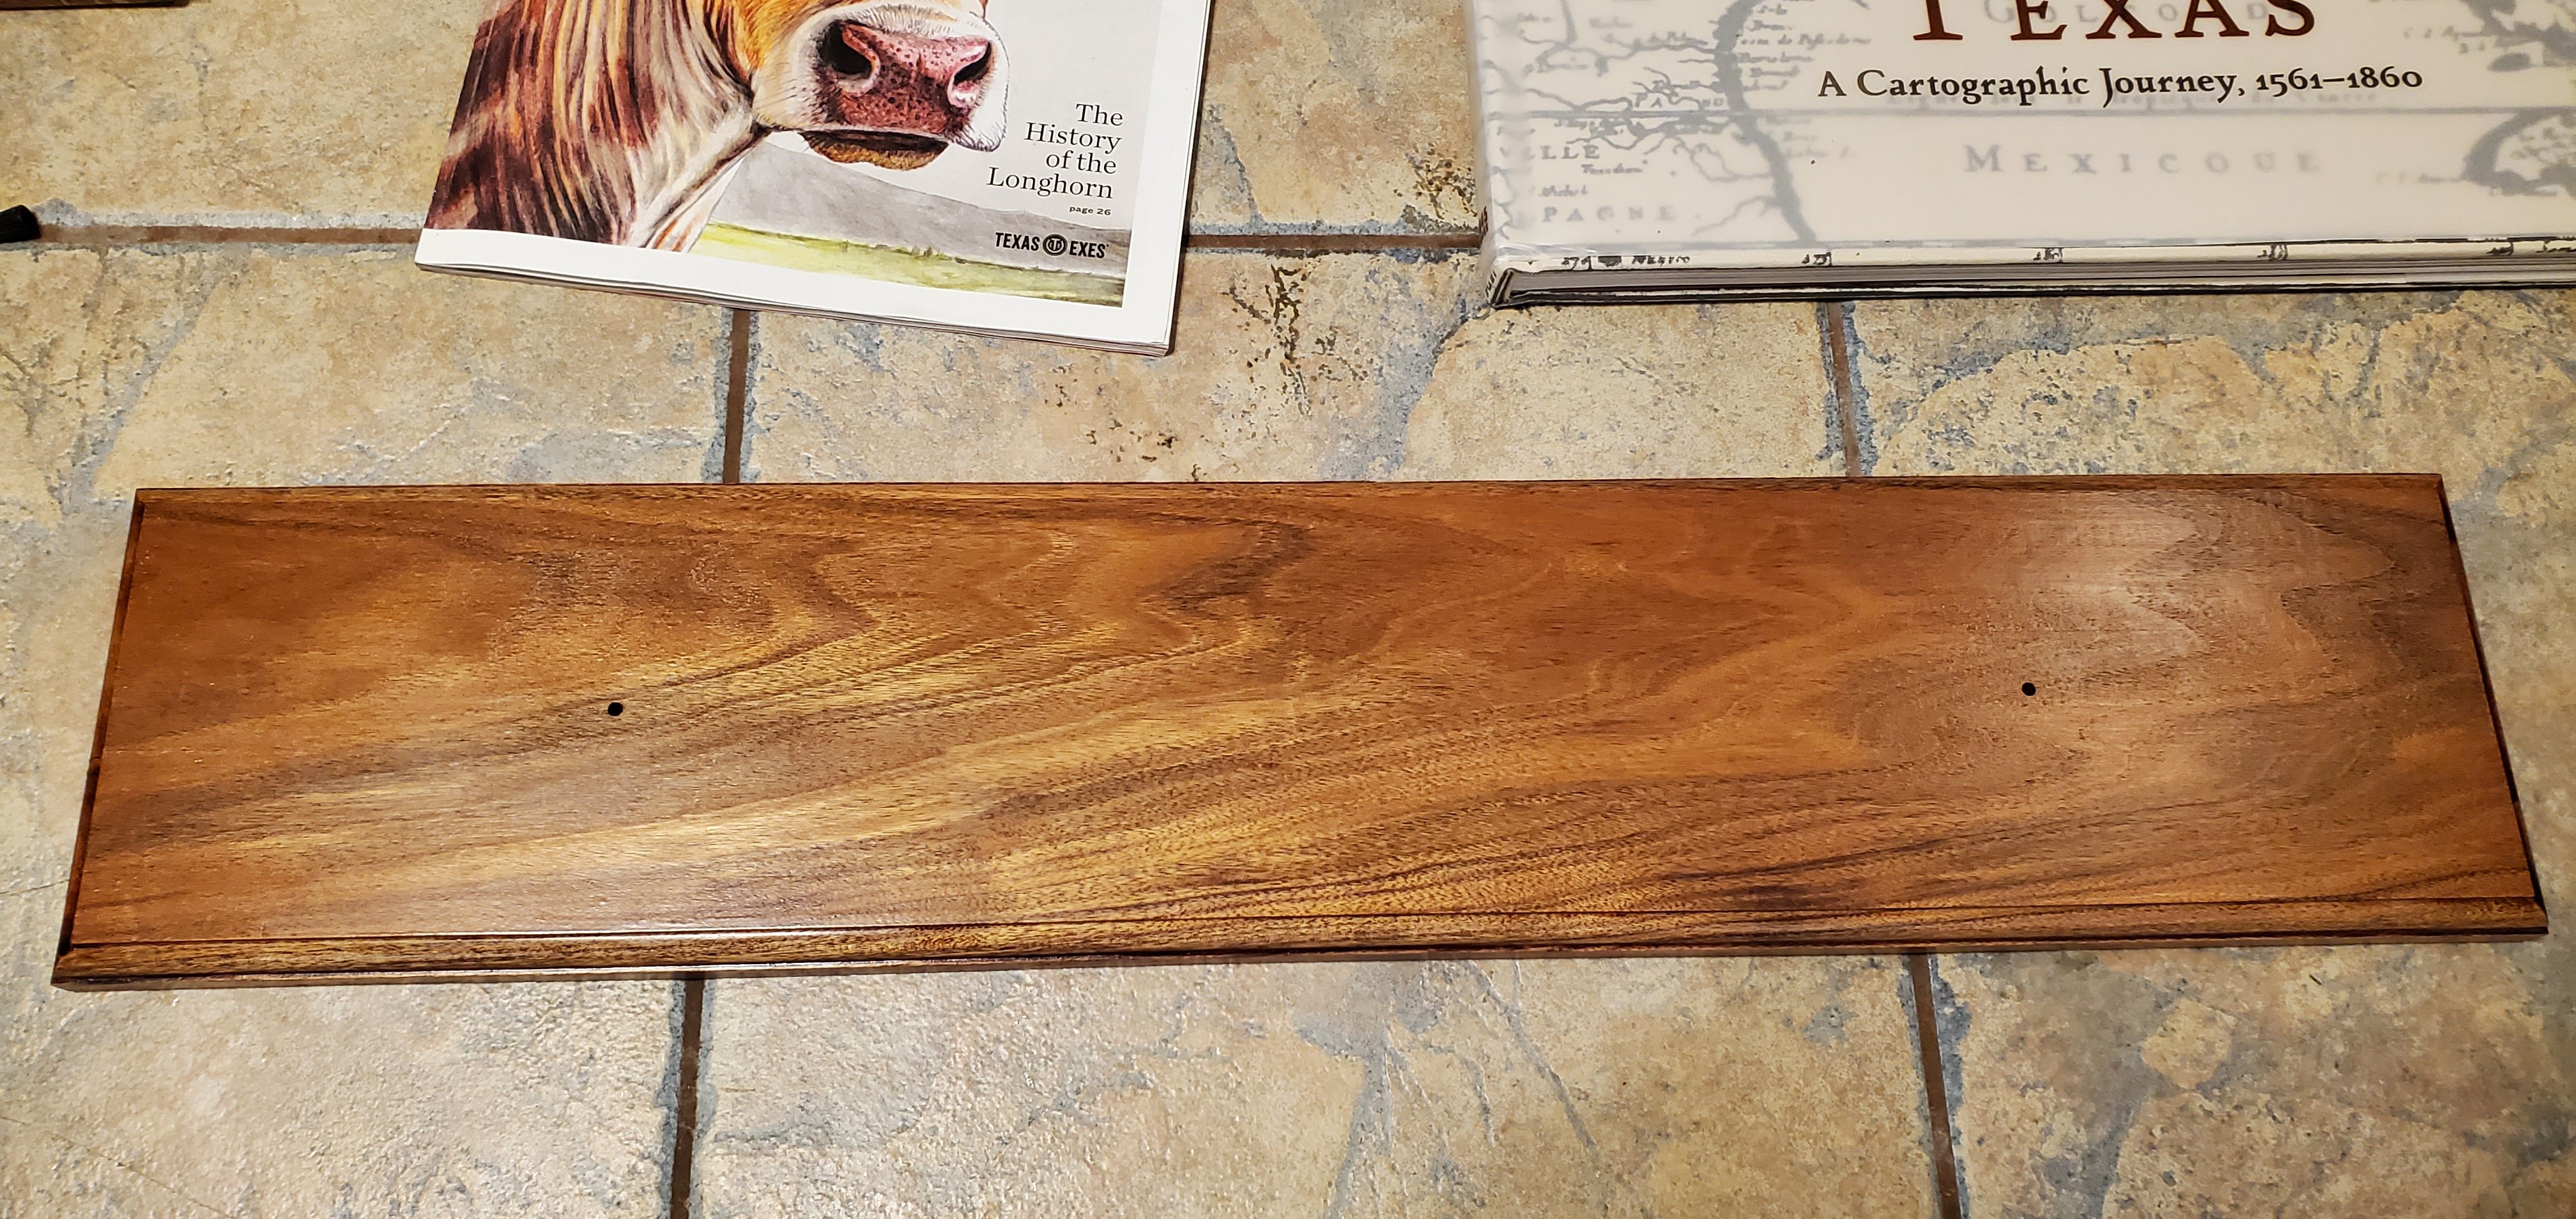
I appreciate that, Mark! I think the drive to my buddy's house is a little shorter than visiting you in Chesapeake Bay (may not be as scenic though!). 😃 To be honest, I do have a router myself. But I'm not that great with it and did not trust myself on such a fine piece of wood. Well, a blue norther came through and the wind changed directions after she docked! Actually, the flags can easily be flipped. So the family can decide how they would like them displayed.
- 301 replies
-
- 6
-
-
- Constitution
- Bluejacket Shipcrafters
- (and 1 more)
-
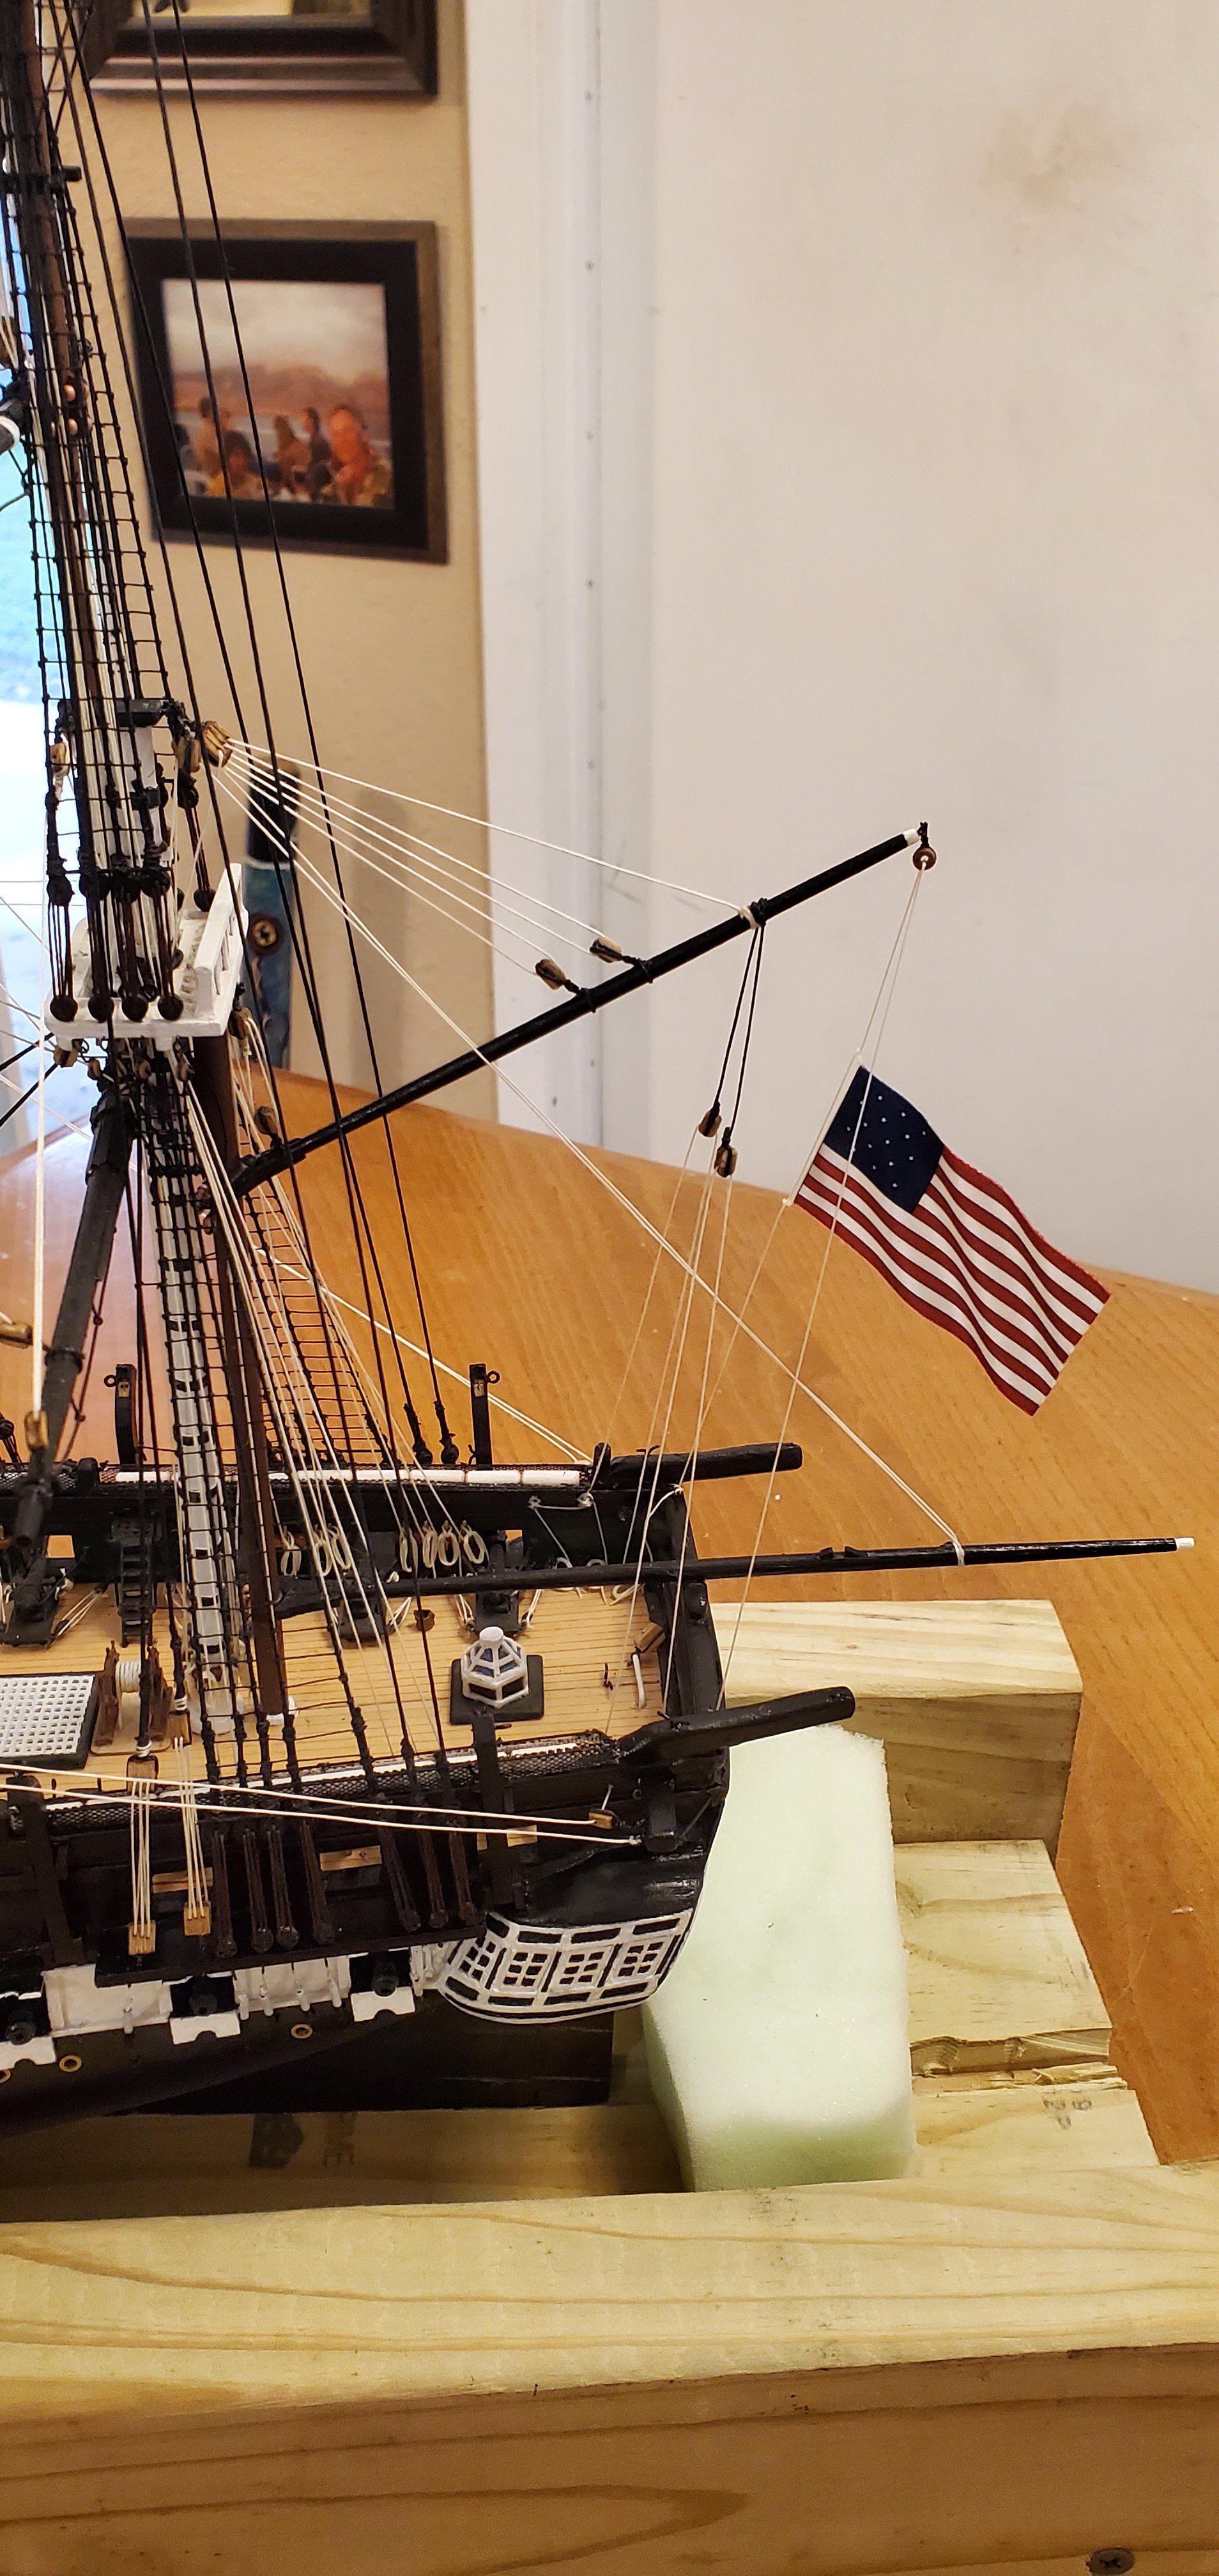
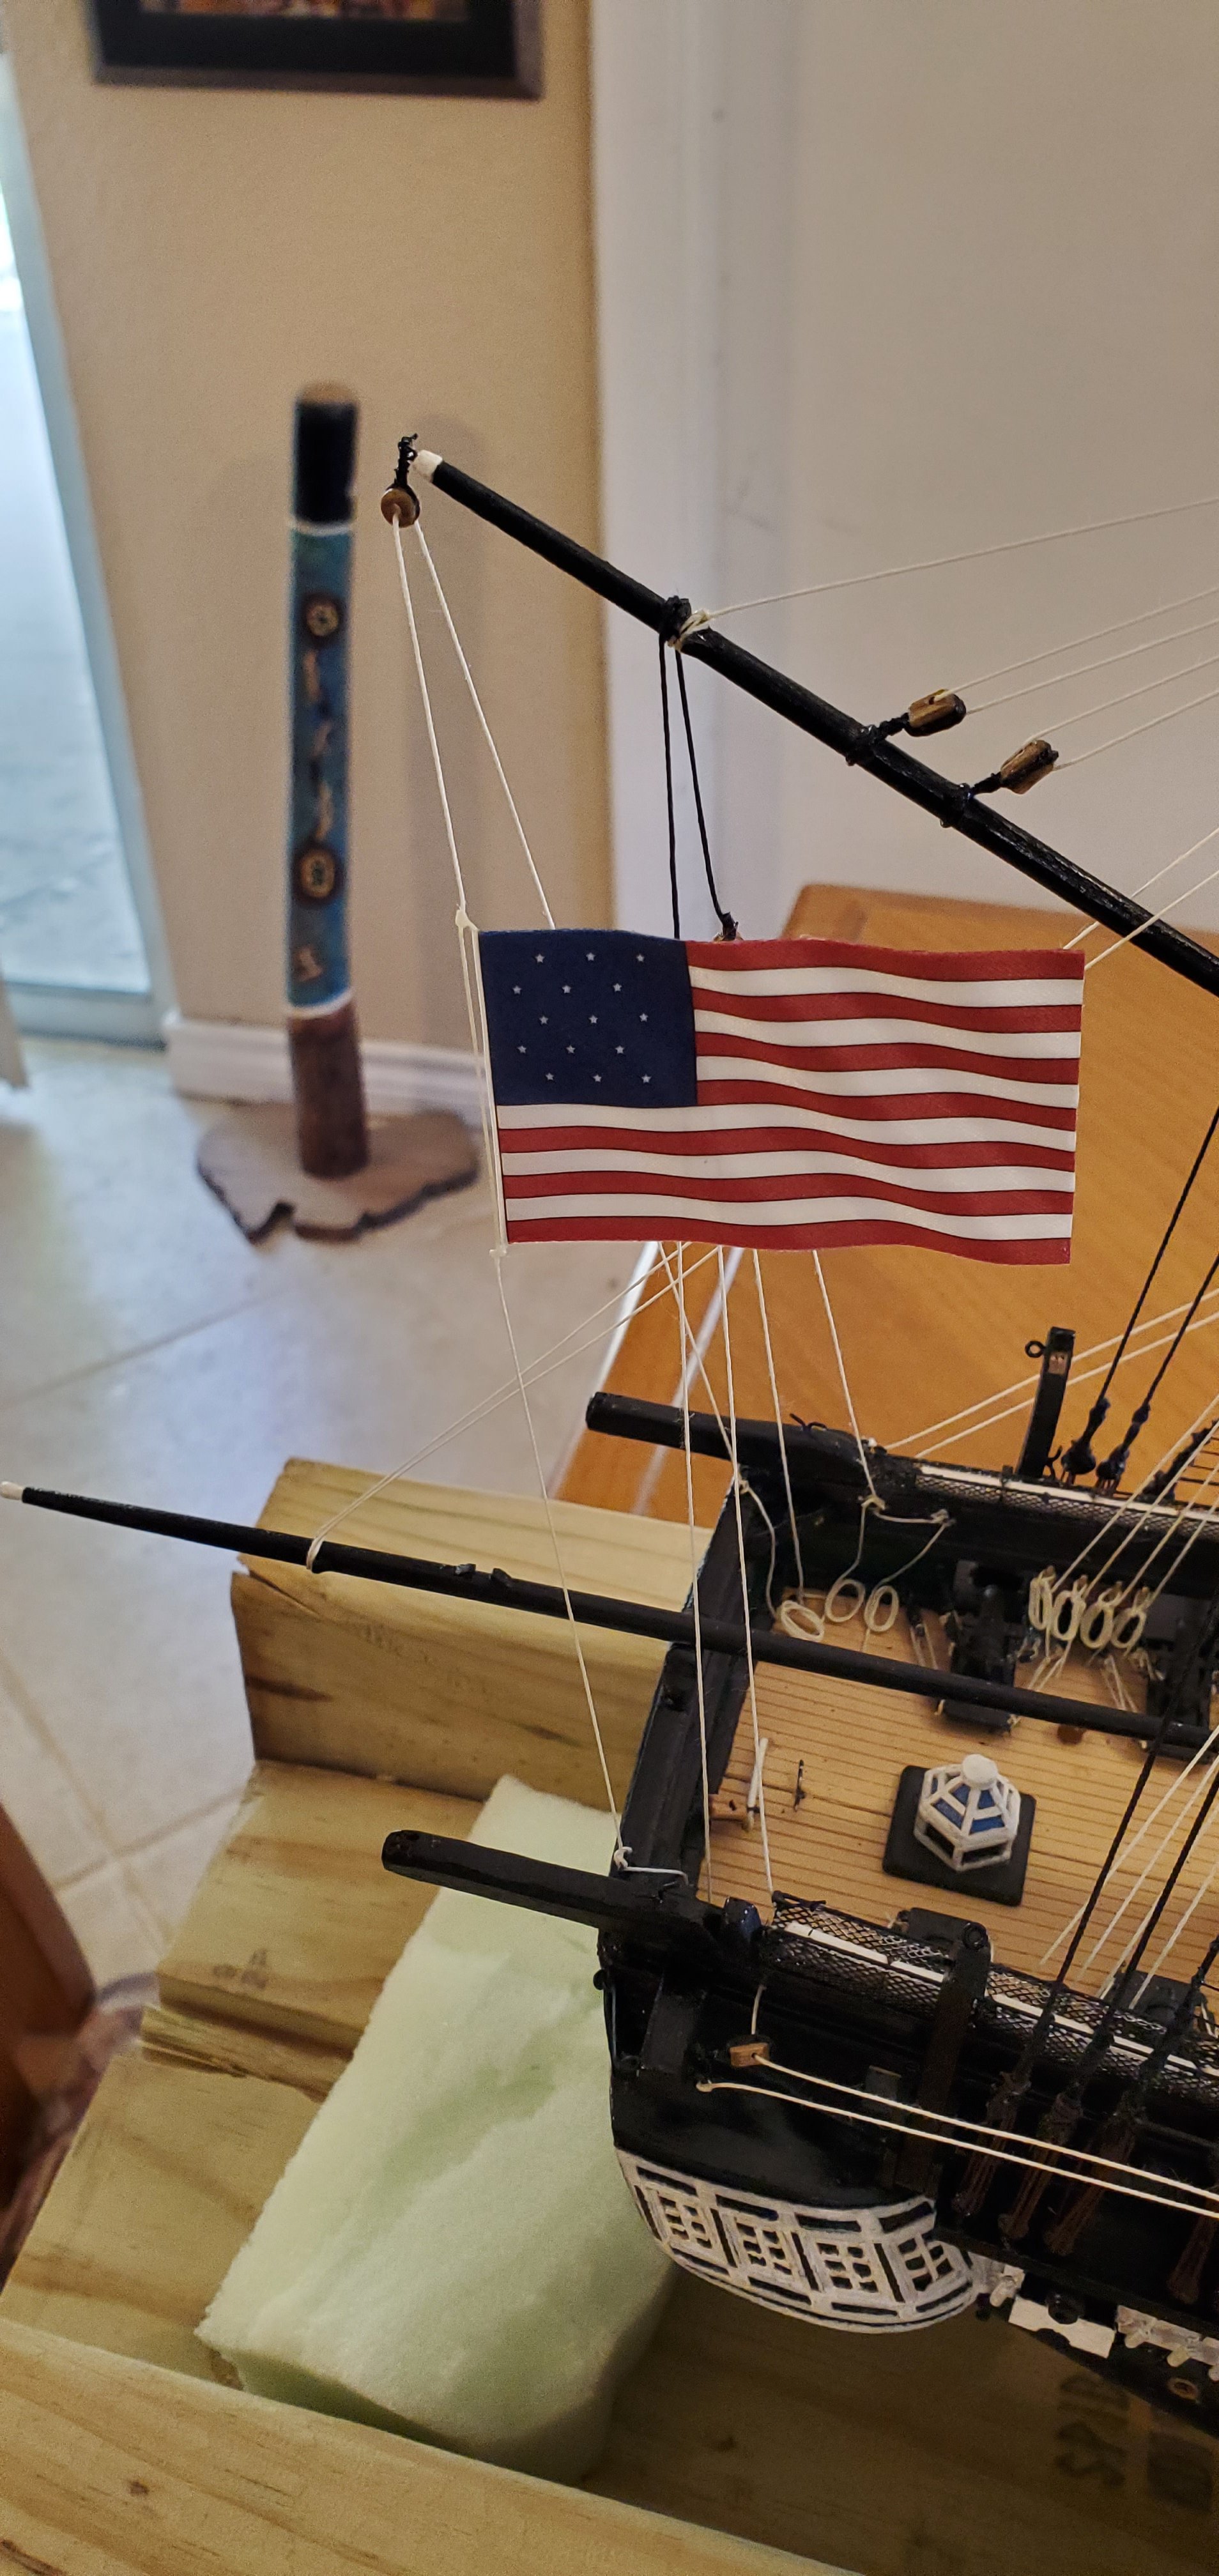
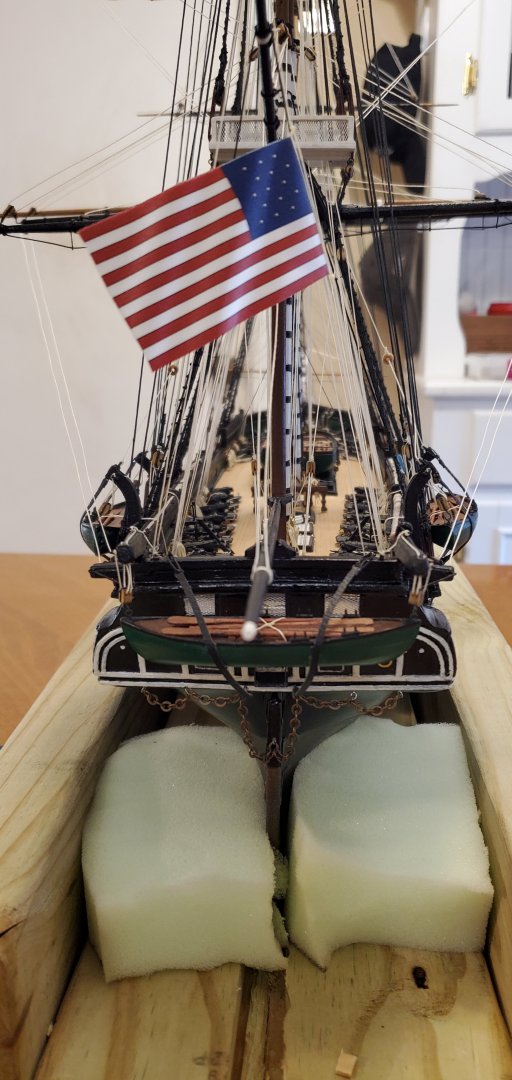
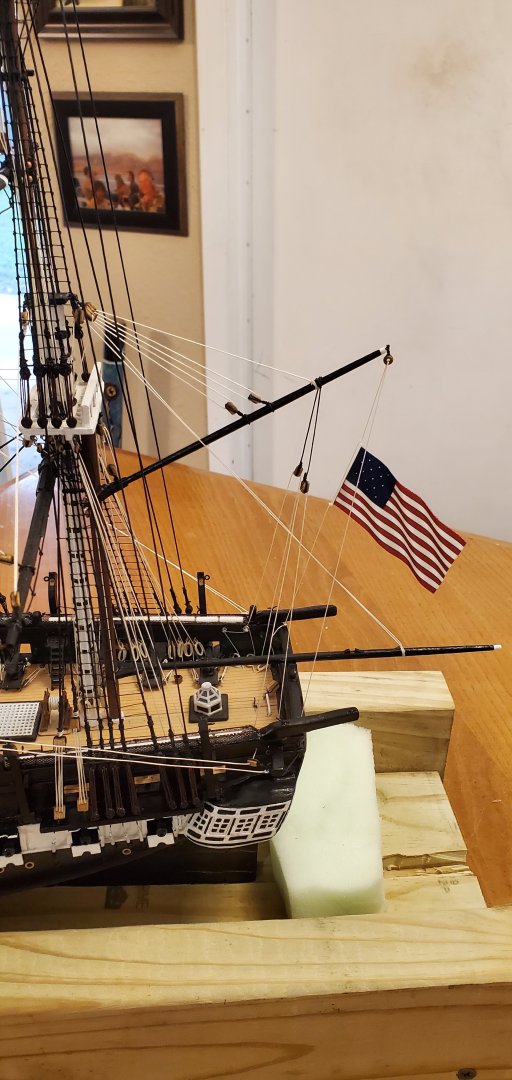
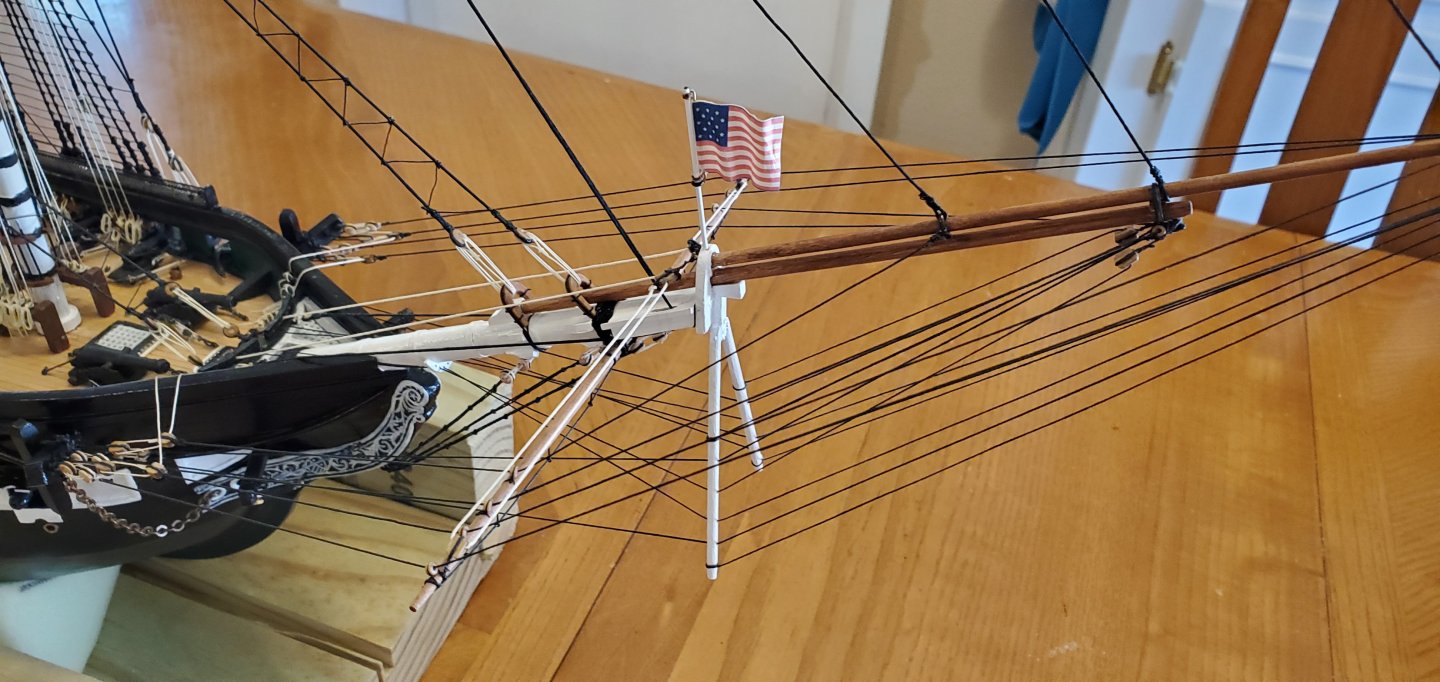
Seems like forever since I did any work on the Constitution. But I got my Kenoshi-sen to a point where I'm comfortable I can meet my deadline with it, so now I can focus on getting the Constitution across the finish line. I'm definitely on the home stretch here. Next on the list was getting the US flags flying. The original builder had mounted a small, paper flag on the bowsprit cap. I had to remove it when I rebuilt the broken bowsprit, but now it's back in its original place waving proudly forward. Looking at a variety of finished Constitution models, I saw many that had a larger flag flying from a halyard rigging off the gaff. I went to my favorite poaching box (Artesania Latina kit for the USS Constellation) and grabbed the flag from it. I've poached so much stuff from that box that if I ever decide to build the ship, I will probably have to buy an entire new kit. Or try and build it from scratch (YIKES!). I also found a beautiful piece of Patagonia rosewood that I'm going to use for the base. I had a buddy of mine rout the edges and I applied a few coats of poly for the finish. Next up is hanging the 3 whales boats from the davits.


- 301 replies
-
- 15
-
-
- Constitution
- Bluejacket Shipcrafters
- (and 1 more)