Snug Harbor Johnny
-
Posts
1,502 -
Joined
-
Last visited
Content Type
Profiles
Forums
Gallery
Events
Everything posted by Snug Harbor Johnny
-
 Glass can be a liability in the long run, due to the break-ability and weight. One of my Dad's clippers suffered great damage in a glass stattering accident. (Kids can trow stuff.) Acrylic (as opposed to plexiglass) is a good alternative ... shatter resistant and easily replaceable.
 -
I know what you mean about the old 1:96 Revell kits, as I built the CS. Yet one MSW restoration of a Thermie indicated that much of the masts and yards were brittle and disintegrating. I wonder if that was due to the lack of paint ... or will the mere passage of time render the plastic brittle. The wood model I'm now restoring is all-wood, and time has not had any effect on the rigidity and soundness of the components (other than some of the rigging lines). The question is, if one has one of the 1:96 plastic models ... will painting all plastic parts be sufficient safeguard for a life of at least 100 years (assuming anyone wants such a thing after the builder is long gone)? The alternative is to replace the masts and yards with wood (also belaying pins of preferably brass) as Bruma did on his CS. Any thoughts?
-
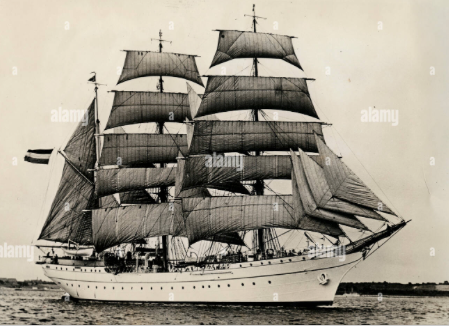
'Still thinking things out ahead of doing anything I might want later to un-do or wish I did otherwise ... details like how the foremost stays are to be done. The first one (a pair) going from the fore top to the forecastle deck will have a pair of turnbuckles at the bottom (as seen on other examples). The ratlines and stays (fore and back) were of wire rope versus fiber rope used much earlier. From what I can see in a couple of photos of the 1st GF, the jib stays may have gone through sheaves and passed inside the hollow steel bowsprit - presumably to be tensioned under the forecastle deck. So I'll likely make slight mortises where needed on the wood bowsprit, insert a sealed end of black line into the mortise and secure (with CA) a small brass sheave pushed into the mortise. The loops (wherever they occur) in stays and shrouds will likely be seized with a pair of small beader's crimps - so I'll have to get the tension right. The jib sails and stay sails will likely get suitably sized metal rings that the stay lines will pass through. In-haul lines will pass through the rings to blocks below (and thence to belaying pins). Out haul lines should be as typical. The idea is that each time a line is put on, it has to have a purpose - a beginning and end point consistent with that purpose. As mentioned before, there will necessarily be simplifications to the 'actual' full-rigging (never the purpose for the sake of restoration), yet I'd like to have better rigging than the rudimentary ropes thrown on the original model. After all, I'm the 'Master' of this representation of the ship - the final say in the details of rigging will be mine ... such as they are. I see by the photos below (one of which is of the GF) that sails tend not to be 'pure white', due to various reason for some discoloration. And there are often obvious signs of repair/maintenance. The restored sails on my model do have an off-white appearance (I might have even done less whitening, but that step is past), but that is as they should be. The second photo below shows how the varying light of day can also influence how the sails appear.

-
Keith, I forgot all about the sideways facing clock ... it needs restoration and I haven't got around to it. You spied the clock behind the jigsaw, so that means that there is STILL another clock hiding ... hint (spoiler) it's next toe one behind the jigsaw, concealed by some pussy willows.
-
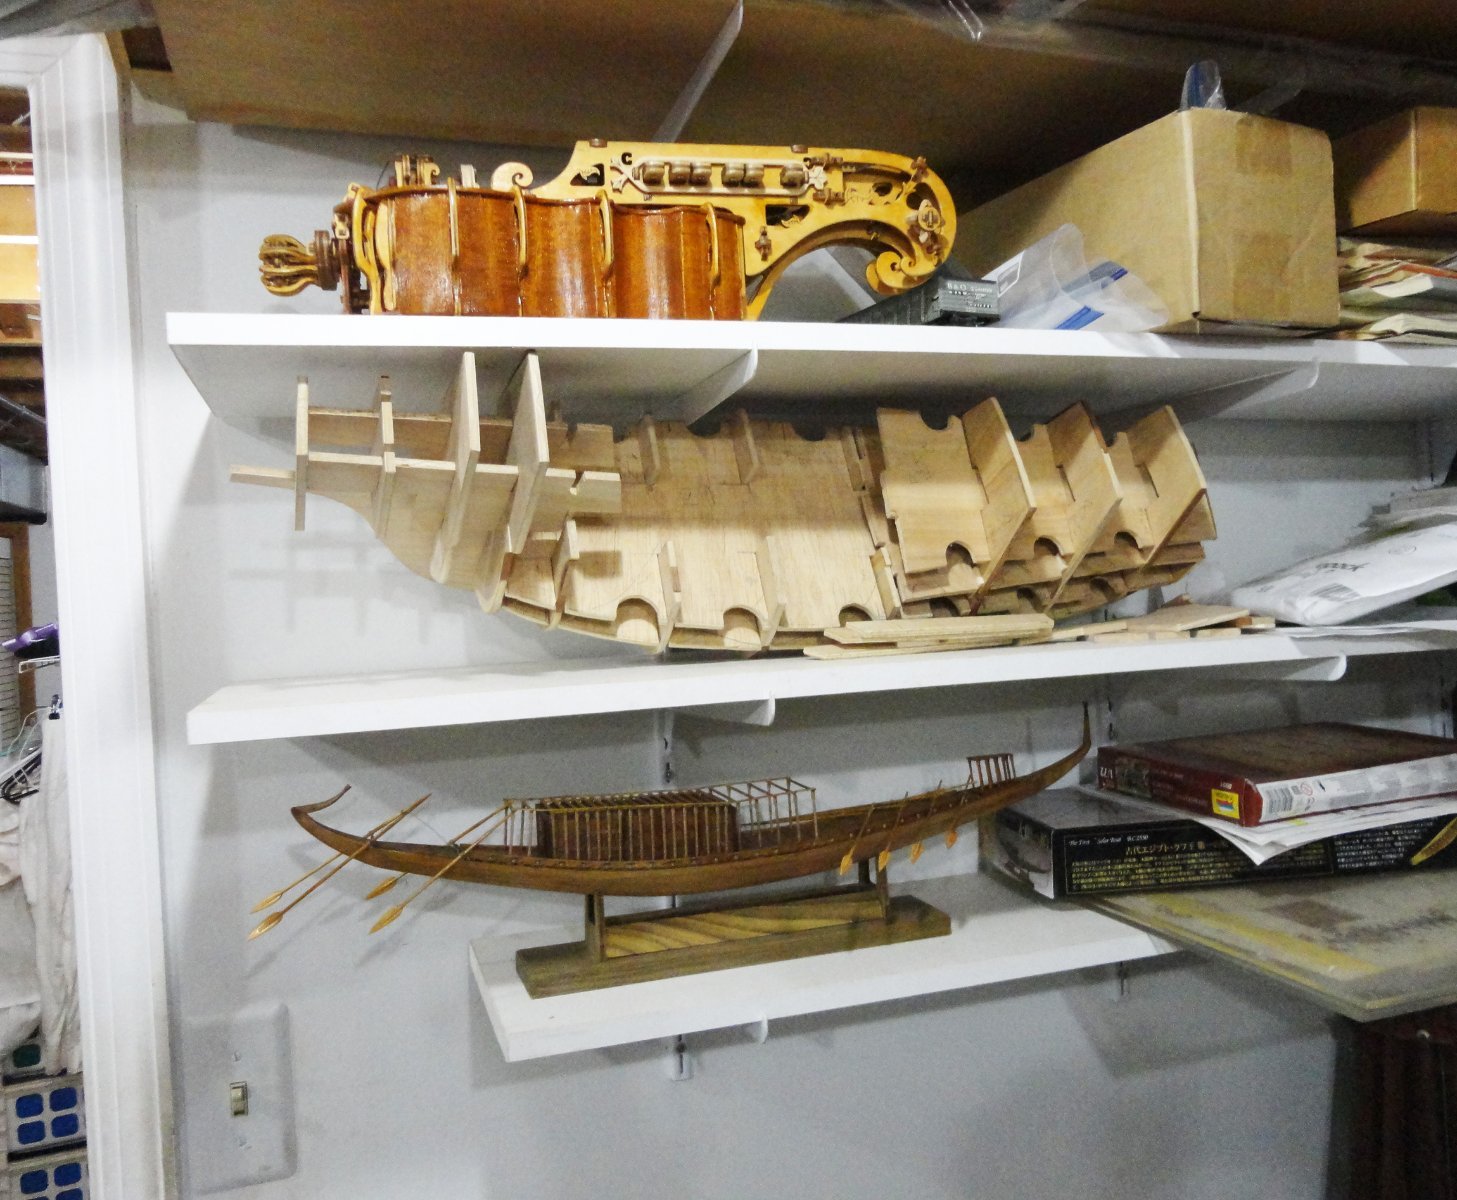
The clock high up on the shelf is an antique wind-up clock (mid 1800s) ... but its only a 24 hour winding, so to run it one must wind it every day (technically 36 hours per wind, but after 24 hours the clock slows down because the spring gets too weak). Because of that, I don't bother to wind it. What you don't see (out of the frame on the left) is another late 1800s clock that can go for 7 days when fully wound - and i do wind that up every week, since it has a nice bell that rings the hours if the striking spring is also wound (not quite the sound of a ship's bell, but pleasant nonetheless) and I notice that even when concentrating on something in the shop. I have several other clocks throughout the house that are also 7-day wind-ups, but since all of them can start to lose steam near the end of the week (the winding day being Sunday), I give then a 'midweek boost' of 4 half-turns on Thursday to insure accuracy until the following Sunday. Then it takes about 10 half turns of the key to feel 'tight enough' to stop - something learned by experience to prevent 'overwinding', and the possibility that the coil might seize or even break. One of my clocks has a mechanism that automatically prevents overwinding. Now heres your 'challenge'. You have pointed out one clock in the first picture, but there are TWO other clocks also in the picture ! One needs maintenance, and the other I have running. I thought this might be a little like "Where's Waldo" - can you find the other two clocks and note where they are hiding? In the second and third pictures there is what looks like a miniature piano next to the Wasa - it is an early 20th c. Schoenhut toy piano (two octave, white keys only) in need of restoration. I found it in an antique shop in Lancaster Pa (there are many such shops there and in Adamstown), and some of the tones sounded with clear chimes (small xylophone plates), unlike most such toys that use cheap-sounding metal rods. I ought to get to that sometime.

-
Rob Weiderrich has commented on this 'light ratline' topic on other threads, and notes a proliferation of 'OPM's with very light and even white (or at least they look white in photos) ratlines that just don't jive with contemporary art (pre photography) and with photographs of rigged ships in the 19th century. Nor does the use of light lines on standing rigging jive with every old model I've ever seen up close or in books (other than models done in metal, ivory or bone). Thats not to say ratlines were 'tarred' per-se, but were treated with a mixture (Swedish oil?) that gave the lines at least a medium brown appearance that would slowly darken over time. To my eyes, the use of too light a line for ratlines gives a black-and-white 'checkerboard' appearance that just doesn't look right.
- 106 replies
-
- 1
-

-
- Soleil Royal
- Ship-of-the-line
- (and 2 more)
-
Back in the 60s, the 'standard box' theory may well have been true for Billings, since the original box for their 'Wasa" @ 1:100 (now everyone uses Vasa - preferred by the Swedes) was the same size as the Vikingskibbe @ 1:20 (my father bought both kits ca. 1970). He gifted me the Wasa in my teens, and I started the build back then (assuming that all was accurate ...) not realizing that the OAL was 3" too short for the stated scale. I noted that the precut keel 'just fit in' the box. To make the length appropriate for the scale would have either required a longer box, or a 2-piece keel. I wish they'd done the latter (since many of their kits came in one size of box), since my recent efforts to actually make something resembling what is now known of the Vasa were severely hampered by having a hull that might have well been 'rear ended' in a collision. The previously single-planked hull (a tribute for a teenager to do as good as that much turned out) could not have been correct for length (and, gosh, the OAL was KNOWN at the time the kit was marketed because the basic hull had been raised beforehand as documented in National Geographic ... I still have that issue somewhere) without removing the planking from amidships aft, extending the keel with new bulkheads added and all the rest modified for proper fairing - then re-planking. I just wasn't prepared to do that, so 4 main deck cannon (2 on each side) that should be exposed are covered by aft decks. The Vikingskibbe (an interesting kit in its own right, but requiring a lot of jigsawing from flat stock) was re-designed as the Roar Ede in 1:25, to go with the now improved Oseberg of the same scale. Obviously the box size has not been an issue for a long time - but 'once upon a time' it apparently was. Another example of 'unibox' practice were the Steingraber kits - all in the same size box, but with a different picture on the lid pasted on.
-
Truly awesome - both research and the model. Now Louis was very vain and willing to tax the third estate as much as needed (plus heavy borrowing) to spend on his personal project e.g., Versailles ... and this ship. So I'd be tempted to put even more gilding on. Yet all that intricacy could be badly splintered by a single cannon ball. Will the ratlines and deadeye lacings be done with dark colored line?
- 106 replies
-
- 3
-
-
- Soleil Royal
- Ship-of-the-line
- (and 2 more)
-
Nice pics ... one notices that the ratlines and deadeye lacings are dark in color - traditionally modeled with either black or dark brown lines, as was done with all the standing rigging.
-
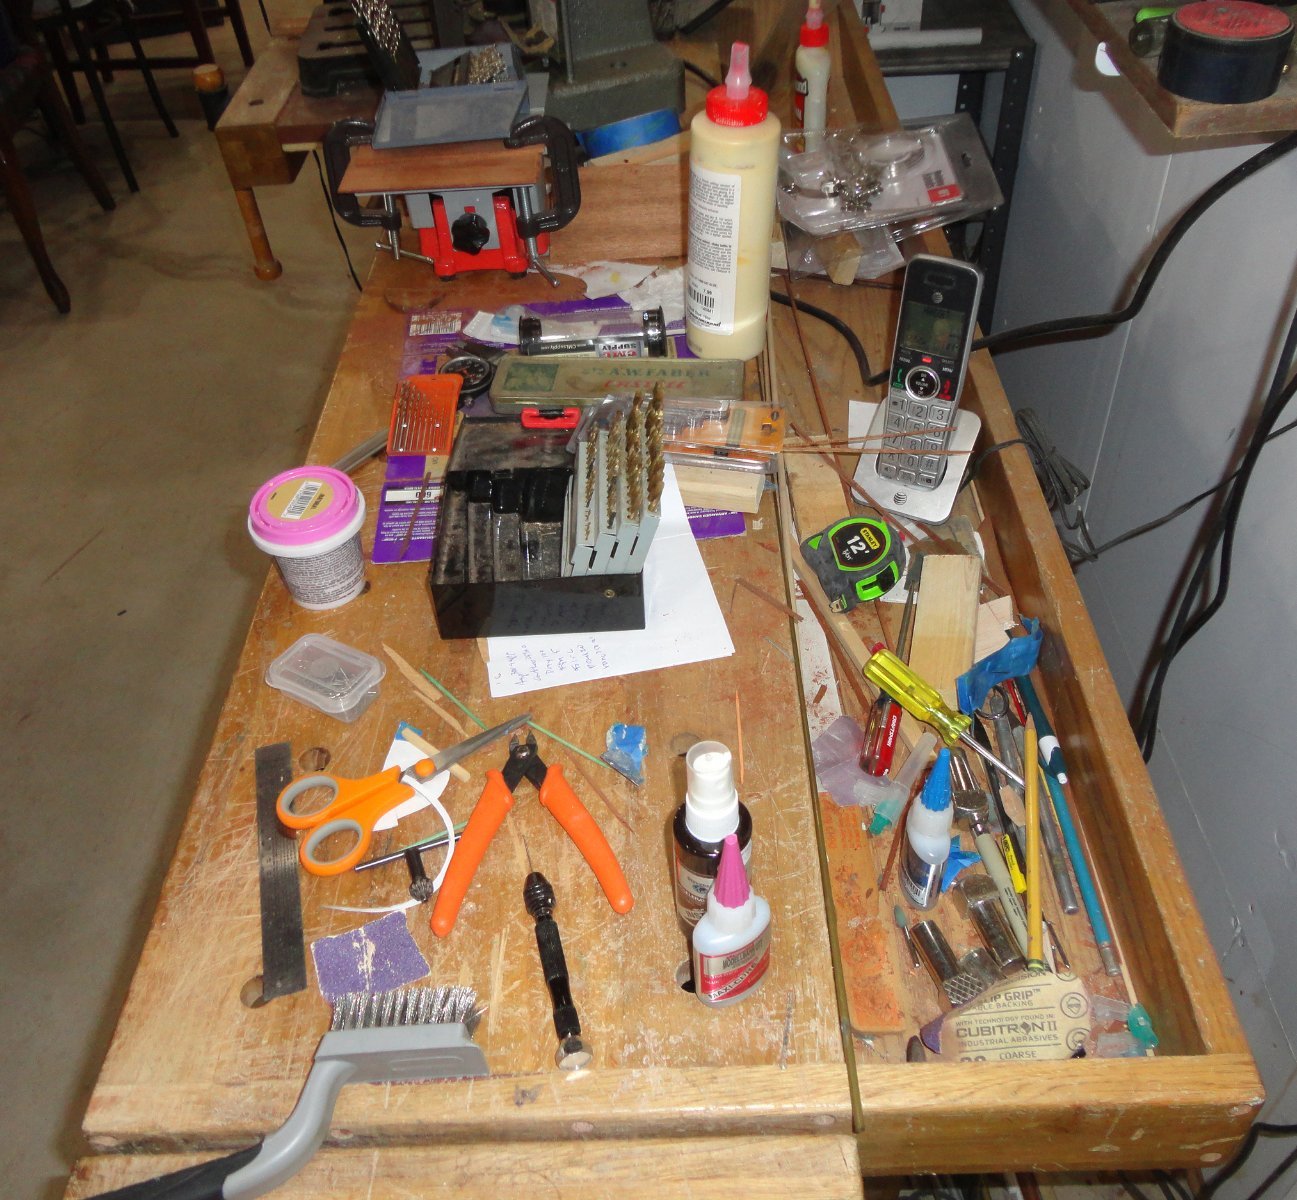
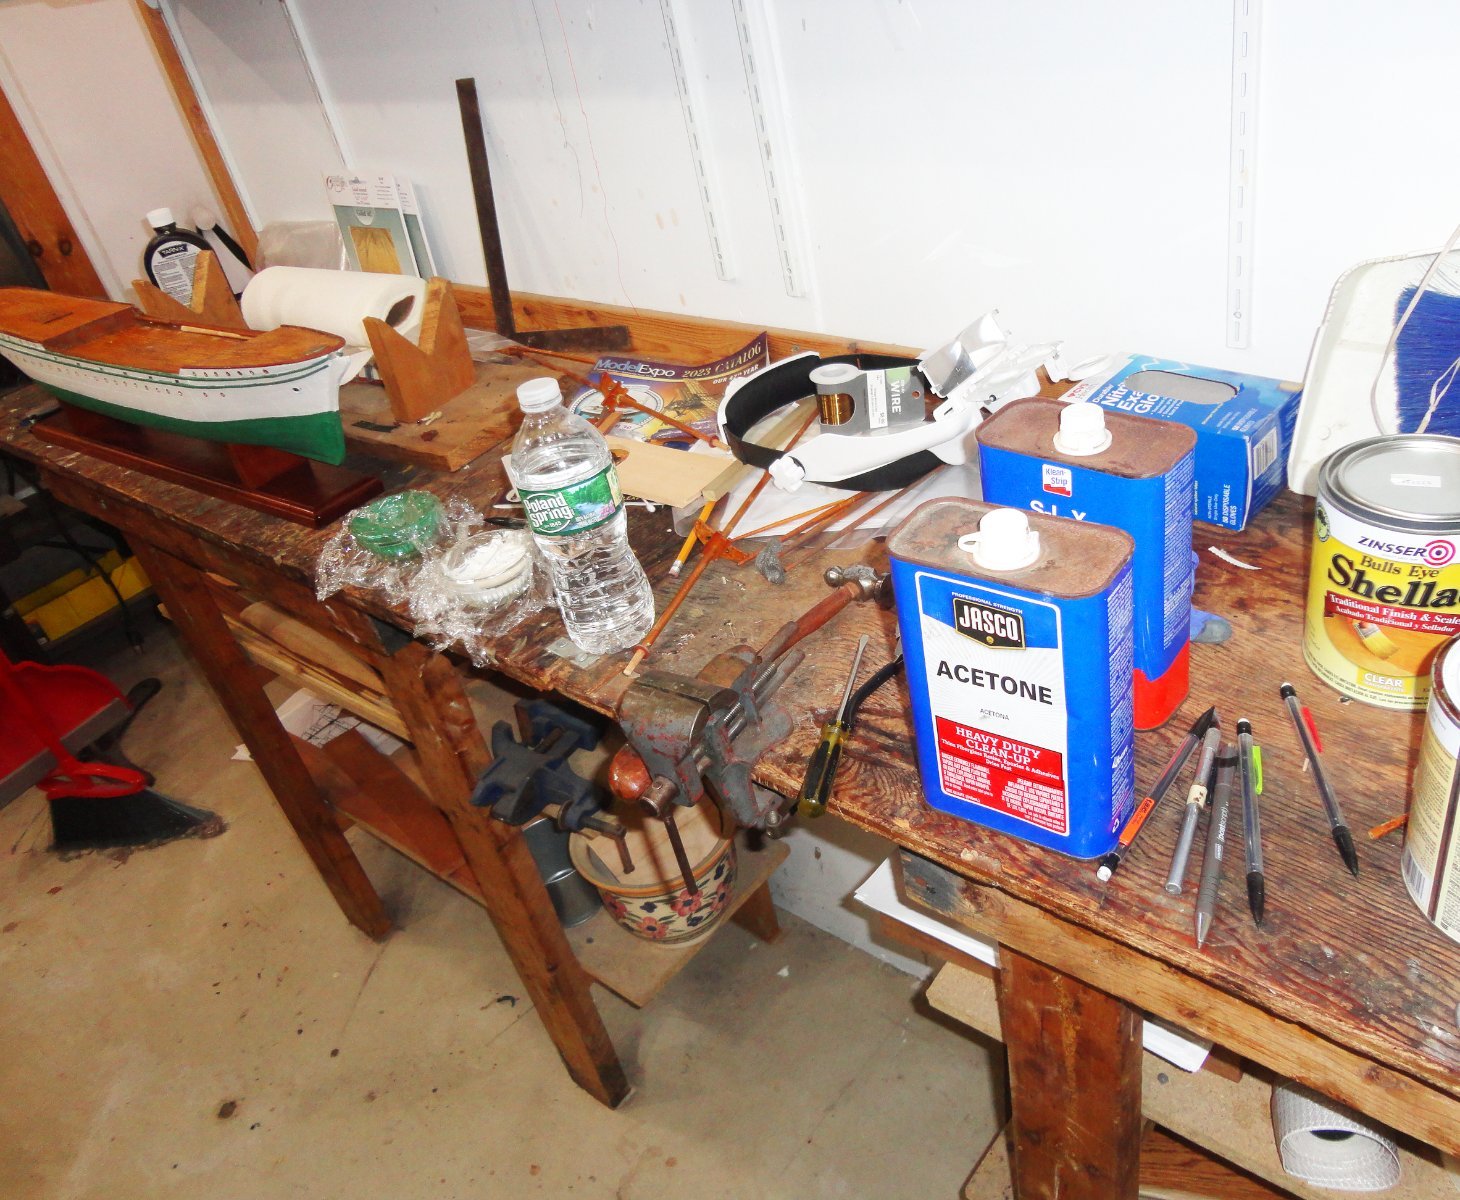
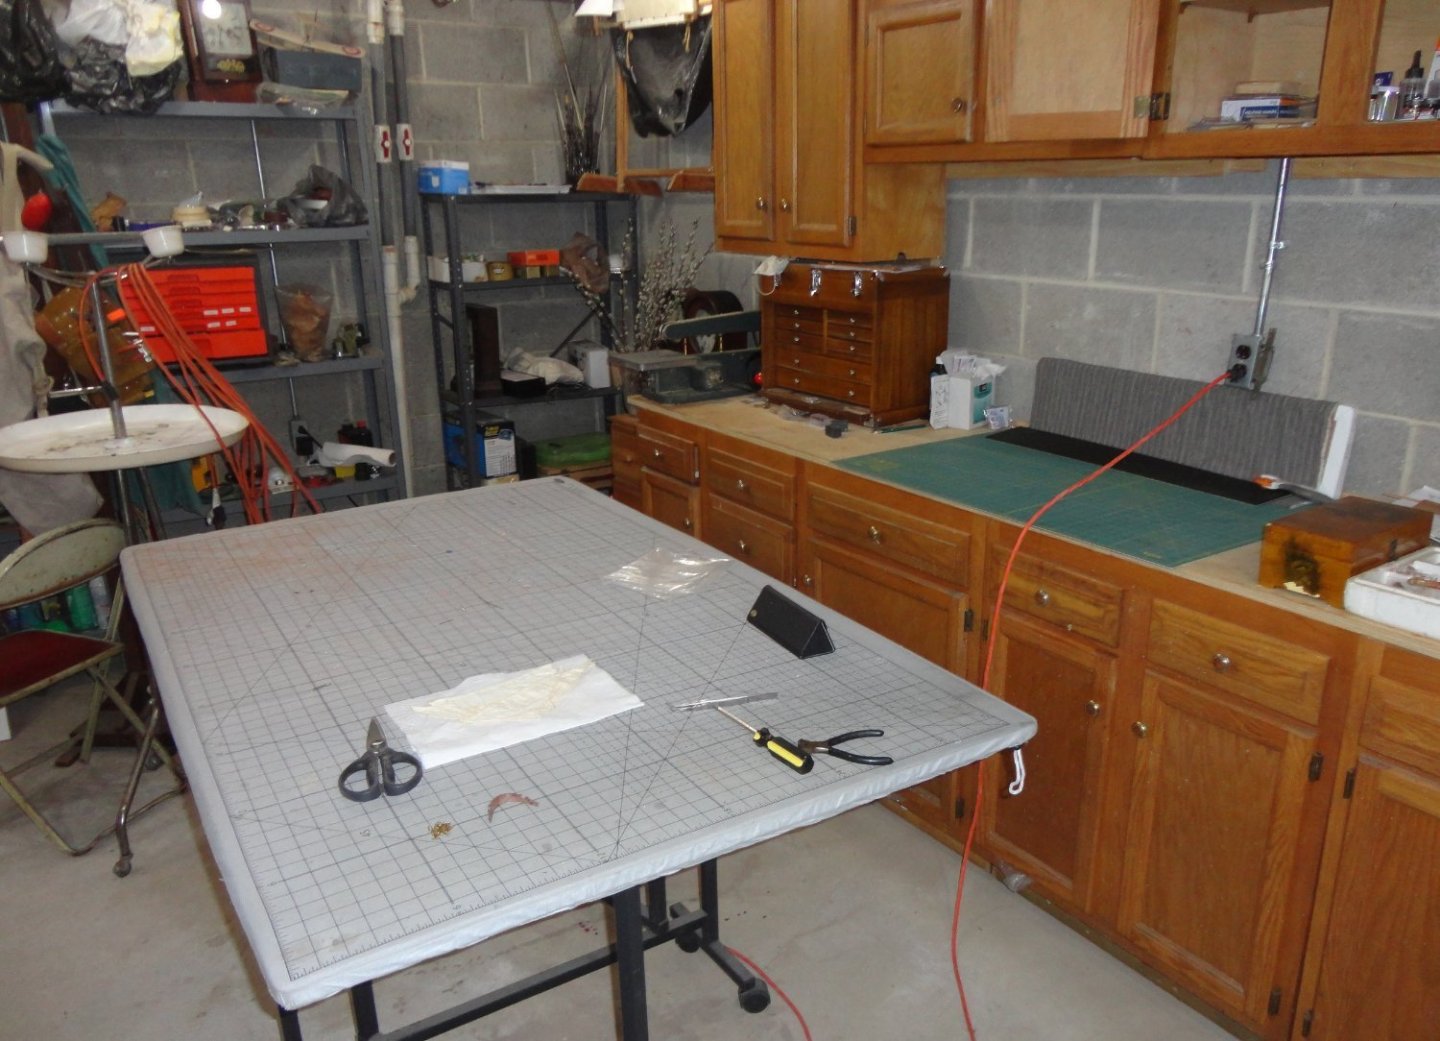
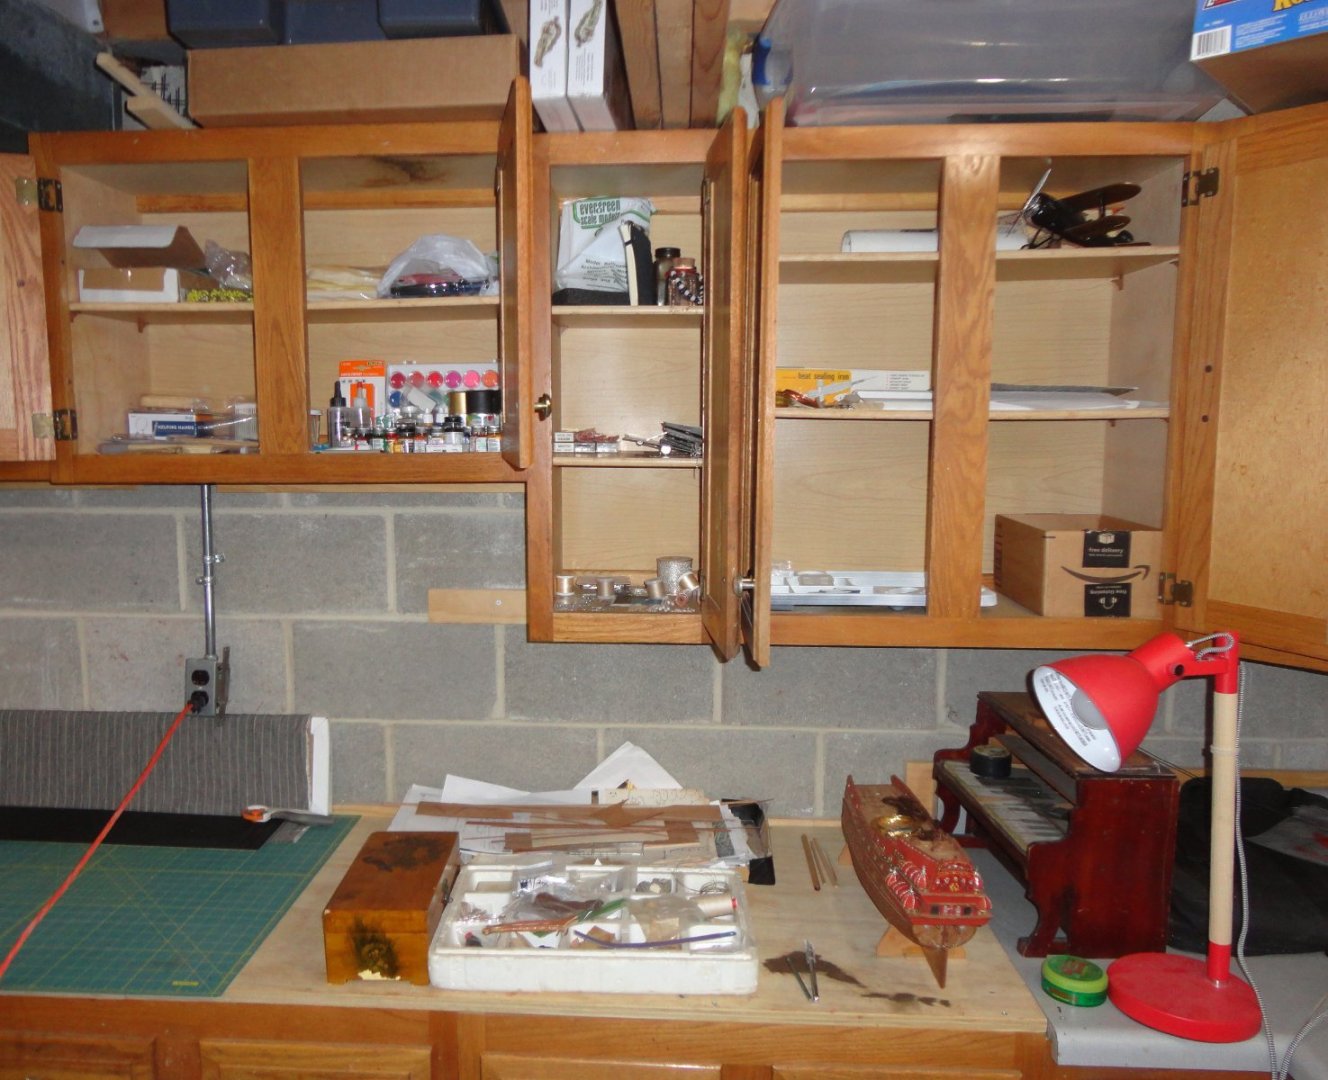
I've taken a pause, in part to 'catch-up' on shop tidying. As things progress from step to step; tools tend to get left on the table where last used, shavings and saw/sanding dust accumulates and stuff gets all out of order - which has me constantly looking for things. So much of one afternoon was spend getting about halfway through the process of re-ordering. Then came the duty of helping the Admiral do a craft show and now comes a weekend of 2nd shift hospital work. Anyway, I'm finally through the basic hull prep, so now must start pinning eyebolts, standoffs, pin rails and deck detail prior to re-masting. It occurs to me that a Build log is really a type of Blog ... a record of the mental process, choices, tools and techniques used to tackle a given circumstance. And that is a presentation of a builder's life - or at least that which pertains to modeling. I've found many good tips and techniques as well as ship info by reading many logs in MSW, whether on topics most interesting to me or on other aspects or ship types I hadn't explored before. So here are a few shots of 'where I am' in the shop: The movable work table is pretty much cleared for action, other than a couple remaining tools and a good brushing off. Its a sewing work table with folding wings. Old kitchen cabinet were moved to the basement (I mostly redid our kitchen myself upstairs), the area from the Dremel jigsaw (quite useful) past the small tool box and cutting mat (I make colonial soldier hats piecework from time to time - but no orders lately) have been vacuumed. I'm getting used to my hand-me-down camera, the pictures are dragged to the desktop after attaching the camera to the computer. Then I'll open photoshop (I'm a rudimentary user) for the most basic adjustments: cropping, rotation (if needed) and then the simplest of brightness/contrast adjustments. Photoshop might be compared to an Olympic sized swimming pool where I've barely dipped a toe into the shallow end ... make that the spa tub next to the pool itself. Moving to the right are open doors showing an attempt to segregate supplies by type, and below that is the suspended Vasa build so everything will be there when its time to get back to it. 'Rather fond of the old Wasa ... and I'm surprised I've got her this far, considering the limitations of what I started with. On the other side corner are some shelves - from the bottom up is the finished Khufu's barge, the rough bulkhead framing of the Great Harry and a small hurdy-gurdy kit busted so it actually plays. So whats left to clean-up is on the other side of the shop (a partitioned side of the basement). I have to do the workbench area ... ... and the high bench area. Of course there are other shelves to tend to, but they are holding stuff not related to ship modeling .


-
You've got something good going there. The use of small wood blocks for clamping the second planking (with the wood clamps temporarily nailed into the 1st planking below) is novel ... I'll have to remember that in future. Your re-do at the bow and stern of the 1st planking was well thought-out and resourceful. No doubt you'll have a great model in the end, however long that might take.
- 44 replies
-
- 2
-
-
- Cutty Sark
- Sergal
- (and 1 more)
-
Point well taken, so I consider it being optimistic on how many years of retirement there will be to enjoy before disabilities of one sort or another hamper me too much. Besides, 4 in the stash are plastic kits obtained for comparison and study e.g., the Lindbergh/Pyro R. E. Lee (plastic) is identical in scale to the classic Scientific R.E. Lee (wood based) aprox. 1:163 ... and there are many plastic parts from the Lindbergh kit that will enhance the detail (and ease of build) of the Scientific kit - a 'melding' of the two as noted in another MSW thread. I've reviewed all the Lee builds on the forum and look forward to my own in the future (assuming I don't check out beforehand). One considered in the stash is actually underway (suspended build of the 1970s Sergal Great Harry). The sheer size of the aprox 1:65 original kit, and also the inaccuracies in design due to the lack of information then (the Mary Rose had yet to be discovered, raised and preserved), prompted me to re-scale and correct all the bulkheads at 1:88 (cutting them all from new flat stock). After completing the restoration of the Gorch Fock - getting some practice at rigging in the process, it will be back to finish the Vasa to the extent I've decided on, and then a return to the Harry - a very interesting project indeed. That will leave the Billings Oseberg & Roar Ede (both 1:25 - a nice pair), Occre Endurance (about 1:70) the R.E.Lee and a perhaps version of the Golden Hind based on my research - but that might be left to someone else.
-
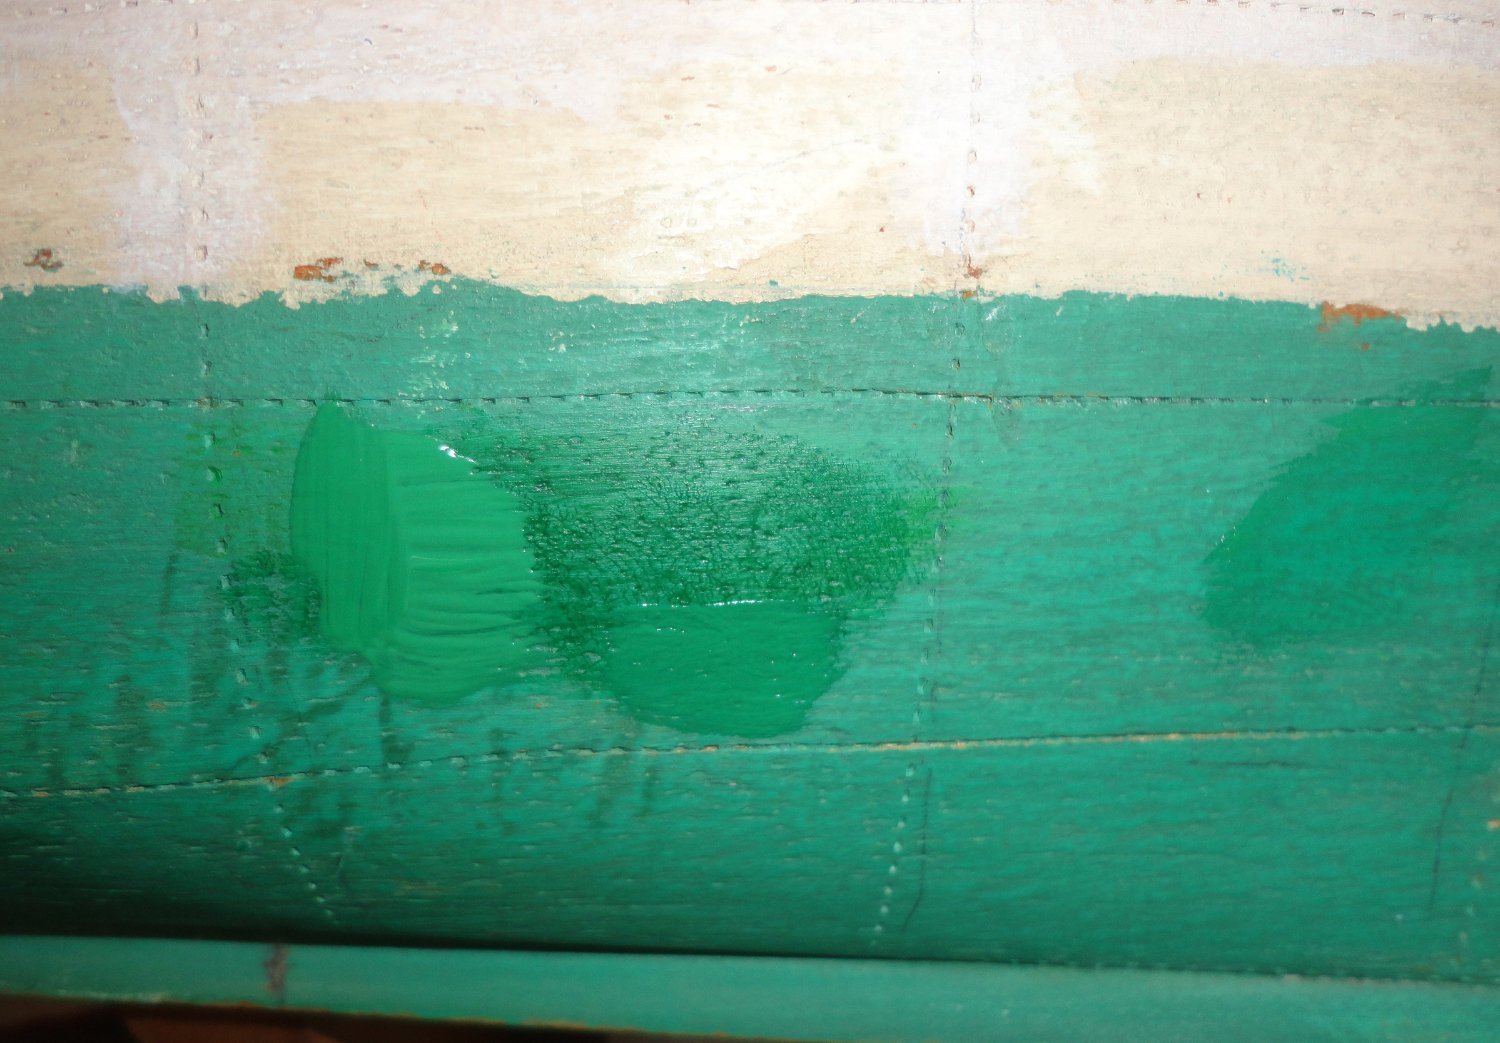
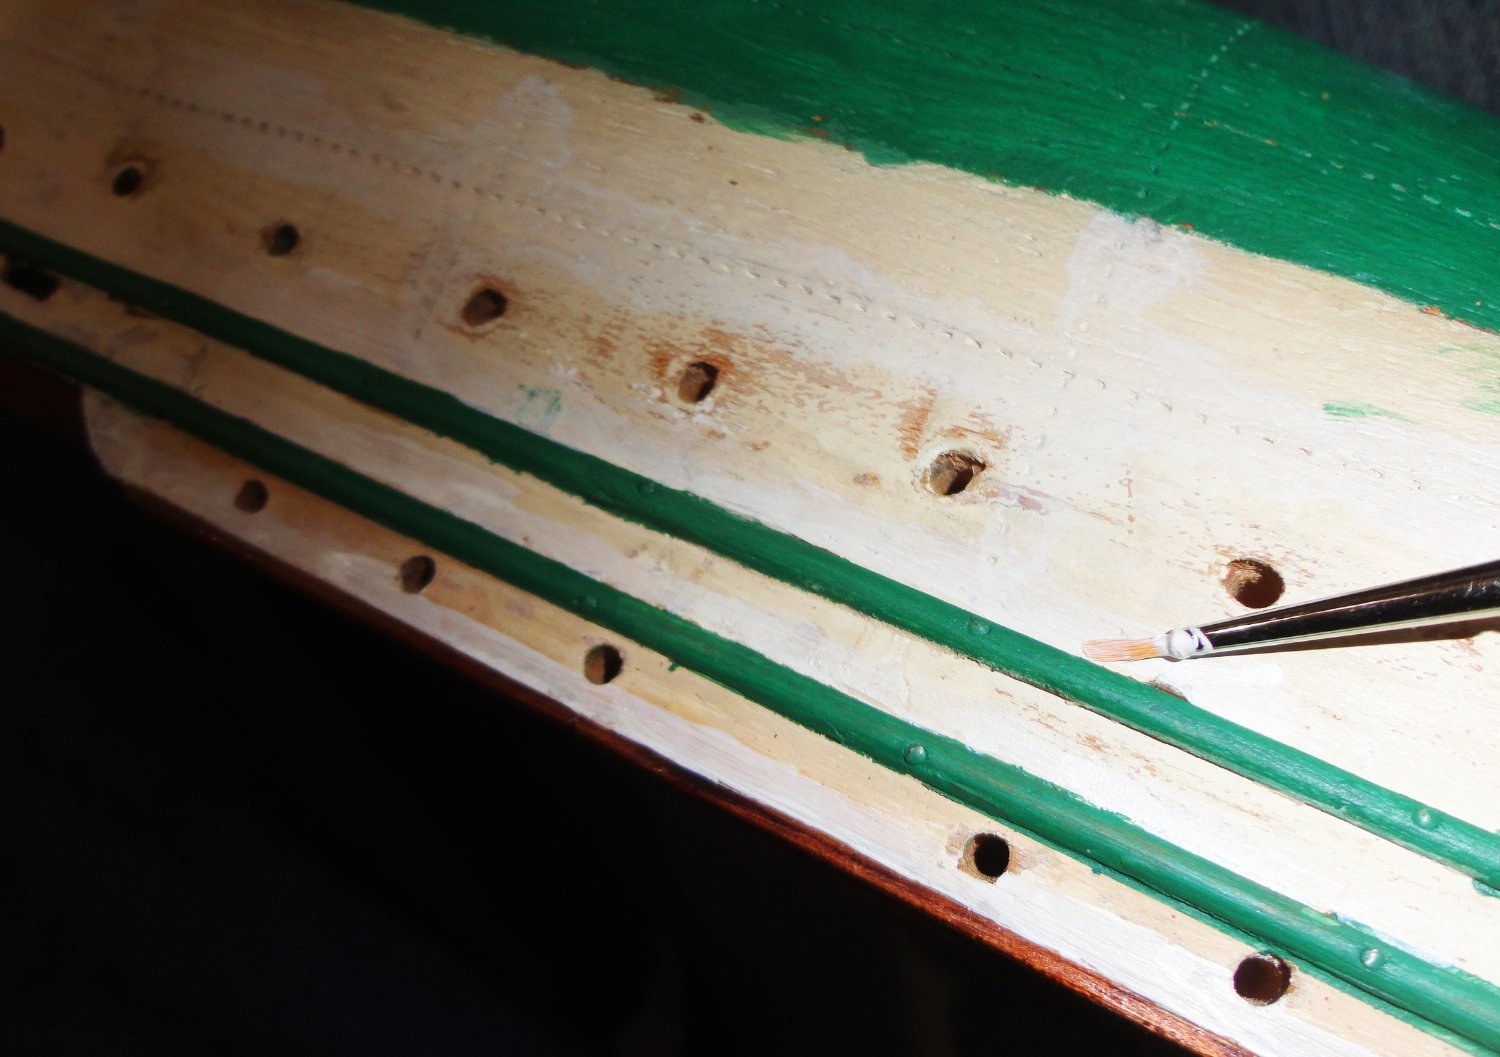
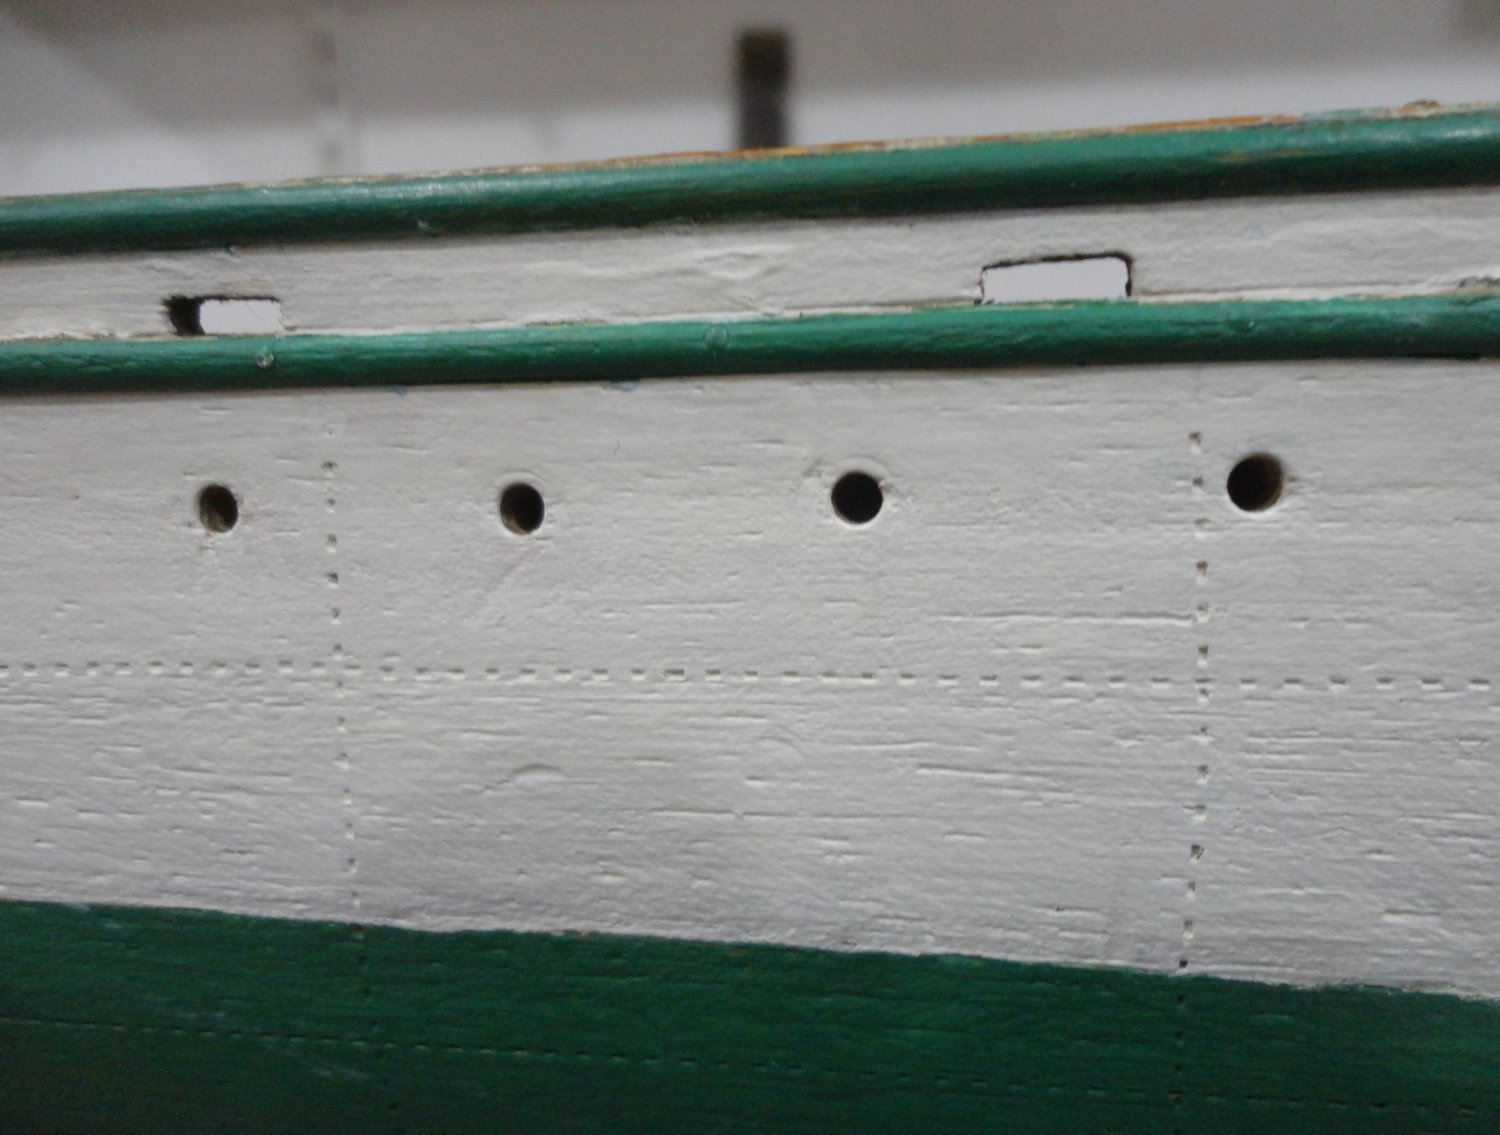
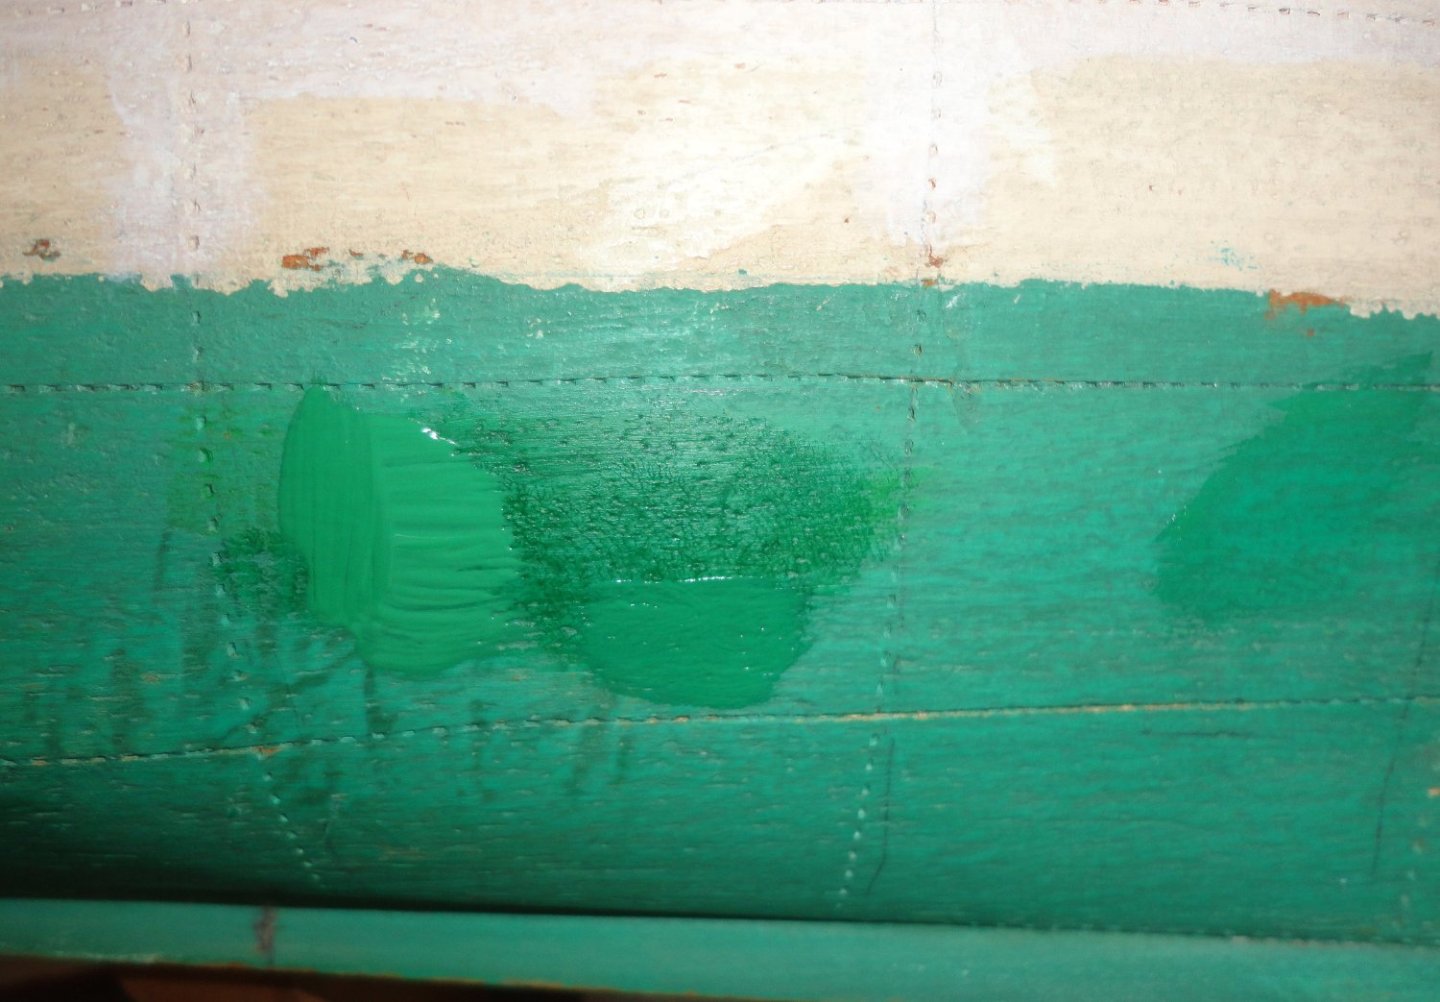
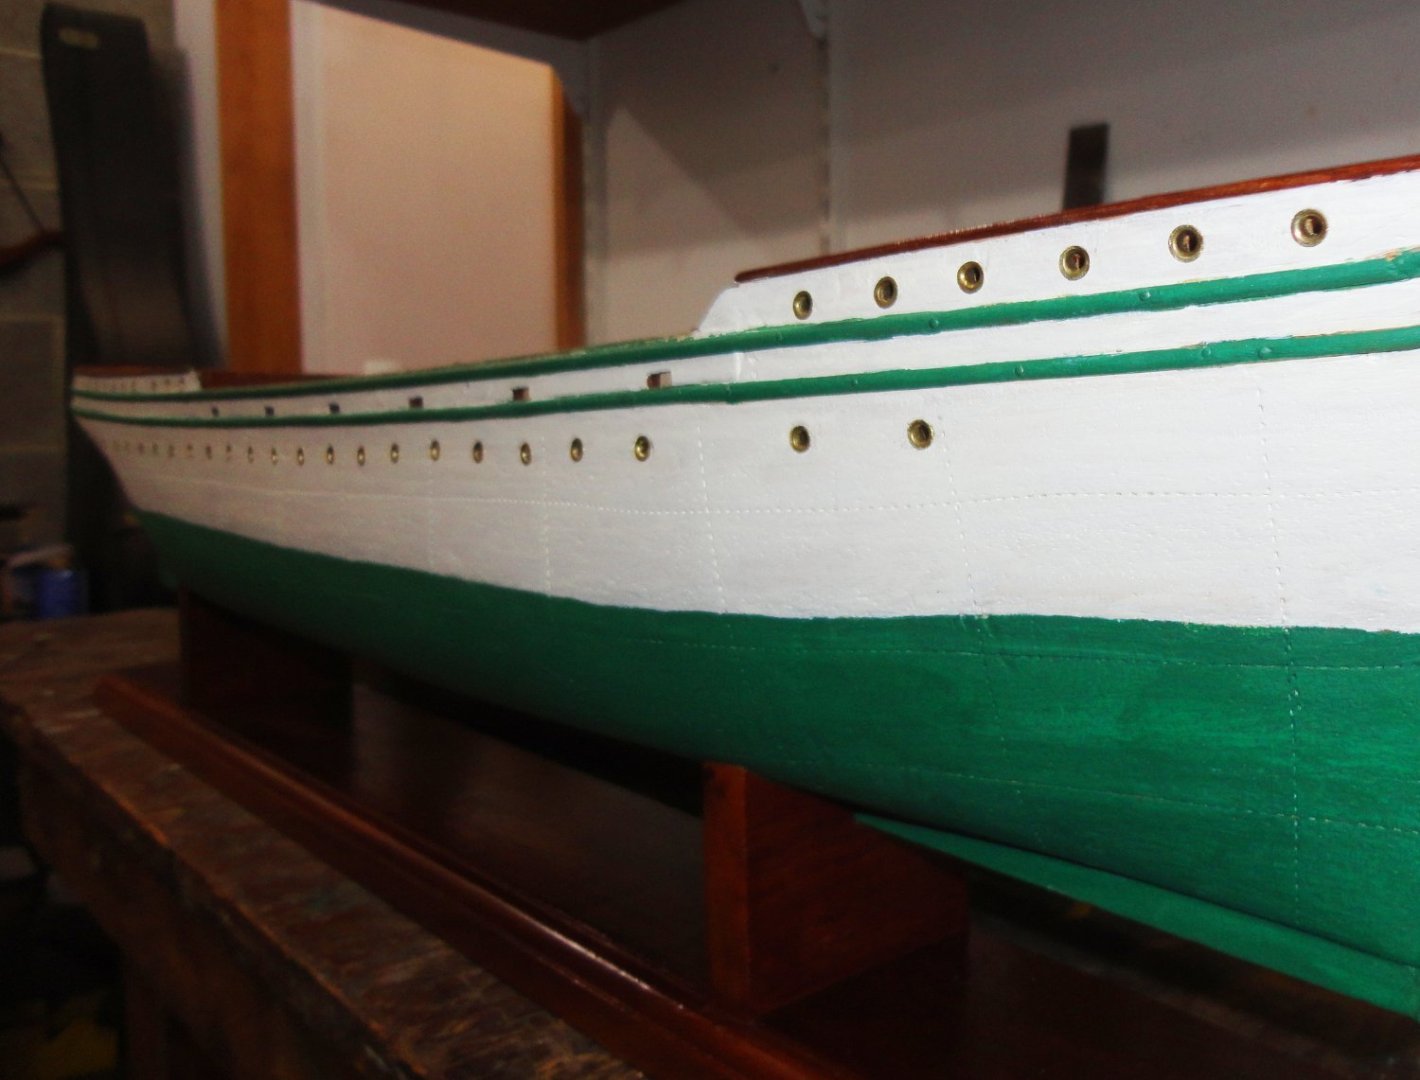
Now it's time to paint the hull. I bought a few tubes of middle grade acrylic colors at a local craft store ... I suspect that this is about the same as in the little bottles for models, but 5 bucks for a big fat tube seems like a better bargain. The finish is flat, but with multiple coats can be semi-gloss - but I'll stick with flat. I didn't want 'dead' white, so mixed a little unbleached titanium with mostly white. Thinning a little with water (no smells with acrylic), the barely ff-white white was 'pounced' into the divots made earlier to make sure paint got in there - which would have otherwise been dark dots. The brush used was a relatively still artists' detail brush. Note that the original waterline in this close shot is definitely a bit 'rough'. I'll do a little better but NOT try for a 'dead straight' fine line ... This project is a restoration, so I wanted to hand paint as the builder did - leaving some grain visible on close inspection, as opposed to trying to fill everything to a flat sanded surface. One advantage is that acrylic dries fast - which can also be a disadvantage. Mixing green from blue and yellow was trying, so the Sap Green by itself was close - but a little dark as seen below. Adding some yellow made it too light, but then some blue made it darn close. The color did dry a tad darker than when it was wet - something seen when using latex wall paint re-doing a room. Yet copper based anti-fouling paint does have a blue-green look to it, as seen with verdigris. Scotch tape was used to mask the wales, since it will be easier to 'fill-in' the gap between with a fine liner brush. So far so good. The tape was stripped off before the paint set to avoid any peel-off, and there were few slops. Being right handed, the liner brush was used from the right going all around the model on one side of the wales before flipping the model over to tackle the other sides. Below shows things looking about like I wanted ... but prior to the re-installation of the port hole surrounds. Yeah, such surrounds were not on the original ship - but again (in the spirit of restoration) they are to be added since 1.) the perimeter of the holes on this hull are a tad irregular and 2.) a lot of time was spent re-conditioning and regularizing the brass grommets. Some of the grommets were snug, but some almost loose. So to prevent future loss, a dab of glue went just inside the portholes, then after placement each grommet was set with the grommet setter - later inverted to tap the edges flush as needed. There is a certain charm to them. I see the slight wave in the waterline, so after this picture was taken, it was straightened with a liner brush - easy enough to do. Peering down the length of the hull revealed a few other places for slight adjustments in the line - now made.


-
I get the 'scale inaccuracy' (what were they thinking ... or were they thinking at all?), as I picked up a Airfix 1:72 Golden Hind (one of their better models) to compare with my 'old stock' (pre fire) Mammoli GH stated to be 1:54 on the plans ... but the hull sizes are virtually identical. (I think I figured the 1:72 was about right.) These are part of my "kit collection" (AKA 'stash'), which isn't too large really - 10 plus three 'parts kits'. I do like looking through them from time to time.
-
"I see," said the blind man ... then he picked up his hammer and saw ! We were talking about dowels all along ... the term 'strips' had me confused, as I think of strips as varying widths of flat stock. Dowels, of course, are round - and I'll have to get some of them. Cool!
-
Simply awesome, those treenails. Did you cut 1mm strips off he 1mm thick walnut stock, then pull through a die plate to make them round?
-
OcCre HMS Victory Limited edition
Snug Harbor Johnny replied to modeller_masa's topic in Wood ship model kits
$1,500 before duties, shipping, and extra stuff to correct or upgrade seems steep - as well as (my guess) the 2 - 3 years (or more ... unless retired and with a lot of available time) one might take from soup to nuts. But is money is plentiful and the desire is there - why not? There are many who take on the Victory, but I wonder how many get finished - and in what fashion. Hopefully a builder won't use nearly white rigging line for the ratlines and deadeye lacings. 'Always thought models so completed looked odd, as contemporary artwork and 19th c. photos show dark lines for all the standing rigging on sailing vessels. OK, someone used tan line on the present-day Victory on exhibit ... couldn't say why. -
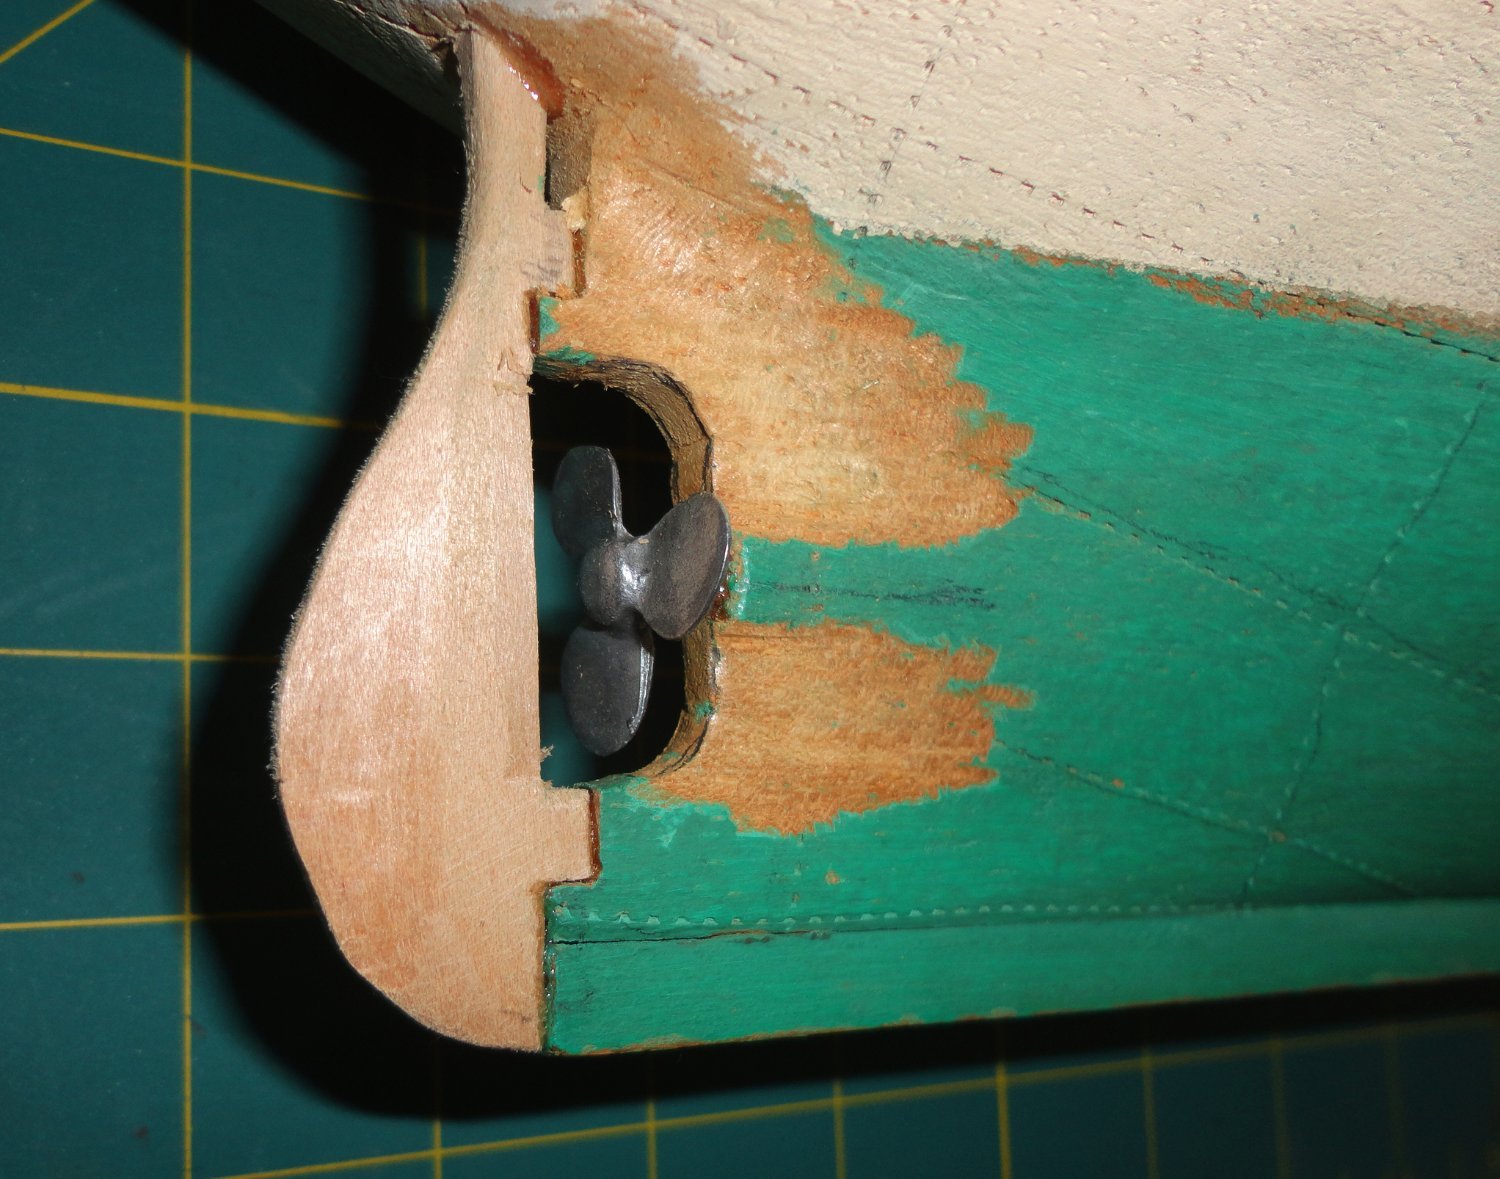
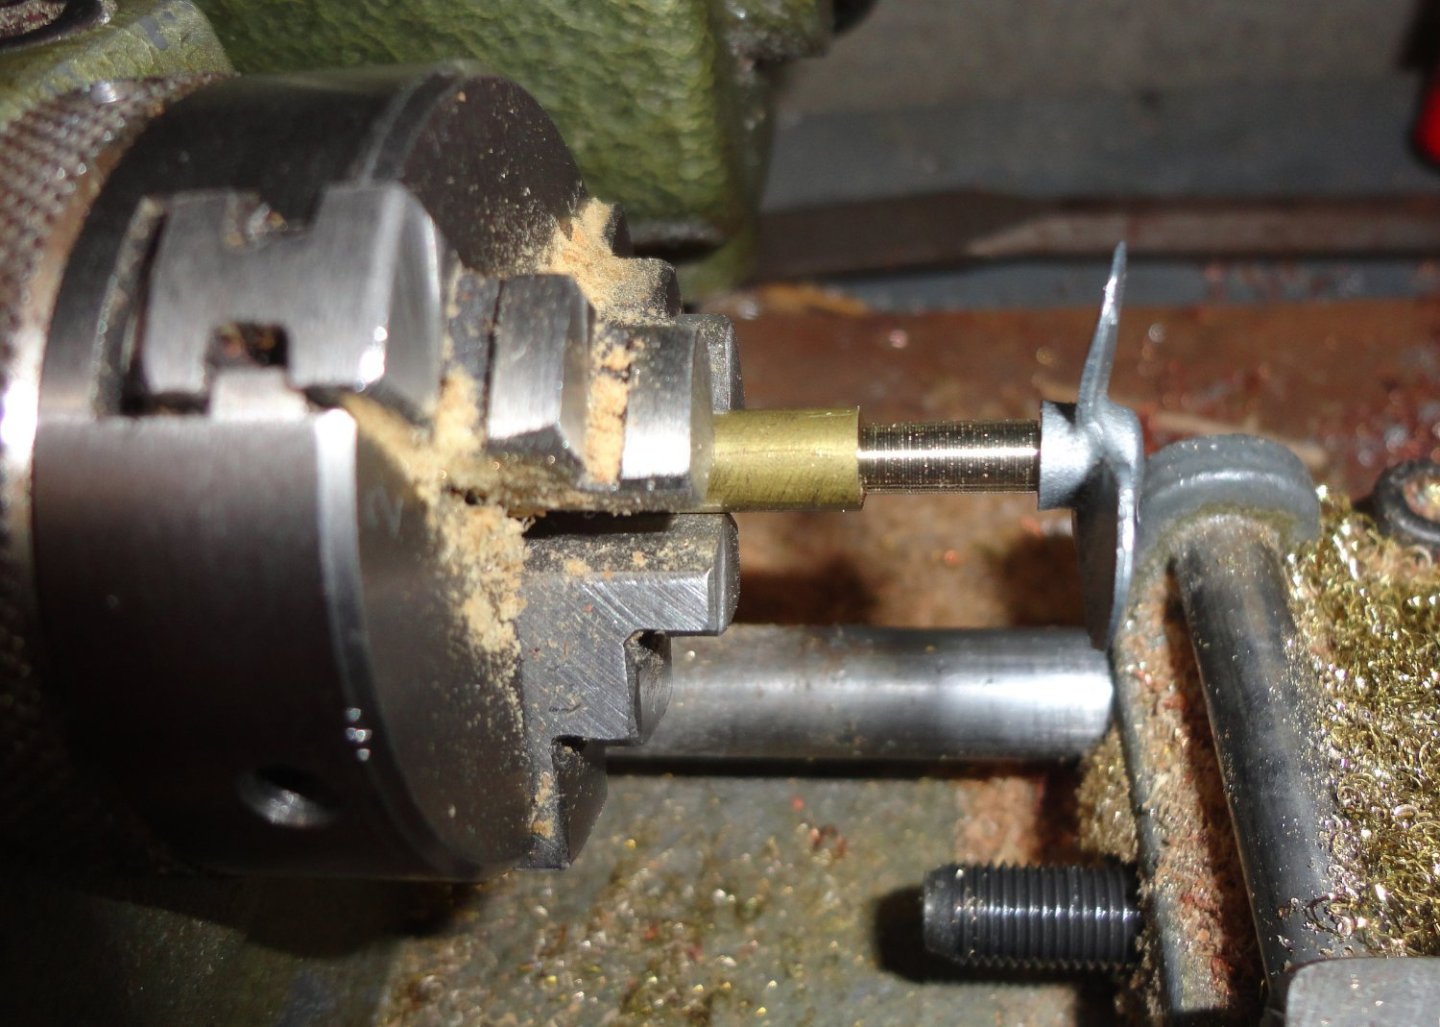
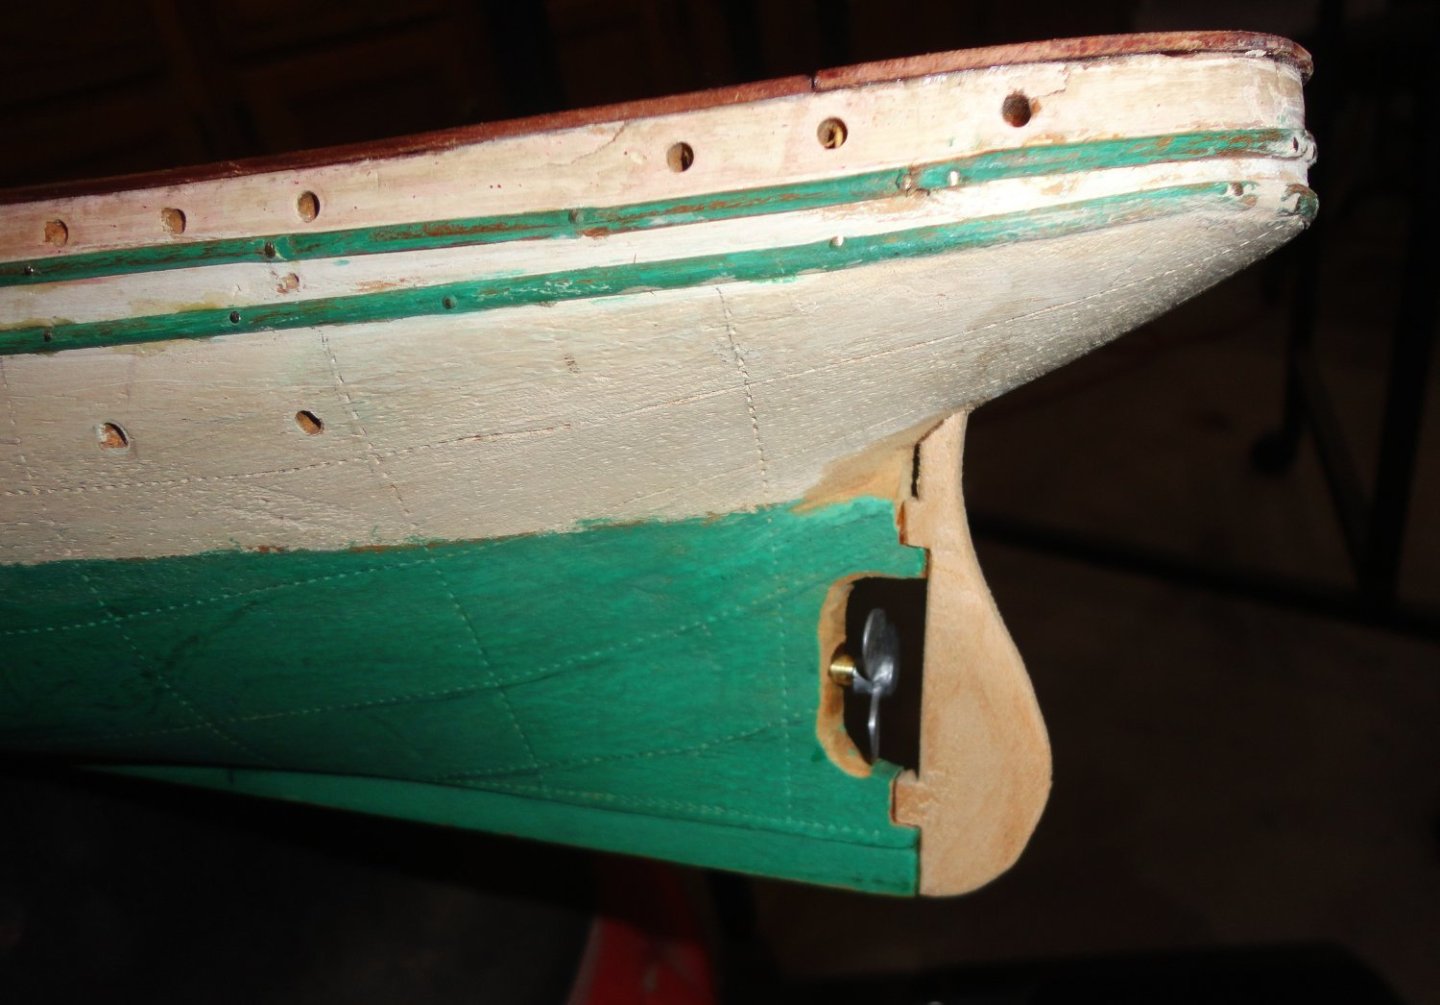
'Looked at the stern below the waterline after the rudder and prop work, and thought the thickness of the flat ahead of the prop didn't look right ... way too wide for effective propulsion. Good enough, perhaps, but I thought to myself, "Johnny, seriously ... you can do better." So I got out a couple small wood carving tools and roughed-out better streamlining, Then the area was sanded and I could see an improvement ... when painted, it will then be a little better then 'good enough'. On the other side the difference between the soft early growth and the harder ring growth started to show. It then became apparent that the difference in the resistance to pin pushing was due the variability in ring distribution and angle - easier to push pins between the harder ring deposits. Perhaps then the hull was carved from a single block of moderately dense pine - not the fast-grown stuff farmed in recent times for building houses. Our first house was built in 1927, and when doing a little remodeling I discovered how hard a stud cut from older growth with tight ring structure can be. Framing timbers then were far stronger than what is used today. The wooden hull of this restoration seems to be something 'in between'/


-
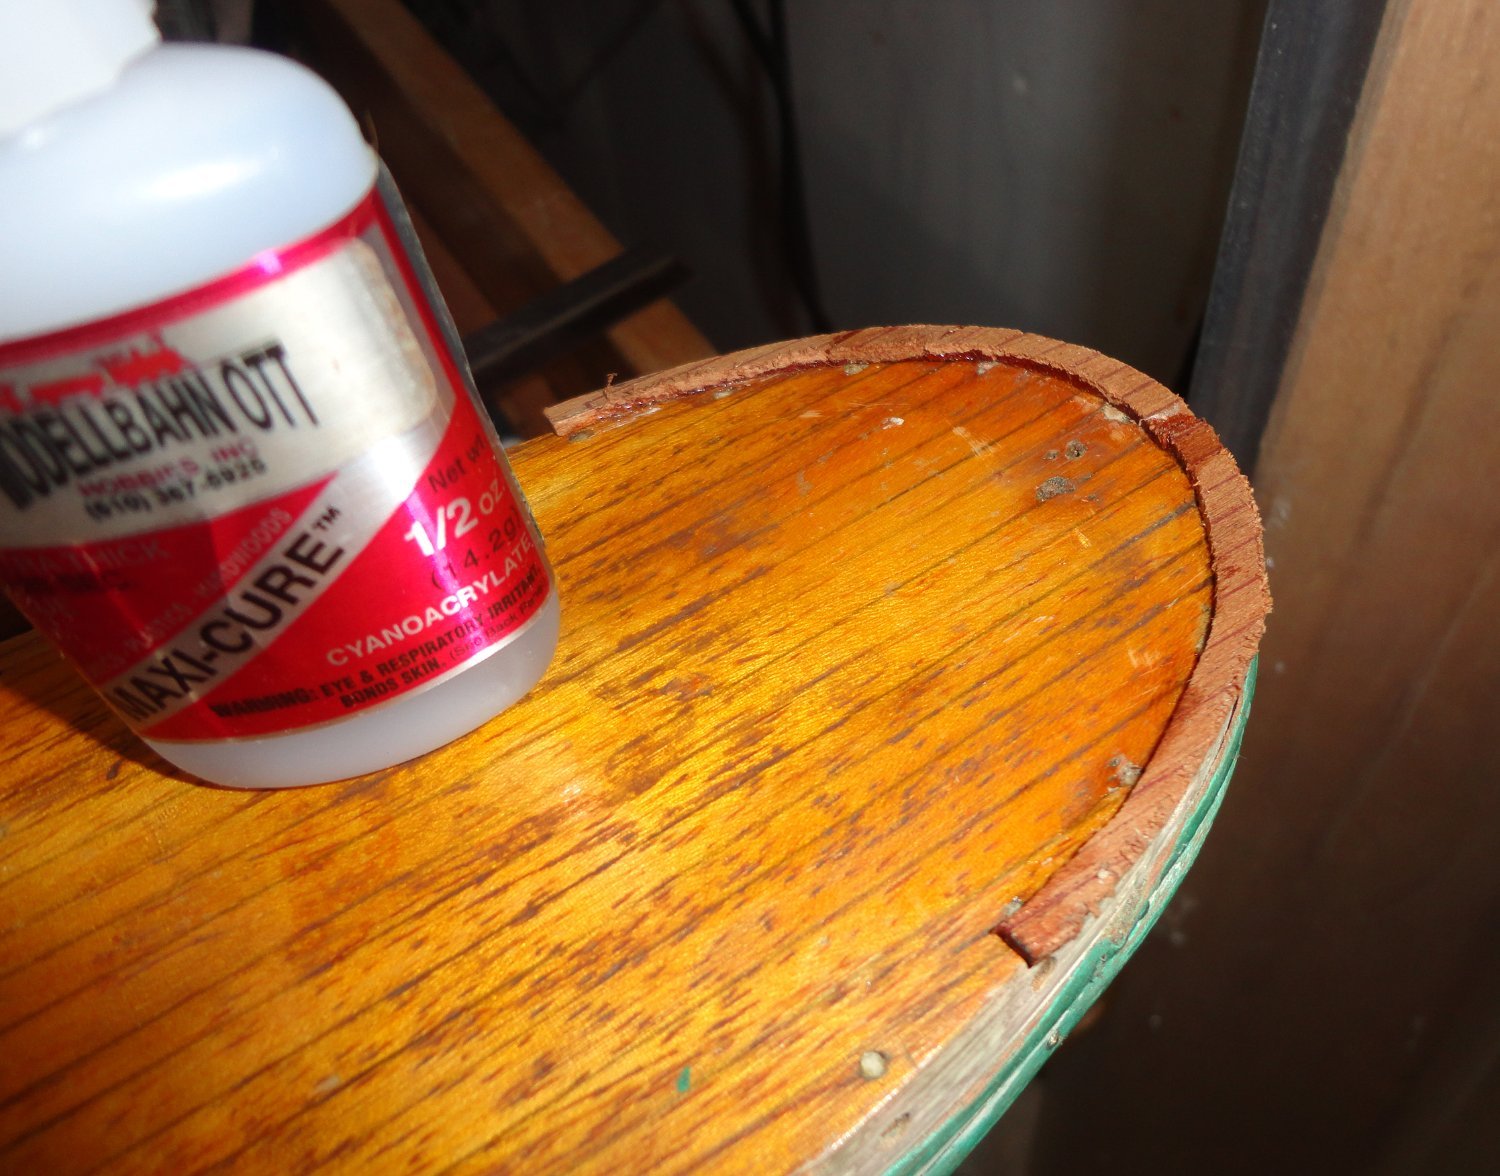
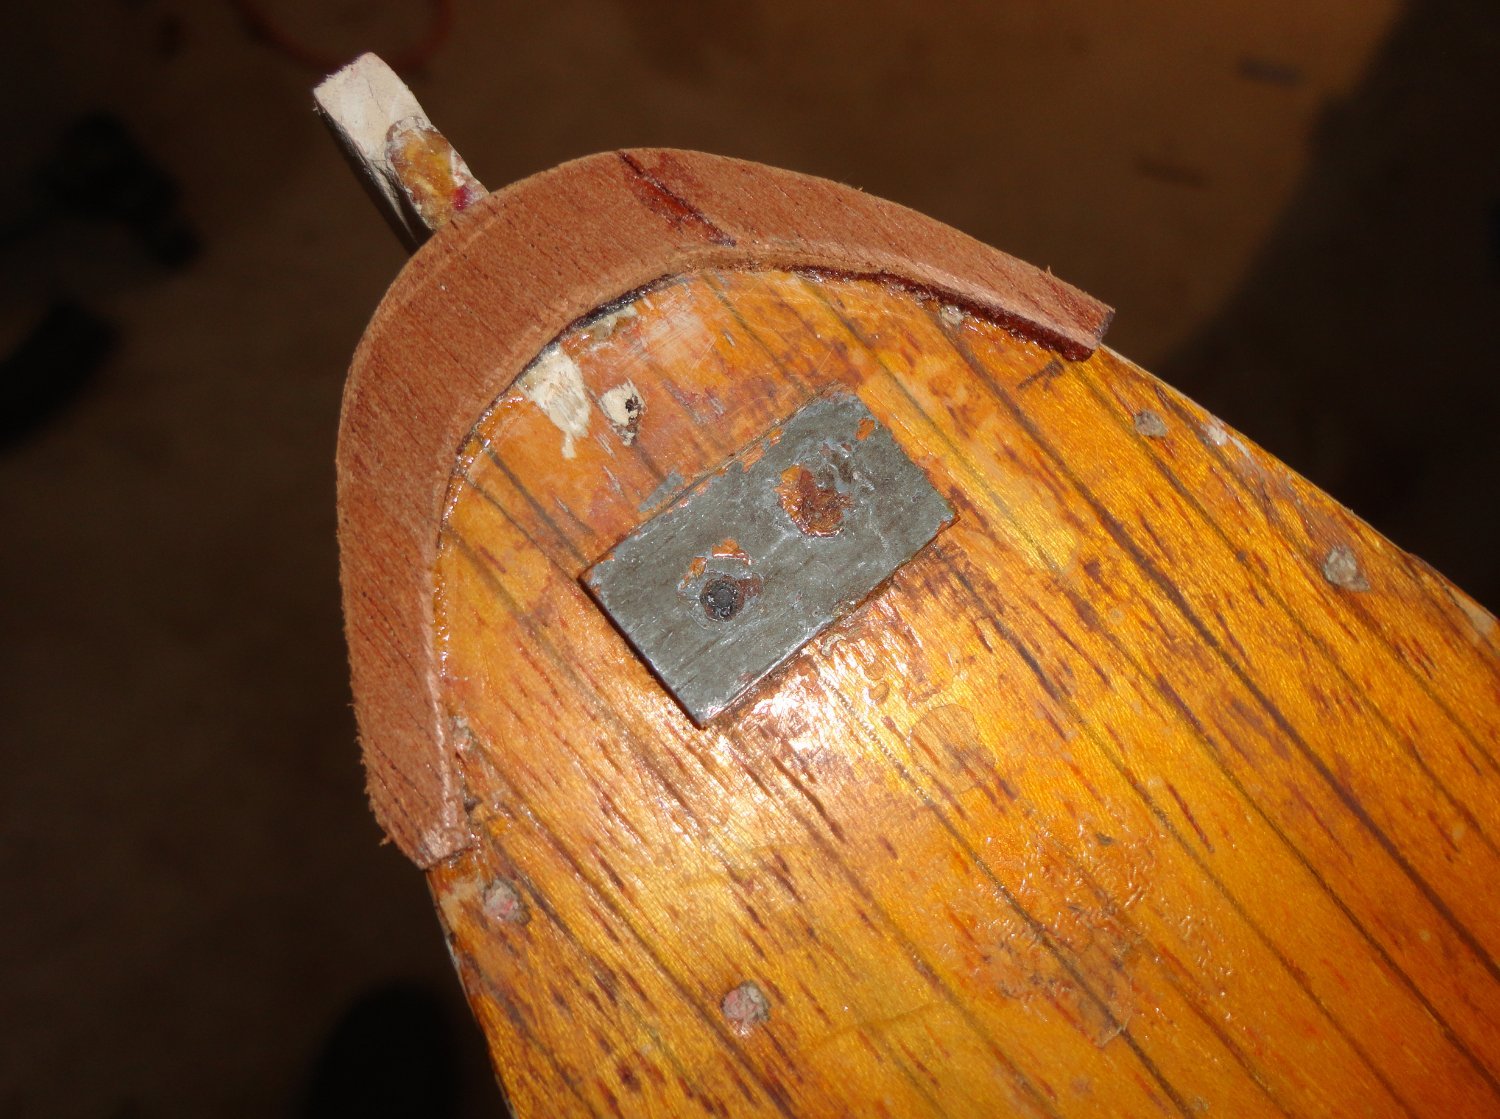
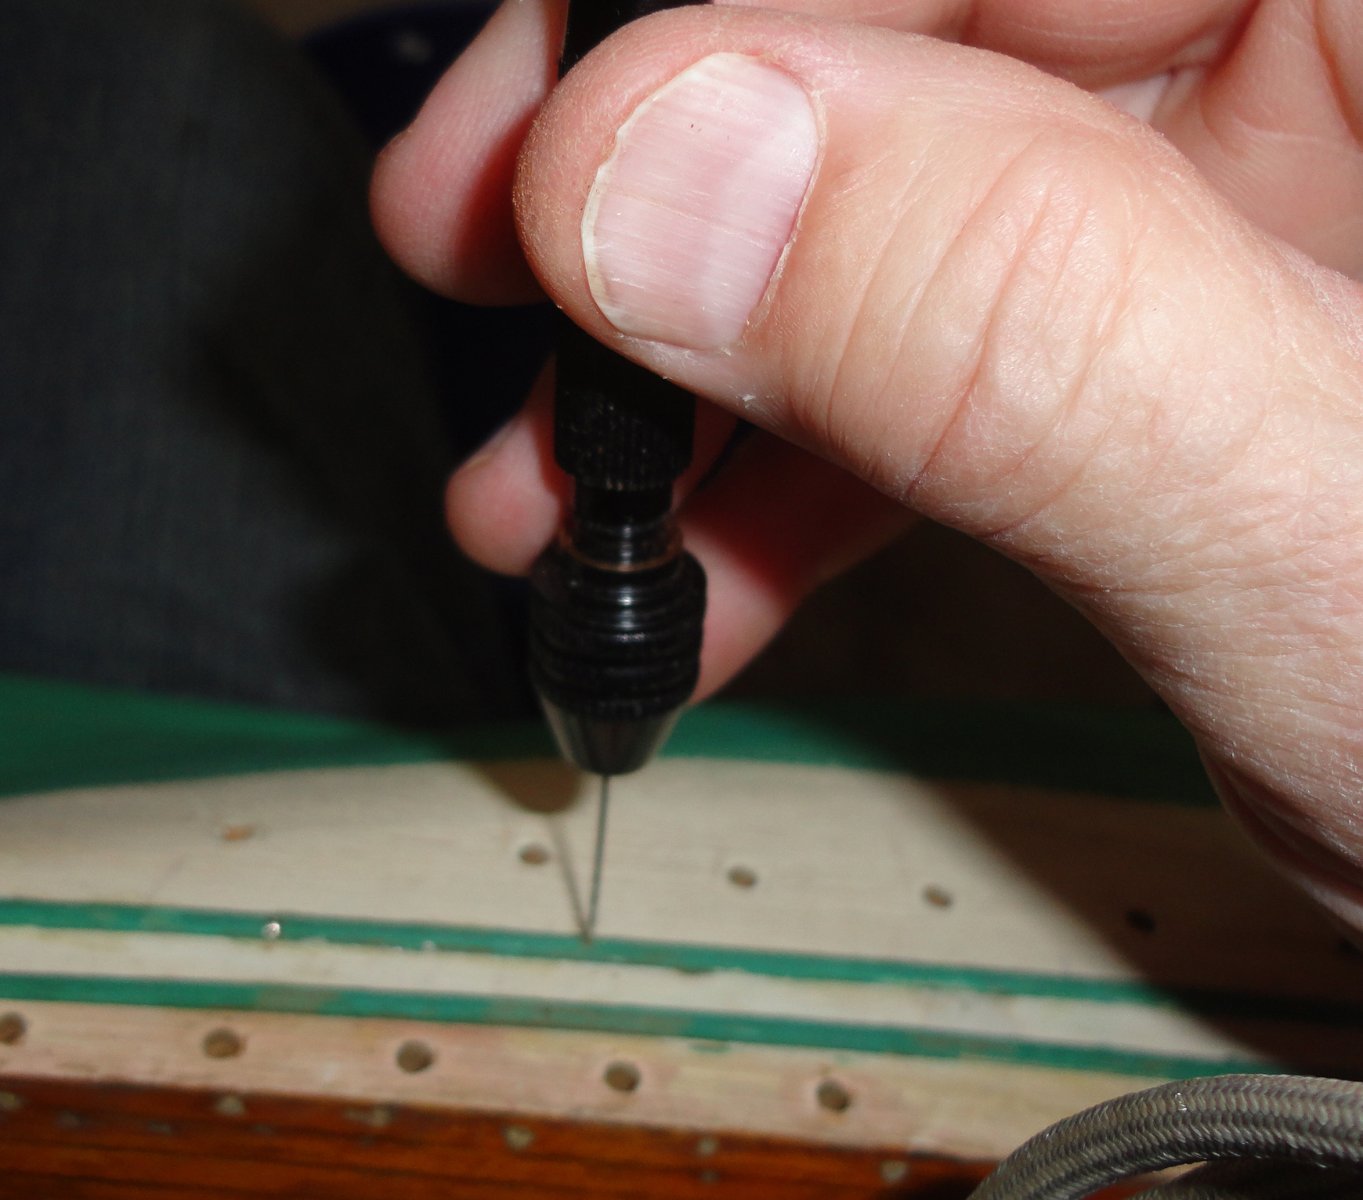
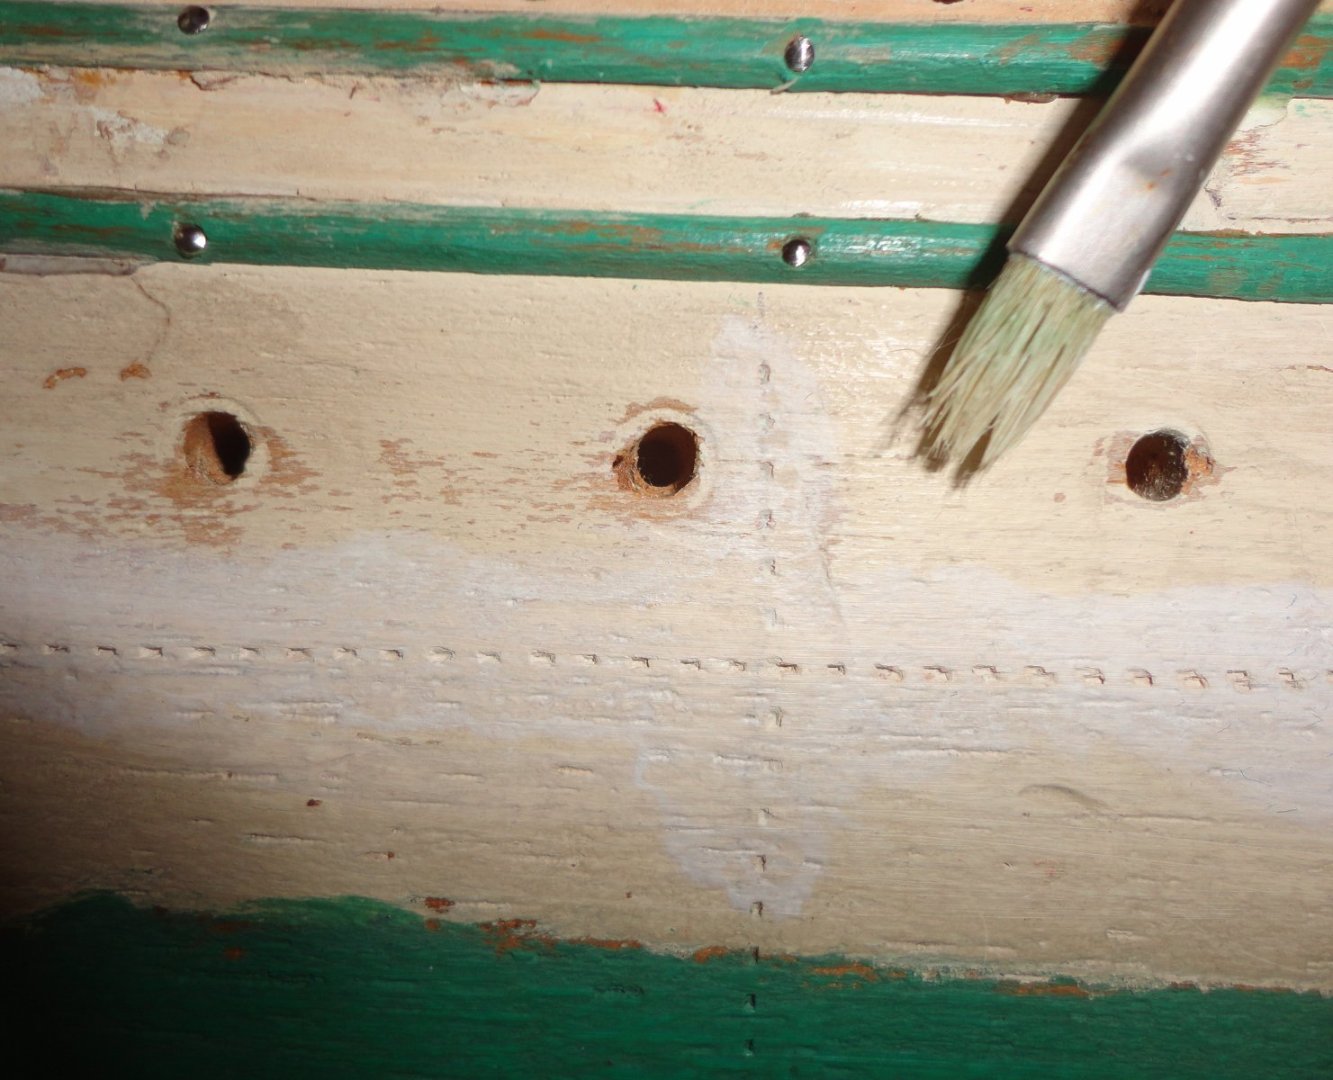
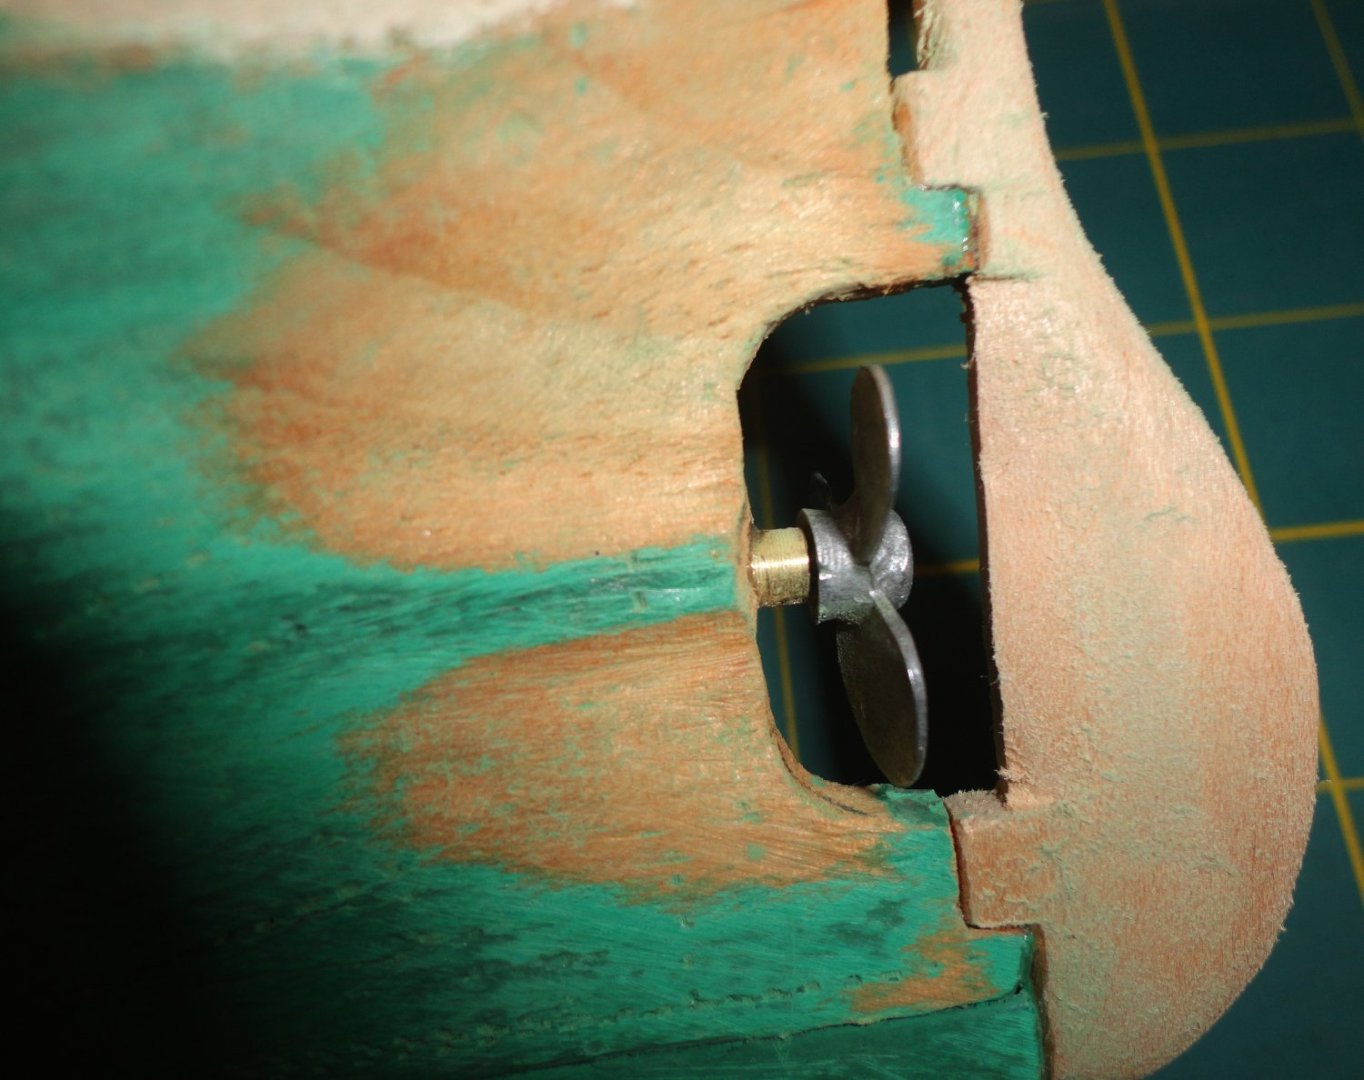
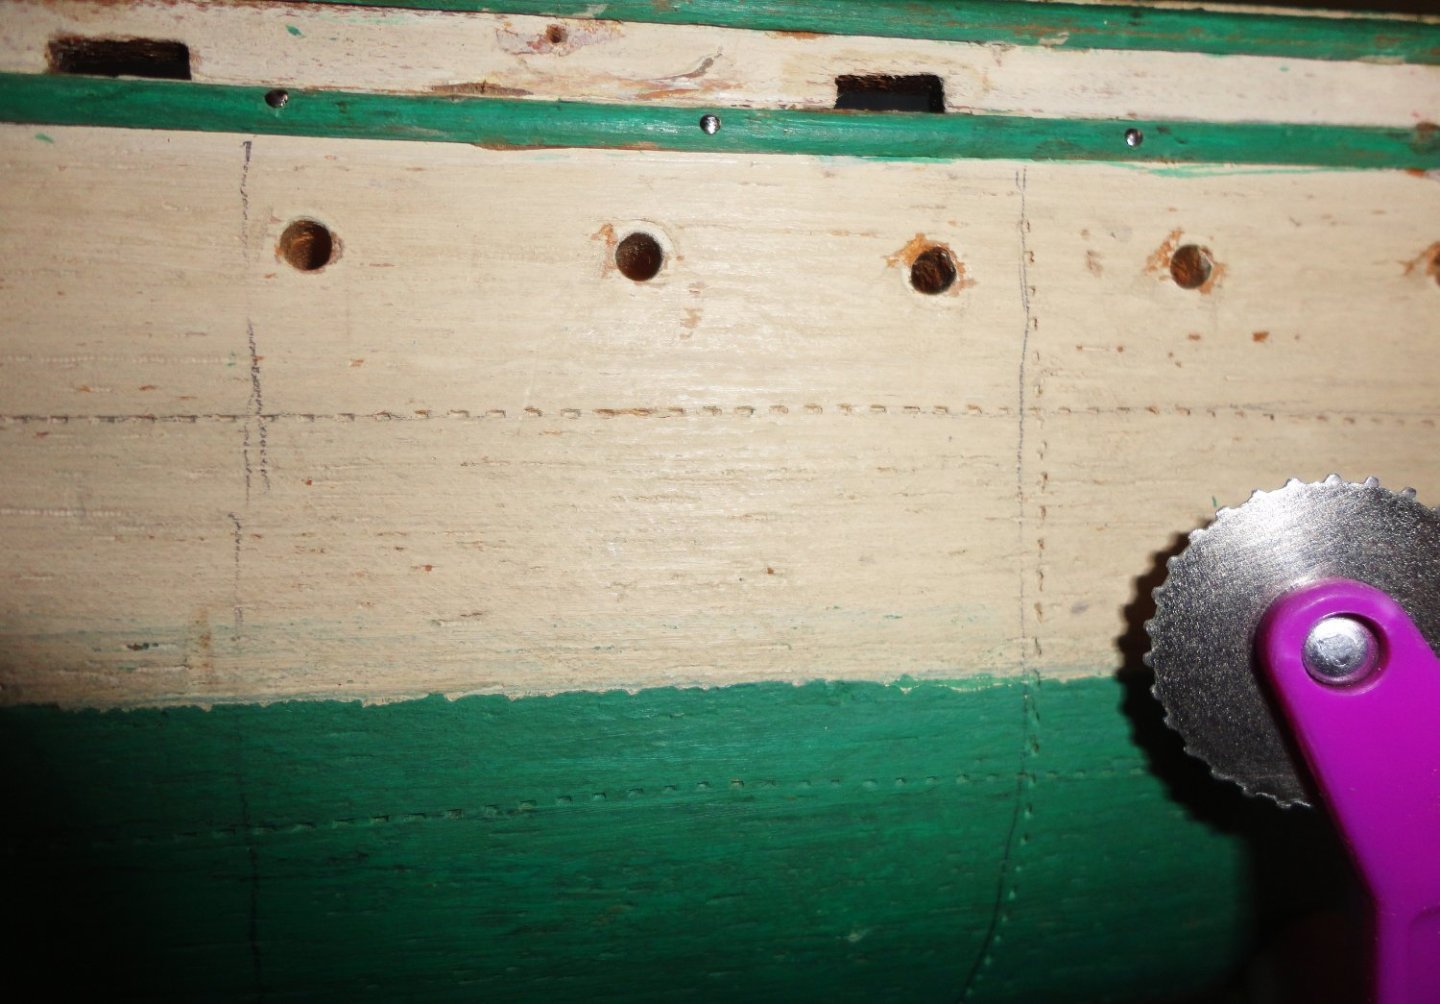
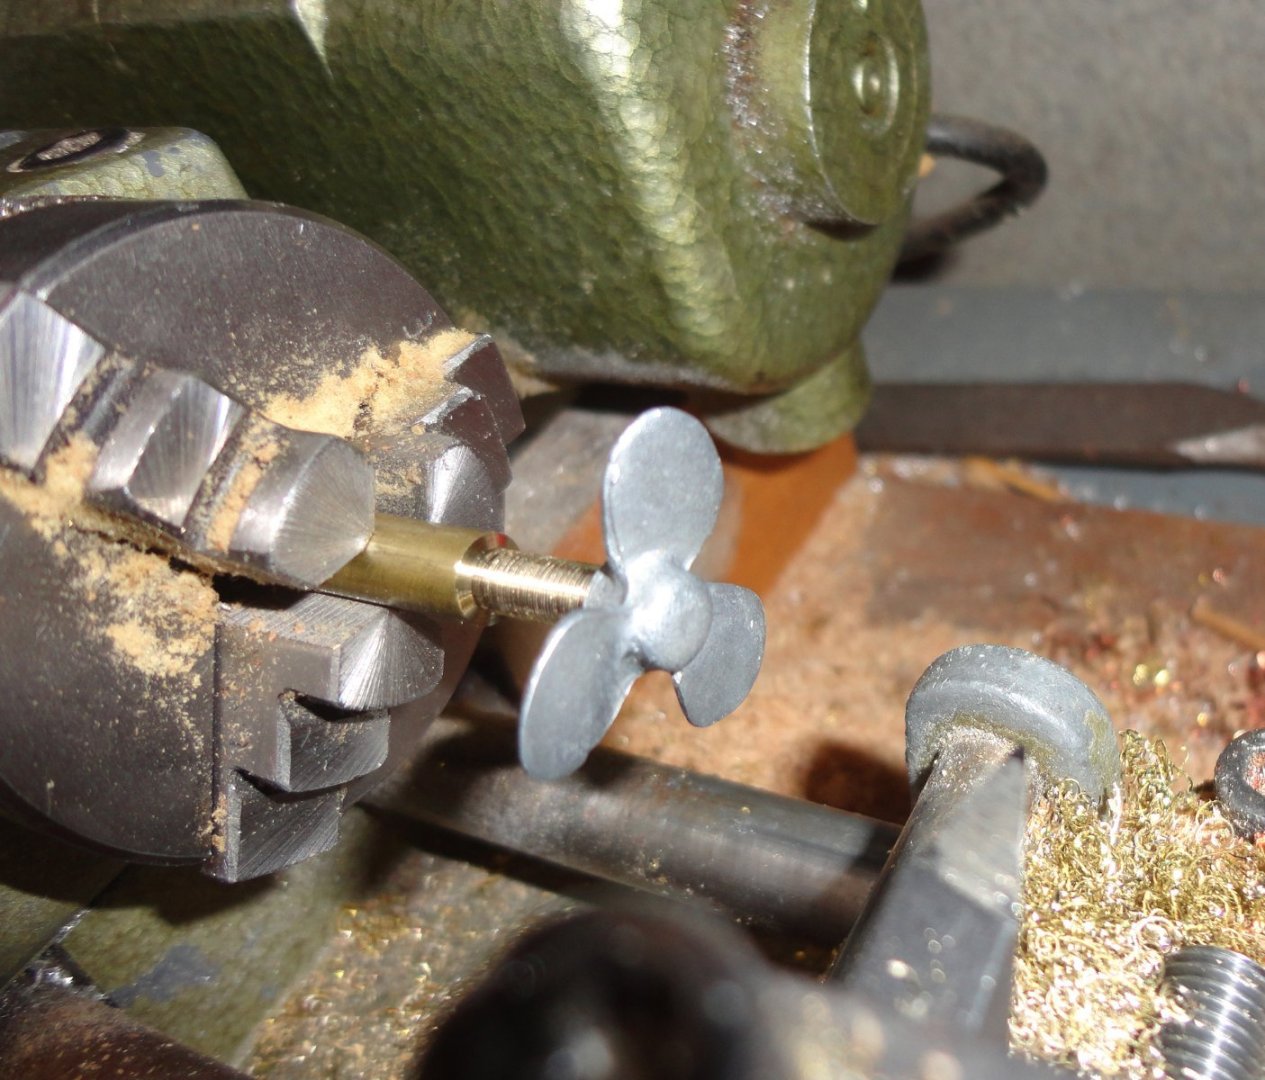
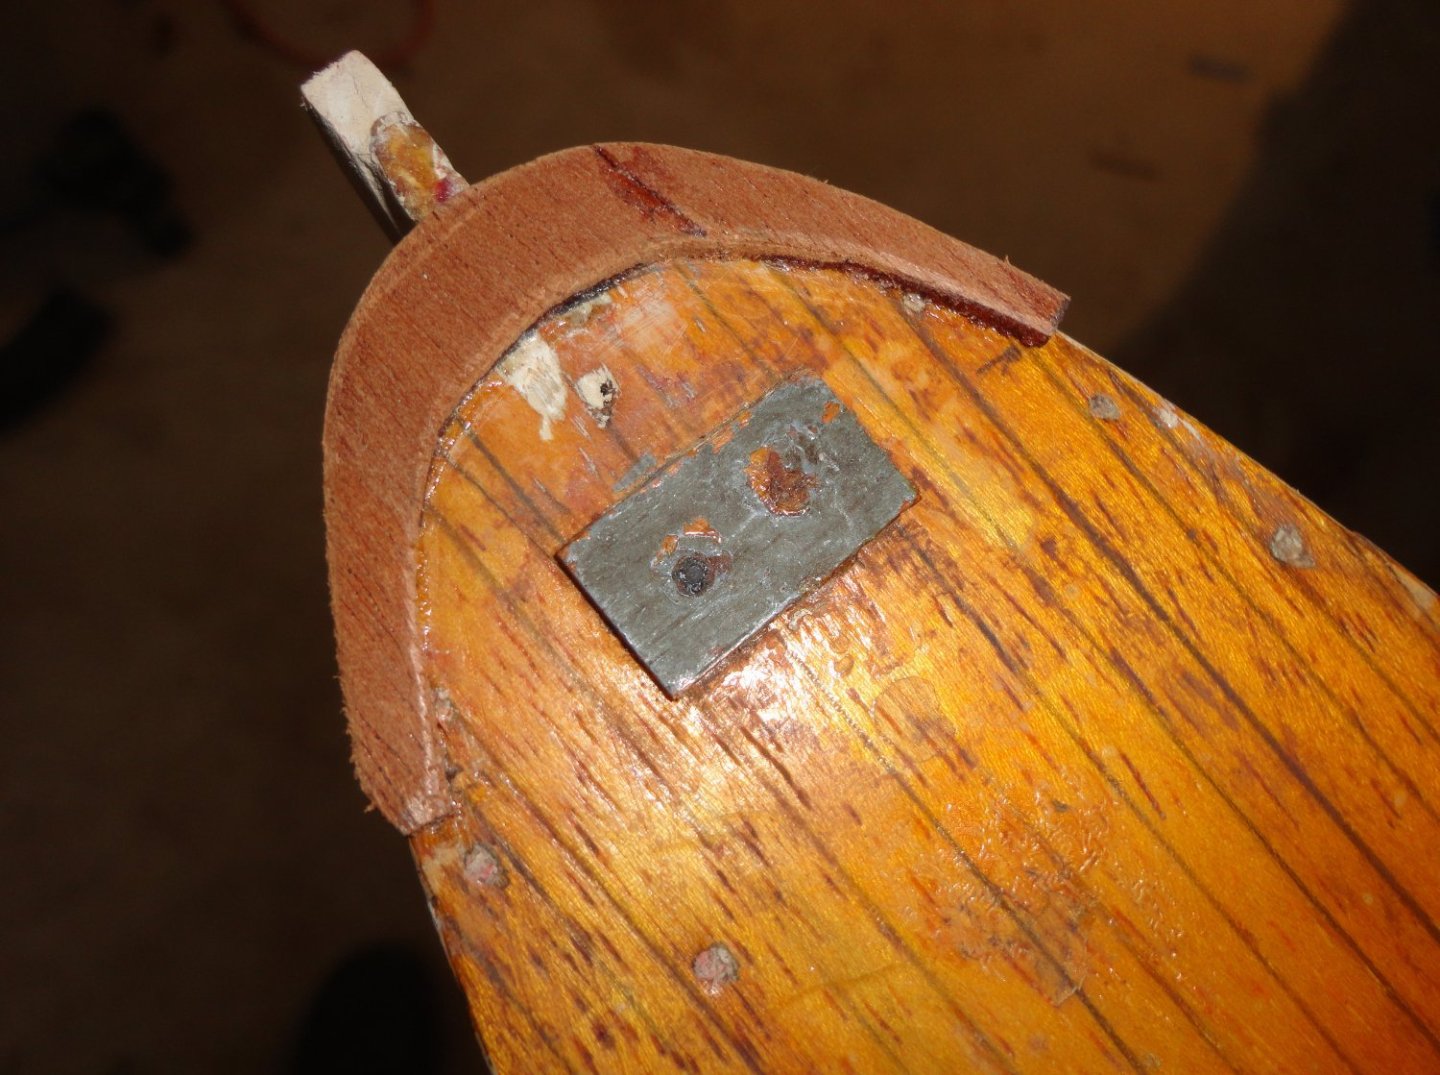
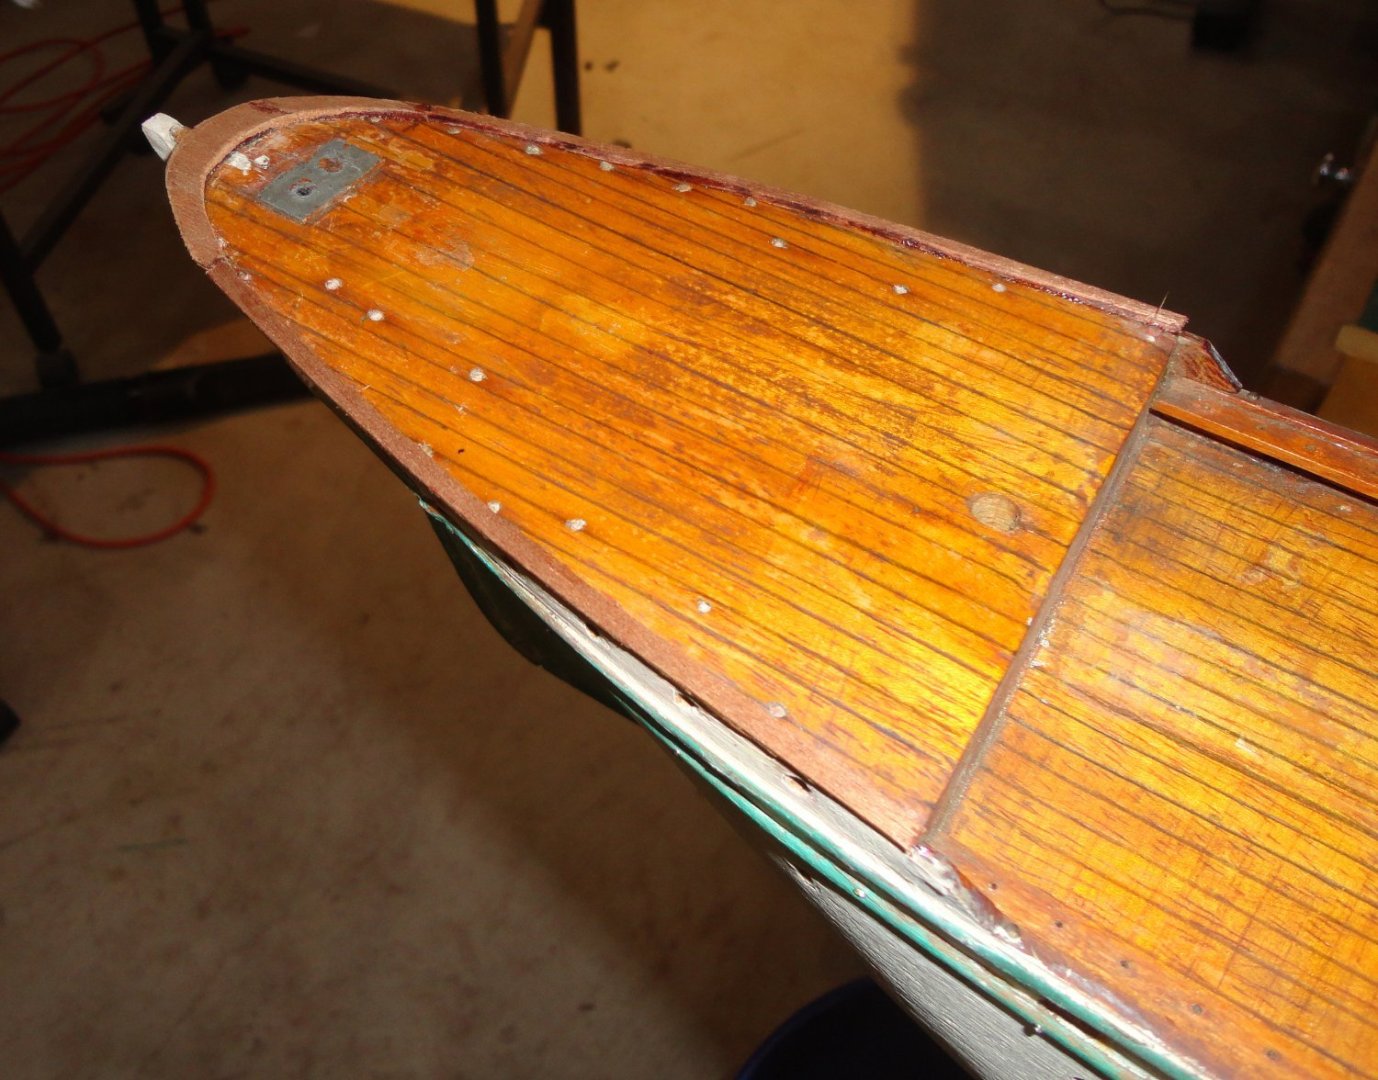
So I thought it was time to mark out (by eye) the main rivet lines discussed earlier in the restoration ... but only using the modified ('nubbed') pattern wheel, with no actual rivets (out of scale) or other fiddling (tooling) with the hull. These prove to be very small indentations to suggest the riveting on the original, noting that there are other weld lines that simply don't show from a distance. Holding a mechanical pencil, other parts of the hull were used as a guide as the horizontal lines were drawn. The verticals (the Pennsylvania 'Dutch' hereabouts pronounce it werticals, almost like 'where (it) tickles', - the v having a w sound. I used to work in a fabrication shop among many PA Germans, and asked one how he'd say valve ... what he said sounded to me like walf.) ... anyway, the verticals were spaced at about 2" intervals (roughed with a scale) and descended by hand. Sometimes one just has to jump-in and do something - but I suppose if one either wanted to be super-accurate or to compensate for a less-than-steady hand, one would tape out each line individually. I didn't want to fuss that much and thought NFW, I'll wing it ... they're only mere indications that will also be painted over. The Admiral asked me about the acronym NFW, and I said that the N stands for 'No' and the W stands for 'Way". Next the wheel was used with 'just the right' pressure learned from practicing near the keel. From pinning things in various places on this old wood hull - which I like working with enough to contemplate carving hulls for future models - much of it may actually be a dense basswood with maple blocks glued as the forecastle and the poop deck, since those areas were much harder to push a pin into. The hand drill was just used a little deeper in those areas. The weather deck has the same grain & appearance as the higher decks, so may also be an applied piece of wood, albeit thinner. The divot lines were straighter than the rough pencil guides (corrected in-process), but there are a few places with some drift - no matter. Now I thought it time to rough out a rudder from basswood stock about as thick as the keel. The angle on the model is a bit off, but that will be filed/sanded for improvement. As mentioned before, I'm using the OcCre Endurance 3-bladed prop that will be suitable for this restoration - the original prop on the model was a miserable piece of tin cut to have 3 blades. To position it properly in the prop-space on the model, I decided to cut a shaft segment on the Unimat - center-drilling and end drilling a right-sized hole (2.3mm, which mic'ed about .092) for the pin on the cast prop to fit into. The diameter was made to be less than the hub on the prop. Below is another view prior to cut-off. I picked a number drill just under the brass shaft and twizzled it by hand with care into the end grain of the hull (after center punching lightly), and test-fitted for effect. There was a bit of filing and shaping to correct the angles, and ended up with something my eye thought 'good enough'. Then everything was CA's with gel (one at a time) and 'kicked' with dabs of accelerator. 'Guess it's good enough. Like the Coach told the Jamaican Bobsled team in the movie 'Cool Runnings', "Winning a medal is a fine thing. But if you're not good enough without the medal, you won't be good enough with it."

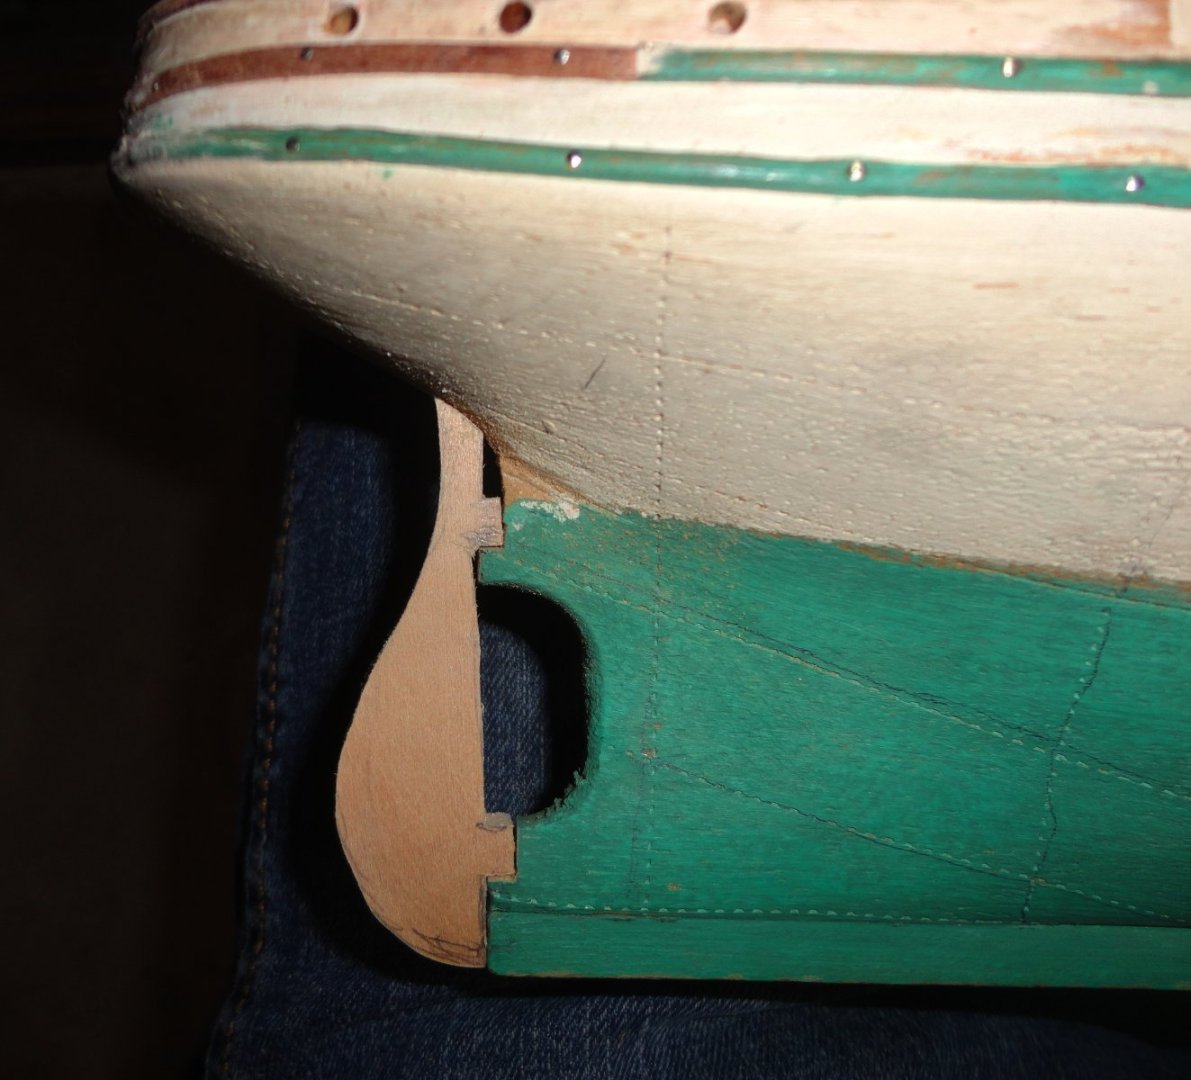
-
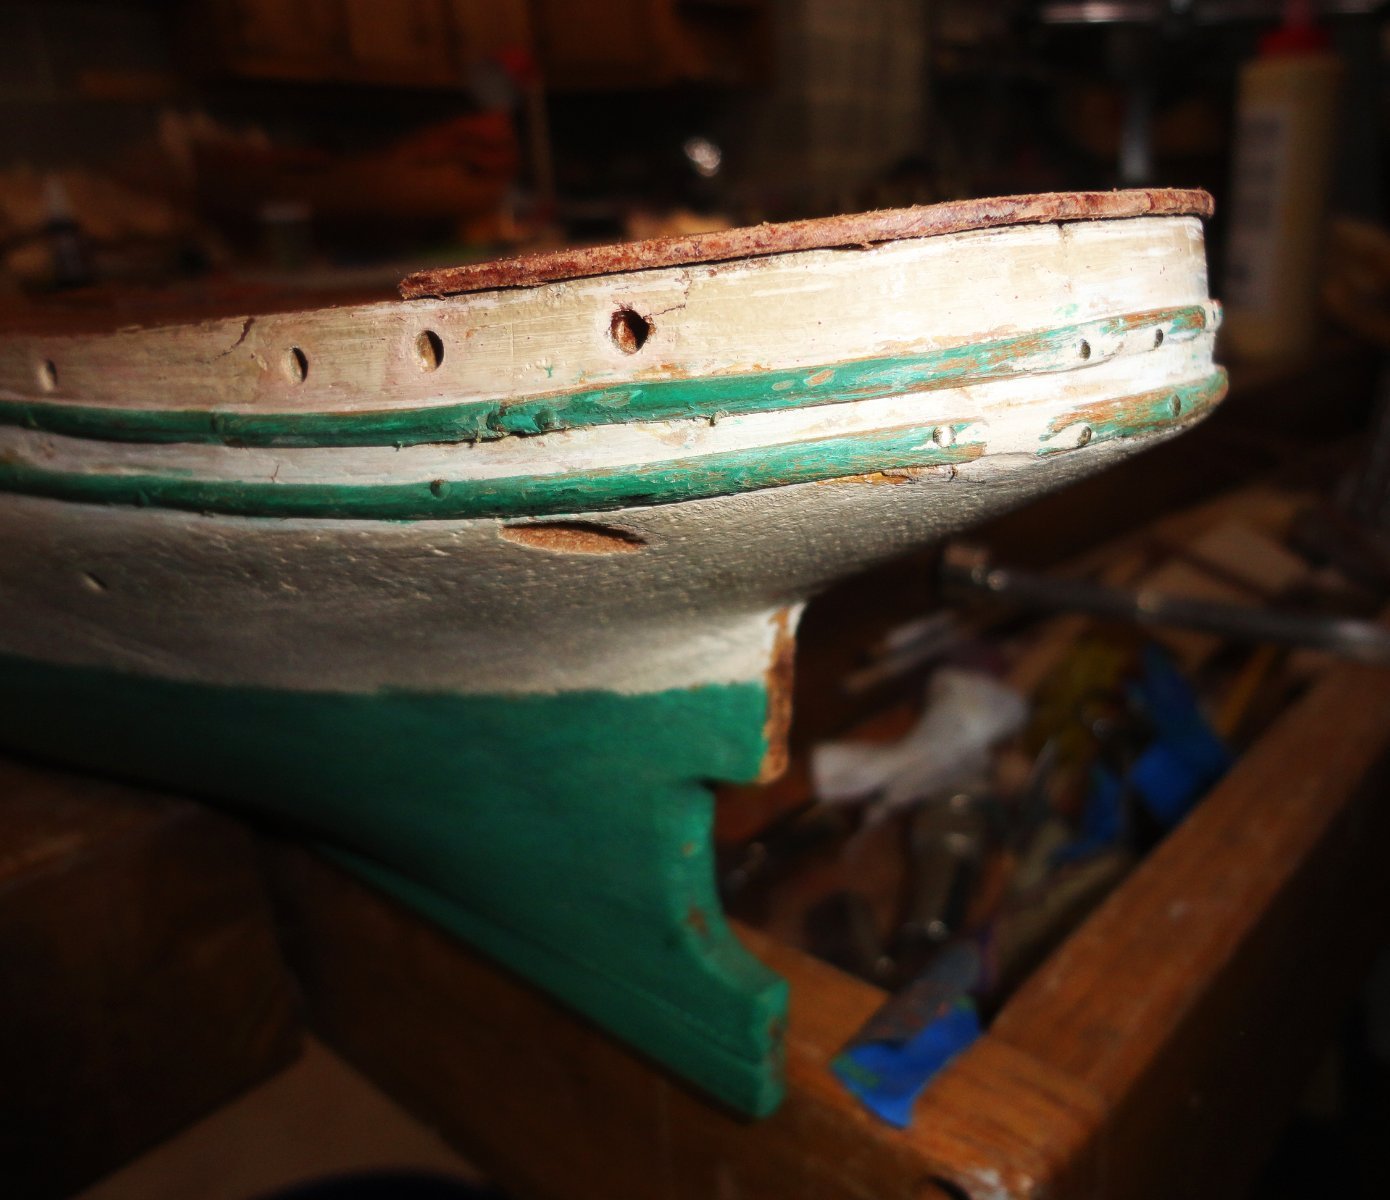
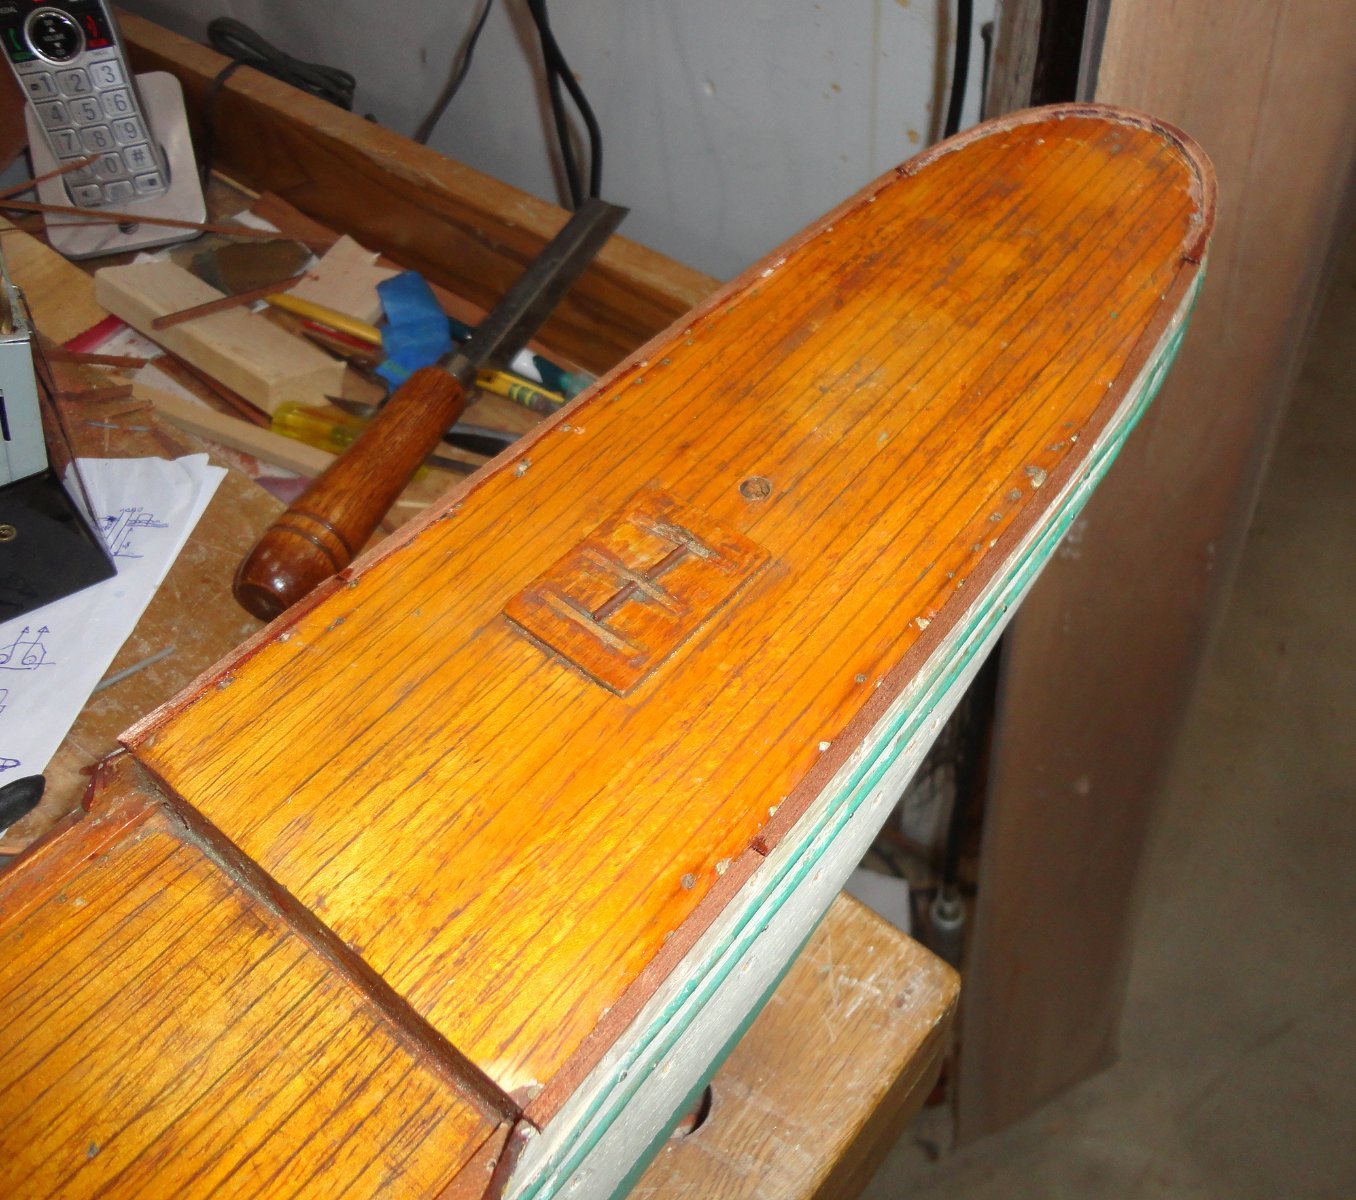
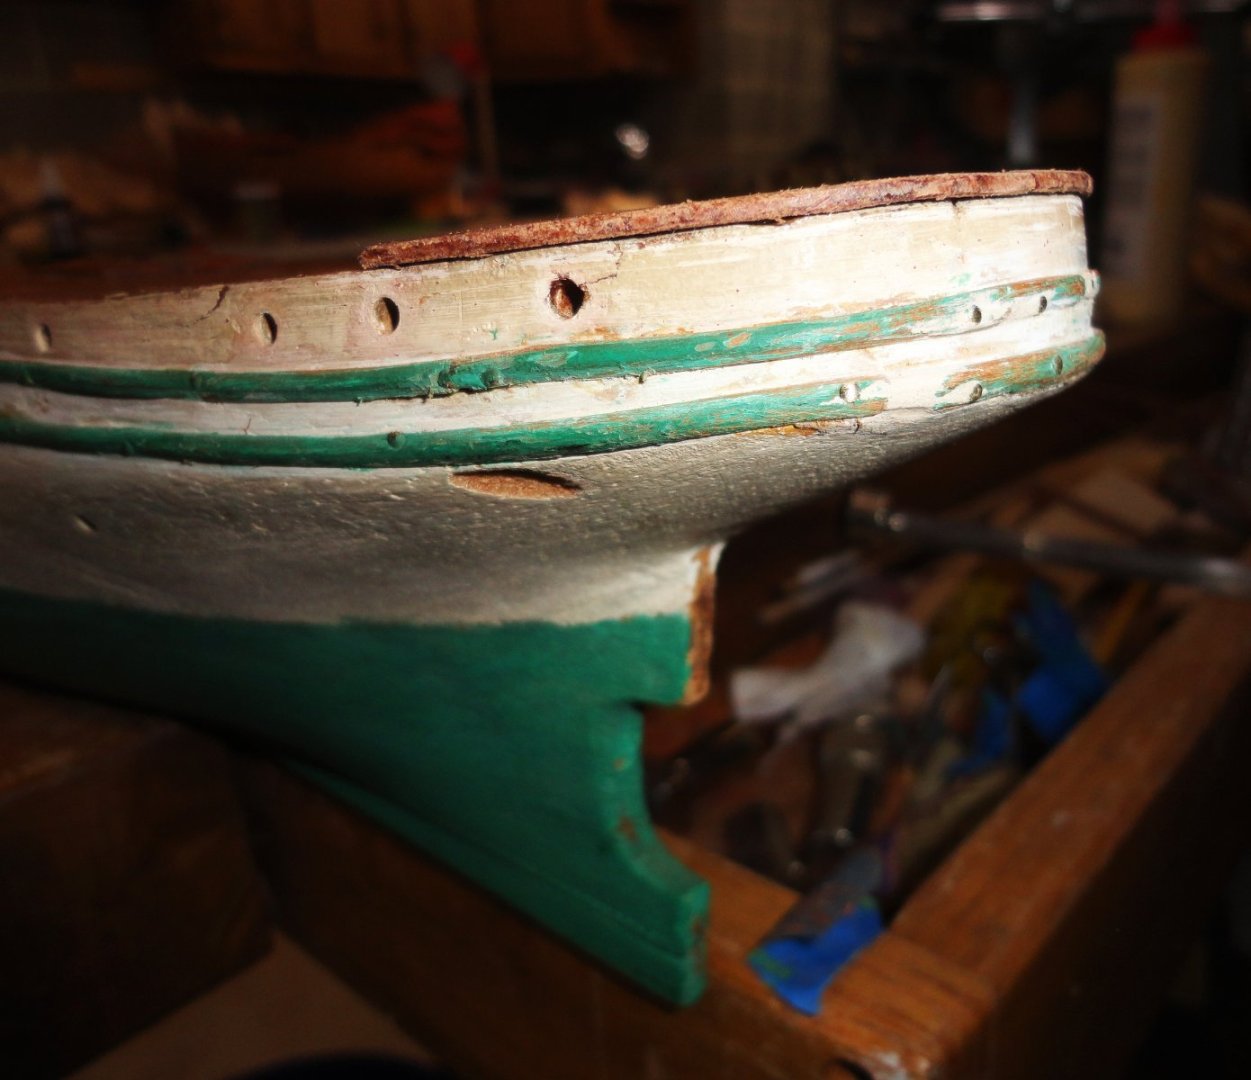
A trim piece is absent on the forecastle and poop deck - one seen in other GF models and also in photos. Bending the long dimension just won't work on the curvature on the ends, so paper patterns were made and end segments cut out on a jig saw. Thicker CA was used - first applying around the periphery of the deck, the wood (cut slightly oversized, since it can be easily abraded later) laid on (held with finger pressure) - while the other hand delivered a dollop of accelerator with a dental tool. SHAZAAM, the CA set-up really fast, and bonded the wood to the varnished deck just fine. The add-on piece was still fragile and cracked in a couple places, but the CA bonded them. There is a slight 'sweet' smell of the bonding reaction, which is also exothermic. As said elsewhere, the 'thin' CA is wicked stuff that wants to go everywhere ... but there are a few applications for it. Another pattern was made for the bow and the wood installed the same way. Here is a picture of the rough sanded stern. I see a hull nick (tear-out) that I hadn't filled before - no matter, that is easily accomplished. A rudder will be fashioned from the same thickness of basswood used for the bow repair, and I have a suitable prop to install ... the one supplied in OcCre's Endurance kit, as a two-bladed prop has already been obtained for that future build. Below is a shot of my inexpensive Harbor Freight mini saw ... and the deficiencies inherent in a budget tool were mentioned in another MSW thread. However, the make-do fence clamped to the table seems to work for sawing the width needed for the rest of the top rail (wale? .. whatever). Below are shots of the CA'd wood added to the bow and stern. 'Seems OK to me. I'll even the color over the plugged holes with amber shellac, and the added wood as well.


-
I've seen other builds more or less 'out of the box', and wonder if (as OcCre instructs) the middle portion of the yards (where flat wood is bonded around the yard to make a polygon) appear a little 'fat'. One could file flats around the middle portion of the yard prior to gluing on the additional wood, so the diameter in that area would be reduced. The studding sail booms might be a tad oversized (thus the rings for them also), and are they normally placed atop the yard? I simply don't know but generally see the booms near the bottom of the yard, perhaps slightly aft. Foot ropes might not descend as much as shown, and deadeyes seem to be typically dark in color. That's all the details I care to ponder, as your work is significantly better than anything I've done. KUDOS !
-
Have the pecan slab-cut asap and stack with slickers to dry in a covered space (garage or shed) over the winter, then move the stack indoors (adjusting the spacers periodically) for a year. Dap the ends with melted wax to limit checking. I was given a freshly cut 3' long x 8" diameter apple wood log by a friend some years ago, and at the time had a radial arm saw with a head that could index 90 degrees, So I got fancy and figured out a pattern to maximize quarter-sawn pieces. The whole house smelled like "Christmas" the day of cutting. The drying was uneventful, and half of the stash remains.
-
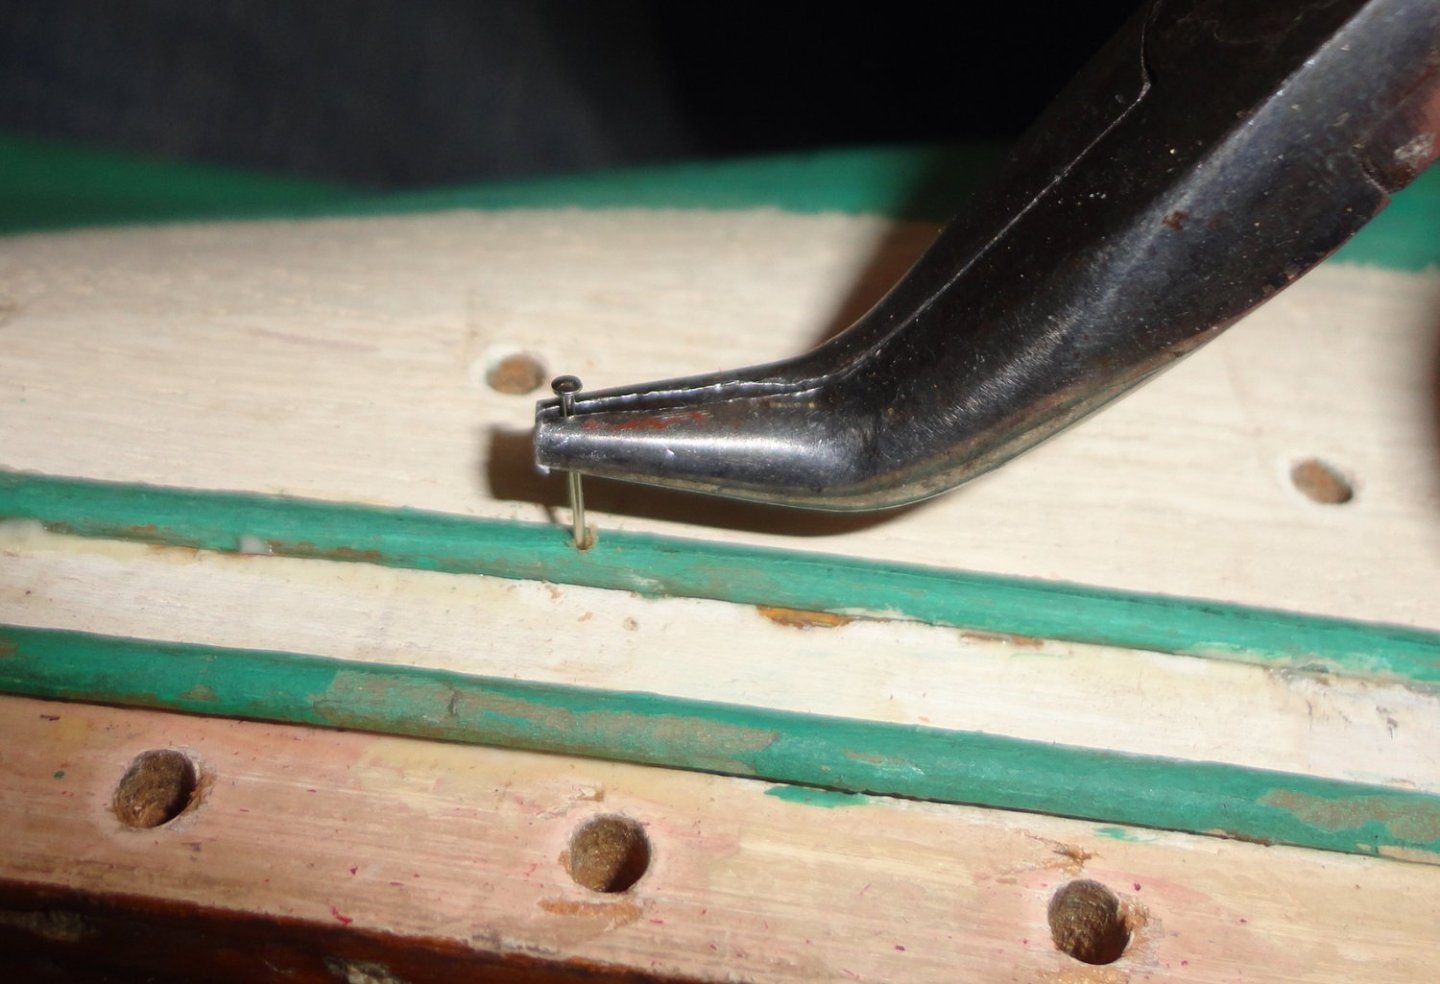
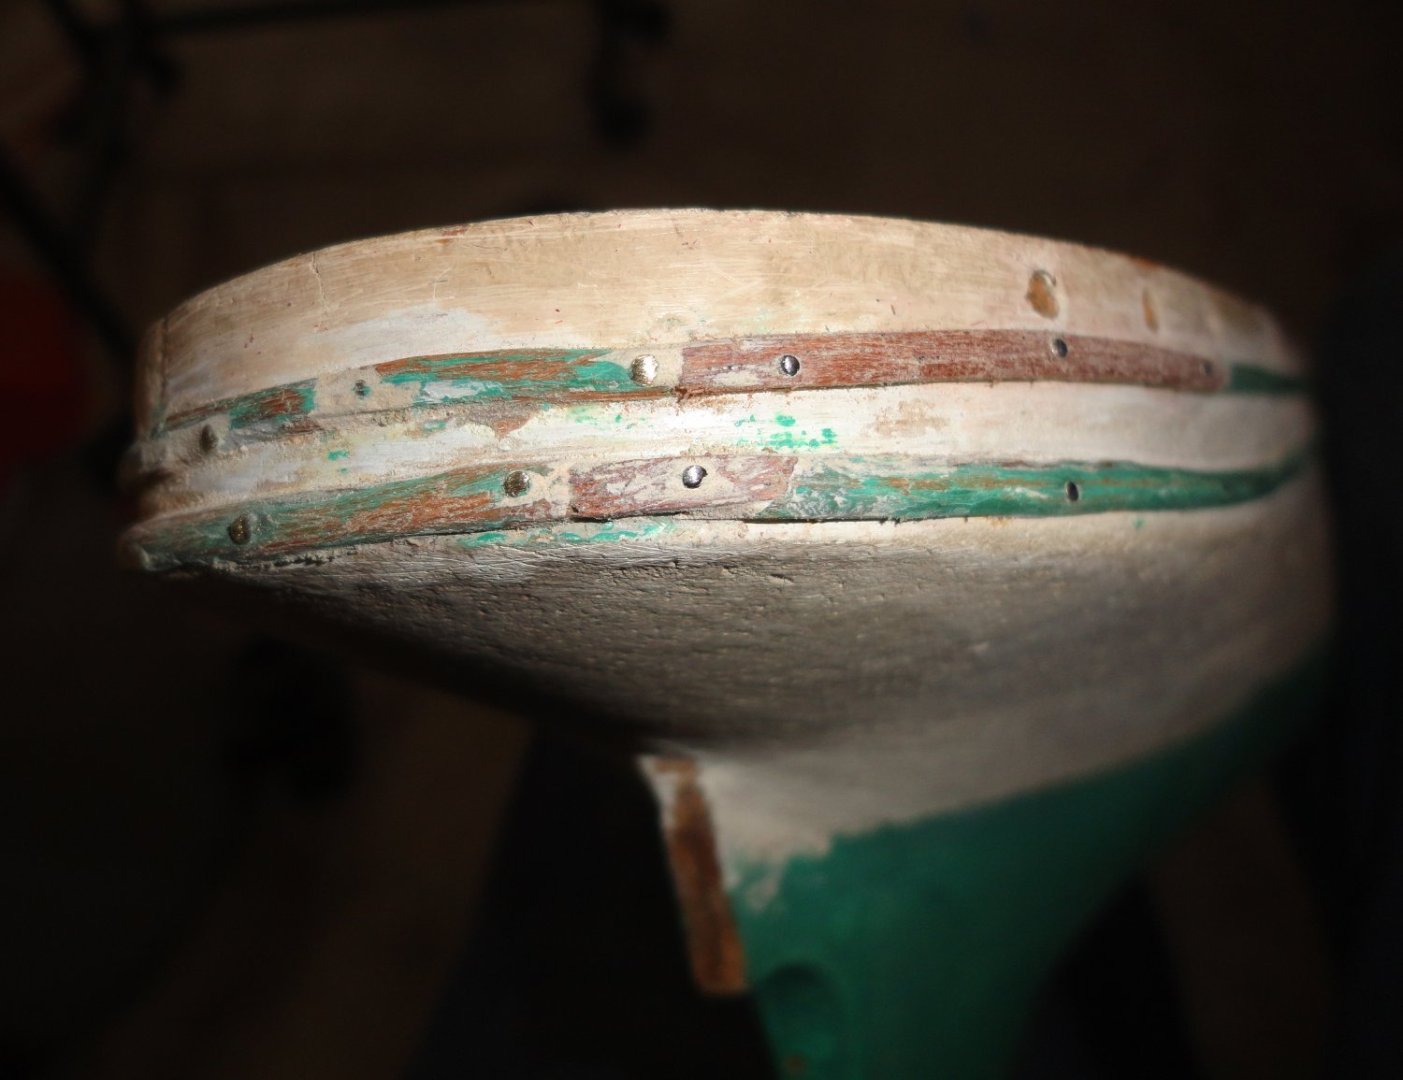
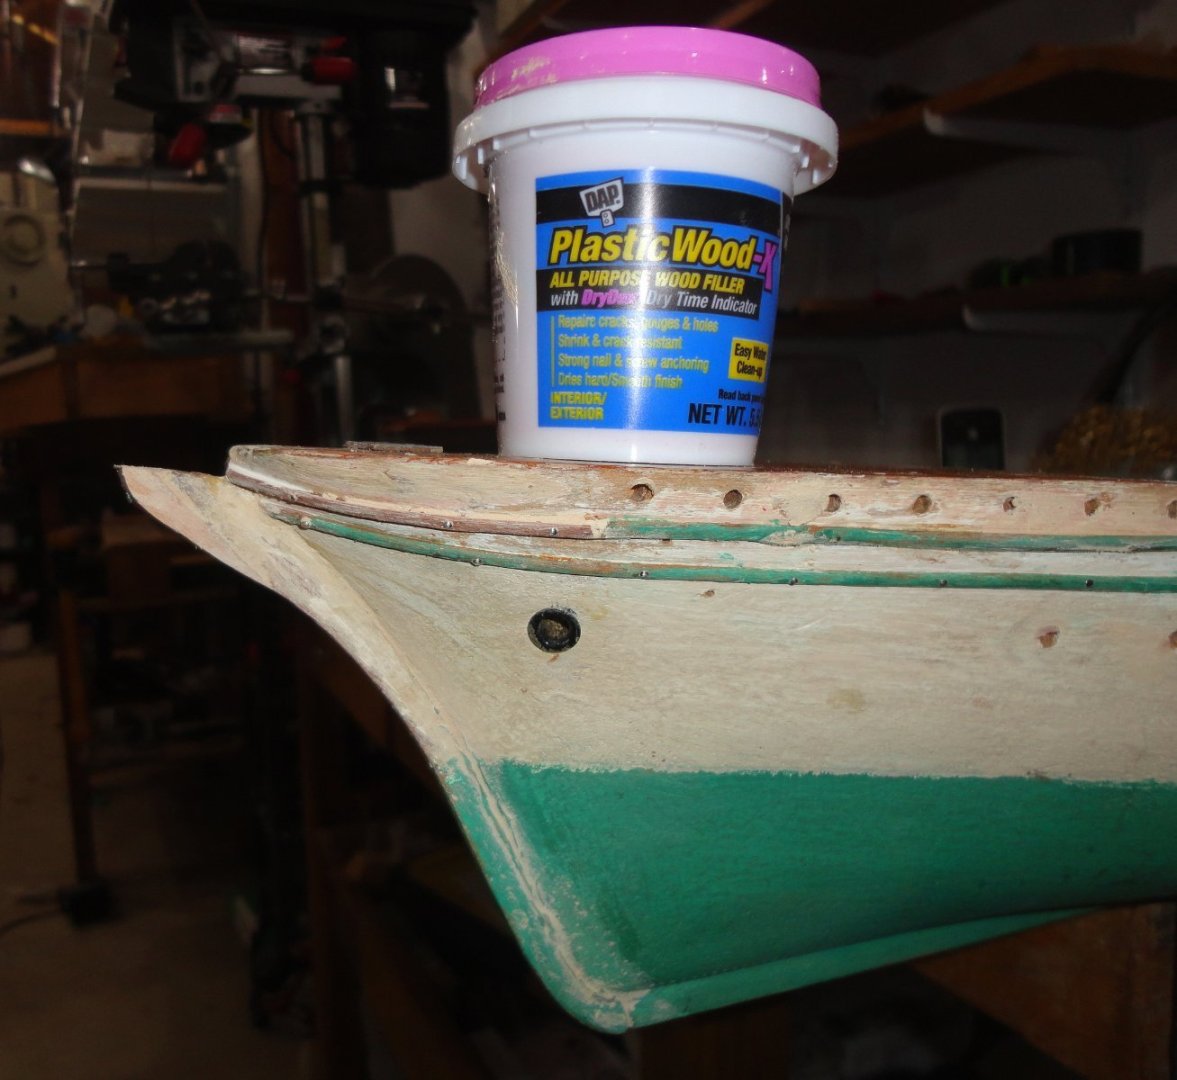
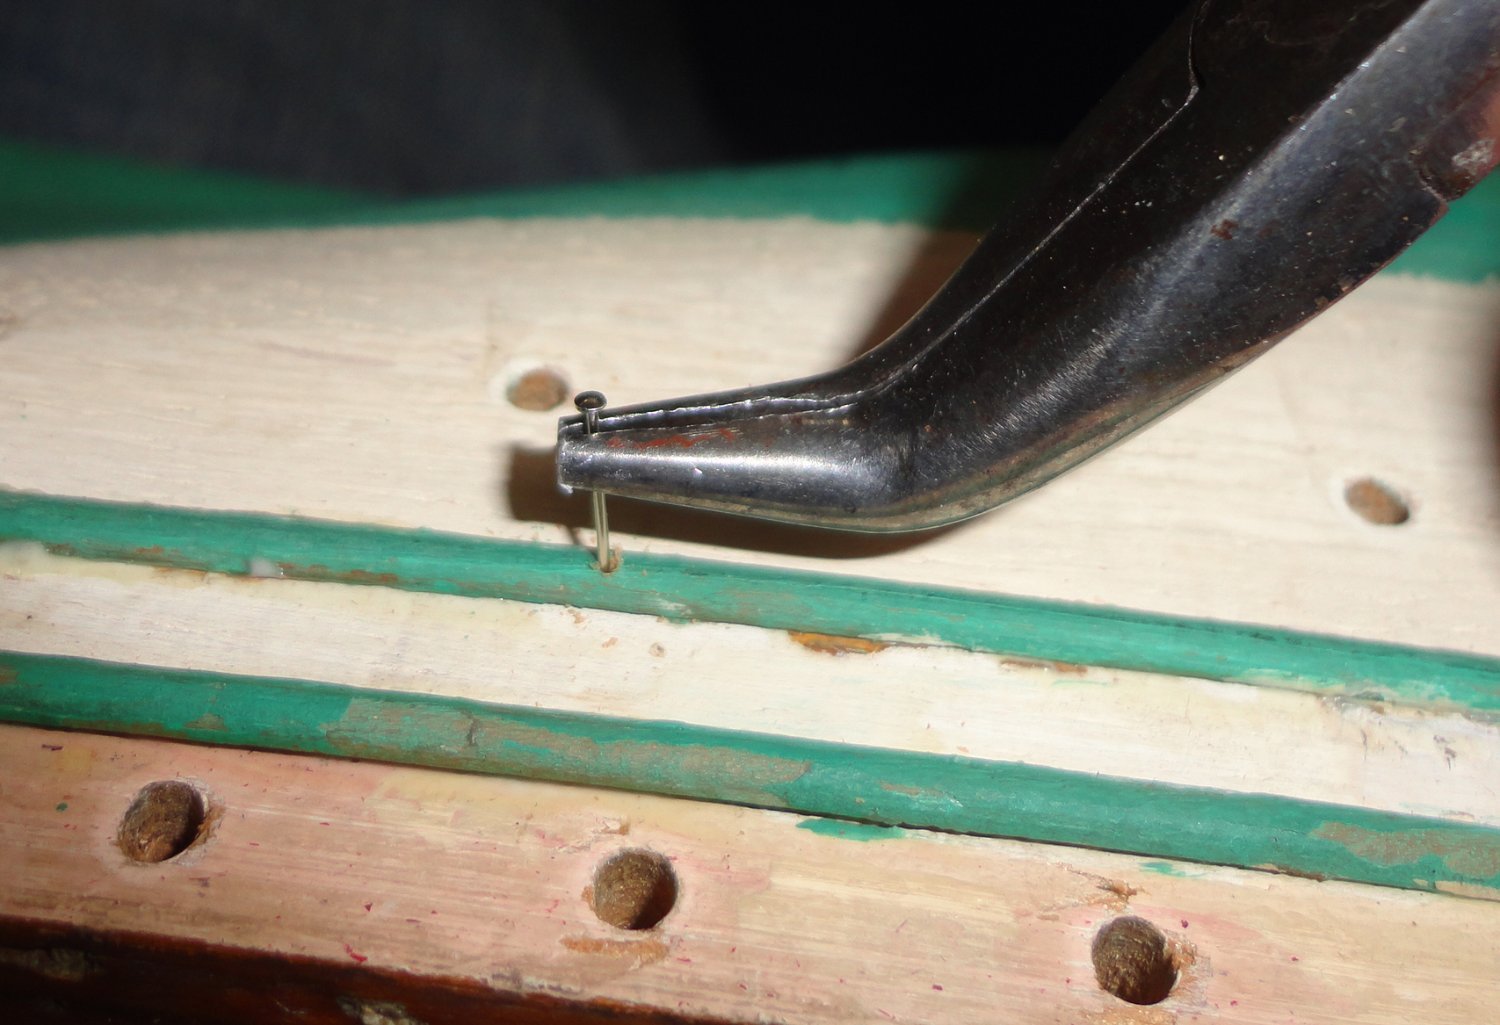
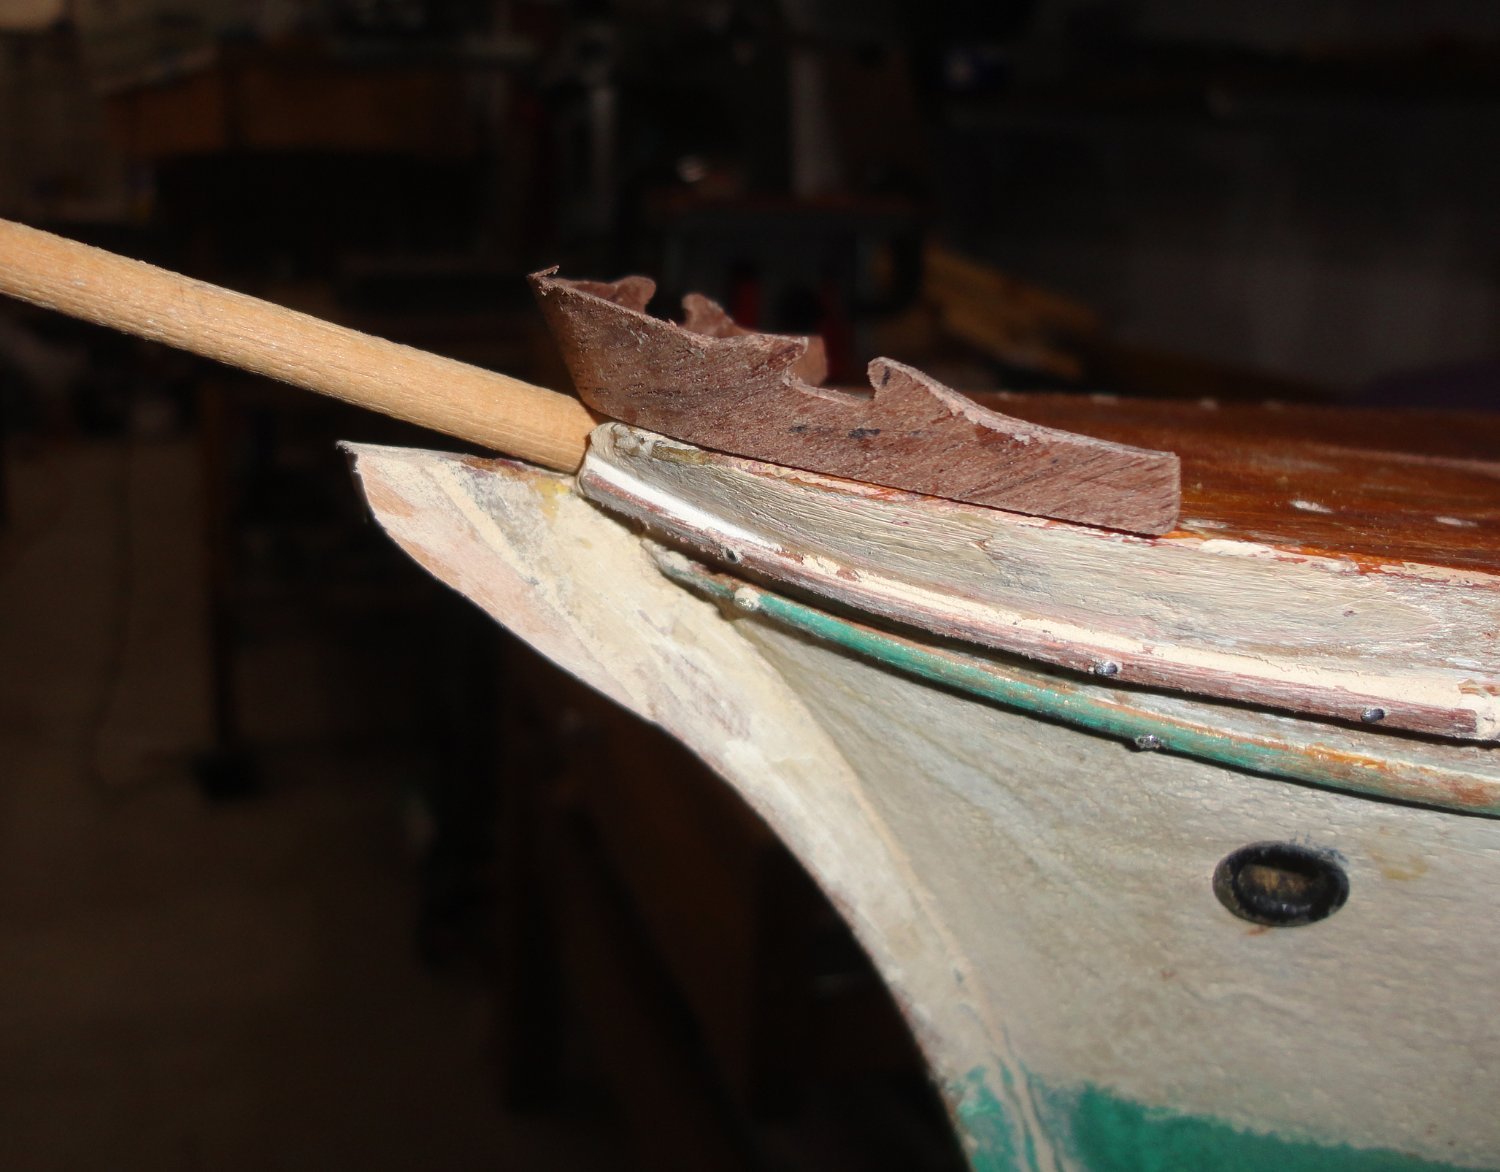
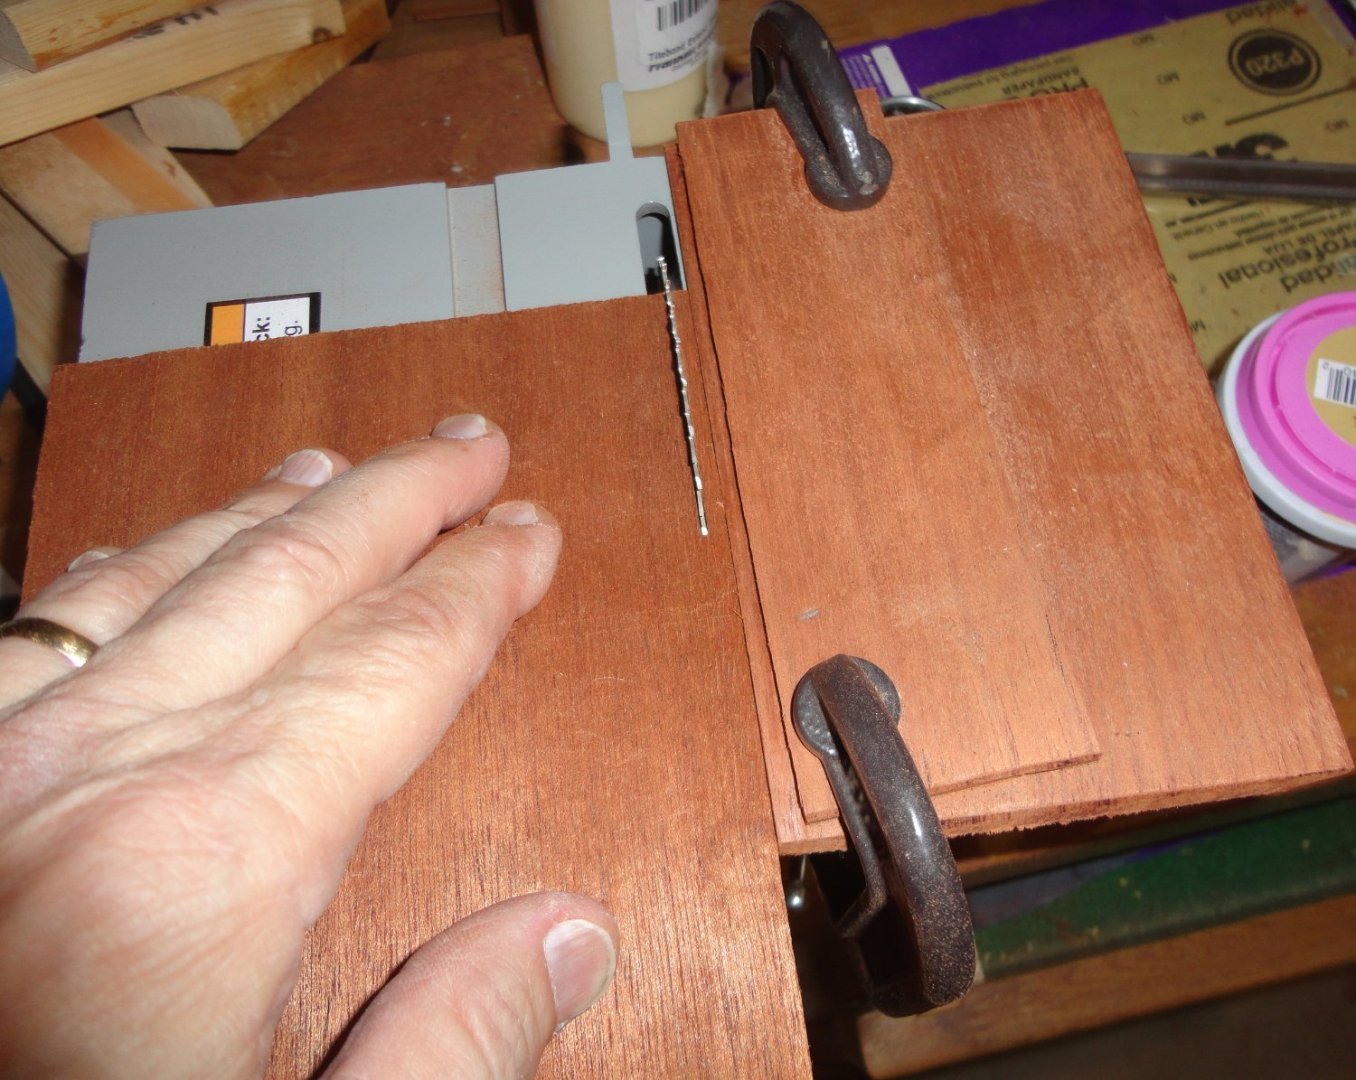
Second post of last evening's work. While the veneers were drying, I went ahead and pinned down loose wales - something practical with a solid wood hull. So not to split the thin wood, a pilot hole was hand drilled, but not as deep as the pin to be used. Bent pliers got the pin started into solid wood below, and could sometimes nearly seat the pin. A tap or two with the planisher was followed by a roughening with fine sandpaper so paint will adhere. Then replacement strips were added where the original was lost. I decided to try a new filling compound - one that doesn't 'smell' of solvent. I found that solvent-based wood putties can dry pretty darn hard, and can be difficult to sand. This new stuff cleans-up with water (that which has not dried). The dried compound sands a lot better than stuff I've used before, as it is not as hard when dried. You can see an add-on to restore the original shape of the prow, which had been damaged in the past - presumably when the bowsprit broke. The new wood was glued on and pinned to the underlying wood - then filled. Now enough time passed that I unclamped the piece formed ... it still had a little 'flex', so it could be adjusted. After some sanding and shaping, it about what I'd been looking for.