Snug Harbor Johnny
-
Posts
1,501 -
Joined
-
Last visited
Content Type
Profiles
Forums
Gallery
Events
Everything posted by Snug Harbor Johnny
-
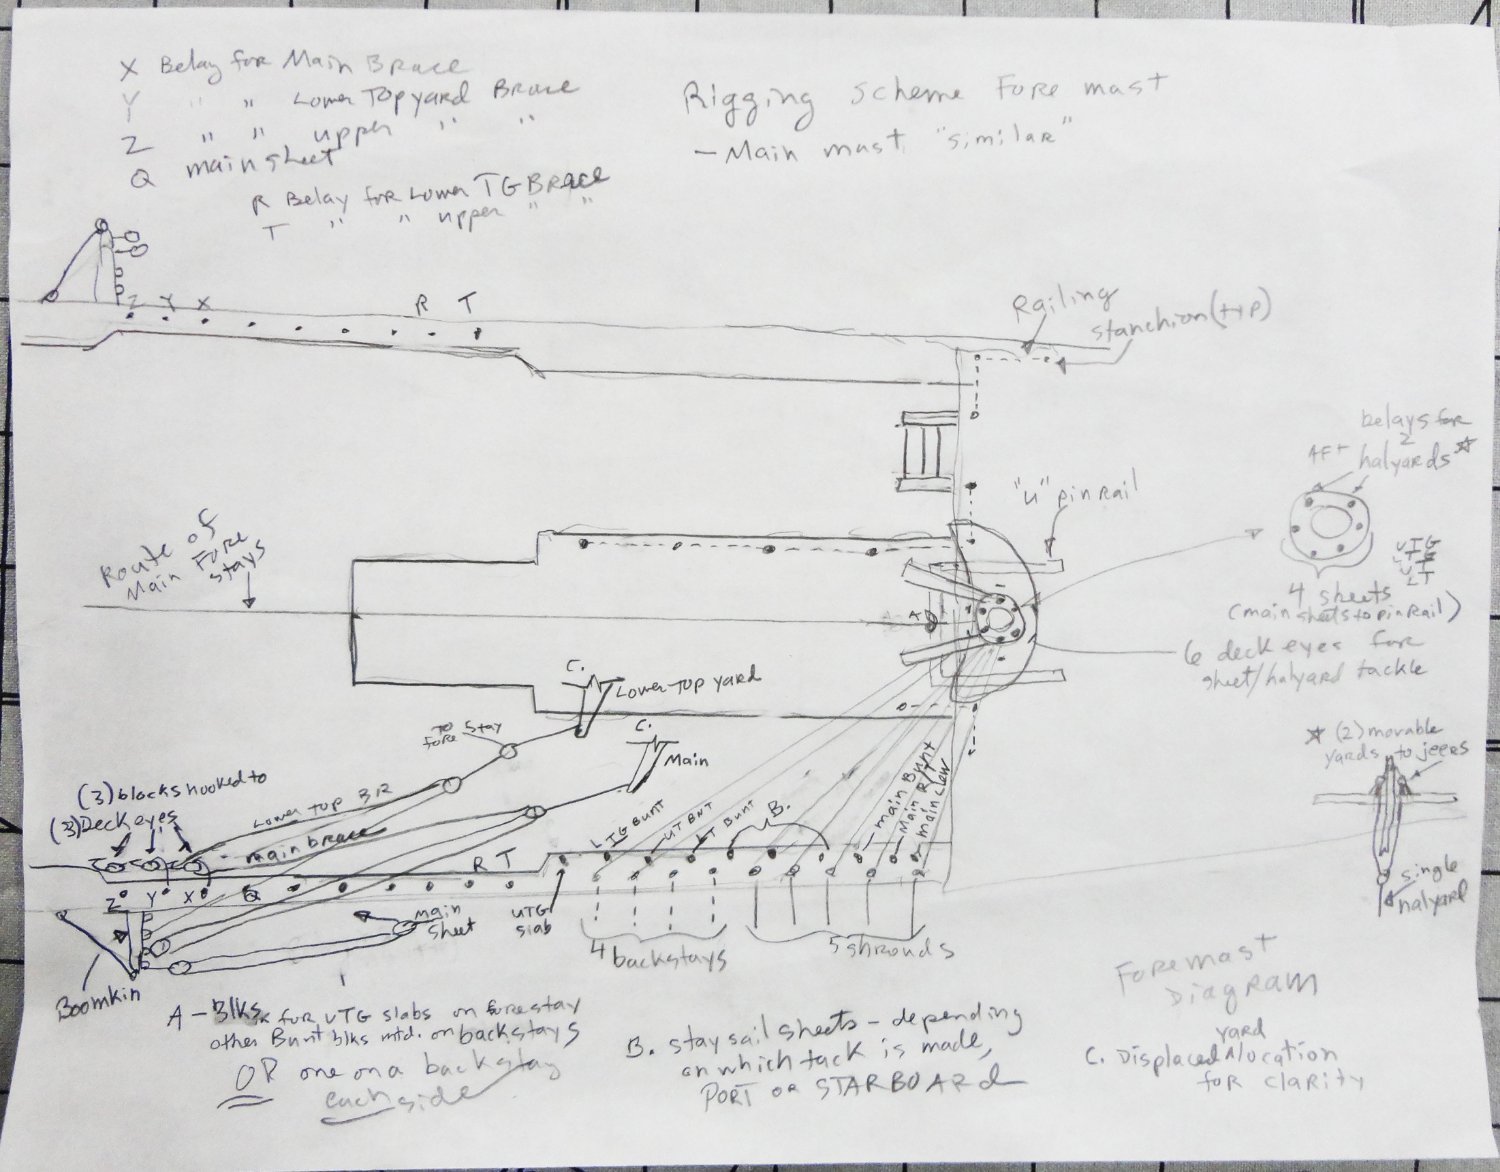
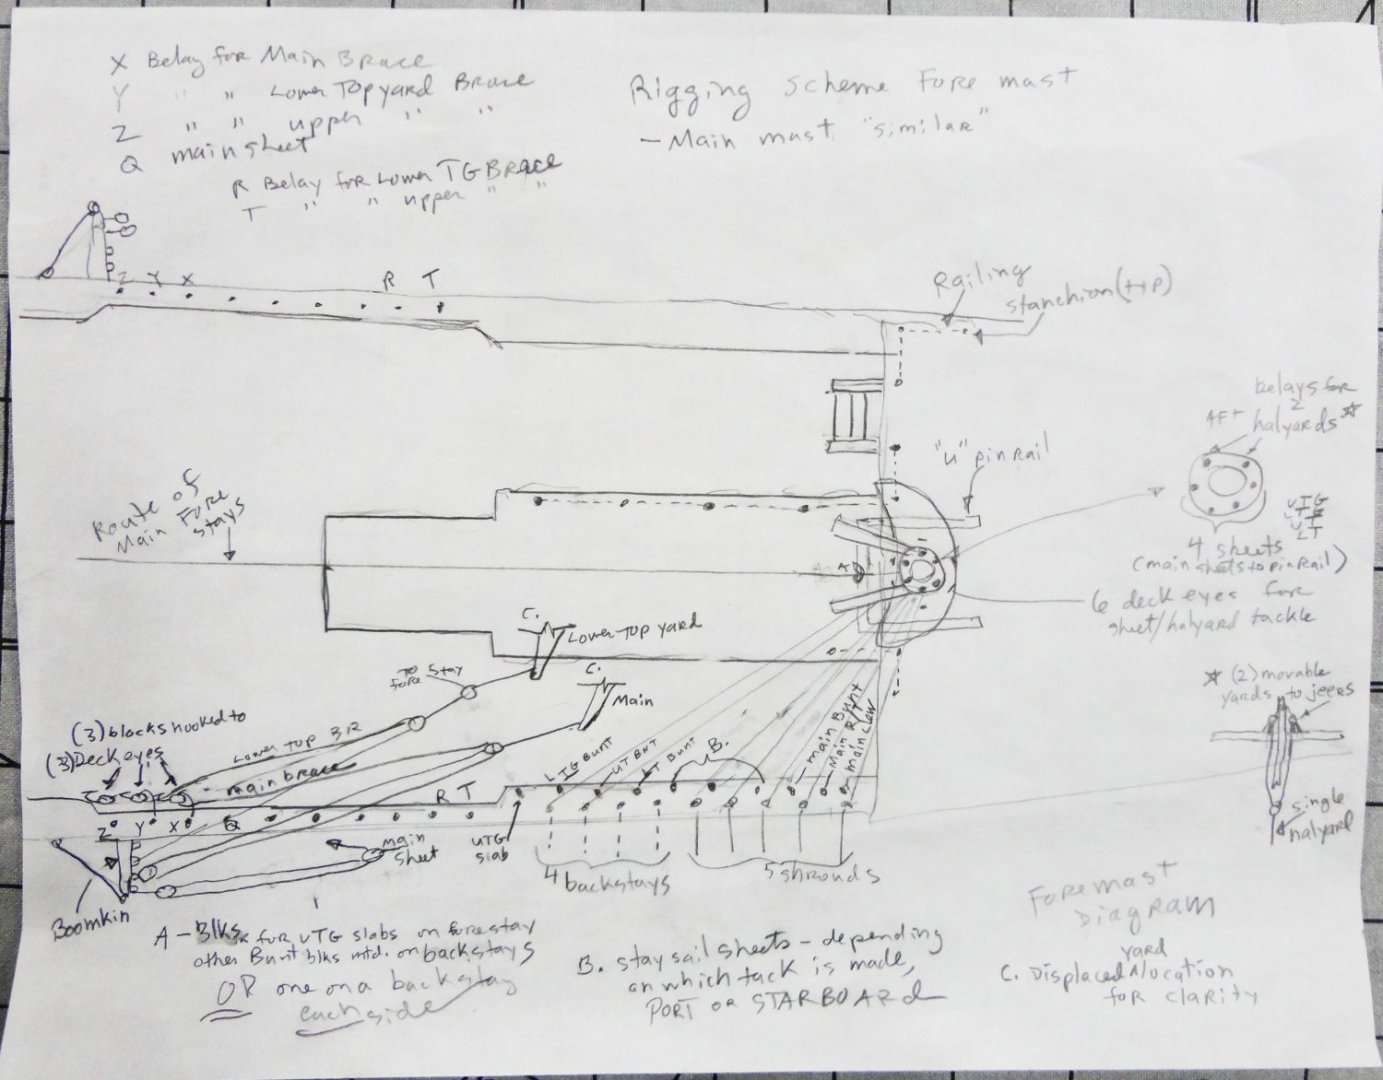
 'Thought I'd make a full size drawing to be sure of how the rigging might look. Since the masts, as built, have their own peculiarities (inaccuracies) - I have to use them as-is for restoration purposes, and adapt reasonable compromises per belay points, etc. This has been a cool exercise, since 'winging it' would have been a mistake - that is, the mistakes would have been made on the model. Then the corrective measures would have been tedious in terms of non value-added activities (including hair pulling). So I made many erasures on the paper (nice new-world discovery, the rubber eraser is), editions and notes ... and the present iteration is pictured below. There is a nice look to her - she's definitely yar. In the process of drafting, I realized I'd mis-place the forward boomkin ... too far forward. Now the advantage of a solid hull comes into play, since I only had to drill new holes on either side to place the parts in. Then a plug of the same stock was cut, some wood glue applied, then it was tapped into the old hole flush with the surface. A couple dabs of paint will blend-in just fine. Speaking of solid hulls, I'd watched a Scientific kit (supposed to be 1:96, but might be a tad smaller at 1:108) of the Thermopylae (supposedly their 'best' clipper kit) on Ebay that had originally been $140, then reduced to $99 - since some work was already done on the hull (hardly started). Not forgetting a fascination with that ship's lore and that the GF is a 'dry run' being barque rigged as the Thermie was in the timber trade, I ordered it since there were no more reductions and the other two examples of the same kit had disappeared. They do come up every now and then.
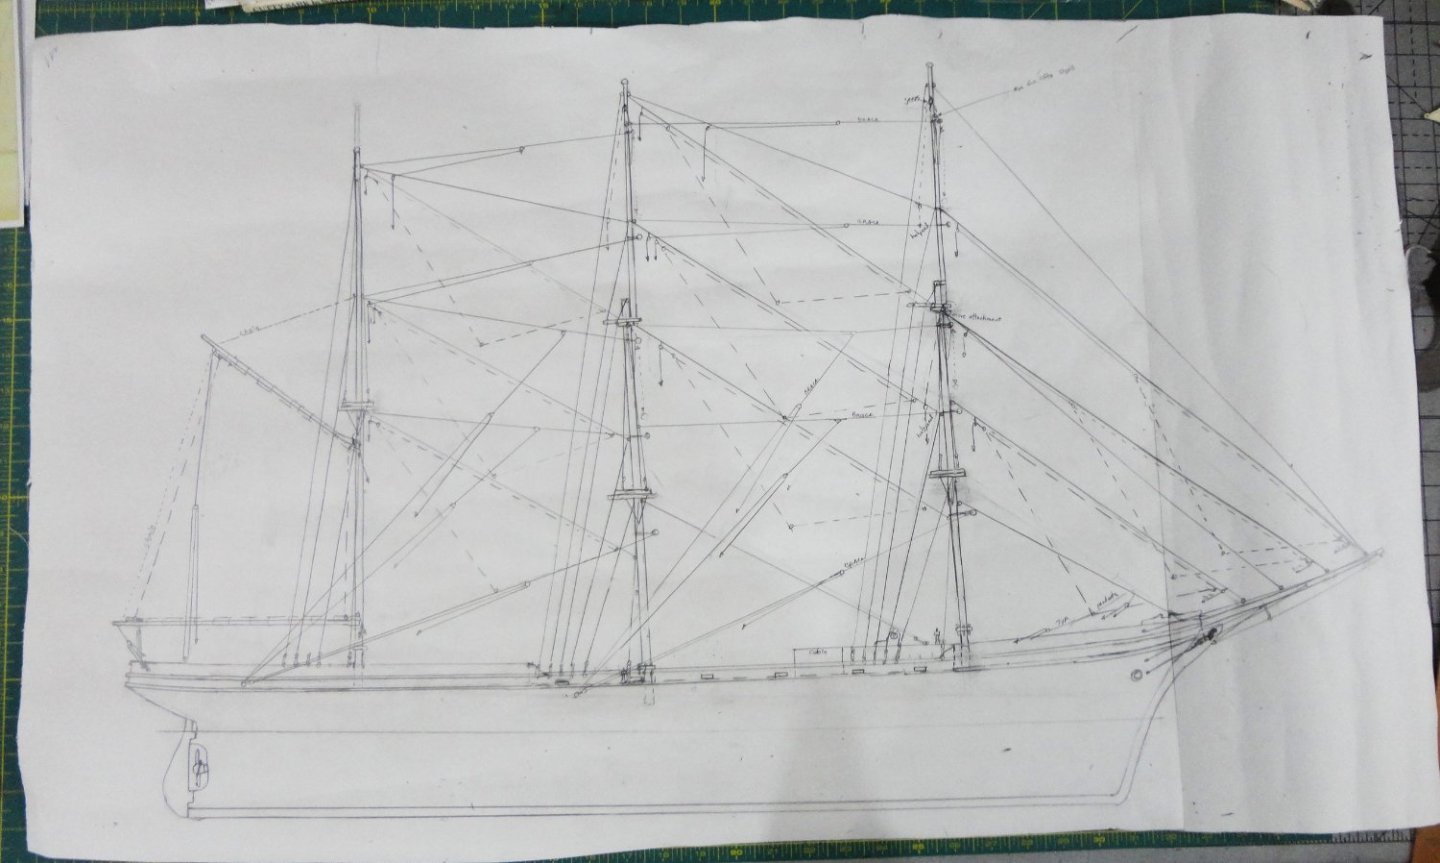
-
"Much of the satisfying work of life begins as an experiment, and no experiment is ever quite a failure." Alice Walker 1944 - ...
-
This is a super project, and one I'll follow.
-
With baited breath, the cat breathed into the mouse hole ... You might say it was a better mouth trap. 😉
-
Tool Rest Question
Snug Harbor Johnny replied to kgstakes's topic in Modeling tools and Workshop Equipment
Try and see if someone with a little lathe know-how can fix your fine machine. Perhaps there are machinists forums that might lead you to a local resource. Failing that, a logical examination of the problem might guide you to You Tube videos that can help you proceed. Heck, I needed to replace garage door springs, and found what I needed to know on the Internet. Same goes for a variety of mechanical challenges. Then again, being handy helps a lot too. Daniel Boone is quoted, "First, be sure you're right. Then go ahead." -
A masterpiece ! ... a fine example of true "Museum Quality". I think she'd be a fine acquisition for a Nautical Museum. I'll pick my jaw off the floor and only dream of emulating your skill and craftsmanship.
-
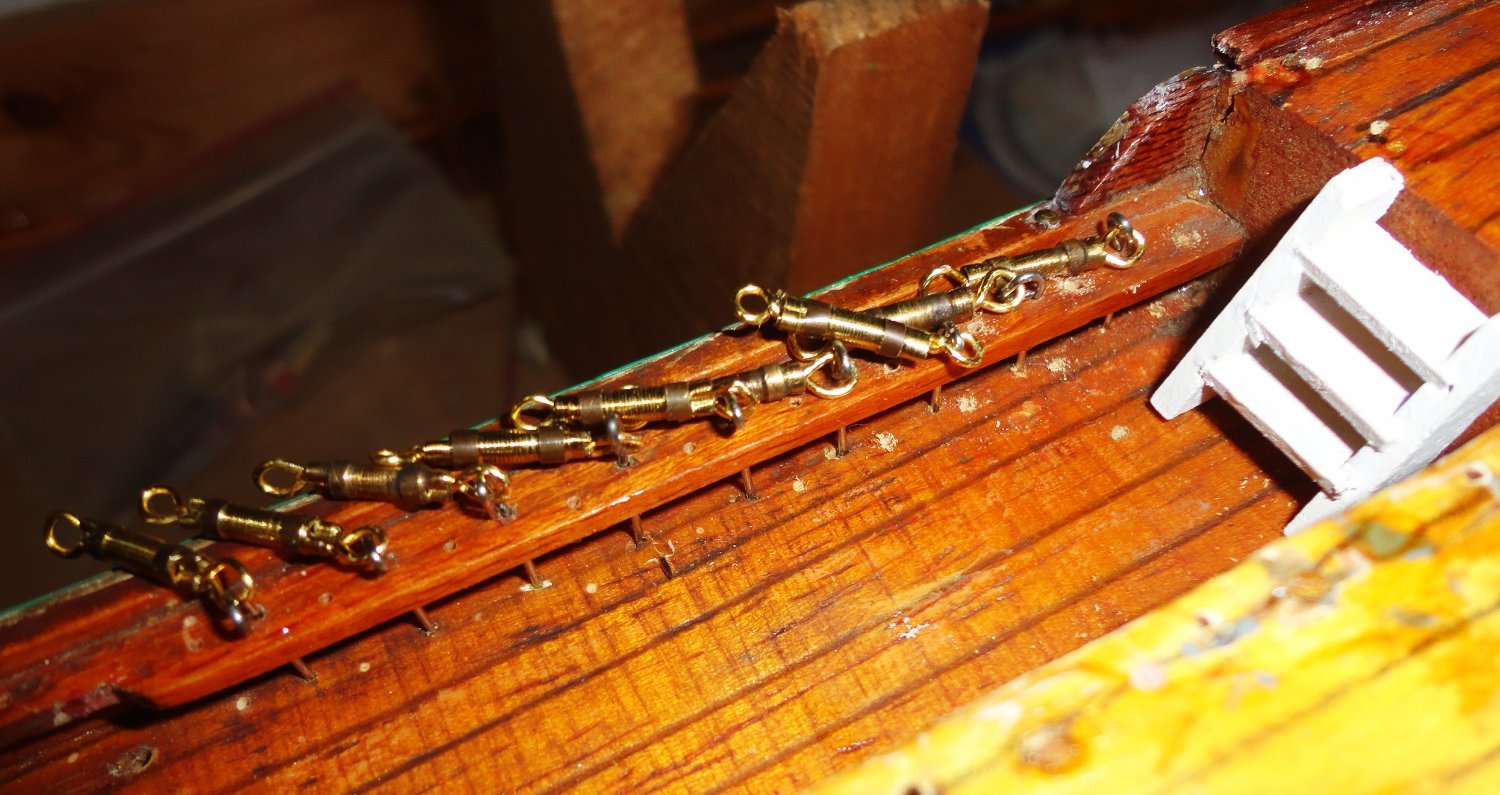
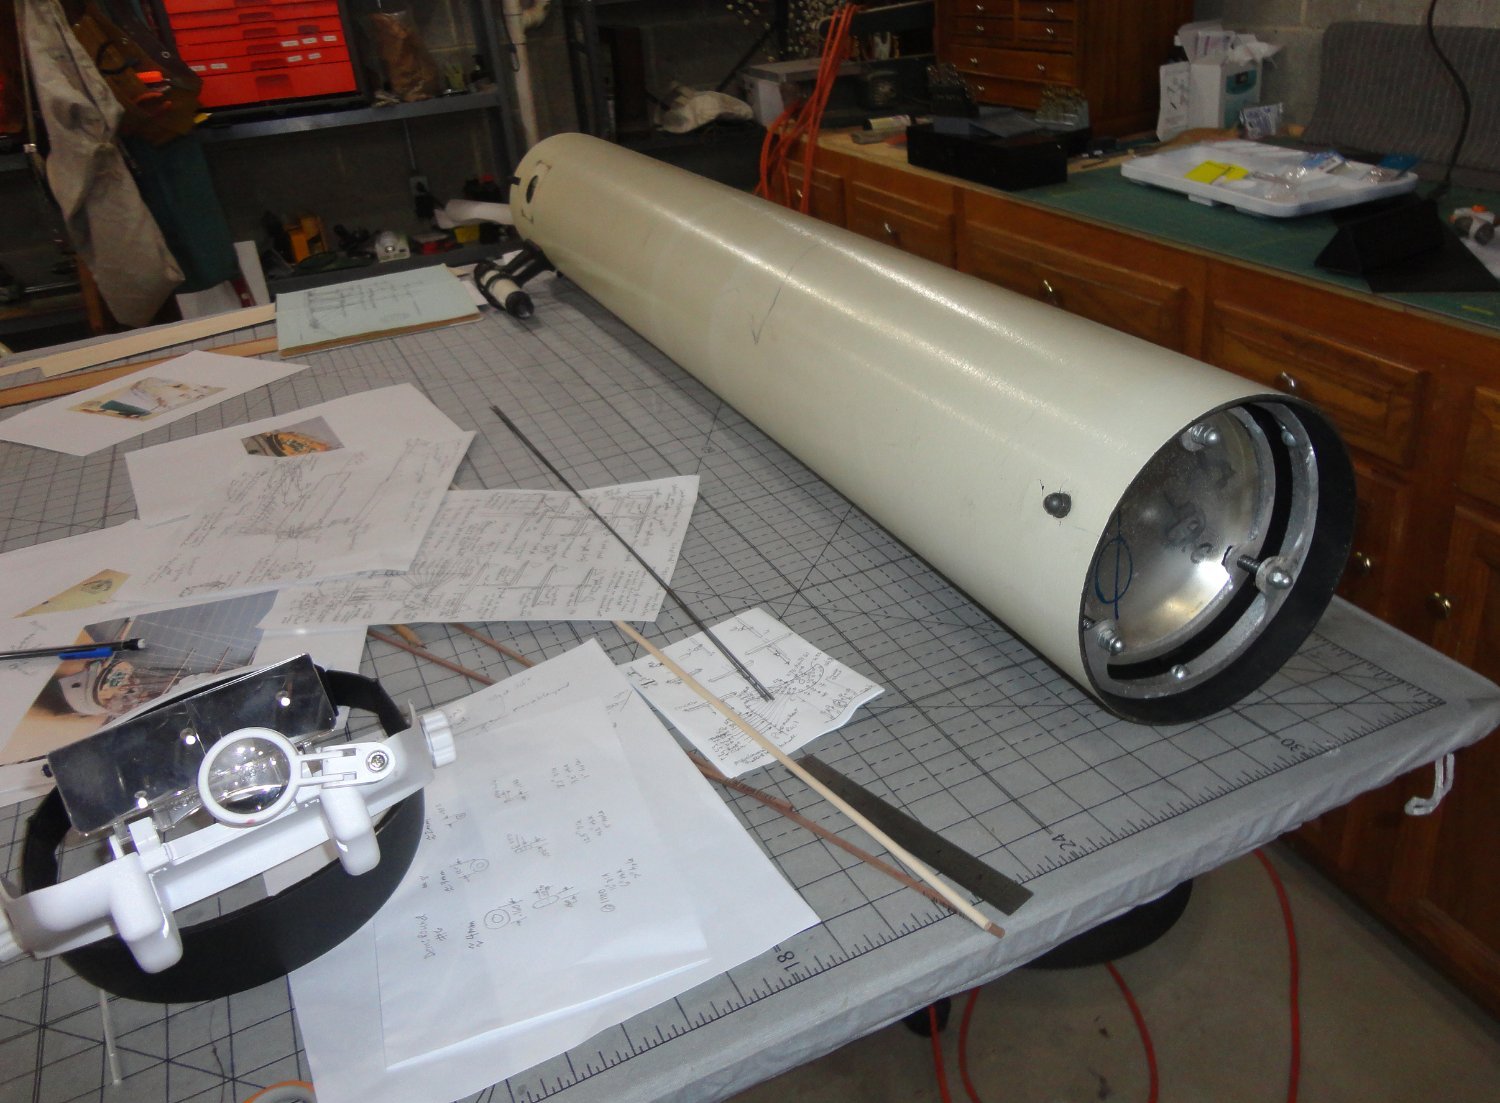
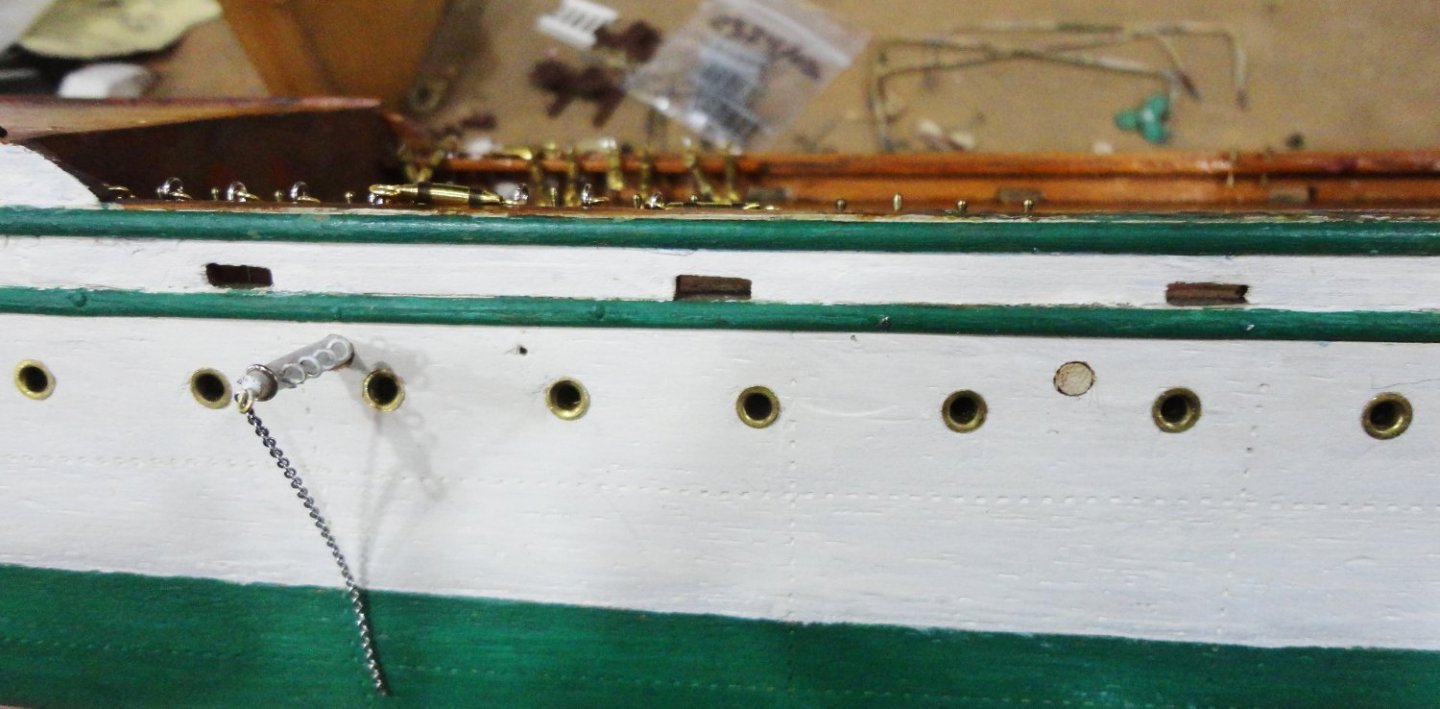
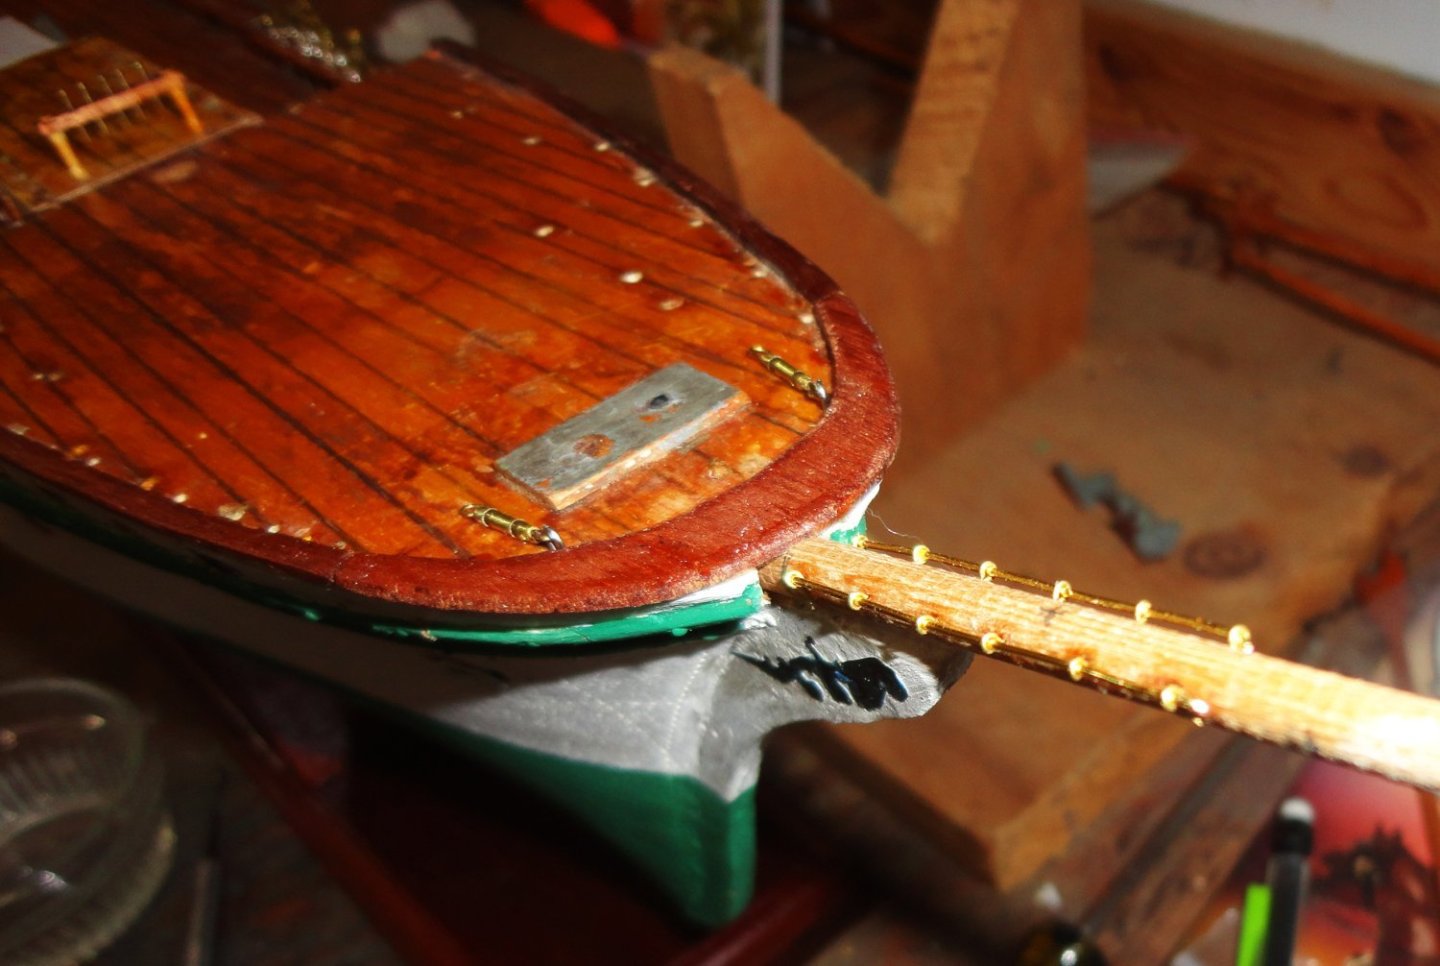
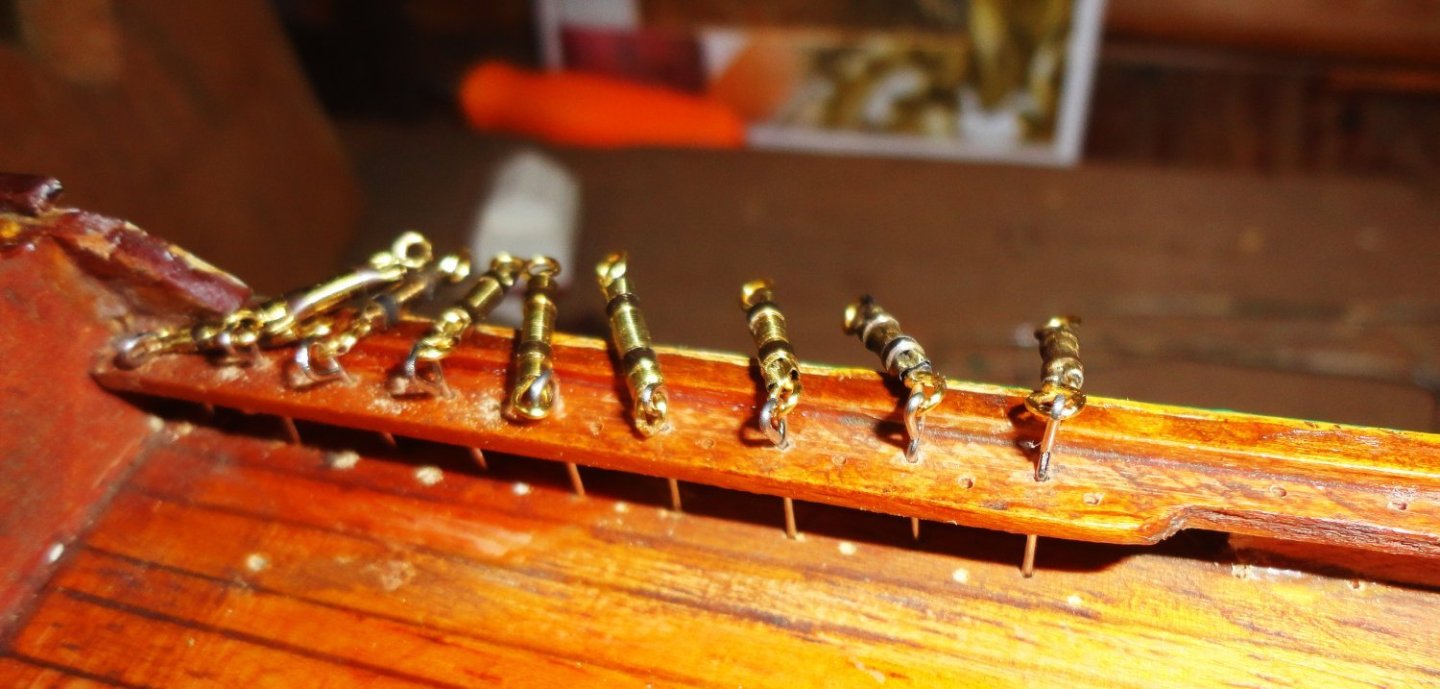
'Have done a couple things on the GF - I'll have to finalize what's done on the bowsprit at some time, so started with what appear to be jackstays on either side for a certain distance. My guess is that they might offer some foot purchase until a cadet could get a hands on the stay cables. There will be a long cable on either side going from the point of the bowsprit to the hull, and the ship has netting suspended from these cables going entirely under the bowsprit as a safety net - a wise precaution. Drilling for eyes and threading 22w gauge brass wire through before gluing is good practice for the jackstays that will go on all the yards. Note that a pair of small turnbuckles are fixed by eyes on the fore deck, that will be for the 'split' lower forestay. The breaker shield (already built) has yet to be glued. The larger turnbuckles are mounted in tow places (so far) on the port side. 'Found I had to bend hardened quilters pins into eyes, and the ends were forced into the hull as the original builder did. The soft eyes (ship findings) kept bending when I tried to force them in - so harder pins were resorted to - just that the eyes are irregular, but trying completely round tapered needle nosed pliers makes for better eyes ... I have no intention on pulling these out, as I prefer to go FORWARD (not back) - unless absolutely necessary. Small holes were drilled for belaying pins (not installed yet), and the drill bit did mark the deck below (my bad) ... a touch of shellac will blend those marks. I think I'll have to pre-attach line to at least some of the belaying pins, since there will be 'tight spots' in certain areas - like when the stairs so in with railings. 'Lots of though still on which order to do stuff in. As usual, the ship yard is by no means my only interest. And lately I thought it would be nice to look for a used telescope to at least look at the moon as the phases change - lots of shadows and craters seen clearly wherever the 'terminator' (lunar day-night zone), plus whatever planets might be available. And I found one locally - an old Criterion RV6 - 6" f8 Newtonian on a motorized German Equitorial mount. The scope itself was only $375 (assembly and tweaking required - like modifying a spare pinion to fix the focuser). Another $125 bough some decent eyepieces and a Barlow. The optical tube is lying on my wheeled project table. 'Still some additional assembly needed for the mount pictured below.


-
Tool Rest Question
Snug Harbor Johnny replied to kgstakes's topic in Modeling tools and Workshop Equipment
Wood and metal turning ... two different animals, and I wouldn't advise trying to do both materials on one lathe type. I used to have a Sears wood lathe, and turned furniture parts on it. There were bolt holes in my home made bench top so I could take it down after one project was done, and it fit on a shelf underneath. The "bench" was actually the extensions built 6 feet on either side of my Craftsman 10" radial arm saw, and I used either side as a 'standing-up' height work bench. Sold the lathe and saw when I sold off my wood stock due to forced relocation ... but I kept the bench wings, and they were 'married' into a long bench now in my man cave in our present digs. -
Looking down the hull from the bow ... how sensuous - she's big and beautiful !
-
Nice brass belying pins ... gotta love 'em.
-
Very clean and nice ! as for me ... not so much, but I try.
-
Electric sander
Snug Harbor Johnny replied to Ron Gagner's topic in Modeling tools and Workshop Equipment
Actually ... my Unimat can 'convert' to a mini drill press by putting a drill chuck on the spindle, unbolting the head stock, installing the vertical bar, mounting the head stock on the bar with levered pinion for downstroke, putting the milling table on the tool slide, and topping that with a mini vise. Its sort-of a pain, and to go back to a lathe one must reverse the process. Also, the Unimat is typically underpowered. "All in one" type of tools have a certain amount of gimmickry involved - a friend of mine had a 'Shop Smith', that could be re-configured (with some fiddling) into a wood lathe, table saw, drill/mill press, spindle shaper, belt sander, jointer or a spindle shaper ... only one type of work at a time. The other example of "overkill" was the PBS 'The New Yankee Workshop' with Norm Abrams (Naahm) ... I mean this guy had every conceivable power tool for wood working in existence - multiple table saws, jointers, planers, biscuit joiners, mortisers, band saws, lathes, spindle shapers plus all sorts of specialty jigs and fixtures. THEN, after machining virtually every part by one machine or another - he'd pick up a chisel (good heaven's, a HAND tool) and say something like, "To clean up this corner, I'll need a couple taps with a chisel." Then, tap-tap - and the hand tool was put down. More to my liking was 'The Woodwright's Shop' with Roy Underhill. The man has a respect for hand work and traditional tools ... with occasional power tools used - one only needs a few. -
Electric sander
Snug Harbor Johnny replied to Ron Gagner's topic in Modeling tools and Workshop Equipment
I'll second you on that, Roger. I have a regular sized bench-top drill press, and a 2-axis cross vise is mounted on the table (that cranks in the vertical axis). I can drill and mill with it. For modeling purposes, a miniature drill press would be nice ... maybe someday. -
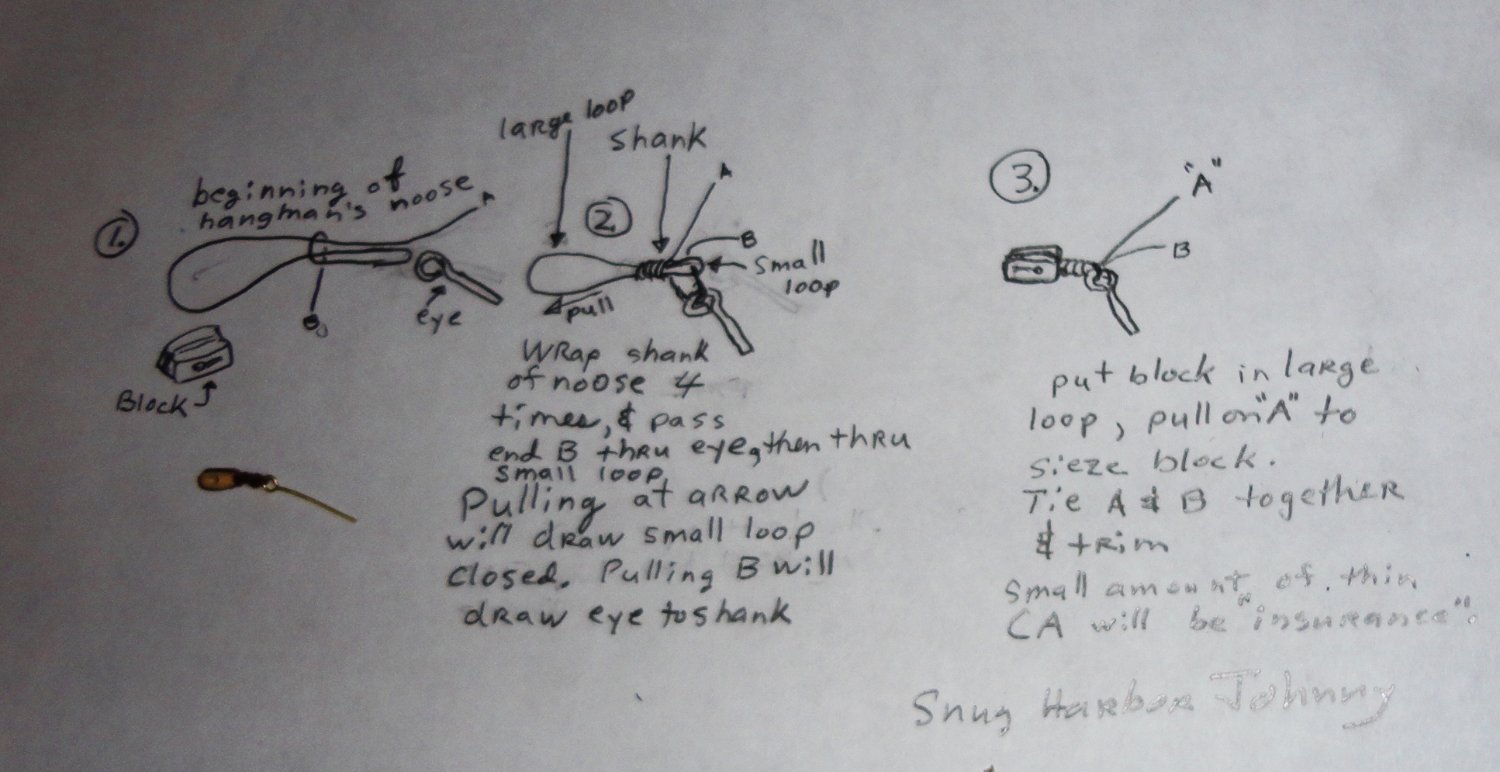
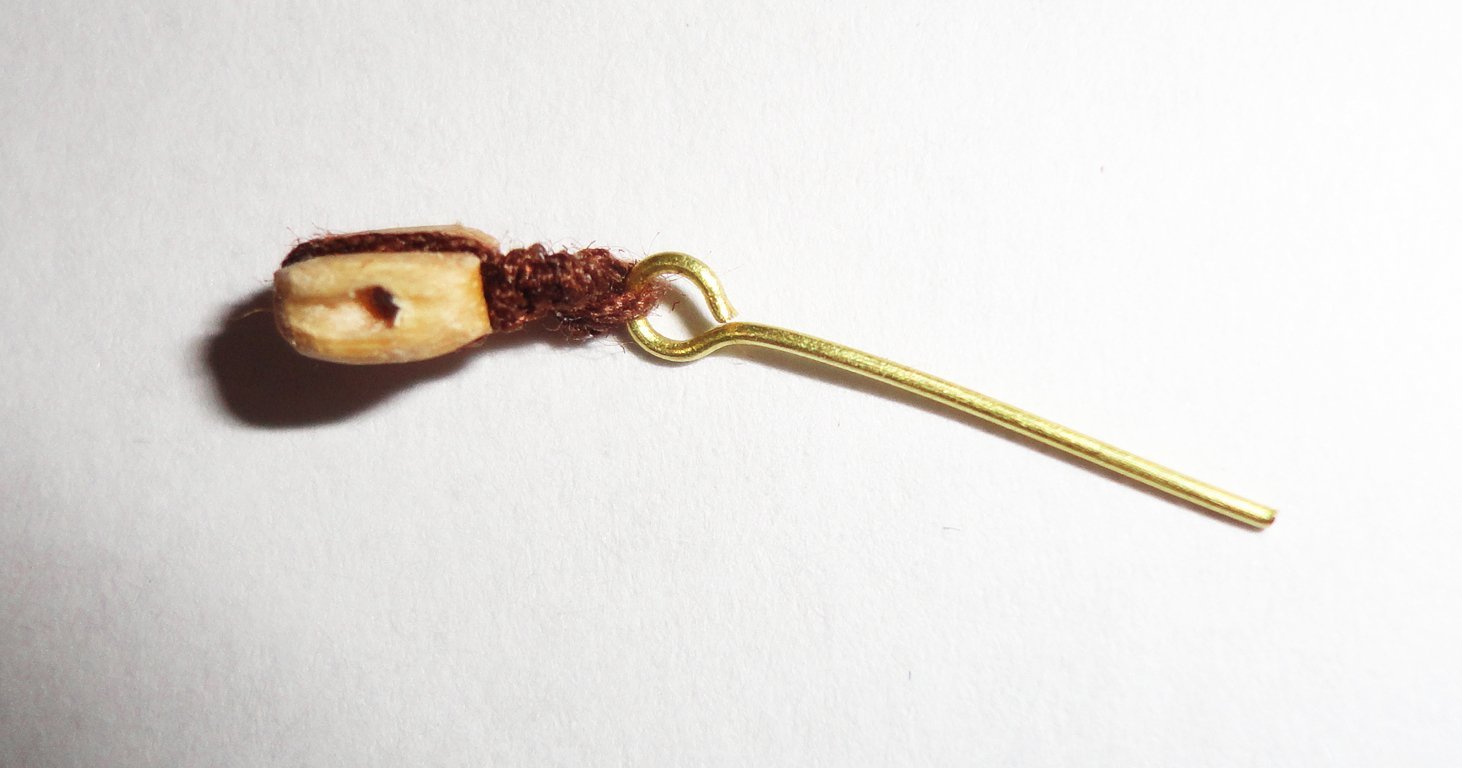
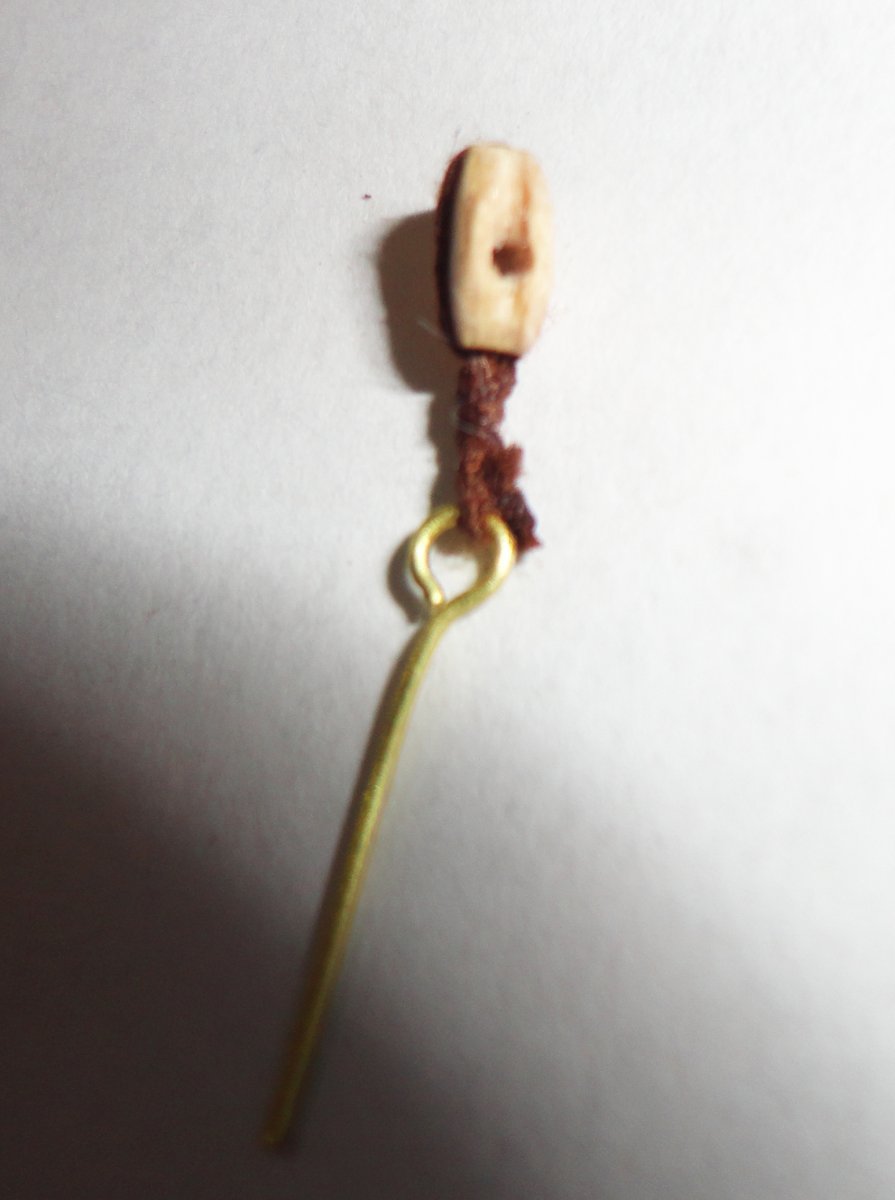
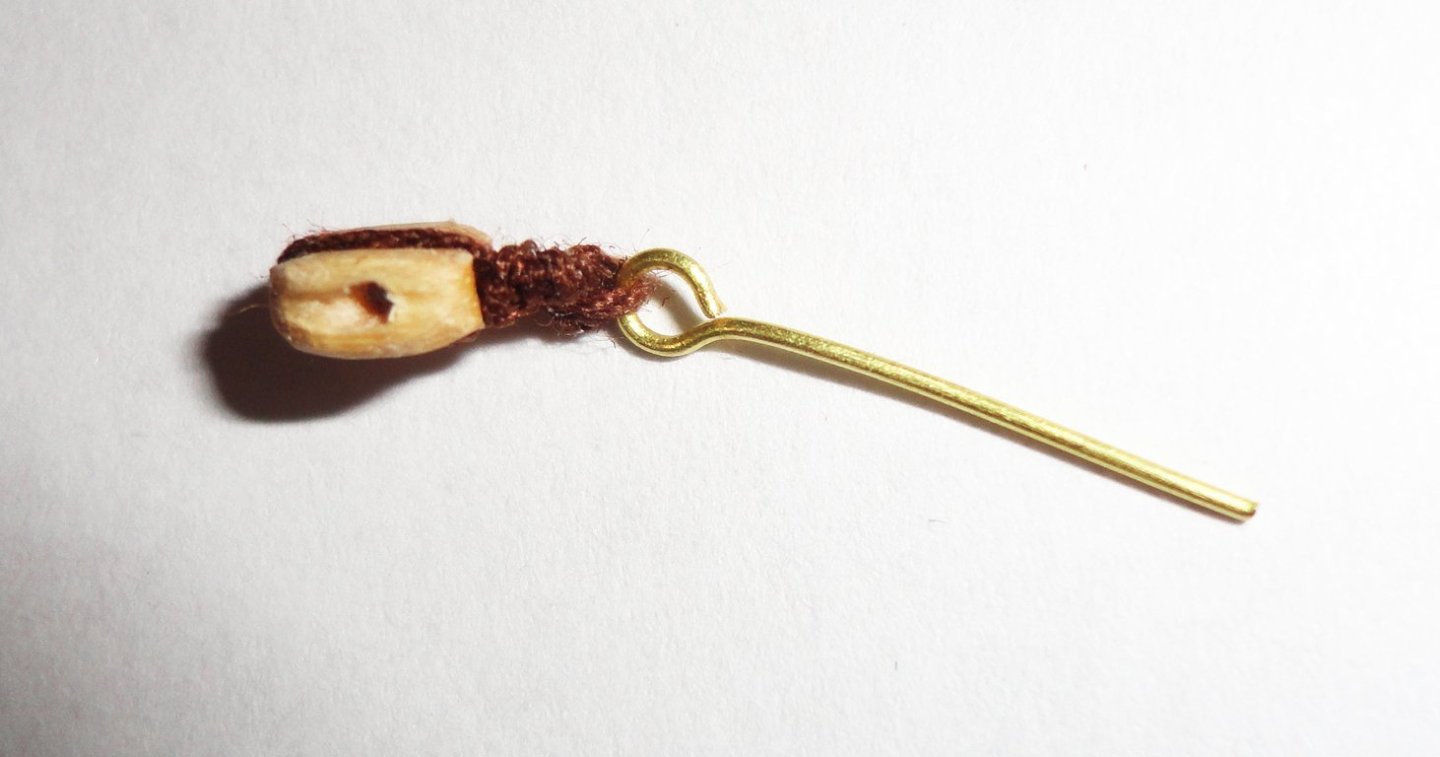
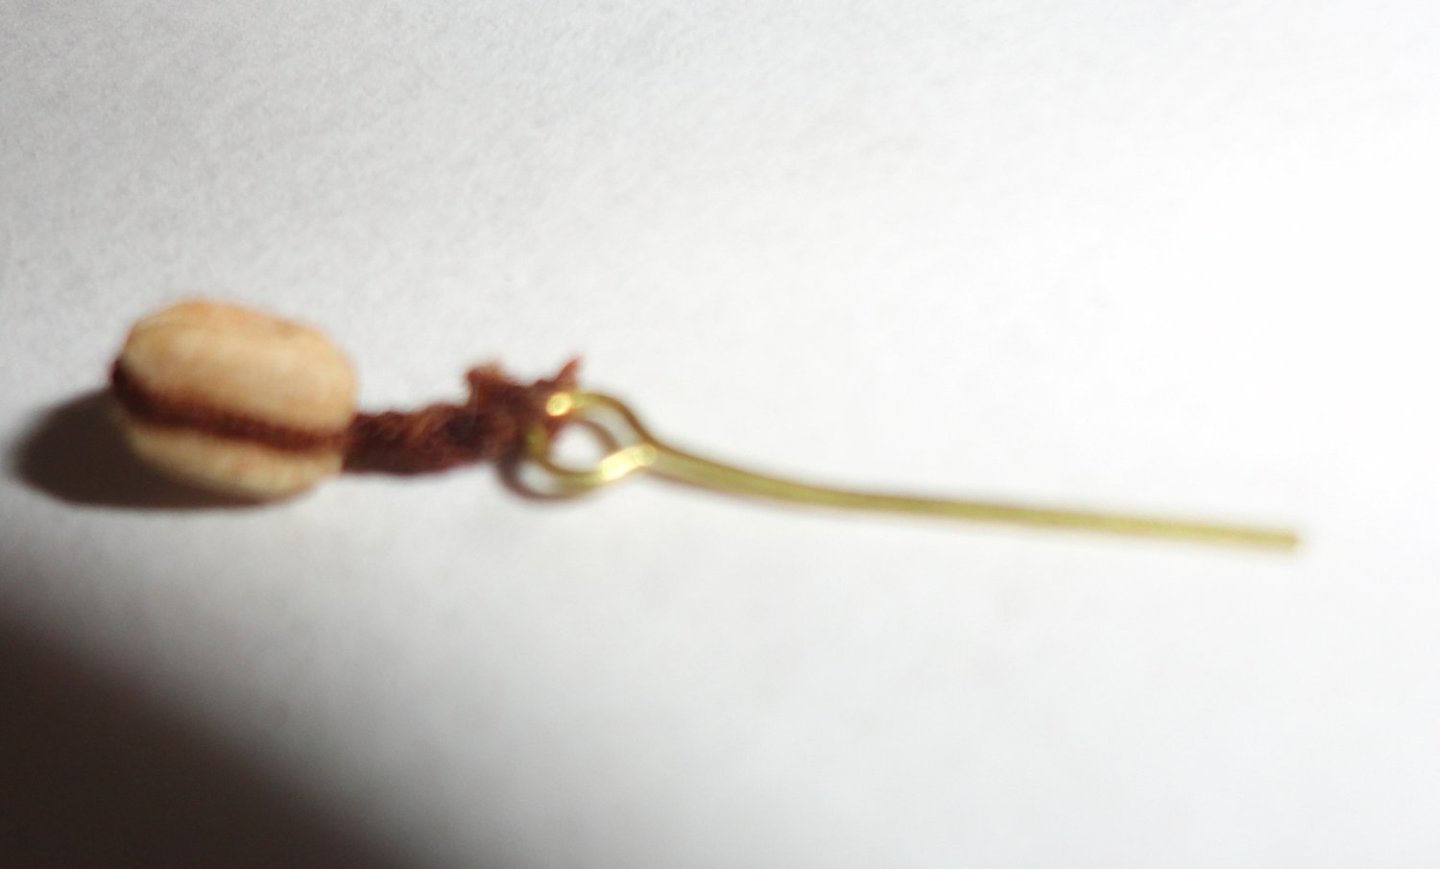
Patrick, looking at your series of photos got me thinking on yet another way to strop a block to an eye ... It seemed to work on a 4mm test block - it is an OcCre block that I worked on just a little to enlarge the hole and round the corners to make it look better. The line was made with Chuck's 'Rope Rocket' and just 3 strands of brown Gutterman poly sewing thread. 'Could have used tan, but the batch was for Vasa to be rigged in brown.

-
Electric sander
Snug Harbor Johnny replied to Ron Gagner's topic in Modeling tools and Workshop Equipment
I found that a relatively narrow belt sander was useful for general shop work (furniture, metalwork), but have only used it for one application in model making - setting the table at a slight angle from the belt to adjust the angle of 2 deck cabins (made from solid blocks) where they meet the the fore and aft decks, respectively, on my Gorch Fock restoration. The builder had the face of the higher decks at a slight angle, as the hull had been cut from a single block of pine ... so I imagine that if shaping a block for a hull from scratch, the 'hogging' of material (after band sawing) would be made much easier with a belt sander. It was certainly helpful shaping pieces for repro wooden dolls of the Colonial era. I'm seeing some advantage to a solid hull versus P.O.B. - but each has its own plusses and minuses. I think that the most useful wood modeling powered tools are a scroll saw (makes cutting-out curved pieces from stock a breeze), a mini table saw (super useful for straight cuts from various model stock - as a full size table saw is both overkill and too dangerous for small work) and a variable speed rotary tool (foot controlled, and there are very many things that can mount on the rotary tool for a particular job on the model) ... These are my 'go to' machines of choice. Obviously, higher priced quality tools are best in the long run, but if money is tight (many of us have Admirals to report to), you can get less expensive alternatives that will work, as long as you are aware of some limitations. -
Thanks, Glen. Now that I think about it, ships in bottles are more likely to survive over long periods for a number of reasons; interesting to look at - so they can add to most any room decor, they don't take up a lot of shelf space, the light weight of the craft is resistant against damage if it secure on the inside surface of the bottle, easy to dust, easy to move or store. If someone no longer wants one, they can easily sell (e.g. yard sale) so they are far less likely to be trashed. So the model may pass through successive hands for generations, which is why having at least the builders name and build date visible by looking through the underside of the bottle is a good idea. The completed Khufu barge I'm considering how to display can't be stuffed inside a bottle - but maybe a completely clear plexiglass case can be made in a similar way I've made cases for butterflies before. The sides are 'welded' together with plexiglass cement applied by the thin metal tube on the cement bottle. The cut edges can be polished smooth before assembly. I'm appreciating the flexibility of working with wood, as I realized that the holes drilled for the corner railing uprights on the GF did not take into account that the railing wire will have to bend at a 90 degree angle AFTER passing through the ball forms in the posts. That will create an inward angle going to the next post in the new direction ... then the railings won't look the way I want them. So I filled the corner holes with toothpick and touched up with shellac, then drilled new holes just a little back from the former position. That way the bend in the railing will then go straight to the next post in the new direction. On the Ergenstrasse build, the posts are even further back from the 'corner', since the builder put a nice radius curve in the railings to assume the new direction in the scale being modeled. At my 1:100 scale, I'll just bend the rails at the posts. Wood is great for realizing mistakes, or a better way to execute a feature or even making repairs, since it can be trimmed shaped glued as desired. Metal has got to be a tougher medium. Plastic has plusses and minuses, but I favor wood by far.
-
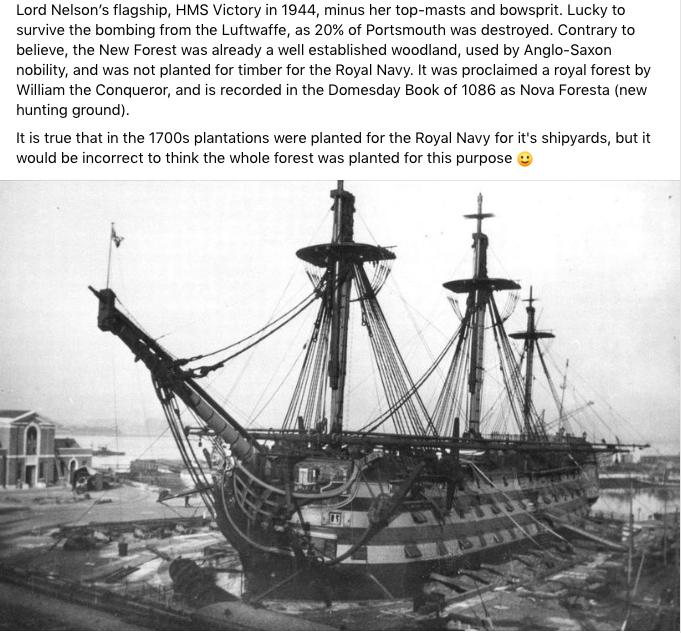
Since your building the Victory, 'though I'd post the image below. I've seen versions done with just the first sections of mast - a step beyond an admiralty model with stubs - and there is a suspended build of another ship I'll probably finish that way ...
- 33 replies
-
- 3
-

-
- Victory
- DeAgostini
- (and 1 more)
-
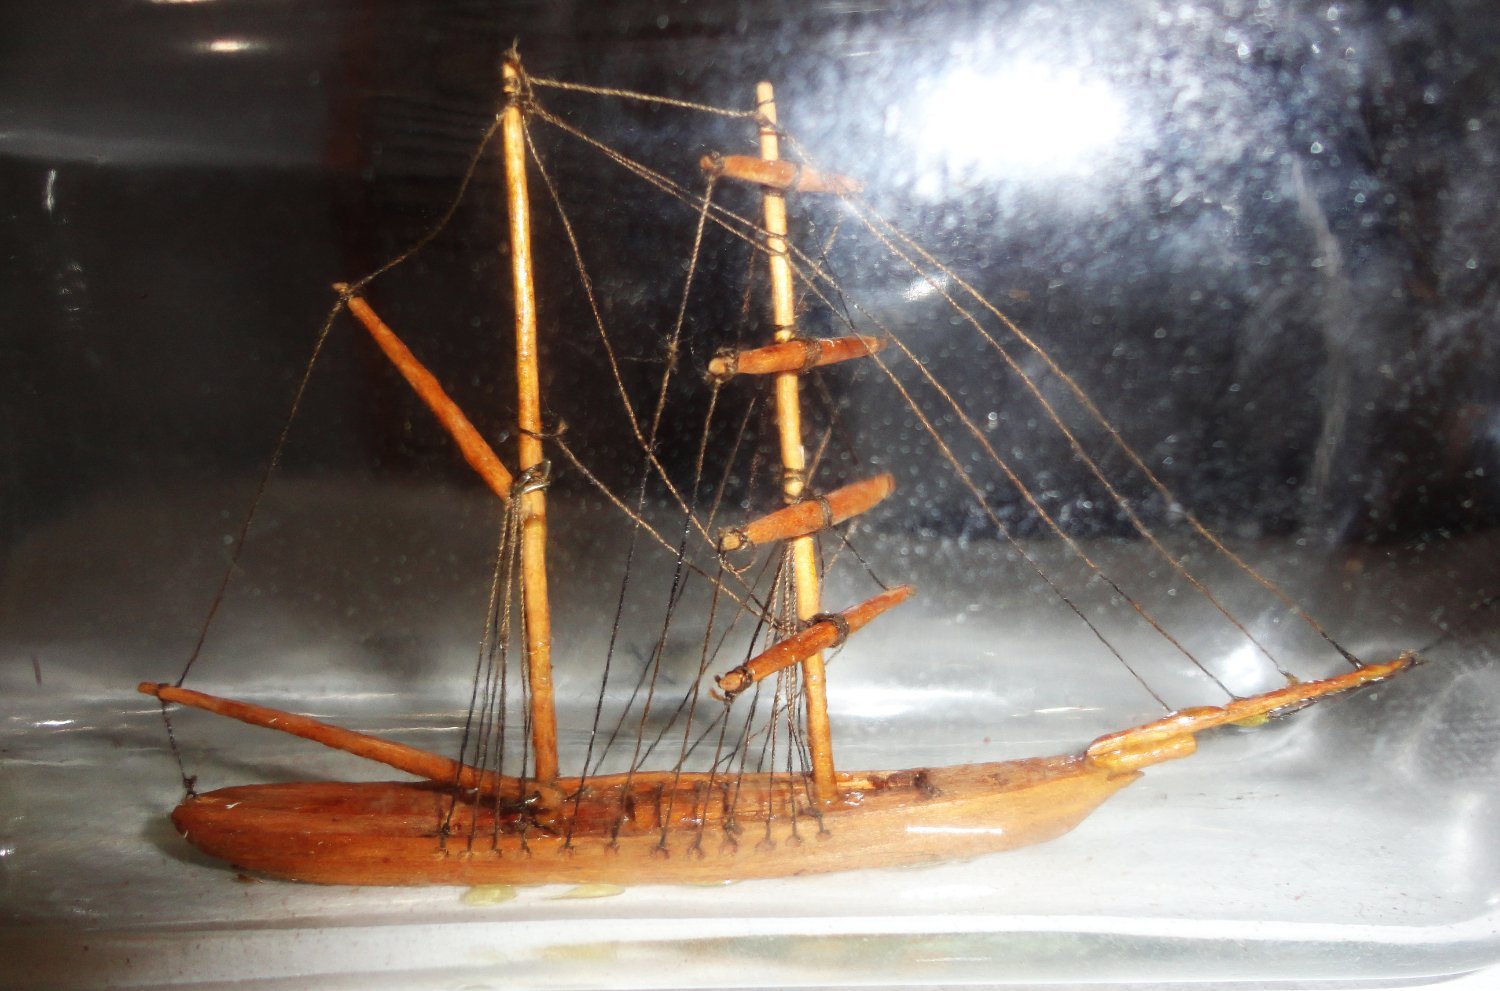
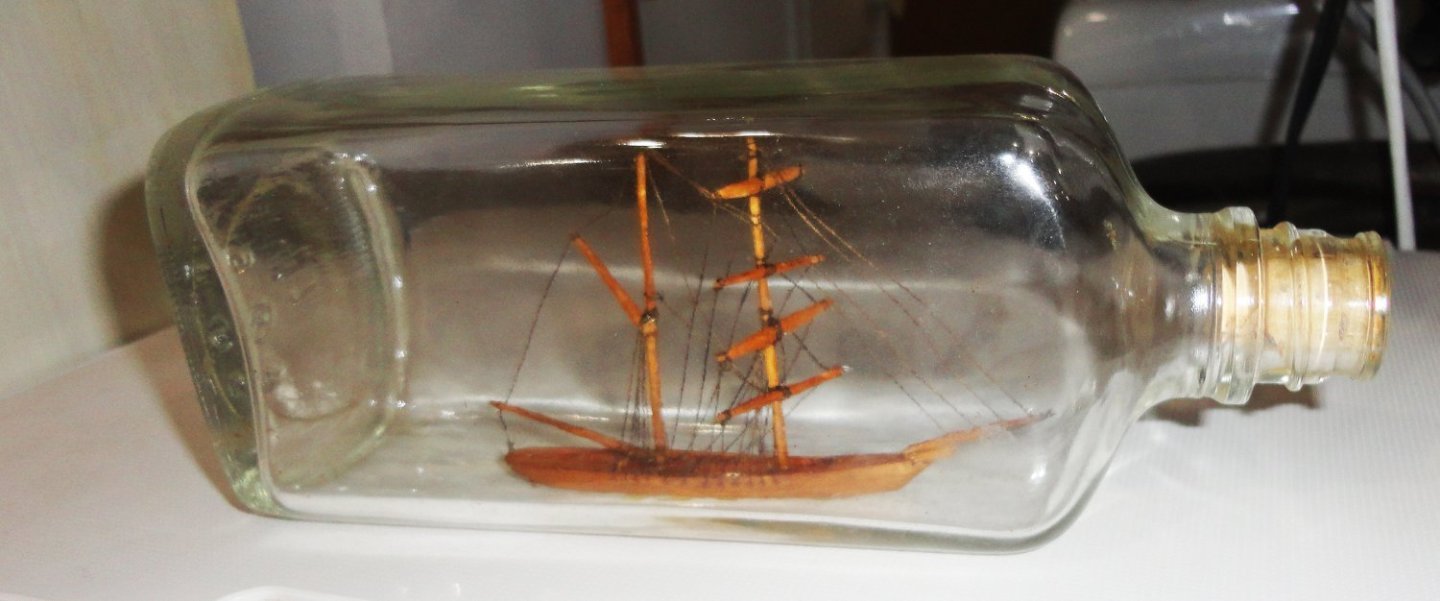
A ship in a bottle I made over 50 years ago was mentioned in another thread, but I could not provide a picture because it's whereabouts was unknown. 'Seems it survived a couple moves with my Mom, and then was somewhere in my brother's house ... and he finally found it and I received it back when visiting yesterday (Christmas Eve). I didn't know much about proper rigging at the time, but its not bad for a first exercise. A better version is on my 'bucket list' now. I'll have to find 'just the right' bottle - high and narrow on its side - and this is another thing to look for in the many antique sellers to be found in SE Pennsylvania. The wavy glass distorts things a bit (typical), and next time I should have 3 masts (barque rigged) - like the GF or Big T in her later years. Notes to self; have the back stays go to the masts (not the yards ... although that made it easier to untwist the masts once in the bottle, as those lines pass over the deck to the corresponding hole in the opposite bulwark ), add fine ratlines by gluing, paint hull, rig braces to beads on the forestays. The masts were not hinged, but just fit into shallow holes in deck. Several dabs of slow curing epoxy were put on the inside of the bottle, and the collapsed vessel maneuvered with long tweezers to that place and allowed to completely cure. Then a dab of epoxy was placed in the holes for the masts (with a long wire as an applicator). The forestays attached to the fore mast had long ends at that time and came out the neck of the bottle. Long tweezers helped grip the base of the for mast as the stay lines were pulled to stand the masts up - the 2nd mast just following the first. The tweezers pushed the mast bottoms into the shallow holes and they were allowed to completely cure. The fore stays did not go through holes in the bowsprit, so each one (in turn, from back to front) was positioned on the bowsprit with tweezers - and another tweezer end applied a dab of '3 minute' epoxy where the line was held on the underside of the bowsprit. After setting, another line was done (the line ends still coming out of the bottle) until all were done. Then after curing, a long X-Acto trimmed the lines at the bowsprit. Then a cork was jammed into the bottle neck. Additional notes to self - work out making the masts hinged, because that will be less harrowing that 'planting' the mast ends into holes like I did (I recall that it was difficult to manage). I've seen hinges used on other ship-in-bottle MSW threads. Also, having the fore-most stays passing through holes in the bowsprit will be much easier to glue later. Merry Christmas (or Festivus) and a Happy New Year in you shipyards, mates ! Johnny

-
No pics this time, as I'm prepping a lot of little parts. The decision was made to use Revell 1:96 internally stropped blocks for the larger ones needed, as they are close to scale (just a little over). I could work with 4 1/2 mm wood blocks (smaller ones give me trouble) but 1.) they are too much out of scale at 1:100, and 2.) they are externally stropped. The 3 1/2 mm Revell blocks are from a kit I happen to have on hand, but they can be found in several kits still available on Ebay or elsewhere. The bunt blocks will still be beads. The plastic blocks must be completely painted. Also, I'm pre-painting the railing stanchions white. 'Soon time for Christmas break and lots of family obligations.
-
I'd avoid using lead, as tin solder is readily available (and far less toxic).
-
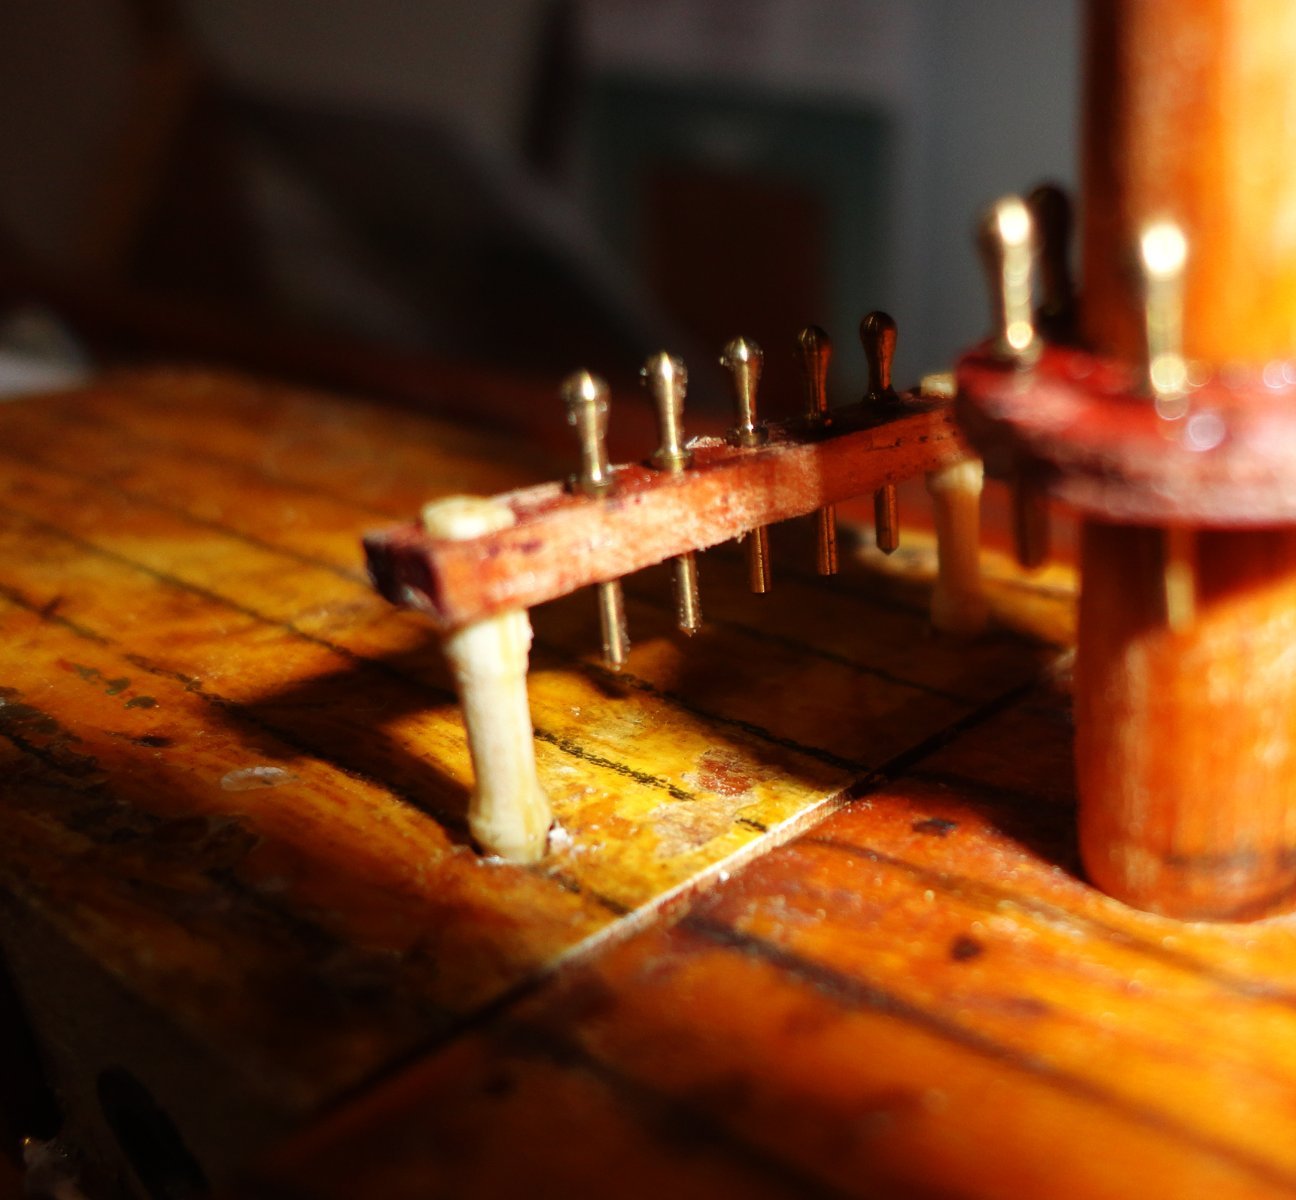
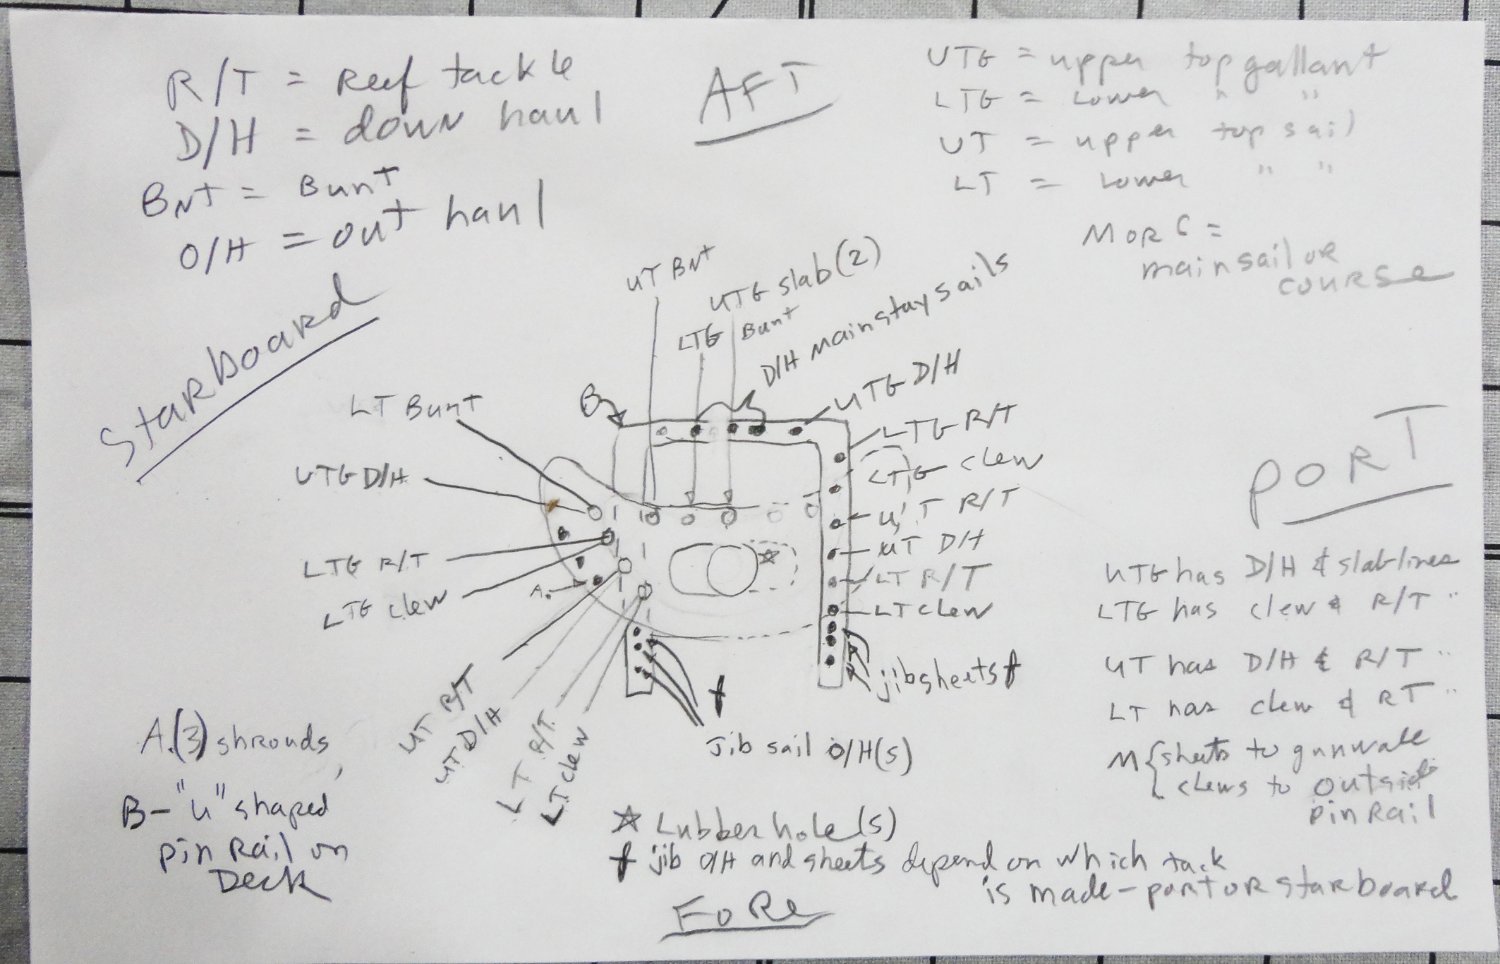
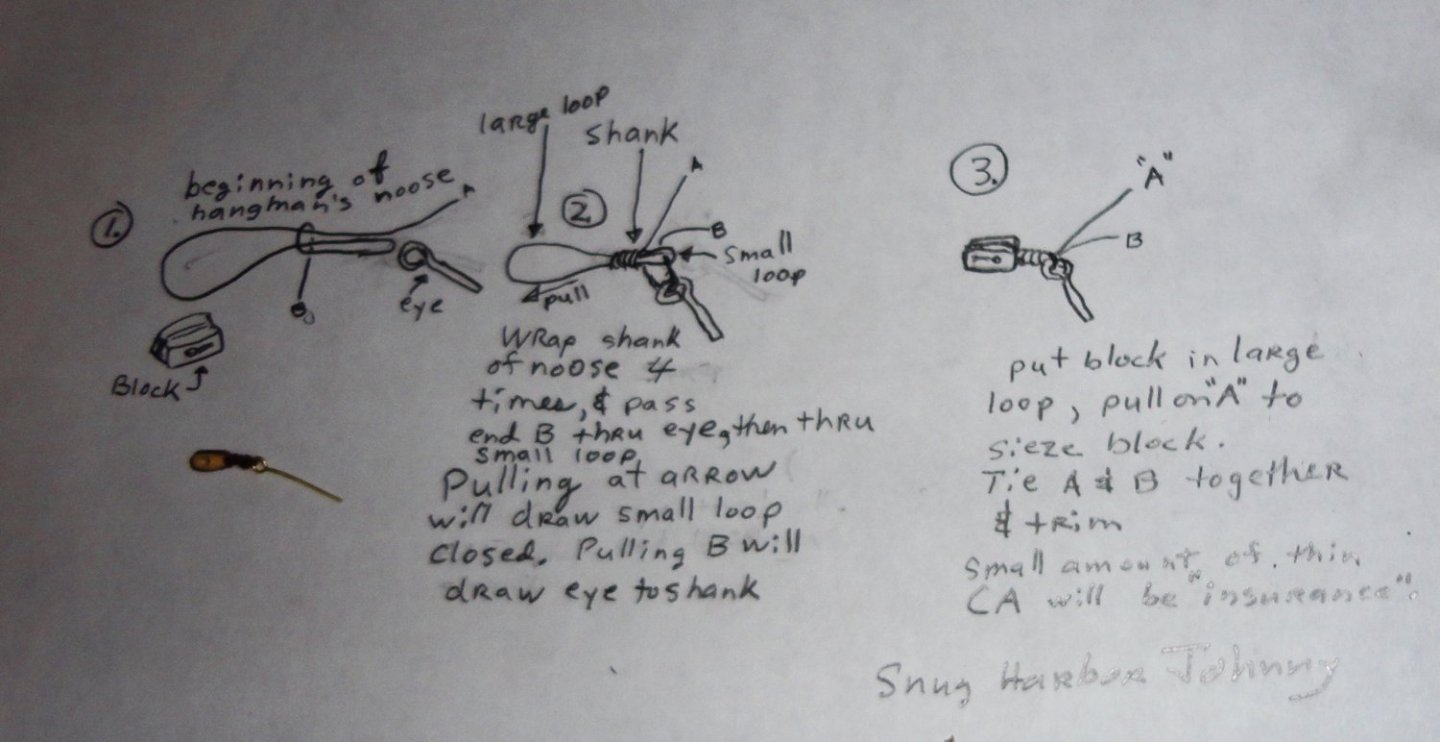
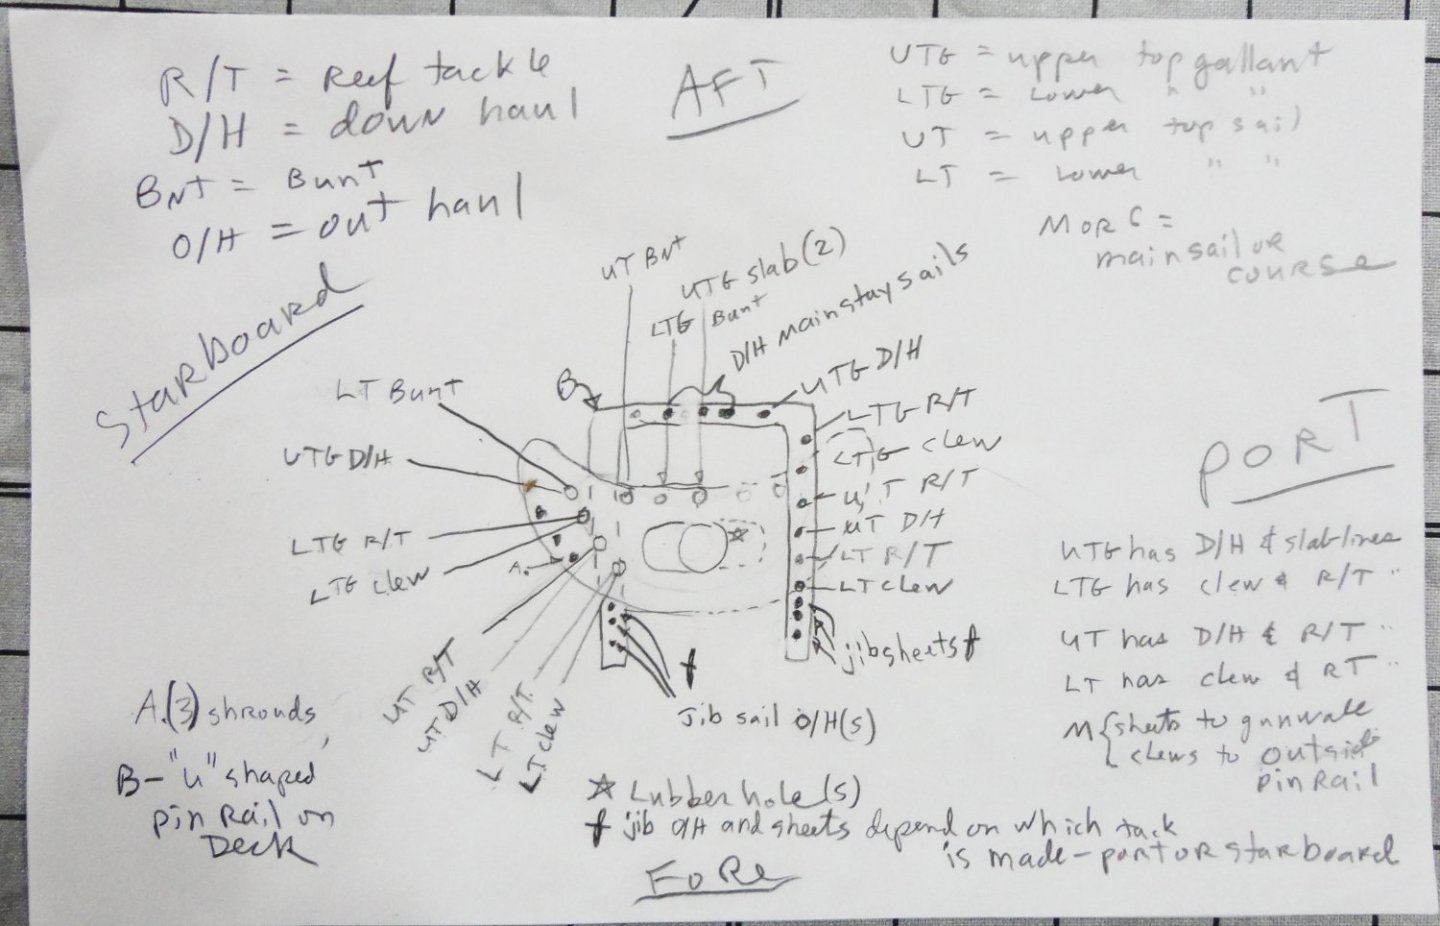
'Decided to make a standing pin rail, and used toothpicks that come with shaped ends (for hors d'oeuvres ... mine weren't all that well formed, so I picked a couple and touched them up on the mini-lathe) for uprights, and a strip of mahogany drilled to accept uprights at each end - and pins in between. The deck was marked through the rail (before anything was added) for drilling. Then things were assembled and fixed in place with dabs of thin CA. Its hard to get everything in focus at close range with the crummy camera I have - but you get the idea. A little amber shellac will tone the uprights. I'll follow suit for rails elsewhere. Pics of my rough sketches on belaying the lines follow. Rough, to be sure - just haven't wanted to spare the time yet to 'clean them up', as they are still subject to change.

-
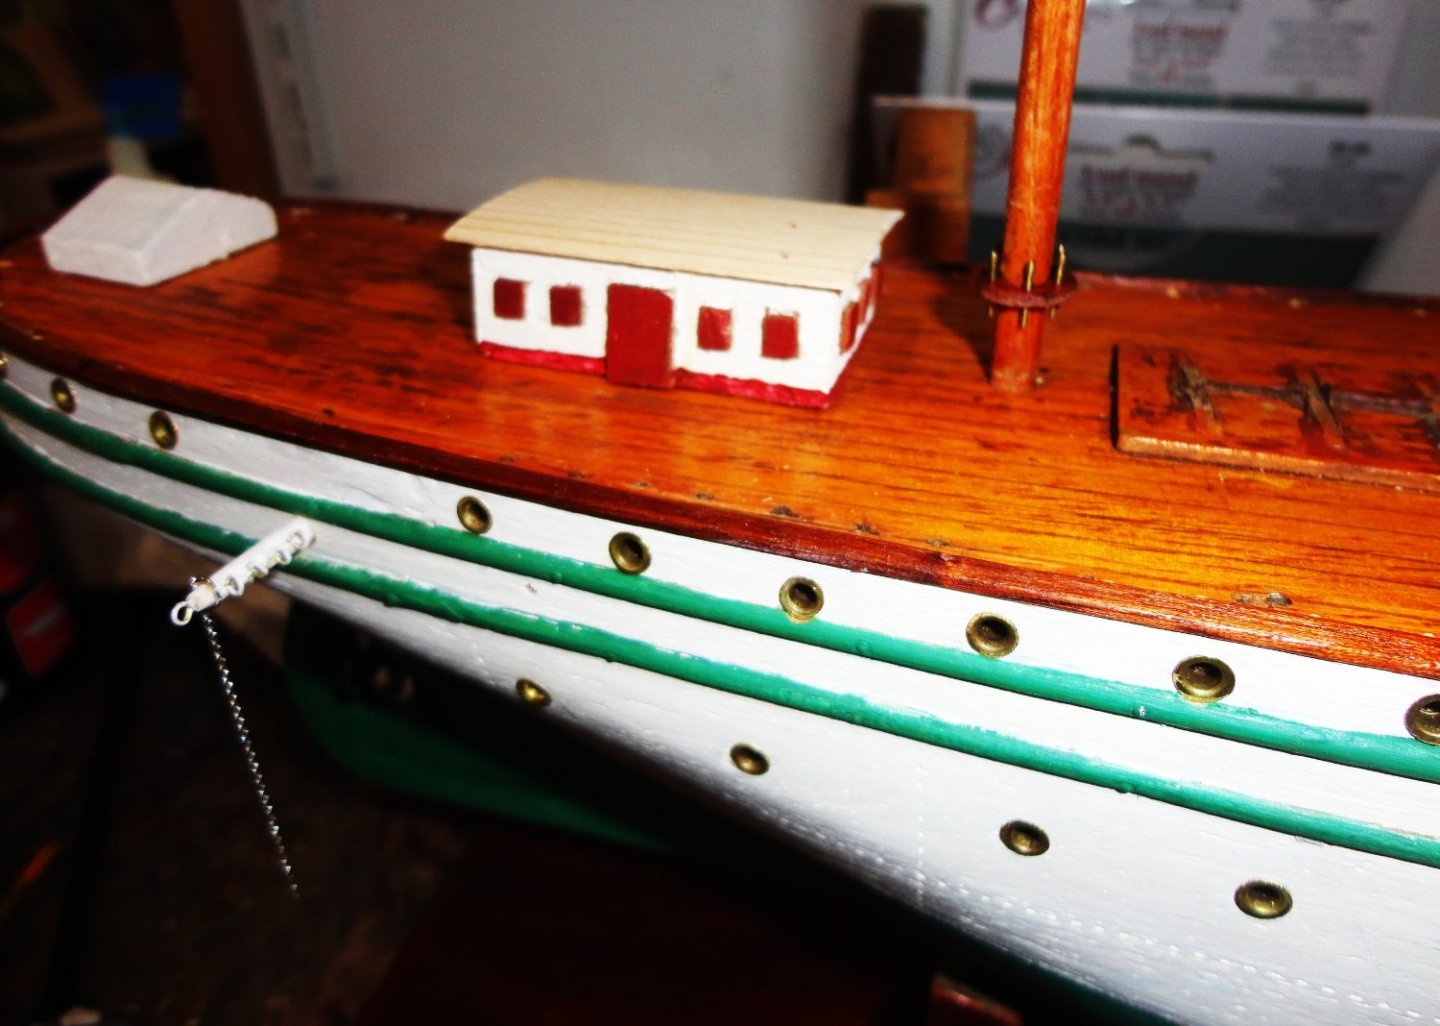
Sometimes days can go by with no progress, as I'm always pondering which course to take ... But once I forge ahead in some respect, much can be done. Now I often look back and think of how it might have been done differently or 'better' - but there is no point in doing so other than for future reference. The 'Holy Grail' of 'absolute' authenticity is virtually unachievable. Compromises in detail and scale must be made frequently. As with life in general, imagining 're-dos' is not productive. There was an entire rear cabin missing from my restoration model, so I had to make a replacement that would 'blend in' with the ship as-built. So I took a scrap of ordinary furring strip, trimmed the width a little, then cut off to length. Mahogany doors and windows were trimmed form planking strips, then glued into place. Off-white paint was mixed and applied to the walls, and clear shellac to the darker wood. The cambered roof (by sanding) was an application of scribed decking stock commercially available. I still have to install the grab bars and tone the roof as needed, but I set it in the deck without gluing to take a picture. A little paint perked up another deck feature .. a couple things still need to be added to it.

-
'Harbor Rig' (w/o sails) has a lot to recommend it. Good golly, the virtual spaghetti of lines needed for a clipper under sail is daunting - as I'm finding out. Kudos for your fine artistry and excellent detail at every stage of construction. Your build was interesting to follow, and can be a valuable tool for future reference.
- 602 replies
-
- 1
-
-
- Flying Fish
- Model Shipways
- (and 2 more)
-
This is a long, tough build - and I can see why some start with a plastic kit and order PE sets to improve the result. My hat is off to your efforts.