Snug Harbor Johnny
-
Posts
1,500 -
Joined
-
Last visited
Content Type
Profiles
Forums
Gallery
Events
Everything posted by Snug Harbor Johnny
-

What Wax To Use On Rigging Line
Snug Harbor Johnny replied to JFMJr's topic in Masting, rigging and sails
'Always knew you were a 'Renaissance man". -
I'll watch you build as it progresses - 'guess the kit is of the Gorch Fock 2. I'm slowly restoring an old scratch model of the GF 1, still extant but with a few modifications from its original configuration.
-
I grew up in Maryland and remember the opening of the FSK bridge. Since then (now a Pennsylvanian), I've used it a number of times to avoid the tunnels or heavy traffic on the long western loop of the Baltimore beltway. 'Guess in the 70s, no one did a 'what if' scenario to cover this type of collision. Other bridge designers have considered this and built massive pier guards fore and aft strong enough to withstand a direct hit by a massive ship.
-
'Love the random-joint look of the decking ... likely how many decks were made from deck plank stock from the sawmill, where defects have to be cut out or warpage reduced - yielding planks of various lengths. These are cut, of course, so that the joint between running planks will center on a deck beam for securement - but there may be no detectable 'pattern' to the joints across the deck (at least not intentional).
-
The close up views inside the stern castle make one realize the size and depth of the ship from a crewman's viewpoint ... and I can imagine the horror of being trapped down inside when she sank that fateful day ... much like the Vasa.
-
Your photo from below shows an open access in the bottom of the 'crows nest' ... so there's no need for a door - which was a guess, really (and that would have been awkward). The 'nest' appears to be an elongated barrel. So the climbing bars go right into the bottom. 'Not sure what there was to stand on, but the simplest arrangement would be that 2/3rds of the bottom was hinged (either there or one further up in the barrel), so that it could be flipped closed once inside. The taper of the barrel would keep the trap door from moving further than horizontal. Hmmm, gives new meaning to the old phrase, "Your turn in the barrel." 😉
-
A friend of mine made a scratch African Queen with a working steam engine to power the working model.
-
I've been making my own scale rope with the Syren Rope Rocket. Some 'ordinary' Gutermann poly thread bought in a sewing shop made good rope without much 'shine'. 'Don't know if it Gutermann "E", as there is no letter designation on the bobbin. The fuzz is minimal. Using Mettler ploy thread had less shine, but more fuzz (still less than cotton) - but 'flashing it off' by QUICKLY passing the line over an alcohol flame in an old fashion glass burner. 'Guess that might work for cotton scale rope. Poly rope needs 'tempering' 5-7 min. at 350 degrees as part of the manufacture, so you can save yourself trouble with quality scale line form either Ropes of Scale or Syren - both good suppliers.
-
Aha, we were looking at the "kit review", which did not go into any building. I did start a Build log of 'Busting' the Sergal kit, and couldn't find it again ... until I stumbled on "content you've started" the code for the link I copied to paste below: Now you can see what I started to do with the Sergal kit, and there are more photos of kit contents. Louie was helpful in his comments. Now I have to get the box off the shelf and look at the contents again. Johnny
-
G'day mate, (don't know if they say that in New Zealand) ... Ah yes, the GH build in limbo right now. That's because I'm preoccupied with restoring an aprox. 70 yr. old 1:100 model of the Gorch Fock (and going very slowly & carefully with it) - mostly because I needed to learn more about rigging in general, and clipper rigging specifically. There is value in this, even though I'm realizing the difficulties of working in a somewhat smaller scale. Hmmm, and there is also the 1:100 Billings Vasa (circa 1970) also in my queue. Then again, Louie da Fly did a much smaller Great Harry (1:150 scale?) and did an incredible job ... all depends on ones motor skills, patience and determination - as there are many fine examples of exquisite work on MSW. Too bad the castings are missing, as they add a lot to the Sergal GH kit. I take it that all the guns are there, which are more important, and the bits in the blue shrink wrapped castings holder can be re-created in other materials with some fiddling. As noted in what was in the log, the cannons seem to be about 1:88 scale, versus about a 1:65 for the hull. I did not want to build the hull provided because 1.) it IS a bit large and would need very large case, and 2.) the smaller scale cannons peeking out of that big hull just wouldn't look right ... seriously, Henry didn't arm his ship with 'pop guns'. I did a lot of work re-scaling and making a 1:88 set of bulkheads plus intermediate decks. I did not like the way Sergal "interpreted" the fore and stern castles, so I re-designed those. I'll put on my 'to do' list making drawings (on a grid) of the revised1:88 bulkhead set for the GH, so anyone on MSW who wants to do a scratch build can screen capture the photos to be posted and print them. Scanning the big poster just can't be done - its a monster, but still attractive. I did not see any tubes in the kit, but will have another look just to be sure I didn't miss anything. For a mid 70s kit without the benefit of the Mary Rose recovery, it IS impressive - and I think still worth salvage ... you did such a good job on the L'Astrobabe. And indeed, one can still build the Sergal GH kit as provided (the frames are well done and fit OK) to make a REALLY impressive 'big model' - even with the inaccuracies in the castles. But the top structures on the stern can be omitted, and the forecastle modified somewhat to make the result closer to the Anthony Roll, and contemporary artist's interpretations of it - in light of recent archeology on the Mary Rose. The GH was her 'big brother'.
-
The solution seems evident, as form follows function. FIRST, one has to climb the futtock shrouds to reach the top mast shrouds mounted on the side of the top. You can just make out the ratlines on the futtock shrouds on the second picture, and this is almost universally the way to gain access to the next set of shrouds with ratlines (or horizontal bars, in this case). So one should use solid bars on the Endurance shrouds, but the ratlines on the futtock shrouds below have the characteristic 'sag' of rope ratlines (a small detail to note). SECOND, the man will move to the other side of the topmast shrouds (the inner face) - which one would do to stand on the top. It looks like there is a larger space between the decking on the top and the first climbing bar - so perhaps this is meant to pass under before climbing the inside. THIRD, one climbs up as far as the bars go (heres comes the tricky part, but not so hard for an able bodied seaman) then transfer to the climbing bars going up from the back of the top. This leads to the access door on the crow's nest (presumably hinged and secured with a latch - and opens inward), which is on the aft side of the crow's nest ... since it secured to the back of the top mast.
-
Hello from Leicester, England
Snug Harbor Johnny replied to Nica21's topic in New member Introductions
If you don't mind my two cents worth, the quality of work on the model you inherited is high - and it has the appearance (with little more to do) of an Admiralty Model. Adding gun ports lids (hinge kits are available from Syren) could be done. Not sure, but you might fashion basic wooden gun mounts (no detailing required) to hold cannon barrels or half-barrels that could be put into the side gunports from the outside with long tweezers. A dab of wood glue before positioning, when cured, would hold them well enough. Add channels with just the lower deadeyes with chainplate, a stub mainmast and bowsprit, detailed guns for the weather deck and a few other finishing details ... and you'd have something impressive to make a case for. Or, simply encase the models as-is. -
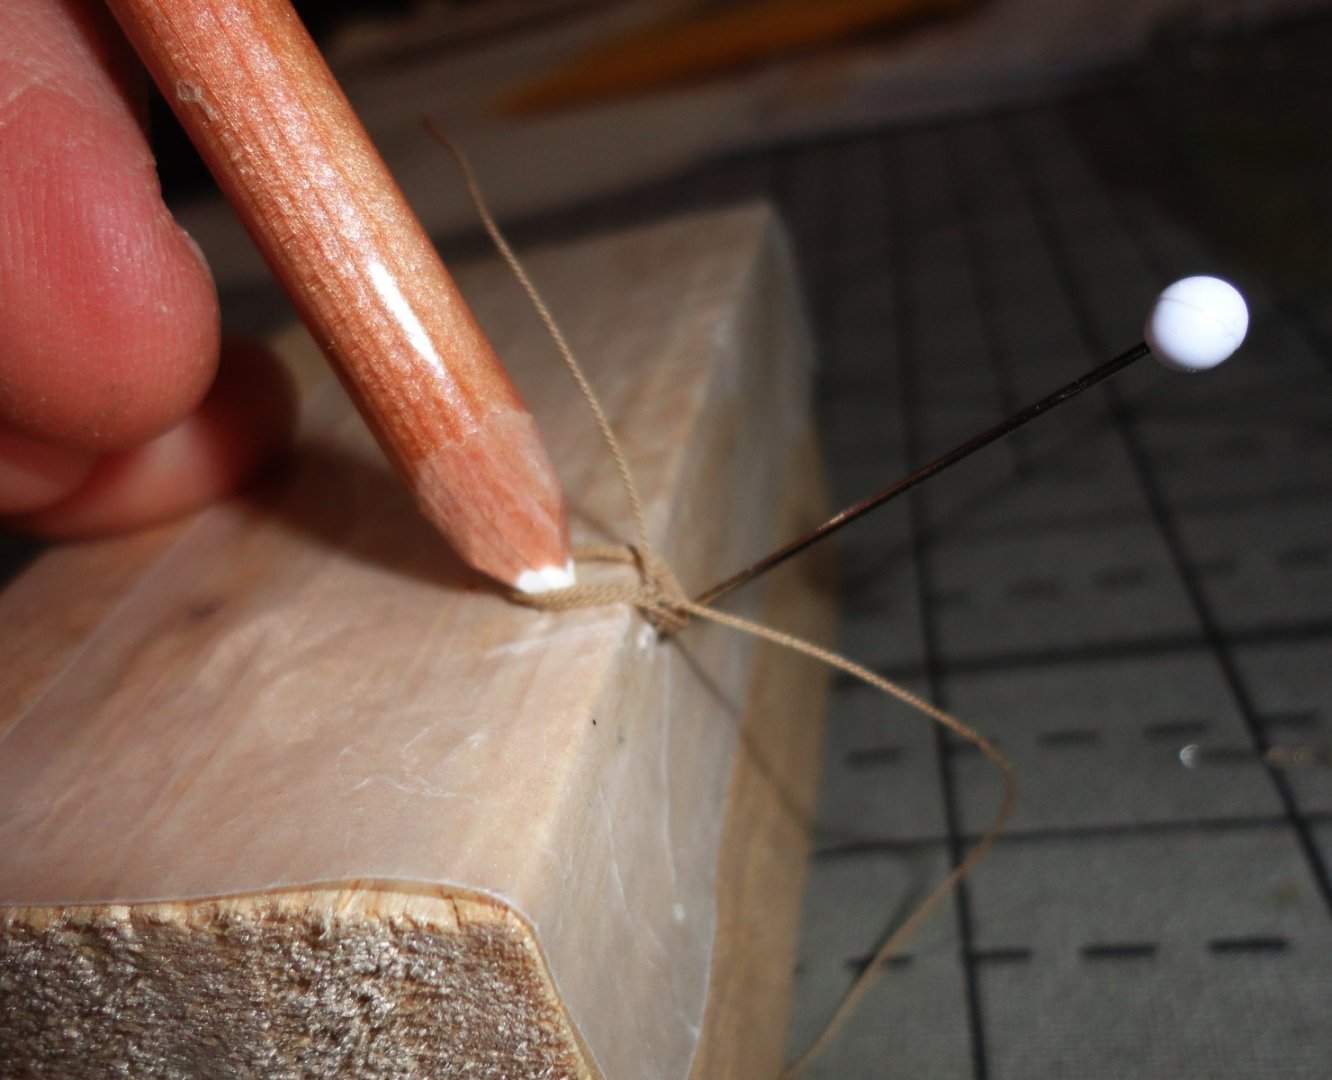
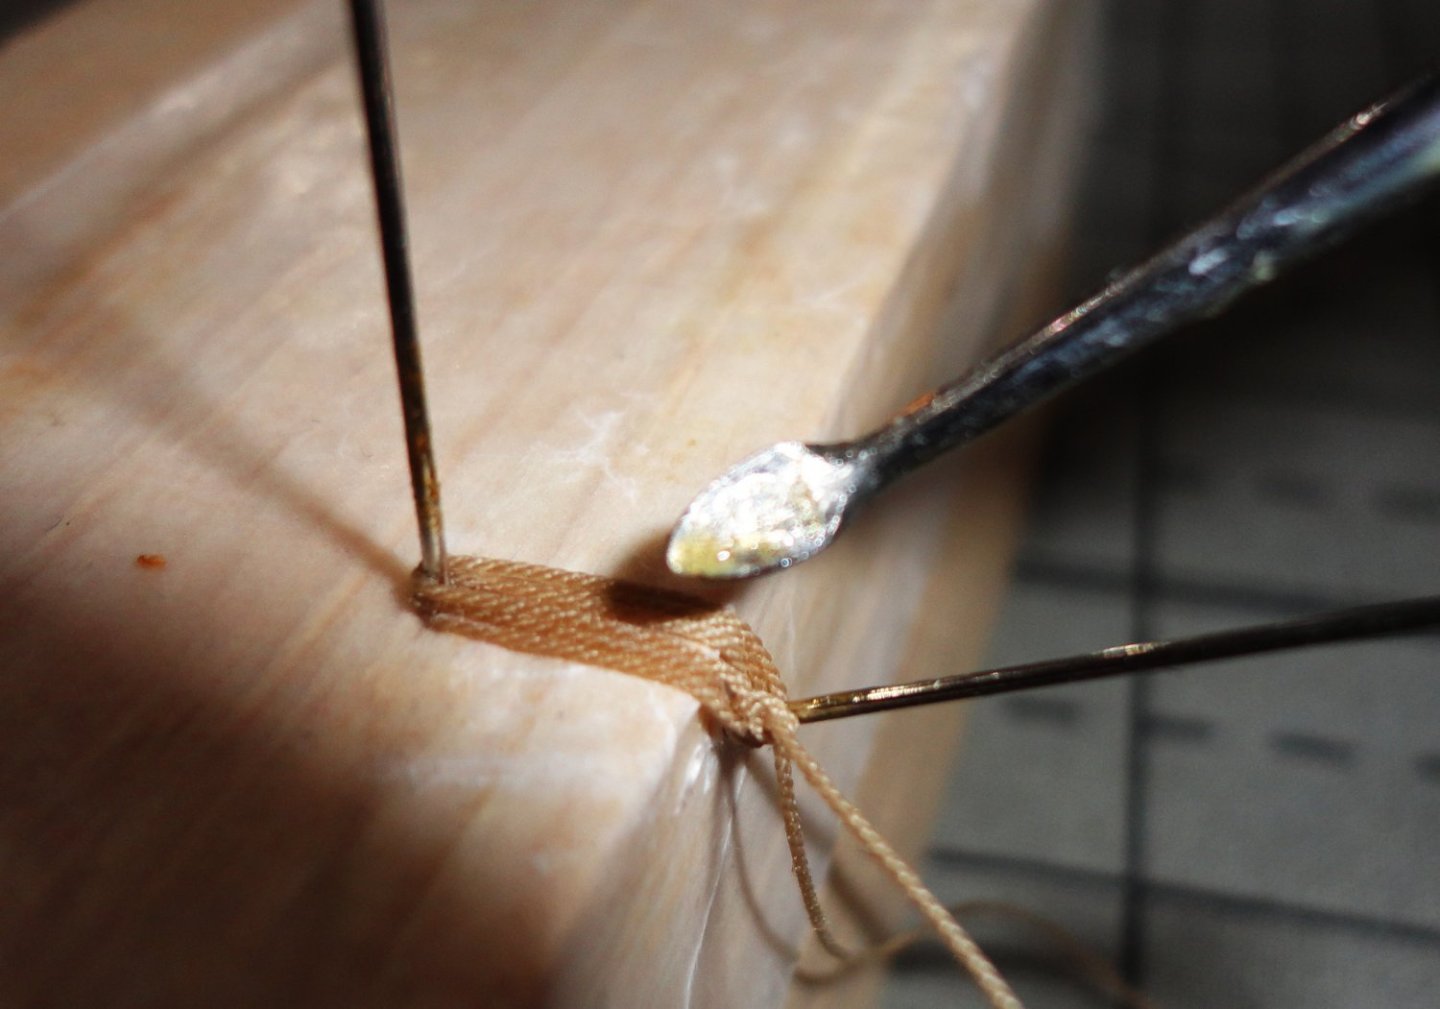
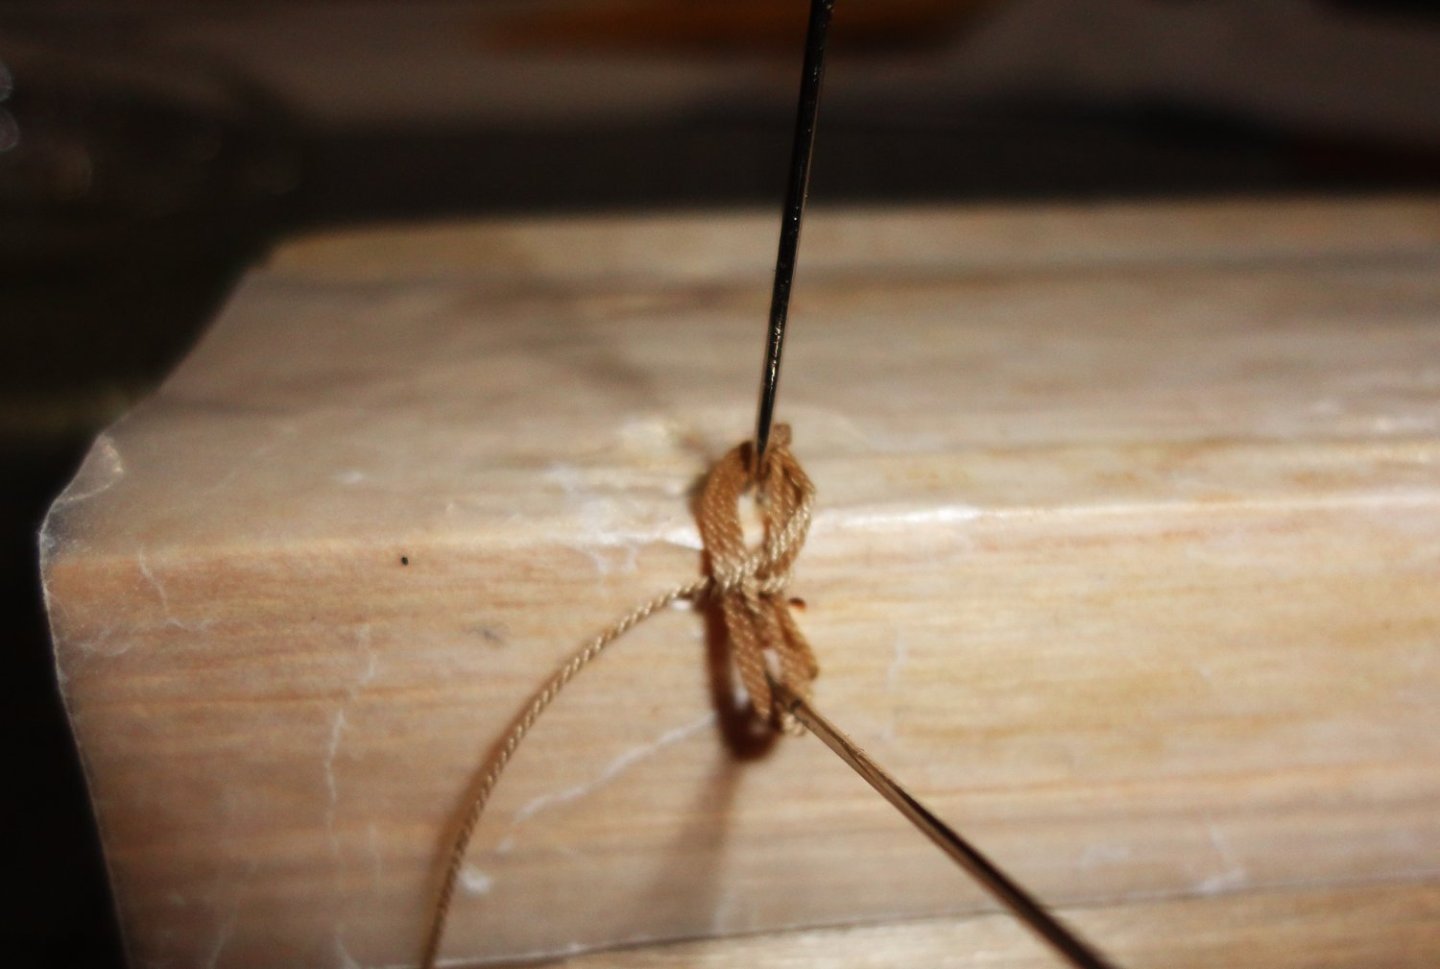
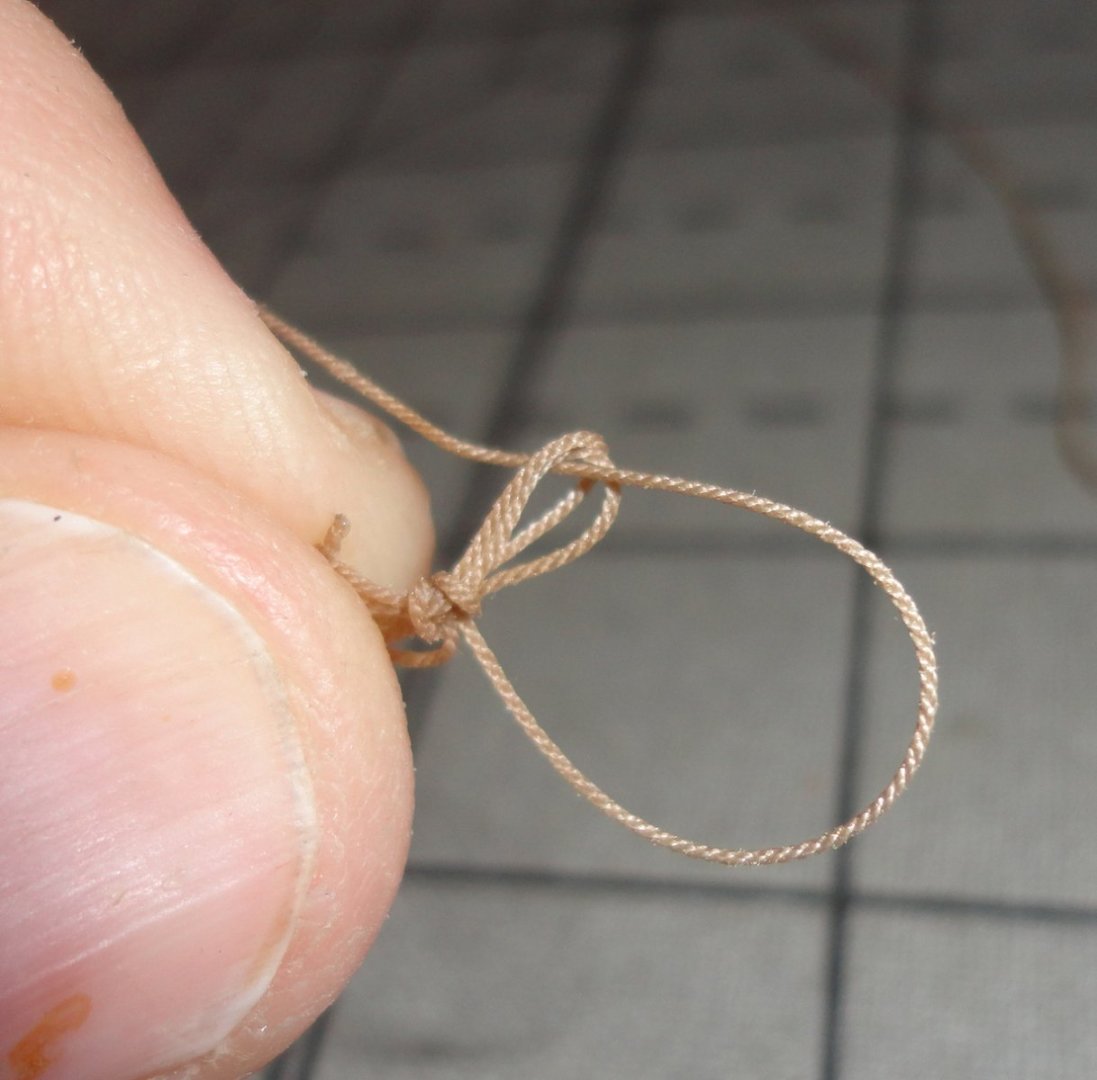
OK, the first attempt wasn't too bad, but it didn't want to 'behave' ... that is, the coil of line needs to bend over the pin rail and hang down. But at 1:100, the scale rope I made doesn't do that readily on its own, and I had to manually bend it repeatedly to try and force it. The hank needs to be tied better. So I started to develop a better process (since I have to make a whole bunch of these). First, a word on my limited camera skills. I found that I could improve the look and eliminate unwanted parts of the field by using s few basic editing options in the Admiral's Photoshop. Now THAT program is a 'monster', and I'm not claiming any facility with it ... and there are most likely easier photo editing tools. Yet ... I plug the hand-me-down camera into the computer, then drag the photos onto the desktop (then unplug the camera). In Photoshop, it is FILE - open (desktop), then select an item. The 'crop' tool takes away anything unwanted. Then its IMAGE - adjustments - brightness/contrast, and the bars are moved around until it looks better. The file is saved as a jpeg, then closed. That's all there is to it. (Speaking of the Admiral, my first week off in months had me trying to knock things off the 'honey-do' list, plus yard cleaning ...) Since the challenge is to have the hank 'bend' naturally on the pin rail, I decided to make the hank over the edge of a piece of balsa. Now I used kid's glue stick to fasten a piece of wax paper over the edge of a balsa block, so the hank won't stick to the block when a little CA is applied to 'set' the bend i want into the hank. Remember, this is 1:100 and its small work for me. In the photo below, the scale rope is wrapped thrice around a fat pencil (.300 dia.) and tied with a square knot. the point of the pencil is placed near the edge of the prepared block. BTW, I just love the look of the scale rope. Next (so the coils don't unwind), a pin is used to drag the tied end over the edge of the block. (Note that this is the top end of the coil - the part to go over the pin - that is over the edge of the block ... I suppose I could just as easily do it the other way round to keep it straight in my mind.) The chalk pencil tip still retains the other end. Then another pin is put in to secure the other end of the hank so the pencil can be removed. The hank is now bent as desired. A dental tool is used to apply just a bit of thin CA, which will wick into the rope to 'set' the bend. If too much is used, it will also wick down the hank in both directions ... making the hank too stiff (as I learned). Touching with accelerator hastens curing.) Still working on a method, I flipped the cured hank around to figure out how to tie it. Hank tied experimentally. Not really that good, yet. The first line was loosely coiled and secured from tangling with a short piece of 'keep tie' ... as these are made for rigging lines that will be routed UP to wherever they are going on the mast. I intend to simply let then hang over the gunwale for the time being. Like what the mate yelled to the seasick landlubber , "Over the gunn'l man, OVER THE GUNN'L !" My second hank (with a 'set' bend) was easier to seat on the pin that pinches the next line securely. I tugged it to test, and it didn't budge. OK, now to improve the process further. The 3 loop hank look s little trimmer than the 4 loop hank on the left (above), but there is another consideration - different lines will have different amounts on the hank (excess coiled rope hung over the pin) depending on how the ship is portrayed. E.g., under sail the bunt lines will be fully extended, so their remaining coils will have only a little line left. But If the sails are furled, the bunt lines will be hauled-in - so the respective coils will be larger when hung on the proper pin. The coils for sheets, clew lines, halyards, etc. will all vary depending on how the sails (or lack of sails) and yards appear on the model. Likely, most observers won't notice this, and since I'm trying to 'simplify' things on this restoration in the spirit of 'K.I.S.S.' (Keep It Simple, Stupid), I might just make them all the same ... or not. It's just a matter of how far one wants to go into the 'rabbit hole'. I just knew that rigging would end-up being the most involved (as well as time consuming). Take contemporary kits with laser cut parts. It's relatively straightforward to assemble the bulkheads, fair, then start first planking. Even getting through second planking and decking, there are many builds that go that far. NOW comes the task of fitting out (o-m-gosh, cannon and gunports), railings, equipment, mast & yards, then a myriad of 'fiddly bits'. This is a good reason to LIMIT what kind of 'stash' one has in unbuilt kits. To make the coil have a more rounded look on the ends, the pins used in forming will be replaced by toothpick ends, and CA will only be applied to the 'bend'. The gathering tie needs work. Below shows the next coil on the block with toothpicks, which were easily pushed into the balsa. You can see how small these coils are, as the toothpicks look like telephone poles in comparison. This time I'll try a cow hitch around the middle, with a touch of CA to secure it. The free end was just put through the lower loop (below), but may be better off passed through the cow hitch before tightening. With the third line mounted, the coil is looking better. Now there are multiple posts showing ways to make coils to hang over belaying pins, but I've included this method to give another option, as I have not seen it used elsewhere. Smooth sailing to all ! Johnny


-
A swell job, for sure ... nicely done & deserving of a case !
-
'Looks like a good scale to work with, with small items easier to handle than at 1:100 or thereabouts. (EDIT) Taking another close look at the review and photos, the thought going into the design and contents really shows. About the only upgrade I might opt for would be turned (3D) brass belaying pins, which are readily available in the aftermarket. The blocks and rigging rope appear better than average, with Syren blocks & line still an option. I'd highly recommend the Sherbourne as a project to do BEFORE tackling a Vasa, Sovereign of the Seas, or Victory.
- 9 replies
-
- 5
-

-
- vanguard models
- cutter
- (and 1 more)
-
You're right, Dave, about the solvent for a plastic 'melting' (dissolving) the material ... actually, a small amount of appropriate plastic glue (solvent) is absorbed in to the parent material to make it gooey. Mating surfaces together 'welds' them as the solvent both migrates AND out-gasses (vaporizes), leaving behind a fused joint - not unlike welding two pieces of steel together (but that is done with heat, not a solvent). An engineer friend of mine once put some solvent for ABS plastic in a glass bottle, then dropped in a chunk of ABS. The next day, the plastic was completely dissolved in the solvent, but leaving the top off let solvent progressively vaporize until the mixture was a gooey glue ... and eventually only solid ABS was left in the bottom of the bottle ! Different plastic have different solvents. So, to undo a glued plastic joint, one could cut it free - or in some cases use a thin cutting wheel on a Dremel to cut along the join line. After modifications, the parts can be re-glued. There is some material loss with the cutting process, which can also be adjusted for.
-
Chopper Lesson Learned
Snug Harbor Johnny replied to Todd Hart's topic in Modeling tools and Workshop Equipment
Having a very sharp steel blade is key. I'm talking about 'razor sharp', which really needs a sharpening jig to get the right angle on the water stones used ... and also a final 2 degree finer bevel at the very edge - then stropped. The process starts with being sure the back face is truly FLAT. -
'Always wondered if deck planks were all supplied in exactly (or with a little over nominal for trimming) the same length ... so that there would be an EXACT staggered pattern with the next board joint being in the middle of neighboring planks. I might prefer more of a herringbone effect, but suspect that there was some randomization in planking stock lengths, as well as the need to cut some short to get around drying defects such as twist, bow and warp ... plus bad knots or splits. This would then result in a more random array of plank joints - although a joint must be centered on a support for fastening. As I recall, my Dad's 1:120 clipper model was planked with flat toothpicks and had such a random pattern to the joins.
-
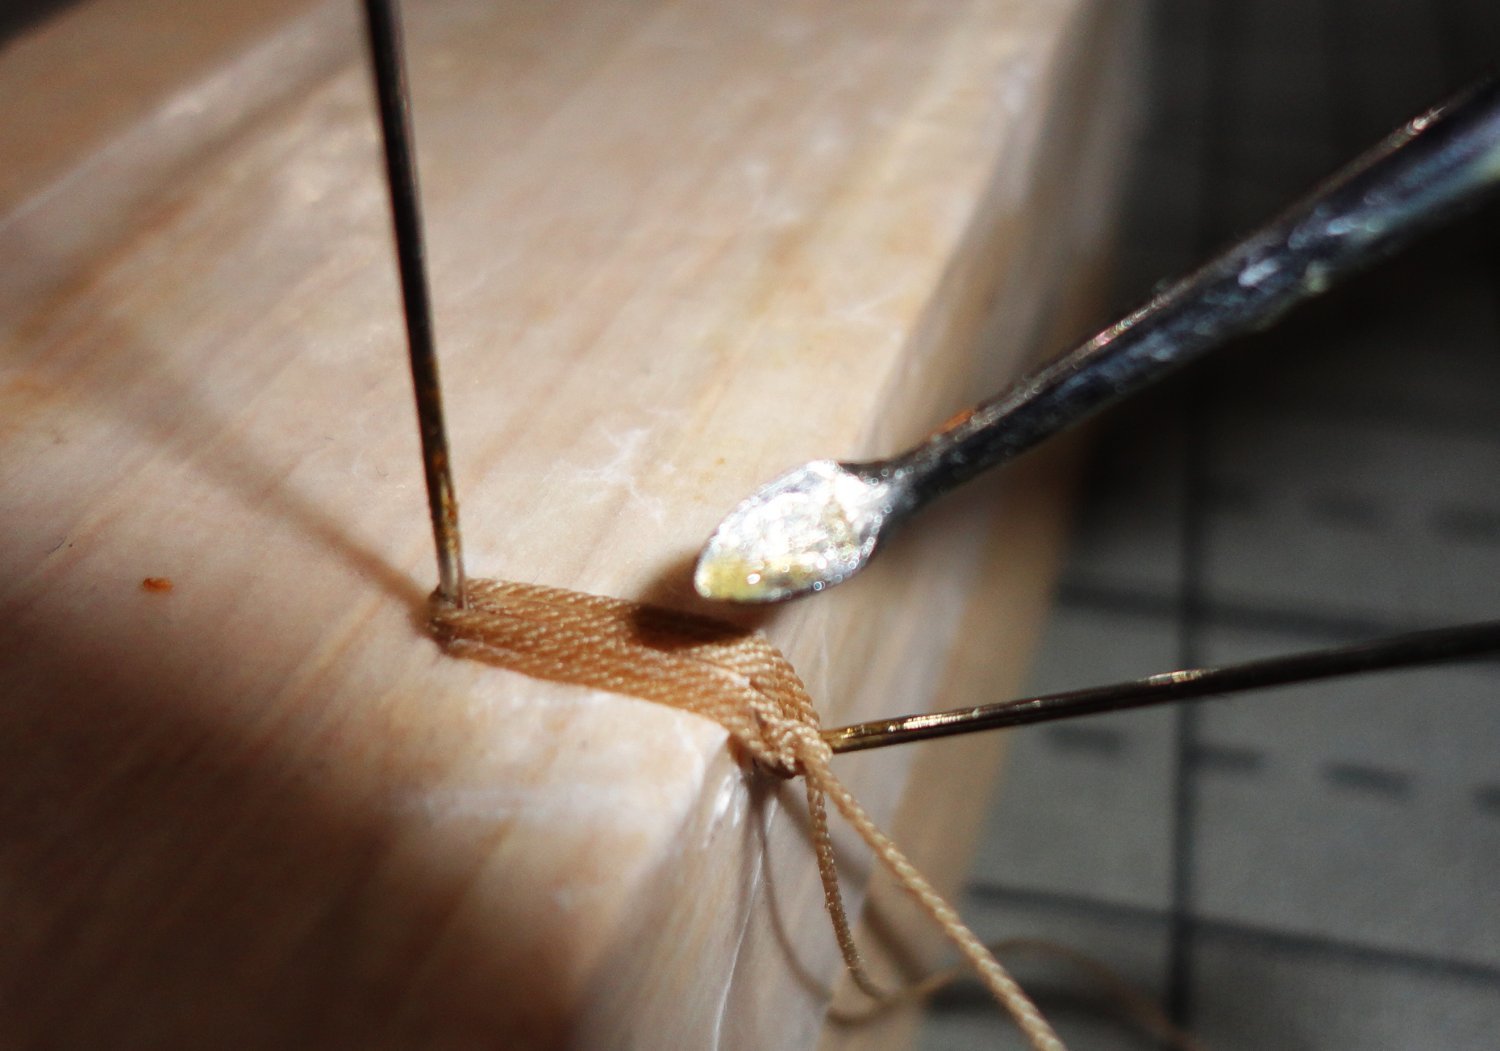
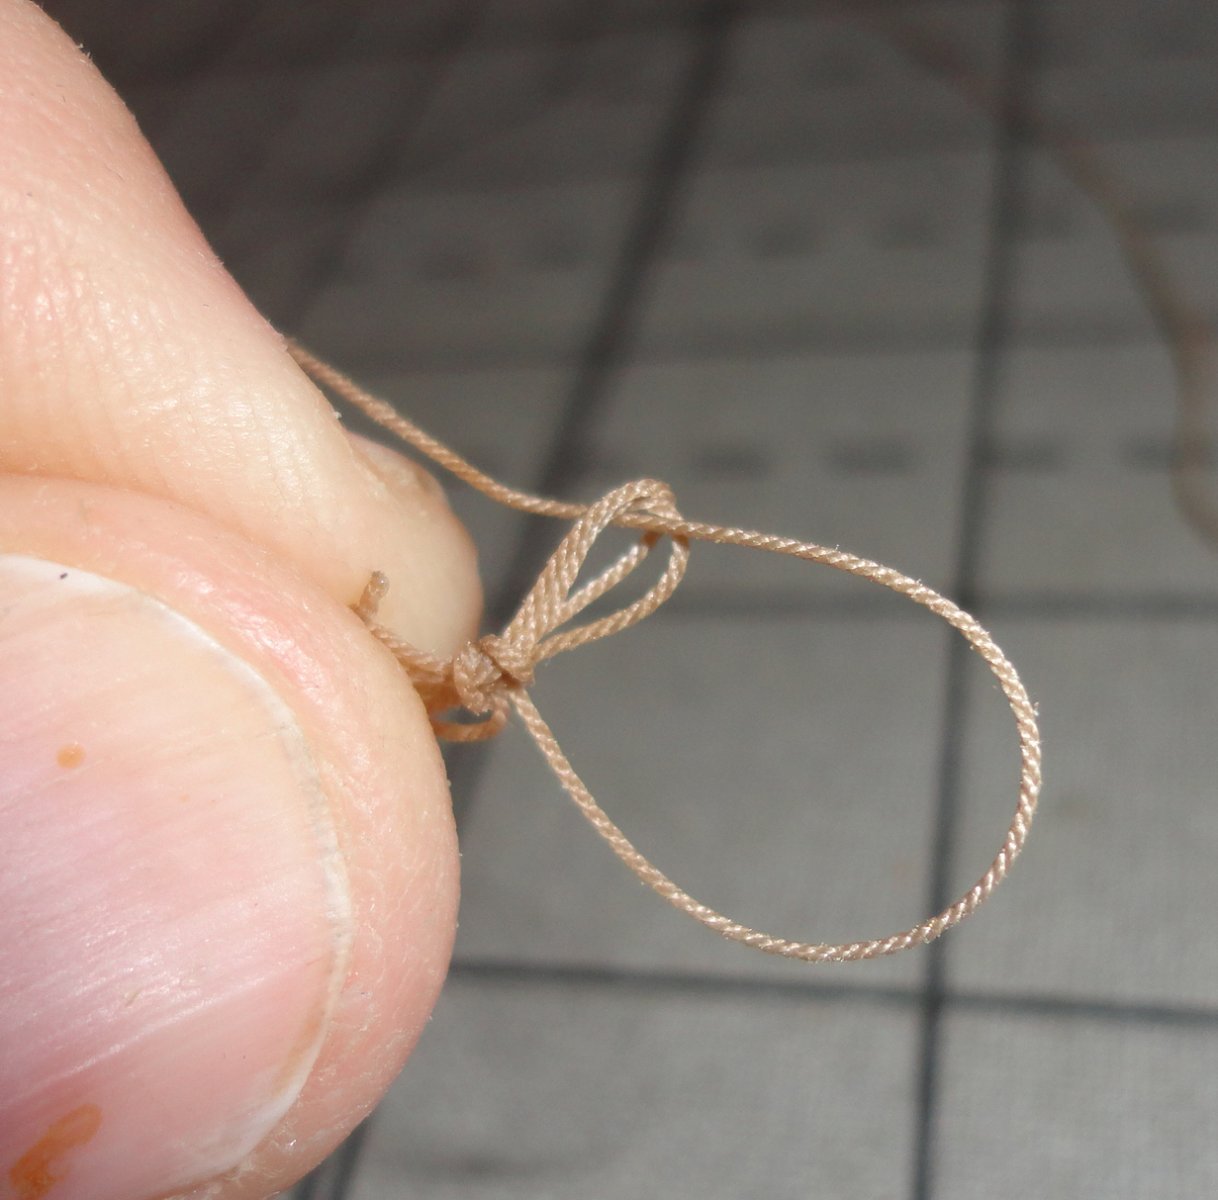
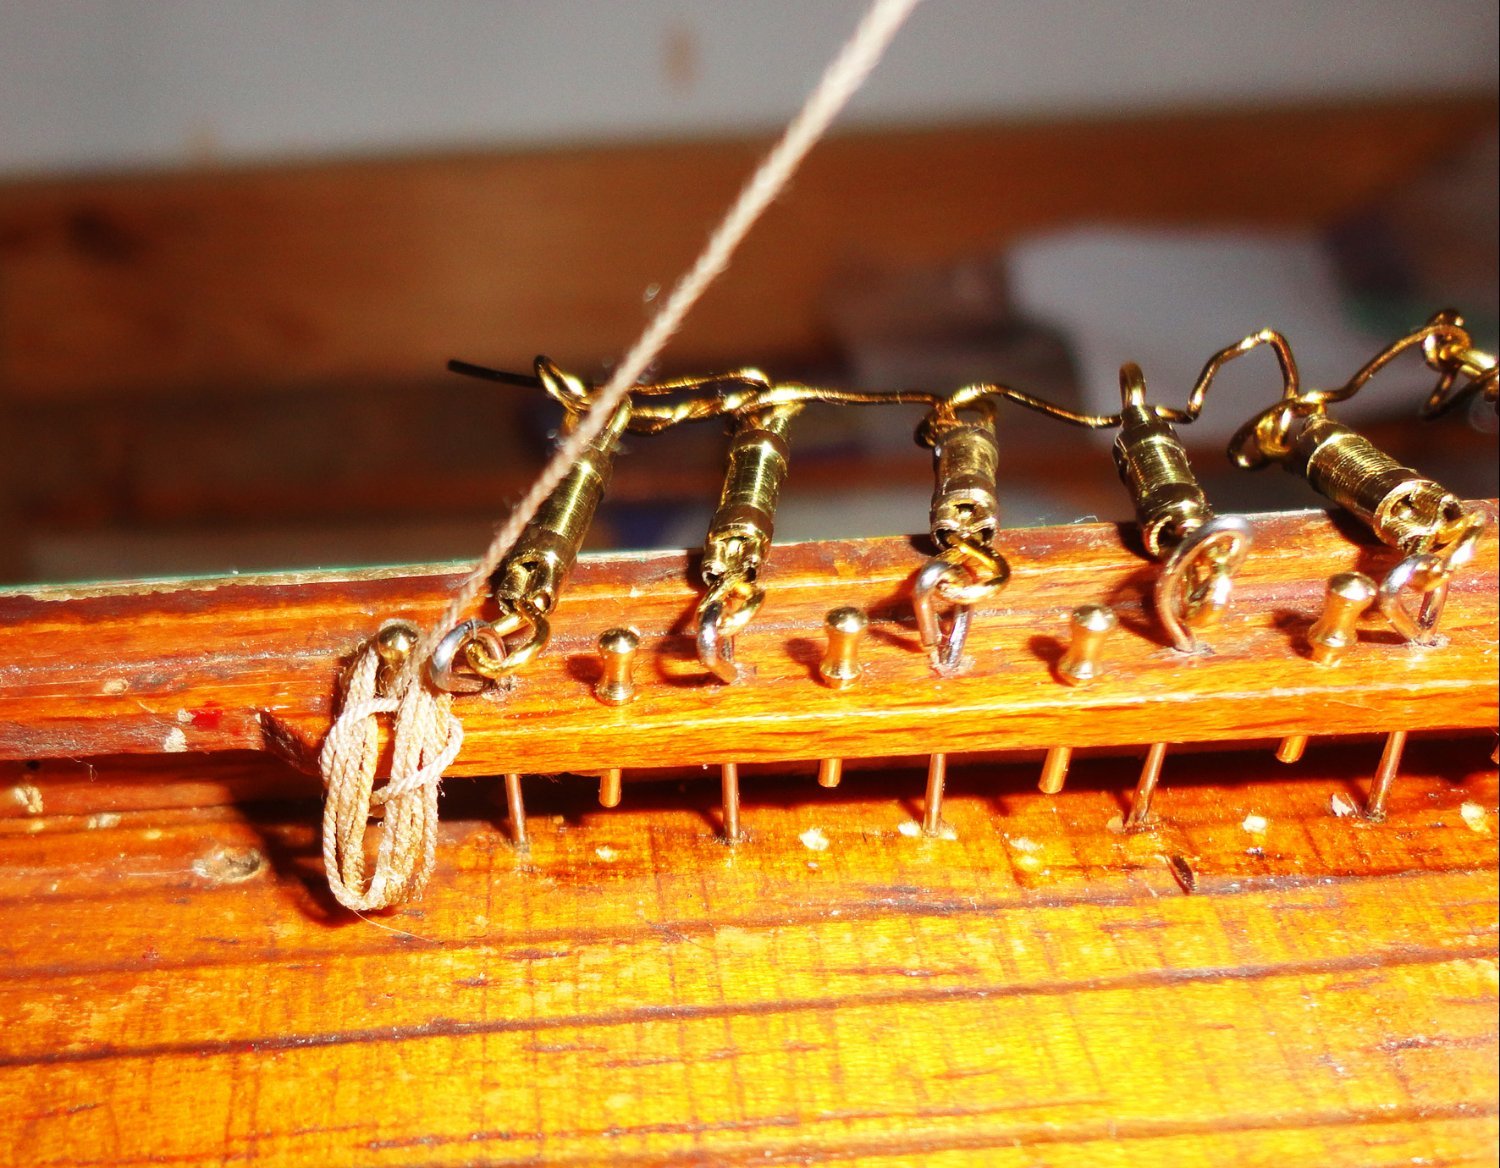
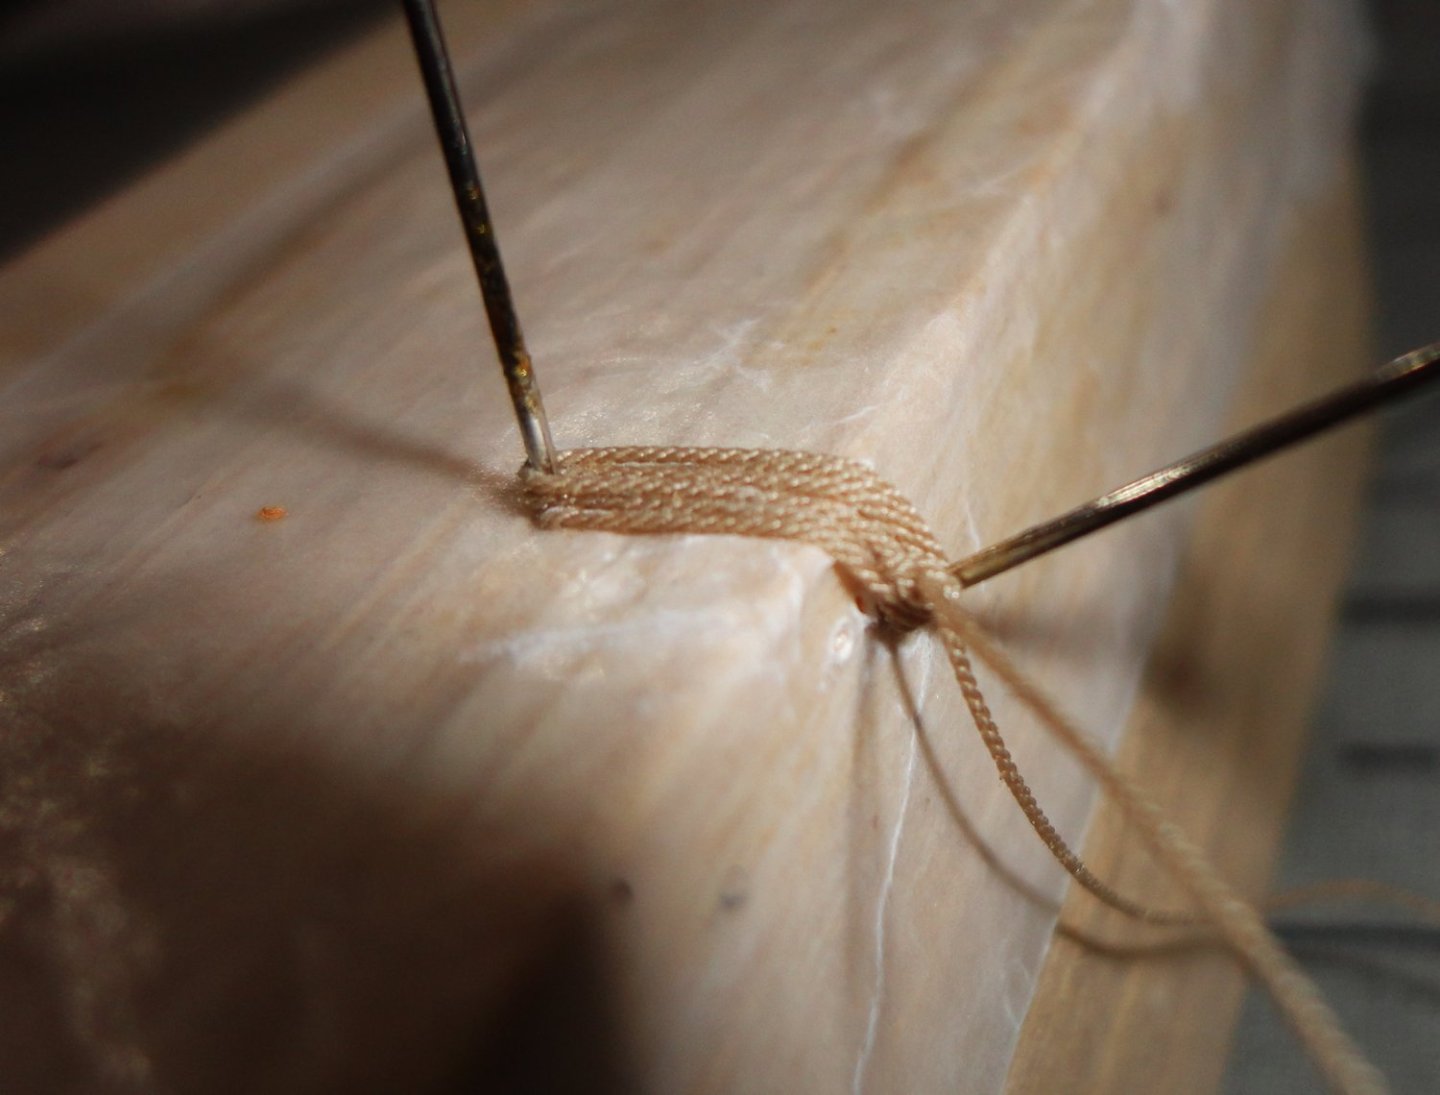
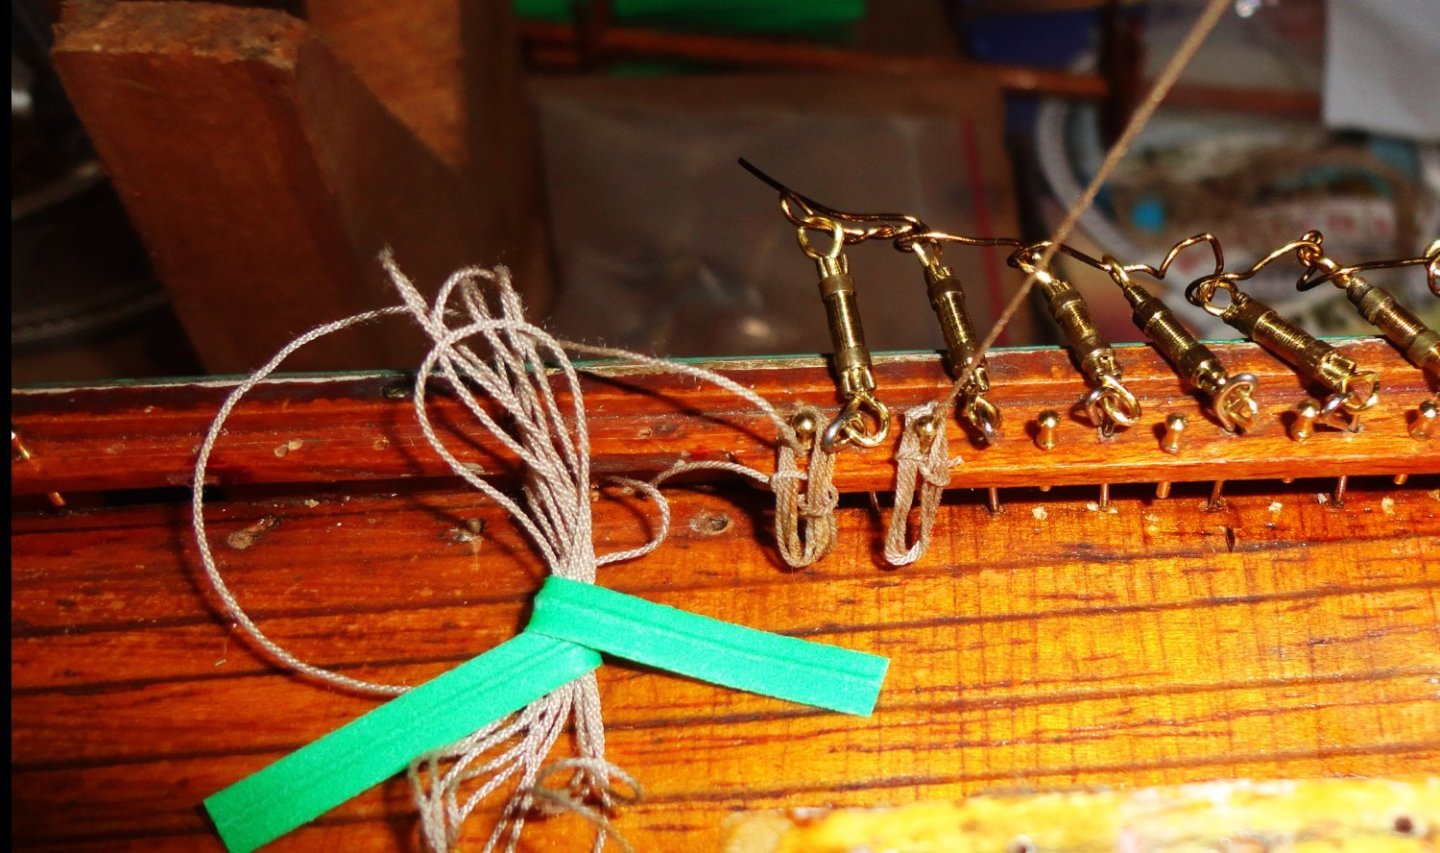
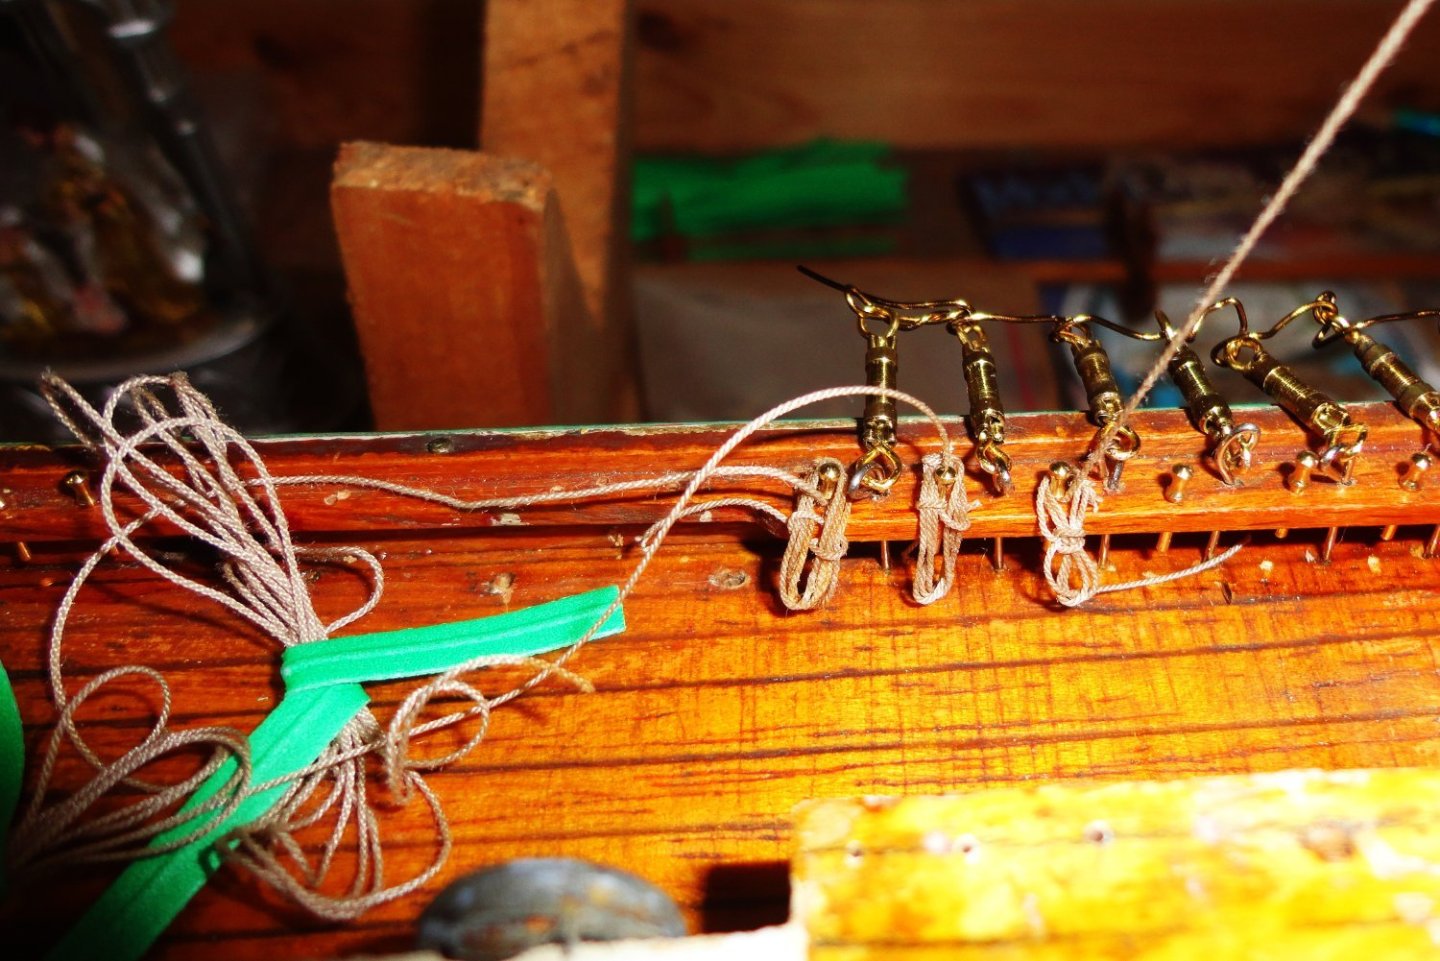
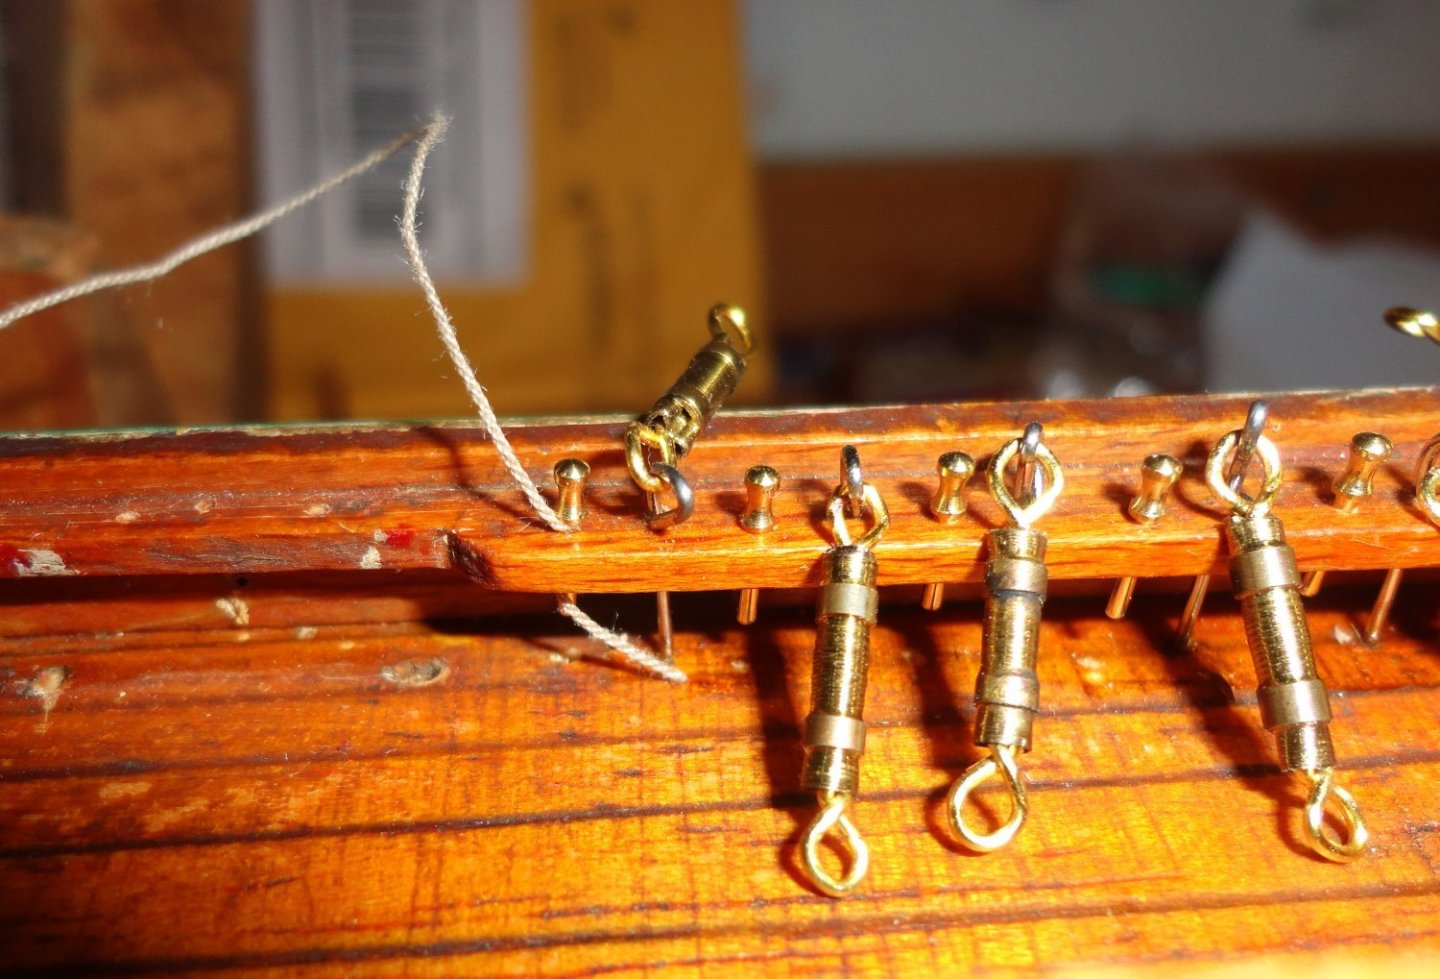
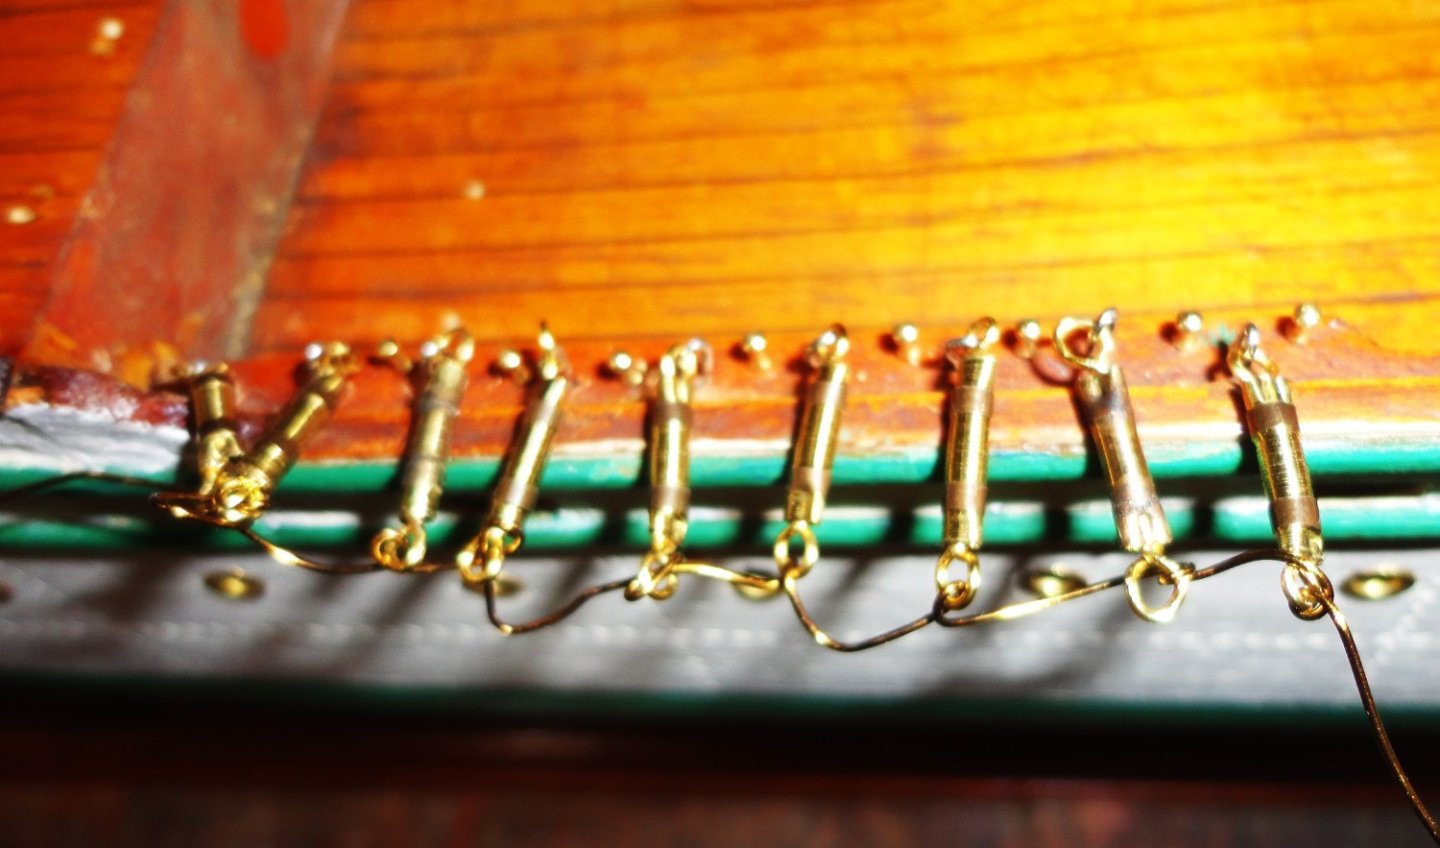
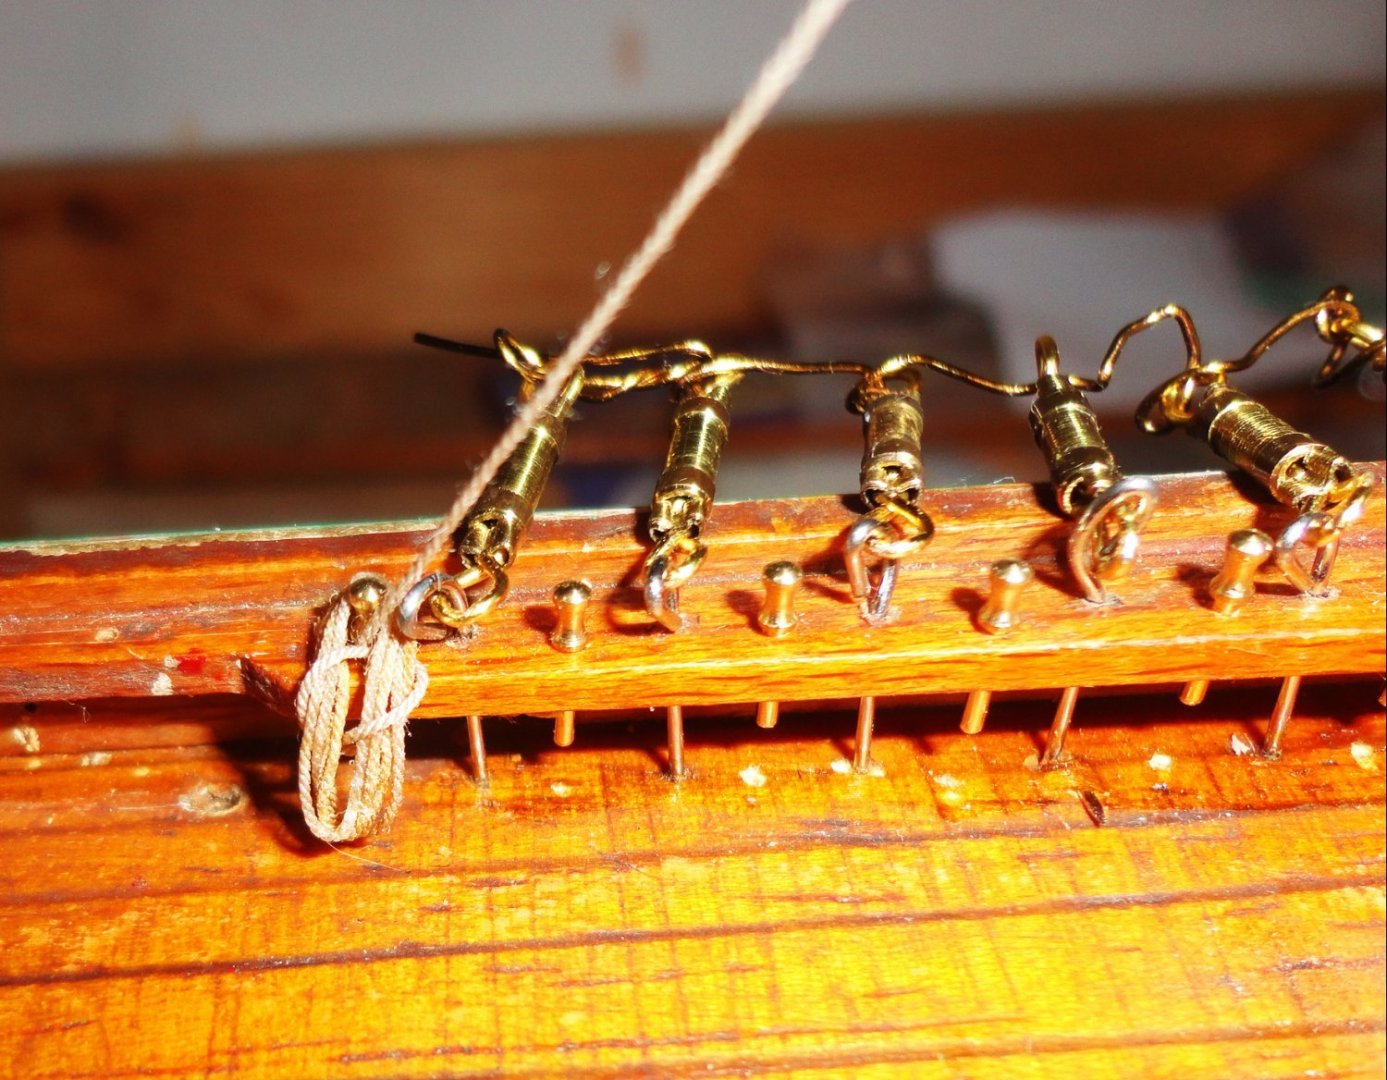
Ahoy ! What I thought would be a dull winter month turned out to be far busier than anticipated - a long story I'll just skip. Presently my project has been going at a snail's pace ... actually the snail would be faster. So with the complexities of even my 'simplified' rigging plans, the realization that 1:100 is a smaller scale for blocks, jackstays, etc. than I'd be better off with (God bless those nimble enough with tiny things) - and the coming growing season, I'll give myself the 'rest of the year' for the restoration of GF. Its nice just to look at in the shipyard and think about at other times anyway. Once done, it will deserve a case - then its hands off, then won't have to be fiddled with for a very long time. I found some Gutermann thread and made a sample ... sure enough, there was FAR less 'fuzz' - and the little that was there was needed magnification to see. So I'll use that from now on with the Rope Rocket, and remember to oven temper as noted in a prior post. There should be no need for the 'flame treatment' for rope made with the other brand of thread (with fuzz). The rope made from Mettler poly thread did not unravel when cut after tempering, and I expect the same from Gutermann poly. I'm not going to trash any line made thus far, even if it has some fuzz left. 'Tried belaying some rope on a brass pin in one of the pin rails - and this proved to be more difficult than I thought: a.) the pin rail is thicker than it would be in-scale, b.) the pin has to be a far enough in from the edge not to risk splitting the wooden rail - so that relationship is a bit out of scale, c.) the space is a little tight at 1:100 . The stuff that has to go on the deck will only make space tighter still in many areas, and that was the reason to pre-mount the turnbuckles - as well as pre-belaying many lines, then threading UP through the masting to their destinations. It will require that enough line is provided, since splicing thin scale rope would be a feat indeed. A properly done long splice of running lines will still run through full-size blocks, but I can forget splicing line that is only .012" in dimeter. So the fallback is to pass the end of the line through the hole for a belaying pin, then insert the pin to 'pinch' the line in place. This has turned up recently on a clipper post, but has been done before on other builds. FIRST, the pin needs to fit the hole on the snug side to begin with - so it won't slide out ... ergo the right miniature drill bit must be used. Some of my pins were just a tad loose, so some shellac was applied (which 'wicked' into the gap). Once dry, the brass pin was twisted - metal does not bond to the shellac that has soaked into the wood (although metal surfaces can be coated with shellac). Then the pin will come straight out, and it can be slid back in with a perfect fit. Rope made from polyester thread has a little 'give' to it (also a little 'stretch' - not that we're tensioning anything on the model, since that would just bend other thin elements). So when the pin is inserted, the poly line is compressed ... tugging on the line showed me that it won't come loose. The picture below show my test line, but the loose turnbuckles need to be wired together to keep then mostly out of the way - since the shrouds won't be added until much later. The next pic shows a group of turnbuckles wired with beaders' wire, which is quite pliable. Once a line is pinned - and this is reversible, should the line need to have any slack taken up - a test coil was made by: a.) wrapping line around a round pencil and tying, b.) stretching between 2 pins to make an oval, c.) applying a small amount of thin CA to stiffen the oblong coil. The test coil has 4 loops, and I think 3 might work out a little better - the middle could be bound tighter. (picture below)
-
I'd had some luck on geometry like that by 'nearly' boiling (starting to bubble) some water, then (off the stove) soaking the end into the hot water (not too long) and carefully pre-bending / forming around a similar curve ... even using my teeth a little (one can 'feel' when the wood wants to crack before it breaks, but the pressure can be quickly modulated in response). A couple of go's might do it, and the wood is mostly dried before gluing. With water-based glues, the wood does not have to be completely 'bone dry', and the glue will work all the same. Whatever works ...
-
'Love your working drawings !
-
You can have a certain wood that works pretty good, yet another batch (or age) of the same wood may not work nearly so well - or poorly. This depends on how the grain runs (thus how thoughtfully it was cut), the quality of the stock and storage conditions. In short, if provided wood works OK, go ahead. If not - try something else. Maybe its like a choice of wine - and there was a TV cooking show about Louisiana cuisine hosted by a good-ole boy Justin Wilson, and he used to say, "Some people axe me what kinda wine you drink with dis here food. And I tell 'em, whatever wine you get hold of."
-
Ahoy Noel, (Sorry for my delay in response) Indeed, the Imai 1:120 CS was marketed under the Monogram label (the one I bought on EBAY) and also Aoshima (as noted in the title of this kit review - see also the picture of the box top). 'Can't recall where the seller was located, but the 1:150 Academy version I bought for inspection came from Japan. So far I've bought things from around the world, but as long as it was through EBAY there were no problems. Buying directly from Artsania Latina (or any well-known manufacturer) is also just fine. It's only international direct sales from an individual (or Ali Baba) where you start taking risks. But I digress - the 1:120 Cutty Sark kit is indeed worth getting, as it is not so large as the 1:96 Revell - nor as small as the Academy 1:150 or even the 1:168 Airfix 'classic' CS (discussed elsewhere). They are just too small to get into much detail (although some have the incredible skill it takes to do so). As for the 1:300 scale version found in toy stores or Hobby Lobby ... forget it. The things the 1:120 kit does NOT have are blocks. The instructions only show rudimentary 'simplified' rigging, when in fact there is a lot you can do with or without sails by consulting other sources (e.g. the companion book to the Airfix CS 'Cutty Sark Classic Ships Their History and how to model them' Noel C. L. Hackney 1974. What a compendium for any level of pretty authentic rigging for the CS or late clipper - if you have the patience to navigate through it and study. It shows an actual model - a fine miniature - at 1:168, so imagine what one can do at a more generous 1:120 !) If one does not want to struggle rigging scale deadeyes, the molded shroud sets in the 1:120 kit are better than average since the ratlines have 'sag' built into them. One can also rig true deadeyes (and blocks) that are 1:96 scale and get away with it, which you really can't do in smaller scales. Iis up to the modeler just how far 'into the weeds' one will go. Now I recall that there was an uncommon 1:96 Thermopylae kit from Japan where the hull was plank on frame, but the deck upwards was plastic. Now that I have the idea of combining the 1:120 Scientific wood Thermopylae with parts from the 1:120 CS, it becomes obvious why a 1:96 version combining wood and plastic came about. The cost of making a large hull mold for injection molding was too expensive for the low production imagined. Gosh, the details about said kit escape me now, but I suppose if I'm that curious I can retrace my investigations.
-
Just an update note ... rigging at 1:96 (I use 1:100 to figure block sizes easier, e.g. an 8"block is about 200mm - so that would be 2mm on the model, dividing by 100, that is). Now I have some 2mm blocks, and they are DARNED hard for my hands to deal with. So sizing blocks up to 50% out of scale might fly - and the 3mm molded blocks in the Revell 1:96 kits suffice. Looking at 1:120 (definitely a size smaller), my thoughts are to use beads like my father did at that scale. I found some bronze-brown Czech 'demi round' beads that look pretty good as blocks (compared to ordinary round beads) in 2, 3 & 4mm - representing 6" (30% oversize), 8" (50% oversize) & 12" (50% oversize) at 1:100, respectively. The 2mm beads at 1:120 would only be 20% oversize for 8"blocks - definitely close enough. The 3mm at 1:120 would be 43% oversize for a 10" block or deadeye ... but I suppose that the 4mm would be OK for the hearts, and perhaps passable as the largest deadeyes - with the 3mm as backstay deadeyes and topmast deadeyes (saving the 2mm for topgallant mast deadeyes). One has to choose one's battles carefully. ALL the Scientific clipper kits are about 1:20 scale. This includes their "best" kit - the Thermopylae. I've seen that listed as a larger scale model, but DON'T believe it. Just to be absolutely sure, I bought one on EBAY for $99 (the hull barely started, with nothing not correctable). Sure enough, its a 1:120 kit. What makes it stand out from the other clippers in the line are three big drawings (compared to single sheets in the other kits) that go into much better detail - including rigging. Now they intended the kit to be equipped with sails, and they omitted some key lines to make the kits easier to build ... and much of the omitted lines would be blocked by the sails - specifically clew lines and sheets. Halyards for the yards having them would just run down the back of the masts, so they are omitted also - as well as reef tackle and downhauls. (There are no jackstays shown.) The drawings DO go into detail for all the braces, bunt lines and leech lines - and how to rout them to specific belay points (modified for the purposes of this model) They show in and outhaul lines for the jibs (and their sheets), but no hauling lines for staysails (yet that can be copied from what is shown for the jibs. The rigging for the spanker seems detailed enough - as well as the shrouds, forestays and backstays. The effect will be to present many lines that are most visible for a ship under sail. With some additional source material, one could omit the sails and add some lines for a decent enough 'harbor rig'. Railings still have to be hand-made, but I suppose there are aftermarket stanchions or PE that might help in that area. There is a multi-page instruction book with more illustrations that beats, by far, the relatively scant instructions in the other kits Scientific made. There are also more fittings provided - including a nice metal casting of King Leonidas for the figurehead. A challenge from a modeling standpoint would be the same presented doing the cabins and some other details as noted on Popeye the Sailors MSW build of the 1:124 Sergal Thermopylae. Things get tiny at scales smaller than 1:100 - and they are tiny enough even then! Note to self: now that I have this Thermie kit, do a review with photos on the forum. Now an idea hits me ... that the cabins and many small details so well done on the 1:120 IMAI Cutty Sark would work on the 1:120 Scientific Thermie - another case of 'borrowing' stuff from one kit to use on another ... like lifeboats, davits, winches, etc. The idea will take some time to hatch.