

Gregory
-
Posts
3,175 -
Joined
-
Last visited
Content Type
Profiles
Forums
Gallery
Events
Everything posted by Gregory
-
Here are the Chapman Drawings The description is Pleasure boat or Yacht. No mention of Dutch, so that was my mistake.

-
The plans are based on a Chapman drawing of a dutch pleasure yacht.. I'll post a picture later.. Something to be aware of in that new Dusek version of the kit. The base for the cabin roof is too small. You will need to make a new one based on the plans..

-
 You seem to be familiar with spilling.. You might try this: Take a piece of masking tape and lay it lengthwise on a plank that is on the ship, preferably one that butts up against the stem. Trace the outline of the plank onto the tape. Lay the tape out flat, and you should see how the plank is bent.
 -
They didn't fit on the other side? 😄
-
They are having a sale right now. Great discounts on some kits, and free domestic shipping for a $75 order.. $49 flat rate for international orders.. I have to resist.. Too many kits on the shelf..
-
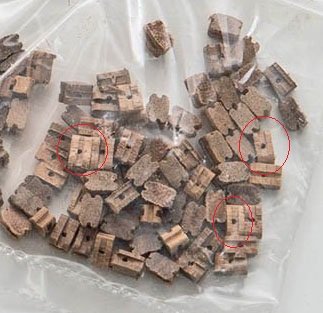
Making extremely tiny fittings
Gregory replied to BETAQDAVE's topic in Metal Work, Soldering and Metal Fittings
My thought would be to make one piece, then cut and shape after it is in place. More friendly than using two small pieces.
-
How to rig spider lines on Spanish ship Sn Felipe
Gregory replied to dnevin's topic in Masting, rigging and sails
Are you trying to set it up, on or off the ship? You might find it easier to set it up off the ship in a jig of some sort, then stiffen it a little with diluted white glue before setting up on the ship.. -
My point about sheave holes. You could finish them until the shape looks like Chuck's blocks, but the sheave hole in the middle blows the whole deal.
-
I tried one of those rock tumblers on the typical kit blocks, and it took over a week of tumbling just to knock the edges off. Still had to do some work to define the sheaves, and of course it was no help at all when the sheave holes were near the center like you find on so many of them. Syren came along, and i never looked back,,
-
I have seen other logs where the builders commented on what might be over sized cannon in the kit. Do the plans have a view of the cannon adjacent the gun ports?
-
What size is that ships wheel? Might be a good excuse to get one of Chuck's Ships Wheel kits.
-
The curve appears to me to be very subtle, unless this is a matter of the angle on this picture. Looking back at Chuck's build log, the curve is really hard to see until the molding is added.
-
Drilling holes with crisp edges in wood
Gregory replied to laps's topic in Modeling tools and Workshop Equipment
At the risk of sounding negative, how often do you really need a "crisp" hole that is not going to be covered by some type of framing, such as mast partners or other framing. At the least, any round hole would probably need some kind of beveling -
The frames have to be built up from the supplied strip wood.. There should be more wood than what is shown in the picture above. More like this:
-
FWIW the Mamoli Valient is totally fictitious.. It shares the same lines as two other Mamoli kits: Portsmouth and Blue Shadow, also fictitious apparently. Mamoli Has re-boxed a lot of kits ( in the past before Dusek took over the line ), changing details and giving them different names. For instance, their Surprise is a re-boxed La Glorie. I built the Blue Shadow a while back, and it made a pretty nice mantle piece until the cat sent it to Davey Jones locker..
-
Twisting blade on MicroMark saw?
Gregory replied to Rcboater Bill's topic in Modeling tools and Workshop Equipment
Here is a carbide tipped blade I have used with good success.. MTP 3 3/8 10mm arbor I don't think the Micromark blades are any better, and they cost 7 x as much.. -
Twisting blade on MicroMark saw?
Gregory replied to Rcboater Bill's topic in Modeling tools and Workshop Equipment
Do you have a model number or a picture of the saw. I have an old Microlux that looks a lot like the current Micromark saw. I can turn you on to some excellent blades I have found for ripping plywood. The kerf is pretty big, so they are not very desirable for fine woods.. Too much waste. -
Your best option would be to make it yourself.. Sanding dust and white glue or matte, water based varnished.
-
That deck looks a lot better than some I have seen.. What was the source?
-
Planking remains a challenge even after many builds, Look in on some of the Winchelsea builds. You will see a lot of planking excercise, with people acknowledging and correcting their mistakes. https://modelshipworld.com/forum/92-member-build-logs-for-the-hms-winchelsea/
-
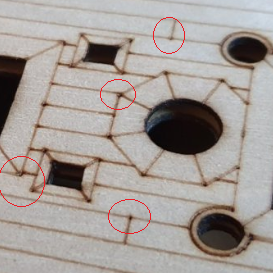
I believe your planked deck looks much better. I see problems with the quality of the Laser etching. There is a lot of over-burn at many points. I have seen this problem with my laser when the power is too high and the speed too slow. The over-burn happens when the head changes direction.
-
You might take a look at the Framing and Planking tutorials where the bearding line is explained.
-
Using pins
Gregory replied to Oddball's topic in Building, Framing, Planking and plating a ships hull and deck
Did he provide any illustrations of his method of " pinning " ? Was his purpose visual or for strength, or both ? -
Does anybody have some experience with CAF Models ?
Gregory replied to yvesvidal's topic in Wood ship model kits
You might try a PM here on the site, and let him know about the email problem.. https://modelshipworld.com/messenger/compose/?to=33401 -
Son of a gun!

