

Gregory
-
Posts
3,176 -
Joined
-
Last visited
Content Type
Profiles
Forums
Gallery
Events
Everything posted by Gregory
-
 Here is the actual drawing with a ruler overlayed. This will not print to actual size. I will send you a PM with the image that should print to actual size.. It looks like the Bower Anchor is about 75mm at 1:96. PS As we discussed in our PM exchange, I think this scale - 1/96 - is off.. Seems off by maybe a factor of 2, and is actually 1:48
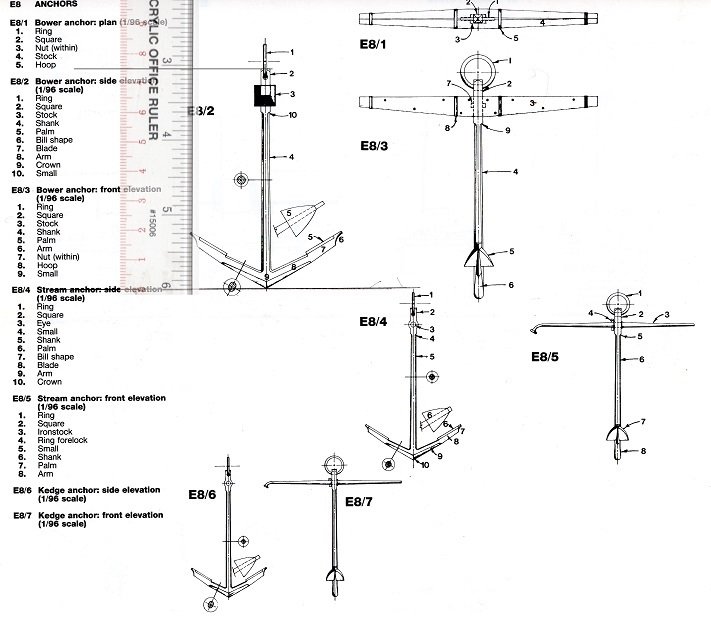
-
I sure will .. Later today.. Sorry, I didn't think of that when I posted..
-
If you didn't get the email, Essex is on sale, and there is an extra 25%off with free shipping over $150 P.S. You might want to check this out.. MODEL SHIPWAYS 18TH CENTURY LONGBOAT WOODEN MODEL SHIP KIT & TOOLS A great price with an extra 25% off during this promotion. Would make a nice practice kit, along with a few extra tools.
-
Good explanation Frankie, and brings us back on topic. If Scott is still curious about a detailed plank on frame kit, here is a pretty good example. Cutter Alert from Trident Model.. ( Not yet available as far as I know. No updates from Trident lately )
-
I'm reminded of another saying: " We learn from our mistakes, but it's better to learn from someone else's mistakes." Hopefully, Scott Brown will draw upon the expertise here and have smooth sailing..
-
Shipwrights have to start somewhere.. 😃 I'm reminded of some wisdom from the late, great George Carlin, who observed: " There was a time when no one knew how to play the piano. They were all practicing. "
-
Gun rigging is exceptionally nice, and does not look out of scale..
- 335 replies
-
- 1
-

-
- alert
- vanguard models
- (and 1 more)
-
Here are the anchors from the Anatomy of the Ship " The Armed Transport Bounty

-
I was thinking the figurehead on the model might depict St Francis, being a tie-in with the name ' Swallow '..
-
Belay Pins
Gregory replied to shipman's topic in Discussion for a Ship's Deck Furniture, Guns, boats and other Fittings
Which the majority of people are, and don't feel particularly challenged in that regard. -
Belay Pins
Gregory replied to shipman's topic in Discussion for a Ship's Deck Furniture, Guns, boats and other Fittings
I apologize if i missed it in all of this, but what is a good generic overall length for a belaying pin? ( I'm not particularly concerned about the rivet counters surveying one of my models and proclaiming that my belaying pins are 2 scale inches too long.. ) -
Need CAD type program
Gregory replied to Sambini's topic in CAD and 3D Modelling/Drafting Plans with Software
That is assuming that one is only going to " do something once every two or three years ", in which case I agree.. However, I am using a laser cutter to enhance the kits I build, and hope to work on a scratch project someday soon. I am exploring the use of a CAD program to enhance my parts creating tool box, even though 2D is all I need right now. Relatively low cost 3d printers and CNC tools are already a reality, and robust 3D software is essential to using these tools effectively. -
Need CAD type program
Gregory replied to Sambini's topic in CAD and 3D Modelling/Drafting Plans with Software
I see V25 is available on Amazon for $80.. Does that sound like a good deal? Anyone ever use Turbo Cad. I have a pretty robust version but haven't taken the time to learn it.. Any opinions if it would be worth the effort? -
Belay Pins
Gregory replied to shipman's topic in Discussion for a Ship's Deck Furniture, Guns, boats and other Fittings
No kidding Frankie.. The parts of the drawing labeled 1/3 & 2/3, look more like 1/2 & 1/2.. -
A very ambitious undertaking.. I look forward to your updates.
-
How to sew ratlines help needed please.
Gregory replied to Peter Cane's topic in Masting, rigging and sails
There is much discussion about ratline technique, but it is difficult to do a search because the subject appears in many different topics, including many different build logs. You will probably get many suggestions from our members. Here is a technique I like, offered by Jersey City Frankie Glued Ratlines ( Scroll down to post #118 ) I also like what Frankie said in another topic about tying them: The thing about knots, is that they can easily appear way out of scale, depending on the scale of the model and the size of the rope used. Here are some actual ratlines from Victory and Constitution.

-
My kit also only has two plan sheets. No Sail or mast construction. There is an instructions booklet with three pages of very sparse English instructions, the bulk of which is a parts list. I will be happy to copy and email you those three pages if you feel they would be useful. I would not expect the instructions to be much help to anyone who does not have experience with a few other kits and some considerable knowledge of model ship building in general. While it may be a bit of a chore to filter it out, all of the information you need should be found here as MSW. Not just the Enterprise logs, but any number of other logs that have a lot to offer in the way of technique and how to progress. I'm sure there are others, but one Enterprise log that caught my attention is the one by src.. Enterprise by src - Constructo - 1:51 - or Lessons in Adapt Improvise and Overcome I see 10 Enterprise build logs in the Index of wood build logs. Two of them show finished.
-
I have what I believe to be a complete kit.. I'll have to check and get back to you later..
-
I like the natural look and the subdued colors. The darker colors provide too much contrast with the lighter wood of the hull, and draw attention away from the model as a whole. On the contemporary models with darker wood tones, it is not as much of a distraction..
- 1,784 replies
-
- 1
-
-
- winchelsea
- Syren Ship Model Company
- (and 1 more)
-
Ship lettering
Gregory replied to rlundy90's topic in Painting, finishing and weathering products and techniques
Any insight as to what materials and methods have enabled this art to last for almost 300 years. Winchelsea model. Circa 1764.. Has it been restored at some point ?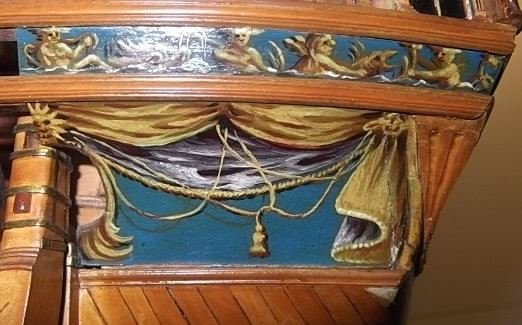
-
Syren ( semi kits..) Model Shipways Caldercraft Amati/victory Vanguard Master Korebel Dusek BlueJacket Not necessarily in that order.. P.S. Since many kits are of fictitious ships, who is to say if they are accurate or not?
-
Because it was a full time job, and we don't see all the throw aways before they got it right......
-
Strange .. Your link wants me to log in to see the item.. If I click on my eBay bookmark, I am logged in. I searched for " Byrnes Model Machines 4" Table Saw " and found it...
- 99 replies
-
- 1
-
-
- winchelsea
- Syren Ship Model Company
- (and 1 more)
-
How did the parts compare to the plans? I have the AVS plans and am considering a scratch build someday.. I don't think I'll bother if parts made from the plans don't go together well...
-
Any chance you will be making those cannon available apart from the kit?