


AJohnson
-
Posts
2,028 -
Joined
-
Last visited
Content Type
Profiles
Forums
Gallery
Events
Everything posted by AJohnson
-
 Hi Craig, how's this build going, have you hit the "pause" button? Not that I can talk with my "Nisha"! 😆 - though will be back to it soon(ish.)
 -
Excellent scratch-built Binnacle! 👏
-
Sea Harrier FRS1 by AJohnson - FINISHED - Airfix - 1:72
AJohnson replied to AJohnson's topic in Non-ship/categorised builds
Agreed with all the statements above, many kits are getting a bit too much for my wallet. I have one “big” kit on back order - Airfix’s 1/24 Spitfire IXc due out soon, this is £95 so is my only main kit purchase this year. Not bad value compared to these 1/48 & 1/32 scale “Uber” jet kits. But I think it is also making the wood ship kits from Vanguard and Syren look exceptional value for what you get. Plus at the rate I build them, even better value when looked at in terms of time spent building 🤣 Think this is why I will always return to plastic kits for the “quick hit” now and again when I need a “fix” of near instant gratification. 🫢 -
Sea Harrier FRS1 by AJohnson - FINISHED - Airfix - 1:72
AJohnson replied to AJohnson's topic in Non-ship/categorised builds
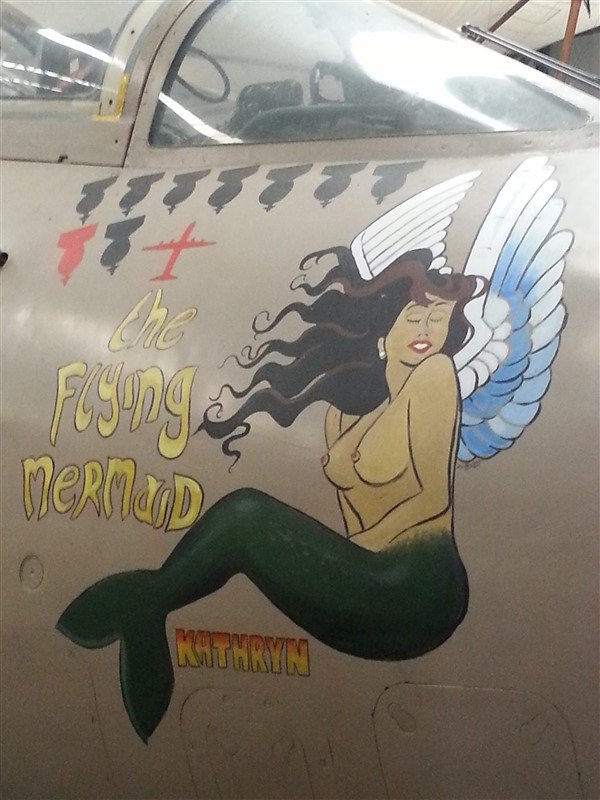
No I have not had a look at it, but I have built the previous version and yes it was a challenge! The new one has an RRP. of over £70, so, it might take me a while to feel the need to do another... I did mine in the colours of the preserved example residing at the "Yorkshire Air Museum", Elvington, near York; about 20 miles from here. A Gulf War veteran that was named "Kathryn", same name/spelling as the admiral, so it had to be done! 😁 Here a few pictures of my old kit (must be 15 or so years old now and a bit dusty.) I did the wings folded primarily to save space, but also the joints were appalling on the kit, though I realise it is highly unlikely the aircraft folded its wings during the Gulf War. Also a couple of the original at Elvington.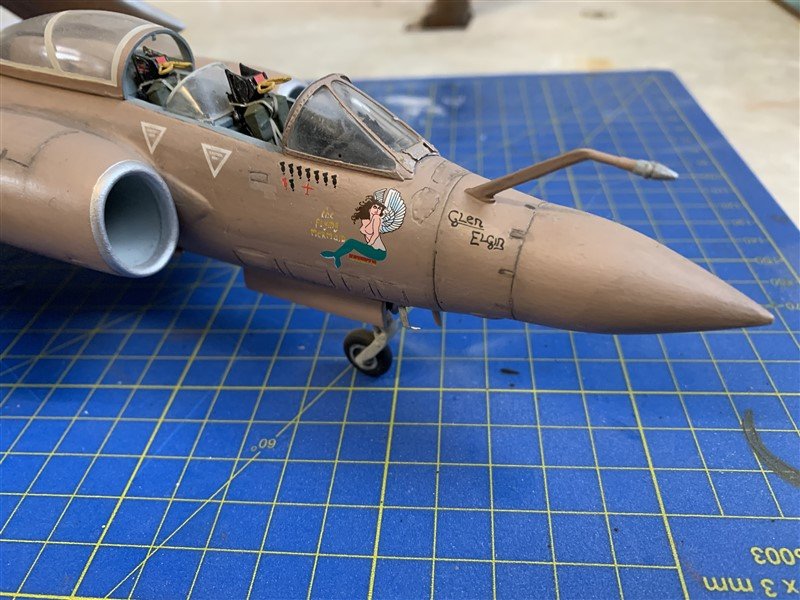
.jpg.655a0eeb133e534f2034a209460cb441.jpg)
- 71 replies
-
- 10
-

-

-
Sea Harrier FRS1 by AJohnson - FINISHED - Airfix - 1:72
AJohnson replied to AJohnson's topic in Non-ship/categorised builds
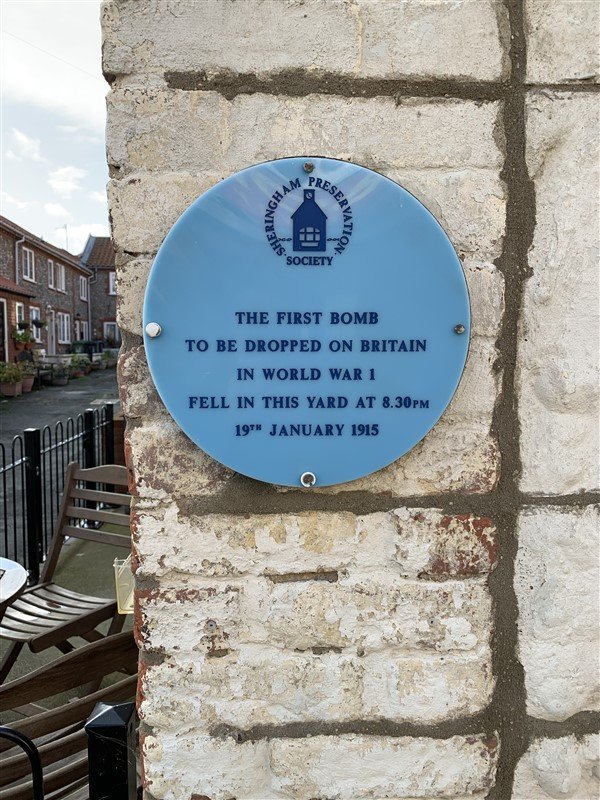
Yes the plaque is in Sheringham, just opposite the Wyndham Arms pub if you know it. The last time I went Burnham Thorpe to look at the Nelson bits and bobs the pub was shut, it has since been refurbished and massively extended at the back. To be honest I felt the new “open” barn style restaurant at the back detracts from the feel of the old pub at the front. Certainly Nelson would not recognise the place. Food was good though. -
Great finish and nice setting. 👏
-
Sea Harrier FRS1 by AJohnson - FINISHED - Airfix - 1:72
AJohnson replied to AJohnson's topic in Non-ship/categorised builds
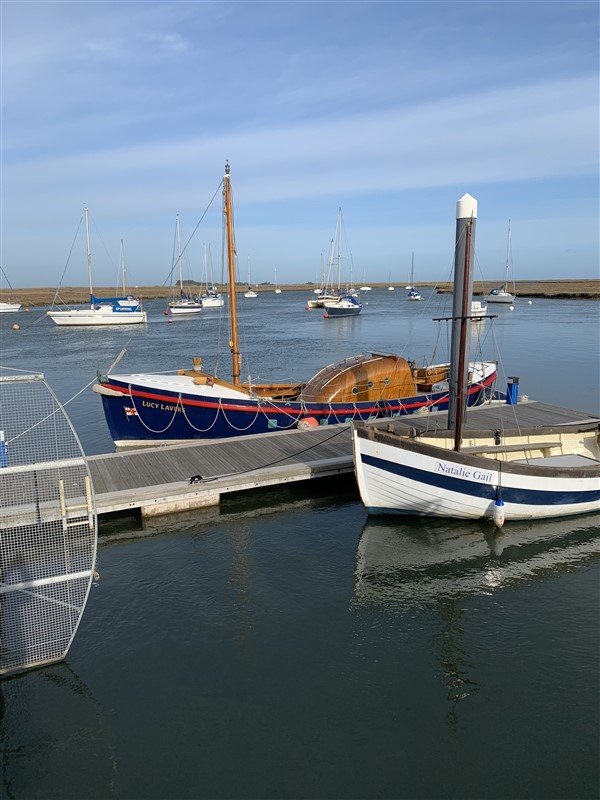
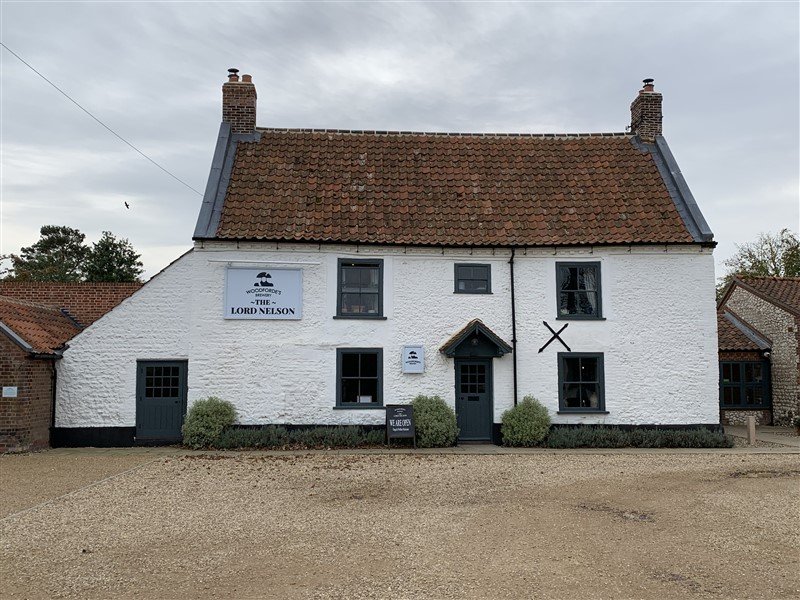
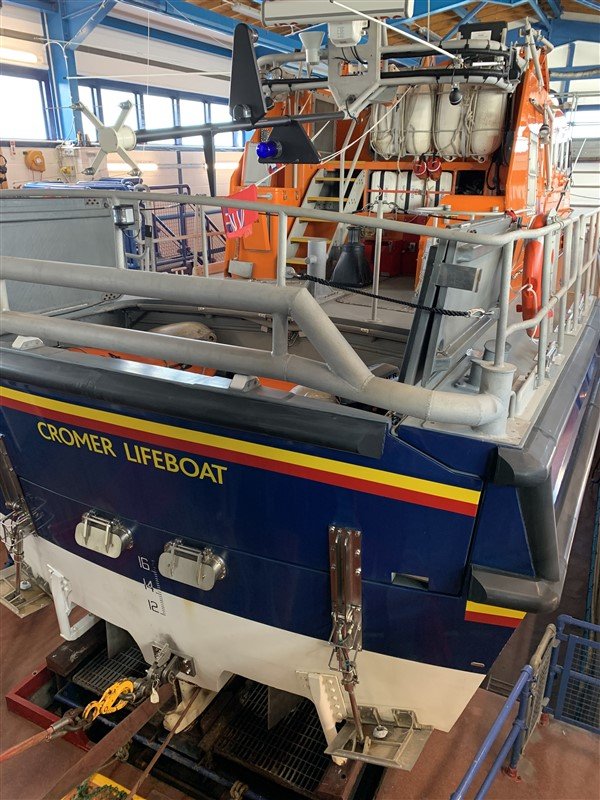
Hi Edward, yes it was, a nice little break. Unfortunately the "Henry Ramey Upcher" building was closed for the season. 😌 But plenty of other Nautical themed things to see, including lunch at the Lord Nelson pub in Burnham Thorpe, a visit to Wells to see the "Lucy Lavers" and Cromer, had a nosey at their lifeboat after a walk on the pier. Also hadn't realised that where we were staying was so dangerous back in 1915 (see the plaque.)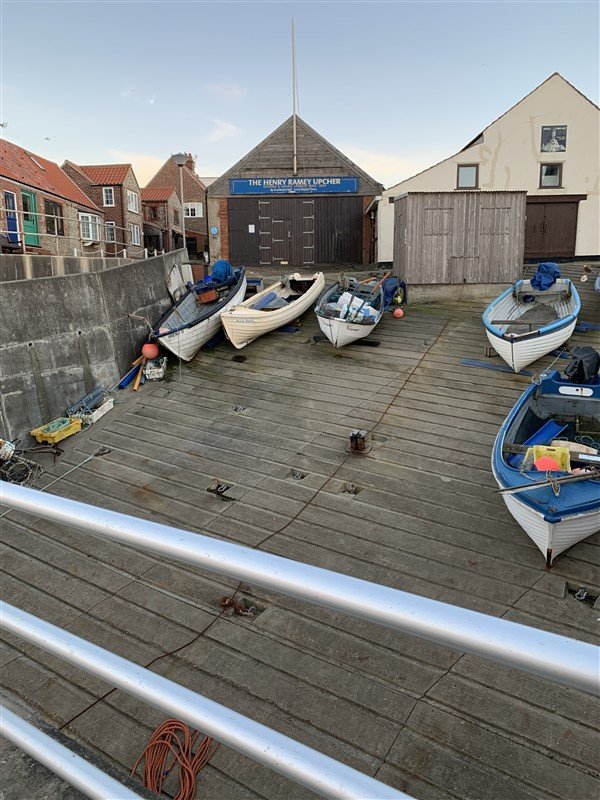
- 71 replies
-
- 11
-
-
Sea Harrier FRS1 by AJohnson - FINISHED - Airfix - 1:72
AJohnson replied to AJohnson's topic in Non-ship/categorised builds
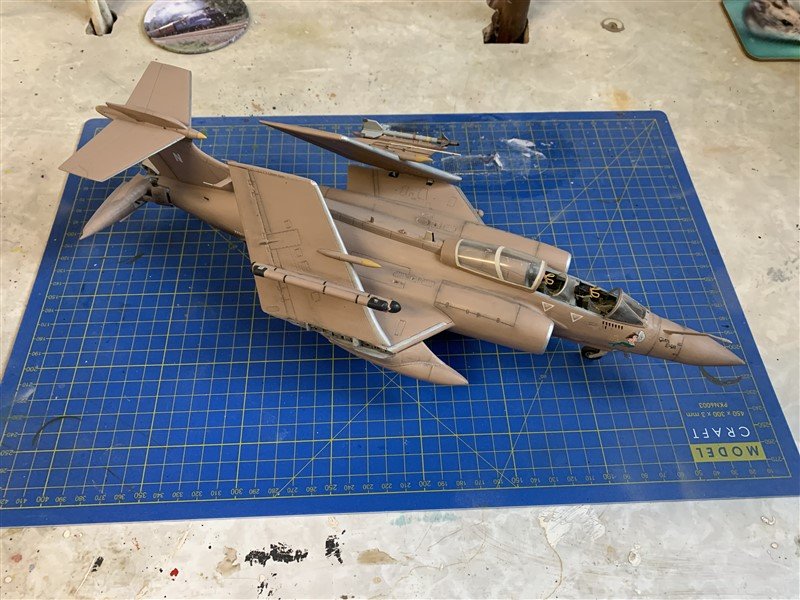
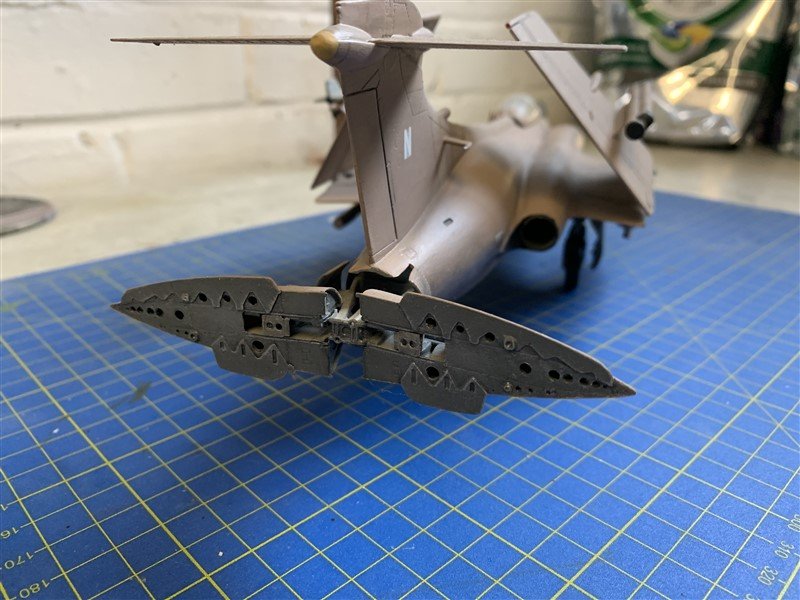
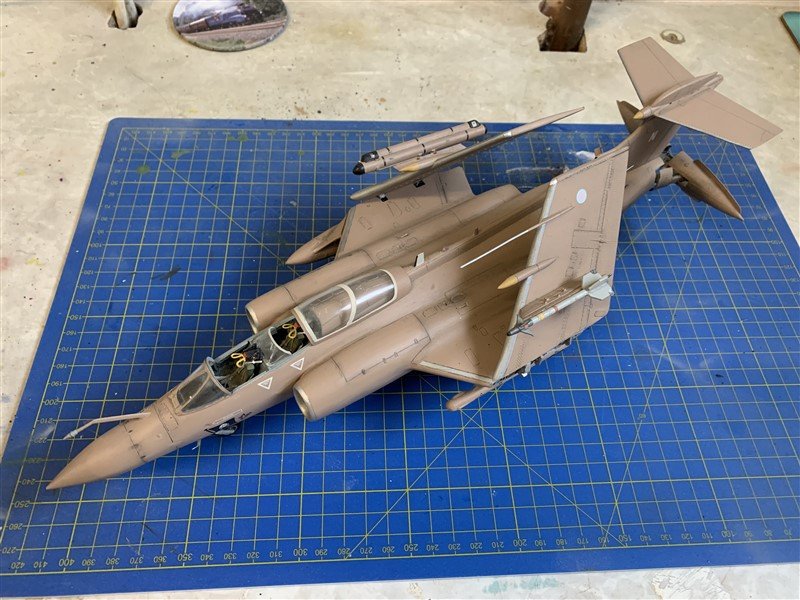
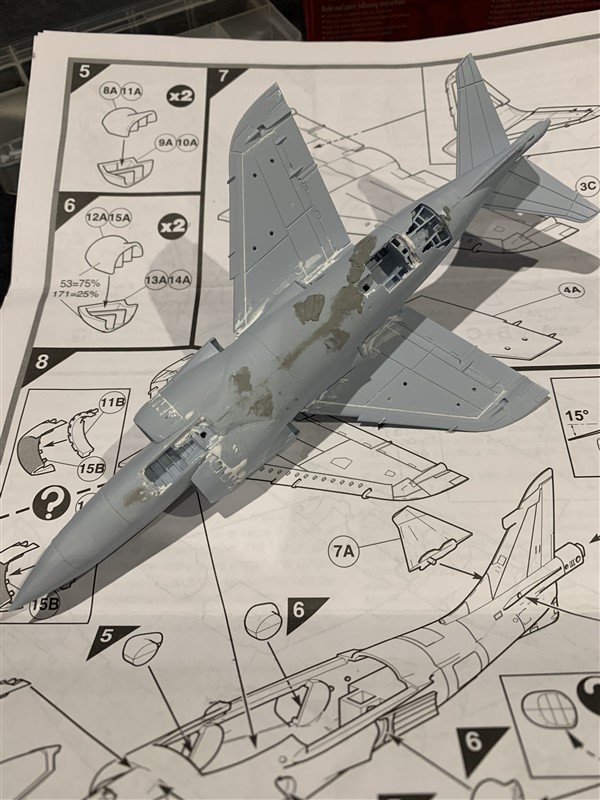
Evening all, thought I better post something up as I've been a bit quiet on this one for a while. Not done too much as I've been away, but what I have done has involved a fair bit of glue and multiple applications of filler! - this is not the best fitting kit! 🤔 not to mention a fair few sink marks. Anyway a couple of pictures of how it looks at the moment, hopefully a nicer looking set to appear later, after a few more session of sanding down, filling, repeat!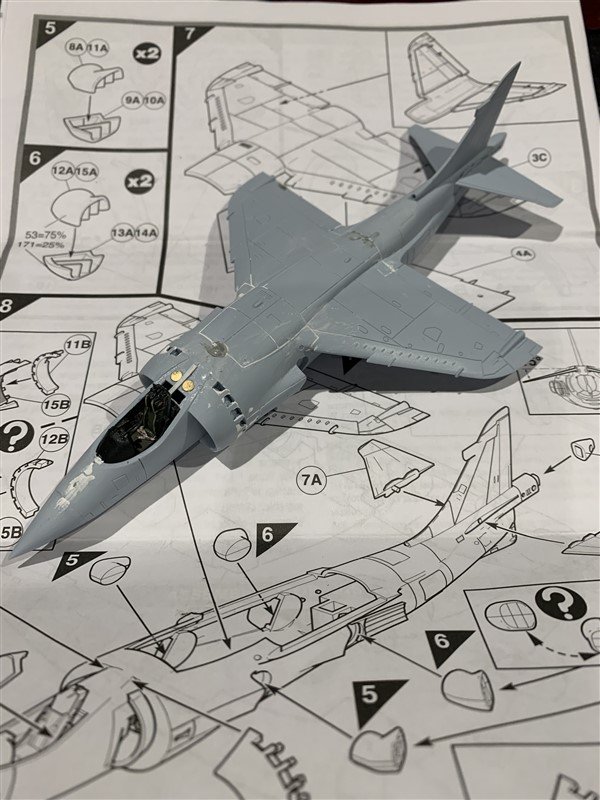
- 71 replies
-
- 13
-
-
Hey, I’m on the North East England map! My neck of the woods and I like visiting the old airbases, many returned to agriculture or industrial parks now, but many of the old buildings survive, either repurposed or quietly crumbling. Great interior detailing Andy, you are much neater than me.
-
Great model, superb finish and neat rigging! 👏
-
Very nice start to the interior details, really neat Andy
-
Sea Harrier FRS1 by AJohnson - FINISHED - Airfix - 1:72
AJohnson replied to AJohnson's topic in Non-ship/categorised builds
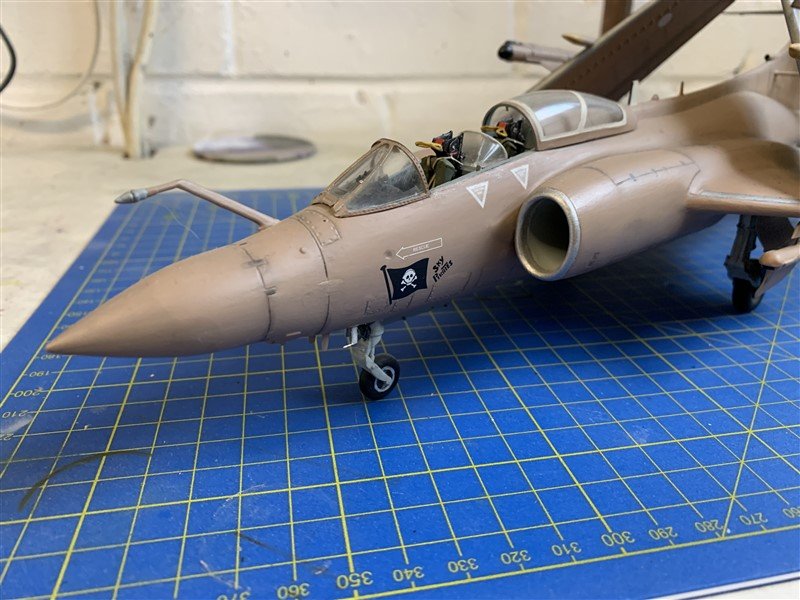
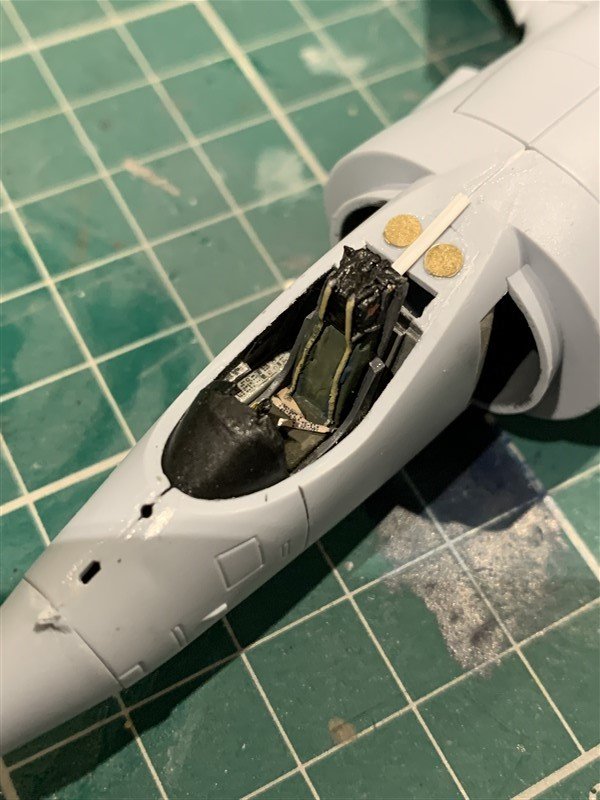
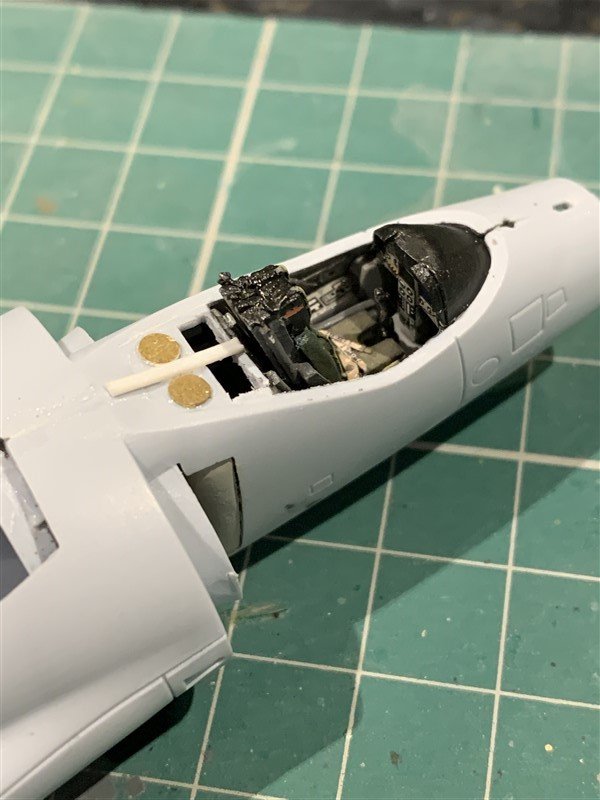
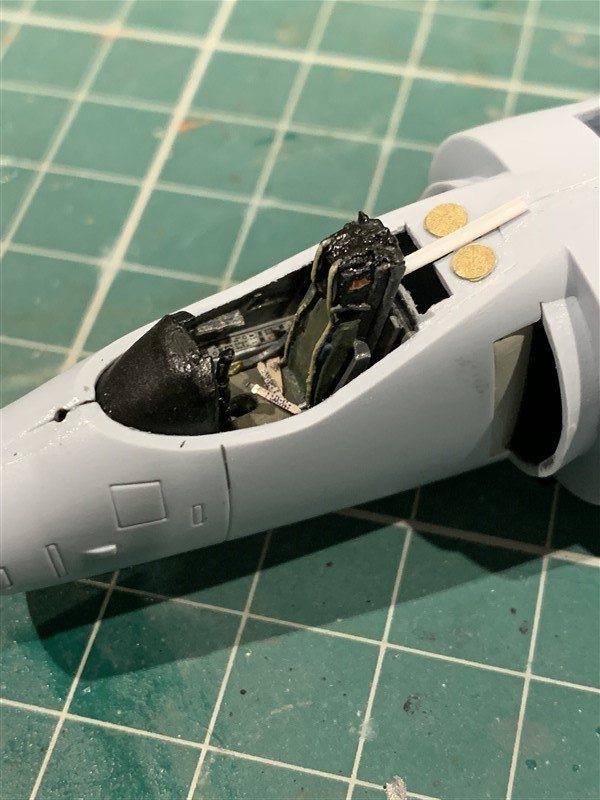
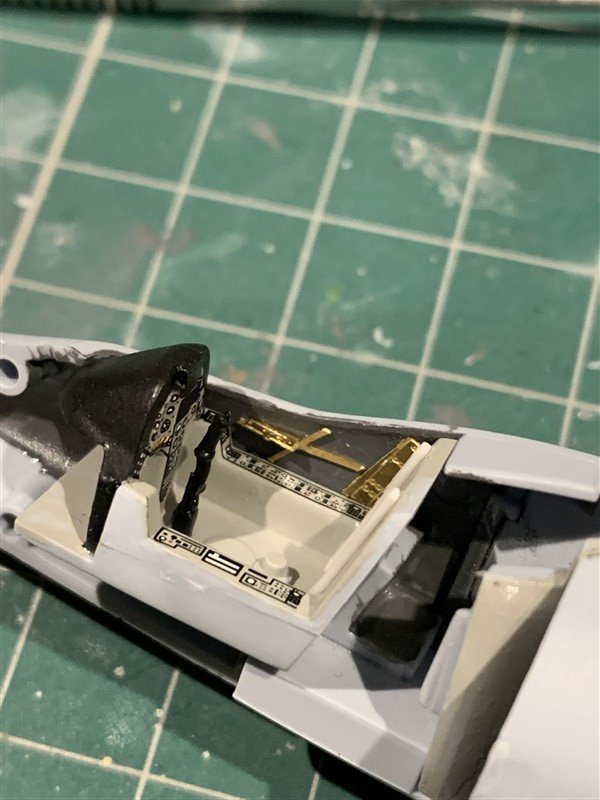
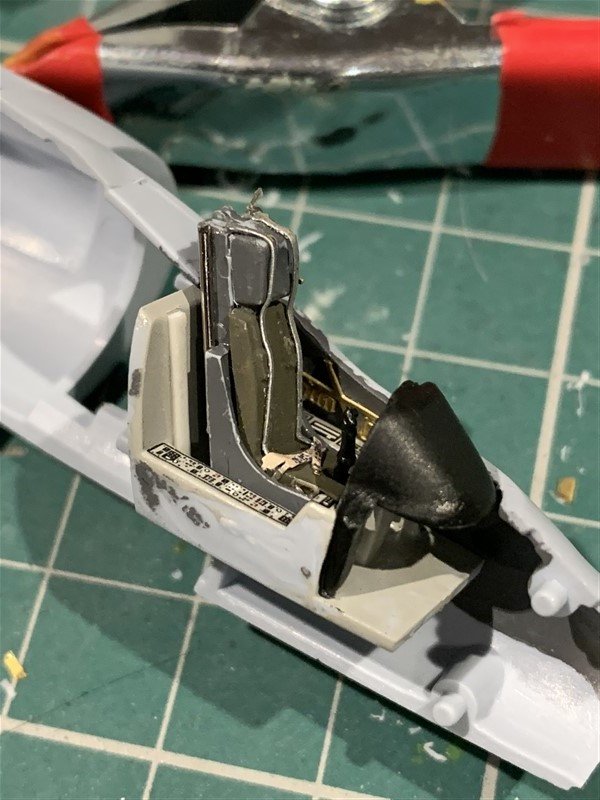
Cockpit about there for now, some little details added to the "shelf" behind the ejector seat, as the kit was devoid of anything, including the prominent canopy sliding rail; this all needs a tidy up once I have glued together and filled/sanded the body. I also added two small slivers of plastic card to the front of the instrument panel hood as this was missing the "sunshade" projections. I think there is an adequate amount of detail in there now, once the canopy parts added it will be hard to see much anyway. I will be displaying the canopy open. Time to glue the fuselage together! Until the next instalment, thanks for the likes and follows. 😁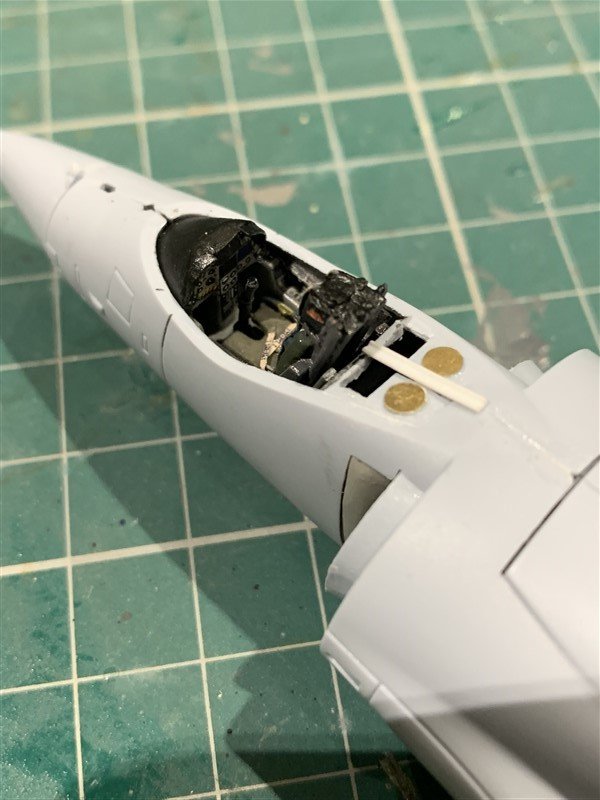
- 71 replies
-
- 12
-
-
T Rex 36in (90cm) long Skeleton - Finished
AJohnson replied to Old Collingwood's topic in Non-ship/categorised builds
This looks fun! 😁 -
Sea Harrier FRS1 by AJohnson - FINISHED - Airfix - 1:72
AJohnson replied to AJohnson's topic in Non-ship/categorised builds
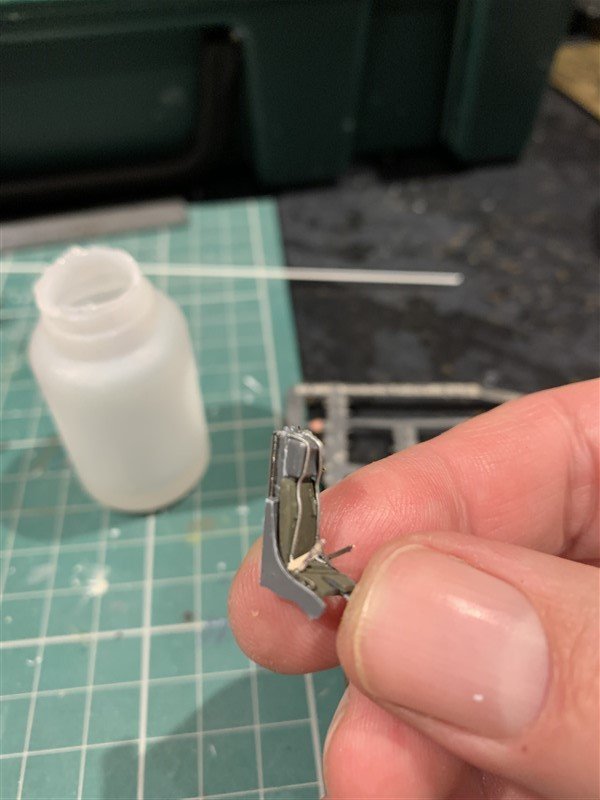
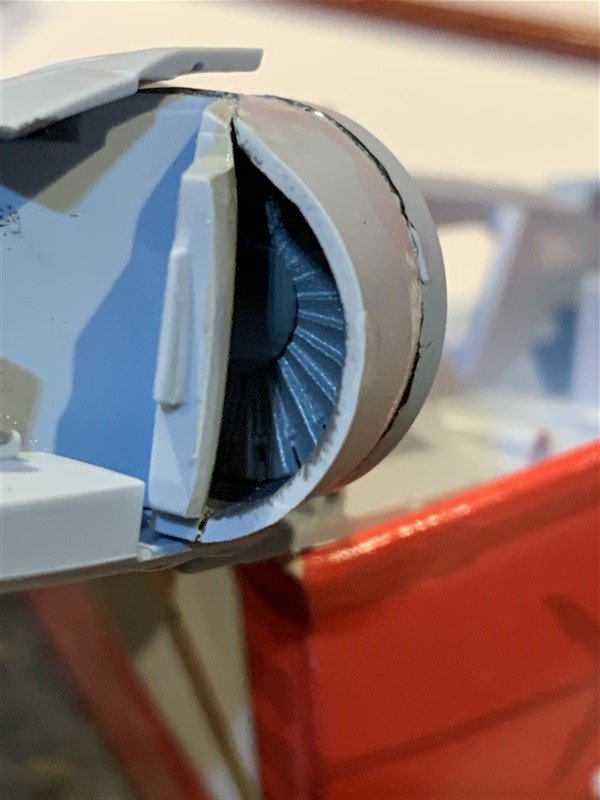
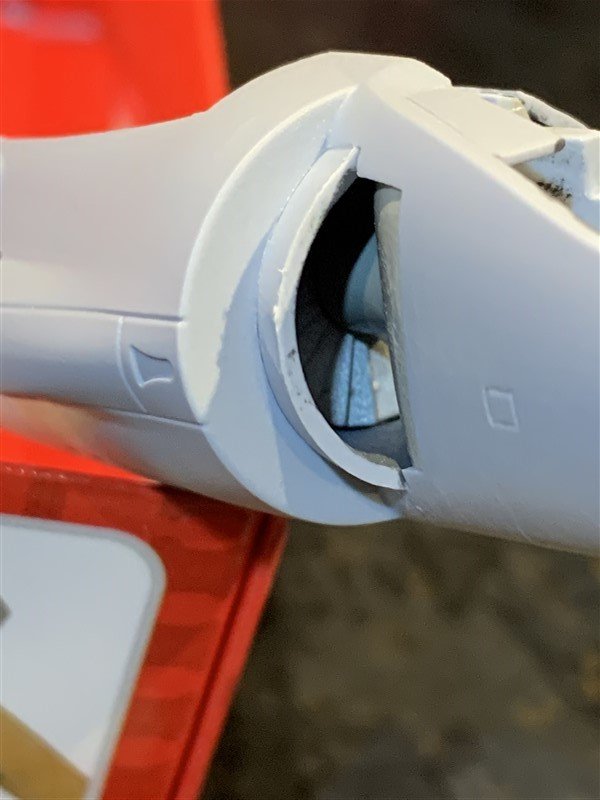
Evening gang, I've been grappling with this little kit a bit and nearly decided to give it a miss as the quality of the moulding and thickness of many of the parts, trench-like panel lines and pock-marked sink holes everywhere offended my sensibilities! Then I told myself to not be so "precious" and just stick it together! and remember that the eight year old me would have been ecstatic at the mount of detail this kit has compared the Airfix Harrier GR1/Kestrel of the 1960/70s... 😁 - So onwards! That been said I'm not going to be buying any aftermarket bits for this kit, as it doesn't warrant it, just do what I can with some scratch built bits and pieces. I know there are plenty of resin Martin Baker Mk.10 seats and cockpit tubs out there, but as the whole cockpit opening is less then 10mm long, I don't think much would be seen without illuminated magnification anyway. Beside the aftermarket stuff would cost way more than the kit did! So out of the spare box has come some PE. bits, thin wire and plastic rod to pimp up the cockpit area and ejection seat a bit. Pictures are before I painted any of it, also added the front fan, again a bit crude but it will be hidden deep within that gaping inlet area fortunately.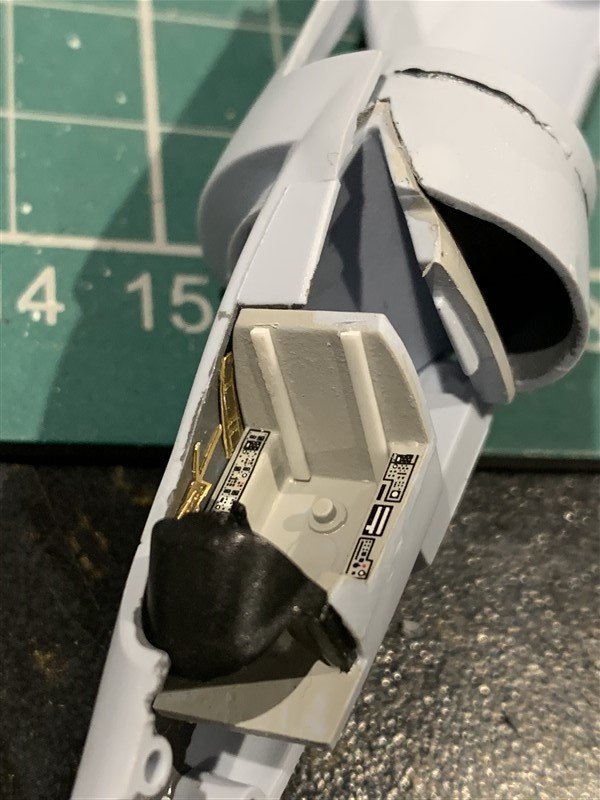
- 71 replies
-
- 14
-
-
Intrigued with what these are for! 🤔
-
A trip on the Steam Trains a definite, I work in the Railway industry for my sins and volunteer on the North Yorkshire Moors Railway for renovation works at Levisham station 🚂. We love north Norfolk, plenty of old bomber bases to visit, “Rescue wooden boats” near Stiffkey, “Lucy Lavers” at Wells, Cromer, not to mention Nelson’s birth place, just love it. 😁 The “Card side” is strong in you, I am afraid Darth @ccoyle has you in his grasp now! 🤣
- 30 replies
-
- 5
-
-

-
- small
- clinker built
- (and 2 more)
-
Hi Edward, just to let you know I'm off with the family to Sheringham for a short holiday in a week. I shall pay a visit to the West slipway for a look! 😁 How's this build going, or you still hooked on card models? 🤣
- 30 replies
-
- 4
-
-
- small
- clinker built
- (and 2 more)
-
Got to disagree Brian, I for one think you are doing great work! 👏. For the capping piece to the transom have a look at @Moonbug build log of his HMS Pegasus, he added a fine capping strip in his which really nicely finished it off.
-
👻 spooky! I have been looking at these Eduard F2.Bs only this last week as a future project as I was fancying a biplane for a change. Pulling up a chez lounge, as you wanted us to be at home!
- 140 replies
-
- 10
-
-
Sea Harrier FRS1 by AJohnson - FINISHED - Airfix - 1:72
AJohnson replied to AJohnson's topic in Non-ship/categorised builds
I know the one! I built one also as part of a “group build” when in the Air Cadets as a kid. We mocked up HMS Hermes on a table top and added our Harrier builds. - Happy days 😄 -
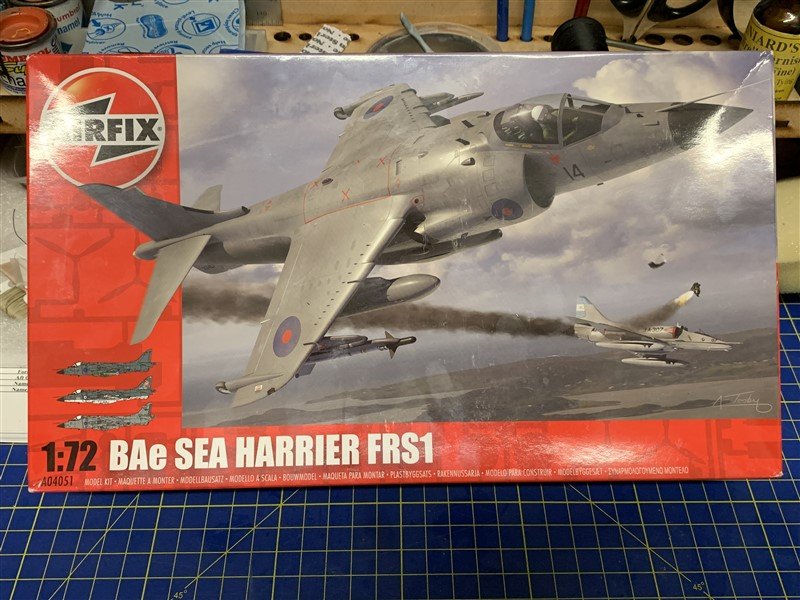
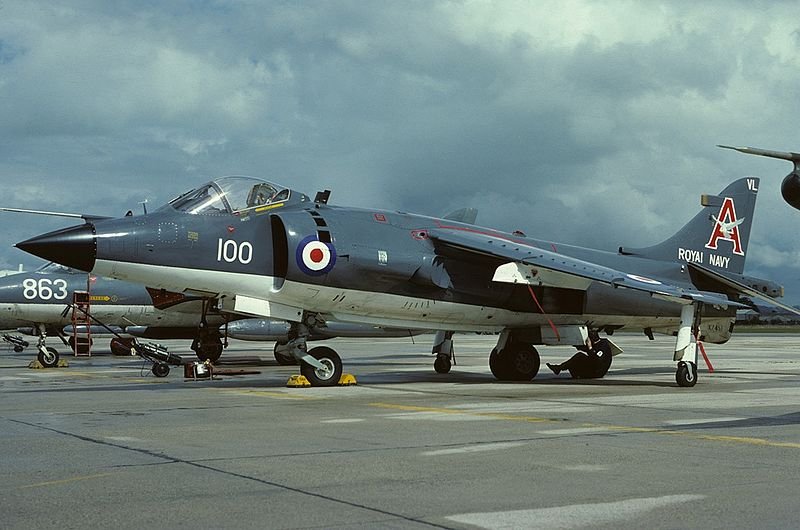
Evening all, Last of the plastic aircraft builds I want to finish up before I go back in to the "Boat" yard! ⛵ I did a search and this fine build by @Old Collingwood is the only other Sea harrier I can find here. But this is only a tiddler at 1/72 so it won't be as complicated a build and I am doing it out of the box without "bought-in" additions. I intend to do it as FRS1 - XZ451; one of the kit options. This aircraft was delivered in 1979 and initially served in 700A flight (see second picture, this is how I intend to finish the model), before being transferred to 899 NAS in 1981 sporting codes "100" & "VL". It took part in the Falklands War and was transferred to 801 NAS onboard HMS Invincible. During the conflict it shot down a C-130H Hercules, this has caused some controversy in some quarters since as Commander Nigel "Sharkey" Ward expended two AIM-9L Sidewinder missiles and 240 rounds of 30mm cannon fire into it to bring it down. ZX451 itself came to grief in 1989 after mechanical failures and crashed into the Mediterranean sea off Sardinia (pilot ejected). Hope this log of interest to some of you.
- 71 replies
-
- 11
-
-
Looking very tidy Mike, good tip to watch out for the backstays when I eventually get around to my “Snake”
-
I did a quick search to see if there were any Harriers lurking on MSW and I might have known there would be one by you @Old Collingwood! 😁 and lovely build it was I have a 1/72 Airfix FRS1 to finish up, next non-ship build log from me.
-
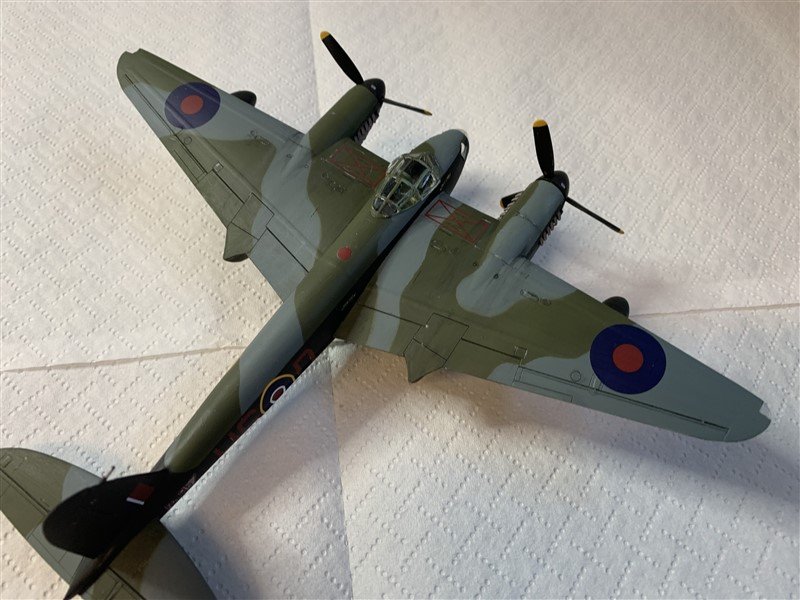
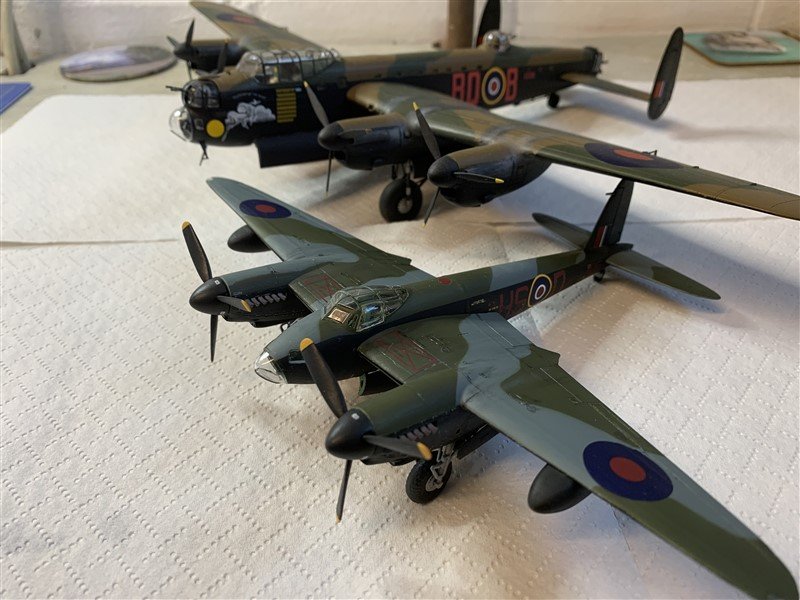
Thank you @Old Collingwood, @king derelict, @Edwardkenway, @Canute & @CDW for your kind words! Yes, it is interesting to compare a Lancaster & Mosquito for size and to think they both could carry the 4,000lb "Cookie"! Okay so not the 8,000lb "Cookie", or 12,000lb "Tallboy", or 22,000lb "Grand Slam", but you get the idea, for the "Light Bomber" category the Mossie was THE benchmark for speed, range and payload. I can only finish off by quoting a Nazi! (😲 - I know, not expecting that were you, but it is the finest compliment to the "Wooden Wonder" I know of...) “In 1940 I could at least fly as far as Glasgow in most of my aircraft, but not now! It makes me furious when I see the Mosquito. I turn green and yellow with envy. The British, who can afford aluminium better than we can, knock together a beautiful wooden aircraft that every piano factory over there is building, and they give it a speed which they have now increased yet again. What do you make of that? There is nothing the British do not have. They have the geniuses and we have the nincompoops. After the war is over I’m going to buy a British radio set – then at least I’ll own something that has always worked." – Hermann Göring, 1943
-
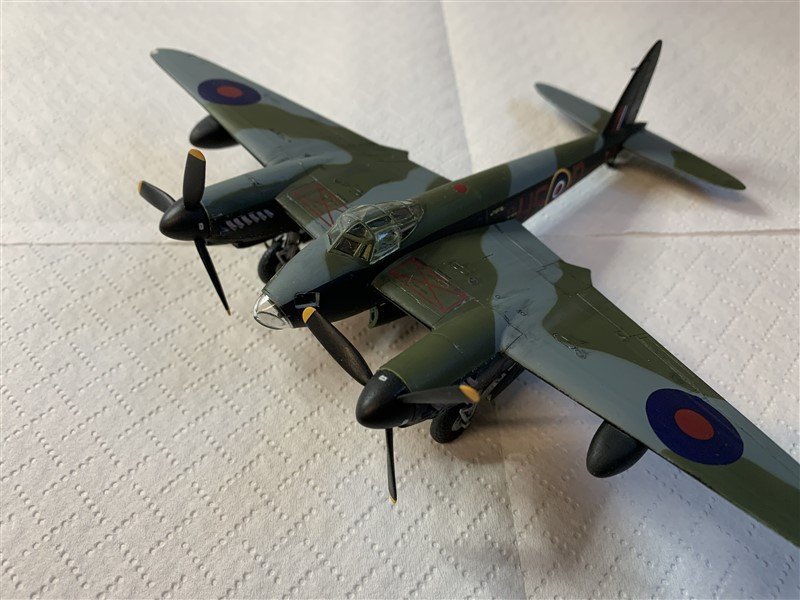
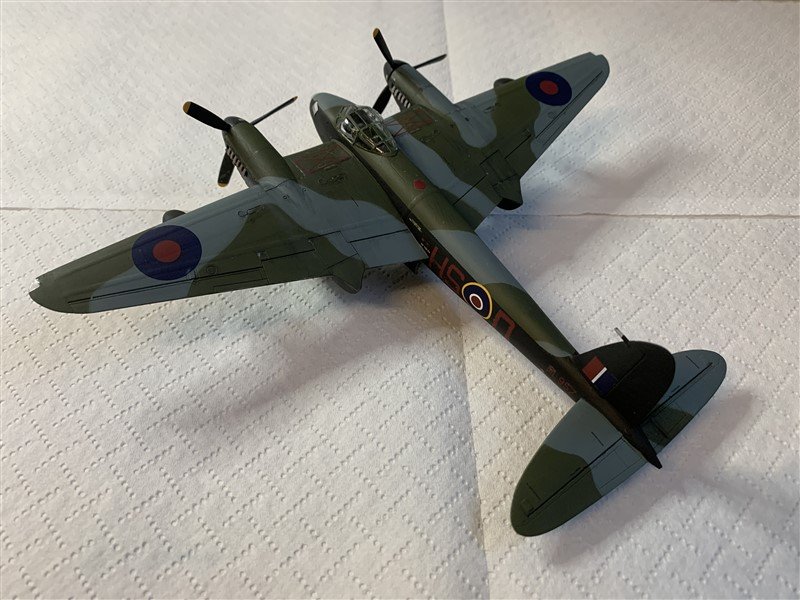
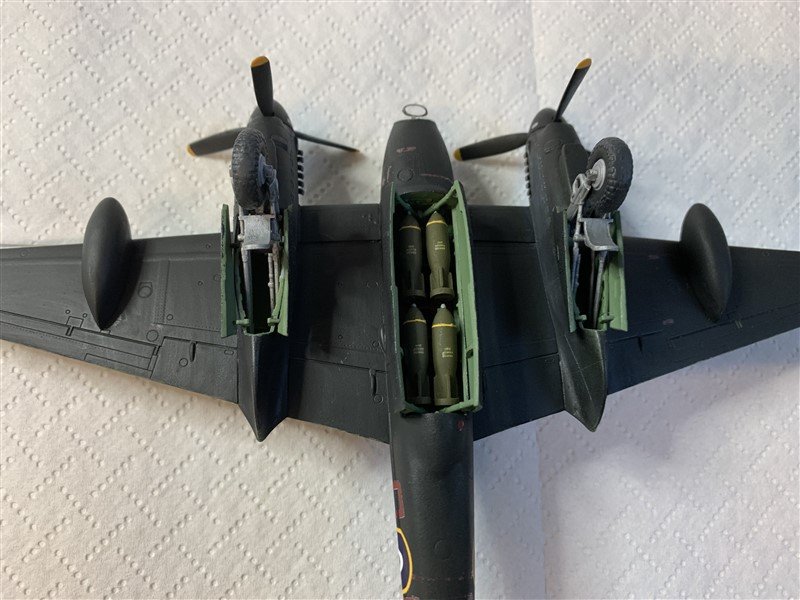
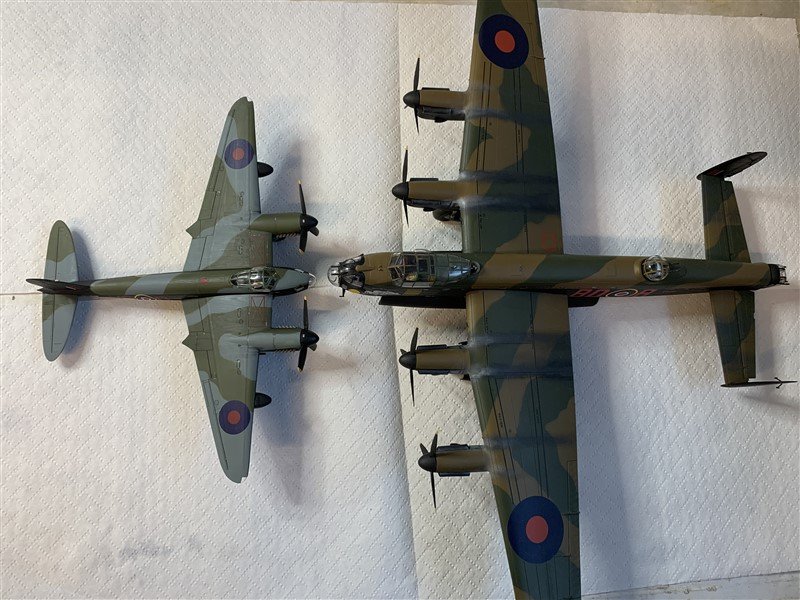
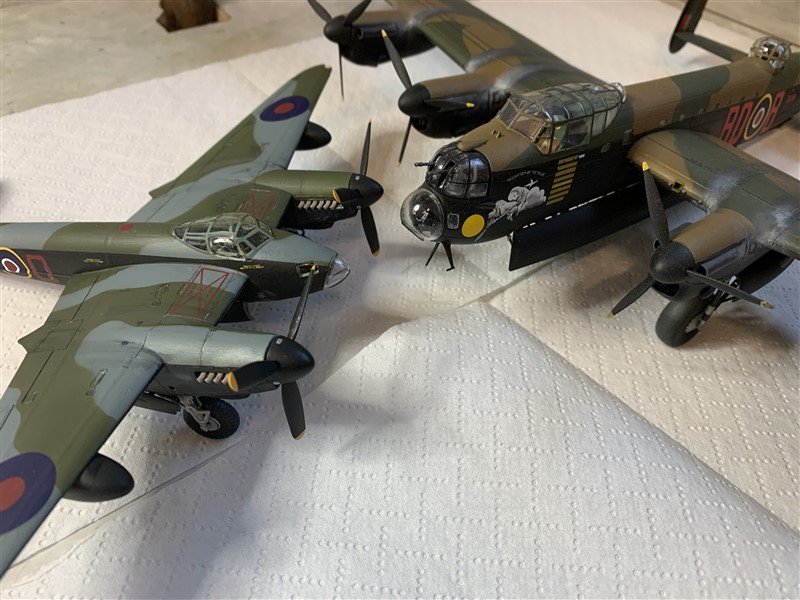
Hello all , here are the final pictures of the Mosquito, including a few with a Lancaster I did a while ago. ("Pathfinder" for the heavy!) Thanks all for following along. One more kit to finish up and I'm back on the boats for a while.

- 50 replies
-
- 16
-
-
