Thukydides
-
Posts
1,362 -
Joined
-
Last visited
Content Type
Profiles
Forums
Gallery
Events
Everything posted by Thukydides
-
 Nice job. That is a detail I would have liked to add to alert, but I didn't feel confident enough at the time.
- 152 replies
-
- 3
-

-
- Vanguard Models
- Cutter
- (and 2 more)
-
There is no easy answer to the question if it is already assembled. You can try smaller brushes, adjusting the angle you are painting at etc... In general my advice would be to paint off the model or paint earlier in the process before you make the area hard to access.
-
I have him too and I refer to him regularly. The problem is he doesn't often explicitly address cutters and so I have to take the principles and apply them rather than wholesale copying. Basically my order of preference is: Steele Lees (If he addresses it) Goodwin (if not in conflict with common sense or the above) My gut / what I think looks the nicest
- 562 replies
-
- 5
-
-
- vanguard models
- alert
- (and 2 more)
-
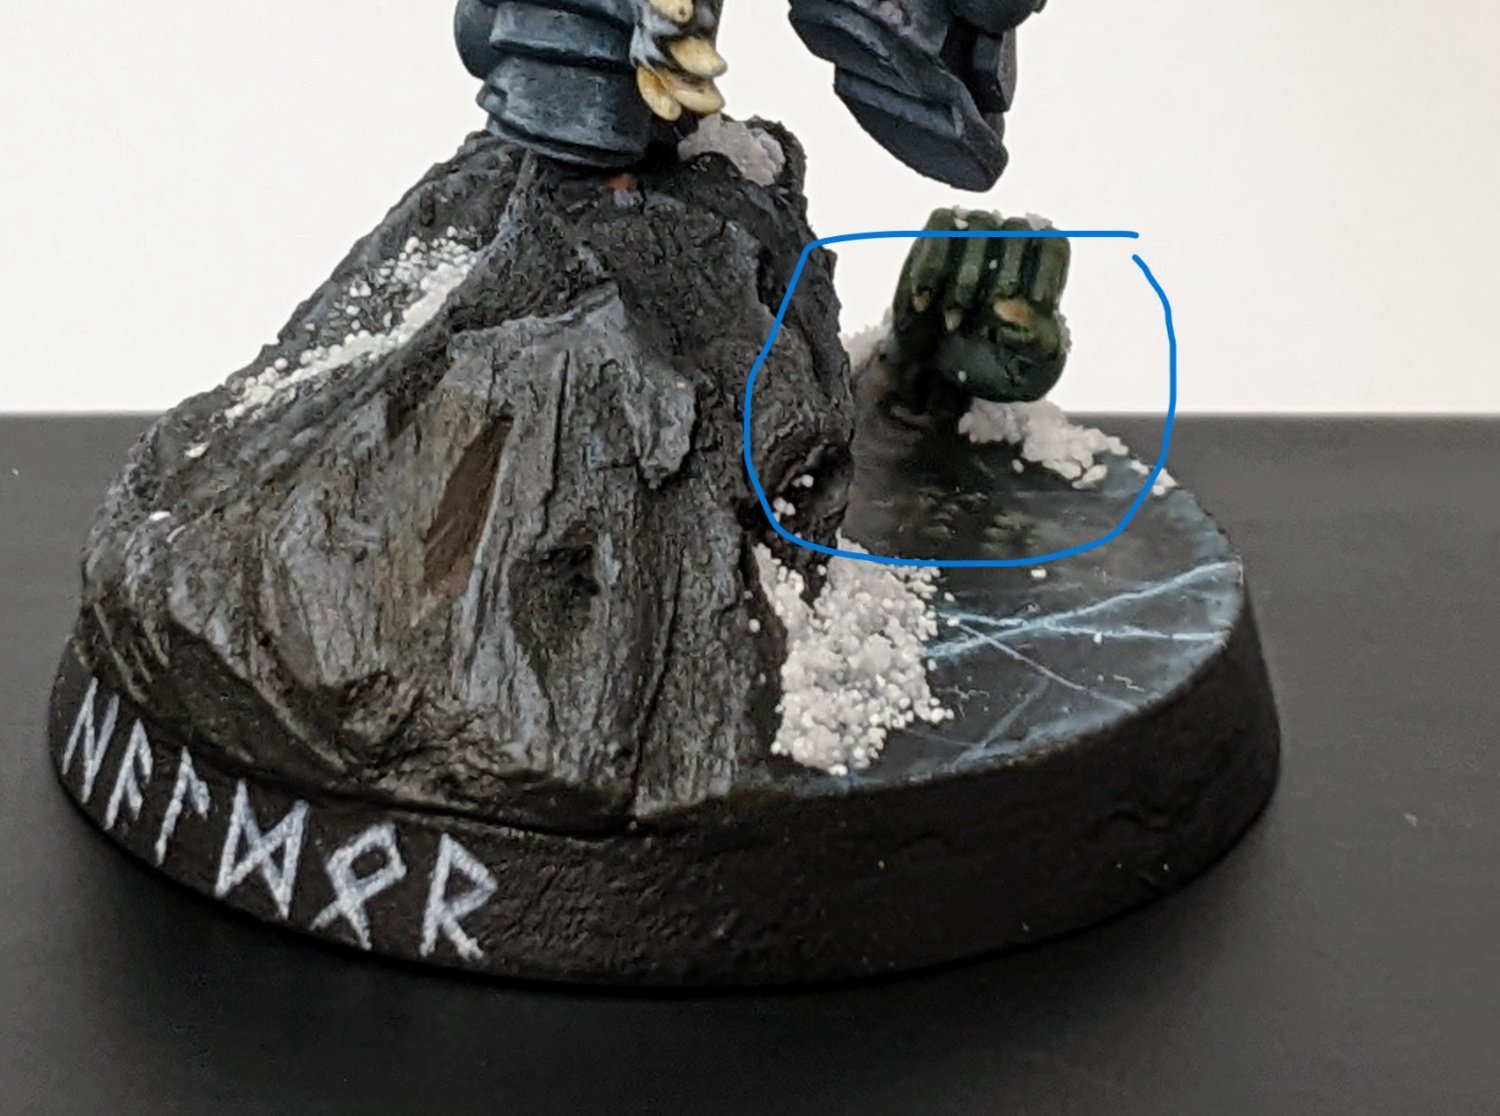
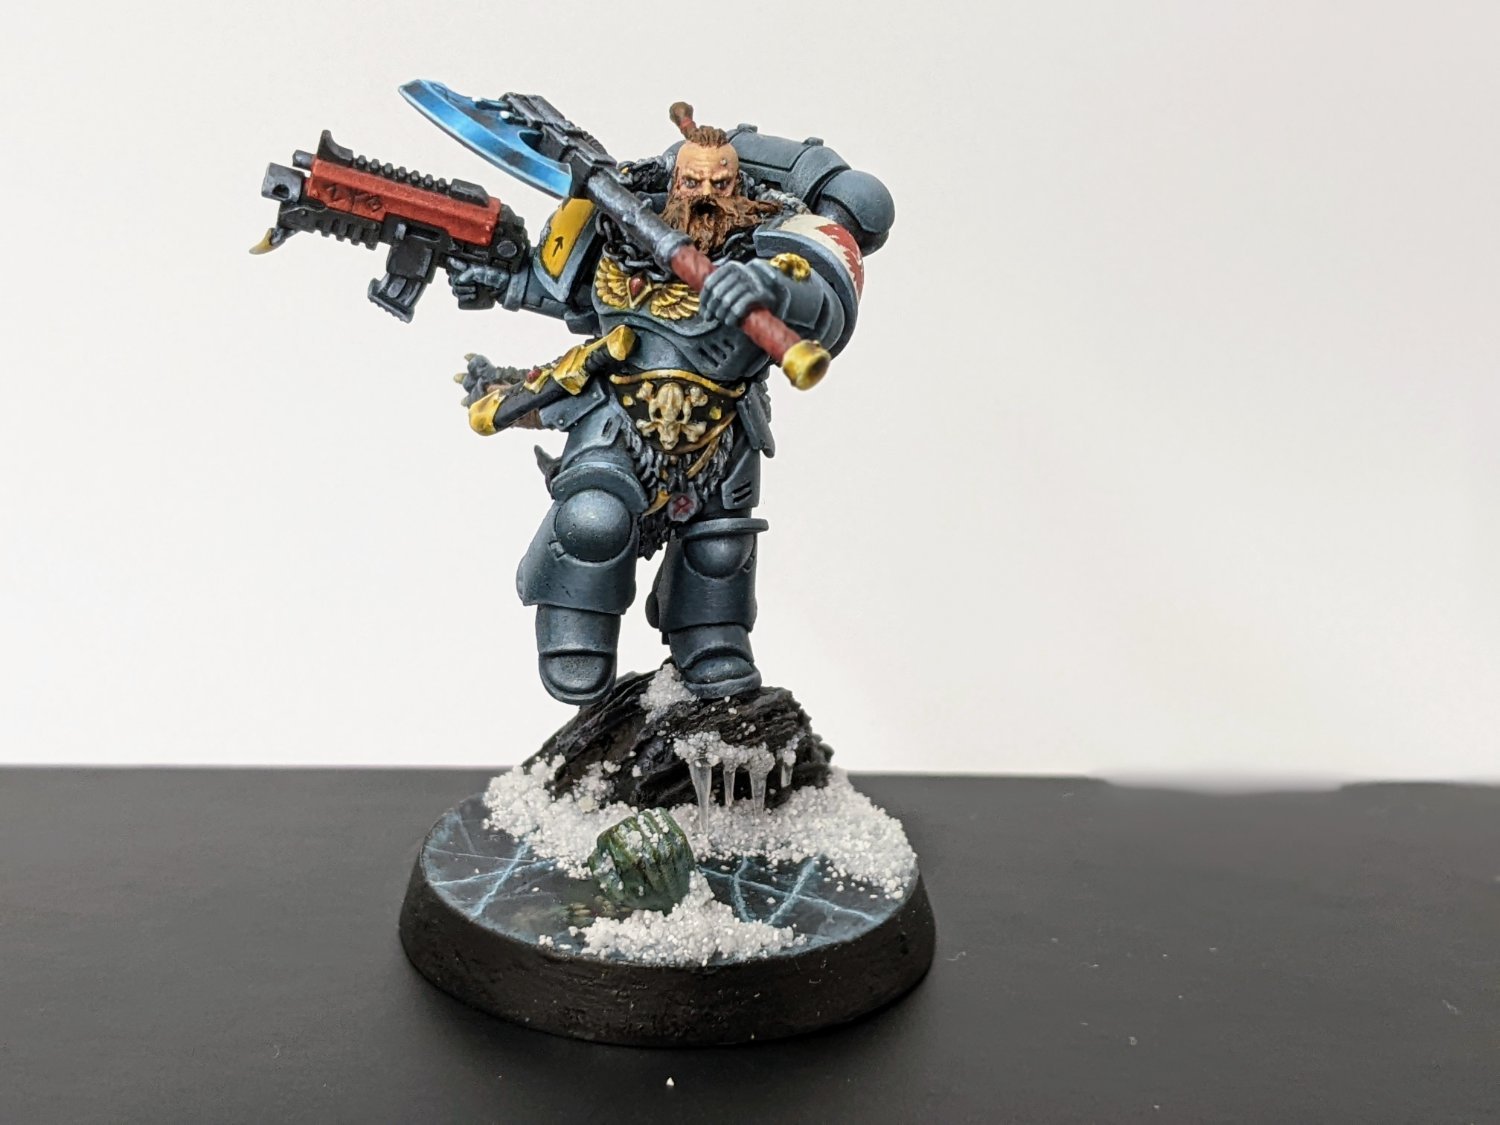
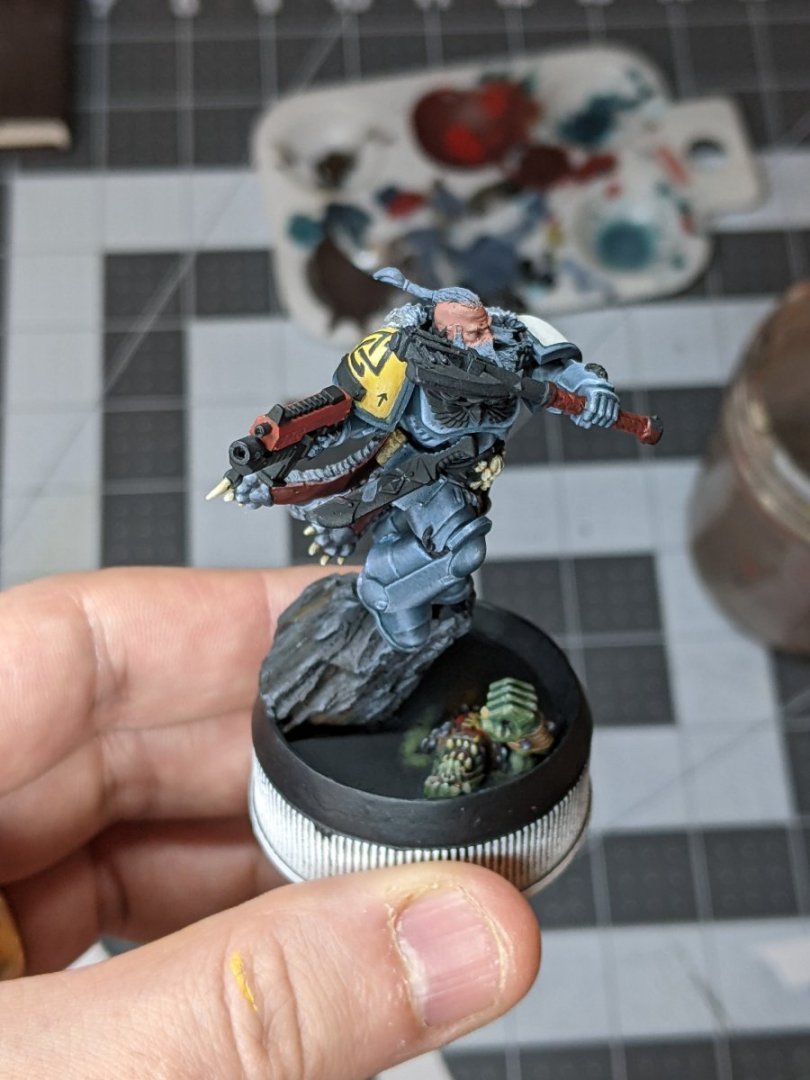
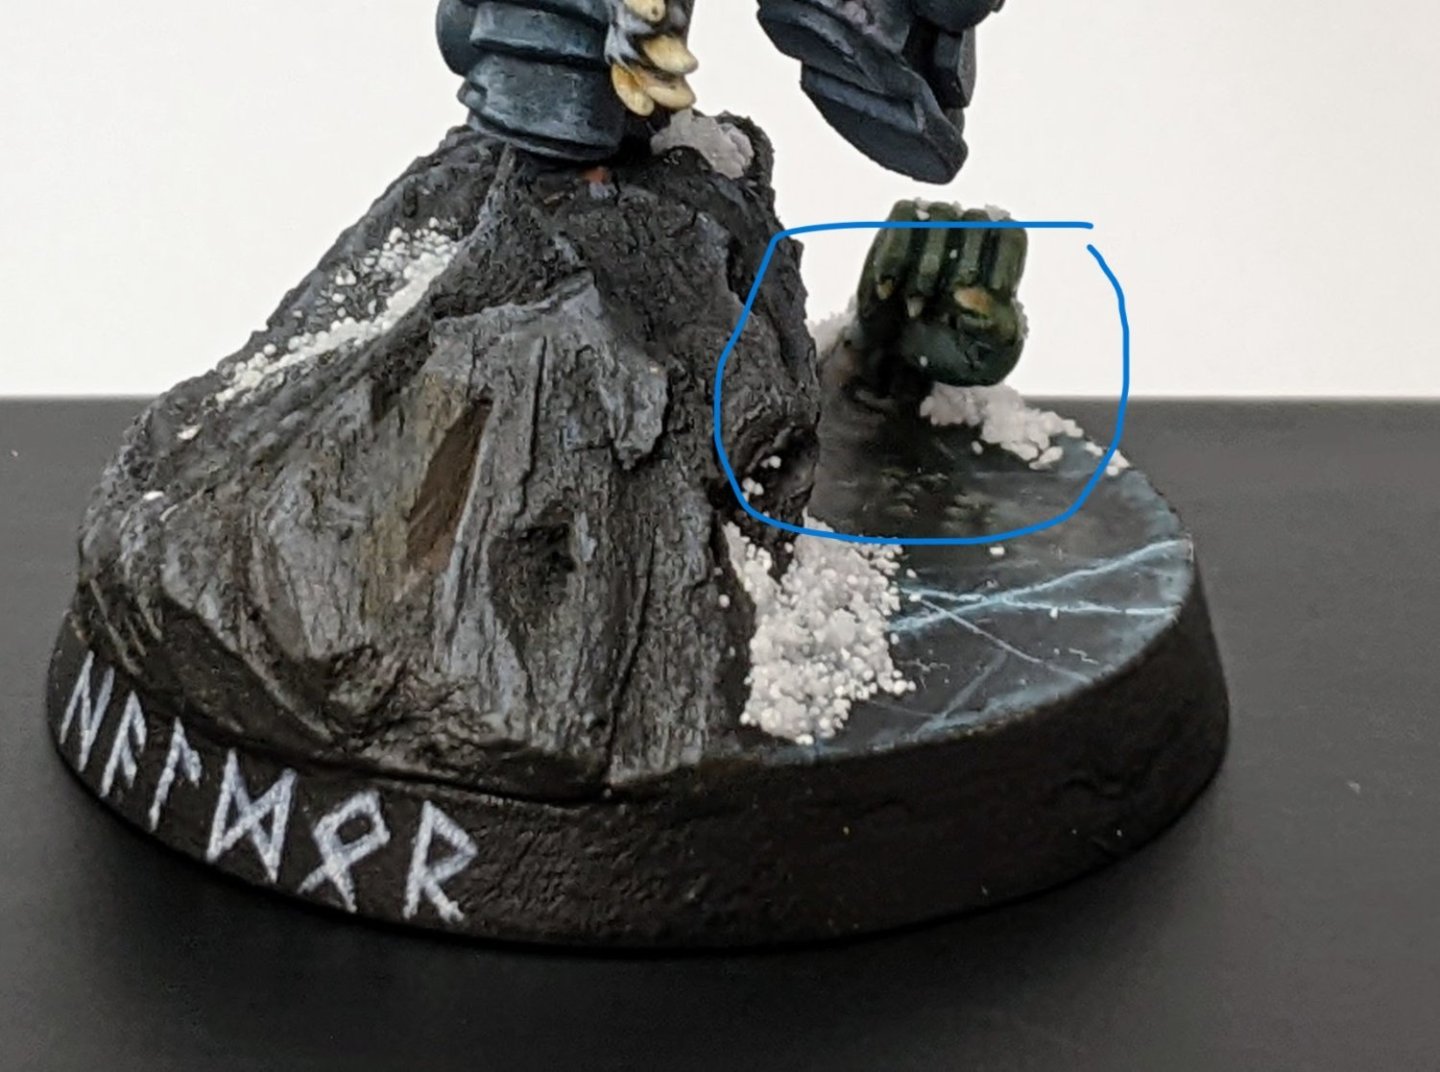
This will happen with any epoxy pour. The issue is the epoxy is adhesive (it sticks to other things more than itself). So it has a tendency to try and creep up the sides due to a combination of the adhesive nature and the surface tension (it creeps a bit and then the surface tension pulls more up so it creeps more etc...) This is counterbalanced by gravity, but if it has lots of things to "grab" then it can climb very high. This a particularly pronounced problem if you have a small crack. I have had it creep up a thin gap so it was way above the rest of the pour and had to hide it with paint etc... You can try to solve this by: Designing around this (making sure there are no thin cracks it can creep up, leaving space so you can cut off the edges etc...) Putting your sides only to the height you want to pour to. This allows you to fill all the way to the top and the surface tension will hold it level. Pouring in multiple thin layers (still doesn't perfectly solve the issue) Sanding down and polishing the raised edges. Note: I have never tried this on something that I wanted to be perfectly clear like water, I have mostly used epoxy for ice and so I can just cover those bits with snow and make it looked scratched etc and it doesn't matter. EDIT: I can illustrate this by showing you some pictures of a figure I did a ice pour for. The picture below shows the figure before the pour. You can see how I have a lip I want to come up to. Then below you can see after the pour. I don't have a picture before I added ice, but you can see how the resin is level around the edge. However, under the rock, the reason there is so much snow there is because it crept up the bottom and I had to hide it with snow. In the following picture you can sort of see where it has crept up most of the back of the hand.

-
That is a question you would have to ask Goodwin :). In general I would say that there are a number of errors / inconsistencies I have found in the drawings for the Alert book (for an example of this see post 365 where I discuss the problem of the foresail halliard). As I note in post 367 there is also the problem that the preventer stay in that diagram is attached with an obviously thinner rope which makes no sense as there is a single failure point. My practice has been as much as possible to ignore the drawings for the purposes of determining the rope type and size and just go with the steele table for the ropes (Goodwin includes it in the book). In cases where the table is not clear (e.g. naming conventions are deafferent or a line is missing), I have tried to use common sense and refer to the drawings. So in my case I used cable for the stays and the shrouds as that is what the Steele table called for. The running backstays I used shroud laid as my best guess as to which was the correct rope in the table was shroud laid.
- 562 replies
-
- 6
-
-
- vanguard models
- alert
- (and 2 more)
-
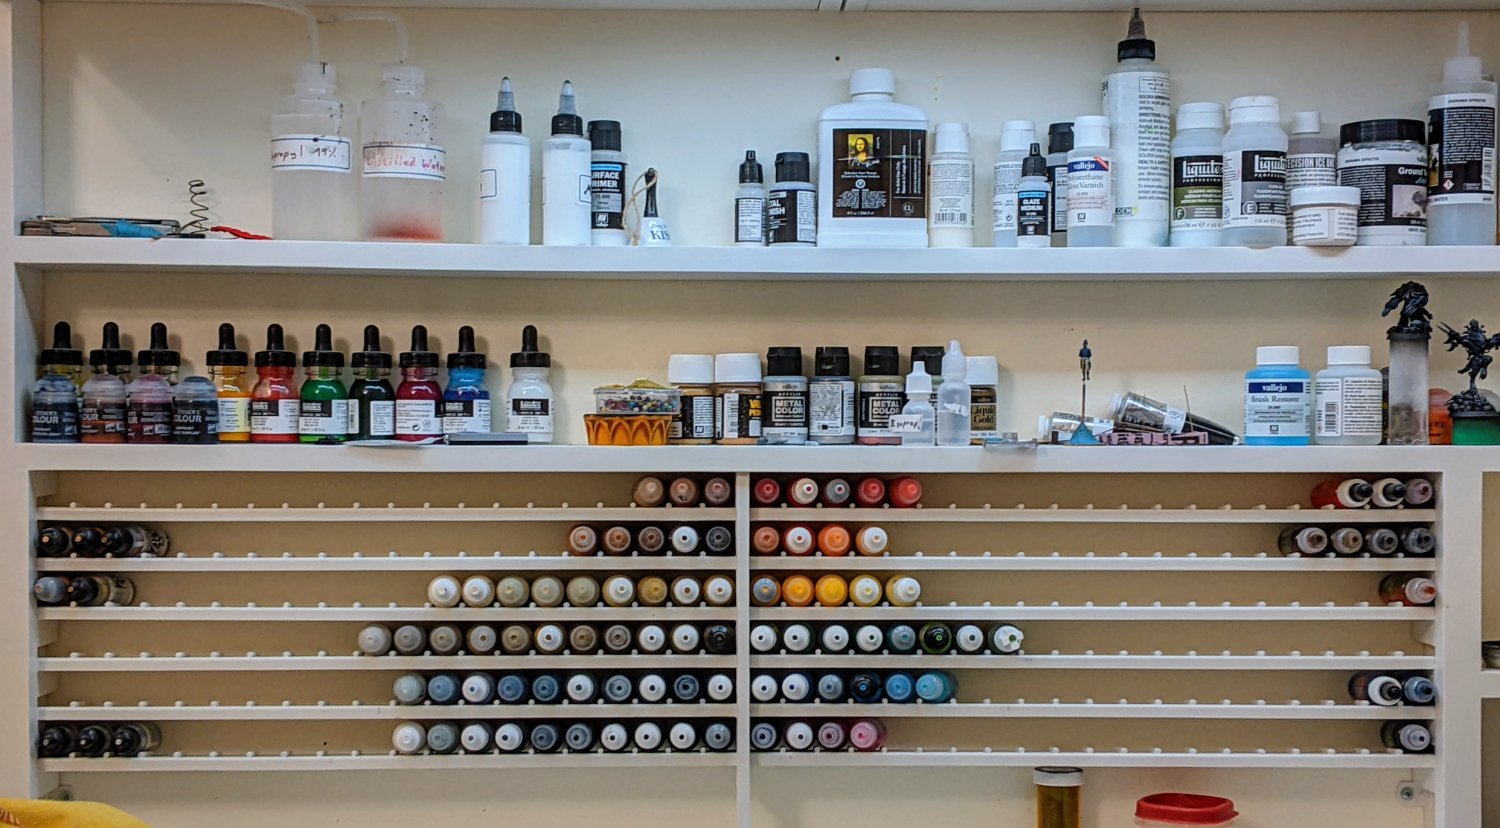
I have accumulated a few over the years. Some get used more than others. I just buy them as I have a use for them and over the years you accumulate a lot as apart from a few colours I rarely run out as I use them in such small amounts. Also the top shelf is made up of every additive under the sun which tend to come in large bottles and I use them by the drop:).

- 562 replies
-
- 8
-
-

-
- vanguard models
- alert
- (and 2 more)
-
welcome aboard
-
I like the modification you added to the mast cap.
- 587 replies
-
- 4
-

-
-
- Indefatigable
- Vanguard Models
- (and 1 more)
-
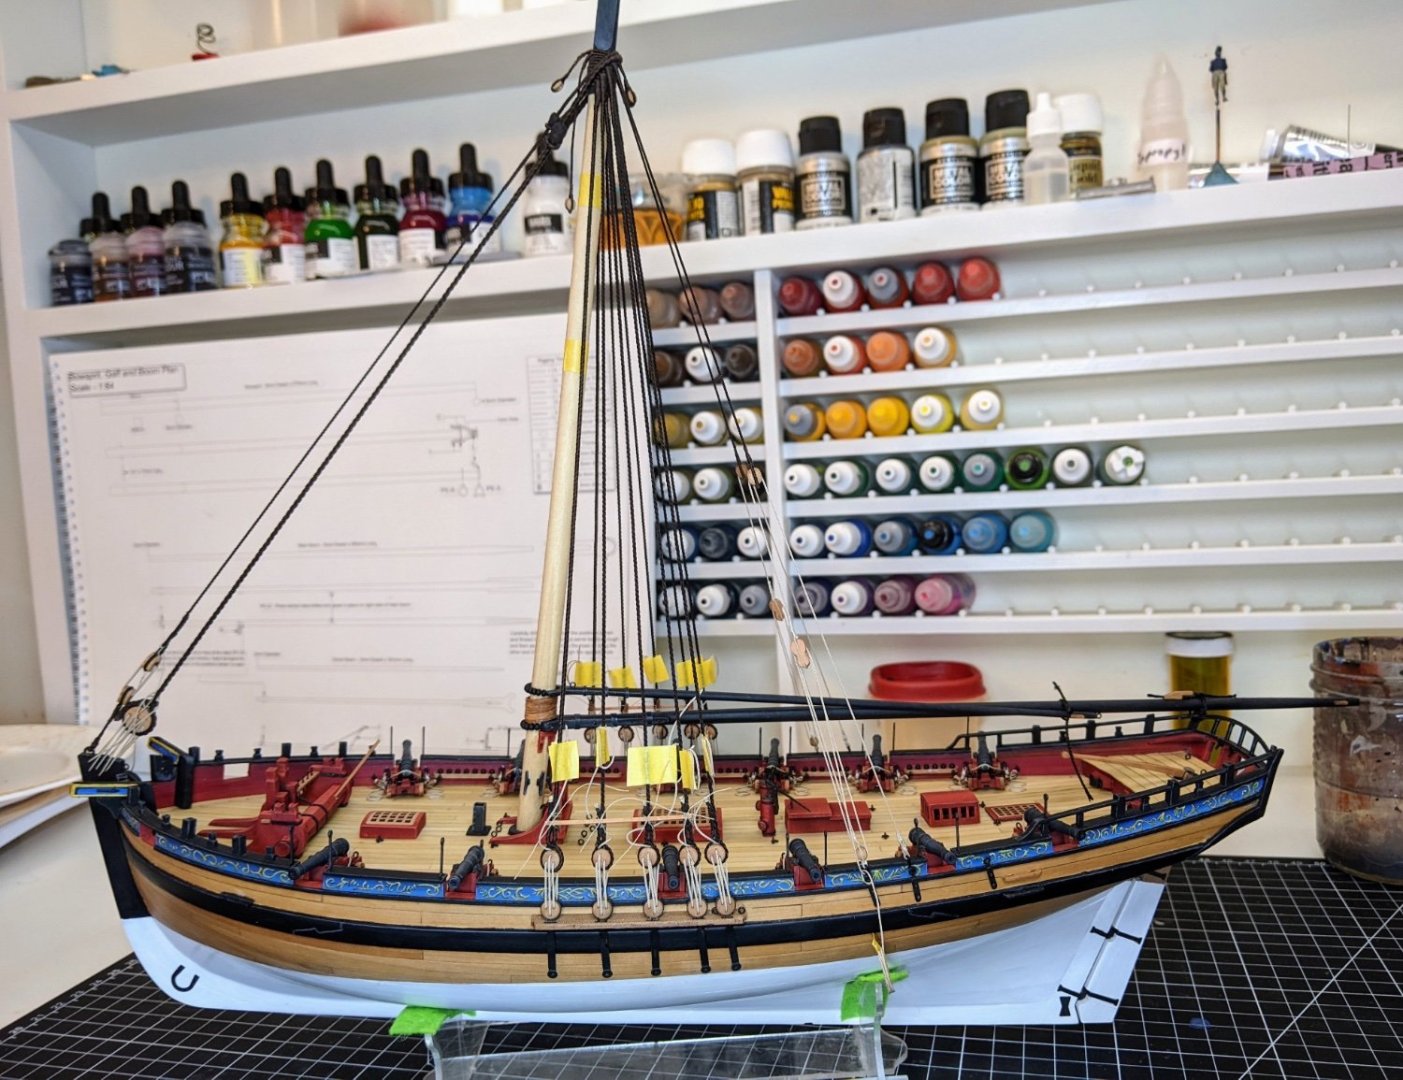
Yes it is surprisingly big now. Part of the reason I originally was trying to delay attaching the bowsprit was for that very reason. But given all the trouble I had with the bowsprit it is probably the way to go. I am to the point in the build where no matter what I do I am going to have restricted access. I try to keep it towards the back of the desk but yes I am a bit worried I will catch it at some point.
- 562 replies
-
- 5
-
-
- vanguard models
- alert
- (and 2 more)
-
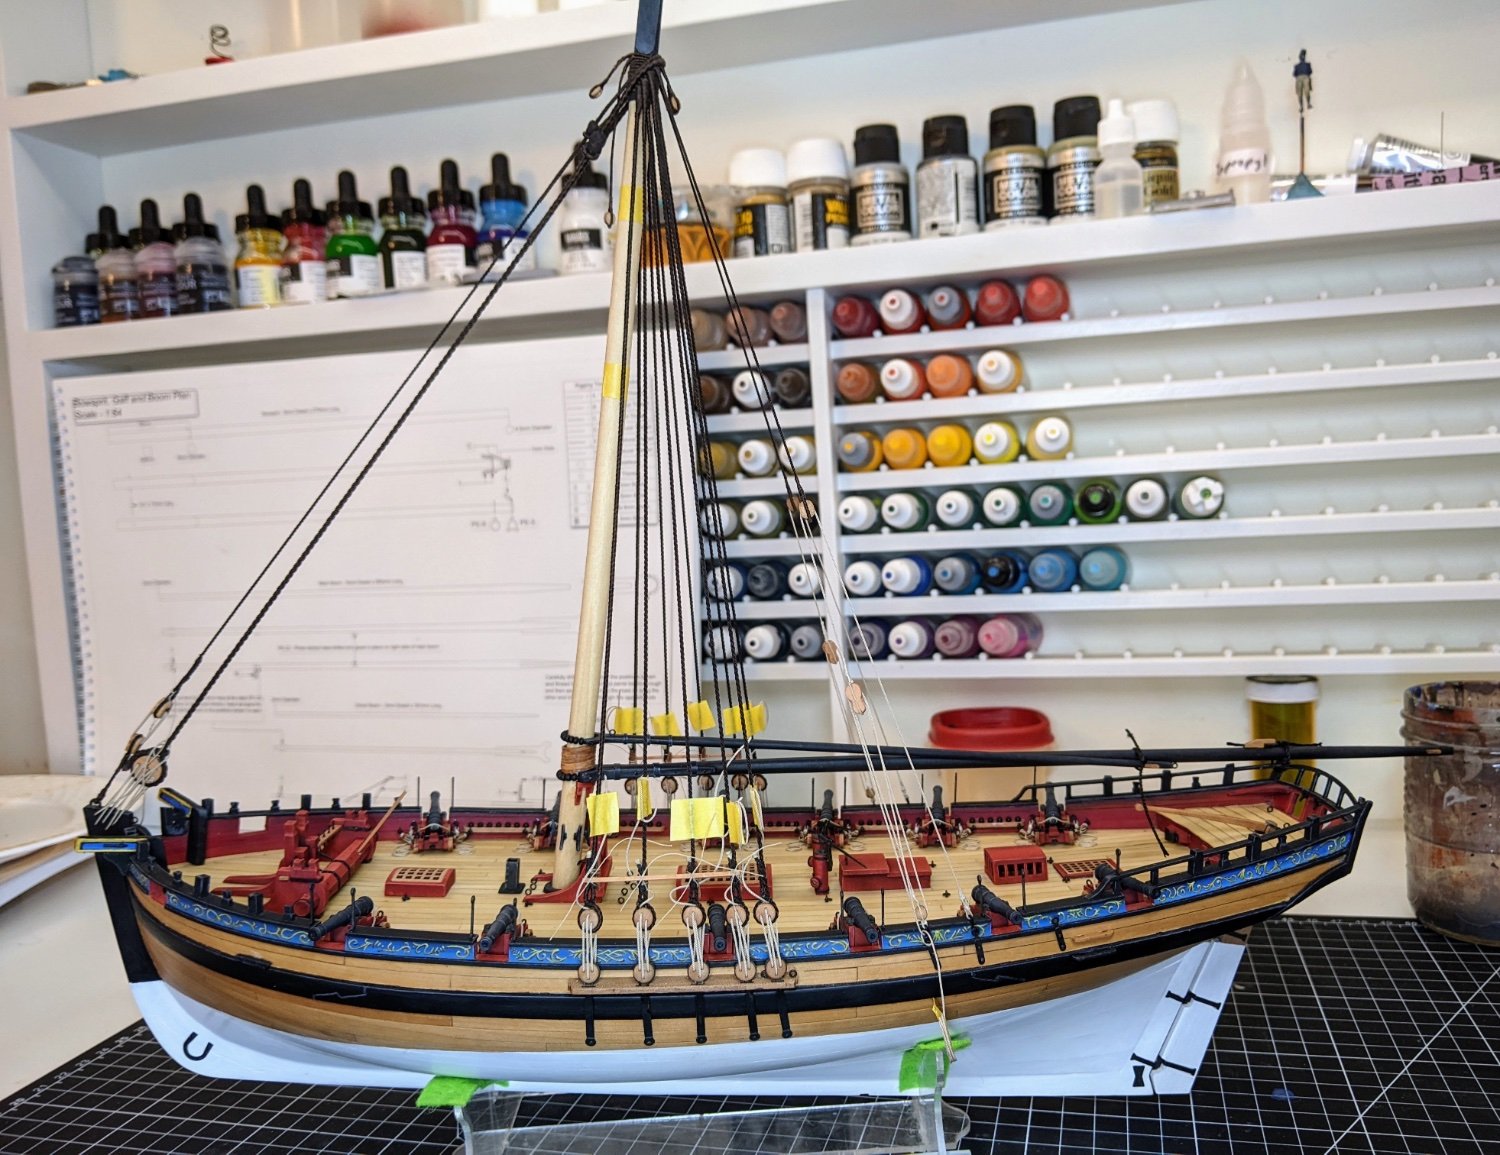
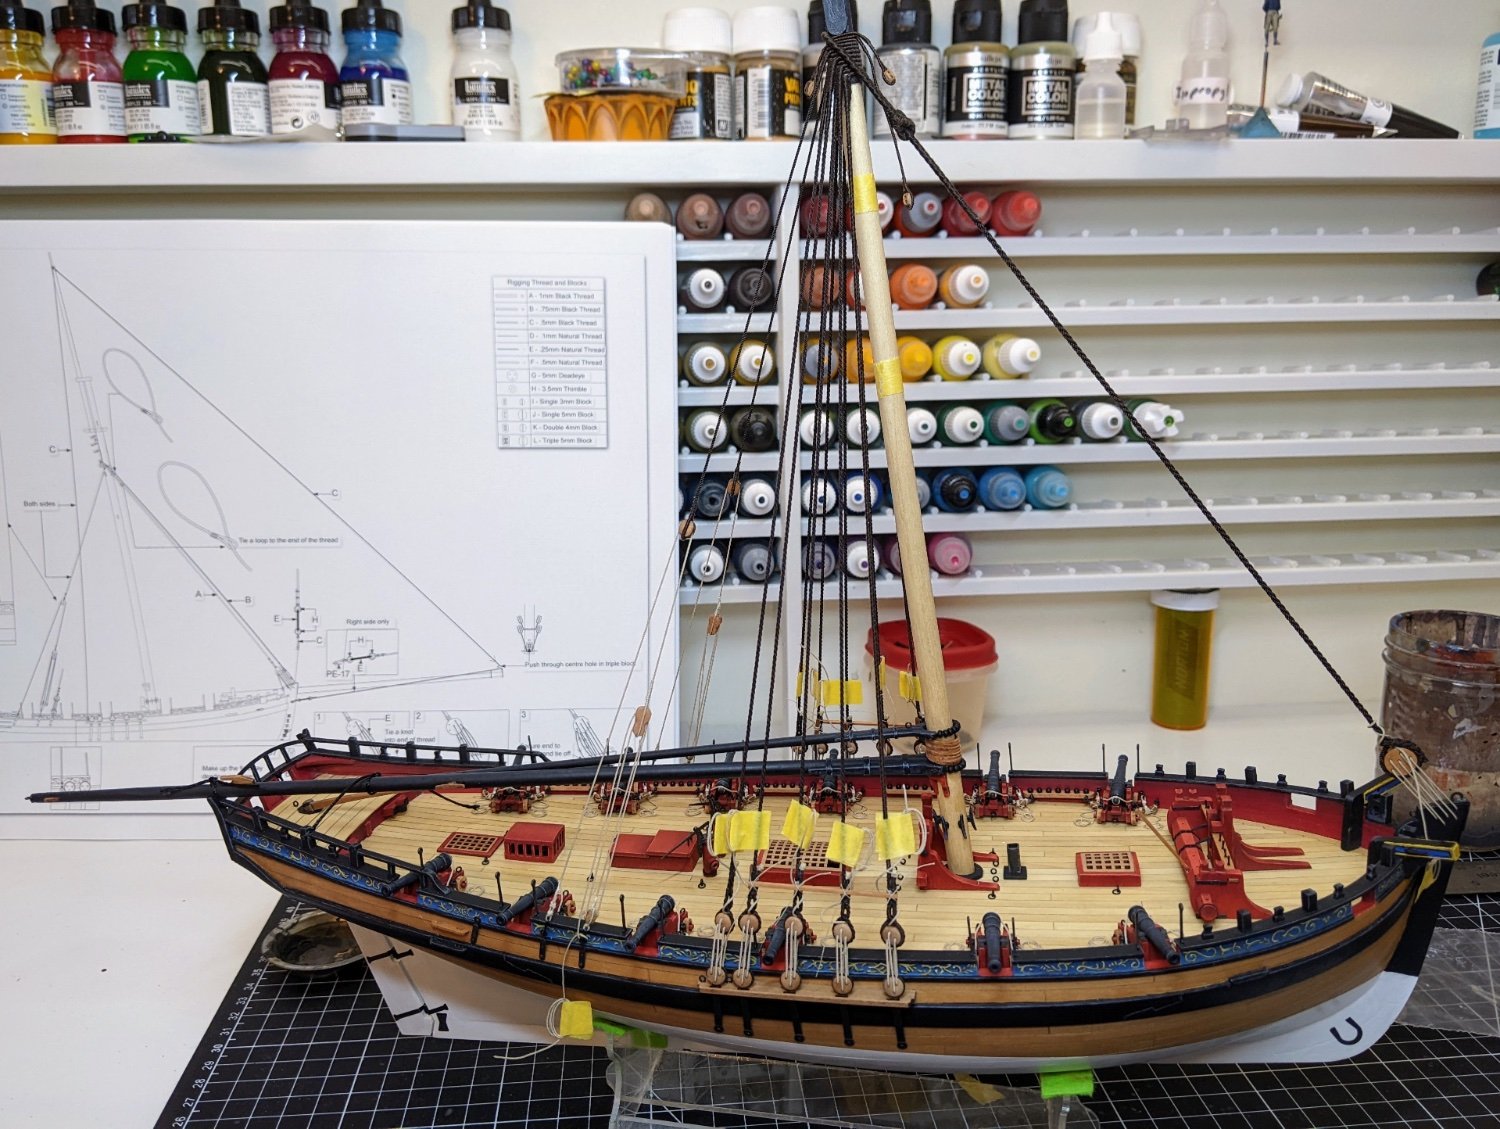
Thanks @Glenn-UK and @AJohnson. The glue set and so I took a quick shot of the whole thing now that the dimensions of alert are mostly set.
- 562 replies
-
- 20
-
-
- vanguard models
- alert
- (and 2 more)
-
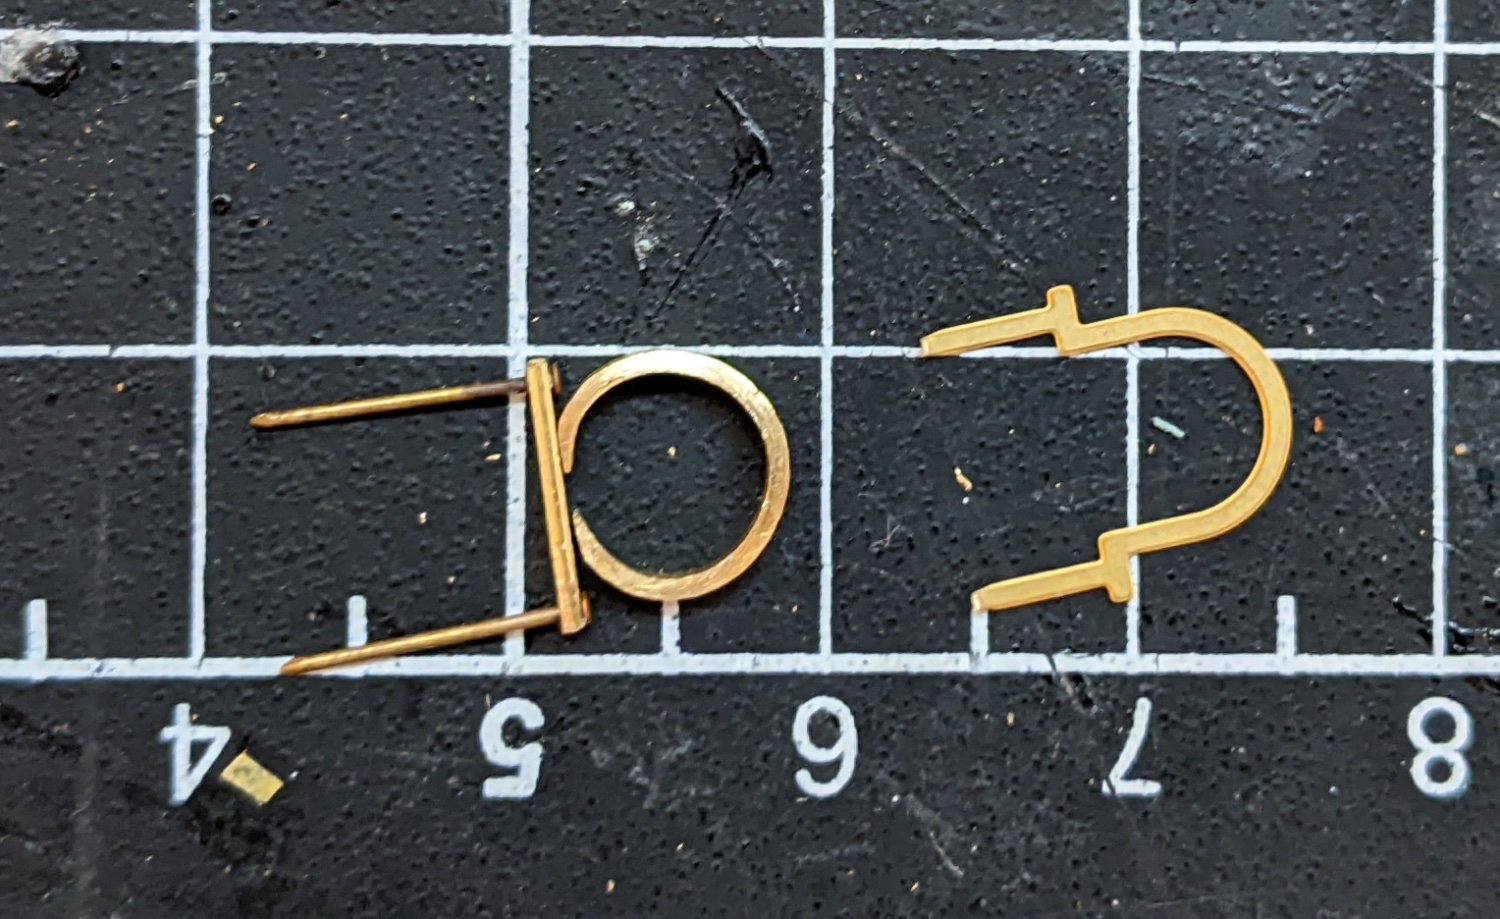
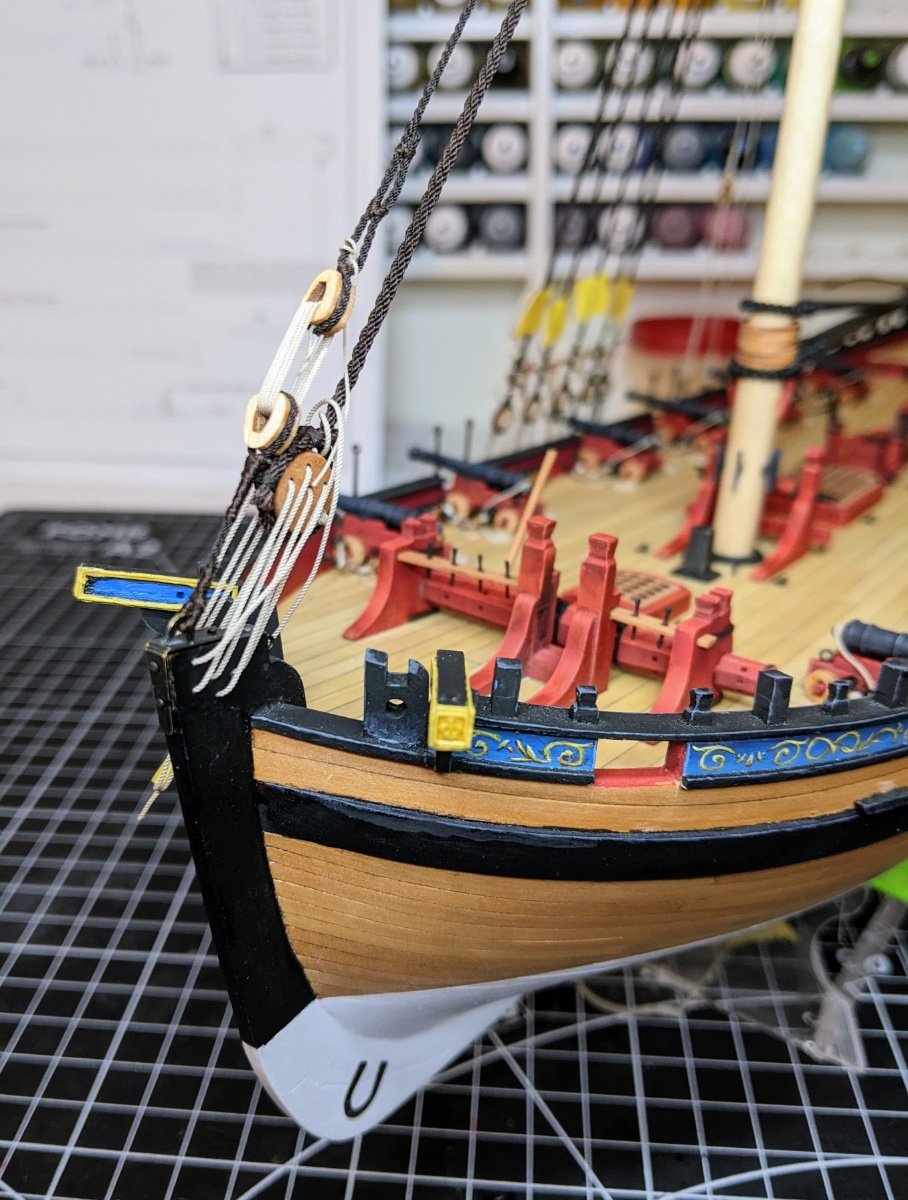
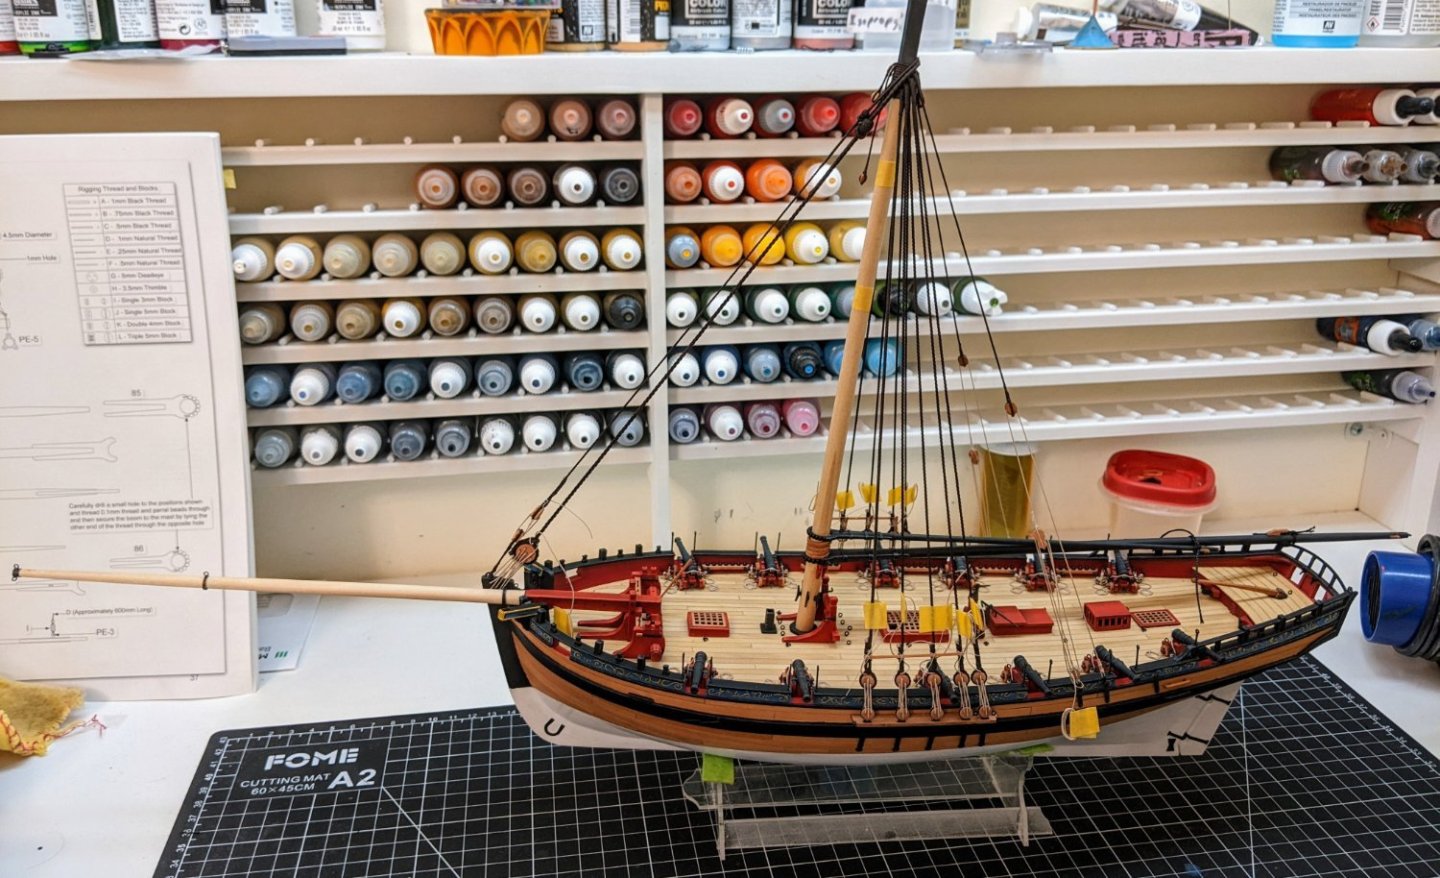
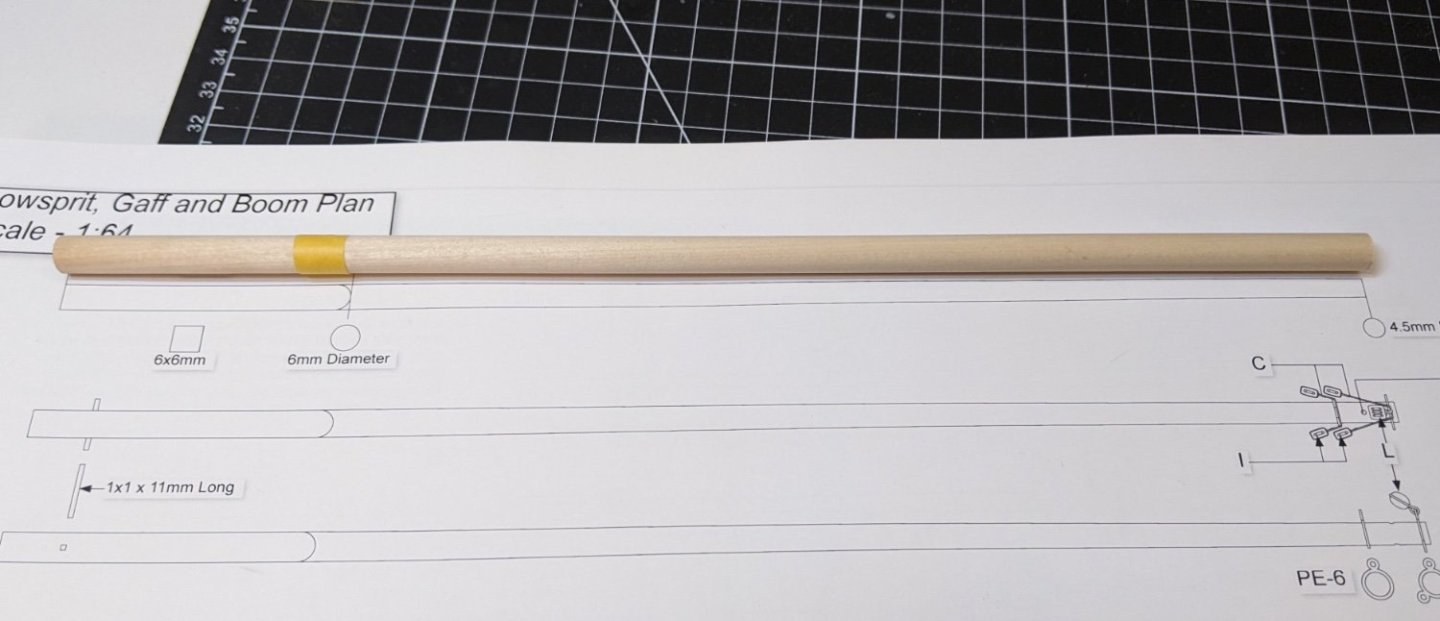
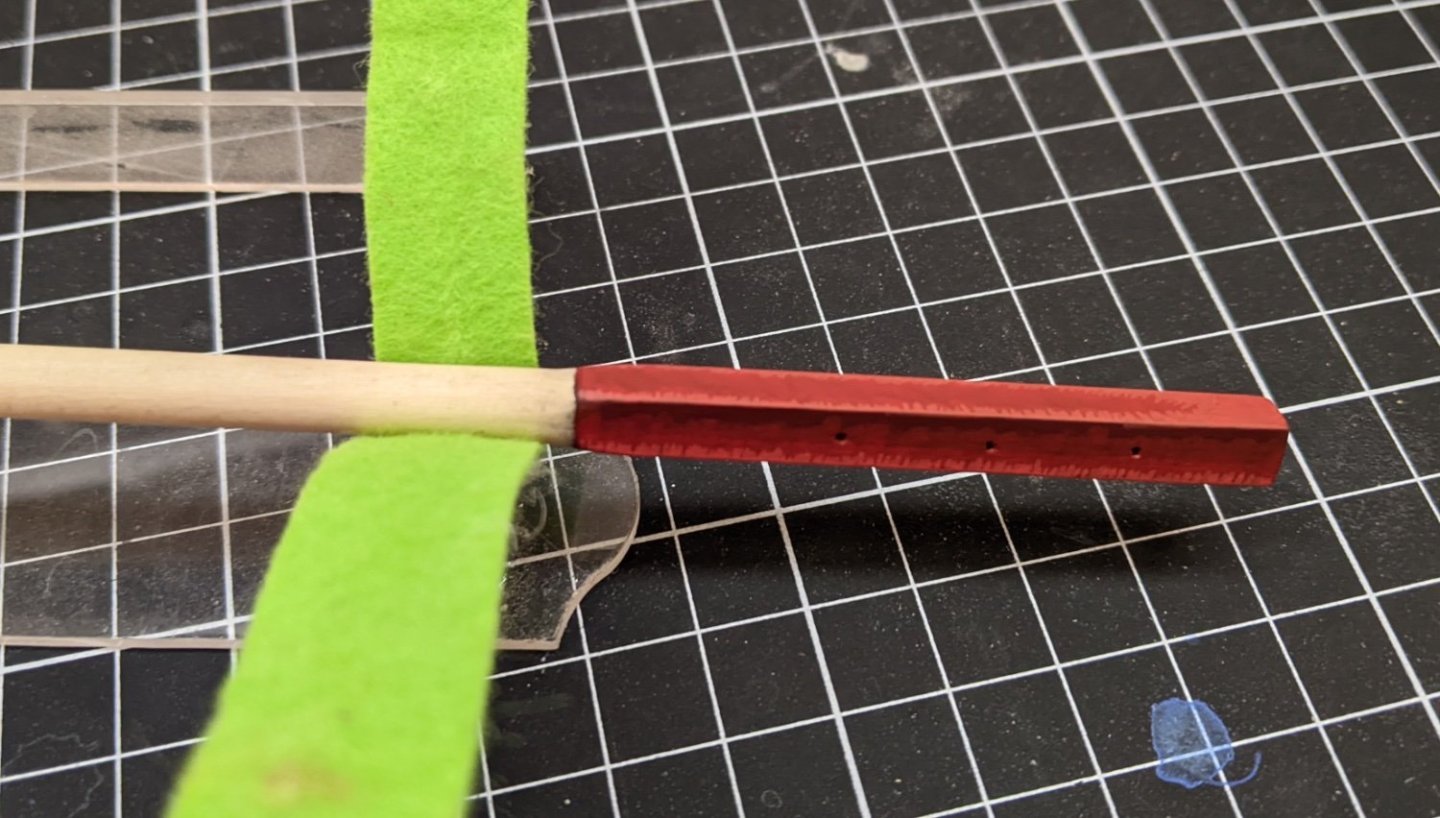
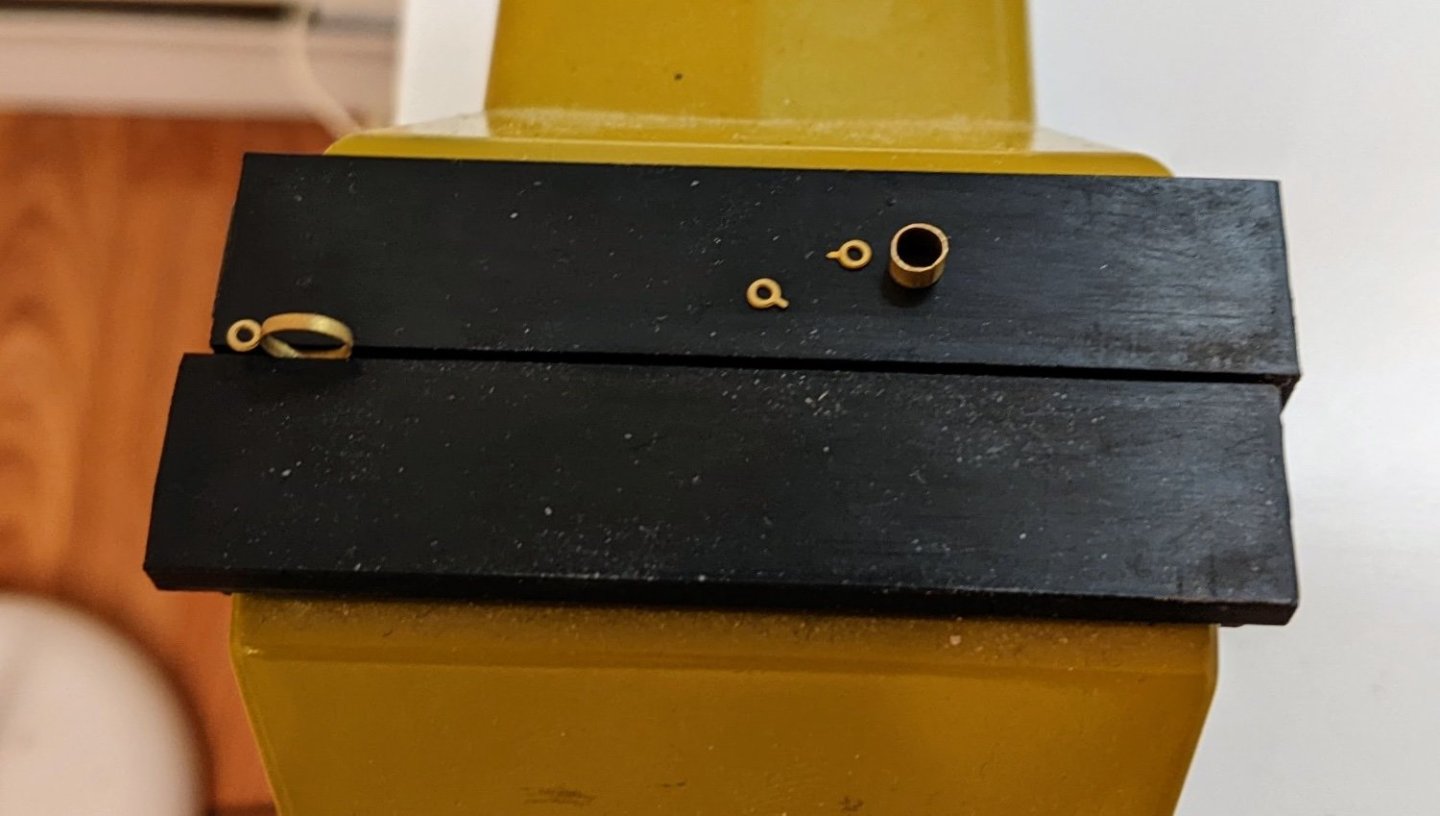
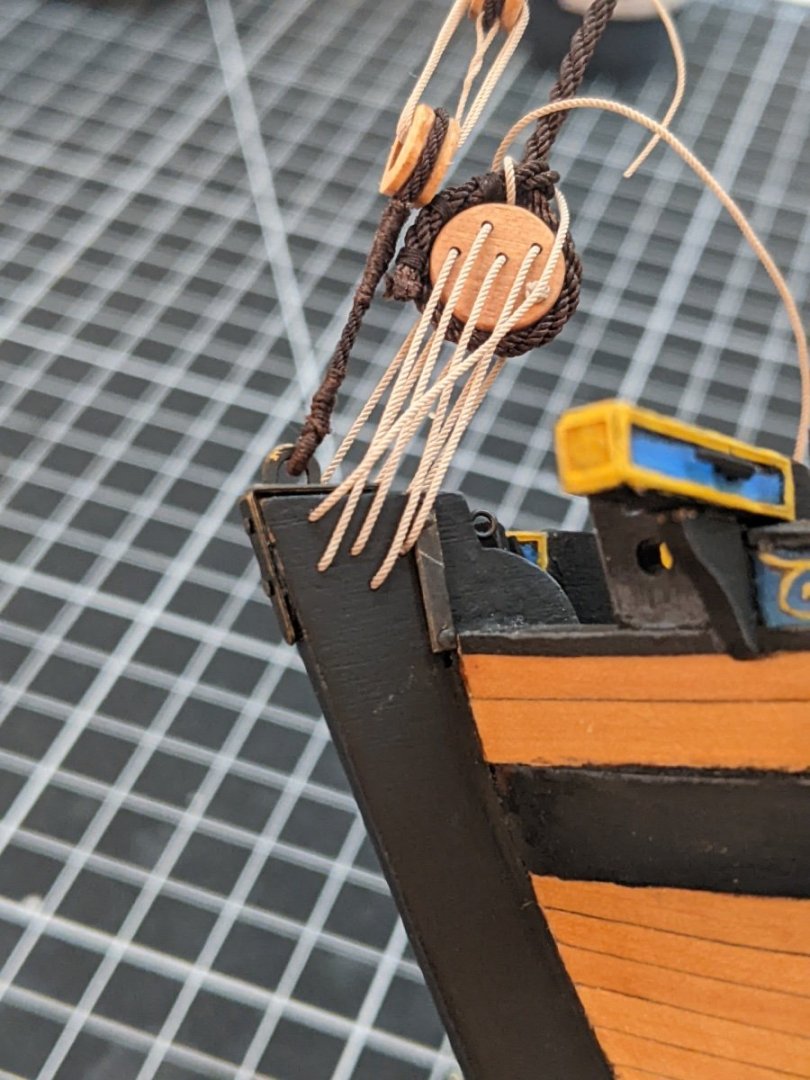
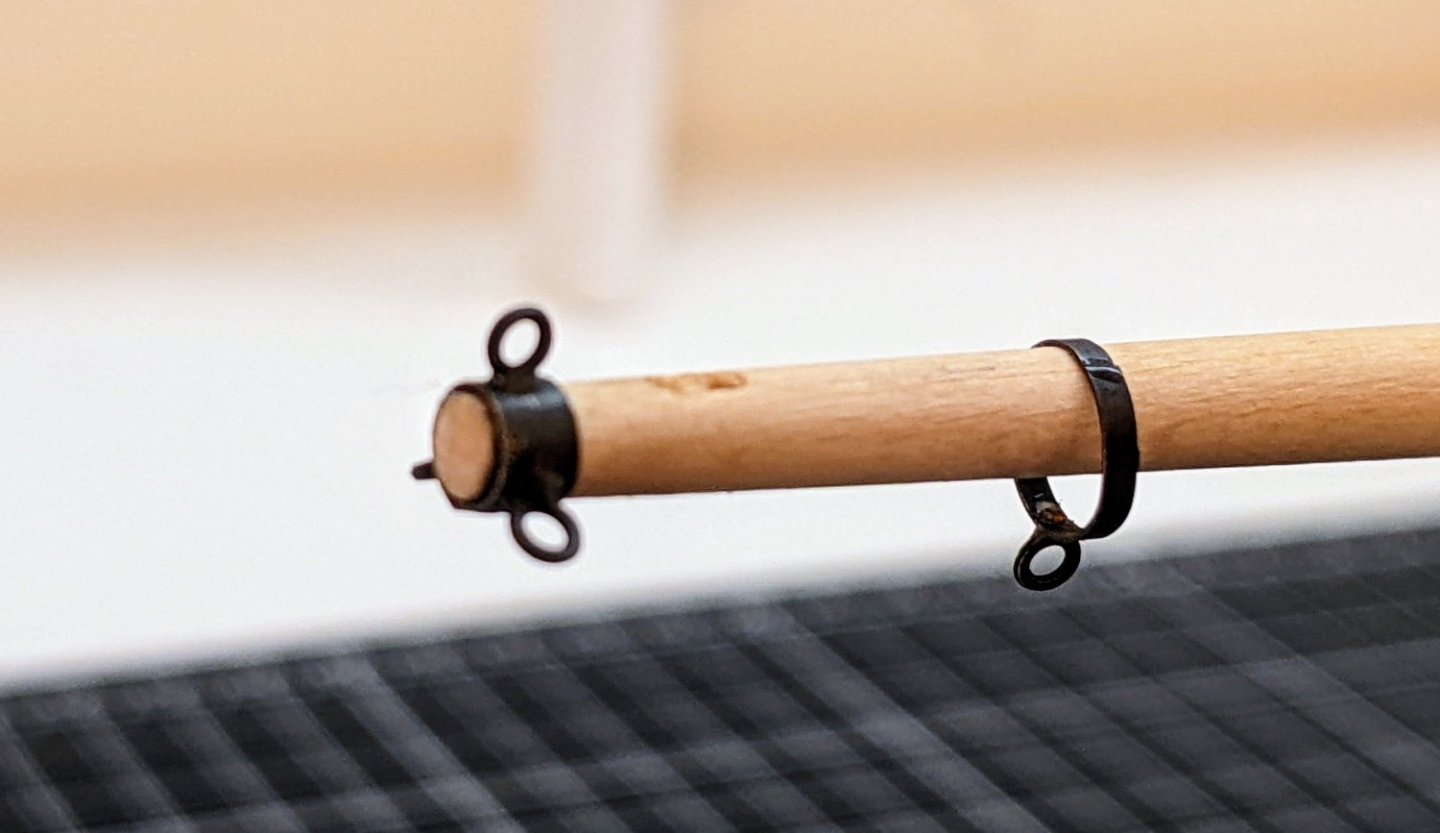
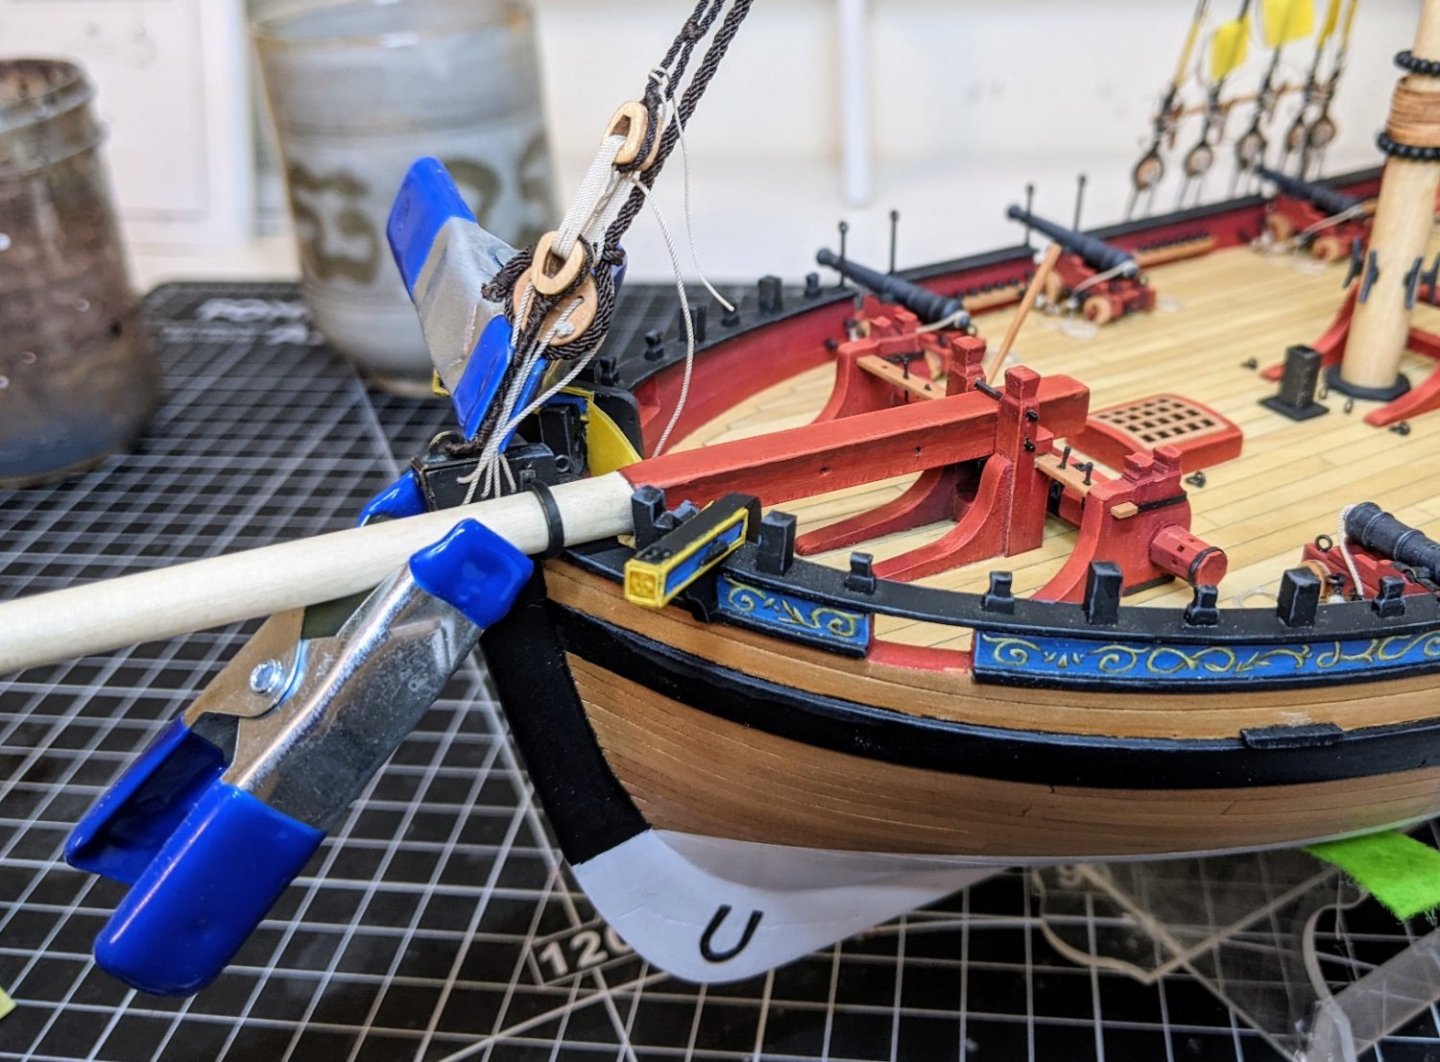
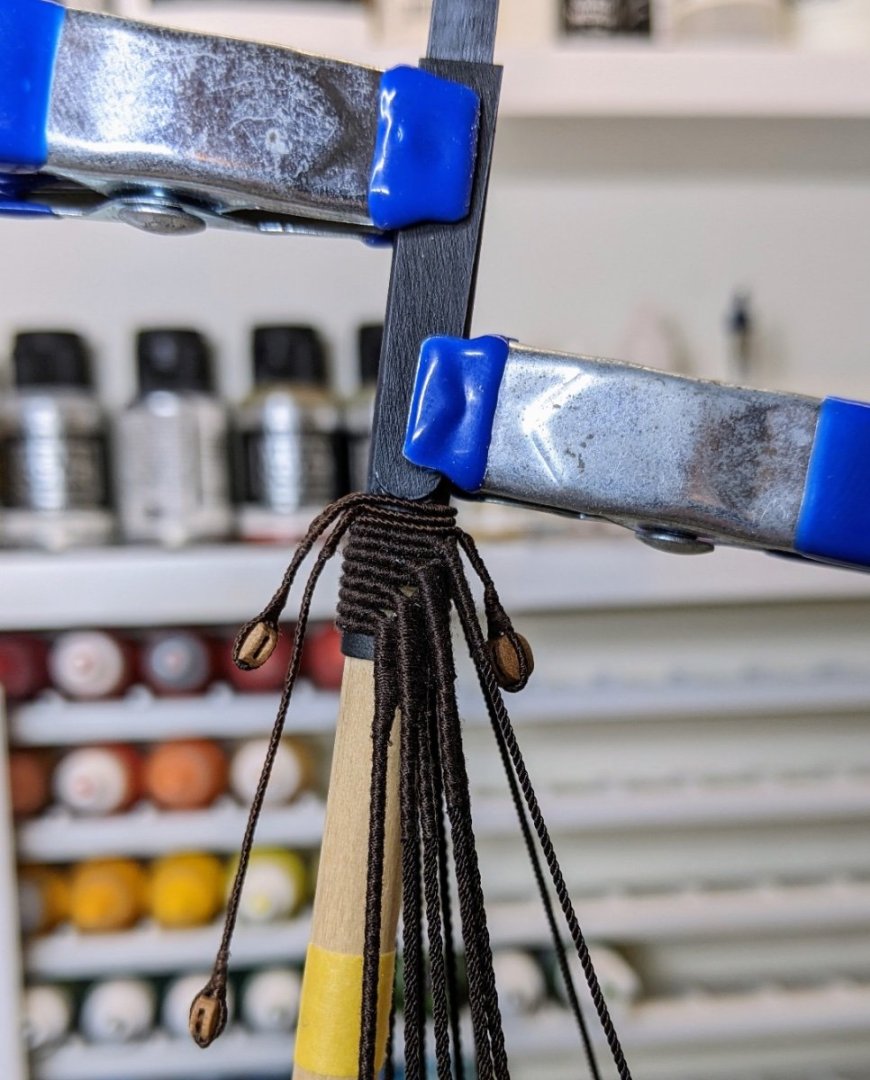
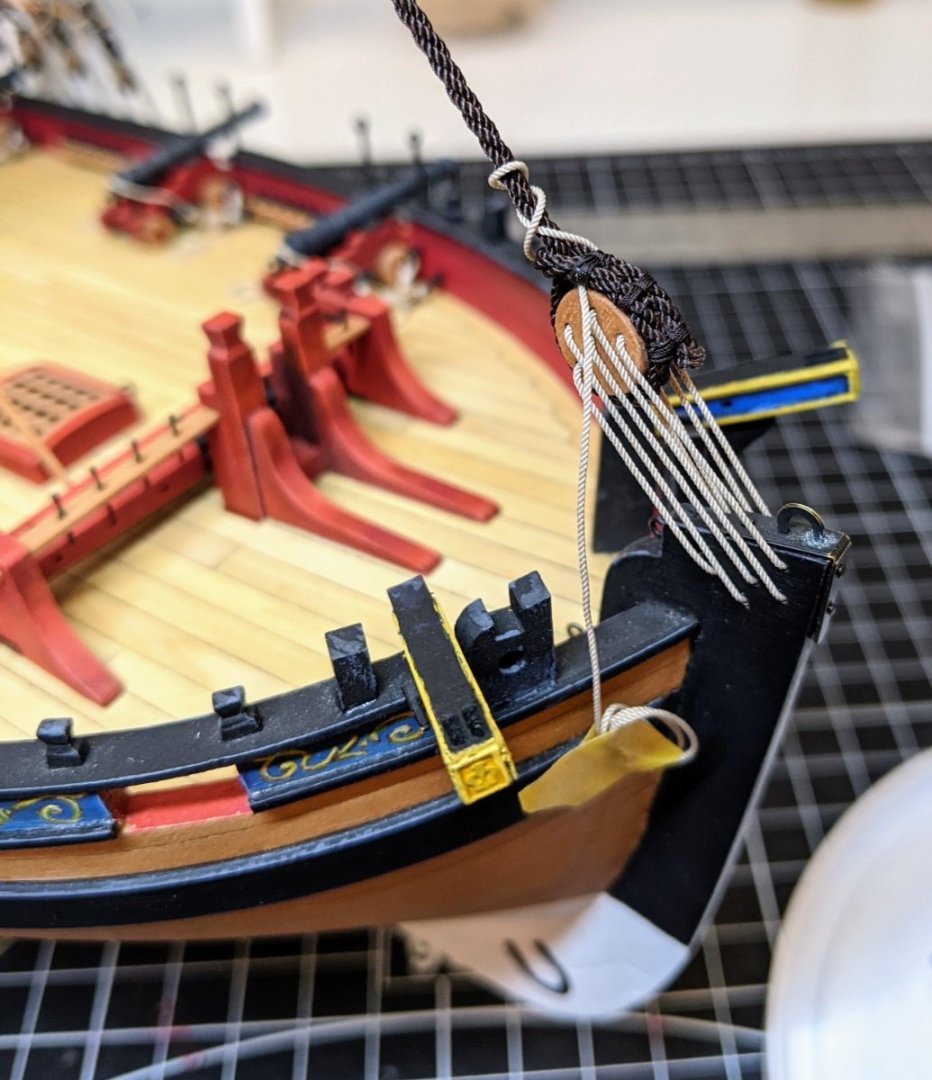
Log #64: The Bowsprit As I discussed in my last post, I decided that I needed to do the bowsprit next before I proceeded with any more rigging. As you will see this is another lesson in “it would have been much easier if I had planned ahead”. First step was to make the bowsprit itself. This was done in the same manner as the other spars with my drill. I decided to paint the end red as I liked the look of that better than the black suggested by the kit. This was done in a similar manner to previous painting. I highlighted the sides towards the bottom, the top I left largely one bright colour with some less pronounced highlights towards the inboard end and the edges. You can see a progress picture below after I had blocked in the main highlights before I started glazing to smooth the transitions. I also decided to rework a lot of the ironwork as in many cases the kit version didn’t really match Goodwin and also at times looked a bit flimsy. These were made using scrap from the kit PE. The eyebolts you see below that were attached to the rings were the ringbolts from the kit PE with the attaching point not cut off so I could insert them into a hole. For securing the bowsprit I scratch built using the edges of the thicker PE sheet from the kit. You can see it below compared to the kit version. After blackening you can see the result. I also drilled a simulated sheeve into the end of the bowsprit as per the Goodwin arrangement. For securing the bowsprit I first attached the plate. And then I attached the rest. Notice all the damaged belaying pins. The whole process of drilling the holes for the iron bars to secure the bowsprit was fraught with problems. At one point I completely broke the whole assembly and had to reattach everything and in many cases add some paint touches to hide the damage. It would have been much easier if I had planned for all this from the beginning. In the picture you can see me gluing the ring to the plate. I have a clamp holding the laniards away as I don’t want to get glue on them accidentally.

- 562 replies
-
- 22
-
-
- vanguard models
- alert
- (and 2 more)
-
Despite the bubbles I think she looks really good. You can’t really see them from the top. Epoxy can be quite frustrating at times.
-
Great job, it looks really good.
- 217 replies
-
- 2
-
-
- medway longboat
- Syren Ship Model Company
- (and 1 more)
-
Method of securing the mizzen outrigger on a Cutter
Thukydides replied to Thukydides's topic in Masting, rigging and sails
Ya I was thinking something along those lines, but I was wondering if anyone had any definitive answers as to what the practice was. I have been considering rigging the mizzen on alert, just as something a bit different. -
I haven't gotten to this point, but one thing I have seen people do is super glue the end of the line in place and then make the rope Hank separately and put it over the glued line.
-
That is very kind of you, I will definitely send you a short list (I just have to whittle it down first :))
-
How are you finding them 7 months later? How close do you need to be to stay in focus? The build is looking really good :).
- 207 replies
-
- 1
-
-
- billing boats
- cutty sark
- (and 1 more)
-
Very nice. I always appreciate some good research. I am jealous of your ability to go visit the archives. All my research is restricted to descriptions of the items or what happens to be digitized being located across the pond.
-
I had the same problem. Goodwin gave a length for the breach ropes which was too long for the size of the ship. Though I discovered this after the first two so I had less to redo. Great work
- 152 replies
-
- 5
-
-
- Vanguard Models
- Cutter
- (and 2 more)
-
Thank you, though it is only tidy when I take pictures 😄. When I am in the middle of rigging the desk very quickly becomes a mess of reference books, tools and supplies.
- 562 replies
-
- 4
-
-

-
- vanguard models
- alert
- (and 2 more)
-
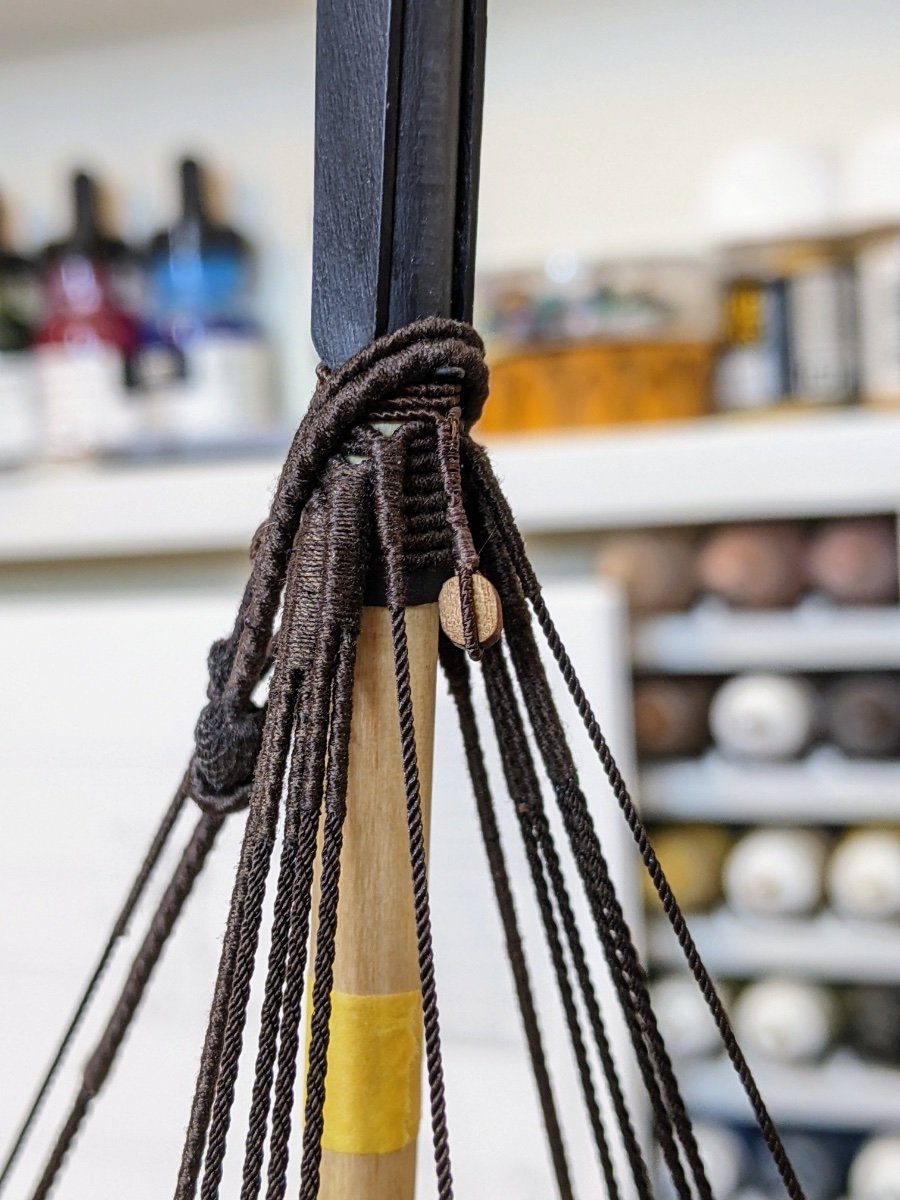
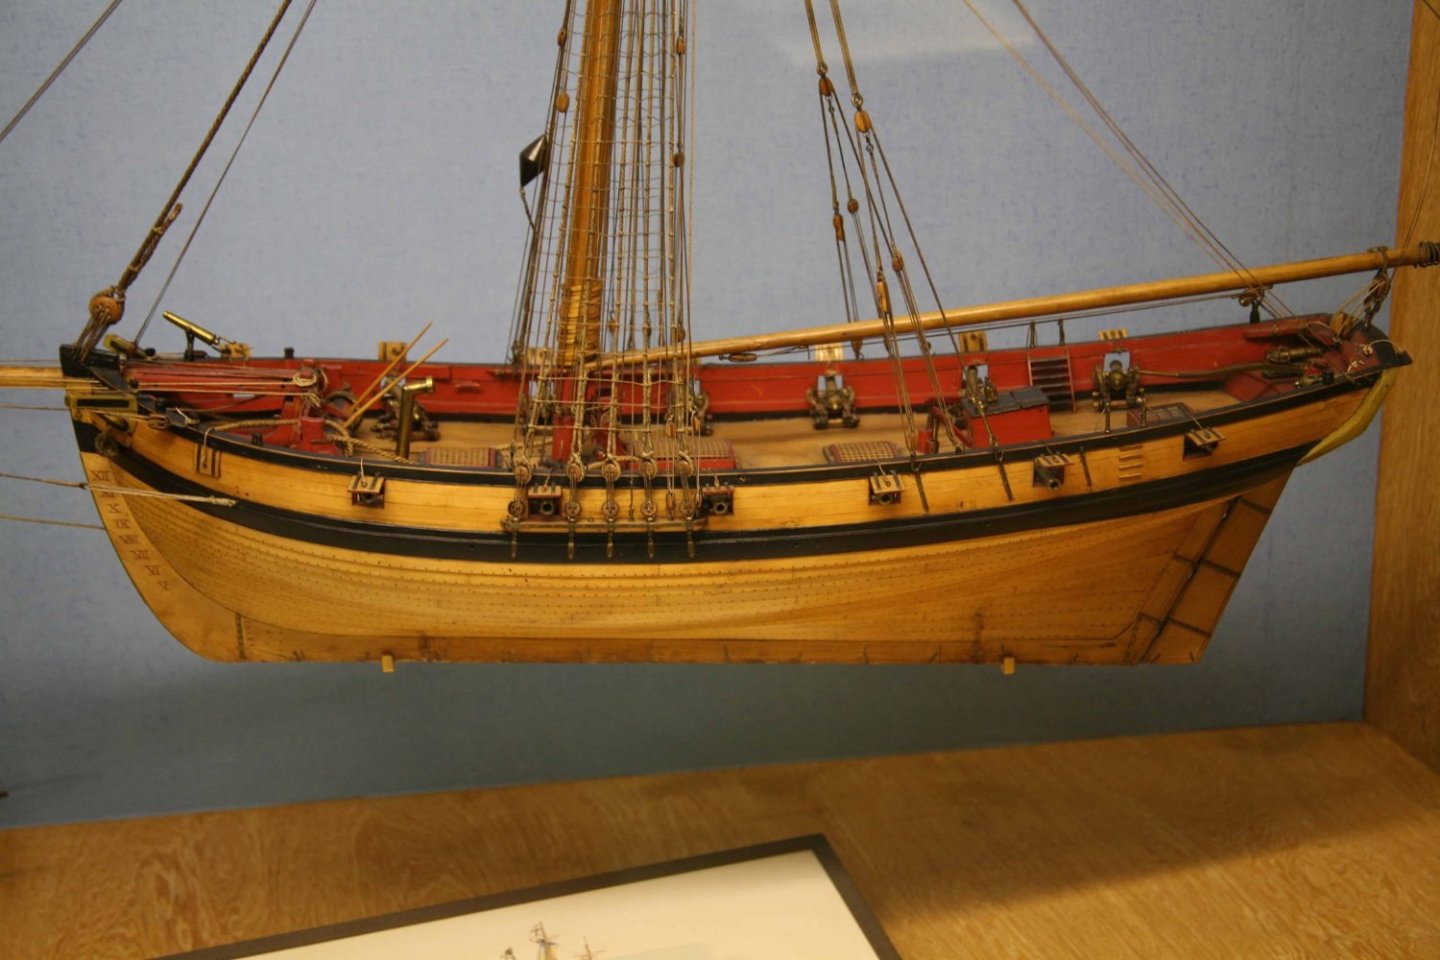
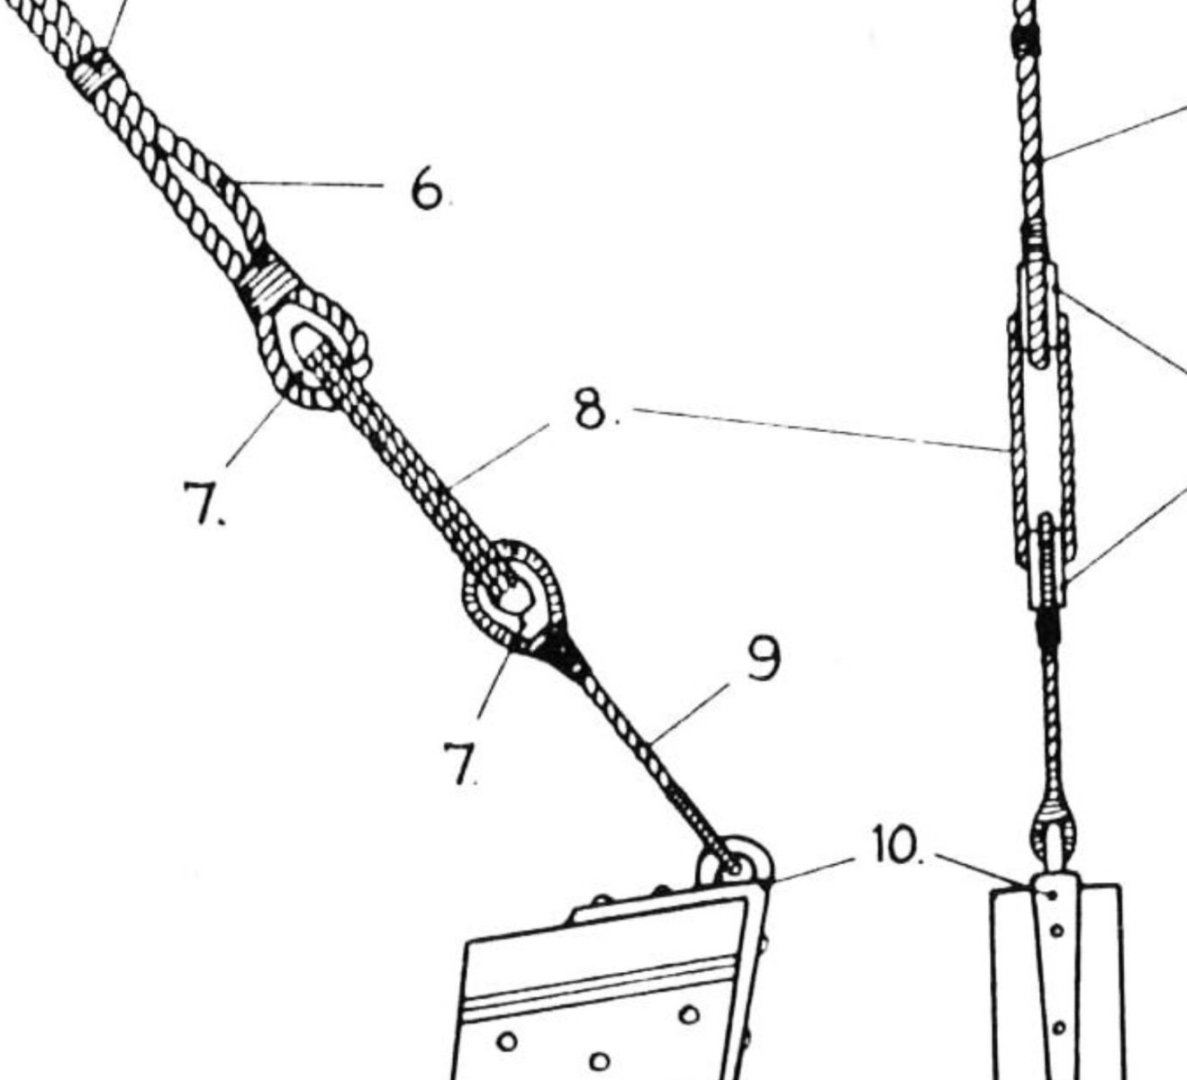
Log #63: Rigging the Preventer Stay Thank you to everyone who has stopped by and commented and given encouragement. With the Mainstay done, I moved on to looking at the Preventer Stay. Here there is even more variety than with the Mainstay. Goodwin depicts Alert with two closed hearts. The odd thing about his depiction of this arrangement is that the line connecting the heart to the stem is thinner than the preventer stay. This does not make a lot of sense to me as it is a single line and so why have a heavier line at other parts when the thinner one will be the weak point. The Hawk model simply depicts the preventer stay attaching to the stem using a single thimble. The science museum model shows the preventer stay below the mainstay or possibly this is another line and there is no preventer stay. The kit goes with two thimble sized together and Chuck’s Cheerful has no preventer stay. When it comes to other builds on MSW, most have gone with the kit arrangement, but Blue Ensign decided to go with the Goodwin arrangement using the closed hearts. This latter arrangement consistent with Goodwin is what I decided to go with in the end. In this case I don’t really have a good reason for picking this over the others apart from I liked the look of it the best. The one change from Goodwin I made as to use the same 0.8mm cable for the section attached to the stem as I felt this made more logical sense than using a lighter line. If I was being strictly correct I should probably have had a metal bit inside the served loop that attaches to the stem. However, I felt it wouldn’t really be visible and so I just stuck with serving the area. I also made a small adjustment to the masthead as I was having problems with the stays slipping down. I added an eyebolt just above the last of the pendants to keep the stay from slipping down the mast. Even if not strictly correct it is barely noticable. And with that the main standing rigging is done. In my previous log I mentioned that I was planning on next adjusting the tension on all the lines, but looking at a few other logs and thinking some more I think that I first need to get the bowsprit on the model. This may just be me trying to procrastinate on the ratlines :), but as much as I have enjoyed the rigging, it is very fiddly work and I like the idea of doing a slightly different type of task for a bit. Thanks for stopping by and here is a shot of the current status of things.


- 562 replies
-
- 20
-
-
- vanguard models
- alert
- (and 2 more)
-
Log #62: Rigging the Mainstay Having finished the last halliard pendant it was time to move on to assembling the next stage of the mast. However, at this point I noticed an inconsistency in Goodwin which I want to briefly discuss. The following is a diagram I have been using to organize how I went about ordering the mast head, but there is an issue with block number 26. This is referred to as the foresail halliard, but in all other places in the book, the foresail halliard block is sized to the mainstay, not to the masthead. Additionally it appears to me that the Hawk model follows the sizing to the mainstay convention. I have assumed that this was just an error on Goodwin’s part and plan to size the foresail halliard to the mainstay (this is also how the kit instructions say to do it). Next up was attaching the cheeks (I think that is what they are called). These were glued and clamped in place and left to dry overnight. Then on to the mainstay. There seem to be two possible ways to turn the stay in the deadeye. First there is the method used by the Kingfisher model and that is the one recommended by the kit. This was also chosen by Chuck for his Cheerful model and most models of Alert I have seen appear to go with this method. The second is to wrap the stay back down around the deadeye and size it there. This is the method used in Goodwin and on the Hawk model. I decided to go with the later method as I went with the Hawk arrangement for the running backstays so I might as well go with the theme. Most other models I have seen use the kit arrangement so this allows me to do something a little different. I sized it using the 0.2mm line Ben custom made for me. So with that the mainstay is attached. Next up is the preventer stay and then I will have to go through all the standing rigging to adjust the tension and secure it in place.


- 562 replies
-
- 18
-
-
- vanguard models
- alert
- (and 2 more)
-
Ah I understand. So I much prefer the look of actually cutting the planks into their proper lengths, but I can't answer for you what you prefer. I would say that it is not much extra work so if you prefer the look, I would recommend going for it.
- 152 replies
-
- 3
-
-
- Flirt
- Vanguard Models
- (and 1 more)