Jay 1
-
Posts
654 -
Joined
-
Last visited
Content Type
Profiles
Forums
Gallery
Events
Everything posted by Jay 1
-
 Thanks for the very helpful update and overview, Bob. I have a copy on order with Amazon, and will look forward to your review! Cheers, Jay
 -
Very nice work, Luca--your Cutty looks great! About your missing photos: Yep, you'll have to re-load them due to an issue with the MSW server a few days back--a lot of pictures were lost due to that glitch. Again, great work! Cheers, Jay
- 121 replies
-
- 1
-

-
- cutty sark
- artesania latina
- (and 1 more)
-
Absolutely gorgeous work, Michael--your craftsmanship never ceases to amaze me! Would love to spend time in your shop learning the underlying techniques and skills you bring to your work!! Cheers, Jay
-
Very cool stuff, Paul and great video--thanks for sharing this resource and modeling technique! Cheers, Jay
-
Gingher scissors are excellent, come in a variety of sizes, but also are rather expensive--love the ones I have! Cheers, Jay
-
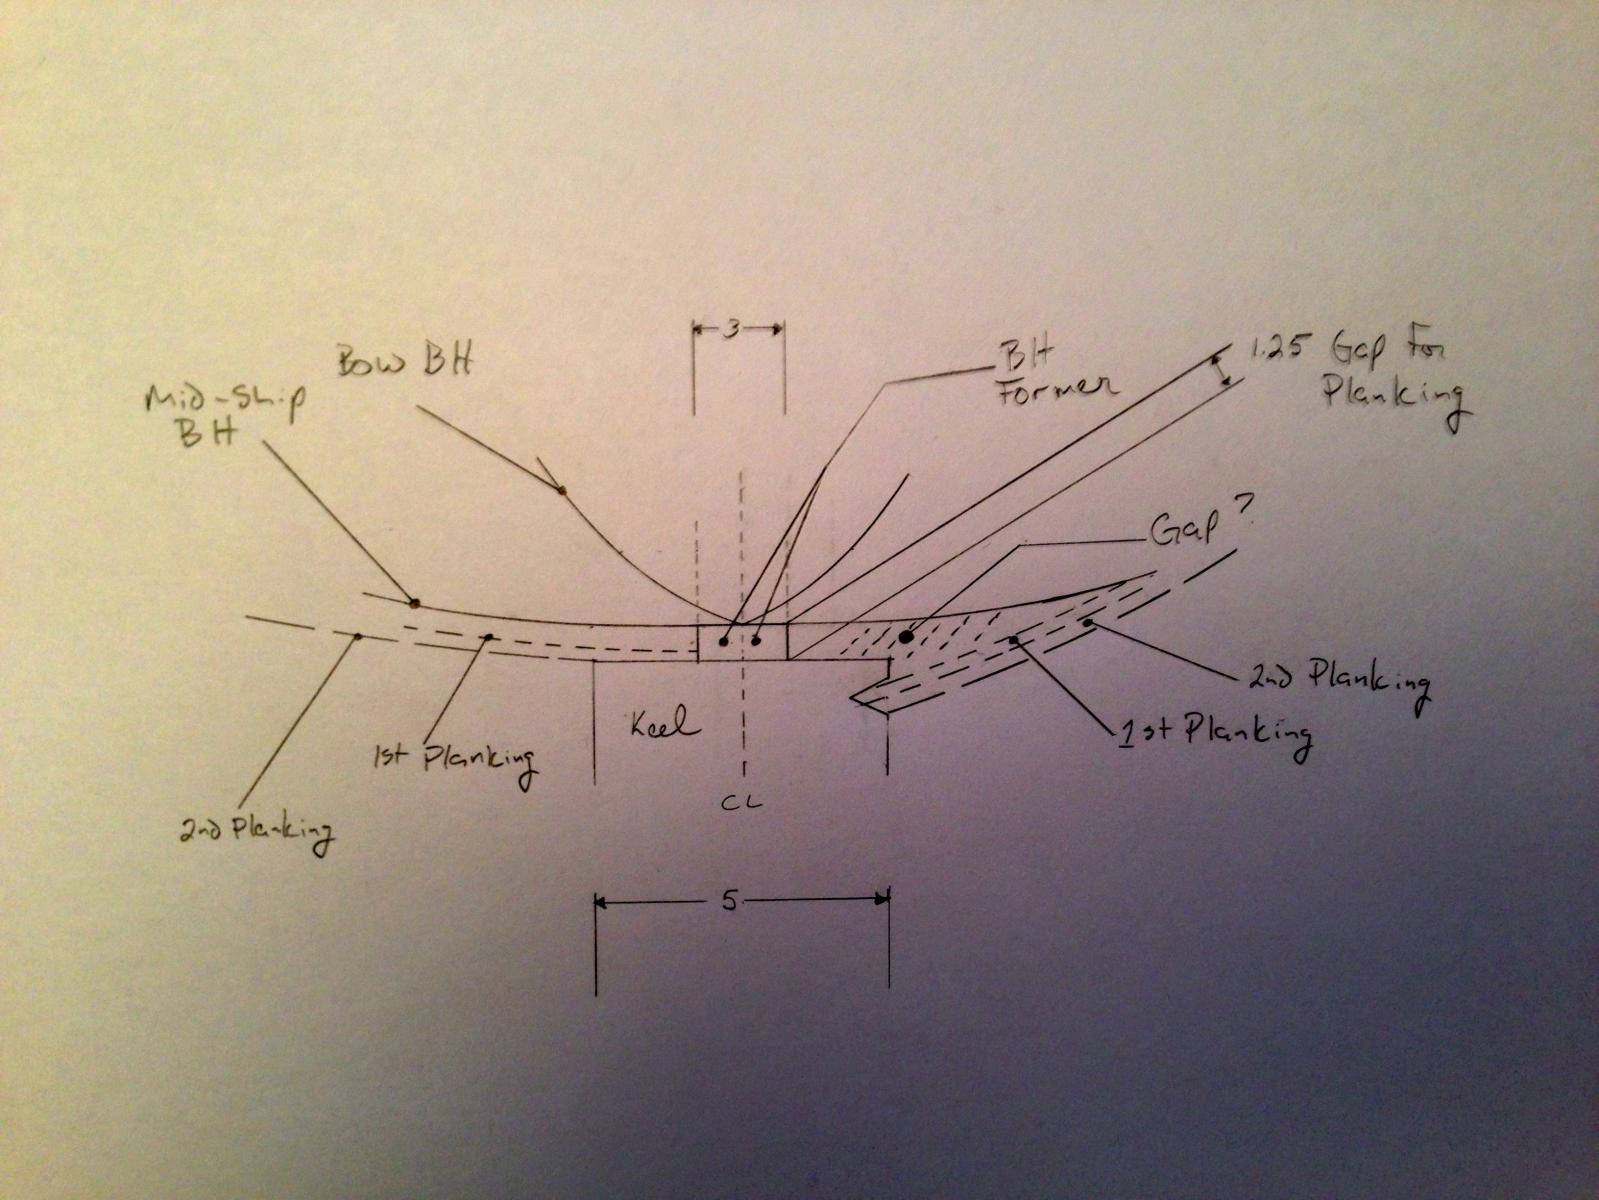
I think I'm tracking now, Mike on what you're looking at doing. Where it'll matter are the bulkheads (BH). Check them on your warped BH former to see if the BHs are flush with the bottom of the former. If they're flush, then your garboard should be able to flow sweetly into a keel-cut rabbet (am guessing you'll use a slightly broader plank for your garboard). My initial thoughts are that if your BHs aren't sitting flush with the former, then I'd really consider not cutting a rabbet into your keel. However, I would test the magnitude of how this will effect the planking if a rabbet were cut. You can test how things will work/look by tack gluing a couple of midship and bow BHs (before the stem sweep) with PVA (alcohol will dissolve the bond) to the former along with scrap pieces of 5mm breadth keel. Cut one simulated keel side w/a rabbet and then dry fit a 1st and 2nd layer of planks on both sides to see how they lay if you use a rabbet and how they lay if you don't. In the attached drawing, I quadrupled the scale of your parts (am assuming 1mm for 1st planking and .25mm for 2nd planking thicknesses). Hopefully it'll give you a visual of what I was mentioning above about how non-flush BHs may be an issue. The left side shows how the kit likely was designed to accommodate for planking; the right side illustrates potential issues in this case if a rabbet is cut into your keel. The forward BH is has much sharper profile than probably your kit forward BHs, but it should give you an idea of potential issues as your near your stem sweep. Cheers, Jay
-
Mike, both approaches sound reasonable. I'm guessing the kit is dbl. planked, so if I understand correctly you'll be increasing the width on each side by just over 1mm for the rabbet? In addition to being slightly out of scale (~ 2mm @ 1:75 is just over 1/2" real world, so not huge), if you increase the width of the stem and stern posts, you may want to see if those changes will impact the kit's steps for the head construction, bulwarks and rudder fits, and so forth. Cheers, Jay
-
Mike, Russ is right on about twists. I did a build that had a bent and also twisted plywood keel. Did the soak-and-glass bit that I mentioned above; while that got rid of much of the problem, it didn't get rid of all it. Long story short, the slight bend and twist that still were there caused a number of issues as I went further into the build (plus, overall it just was a crappy kit). In the end, the build came out well but I fought with a lot issues due to the warped keel. Since you have a scroll saw, I'm still recommending cutting a new keel--if you have the spare wood, you can give it a few goes 'til you get the keel you want. On the one hand, all may work out OK after you fix the keel you have; on the other hand it also may set you up for a lot of hassles further into your build or when it's done (will the twist continue to warp out?)...why chance it? An alternative to using Swiss Pear for your keel is Baltic Birch plywood--I think it's been mentioned in a few forum posts, and you'll definitely find stuff about it using Google. Cheers, Jay
-
Hasn't released yet on Amazon yet in the US; likewise, couldn't locate any online reviews either--too new--however, looks like an interesting read. I may place a copy on order. Cheers, Jay
-
Mike, I've had mixed results with soaking plywood keels and then putting them between heavy sheets of glass (used glass vs boards because the glass is straight--picked this up from Don Dressel's planking book). Also, there are a couple of posts/threads on the forum that discuss scoring the keel to get it straight that looked like a viable solution. Personally, I think cutting your own new keel is the way to go, esp. if you're planning on upgrading/scratching a lot of your kit anyway--then you know the foundation of your build is both true and solid. Cheers, Jay
-
Has anyone used this product?
Jay 1 replied to Ulises Victoria's topic in Modeling tools and Workshop Equipment
Yep, agree with Keith and Brian--I use Titebond PVA and have been happy with it and use regular PVA when I want more time to adjust parts or where I care how a visible seam looks (like Keith said, Titebond dries yellow). Only rarely do I use CA glues. Cheers, Jay -
Great innovations, and very nice work Tony, and your lathe work on the cannon looks great! Cheers, Jay
-
Hi Robbyn, just caught up with your log. First and most importantly am sending prayers and good wishes to your mom, you, and your family!! Words are never quite adequate for those places of the heart. Your start looks great, and it looks like things are going well! Cheers, Jay
-
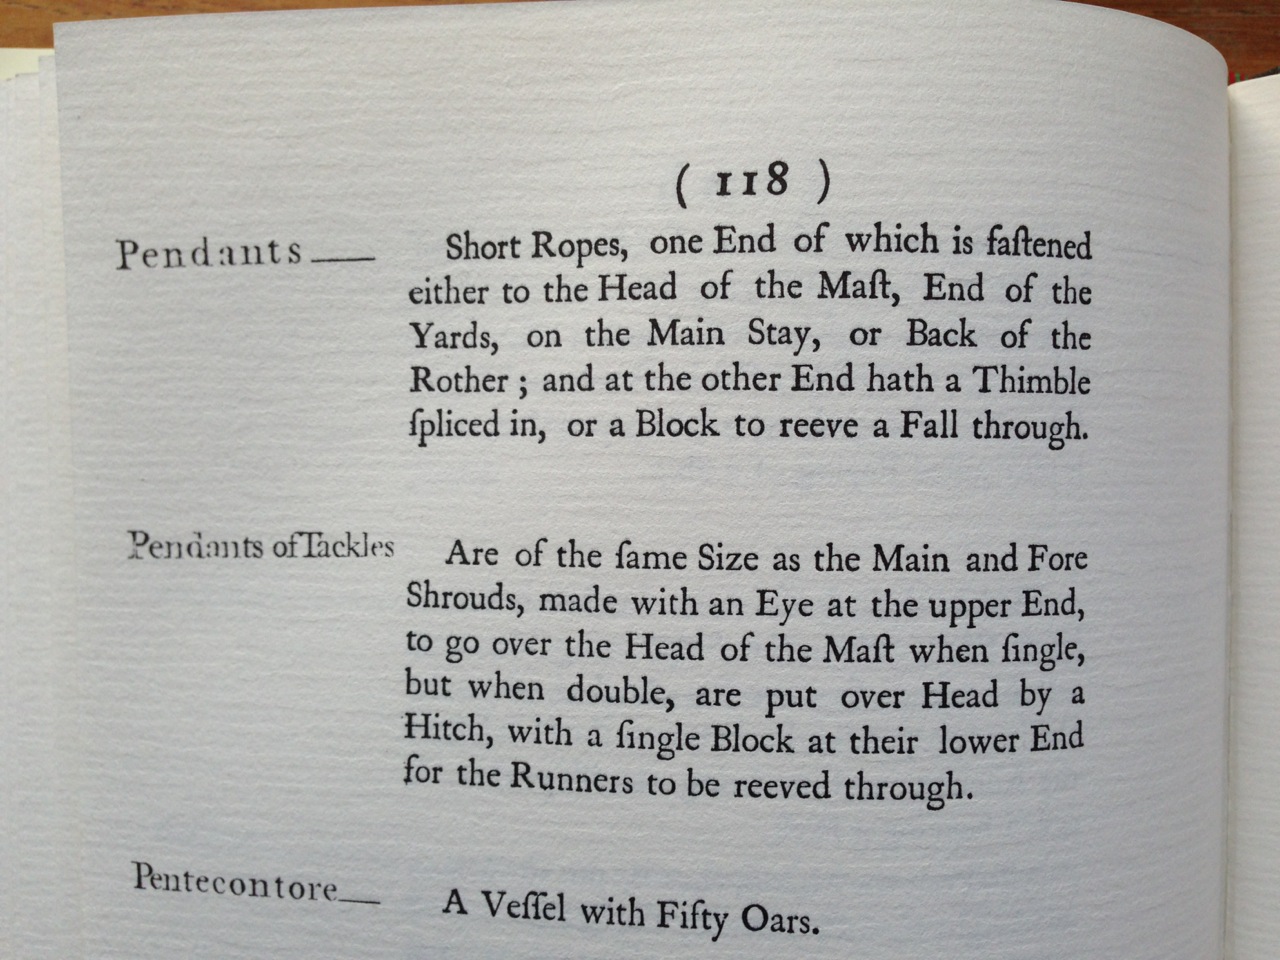
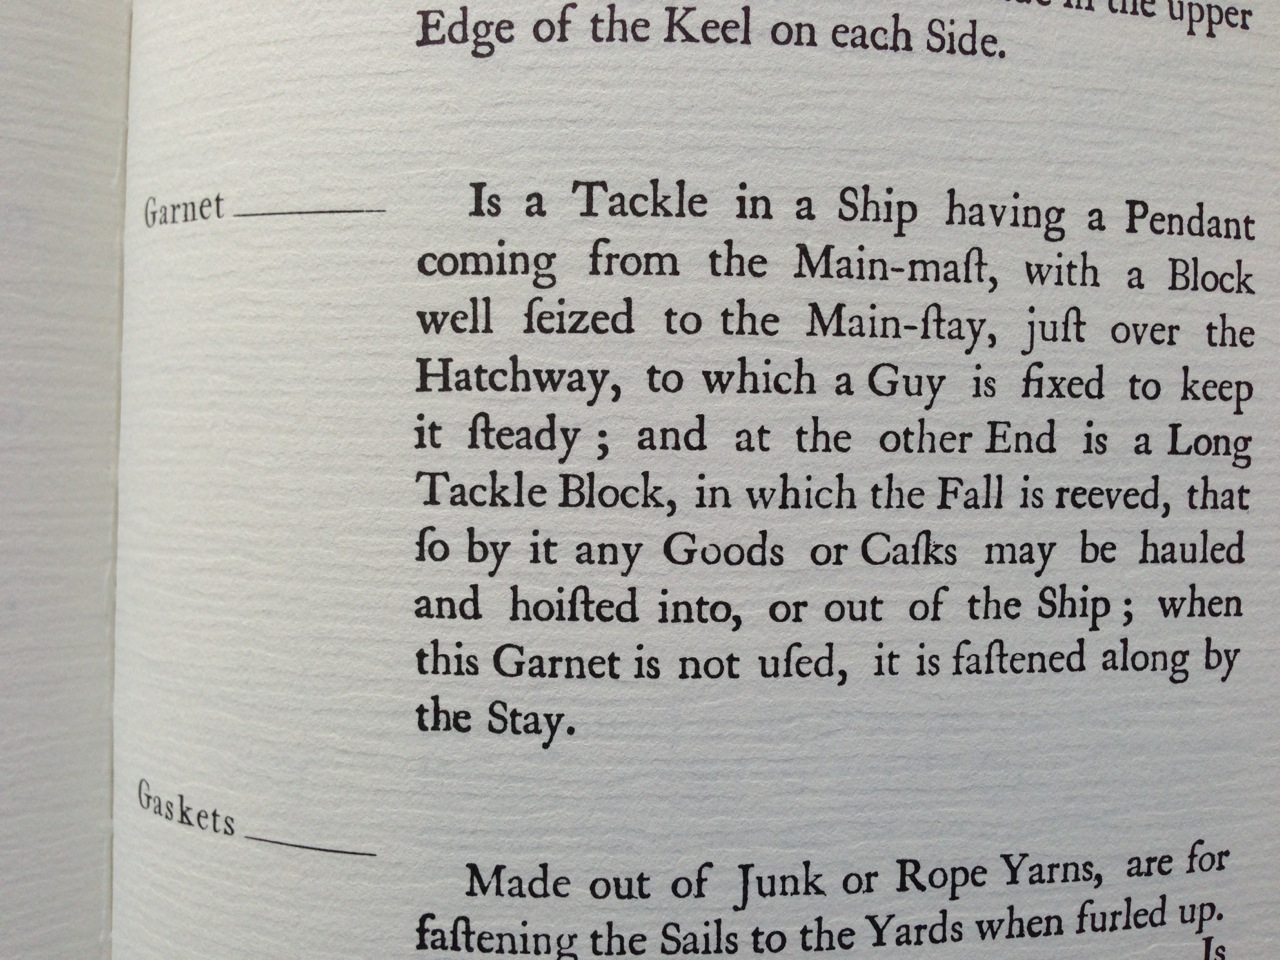
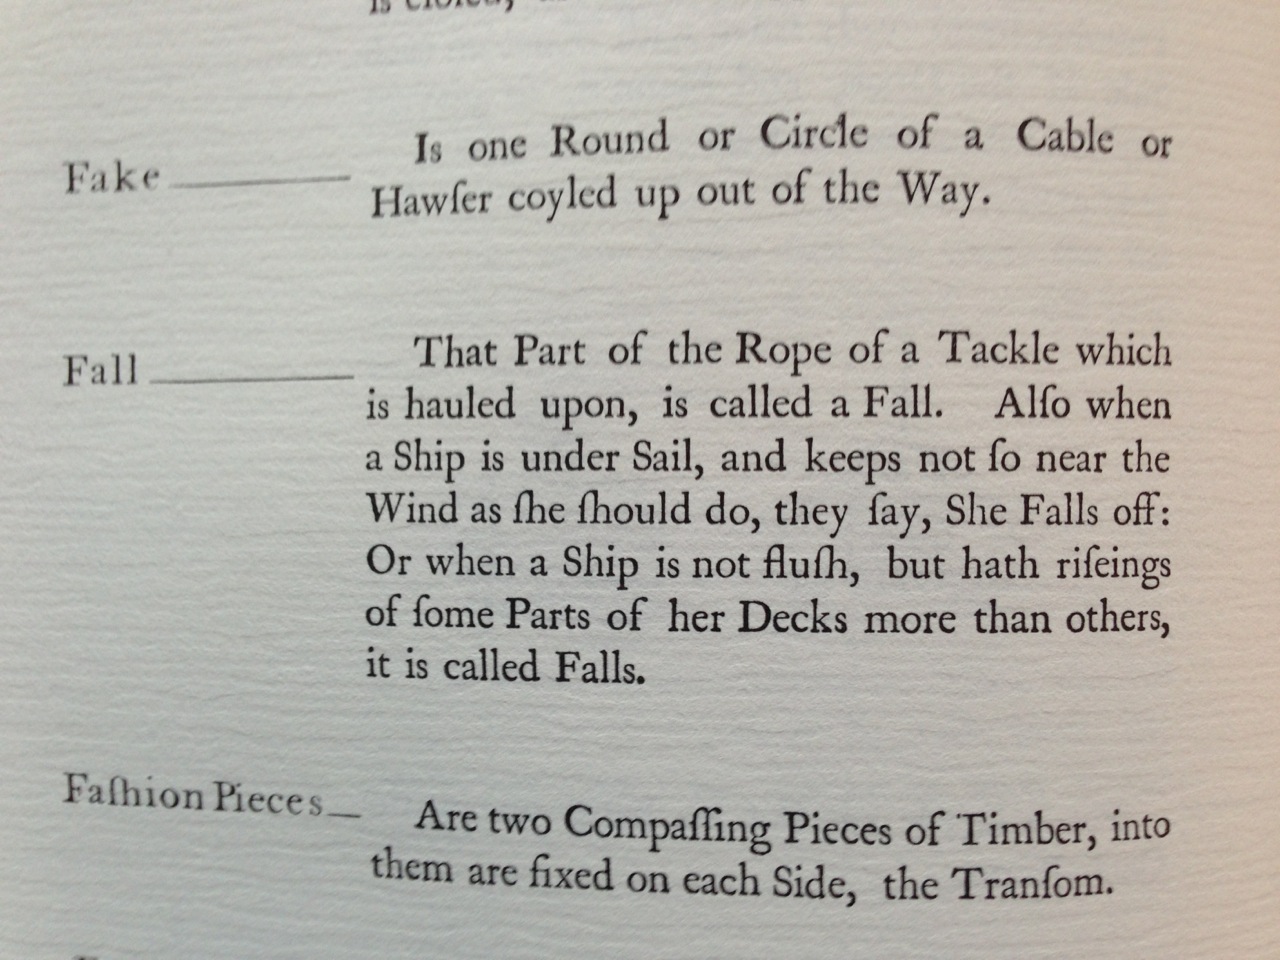
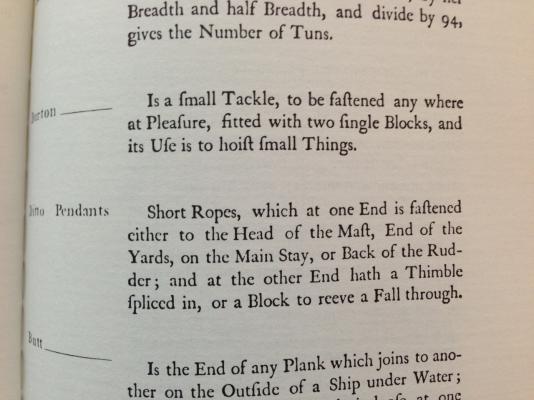
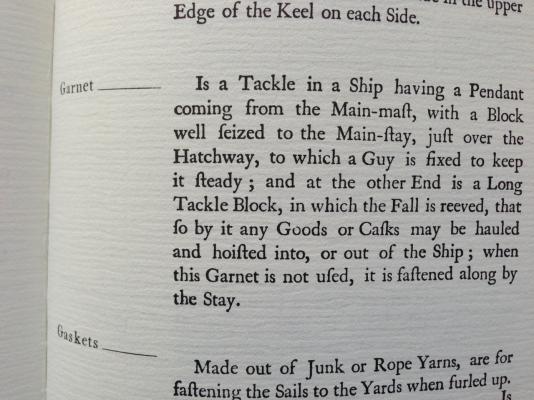
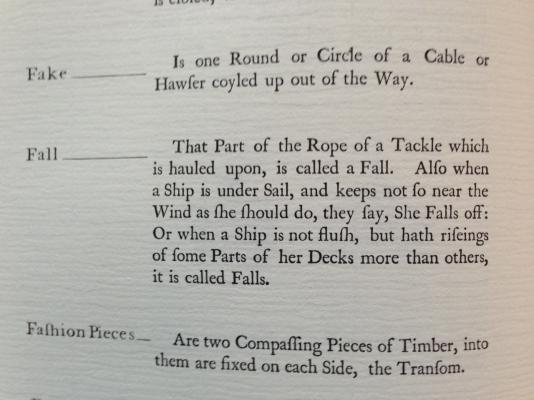
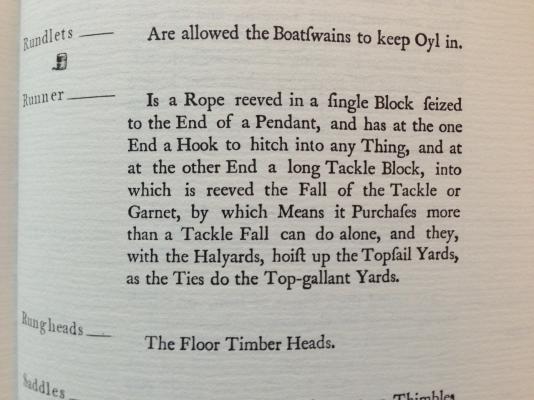
Hi Pat, glad that was of help! There was just enough there to go along with Parkins and Marquardt--it's always nice to find those helpful contemporary tidbits. I like your idea of a shroud cleat for the fall--I'm partial to these less seen details! Cheers, Jay
-
Pat, here's primary source info. (added a few cross-ref. definitions for addtl. details) from Blanckley's A Naval Expositor (1750): Falconer likely will move you closer to your time period and may also shed light as well; sorry, don't have a copy of his work on my shelves (yet!). Based on Blanckley, Lees, and Marquardt, your approach is sounds appropriate for the period you're rigging. Cheers, Jay

-
Very well done--looking forward to see her rigged! Thanks for sharing, Peter! Cheers, Jay
-
Sending you a 4-leaf clover, lucky rabbit's foot, and a super-secret nija shipwright charm for your new build, Robbyn! Only people in our elite bunged-up hand club can get the nija charm! Cheers my friend, Jay
-
Thank you Gregor! Too bad it only works with brass...it still does a nice job. I will see if I can obtain this in the States--didn't look closely at the label but as you pointed out, the formula is there, which I now see! Thanks! Jay
- 210 replies
-
- 1
-
-
- Sherbourne
- Cutter
- (and 5 more)
-
Wow, Gregor those look really nice! Would love to find a similar blackening agent here in the US! Thanks for sharing! Cheers, Jay
-
My heartfelt condolences to you and your family, Alan. This build will be so beautiful: At its heart is such profound and tender love. Jay
-
CAD software limitations/work arounds
Jay 1 replied to Don9of11's topic in CAD and 3D Modelling/Drafting Plans with Software
Don, I'm using CorelCAD and ran into similar issues with my body plan station curves. I lifted a lot more points and used splines for the stations and that seemed to work (still have do proof diagonals). So I think your approach is a good solution--will be curious to read how your scaling up works out for you. Cheers, Jay -
Very nice, Gregor--I really like the lettering and your pin rails look great! The blackening from the chemist looks like it worked really well...have always had mixed results with Krick and other brands. Cheers, Jay
-
Russ, it's been a pleasure catching up on your latest work--all very nicely done! Wow, the size of those chain plates you made--1/32" makes my eyes hurt (thank goodness for our magnification visors--I often think that's the best tool I have in my box!)--and really liked how you made the pins for them--well done! Glad you're getting some time in the shop, and I'll look forward to your 1/24 build when you start her: fully framed will be a beauty to see! Cheers, Jay
-
Looking for old article from MSW 1
Jay 1 replied to acdblujns's topic in CAD and 3D Modelling/Drafting Plans with Software
Pat, that would be great if you did update and post the article! I'm think others besides me will find it helpful. Thanks, Jay -
Gun port lids and sweeps, on small vessels
Jay 1 replied to Stockholm tar's topic in Wood ship model kits
Right, Tony on the lids. There's just no "meat" between the upper port edges and the rail. I haven't yet worked out the scantlings for the rail widths, but am pretty sure they will overhang the ship both in- and outboard, which would likely make it even more difficult for mounting hinges. Additionally, the rail either has a lip or an indention that is a 1/2" (~1.3 cm) above the lower rail edge (that feature probably is not distinct in the plan photos I attached--but if you see a faint line just above the lower rail edges, it runs the entire length of the rails and it is what I'm referring to) and this feature likely might further complicate mounting hinges. Spot on Kester--ya leave for a spell and the thread goes wild! Kidding aside, I'm with you about this being great discussion! At this point, the only thing we can state that's beyond doubt is that lids are shown on the 2 as-build draughts. Everything from there on is just conjecture unless information on these details show up, like you say, in primary source documents. I'm planning on obtaining some primary source material as I move further into the project, and hopefully it will shine some light on a number of details. Perhaps by this coming spring, I can shift gears a little and spend more time on research after I am closer to finishing my initial draughts. At the rate I'm going though, those draughts may take years...there's been lots of do-overs...lol! Cheers, Jay