


DanB
-
Posts
162 -
Joined
-
Last visited
Content Type
Profiles
Forums
Gallery
Events
Posts posted by DanB
-
-
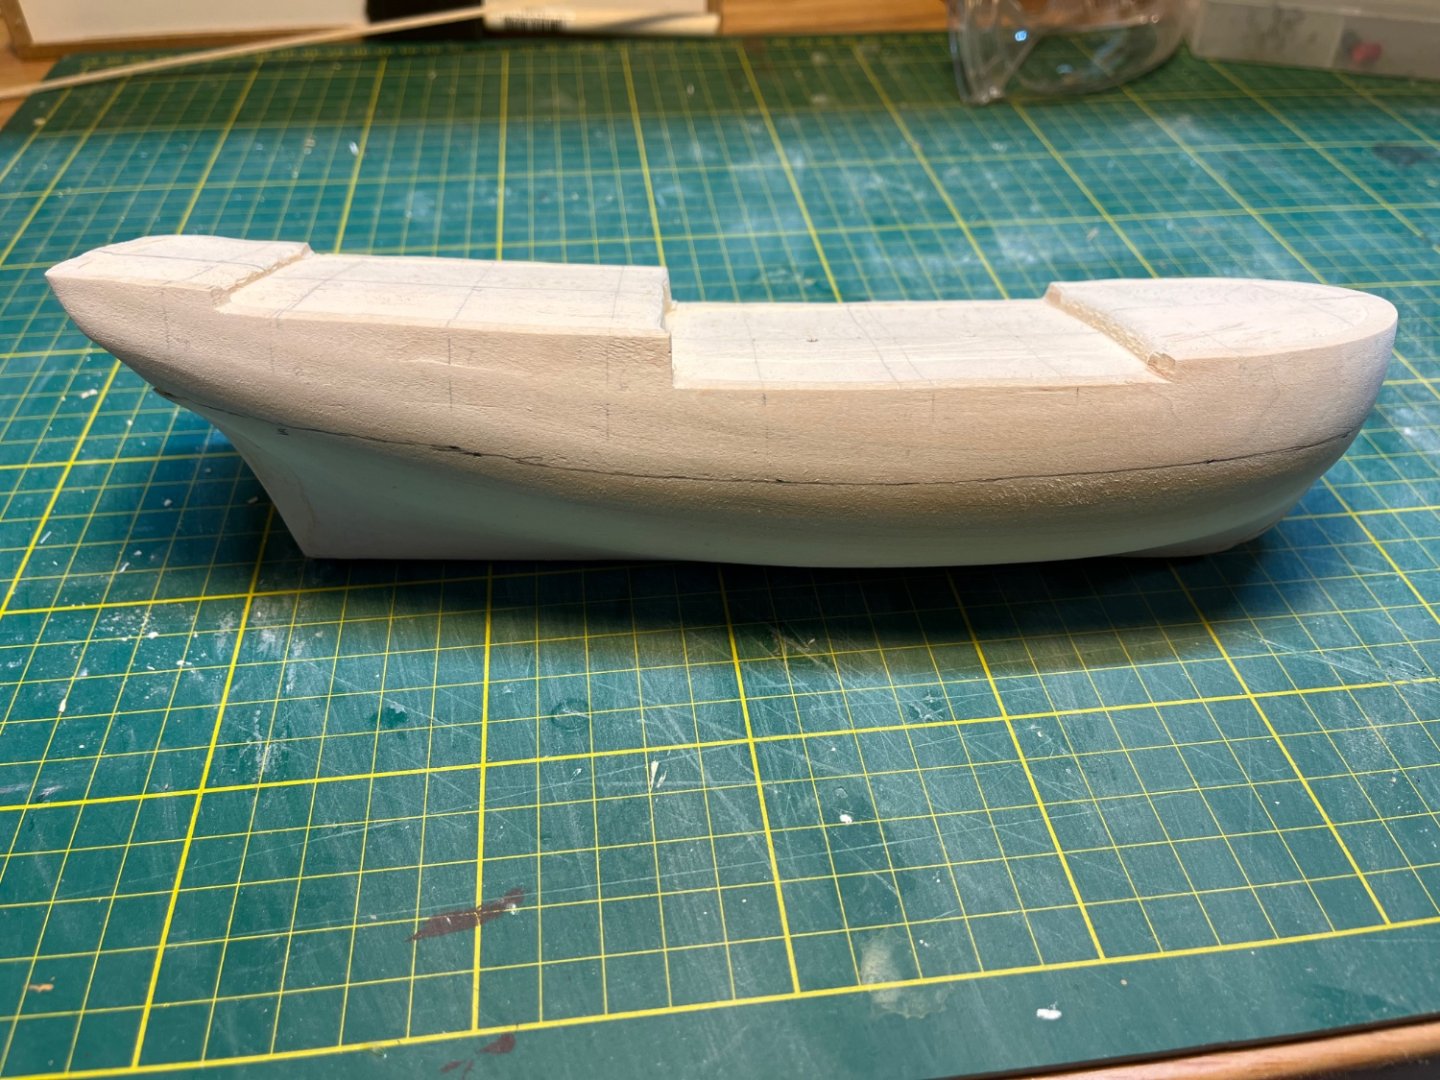
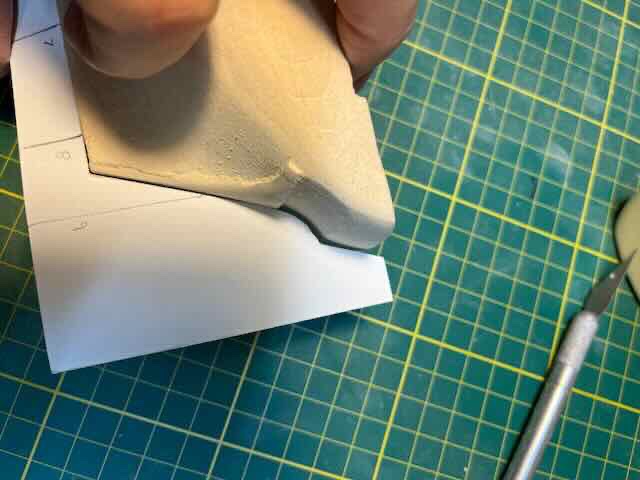
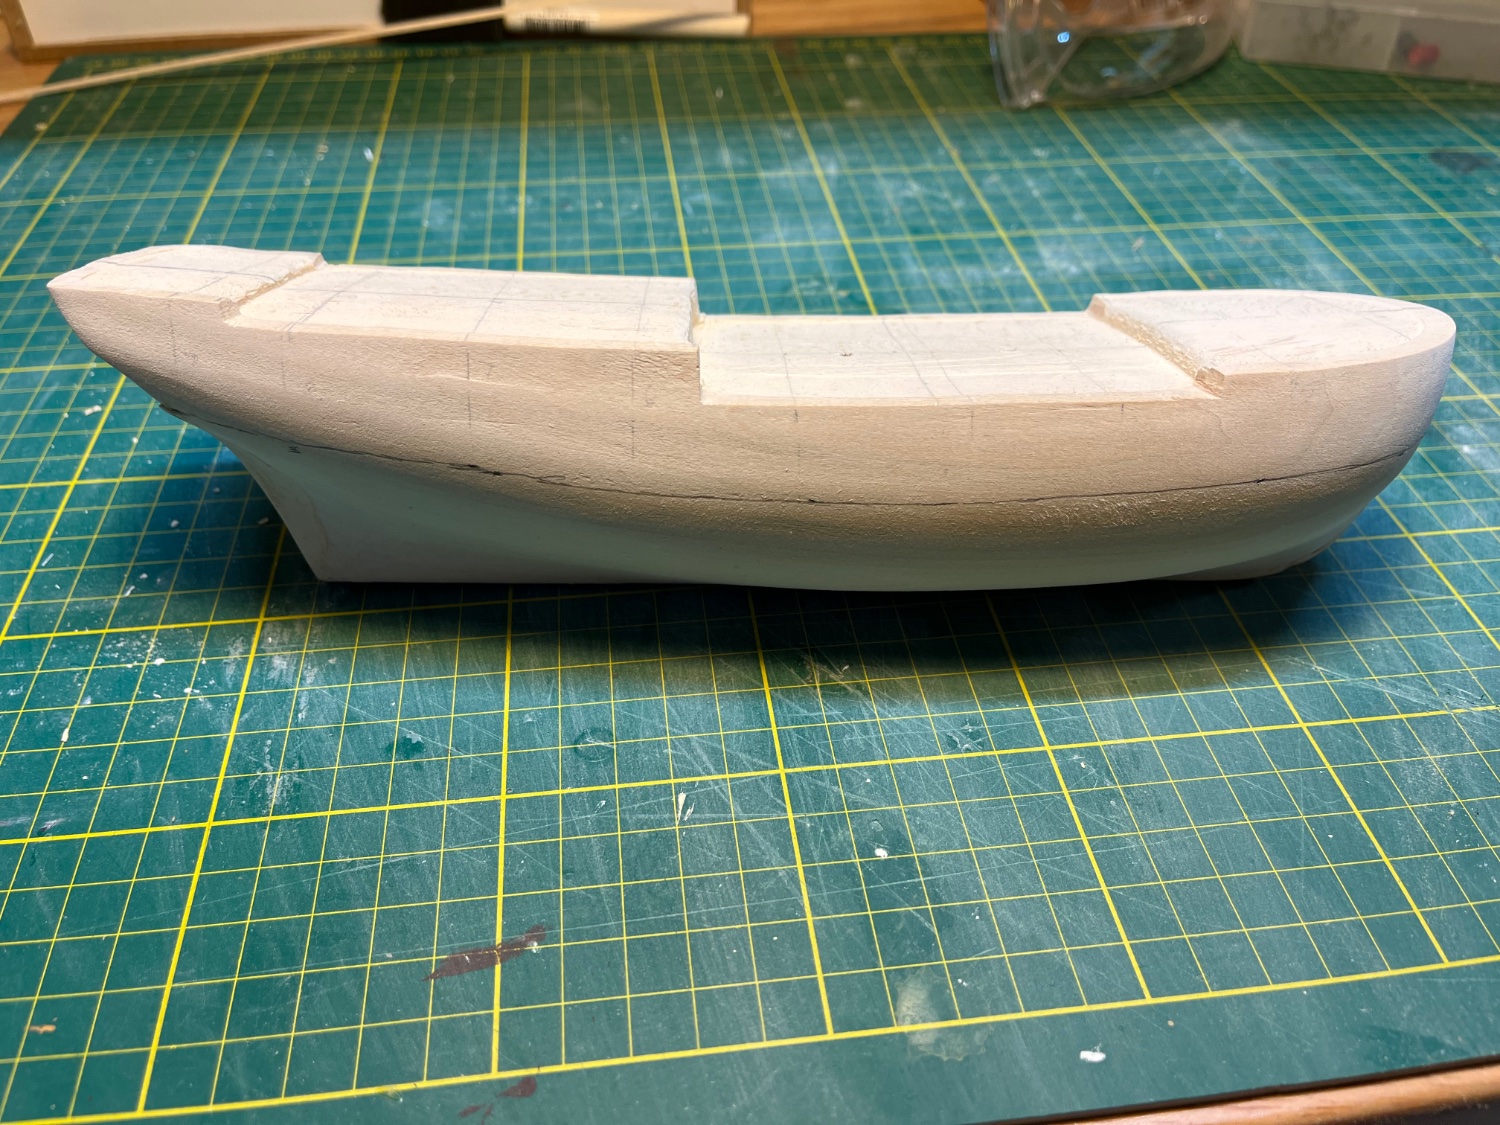
I took some time off from this build. I had difficulty figuring out how to shape the hull using the templates. I looked at a bunch of build logs of solid hull models. Many did not say much about the process, others used all sorts of techniques to try to get the shape very accurate--some of them very elaborate. Chuck's instructions say to establish a centerline mark the stations and use the templates to shape the hull ( the kit instructions are the same). The centerline was difficult as the hull came out of the box a bit asymmetric at the bow and it took some initial sanding and filling to try to get that sorted out. I finally used dividers and a ruler to get a centerline on the deck and used tape to carry the line to the the bow and stern and keel. After working on the bow , the hull did not need that much sanding ,and it was surprisingly easy to take off too much even using 220 girt sand paper. More filler.
The floppy templates were hard to use so I glued them to heavier cardboard which made it easier to line them up with the stations. I think I have it pretty close at the bow and stern profiles and at the most of the stations. It is not perfect. Finally though, I think, it comes down to it looks symmetric and about right It seems similar to faring the bulkheads the POB models. One of the other folks who built Sultana following the practicum, @Overworked724mentioned letting go of fear of messing it up. That was helpful advice! It has taken me a while to just get this part of it done.
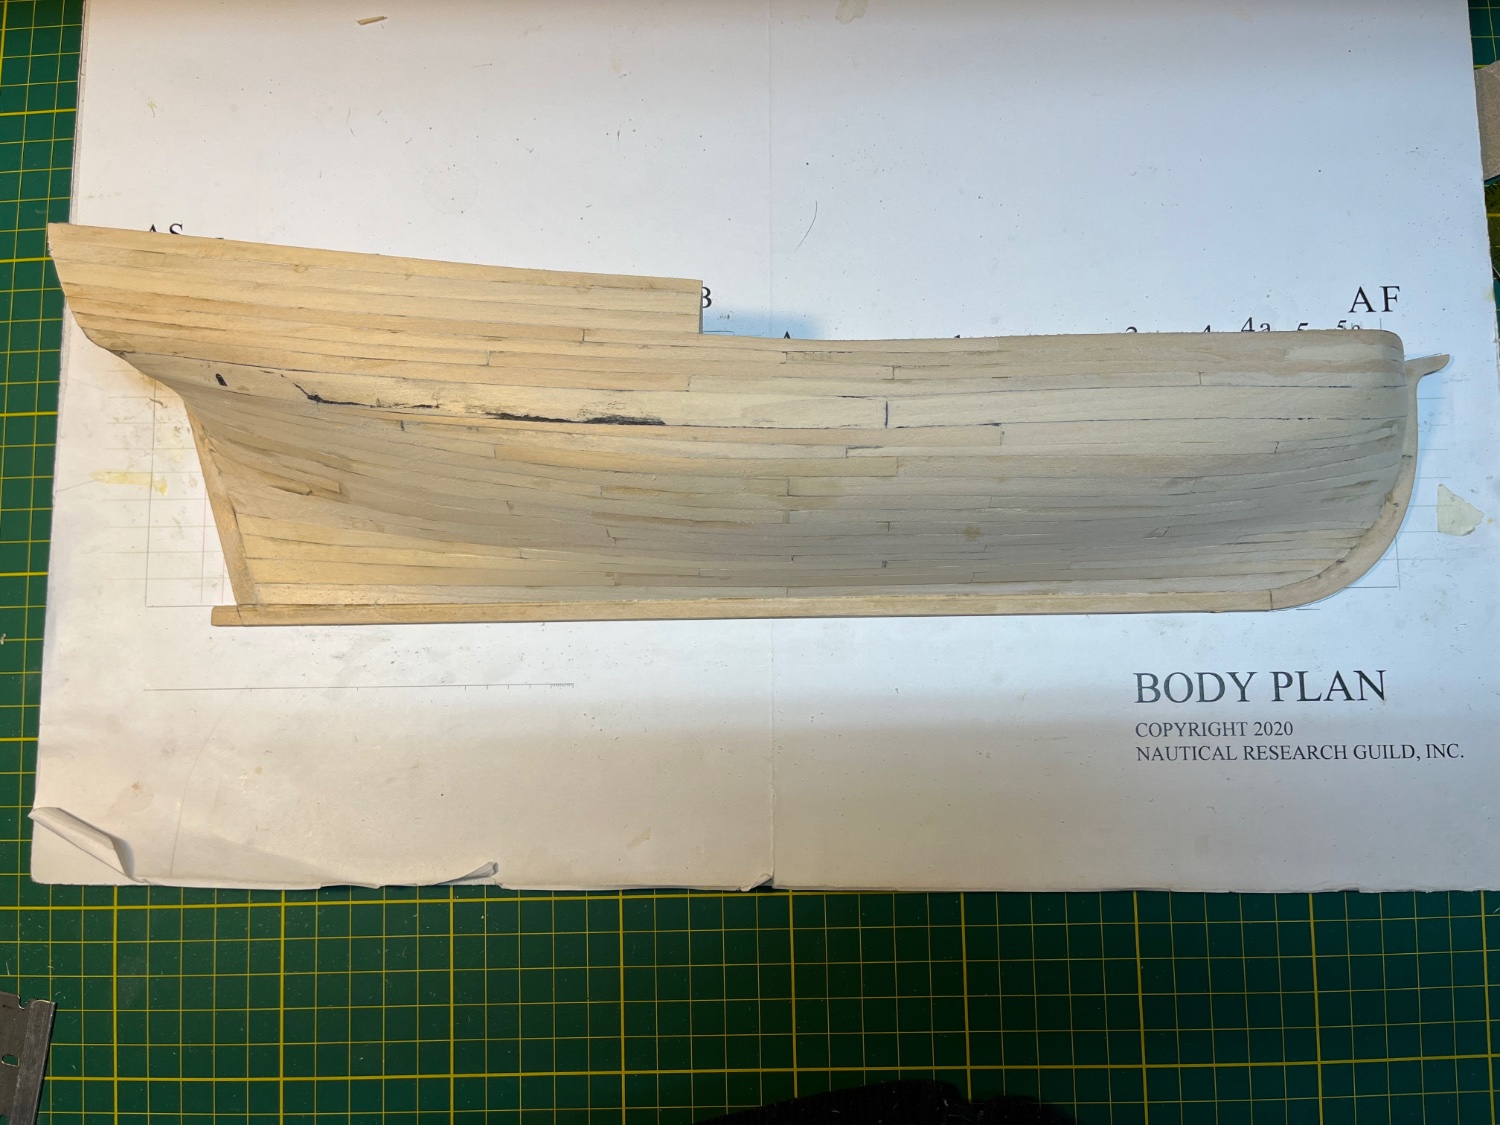
I marked the wales by transferring the measurements to templates from the plans, marking them on the ship. and then used tape to make them out on the hull. (I learned about the wonders of using tape from the NRG half hull project!) Chuck said to use a strip of wood, but the tape seemed to work fine and was easier to adjust and bend to follow the hull shape.
I have started caring the hull back 1/16 inch above the wales to allow for the planking. It's pretty tough at the bow where the carving is against the grain. I'm going slow and being careful not to crave my fingers too.
- GrandpaPhil, Kirby, whitejamest and 5 others
-
 8
8
-
Hi Dave. I used the Model shipways paints. I used Warm white for the outside of the hull and copper red for the inside. I think they were in the paint kit they sell for the kit.I think it included an acrylic semigloss varnish the I put over the warm white. Good Luck with your model!
-
-
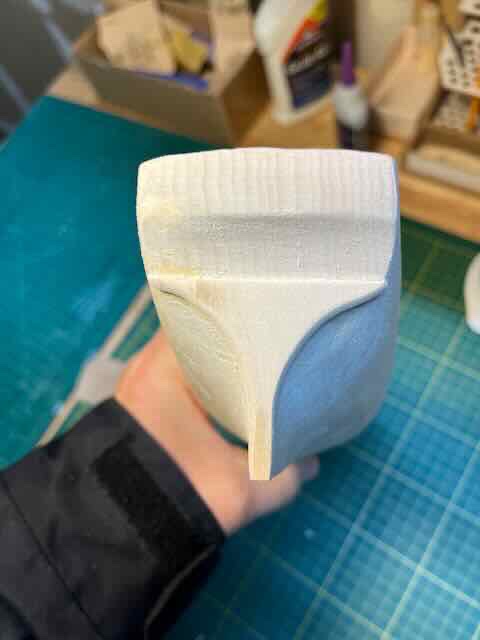
Shaping the Stern
This is my first solid hull model, and I am trying to get the hang of using the card templates to shape the hull. The stern is tricky because after it is shaped it is supposed to be reduced 1/16 inch to allow planking above the wale and 1/16 is added back to the lower part. I think I am pretty close and will wait until I shape more of the hull to do the final sanding . The basswood carves and sands pretty quickly and it is easy to take off too much, so some wood filler has also been helpful.
-
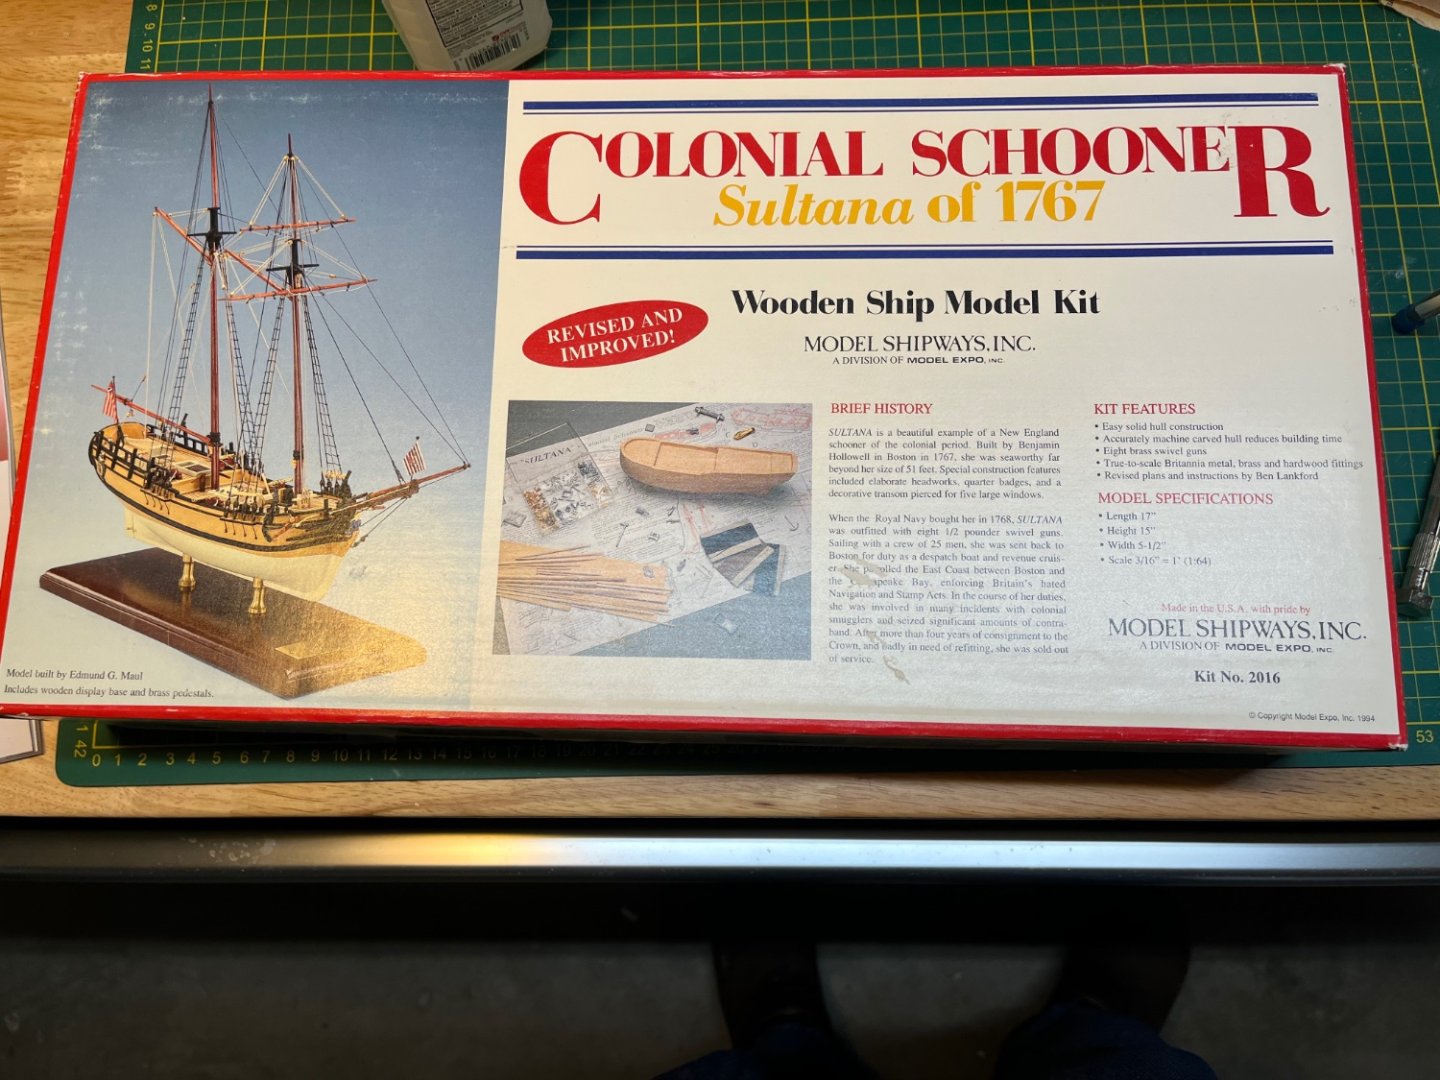
I am moving on to this ship after finishing the NRG half hull planking project. I was looking for my next ship when I was finishing the MS Lobster Smack and found Chuck Passaro’s very detailed shop notes for this model. I kept looking at those instructions wondering if I could follow them. I finally decided to order the kit, but after about 6 weeks, Model Expo told me that they had stopped making it. So I did the half hull project next to work on my planking skills. While I was working on it I found a Sultana kit on EBay. I think it’s pretty old.
The shop notes give detailed instructions for modifying the kit and doing some scratch building. Some parts of it look pretty difficult. I am especially worried about the fun with Sculpy parts that involve sculpting a new quarter badges and a figure head, but they are a long way off, and I can always wimp out and just use the cast ones that come with the kit.
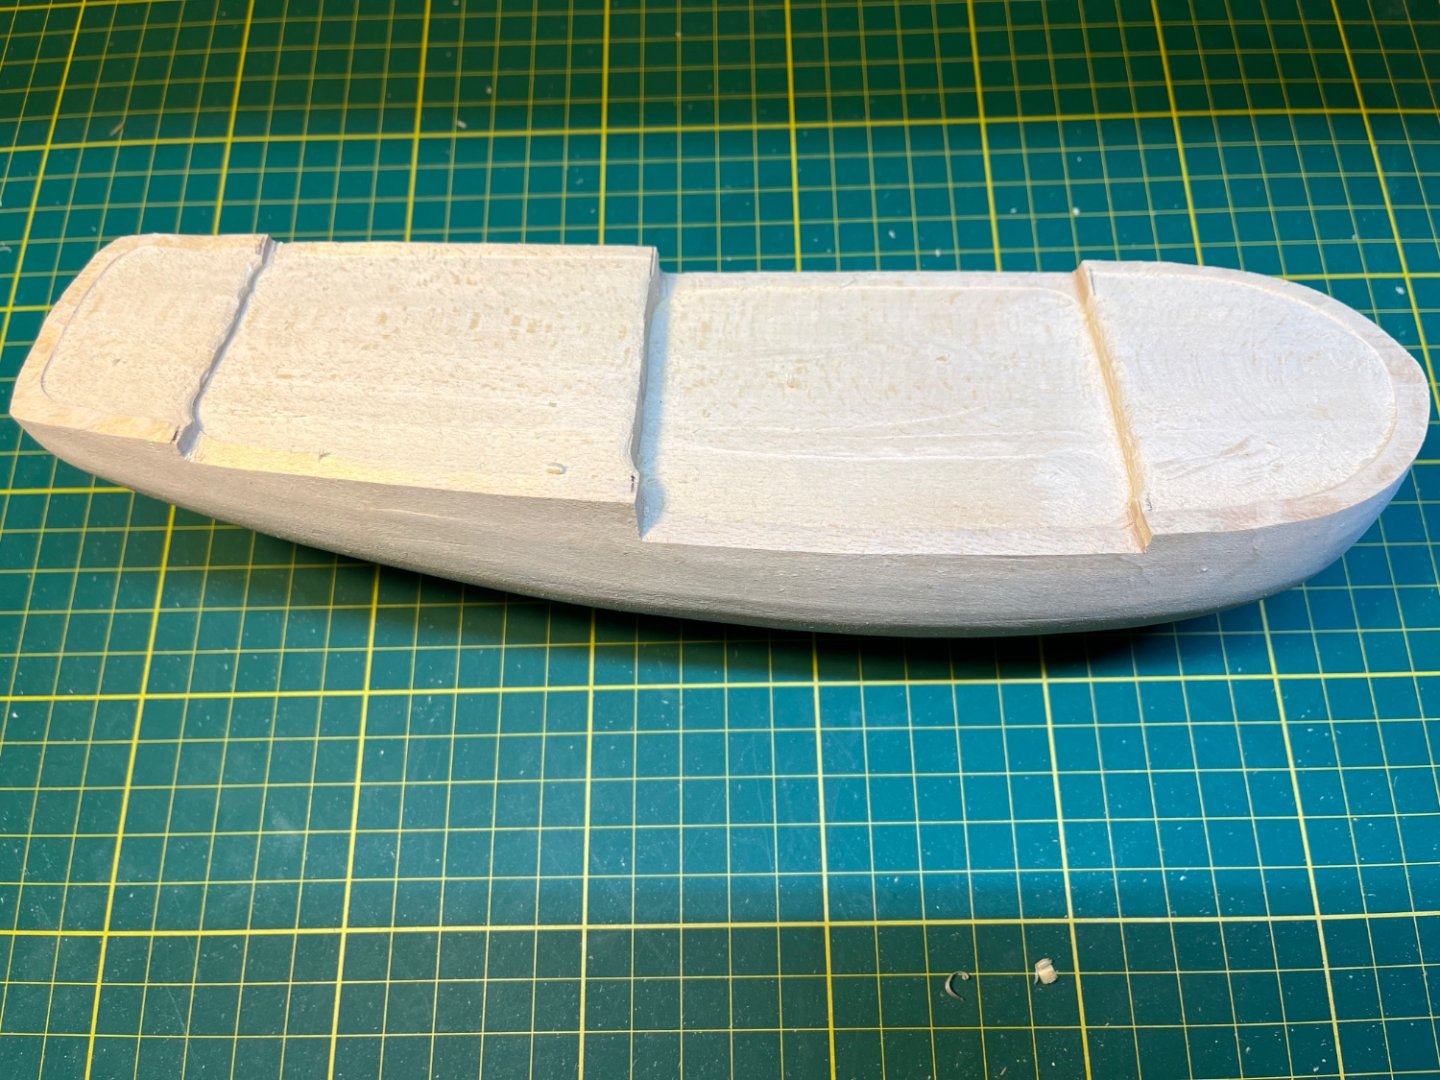
The hull is supposed be planked above the waterline, and the planking replaces the carved bulwarks so the first step is to modify the solid hull.
This is the hull as it comes out of the box:
This is after slowly shaving off the bulwarks. I am glad I bought a big pack of number 11 blades for this one.! I think there is more to take off, but decided to finalize it when the time comes to sand and shape the decks:
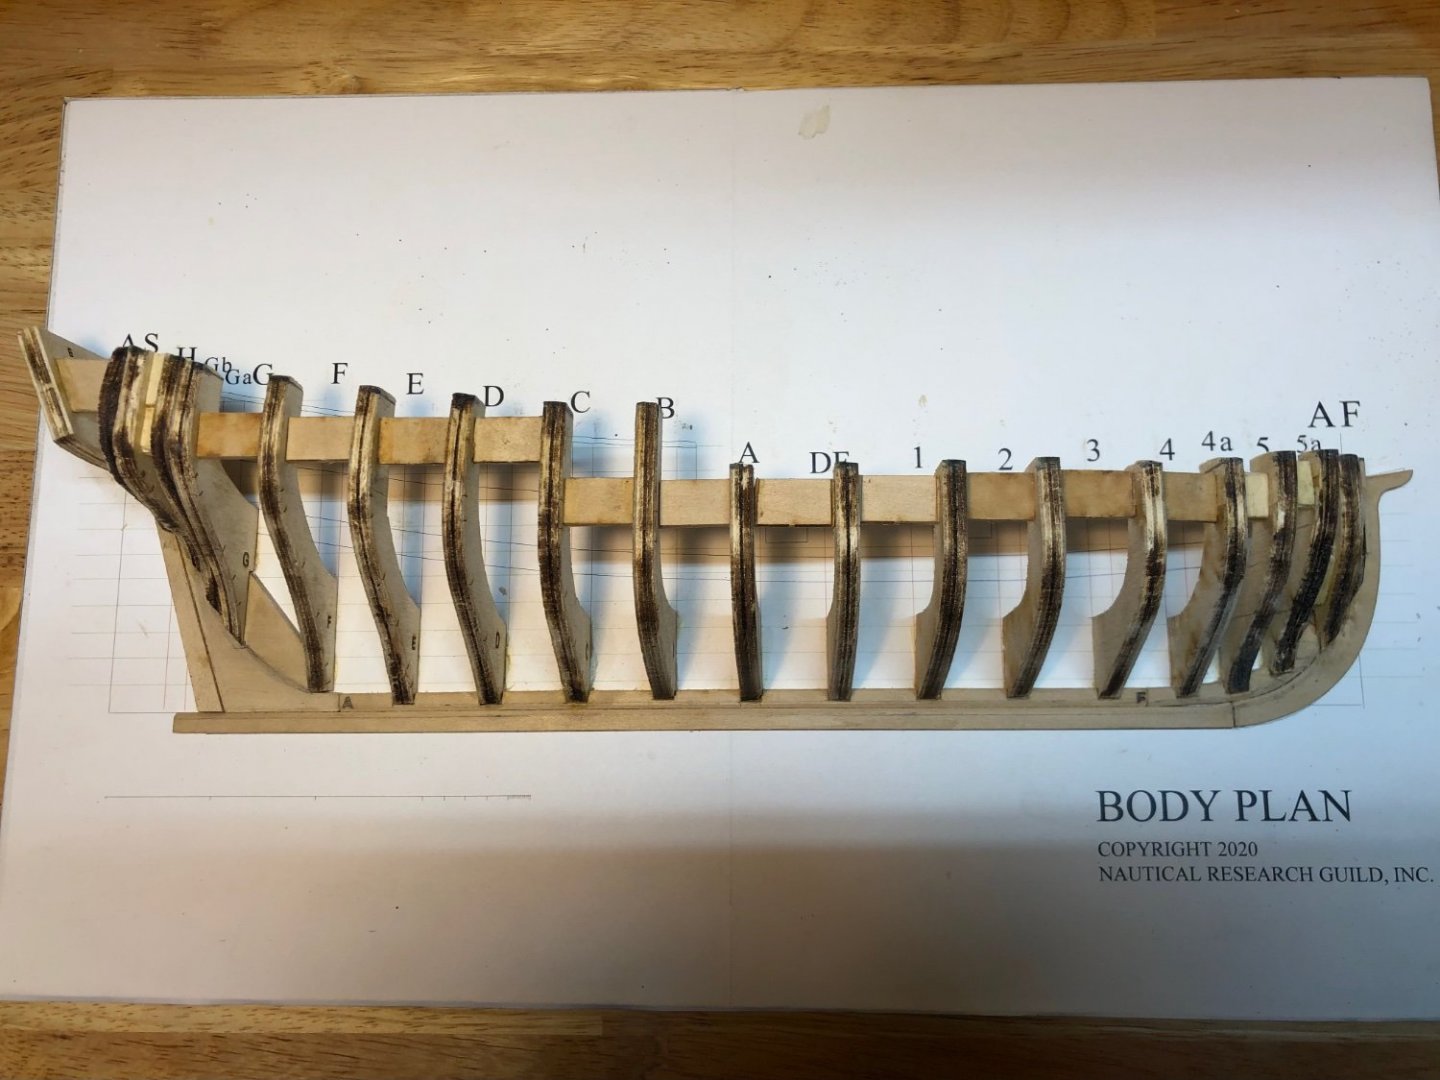
I cut out the hull profile templates and started shaping the stern. It needs a lot of wood removed! Chuck recommend a rotary tool. I did that for a bit. It made quite a mess and made me nervous I was going to take off too much wood. I switched to sand paper wrapped around a dowel to take away more wood for the concave curve at the stern. The profile template says there is more to take off. This is my first solid hull model, and I think the challenge is going to be using the templates to get the hull shape correct. I seem to work pretty slowly, and I think this one is going to take me a quite while!
-
I think next is the Sultana following Chuck Passaro's amazing practicum as much as my current skills will allow. I had planned to do build it after the Lobster Smack and ordered the kit, but Model Expo stopped producing it. The half hull project seemed like a good next step . While I was working on it, II found a Sultana Kit on E bay. The practicum is very detailed with lots of modifications and scratch building. It's a solid hull kit, but the Chuck's instructions modify the hull to allow for planking above the waterline. Should be fun
-
Finished
- Planked the counter-- a bit tricky
- Planked the Stern-- easiest part of the planking
- Made the second layer of the wale after several attempts and messing up the scarf joint a few times .
- Made the top rail. Got that scarf right, but it is a delicate piece and it broke a few times during shaping and painting, so it is CA scarf joint
-Made the trim pieces, mine are a bit wider than the manual suggests, but it covers some planking issues near the stern
- I used MSW Spar Black paint to paint the wail after masking it off. I painted the top rail and the trim pieces before gluing them to the mode.
- Finish with few coats of Teak oil, let it dry a few days and then a coat of wipe on poly. Manual suggests Danish oil which is oil that contains varnish. I used what I had on hand after doing some research on the internet and a test run on some basswood planks that were glued together
- Used some ¼ inch MDF painted black for the mounting board
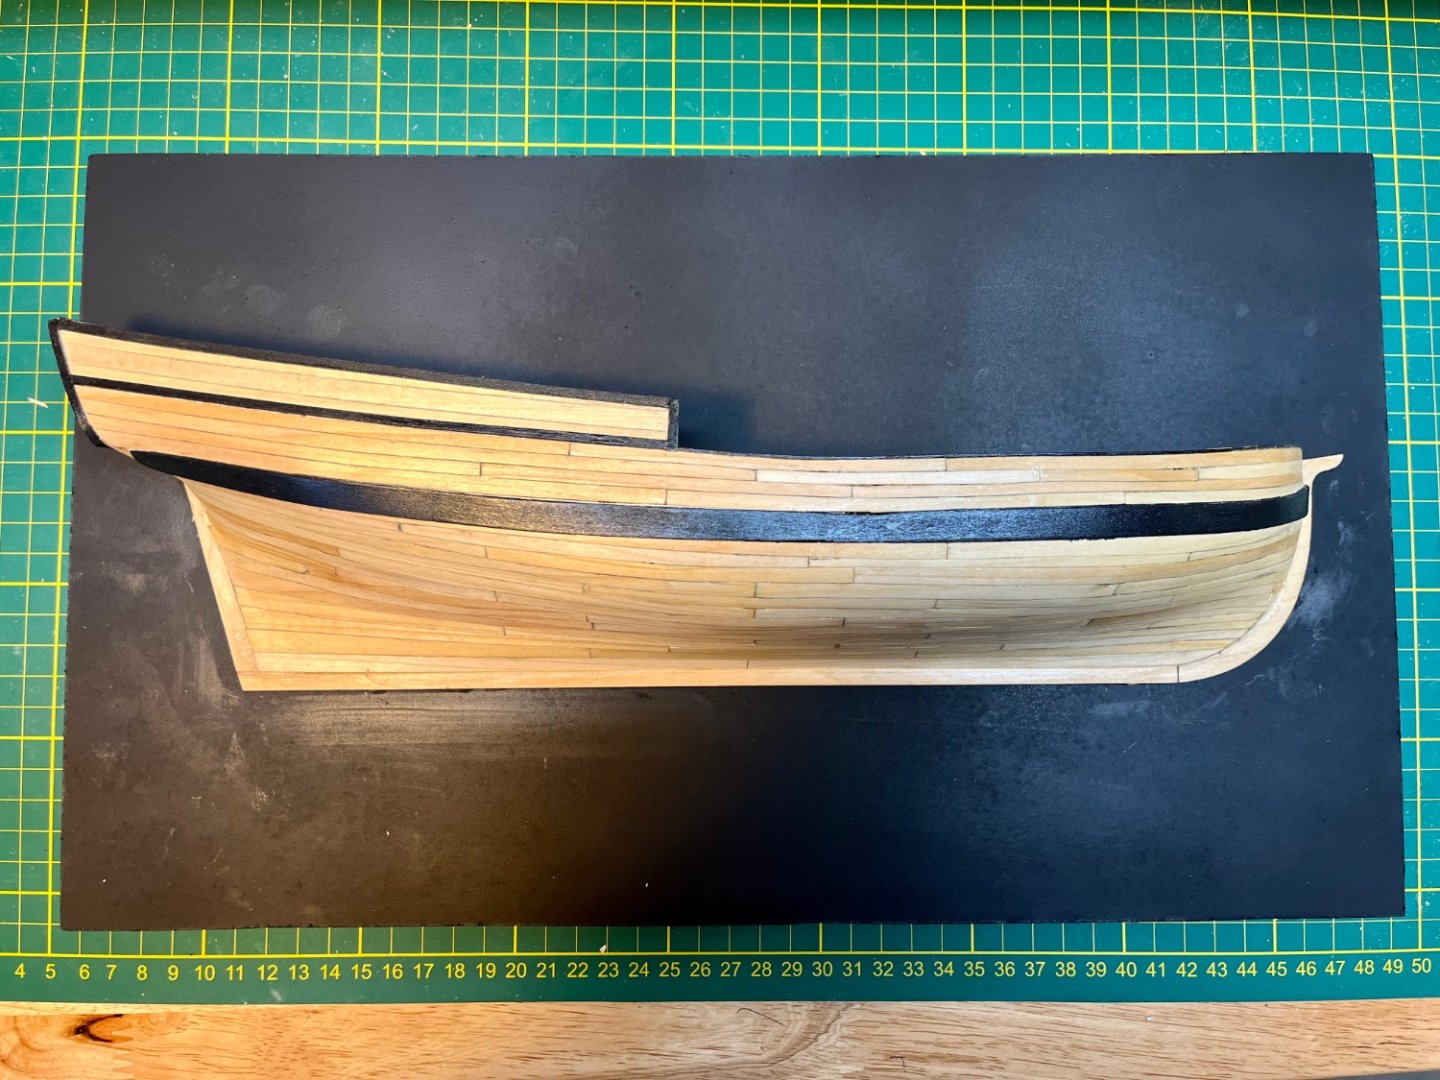
This is really an excellent tool to learn about planking a hull. Between the very detailed instruction manual and the author's build log for the kit, there is lost of great information and help along the way. I think I improved as I went along, but I still need more practice! I messed up enough planks that I needed to buy another sheet of the 1/32 basswood to finish the kit. For the planks that needed some bending I soaked them and then either clamped them to the model and let them dry, or I used the MSW plank bender to heat them and get the curve about right.
-
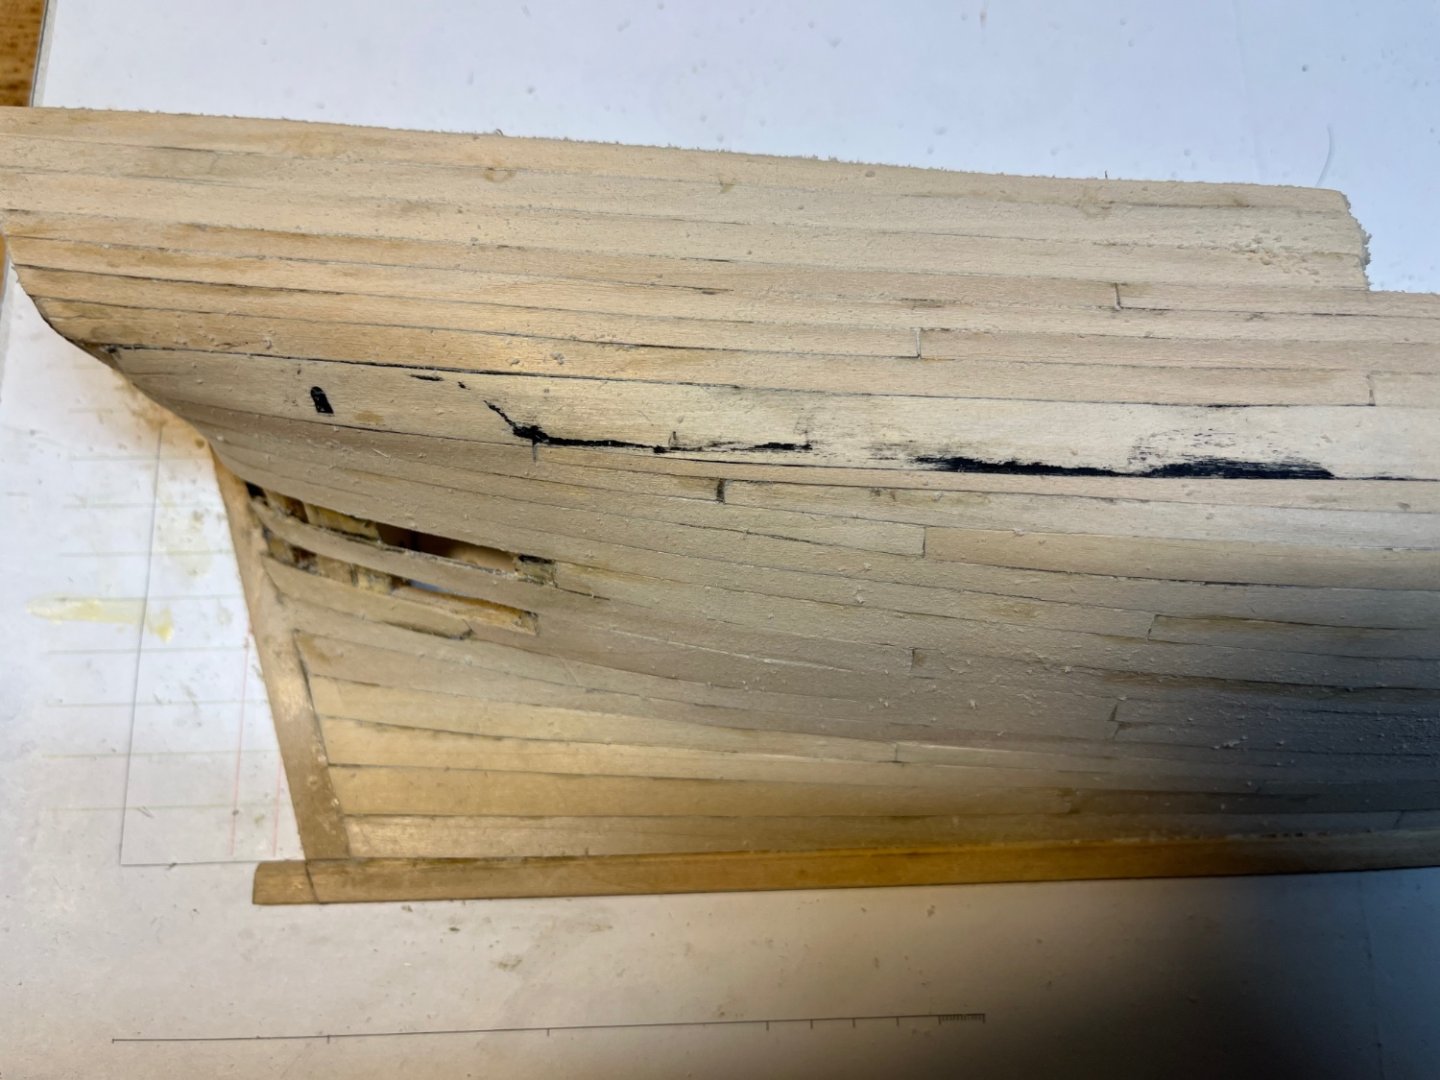
Well, I managed to cover the hull in wood. It was a lot more difficult than I thought it would be, and my work is not so pretty. I had 2 planks near the stern that were not aligned well. One had a deep dent where I had clamped it and the other was so off that I sanded through the the edge of it sanding the hull smooth. I decided to cut them and unglue them and replace them. I had to take 3 tries to get one of the replacements about right.
Replacing the planks

Onward
-
-
I have been working at project -- slowly. Life has kept me very busy with not much time to play at my work bench. I think I needed to take more care in marking out the lines for the planks in each belt. I was careful but still wound up with some planks that were too thin or had odd shapes. In this last belt below the wale I needed to make drop planks at the bow (in the instructions) and at the stern (not in the instructions but that is what the ship said it needed). I am learning a lot. I am starting the planking above the wale which in instructions say will need less spiling

-
Second planking belt completed
Moving along very slowly, but still at it. Making mistakes and fixing some and letting others be. Starting to work on the wale.

- chris watton, Henke, Seventynet and 3 others
-
6
-
First planking belt complete.
I have been busy with other commitments and have not had as much time to work on this project. It is going slower than my usual slow pace. I am still getting the hang of shaping the planks, but the whole process is a lot of fun. I have some small gaps between the planks in spots that I think I can fill with sawdust and glue. The next step is to make a stealer plank in the next strake at the stern. After reading the instructions about 6-7 times, I think I sort of understand it.

-
-
3 hours ago, flutlo6180 said:
You've convinced me that my next build should be this half-hull.
It’s a great kit with a wonderful set of instructions.
There is a detailed MSW build log by the kit developer that will give you a much better idea of what is involved than my log:
https://modelshipworld.com/topic/21980-half-hull-planking-project/
I have found it difficult and slow going so far, but I think that is part of the learning process. After trying this project , I am even more awed by the work of many of the folks on this site who are able to do such beautiful work planking the large and complex hulls on their models. I managed to finish one plank today after messing it up yesterday and starting again. I think I will be at this for a while and will need to order a few more sheets of the 1/32 basswood planking material. I am happy that the developers wisely chose planking material that is easily available.
Dan
-
After several tries, I managed to get the broad strake in without the dreaded smiley face position of the plank at the bow. I read Toni’s instructions and the build log for the project whole bunch of times , marked the position of the planking belts and then made tic strips for each frame. I tired both techniques for laying out the planks described in the manual. The one with a compass may be a bit more accurate, but just putting a piece of tape over the the position, marking the bottom edge and copying the marks on the frames on the though the tape seems t to be working well. I finished the next strake. I keep reminding myself this is a project to learn on. Its taking a while, but I think I am finally starting to understand it.
-
Garboard— Again , and again .
I figured out that my first try at the the garboard was too high and too far forward after I had installed the broad strake. I took the whole thing apart, tried it again and was still too high. After the third attempt, I think I have it about right based on the measurements in the instructions. . The instructions in the manual are good and point out this problem of the garboard being to high at the bow. I think maybe I am finally understanding the whole process or measuring the width on the frames, getting the run of the plank right with thread or chart tape (I like the thread a lot better)and then marking the plank on masking tape, but it has required trying it, messing it up and trying it again, before I have started to get the hang of it.
Picture looks about the same. Onward.

-
Terrific job Dave! Congratulations!
- Dave_E and Keith Black
-
2
-
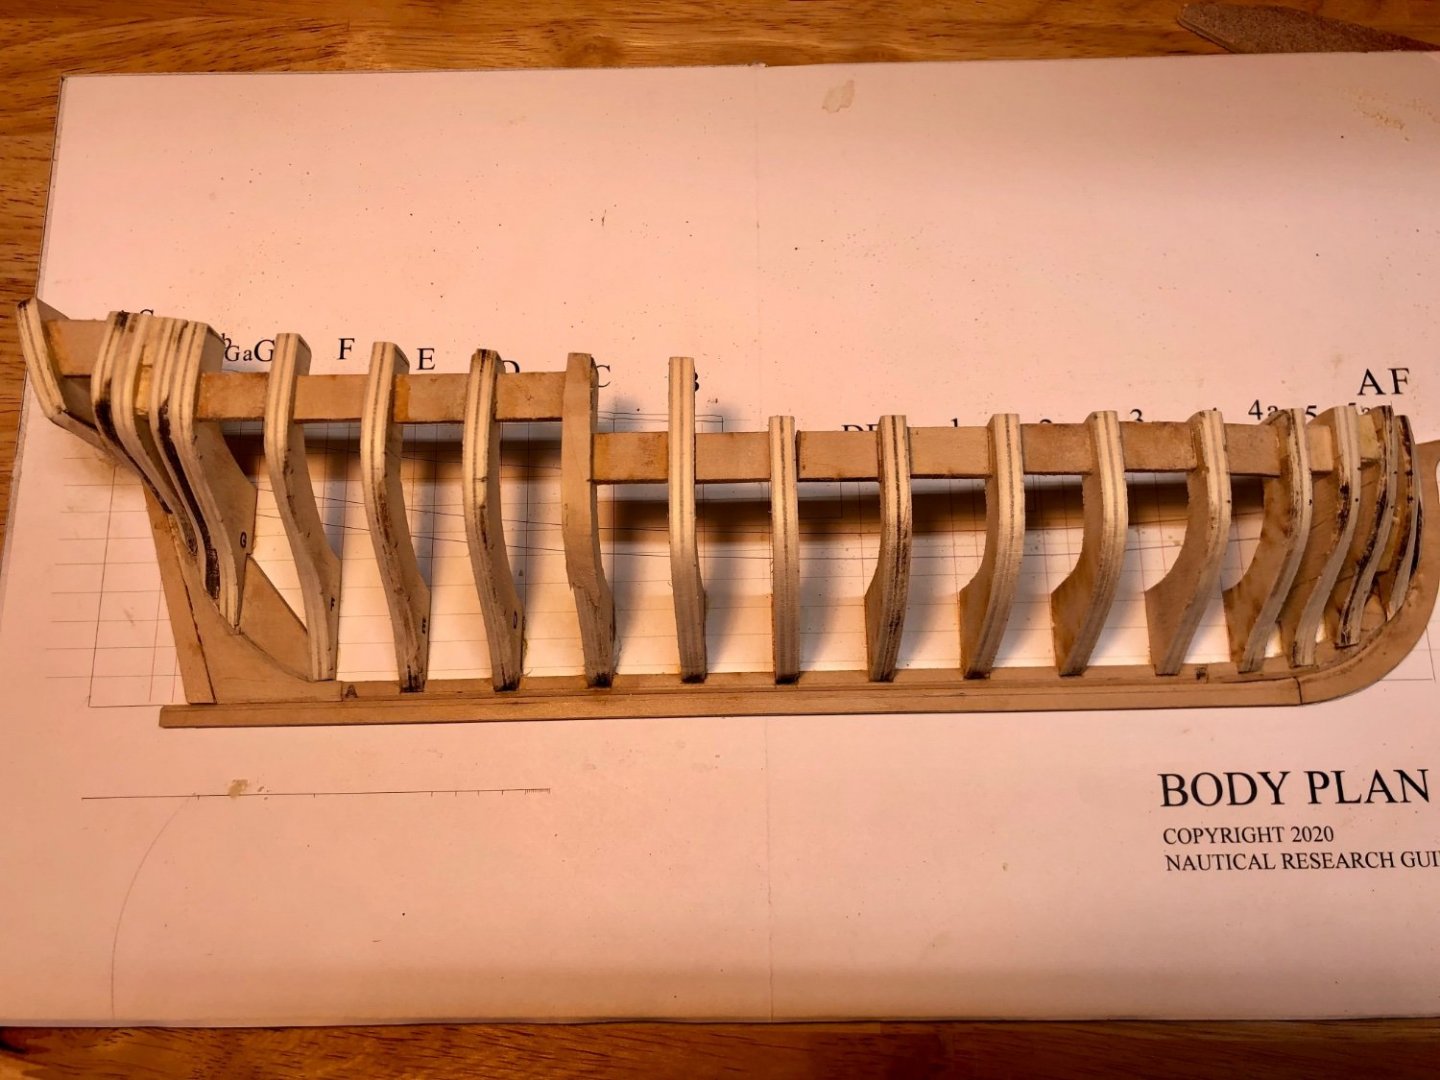
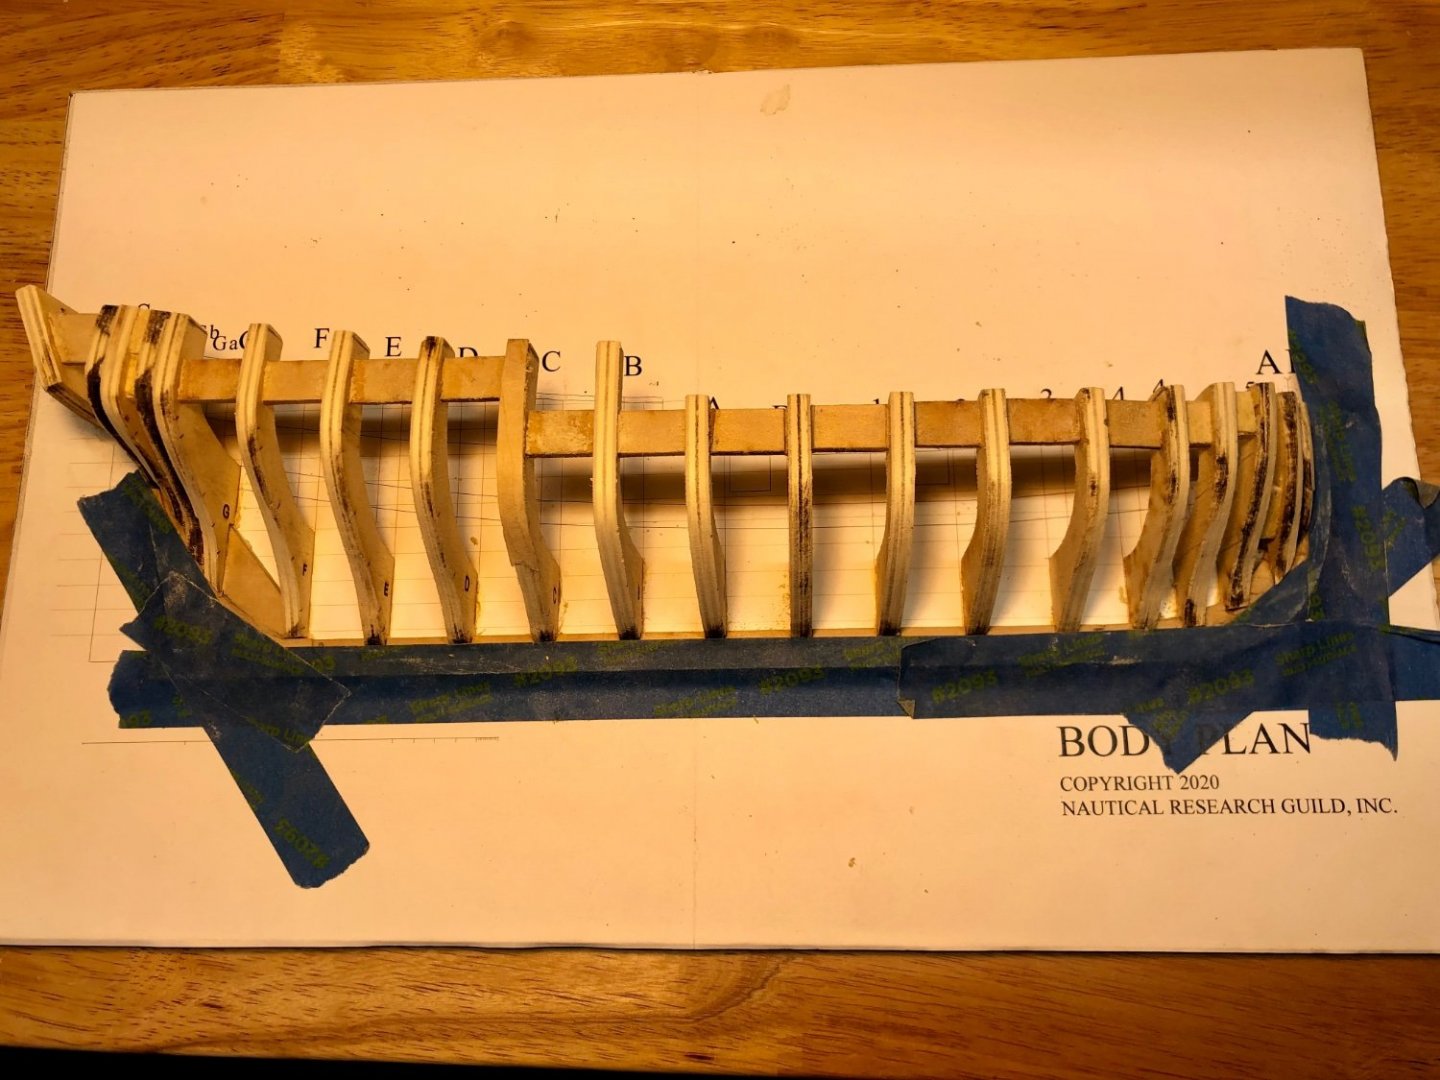
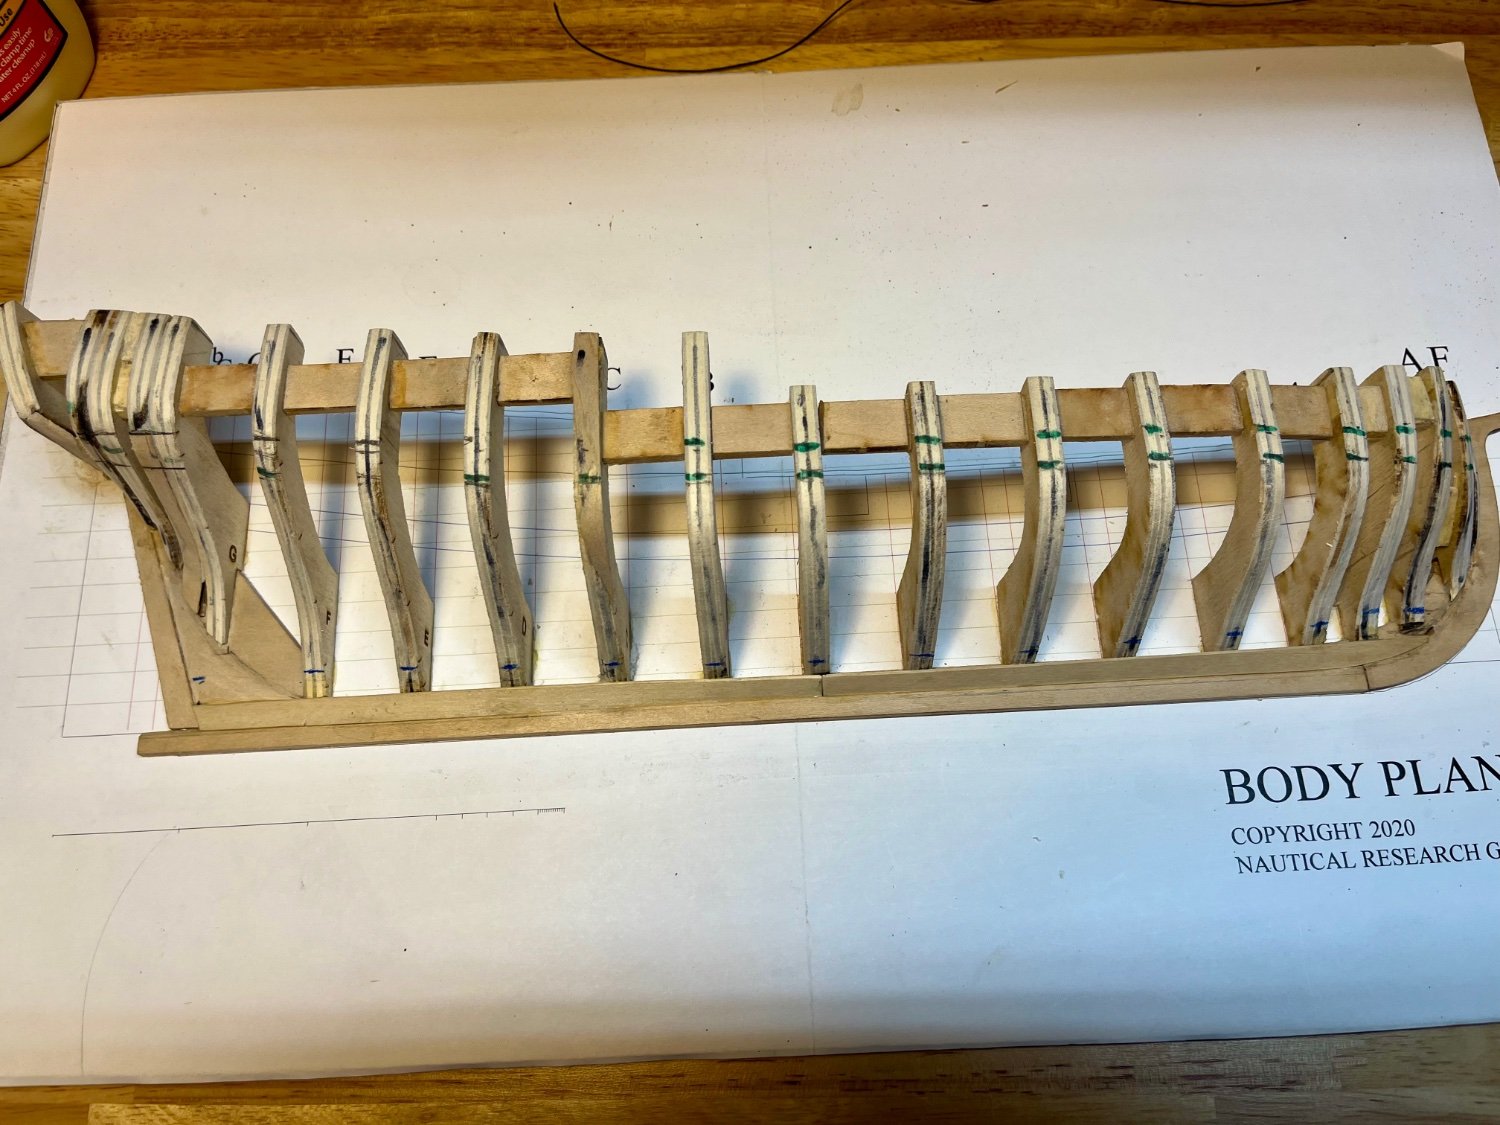
I finished fairing for now at least. There may still be more needed, but I think its closed. Marked out the position of the wale . I had to look at the pictures a bunch of times and modify the small square that came with the Norwegian Sailing Pram so I could get it level between the frames. The carpenter square was too big to fit between the support pieces to take off the positions from the building board.
I made the garboard planks. It took 2 tries, but I think I am getting the idea. I marked out the position of the broad plank on the frames.

- Dave_E, Cathead, Paul Le Wol and 1 other
-
4
-
Yes, I thought the line was way to thick when I built the dory . I bought some 1 rigging line because I did not want to enlarge the holes so much and then have the rope look out of scale. I had to enlarge the holes some for the 1 mm line but, I think looks much better. It is a small detail, but it is the details that add a lot to the model. I think even a bit thinner line ?0 .8 mm would have been fine. I had a similar problem on the lobster smack. The line supplied was too thick to work well with the turnbuckles in the kit.
- John Ruy, mtaylor, thibaultron and 1 other
-
4
-
I started to add the counter and figured out I glued the transom in wrong. I looked at a bunch of build logs, unglued , and repositioned the transom, and shaped and glued in the counter. This area is a bit confusing. The stern frames needed a lot more fairing. The picture looks about the same but, I think its getting closer. It must be, I made a lot of saw dust.
Its hot in my garage, so I that is enough for today. I am going to sip ice water, and go look at a bunch of build logs I need to read ahead and see if I can understand how the planks are supposed to fit into the rabbet and how they meet the counter at the stern.
-
-
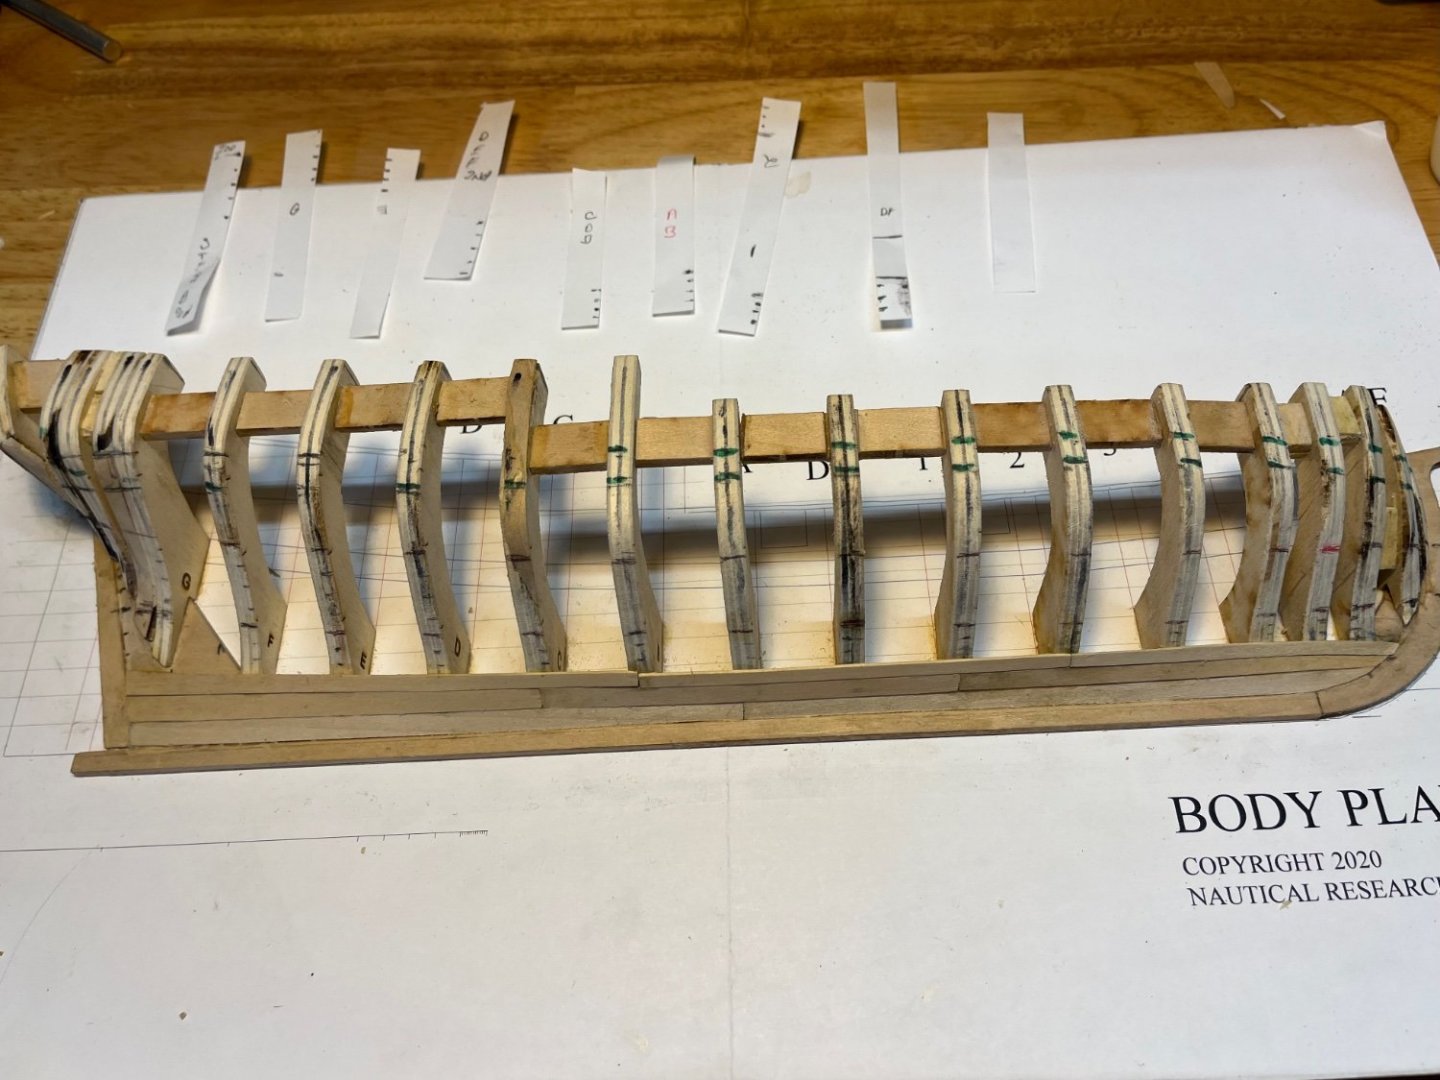
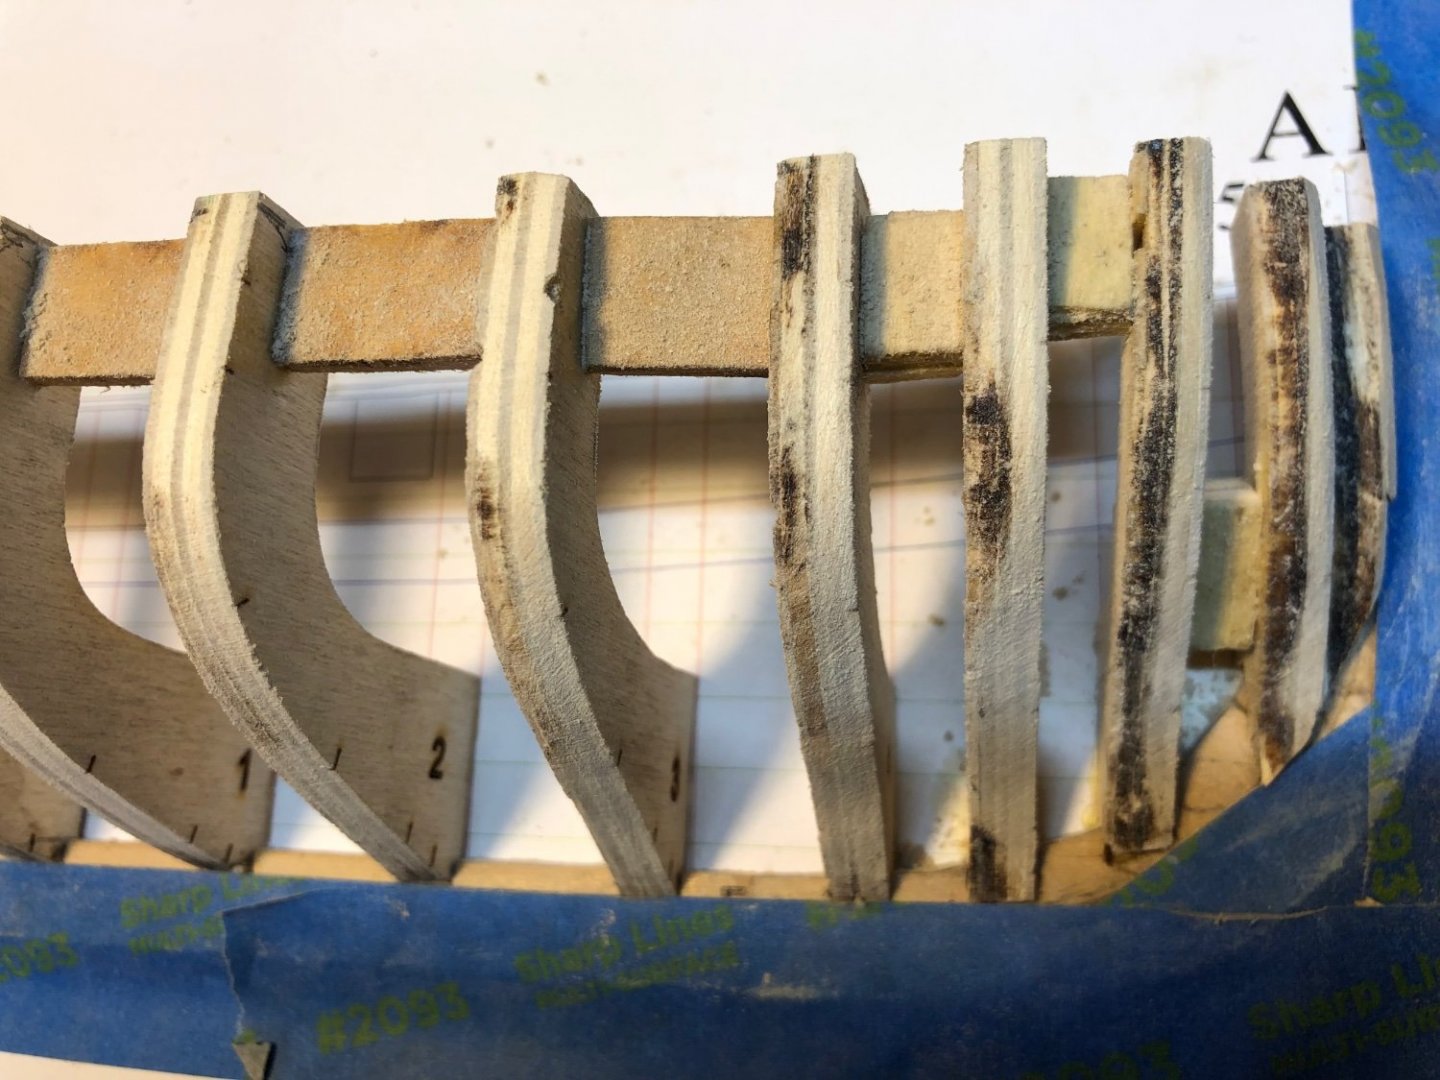
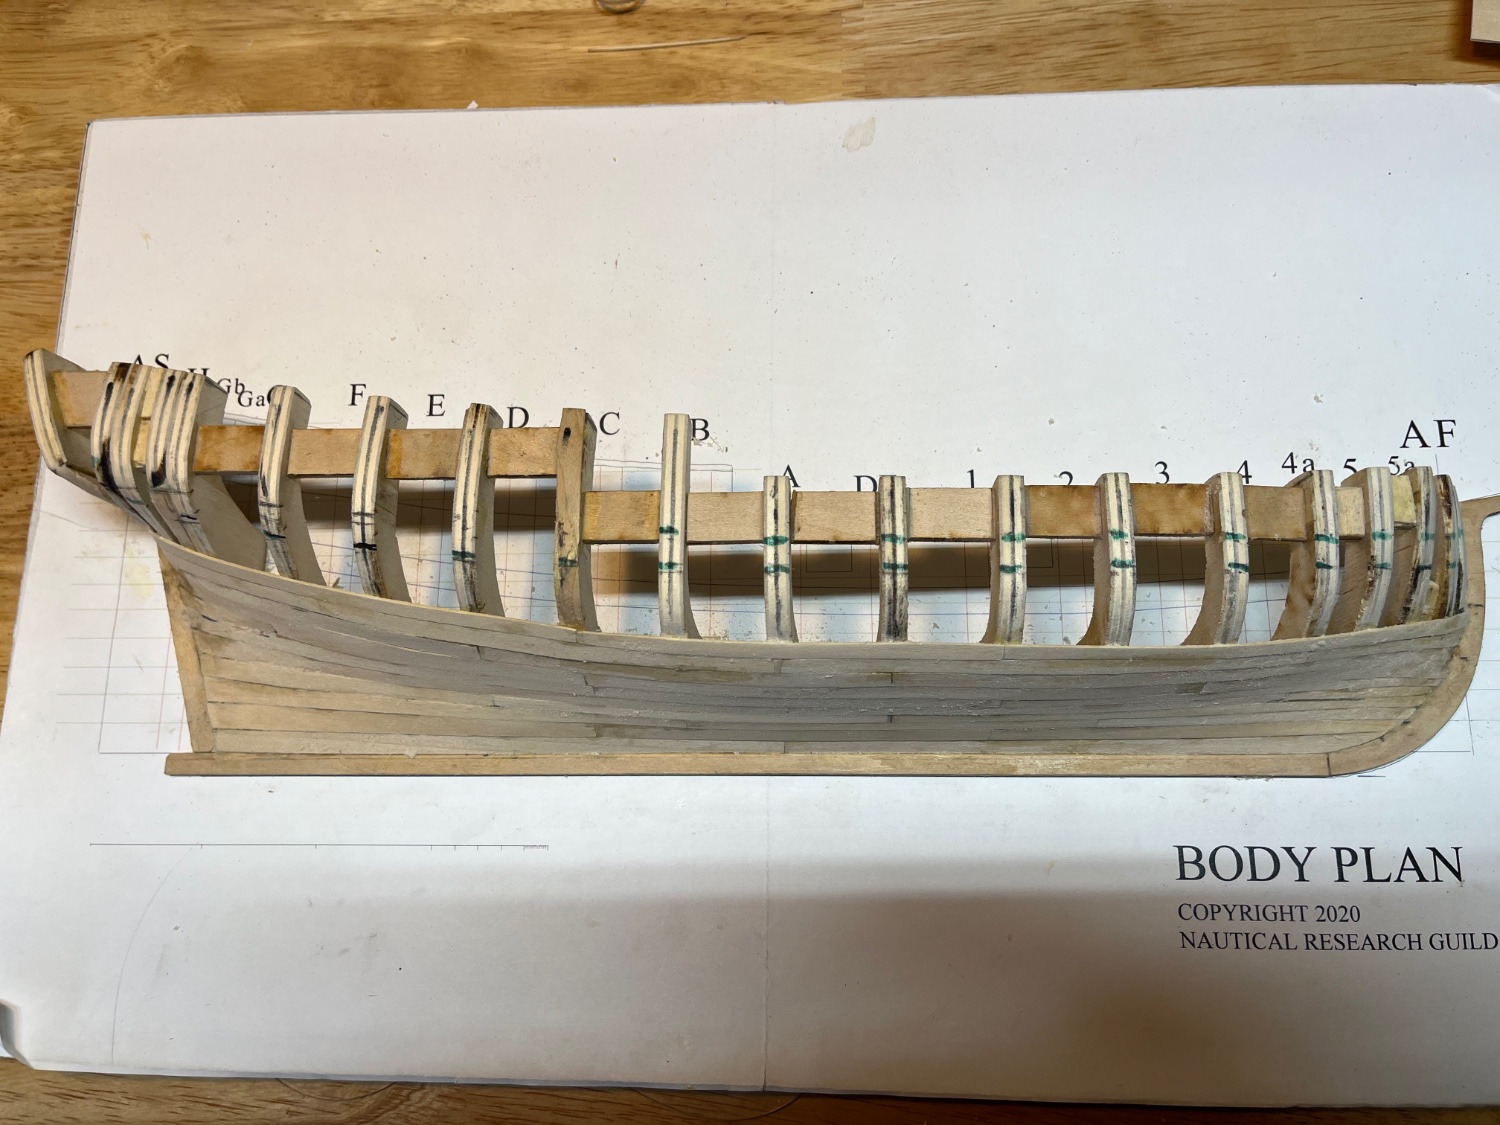
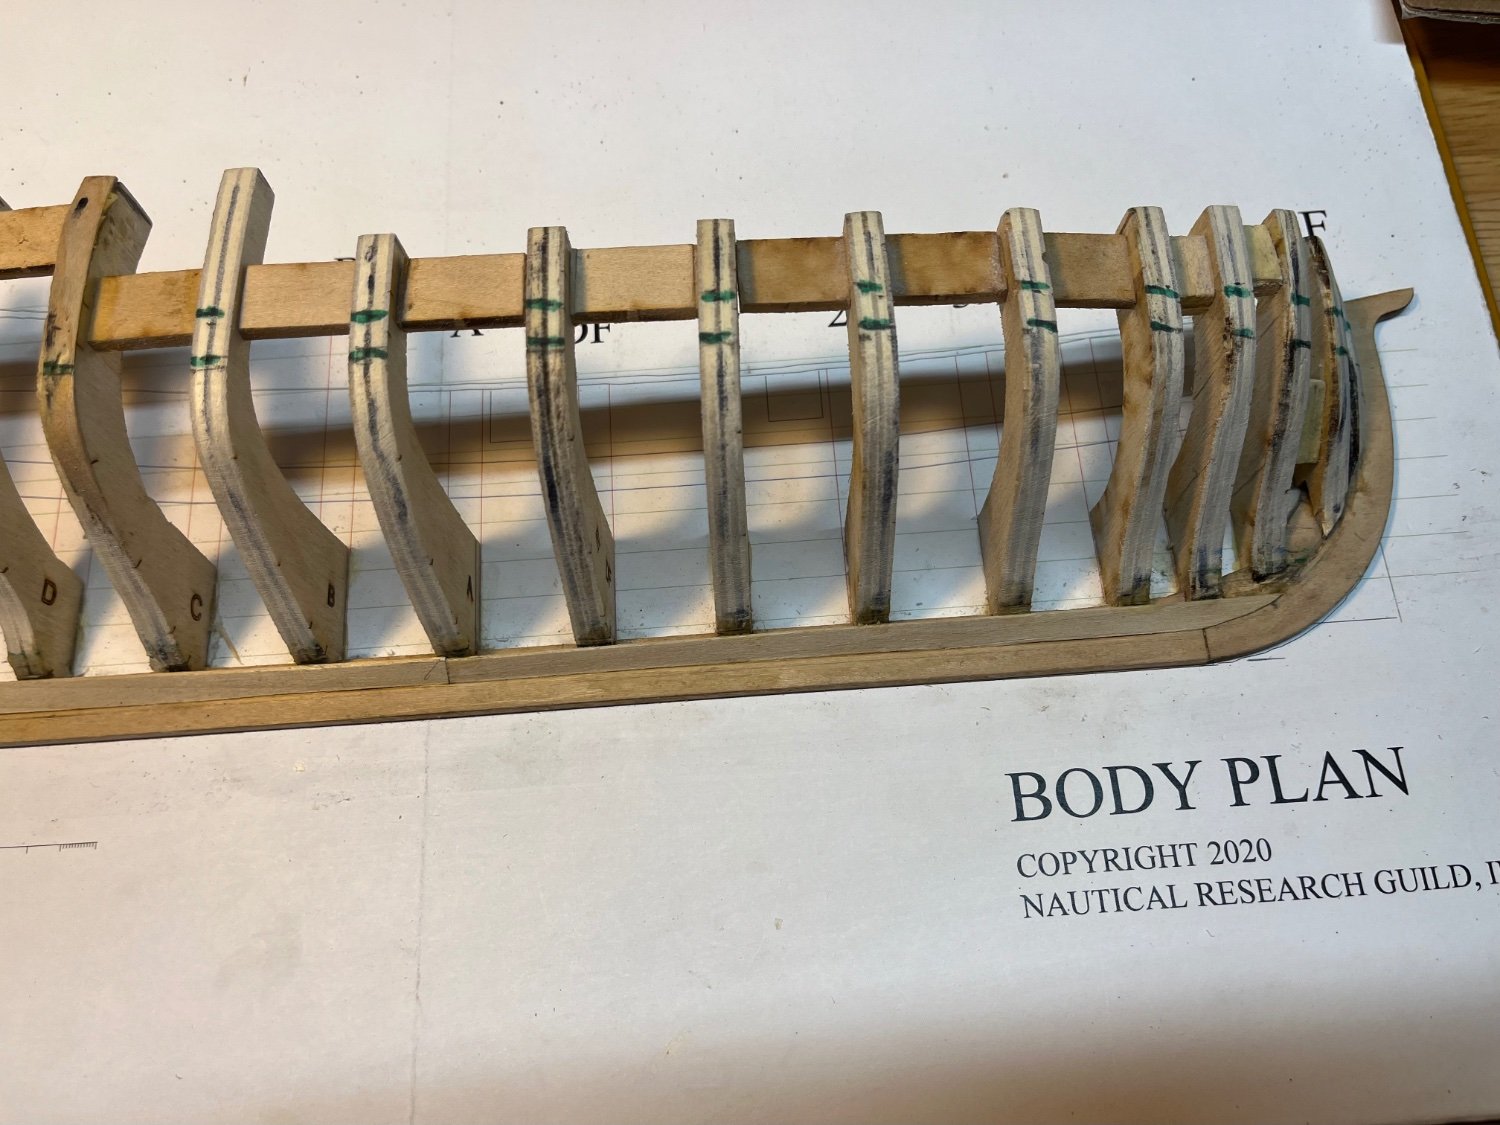
I have been fairing the frames for the past few days. B was very high and C was too low, so it took a lot of sanding on B and adding a shim to the upper part of C to get the batten to have a smooth run. The batten says I am getting close, but looking at the pictures in the instructions, it looks like I have more work to do at the bow and stern. I have been using a 100 grit somewhat flexible standing stick and using a dowel that is about 1 inch diameter with some sand paper glued to it for the concave parts. The instructions suggest it should take several hours over several days to get the shape fair. That seems to be about, right, and longer for me because I have been taking more time with it, and I am not comfortable doing this with the rotary tool.
I have been using an N95 mask with a valve, but still feels like I am getting to much dust exposure. I bought a more permanent mask with replaceable filters called an RZ mask that fits better, seems to filter better, is more comfortable to wear and easier to get on and off. So far it seems like a good investment .
-
I finished adding the last frames, and spacers. I messed up the transom and had to unglue it and fix the spacer. I marked the top line as the instructions suggested. This spooked me a bit because some of the frames needed a lot taken off — but it looks like that in Toni’s build log. I think I still measured the line and marked it 3 or 4 times. I used a rotary tool with a sanding drum and sanding disks to sand the tops of the frames. First time I have used it do that,and I am still getting a feel for how much they take off. The disks seemed to be much gentler than the drum. When I was getting close, I switched back to sanding sticks which is taking a lot longer but easier to control. I have a bit more to do, continuing to measure the tops against the plan and also using a batten to check the curve. All of this seems like good preparation for faring the frames which is the next step.
- Dave_E, GrandpaPhil, Cathead and 1 other
-
4
-
1 hour ago, Dave_E said:
Watching your progress is making me consider doing my Half Hull before I start the Rattlesnake. 🙂
Thanks Dave. Its a great kit, and the instructions are really excellent. There are also multiple build logs to look at when things are not clear.. I think fairing those thick frames is going to be quite an adventure. I was planning to move on to a different ship, but I am happy I decided to this next.


Sultana by DanB - Model Shipways - 1:64
in - Kit build logs for subjects built from 1751 - 1800
Posted
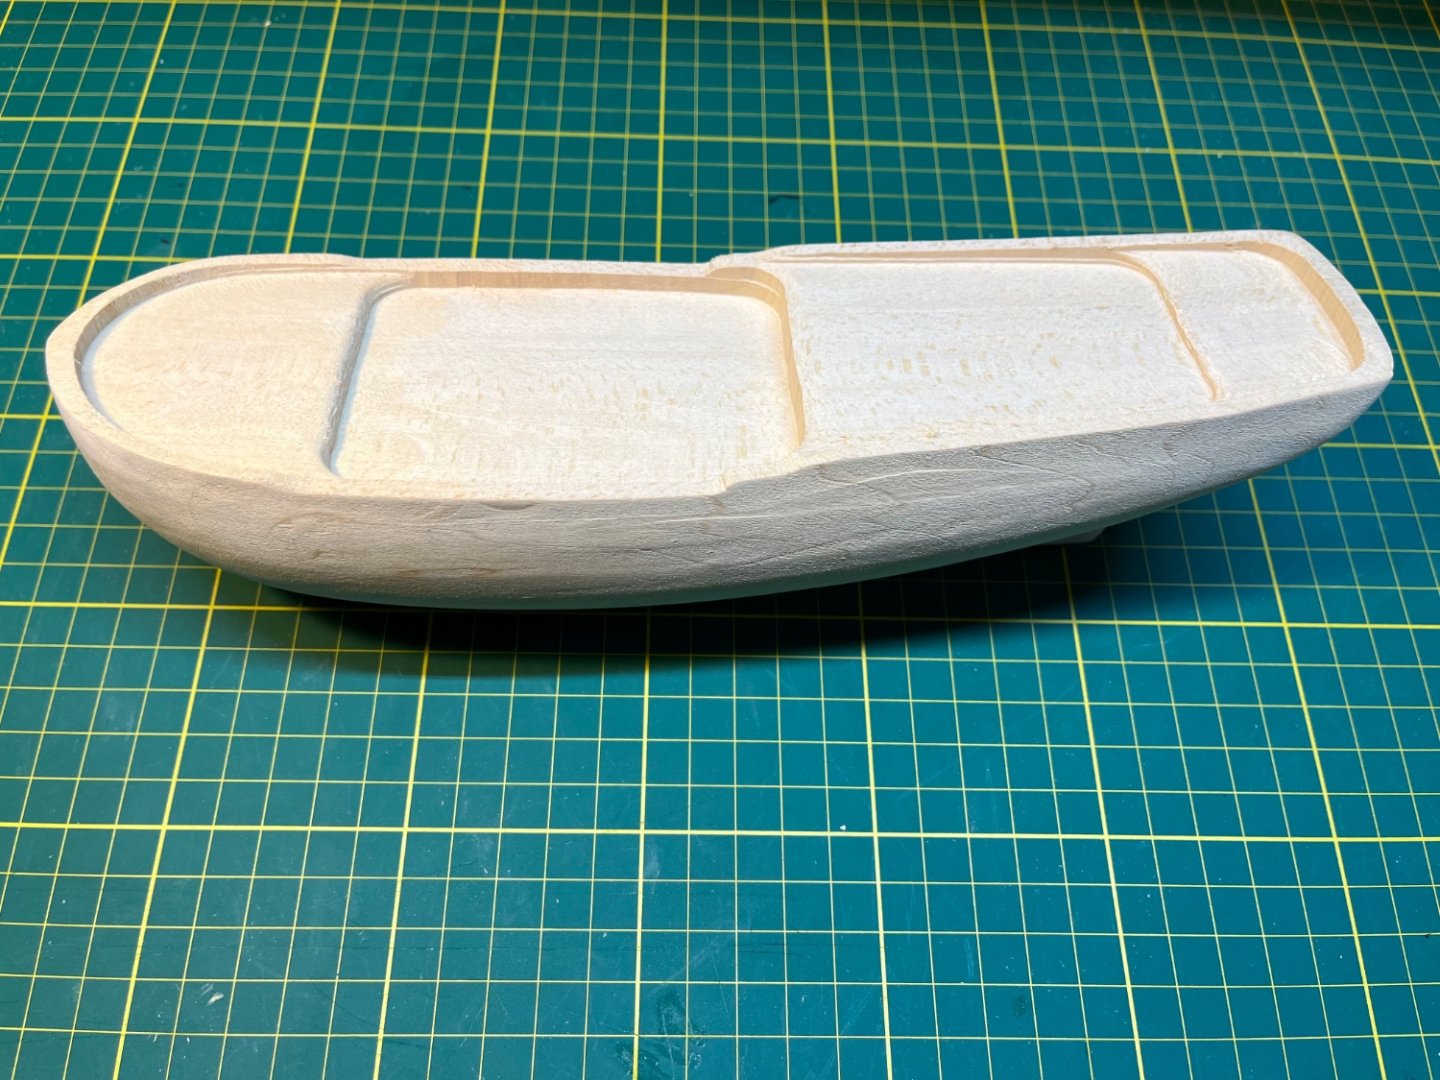
Carving the Hull above the wale to add planking
This week I carved the hull back about 1/16 inch since the plan is to plank it above the wales. It was a lot of work! I used number 11 and 17 knife blades as Chuck's instructions recommended . I went through a lot of blades, and it was slow going. I alternated my modeling time between shaving the hull and ballasting track for the small model rail road layout I am building for me and my train-addicted grandson. It was helpful to be able to take a break from the carving and ballast track, and take a break from the track ballasting to go back to carving! The kit instructions recommend screwing a block of wood into the deck to hold it in a vise. I did that for this step and it was very helpful to have a firm hold on the ship as I carved it.
The suggestion to use rubber cement to glue photocopies of the deck plan to the deck to make sure the profile was correct at deck was brilliant. It made it easy to see what needed to be removed and how the decks needed to be shaped. I'm getting getting close but there is still some final shaping to go. The next step after that is to sand the deck camber and take the deck down about 1/16 inch for the deck planking.