


allanyed
-
Posts
8,149 -
Joined
-
Last visited
Content Type
Profiles
Forums
Gallery
Events
Everything posted by allanyed
-
Great information Ian! Does Harland give a contemporary source for this information? Thanks for sharing! Allan
-

Planking Question
allanyed replied to Malazan's topic in Building, Framing, Planking and plating a ships hull and deck
There are a number of books showing the rabbet and how to make it. It is basically a groove in which the lower edge of the garboard seats as well as the ends of the balance of planking as it rises up the post and stem. It is dynamic in shape so near impossible to draw for it's entire length, but it really is only a matter of following the shape of the framing. No offense to others, but I always READ everything I can if only to avoid mistakes others have made and then shared their experiences. With the cost and scarcity of wood these days, it is something to consider. If you do a search here on MSW the rabbet is addressed in how others go about cutting it. Some use scrapers, some chisels. It really is not very hard to do. Maybe practice on a piece of scrap and you will gain the confidence you need to move forward on your final piece. Many builders spend hours, days, weeks researching to avoid making the scrap pile too large. There will still often be mistakes made, but if nothing else, reading is educational which means it will help avoid trying something others have tried that did not work. Why waste time making the same mistakes. A twist on Einstein's quote, Insanity is doing the same thing others have tried that did not work and expect different results. Allan The dynamics of the shape of the rabbet in the keel moving aft to the stop point: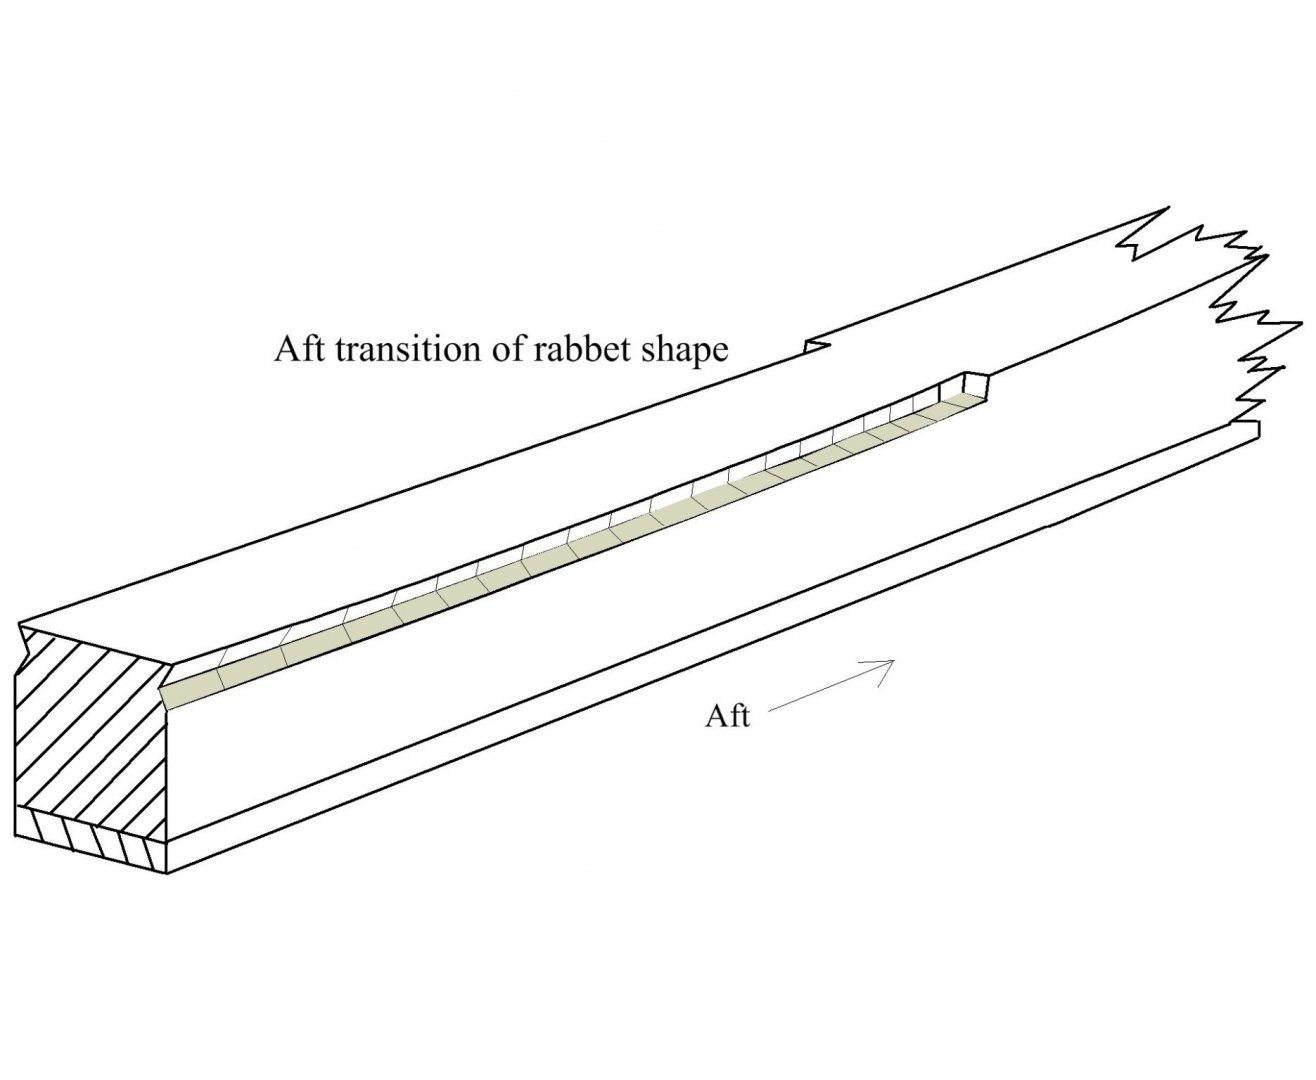
-
Very nice Michael! I agree with you that the pinrail holes appear to be way over scale. Kits are notorious for supplying hugely over scale pins. For SoS, there probably were no pinrails at all? David Lees notes in Masting and Rigging of English Ships of War belaying pins were not used by the Royal Navy until about 1745. This is more than 100 years after SoS was built, and when introduced, they were mainly in racks lashed to the shrouds not on racks secured to bulwarks or on the bitt cross pieces. Donald McKay's book on on the SoS is supposed to be a great source of information for anyone building SoS and might address this as well. Again, your construction is very clean and very nicely finished! Allan
-
Liver of Sulfur Help
allanyed replied to Laggard's topic in Metal Work, Soldering and Metal Fittings
As above, LoS does not blacken brass easily if at all. Copper, no problem. I have gone to copper whereever possible, but when I do need to use brass, pickle it, rinse it and blacken with Birchwood Casey (or similar products) since my favorite, Blacken It is no longer available that I can find. Allan -
Hi Laggard Never say never😄 Deadeye sizes and style vary with scale, ship, which channel, etc. I would be surprised if there are enough aftermarket chain plate sizes and types to cover all situations. I have been buying rope and blocks, but I plan to make rope on my own for upcoming builds as I invested in a rope walk. Blocks??? I am not so sure about that. I have made my own blocks and have purchased them. The same problem arises though when buying them. On a full rigged ship, there are a lot of sizes and types of blocks and after market blocks seem to be limited to about a dozen sizes/types. I will be curious to see others' responses. With the growth of 3D printing, a proper drawing is all that is needed to have custom made pieces so I see that as a big plus to sourcing some things such as gun barrels, and more, without sacrificing accuracy. Allan
-
I think a lot of us are interested Roger!! Thanks Allan
-
Chris, Building the models looks to be a fun project but I would be cautious with pre sewn sails or any cloth materials for that matter. It is impossible to make these to scale at 1:50 or smaller using cloth and sewing machines whether done on your own or buying them pre-made. It is a shame to see many well built models ruined with cloth sails that are so out of scale. If you do a little search you will see that there has been a lot of discussion and instruction details on using alternate materials to make realistic sails to scale lately here at MSW. I am not familiar with CMB's sails, so they may be using scaled materials other than cloth and sewing thread. It will be interesting to see what materials they are using. Allan
-
The combination of CA & Rigging is not quite as bad as mixing vinegar and bleach but definitely two things that should never meet. (except to make a needle tip on a line to be rigged) Allan
-
Dave, It is not hard when it is fun to do. It can be frustrating at times, but then it is just more of a challenge!!!
-
Derek, As you probably know paper of all kinds are in short supply. I have read claims it is due to worker shortages in the pulp mills in North America, and other claims that it is the lack of truck drivers so ships and warehouses are waiting to be unloaded. Allan
-
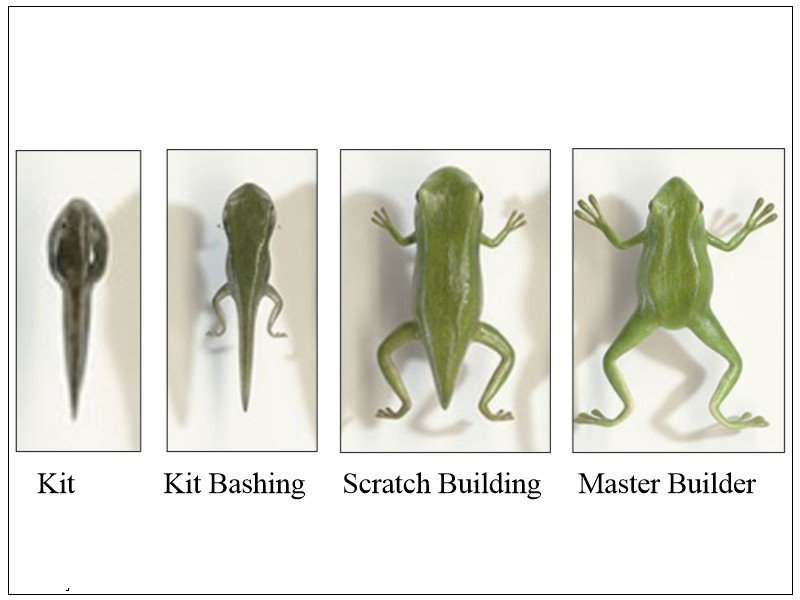
I was shown a similar progression some years ago regarding the progression of a ship model builder. It is not only the actual building, it is the access to tools and space, as well as learned skills, and the desire to do the many hours of research that help separate the categories. And this is not meant to say one is better than the other. A tadpole can be as beautiful to see in the pond as the frog. Allan
-
HI Dave We use it over here as well. You piqued my interest on this one so I did a quick search and found the following--- The oldest known use of the phrase dates back to the 1840 work 'Way down East; or, Portraitures of Yankee Life by American author Seba Smith. In his 1855 classic, Westward Ho!,” British author Charles Kingsley wrote, “There are more ways of killing a cat than by choking it with cream.” Others did cats in with butter while a few still offed dogs with pudding. "There are more ways to do in a dog than hanging it" was a similar term but generally referring to nefarious men. Even Mark Twain got in on the act in A Connecticut Yankee in King Arthur’s Court in 1889 -- “She was wise, subtle, and knew more than one way to skin a cat.” Allan
-
For squares, the machinest square shown previously is my preferred tool in various sizes, but for squaring tight small items, I have a couple Lego blocks that are perfectly square and work well. The grandkids took pity on Grandpa and sent me a few so the price was right😄
-
Dave, The following is the contemporary model located at the Royal Museum Greenwich from which the sketch was made by John Franklin. Allan
-
Shep I am sure Druxey will reply, but in the meantime, I would invest $7 and buy his booklet on making sails. It has all the details on his process including adding the bolt ropes and seam lines. https://www.seawatchbooks.com/ItemDisplay.php?sku=115003 Allan
-
kearnold What ship/year/nation? What items are you referring to? Many kits put in cast metal parts even if they were wood on the actual vessel so they may need to be different colors or replaced altogether depending on the item itself. Examples are ships wheels, anchor stocks, moldings et al. Just as an FYI, you mention steel and iron. While steel has been around for thousands of years, in shipbuilding, steel was not replacing iron until the 1880s, at least in the UK (Source - Royal Museum Greenwich) They may be referring only to hull and framing construction though, not necessarily fittings. Still, I thought you might find it an interesting point. Allan
-
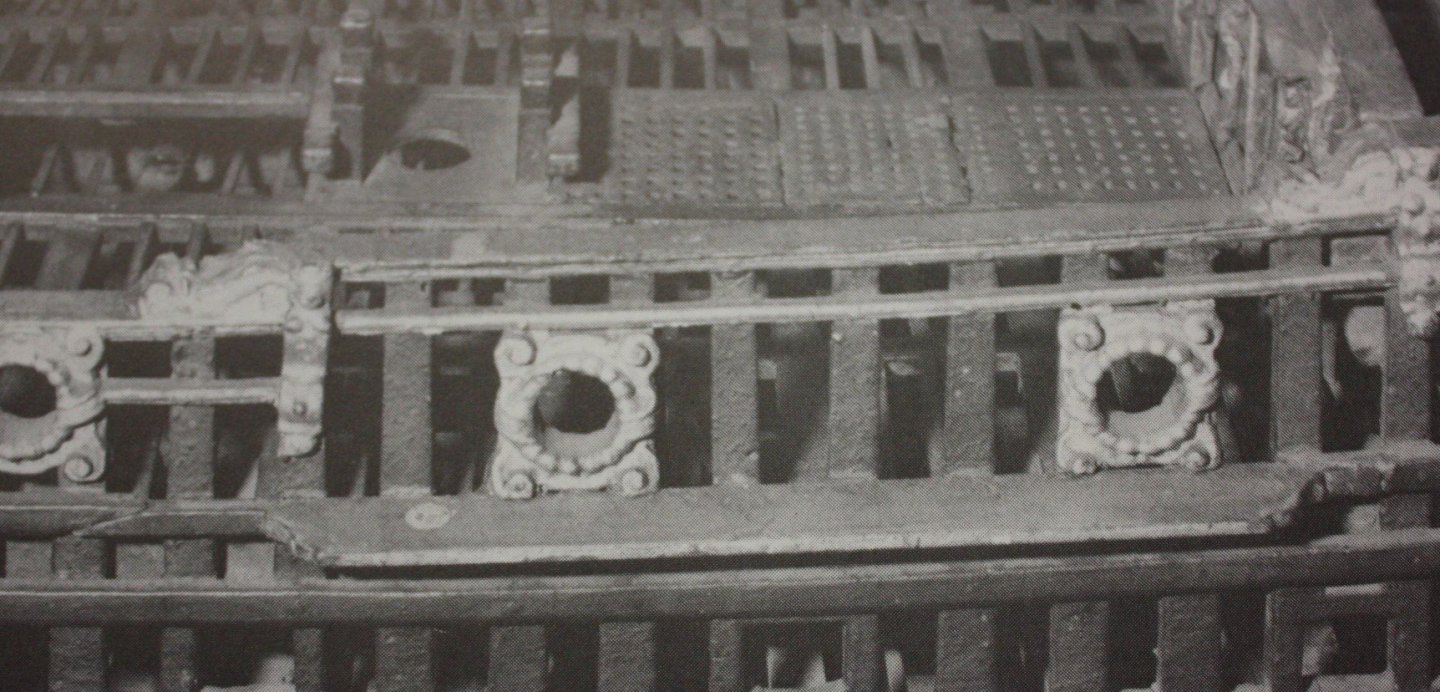
I know this may be too late, but for MODELING purposes, there is another option found on a contemporary model for channels mounted on the channel wale. This is from John Franklin's Navy Board Ship Models 1650-1750, page 66. You can see that the modeler made the channel as a widened section of the channel wale itself. The book also shows a closeup photo of this on the model. Allan

-
It is a real pleasure to see another member that takes time doing research and paying close attention to details. Your scale is quite large so a fun build log to follow. Thank you for sharing your first go around as well as your new B&B build. Allan
- 454 replies
-
- 1
-

-
- Union Steamship Company
- Stepcraft 840
- (and 3 more)
-
Very glad to see you coming aboard Richard. Your background and experience sounds like it might give some insights to other members from time to time!! Allan
-
HMS Bounty by AdamA - 1:48
allanyed replied to AdamA's topic in - Build logs for subjects built 1751 - 1800
Whatever method that you choose that gets accurate final results is a good one. There is no easy way to pre-sand to the final thickness before installing the fames. Close is good, but getting the bevel started and still leaving a 1/32" or even 1/16" excess is not a bad idea. You can always remove material but cannot put the wood back on. Allan -
Thanks again B.E. I found the date I had mentioned in Anderson's Navy Board Ship Models. I found one photo of a contemporary model 1741 (HMS Royal Oak) with the stern name and another circa 1740, HMS Barfleur which predate the Admiralty order by quite a few years although there appears to be a lot of questions regarding the accuracy of the Barfleur model according to Anderson. Don't know if these were painted during a model renovation between when they were built and now though. I looked at stern photos of contemporary models after 1782 at Preble Hall and could not find any with a name on the stern. This is a very small sampling so may not hold much validity. Another good source to check may be the Kriegstein collection of models. Perhaps members here with the books of that collection can check the photos and shed some additional light based on those models as well. Allan
-
Keith Your build log continues to be my all time favorite!!! What are your plans for the model when she is complete? If you mentioned this earlier, my apologies for asking. Can't wait for the next post!! Allan
-
B.E. you have the wording I remember seeing (was not sure about the dates). I cannot remember where I saw this to start with, can you share the source? MANY THANKS for your post. Allan
-
If accuracy is a concern consider what Druxey posted. I recall reading that the use of the names was indeed started officially in 1772 by order of the Admiralty and then stopped by the Admiralty about 1782 although it may have continued unofficially. If you are referring to your build of Endeavour, as she was not decommissioned until 1774, she may have had her name painted on her transom for at least the last few years of her life. If you do go with the name on the transom, note that these were painted on, they did not use carved letters or name plates. Enjoy the quest!! Allan
-
Planking Question
allanyed replied to Malazan's topic in Building, Framing, Planking and plating a ships hull and deck
Great advice from Toni!!!! The more you read the more satisfying and fun the hobby can be. The more you read the better. Allan


