allanyed
-
Posts
8,149 -
Joined
-
Last visited
Content Type
Profiles
Forums
Gallery
Events
Everything posted by allanyed
-

HMS Euryalus 1803 by rlb - 1:48 scale
allanyed replied to rlb's topic in - Build logs for subjects built 1801 - 1850
Good point Shipman! Just thought most members would not mind spending five or ten seconds typing Euryalus Matiz in the search box 😀 Cheers! Allan- 122 replies
-
- 2
-

-
- Euryalus
- Plank-on-frame
- (and 4 more)
-
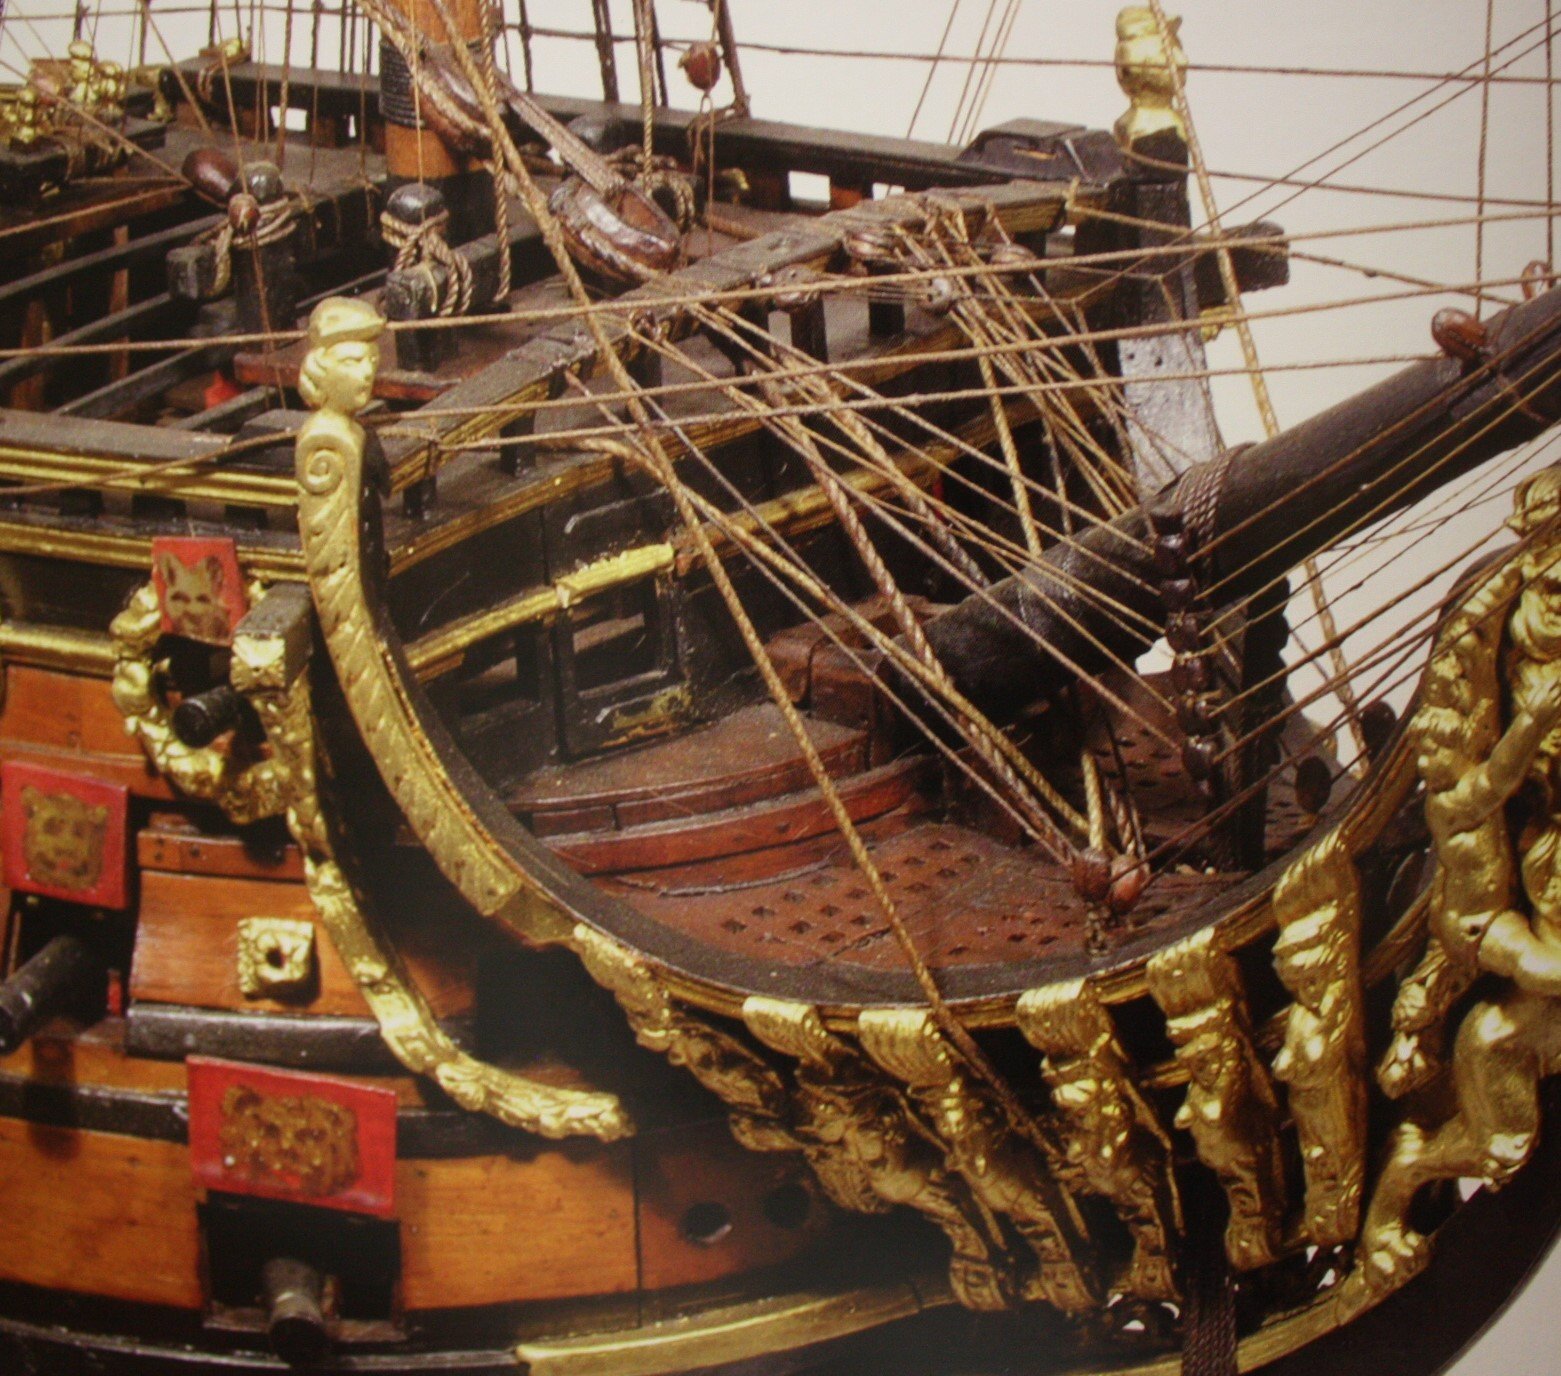
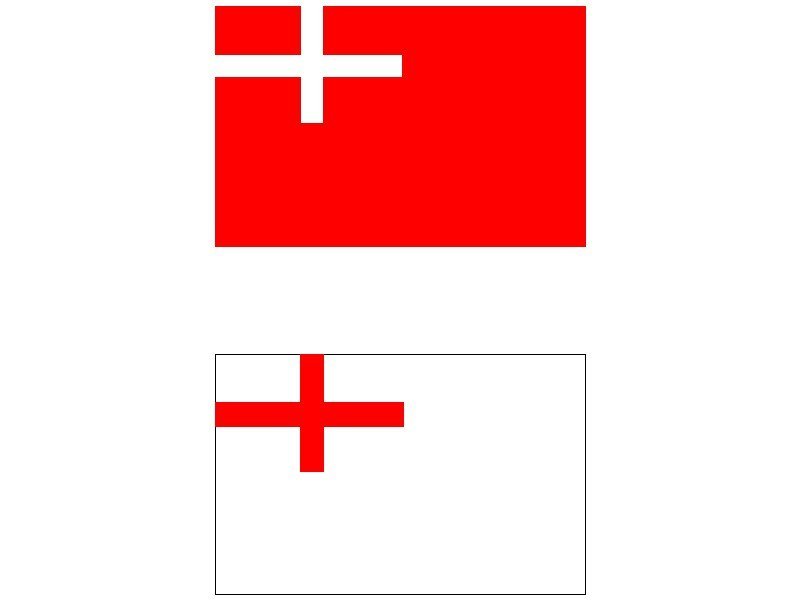
Hi Michael, For sure, as you are successfully getting some bashing going, get rid of the pin rails on the bulkheads. If you do want to keep the pin rack, maybe consider replacing them so the pins will be to scale. The holes look to be at least double, maybe triple the diameter of the pin. Hope you don't mind a question and comment. Do the instructions show the type of hull planking on your model? We see this style of planking on many kit build and I have wondered if they give instructions to do it this way instead of how it was actually done. Your planking is very neatly done but I was curious about this style. Regarding the flags from the kit, the two on the left of the photo you posted look like ensigns. The top one is the the type of Union Jack which came into use in the beginning of the 19th century so would never have been seen on the SoS. The lower one is a St. George's cross which was used in the 12th century for ships mainly for British ships sailing to the Med at that time and its use continued for some time time but I believe was no longer in use in the 17th century. By the time of SoS, the most appropriate ensigns would be a white ensign or red ensign. If you want to go with one of these, it is really a simple matter of printing these on silk span or other tissue paper and then fixing the ink before furling it to hang naturally. I have recently had to print these for my own project so if you would like the drawing please PM me with the dimensions and I can send you a printable color drawing. Chuck Passaro goes into some detail on printing flags using gift wrapping tissue here at MSW as well. Much better scaled than cloth of any kind. Allan The red and white ensigns in use between 1625 and 1707 follow:
-
HMS Euryalus 1803 by rlb - 1:48 scale
allanyed replied to rlb's topic in - Build logs for subjects built 1801 - 1850
Ron, I have been following Matiz' build log on Euryalus. If you have not already been doing so, maybe give it a look see. His work is spectacular plus some good questions and comments have arisen during his build. I am looking forward to seeing your progress updates 😀 Allan- 122 replies
-
- 4
-
-
- Euryalus
- Plank-on-frame
- (and 4 more)
-
Druxey I agree that this was normally the case but I remember seeing doors on the side of the bins on a drawing. This was quite a few years ago, so I'm not sure which ship/drawing. Time to dig out the old rolls of paper plans and take a look see. Allan
-
Harold Hahn method
allanyed replied to Essayons's topic in Building, Framing, Planking and plating a ships hull and deck
Tim, Sorry to continue with spending money and researching suggestions, but............. You can learn a lot about "the method" in The Ships of the American Revolution and their models by Harold M. Hahn. ($13 for a used copy at Abe books) For a somewhat complete explanation from start to finish of "the method" , maybe consider continuing your search and check out the Beavers Prize build log here at MSW. Allan -
Charlie Depending on the wood, (forget using the walnut in the kit) you can either try edge bending or spile the rail as Jaager suggests. I prefer and use the method he suggests for heavy bends, but, you can try edge bending some species. Soak the appropriate wood in water for a few hours and while it is doing so, cut a jig the shape of the bend that you need. Then follow the method Chuck Passaro has detailed here at MSW on edge bending the wet wood and heating it so it will hold its shape. If the bend is too severe, most/all species will break and you will be much better off cutting the rail to shape in two or more pieces for each side from a wide board as Jaager described. I have had success with pear, castello, and holly using the edge bending method, depending on the thickness to width ratio and severity of the curve. Holly is the easiest of these to bend and will hold the shape with no problem once heated and left to dry in the jig. (Hot air gun - her hair dryer - works well) Allan
-
Ciao Matiz I am not sure I understand. The lower deck drawing shows the bread bins and scuttle that leads to the bread room below which, if I remember correctly, was a platform on the Orlop level. I believe the bins on the lower deck had doors into them from the sides. The upper deck in that area aft has the great cabin, bed place and coach, and there would normally not be any access to get below to the bread bins these areas. Maybe I am missing something here and Wayne can clarify. Allan
-
The smaller the scale, the more I cringe as well, BUT, if you get hold of a copy Ships in Miniature by Lloyd McCaffery there is information on everything about building and rigging ships in scales even smaller than 1:100 that you may find useful. This includes method for making blocks for scales half the size you are working which may still be applicable for your scale. Allan
-
Does the shape of each plank as shown on a planking expansion drawing show the actual shape of each plank? If it does, there are no planks with a straight edge on either side for their entire length except that the garboard appears to be close. The upper edge rises slightly aft and the lower edge is reduced forward to follow the rabbet. One example can be seen at https://commons.wikimedia.org/w/index.php?title=Category:Ship_plans_of_the_Royal_Museums_Greenwich&filefrom=Saint+Albans+RMG+J4033.jpg#/media/File:Squirrel_(1785)_RMG_J6457.jpg Allan
-
Planking
allanyed replied to bluenose2's topic in Building, Framing, Planking and plating a ships hull and deck
I heartily second Jaager's response. Why kit makers use walnut I will never understand (except maybe it is cheap) as it looks awful due to the grain and is brittle. Oak is great at 1:1, but looks as bad as kit walnut at our typical scales and is just as miserable to work with. In addition to the woods recommended above, if you cannot mill your own planks, you can get sheets or strips of Alaskan cedar which is gaining in popularity or castello. If you do mill your own, you can buy billets or boards of cedar and castello or use any of the hard woods Jaager recommended. For decks, you can use the same, or add holly that has been properly harvested and quickly kiln dried to be sure it is white. Allan -
Lovely model David!! It is really hard to tell from the photos, but it appears the coppering has indentations going in as if nailed. If this is the case, kudos, that is the way it was done in actual practice. Many models have them wrong with bumps sticking out rather than indentations, but I suspect this is incorrect information from the kit manufacturer. One point for future consideration, hope you don't mind. There was normally no gun port stop on the underside of the upper sills. Stops were only on the sides and on the top of the lower sill. I did find a photo of one contemporary model, Lizard 1697, that seems to have a stop on the underside of the upper sill on at least one port so there may have been exceptions. Cheers Allan
- 218 replies
-
- 1
-
-
- Victory
- Caldercraft
- (and 1 more)
-
John Looking at photos of a number of rigged contemporary models, the vast majority have no sails but nearly all running rigging is in place. As with the clew lines for example, leech lines and bunt lines are knotted on the end that would attach to the sail if it were in place and start at the blocks on the spars then rove through the appropriate lead blocks and then to their belaying points. Sheets and tacks are rigged as well as lifts and more. How many lines "should" be rigged if no sails are included?? To each his own. Allan
-
Phil This is the downside to proper research. Sometimes it raises more questions than giving answers 😁
-
Endeavor Standing rigging HELP! FRUSTRATED!
allanyed replied to bobc622's topic in Masting, rigging and sails
Bob, If you have not started rigging Endeavour, maybe consider forgetting the kit as it is probably not without mistakes and purchase a book that will give you accurate information such as Lee's Masting and Rigging. Used copies are available. Even Rigging Period Ship Models, while geared to one ship and without the details of Masting and Rigging, may be more accurate than the kit. Allan -
Hi Michel, Sorry, but I have no experience nor have I ever researched Baltimore clipper schooners so cannot help too much. The sizes and ratios of flying jibs, jibs and stay sails are given in detail on pages 151-152 in Lees' Masting and Rigging for British ships, not American ships. If you don't mind using British figures, I recommend you get that book as it will help you here and hopefully for future builds for all the details regarding making and rigging masts, spars, etc. Advice on following the booklet from David Antscherl? Make one or two sails to test how things are working. He is a member here so if you run into problems and post questions in this forum I am sure you will get responses from him and/or others that have used his booklet as a guide. The only way to know what questions will arise is to make your first sail. My last project required a myriad of sail sizes but I started with a small frame to do a test on for one small sail. Once I felt comfortable with the process, including small changes that worked better for me, I made a large frame that allowed several sails to be made at a time. Allan
-
Bonjour Michel, ça va? Yes, what I call the plug is the insert, just a different name for the same thing. From James Lees' Masting and Rigging p.136, .....the usual width of a cloth (and a cloth, by the way,, is the sailmakers term for the canvas he uses) was 24 inches though in the 17th century a 25, 26 and 30 inch width was used. Also, an 18 inch cloth was often used for staysails and jibs in the nineteenth century. He also goes into great detail on the linings, bands, reef tackle pieces, buntline cloths and more. As to bolt ropes on square sails keep in mind there are multiple bolt ropes, not one continuous rope. On square sails the head rope is the smallest at 0.40 the size of the leech and foot ropes which were the same size. Lees points out that it would take volumes to list all the sizes of bolt ropes for all sails for all ships and eras. For model purposes he suggests ratios for the various sails to their respective stays on page 139. Leech and foot ropes for square sails: Main course - 0.33X the main stay Fore course - 0.33 X the fore stay All topsails 0.67 X their respective stays Topgallants -0.5 X their respective topsail leech and foot bolt rope size Sprit sail 0.6 the leech and foot bolt rope of the fore course Sprit topsail same as the fore topgallant There is a lot more, but these should help. For jibs and stay sails it is different. On four sided stay sails (Lees, page 152) the head rope is twice the size of the leech, foot and luff ropes. On three sided sails, the bolt ropes were the same on all three sides. The proportions are ratios to the main topmast stay from 0.2 to 0.4 depending on which sail. Again, Lees points out that these proportions are good for model makers but are not necessarily exactly to scale. Allan
-
Is the book good? Yes I think it is pretty good. Would I recommend it? Probably not to anyone that is not very interested in research and is a scratch builder. Fantastic models to be sure and I am sure I will be checking them out many times in the future as questions arise, but I would rather spend a day or two at Preble Hall or a museum with a similar collection and take several hundred more photos. I reference my current collection of photos from Preble Hall a lot and wish I was closer so I could visit again and take several hundred more photos. The write ups in the Kriegstein collections on each model are interesting, but I would rather have seen four or five more close up photos than learning about their provenance and such. Just my opinion but I think Franklin's book is much more useful to ship modelers. Allan
-
As it internally stropped with metal it is likely well into the 19th century. These were on all manner of vessels from fishing schooners to warships. Without knowing the dimensions of the block and the year, I don't think there is anyway of knowing what line rove through it let alone what size ship. Allan
- 1 reply
-
- 3
-
-
I think there is a play on words regarding cavel versus kevel. According Lees' Masting and Rigging on page 170, they are two different things. Maybe there are other sources that do not agree. Anderson calls the cavel blocks small knights. Neither calls anything looking like the cavel block below a kevel. Anderson does show kevels but they look exactly like those labeled kevels below. Not a big deal regarding the name now, but for future, it may cause some confusion for those picturing one thing in their mind and others something else. Interestingly I cannot find the origin of the word cavel in the marine sense other than it is a variation of the word kevel. Another day, another quandary!! Allan
.thumb.JPG.e8ad171b6a2a6f4323b7942b3856ee41.JPG)
-
Where can I find metal wire?
allanyed replied to flying_dutchman2's topic in Metal Work, Soldering and Metal Fittings
Marcus I usually just do an Amazon search for whatever I need, be it copper wire spools, sheet stock or ???? Thanks to Mr. Bezos, I pay less, get things fast, and have more time to be in the shop rather than burning gas and time going shopping. I am a fan of McMaster Carr and Grainger for some things such as drill bits, fasteners, and a few other things where I want to be sure I am getting jobber quality, not junk. Yes the copper should be cleaned once you finish your soldering. I like to file or steel wool off the excess solder, then just give it a soak in acetone to get off any residue. Pickling is also a favorite depending on the situation. I know it is not good to handle the parts with bare hands, but I find it is easy to dip my finger tips in acetone and wipe clean with a paper towel immediately before setting the parts in place. RARELY have I had a problem since doing it this way. Rubber finger cots are a great alternative and probably better for your skin though. Allan -
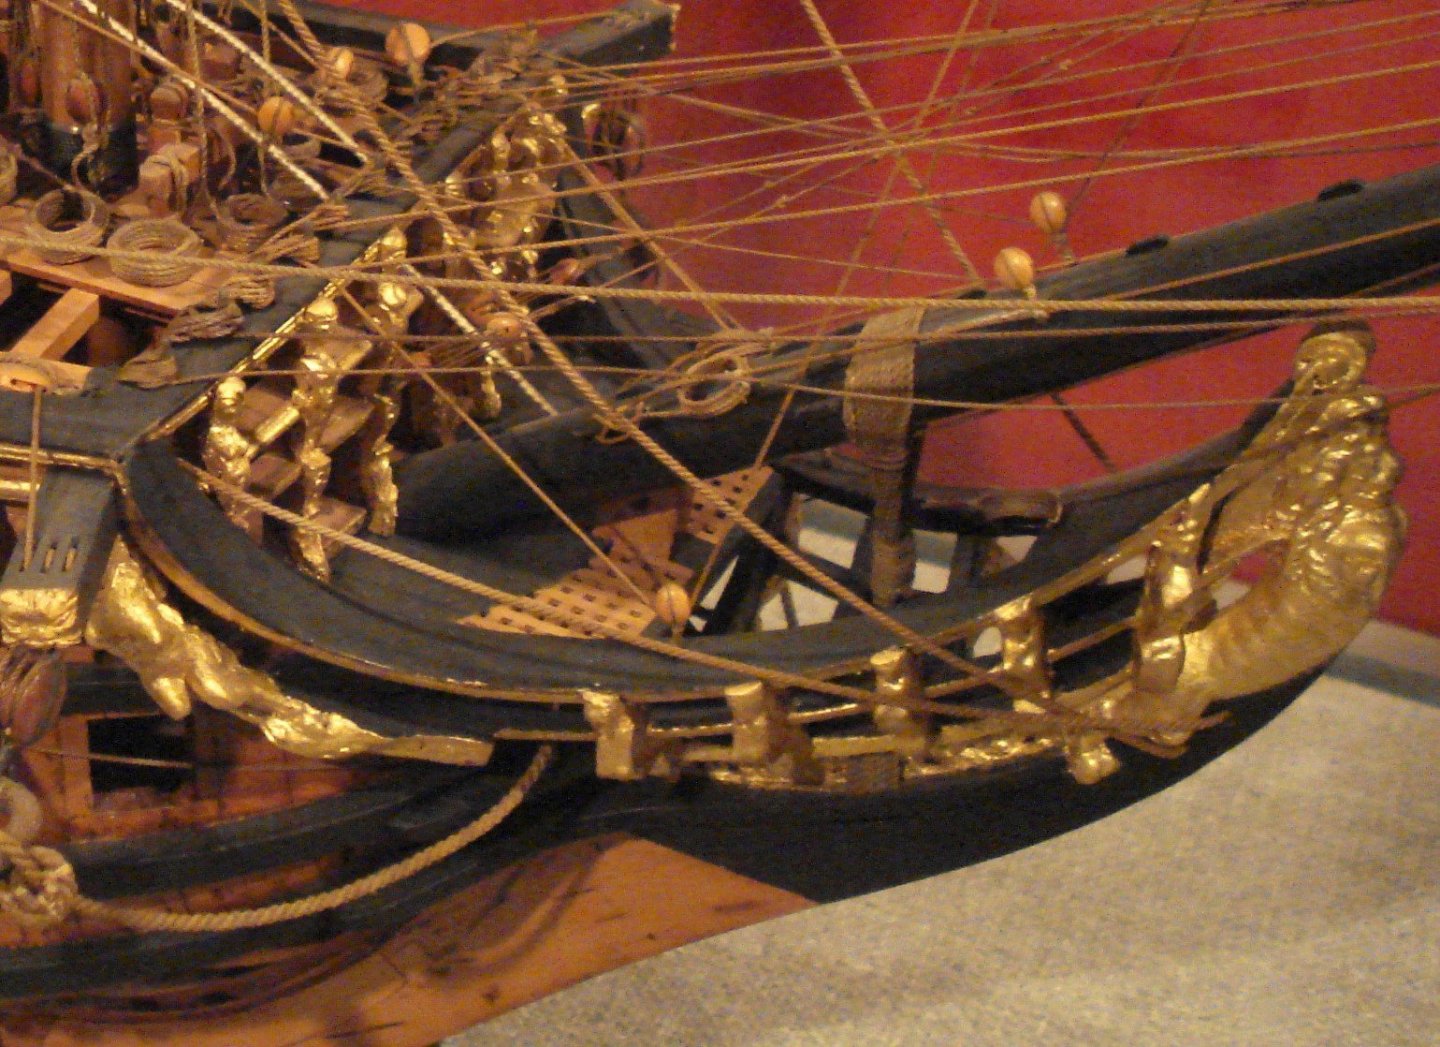
EJ, How would the lines belay to the rail without pins? I am having a hard time envisioning a pin rail that has no pins but can still be used to belay a line. From looking at 17th century contemporary models the lines were belayed to cap rails, cleats, and timber heads for the most part. Below are bow photos showing two different styles of rigging at the bow and there is no indication of any kind of rail as in Michael's kit. Granted these are only a few examples so certainly not cast in stone. RC Anderson's Rigging of Ships in the Days of the Spritsail Topmast is a great source for more details and nowhere does in write about a rail like those in the kit. Below -- Coronation from the Kriegstein collection Note the fairleads at the gammoning Below is the bow area of a 3rd rate of 1650 at Preble Hall - Note there are no fairleads at the gammoning In the below photos there is a small set of bits just aft of the figure head on the Hampton Court (1678) in addition to the fairleads for other lines going to the timber heads. This photo is cropped rom the one on page 92 in Franklin's Navy Board Ship models. I have no idea if any of these are appropriate for SoS, but they may be closer to the way it was actually done compared to the kit version. Allan


-
All is beautiful, and I especially like seeing how you set up the stock to mill the beams. Now that I have finally gotten a milling machine, this is a task I am anxious to try using your method. Beats doing it manually by hand with chisels! Allan
-
Now I understand. Numbers 36 and 37 are not timberheads like those at the forecastle. These are definitely not extensions of the top timbers, but look more like a variation of what could be a cavel block. The drawing seems to show a hole in the cavel block, where as it would normally be a sheave arrangement closer to the deck for the line the pass through to the cleat next to it (if it is indeed a cavel block. ) As to the angle, I have no idea how they came up with this, but it may be correct based on some contemporary plans or models they found. I did some quick looking at photos of contemporary models in Franklin, The Kriegstein collection, and photos from Preble Hall and cannot find anything to confirm or dispute what they show on the plans. Allan
-
Where can I find metal wire?
allanyed replied to flying_dutchman2's topic in Metal Work, Soldering and Metal Fittings
I use Ace and HD and others but I find better pricing on line and one or two day delivery most of the time.. Copper is great for deadeye chains as it can be blackened with LoS in situ. For me I prefer brass where the item has to be stiff such as a hook. Allan -
Glad the plans have the right number of timberheads. I saw a photo of their model and only counted five, thus my comment. I may have missed one that is not viewable. Photo below. Not sure what you mean about leaning timber heads. I THINKG they should pretty much follow the line of the top timbers if it were a fully framed model. Hopefully some one will have a firm answer for you but perhaps the body plan may give you an idea of the line. Cheers Allan

.JPG.daa29d80a1fdf04ed4db76f5d9428bc4.JPG)