


allanyed
-
Posts
8,149 -
Joined
-
Last visited
Content Type
Profiles
Forums
Gallery
Events
Everything posted by allanyed
-
Dziadeczek If you find a good source that offers more than one grade please post the link. I would like to experiment with different thicknesses as well. I have only had one thickness and I don't know if it is the thickest or thinnest. Regardless of what you wind up using, even the thickest span will be closer to scale to any cloth that exists for 1:48 or smaller. Allan
-

Gun Port wreaths
allanyed replied to allanyed's topic in Building, Framing, Planking and plating a ships hull and deck
Thank you Jaager and David. Not "wounding" the wales makes total sense and with the vast majority of contemporary models confirming this, that is the route I will follow. Allan -
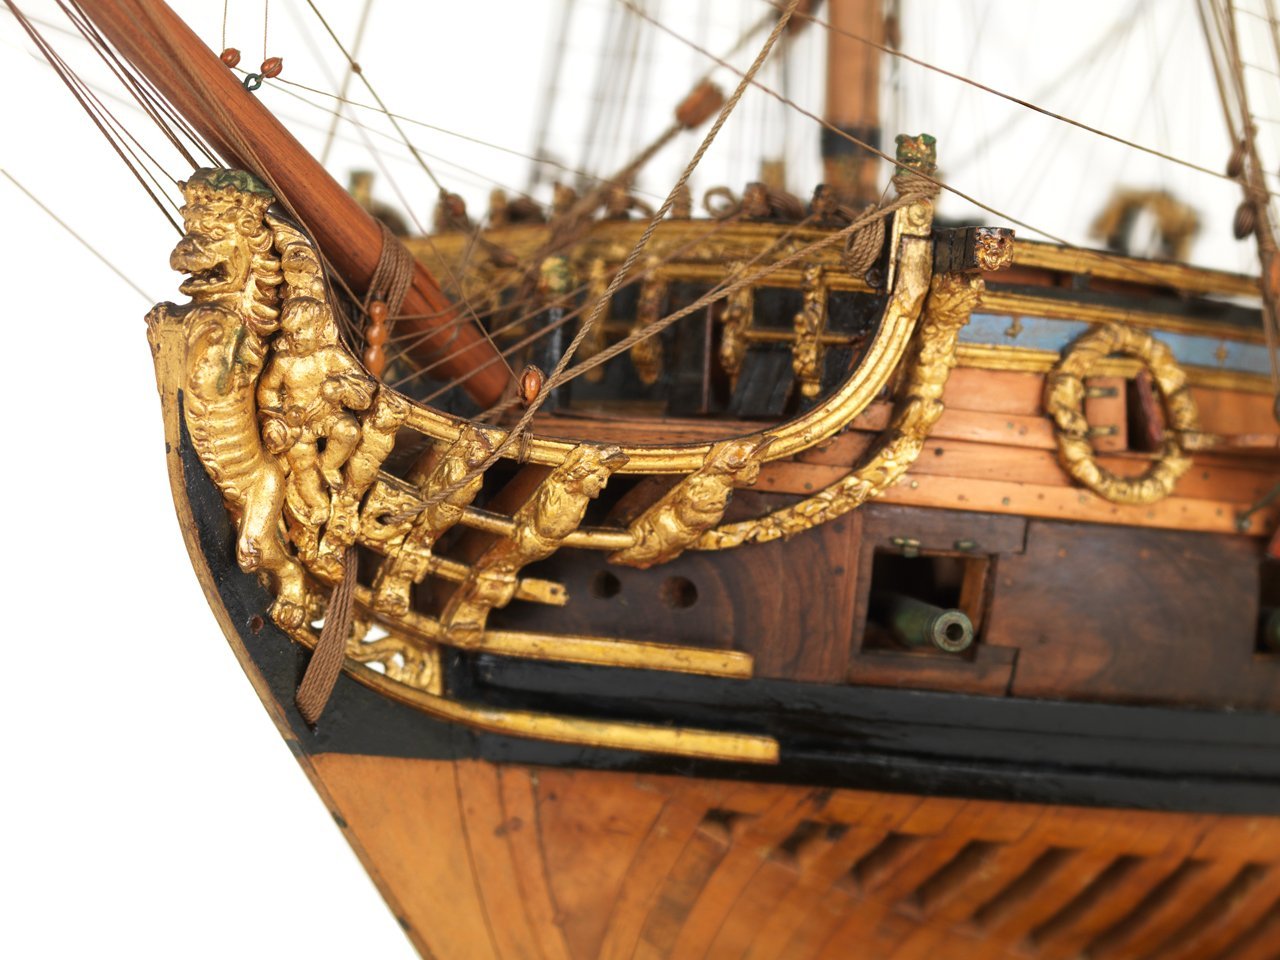
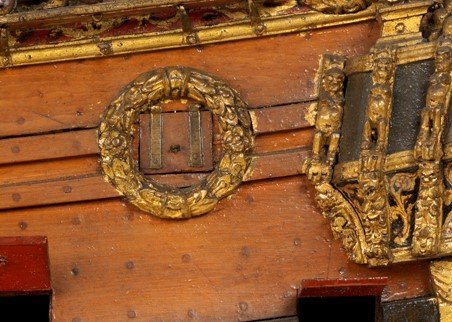
Looking at photos of contemporary models, most appear to have gun port wreaths that have a groove/rabbet cut to accommodate wales or moldings. A few have the moldings or wales cut so the wreath can lay flush against the hull without any wood removed from the back of the wreath. I cannot find anything indicating what the actual practice was. If anyone has information based on contemporary descriptions I would be grateful to learn how this was done in actual practice. Examples on contemporary models follow: TIA Allan Wreath over wales and molding Wreath with wales cut to fit.
-
1st Planking Video
allanyed replied to Glenn-UK's topic in Building, Framing, Planking and plating a ships hull and deck
Thank you very much for posting this Glenn. After watching the video, it brought a question to mind, what is a professional model builder? In looking at definitions for other hobbies such as photography, by definition, an amateur is “a person who engages in a pursuit or activity for pleasure rather than for financial benefit.” On the other hand, the definition of a professional is a little less straightforward. Sources define a professional as simply as “one who earns a living for their occupation,” or as vague as “a person who is expert at his or her work.” Clearly, it’s this vagueness of what a professional is that is at the root of many debates. There are many members here that do work far superior to that shown in her video and some do sell some of their models, so, are they professional model builders? Is building a kit versus scratching a part of the definition in ship modeling? I have no idea of the answers, if there even are any, just curious to know what others think. Thanks again for the link Allan -
Need to find a nut and plant it for..... the next generation of ship modelers. Very pretty wood! Thanks Matiz
-
Matiz, Sorry amico, but I have a few questions, I hope you don't mind😁 How are you drawing the walnut down so small and so well? I use a Byrnes plate and find bamboo works best for me, but never tried walnut. Do you know what species of walnut? Thanks!!! Allan
-
Good find on the photo Dafi, und danke for the drawings. As with most things in this hobby, there do not seem to be any constants. Allan
-
Ciao Matiz, Sorry if you posted about this previously, but what is the material you are using for the bolts? When we worked on Euryalus I used blackened brass but since then I have gone to copper. The bolt can be inserted, cut, filed, cleaned (this is critical to get out copper filings) and then blackened in place with liver of sulfur. Your build is inspiring!!! Allan
-
OK, anyone wanting to reach out to Taz for 3D printing work............. https://www.treatstock.com/c/tazs-3d-printing I used this site for the first communications and everything was smooth although I now communcate via email directly or Skype. Allan
-
Not sure if this topic fits this forum but it is an interesting topic none-the-less Laggard. Looking at some pretty extravagant RC boats that don't sink (usually), are there licenses or Coast Guard regulations involved to sail them? We had a 25 foot sport fisherman and would go fishing out in the ocean, cruise up the Hudson River, go through Hell Gate into Long Island Sound, etc. but I did not need license to operate a boat nor did I have to have it inspected. I did take a safety course by choice and I was boarded by the Coast Guard for a cursory safety check one time in 10 years, but most folks do not. The first time I gave the proper horn signal as I was about to pass another boat on their right I received a middle finger gesture in return. They must have missed the class on navigating in traffic. But, if you want to fly a rocket as a hobby you need a license even to buy the fuel in some states. Want to fly a drone over 300 feet? You need to pass a test to get certified to do so. Seems like boats are another matter unless you are taking paying customers wherein you need to be licensed. I would say the chances of someone sailing their RC boat somewhere where there is danger of hitting a person or another craft are small, but then again there are irresponsible folks no matter where we go, but, I digress, my apologies.
-
Dunnock, there is a string on 3D printed cannons here at MSW that is active right now. I just received forty cannon barrels (twenty 6 pounders and twenty 12 pounders) and 100 port lid hinges for $20, including postage. I ordered smaller ones for my previous project and there are photos of them on the string. I believe Diana had Blomefield design guns so if you want to go the 3D printing route you would need STL format drawings of this design to get these made. (Mine were for the 17th century so not appropriate for Diana.) It really is worth the effort! Check out the string -------> https://modelshipworld.com/topic/29148-3d-printed-cannon-barrels/ Allan
-
Mark, I was not sure about posting/advertising a website as he is not a member. Then again, I should have known better as we post places like Grainger and McMaster Carr. My bad. I originally found him through a third party so prices would be higher do I just sent Chris (Sgt Taz) an email asking if he has a direct website as we don't post emails on the forums. I'll post something as soon as I hear back from him. Allan
-
Further to this conversation, I have need coming up for 40 cannon barrels in two sizes that were different than those I had for the Charles Galley. I spoke with the printer and he was able to enlarge the cannons appropriately with no need for new drawings. The quality is fantastic. I ordered 40 cannon in two sizes, 100 port lid hinges, (50 left, 50 right) and the total cost was $20 including postage. Total time from order to delivery - 4 days. I would be hard pressed to make these from brass or making my own mold and casting them for double price and it would take weeks of work. I have turned cannon from brass, made a master and mold and cast in pewter and casting resin and now have found 3D printing which I am liking, a lot. These particular barrels are based on those used in the late 17th century so a new drawing will be needed should I have a project calling for later barrel designs, such as the Bromefield. I have not found any supplier of brass barrels or any type of cast barrels that offers the particular design I needed. If anyone needs a contact on this kind of service here in the US feel free to PM me, but I am sure there are a LOT of 3D printer folks all over the world for anyone interested in going this route. In this case, the vendor is now familiar with making these parts so may have an edge. Allan
-
Welcome Jesse. As you are in Maryland, would you mind taking a run over to Preble Hall and shoot several hundred close up photos for me? KIDDING. I am glad to have left the northeast but I do miss some things like being able to get to Preble with a few hour drive, St Michaels, the seaport in Baltimore, best crab cakes in the world, oysters to die for..... Maryland is a GOOD place to be. Again, welcome to MSW. Allan
-
Dave Interesting idea. I have never heard of such a method, but if you give it a try it will be interesting to see and hear about your results. Always room for new ideas here, that's for sure!!! I see problems in being able to assemble the lower deadeye to the chain plate and the shroud to the upper deadeye and securing them if they are preassembled as the lanyard maybe annoyingly in the way. Also, as every shroud is a different length as well as the lanyards due to the angle change of each shroud, getting these aligned may be tricky. Allan
-
Mark, Thus an advantage of building POF. Some contemporary models are planked from the bottom up a few strakes if any at all and from the top down to just below the wales leaving a big area un-planked. After going to all the work to loft, build and raise frames, I like to leave an area of framing exposed which gives the advantage of not having to worry about those last few strakes. 😀 Allan
- 505 replies
-
- 7
-

-
- vanguard models
- Sphinx
- (and 1 more)
-
Your idea of running the line through the hole first then "pinning" it temporarily is great. I had heard of this in the past, but this renews my thoughts to give it a try. My current is 17th century when belaying pins were not used on British ships so I can dodge this bullet for the time being. 😀 Cheers Allan
-
Hi Dunnock For future use, when the names were on the stern, they were always painted, not made with any plates or other materials. Allan
- 310 replies
-
- 2
-
-
- Diana
- Caldercraft
- (and 1 more)
-
Phil, You are not alone in not finding information on belaying points so kudos for researching this!!! Unless you happen to be modeling a ship where the belaying points are the exact same as specific samples in books by Lees and Anderson for example, it is a difficult thing. Not saying this incorrect, just new for me, but I cannot find any contemporary models of similar vessels with eye bolts in the deck except where there are lead blocks tied to them. Can you share your source on this type of belay point for the standing parts of the lines that you list? The Pride of Baltimore II has a cluster of cleats on the mast as well as belaying pins, but I am not sure if they have eye bolts as well. You might consider contacting the Pride of Baltimore II group (https://pride2.org/) or Preble Hall and ask if they can be of some help to your belaying point search. I have had good luck MOST of the time getting help from Preble Hall. I would call rather than email but the choice is yours --- 410-293-2108 They do not have researchers on their staff so getting answers can be daunting at times. You can also contact the Naval History and Heritage Command as they do have librarians and researchers on staff. I don't recall if they give a phone number on their website so you may need to contact them by email which is probably listed on their website. Allan
-
Andrew, Names were not normally painted on the stern of RN ships prior to the 1771order of the Admiralty. They were allowed until the Admiralty rescinded this in 1782 so it is only a ten or eleven year window where the names were commonly found. Were there exceptions, probably. This order from the Admiralty obviously changed again many years later, but I am not sure if was in the late 19th or 20th century. Common sense comes into play here. Flying false colours and such was supposedly used on occasion when coming on the enemy. Having your ship's name on the stern would pretty much negate the idea of flying a false flag. I've looked at many dozens of contemporary models in person and in photos in the Kreigstein, RMG, Thomson and Preble Hall collections as well as many photos in Franklin's book, Navy Board Ship Models and others. I found only three contemporary ship models built prior to the 1771 orders that had their names painted on the stern. No others that I have seen had the name prior to 1771 nor after about 1782. I have not looked beyond the first decade of the 19th century so cannot tell you when the practice of painting the name of the stern started again. Allan
- 310 replies
-
- 2
-
-

-
- Diana
- Caldercraft
- (and 1 more)
-
Lovely build!!! Thanks for sharing your progress. One question, hope you do not mind. Did the kit call for a name on her stern? I realize Diana MAY have been and exception to the rules of the Admiralty, but just as an FYI, it is extremely unlikely that Diana would have a name on her stern as the RN only called for names on the stern about 1772 then banned them about 1782 presumably to keep unnecessary information out of the hands of the enemy. As Diana was launched in 1794 she normally would not have her name on the stern. White shows the name on the stern in the Anatomy of a Ship book on Diana so maybe she was an exception. Way too many mysteries in this hobby of ours. Allan
- 310 replies
-
- 2
-
-
- Diana
- Caldercraft
- (and 1 more)
-
EODGoat, Yes a year since his last post but It is five years that you have been a member and this is your first post so please accept my warm, albeit belated, welcome😀 Allan
-
David, Your work is very neatly done!! Do the red pieces in the gun ports represent the sills/cells top and bottom and the edge of the frames on the sides? The reason I ask is that they are already painted so it would not be easy to glue the port lid stops in place on top of the lower sills and the sides of the frames. (There would be no stop on the bottom of the upper sill) Thank you Allan
-
Welcome Melissa, First and foremost, THANK YOU VERY MUCH FOR YOUR SERVICE TO OUR COUNTRY. I too get the astronomy bug now and then, having had an 8" Schmidt Cassegrain from Celestron. Living in a relatively small town now, the only light pollution is from the street lights so maybe time to re-up. I would love to get an 11" SC but the weight and moving it in and out would not be good for these old bones. Maybe sink a post in a concrete base and mount it semi permanently. Then again, if it is permanently mounted maybe a 14" !!!!!! Good luck with your ship modeling, you have literally tens of thousands of tutors available to help you along the way. Allan
-
Thanks Wayne, Your memory of our conversation is waaaayyyy better than mine and I appreciate you posting about this. I knew this had been researched, just could not remember the circumstance. Cheers Allan
