


allanyed
-
Posts
8,149 -
Joined
-
Last visited
Content Type
Profiles
Forums
Gallery
Events
Everything posted by allanyed
-

Sand & Sealer
allanyed replied to DaveBaxt's topic in Building, Framing, Planking and plating a ships hull and deck
Dave, Not sure what you mean. The wales are just another strake, but of thicker material and go on as you are putting in the other planking. Why would you leave them off and then try to add them later? I am probably missing something here, so my apologies if I am a little dense this morning. Below sketch is how I envision this and it may not be what the kit suggests. Allan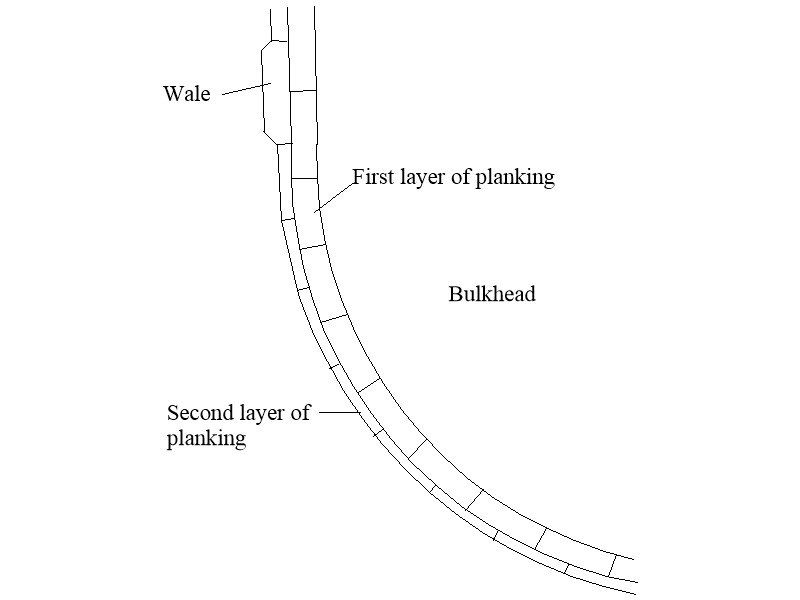
-
Hello from Kansas City (Kansas side)!
allanyed replied to GGibson's topic in New member Introductions
And please give my hearty thanks to your son as well!!! Allan -
Thanks for sharing your methods Keith! I have two wishes --- One, you would move to Ave Maria, Florida and two, you would give classes in the use of a milling machine. Allan
-
For what it's worth, Lees writes a bit about the martingale stay being spliced round the the dolphin striker and the martingale backstay being seized in the bight round the striker but makes no mention of these lines being served. Allan
-
Hello from Kansas City (Kansas side)!
allanyed replied to GGibson's topic in New member Introductions
Welcome Gregg from a frequent visitor to Lansing, KS. Not that it has a lot of attractions for tourists, but our youngest and his family settled there when he retired from the Army. Allan -
New To Building Ships Help and advice needed
allanyed replied to Richard O's topic in New member Introductions
Belated welcome Richard. Take a look at the planking tutorials and other tutorials as well as the build logs here at MSW. There is a wealth of information on proven techniques and everything from glue to tools to study. As a relative beginner in this type of modeling, you may spend more time in class than in the lab for the first build, but it is well worth it. Allan -
Jon, Your post is the best response on one my build logs I have ever received. THANK YOU VERY MUCH for sharing!!! Allan
-
Vanda-Lay treenail maker
allanyed replied to JerryC's topic in Building, Framing, Planking and plating a ships hull and deck
I agree with Eberhard. I made cutters of brass in the past much as he describes, to cut axles and such, and for hardwood like box or similar, they would not hold up for thousands of treenails without continually having to sharpen them. Carbon steel that is hardened is the way to go. In the end, I believe a drawplate is faster and will work with the tiny sizes most of us need. Gregory, when you say softwood, which are you referring to? Just curious. Thanks allan -
Hi Allen, Can you post couple photos. Thanks Allan
-
I suppose I am one of many that get joy out of the details. Alas, this also brings a LOT of agita because it can be difficult, if not impossible, to achieve at times depending on the object and the scale involved. As you had done with Dove, I set aside this project for about 7 years before picking it up again, and am once again torn as to what is more fun for me, ships from the 18th century and earlier, or schooners from the late 19th century into the 20th century. Allan
- 86 replies
-
- 1
-

-
- schooner
- effie m morrisey
- (and 1 more)
-
Dove by jlefever - 1:48 - Pinky Schooner
allanyed replied to jlefever's topic in - Build logs for subjects built 1851 - 1900
Looking forward to your progress reports Jim. How well done are the plans from the Smithsonian? Allan -
I would like to also offer my sincere condolences Doris. Your work, especially in the clay decorations has inspired me to give it a thorough try on my next project. Allan
- 1,035 replies
-
- 5
-
-

-
- royal katherine
- ship of the line
- (and 1 more)
-
Ernestina Morrissey by Jond - FINISHED - 1:48
allanyed replied to Jond's topic in - Build logs for subjects built 1851 - 1900
I truly envy you having access to the inner most parts of Ernestina. It would almost be worth spending a winter in the frigid tundra of Maine!! Allan -
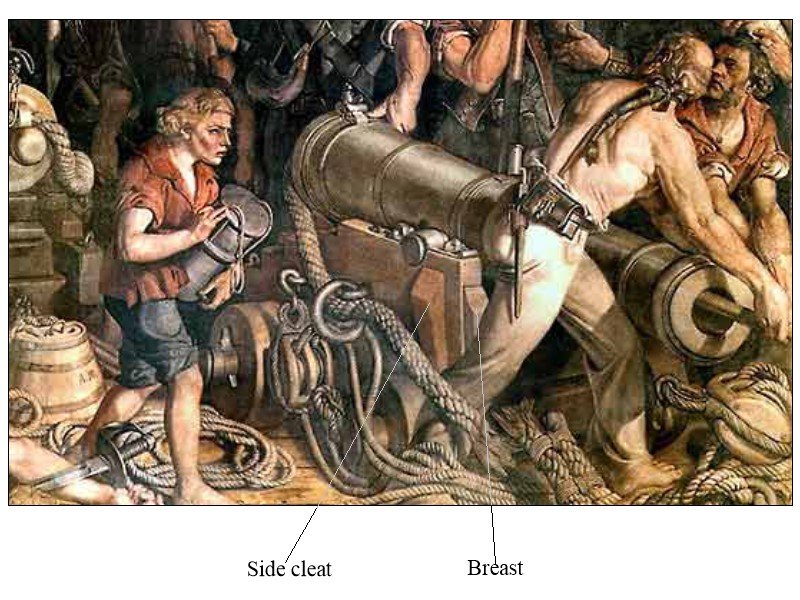
Rick, Per our earlier conversation, at the time of Trafalgar, the carriages, at least for the 32's and 24's would have likely been the 1795 design which had cleats on the sides and breasts on the front edges of the brackets. Perhaps other members can shed some light on this. I have attached the portion of the painting The Death of Nelson at the Battle of Trafalgar by Daniel Maclise that shows these items. These are addressed with some detail in The History of English Ordnance, Volume II, pp 379-80 Allan
-
With the main mast stepped and secure, time to work on the shrouds. For the Effie size and late 19th century she has three shrouds on each side for both the main and foremast. The shrouds are galvanized steel, 3.25" in circumference and painted black. Having totally failed using wire in the past, I have painted appropriate line black. In this case I am using 0.025 diameter line from Syren. Easy enough to put a full coil in a small jar of watered down acrylic paint, give a few shakes then hang the line to dry. A small clip for weight on the end prevents shrinkage or kinks as it dries. Because the line is steel and the deadeyes are wood, canvas was wrapped around the line where it went around the upper deadeye then painted white. Same thing where the shroud goes round the mast head. I used silkscreen painted with tubed acrylic titanium white and glued with matte medium and wrapped it around the line as can be seen in the photo. I went overly long as the shroud was spliced then served from the deadeye upwards for a few inches (at scale) so the serving covered the excess "canvas" on the model shroud. As there are three shrouds, the foremost was a swifter as described by Chapelle in his notes in The American Schooners. The swifter was cut spliced with one shroud starboard, one port. The next two are paired, with the starboard going on first. Allan
- 86 replies
-
- 8
-
-
- schooner
- effie m morrisey
- (and 1 more)
-
Vanda-Lay treenail maker
allanyed replied to JerryC's topic in Building, Framing, Planking and plating a ships hull and deck
With those sizes, there-in may have been the problem getting anyone to buy these. For a 1:96 scale those are 2 to 3.5 inch diameter treenails which are way over scale. Still would be a good fit for 1:48 scale, not so much for 1:64. Allan -
Just as an FYI, a long while back I did a scratch build of a schooner (I think it was Columbia) and found that the plans I purchased had a hiccough. One bulkhead was incorrectly drawn and under sized and I had to redraw and make a new one the correct size. In your case, it could be that all of their kits have the same problem because of a design error. If you do remove the planks, be sure the bulkhead is correct or, if it is not, that you have the tools and material to make a new one from scratch that is the correct size. Allan
-
Vanda-Lay treenail maker
allanyed replied to JerryC's topic in Building, Framing, Planking and plating a ships hull and deck
Jerry, I believe there was little interest in that they only offered two size cutters, 0.02 and 0.03", which are actually pretty useful sizes for 1:48 scale builds. A draw plate such as the one from Jim Byrnes can be used for 30 different diameters from 0.017 and larger to 0.057 As to not wishing making treenails on anyone, yep it can be a tedious task. I did a study over a few days some years back and found that I could produce about 300 bamboo trennals per hour. With 10,000 to 12,000 in a typical hull of a fully framed model, that's 40 hours of making trennals. Out of curiosity, how long would it take to make 12000 on the Vandalay unit based on your experience? Thanks Allan -
Thanks Jim, Don't know about you, but If anyone would take up the challenge and create a proper index for Chappelle's American Fishing Schooners from page 313 to the end, which is a compilation of information from his notebook, I would be happy to pay for a copy of the index. While the subjects are in somewhat alphabetical order, the layout makes no sense and I find myself constantly thumbing through pages to find information. For the main topsail tack, I only recalled it going to a pin on the pin rail, not to the boom. (page 332 diagram in Chappelle) . Then I looked at the drawings of Dove that you mention and see exactly what you mean and yes, different strokes for different folks is not unusual in belaying lines. I never really looked at these drawings of Dove before and must say, she looks to be a fun build. Added it to my own bucket list. Do you have a build log going? Would love to see pics of her as your build progresses. Allan
- 86 replies
-
- 1
-
-
- schooner
- effie m morrisey
- (and 1 more)
-
Rick, I especially like that you included the 45 degree bevels on the cheeks as the bevel finish replaced the quarter rounds about 1791. Allan
-
Scott, Since I last posted I was also thinking the cleat may be for a flag halliard. I am checking with the shipyard that is rebuilding Ernestina/Effie M. Morrissey to see what information they have. Allan
- 86 replies
-
- 1
-
-
- schooner
- effie m morrisey
- (and 1 more)
-
Greetings from deepest darkest Dorset
allanyed replied to Tim GC's topic in New member Introductions
Welcome aboard Tim, You are doing a very thoughtful thing for your friend. Keep in mind Victory had as many as seven different ship's boats about the time of Trafalgar so you have choices which is a good thing. Depending on the time frame of Victory she had changes in the types of boats. For the most part I believe she would have carried a combination of cutters, launches (which replaced longboats by order of the Admiralty about 1780), perhaps a pinnace, et al. There are a lot of drawings out there, and if you have a few tools, scratch building may be something to consider. Other than the kit of the longboat from Chuck Passaro at Syren (and I believe offered at Model Expo as well) there are not a lot of kit choices. Unfortunately the longboat is not appropriate type for Victory but still may something to consider. Again, welcome aboard!! Allan -
I did some more checking on the drawings in Chappelle. In one drawing (page 539) the main boom guy fall belayed to the pin on the port side. The topping lift fall belays to the pin on the starboard side as Jim wrote. I cannot find anything so far in Chappelle or in the Ernestina photos as to what belays to the cleat on the starboard side of the boom. There appears to be no cleat on the port side. (Chappelle, page 547) Thanks guys!!
- 86 replies
-
- 2
-
-
- schooner
- effie m morrisey
- (and 1 more)
-
Honestly Eberhard, I am not yet sure at this point. As there are also cleats, (see photo below) this will take a little research. A line on the starboard pin is obvious in the photo by I don't know which line this is. Will keep you posted on what I find. Allan
- 86 replies
-
- 2
-
-
- schooner
- effie m morrisey
- (and 1 more)
-
It is always nice to get information on any potential material suppliers, but, is having the above advertisement from a new supplier appropriate for a first time post in this particular forum? Plus it has been pointed out many times that posting an individual's email address in an open forum is not a good thing to do. Allan