Stockholm tar
-
Posts
866 -
Joined
-
Last visited
Content Type
Profiles
Forums
Gallery
Events
Everything posted by Stockholm tar
-
How to avoid twisted lanyards
Stockholm tar replied to Captain Al's topic in Masting, rigging and sails
Captain Al, The lanyards are rove the same way, irrespective of the side, due to the right hand lay of the rope. There was and old saying which I believe went: 'starboard side forward side, port side aft side,' which referred to the starting point where the knot was (incidentally a 'Matthew Walker', not that it matters on a model!). If it makes you feel any better, this twisting happened on 1:1 scale ships too! To prevent the upper deadeyes from turning and to keep them in line a light spar, the sheer pole, was fastened across the whole 'gang' just above them and below the ratlines. The lower deadeyes were normally fixed. What I usually do is, after every turn through a hole, try and work all the twists out of the lanyard before reeving the next one. It seems to help. -
Henrik, You might get some idea from reading the few build logs of Gorch Fock. As far as I can see there are three under kit builds, one Mantua and two Occre, and one scatch build (Nils). The latter probably won't help you much in deciding which kit, but might be useful later with whichever kit you have decided on!
-
Clock, Have a look at the Ship Kit Database on the start page (scroll to the bottom and its on the right), where you'll find lots of information on various kits, sizes, skill level, etc. I'm sure you'll find something there. Good luck.
-
HMS Vanguard Staysail Attachment
Stockholm tar replied to bwood's topic in Masting, rigging and sails
Bwood, According to Lees, the arrangement was much as Henry says – but he also said that it probably wasn't worth the trouble, as the sail was rarely set. This would make sense, as I imagine it could get caught on the boats, etc. -
Naval History On This Day, Any Nation
Stockholm tar replied to Kevin's topic in Nautical/Naval History
Remembering Trafalgar Day, today. The RN, the Nelson Society, the 1805 Club and other organisations wiil be holding dinners to commemorate Nelson's greatest battle and his tragic death. The toast is traditionally, 'The Immortal Memory', although latterly the words 'of Nelson and those who fell with him', have been added. I believe this was the original wording until it fell out of use until more recently. Nelson would certainly have approved of their replacement. -
Need Help Identifying Grandfather's Ship
Stockholm tar replied to cletusbrandine's topic in Masting, rigging and sails
Cletus ?, Interesting project, especially as it's been handed down to you. From what I can see, it looks like a three masted fore-and-aft schooner. Fore-and-aft means that the sails are set along the centre line of the ship. It doesn't look as though there any yards, the spars set across a mast from which square sails are hung. So, it's quite a simple rig and shouldn't be too difficult to repair. I wouldn't have thought this was a kit, so any replacement parts you would probably have to make yourself – although if you can gauge the scale, you might be able to buy some of them. The sails you would probably have to make, although that is not too difficult. I am sure many members here would love to help you, but it is is not easy to see the model clearly in your photo. Would it be possible take a few more pictures of the model from different angles and against a more neutral backdrop? My own advice would be to only remove so much rigging, paint, etc., as is necessary and only replace that which is missing, carefully matching it to the existing part. That way much of the original will remain. -
John, It seems most kits are seriously lacking when it comes to belaying points, from providing very few to none at all! I'm having similar problems with my Sherbourne (ok she's a cutter, but the rigging for the fore and aft sails would be similar) and having to improvise as I go along – or preferably, before I get to the point of actually belaying the line. I might have to extend the bulwark pin rails (they only provide for six pins a side) and am also thinking of employing shroud cleats, which are period. (Victory has them and I'm sure you'll be able to find pics of those the net). I also added cleats around the foot of the mast, but I see you already have those. Your foredeck looks a bit cramped like mine, but you might be able to drill a few holes for belaying pins in the bitts over the bowsprit, as I did with mine in front of the mast. Another thing you might also consider is fitting a 'horse' across the foredeck hatch to take the staysail sheet block. I found its positioning though fairly critical, as you have to place it so that it would be possible to raise the grating, but also make it possible to sheet the sail when set. I would consider fitting catheads, if she had them. Hope this helps.
-
Grsjax, I have never heard of broadside gun carriages nor the carronades, here the 68 pdrs on either side of the Victory's fo'c'sle, of ships of the line being painted any other colour than yellow ochre and certainly not as late as 1812. (1812 incidentally was the final year of Victory's last sea-going commission). I believe however smaller vessels may have had different colour carriages, but not specifically at that date. The Endeavour replica, for instance, has them painted red – for which there must be a reason, but that was pre 1812.
-
Jan, To answer your question, I imagine the reason that it is not perhaps mentioned much in either country's history books (although I remember studying it when at college in the UK) is that it was not an invasion in the accepted historical sense – ie. many hundreds didn't get slaughtered, with a victor emerging at the end of it. The event has also been the called 'Bloodless Revolution', although this was not strictly true since I think there were skirmishes with Catholic forces fighting for James ll. I don't know much about it however, from the Dutch angle. What for instance happened there when William came to England?
-
Hi Tadeusz, Thanks for the photos. The third one down of her figurehead, or more correctly, billet head will come in handy when I get to that point. I was actually at the 1985 Sail Amsterdam, although not of course on SL, and it was a great experience. I was part of the crew on a small schooner.
-
Marc, Thanks for that – interesting but, as you say, not much new there. I sometimes wonder what authors of these books are attempting to imply. It's all very well giving all these facts and figures about the size of the Dutch fleet etc., as if it was some unwelcome invasion force, but the 'Glorious Revolution' was agreed with the British government beforehand and very likely a large part of the population would have accepted with the decision. Crucially, it had not only to do with the continuation of the monarchy, but it had to be the right monarchy – ie. a protestant one. Thus William was thought the only suitable prospect for Mary, daughter of the Duke of York James ll, to marry. I believe that both he, and Charles ll, her uncle, had initially been opposed but eventually were won over, as it would seem that the only other contender was a French prince, who of course was Catholic. I suppose understandable, since James had always been Catholic and eventually fled to France, whilst Charles I believe reverted to Catholicism on his death bed. It should also be mentioned that England and the Netherlands had been to war three times in recent memory, and another reason for the union was a strong desire that this hostility, which was draining on both countries, should come to an end. I believe both countries actually respected each other and thought that peace was a far better prospect. England certainly needed some stability. I believe the marriage was a reasonably happy one and the joint rulers introduced new legislation, including a Bill of Rights. For us on MSW of course, it was notably William and Mary who began work on the Royal Hospital at Greenwich, as a home for retired seamen and copying the Royal Chelsea Hospital for old soldiers. I am sure we are all familiar with the splendid buildings at Greenwich, now housing a university.
-
Nils, Thank you for the explanation. Very sad, but it could have been much worse. Good idea about the hull rivets. If they were scale you probably wouldn't see them at all.
- 2,625 replies
-
- 5
-

-
- kaiser wilhelm der grosse
- passenger steamer
- (and 1 more)
-
Nils, Just been catching up on your log of this splendid build. You've just reached a rather interesting bit for me, the steel rivetted plating. Food for thought there, when I get to that point on my Statsraad Lehmkuhl half model. The pics show quite clearly how you achieve it, although you did draw me a diagram in my log, so thanks for that. By the way, re. your post 446, what happened to the ship in your first picture? I imagine you would know.
- 2,625 replies
-
- 4
-
-
- kaiser wilhelm der grosse
- passenger steamer
- (and 1 more)
-
Druxey, Thank you and I wish you the same. I didn't get to do so much to SL this summer as I had hoped but, as I said, there's always next year! So now it's back to the Sherbourne. Now, where was I ... ?
-
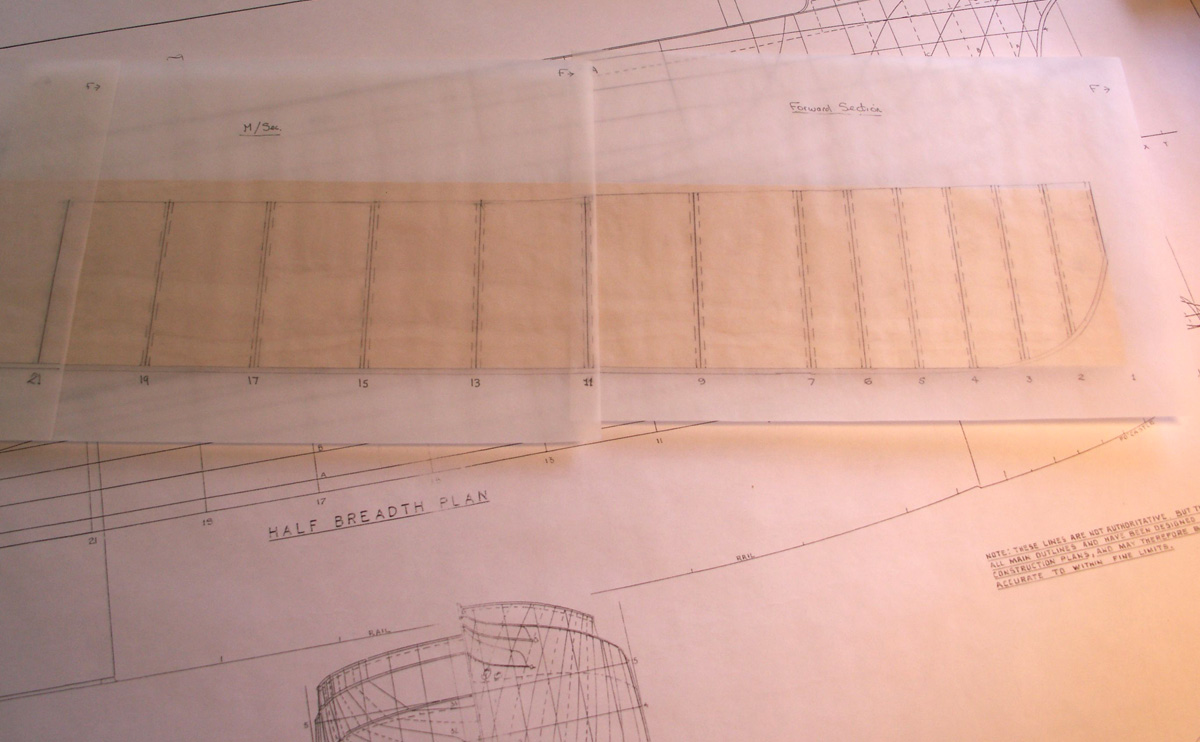
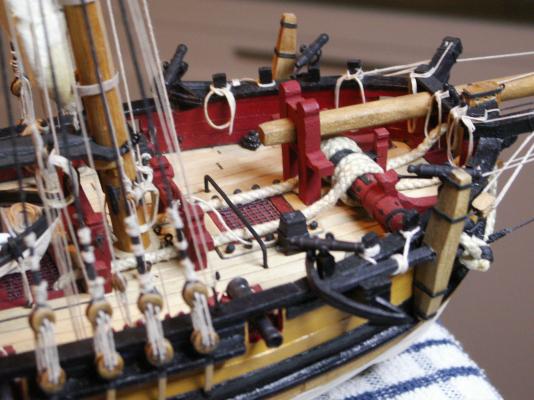
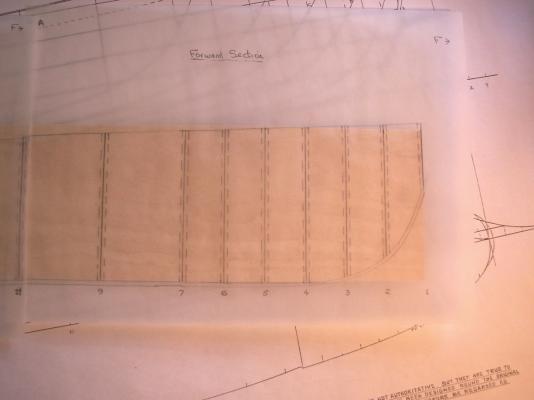
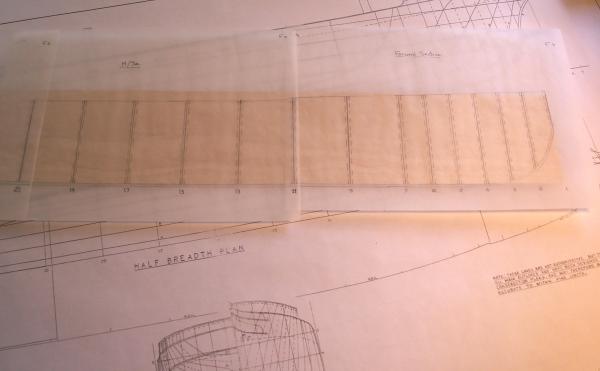
Just a short update on SL. I have now finished drawing the fore and mid sections from the sheer plan, showing the position of the bulkheads, keel and centre deck line, on to tracing paper. I am partly though doing the same with the after section. The size of the plan meant that three sides of A4 tracing paper were required, carefully overlapped and running from bulkheads 1 – 30. The extremities at the bow and stern will require two additional sheets. I have drawn a dashed line, 2mm either side of the bulkhead position shown on the plan, marking the width of the cut needed to take each 4mm bulkhead. The tracings will be transferred to paper before gluing it to the board. I intend to cut out each slot to about the halfway mark on the board, the other ‘half’ being cut from the lower part of each bulkhead. That way, apart from perhaps making for a more secure joint, the board should remain in one piece! The two rather poor photos (which I am blaming on the weather) show the progress so far. Besides gluing the board to the thwart/backboard I am still debating whether to use four screws, for added security. I think it might be a good idea: As we have now returned to Stockholm for the winter this, unfortunately, will be the last log entry on SL for this year. I had hoped to progress a little further, but our departure for the ‘big smoke’ was somewhat earlier than expected – prompted by 1: the weather; 2: one of our four cats and his increasing expeditions down to an unknown site of interest nearby a busy road, which runs just a few hundred yards down the lane from our cottage. Not wanting to run the risk of him getting injured, or worse, we decided to play safe and return home early. Never mind, there is always next year, when work on SL will resume!
-
Frederick Henrik af Chapman was one of the first ship designers, if not the first, to base ship design on scientific principles. He is thought a great deal of, not only here in Sweden. There are some beautiful models of some of his ships, many in large scale, in Stockholm Maritime Museum. Most of his ships were good sailers although that, unfortunately, couldn't have been said for the Royal yacht Amphion which he also designed and which by all accounts didn't live up to expectations. He was much better at warships. Amphion's stern and cabin are preserved and on display in the museum. Besides modernising Sweden's offshore fleet, he built her inshore galley fleet and also many of the dockyard buildings at Karlskrona naval base. These are still in existance, including the mast crane – a photo of which I seem to remember appeared on an MSW thread recently under, I think, 'Amazing Photographs'. I have been meaning to get the Dover publication, but I do have another interesting book on Chapman. This is 'F.H. Chapman – the First Naval Architect and his Work', by Daniel G Harris. Harris is Canadian, but his wife is Swedish and he studied Chapman for much of his life. The book was first printed in 1989. I don't know if there have been subsequent revisions, but it is probably available second hand. It is a first class read if you are interested.
- 66 replies
-
- 8
-
-
- resolution
- hunter
- (and 2 more)
-
Jonny, Good luck with your latest project. If you do get to Greenwich, have a look at Prince Frederick's barge dating from 1751. A purely pulling barge, without mast and sail, but it might give you a few ideas. She's situated in the Neptune Hall, or was, near where you go in, so you shouldn't miss it: http://www.rmg.co.uk/explore/sea-and-ships/facts/faqs/history-of-prince-fredericks-barge
-
Jeff, Some good solutions to some of the problems with the kit. She's looking very nice.
-
Alexandru, Absolutely beautiful work! She must be one of the best Victory's I have seen. I do have one comment however. Your photo of the forward bitts shows the same number of holes in the both pinrails, fore and aft. I seem to remember that there are rather more than that in the forward rail, according to the diagram in Longridge's 'Anatomy of Nelson's Ships.' You might want to check that, as I wouldn't want you to get to the rigging stage (if you intend to rig her) and not have enough belaying points.
-
Eamonn, I'm sure the road works must be annoying, but you really shouldn't keep offering them tea – that tends to lengthen the proceedings (and I hope they're not going to dig it up again!) Never mind, I'm sure we'll still be here when you resume.
- 1,039 replies
-
- 2
-
-
- ballahoo
- caldercraft
- (and 2 more)
-
Gordon, The Bounty's launch would have worn a red ensign, if she had one, since that was the ensign worn by the ship. (Ships on detached service, which the Bounty would have been, usually wore the red ensign which was the senior of the three squadronal colours.) The mutiny was in 1789, so the union flag in the corner would be pre. 1801 (i.e. with no St Patrick's Cross on the white diagonal cross). I don't know about the carronade, but I am not sure she would have had one, since she had eighteen men to accomodate.
-
Jeff, Looks like you made a good job of it too. I imagine you know that the cherub with the blue sash is supposed to represent the seamen and the one with the red, the marines? I believe too the arm of one of them was shot off at Trafalgar, although I can't remember which one. I think the figurehead is at Chatham Dockyard at the moment, as the centrepiece of an exhibition on the 250th anniversary of Victory's launch (or rather 'floating out') in 1765. It is on loan of course but I wonder if Portsmouth will get it back, as Chatham have been trying to get the whole ship returned to the place of her birth for years!
-
Badger, I seem to have missed this lately, but anyway, that is one great looking Sherbourne. Keep up the good work.
- 29 replies
-
- 1
-
-
- sherbourne
- caldercraft
- (and 1 more)
-
Hi guys, and thanks for the likes, even though it's early days yet. Nils, Or is that half-keel laying perhaps? The next challenge is to trace out the required lines and transfer them to the board that will take the bulkheads. I will start doing that this afternoon, especially as the weather has taken a turn for the worse and I will probably be indoors for the duration. The forecast says it will be raining all day with strong winds and, for a change, they appear to be right! This might take a little while, but I'll be taking pics at each step... Crackers, Thanks for the lovely picture. Harold Underhill thought SL one of the most beautiful, if not the most beautiful, barques afloat – and I agree, of course. (I wonder if he would be amazed that she was still sailing at one hundred years old?) I don't think there is a photo, from any angle, which is less than pleasing.
-
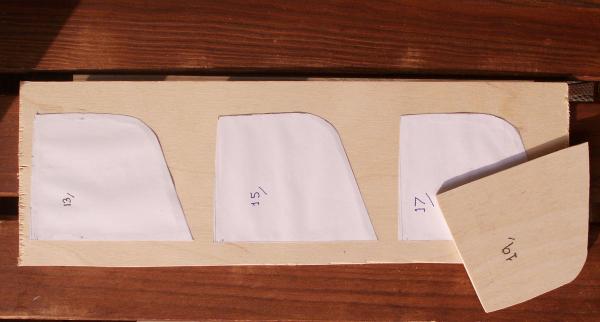
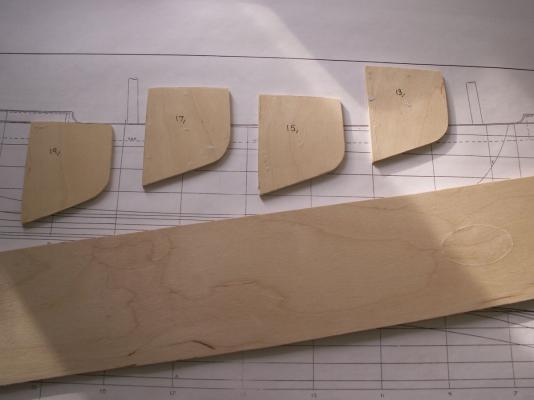
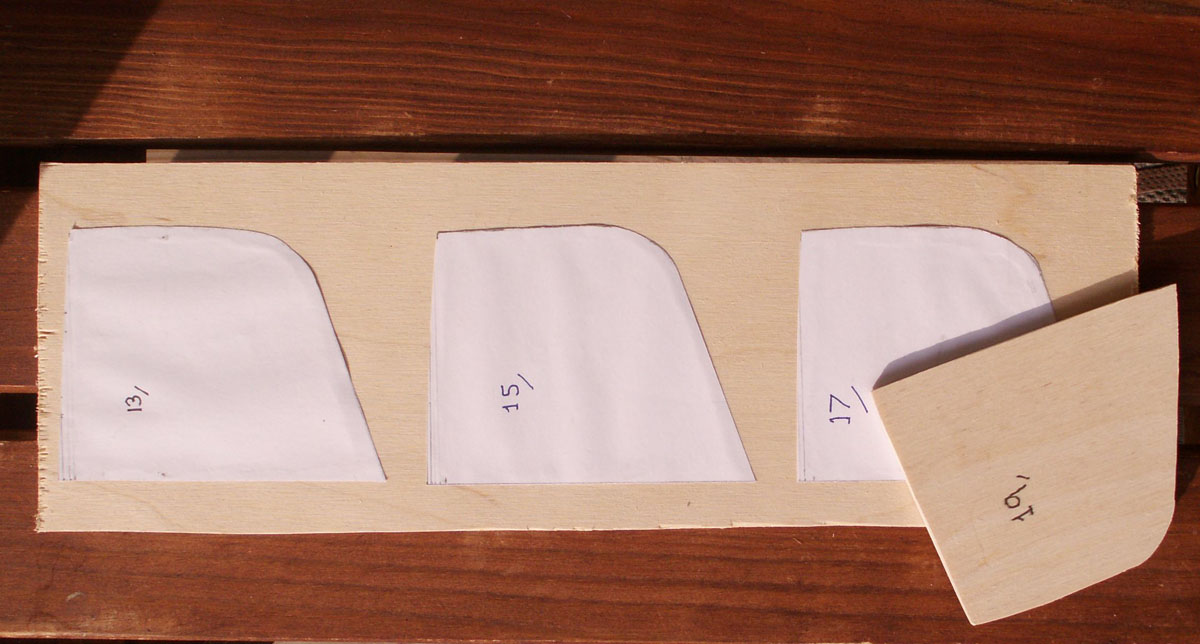
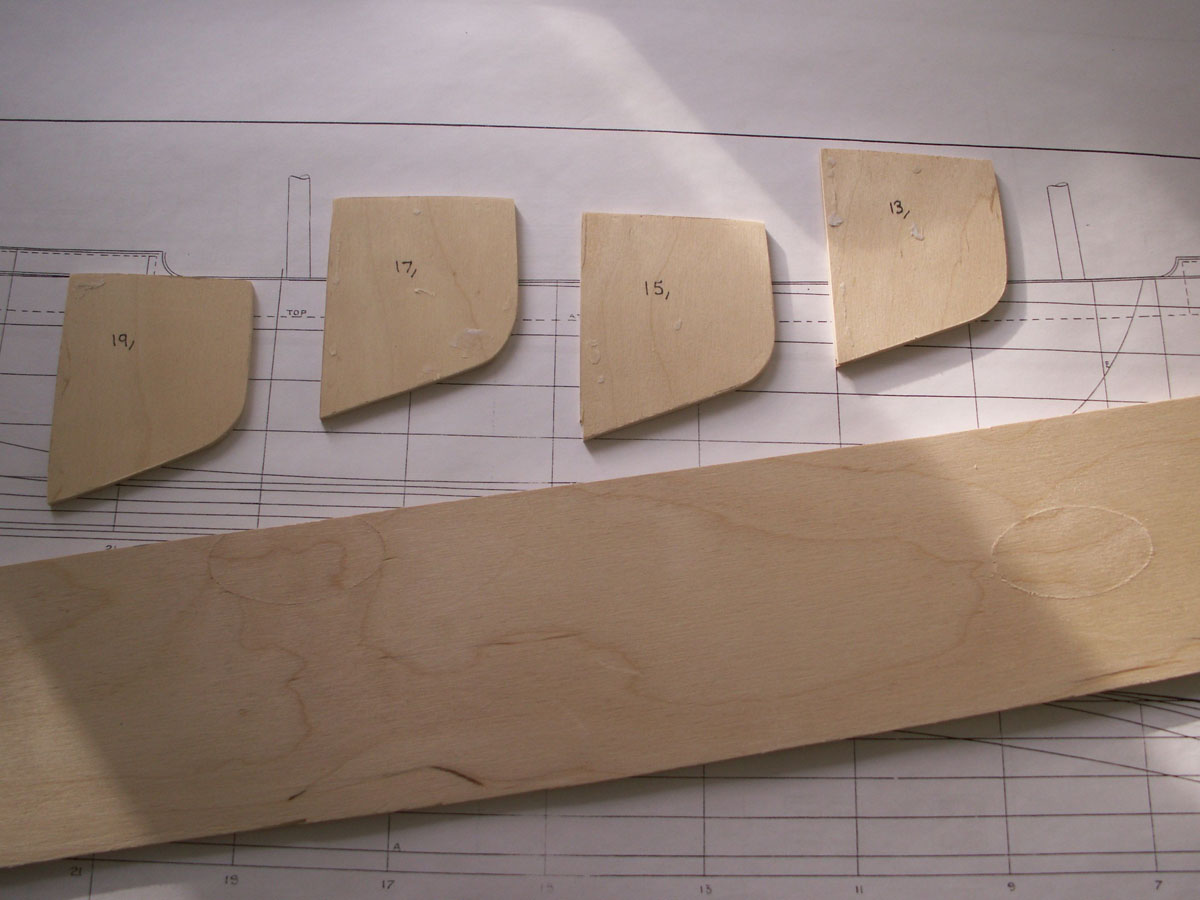
At long last I’ve managed to cut some wood (!) and started with the four midship bulkheads, the idea being to work gradually towards the bow and stern. I cut out and shaped the four bulkheads (using a sticksaw with the finest blade, and a small battery sander) and finished them off by hand. This worked well and I am improving with practice – the only real problem being in the sticksaw hitting a clamp and coming to an unplanned for stop. The sander enabled me to get quite close to the line and this together with the final sandpapering made for almost an almost perfect shape. Unfortunately, the first bulkhead didn’t turn out quite so well, as I took off just a little too much at the top of the side that will butt against the backboard. This won’t matter much as I intend to glue the inboard ends of the bulkheads into a slotted board, itself glued (and perhaps screwed for added security) to the backboard, and which will fit inside the keel, stem and stern pieces. This is cut from the same 4mm birch-ply sheet as used for the bulkheads. Some careful measuring and tracing of the plan will now be needed to accurately cut the slots. I am inclined towards gluing the bulkheads into the slotted ply before fixing the whole to the backboard, complete with keel, stem and stern pieces, the latter of which I can probably make out of planking strips. Spacer bars will be glued between the bulkheads on the outboard side, to keep it all square. I think the pics are self explanatory, the second showing the board to be slotted. Having examined it, I have decided that the backboard (the thwart from my father-in-law's old yacht) will need a light sand and a re-varnish with something of a matt finish, as I don’t really want it to make it too shiny and new looking. In passing it feels good to have actually started on this. We hope to be out at the cottage until the end of this month, or perhaps until early October, so some time to progress!