HOLIDAY DONATION DRIVE - SUPPORT MSW - DO YOUR PART TO KEEP THIS GREAT FORUM GOING! (Only 36 donations so far out of 49,000 members - C'mon guys!)
×


Bluto 1790
-
Posts
324 -
Joined
-
Last visited
Content Type
Profiles
Forums
Gallery
Events
Everything posted by Bluto 1790
-

ancre Chebece 1750 by Jeronimo - FINISHED
Bluto 1790 replied to Jeronimo's topic in - Build logs for subjects built 1501 - 1750
I'm not seeing them either. Karl ~ we REALLY DO need to see your fantastic photos !!! -
Hi Bob, I have to say what a superb job you have made of your Vanguard . . . and I'm looking forward to your Granado build. Although I haven't commented on your log before now, I've been lurking around your 30 pages of progress over the last few months and have been referring to lots of your excellent pictures more than a few times. I'm at the rigging stage of my build and I've found your build log invaluable to me. . . . and there's something else that I've read in your log that I've found helpful - - - I think that on a few occasions you've commented on your close-up photographs - well, I'm glad I'm not the only one who finds them (that's MY close-ups I'm talking about) very discouraging. What I see in my own build 'with my eyes' isn't what I see when I look at these brutal close-ups!
-
Tom ~ that does sound a bit normal for me . . . it's just that I don't always admit to it! Bill, if you're thinking about building a 2 decker this is a good model to choose. It's a bit more involving than a frigate but a bit less than something like a 74 gun ship. The plans and drawings contained in 'The Fifty Gun Ship' (by Rif Winfield) are adequate for a P.o.B. model, although, as I've already said in previous posts, the rigging drawings are a little sparse but I'm able to find most of the info that I need here on the forum or in Petersson's book. Frankie, I'm really pleased to read that. I have to say that I've never picked up on that anomaly in any other forum posts I've followed, nor have I noticed it on any of the few models I've actually seen "in the flesh". - - - So, it's not just ME! I'll also have to move the lift blocks a little further forward on the main cap for the same reason, but I might be able to save the foremast as I haven't yet milled the slots in that top yet, so I can modify the positions of these slots now that I'm aware of the pitfall. Oh . . . and I've done another 4 ratlines tonight! (until my eyes started to go and my fingers started to cramp up.)
-
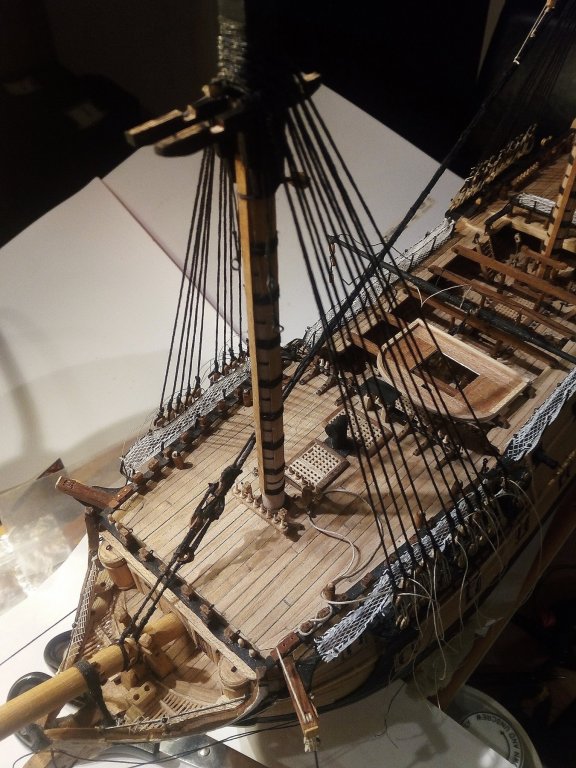
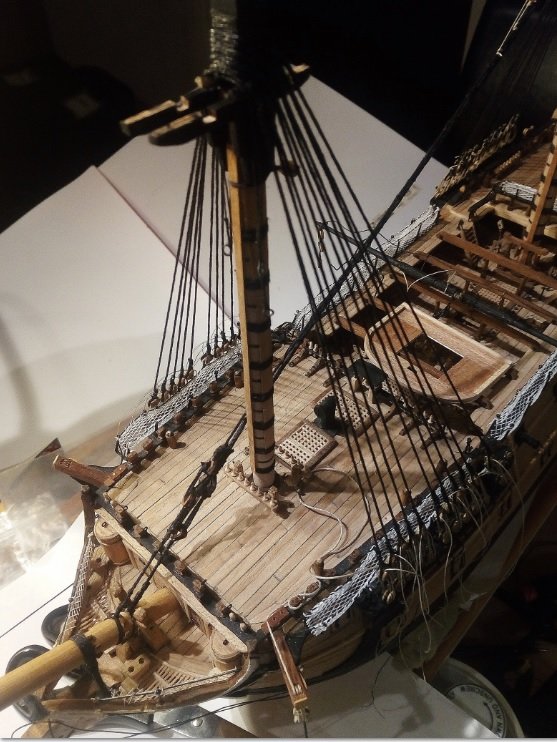
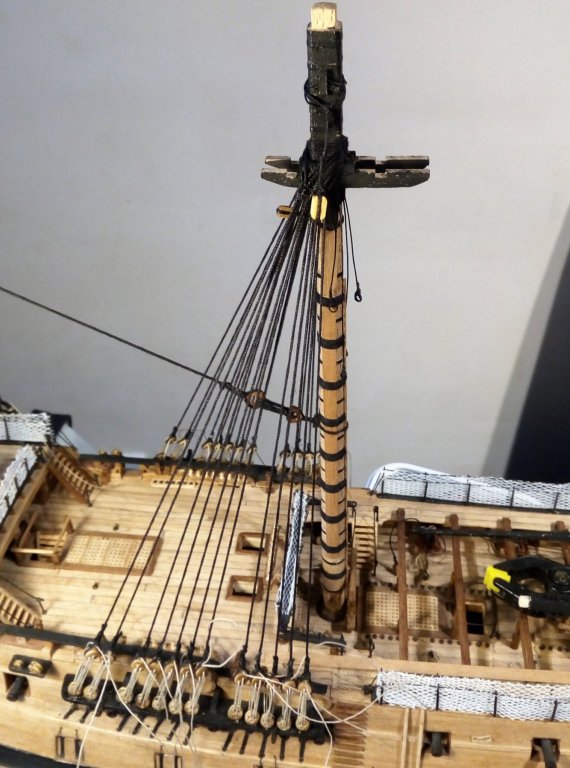
Thanks for the comment, Popeye, and to the others for the likes. It has been a week or so of forward steps, backward steps and discoveries. First, since I fitted the fore stay and preventer I've been unhappy with the size of the mouses on these stays. (It doesn't feel right to say 'mouses' instead of 'mice'!) It just annoyed me immensely every time I looked at them >>> So ~ a sharp pair of scissors, and . . . . . New stays with smaller mouses . . . even if they aren't perfect they're a bit more in scale and less annoying. and 're-snaked' >>> Several months ago I made what is so far the only yard -- the mizzen crossjack >>> I wanted to get it on the mast and that is when I made a discovery. When rigging the lifts it became obvious that after the topmast shrouds will be fitted, the lift lines will foul the foremost of these shrouds and will have to "bend around" the shrouds instead of having a 'straight run'. This is because the slot in the mizzen top that accommodates the foremost topmast lower deadeye is slightly further forward than the position of the upper crossjack lift block. As the entire assembly is now firmly and permanently glued and rigged I had no intention of carrying out a major demolition job on the mizzen top in order to correct this problem, so I have moved the position of the upper lift blocks from the middle of the masthead cap to the front of the cap. I know this isn't strictly correct, but in the circumstances it was the best solution that I could come up with. Another discovery ~ although not entirely unexpected -- was that the crossjack braces have a tendency to pull the aftmost of the main shrouds out of line, even with just the small clamps that are weighing down the end of the brace lines. The 'out-of-line' shrouds can be seen in the above as well as the following photo >>> None of the lines attached to the crossjack have been made off yet. The bitter ends of the braces, the lifts, the sling and the truss pendant are all just being held by these clamps/pegs. Because of the deflection in the aftmost main shrouds I want to get the ratlines and futtock staves fitted to the main shrouds before I tension the crossjack braces. So, I have made the heroic jump into the world of never-ending ratline tying! >>> I will soon be off to bed now, dreaming of ratlines and clove hitches . . . . ZZzzz . . .


- 257 replies
-
- 13
-

-
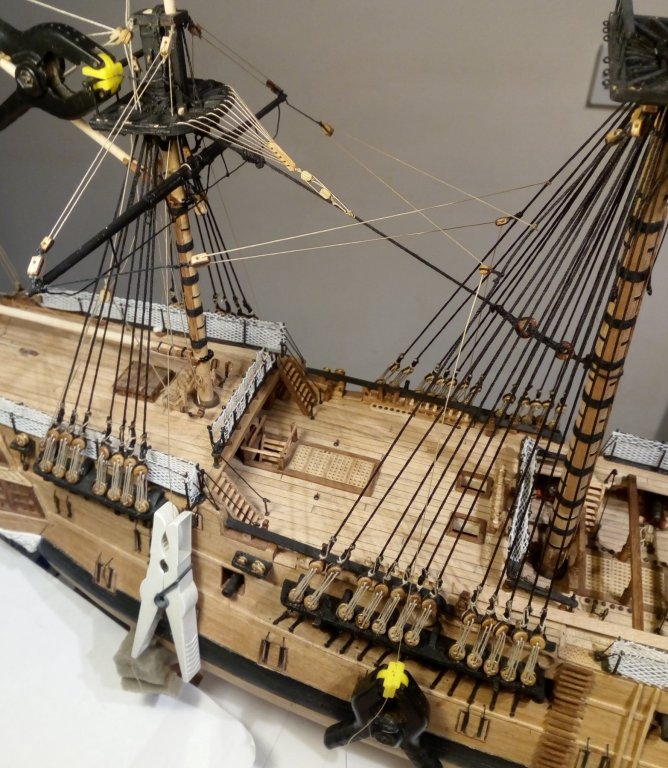
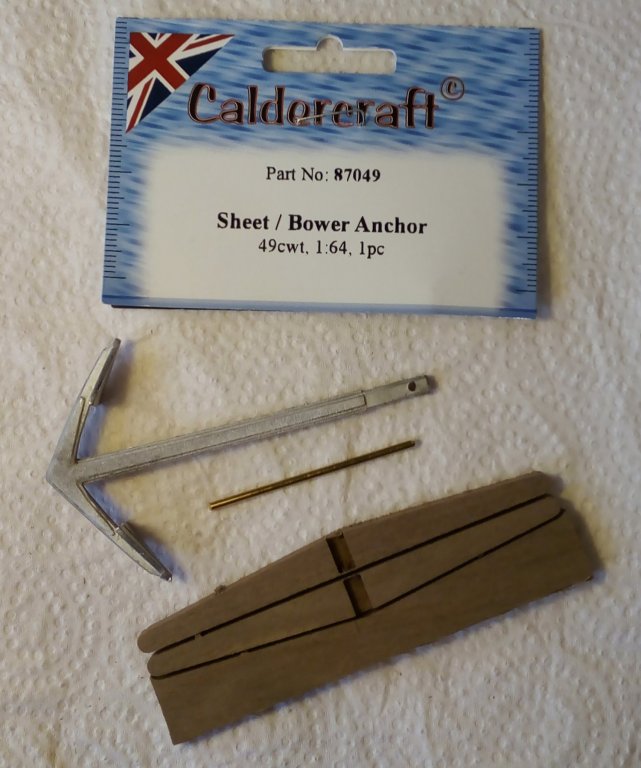
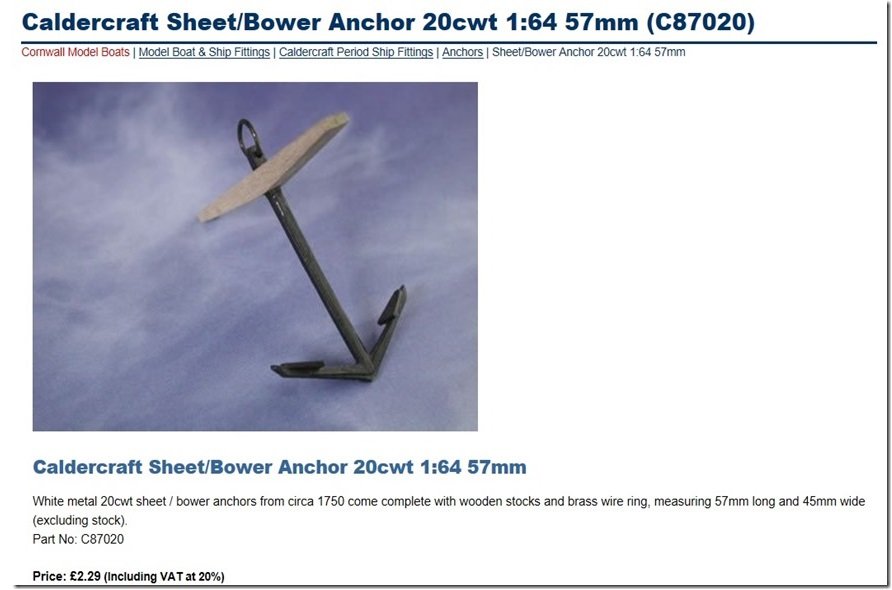
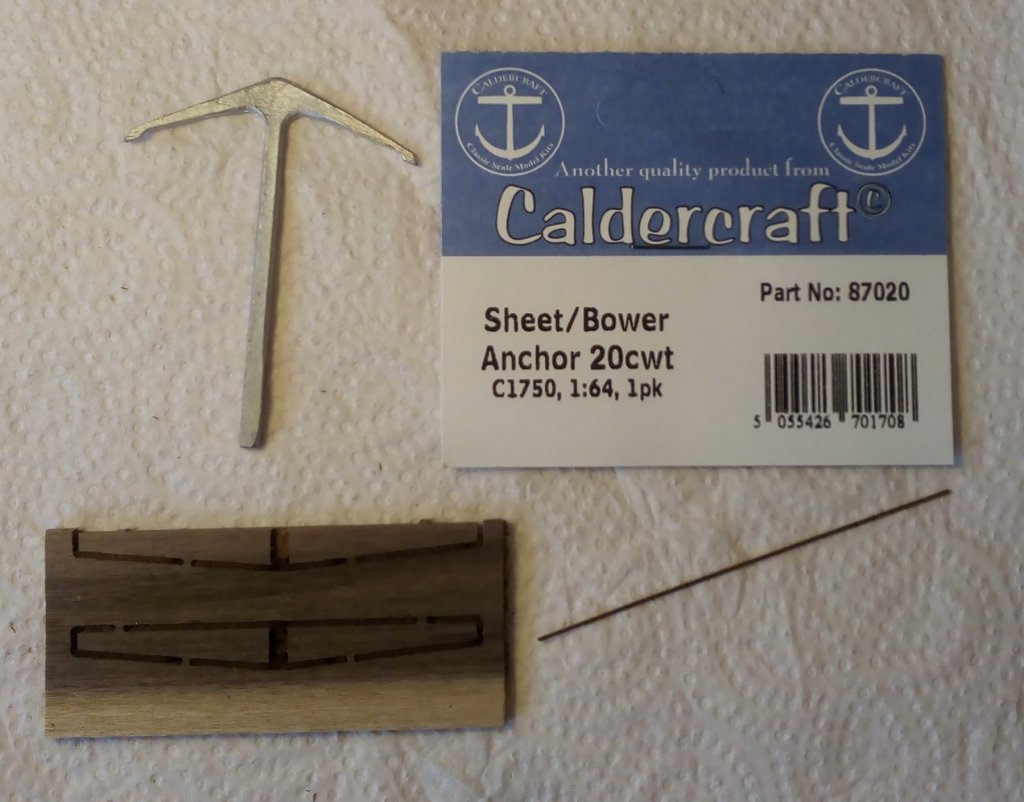
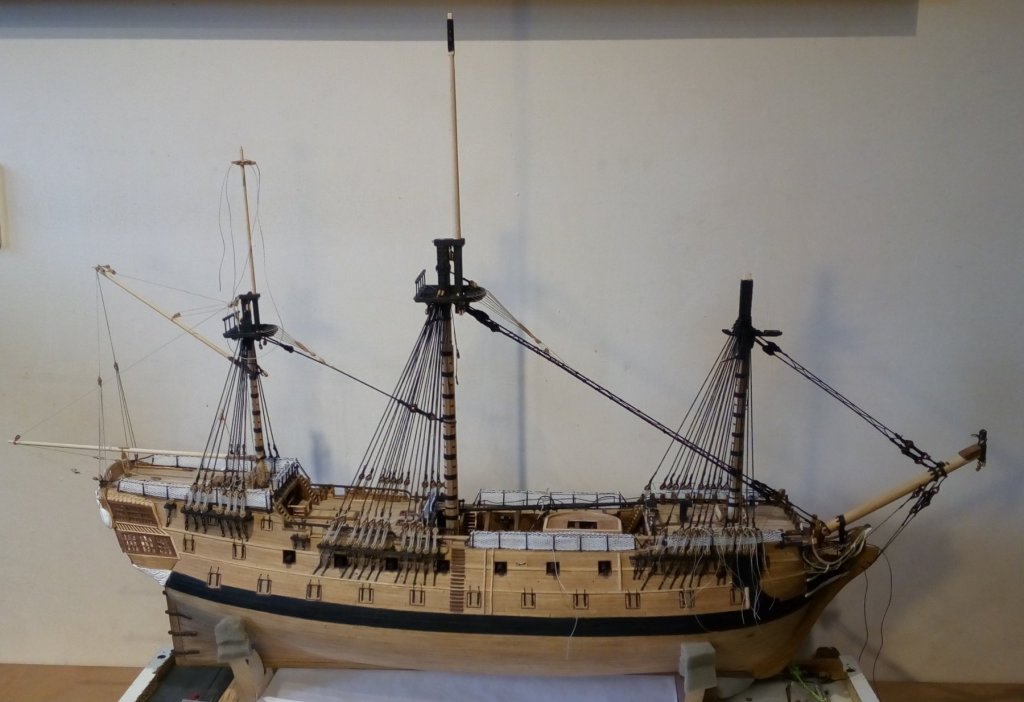
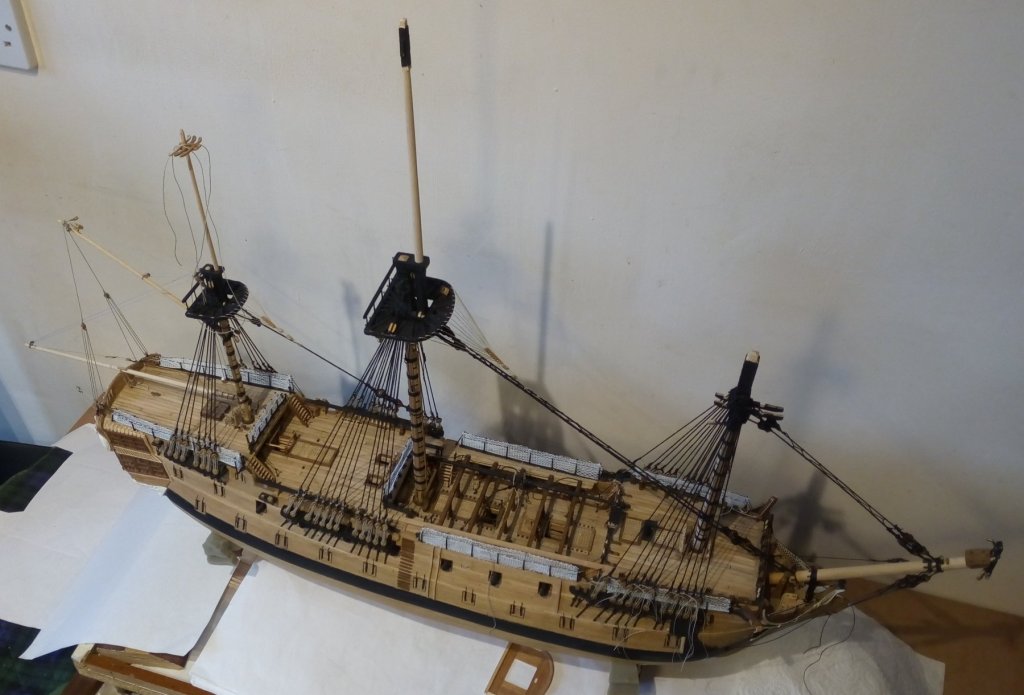
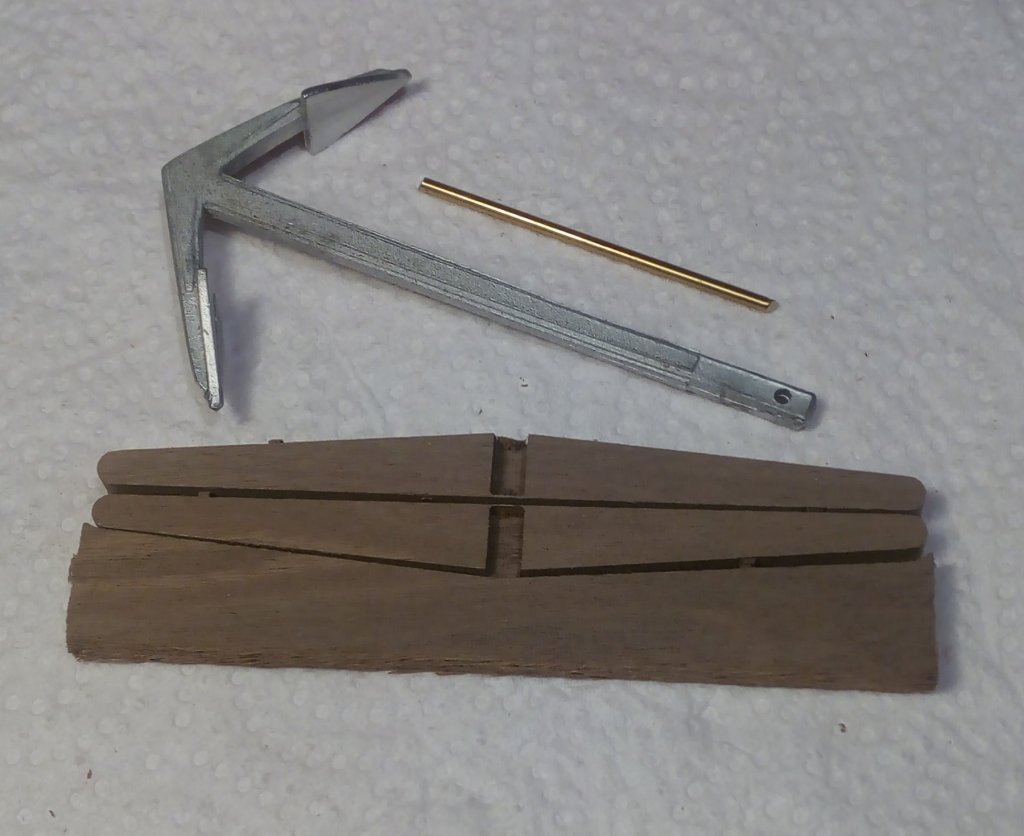
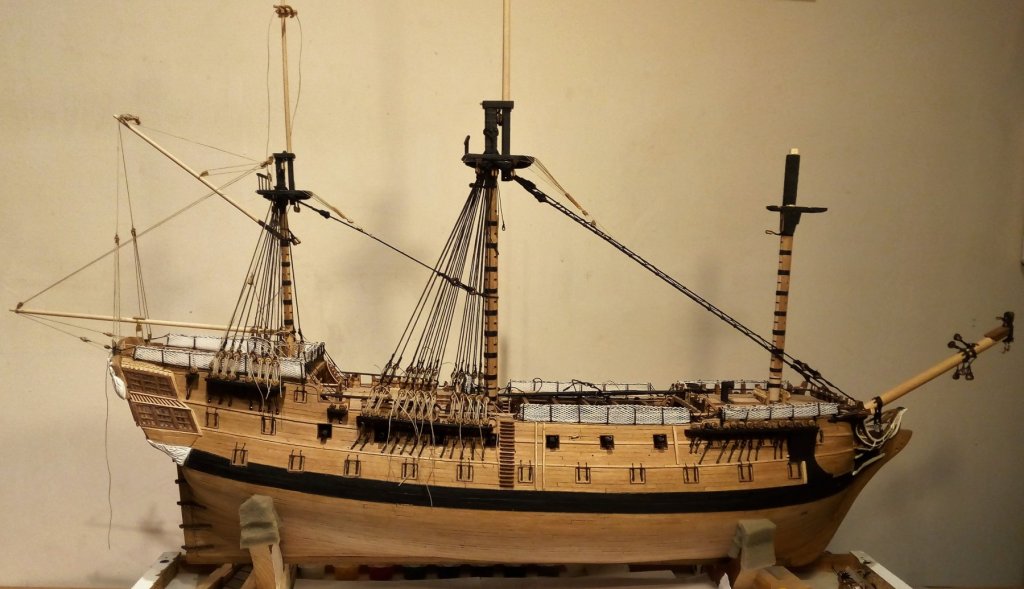
Hi Tom, " There is no such thing as cheating. I like to think of it as using the available resources to fit your needs and accomplish the goal." ~ I don't really have a guilt complex about the bought items! - - - it's just my way of saying these items weren't scratch made! Jason, The anchor is a Caldercraft item. I don't know if you can source Caldercraft products in the U.S.? Here's the one from my previous post >>> I bought 4 anchors at the same time. Two at that size, and two smaller ones. The smaller ones appeared like this on the website >>> BUT ~ when they arrived they looked like this >>> The website photo had shown the anchor with flukes, but what I received had no flukes - and neither were there any flukes in the pack that could be fitted. I'll have to make and fit the flukes for these smaller anchors. I DID email the supplier and pointed this out to them and they replied that is how they receive them from Caldercraft. I see that the photo on their website has now been changed to equate to what is actually in the packet. (The larger anchors were exactly as shown on their website.) [Can't help thinking that would be something like buying a model ship kit and finding that you have to make something major like your own bulkheads ! ] Since I'm here, here's a quick update. Forestay, preventer and snaking now done >>> Shroud lanyards still to be tensioned and trimmed. This is a general view of the ship as she is at present >>> Oh ~ and I'm well familiar with St Stephen's Street!

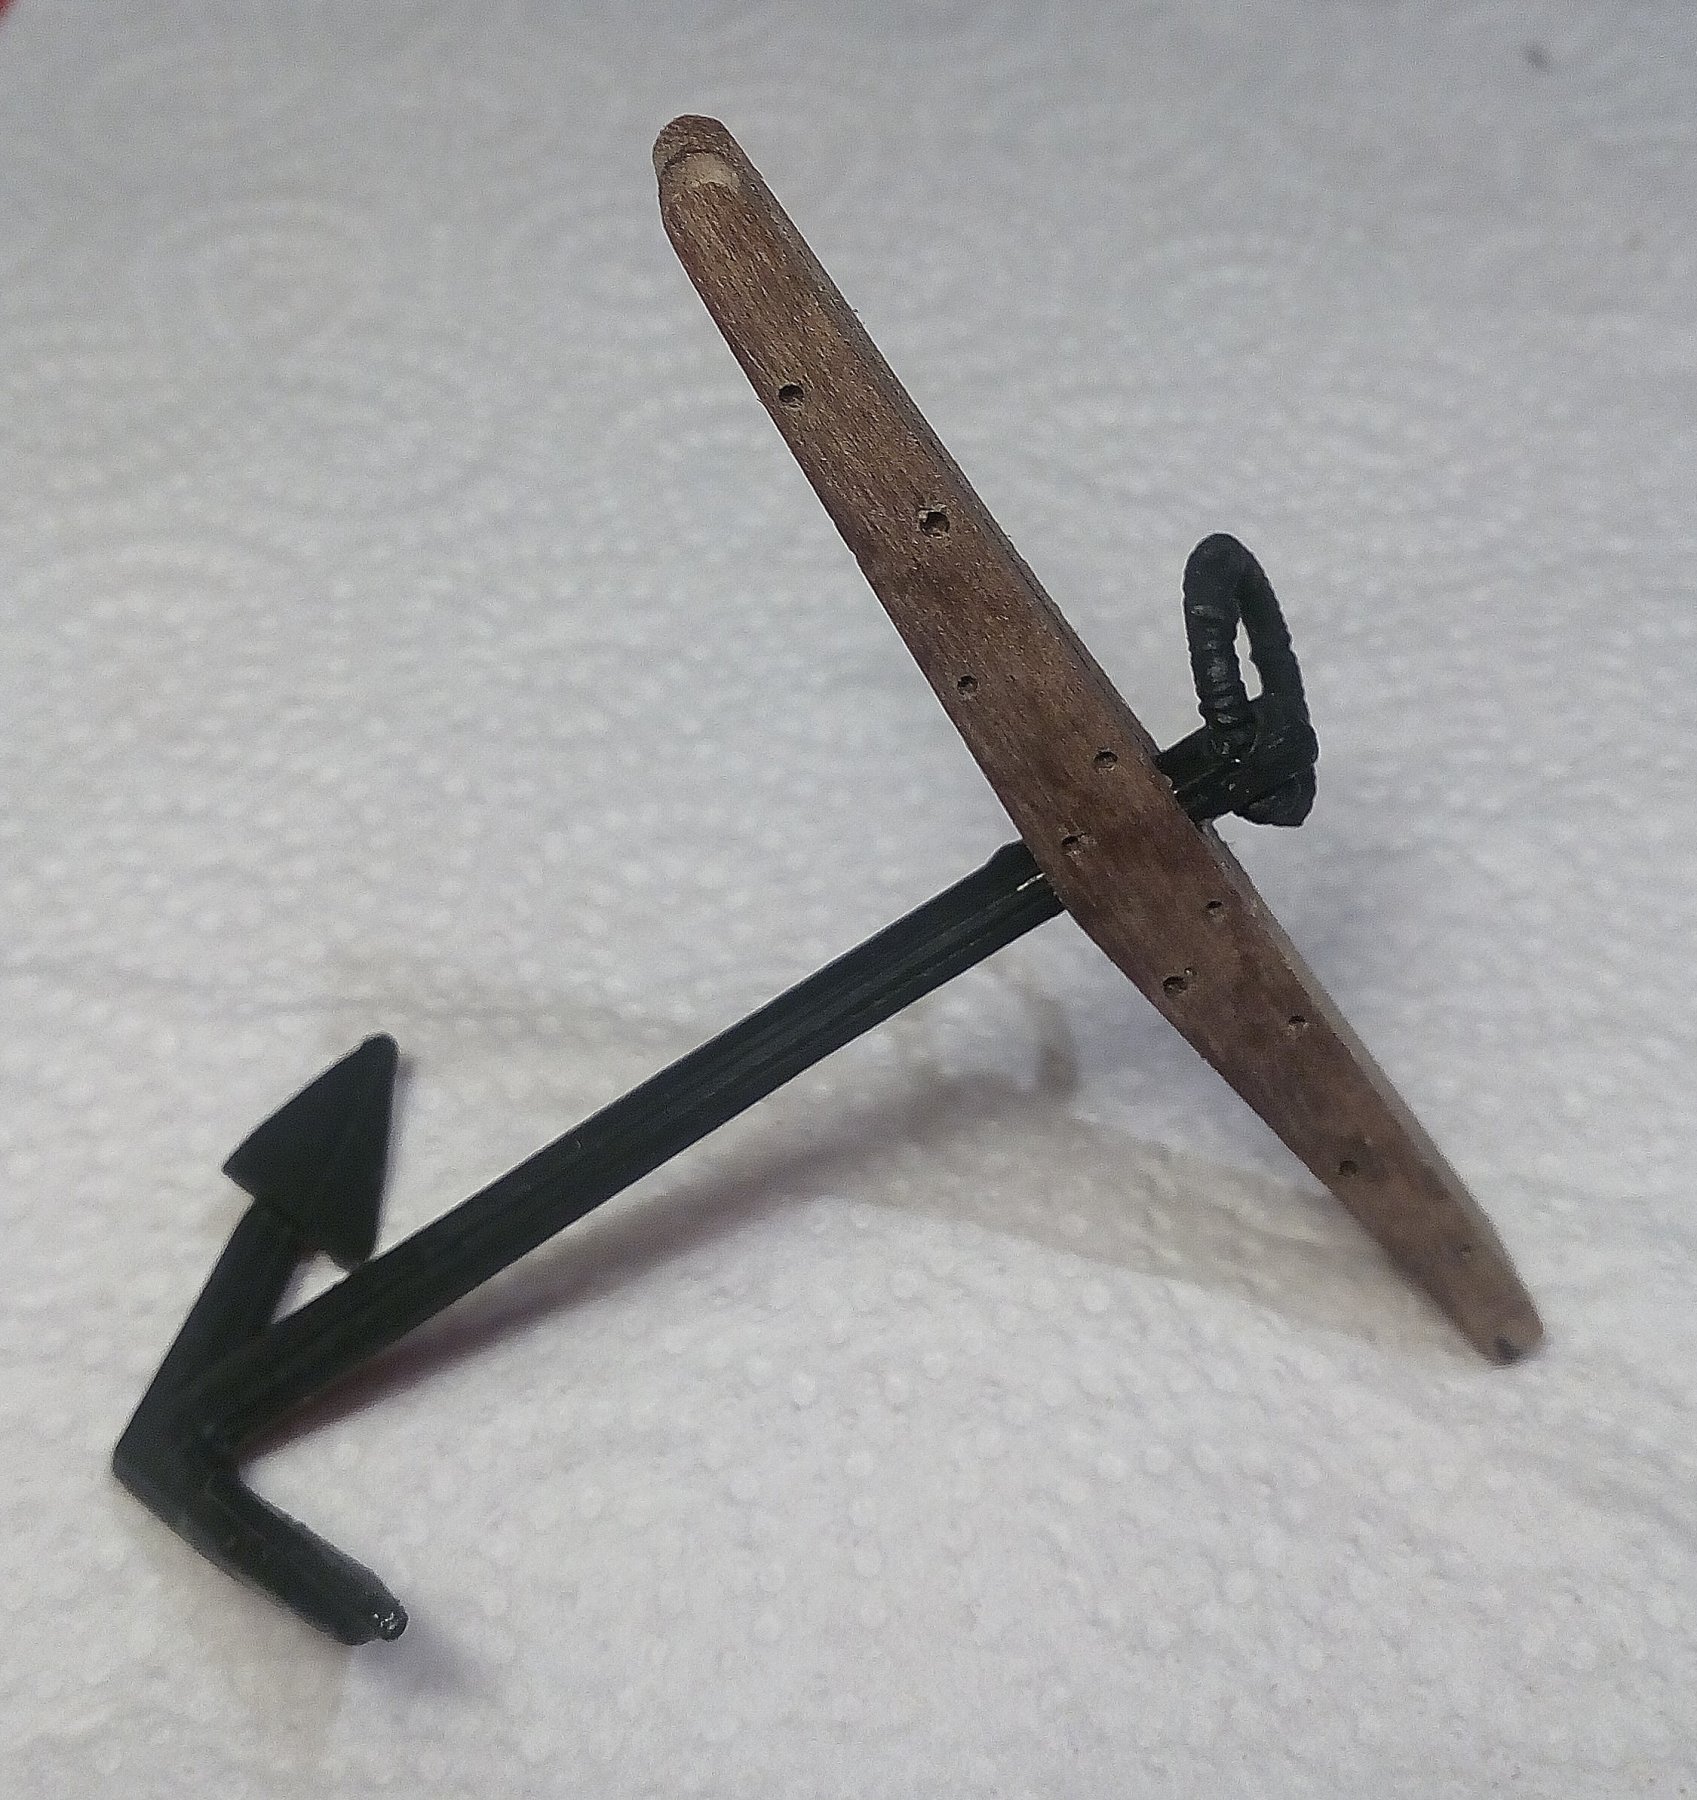
-
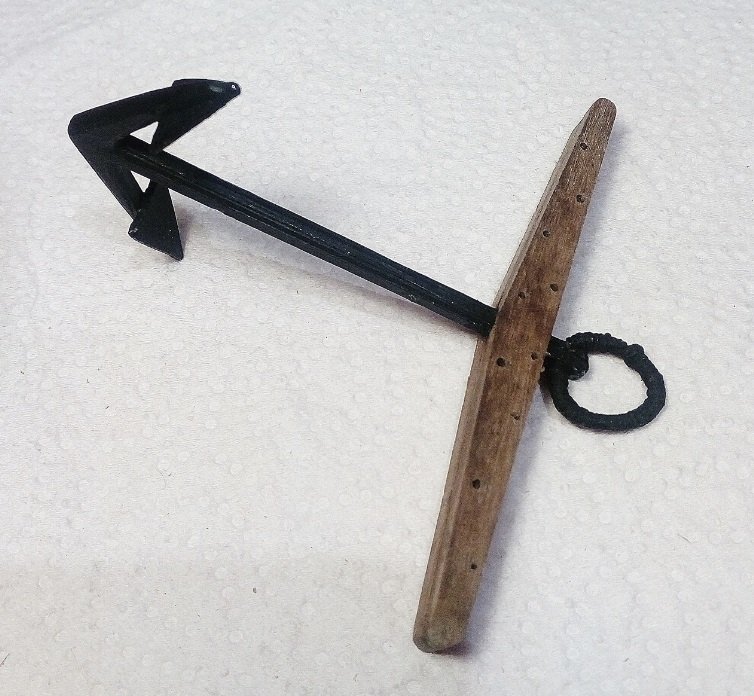
Thanks for the comment, Derek, and to the others for the likes. I was right in my remark at the end of my previous post ~ I DID hear the foremast shrouds calling . . . and they kept me busy for a couple of weeks. I have to say I'm glad that I've now got all the lower mast shrouds in place as I was finding it a bit tedious. On a really good night I would get 4 shrouds (2 each side) done but on 'normal' nights it was more like 2 shrouds. (there are 22 on the fore lower mast) Deadeye lanyards waiting for the fore stay and preventer before being finally tensioned and trimmed. In order to relieve the tedium of the shrouds I diverted to a few other projects. I made the basic platform of the fore top, had a go at rigging the port side cat tackle and assembled an anchor. OK ~ as with the deadeyes and most of the blocks, I cheated with the anchors -- I bought over-the-counter items instead of trying to make my own. The ones I got are quite acceptable and probably better that I would have made myself. The cat tackle >>> Here's what comes in the anchor kit >>> The only thing I found a bit tricky was getting that brass rod to bend into an acceptable round ring. . . . and then having some fun trying to serve the ring >>> Still have the bandings to be fitted to the stock.


- 257 replies
-
- 11
-
-
You've done a great job on these stern lights Tom! I should have waited off a bit and got you to do that stern area in 1:80 and have you mail them to me!
-
Patrick ~ if "La Renommée" is your first scratch build I can't wait to see your next ones!
-
WOW! Patrick ~ why have you been hiding this work from us !!! . . . and you have a room with a view for your work station. What is the 3 deck ship in the display case in the first photograph? Oh - - - and how did you manage to shrink yourself down to 1:48 !
-
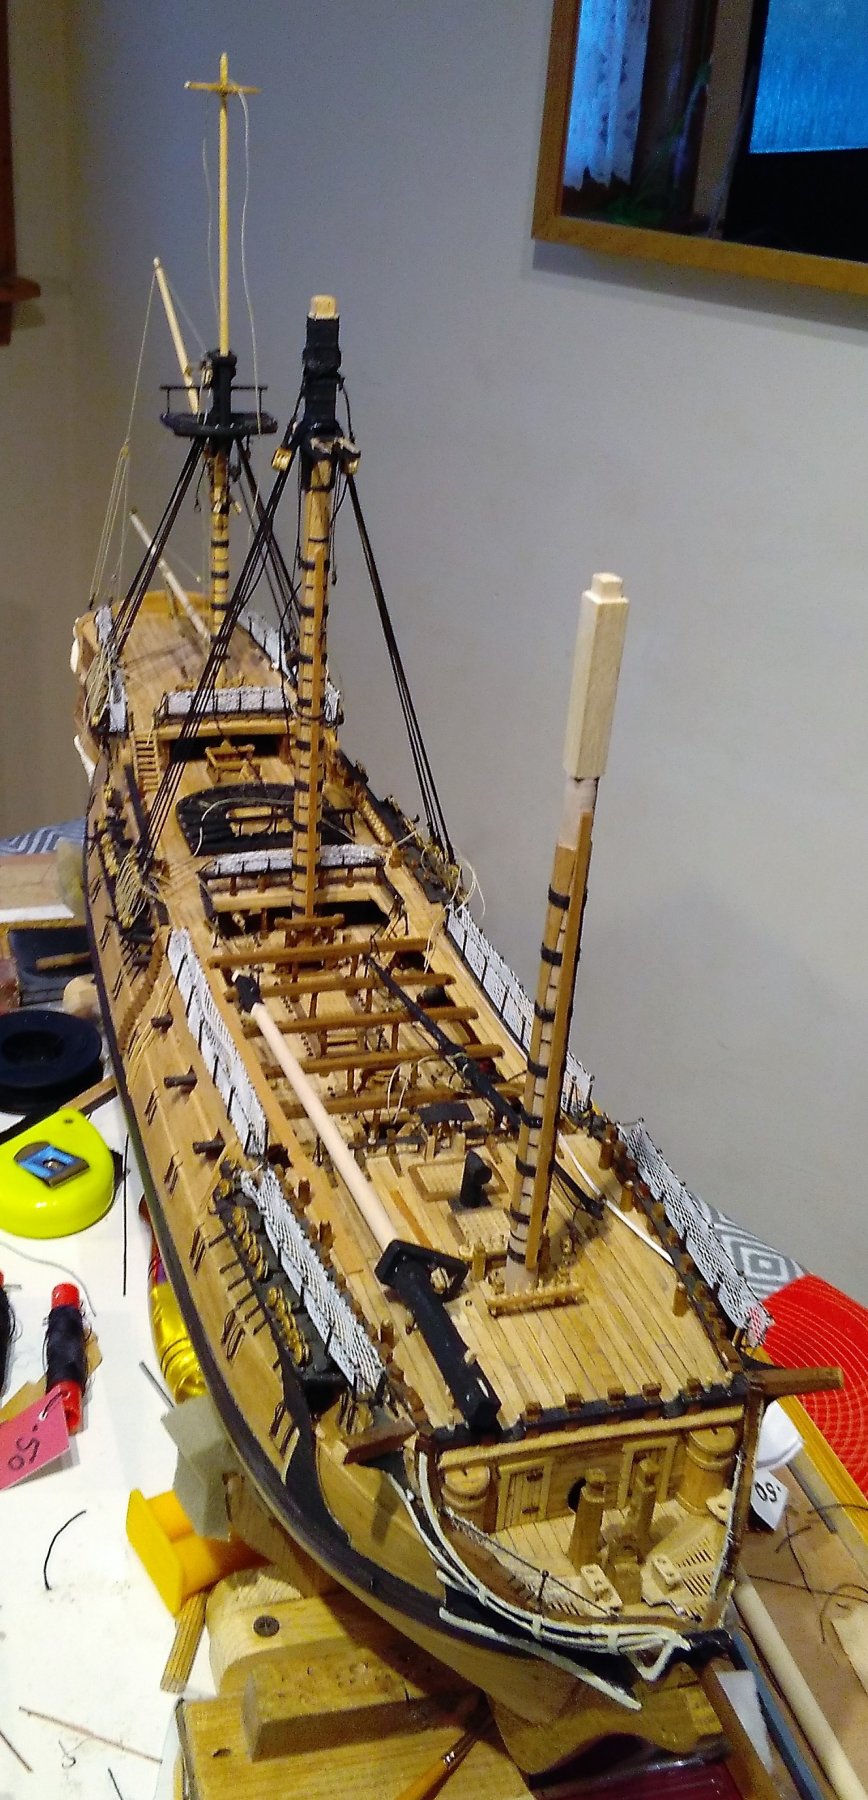
Thanks for your comments, Nigel and Tom, and to the others for the likes. The main and mizzen shroud lanyards are eventually made off and the excess trimmed. Since the bowsprit is now in position I rigged the bowsprit shrouds and bobstays. In the pic above the boomkins are dry-rigged just to check the fit. They won't be staying there until the time comes when I'll have to fit them. They look so fragile and vulnerable sticking out the front and they're now back in the 'safe box'. (The 'safe box' is so safe that a few things that have been hiding in there for a while are no longer 'findable' and I have had to make replacements -- I have no idea where the originals went!) O.K. ~ I'll be off now, I think I hear the foremast shrouds calling . . . . .

- 257 replies
-
- 11
-
-
Tom ~ I was just kidding about speeding up! - - - it's easy enough to mess up even when there's no rush. I'm sure you can guess how I have acquired such wisdom!
-
Tom said "Okay so I lied a little." ~ we're all entitled to change our minds, Tom! That planking looks very neat as do the gun port liners. Now I need you to speed up some so that I can copy your rigging!
-
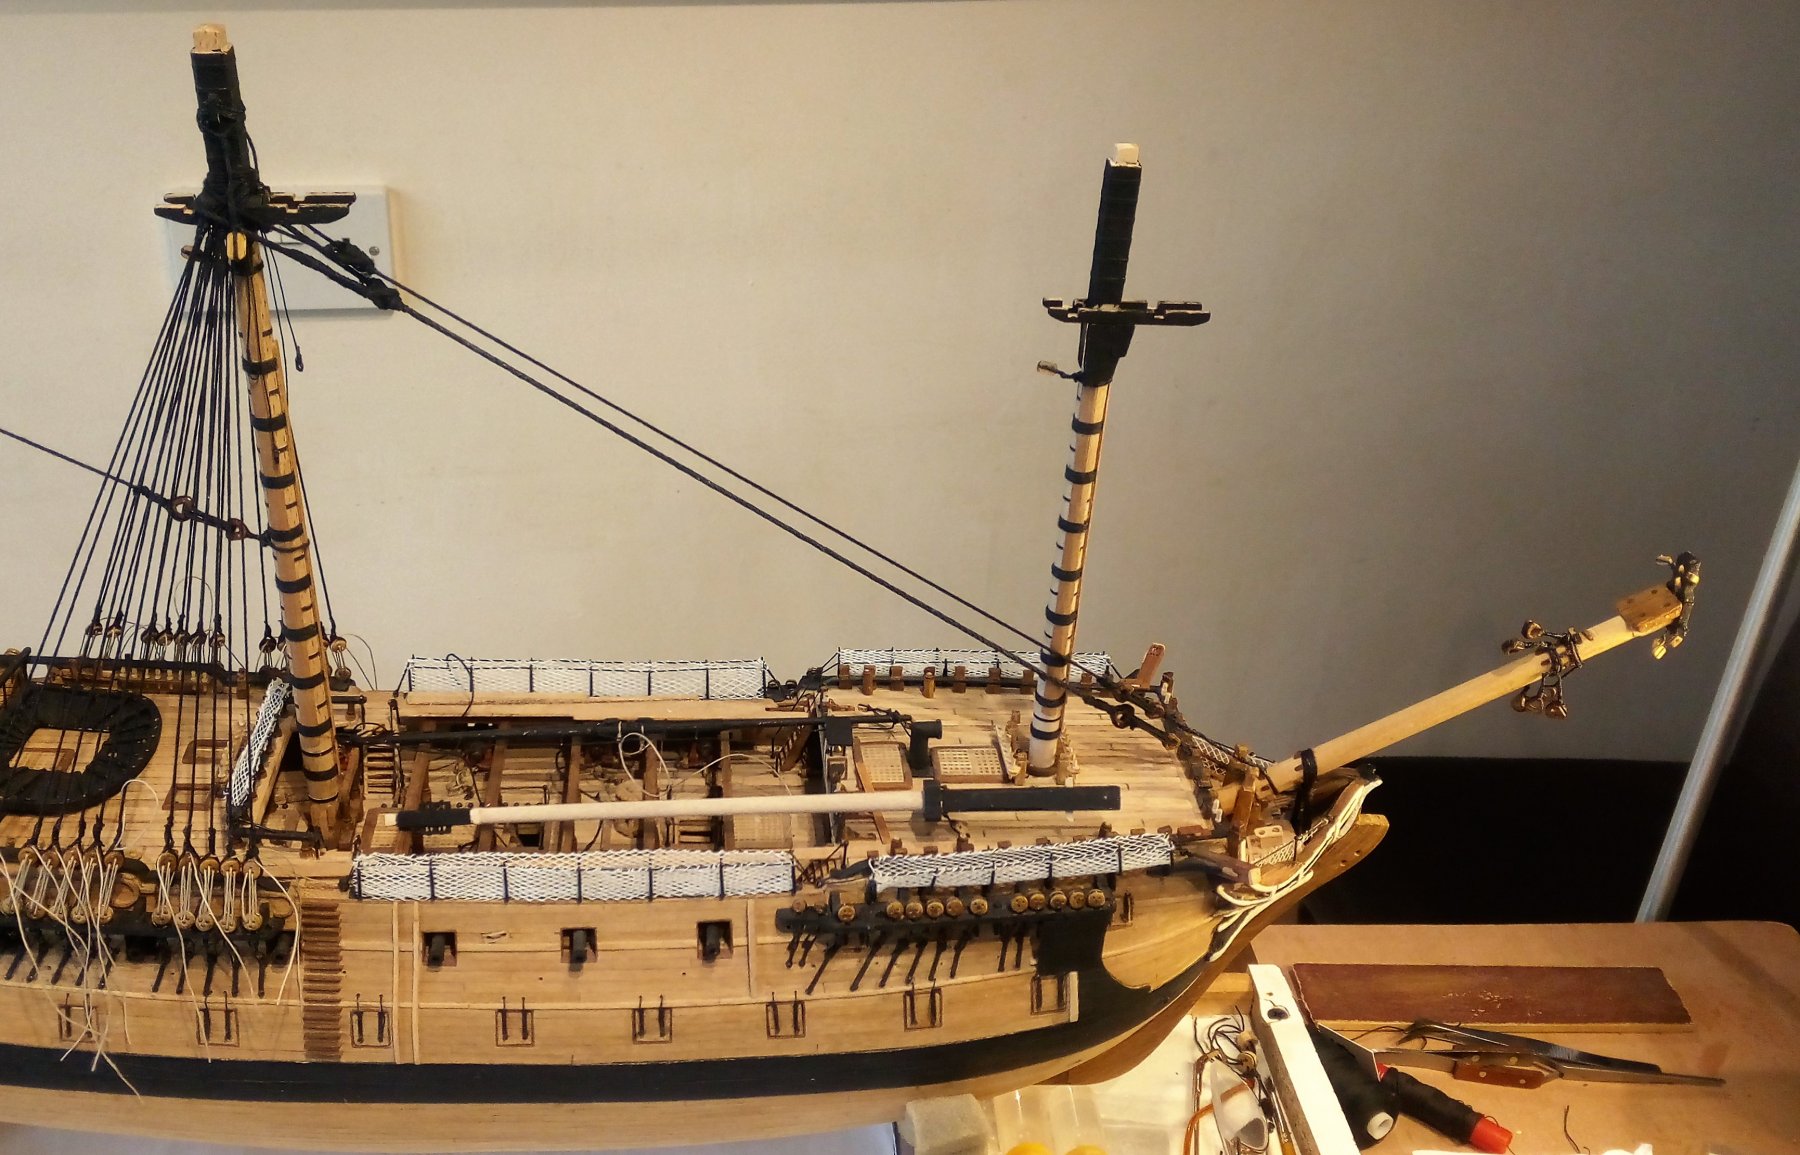
More knots have been tied and more bits of wood added. The wooden bits are the foremast which is now properly fixed as is the bowsprit which I needed in order to get the main stay and preventer rigged. Here the main stay is looped around the masthead and the lower end is just looped inside the heart block at the bowsprit end and held by a clip. Main stay and preventer now rigged. At this point I was quite happy with the gap between both of these stays >>> I wanted these stays in position as I wanted to do the snaking before even thinking about rigging the foremast shrouds ~ I didn't want to be messing with trying to do the snaking behind all those shrouds. Here, in the pic below, the snaking is done but the stays are a little closer together that I would have liked. There is no tension in the snaking -- I made efforts to ensure that I wasn't pulling the stays together but somehow they are a bit closer that I had hoped for >>> I have to say that I'm pleased that I did the snaking as I found it quite tricky even in the "open space" I had to work in. I think it would have been much more of a nightmare if I had waited until the foremast shrouds were in place. The crows foot of the main top has also been rigged. (The main top platform is now eventually a permanent part of the mast!)>>>


- 257 replies
-
- 11
-
-
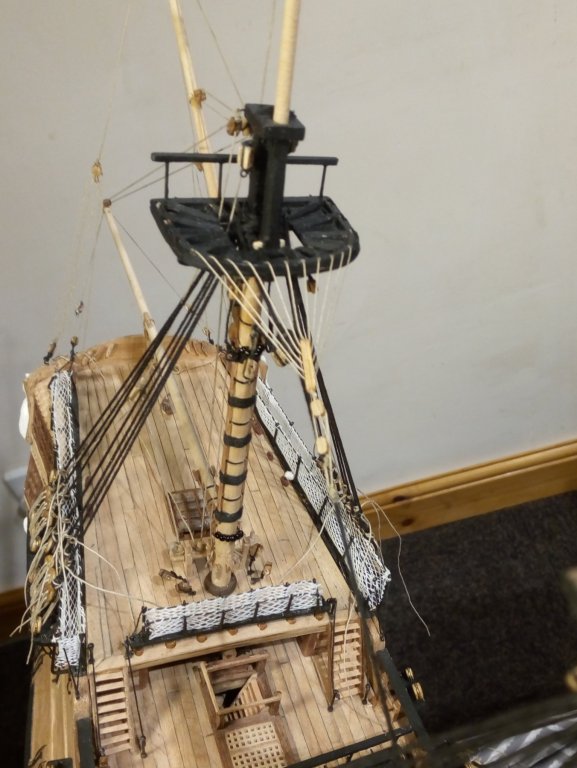
Thanks for the comments and the likes. Not a lot of progress since my last posting, partly due to a hand injury. I'm right-handed and the injury was to my left hand, but it's amazing how many daily routine things are so much more difficult when the 'other hand' is not working properly! The main shrouds are now in place although the deadeye lanyards are still to be made off properly >>> Now that I'm at the rigging stage I really don't know in what order things should be done, so I'm kinda making it up as I go along. I'm trying to think ahead and imagining what snags may lie in wait if I do "X" before "Y" - - - or if I do "Y" before "X". In any case, since the mizzen stay was in place I felt that there may be some intrusive rigging in the way if I left it to later to rig the crow's foot of the mizzen top so I made the euphroe and went ahead and rigged it >>> That main top that is lying on the Q/deck should soon find its way up onto the main trestletrees/crosstrees as soon as I finish attaching the blocks to the underside of the crosstrees. They're still off the ship as it seems to be taking forever to fit them pesky blocks! . . . I'm just glad that I didn't fit the crosstrees first and then attempt to fit the blocks afterwards . . . ! I'll soon have to be fitting the bowsprit as the main stay and preventer both originate on there . . . I'm just trying to delay as long as possible having those long, vulnerable things sticking way out in front of the ship.
-
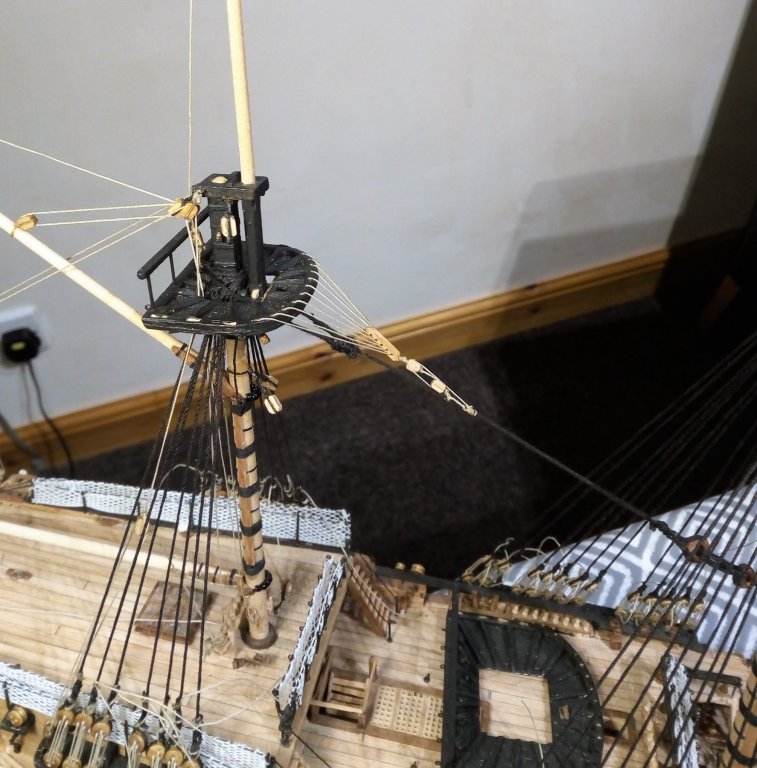
Thanks for the comments and likes. A little progress. Mizzen stay made off to the main mast and a start on the main shrouds >>> The 2 black 'ropes' hanging loosely behind the main mast are shrouds number 6 for each side of the main still waiting to be attached. The line hanging over the mizzen topmast top is the mizzen topgallant halliard. At it's fixed end it is attached to a block which is attached to the topside of the mizzen top platform. When I looked at Petersson's rigging plan it seemed to me that block would have been extremely difficult to fit into the very tight space available on that platform, so I fitted it to the platform while the platform was still off the mast. I had already fitted the first 2 pairs of shrouds to the main when I realised that I hadn't made and fitted the Burton pendants. I made the two pairs (Burton pendants) and managed to get them squeezed down through the shrouds and secured in position over the masthead and bolsters. The upper jeer blocks have been attached to the masthead for some time. I had a lengthy respiratory infection and was staying away from making any sawdust for a while. That's why there have only been the main and mizzen lower and topmasts making an appearance on and off the ship for some time. I've been back at my makeshift lathe and the fore lower mast is now in position.


- 257 replies
-
- 10
-
-
Pandora by marsalv - FINISHED - 1:52
Bluto 1790 replied to marsalv's topic in - Build logs for subjects built 1751 - 1800
On Friday Marsalv wrote: Thank you guys for all the likes and nice comments. To Ondras71: You are not right, there are many other builders much better as me on this forum. I never thought that I would make a post here in which I would disagree with you, Marsalv - - - but here it is! While there are many other builders here on the forum who may be as good as you, it's my opinion that there aren't any who are better than you. You are definitely right up there in the "top league" with the others! -
Hi Tom, That looks like a milestone you're approaching! . . . it's great to get that hull planking finished. Once I got my planking done I started to feel that I could get on with stuff that I enjoyed working on! Unlike my stern quarters which were just a real mess for a long time, I see you've got yours going in the right direction.
-
Thanks for the comments, guys. Finally made a start on the rigging. The shrouds for the mizzen lower mast are now basically in position. They've been attached by the lanyards but the lanyards are still to be fully tightened. The mizzen stay has been looped around the masthead but hasn't been attached to the main mast yet. >>> In the pic above the stay had been incorrectly looped inside the trestletrees instead of outside -- that has since been rectified. The heart block has also been seized into the lower end of the stay since the photo. So that I could get the gaff and boom from flailing around loosely they've been rigged, but only after the mizzen top and topmast were fitted. >>> Petersson's book shows the line for the boom topping lift going to a block on the mizzen channel then to a belaying pin on a side pinrail. Leopard has no side pinrails on the poop deck so I led it via a double block to a pin on the central pinrail immediately behind the mast >>> The gaff vangs and boom guy pendants have also been rigged >>> There is one thing that these photos have revealed that is virtually invisible to the naked eye --- and that is all the 'fuzz' on the rigging threads, so I'll have to get some bees wax on the job.


- 257 replies
-
- 10
-
-
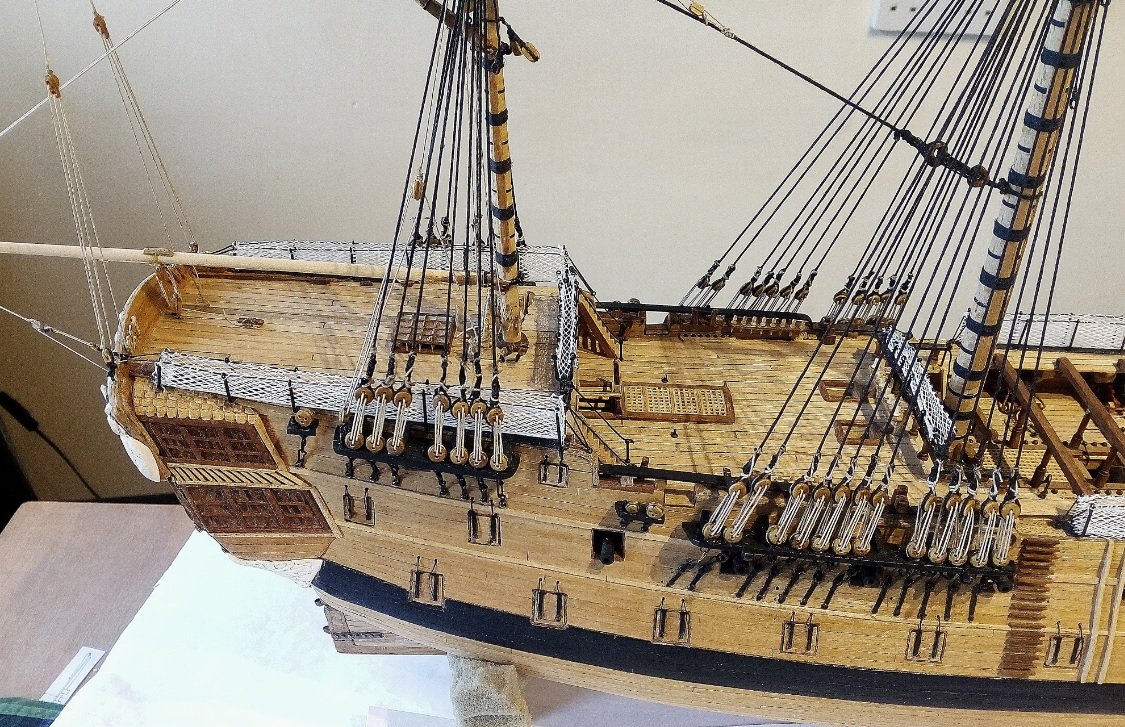
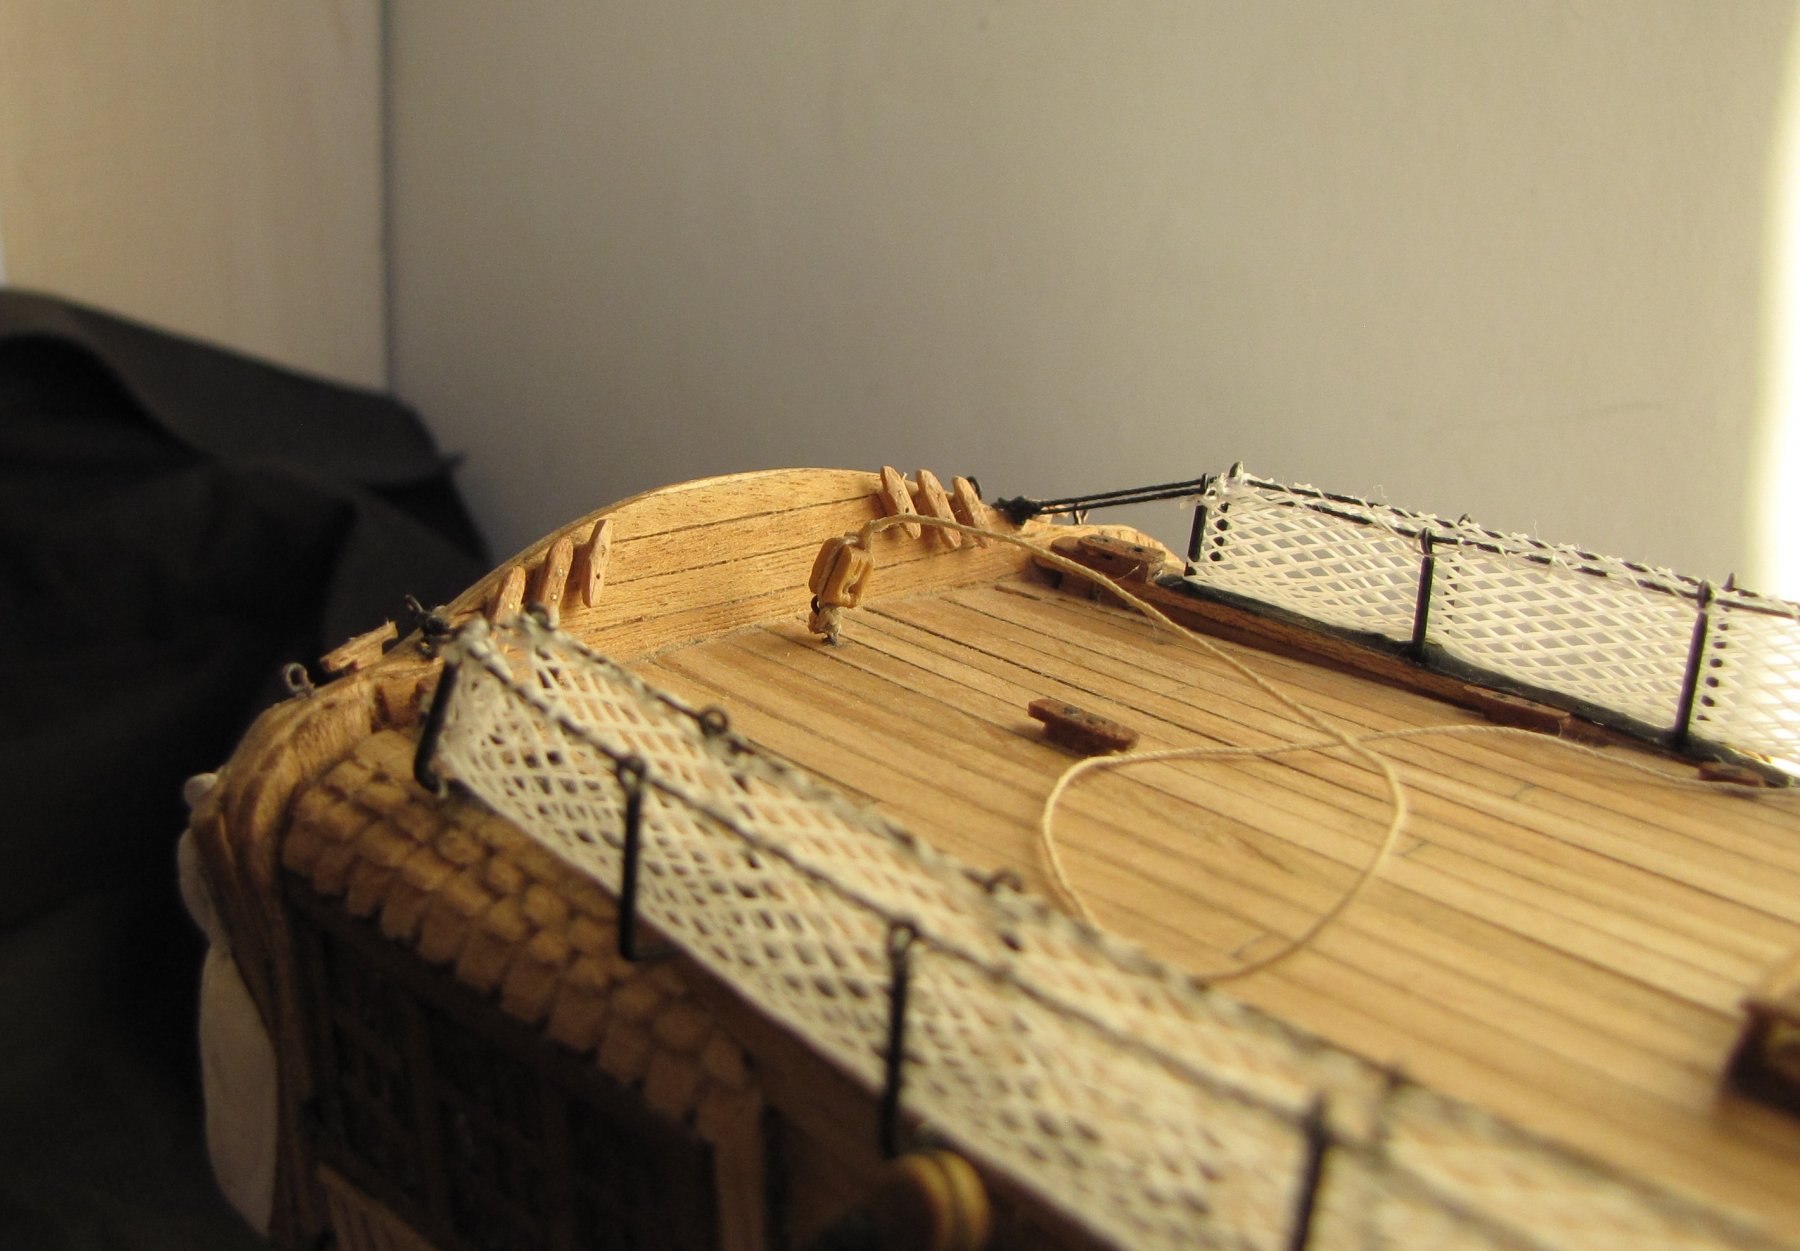
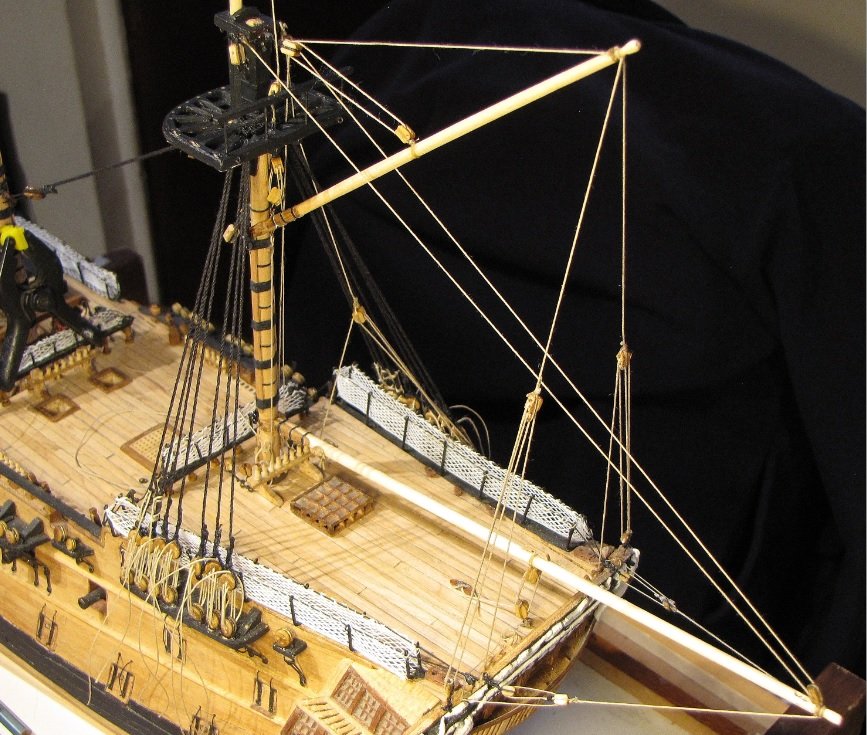
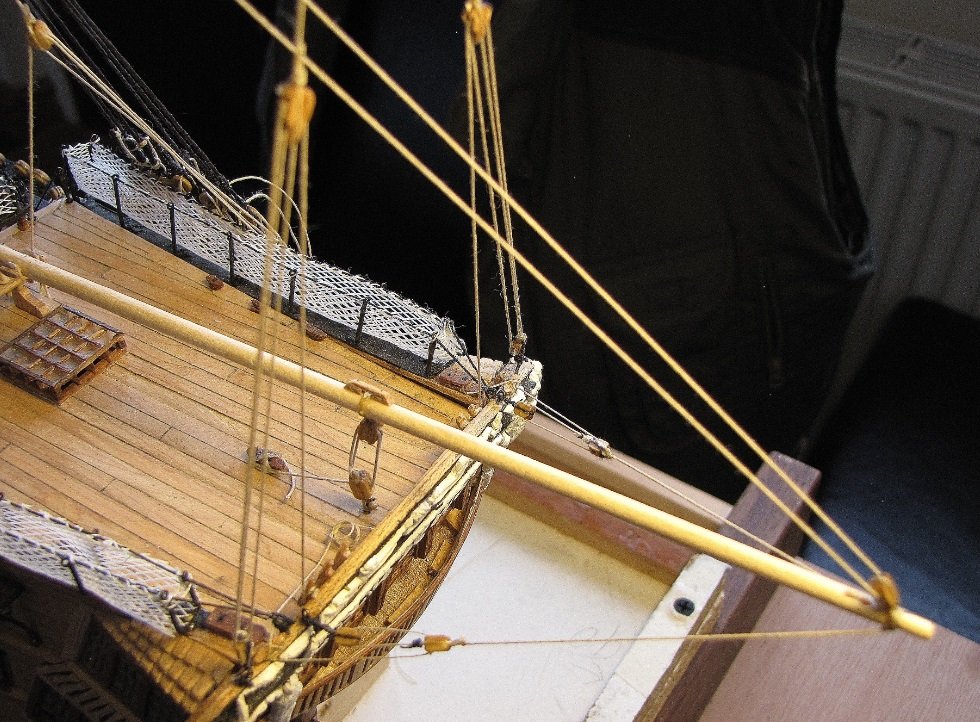
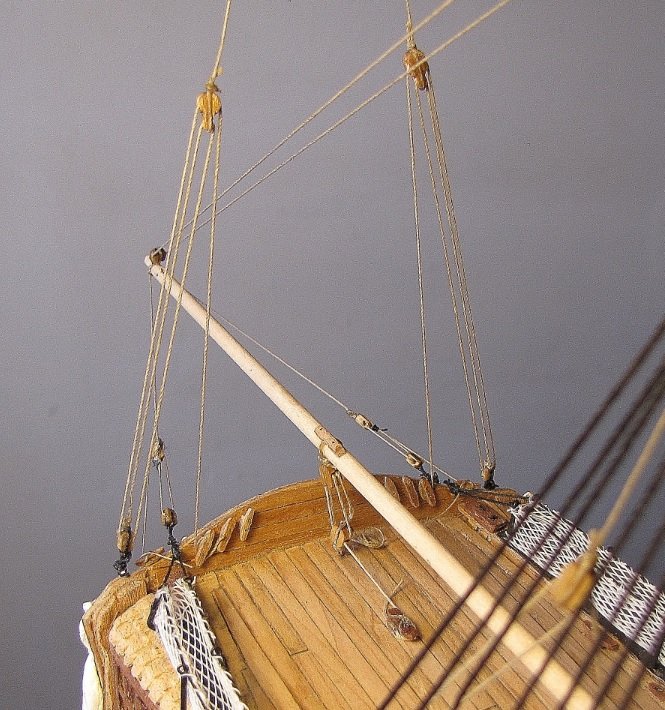
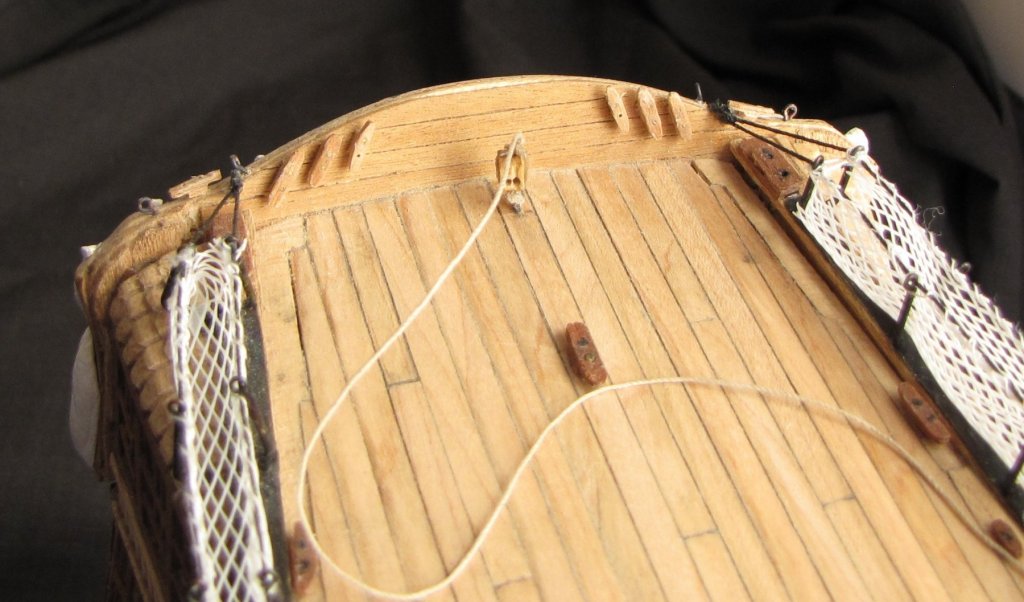
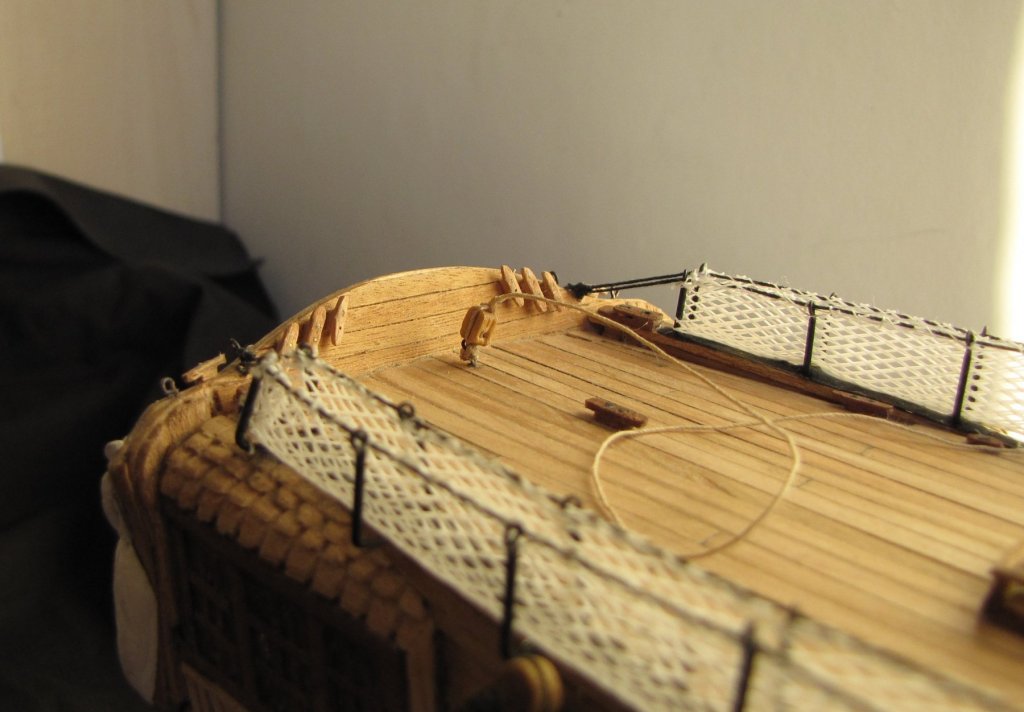
Thanks for the comments guys. I had imagined that by now I would be starting the rigging for real - - - like getting the mizzen shrouds in place for instance. BUT ~ I'm learning just how much 'stuff' has to be done before the first shroud is connected. There is nothing in my plans/drawings that shows any belaying points in the area of the taffrail and there needs to be at least eight cleats/belaying points there in order to catch the 2 guy pendants, the 2 vangs, the 2 mizzen topsail braces and the 2 mizzen topgallant braces. As there are no bulwarks on the sides of the poop deck on Leopard, I felt the only place I could use was the taffrail. Before I started on any of that I took some time and made the aft guard rails for the main and mizzen tops >>> Then a few cleats (don't know why I only made six to start with when I knew I needed eight!) >>> I mounted one cleat on top of the taffrail at each side . . . these are for the guy pendants. The other six cleats (3 on each side are for the vangs and the mizzen top and topgallant braces) are just mounted on the inside face of the taffrail. The line attached to the double block at the aft end of the poop deck is the spanker boom sheet. >>> Here, the standing parts of the vangs hang from the gaff and the line for the peak halliard hangs like spaghetti over the top and the gaff and a couple of blocks for the guy pendants hang off the top of the taffrail >>> I feel I may be closing in on the shrouds . . . . .
-
That planking is looking real good, Tom. I remember that dim light at the end of the planking tunnel . . . I double planked mine so my tunnel was twice the length! Just a cautionary note about the hull sanding - - - before I commenced my second planking I sanded the first planks and succeeded in rubbing through one small part. It was only a small area and it wasn't a problem as the second planking was coming along to save it . . . but I wouldn't expect you should have any problem like that as your planking is twice the thickness that mine was.
-
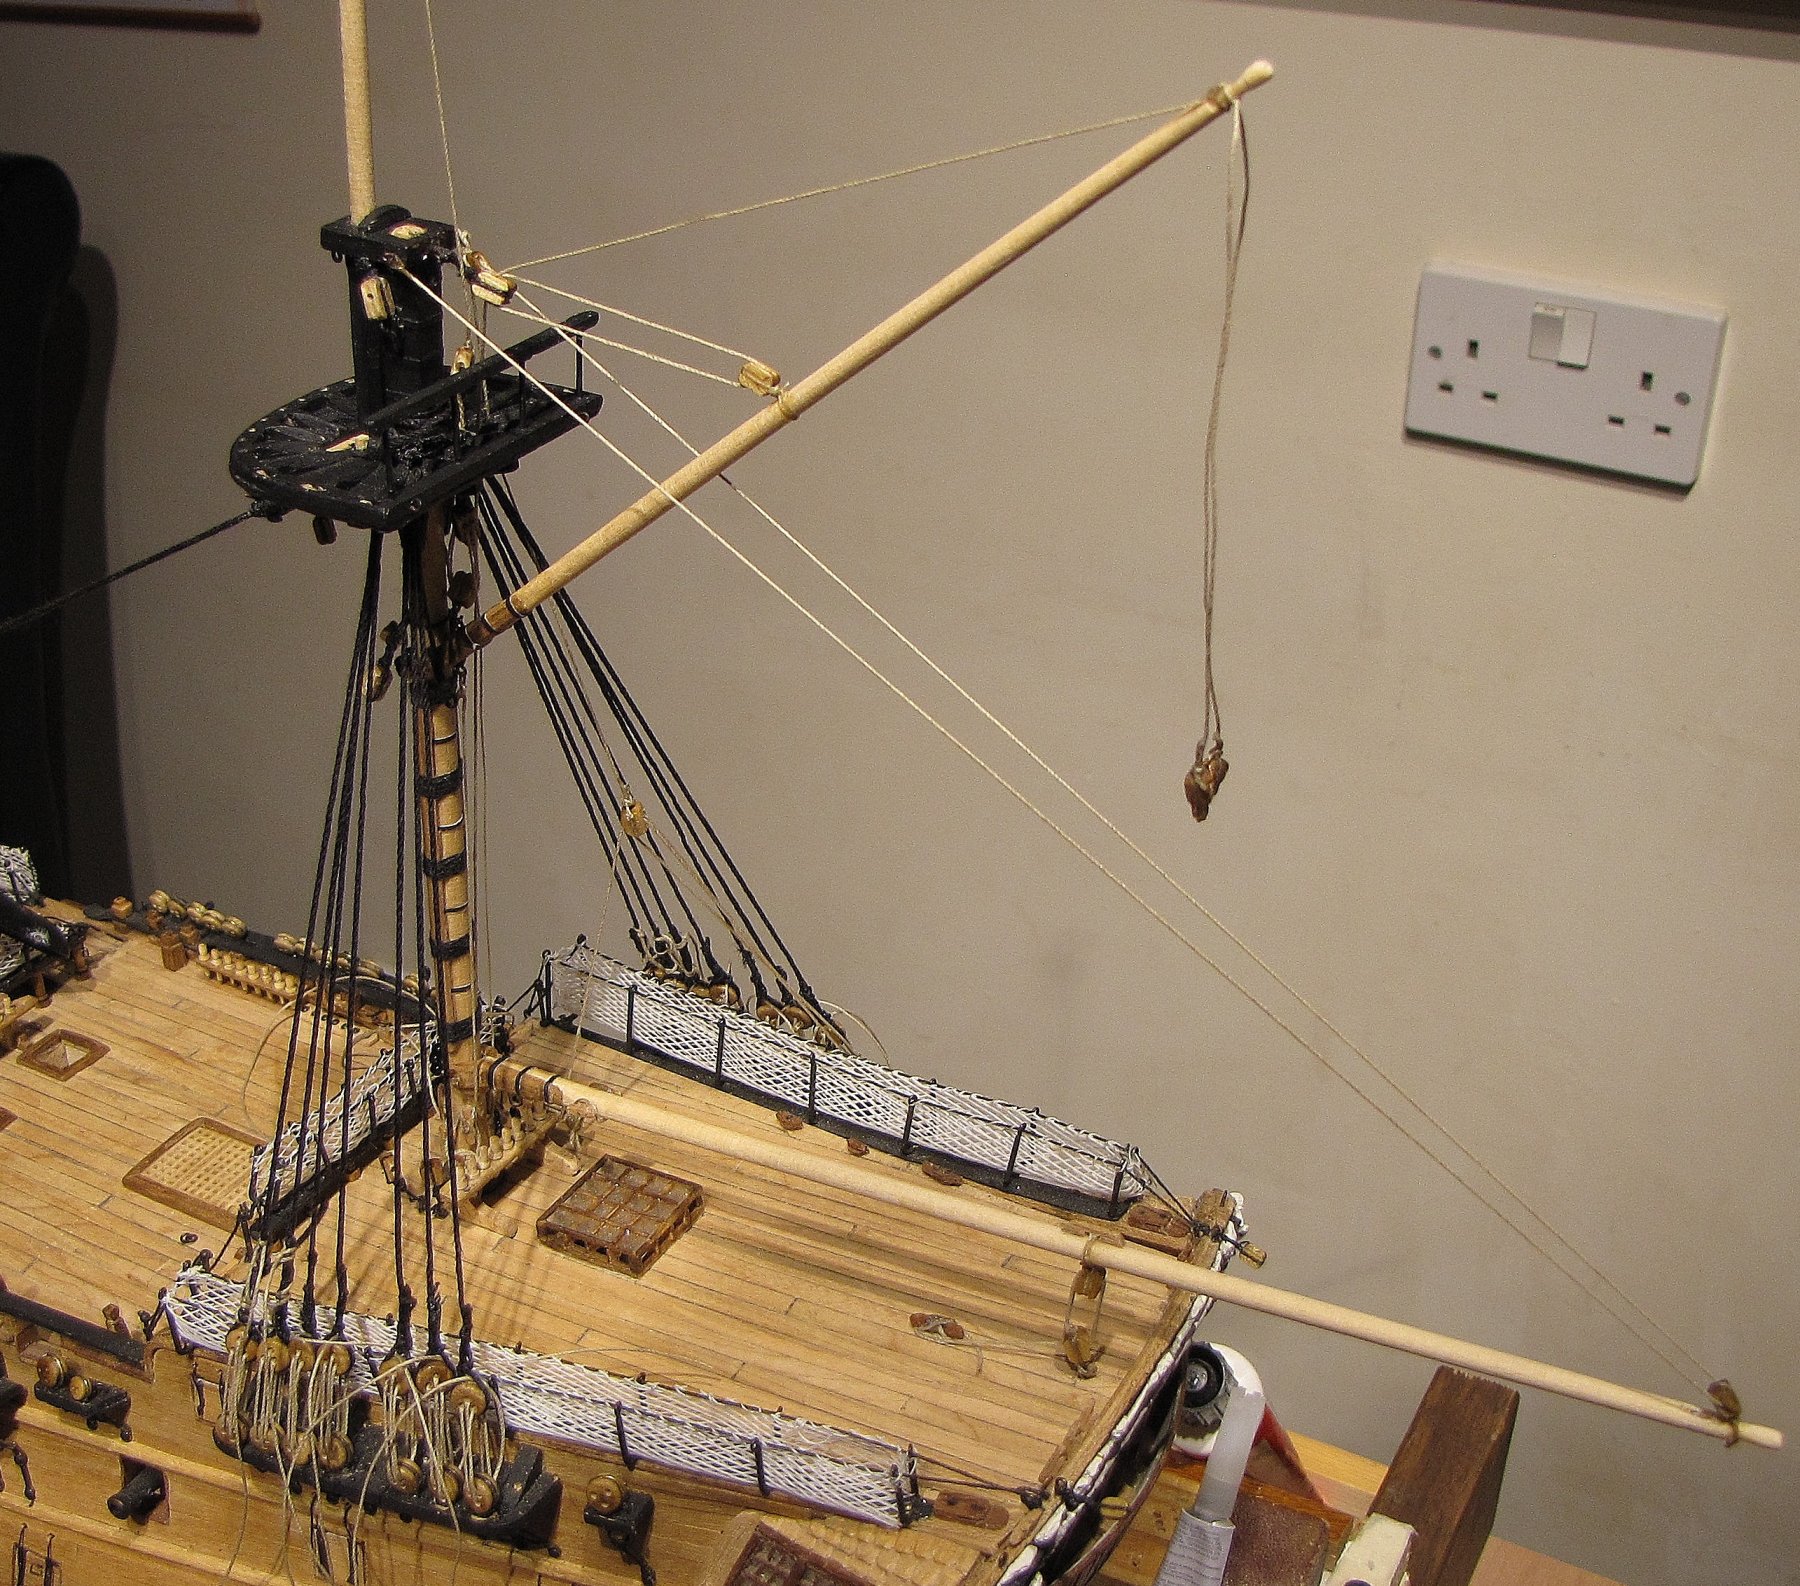
Hi Nigel, I hadn't noticed that the MacAllan had sneaked into that photo! As for daunting, yes! - - - when I first got the Lennarth Petersson book I remember looking through it and being completely bewildered. BUT - I'm slowly finding my way by trying just to concentrate on the particular part of the rigging I'm working on at any one time. Since yesterday I've made a couple of dummy mastheads, one for the mizzen and one for the main. (Haven't arrived at the fore yet.) By using these it should take a bit of the guesswork out of obtaining the correct size of loop in the shroud pairs for fitting their respective mastheads for real >>> Also, as the crossjack hadn't been in contact with the mizzen I had a go at making the sling for it. It was a bit fiddly to make but I was able to make it 'off site' ~ meaning I wasn't hampered by having to mess around with the crossjack at the same time. I've left a long tail on it for now and I'll trim it once the yard is on the mast properly >>> Here it hangs around the mast cap . . . just so that I could see how it looks! >>> (The clamp is just there holding the top in position while I threaded the sling up through the hole and round the cap. The black thread sticking above the cap is the excess tail which will be trimmed when everything is permanent.) I've also made the truss pendant but that was a lot more tricky as it had to be made directly onto the yard. At least I hope this is serving me well as the mizzen, being the smallest of the masts, everything for the other masts should hopefully be a little easier due to the slightly larger sizes I'll have to work with. I'm now beginning to suss in what order I'll have to do things when I'm done 'practising' and get this rigging started for real.


-
Henry, Jason and Jan, thanks for your further input!
-
HMS SUSSEX 1693 by 8sillones
Bluto 1790 replied to 8sillones's topic in - Build logs for subjects built 1501 - 1750
Totally amazing beamwork! . . . as well as the rest of your work! . . . AND ~ your model has a model ship inside it! -
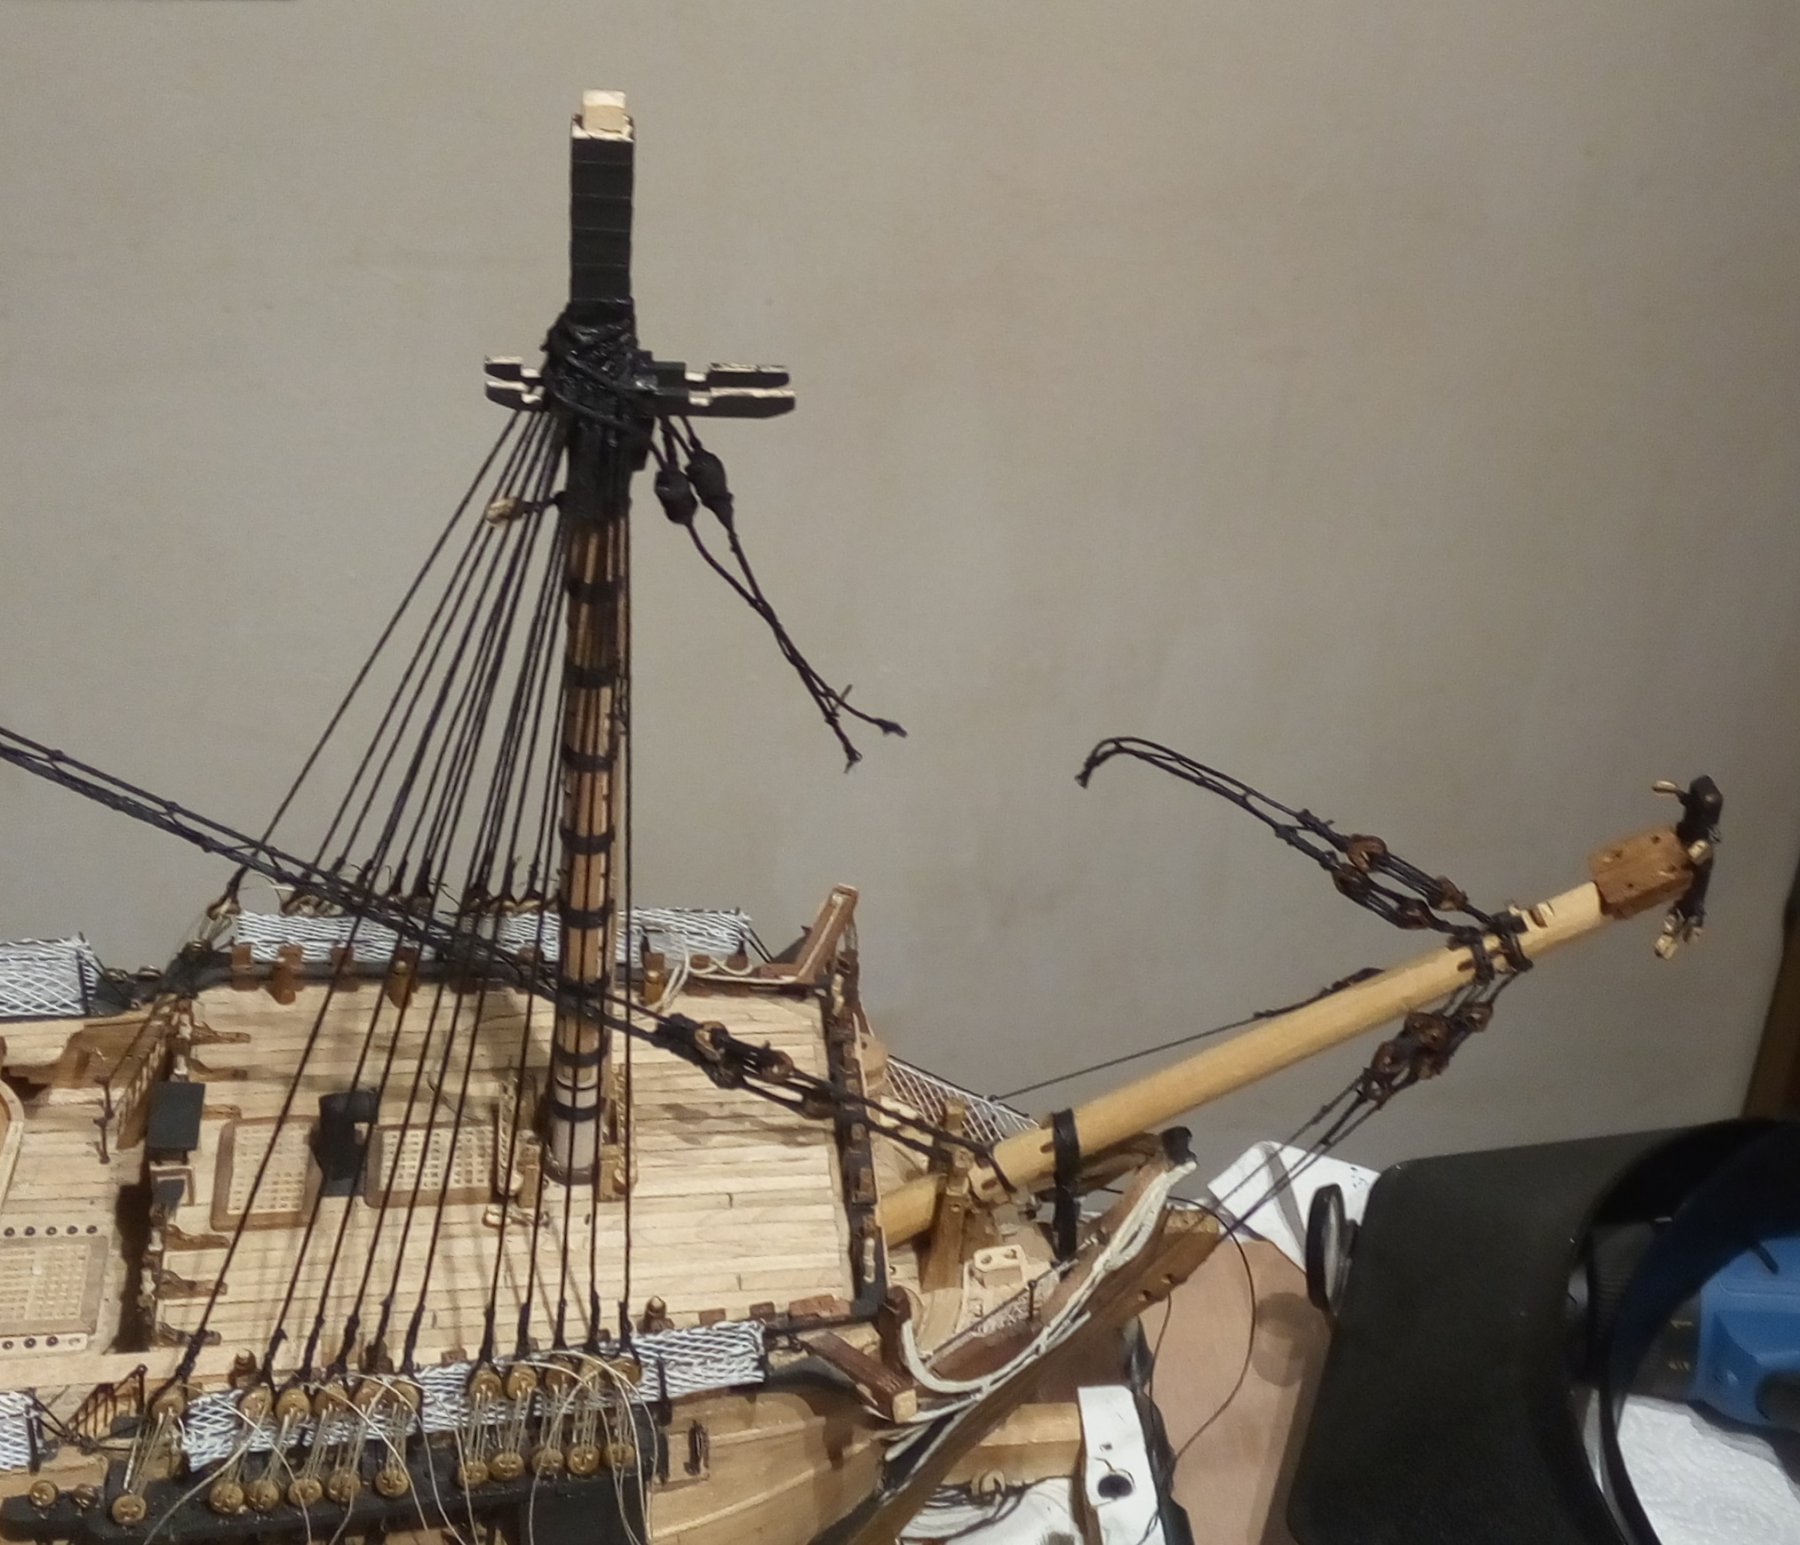
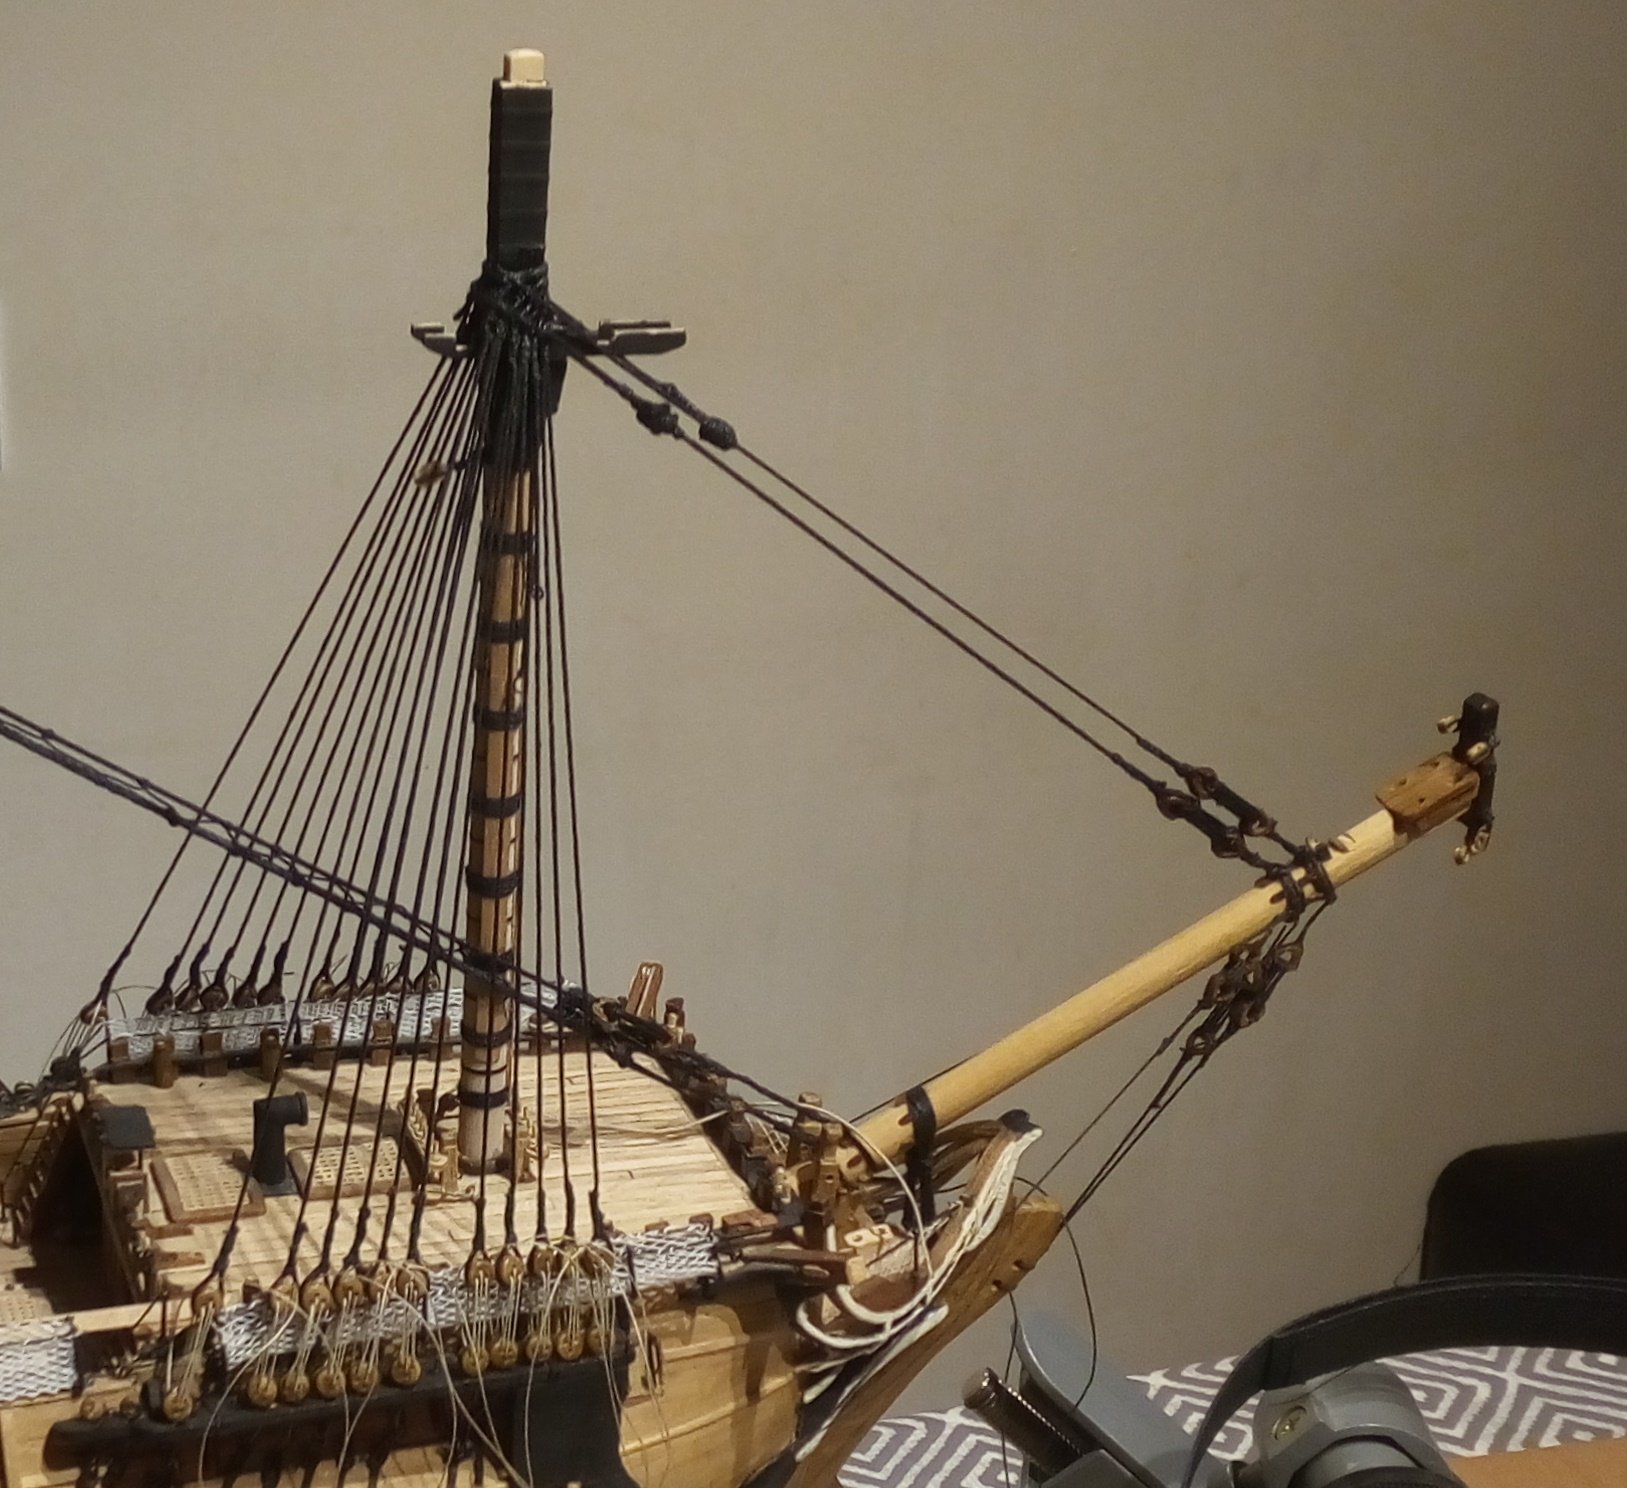
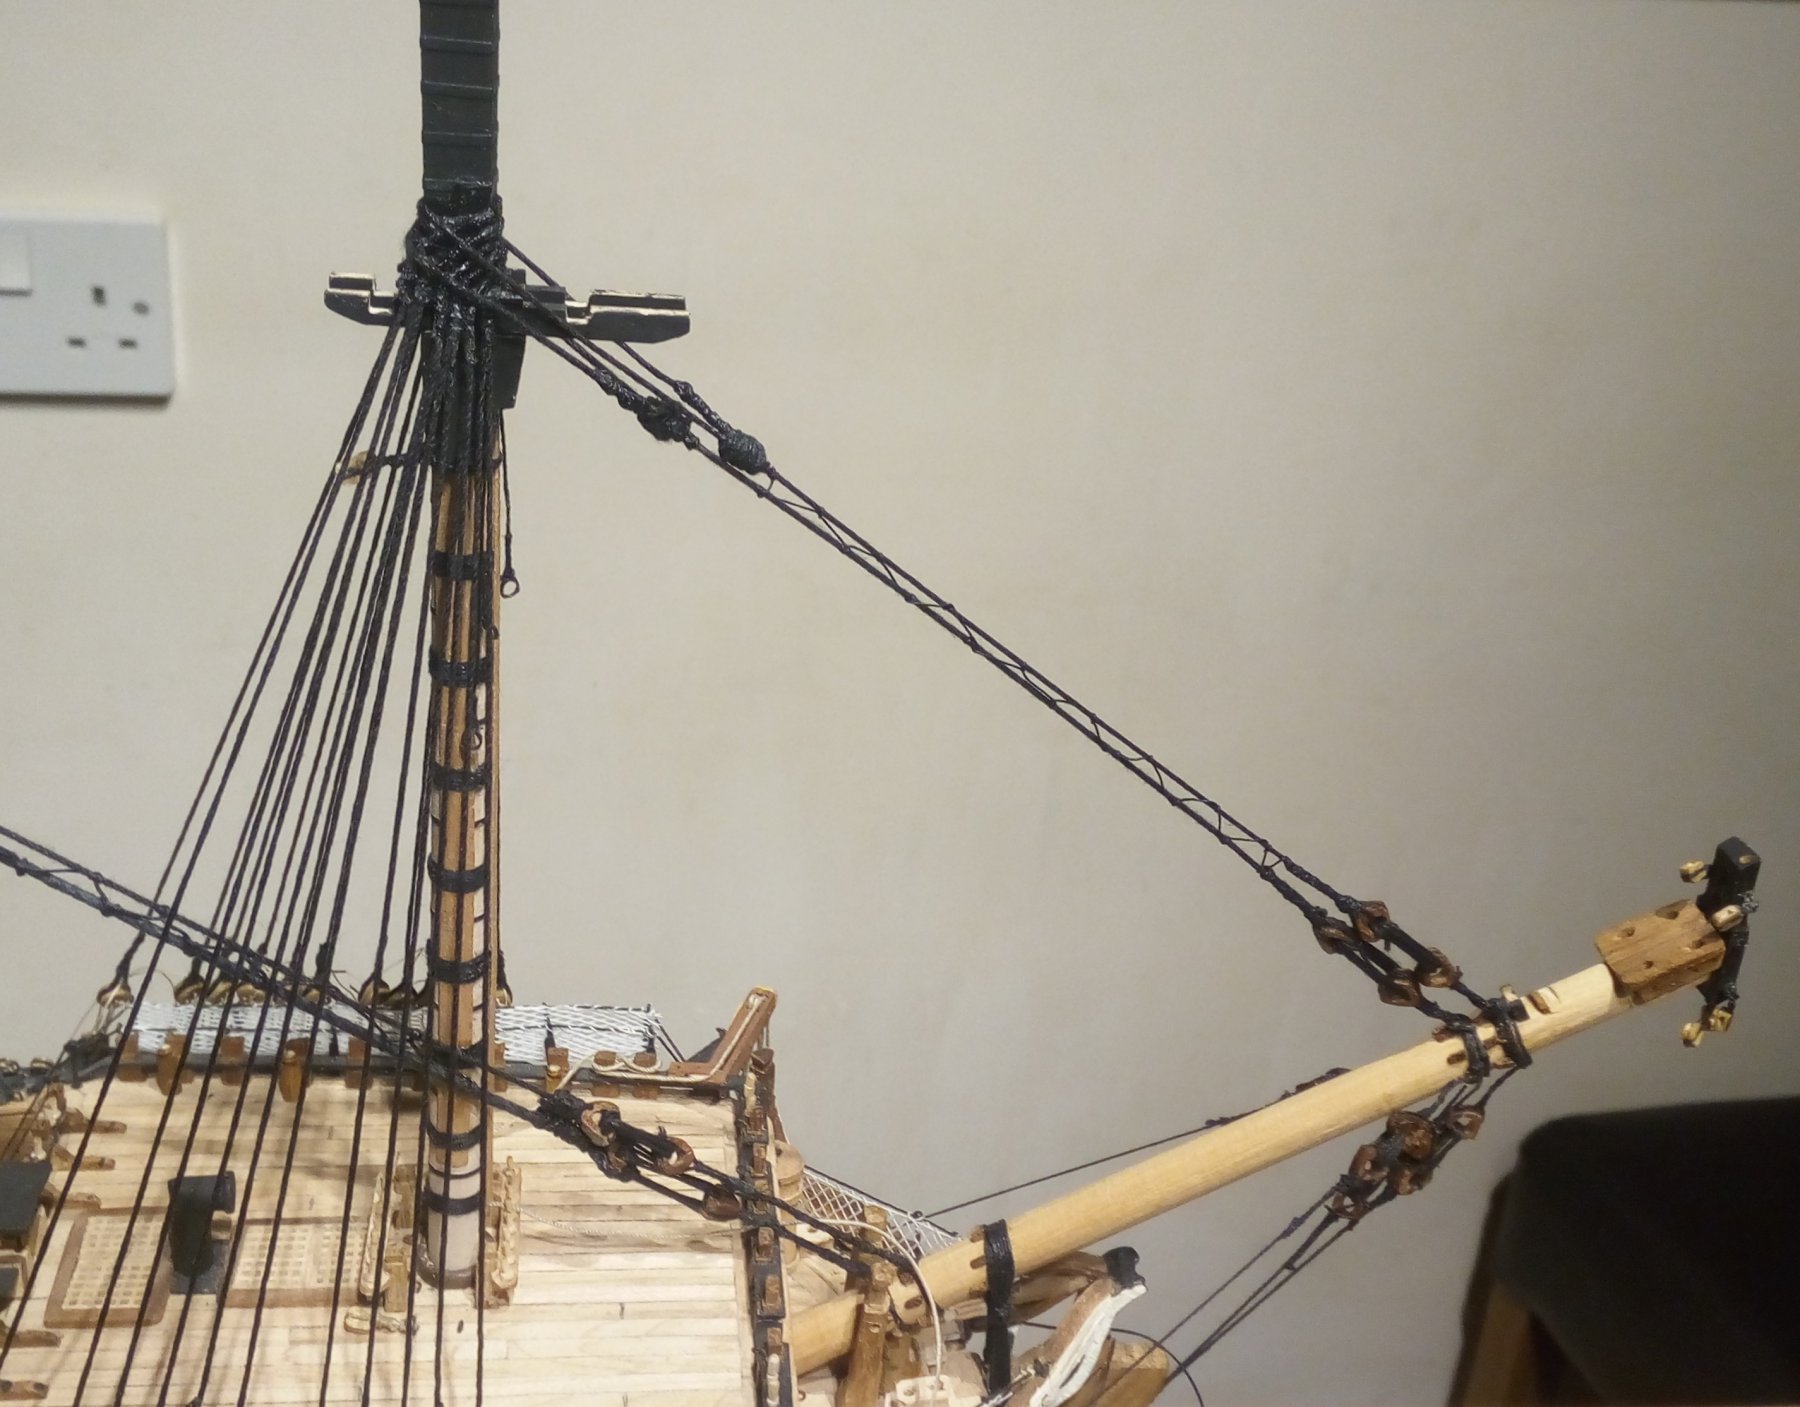
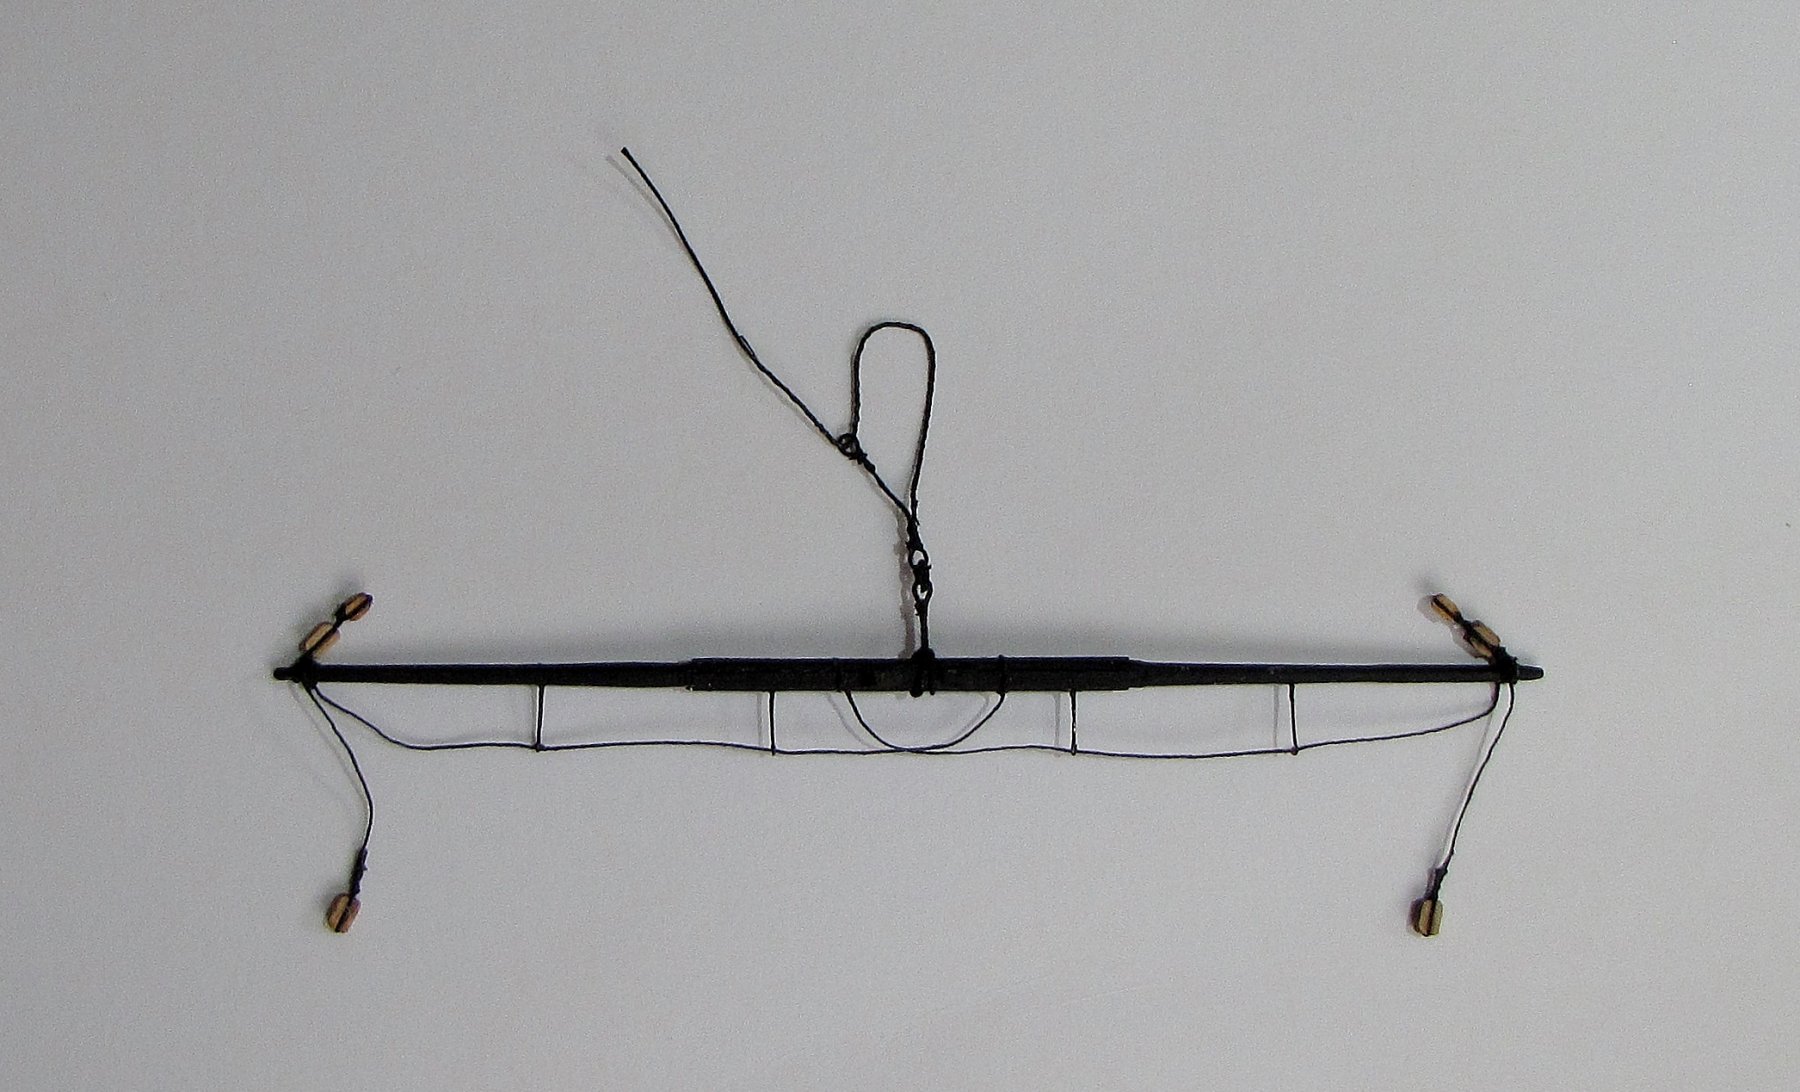
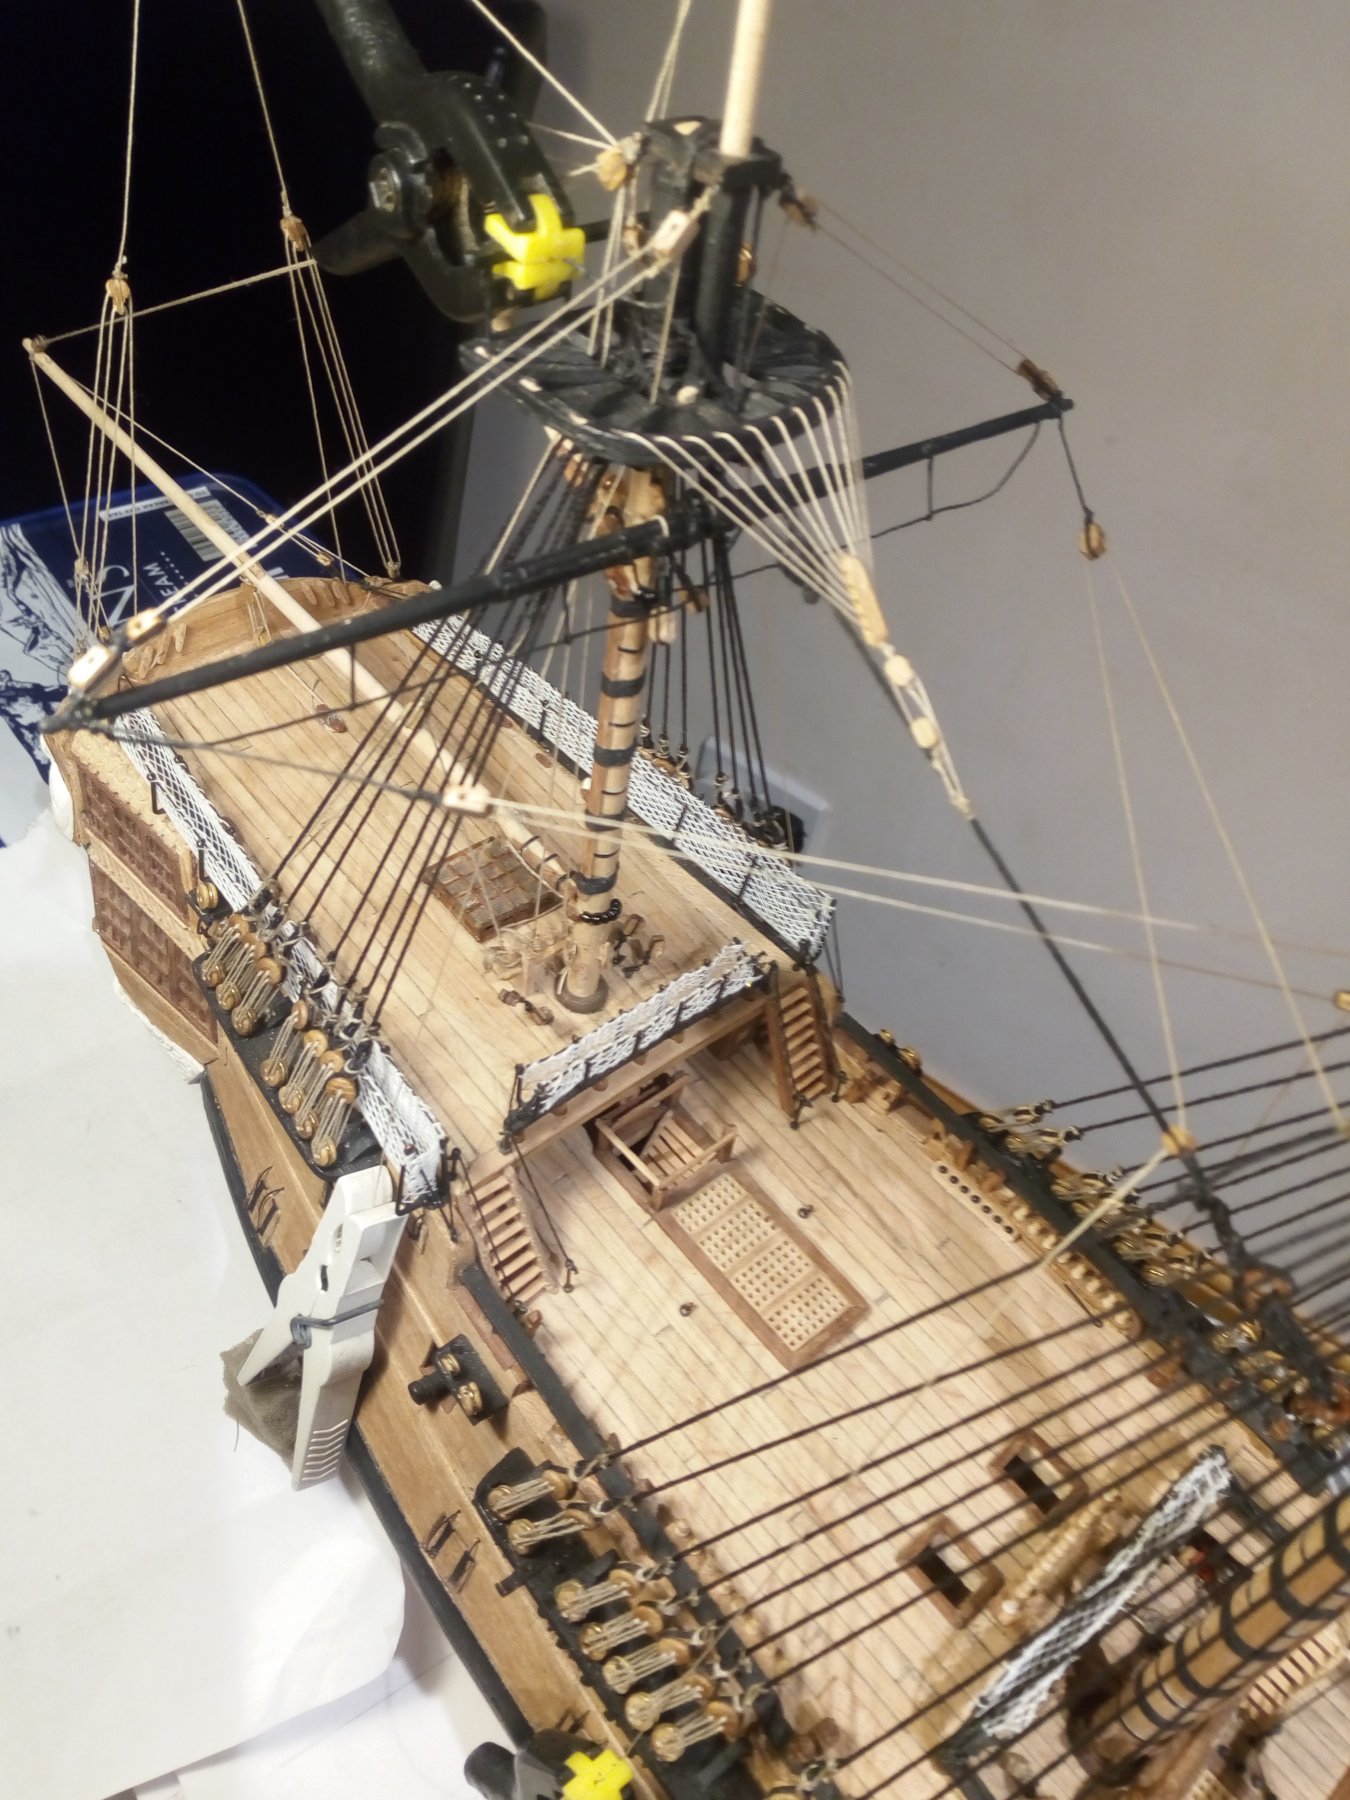
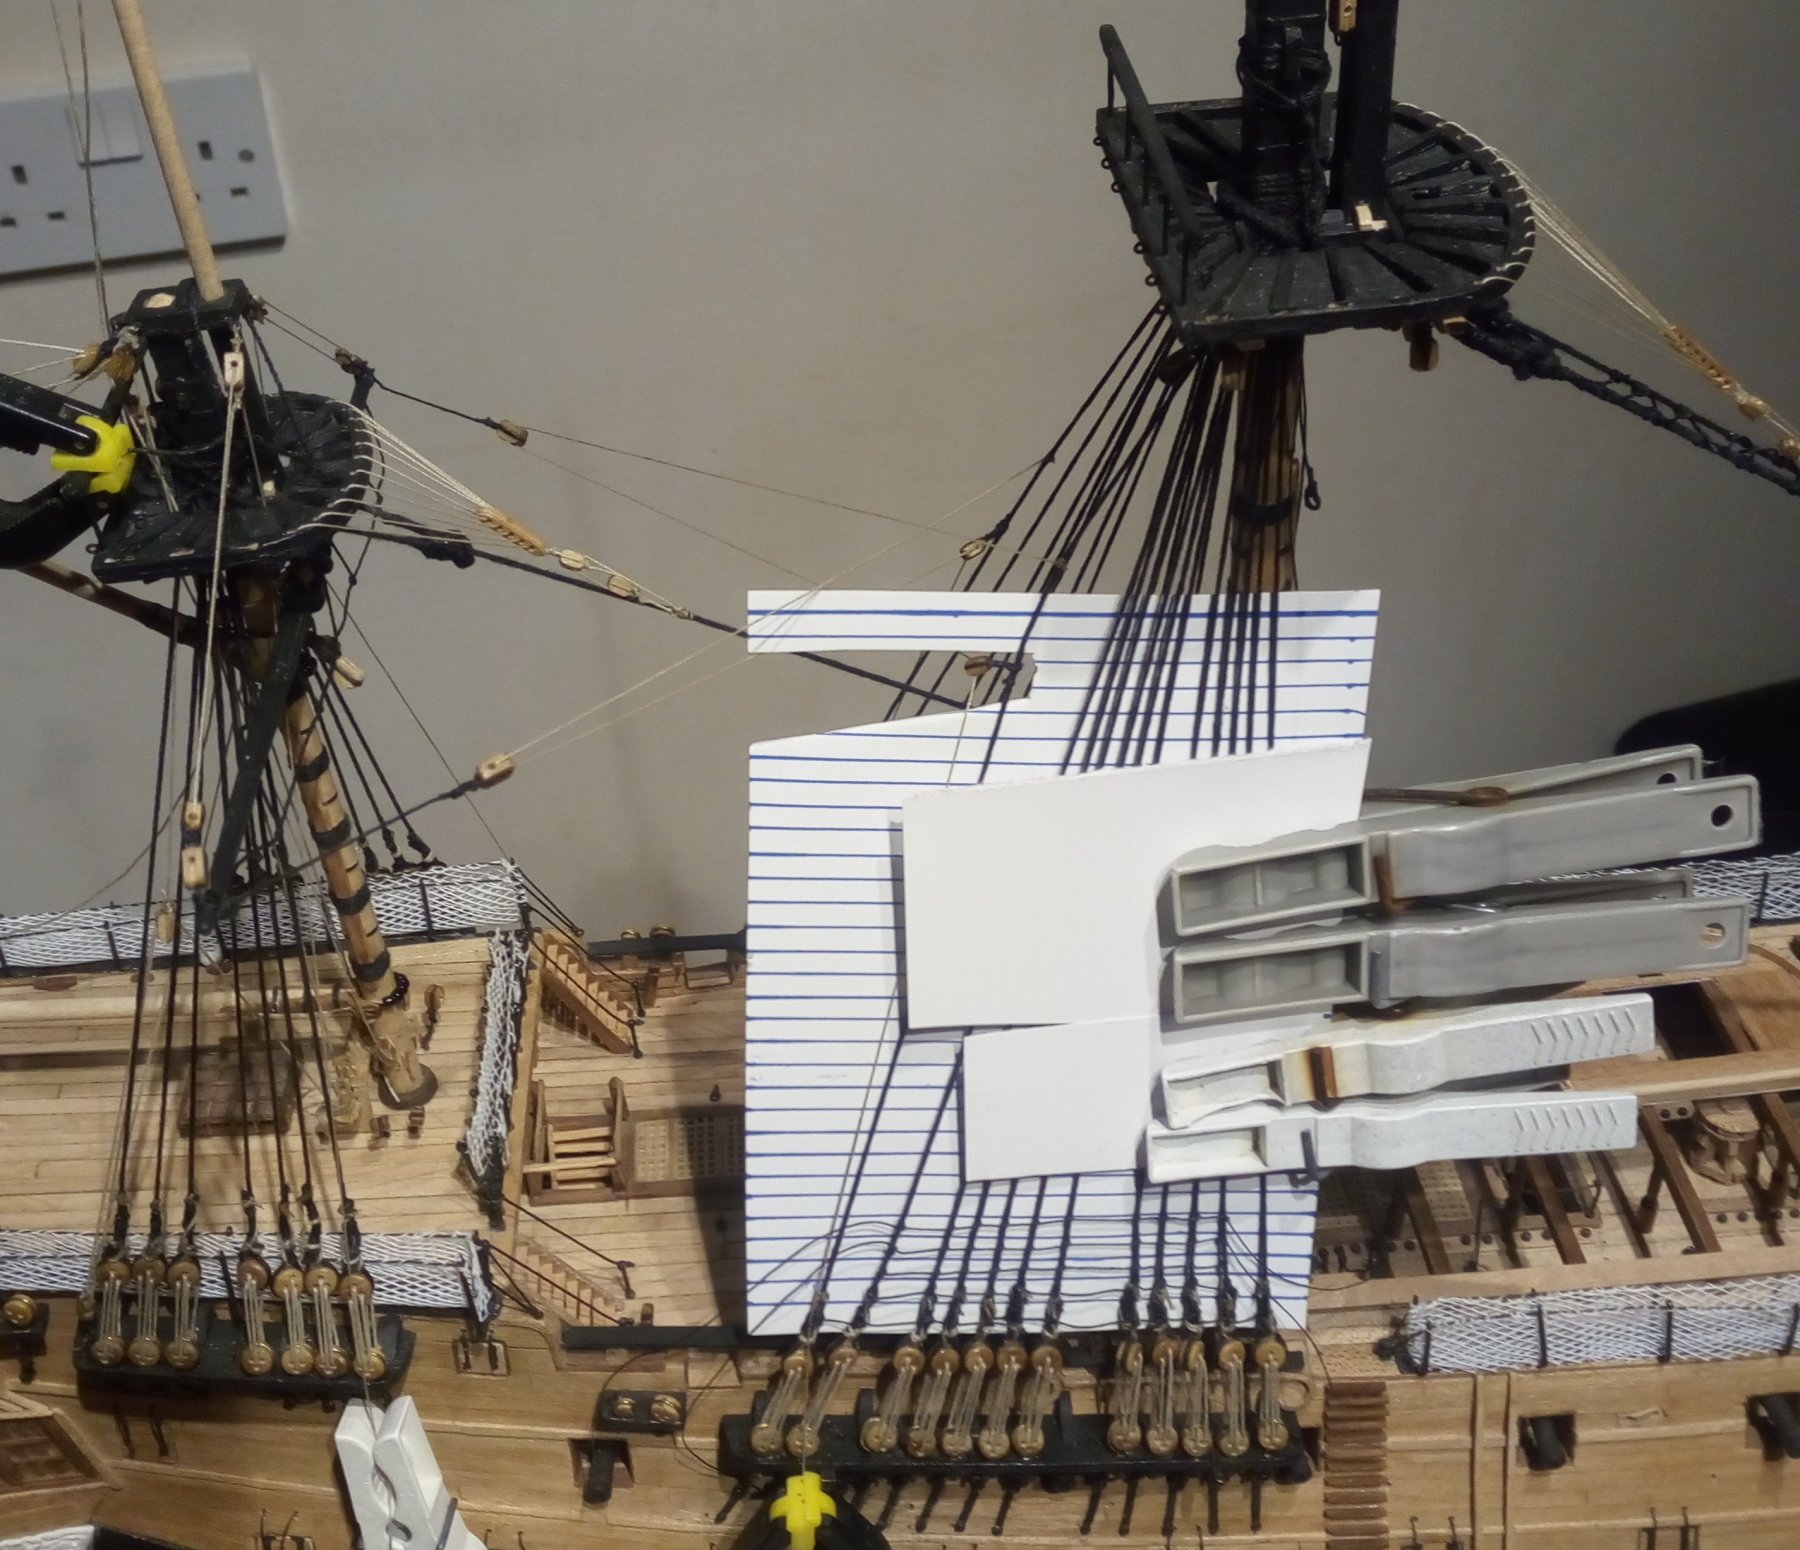
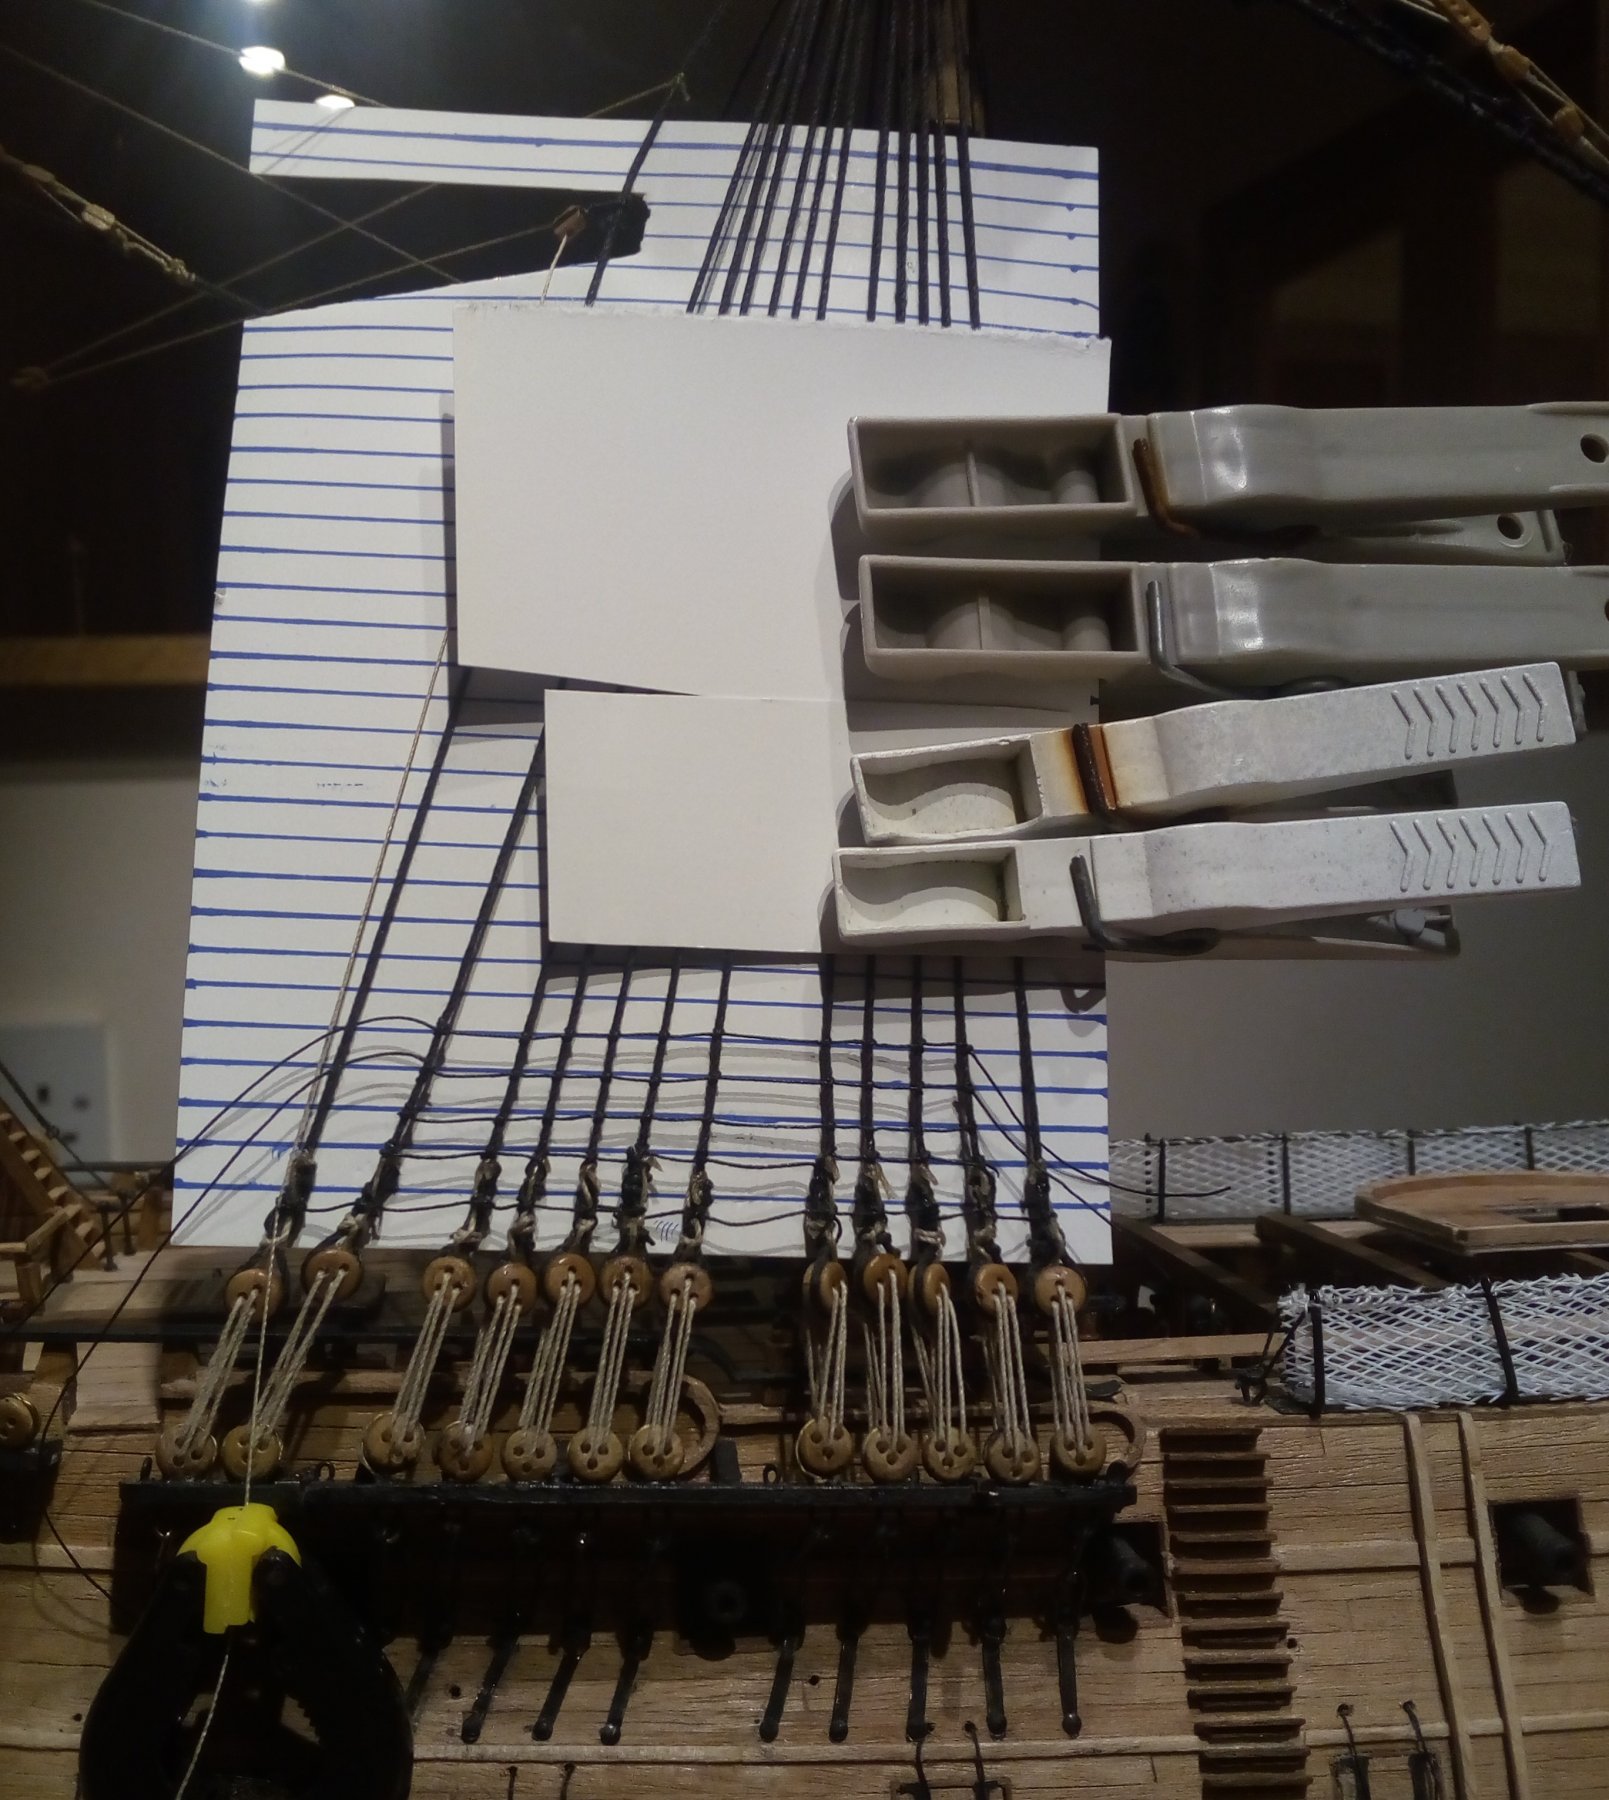
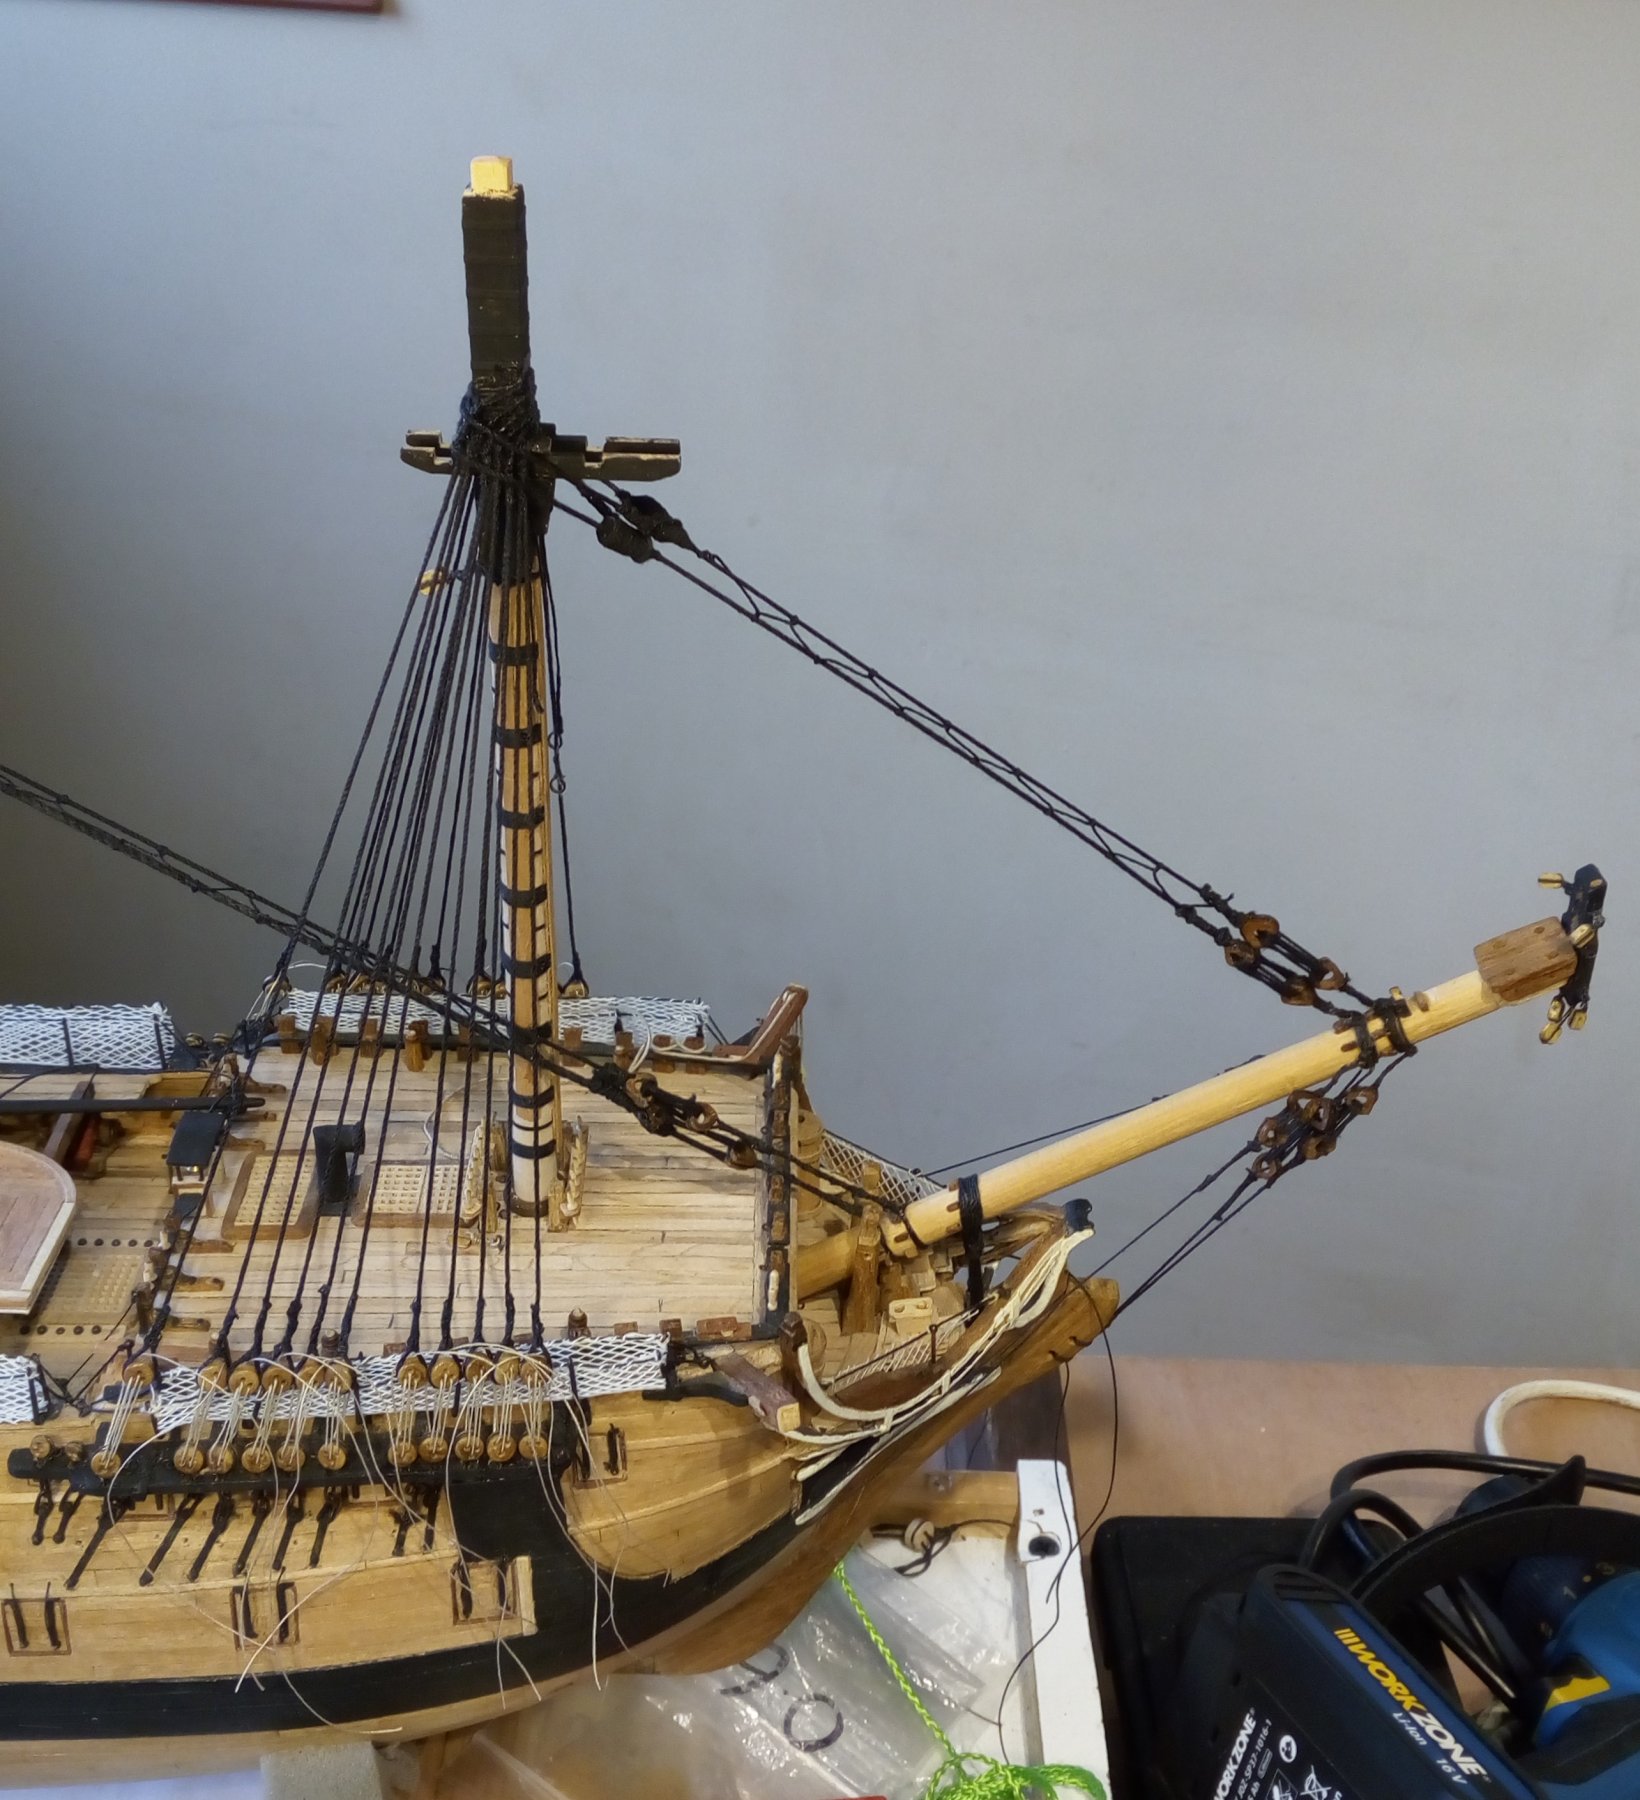
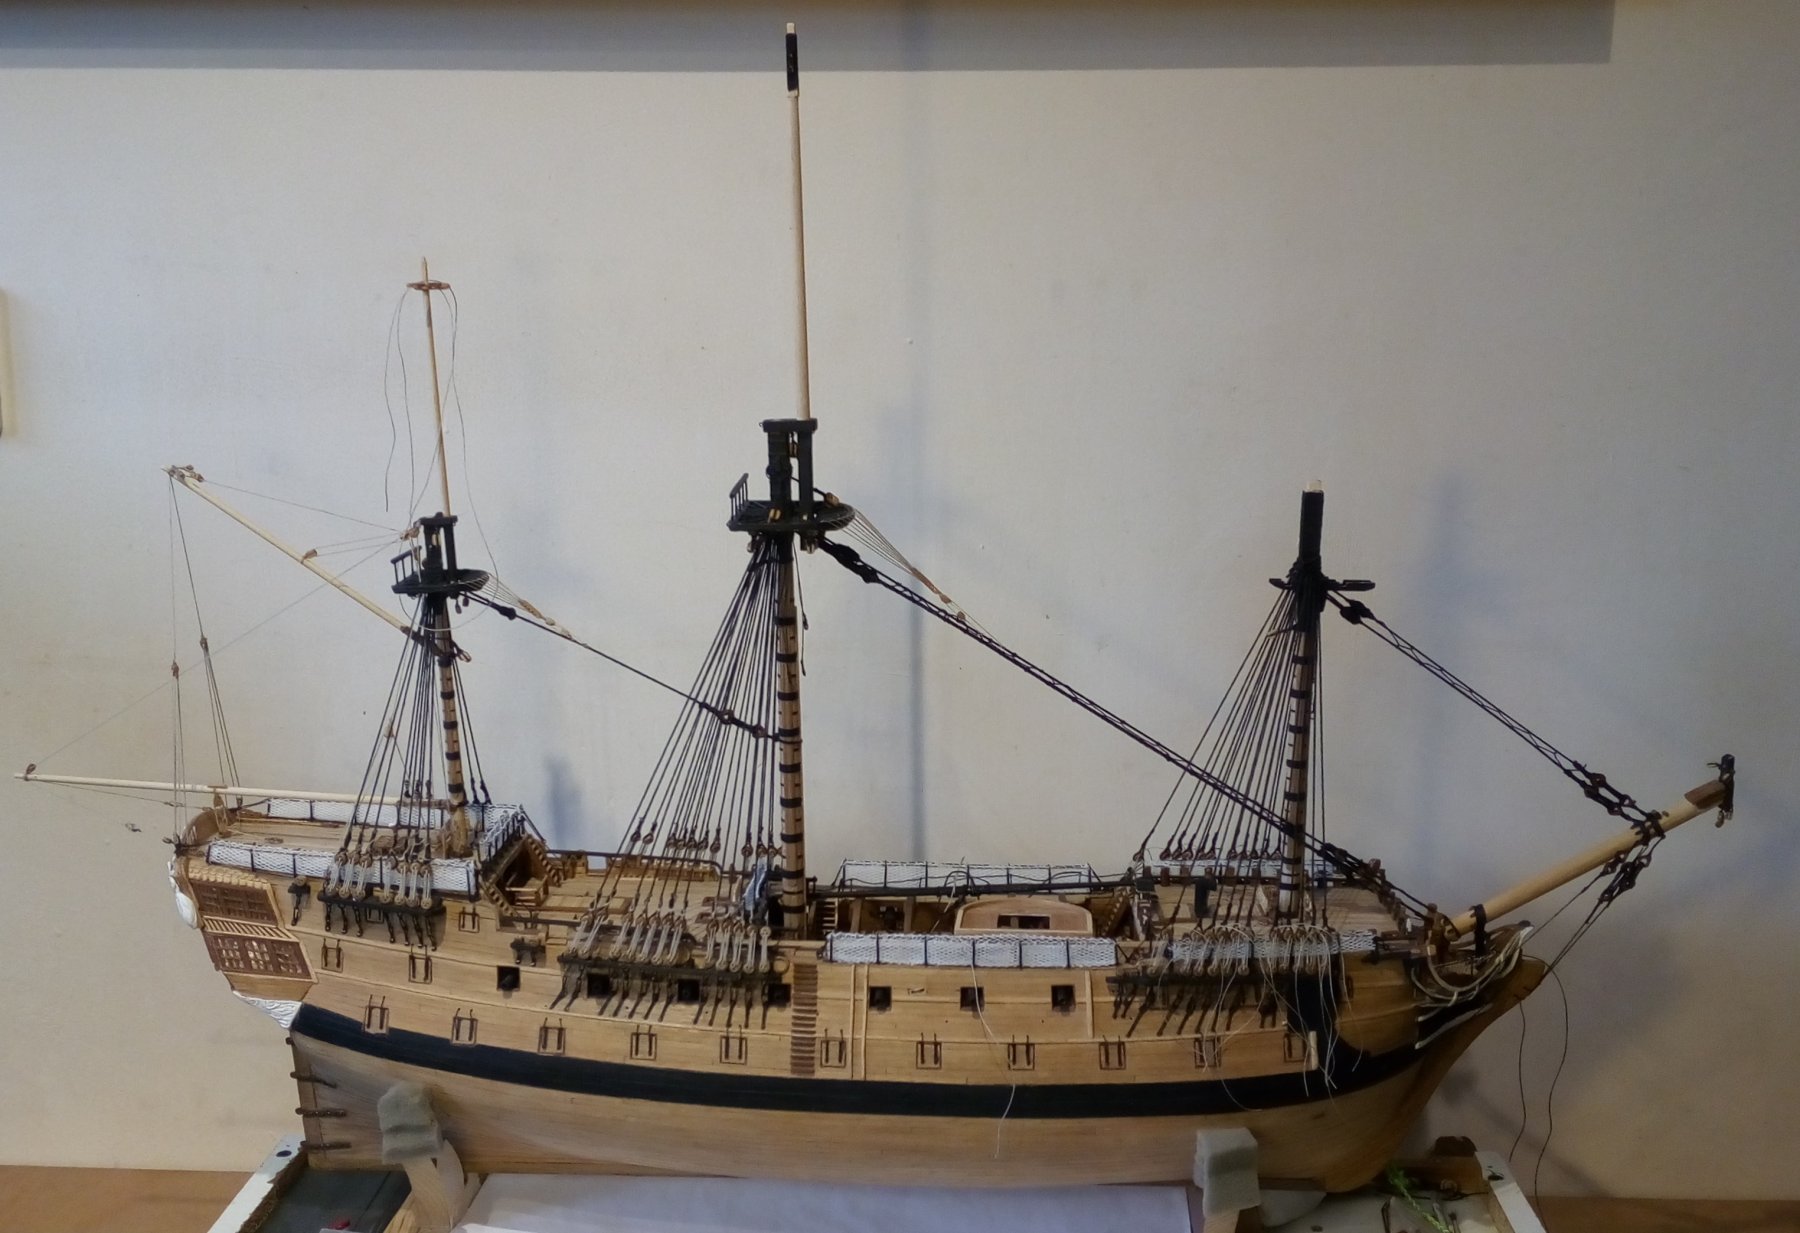
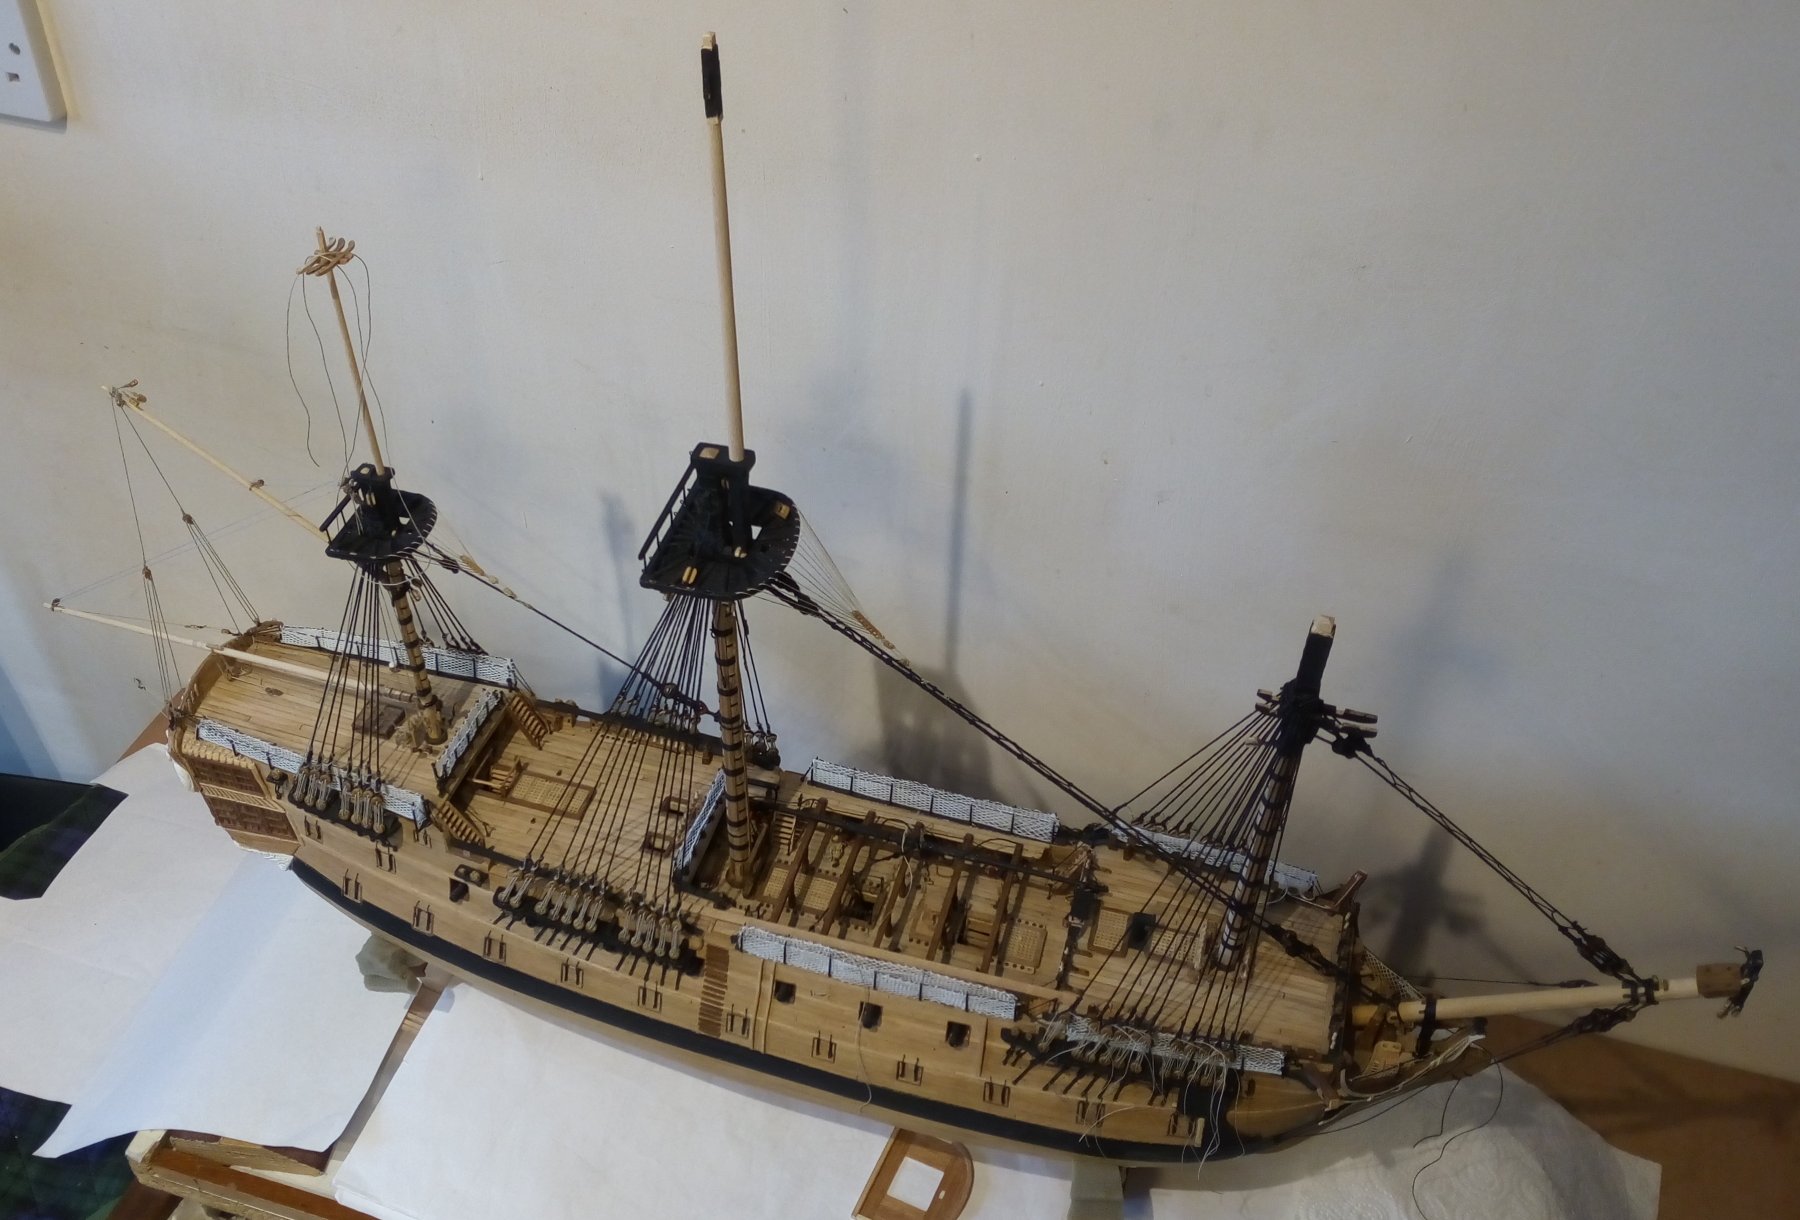
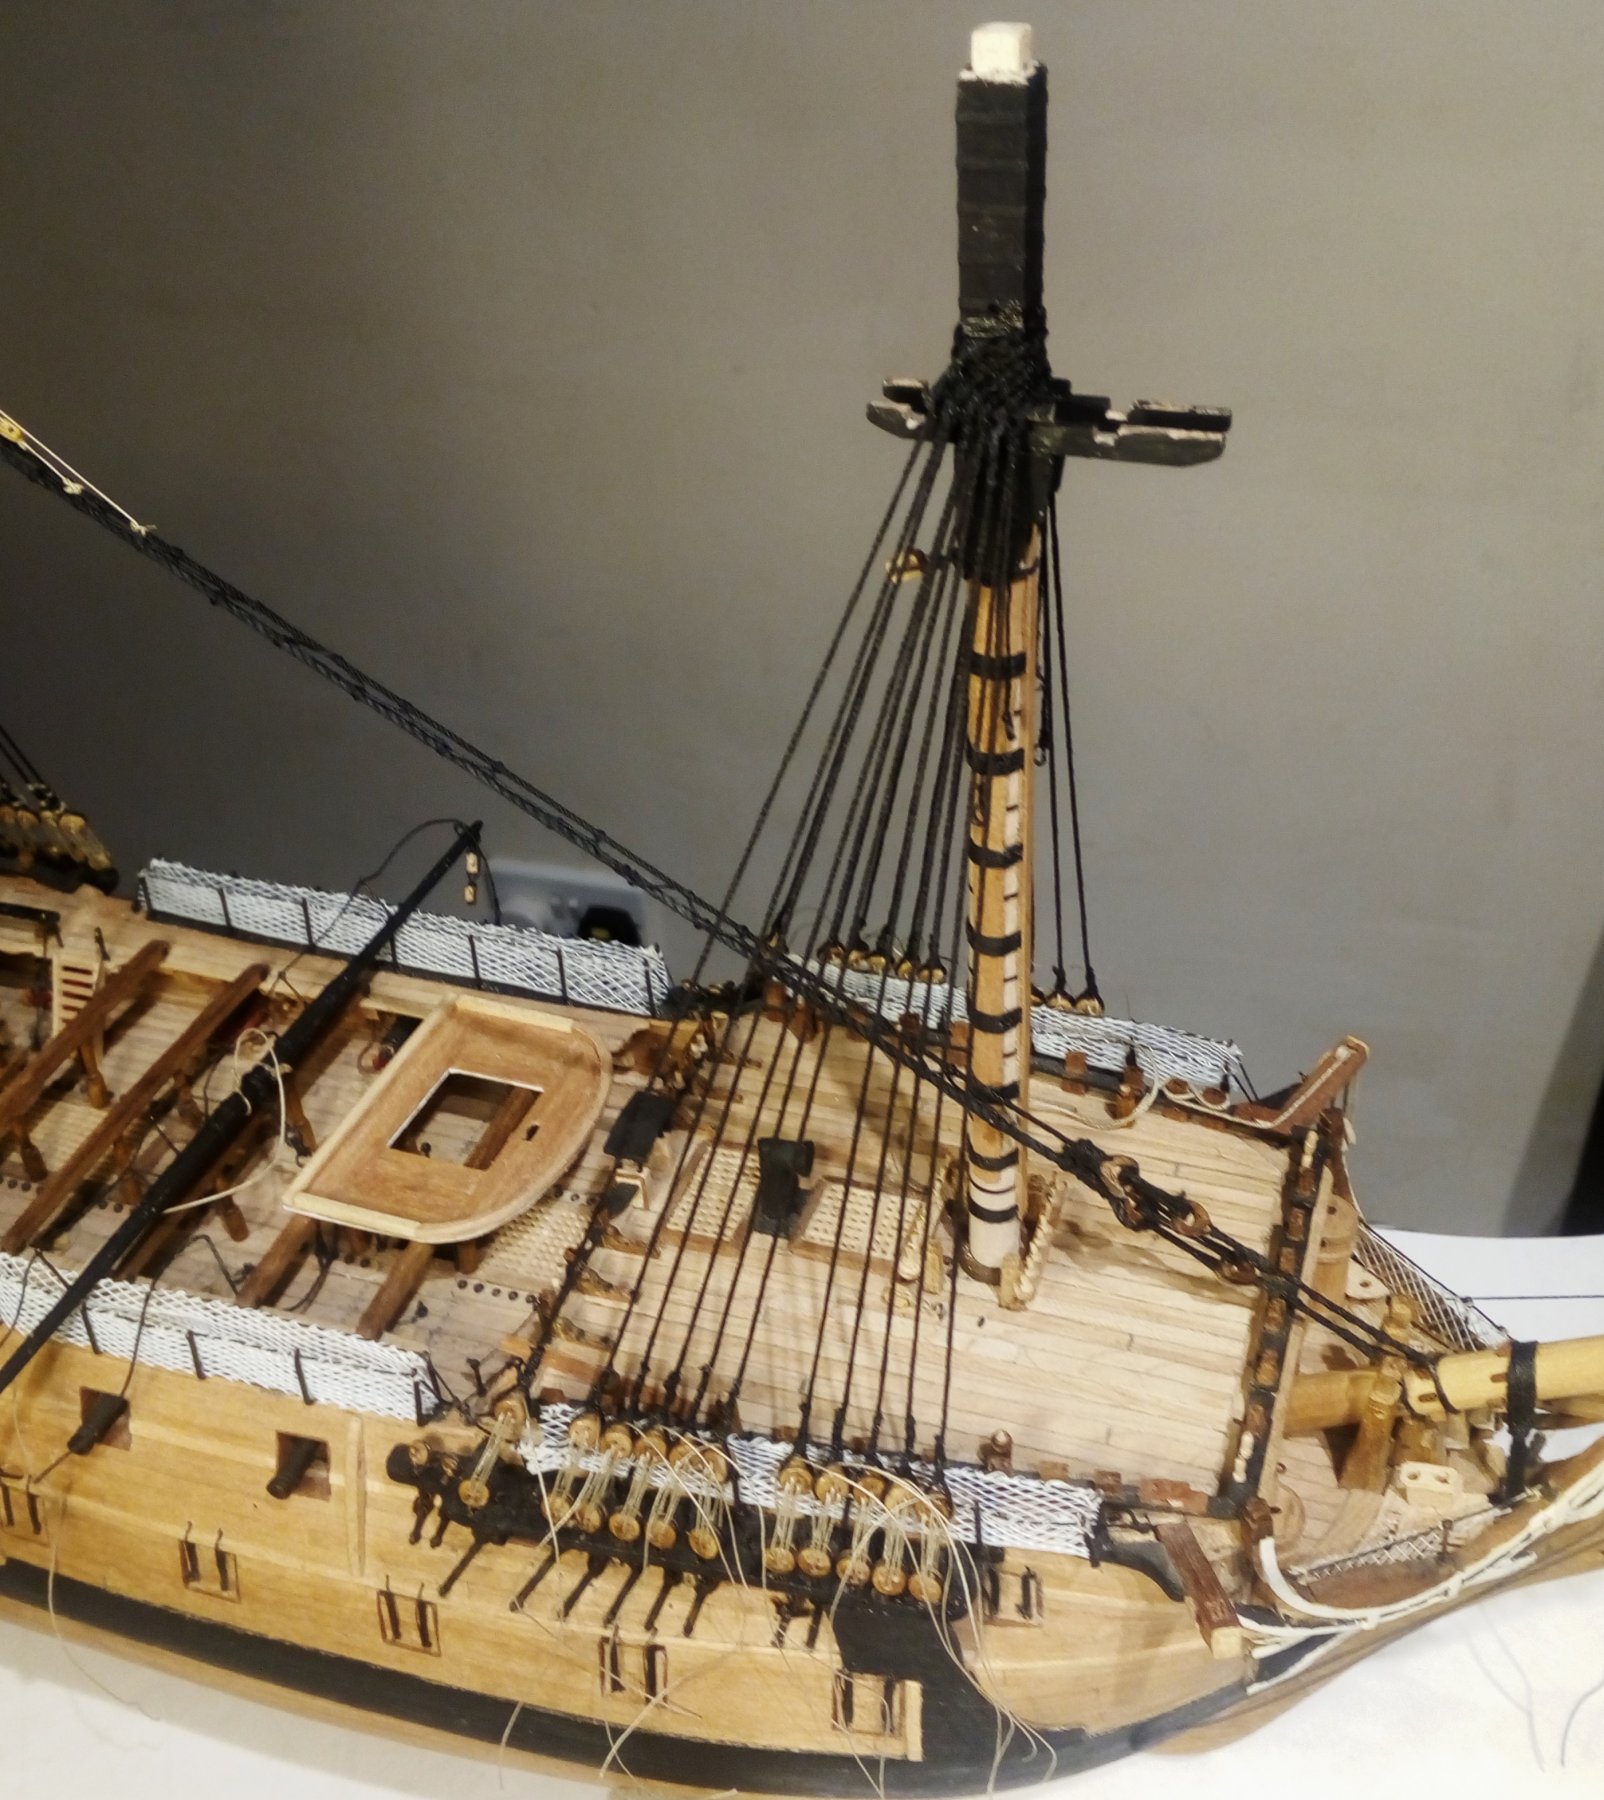
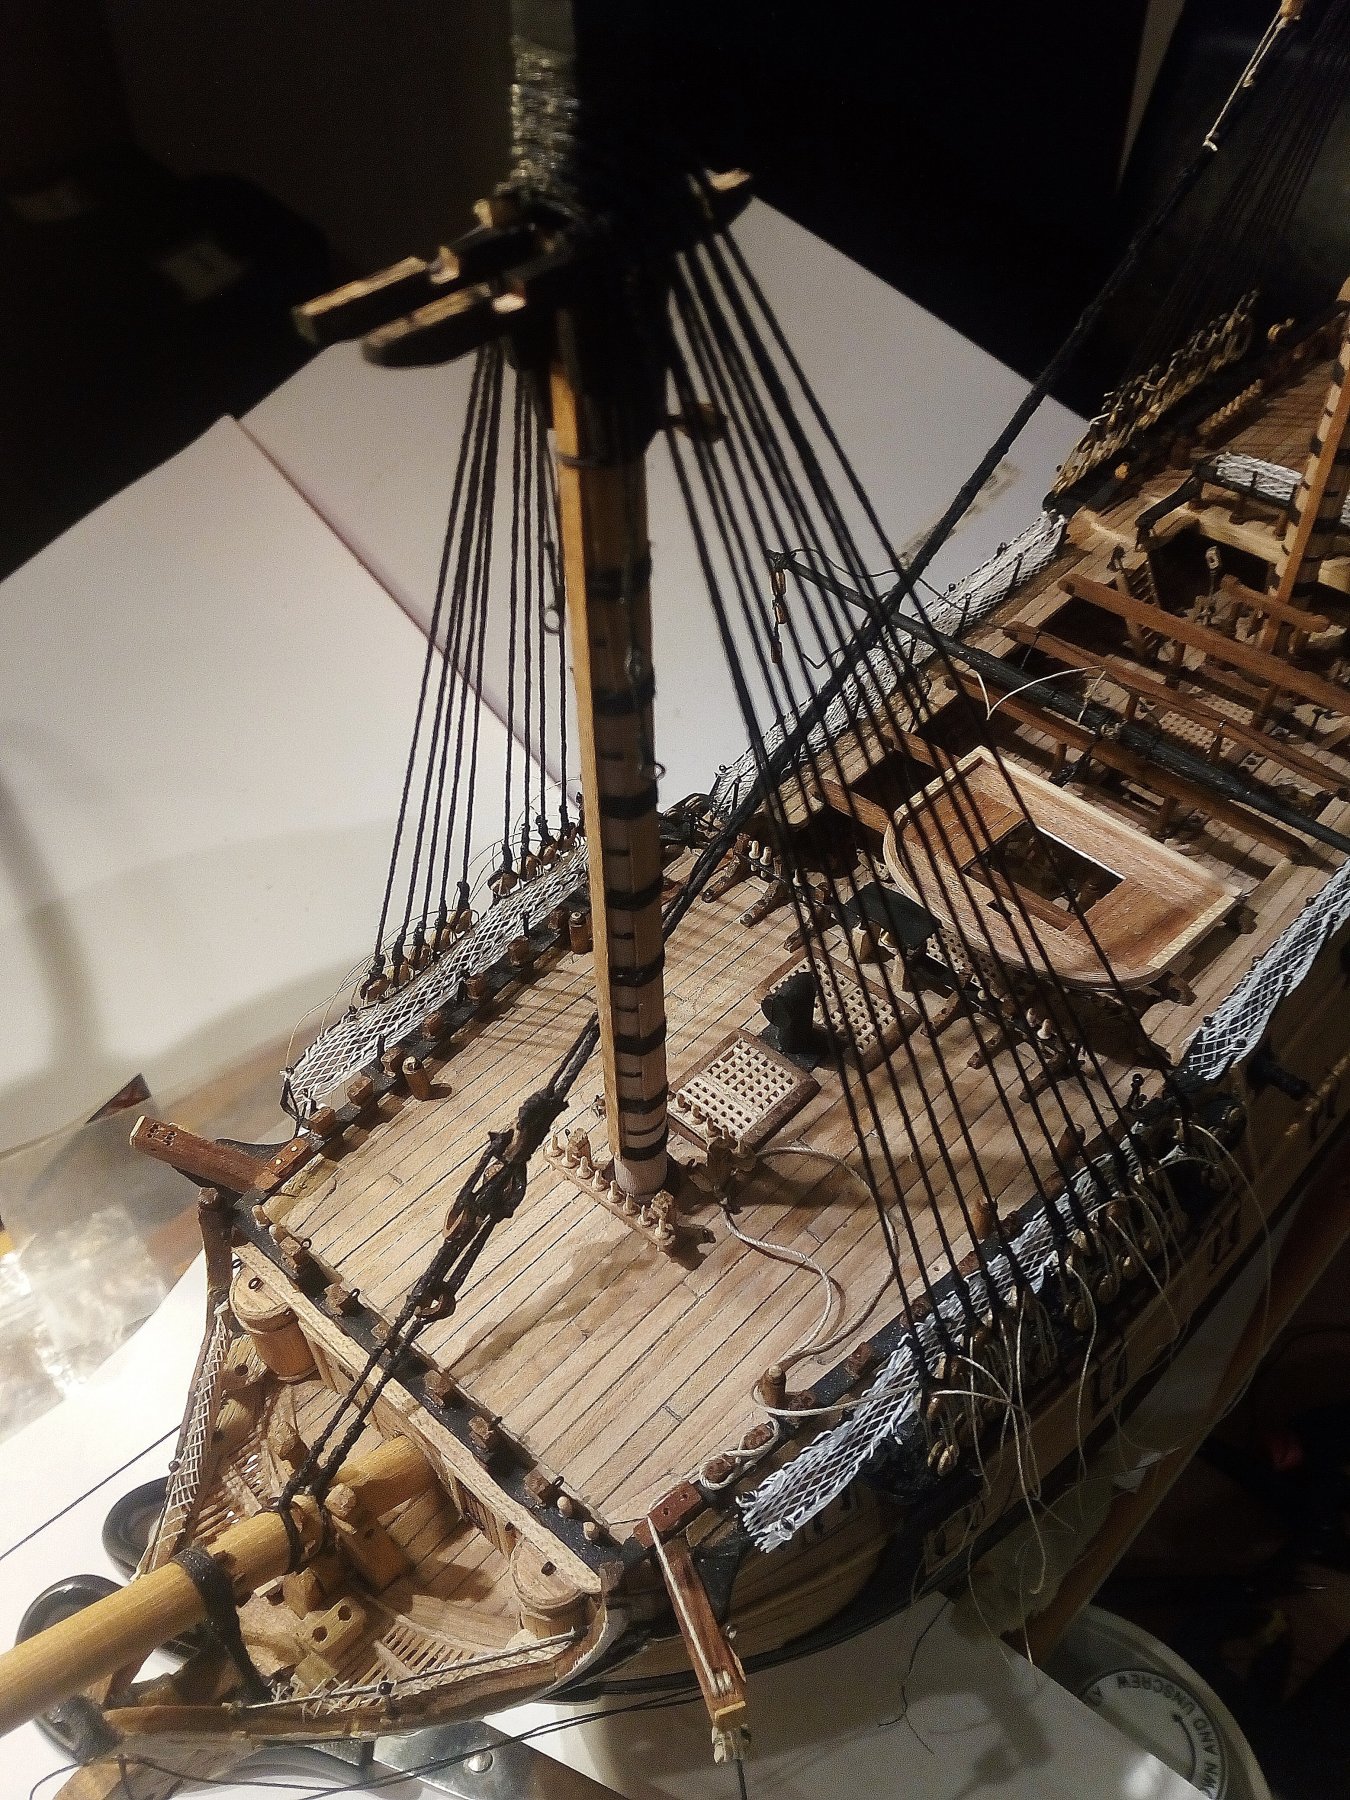
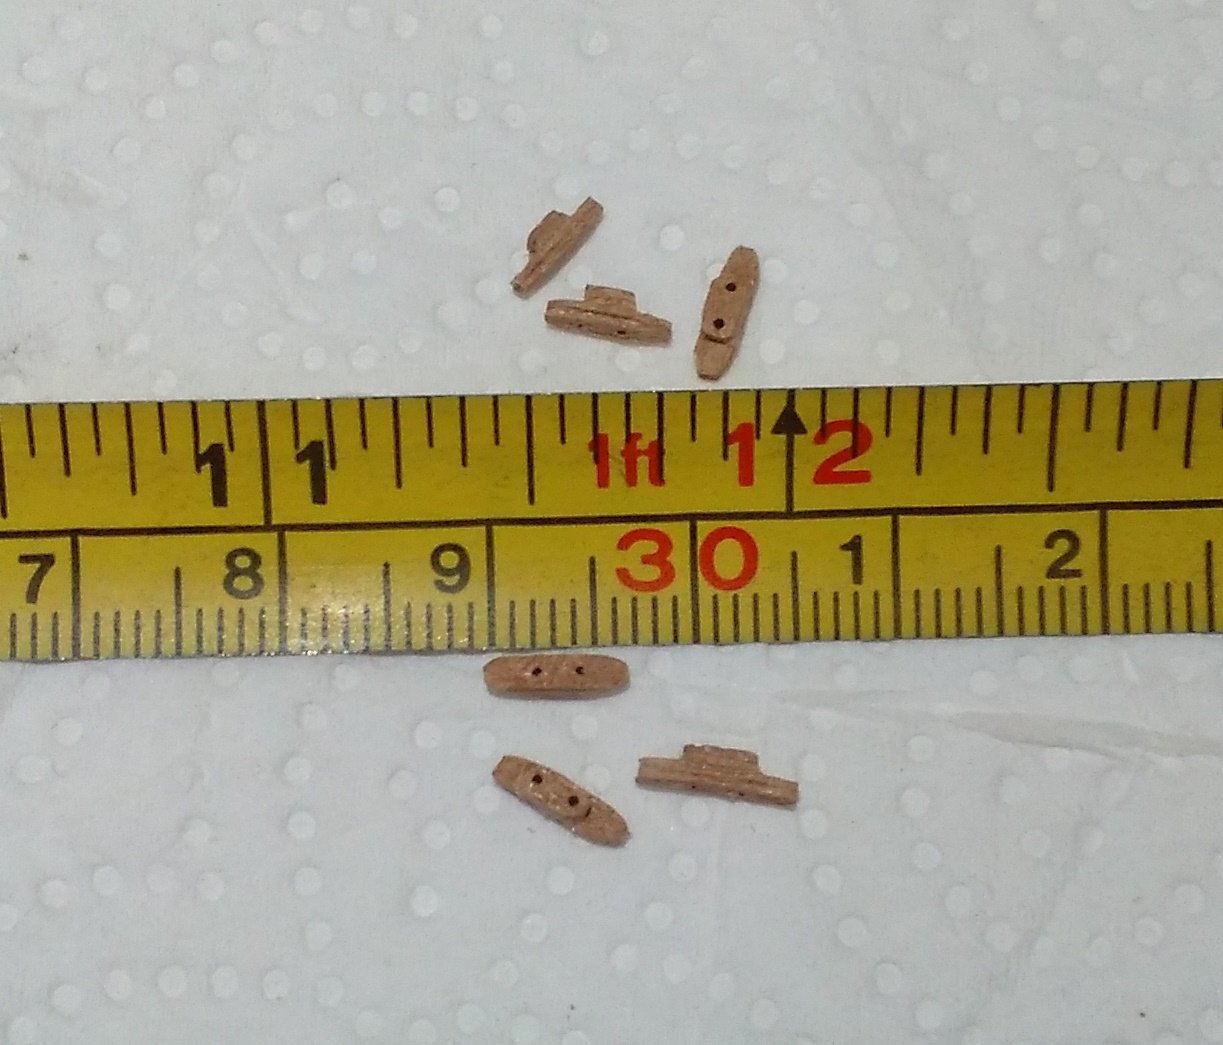
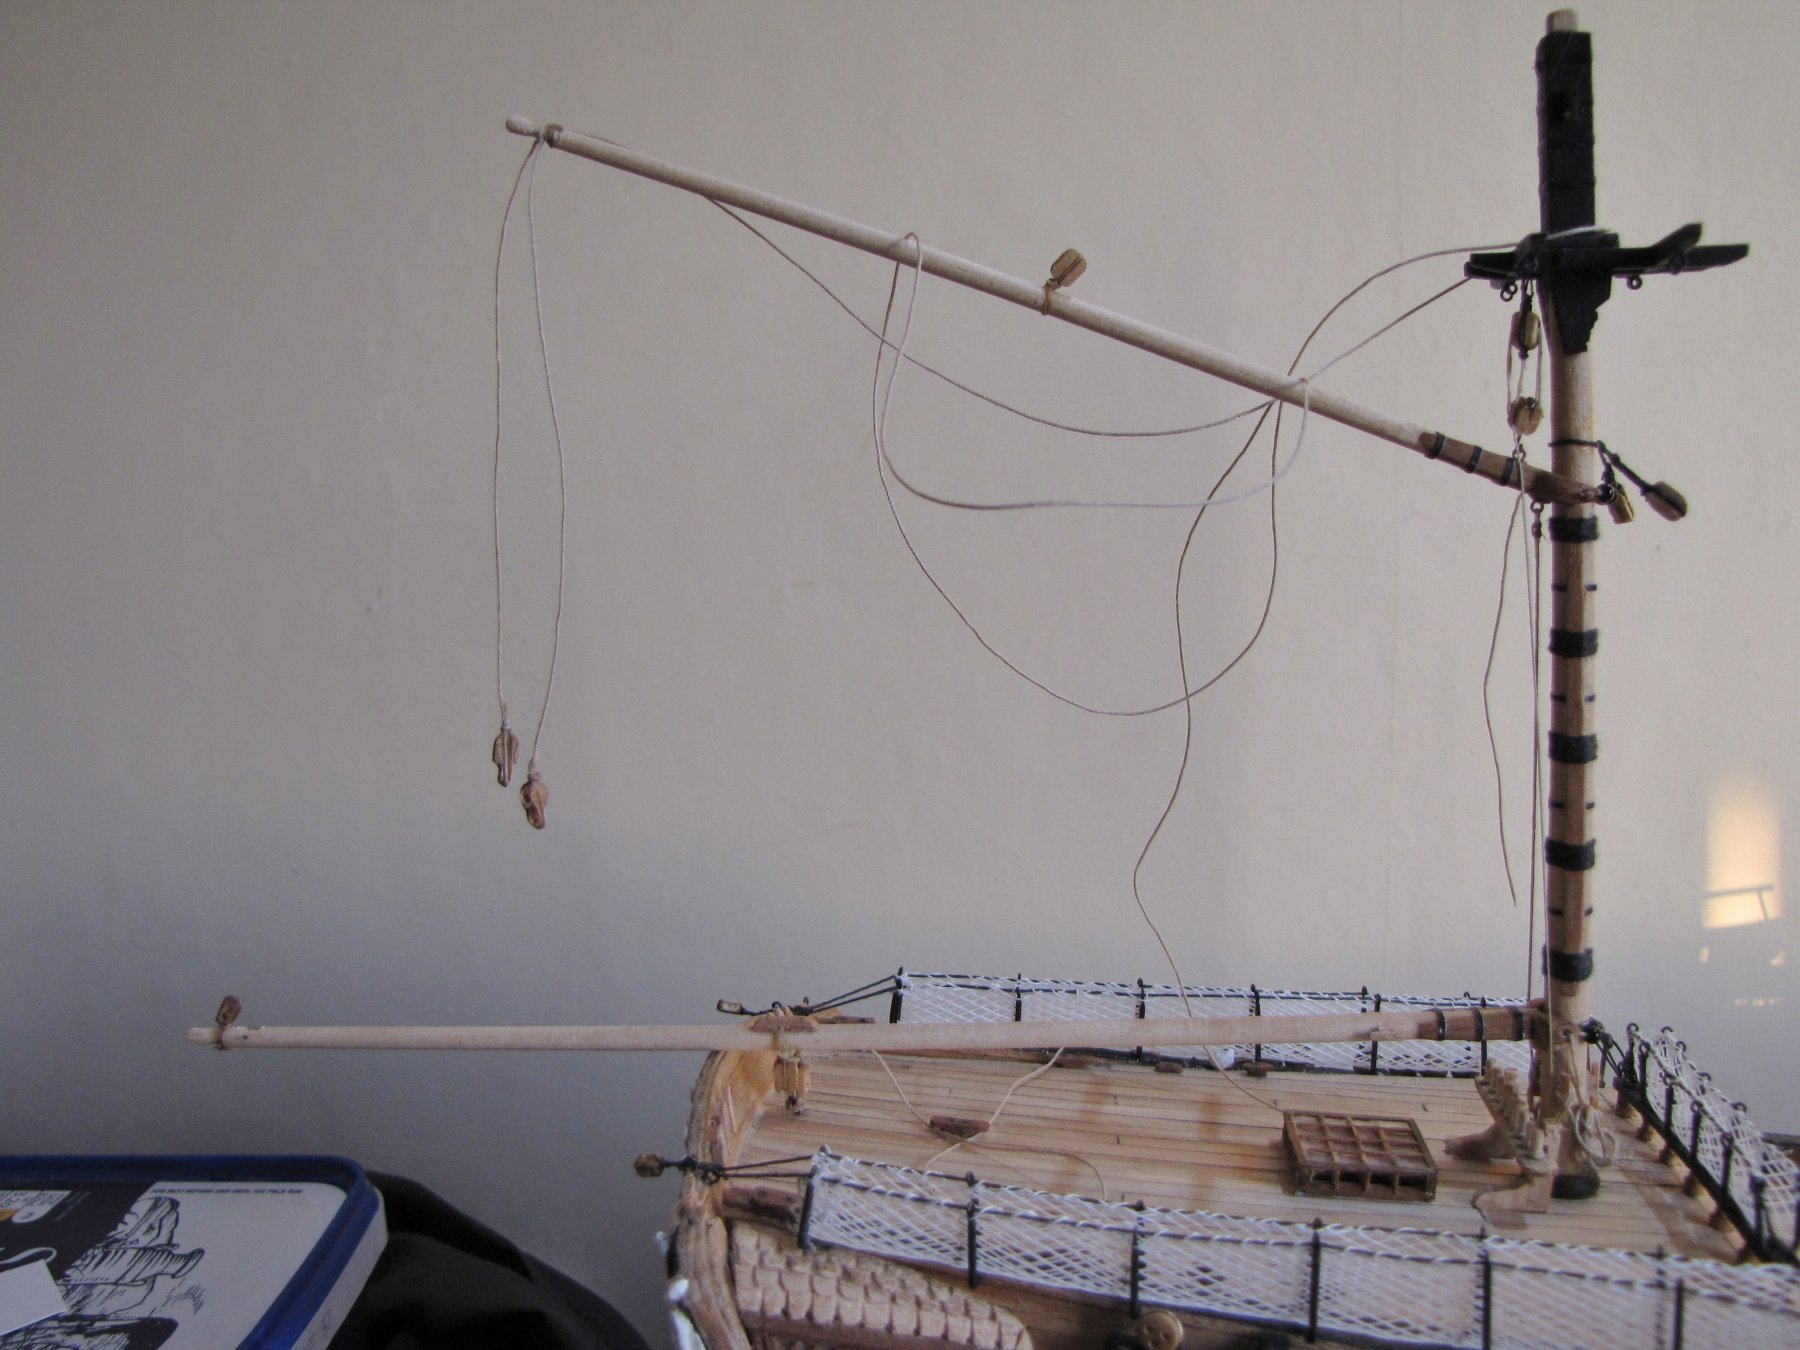
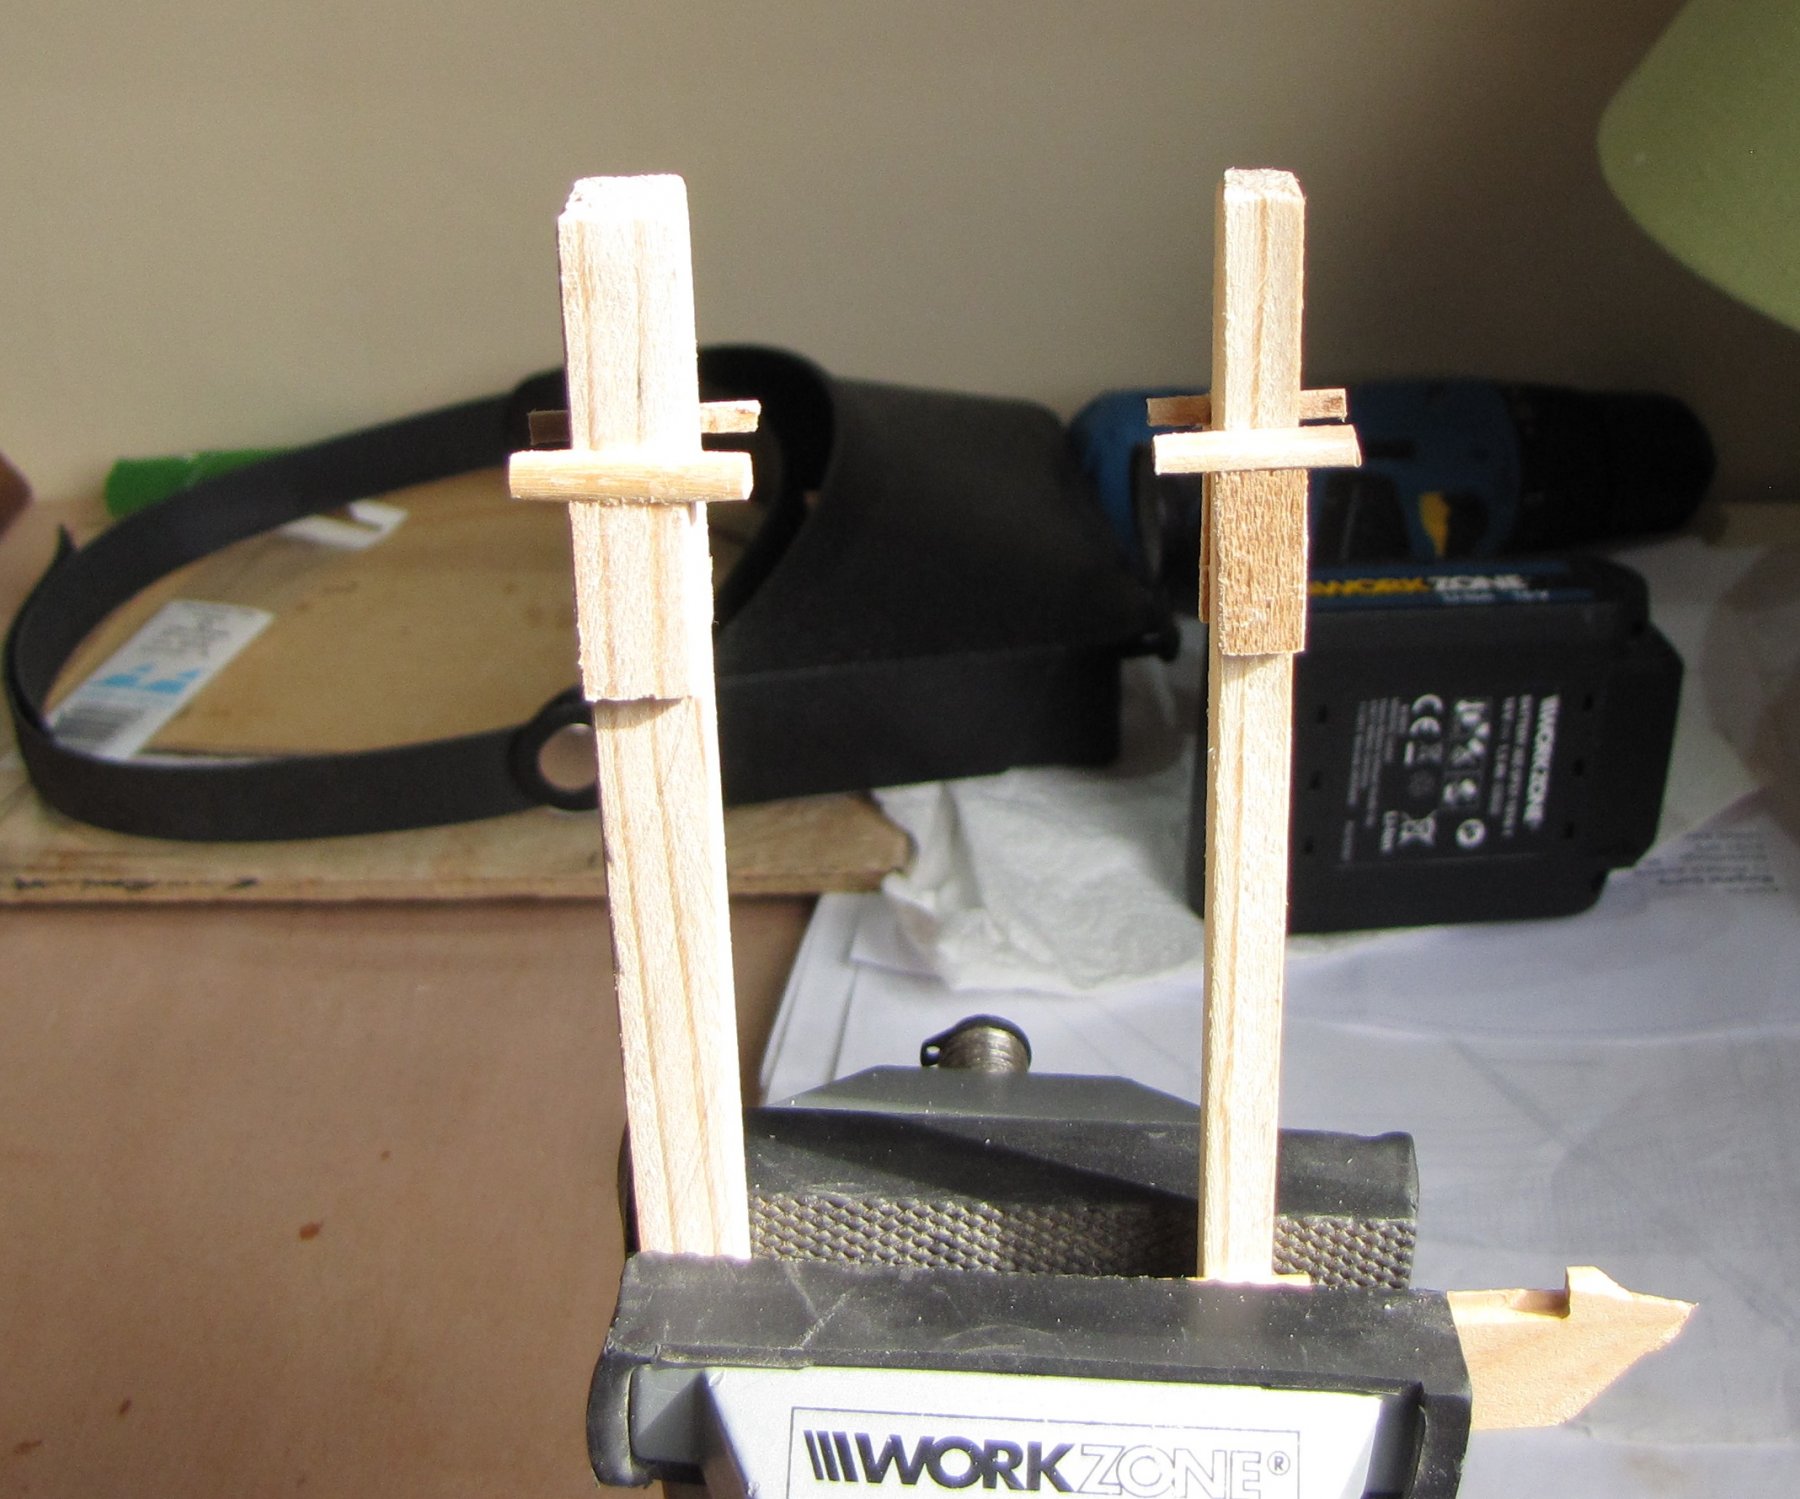
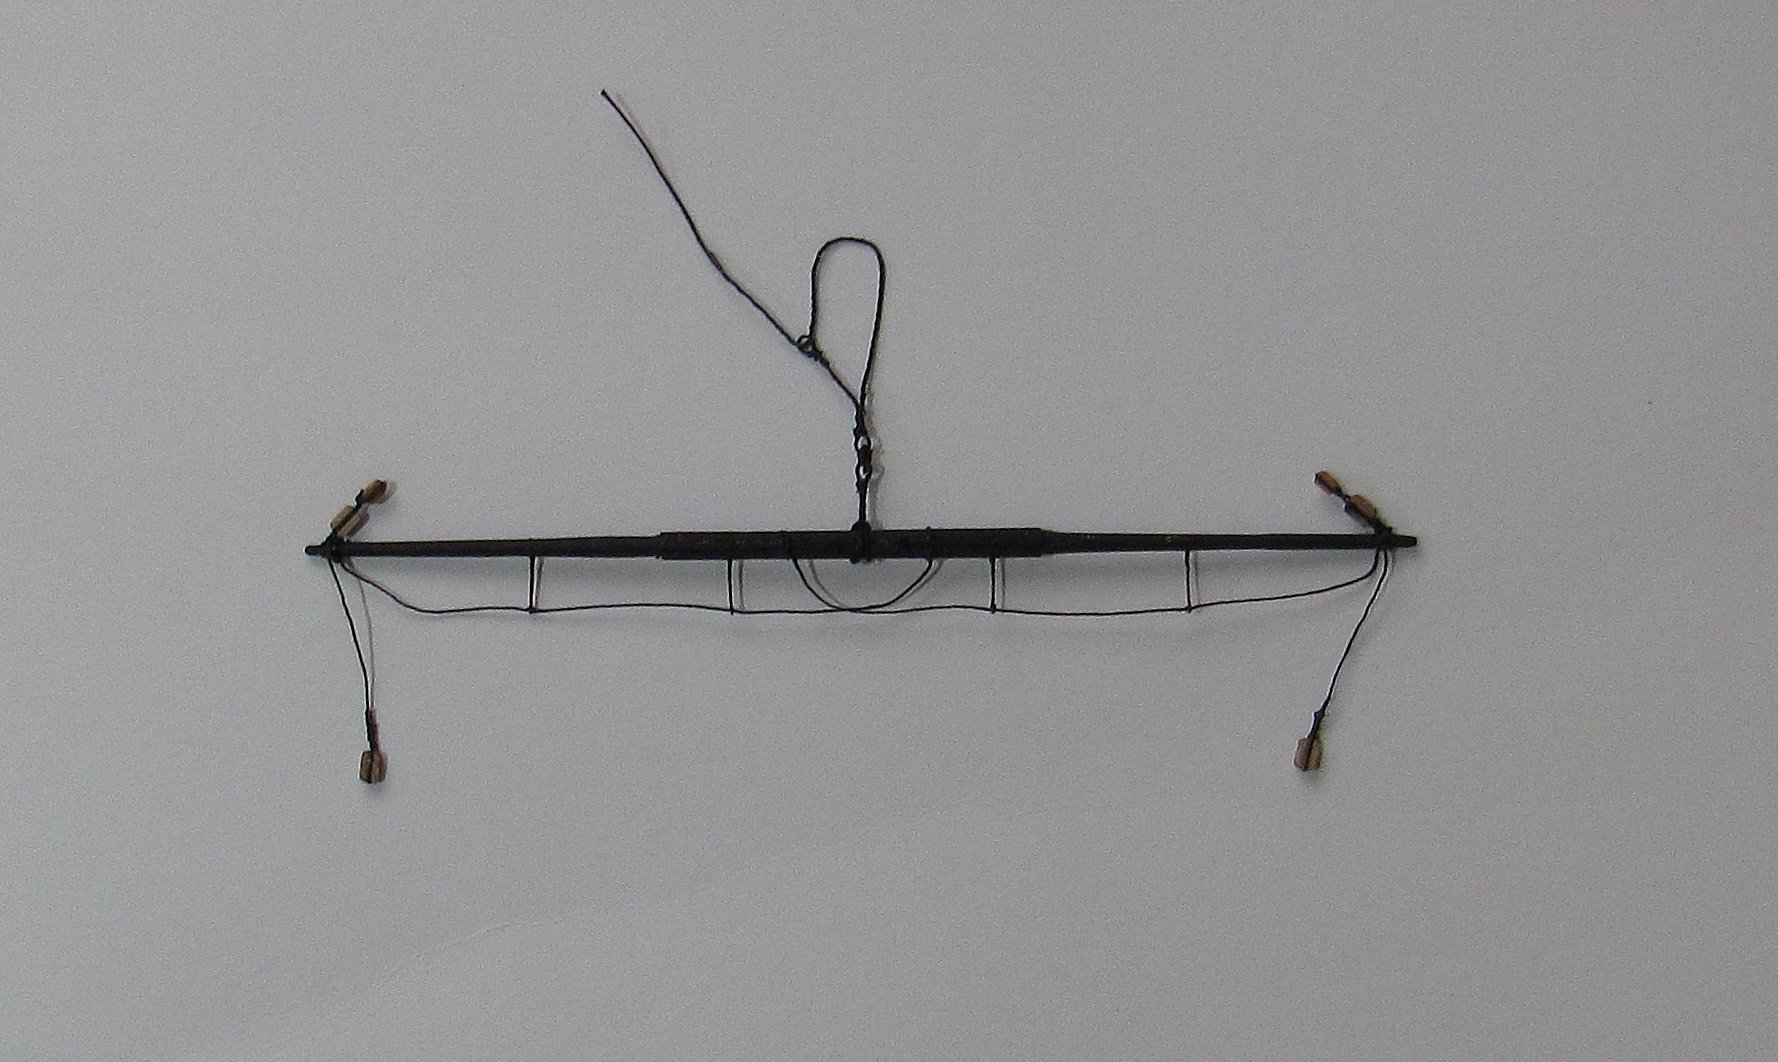
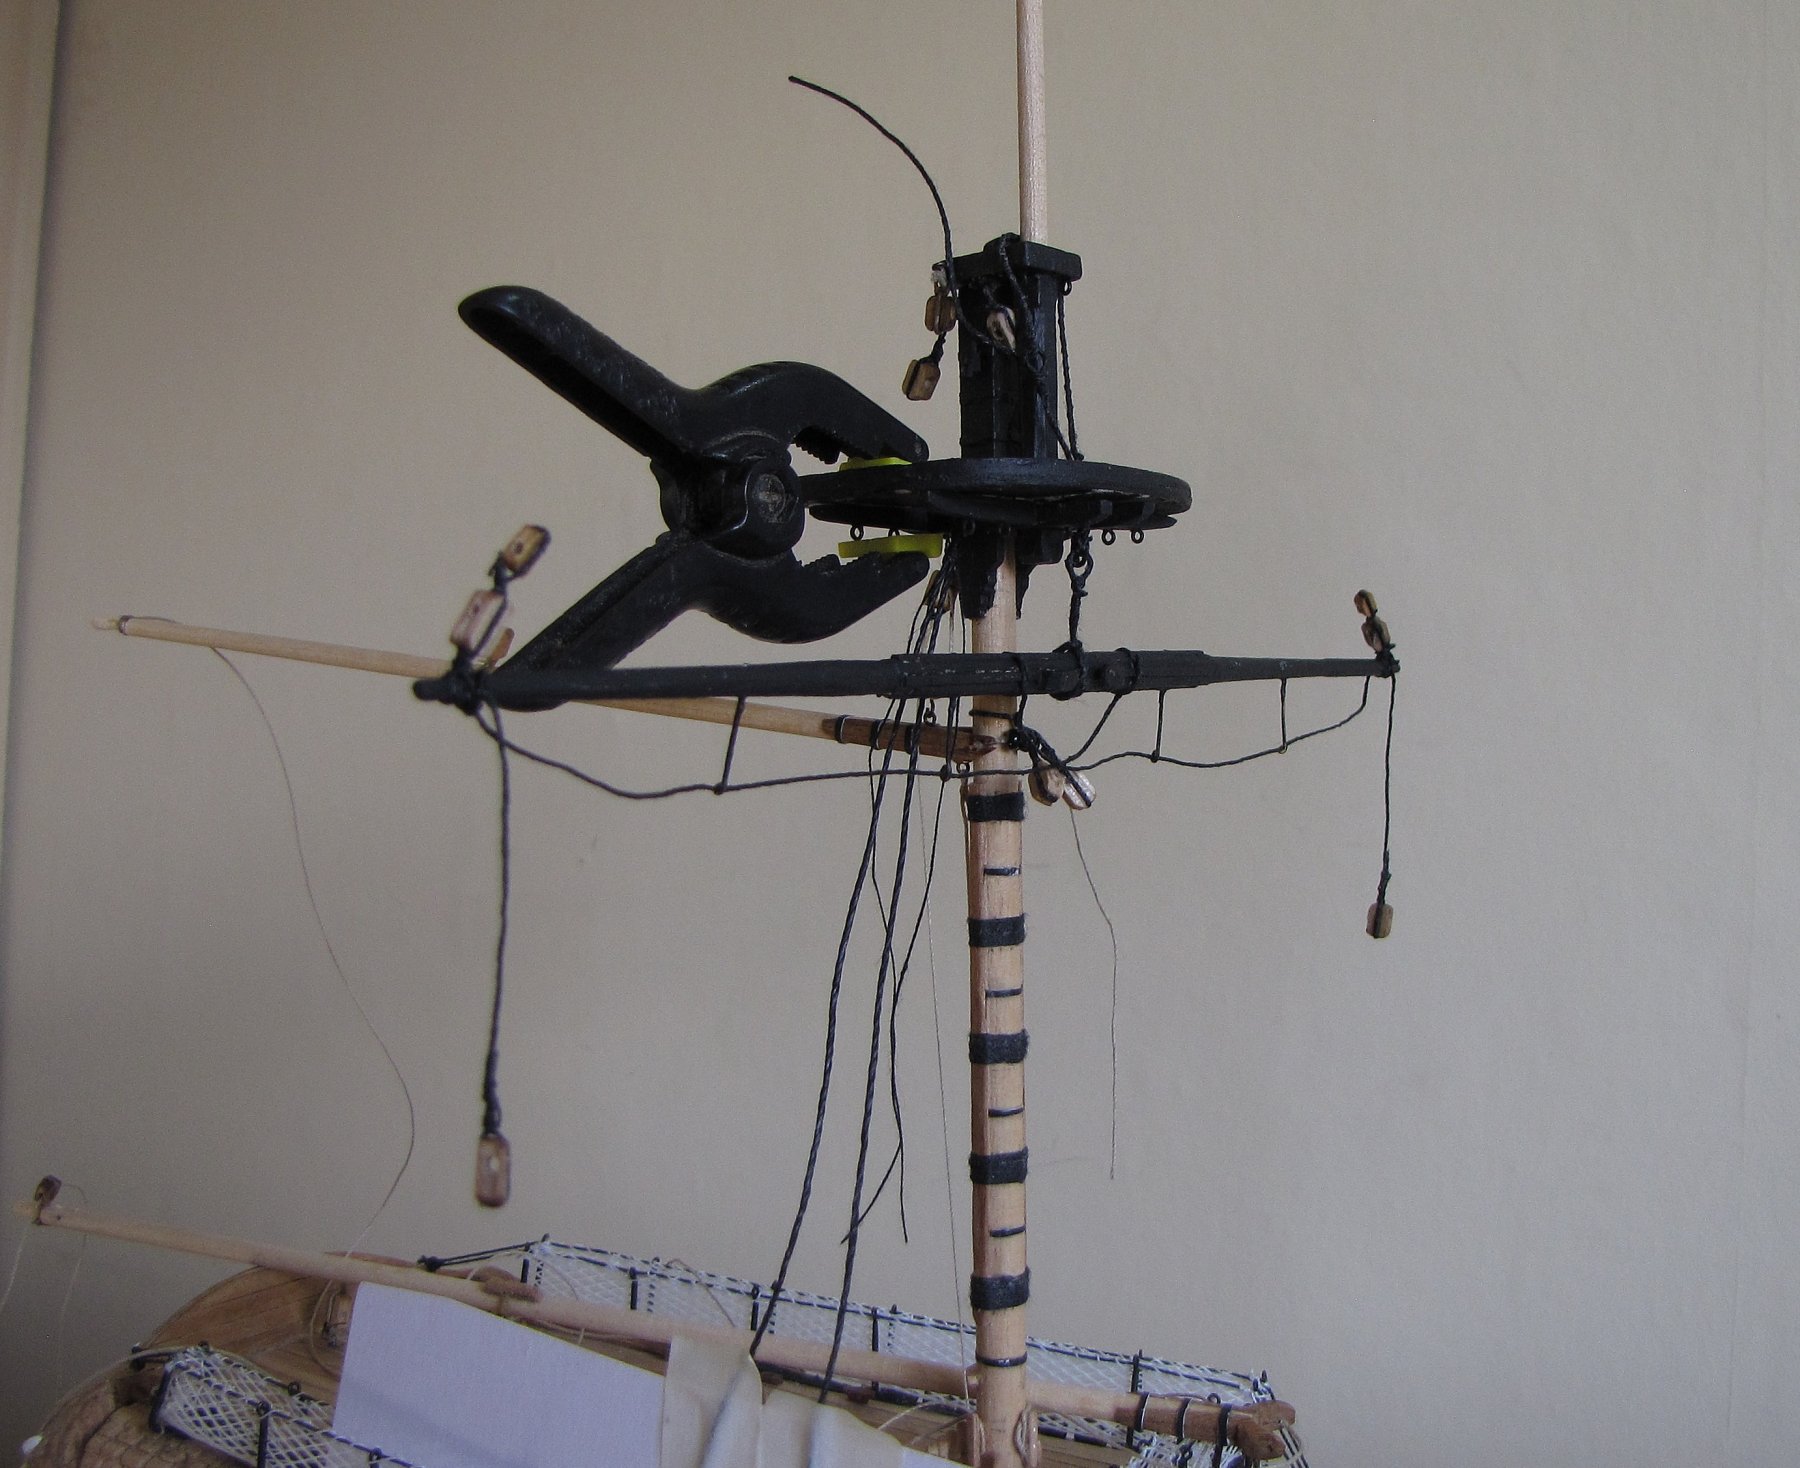
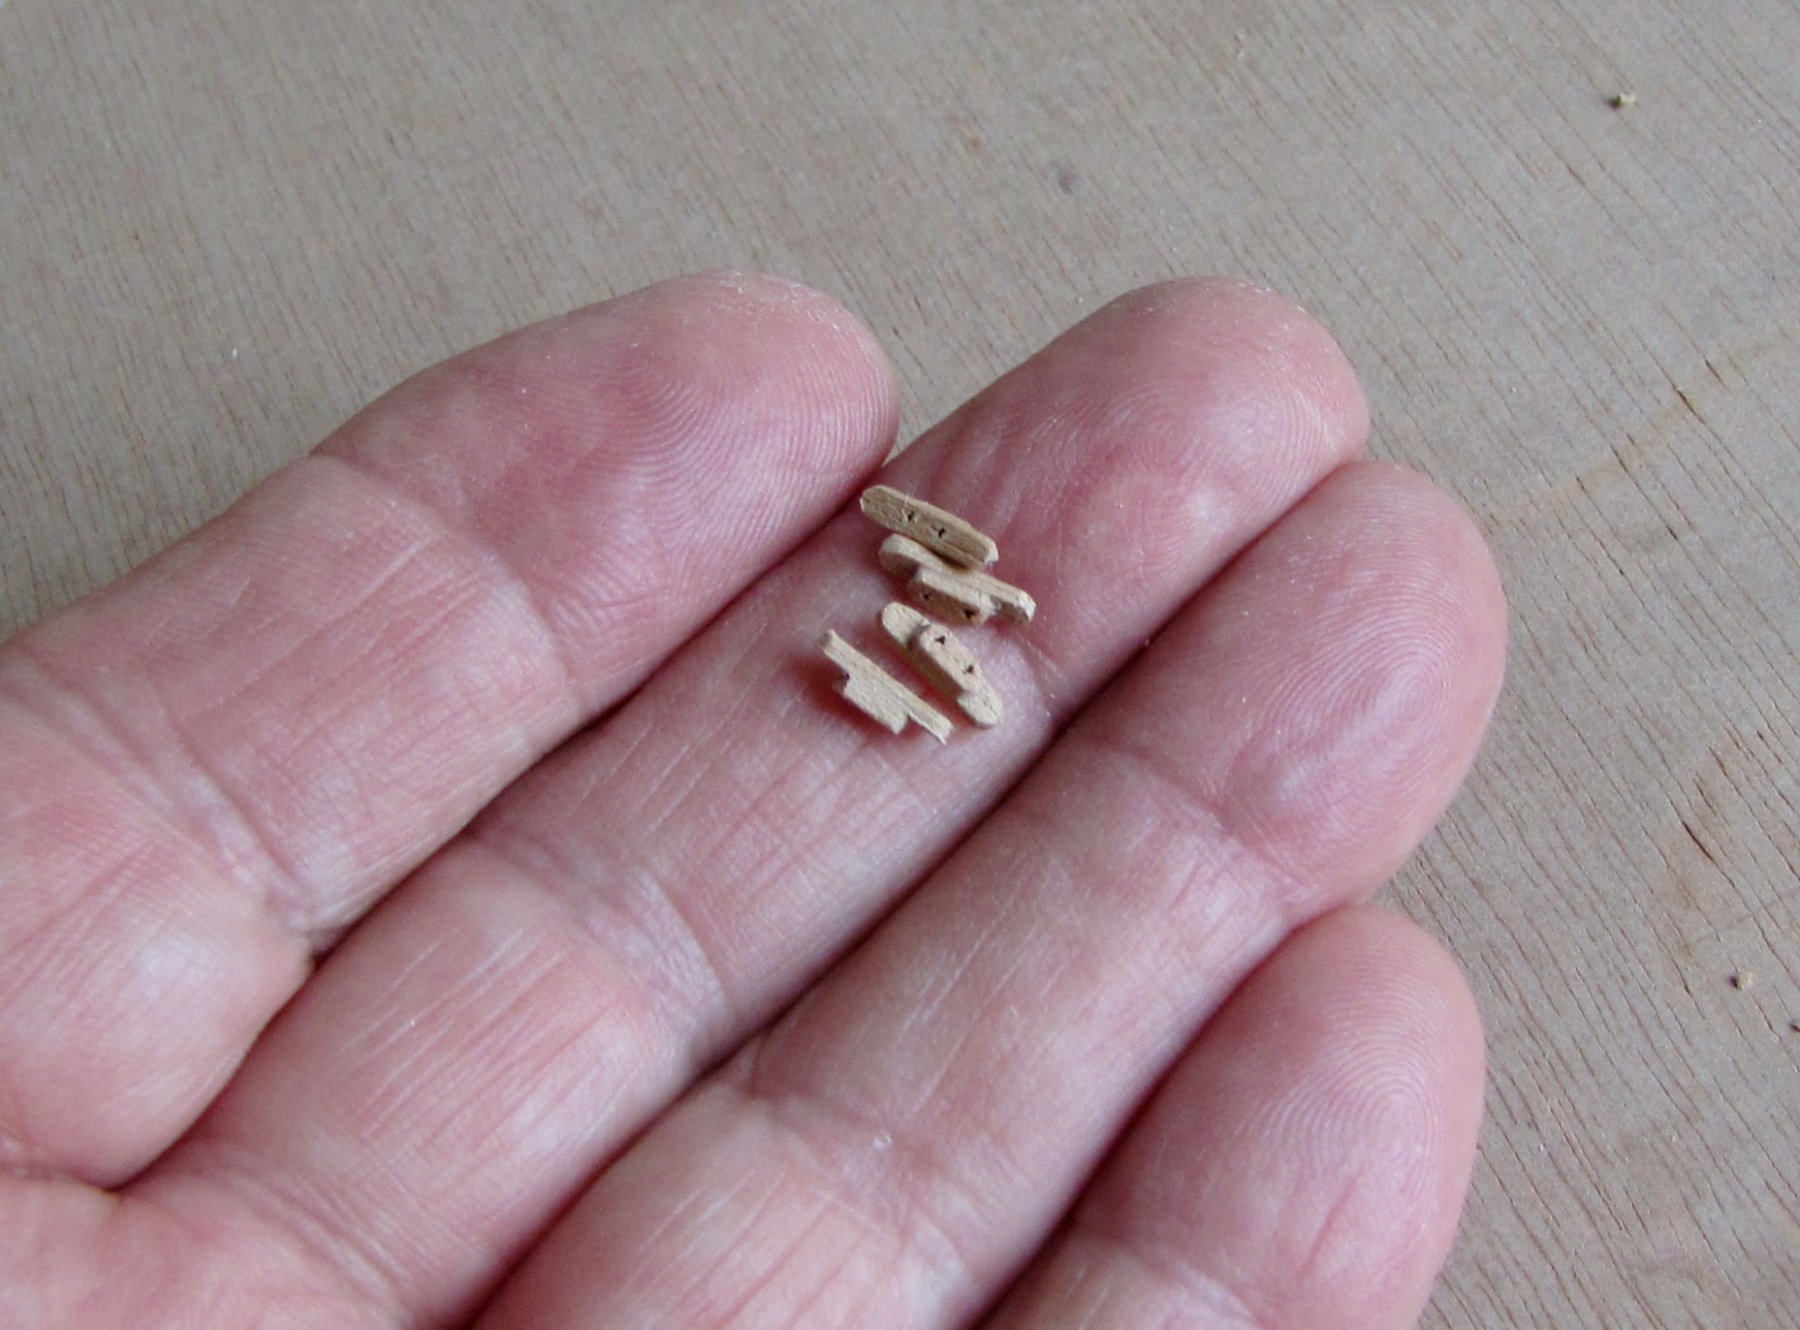
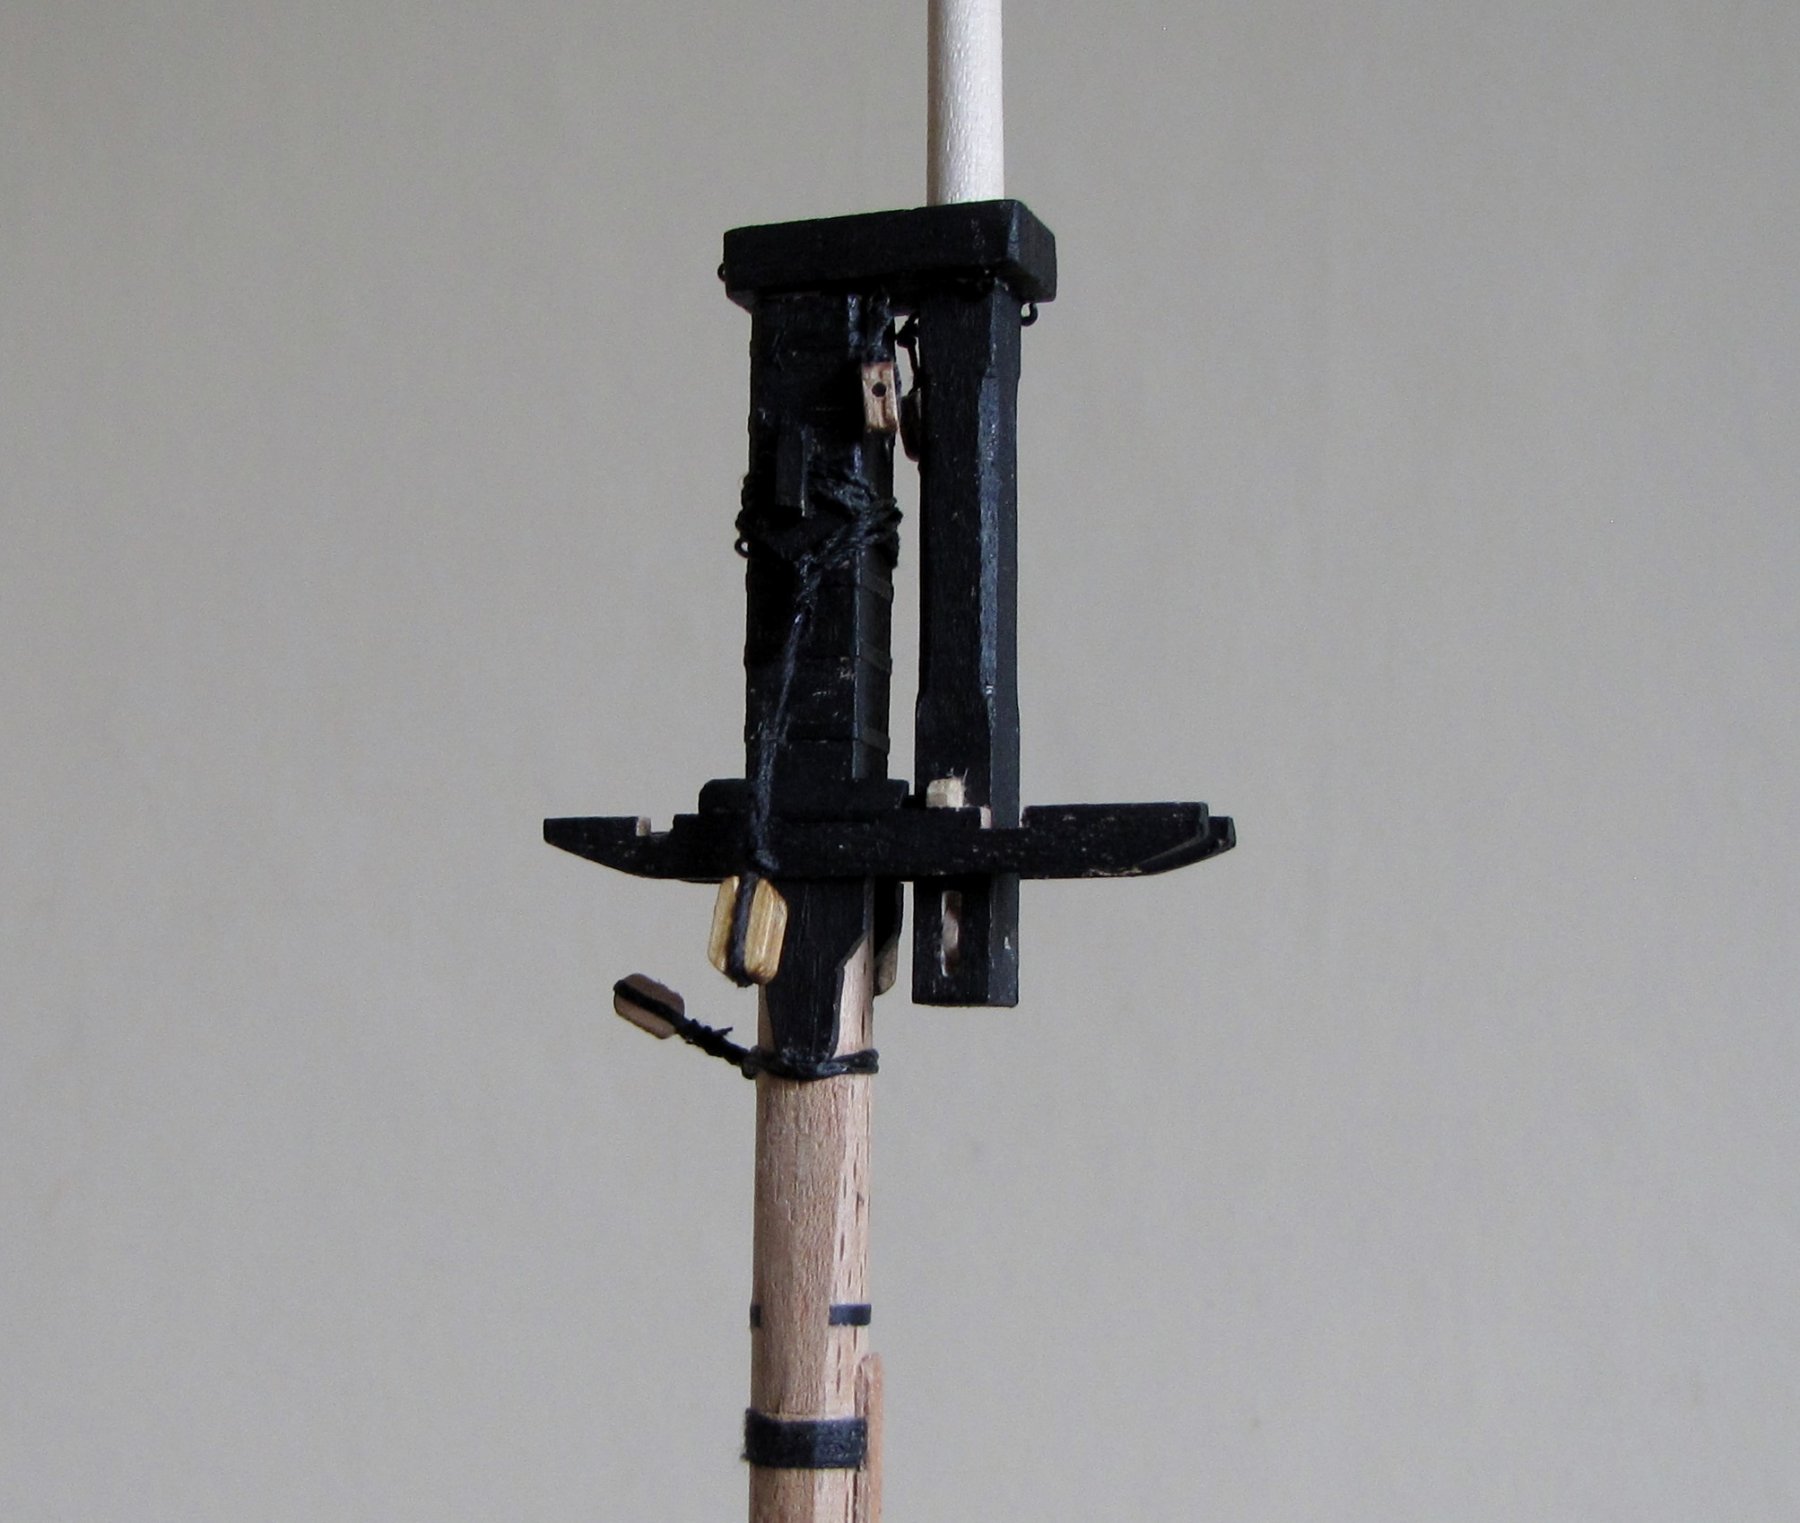
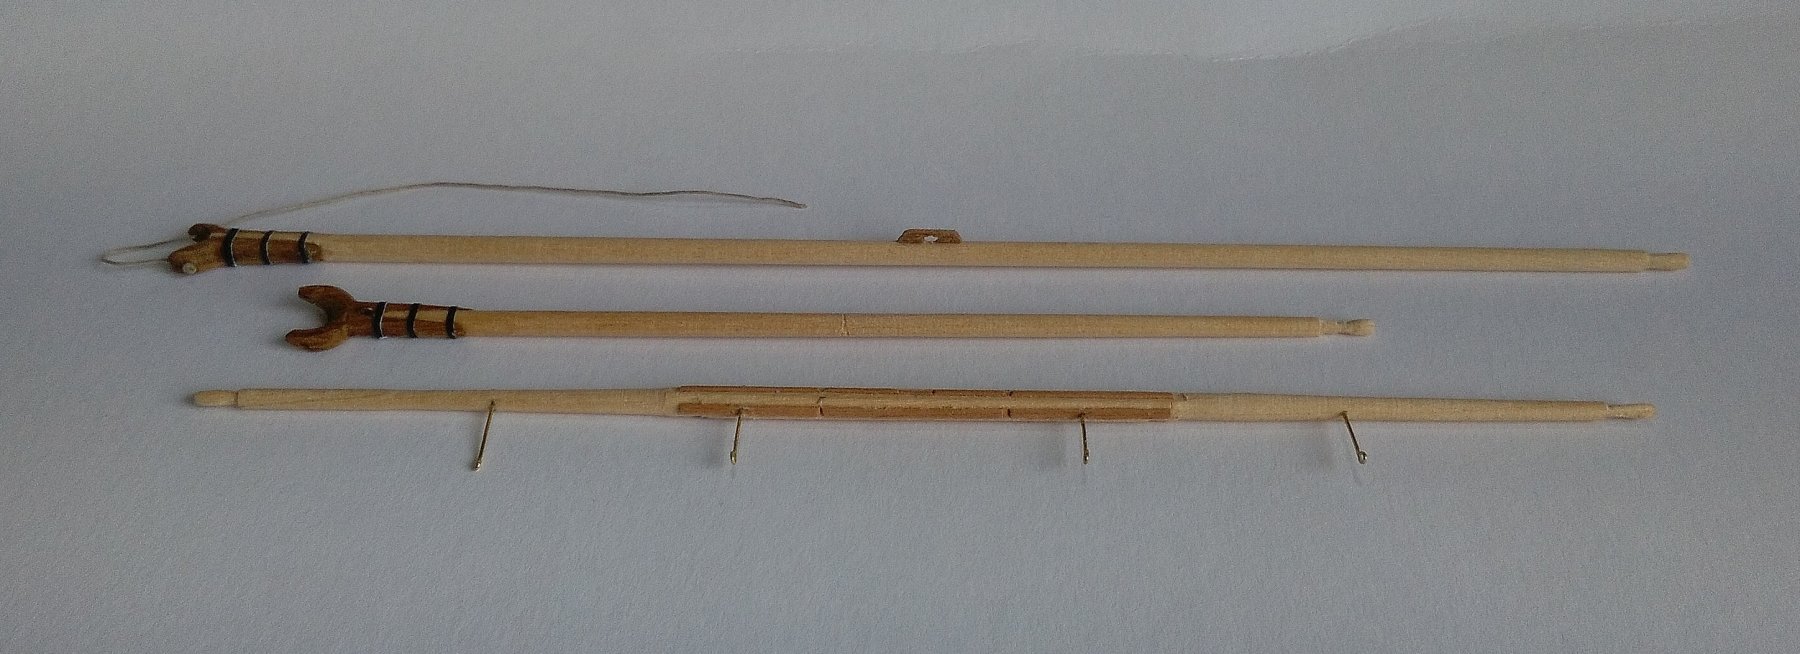
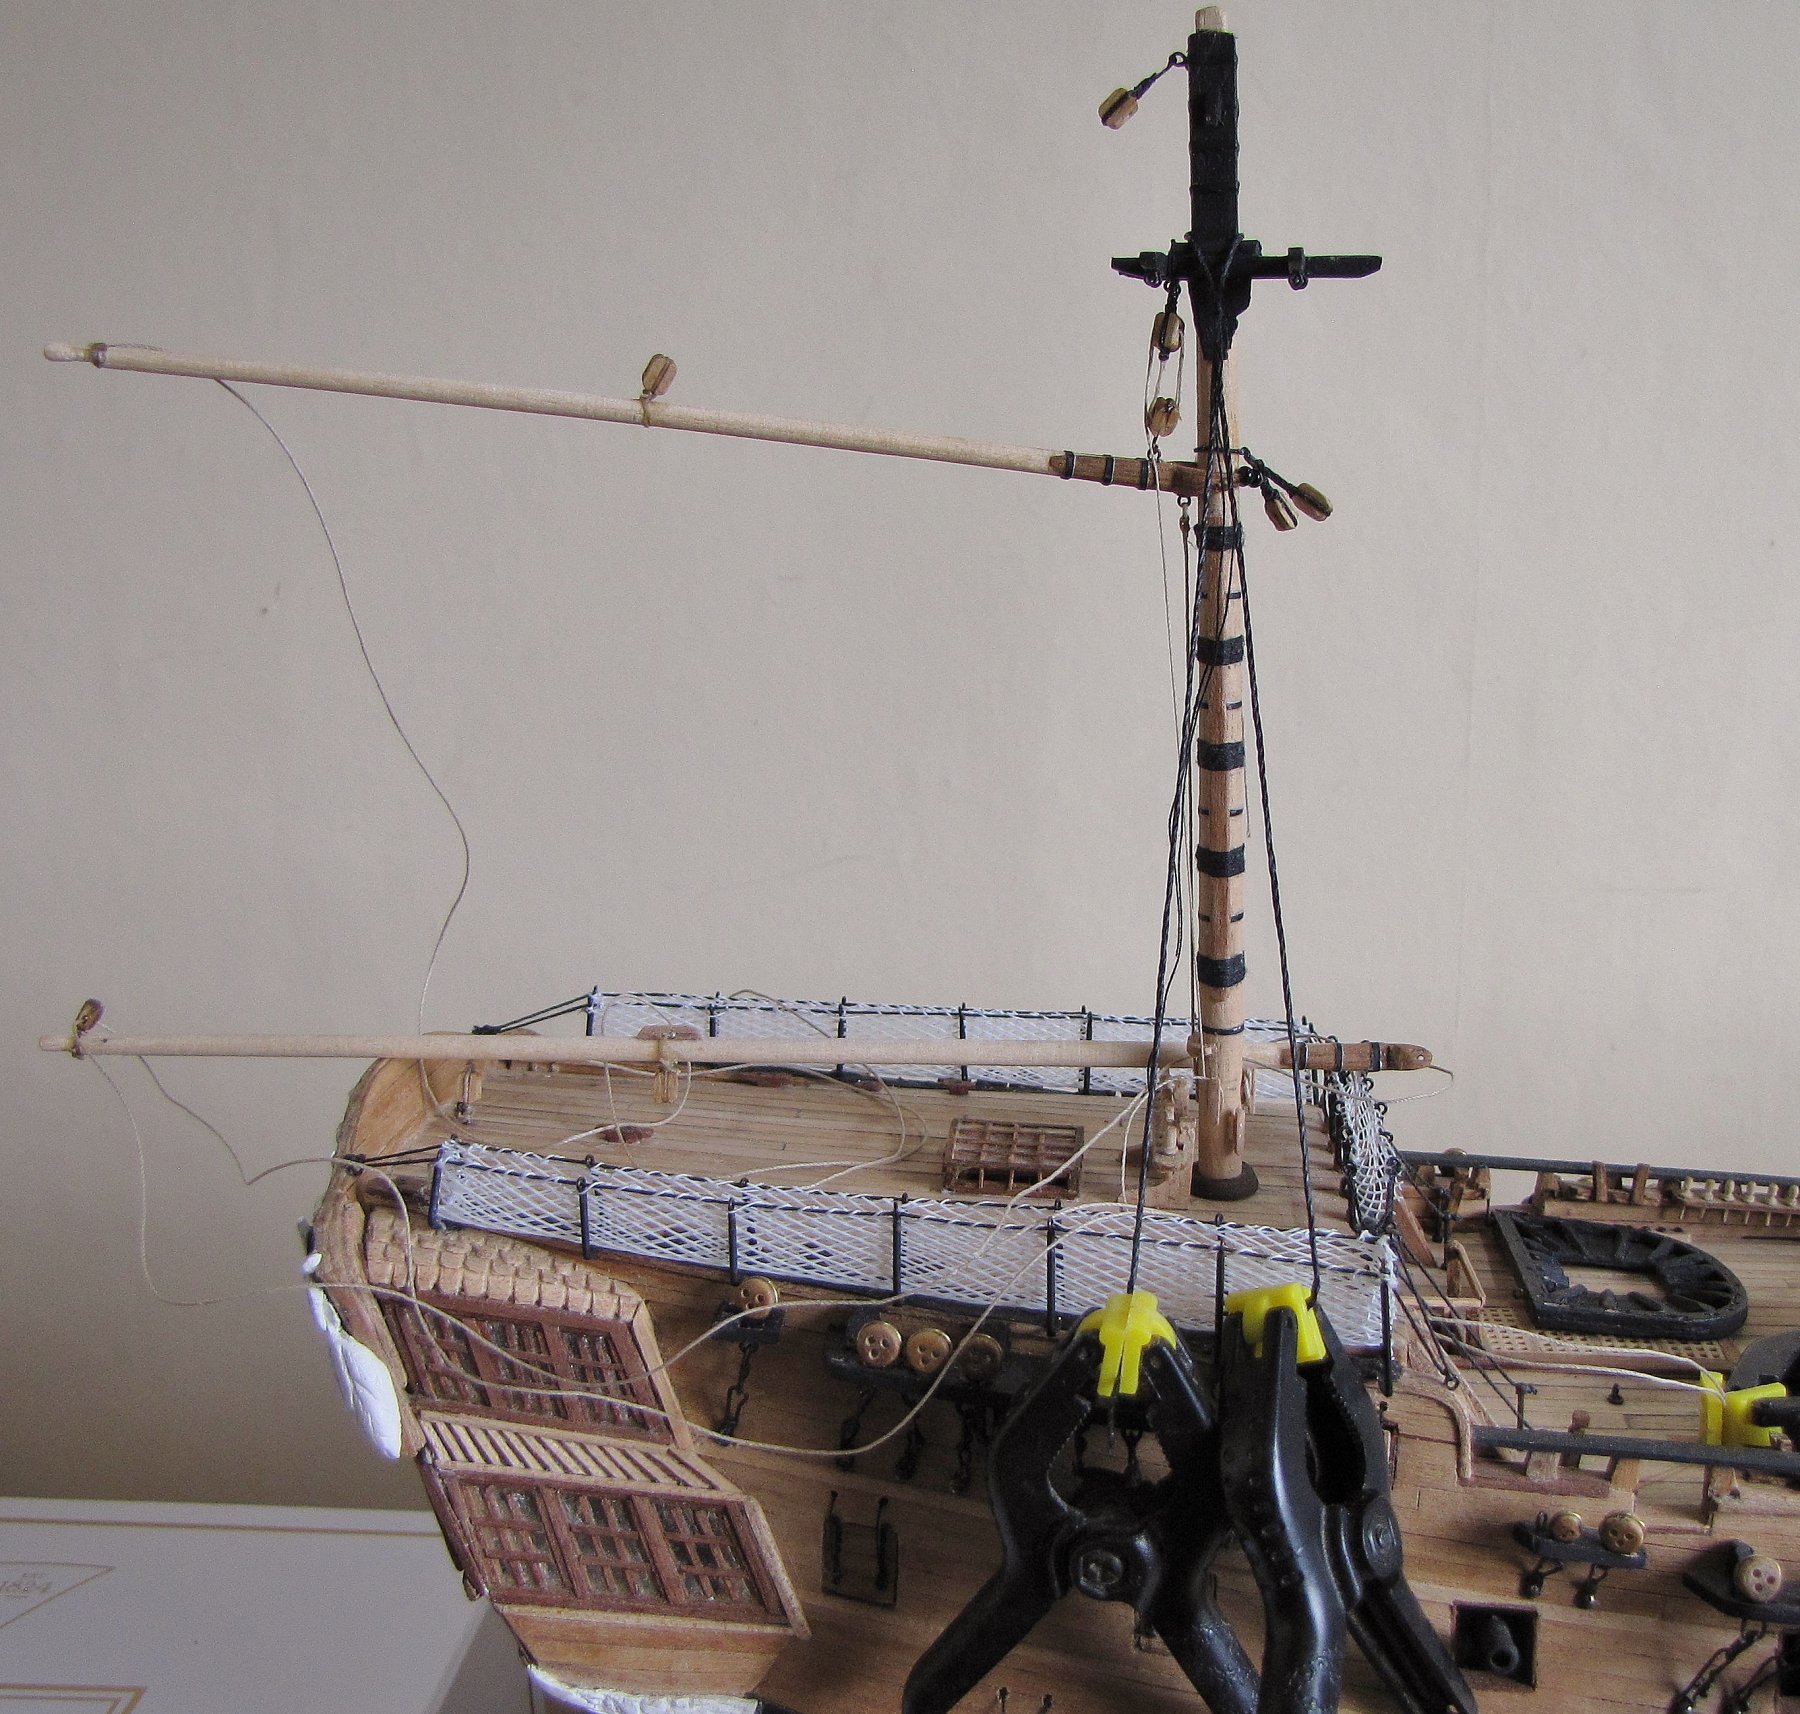
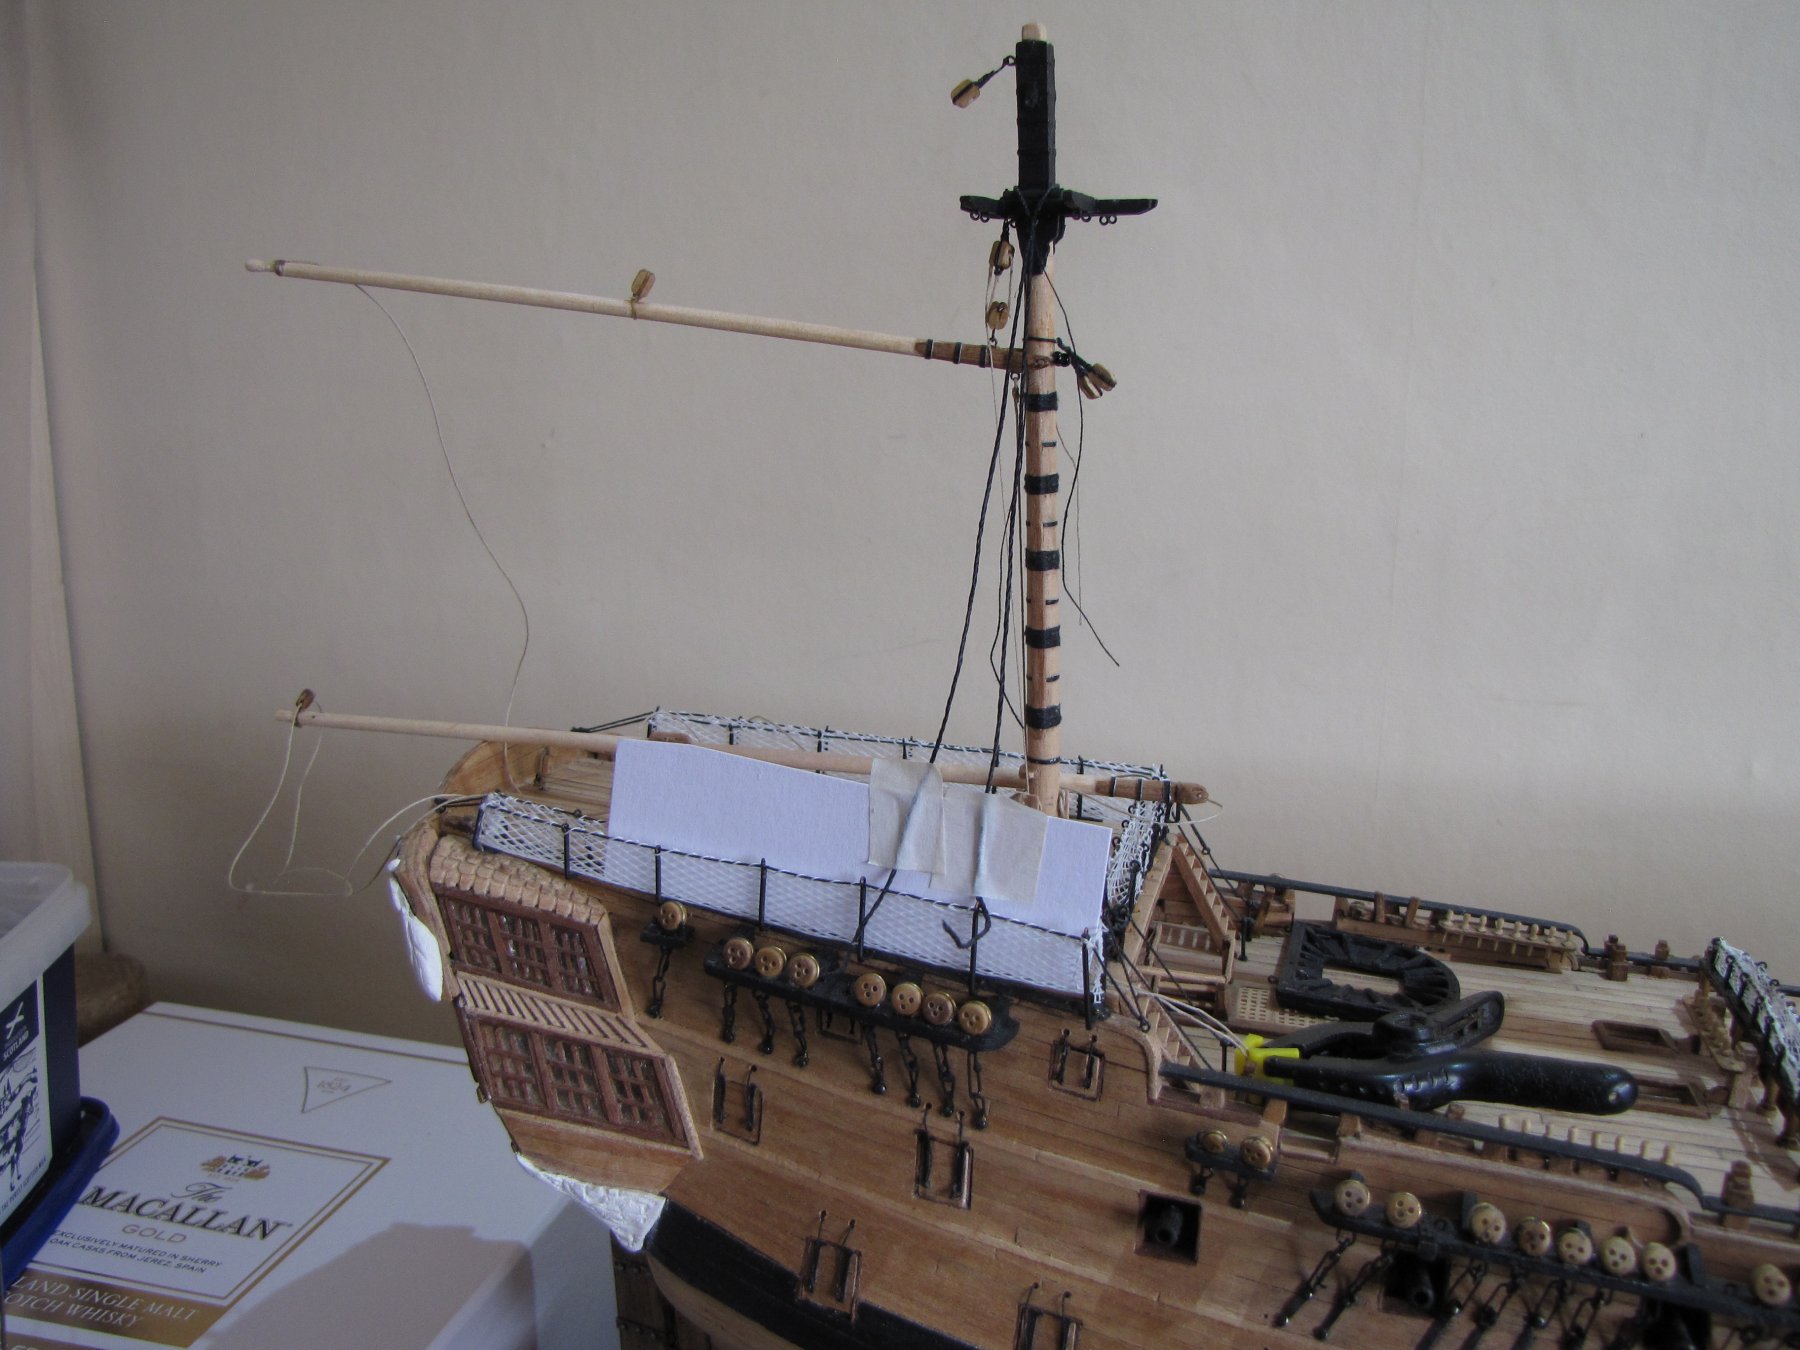
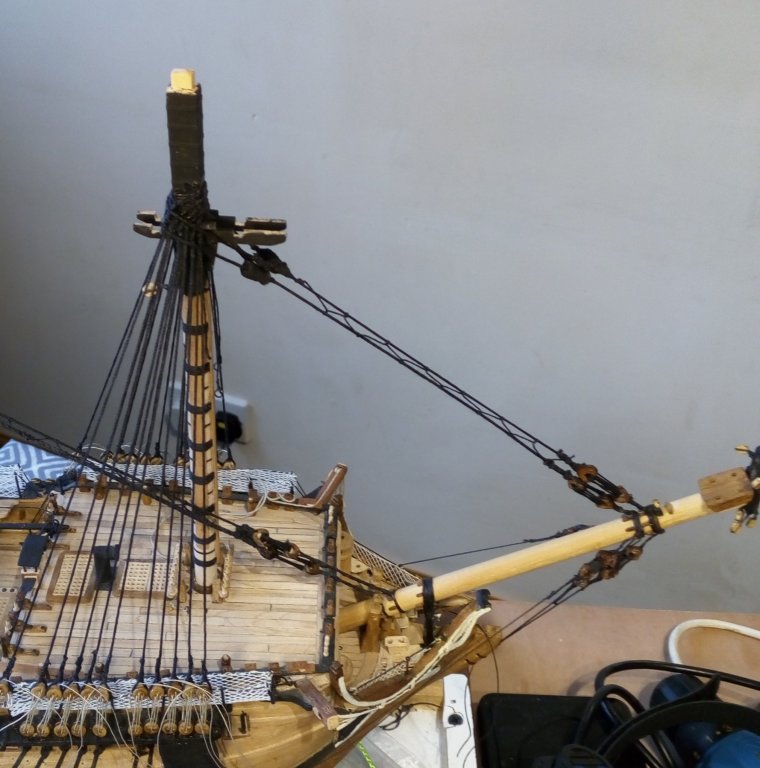
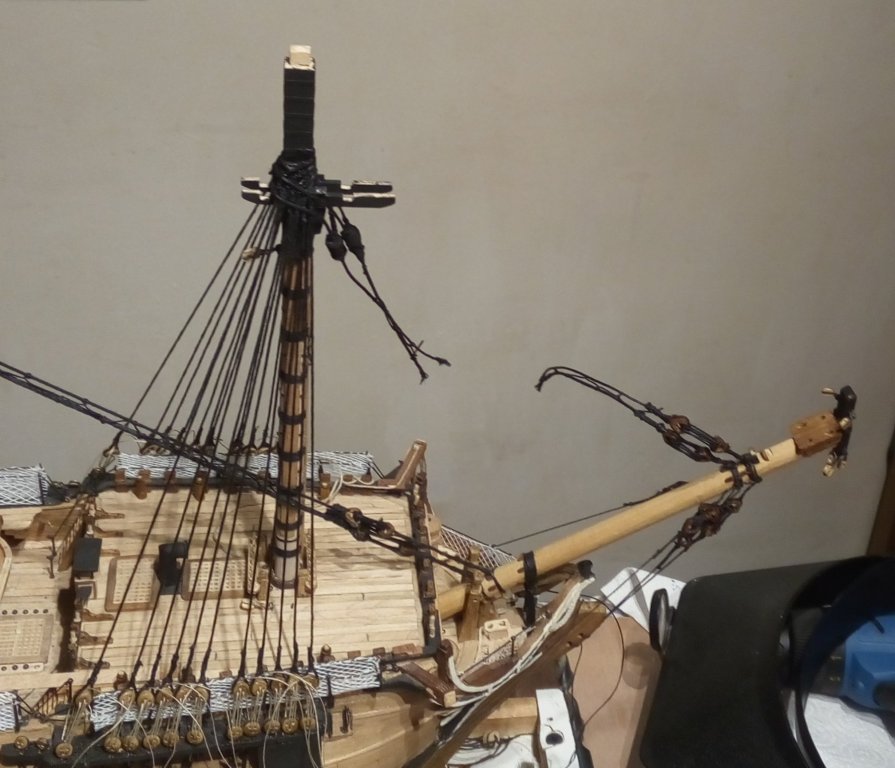
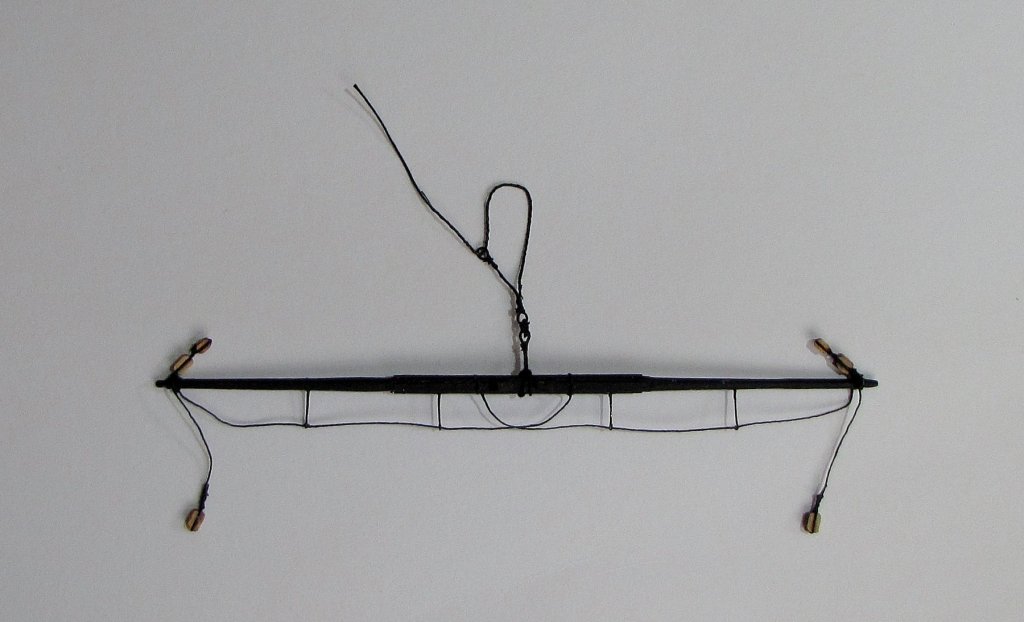
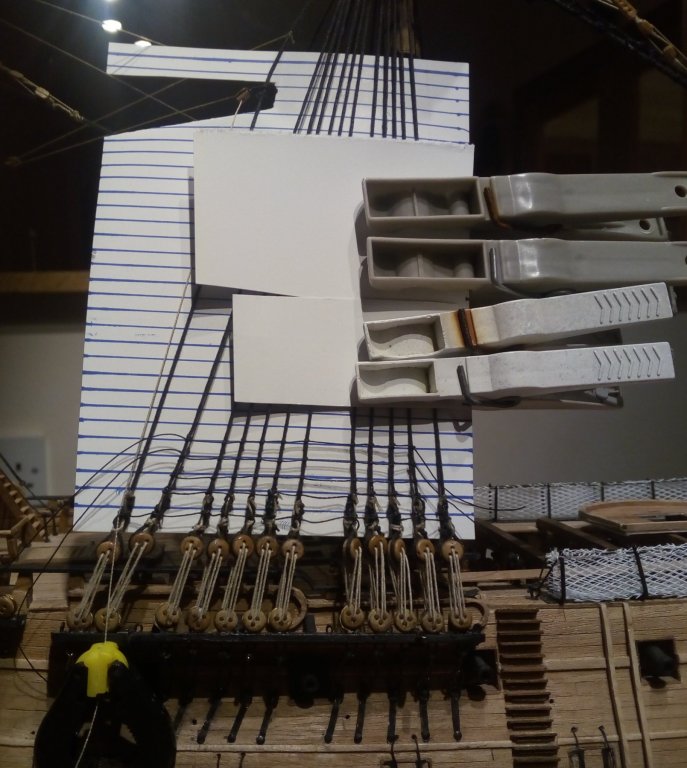
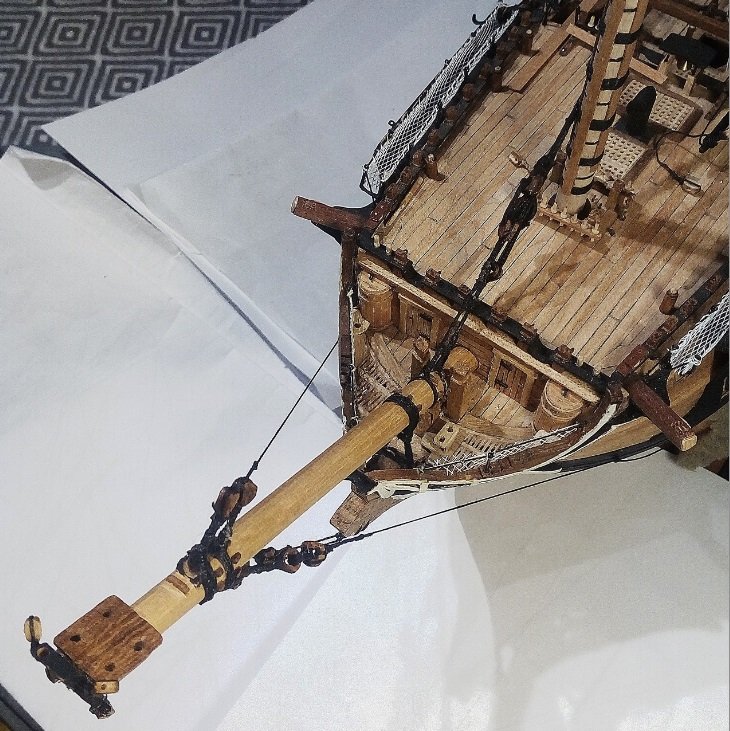
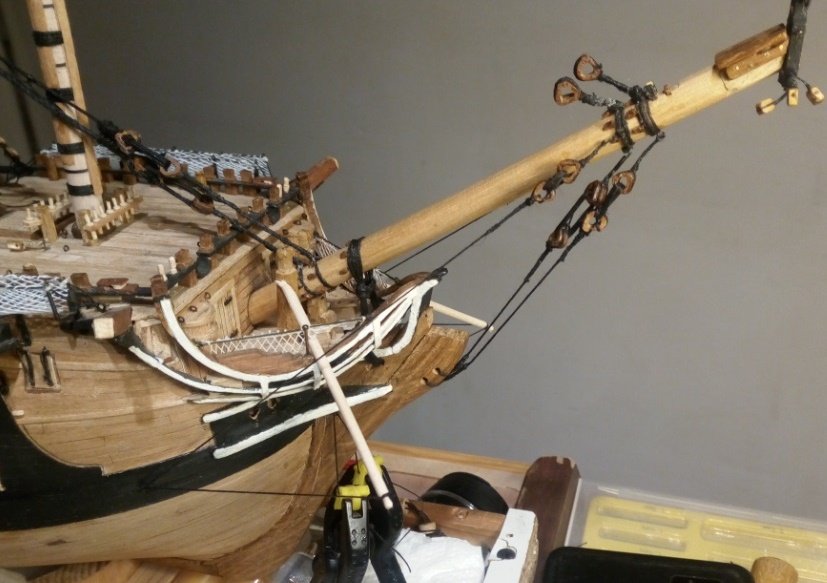
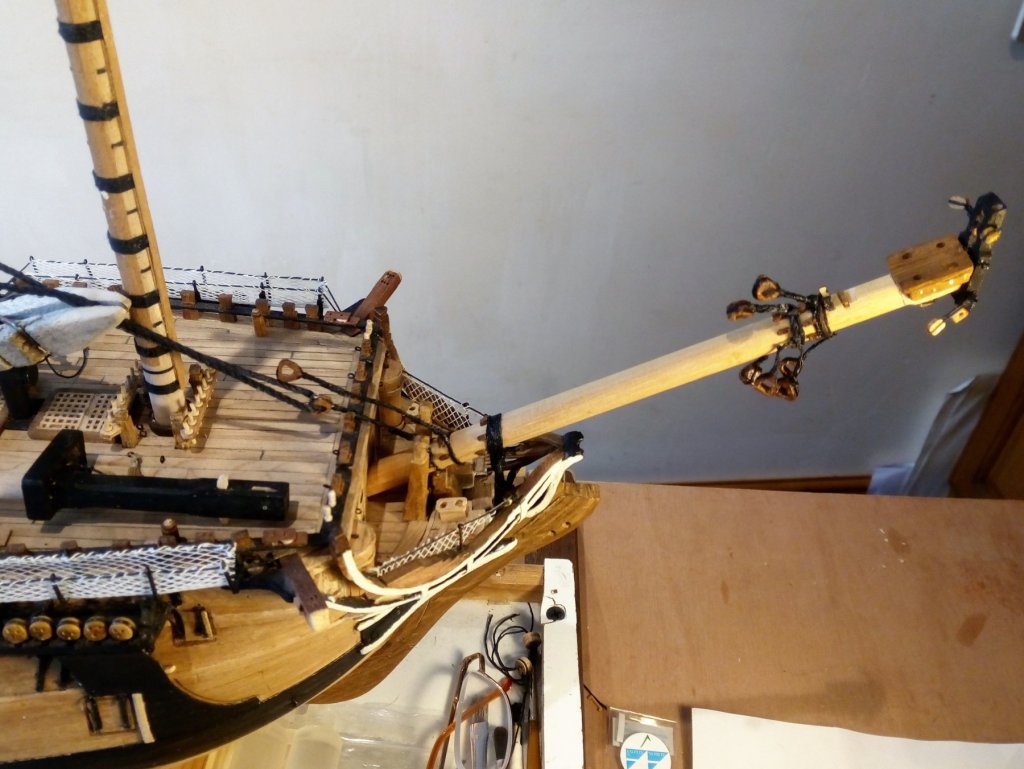
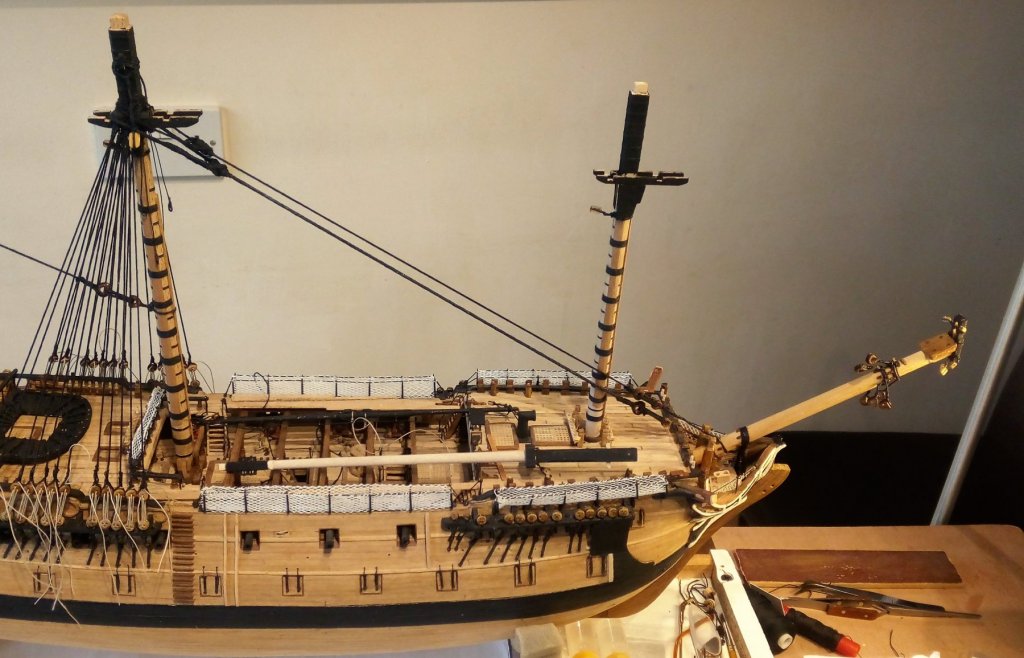
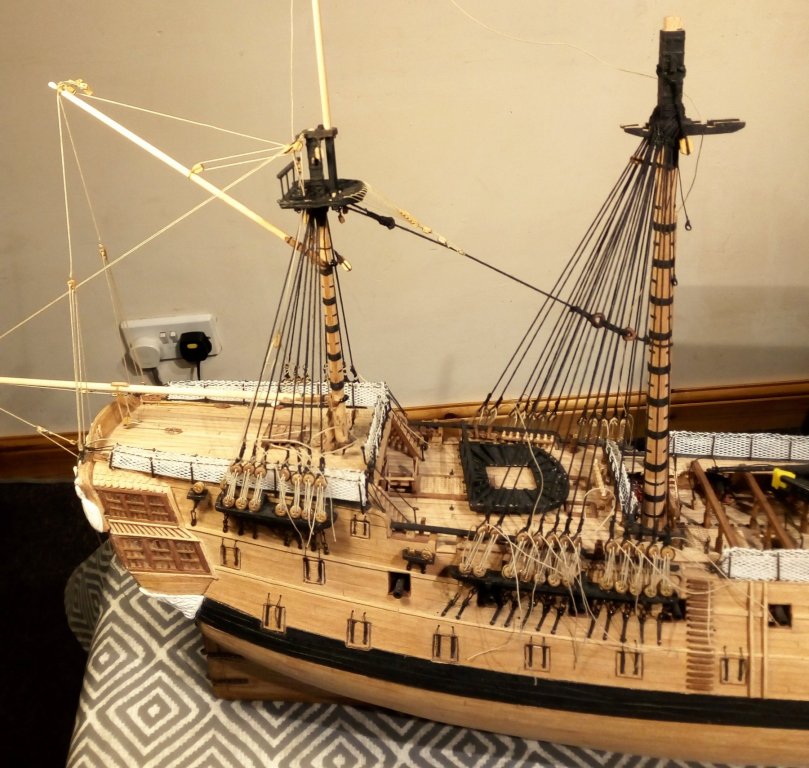
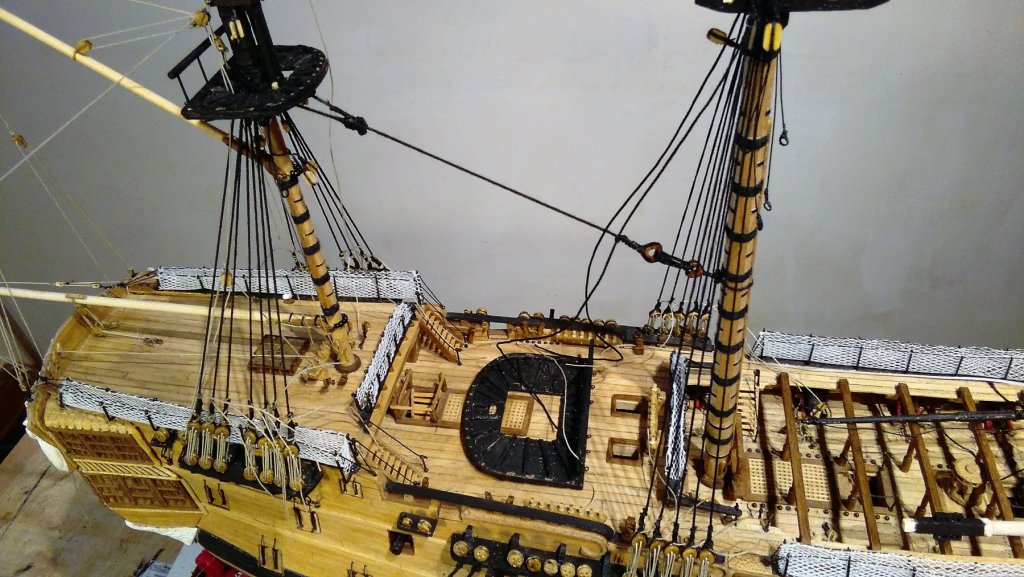
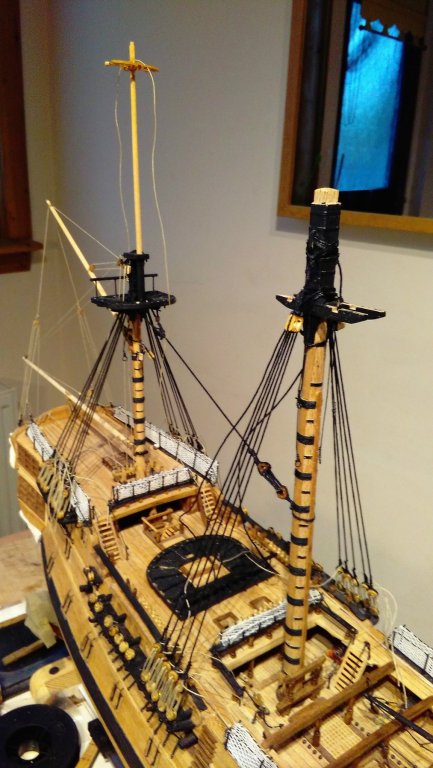
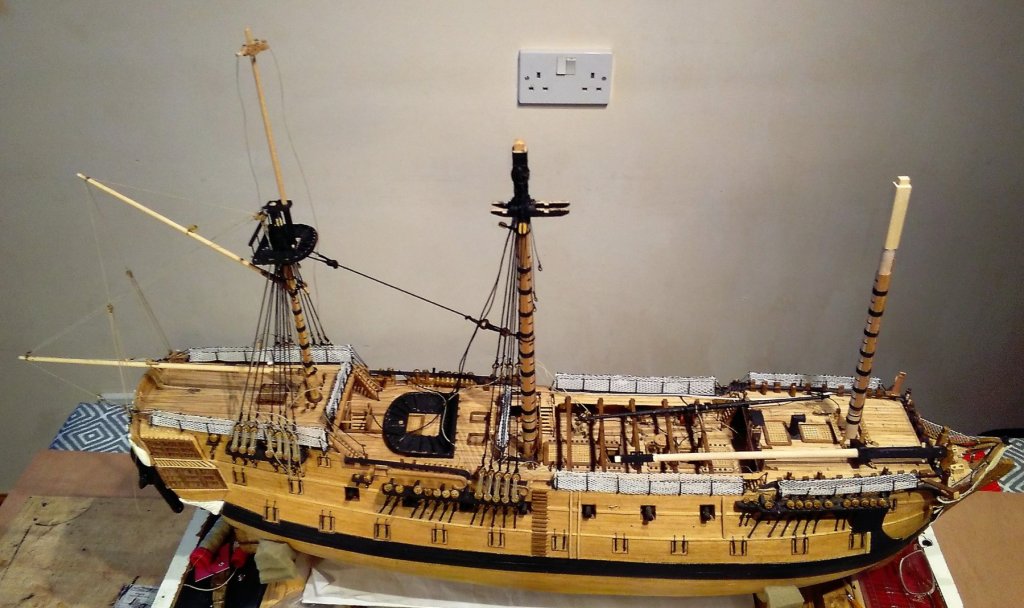
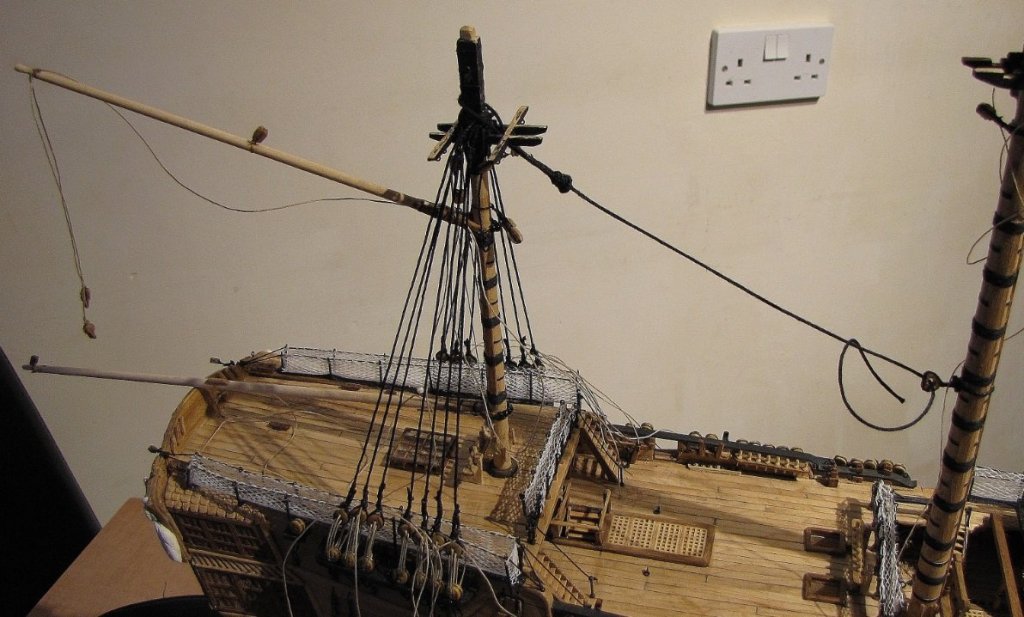
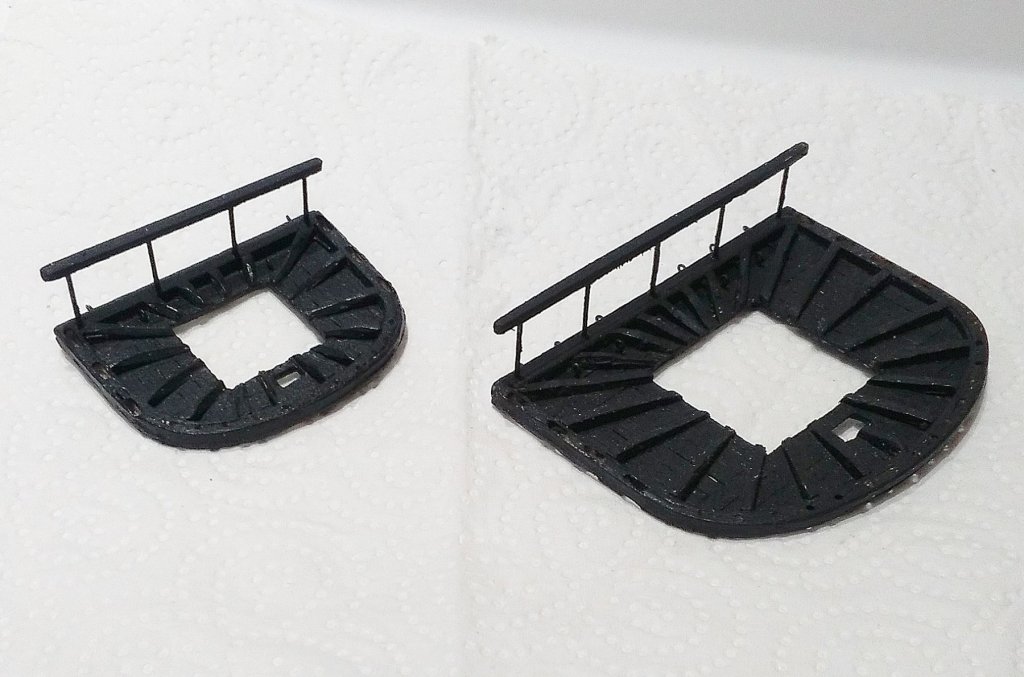
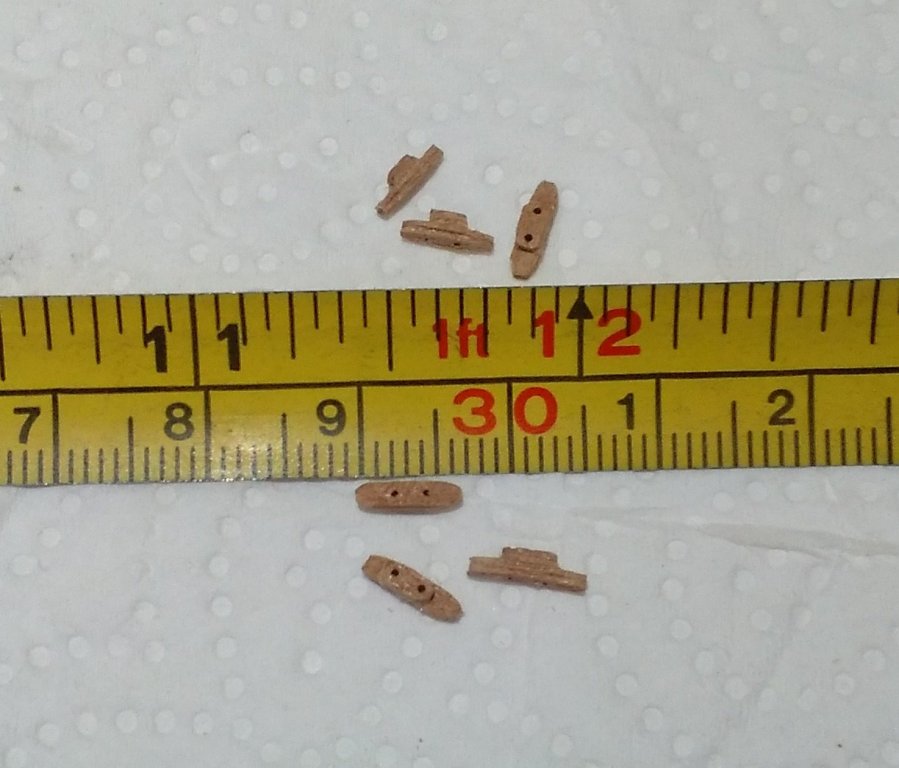
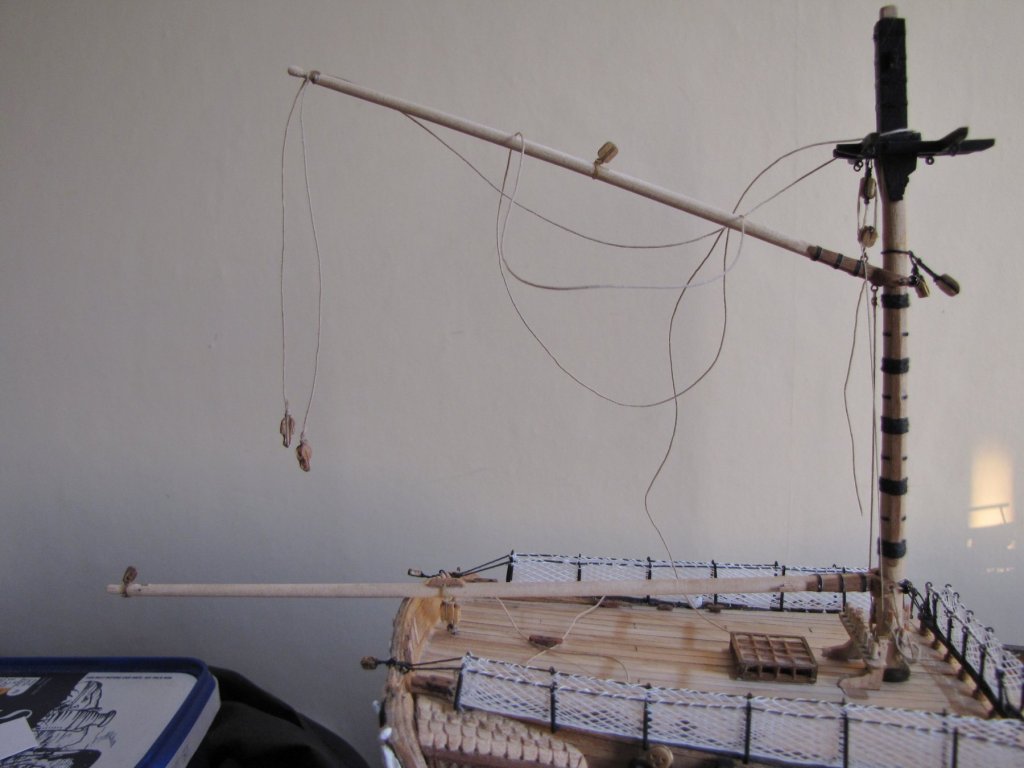
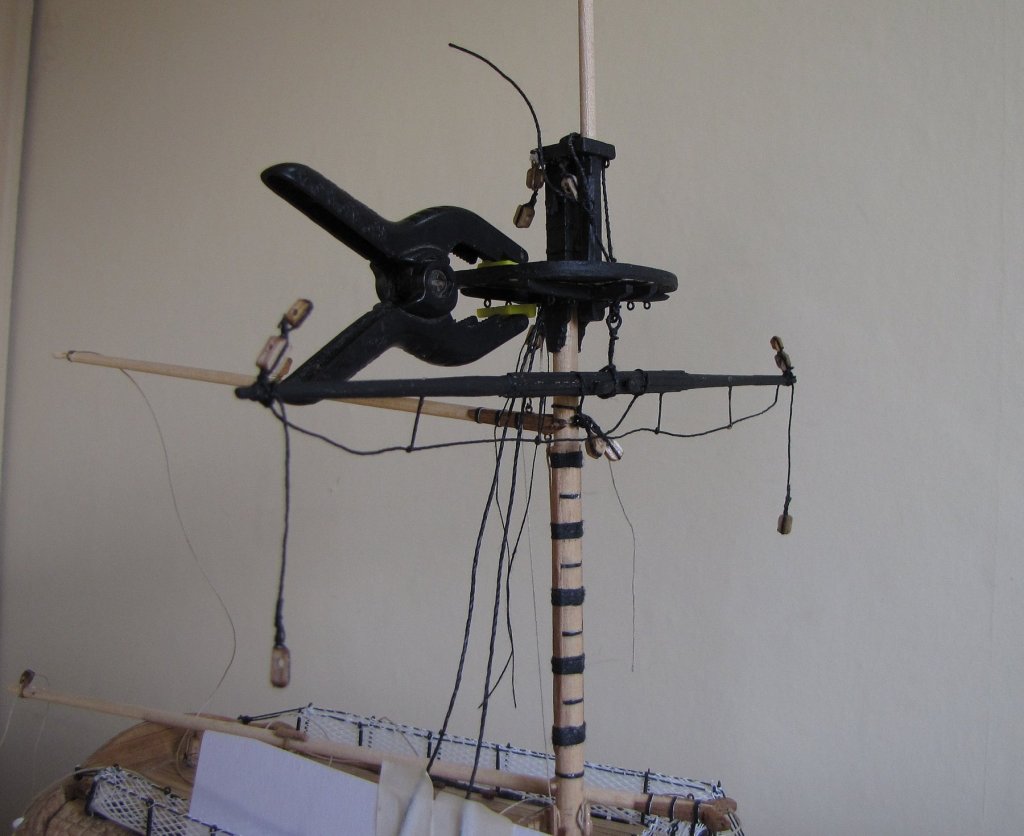
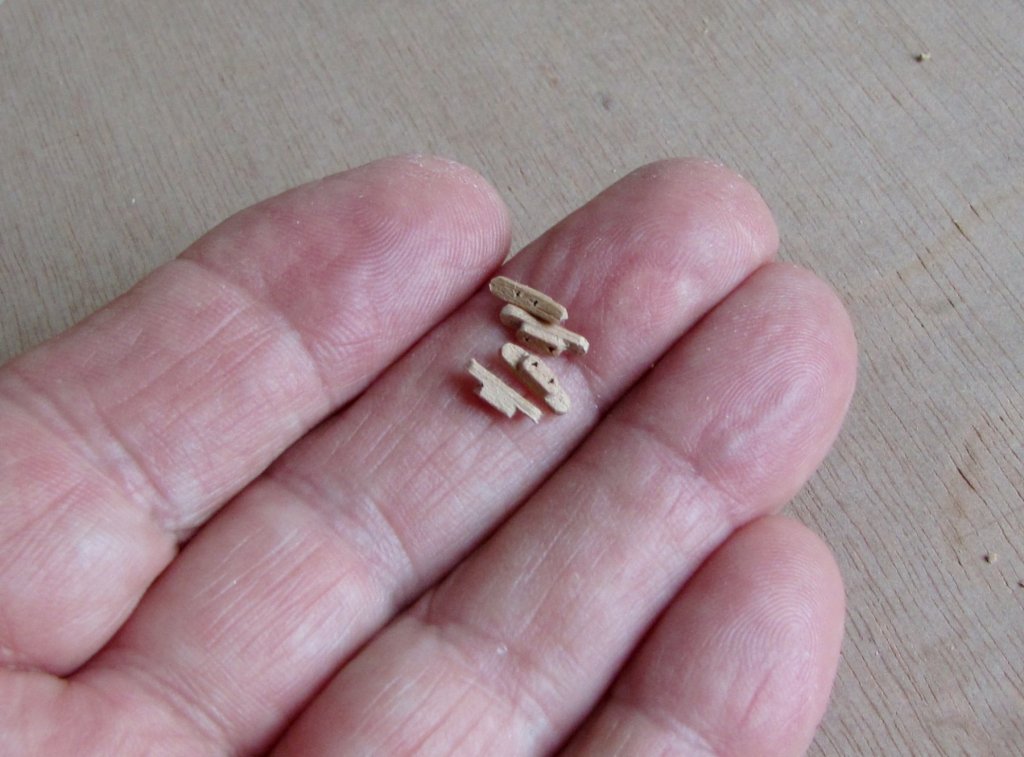
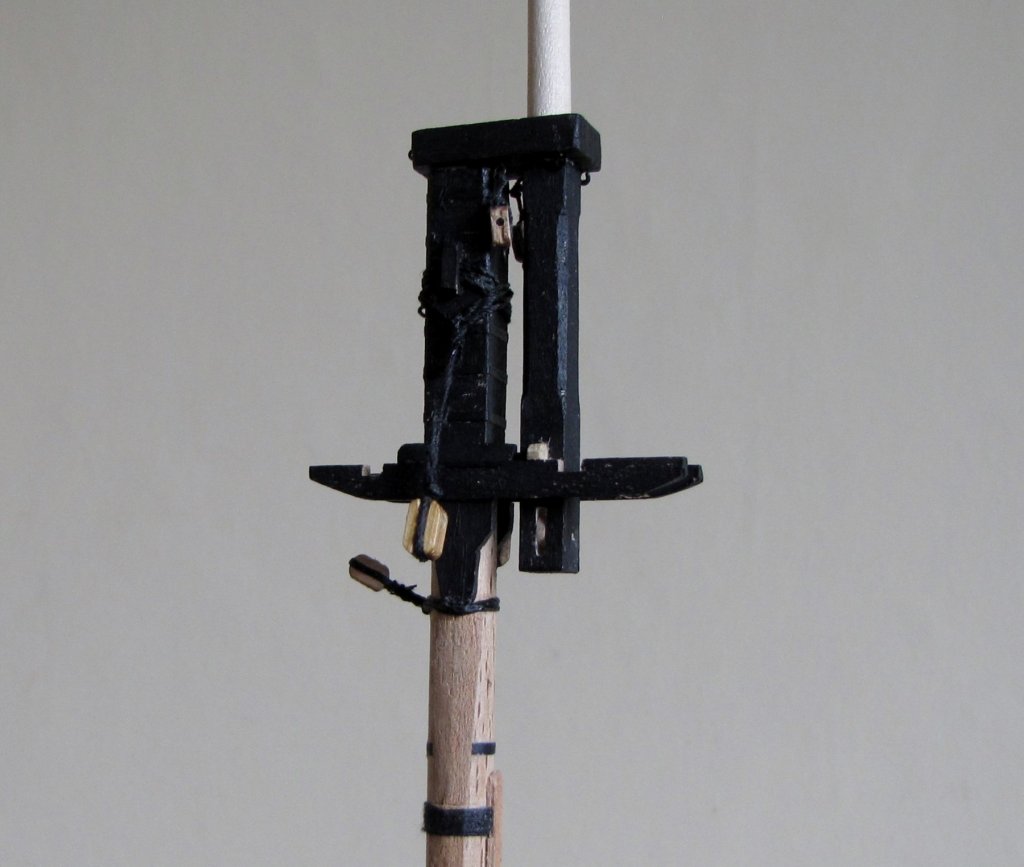
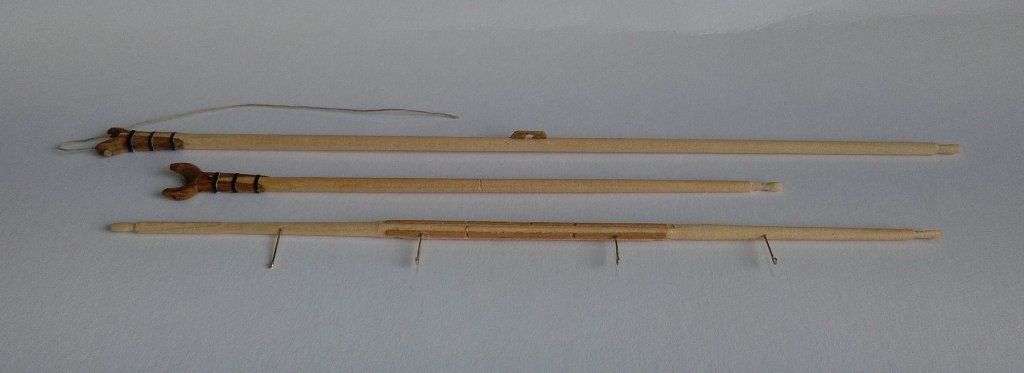
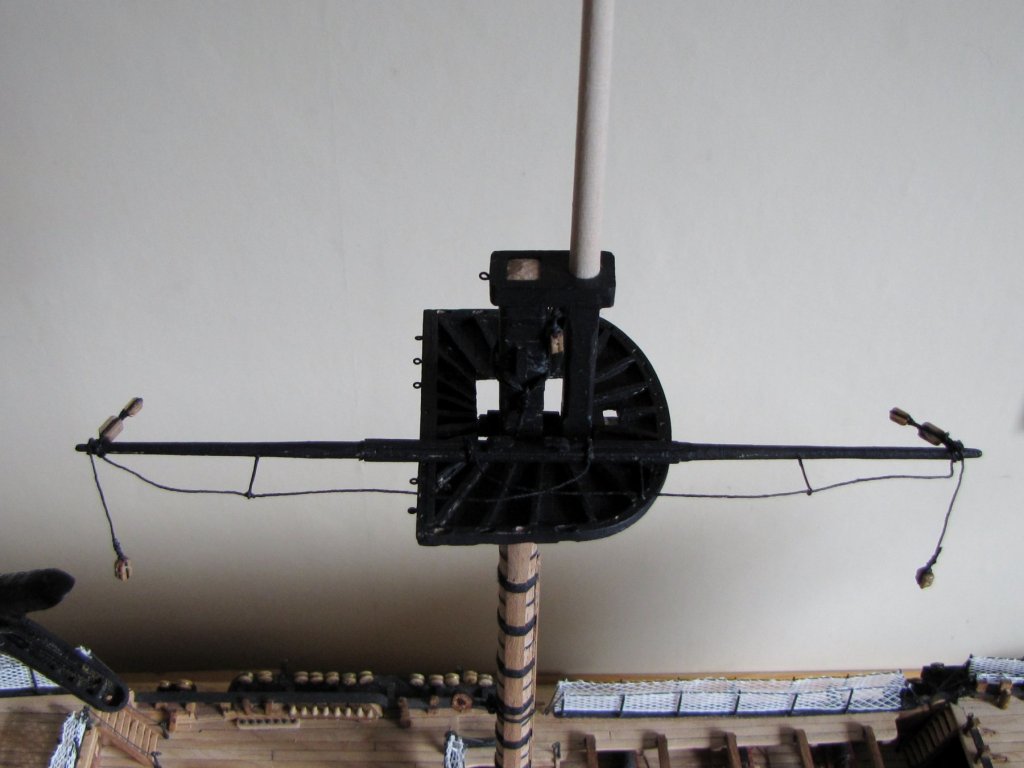
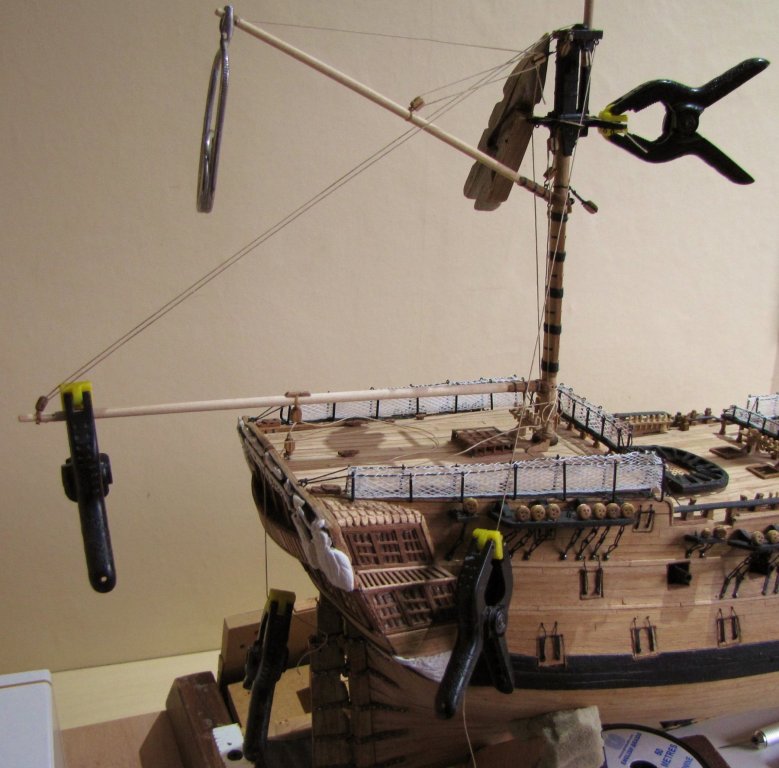
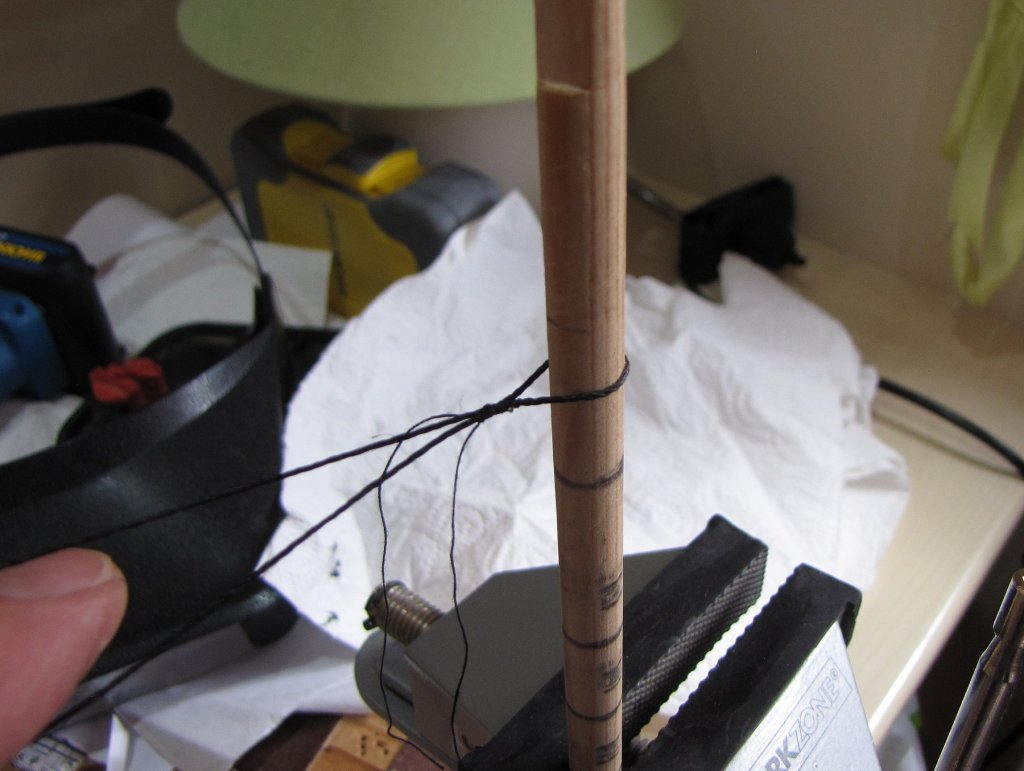
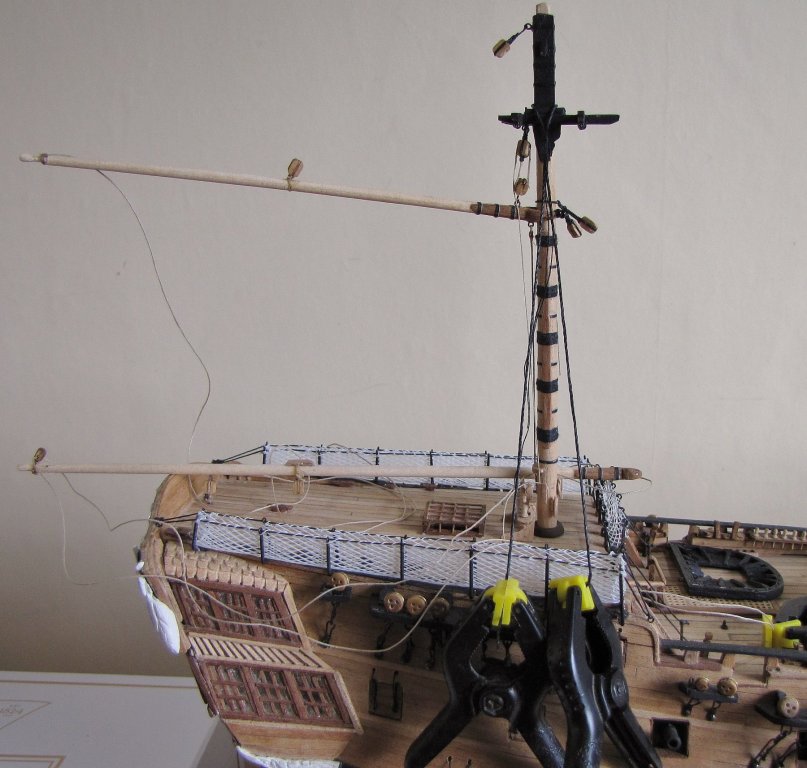
Popeye, Tom, Joshua and Nigel, thanks for the comments and to the others for the likes. Nigel wrote -- "I'm a novice but you're on my list now as the log is so instructive." -- I'm glad you find it instructive. In one of my early posts I said that I don't show very much in the way of the procedures I try to follow as I feel they're much better presented by so many other builders here on the forum, but if there's anything you've found helpful then I'm delighted. (By the way ~ nice locations, Antalya and Derbyshire!) On 28 March I wrote -- " . . . then it will soon be time to be thinking about the scary rigging for real. " I'm now beginning to get the full understanding of the 'scary' part! Arriving at this adventure for the first time, procedures are a bit of an experiment for me. When I see how fiddly it can be to get some of the yards attached to the masts I felt it might be just a step too far for me to try to fit them after the masts are stepped and the shrouds attached. I was quite pleased to find this topic recently >> https://modelshipworld.com/index.php?/topic/15687-masts-and-spars-off-site/ and have decided that's the way I'm going to try to go. Before I made a start with all those bits of thread I realised I would probably need a few more belaying points that are shown on the plans so I had another go at turning some toothpicks down to form belaying pins. I had previously tried with the toothpicks some time ago but was having too many breakages and eventually bought some from Cornwall Model Boats. These were a bit fat for scale and I had better success in turning them down a bit thinner. I thought I'd give the toothpicks another chance to redeem themselves, and while there were breakages I did get the amount I needed. Here's one of the survivors >>> I also managed to squeeze five cleats on the mizzen mast below the spanker boom saddle and four on to the main mast just behind the main jeer bitts. Here are the main mast cleats >>> At the main masthead the lift blocks and the upper jeer blocks are fitted as well as the block for the mizzen topmast stay >>> The spanker gaff, boom and mizzen crossjack >>> I'm not sure of the authenticity of metal stirrups for the yards' footropes, but I've seen a few models on the forum which have them, so I used 0.5mm brass wire pushed and glued into 0.5mm holes drilled in the yard. I worked for me and has the added benefit of reducing the amount of string tying and making knots - - - and that's definitely a bonus for me! The almost finished mizzen crossjack hasn't met the mast yet and here (in this poor picture) sits along the main top >>> Right now I've still to figure how to create the truss pendants and sling for the crossjack but I've temporarily rigged the gaff and boom as an experiment to see just how tricky it's going to be to get all the necessary rigging done. The next pic shows several weights/clamps hanging around simulating roughly how the gaff and boom might look as I try to calculate all of the difficulties that lie in wait for me >>> In that photo above the mizzen top lies on the quarterdeck wondering how it can ever be fitted with all that rigging around the masthead. Of course, the answer is -- IT CAN'T BE! The gaff peak halliard and the boom topping lift have to be 'un-rigged' before the top can be fitted. I tried this mock-up hoping to find that I might be able to fit the shrouds with the top in position. I undid the topping lift and the peak halliard and clamped the top on to the trestletrees/crosstrees and tried rigging a dummy 1 & 2 shrouds on starboard side. It could be done but with a lot of huffing and puffing and some uttering of unpleasant words partly because of having to mess with trying to get the shrouds down the lubber hole in the top. I then realised that the shrouds could be done with the top removed but even that was tricky when trying to seize the 2 shrouds together. (It doesn't help when trying to see how to tie 2 black shrouds with black thread against the black background of the blackened masthead . . . too much blackness here!) I wondered if the shrouds could be seized when off the mast and tried doing it around a spare dowel clamped in a vice >>> The pair of shrouds can then be taken and placed over the masthead and down onto the bolsters. I realised that if I carry on this way then there has to be a way of identifying each shroud ( 1 - 7 on each side of the mast) so I hung a clamp on each of the first two as seen here >>> With seven shrouds on each side, that's 14 clamps required (and that's only the mizzen - 24/22 on the main and fore!) and I don't have that many clamps - - - nor would there be space for them, so I'm trying to keep them in position by taping them to a card. As none of the sailors have yet placed their hammocks in the cranes, that will be the ideal place to keep the card >>> In the photo two above, an eyebolt can be seen in the underside of the gaff jaws. I found that when lifting the gaff with the throat halliard the jaws of the gaff tended to want to rise up, so I fitted that eye and attached a line (a downhaul?) and cleated it off at the mast below the boom saddle at the port side. (Elevating the gaff with the peak halliard helped reduce the amount by which the jaw wanted to rise, but there was still that tendency, so downhaul it was for me - - it works.) None of the rigging seen in the above photos has any permanency right now, and the masts are only placed in temporarily, but I now have a slightly better idea of how to tackle some aspects of this fun project! In a couple of days I'm off to Portugal so there won't be much rigging done for the next couple of weeks. (There may be a little swigging done?)


-
Hi Nils, Thanks for your comments, and for your very clear explanation. I now understand how the adjustable pendants would allow the required movement of the yard whereas the fixed parrals wouldn't allow for as much as might be needed. In line with most of the square rigged models here I also just intend to have no sails, so the yards will be perpendicular to the masts and will have no need to be braced in either direction. In any case, having looked at the two line pendant system that's what I'll try to fit. (I did say TRY to fit!)