


wefalck
-
Posts
6,493 -
Joined
-
Last visited
Content Type
Profiles
Forums
Gallery
Events
Posts posted by wefalck
-
-
In order calm down my ambitions as teenager, my father used to say that 1 sqm of model railway would cost 1000 Deutsche Mark. Considering inflation since the 1960s and translating this into imperial measures this amount to 100 $/£/€ per square foot today ... I have been repeatedly tempted, particularly around this time of the year, but space is a serious limitation, more than money.
-
-
-
Apologies for my ignorance, you are referring to page 10 of what ? ... and what are 'wip' ?
- Keith Black and mtaylor
-
 2
2
-
That looks like an excellent model - could you post please a link to your building log? Somehow, I didn't manage to find it ...
- mtaylor, Retired guy and Keith Black
-
2
-
 1
1
-
On some kinds of small ships (and boats) iron forks on the bulwarks were used to store long items. I wouldn't know, whether this is correct for your class of ship.
- mtaylor, Keith Black and druxey
-
3
-
How will you treat the hull as such? Perhaps, if the hull is going to be stained as well, the visual contrast between the supports and the hull will be less. Otherwise, to me they don't look so blotchy and such boats would look a bit rough anywhay, won't they?
- JacquesCousteau and mtaylor
-
1
-
1
-
There was a colleague (sadly deceased last year), who turned this into a useful tool and made a small series of micro-meter fences for a group of people here.
When I bought the KS230 nearly 30 years ago, the Böhler machines existed, but were not easy to get (no Internet sales back then), to see in the flesh, and at some stage the company went bankrupt, I believe. The other thing that then let me shy away was the fact that it uses 12 V DC motors - high speed, but low torque.
Perhaps one could use the cast parts from the Böhler and upgrade with a decent motor ...
-
As you mention a tilting saw-blade, that is also something that I would have found useful at times (e.g. for cutting long mitres in certain pieces of joinery), but some people have come up with tilting/angled sleds (there are examples on YouTube for full-size machines that could be adapted).
- Gregory, Canute, Roger Pellett and 1 other
-
4
-
-
At the time, when the PROXXON KS230 was put onto the market (around 30 years ago), there was basically no alternative, at least on the European market. And still, there are not many alternatives for small table-top saws, other than the really cheaply made ones from the Far East. The PROXXON FET and similar ones are much bigger in size and price - the next one up would be small, but full-size circular saws I suppose.
The KS230 was never intended to mill lumber, I suppose, but to allow (not so serious) modellers to cut pieces from softer woods. Of course, it can't cope with 5 mm oder more of hardwood.
I fully agree, that its main weaknesses includes the rather wobbly fence that is only fixed at the front. Some 25+ years ago, when I bought my KS230, I installed an additional fence, that could be fixed at the back as well. This is not so easy, as the body of the saw does not allow access to the full length of the back edge of the table, which I consider a design shortcome.
The other weakness is the width of the saw-slot that is too wide (to accomodate their carbide studded saw-blades). I actually, put a thin sheet of aluminium over the table with a zero-clearance slot for their thinnest blade.
Perhaps the biggest weakness is that the saw-blade cannot be raised or lowered and there is no real 'improvement' that can change that.
It is also rather inconvenient, but it presumably is a marketing thing, that the saw arbor is designed for blades with a 10 mm hole, which basically forces you to buy the blades from them. Standard hole diameters would be 8 mm or 16 mm (that is, if you are metric, of course).
On another note, it would not be very difficult (and you don't need machine tools) to build your own saw with the different parts e.g. for CNC machinery that are now readily available from ebay et al.
-
-
... and stoking tools.
- Jack12477, mtaylor, Old Collingwood and 4 others
-
7
-
The forum https://www.marine-modellbau-und-mehr.de/ is a bit special. The original owner was a rather strange character, he died a couple of years ago. The guy, who continues it, seems to continue also the rather selective admission policies.
The policy seems to be to admit to the forum only people they know or people who have been recommended. As the original owner somehow didn't like me (though I never did anything bad to him knowlingly) and had apparently put me on a black list, the new owner didn't admit me either. When I tried to register out of curiosity under a false name and different email address, hiding even my IP address, I never got a response to my application.
In summary, I don't think it's worthwhile to register there.
- Ras Ambrioso, Keith Black, FriedClams and 3 others
-
5
-
1
-
How did you cut the slots for the metal inserts, free hand with a small power-drill and a saw or cutting disc?
- Roger Pellett, Canute, mtaylor and 1 other
-
4
-
A quick technical question: why did you put the brass 'bulwark' on top of the wood? I thought this kind of inserts were used in areas of open bulwarks in order to get a (nearly) right thickness of materials. Will you eventually remove the wood from behind the brass?
- Keith Black, mtaylor, Canute and 3 others
-
6
-
Looking forward to the gestation of another wonderful model ... good luck!
- Keith Black, Canute, Ras Ambrioso and 2 others
-
4
-
1
-
Allan, it seems that the version that I found strange was used on lower decks only. The upper deck shows the version with the waterway sitting flat on the beam, but is locked in place with a key (which is also a practice I had not noticed before. Technically speaking, that key would transmit the force from caulking the deck-planks into the beam, rather than to the top of the frames - which makes some sense.
-
13 hours ago, allanyed said:
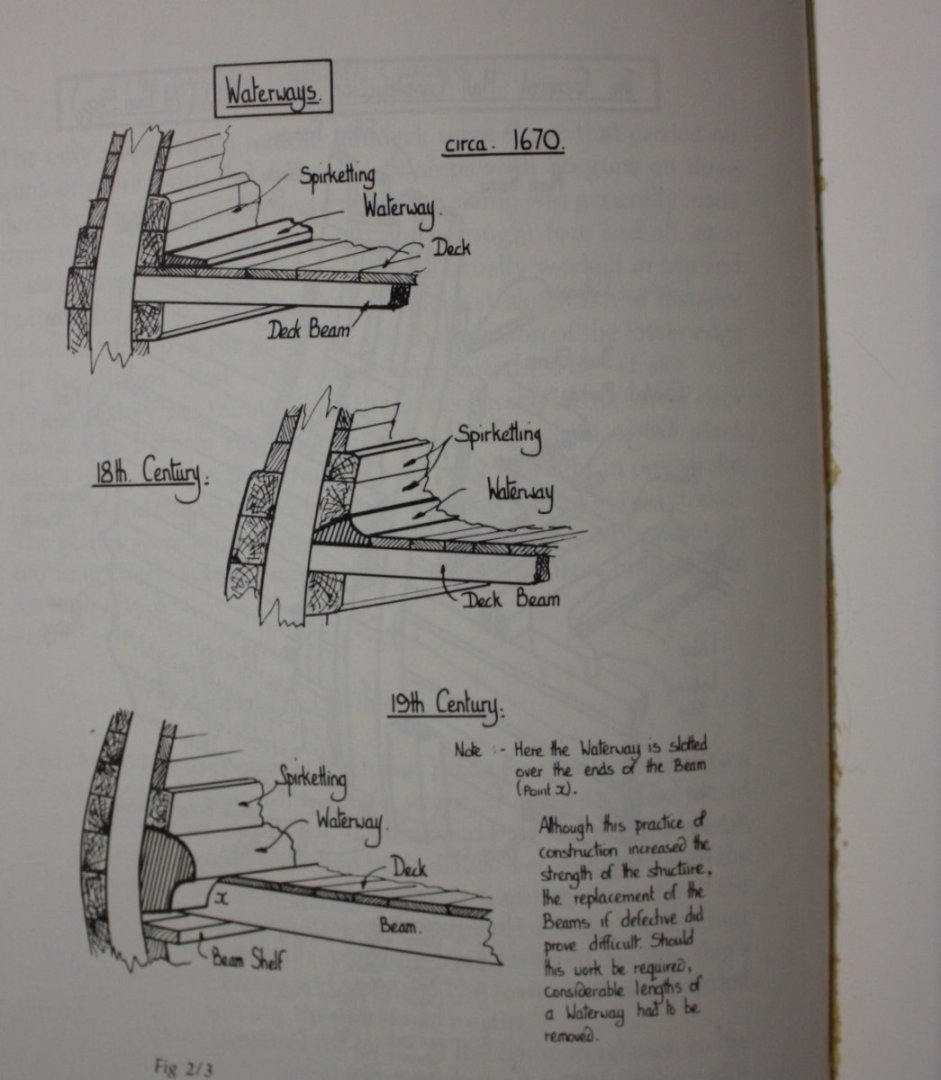
Deviating a bit from the actual subject: The method shown on the last illustration for the 19th century seems to be rather unusal and I wonder, where the author got this from. All my 19th century (European) textbooks show the waterway sitting flat on the beams and not overlapping anything. The arrangements may vary a great deal in detail, also depending on the size of the vessel and whether naval or commercial. The arrangement on this last illustration would be difficult to caulk satisfactorily, just at a place that would be one of the wettest one on a deck.
- mtaylor, tmj and thibaultron
-
3
-
As usual, your encouraging comments are much appreciated !
********
In the meantime, I had to make myself a list of all those tiny details that still need to be fabricated and installed. It is easy to forget them, when you are getting closer to the end …
Crane above the projectile hatch
Projectiles and powder bags were stored in different compartments for safety reasons below the barbette and in consequence, each had its own hatch. That for the powder bags was round, while the one for the projectiles was rectangular in order for them to lifted out on a trolley.
As discussed in a much earlier post, the lithographies from the early 1880s do not show any mechanical device to help the 330 kg heavy projectiles from their storage space to the floor of the barbette. Man-handling clearly is out of question. However, drawings related to a later re-fit show inside the deckhouse a winch marked as ‘winch for the hoisting of projectiles’ and a simple derrick-like wall-crane bolted to the rear wall of the barbette. In these drawings it is not shown how the runner rope would have been led from the crane to the winch, there most have been some sort of opening in the rear of the barbette. Also, not clear is, how the in the gun-crew in the barbette and the men in the projectile storage room would have communicated with the winch-men inside the deckhouse.
Interestingly, in the same drawing a simple wall-mounted crane for the powder-bags seems to be indicated, but no winch belonging to it. Perhaps the 45 kg bags were hoisted up with the help of a tackle.
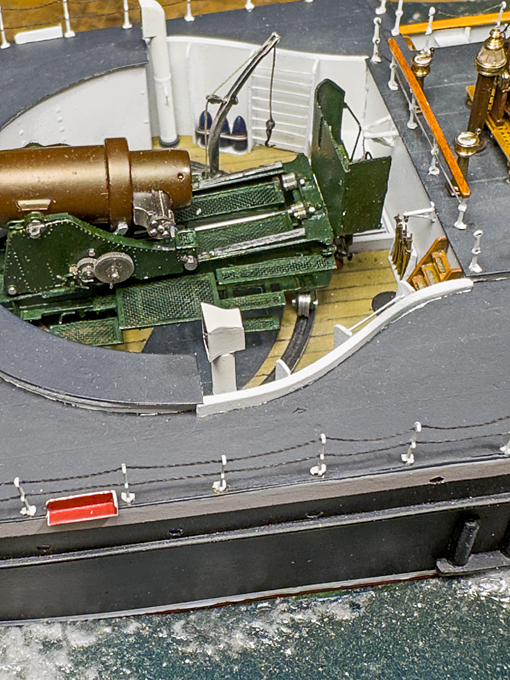
The assembled and painted parts at their place, port view
The small detail (about 3 mm by 3 mm) of the projectile crane caused me a lot of aggravation and took a long time to fabricate. I drew it in several versions to be cut from Canson-paper on the laser-cutter until I arrived at a solution that worked. Assembly was also rather difficult and several parts jumped into the invisible black hole on the workbench, so that they had to be replaced. The pulley was turned from 1 mm steel rod.
The hook was fashioned from tinned copper-wire and the shape built up from Vallejo acrylic paint ‘oily steel’. A short piece of rope was spliced into the ring and the spherical weight built up from acrylic paint.
Likewise, the powder-crane was cut from two layers of Canson-paper, soaked in varnish and painted. There is no information on what it may have looked like. I did not model the tackle, assuming that during the gun-drill in which the model will be presented, no charges were used and therefore, the tackle was not rigged. Only a shackle was fashioned from tinned copper wire.
Lamp-boards
Another small item on my to-do-list were the lamp-boards. According to the very first photograph of SMS WESPE these were placed at the front end of the deckhouse surrounding the barbette. In the lithograph and in later photographs they are shown on short poles towards the rear end of the deckhouse and raised above the rails.
These lamp-boards were laser-cut in three parts from Canson-paper and painted appropriately after assembly. The petroleum-lamps are not shown, as during day-time they would have been cleaned and then stored in deckhouse(?).
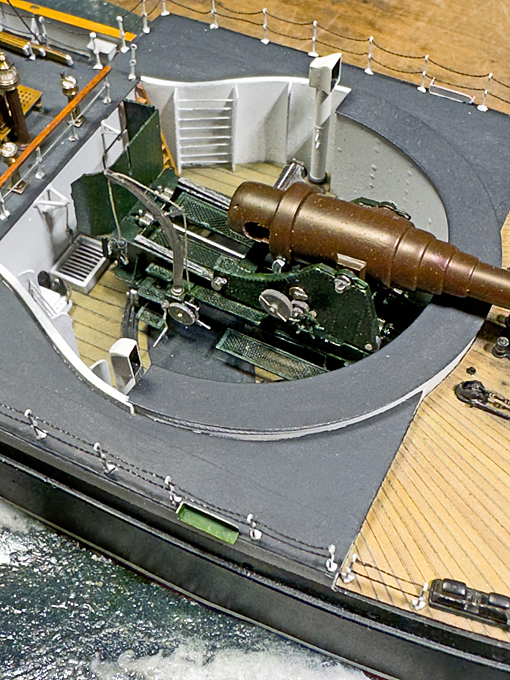
The assembled and painted parts at their place, starbord view
Not much to show actually for the amount time and effort spent on the parts …
To be continued ....
- GrandpaPhil, Keith Black, FriedClams and 20 others
-
16
-
 7
7
-
And some pretty solid equipment in the workshop 👍🏻
-
-
There used to be a guy in Germany, who made small batches of very solid and precise small table saws, but as always, he was a pensioner and at some stage had to give up this business. The market is small and the costs are high, so one can really do this only, when margins can be small because you have other income
-
There are umpteen different types of pin- and hand-vises from different professions ranging from watchmakers, toolmakers to biologists and the medical professions. Some of them are meant mainly for tool-holding, while other are primarily for work-holding.
A while ago, I put together a couple of pictures of the different types of work- and tool-holding devices that I have in my workshop (see also https://www.maritima-et-mechanika.org/tools/workholding/workholding.html). :
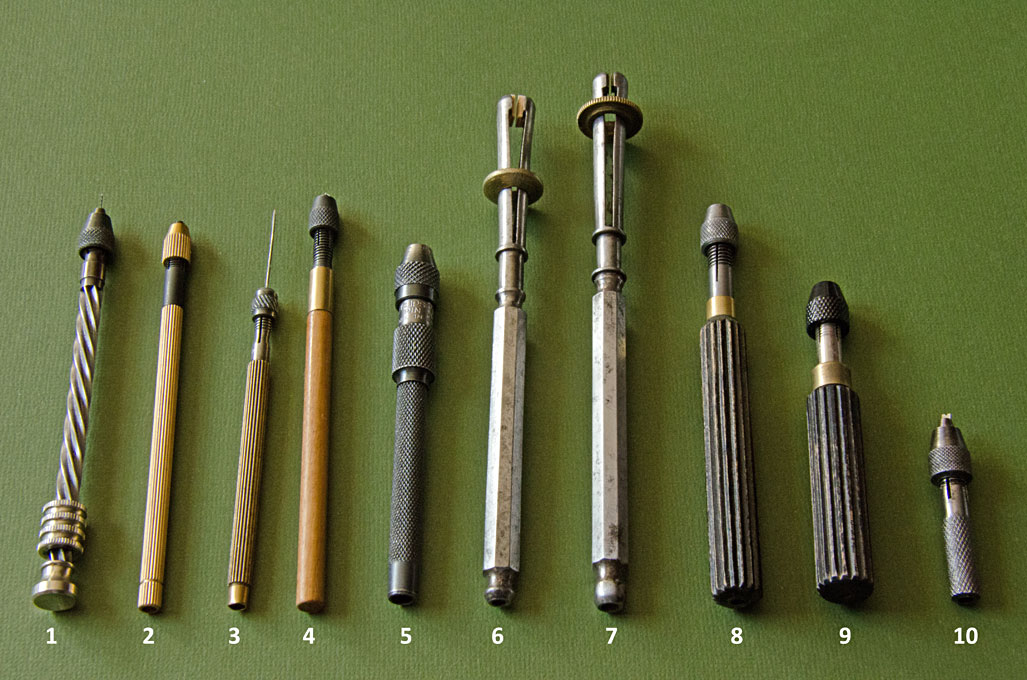
1 - Archimedes drill for watchmakers.
2 - Slender modern pin-vice with hollow fluted brass body.
3 - Slender antique pin-vice with hollow fluted brass body.
4 - Shop-made pin-vice with walnut body and head made from an insert drill-chuck; these drill-chucks are unfit for their intended purpose as they usually do not run true.
5 - Eclipse toolmaker's pin-vice with knurled steel body; these come in different sizes.
6 - French-style pin-vice; these are closed with the sliding ring and have usually brass inserts in the two jaws that can be adapted to special needs;
7 - Dito, here the jaws are replaced in hard-wood for delicate parts.
8 - Antique laboratory pin-vice with fluted wooden handle.
9 - Modern pin-vice with fluted wooden handle; these come in different sizes and capacities.
10 - Antique toolmaker's pin-vice for very delicate work in confined spaces.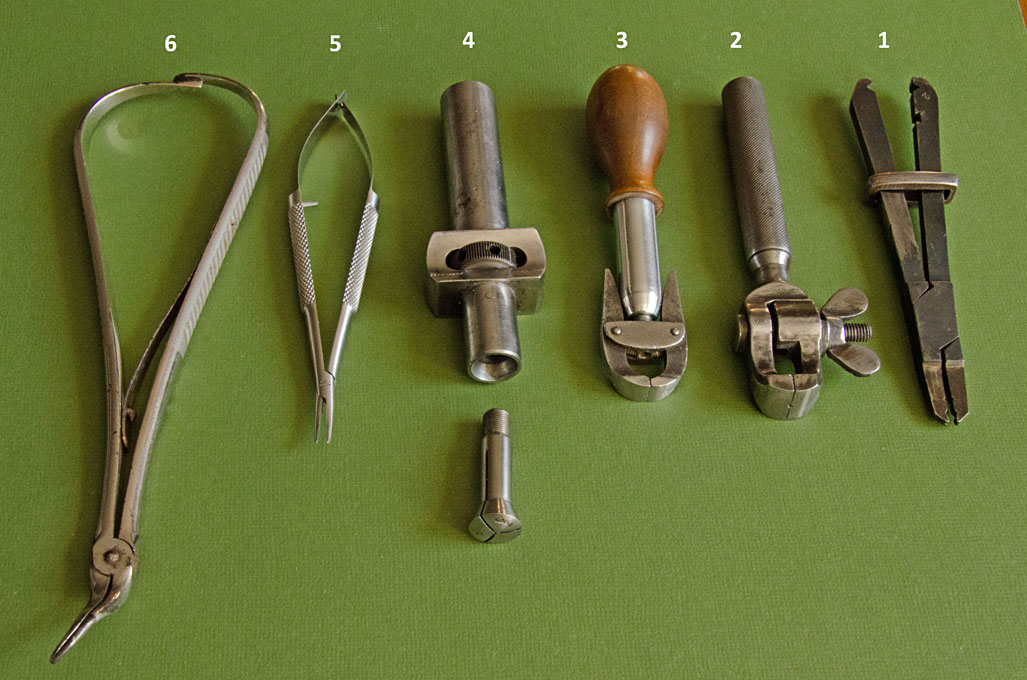
1 - Toolmaker's hand-held vice that is closed with a sliding ring.
2 - Hand-vice with parallel serrated jaws moved by a screw.
3 - Antique american style hand-vice; the jaws are closed by screwing in the conical body; the handle and body have been replaced.
4 - Hand-held collet-holder; this uses horological lathe collets; the advantage is that work can be transferred between the holder and the lathe when it has the nominal collet diameter.
5 - Castrovejo surgical non-locking needle-holder; they come in various sizes, this has medium tips for eye-surgery.
6 - Antique surgical locking needle-holder; these come in a wide variety of sizes and shapes.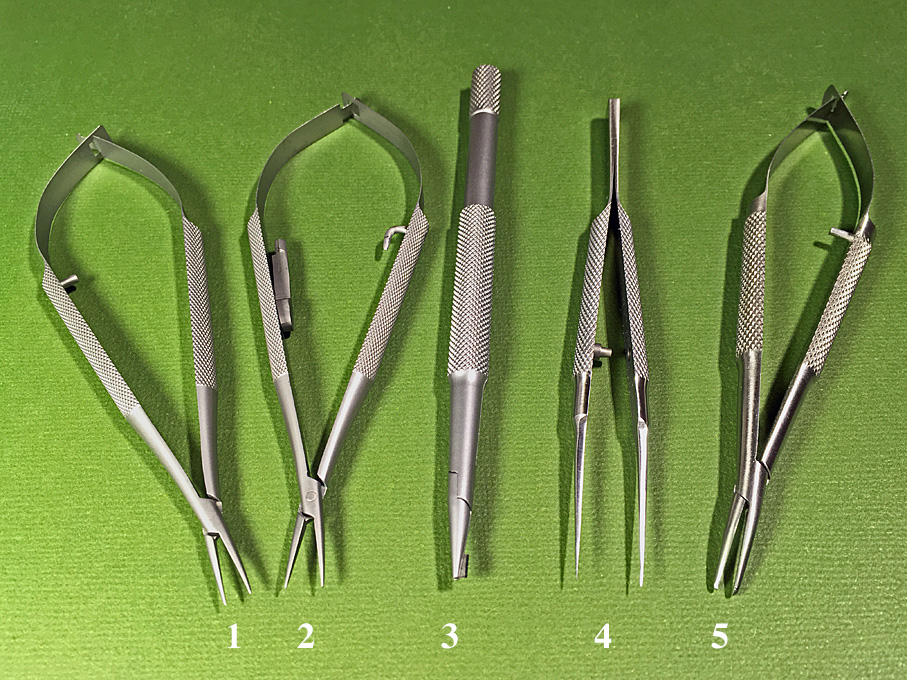
A selection of Castrovejo eye-surgery tools:
1 - fine-pointed non-locking needle-holder with straight smooth tips
2 - fine-pointed locking needle-holder with smooth tips
3 - fine-pointed blade-breaker - this are used to break off pieces from razor-blades to be used a very sharp scalpels
4 - very fine-pointed tweezers - they are stiffer and less springy than the typical watchmakers or biological tweezers
5 - medium-pointed non-locking needle-holder with curved smooth tips
And finally a small precision bench-vise with 30 mm jaws that I mounted on a wooden stand so that it can be shovelled around the workbench. There used to cast-iron bases for these, but they are extremely rare:
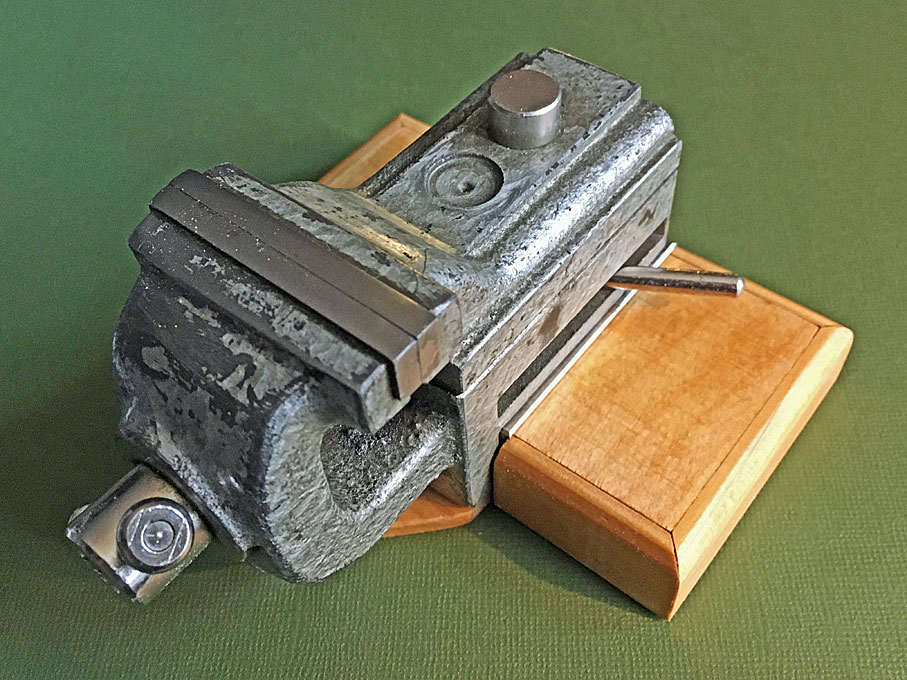
Most of these tools are 'antiques', but some are still available new. Interestingly, different countries seem to prefer different types of tools. For instance nos. 6 and 7 in the first picture I have only seen in France, while no. 3 in the second picture is an US American tool type.
- Canute, Roger Pellett, mtaylor and 3 others
-
6


RGS Rotary Snowplow by yvesvidal - DURANGO PRESS - On3 - 1/48
in Non-ship/categorised builds
Posted · Edited by wefalck
I would rather build everything myself, rolling stock as well as buildings etc. ... as I would perhaps go for a 1860s to 1880s subject, there is not much on the market anyway, a real niche subject.
I have been looking over this site from time to time: https://www.carendt.com/micro-layout-design-gallery/. There are some harbour ideas as well, combining the best of our two worlds ...