


wefalck
-
Posts
6,664 -
Joined
-
Last visited
Content Type
Profiles
Forums
Gallery
Events
Everything posted by wefalck
-
 You could still 'beef up' the bulkheads where they are low with some wood shims and then sand them down where they are high. Always check for symmetry. This will be an interative procedure with quite a few iterations, but is time well-spent, because it will save you a lot of frustration later on - you will be never able to plank the boat properly, if this is not done ...
 -
Dugout canoe build
wefalck replied to reklein's topic in NAUTICAL RESEARCH GUILD - News & Information
Never used an adze myself, but that's what most full-scale boatbuilders used all over the world for hundreds, if not thousands of years. I gather the Alaskan people would have used stone adzes before coming into contact with the Europeans? On the Pacific islands they used mussel shells instead. -
Waterslide Decal Paper
wefalck replied to hof00's topic in Painting, finishing and weathering products and techniques
The problem comes when you need white markings, as no (home) printer prints with white ink. For that you may have to go to a commercial printing house that caters for hobby applications. -
@rudybob, allow me to make a couple of observations following on from the discussion in the other thread and what the others have observed already: - I don't actually see any tick marks on the frames, which seems to indicate that you have not yet determined the (approximate) width of each strake and their distribution over the hull. This is done by e.g. taking the distance between the keel-rabbet and the intended top of the planking along the sheer. Each distance, which varies along the boat, has to be divided into same number of equal plank widths. You then mark of these plank width on their respective frames - Using a narrow strip of transparent paper, long enough to cover the whole boat, for each plank you then can mark out the upper and lower edge of the plank on the basis of the tick marks. However, you do this as the planking progresses for each plank in order to get the real lower edge, not the one you may make marked off earlier. You connect the points using a french curve or a thin wooden batten. This gives you the outline of the plank and you can shape the wood accordingly with some margin for fitting. - Looking at your very first picture, I have the impression, that the assembly of frames has not been fully faired. You can check that by putting a thin batten onto the hull either parallel to the later planking or at a slightly oblique angle. If you fix it temporarily at one end and then press it down on each subsequent frame, you may notice that on some you get a buldge in the batten and in others there is gap to the frame. You will have work down cautiously the high frames. However I would check first, whether on the other side of the frame you may not have the opposite phenomenon, which indicates that the frame is either to far starboard or port and would need to be realigned ... Hope that helps a bit
-
Dugout canoe build
wefalck replied to reklein's topic in NAUTICAL RESEARCH GUILD - News & Information
Are you sure they used scoria? The heat capacity would be very low due to their porous nature. Something like basalt would be much better and would not crack easily either. -
Dugout canoe build
wefalck replied to reklein's topic in NAUTICAL RESEARCH GUILD - News & Information
In Polynesia/Melanesia they seem to use clamps that function similar to the ones used by our boatbuilders. The sides are then pulled apart using twisted together coir ropes of which one part is attached to the clamps and the other to a piece of wood driven into the ground some distance away. -
Dugout canoe build
wefalck replied to reklein's topic in NAUTICAL RESEARCH GUILD - News & Information
I gather they used heat to widen the dugout. This was common process among many peoples building dugouts. Either a fire was lit inside the semi-finished dugout or heated stones were placed into the almost finished one and the side pulled out using clamps and levers. This is not to be confused with using fire to char the wood to make it easier to work on it with stone tools. -
Take your sea-sickness pills - they had no dampening elements (shock absorbers)
-
I don't want to divert your log, but perhaps a couple of comments on imitating wood from my perspective: I don't use inks, I only use acrylic paints. The simple reason is, when you apply ink to a barely porous medium, such as a base-coat of acrylics, the next application of ink or paint will simply wash away the previous work - unless you used a permanent ink. This would be different, if you used the ink say on paper, because it soakes into the paper and gets trapped in the fibres. I prefer to acrylic paints, because one can work fast, it only takes minutes for the washes of paint to dry. Some people use artists' oils, but there you will have to wait several days between applications, even if you work quite 'lean' with a solvent, rather than lineseed oil as medium to make the paint flow. Acrylics, particularly when applied with the airbrush seem to have a slightly porous surface, which is good, because a base-coat applied with the airbrush provides a good key for following washes applied with the brush. However, once you are done with your 'wood-graining', as it was called as a recognised trade, the pattern will look like wood, but not the surface - it will look like just what it is painted. By applying a coat of gloss varnish, you achieve a similar effect as when applying a penetrating sanding-sealer or varnish to wood: the varnish makes the light being less reflected from the surface roughness, it is being dispersed into the paint layer, giving the imitation wood 'depth'. Over this first coat of gloss varnish I apply a couple of coats of satin-varnish, say if I want to have the sheen of 'oiled' wood. For 'varnished' wood I may apply a mixture of satin and gloss varnish to give it the right sheen (but this may also depend on the product you are using). For 'bare' wood, such as decks, I spray on a final coat of matt-varnish. It is also important to apply the washes of acrylics with a brush and always in the direction of the assumed wood-grain.
- 2,699 replies
-
- 6
-

-

-
- heller
- soleil royal
- (and 9 more)
-
You are probably right re. dimensions. I just looked that the sketches with the figures of post #15 and there the distance of the tiller to the lateral coamings didn't look too big. I kind of imagined a person sitting on the lateral decking when steering - if not standing. In a pleasure boat comfort is probably an important criterion, while in a working boat the practicalities of doing whatever the boat was supposed to be doing are the key considerations. A working boat may have been steered standing up most of the time, which also give a better field of view to the helmsman.
-
Dugout canoe build
wefalck replied to reklein's topic in NAUTICAL RESEARCH GUILD - News & Information
OK, different peoples, but do they relate to the Haida dug-outs in some way? -
It is effectively a matt varnish. It is called a 'medium' in artists' vernacular because it would be mixed with the paint in tubes to change its consistency or sheen. Any varnish can be used as a 'cement', as long as the solvent can evaporate, which requires at least one porous surface.
-
Dugout canoe build
wefalck replied to reklein's topic in NAUTICAL RESEARCH GUILD - News & Information
I think it doesn't work, when you don't have a FaceBook account (like me). -
I believe tiller extensions were something that came into fashion on racing boats in the early 20th century, but would not normally be found on cruising boats like this one. Option 1 is probably less likely to be found on a boat of this type for a couple of reasons: one it is very difficult to put the tiller over hard, the aft bench gets in your way, even if you make the tiller longer. The second is that typically you would have a storage space under the decking in the stern, which would be more difficult to access. On a sailing boat you would be spending most of the time sitting on the edge of the coaming (as was pointed out above), so a bench in the stern is not very useful. In fact, I remember from my practical sailing days, we usually sat on the windward decking with the feet on the benches, rather than sitting on the benches, that were only used at anchor or when motoring.
-
One question: how could you fit the second plank 'correctly' without permanently fixing the garboard plank? It is quite likely that, once the garboard plank is in place, you will need to make further adjustments to the next strake up. Otherwise, it is always advisable to work symmetrically, to avoid distorting the frames. Also, it is easier to judge symmetry, when you alternate between starboard and port.
-
Gun Port Yellow?
wefalck replied to Dave_E's topic in Painting, finishing and weathering products and techniques
Thanks for asking, Glenn, in the signature line there is a link to my own Web-site 'Maritima-et-Mechanika'. There are not that many ... -
Gun Port Yellow?
wefalck replied to Dave_E's topic in Painting, finishing and weathering products and techniques
The dockyards supplied the annual allowance of pigment to the ships and ships were expected to repaint twice a year according to: Vale, B. (2020): Pitch, Paint, Varnish and the Changing Colour Schemes of Royal Navy Warship, 1775-1815: A Summary of Existing Knowlege.- The Mariner’s Mirror, 106(1): 30-42. So they had to use the pigment given to them, but the coloured pigment was usually mixed with e.g. lead-white to increase the covering intensity and to make it cover a larger surface area. Within limits, captains were allowed to deviate from the colour schemes as long as they stayed within the allowances. Any extra material they had to pay for from their own pockets (or squeeze out of the food allowances for the crews). -
Gun Port Yellow?
wefalck replied to Dave_E's topic in Painting, finishing and weathering products and techniques
I often often give the actual paint coat a make over with acrylic varnish to pull everything together and to adjust the sheen - not every surface has the same sheen (as some small-scale modellers seem to prefer), depending on what kind of paint was used on the original. Vallejeo, for instance offers, gloss, satin, and matt acrylic varnish, which behave slightly differently, whether applied by paintbrush or airbrush and one can also adjust the sheen by mixing them. This would work for other brands too, of course. -
Gun Port Yellow?
wefalck replied to Dave_E's topic in Painting, finishing and weathering products and techniques
In the 18th century various yellow pigments were available also in quantities that would have permitted to paint ships with it: Naples Yellow - Pb(SbO3)2 or Pb3(SbO4)2 - which is a very bright yellow, e.g. Vallejo 70.953 (or RLM4), Lead-tin Yellow - Pb2SnO4 - also a bright yellow, and Yellow Ochre - FeOOH (but contains a mixture of differen iron oxihydroxides) One would need to find some information, what kind of pigments the Admiralty actually prescribed. Vallejo, btw. was originally a manufacturer of artists' paints and then branched out into offering modelling paints. I found the pigment in their 'Model Air' range, pre-thinned for airbrushing, extremely finely dispersed. -
It seems that these pirates really had been a plague in the western Mediterranean until the 1840s or so. They frequently attacked the Spanish and French coasts and had even strongholds on what is now the French Riviera, parts of which are still called Côtes de Maures, after the French term for Moors. Ships from ports with lesser naval powers had to pay tributes to get safe passage, while naval powers such as Britain, the USA or France were able to force treaties on them to give safe passage. The newspapers were full of reports on pirate attacks well into the middle of 19th century, which also prompted the small Prussian navy to launch a first amphibious attack on one of the suspected safe heavens in North Africa.
-
Will that be built over a former or templates? I suppose these boats had bent-in frames to make the hull light, perhaps with couple of sawn ones as templates? Will make a nice show-off woodworking project I think. And you are right, sometimes we make plans for new projects for years and then we come across something that catches our interest ...
-
These spacing cards are a good idea, I use them also, when rattling down. Also draw the shrouds, then you will immediately see, when you are pulling them out of shape. Don't fix them with glue until you have finished the whole set - this allows you to make final adjustments. Another practical thing to consider is to position the model so that you can work in a comfortable position on it, this is particularly important for the topmast- and topgallant-ratlines. If you have to constantly keep your arms suspended above mid-chest level, this becomes very tiring and you will get sore muscles in the back.
-
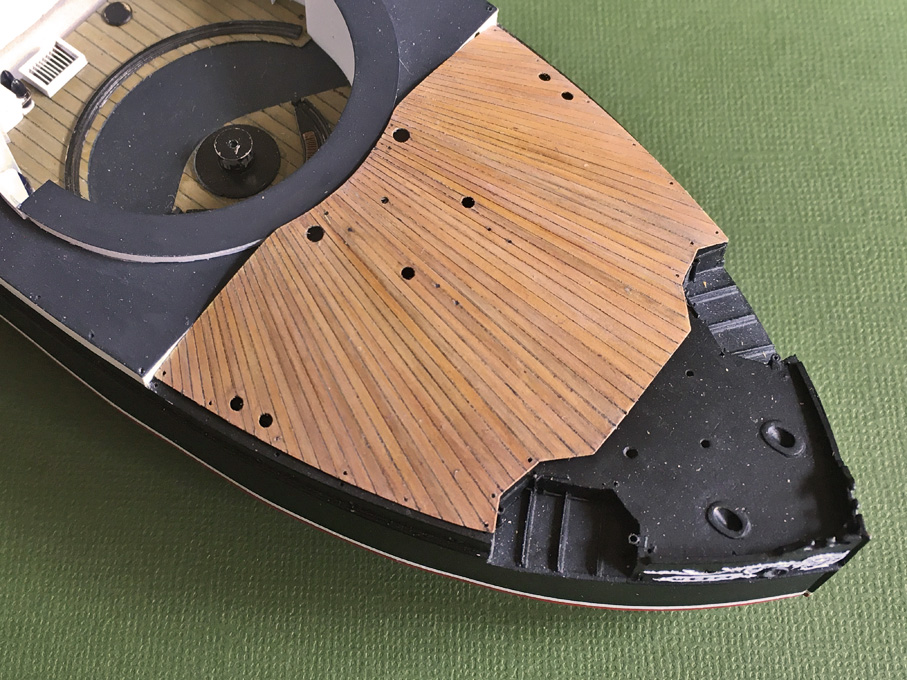
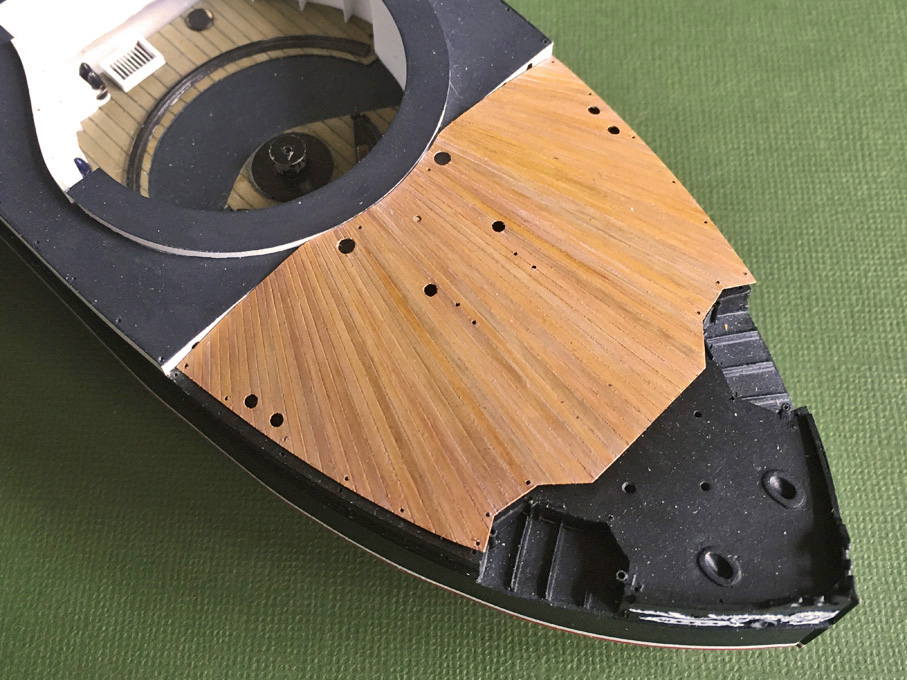
Quarter-deck v4 While the wooden quarter-deck previously produced (v2) was not entirely bad, it lacked the crispiness I had wished for and also the colour was somewhat murky, more like oak, and not like the teak it was probably made from. In addition, I found a mistake in its shape that could not be corrected. This quarter-deck is somewhat unusual in lay-out, as the planks are radiating with the gun-pivot as centre. This lay-out probably was chosen to minimise the effect of the certainly considerable blast from the 30.5 cm-gun. Apart from the fact that most wood-species would be too coarse at 1:160 scale, it would also be a challenge to produce such deck with tapering planks only 0.4 mm thick. A painted version renders more likely a realistic representation, is technically easier to achieve and more in line with the style of the model. The shape of the wooden deck was cut from a 0.4 mm thick sheet of bakelite-paper and carefully fitted to the hull of the model, which was quite a bit of work given the multiple curvatures. The caulked seams were indicated by narrow engraved lines as described earlier in this building log. The holes for all the fittings were also drilled at this stage. In between, I had tried using black styrene, rather than bakelite-paper as a basis for the decking (v3). The rationale was that I would clear out the engraved lines after painting down to the black plastic. This strategy did not work for two reasons, namely the styrene (Evergreen™ sheet) is much softer than the bakelite and the acrylic paints form a kind of quite soft skin, which tends to rip in flakes when trying to re-engrave the lines, so that I dropped this idea. The wood character of the quarter-decking was to be achieved by giving each plank a slightly different colour, imitating the natural variability of wood. The piece was given a base-coat of Vallejo Model Air 71075 ‘sand (ivory)’ using the airbrush. In a next step single planks were randomly given a light wash with Prince August 834 ‘natural wood transparent’ or Vallejo Model Air 71023 ‘hemp’ (which turned out to be a bit too dark actually). In a next step randomly selected planks, particularly those ‘hemp’ ones were given a very light wash with Vallejo Model Air 71288 ‘Portland stone’. Another very light wash with Vallejo Model Air 71041 ‘armour brown’, toned down with yet another very light wash using Vallejo Model Air 71132 ‘aged white’, pulled everything together. Painted quarter-decking before sealing it with varnish To facilitate the picking out of the caulking seams, the decking was given a sealing coat of acrylic glossy varnish. The definition of the caulking seams was enhanced by running the back of an old scalpel along them, making impressions, rather than cutting through the paint. The caulking was imitated using a 0.05 mm marker with pigmented permanent (hopefully) ink. After each line was drawn, the ink was allowed to dry for a few seconds and the excess wiped off with a barely humid finger. This leaves the ink only in the incisions, resulting in a very thin black line. In spite of the glossy varnish, a haze of the ink is left on the planks, darkening them somewhat, but this effect was calculated in, when setting out the original paint scheme. The surface was lightly rubbed down with an abrasive foam block (as used in mani-/pedicure) to thin down the glossy varnish without damaging the underlying paint. This rather complex procedure was concluded by applying another very dilute wash of Vallejo Model Air 71132 ‘aged white’ and finally a sprayed on coating of Vallejo matt varnish. Finished quarter-decking ready for final installation To be continued ....
- 935 replies
-
- 22
-

-
-
Ulitmately, its your decision, of course. Personally, I regret short-cuts I took and mistakes made in ignorance decades ago when looking at my models ... don't complete something to just complete it, be patient, until you have the right information - that would be my opionion for what it is worth.
-
Mini lathe for mast making etc.
wefalck replied to Charlie pal's topic in Masting, rigging and sails
Ball-bearings are a good idea, also, when working with metal. Mechanics of old sometimes made make-shift steadies just from a piece of thick cardboard into which a suitable hole has been punched or drilled. As the diameter decreases, you will have to use a new cardboard with a smaller hole. This makeshift 'steady' could also be screwed to the follower steady.