


wefalck
-
Posts
6,651 -
Joined
-
Last visited
Content Type
Profiles
Forums
Gallery
Events
Everything posted by wefalck
-
 I think you are getting there, Keith! As I say, patience and perseverence are probably the most important tools in our box Concerning very small seizings, it is of course diffiult to reproduce them at very small scales, but one can fake them using some very soft thread that is not twisted together. Over here in Europe, one can find such thread in the sewing department, where it is sold for repairing ladies' stockings - but it becomes harder to get by, as few women seem to bother with repairing them. Another source are shops that cater for the fly-fishing fraternity and that may be a more realistic proposition in North America. You only take one or two turns around the shrouds etc. and then go around the middle and make a knot in the back, so that it is not really visible.
 -
I like to build 'nice' machines ... but these extruded profiles have become quite easily accessible in small quantities. I also bought some 4 mm shafts a while ago - the idea is to be able to use the hooks and cheap collet-holding chucks from my 'third hand'. I have to see what other suitable materials I have in stock. Something I learned from playing around with the Märkline machine was that it is better to put the crank (I am not intending to motorise it for the time being) onto the connecting shaft, rather than onto to the short shaft with the hooks. If you do the latter, the driving force to the left side has to go through two connections, namely the gear wheels on the right and the left - in the former case you drive both sides symmetrically from the same connecting shaft. Seems to work better. I don't understand, why the commercial serving machines are built so 'lofty'. OK, you may want to have some some clearance around the material to be served so that you can pass a reel with yarn around or have space for the traveller with yarn (see archjofo's building log), but the commercial ones appear to be excessively spidery. I will keep mine low and compact, as the very thin material I will be using may not support the weight of a traveller.
-
There seems to be a collector scene for almost everything, but these Märklin sets and parts have been so ubiquitous, that prices are quite low. When we had to clear out my parent's house four, five years ago, when my mother (97) moved to a retirement home, I checked on the value of a lot of stuff - whether it was worthwhile selling off separately or leave it to the house-clearance guys we had to use. Märklin/Meccano and Lego are two different things and train different skills in children, but as Lego seems to have become more and more 'technical' (after my time - I still remember, when wheel units were introduced around 1962), it probably did kill the market for the others, which where much more expensive to produce. I remember seeing Lego as a kid as something to build houses and such stuff and Märklin/Meccano as something to construct machines and engineering structures, which is what they originally were meant for. Anyway, the Märklin/Meccano route does not have any advantages apart from prototype, proof-of-concept construction. Originally toyed with the idea of making an all-Bakelite machine (sort of replicating 1920s/1930s style of engineering) and bought some thick material, but I don't have a big enough table saw, that can cope with 6 mm Bakelite. I probably go for an extruded aluminium profile backbone with T-slots, which has several advantages. I also considered making the gears myself, I do have a M 0.5 hob, but perhaps that's too much effort for such a tool and would delay completing WESPE even further ...
-
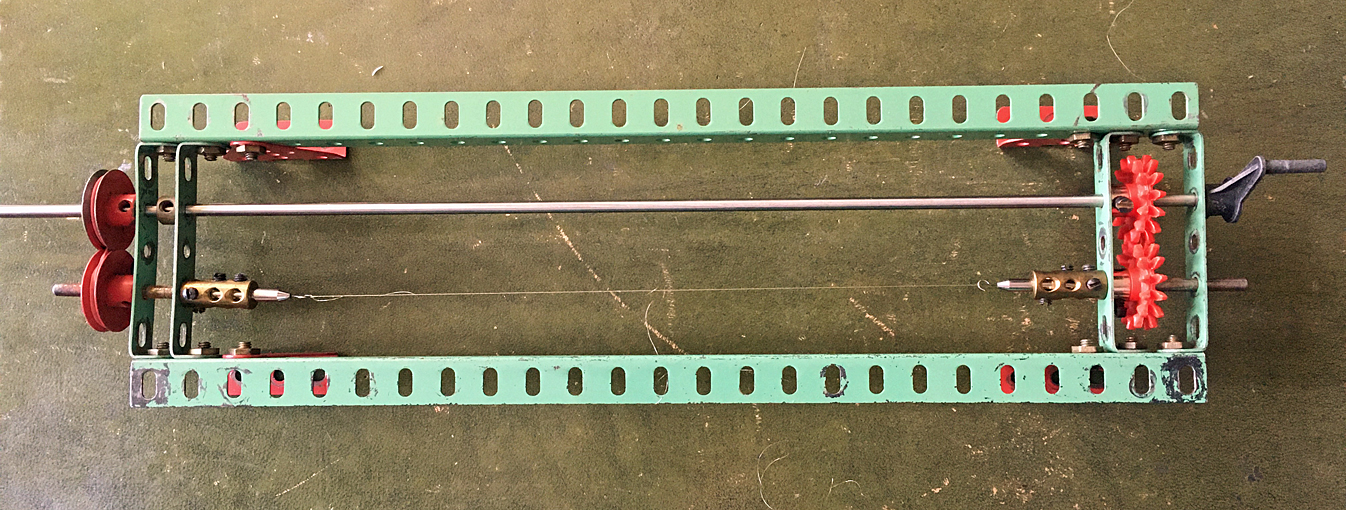
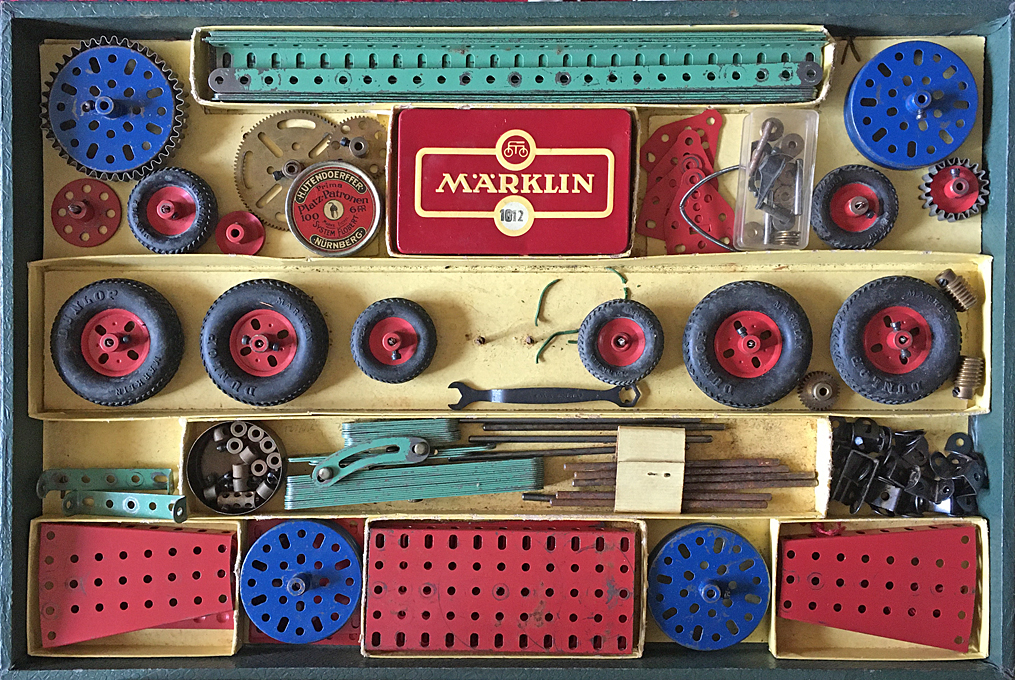
Thanks again for your kind consideration ! ************************************ Interlude: Serving machine On this model there is very limited rigging, four simple shrouds to the mast and the funnel stays. For the latter I have not come to the final conclusion, whether they may have been chain or wire. In any case there would be no serving on them, except perhaps the eyes, in case they were wire. The mast shrouds almost certainly were wire in 1876 on a ship like this. Judging by the available photograph, they were put over the mast with eyes, which is why the mast was prepared as discussed in the previous post. Where wire shrouds go over the mast, they would be served to prevent chafing and cutting-in. As the mast does not carry any sail, the shrouds do not need to be very heavy, 16 mm diameter, i.e., 0.1 mm on the model would be sufficient, as they are also only around 16 m long. The plan is to fashion them from six strands of 0.007 mm silver wire (as apparently used to repair mobile phones and therefore readily available on ebay et al.). They would be made in pairs, looping over the mast from opposite sides and with a seizing to form the eye. The serving required would be about 10 mm long. Medium-sized Märklin construction set of ca. 1960 Given this small amount of serving needed, plus perhaps a couple of block strops, I thought I would get away for the time being with a makeshift serving machine. I kept my childhood Märklin construction set (the German equivalent of Meccano) for such ‘emergencies’ and proceeded to knock up a serving machine with it. Makeshift serving machine made from Märklin parts Unfortunately, it turned out that I only two gears of the same size, while for a serving machine one needs two pairs with the same module and tooth count, so that they have the same distance of the shafts. I had to use two V-grooved wheels with a crossed rubber belt instead. I first twisted the six strands of wire together to form the wire ‘rope’ by uncoupling the drive on the left and then started to wind a 0.05 mm wire around it. While the machine worked in principle, due to the improvised drive-train on the right and the absence of proper shaft bearings, it turned only in jerks and did not run smoothly. While it was a prove of concept, that one can actually serve a 0.1 mm wire rope with say 0.007 mm wire (the thinnest I can get), it requires a precision machine to handle the very delicate material. I had planned to postpone the construction of a proper serving machine until S.M.S. WESPE is finally completed, but will have to look into it now. The ideas are there, but I have to order the necessary materials first. To be continued ....
- 935 replies
-
- 11
-

-
Nice blockmaking - I agree that sometimes the old, traditional methods and techniques turn out to be the best. I did a lot of experimentation on this and then basically came back to something similar as described already 50, 60 years ago in modelling textbooks. I like the idea of the half-round sanding jig ! There are leather-splitting tools on ebay et al. (there must be thousands of craftsmen in China and India, so there is apparently a huge market for specialist tools like this), but Johann (archjofo) indeed made his own to produce leather only a few tens of milimeters thick.
-
Nice brass work! I hope your rail stays put on the mast. I would be a bit worried about differential thermal expansion of the metal and the wood, and about knocking it off by accident. Perhaps glueing it into a slot in the mast would have been more secure?
- 153 replies
-
- 4
-
-
- Ancre
- Bruno Orsel
- (and 2 more)
-
I gather one would need to know what kind of ship we are looking at, also whether it was commercial or naval. Rot would be probably less an issue, but splitting under strain or other damage. On small commercial vessels that operated on low margins, there would have probably not enough money around to pay for fancy metal cappings ... On museum pieces and historic ships I have anything, from nothing to fabricated sheet metal caps to cast bronze caps. However, I have not seen any leather caps and would doubt that it would work - the ropes would quickly tear the leather to pieces, I think.
- 1 reply
-
- 1
-
-
Air brush vs paint & brush
wefalck replied to jefferyt's topic in Painting, finishing and weathering products and techniques
Always keep it on, so that you do not accidentally damage the needle ... -
3d printing crew figures
wefalck replied to highlanderburial's topic in 3D-Printing and Laser-Cutting.
A couple of years ago or so I became aware of HeroForge through a figure-forum I think and looked around a bit. Apart from the proportions, I didn't find the options available very suitable to create mid- to late-19th century naval figures, so I gave up on that idea. -
Air brush vs paint & brush
wefalck replied to jefferyt's topic in Painting, finishing and weathering products and techniques
I looks to me that the nozzle is missing - the exposed needle is strange - the nozzle forms the spray cone. The double-action just requires some discipline: pushing the button down for airflow and the backwards to add paint. -
3d printing crew figures
wefalck replied to highlanderburial's topic in 3D-Printing and Laser-Cutting.
Nice modelling! However, I find that these Heroforge figurines look to much like 'wargaming' figurines (which they probably are) - their proportions are too stocky built, too long extremities and too big head for the body. Also the trousers look a bit strange, the crotch sits too high to be comfortable not to say that they would impede the movement up in the rig. At that time trousers were cut very high on the waste, so that the body is well-covered by the relatively short 'monkey'-jacket. -
My experience with re-chucking such small pieces is, that it is rather difficult to get them right on centre again. For this reason I prefer a method in which all the turning can be done in one set-up. Your idea of using a sort of micro-wax chuck, as the watchmakers would call it, could in principle work, but by removing it from the collet to release the finished piece, one would loose the concentricity. One problem with my 0.2 mm collet seems to be that it pinches the part too much at the front, so that too much of the shear forces are concentrated at the point between the shaft and the handle, leading to the handle shearing off. I have a set of brass insert collets (which watchmakers use for working on very delicate parts on which they don't want to mar the surface), but I think they also only go down to 0.3 mm. Once could make one, that clamps the shafts over their whole lenght, such distributing the forces. All this would be quite a bit of work. If I had a precision tool-grinder with a microscope mounted on it, I would grind a combination of rounding-off and parting tool ... Another strategy I have been thinking of is to only turn down to shaft diameter the part that sticks out from underneath the pin-rail, while leaving the part what would be in the pin-rail/mast collar the same diameter as the lower end of the handle. This would have the advantage of being stronger and allow me to drill a larger diameter hole into the pin-rail, but the height of the pin would need to be set by eye.
-
Brian, see above. Surprisingly, I only lost one of them, when installing them. Actually the steel is a bit of a pain, as I cannot get my tweezers properly demagnetised (I have a demagnetiser as used by watchmakers, but it doesn't seem to work too well ...) and this tiny parts hold on to them, sometimes without me noticing. Actually, the wood effect is just brought about by applying the darker wash unevenly and in the direction of the supposed wood-grain. Also, one has to choose the right colours and work with glazings and varnishes to give the material 'depth', i.e. the impression of being varnished or oiled. Imitation of wood by painting once was a popular technique in interior decoration - to turn cheap woods into something looking more expensive, when for structural strength reasons other materials had to be chosen, or when wood was too expensive, e.g. for panelling walls. There are antique and modern text books on the subject.
-
Caution, not too high spindle-speed, veery low infeed and ... a matchbox underneath to catch the part (visible on the last photograph). It is also important to wipe off all swarf before proceeding with the last cut, because the swarf can catch the part on the cutting tool or make it spin around with the stock. Also, one has to learn to live with losses, but in this case surprisingly, I did not loose any at this step. Later on, I lost one finished pin when trying to insert them, that flew across the bench, but I heard it dropping and found it again - only to jump off the tweezers again into some unidentified black hole on the bench
-
Thanks, gentlemen ! Keith, it sounds indeed logic to begin with the step-wise turning at the thinnest end, the shaft. This, however, would leave you with rounding the head of handle in a different set-up. While this is quite feasible for diameters above say 0.4 mm (and I have done it), it is very likely that the handle would just shear off when you try to do this with shaft of 0.2 mm diameter - and I do actually have one of the rare 0.2 mm collets. So shaping the handle first was a much surer procedure and slipping with the files was inconsequential, while in the other case one may have just snapped off the handle. Also, plunging into the material at 0.2 mm cutting width seems to have excerted less forces onto the part than taking side cuts towards the collet.
-
Search for AlexBaronov and Imperial Yacht. The process is galvanoplastic, which has been used for some 150 years to duplicate objects. Alex uses a sort of inverse lost-wax casting. The core is CNC-milled from jeweller wax and then coated in a conductive paint. On this copper is deposited electrolytically to a sufficient thickness. The core is simply melted out. Another technique used is metal spinning.
-
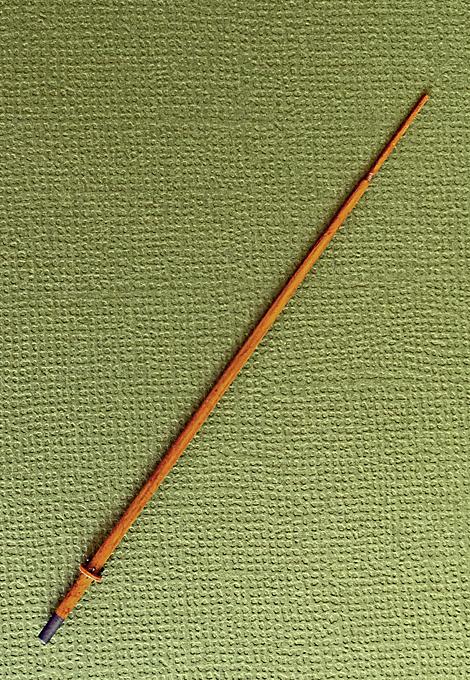
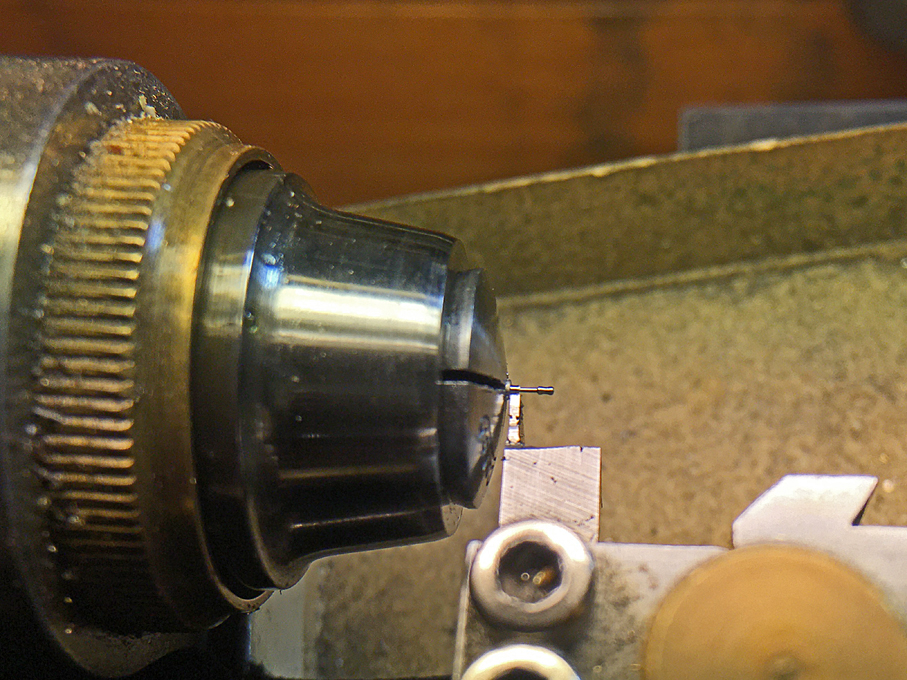
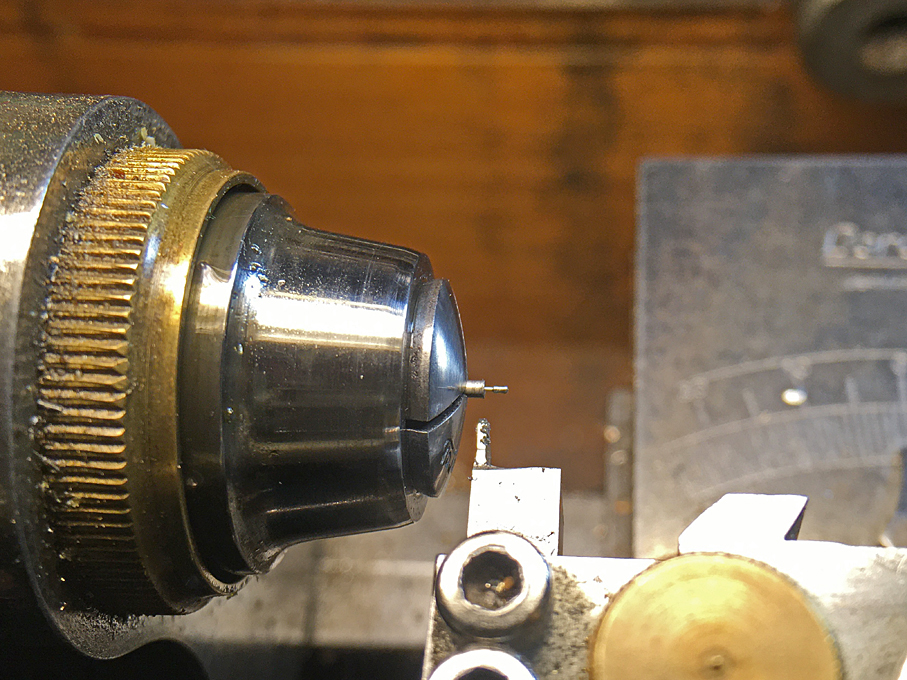
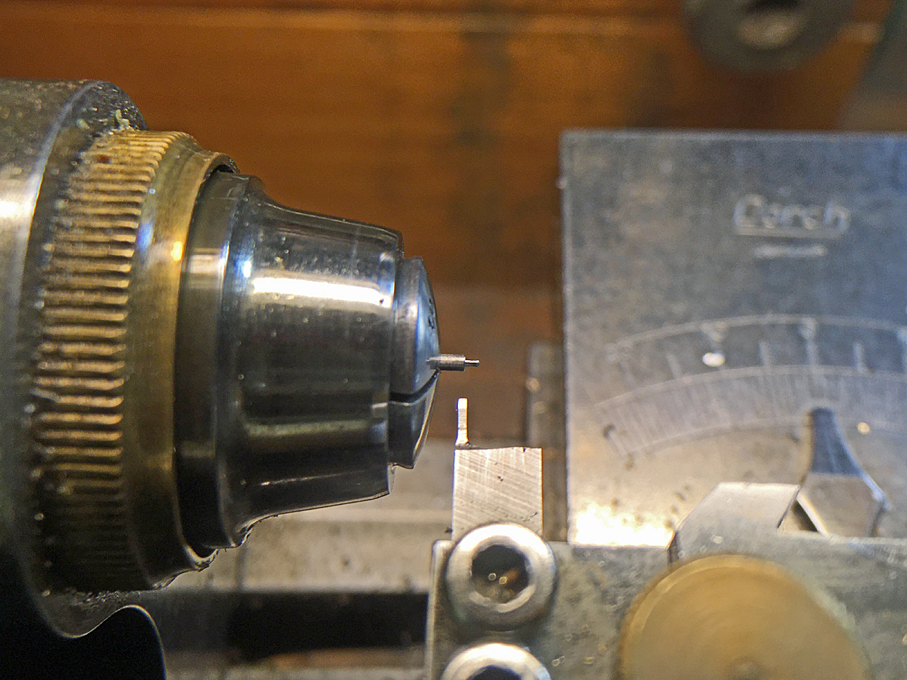
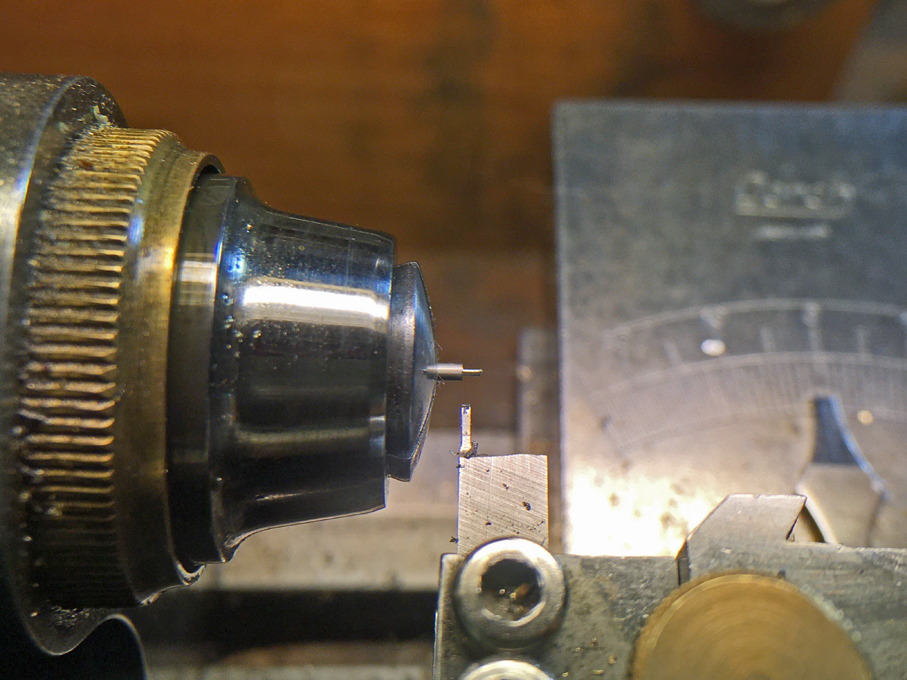
The Mast These boats initially had a very simple one-piece mast for signalling purposes. At a later stage, a more complex version with a topgallant mast and cross-tree was installed to allow for a better spread of signal flags and the cones that indicated the rudder direction to facilitate flotilla manoeuvres. However, the model will be fitted with the simple mast only. The mast itself was turned from a 1.5 mm steel-rod with a shoulder to accommodate the four shrouds and hangers for the signal halliard blocks. The information is rather scarce with only the earliest picture of S.M.S. WESPE showing the whole mast and the lithographs showing the lower part. The height had to be estimated from the photograph, while the lower diameter could be taken from the lithograph. The belaying pins for the signal halliards are set into a wooden shelf, rather than into the spider band. This wooden shelf was fashioned from a tiny piece of bakelite paper into which the appropriate holes were drilled before. Belaying pins of 2 mm length and 0.2 diameter are a modelling challenge. A first attempt using lengths of wire and drops of white glue to represent the handles did not produce consistent and satisfactory result. Therefore, I decided to attempt to make them the ‘proper’ way, i.e. to turn them. After a couple of failures (though the first two attempts went well), I arrived at a procedure that produced consistent results with a low failure rate. The key is to do the turning in small steps to minise cutting forces, having a sharp tool, set to just a tad below centre-height. The material used was 1 mm mild steel-rod because the brass I have available would have been far too soft for such tiny pieces. Although the belaying pins are a bit oversized for flag-halliards, making the pins was a bit of a proof of concept with my follow-on project in mind, where I will need quite a number of such small ones. In a first step, the 1 mm diameter was reduced to 0.4 mm over a distance of 0.8 mm. 1st step in turning micro-belaying pins: roughing out the handle The handle then was shaped using a 1 mm mouse-tail and a tiny flat file: 2nd step in turning micro-belaying pins: shaping the handle with files Then the diameter below the handle was cautiously reduced to 0.2 mm. The first cut here is quite critical, as the square cutting tool cuts over its whole width of 0.4 mm. 3rd step in turning micro-belaying pins: reducing the diameter of the shaft to 0.2 mm In several 0.2 mm steps one then works towards the target length of 2 mm. Final step in turning micro-belaying pins: reducing the rest of the shaft to a diameter of 0.2 mm When trying to reduce the diameter below 0.2 mm, the finished belaying pin usually shears of cleanly from the stock. The pins then were chemically blackened. The mast was given a base-coat of Vallejo 71.033 Yellow Ochre, a wash of Schmincke 28610 Ochre, and a very light glazing of Vallejo 70.956 Clear Orange. Once the blackened belaying-pins had been inserted the whole assembly was given a light coat of a mixture of Vallejo satin and gloss varnish to make the mast resemble oiled wood. The shoulder, were the shrouds rest probably had been protected by a copper sheathing and this was imitated by paint. The finished mast The shrouds were probably made from galvanized steel rope and need to be served in the area where they attach to the mast. I still have to work out a good way to imitate this in 1:160 scale and probably need to build the serving machine first that I had planned to make for a long time. To be continued ....
- 935 replies
-
- 14
-
-

-
Over here in continental Europe these 'informal' aspects of our industrial history and heritage seem to be largely forgotten. At least there seems to be a lot less published material about it.
-
Is that going to be the radiator-cover for a car engine ? Mounted on a railway carriage ? Did you do the tapping on the lathe ? 🤔
-
On many such boats, they would have had a windlass somewhere behind the mast, which would also serve to raise the anchor. However, having the windlass in the bows would also be possible, but one would need a block seized to somewhere near the foot of the mast to redirect the halyard to it, if a sheave in the mast is to be used. This publication of the Maritime Museum in Gdansk you mentioned is only available in Polish, I suppose ?
- 17 replies
-
- 3
-
-
- Vistula barge
- card
- (and 1 more)
-
Indeed, it would have been highly doubtful practice to leave such barrels on deck to be broken up by overcoming seas. Without salt, you may as well sail home. The only barrel/cask that was often stored on deck, securely fastened in chocks and with lashings, was that for a few days worth of drinking water from which the crew and the kitchen drew. It would be placed in a reasonably protected area.
-
I suppose this is a sweep, rather than a rudder. The Vistula/Weichsel is a rather slow flowing river and such boats mainly drifted down-river, so one needed a lot of fulcrum to steer them.
- 17 replies
-
- 4
-
-
- Vistula barge
- card
- (and 1 more)
-
Gütermann (https://www.guetermann.com) is a German manufacturer, so you could write to them and ask them through which channels they sell their products in Portugal. Otherwise, you might find an ebay trader in Portugal or somewhere else in the EU, where postage is not so prohibitive.

