
HOLIDAY DONATION DRIVE - SUPPORT MSW - DO YOUR PART TO KEEP THIS GREAT FORUM GOING! (Only 72 donations so far out of 49,000 members - Can we at least get 100? C'mon guys!)
×


popeye the sailor
-
Posts
16,007 -
Joined
-
Last visited
Content Type
Profiles
Forums
Gallery
Events
Everything posted by popeye the sailor
-
 I do have a small update on the General. I made the hooks for the chains..........this started a small chain reaction of it's own. every move I made with the loco, I'd knock a part off ...fix that problem..........then knock something else off with the next process. anyway......the holes were drilled and they are in place. the next thing was these two parts that go on the front of the valve chests. all they are, are the hand holds to climb up on the front of the loco. I thought they went one way........so I drilled out the holes....then, looking at the instructions again, I stood corrected. I installed them, but I need to paint them because I scraped the gold chrome off......oh well >shrug<.....not a biggie there. time to make the decision her about those hoses. choosing a good place to drill the holes, the deed was done, and the hoses are now in place. this was not without consequence either........I knocked one of the rear foot steps off. it's back on now. then I got to thinking..........was rubber invented at this time? the answer is yes. it was introduced in France in 1735......but the Mayans and Aztecs were the first to make use of this material. the first rubber ball was invented by these cultures go figure! blows my theory that Disney invented it BIG G.D. JOKE!!!!! .........a brief pause............................................................................ took Gibbs out, and then set upon doing something that I think will make Ken smile should have more on him soon
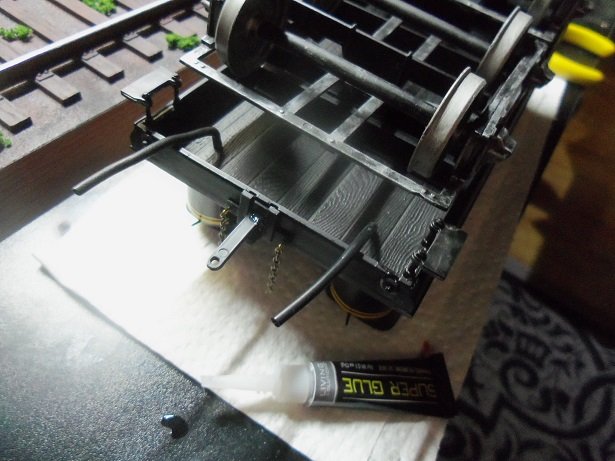
-
Briar Pipe by Papa - FINISHED
popeye the sailor replied to Papa's topic in Non-ship/categorised builds
looks like you need a sander now........the shape looks good one of those side rotary sanders might do well for you, but I think a band sander would do better for the stem part. Briar is a hard wood......that's why it's so commonly used for the making of pipes. do beware though.......breaking it in may be tough, but once the chamber is seasoned, I hear they are the best. -
Fokker Dr.I by hof00 - Hachette
popeye the sailor replied to hof00's topic in Non-ship/categorised builds
don't feel bad HOF.....I've got a Guillow's Fokker in the closet, and a list of projects I really should be getting back to. I need to invest in a good pair of blinders ........ look ahead, my friend is that a site you created? -
looks like you have some pruning to do! wonderful video. it will be fun to watch you build another....a very cool looking piece
-
thanks Rob for the added pictures.........you can post the pictures of her after Pearl, but I likely won't need them. between all the sites I've got bookmarked, I have enough in all the pictures I've seen so far, very few actually show her with blast bags. there are a few pictures though that show here with bags on turret 2. this may be because in the 30's, during one of her gun practices, combustion gasses blew back into the turret injuring one sailor. a fire started a short time later, due to water getting into the electricals. they had turned on the sprinklers to keep the black powder from igniting. the armor belt only covered the important areas of the hull...................Krupp armor, about 13.5 inches thick. when the modernization at Norfolk took place, more was added, and the deck was beefed up too. yes......the three guns worked simultaneously......likely didn't have the technology back then interesting site Lou.......yea....I'll need to sift through it I haven't got the decals yet, but I think there is a color scheme listing in it as well.
-
as long as progress goes forward and not backward, then it's all good look'in good Carl!
-
ahhhhh, the age old problem goes back all the way to the early model kits.........some have descriptive text, some didn't. I agree....it would have been nice to familiarize the name of the part, so it would give me a better understanding of it's function. looks like you know where the parts go.....that's half the battle look'in really good!
-
there is an update coming for this model.........have it on the table as we speak
-
amazing ..........really looks great!
-
it's in there OC.........right along with the Guillow's Spitfire MK1, and the Monogram F 15 Eagle. have fun
-
this should start you off OC........I've posted pictures of the Revell model here and there. the entire build may also be in this link. https://popeyesquadron.wordpress.com/2016/12/09/guillows-fokker-dr-1-the-plans/ I started to sand everything, but got into something else......I really need to get back to it. if I could talk the admiral into it........I'd chat deal, but at that scale, I don't think I'd win.
-
hi Ken..........no, just my stargazers and assorted lilies. I was down in the field with Gibbs a couple of years ago, and we passed by a pile of gardening refuse that someone had dumped.........out of the center of it was this lone Lilly.....about a foot tall and had one flower on it. the flower was really neat and it looked relatively healthy, so I dug it up and brought it home. I put it in a bed by the back door........the ground could've used some fertilizer, but it been there all this time, and now it's about three feet tall, very bushy, and looks like it's going to have several flowers this year! enough Botany I'm going to try and paint the wood load....I've already given it a wood tan base coat. one more day in Wally-hell, and then I'll be on the week end...for me anyways
-
the tail rotor looks great nice to see a picture of the model done so far .
-
you tube can be a scary place on it's own.......you ought to see what else the search brought up. I looked for the big girls too Lou.......they got more 'kick'
-
pick ups were especially hard to pimp out.......most just go for looks, rather than speed. the main drawback is that there is no weight over the rear differential.......the tires would lose traction easily, smoke 'em or wheel hop like crazy. traction bars did little to counter it either. sounds to me like the fella you bought it from didn't do his homework I love the Fokker.......the Germans had some of the most eye catching camo jobs on them. there is also quite an array of aftermarket decal kits for them too the largest one I have is the Revell 1:28 D VII.........if I would get off my duff and get busy, I'd get the Guillow's Fokker Dr 1 out and sand the wings. it has a wingspan of 20 inches.......I think it's 1:17 scale or something like that!
-
thanks Sam.......that was funny. I was looking through videos about women being tied to train tracks, when I stumbled onto it. made me laugh like crazy yep.......not too much longer to go............but there is still more to go. a couple more logs at least
-
look'in forward to the pictures....yea, back then, the muscle car was top priority my brother was stationed in Ft Hood, Texas..........came home in an "American Flag Barracuda". that was a hot car too.........his wife made short work of that though {quite a story}. yes sir.......don't be a stranger.....always a pleasure
-
I figured that Ken........but there are no locator holes or pins anywhere. I'm going to drill a hole on each side, where the front tank lobes are and locate the hoses with brass pins.......then I can connect them to the pipes at the rear of the loco {at least they have pins}. I would imagine they were opened a crack so water could trickle in. it's the next thing to do.......I have installed the chains on the tender. still more to go Kevin.........don't go away glad to have you look'in in!
-
hey there good buddy! where ya been? good of you to look in you can post the pictures if you'd like, but yea......I'm doing the Sox & Martin, and I'm past the half way point as it is. if I were doing a street machine, they would be of more use. jeeze......follow along already!......
-
spent more time on the hull today........also spent time trying to find the paint scheme for the seagulls AdmiraltySeagull200FBustelo this is a place to order resin planes @Admiralty Models. I also went looking for better decals. Hannants - Plastic model kits and accessories they didn't have the decals in 1:428 scale, so I ordered the 1:350 instead. I also read an article where the Arizona lost one of their planes......didn't say why or how........but it was lost at sea. had I known about Admiralty before hand, I would have ordered the decals from them........that'll teach me I have pictures of the paint scheme, but I can't post them.
-
it was fun watching you OC..........I hope when you get better, you finish the Pearl, and perhaps carry on with a new project.
- 455 replies
-
- 1
-

-
- slightly modified
- greyhound
- (and 1 more)
-
you should paint them. I've never worked with aluminum.......I have an abundance of thin wood dowel, so I make them in wood.
-
that little inconvenience bothers quite a few......sorry to hear it's hit you especially hard take good care of your hands.......this won't last long and perhaps you can get back to her sooner. here's to hoping that happens for you no like button here.......I'll be happy when you get back to the table.