


glbarlow
-
Posts
4,134 -
Joined
-
Last visited
Content Type
Profiles
Forums
Gallery
Events
Everything posted by glbarlow
-
 How’s it coming Jim?
 -
Wow Rusty, what a journey. Such an amazing result and a wonderful reference for me as I build mine. Congratulations and so well done!!
- 642 replies
-
- 2
-

-
- winchelsea
- Syren Ship Model Company
- (and 1 more)
-
Wow, it looks so nice with the top jigs removed.
-
It really takes very little effort to add that taper to both the stem and rudder, as long as you don’t get carried away on models not necessarily designed for it. It does make a pleasing difference with only the slightly bit of sanding. An advanced modeler would know this, a beginner likely wouldn’t care.
-
Maybe just Google…
-
Don’t do that ! Use a smaller dowel with 220 then 320 sandpaper wrapped around it and/or a fine tooth round hand file. Go slow, check often and it will be fine. I never use anything but hand tools, a Dremel risk isn’t worth the speed. it was a long time ago but the above I’m sure is what I did on mine since I’ve done it on all my models. If you have to reduce it for the seat then only ways not seen below the deck. And yes it will have some rake to it so account for that in rounding the hole at an equal slant. Hope that helps
-
The mast would never be a smaller diameter where visible above the deck. But at this point it would depend on the seat you built for it below the deck. It needs to fit tight and snug. I don’t see any advantage to decreasing it in size.
-
Any of the beginner level kits from Vanguard Models keeping in mind Chris’ comment above.
-
This is the purpose of the 7-10-7 marking process. Marking the square stock with this ratio of lines simply makes sure you plane equal amounts of each corner and not misshape the wood while rounding it.
-
It would be easy to remove the mast cap and slide it over the top of the mast. If CA use acetone, if PVA use denatured alcohol to remove. Done carefully and slowly you’d never know later.
- 426 replies
-
- 3
-
-
- Vanguard Models
- Sphinx
- (and 1 more)
-
I have the hardest time understanding how any could sit on those seats on the pitching ocean. How many went overboard I wonder. Really fun to see all this great work, and a bit sad knowing it’s coming to an end for you. Whatever adjustment you made certainly isn’t noticeable, it’s all so very crisp and detailed.
- 642 replies
-
- 2
-
-
- winchelsea
- Syren Ship Model Company
- (and 1 more)
-
Nicely done.
-
Nice work. Your skill with the air brush is outstanding. I always appreciate a builder willing to go backwards to rebuild or replace something to improve the model. It’s a bold, but seldom regretted decision.
- 562 replies
-
- 5
-
-

-
- vanguard models
- alert
- (and 2 more)
-
Yes it was, or at least I made it so. Thank you! Thank you, and thanks again for the 1/16th brass strips. I will still find a good use for them. Or OCD. Thanks Derek!
- 840 replies
-
- 2
-
-
- winchelsea
- Syren Ship Model Company
- (and 1 more)
-
Very precise, well planned and thought out, very well done Glenn! Proof positive that a good planking job doesn’t require stealers and how pre-bending and good planning pay off. As far as the troublesome plank, sometimes a shim behind the plank can help correct a low spot. Or if you have the wood cut a thicker plank. At any rate, you should be justly proud of taking on the challenge of a butt shift pattern and making it work this well!
- 587 replies
-
- 5
-
-
-
- Indefatigable
- Vanguard Models
- (and 1 more)
-
There are bow fillers you may want to add, and stern ones as well if you don't have them. the transition from W - U and the third bulkhead need lots of pre-attention in fairing for the planking to lay fair. Nice that you got some of the internal fairing done now, it's all looking very crisp. Well done.
-
Can you remove and replace the offending planks and lightly sand the new planks to be a paintable and/or coppered area as BE and Chris have suggested. It’s wood, there is always some answer.
- 443 replies
-
- 6
-
-
- Indefatigable
- Vanguard Models
- (and 1 more)
-
Well said!
-
Very precise work, well done!
-
Excellent design and another nice model design. This is the one I may pick up to build with my grandson. Well done!
- 57 replies
-
- 7
-
-
- Trial
- Vanguard Models
- (and 1 more)
-
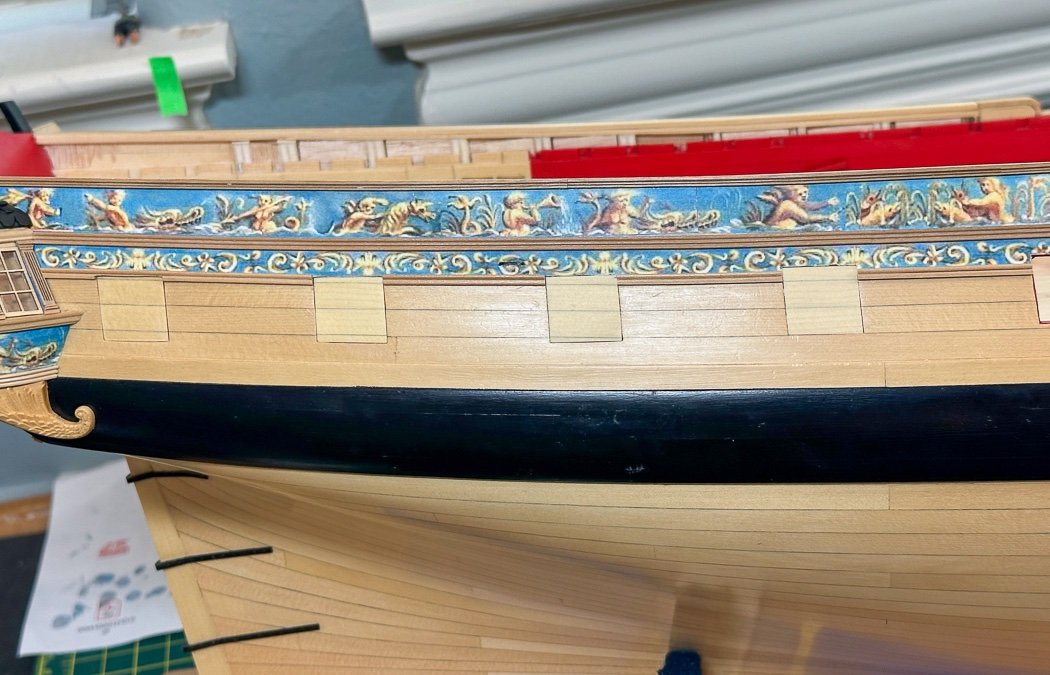
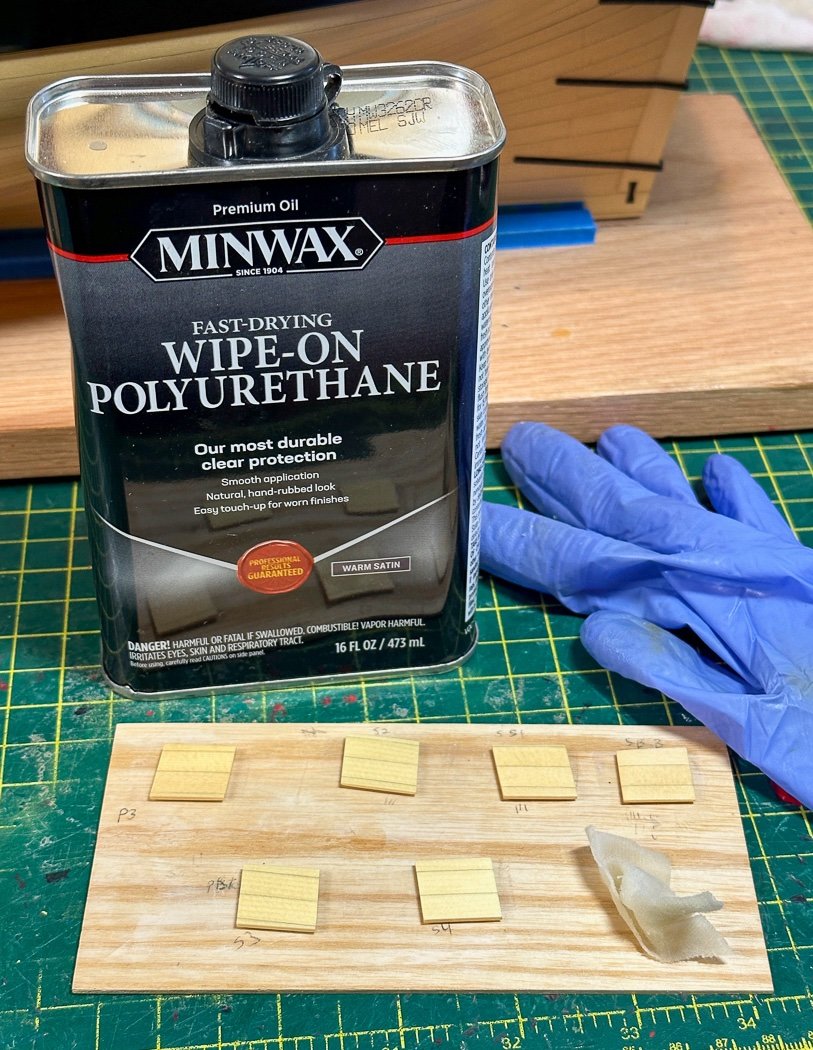
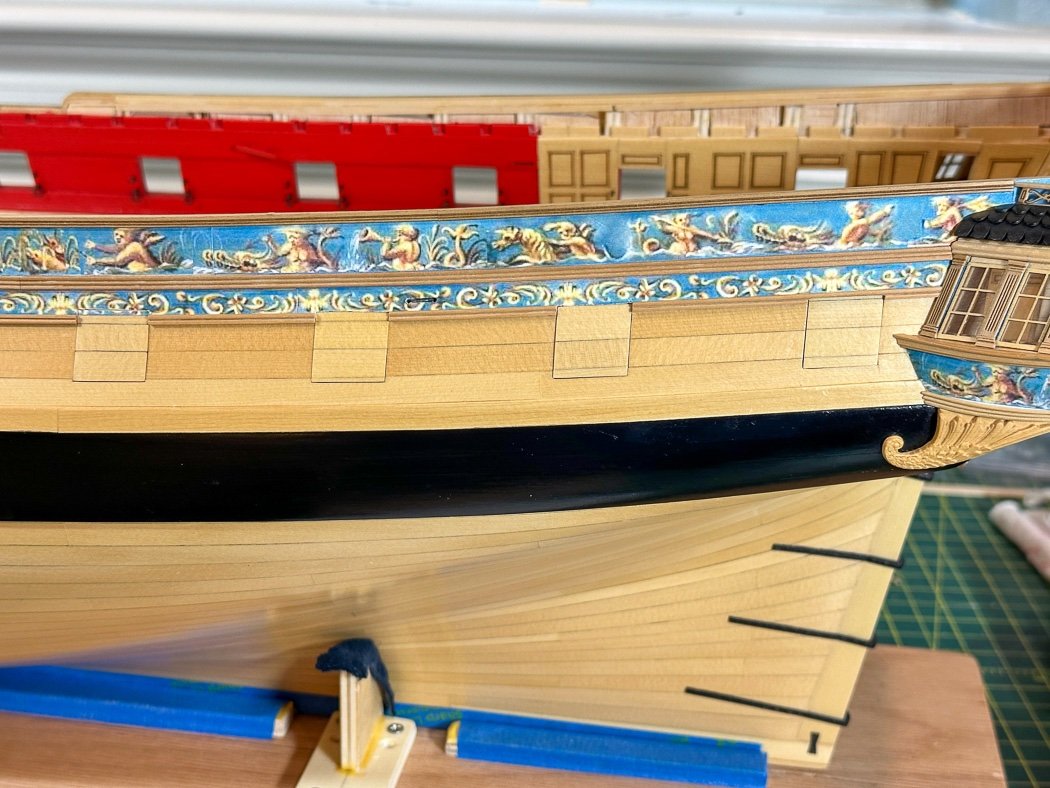
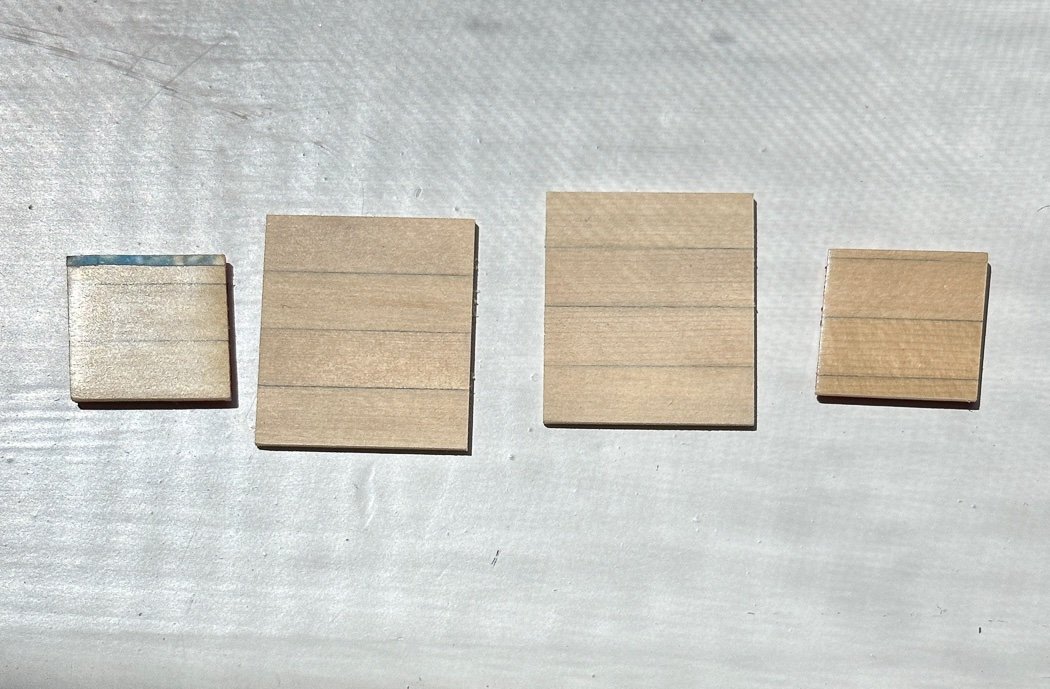
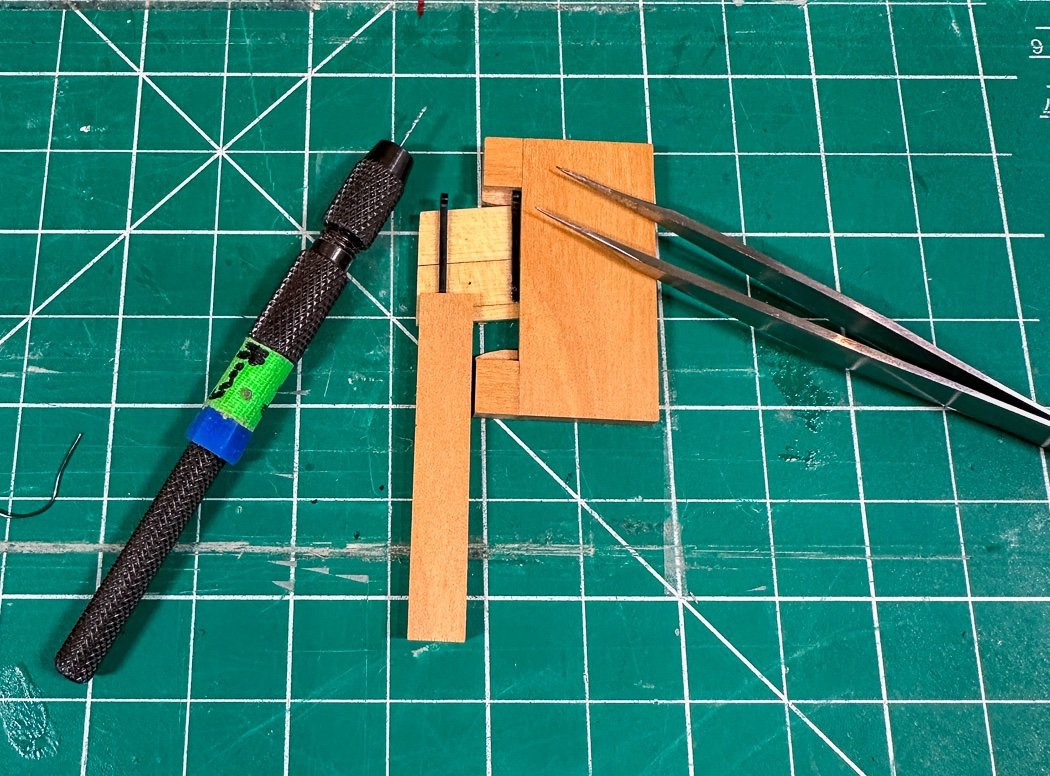
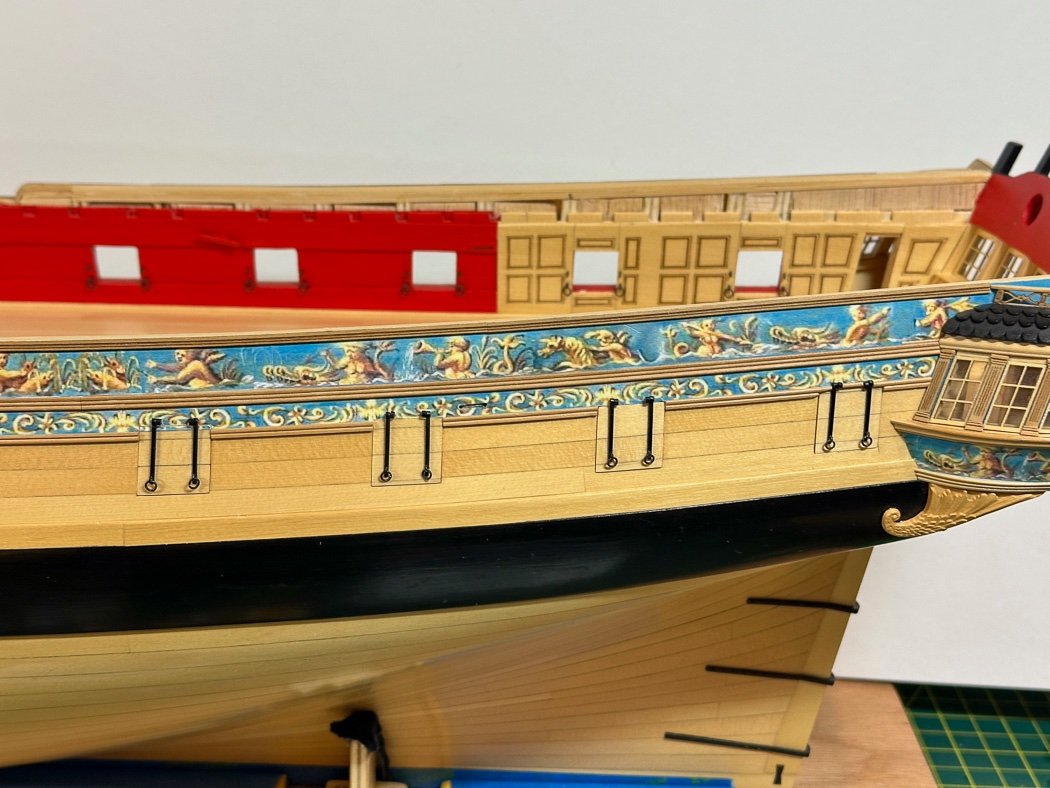
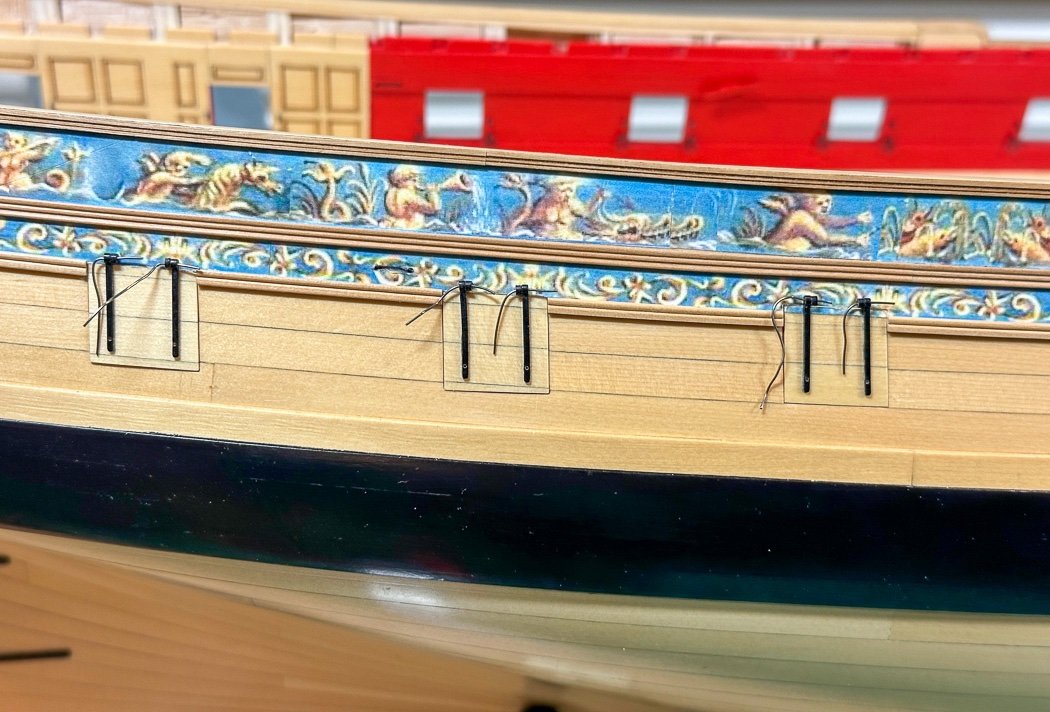
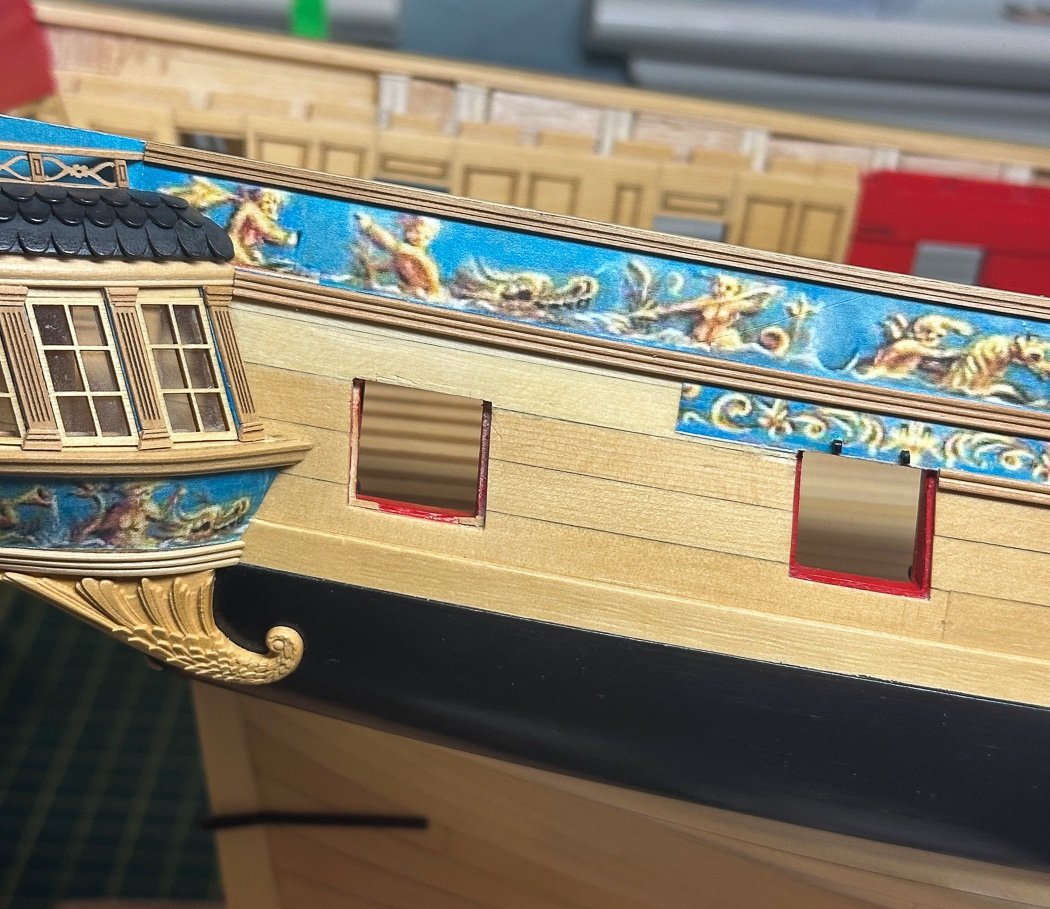
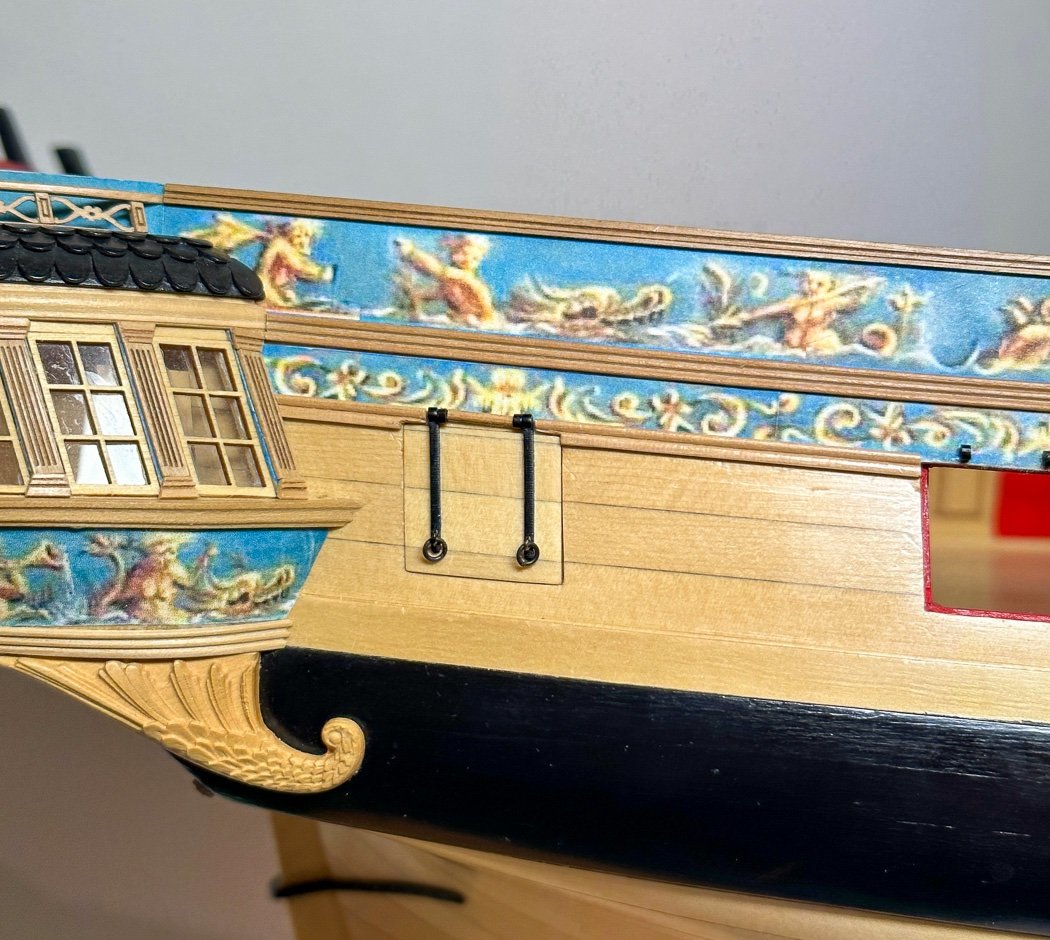
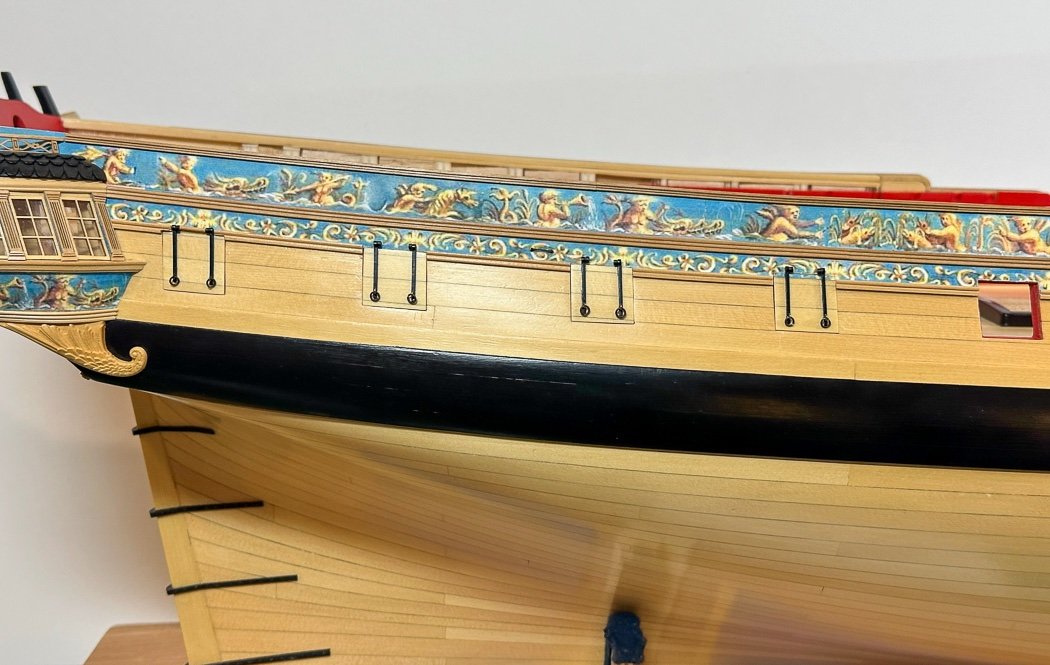
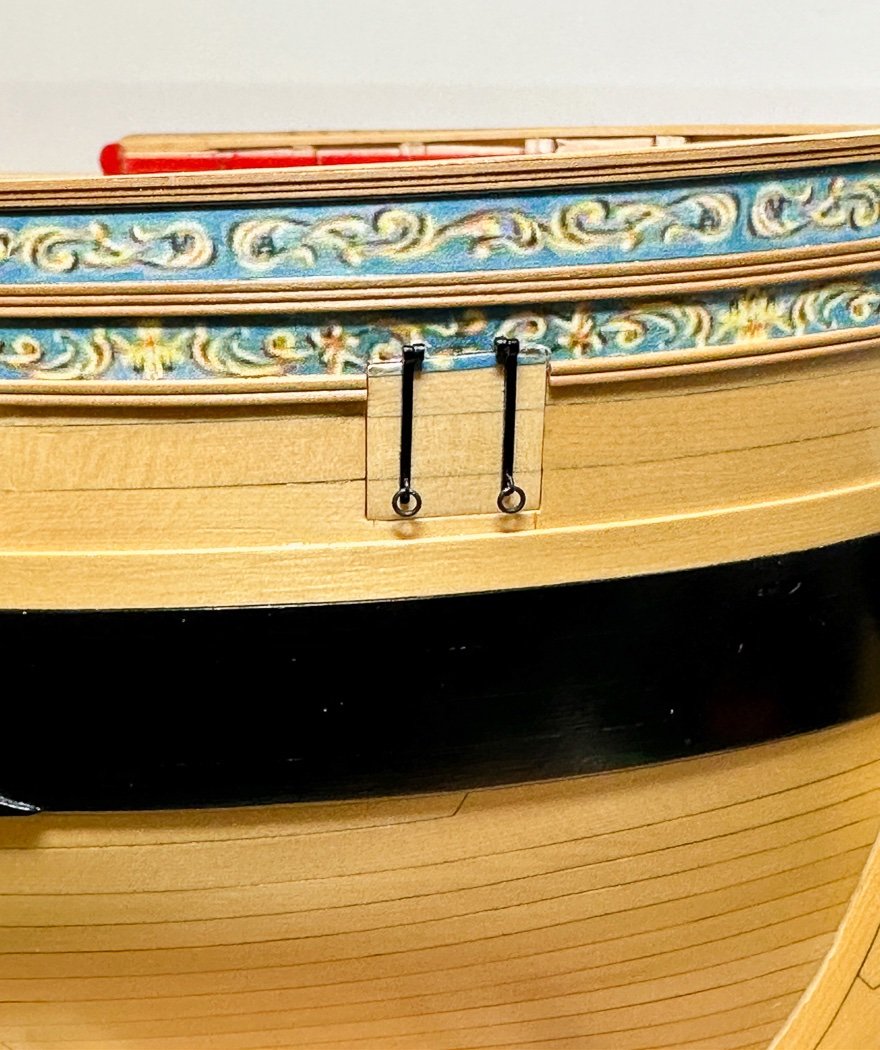
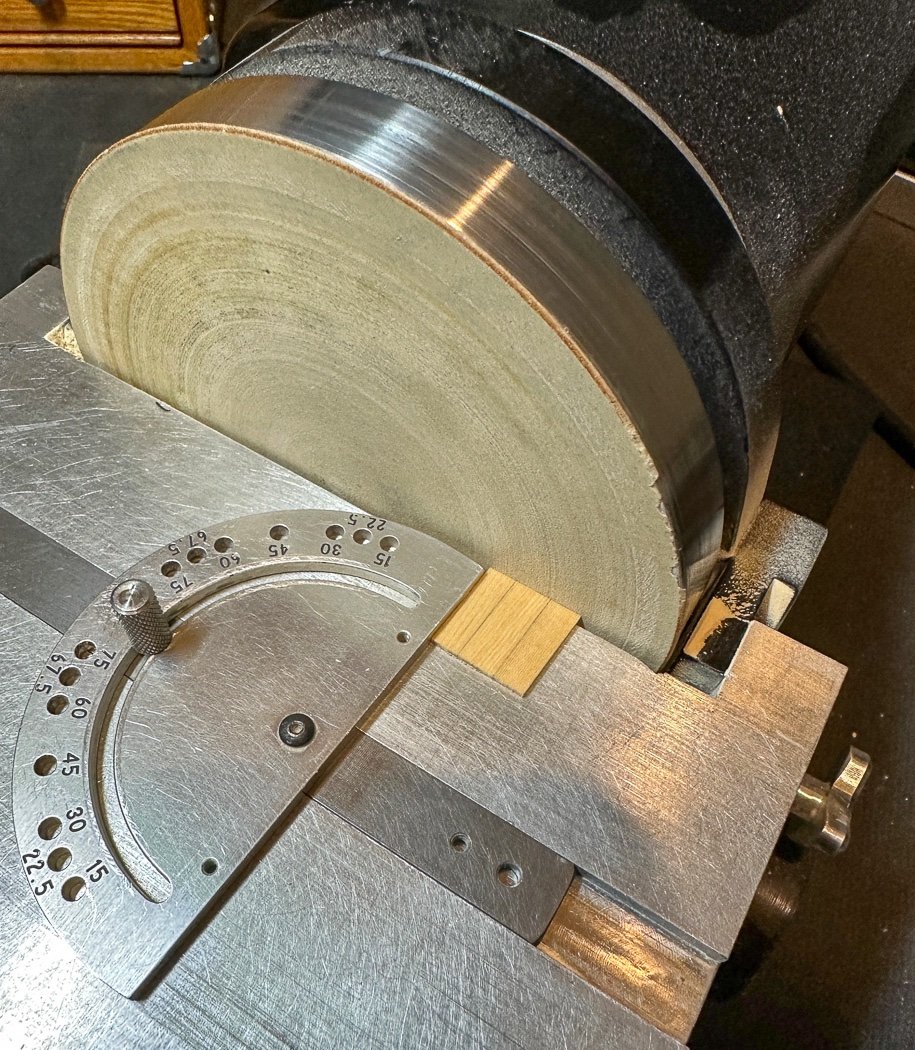
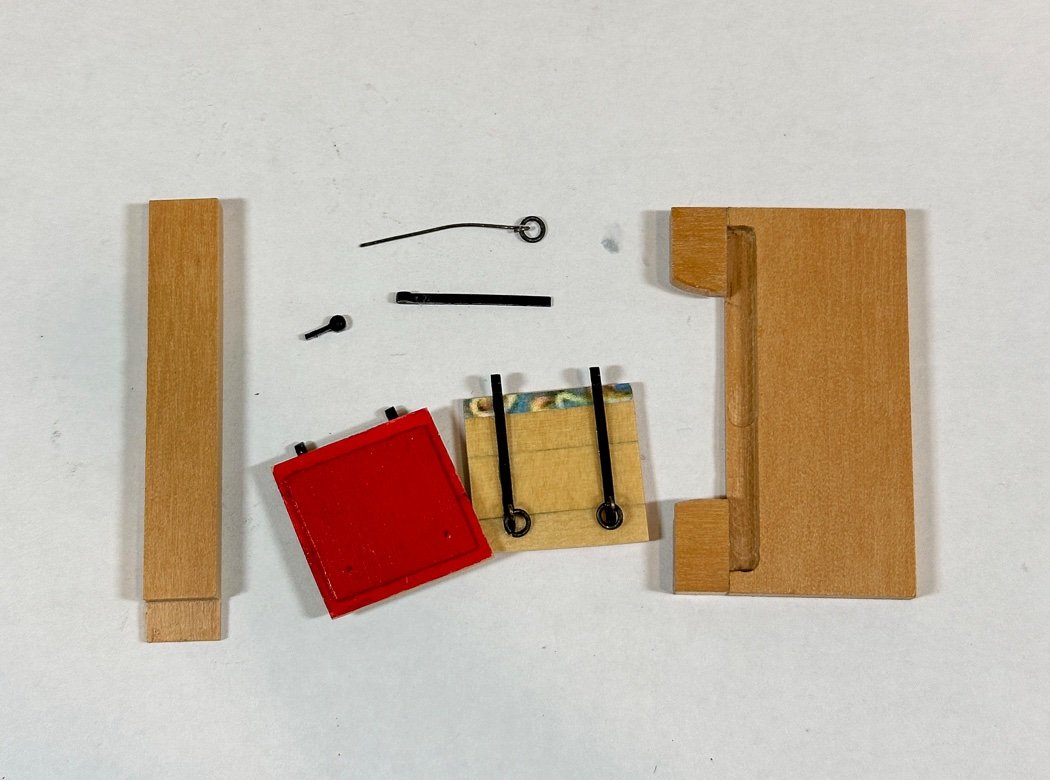
The Port Lids Well that was fun. You’d think making ten little more or less square pieces of wood would be easy, not so muck I discovered. First off, I sure wish I’d set aside the same pieces of planking used above the wales so long ago to now match up with the ports. As it was I spent a ridiculous amount of time sorting through my bin of ¼ AYC strips, having done that I only got so close. Anyway here’s what I did: The first step, after the long and arduous process of trying, and I emphasize trying, to match wood to the hull I edge glued with PVA these little squares, each matched up to their future home. The extra size allowed me to match up the plank alignment and angles, different from port to port. There are undoubtedly many carpenter like ways to proceed from there, I know none of those. I’ve have however grown confident in the extremely fine and accurate edge, size, and angles I can achieve with a delicate touch on my Byrnes Sander. With a light touch I micro-milimetered my way to the right size, shape, and plank alignment. It’s was a slow process but an accurate one. I’m sure seasoned wood workers laugh. It didn’t take long to get a rhythm and feel for how much and where to sand, after the first couple the rest just took patience. Time for a little production run. My double sided tape held them in place for multiple coats of WOP, I had to catch them up to the hull planking in an ongoing effort to match them up. I’ve noticed how my Cheerful’s hull turned a more golden color over the course of a year or more with indirect sunlight, so I thought I’d try to speed up the aging process by placing them in a window with direct afternoon sun. It seemed a dumb idea, but I had to put them somewhere. It actually sort of worked a little bit, it helped to have several days of warm Texas sunshine. They started here. The “aging” process got them here, it was worth all those coats of WOP and Texas sun, at least so I think. They will continue to age and blend in, this is a nice start. First my thanks to @Gregory who was kind enough to provide me with 1/16th brass strips. However, the very day I was going to start on the hinges @Chuck announced his Winchelsea hinges made from a magical new material. I ordered them on the first morning they were available. So with apologies to Gregory and all my fellow Winchelsea builders who labored to make metal hinges…I didn’t. I didn’t have to try to make twenty identical things from a strip of metal. The new material looks about as metal as needs be and they’re absolutely uniform. So yay. I still had some work to do. I made up eyebolts from 28 gauge wire using a smaller drill bit for shaping. Same with the 24 gauge split rings, also on a smaller bit than those on the deck and bulwarks. Whenever I have to do a lot of the same thing the first thing I do is create a jig. These two are made from a piece of cherry I had, maybe not the best use for such nice wood but it had to hold an edge for the mill to cut a groove, plus a reverse groove for the top, and another to make it reversible for the same fit on the lid’s other side. The lid slides under the jig 3mm from the edge, the hinge lays tight against the jig’s upper half with it’s top hitting the top groove cut the distance needed to match up to the hull mounted portion of the hinge. Both the port and jig are held firmly to the mat with, you guessed it, double sided tape, nothing moved as I laid the hinge in with tweezers and a gentle coat of CA onto the lid. 19 more times and then all hinges are in the same place and the same distance from the top and bottom. The second jig, used separately after the first, has a slot milled under the leading edge, it’s placed flush against the bottom and lines up the spot to drill the hole through the hinge for the eyebolt and split ring, twenty holes later and we’re done. I’m much happier with these than anything I could have made, so thanks Chuck for the hinges and for not announcing these two weeks after I’d fumbled about with metal. Sometimes though I have to take a step backwards, in this case several steps backwards to get the result I wanted. The moulding cut through the top of the stern port on my model, as a result the hinges had to be cut into the molding. This went fairly smoothly on the port side but I didn’t like the cut I’d made on the starboard port. So to do it right I had to remove the moulding and fabricate a new piece between the hinges using the extra moulding in my Chapter 3 parts bag. With the judicious application of acetone while protecting the hull the moulding came off. In the process a small part of the frieze tore. Can’t have that so then with the judicious use of denatured alcohol I removed a section of the frieze, I lots of leftover sections ready to go. At that point I stopped for the night and consumed a different form of alcohol. The next morning I was back to where I started, plus the hinges. A lot of work but worth the result. I plan to put these three lids and their port side counterparts away until later in the build, before doing that I made sure I could complete the hinge with wire. The bow and stern post port are closed and don’t need the wire, especially with the tight fit of Chuck’s design. With that my port lids are complete. I wouldn’t have guessed these would have taken me as long as they did, or that I’d write a post about lids as long as this one. I’m content with the time it took to make them relatively uniform and sorta match the hull, and kinda be a tight fit, and have the planking more or less match the plank lines of the hull at each port. While the work isn’t complex it is complicated to make it happen, or at least it was for me. Judging by the high quality lids and hinges of other Winchelsea builders maybe I just made it harder than it needed to be. On to the rest of chapter 5. As always thanks for stopping by and especially for your likes and comments.
- 840 replies
-
- 26
-
-

-
- winchelsea
- Syren Ship Model Company
- (and 1 more)
-
Satin Wipe on poly, at least three coats. Wipe on wipe off the first coat will largely be absorbed by the wood. Buff each coat with clean cotton cloth, give it at least 12 hours between coats. I always sand very lightly after 2nd coat. With 400 grit, but then I do at least 4 coats. Just remember the wipe on wipe off part and don’t put any coat on to thick.
- 443 replies
-
- 7
-
-
-
- Indefatigable
- Vanguard Models
- (and 1 more)
-
It took so long because you clearly took the time to do it right. Everything In chapters 1-2 are foundational to what follows, more completely so than with a typical kit, so well done! I’m still wondering how I missed there was a port upright jig. ‘Took so long’ will take on new meaning when you start planking, it becomes a way of life. 😁

