


glbarlow
-
Posts
4,134 -
Joined
-
Last visited
Content Type
Profiles
Forums
Gallery
Events
Everything posted by glbarlow
-
 Very nice work on the bollards. I’m a big fan of my Proxxon mill, though clearly you know how to make better use of it than I do.
 -
Your Cheerful is really well done, work to surely be proud of. Winnie awaits your return!
-
Really well done! Not only the model, your photography is exceptional. You should be justly proud of such good work.
- 102 replies
-
- 1
-

-
- Flirt
- Vanguard Models
- (and 1 more)
-
Unlike a double planked hull (and this is why they are double planked) you can’t correct uneven fairing by sanding that first planking. With a single planked hull you have no more than the thickness of a 3/64th plank. It’s understandable to want to call it done and move on, but it is essential to have the fairing as near perfect as you can get it. Don’t just pin the batten, slide it up and down, top to bottom with your fingers at multiple sections, you can feel the imperfections if there are any, it should feel smooth and flow evenly. The infrastructure is of course the basis of every thing else you do, it’s worth taking the time to do it right. There is some opportunity to so a little shim work as you plank, but not much. I said it in jest, there is though a bit of zen at the stage. From what I can tell you’re doing a great job of this.
-
Front to back with multiple passes and use of the prescribed battens is my approach. Sometimes, even often shims are a better fix than more sanding, the battens don’t lie. Keep in mind the bow is the first three to four bulkheads, do them as a unit. Your bulkhead B problem could be created two bulkheads away. Fair slowly, be one with the wood. It will show you the way. Ok, that last sentence lost the plot 🤣🤣
-
I use it on seizings instead of CA.
-
Your Cheerful looks great Fred, congratulations! Amongst many other fine features I do like Chuck's new blocks, wish I'd had them for mine. You've done a really fine job and should be justly proud. Everything is so nice and crisp. I think we can both agree Cheerful is a great build. I noted your comment about seizings and CA. Try Matte Medium Clear Acrylic (I use Liquitex) instead of the CA on the seizings, it dries clear, easier to apply, and looks more natural. I made the switch when I build Cheerful, it works great.
- 113 replies
-
- 3
-

-
- Cheerful
- Syren Ship Model Company
- (and 1 more)
-
Buy them from Crafty Sailor, the 6mm size if I recall, maybe 8mm. They make nickels scaled wooden ones, unlike most of the commercial crap. Yours are a bit fat, sorry you asked. 😊 Now you can start making eyelets and ring bolts. My last Winchelsea post was my effort to explain one way how if you’re interested.
-
Nice start, looks ready for those port sills. Well done!
-
Thanks, that was kinda cool. I hope my log proves helpful, I enjoyed learning and building her.
- 155 replies
-
- 1
-
-
- Medway Longboat
- Syren Ship Model Company
- (and 1 more)
-
Always instructive and enjoy watching my ready reference source make such nice progress. I say this often, your cherry/pear version really looks great!
- 642 replies
-
- 1
-
-
- winchelsea
- Syren Ship Model Company
- (and 1 more)
-
You’ll enjoy Cheerful. It’s a great model, i had a great time building mine. I recommend adding hyperlinks to your signature ,one so we can find your different logs.
- 155 replies
-
- 2
-
-
- Medway Longboat
- Syren Ship Model Company
- (and 1 more)
-
Can’t get much better
-
Looking good!
-
Great scarf joints, send me some🤣
-
You’ve now passed me by, well done!. The rudder is a nicely done mini-project.
-
With its size you may want to consider a build more like we use for Winchelsea. The benefit of a secure upright hold and keeping the keel straight over the months of construction.
- 648 replies
-
- 7
-
-
- Indefatigable
- Vanguard Models
- (and 1 more)
-
I’m Glad you find it useful Yes, it’s about scale. The commercial ones are too small and thin, especially at 1:48, but I think also for 1:64. And not all on a ship were the same. Plus, it’s a little bit fun and addy satisfying.
- 840 replies
-
- 5
-
-
- winchelsea
- Syren Ship Model Company
- (and 1 more)
-
That’s good news, I was concerned I was done and I still have all this wire. 🤣
- 840 replies
-
- 5
-
-

-
- winchelsea
- Syren Ship Model Company
- (and 1 more)
-
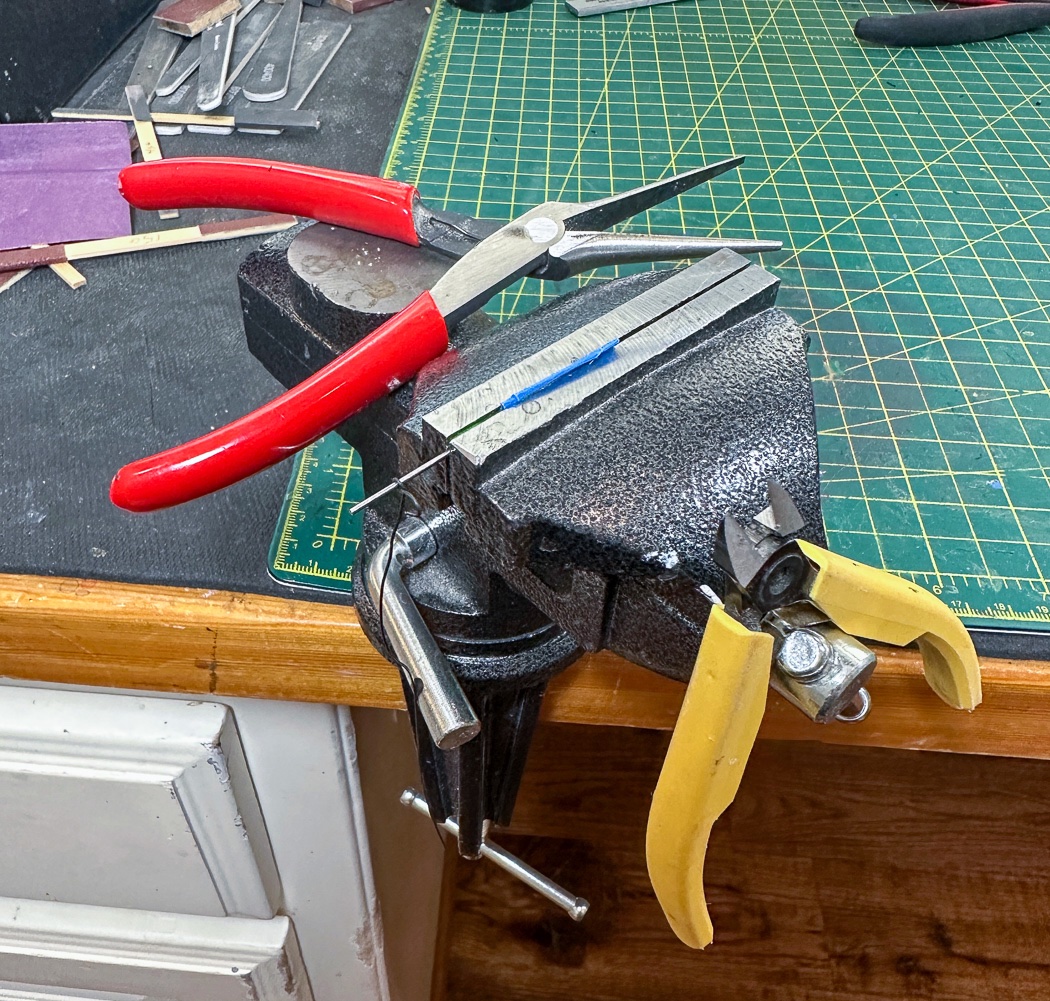
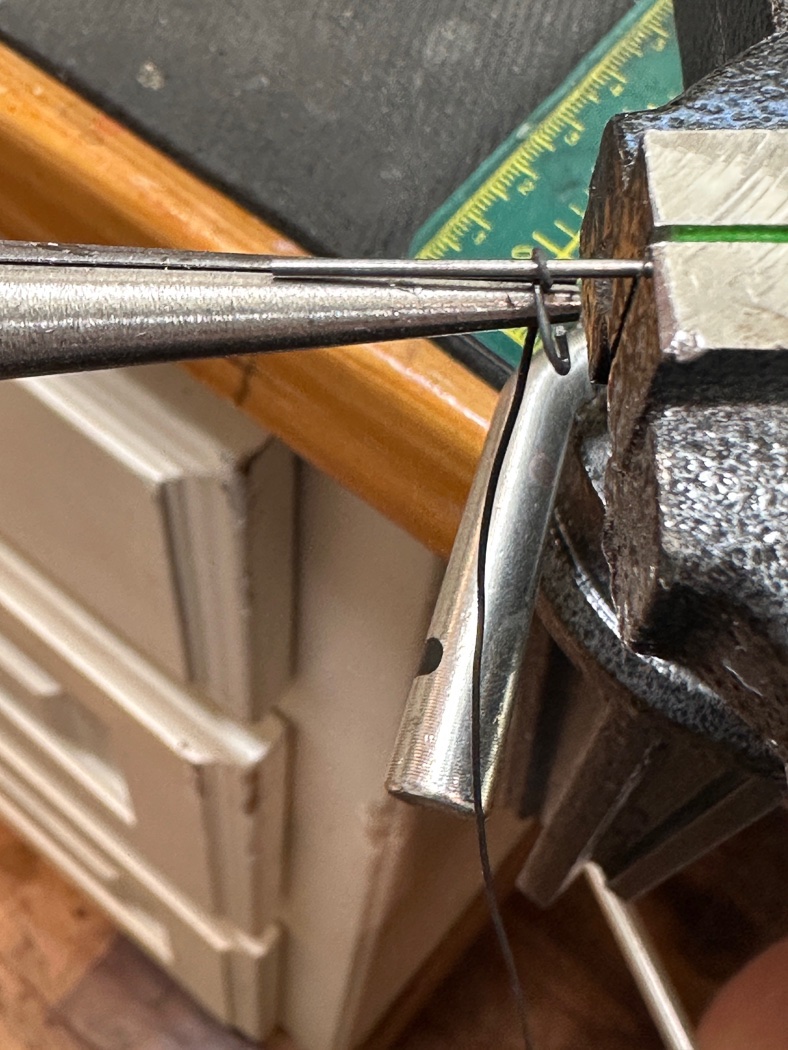
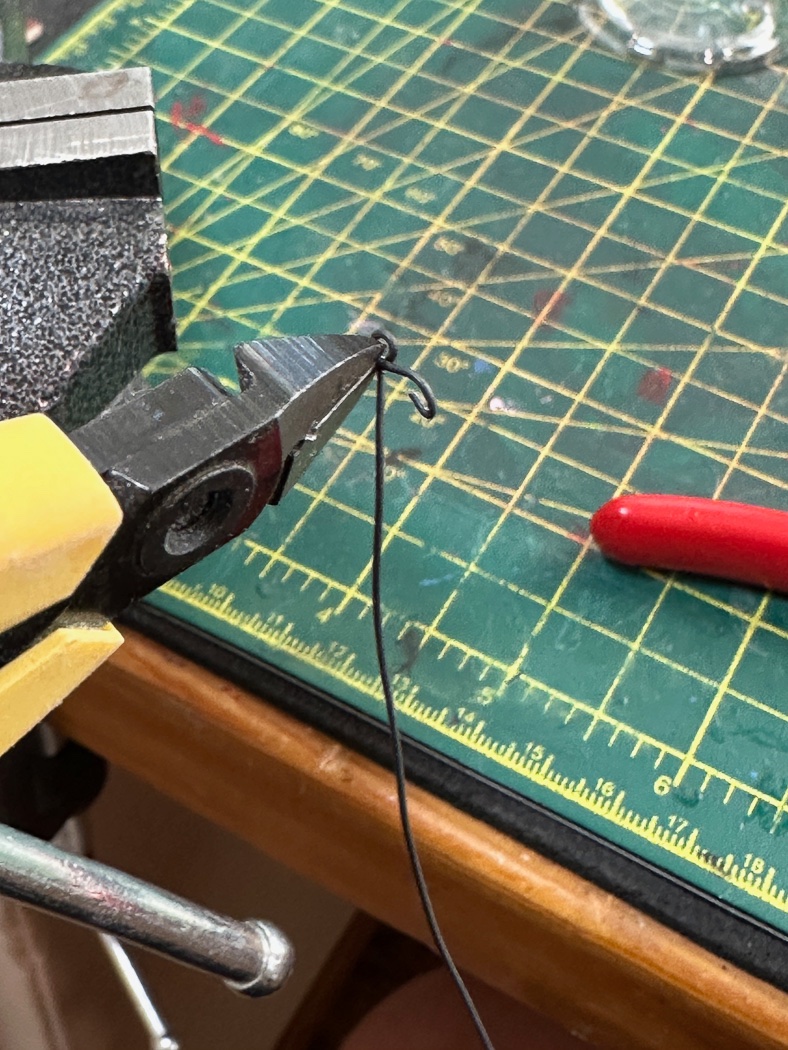
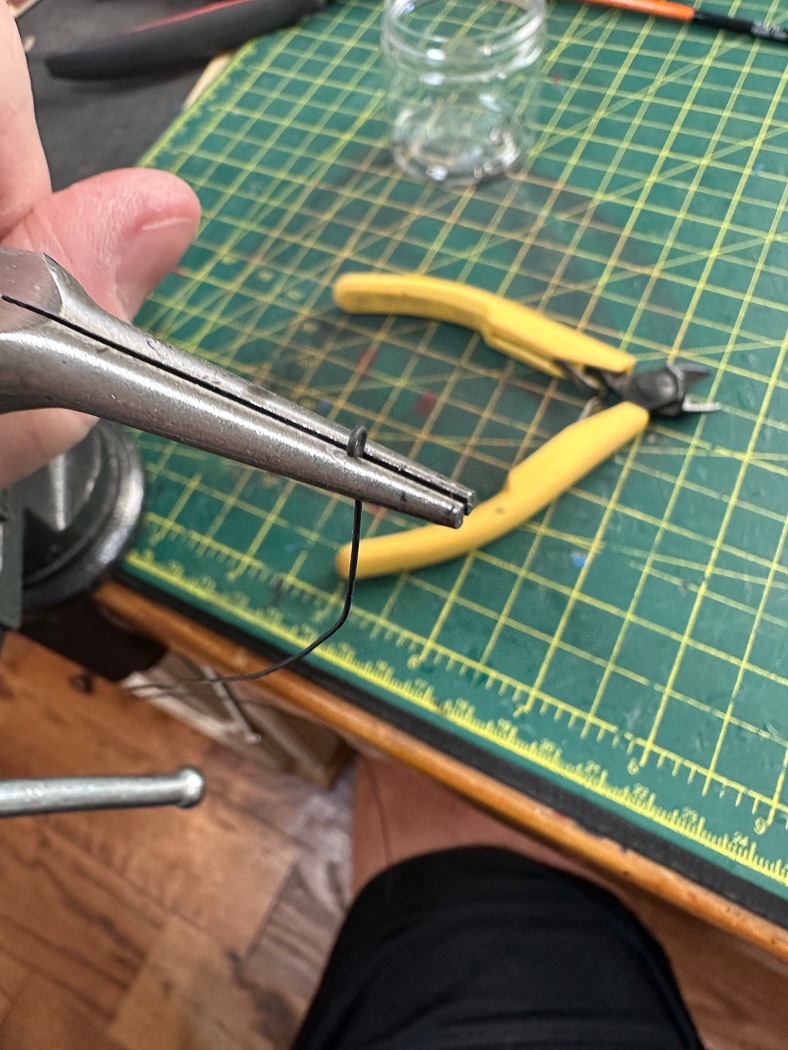
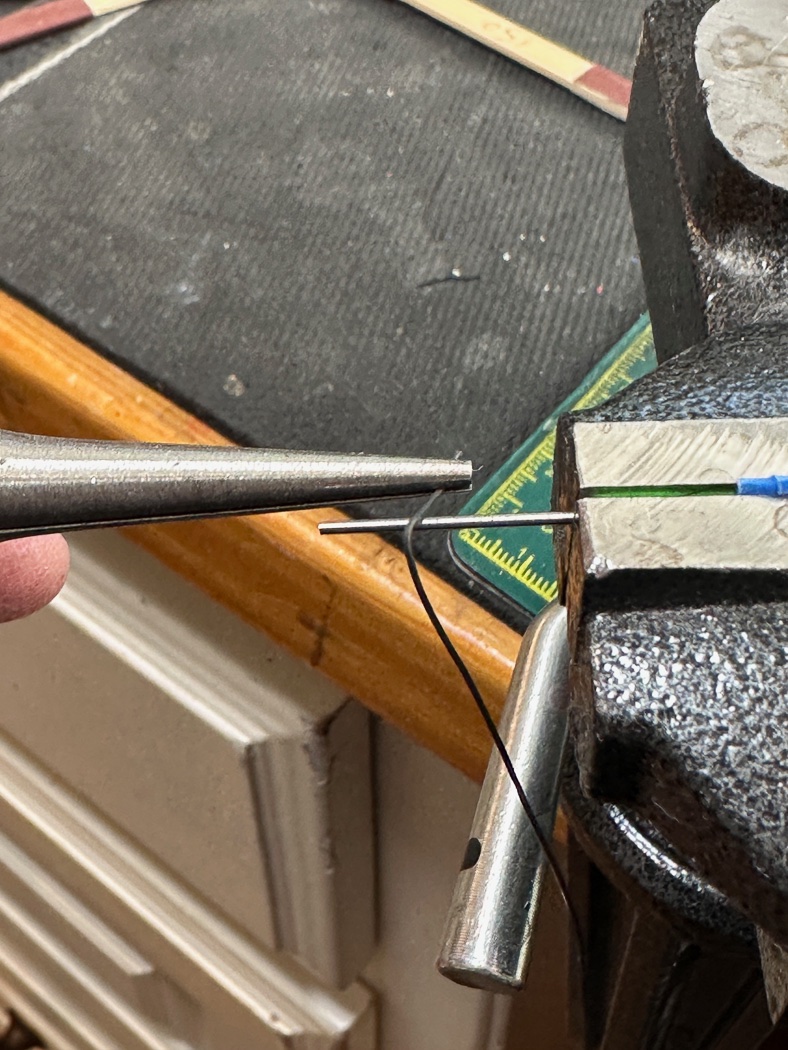
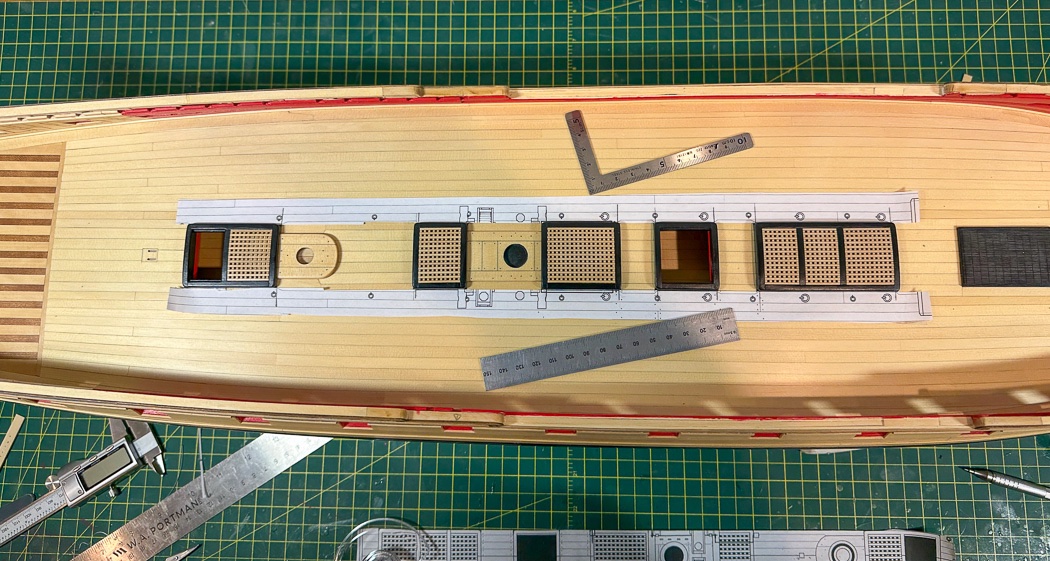
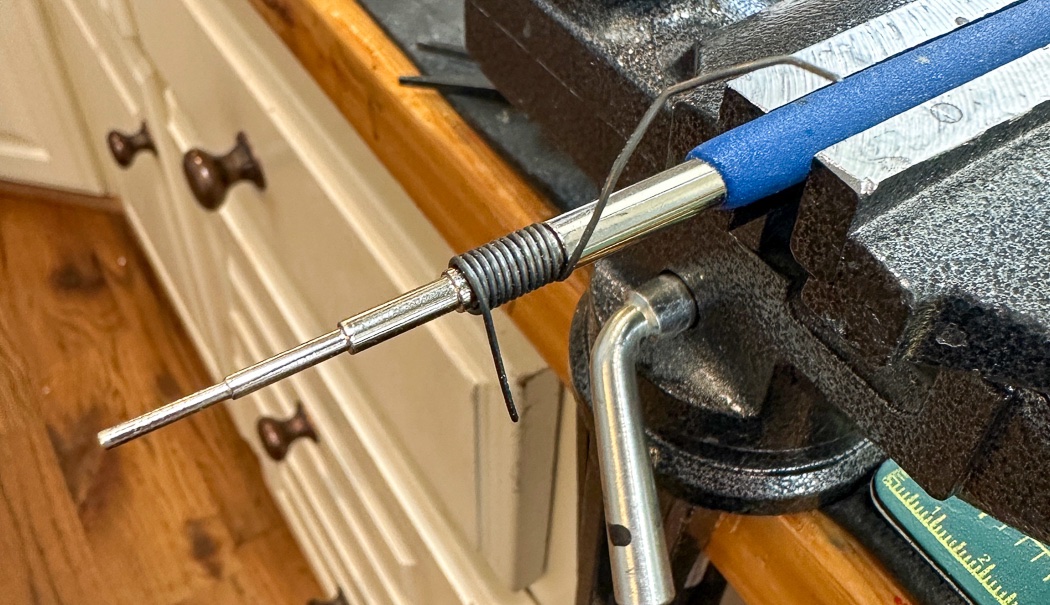
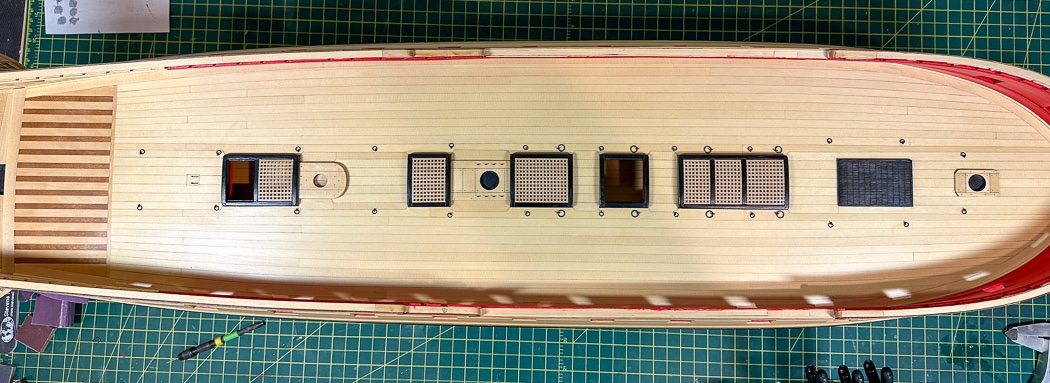
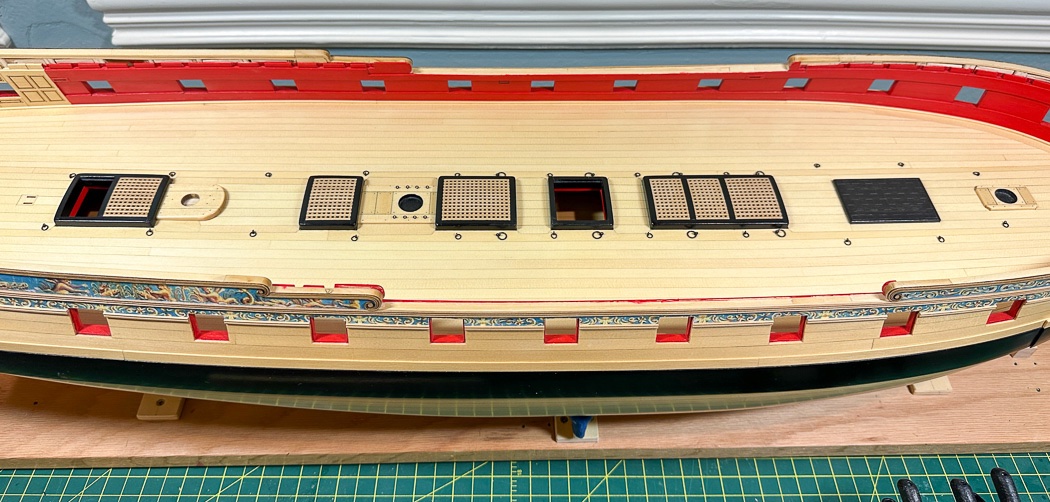
Ring & Eyebolts After a three week absence from Winchelsea I opted for an easy path back into action. I recalled a post from @Rustyj showing near 450 eyebolts and split rings he’d made and thought I’d get a start on getting a few of those behind me. When I built Cheerful I had no idea how make my own eyebolts. I couldn’t find much on how to do them, so with experimentation and counsel from others I came up with a way. In a few photos I thought I’d share my method, some of which I lightly covered in my post on cannons early in this log. Of course there are many other ways, this is just what works for me. I start with The Hillman Group Dark Annealed Steel Wire. I use these red pliers that have flat surface on the inside, really helps to not scratch up the wire. Starting with a #61 drill bit clamped in my bench vice, I wrap 24 gauge wire to form as tight a loop as possible. The next step is to center the loop with a bit of left right push and pull with the pliers on the stem of the eyebolt with the loop still on the bit. This is the part that takes a little practice and hard to describe. By the 10th or 50th eyebolt I’m pretty good at it. Then using high quality (I’ve tried multiple brands, worth spending the money for these) flush-cut cutters I snip as shown. Sadly I can't find these particular ones again or I'd get a second pair for backup. Jewelry making supply websites are the best source for these types of tools. Maybe another twist or so to center it up, snip off the stem a little longer than needed, then do it all again for the next one. I work from a long strand of wire to keep production moving and minimize wasted wire. The split rings are easy, I just tightly wrap 24 gauge wire around a #41 drill bit, remove the coil and snip a straight line down the coil with those same flush-cut cutters. The flush-cut version is essential, regular wire cutters crush the wire at the cut, not good for this purpose. The photo shows the larger 22 gauge split rings that are also part of the deck plan. This tool (whatever its called) comes in handy for this purpose, the section I’m using is near the equivalent of the #31 drill bit size called for in the instructions for the heavier split rings. The eyebolts for these are also made from 22 gauge wire, but with the same #61 drill bit as before. I realize this isn’t useful or new info for many, but honestly I wish I’d found a post like this when I was trying to sort out how to do these for Cheerful. So maybe it will help someone come up with their way. Winchelsea's main deck has 32 eyebolts and split rings plus eight eyebolts on the main mast partners. How to align them per the plans and have them mirrored on the other side of the deck was interesting. The eight on the partners were easy, I’d drilled the holes for them with the mill back when I assembled it and before installing it on the deck. I printed two copies of the plans at the outset of the project. It’s paid benefits over and over using one set to cut up as templates, here was another chance to do so. Being as precise as I could on cutting the inside line (the outside edge of the cargo holds as alignment guides), using my favorite double sided tape to fix them tightly to the deck, checking, measuring and lining them up per the uncut set of plans, then measuring and checking that the other side mirrored the first (this took some time, only one chance to get it right). Once that was done I just drilled the holes right through the corresponding location on the paper and through the deck below. Making your own eyebolts and split rings initially sounds a little daunting. For Cheerful I was temped to use the easily available commercial ones but so glad I didn’t, it made such a difference. On Winchelsea there are SOOO many to make but it was never a question I’d make them. The scale is much more realistic, even if everyone isn’t perfect it just looks so much better. I especially like the look of the eight heavier ones in contrast to the smaller ones. The ship slowly is coming to life, each little detail like these makes it more so. An now I have less to make, just 96 eyebolts and 48 split rings for the bulwark ports, another 112 eyebolts and 32 split rings for the remaining cannons, and some other number for other parts of the deck and hull I don’t want to think about right now. So instead I’ll go make a rudder. Thanks again for the kind comments on my off-topic photos of Patagonia and as always thanks for dropping by for a look. Your likes and comments are appreciated.
- 840 replies
-
- 21
-
-
-

-
- winchelsea
- Syren Ship Model Company
- (and 1 more)
-
Since you’re making your own you may want to mark the grid lines you’ll need to line up the port sills before installing the bulkheads. Your head start on fairing is a nice touch, however the transition between the stern through the first three bulkheads is a challenge as is the last three at the stern. That can only be done on board. There is a flow we all had to find, Fairing defines everything that comes after. I’m sure with your thorough approach you’ll find it.
-
Love making those eyelets, so much fun.
- 642 replies
-
- 2
-
-
- winchelsea
- Syren Ship Model Company
- (and 1 more)
-
Thank you all for the kind comments on my Patagonia photos. I realize it’s off topic and appreciate your taking the time to look. I won’t post anymore, well at least not until I return from Kenya in September with what I hope are nice wildlife photos.
- 840 replies
-
- 3
-
-
- winchelsea
- Syren Ship Model Company
- (and 1 more)
-
I’ll do that, I know that it’s a favorite of climbers. Standing there looking at it I can’t imagine how they climb it, let alone free soloing. Crazy talented people.
- 840 replies
-
- 2
-
-
- winchelsea
- Syren Ship Model Company
- (and 1 more)