glbarlow
-
Posts
4,126 -
Joined
-
Last visited
Content Type
Profiles
Forums
Gallery
Events
Everything posted by glbarlow
-
It’s quite famous and a long held mystery. How do they get out on the dry lake bed and how do they move…know one know for sure, aliens is one theory. 🤣
-
 Indeed it has been. Maybe I’m going slower now because I’m not that anxious to finish her… Thank you, it’s been a good year…….for model building……
 -
She’s had quite a few new modeling tools, but I’m sure there is at least one more, can’t have too many.
-
Not by much if you’re on your masts. It’s a fun build. 👍🏻
-
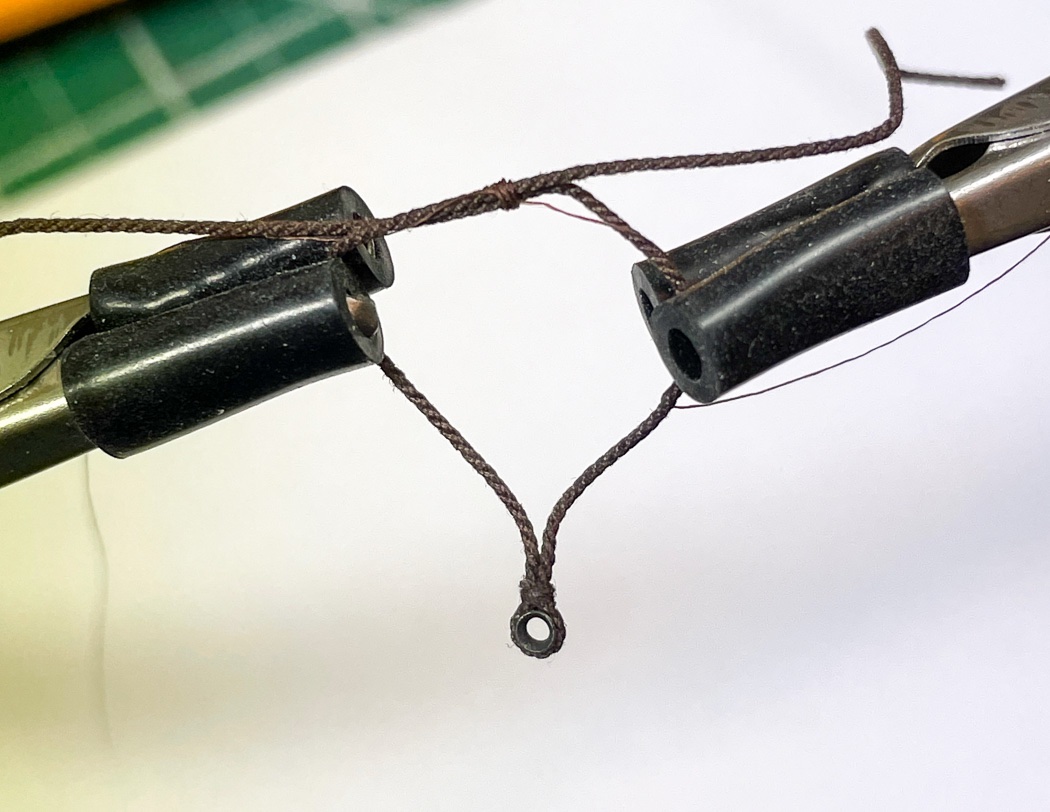
Good catch, thank you. Silly error, this is why I don’t tie off permanently to quickly.
-
Today marks my 1 year anniversary working on Cheerful. This is often the chance to show progress photos, however I’m buried sorting out shrouds. So much fun……yes I noticed I’d managed to snag the peak halyard tackle in the lanyard 🤣 Two down six to go. Lanyards are temporary until all four per side are complete.
- 778 replies
-
- 13
-

-
- cheerful
- Syren Ship Model Company
- (and 1 more)
-
Do you have a build log, I’d enjoy seeing another Cheerful underway?
-
As described in my. Cheerful log, I used black masking tape on the mast, boom, and, gaff then painted over the tape. A little CA and the Paints seals it all with a tight fit. It works great. The “tab” was formed by shaping a strip of brass the same width as the tape I cut including down to a pin to insert through the tape. The tab has to be solid and thick enough to hold the weight of the throat halyard You can see the result in my build log.
-
Since you have Photoshop play with tweaking white balance. This works much better if the photos are shot RAW, but jpegs can also have WB adjusted to a degree. Maybe reduce magenta or just slide the temperature left (cooler) a bit. Though not on a model photo, I’ve spent hours on editing a single landscape photo, many of which are in my galleries at GlennBarlow|Photography Yes blatant self promotion 😁
-
Not true on more advanced and newer iPhones. I can direct the focus point as I wish with my iPhone 12 Pro, I could as well with my prior iPhone X too.
-
While that’s true, f/22 is overkill. I rarely shoot more than f/13, even with the best lens you can get some barrel distortion around f/22. Now try changing your white balance to see what you like best. Sometimes Daylight is better than Flash when using a flash, cloudy is too much warmth and Auto is inconsistent in its guessing. LED lights are great but can toy with color balance. The shadows in part are because your subject is too close to the backdrop. Your right about shadows and drama, my Fair American gallery shots are done that way, Over lighting is as bad as under lightning. Contrast is good and shadows done well add depth. Nonetheless your photos from the last time have improved exponentially!! Well done! You’ll be headed for Iceland on a photo trip by summer 😃
- 725 replies
-
- 3
-

-
-
- vanguard models
- speedy
- (and 1 more)
-
We all get to experience our build and make decisions that suit us as the builder and represents what we choose to do. One clear thing about ship models is that there is not one clear thing. There are many ways to do the same thing, it may not suit how others would do it but that’s their problem not yours. This is your first build, the LN is well suited for that. For example, Walnut color variations are a common thing and blend together in the end or at worst add character. But this kit does have limitations, it’s not a high end kit Enjoy and learn. Don’t stress about master level techniques or trying to match the work of others. Build the model and learn the basics for the next more advanced model and finish with the love to do another model. I built this kit in light work in less than 3 months to decide if I enjoyed modeling again after a 3 year absence. I did and now have 12 months into Cheerful. Have fun, learn things. But recognize this kit isn’t going to earn its way into a museum but you hopefully will have enjoyed your process.
- 139 replies
-
- 2
-
-
- Lady Nelson
- Amati
- (and 2 more)
-
Actually bright can be achieved at most any aperture with adjustments to shutter speed and/or ISO. Most of my model shots are done between F/6.5 - f/11. Of course as with all photography the quality of light source is critical.
-
My first camera was a D90. It will do just fine. Put in Aperture Mode to be able to set what I suggested. My cameras are in that mode about 80% of the time, manual the rest. Auto (point and click) while fine for many things, isn’t great for our models. We need more control to focus on our strings. Also try using Single Point Focus. It means using the cursor to move a box around inside your viewfinder to lock the focus on what you want it to be instead of the camera deciding, which is often wrong, in AutoFocus mode. SP can be tricky, but it’s pretty much all I used on the D90. Experiment a bit and you’ll be expert in no time. James I think has more and better lights specific to product photography. With what you have you can get pretty close. Light Light Light is the key, I move around my work light even when using my iPhone.
- 725 replies
-
- 1
-
-
- vanguard models
- speedy
- (and 1 more)
-
That's great, I'm sure it will help. A few suggestions (which I'd gladly have given rather than kid you about it:-): Set the backdrop so that the bottom has a gentle curve as transition from bottom to back, no clear line transition makes it appear the ship is floating (see my more formal Cheerful photos of the hull, not the regular ones). Put the ship forward of the back paper by at least a couple of feet to prevent silhouettes of what you're photographing. Further, set the lights so they are not direct on the subject, with two lights put them at 45 degree angles. I usually have another light between the subject and the paper just lighting the paper, the brighter the whiter - if it isn't lit it will appear gray, which can be fine depending on what you want. My iPhone 12 pro is good enough I use it for most photos, but for the more formal stuff (and different than other advice I read) I set my Nikon D850 at Flash White Balance (or Daylight), F/11, ISO 400 (or even 800 but more than that is pushing it) and whatever shutter speed** it takes to make those two work but no slower than 1/30 - in that case I'll widen the f/stop to make it work but no lower than f/5.6. The smaller f/stop (larger number) is for full hull shots so its all in focus, but f/5.6 is good for highlighting something like rigging and wider (smaller number) would work but the depth of field becomes so small its not that great of a photo for ship models in my experience, generally you want more to be in focus than not. Anyway - have fun with it. I've traveled the world for my photography, GlennBarlow|Photography , which all came to a crashing halt in 2020 but I hope to get back to it in 2022. **in Aperture mode, you set f/stop and ISO, the camera decides shutter speed based on what you set. f/stop, ISO, and shutter speed are the interlocked trinity of cameras, all cameras even iPhones we just have no control. What ever 1 is set it affects the other two or if two or set it affects the third - getting them right for your subject with the right light is the essence of photography .
- 725 replies
-
- 2
-
-
- vanguard models
- speedy
- (and 1 more)
-
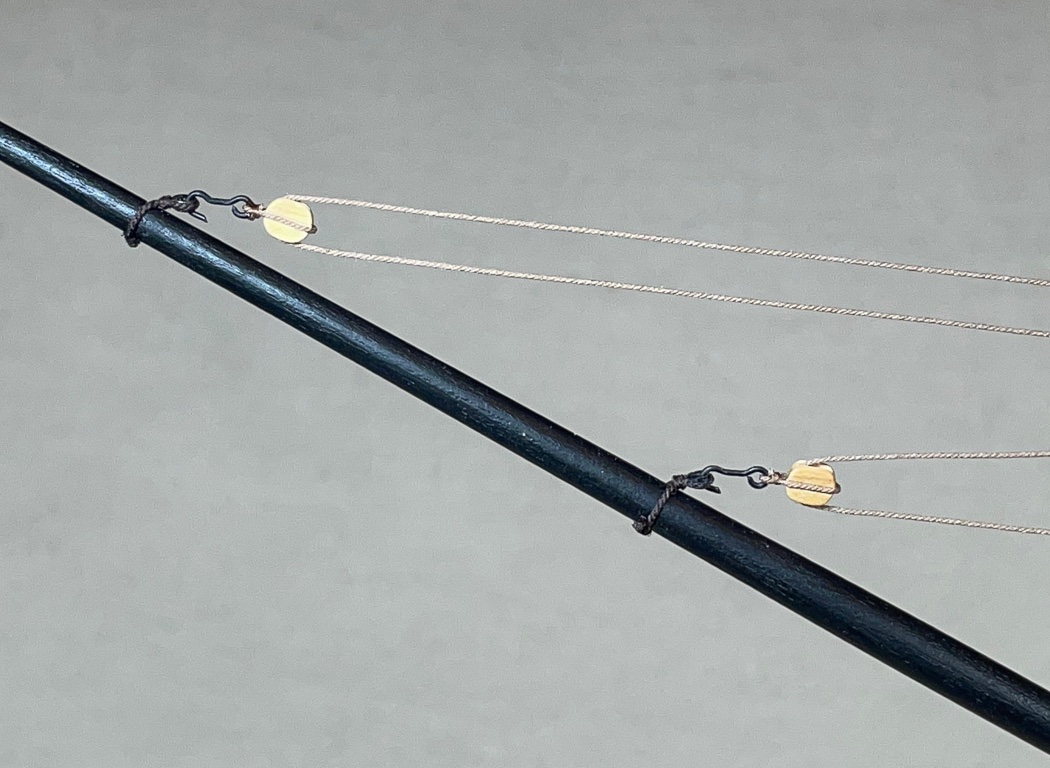
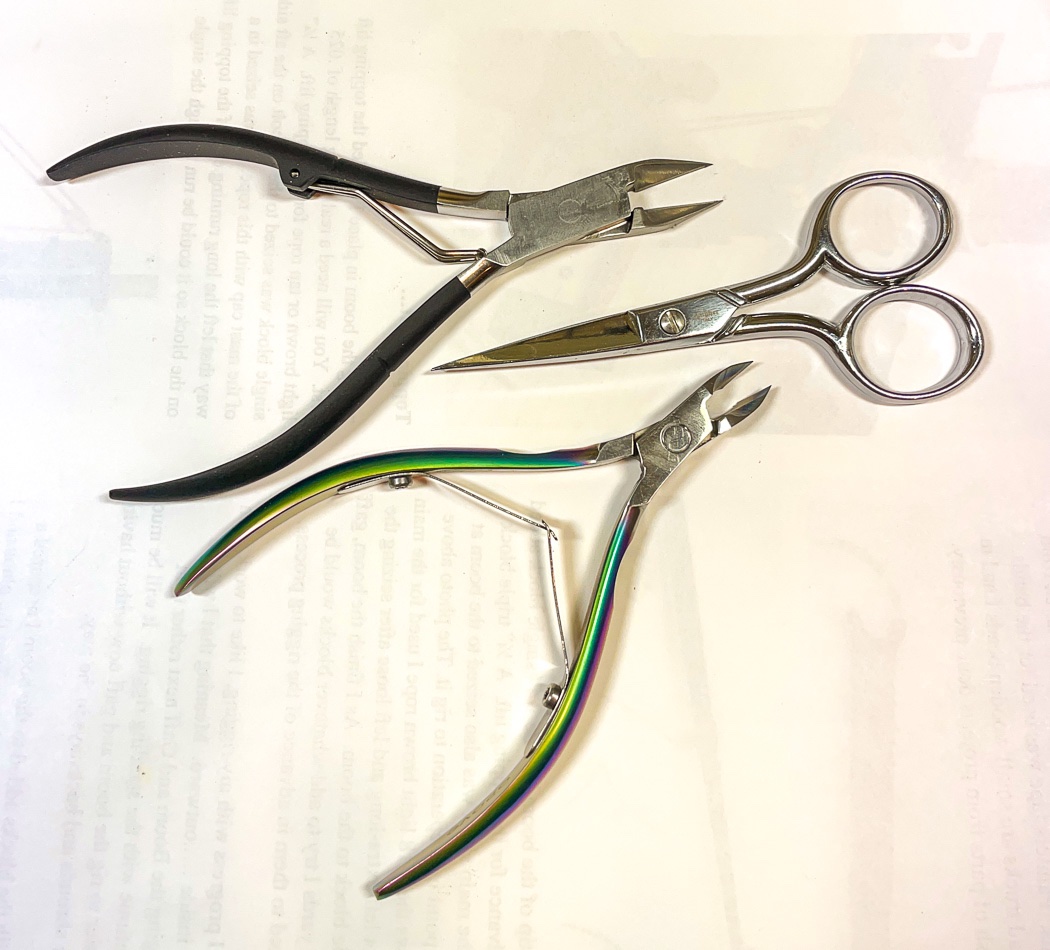
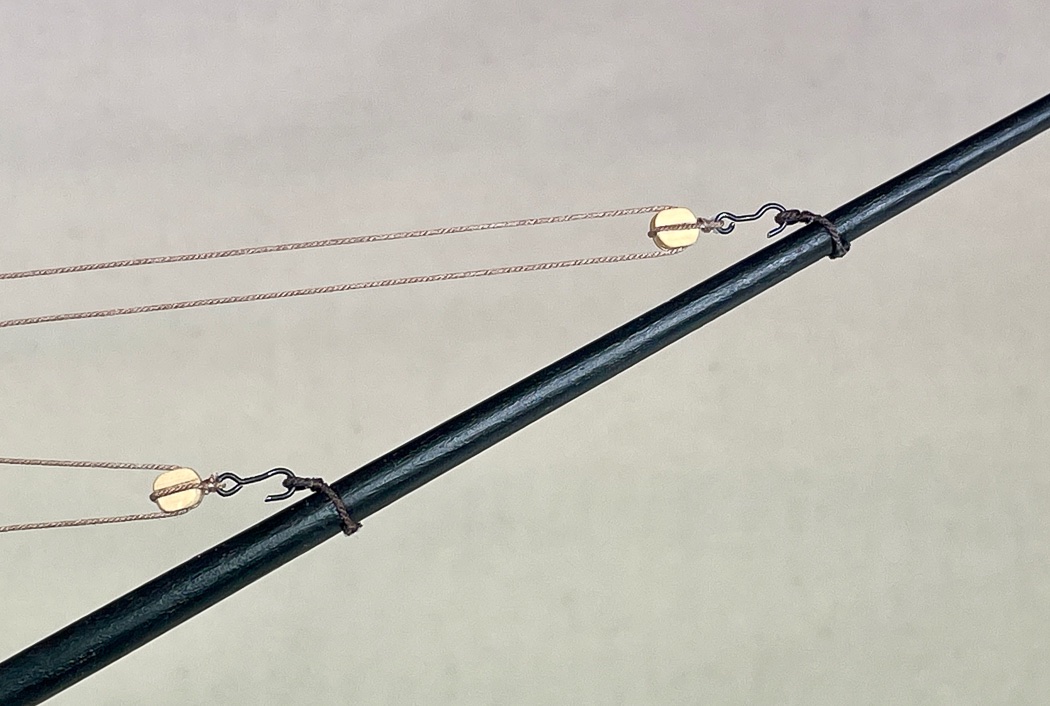
Thanks for the reply and comments. I use 24 gauge black annealed wire bought in bulk from Amazon. I have enough to make about 17,000 hooks which is good, I’ve made about 170 learning to make these🤣.
- 778 replies
-
- 6
-
-
-

-
- cheerful
- Syren Ship Model Company
- (and 1 more)
-
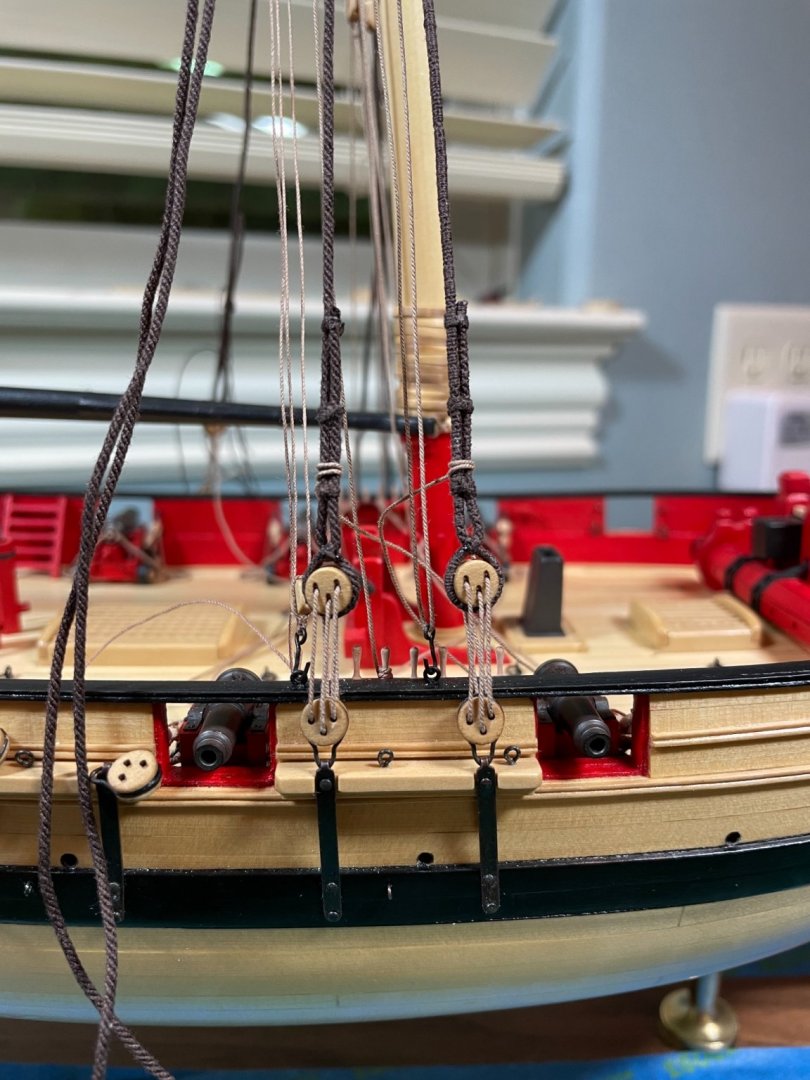
After looking at my photos too long I decided I didn’t like the hooks, so true to form I took them off and replaced all of them. I suppose it’s subtle in the photo, but nonetheless they are all re-made and smaller. Time for me to stop staring at photos and move on.
- 778 replies
-
- 16
-
-
- cheerful
- Syren Ship Model Company
- (and 1 more)
-
Thank you, I really appreciate both comments.
-
Thanks for the comment Garth. The cutters really help on the rigging, as long as I resist the temptation to cut tooooo close and the strop comes apart 🤣
- 778 replies
-
- 2
-
-
- cheerful
- Syren Ship Model Company
- (and 1 more)
-
Thanks for the comment, I guess I really am writing a book. Glad you are enjoying it. FYI it’s rubber tubing not shrink wrap. It came with the quad hands.
- 778 replies
-
- 1
-
-
- cheerful
- Syren Ship Model Company
- (and 1 more)
-
Thanks Rusty, much appreciated.
-
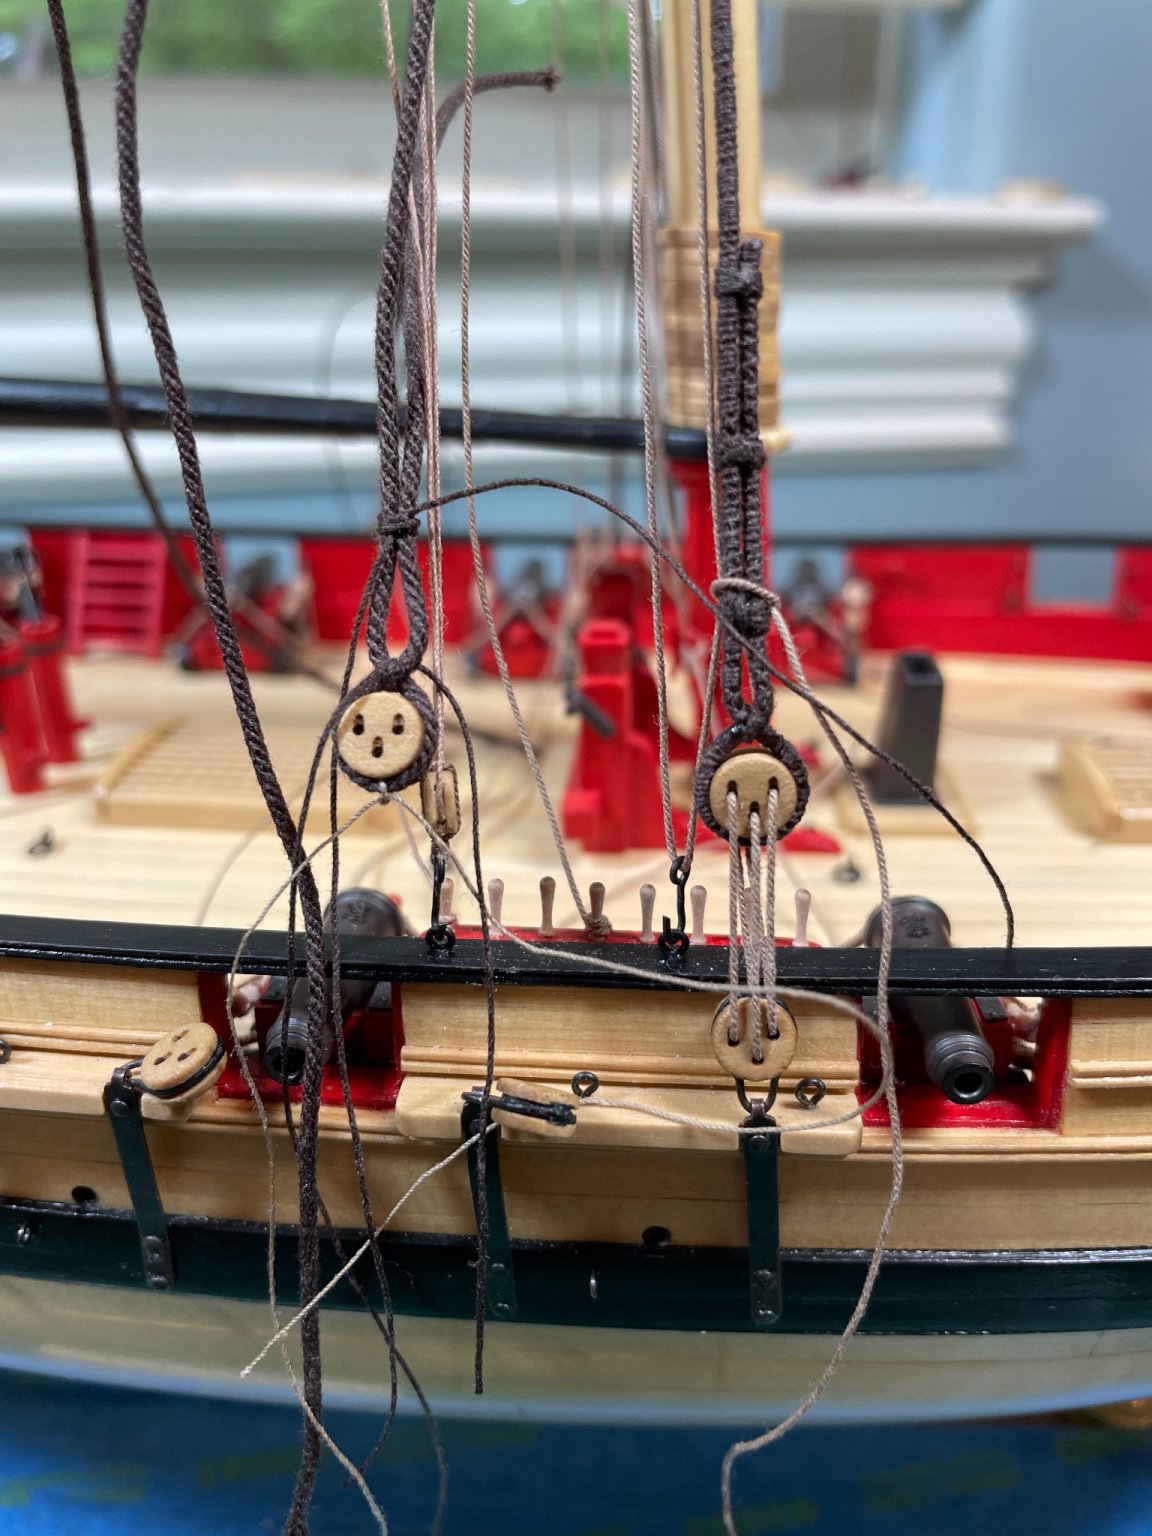
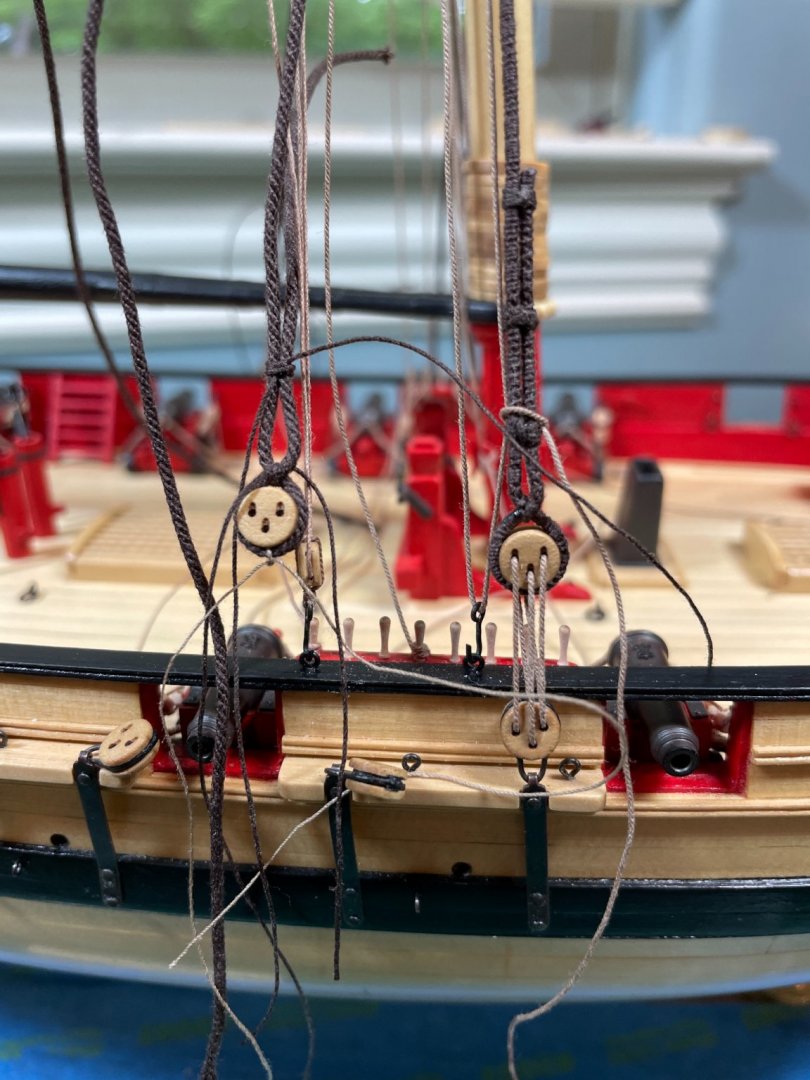
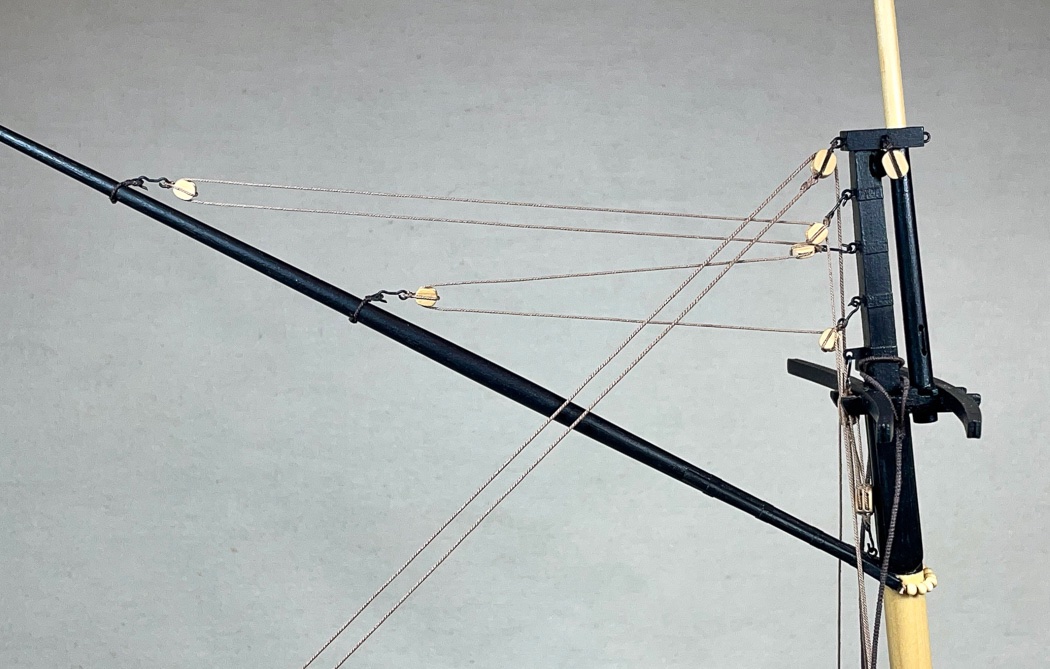
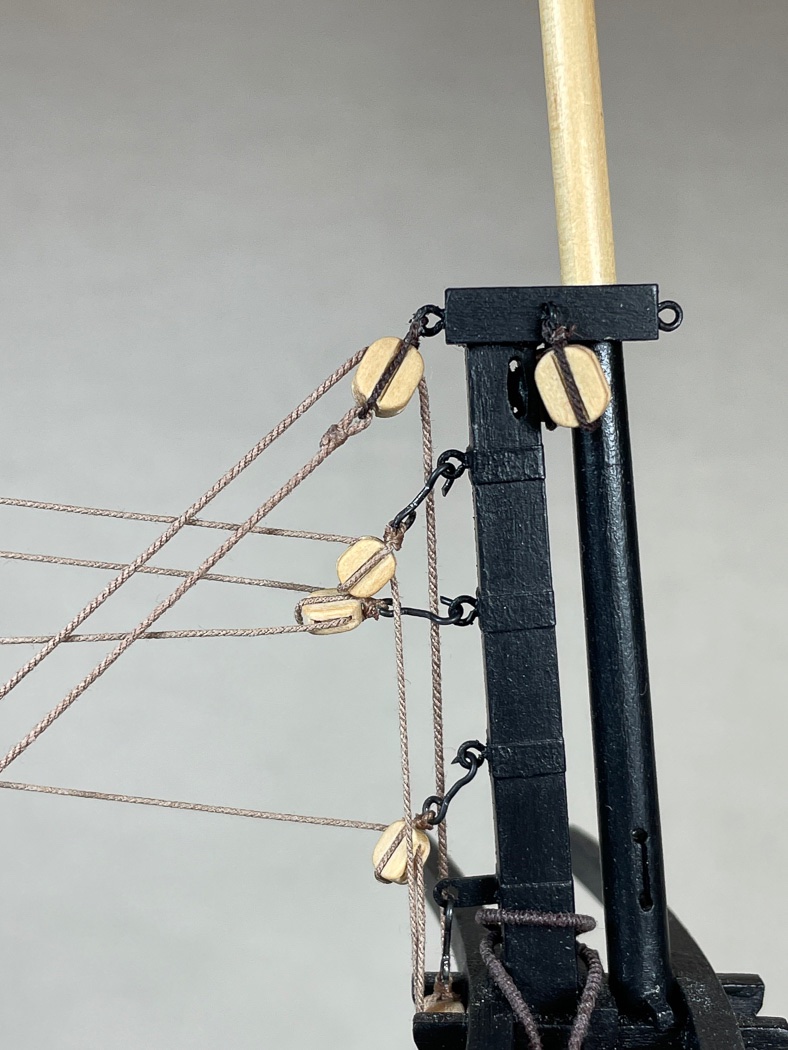
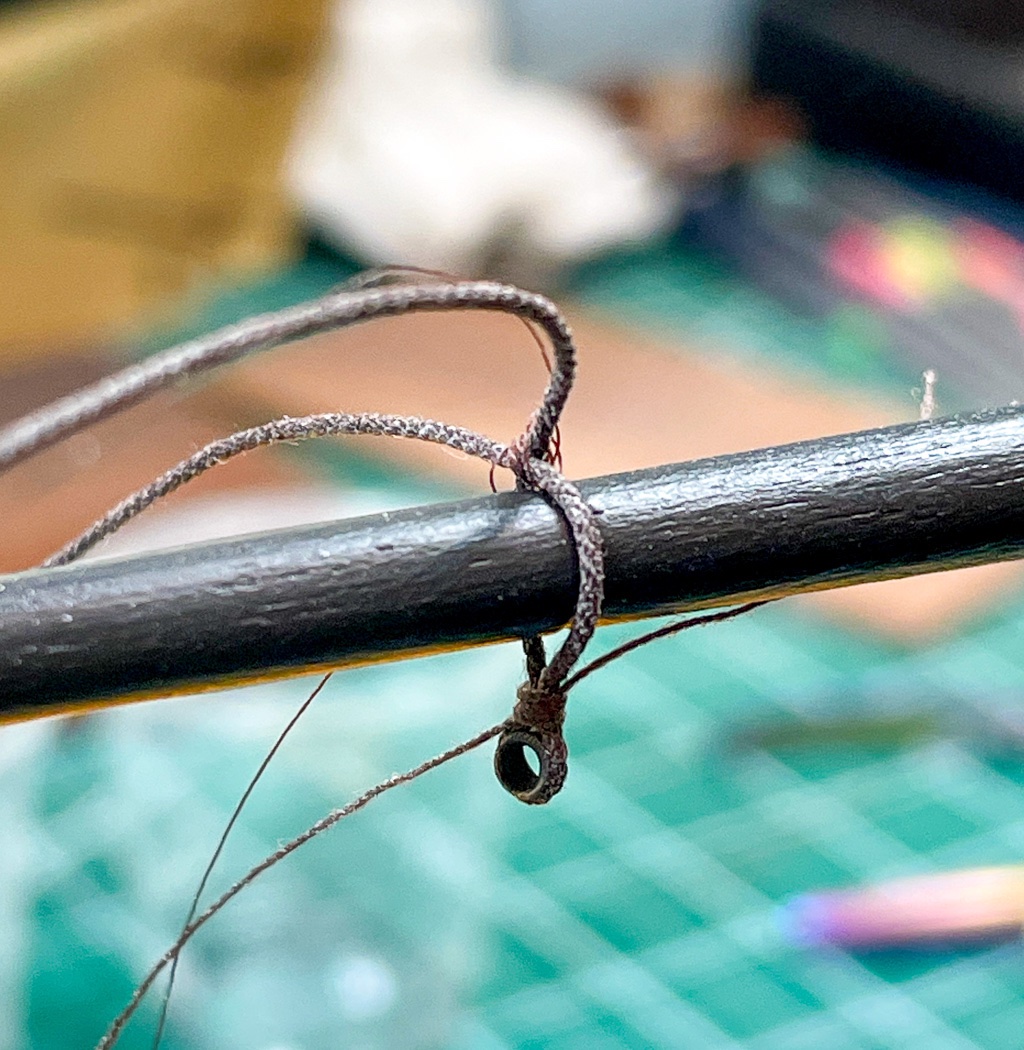
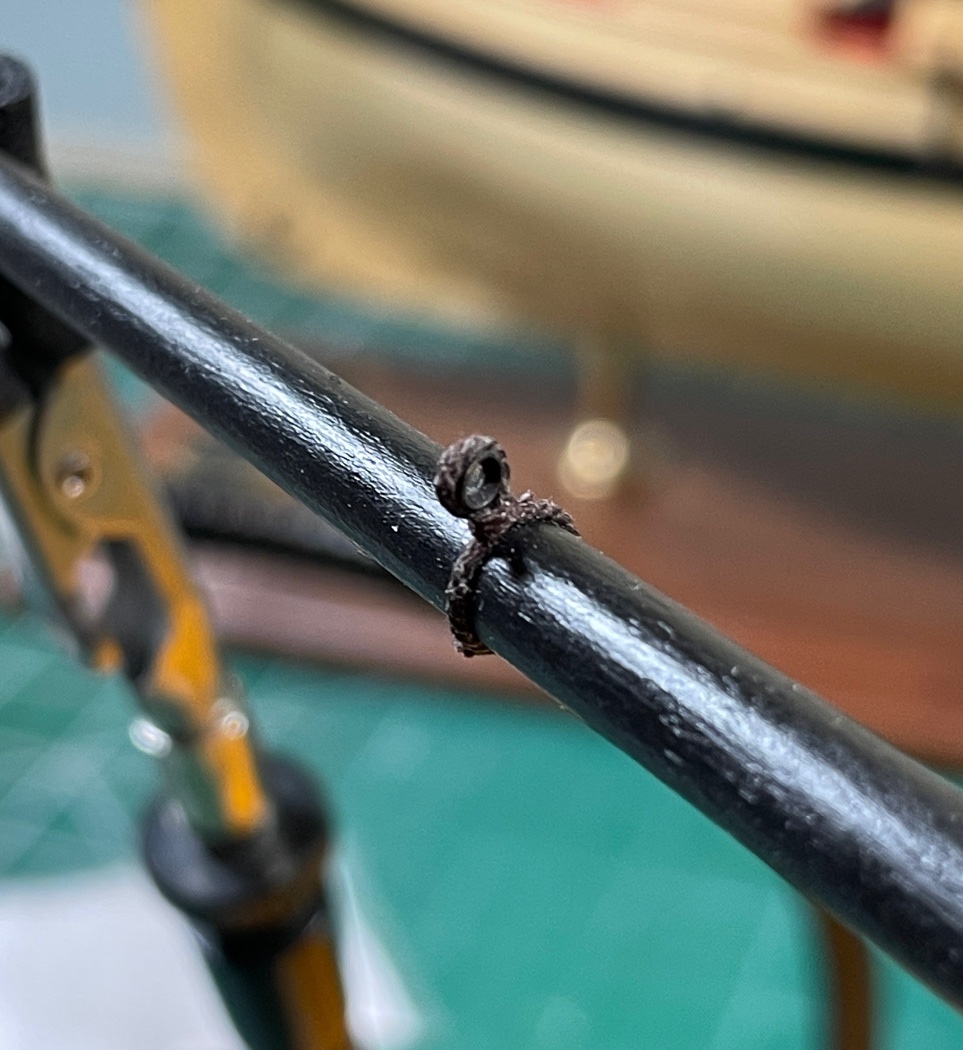
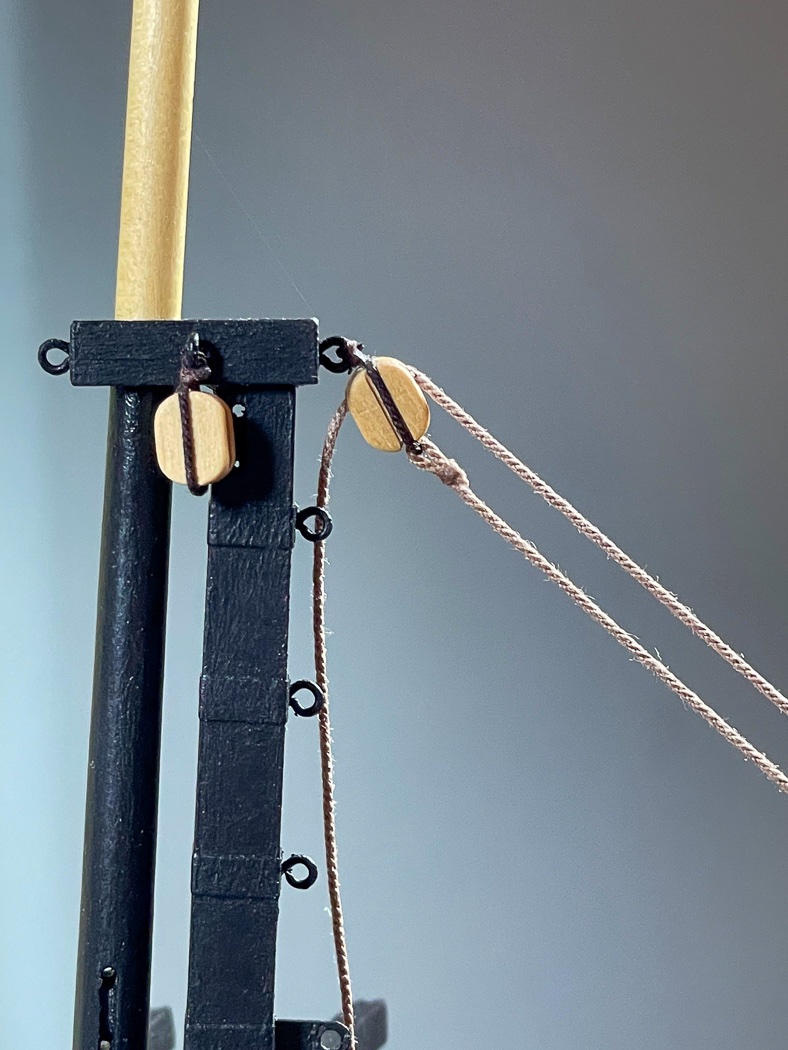
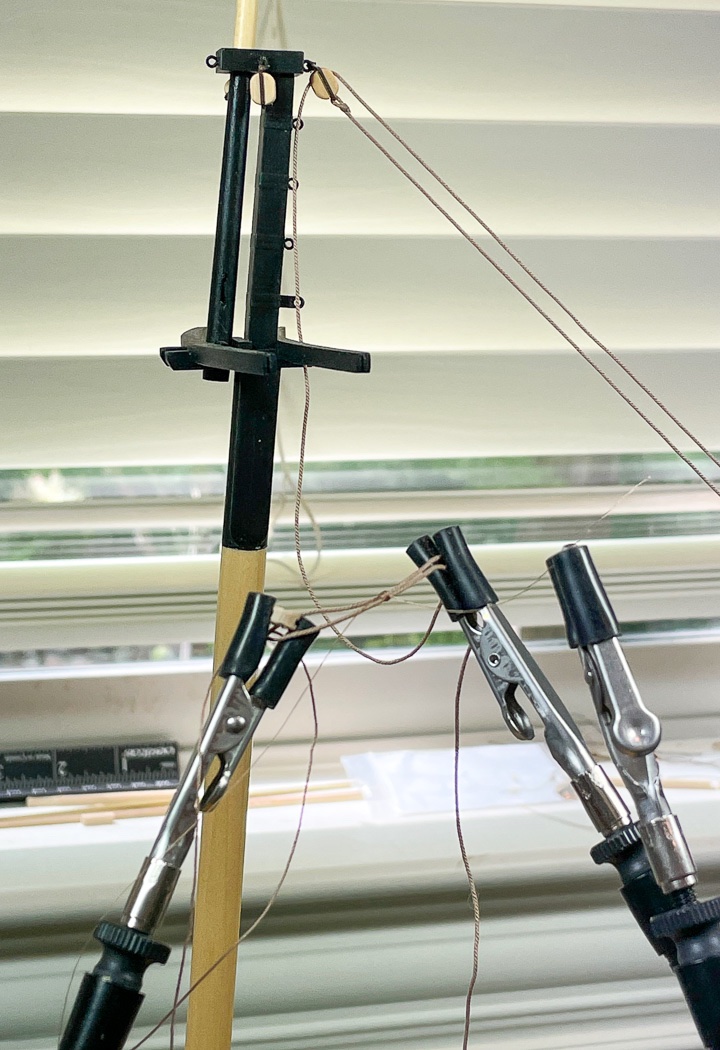
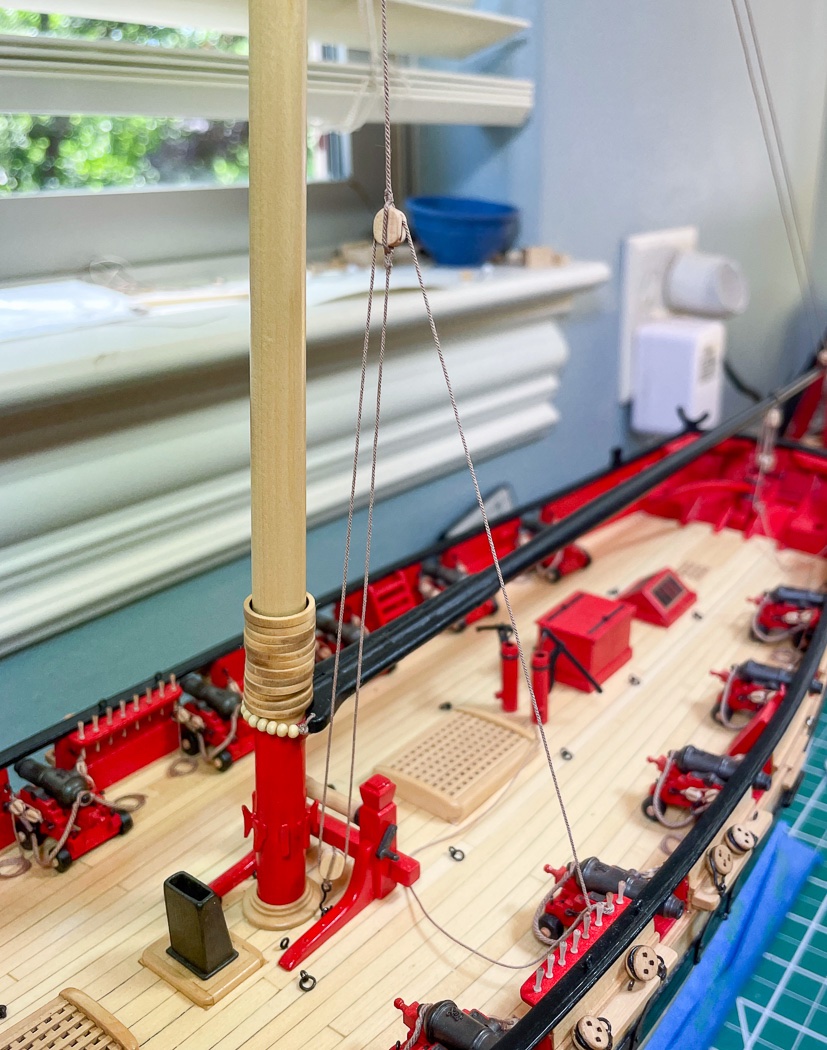
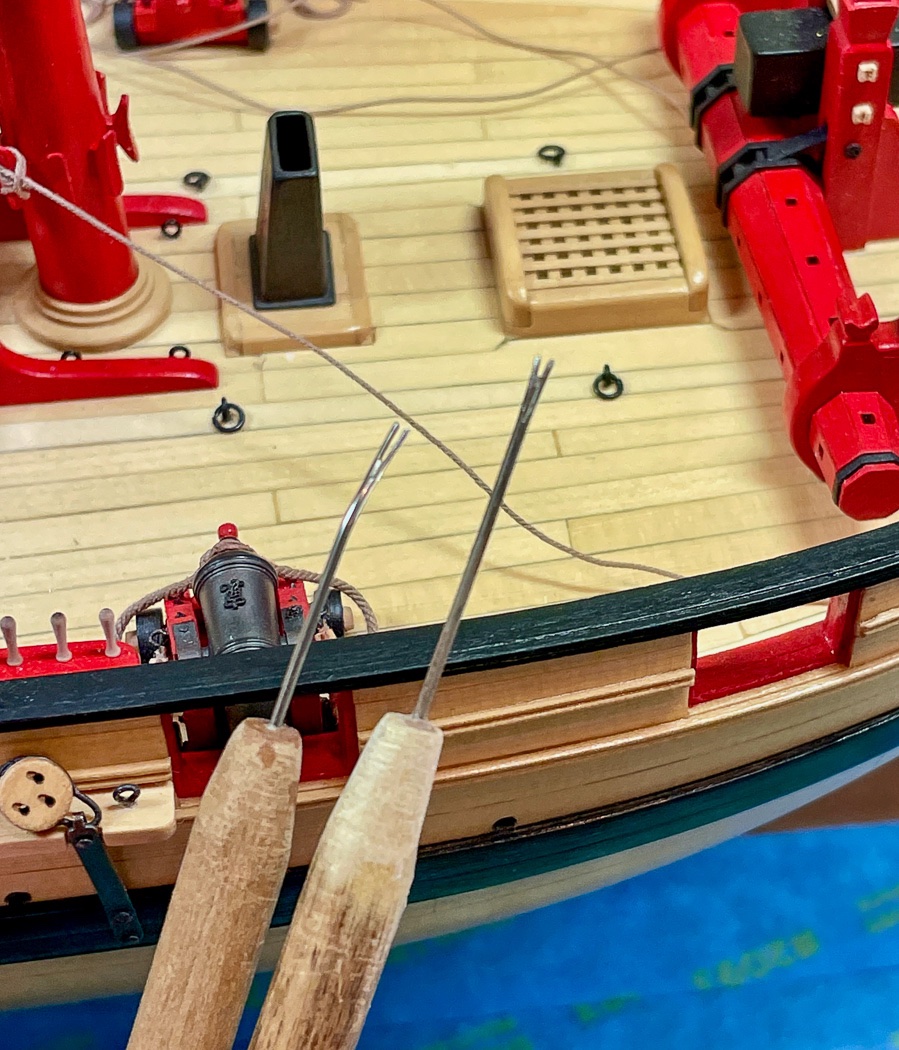
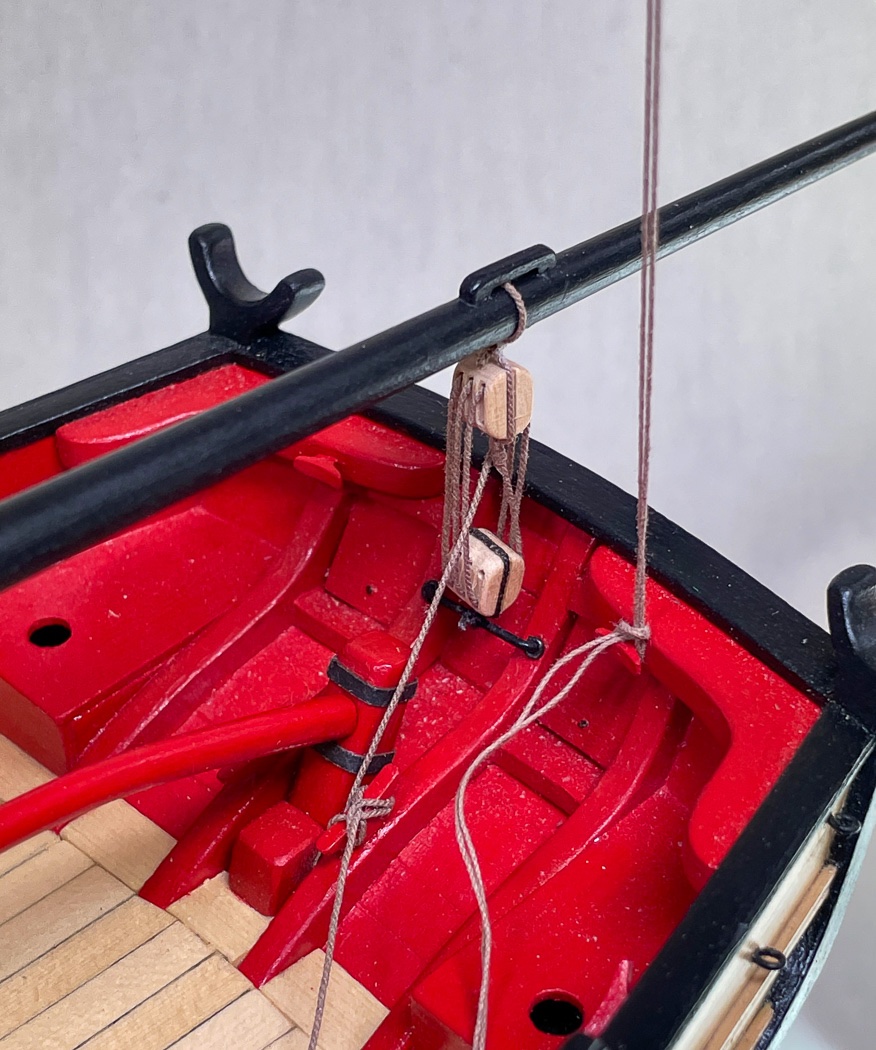
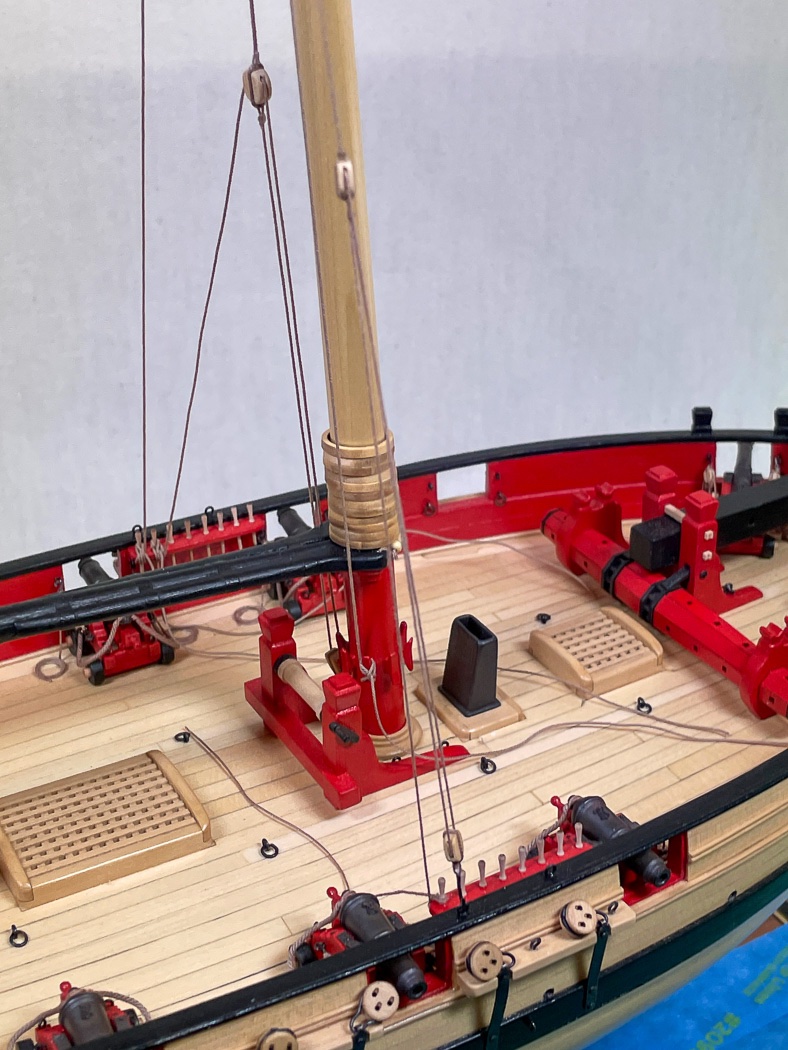
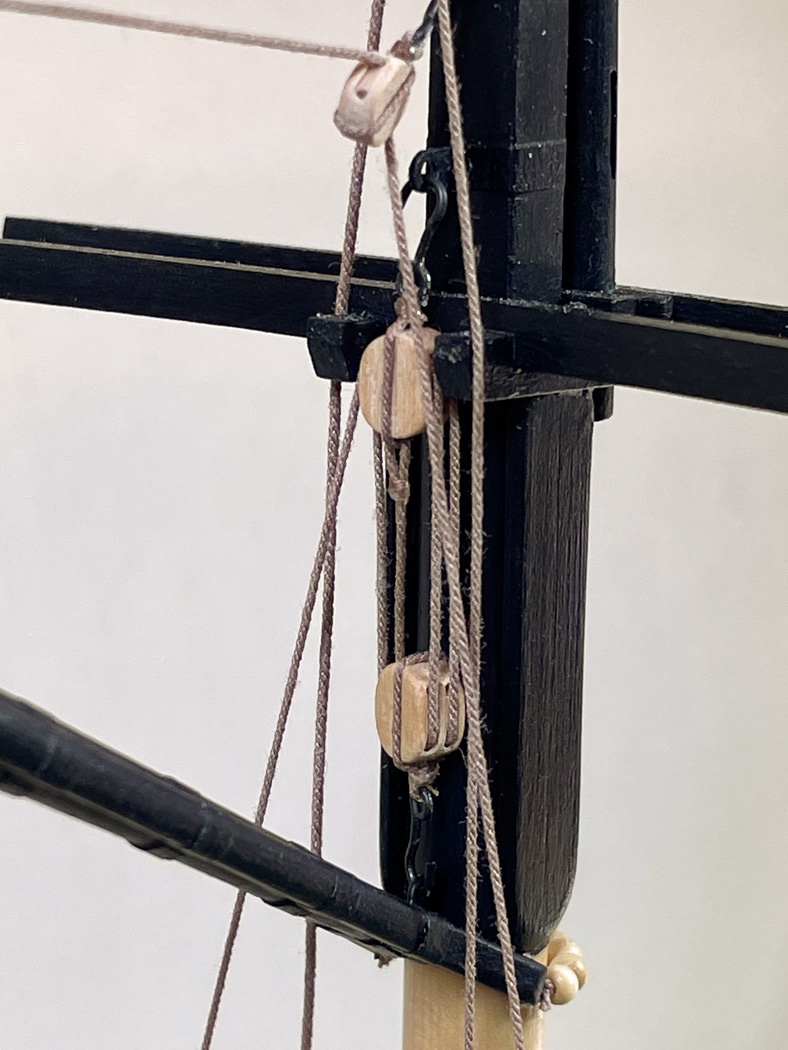
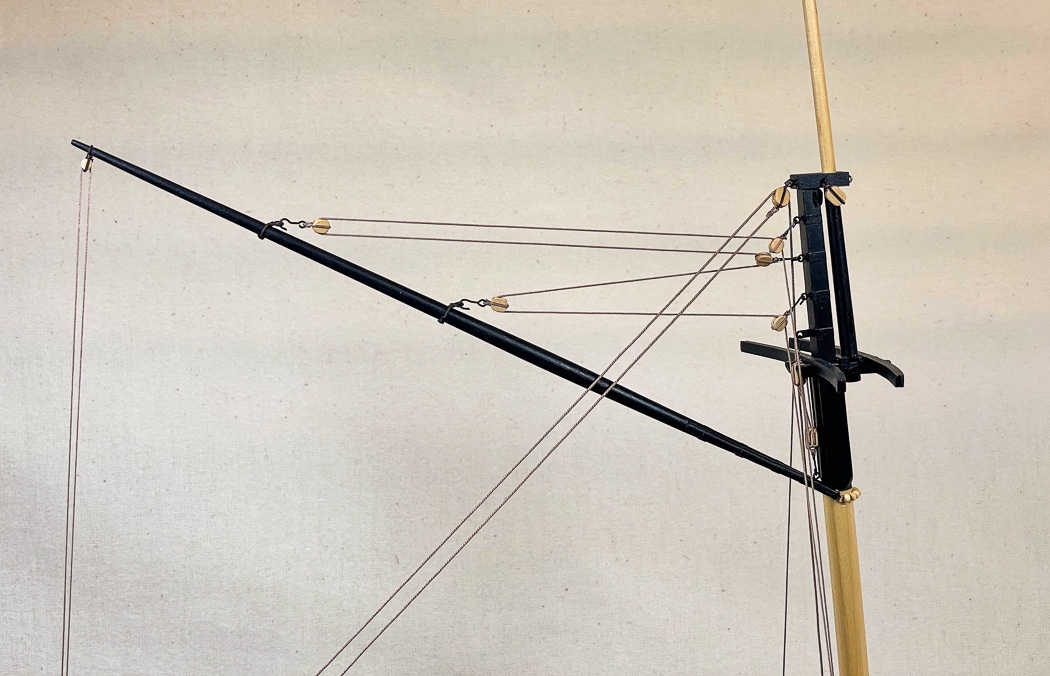
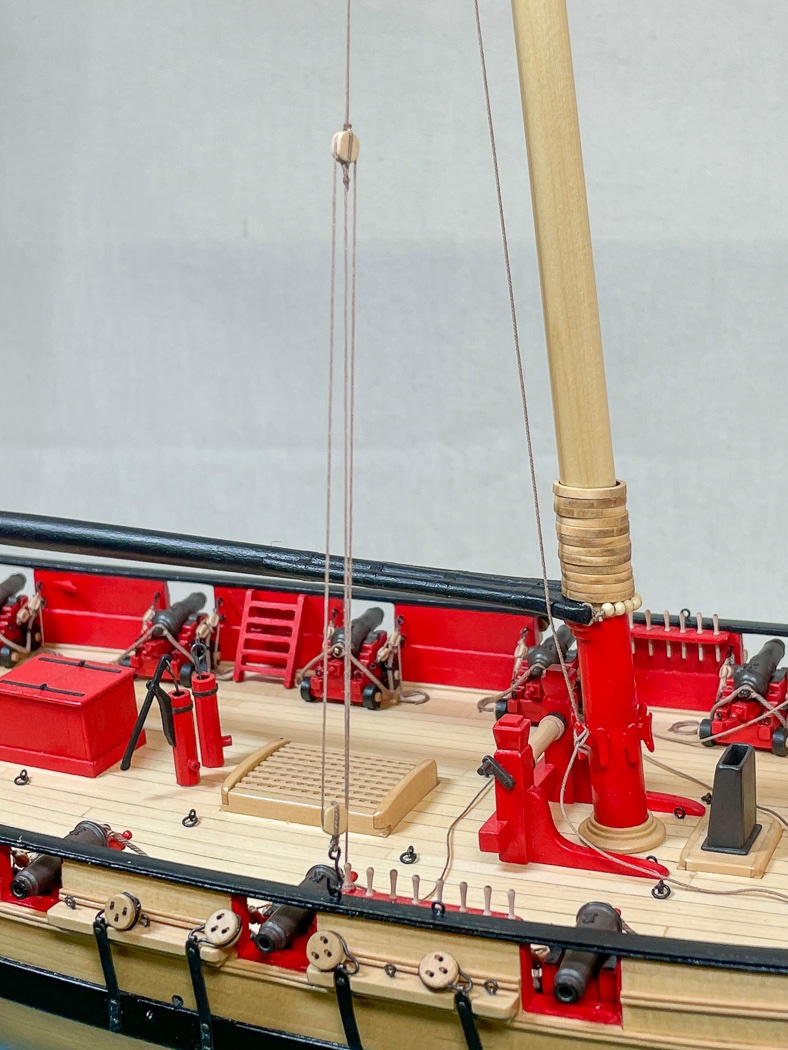
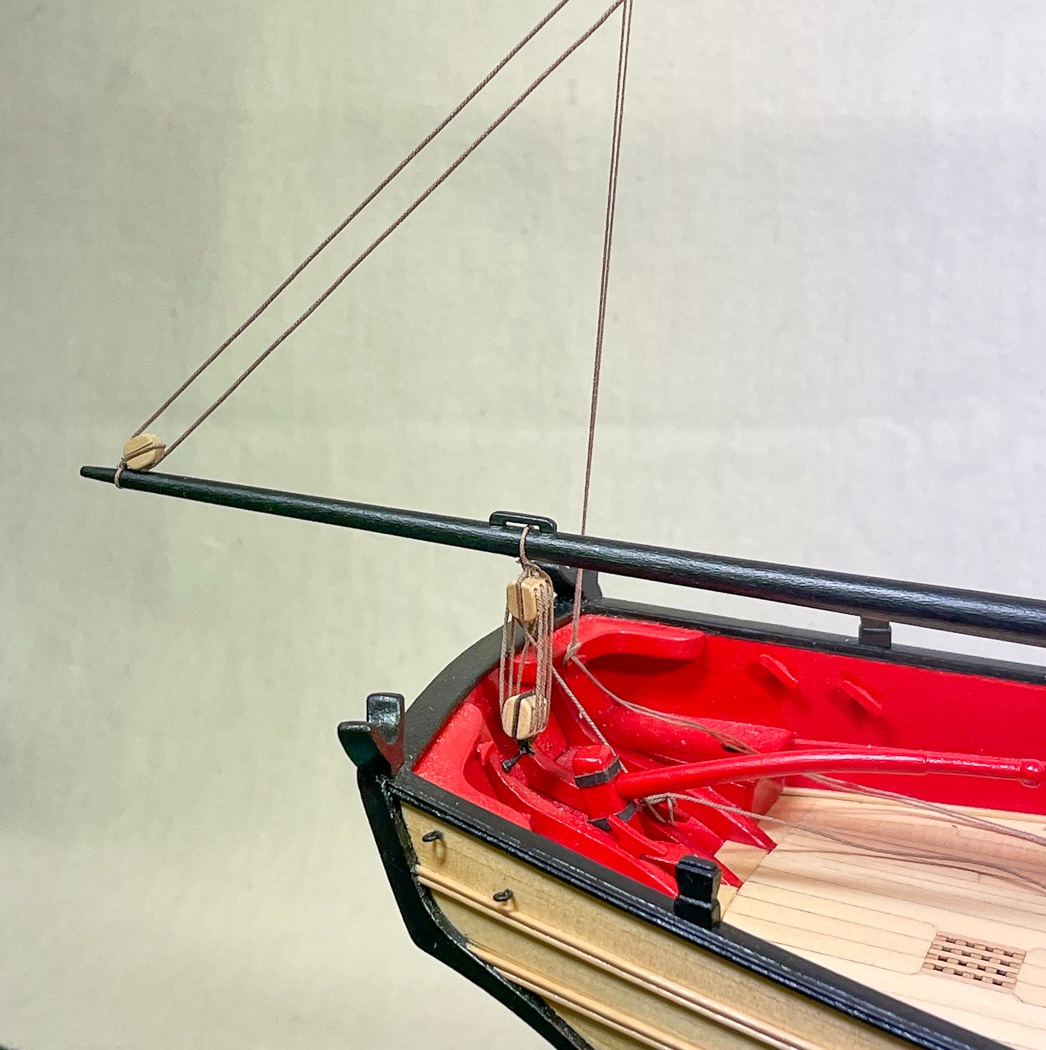
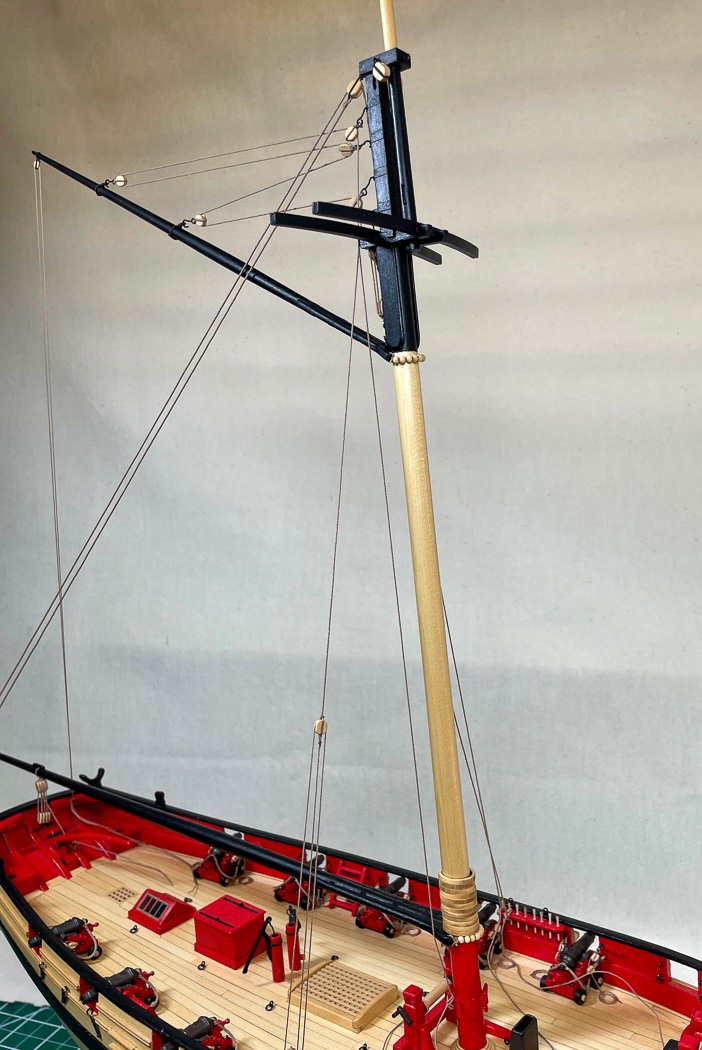
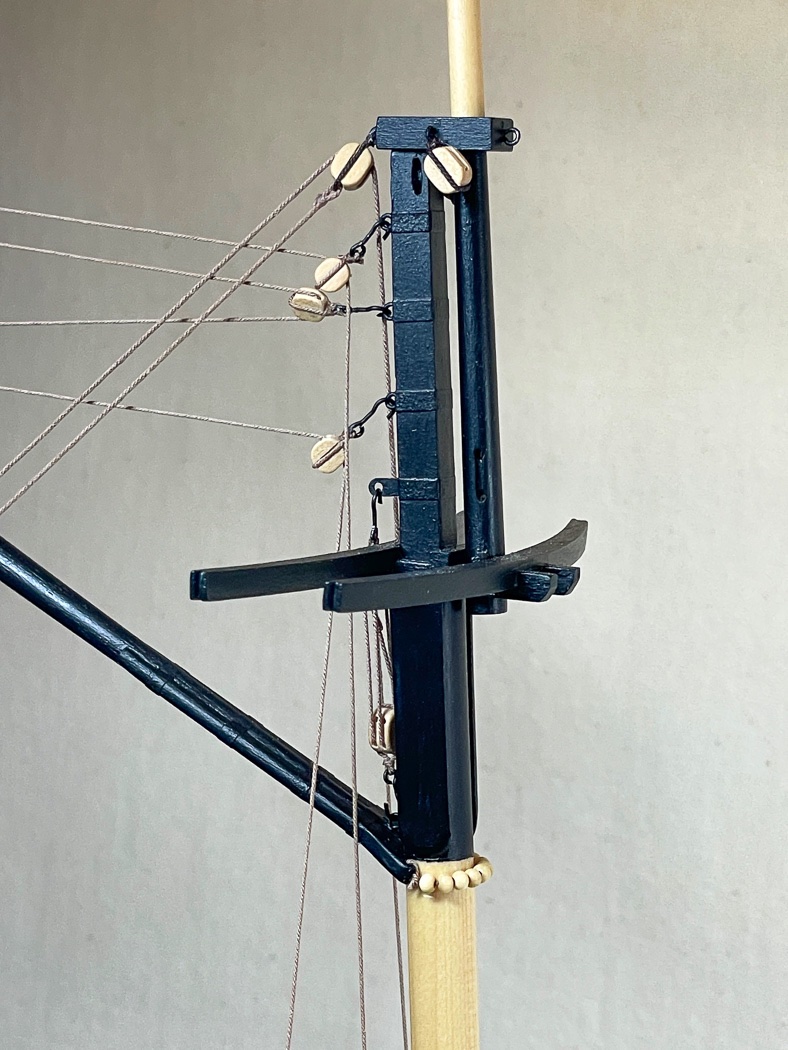
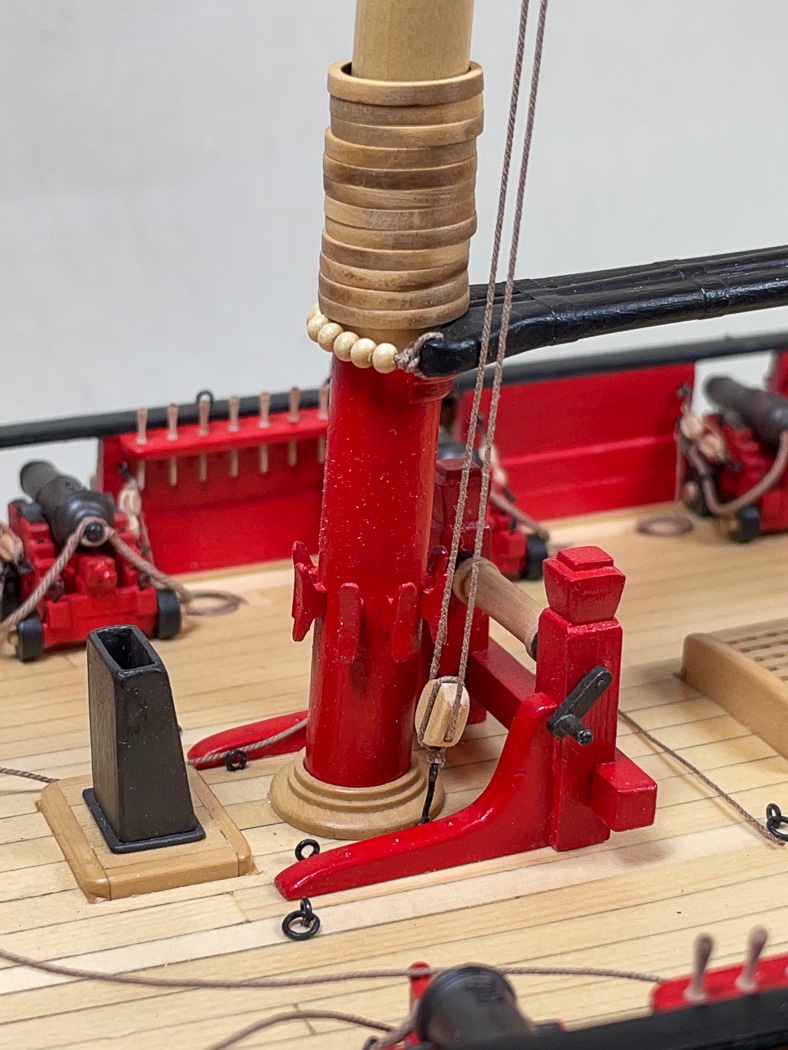
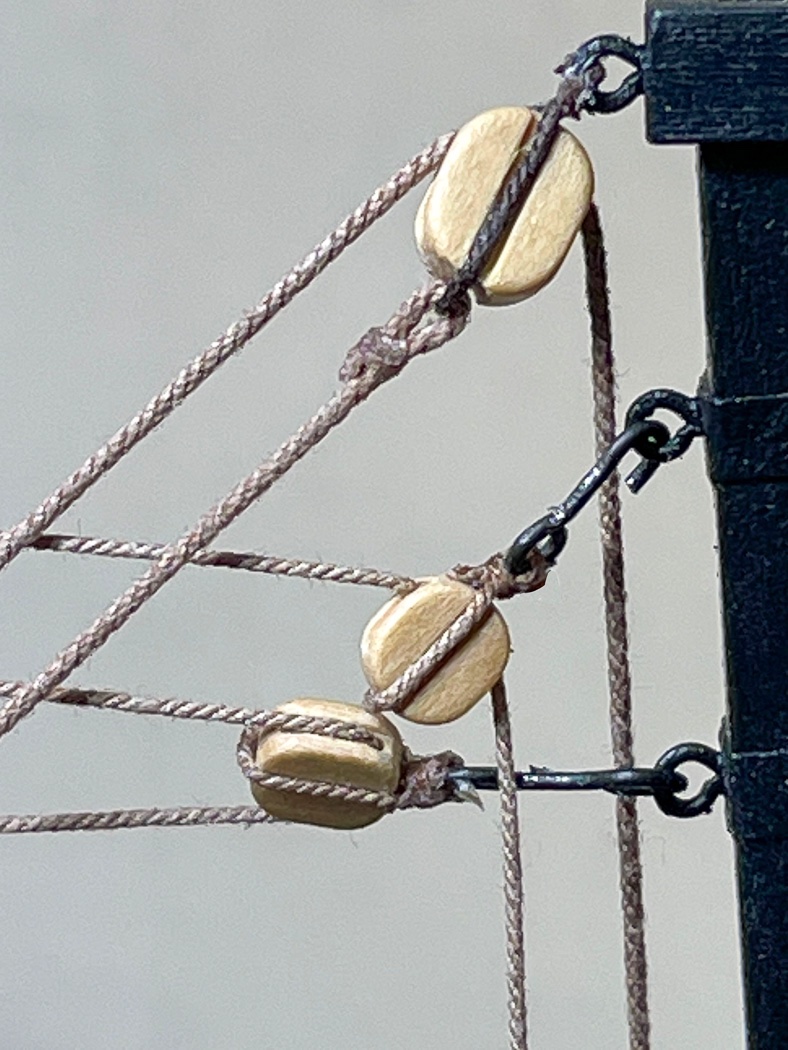
Boom & Gaff Rigging With the boom and gaff made it’s now time to start the full on rigging of Cheerful. I enjoy this part of the build process, it’s fun to work from the plans, determining rope and block sizes and the routes and lengths to organize the complicated block and tackle arrangements, each one serving some specific purpose. I like the look of the ropes running about, it’s one of the main reasons I like building sailing craft, even though fully rigged Cheerful will have a whole lot less lines than I ran for Pegasus. It’s kind of amazing to know that ships of this time period relied completely on wood, canvas, and rope to move the ship. It must of been an orchestra of coordinated movement to haul lines and arrange sails to propel the ship across the oceans. Anyway… First up are two thimbles rigged to the gaff for the peak halyard. This is different than the more common method of seizing blocks, instead here the thimbles are attached to block seized hooks. A little more complicated to make but really fun to do. I described making thimbles in an earlier post. The spring loaded punch makes this a breeze, the set I have allows for a pressure/tension adjustment, with a little experimentation I set the right amount of punch to get an even fold of the brass with just one push punch to each side, no hammer needed. I seized the thimble centered in a length of .018 dark brown rope on my Quad Hands then crossed the ends and added a loose seizing. I’ve mentioned after experimenting with other methods I came back to my Bob Hunt learned approach of turning the thread much like many us learned as kids to tie a hook on a fishing line. Seven turns is my choice for no known reason other than its not 6 or 8. With this rig placed over the gaff and pulled tight, glued with watered down white glue, then trimmed with my cuticle cutters I have my gaff rigged thimbles. I also attached whatever blocks I could to both the boom and the gaff before proceeding with the rigging. I always try to rig whatever I can off the ship where its much easier to manage. A small digression. I apparently credited the wrong cutter to Ryland. His choice being a little heavier duty toe nail cutter, the top one in the photo. Never having met a tool I didn’t like, I also got one to go along with my cuticle cutter (bottom) and Gingher embroidery scissors (note none of the three are actually for modeling, my experience is jewelers and sewers have the best tools, and now apparently so do pedicurists). For the record no way would I trim any toe nails with these things, I'd end up trimming toes instead. No judgement intended, all three are good choices and preference will vary between users, however I like my mistakenly referenced cuticle cutters best for trimming, though my embroidery scissors are also heavily used in rigging. The cutter is so sharp I just get near the thread and it trims itself. The toe nail clippers do have a solid reliable use for heavier cutting where absolute flush is required, but for me personally it would rank third mostly due to the size and weight. Nonetheless I am grateful to @Ryland Craze for his steering me this way and acknowledge his preference and recommendation. With these new tools in hand I quickly abandoned trying out other seizing methods, now being able to closely trim around my seizings. Or maybe I just have the old dog, new tricks syndrome. Back to rigging. I tied off the boom to the boom rest using some boxwood parrel beads I happened to have. They were the perfect match to the ship to complement my character driven (that’s what I’m calling them….) boxwood mast rings and cedar mast. Using .025 light brown line I rigged the topping lift. It runs up to the mast cap and then connects to .018 tackle finishing to a hook at the base of the mast and belayed to the pin rail. These as well as all my lines at this point are not glued to the belay points and are left long enough to release and re-tension later - hence a lot of string on the deck. The Quad Hands are quite handy at working up high, in this case the tackle block for the topping lift. I purchased an additional 16” arm making it even easier. It is due to having this tool I chose to go ahead and glue on the topmast and mast cap and work in the monograph sequence of rigging inside out. This knowing I can manage adding the shrouds on board instead of slipping them on before the mast cap was glued on. Other than standing up and being careful not to break the trees, it’s only a little more challenging than working off the model as has been my past practice. By now I think I’ve established my zest for tool acquisition (sad I know), these simple home made tools make belaying and running lines in crowded places much easier. They are nothing more than sewing needles with the head cut off and the remaining ‘V’ filed sanded smooth (otherwise I’d shred the thread) and glued into a six inch wooden dowel. I’ve had these for years, they work great for me. The different lengths of the V’s serve different purpose, but always for rigging. I had earlier loosely ran .018 light brown line through the triple blocks (one to the boom and the other to the horse above the tiller) for the main sheet before I completed the topping lift. Easier to get there now while the boom is just flopping around loose. (in case you're checking, the stern is pretty well covered in dust this time). I wasn’t exactly sure in what sequence to rig these two triple blocks. I had acquired Petersson’s Rigging Period Fore and Aft Craft from Amazon Kindle and downloaded it to my iPad a while back. The first section is specific to English Cutters and is mostly detailed diagrams for key sections of rigging, it is very handy and what I followed to rig the main sheet. One interesting point is how the running end passes through the center of the two blocks before being belayed to a cleat. After tying off the gaff to the mast using more of my boxwood parrels I chose to next add the throat halyard with more .018 line. Out of sequence with the monograph I found it easier to have the halyard holding the gaff in place a bit. While I was rigging the peak halyard this was left very loose, I only tensioned it after all the gaff lines were run. My practice is there is no need and every reason not to tension lines that work together (like for the gaff) until they are all run and can be slowly tensioned together. The peak halyard requires .018 line with six sets of block and hooks with .012 line tackle at the deck. I’ve mentioned I have plenty of the commercial hooks but elected to learn to make my own. I’m sure they aren’t the best in the world, in fact I’ve since learned to make them a tad shorter They certainly are not as nice as Chuck’s (or many others) but I like them [well, not so much, I replaced all of them after this post]. I’m sure with practice I can make [made] better ones, however at this point I choose to be consistent with the size and look and not have a variety of styles posted around the ship [so when I replaced one I replaced them all]. For the peak halyard I chose to work backwards from the monograph’s detailed description. I stared with the tackle made off the ship (there I go again) and ran the lines up through the blocks back to the belay point on the mast. That allowed me to more easily adjust the starboard tackle block to be even with the topping lift block on the port side….at least for me it worked. This photo demonstrates the superb quality of Syren blocks and (now discontinued) rope along with some less distinguished hooks. I’m going to miss ordering Syren rope. I'm not sure I’m that excited about making my own, fortunately something I can delay until after Cheerful. The completed peak halyard is one of those distinguishing features of many ship models, it is one really long line run from a block and tackle hooked to the deck, back and forth through five blocks up high, then belayed back to the deck. It takes some patience and time to obtain the right angle on the gaff, this angle also affects how the rope looks (geometry, angles, and all that stuff). I marked a spot I had determined from the plans on the mast with gaffer tape by drawing on the plans a level line straight across from the tip of the gaff. I placed a bubble level on the wide side of my long metal ruler to transfer that line from the plans to the ship. Of course I could have winged it and been close enough, but where is the fun in that. Then it’s pulling here, a tug there, through the six blocks until the line looks right. It is critical to not over tension or pull too hard at one spot. Chuck’s blocks are great, but its a hole in a piece of wood, not a working pulley. Like the topping lift, the peak halyard has similar tackle with the peak to starboard and the topping to port. The peak halyard tackle runs to a hooked block connected to an eyebolt on the cap rail and with the other end belayed to the pin rail (that line travel up the mast, out the gaff, back down to the deck only to end up in more or less the spot it started, that's a long line...). The throat halyard is simpler, running directly to a belaying pin on the port pin rail. With the flag halyard added and temporarily tied off at a cleat on the stern (wow, how long ago did I install that cleat….) the running rigging for the boom and gaff is complete. That was fun. Next up the Burton pendants and adding those shrouds. Thanks for stopping by, your comments and likes are always appreciated. I’m especially glad to learn that some find the log helpful as a reference for their own builds. Like many that’s how I learned and I enjoy trying to pass that on.
- 778 replies
-
- 16
-
-
- cheerful
- Syren Ship Model Company
- (and 1 more)
-
As Chuck notes Cheerful isn’t a kit and not a useful comparison to one. it’s a great model but I wouldn’t recommend it for your second one, it’s a lot more than Lady Nelson, I’ve built both. I wouldn’t buy anything from Model Expo. I highly recommend Vanguard models. Chris makes great kits of great wood with excellent plans and instructions. Even with UPS shipping from the UK they are a very fair priced kit. You’ll get so much more for your money. Check out build logs for Flirt, Speedy and Duchess on Kingston.
-
Great work, thanks for the supplemental manual on how I will build Flirt when I get to it. As A photographer I would like to find something as good to say about your photography......I’ll keep thinking about what that might be....🤣😂
- 725 replies
-
- 1
-
-
- vanguard models
- speedy
- (and 1 more)