


glbarlow
-
Posts
4,126 -
Joined
-
Last visited
Content Type
Profiles
Forums
Gallery
Events
Everything posted by glbarlow
-
 Thank you for your comments. Yes, you've shared your approach a couple of times on your log and mentioned your concern over lathes on my log before, though this is the first time you've included your photo here. I will endeavor to provide a detailed response so that we might put it to rest, at least here. I've successfully used the hand drill on my 9 prior models without incident, doing no more than holding it in one hand and the sandpaper in the other. No roller blades bearings, stands or tail stocks were needed to quite successfully make masts and spars of any length. I'm not sure how many I've turned of varying sizes on my 9 prior models but its a lot. I'm sure the handheld method is one done by many people, in fact I think @Chuck mentions this approach in the monograph we both follow in building Cheerful. I've posted the photos of the main mast and bowsprit I turned on the lathe. To this point that's all I've used it for of any consequence, I'm not as far as you on the build and have yet to apply it to spars and booms. You could check out @DelF excellent log on his build of Speedy, he's been quite successful using it for all his work - at 1:64th scale. I am quite pleased with the smooth, well-shaped, identical to plan pieces my mast and bowsprit turned out to be. I have none of the scratches you mention as my final step is to run a very fine sanding stick up and down the piece solely to smooth it and of course the WOP and paint do the rest. To further try to answer your specific question, and perhaps better answer a good one asked by @BobG, I experienced a great deal of wobble when I first put the main mast in the 3 jawed chuck, however I determined I'd just set it poorly in placing the 4 sided stock into the 3 jaws of the chuck. I adjusted and reset it better and found I had little to no wobble at all. What little there was was easily eliminated by holding the far end lightly (so as not to burn my fingers) as I applied the sand paper with the other as I described in my post. I'm fairly confident that the main mast is the biggest, literally, challenge and the smaller spars and booms will go easier - as surely I've seen in Derek's posts on Speedy. I initially thought I might need a tail stock but of course the mast and even bowsprit are longer than this inexpensive tool's base, and it turned out I didn't need it at all and haven't looked back. I might add I think the lower revs may have also helped. In the little experience I've had I've found the quite stable base, the constant revolutions of dial set variable speed, the low and centered weight of the lathe overall, the well designed hold of the 3 jaw chuck accessory (a mandatory addition I think), and a purpose built motor to be a smoother, easier, steadier approach than the re-purposed hand drill I've used in the past. You seem quite content with your quite elaborate home made stand and I'm glad it works for you. For me the bearing in the middle would be problematic in the way in the approach I use to create the taper as I traverse the whole piece to keep it all evenly tapered, shuttling the sand paper up and down as needed to get the required diameters. I need access to the whole piece at once. In short, hand drill by itself, home made holders for one like yours, or lathe are all acceptable ways and all work to one degree or another. I'm pleased with my $198 Proxxon DB 250 lathe. I prefer it to holding my drill and find it does a great job with none of the problems you listed. Should I shatter a thin spar, I'll load up another one until I get the practiced touch to do it right. I hope this answers your questions.
- 778 replies
-
- 5
-

-
- cheerful
- Syren Ship Model Company
- (and 1 more)
-
So you’ll be done by next Monday 😁 As always I’ll enjoy watching your build of one of Chris’s well researched designs.
- 355 replies
-
- 7
-
-

-
- vanguard models
- Sphinx
- (and 1 more)
-
You have so many creative clamps and clamping methods, they’re a story in and of themselves. Nice, meticulous work as always.
- 185 replies
-
- 3
-
-
- queen anne barge
- Syren Ship Model Company
- (and 1 more)
-
That’s one, only 11 more, or 44 more blocks, 44 more hooks, 24 rope coils, and 66 seizings. The breech ropes are done though. Fun stuff😁
- 778 replies
-
- 11
-
-
- cheerful
- Syren Ship Model Company
- (and 1 more)
-
Thanks Bob. Definitely easier, I’m not sure about more precise, that’s more about the person holding the sandpaper. The mast is about 250mm and it was no problem. I think that’s about getting a good secure and level set in the 3-jaw chuck (a necessary accessory). I repositioned it a few times to get the stock spinning more or less level. I don’t think I’ll need to turn anything much longer than Cheerful’s mast.
- 778 replies
-
- 1
-
-
- cheerful
- Syren Ship Model Company
- (and 1 more)
-
Thanks Chuck, much appreciated. I realized I’m down to the rigging and done making things for the most part. I’m almost a little disappointed by that, it’s been such fun this past 10 months. Doesn’t mean I want to drop it and start over again though, that still hurts. Thanks Derek. A Proxxon router bit helped with that, I just sort of wing it and see what happens. I think I provided the details for that planer in an early post. You should pick one up, it could do great things in your skilled hands.
-
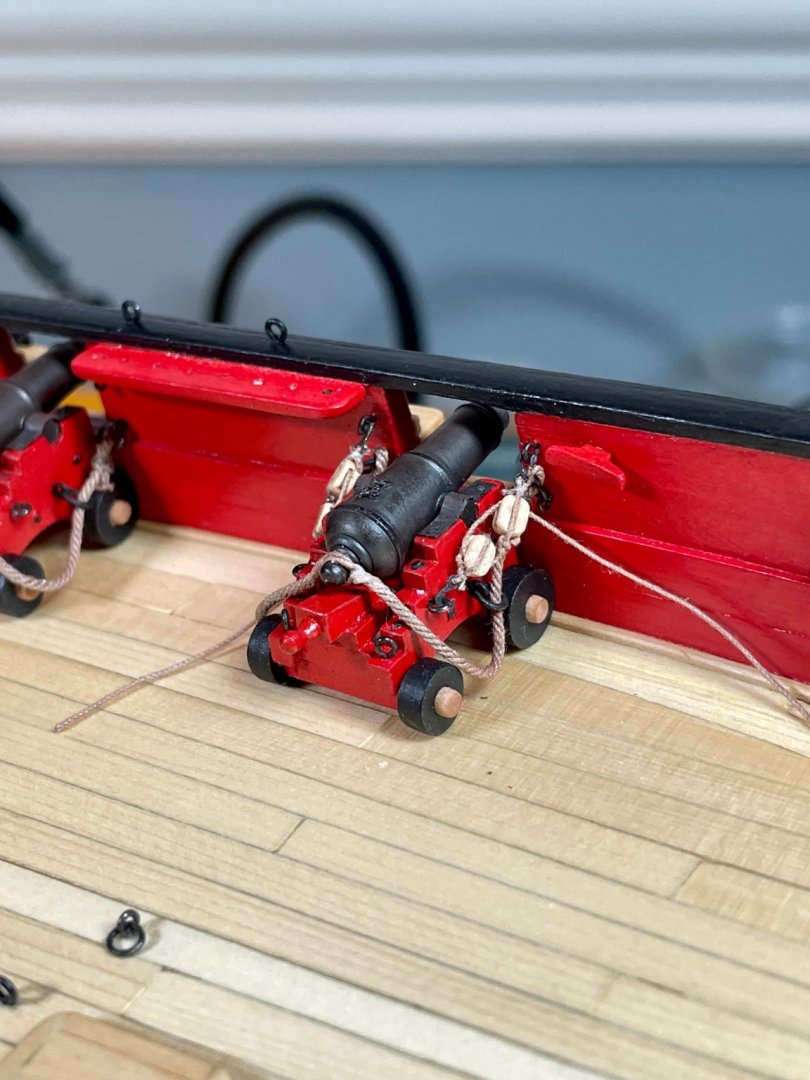
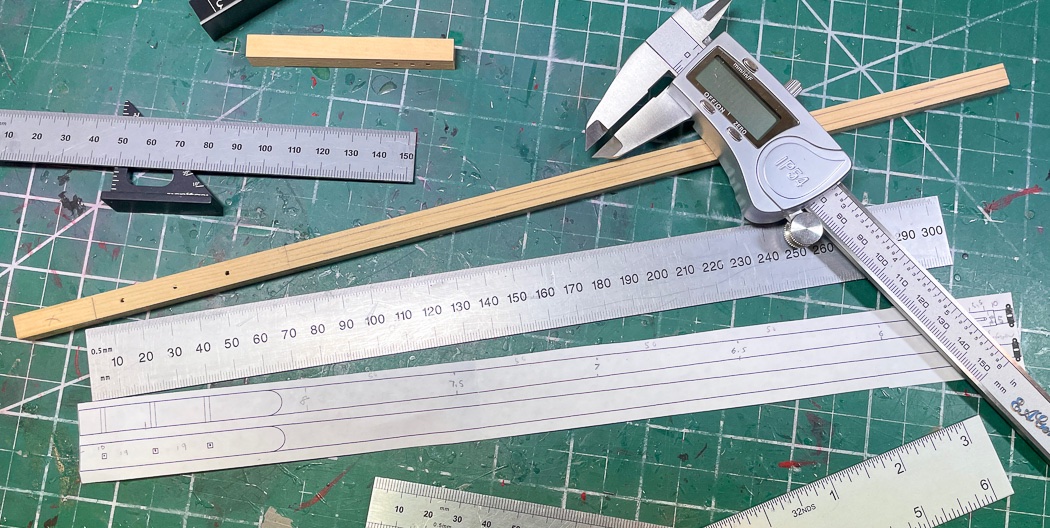
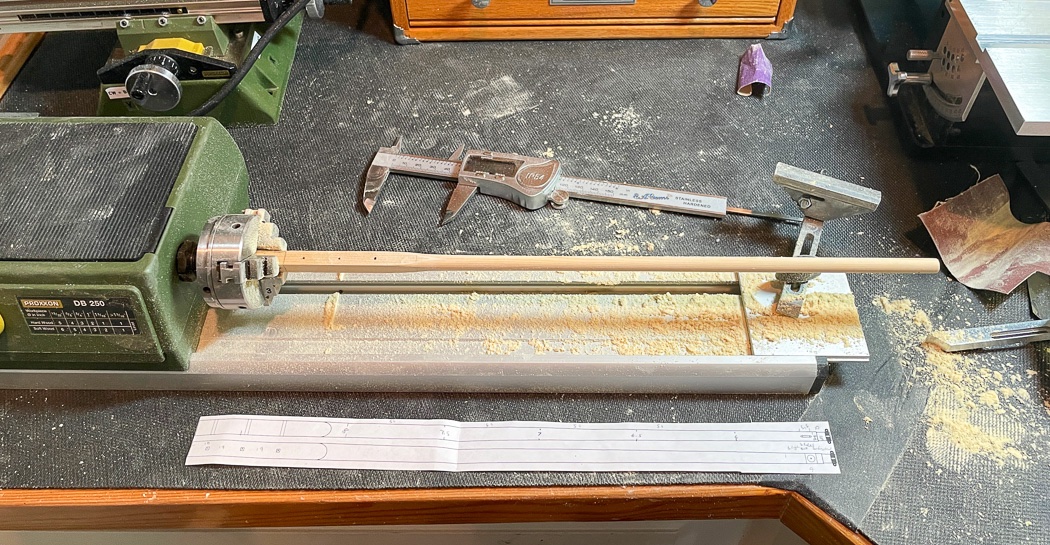
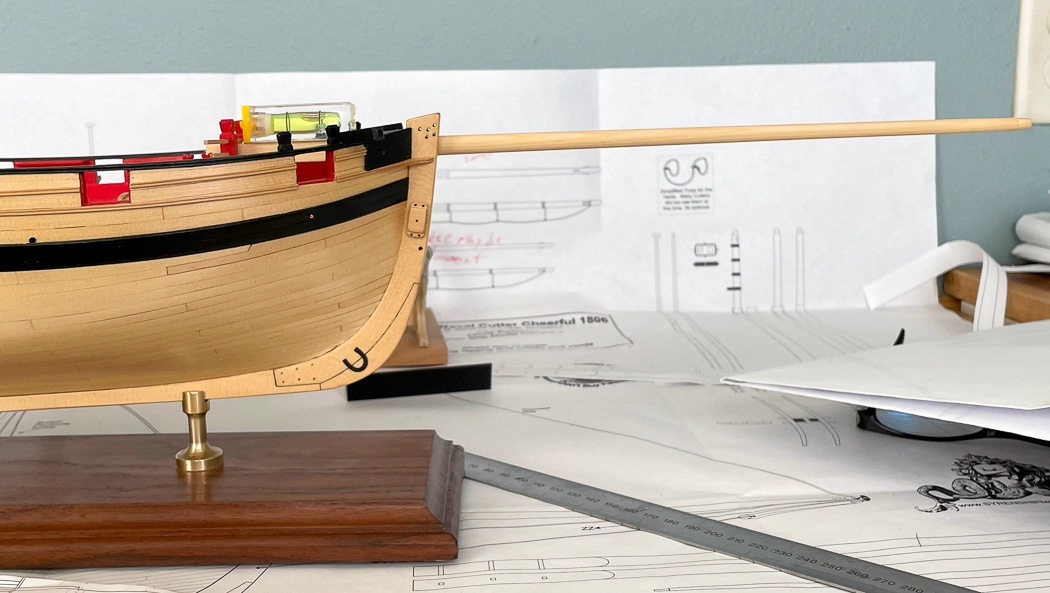
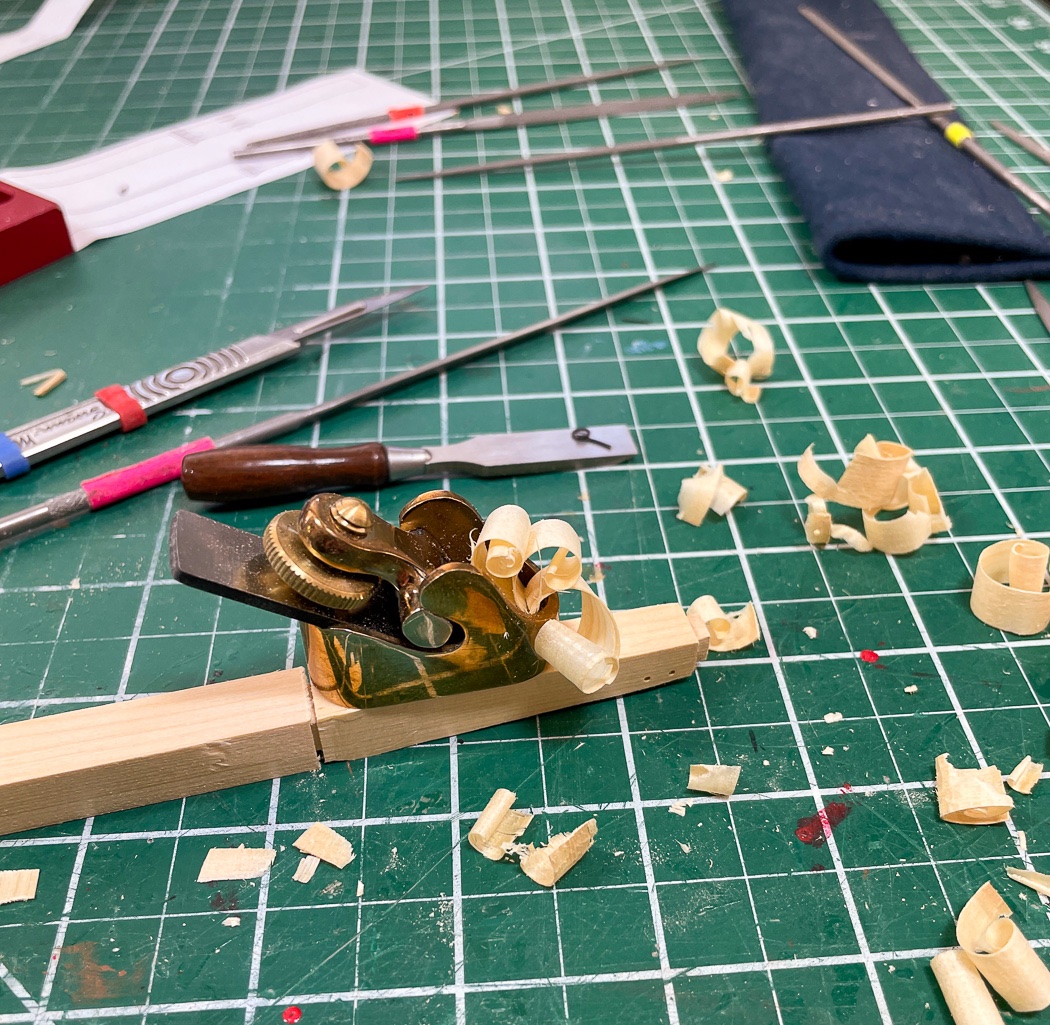
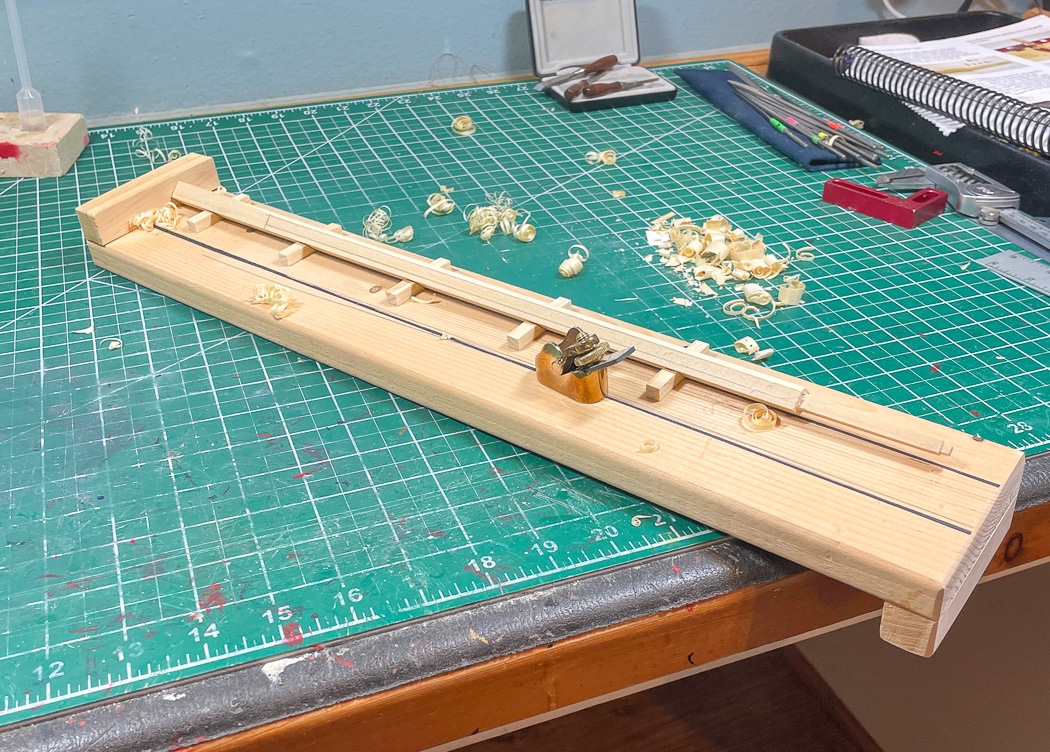
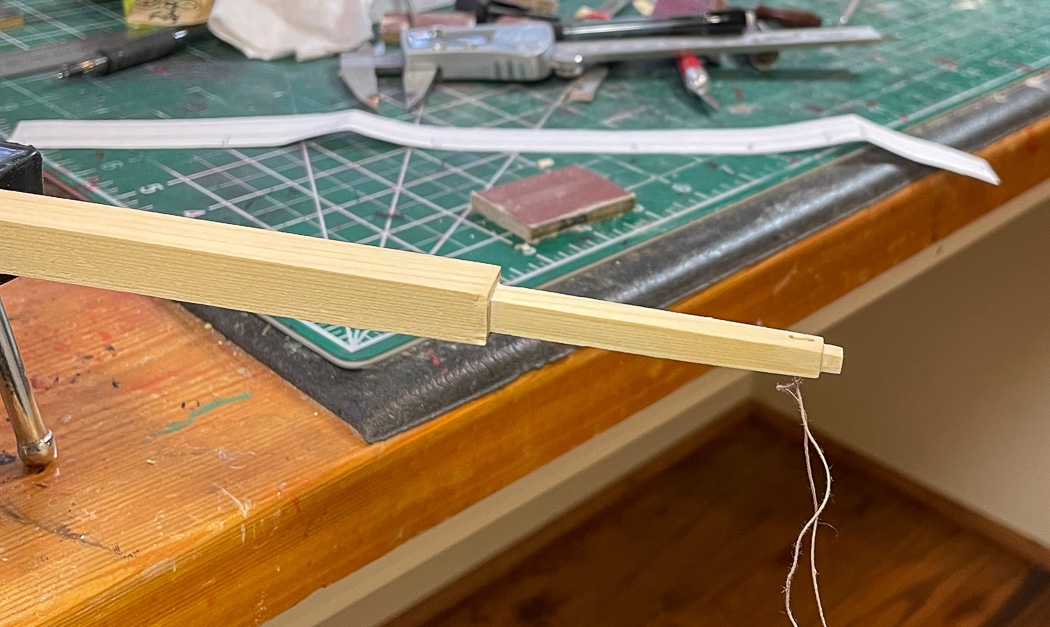
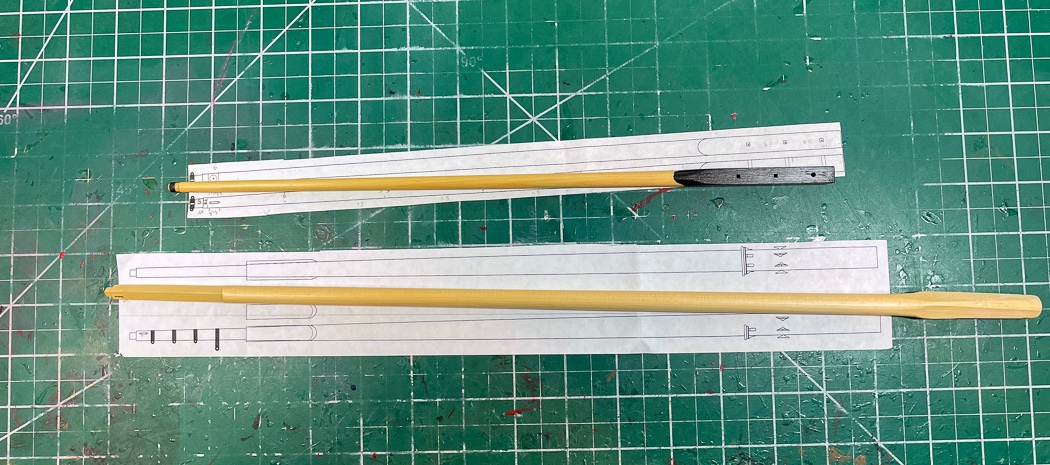
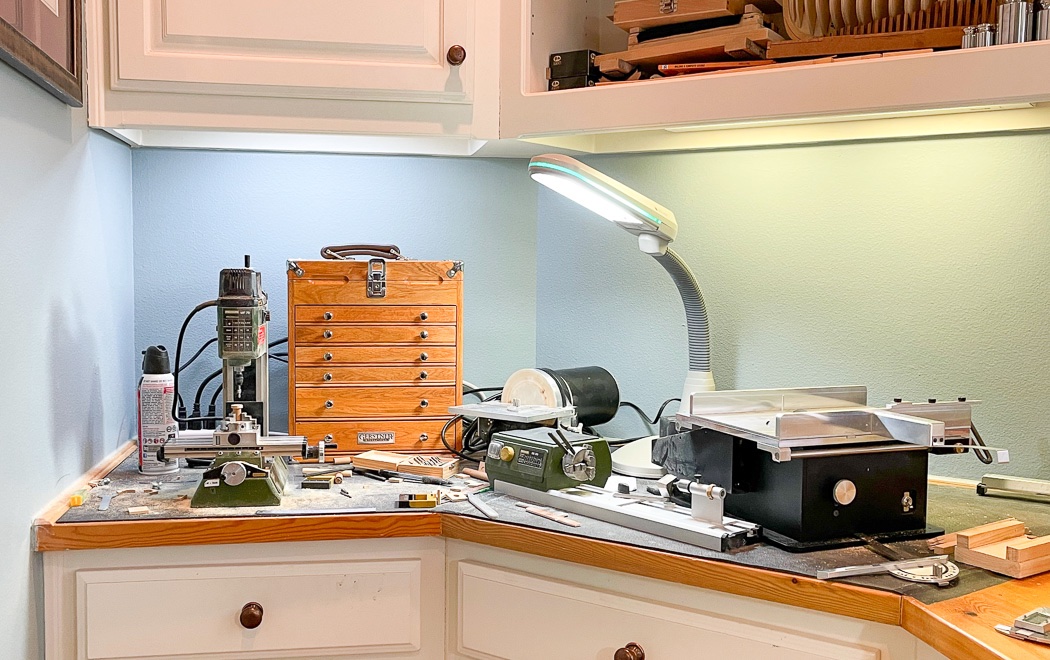
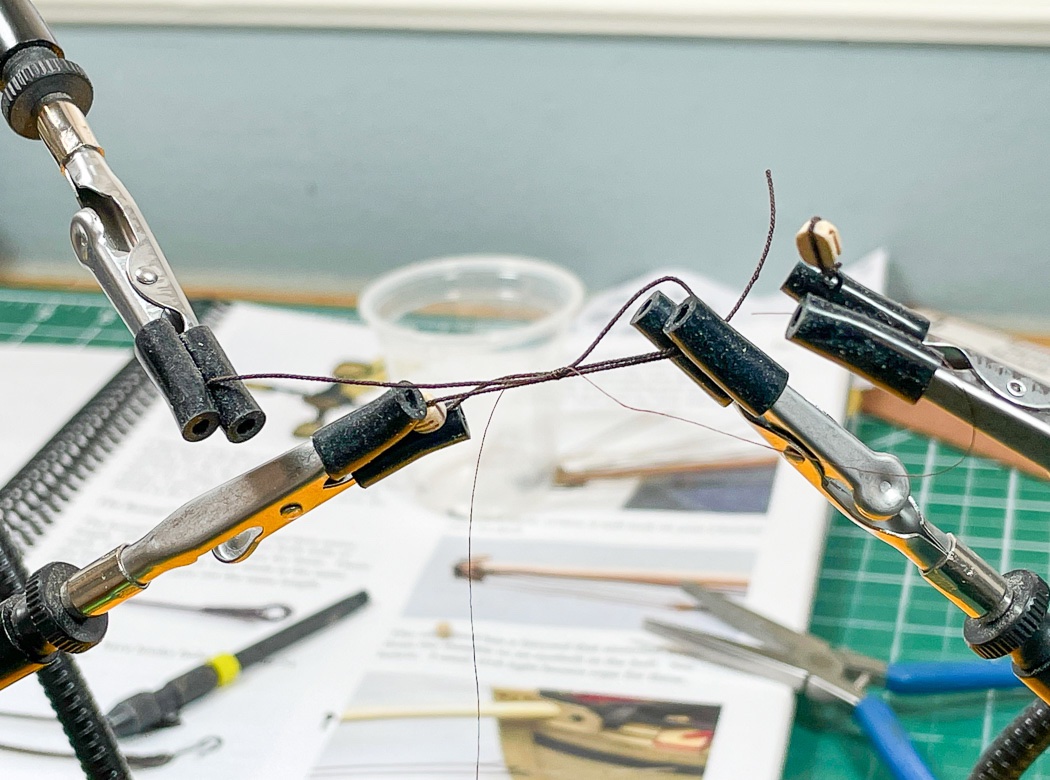
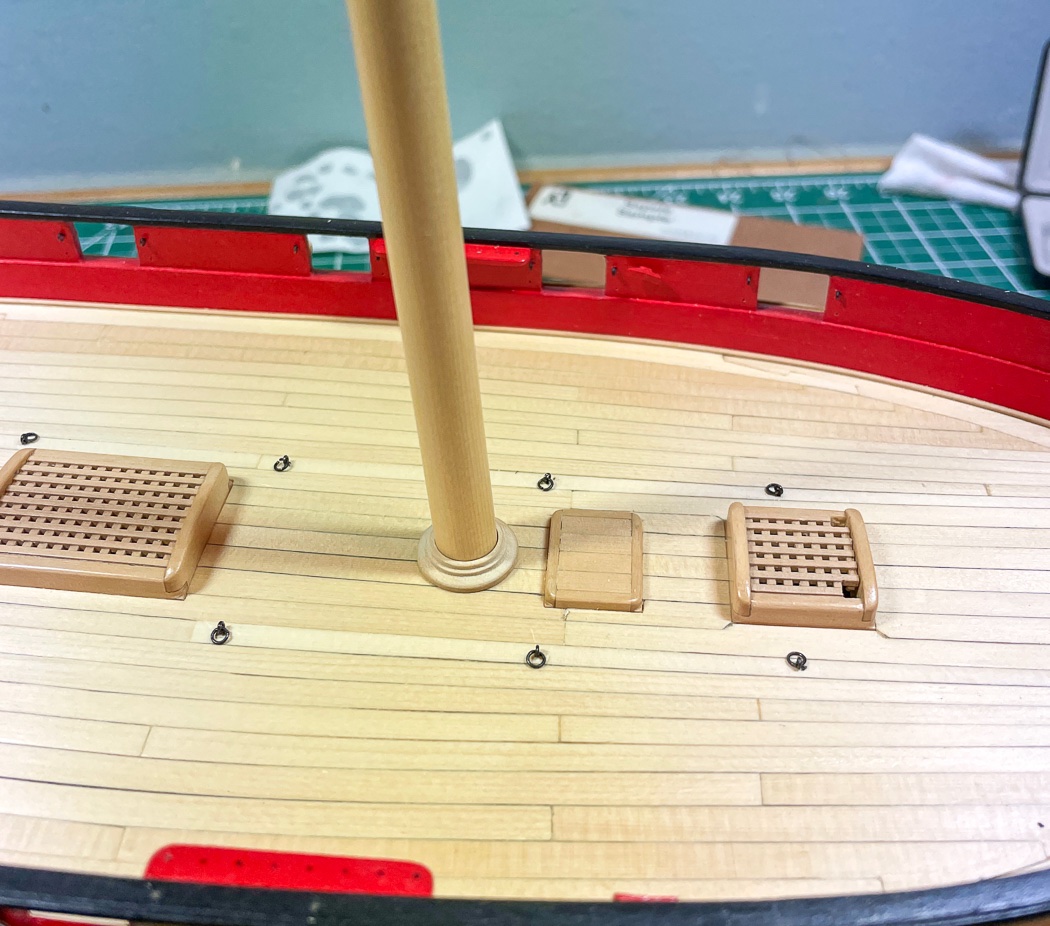
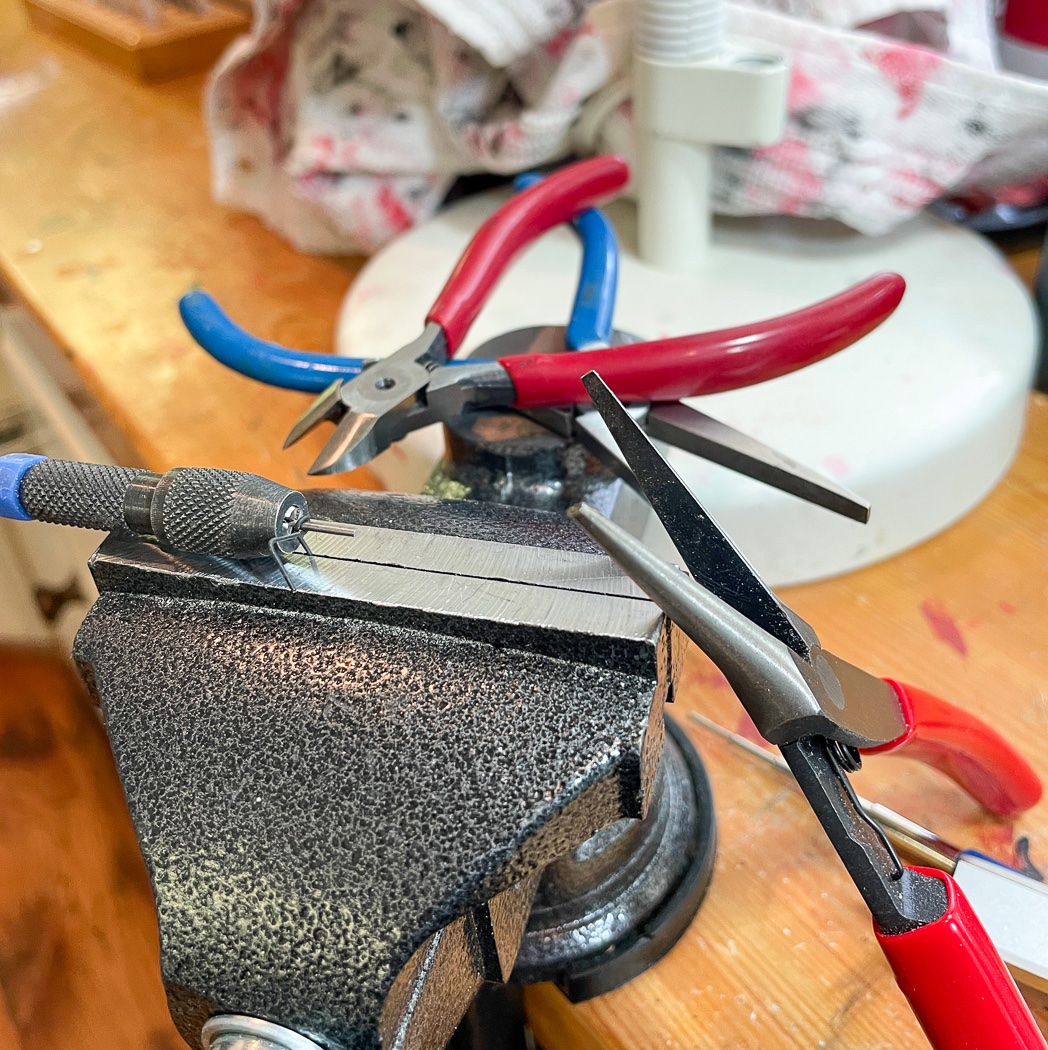
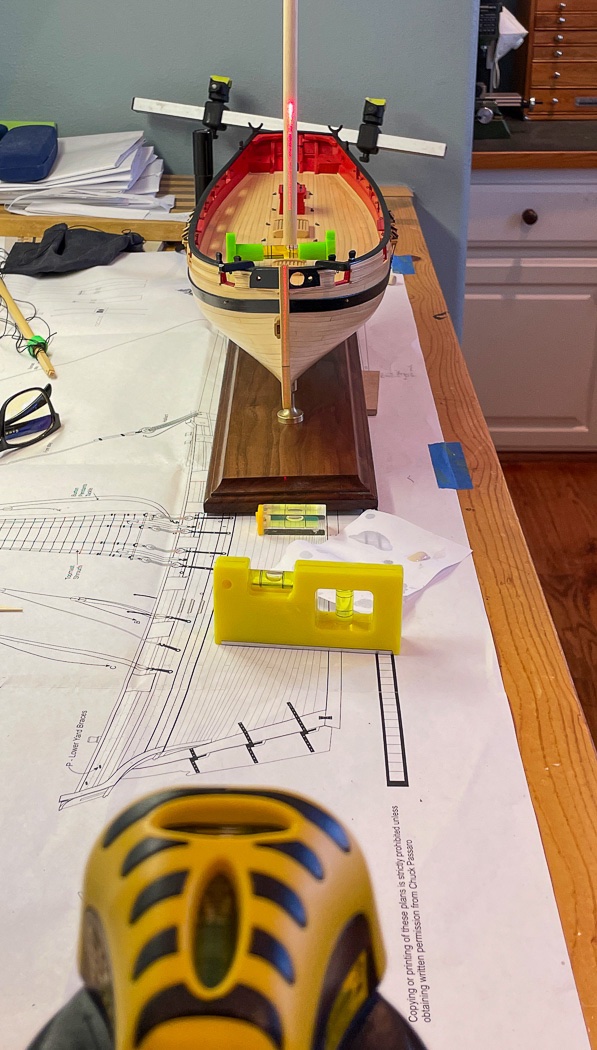
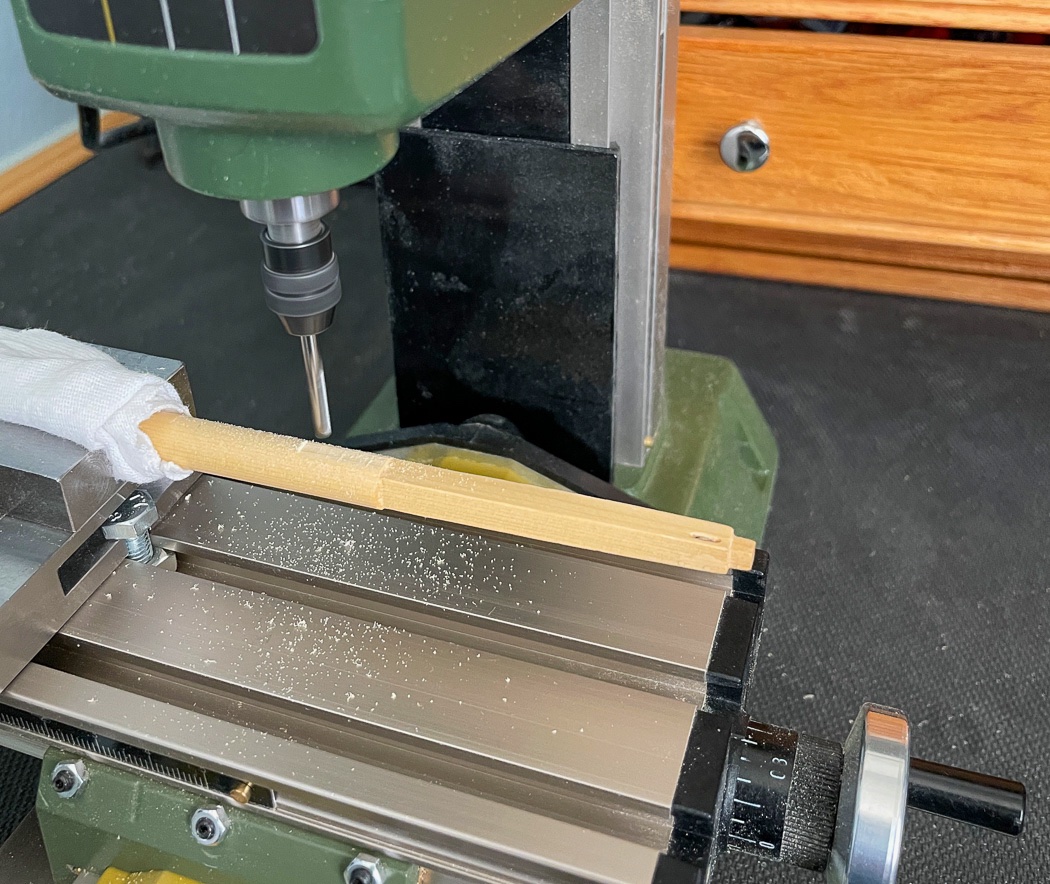
Bowsprit and Mast With all the hull and deck furnishings made its time to mount them to the deck…except it isn’t. I decided I needed to make the bowsprit to ensure I put the bowsprit step in the right place and I shaped the main mast to ensure the mast coat and mast slot were correct and because I was on a roll turning square things round. Thanks to my having to restart after my dropped hull (still makes me shudder almost a year later) I have two sets of plans. This has come in handy, allowing me to do cut outs of various sections while keeping one set whole. In this case I cut the bowsprit and mast so I have them right by the work piece. I marked the square piece of cedar using the 7-10-7 rule and used the mill as a drill press to drill the three holes at the base - I later used a file to square the two forward holes that would be visible once mounted. I also drilled the hole for the sheave at the forward end, much easier to to that while its squared - and as advised by Chuck’s monograph. Then to the jig I sorted of copied from Derek to convert the square into an octagon for both the mast (shown here) and the bowsprit using my quite handy finger plane, that once again proved perfect for the job. I’ve mentioned before I’ve never had any luck with planes, but this little jewel works perfectly in making long smooth strokes on the square edge. The key, for me anyway, is to expose very little of the cutting blade on the bottom so it only takes a little wood off per stroke. I’d rather do more strokes than go too deeply into the wood. Then it’s off to the lathe for its first real use. I left enough stock on the end for the chuck to grab onto. I had been concerned (not sure why it was never an issue when I did it with a drill before getting the lathe) that there would be too much wobble not having both ends steady. It proved not to be a problem by using my right hand to steady the end while the left hand did the rounding. I used only various grits of sandpaper, 150, 220, 320 and 400 as I progressed, no tools needed. I took the measurements at incremental points along the stock (here the bowsprit, same thing for the mast) and stopped to check them frequently with digital calipers. I can’t put it back on, better to take it slow and enjoy the massive amount of sawdust it creates. At least for this task there isn’t a huge difference in the lathe and the hand drill in doing the rounding. The big difference is the quick on/off to do checks and the placement and hold of the stock makes things easier than holding a drill. Some of the jigs I’ve seen for holding a drill are likely just as good, but the Proxxon DB250 is inexpensive and worth the price as I’m sure there is more I’ll do with it later. Another plus pointed out by Derek is the ability to push the wood thru the chuck which though not needed for masts and bowsprits will come in handy later for spars. The mast is squared down at the top and includes an off center sheave - I did both before rounding the rest of the mast. A quick check for fit. I sat the hull on its final stand temporarily to ensure when mounted there is a slight rise. It’s interesting how long the bowsprit is on a cutter relative to a square rigged ship. A check of the mast to make sure with the coat I can get it both level and slightly slanted towards the stern. It’s a little off in the photo, it won’t be when I mount it later. This step turned out to be worth the time, I did have to make minor adjustments. These were easy to do now, not so easy if I’d waited after all the deck furniture, the winch in particular, had been mounted. I got to make a new mast coat, the first was too small, but that’s ok, making them is kind of fun. This one from boxwood got a few coats of WOP after I was sure of the fit. Another trip to the mill to flatten the area for the mast cheeks, just a .25mm deep cut for now, I will shape in more once I have the cheeks in hand. Following a couple of coats of WOP the bowsprit and mast are done for now. There is much more to do on the mast later (the photos are a bit out of sequence, I’d cut off the extra on the bottom of the mast before test fitting). The bowsprit has an iron ring (black shrinkable wire wrap did the job) and four blocks. I added the ring and drilled the holes but will add the eyebolts and rings after the bowsprit is mounted. For me it’s easier to rig the blocks off the ship then glue them in (a practice I’ll follow throughout the rigging). The standard commercial eyebolts work in some circumstances on Cheerful, but not all - the bowsprit is one such place. The commercial versions were much too ’skinny’ to look right so I made four from 24 gauge black annealed wire. I suppose everyone comes up with their own way of making these. I tried finding some options on MSW but didn’t really find anything I liked so I came up with my own using various pliers, shapers, cutters, and vise. I experimented and decided 1mm was the right size so I reversed a 1mm bit in a pin vise. A tight turn, a couple of bends and two cuts and I had it. It being (once again) my first time making these it took a little practice and rejects. But once I got on a roll, I made a bunch for all the eyebolts on the outer hull and cap rail as determined from the plans. With eyebolts in hand I turned to the quad hands to rig the four blocks. I’m using fly fishing line to seize these and other blocks but will also use regular thread when I want the seizing to be more visible. Here I have the eyebolt (hidden from view on the right) in one loop and the block in the other. I use my standard loop and wrap method for all my seizings, it works for me. I’ve always had a third hand tool for this work, but the newly acquired quad hands is a big step up from those and well worth the expense. The flexible clip arms and having four to hold different things really makes the job easier. A completed block is shown on the far right, but the clip hides much of it. Thanks mostly to Cheerful, the power tool corner of my workshop has become a bit crowded. It’s usually not this much of a mess, I was working on the mill and the lathe at the same time. My shop dust filter was working overtime to clear the room as was my dust mask. The dust buster and broom came out after this photo. The tool chest holds all the accessories required for the power tools and was a Christmas gift from my supportive wife. Much of this post probably seems mundane, but it accounts for a lot of time. These small ultimately taken for granted steps are integral to the completed model. For now the bowsprit, mast, and rigged blocks go onto the shelf (I have a literal shelf in one of my cabinets with a soft cloth lining) until its time to mount them. The next step, and the last prelude to mounting everything, is rigging the cannons. That will be my next post. It’s a long process to do one, then 11 more after that one. Thanks for stopping by, the comments and likes are very appreciated.
- 778 replies
-
- 11
-
-
- cheerful
- Syren Ship Model Company
- (and 1 more)
-
Glad you like the mill, it really is a great tool.
-
Every moment spent fairing pays rewards later when planking, I suggest running lots of battens to check for a smooth run, 13 might be a bit high on the stern side.
-
How about for a pre-buy of Sphinx 🤣😂
-
Even wire gauge and dimensions of rings and eye bolts would help, hard to sort out from photos. I’m trying not to lean on Amati store bought for at least for some of the more visible.
- 1,784 replies
-
- 2
-
-
- winchelsea
- Syren Ship Model Company
- (and 1 more)
-
I'm sure it's simple, but would you mind showing your process/jig for making eye bolts? I keep winding up with the stem off-center. Also your thoughts on the size of split rings for 1:48 and the best gauge wire to use also for 1:48? Again, it may be a sigh request but I'd to learn the best way to do these in bulk verses my struggling to churn out 4 for Cheerful's bowsprit.
- 1,784 replies
-
- 2
-
-
- winchelsea
- Syren Ship Model Company
- (and 1 more)
-
Cherry... even better. I wish I had a steady source for boxwood. I used Cherry on both Fair American and Pegasus, it’s really a beautiful wood.
-
The good news is BE and I said essentially the same thing🤣
- 164 replies
-
- 1
-
-
- fly
- Victory Models
- (and 4 more)
-
The masts are the full length including what goes below the deck. The instructions don’t typically address tapering, that’s what the plans are for. As you gain experience you use the plans far more than the instructions. There will be a lot of belay points, ring bolts, blocks, and other misc stuff that’s only on the plans. Look through ALL the rigging plans before you mount masts or spars to find what’s needed. It’s far easier to add the detailed stuff off the boat than it is on. You’ll want to invest in ‘Quad Hands’ it will make rigging far easier, again doing as much off the ship as you can.
-
Jim isn't a real person - he's an automated ship making machine 😄
- 201 replies
-
- 2
-
-
-
- Duchess of Kingston
- Vanguard Models
- (and 1 more)
-
Yes, I put decking below the skylight, which can barely be seen but a glimpse is better than just painted black.
-
Proxxon DB-250 lathe extension bed
glbarlow replied to glbarlow's topic in Modeling tools and Workshop Equipment
Yes, the point is the lathe is shorter than most mast and spars so the tail stock can't be used - unless you run it through the chuck as Derek described. -
Proxxon DB-250 lathe extension bed
glbarlow replied to glbarlow's topic in Modeling tools and Workshop Equipment
Thanks, I wouldn’t have thought of that. I’d always used blue painters tape as the adhesive doesn’t leave any residue on the wood. I must say the lathe is absolutely the best dust generating tool I own 😊 -
It’s all just so neat and sharp. Chris should replace his box art with yours.
- 201 replies
-
- 1
-
-
- Duchess of Kingston
- Vanguard Models
- (and 1 more)
-
Steady work,nice! I’m looking forward to seeing Cheerful decked out in pear wood.
-
Proxxon DB-250 lathe extension bed
glbarlow replied to glbarlow's topic in Modeling tools and Workshop Equipment
I have the 3 jaw Chuck, it works fine. I just made the fairly long bowsprit for Cheerful, really no different than had I used the drill I’ve always used before and it came out fine. It has an offset in the final 5mm which I cut ok but it was wobbly, a tail stock would come in handy. All sandpaper and files, no cutting tools. How do you handle long spars pushing through the chuck without marring them when the chuck is tightened, I guess the old tape wrap trick. I can work with it ok, just looking for a steadier hold. Doesn’t seem to matter, I can’t find the extension bed anyway -
Anyone know where I can get an extension bed for my Proxxon DB250 lathe...besides Australia...?
-
A bit difficult to follow, I’m almost tempted to get mine out to see how it aligns, but Cheerful awaits.
