


Thanasis
-
Posts
635 -
Joined
-
Last visited
Content Type
Profiles
Forums
Gallery
Events
Posts posted by Thanasis
-
-
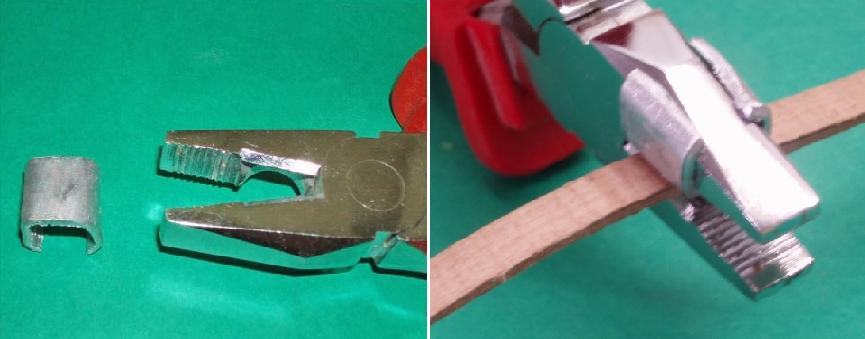
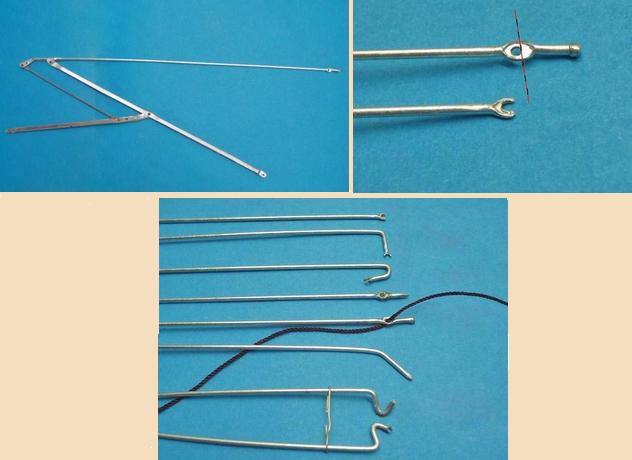
Hi all.
In my last model (is coming soon) I've been challenged to make some more metal work.
So I decided among others to deal also with the shackles. You know, the nautical item shaped as the Greek alphabetical character "Ω”...
I didn't want to spoil my lazy way of making models, so I made relatively reasoning...

Perhaps someone has also found an "easy" way to make shackles but I'm happy with my way.
Consider, I managed to make 12 pieces in 40 minutes, with minimal failure...and there are over 30 shackles in my model.
Just give me a few days time, to set up a presentation.
Thx
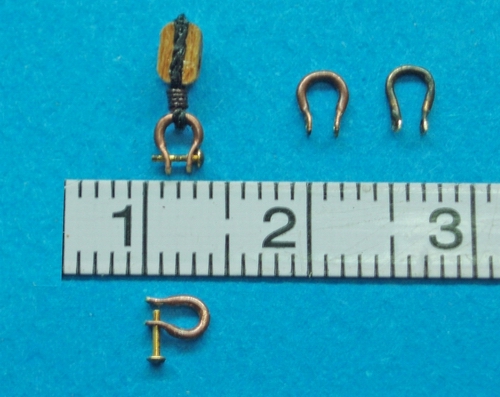 The ruler is in cm.
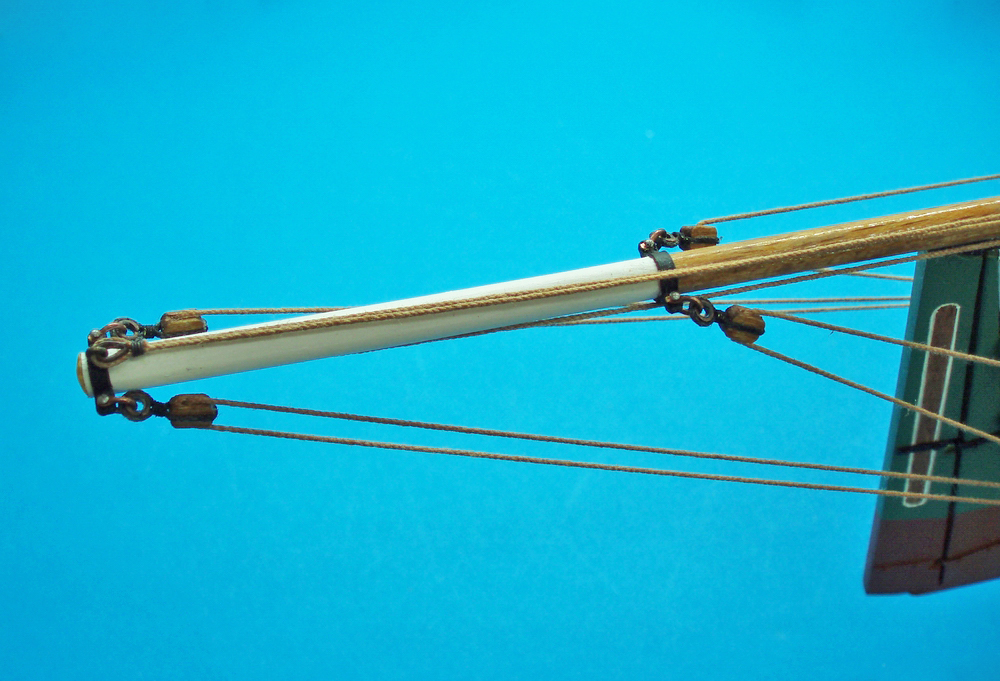
-
Take a look there...
http://modelshipworld.com/index.php/topic/11087-panderma-ferry-by-bibounde-turkmodel-scale-187/
Thx
-
Thank you my neighbour Thanasis :-) I guess you still have a lot of these boats on your shores especially in Kalymnos, i watched an old documentary hundred times about sponge divers living there in Kalymnos; was very informative for me :-)
Mehmet, your good preparation is evident on your model.And yes, There are still some of those vessels in Kalymnos Island, although are painted like clowns to attract the tourists ... Keep up the good work.Thx
- Omega1234, mhmtyrl and komdgurhan
-
 3
3
-
-
Hi all.There's a pdf file titled as "BRONZE AGE SHIPS AND RIGGING" which can be found by a web browser...I haven't read it (sorry ancient ships don't attractive me) but you might find something useful within its lines..Btw... If my opinion counts, you're making a wonderful model. !Thanks
- Omega1234, mtaylor and avsjerome2003
-
3
-
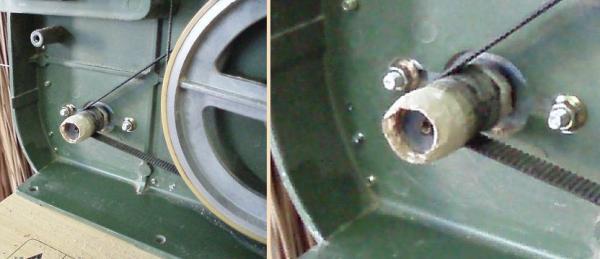
Hi all. I join you in this thread of Proxxon band saw users and I would like to add my experience.
Noises can also being produced by the ball bearings on the blade guide.
The same can happen if for some reason the lower, inside the case, blade guide has moved-turned from his vertical position. At this case you might come even to a broken saw band.
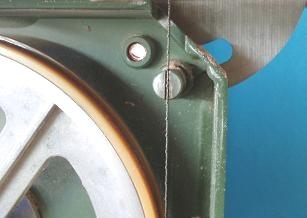
Alexandru. I think you’re right guessing that the noise and the result of the broken saw blades might comes from the worn plastic on the wheels. In addition I consider the upper wheel (as adjustable) as the main responsible for the failure.
What I faced was that for the same reason of the worn plastic on the upper wheel, the band saw blade was stepping in and out of a formed by the use groove. That was causing me either broken bands or bands that frequently were slipping out of the wheel.
After some thinking I came to a simple solution which is still working…I placed a small piece of wood (it could be from plastic) in 3-4 mm (0.11811 inc) of thickness, at the bottom of the slider of the upper wheel. See photo.
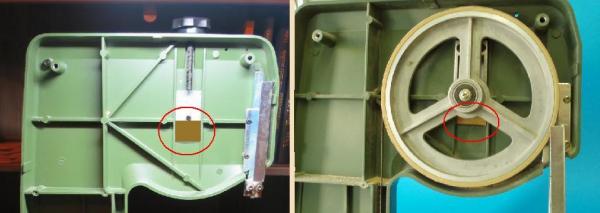
This way and by screwing the back knob (tensioning the blade), the wheel comes to a position where it will be spinning with a small angle, towards to back of the case.…This angle “forces” the band saw to stay at the inner part of the plastic, preventing from stepping in and out of the formed groove… In a way it fixes an alignment…See whether it might work for you as well…
As another option you may try filling (or replace the entire plastic) the formed gap-groove by making-placing loops of insulating tape around the wheel. I have seen it in the web but I haven’t tried it (yet…).
Another tip to keep the drive belt in tension when it’s been loosened by the use, is to make some loops from paper tape on the motor pulley. With the drive belt in its position and by turning the motor pulley by the hand, you apply layers of tape on its surface and from the free side. After some loops there will be a "new" tension.
If you face the problem where the belt slips over the pulley, then you can extend the length of the pulley, so that the belt can rotates in a longer surface.
You can do this by using some cylinders (from plastic or rubber) at the same diameter of the pulley. These cylinders can be placed as extensions and stay in place by applying paper tape over them.
Although I have bought a new belt, I keep using the first one (from the factory) to see how long is going to last…I have been using it in this form over a year by now.
Last tip, you can replace a worn brush from the motor belt with an old toothbrush. Seen it in web...
Needless to say before anything else, unplug the band saw.
You may find my tips a bit of crudity but it isn't the right time to spend money in Greece.
And please don’t stay on my poor English…

Thx
-
-
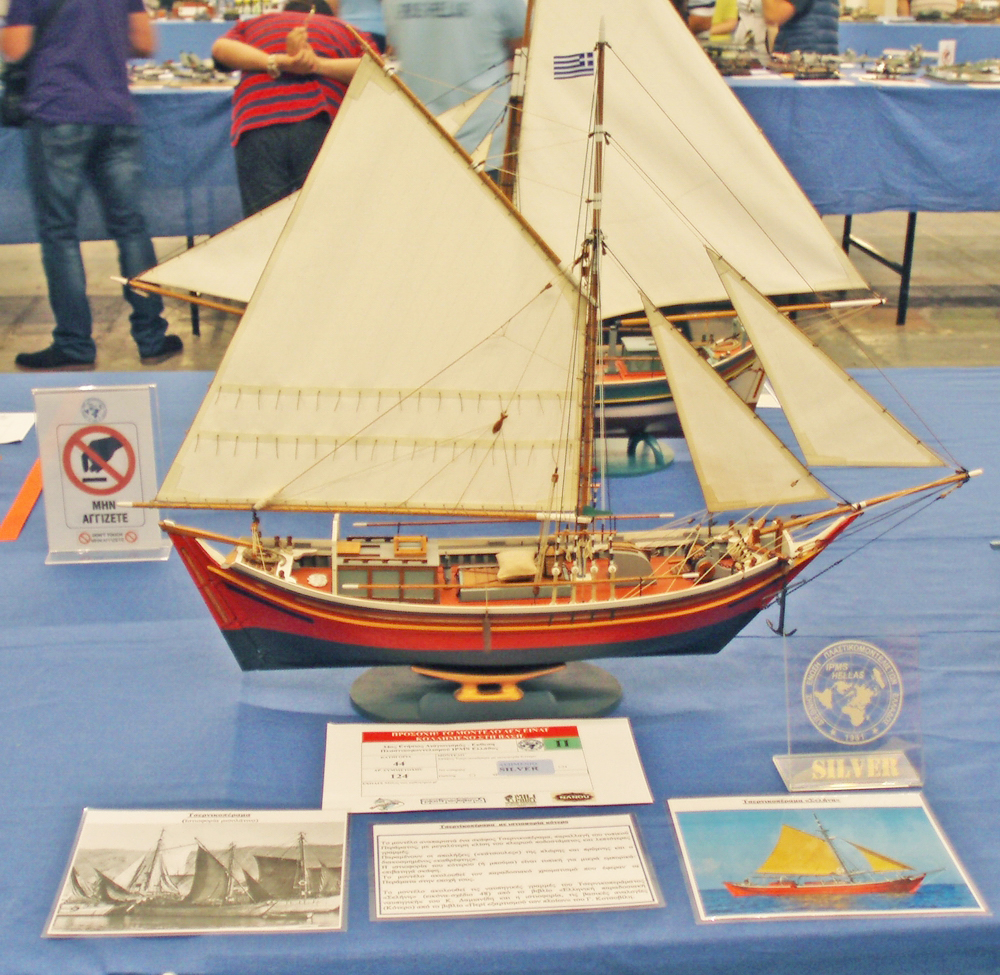
I would like to share my joy with you mates...My model won the silver prize (2nd place) in the 34th Greek Scale Modeling Exhibition of the I.P.M.S. gr, last Sunday.Thx

- mtaylor, michael mott, GuntherMT and 3 others
-
6
-
-
-
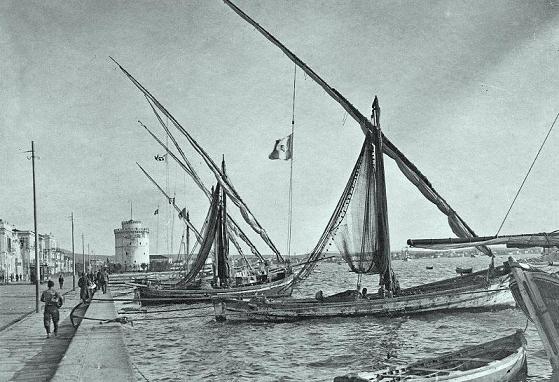
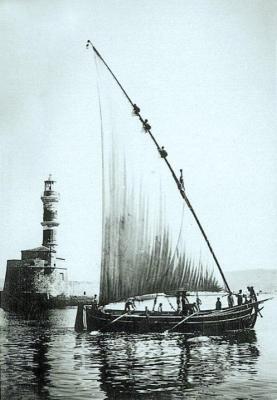
Well, I haven't met anything in Gr. bibliography for these kind of boats, neither for the construction nor for the use by the Greeks...It could had been a case of use in Ionian Sea (Adriatic) although I consider it as unlikely.As about the nationality... I have at least ten old photos of those boats but only one with flags on them which leaves no doubt about the origin...Thx
-
Thanks for your reply and your kind words Mauro.Just to close the parenthesis of the presence of the Paranzas in Aegean sea, most of them appear in photos of ports in Crete (very south) but there are also 1-2 in port of Thessaloniki (very North).Happy modelingThx
-
Thanks for your reply bibounde.I know the Greek part of the ship's history but it might be interesting for the others.As about the, who has been occupied by whom, it depends on the date that someone starts be dealing with the history... And the history of the Ottoman empire and its "activities" in Europe, had started many years before the 1918.But yes, let's stay on the model which I also find it attractive.Happy modelingThx
-
Hi Mauro. It's a beautiful boat and I'm looking forward to see the model...I have met these boats in many photos in our archive (3w.naftotopos.gr), sailing also in Aegean sea.Do you know whether these boats could be departing from Adriatic or it was part of the fishery of the Dodecanese, while the Islands were Italian colonies.The below photo is taken in Crete.Thanks
-
Hello bibounde.Assuming that there is some sort of history about the real ship in the manual of the model, which refers in the "Turkish Independence War", then yes I agree that the "challenge" is already set...Was ever Ottoman empire or Turkey ( later) occupied by some other nation, so that should fight for its independence...?Just food for thought...I wish you good luck with the model.Thx
-
-
-
Well, with no doubt it's a small world...
 You found the drawings for your model (Skaphee) in Rc magazine no. 227 in an article which I wrote... for my good friend Bouzounis.He is an excellent modeler but unfortunately he doesn't go well with English language....I found the title of your build log in 3w.segelschiffsmodellbau.combut I didn't manage to see your model...Don't know why.Thx
-
Thanks for your comment Joerg and let me express also my good impression meeting a non-Greek who is dealing with the traditional ship models of my country.I have seen your work on "Agios Nikolaos" and it's very impressive..As about suitable plans and without the intention of an advertisement, there are accurate hull drawings in the book which has been mentioned at the start of the built log.Those plans I follow in my models.Sadly our team's effort (3w.naftotopos.gr) to spread Gr. ship models by finding a kit company, offering plans-rigging details and copy rights with no any fee, didn't work out due the prerequisite number of secure buyers...!Thanks
-
Hi. A German speaking mate may help.
Thx

- docidle, mtaylor and Louie da fly
-
3
-
Hi all and thanks for sharing.Just food for thought (inspiration) from a retrieved tip of mine, from the days of DDM.Thanks

- Aussie048, CaptainSteve and mtaylor
-
3
-
Thank you each one and every one, for your kind words.
I really didn't expect this welcoming since I think I have violated many rules in this build log ...
Thank you all.
Turksailor. Thank you for your kind words. I don’t want to spend much care or much money on my models. I see it just as a relaxing-joyful hobby that has to follow a low budget. So answering your query, yes I have used just simple modeling brushes and no, I didn't apply any primer. They have been applied three layers for every color and four for the white one.
Steeve. Thank you also for your kind words.
The funny thing is that, while I was dealing with one of those beads to form a pitcher, it dropped me on the floor. Bending over to pick it up, I hold it upside down the way I was dealing with. And then I realized that it would look better (closer to the real one) if I go forming it that way…
Thank you.
- hexnut, michael mott and mtaylor
-
3
-
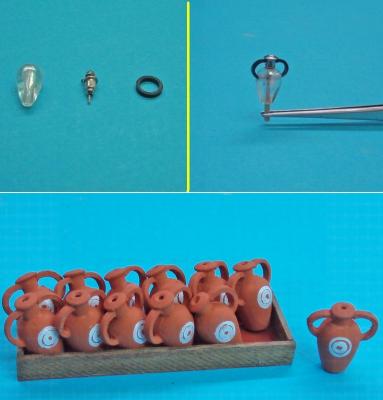
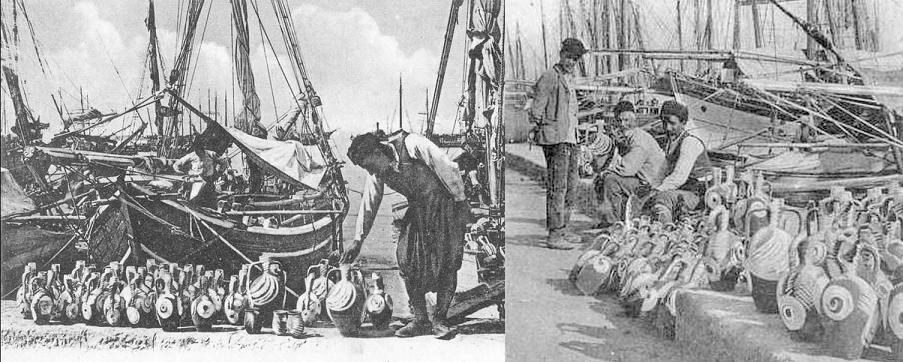
Finishing my model I wanted to make also something that I would place it on the deck as a decoration.
From my photos I stood on some, which are showing islanders in front of their boats, having spread their trading stuff at the dock, usually clay pitchers.
I thought it would be nice if I could manage to place such a cargo on the deck of my model.

I wasn't thinking to handmade something from clay, since the pitchers should be identical and elegant and I'm not that skilled.
So as always do, I went to the "place of inspiration", a local fake jewelry store.
I spent about an hour watching all of its stuff and making combinations in my mind.
I bought some beads and ear-piercing items and by cutting in half plastic rings, I came to what I wanted.
A proper painting gave me a good result.
.....................
Thank you all, that ignoring the warning had the kindness to follow my build log.
You can see the finished model at the gallery.
http://modelshipworld.com/index.php/gallery/album/1182-aegean-tserniki-vessel-rigged-as-penna/

- Mirabell61, Elia, captainbob and 6 others
-
9
-
Thank you all.
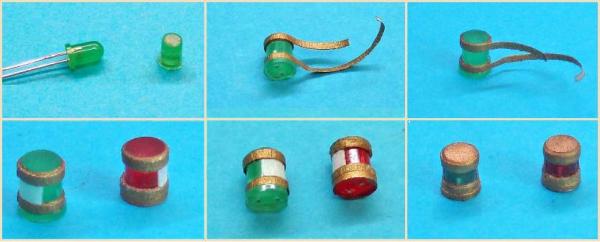
Navigation lights
After many tries with unlikely materials, I turned back to simplicity.
I took two colored led lights in a proper size, I removed the wires and gave them a “hair cut”.
With the use of a rotary tool, I turned their curved end, to flat.
Then I cut gold painted narrow paper strips and by making loops I covered the upper and lower parts.
Every loop was secured at its end with ca glue. I used more gold paper to cover some of the middle part.
To finish, I painted gold the flat upper part.
I think I had a decent result...
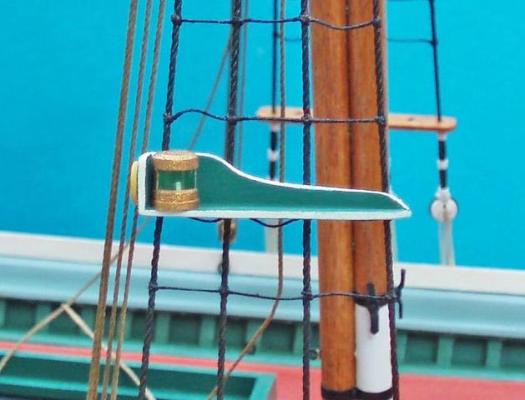
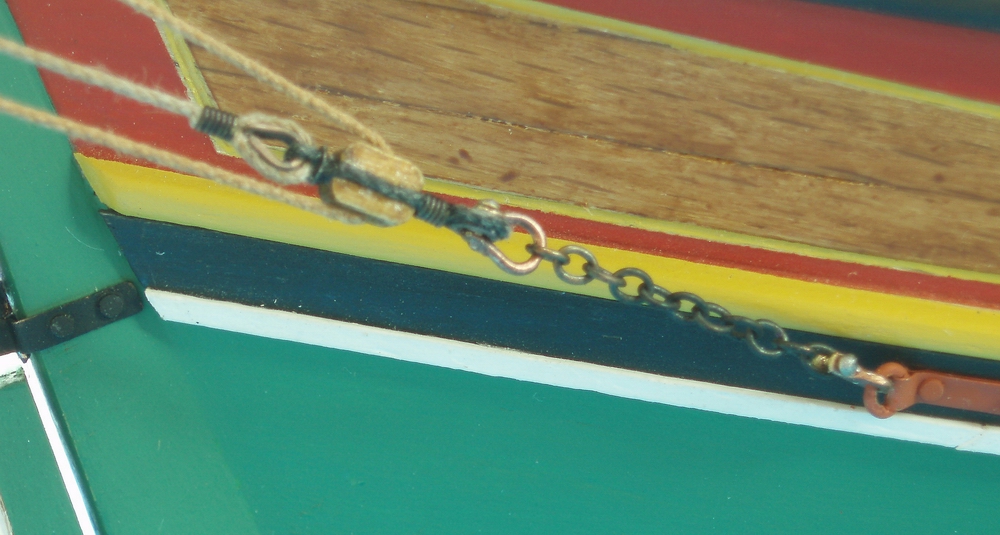
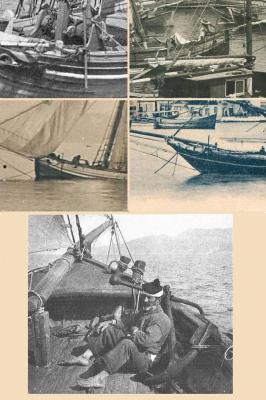
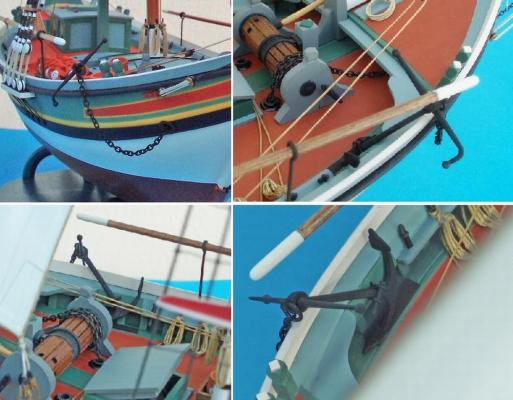
Place of the anchor.
As you might have noticed in all previous photos of the real boats, appear not to have something (e.g. a cathead) that would suggest how the anchor was being raised to the side of the boat. Well, there wasn't anything.
The anchor was being raised at sea surface by a windlass and then by the use of some pulleys (the same attached on the mast for lifting the cargo), it was being hoisted to the deck.
Moreover, there wasn't any particular place to be stowed on board. It was just being leaned and secured on the gunwale, as is shown in photo from another Gr. boat*.
* The photo shows a member of a French mission in a Gr. boat circa 1900 in Cyclades Islands.
.........................
So I did the same on my model...


Making Shackles my way…
in Metal Work, Soldering and Metal Fittings
Posted