No Idea
-
Posts
1,036 -
Joined
-
Last visited
Content Type
Profiles
Forums
Gallery
Events
Everything posted by No Idea
-
 Just seen your build as I've not been able to be here much just lately - really good luck with your build and you have made a great start
 -
HMS VICTORY 1765 by albert - 1/48
No Idea replied to albert's topic in - Build logs for subjects built 1751 - 1800
Albert that is beautiful 👍 -
Chuck how much do you want for it - asking for a friend 😂👍
-
What an experience and also what a momento - if that film turns out to be a classic that boat will be worth a fortune 👍
-
Byrnes Saw for sale in the UK
No Idea replied to No Idea's topic in Modeling tools and Workshop Equipment
Shipping costs about £350 to the UK as it has to come by airfreight. It also included angled table which is quite expensive. Add onto that the 20% VAT we have to pay on arrival plus handling fees. -
David that would be great and have a nice holiday in Shetland too
- 152 replies
-
- 2
-

-
- Vanguard Models
- Cutter
- (and 2 more)
-
These guys hand make any prop you want - I've used them and they are excellent https://www.prop-shop.co.uk
-
David congratulations on your finished build it looks fantastic and I have enjoyed watching your progress. Good luck with Speedy.
- 152 replies
-
- 3
-
-
- Vanguard Models
- Cutter
- (and 2 more)
-
Byrnes Saw for sale in the UK
No Idea replied to No Idea's topic in Modeling tools and Workshop Equipment
Also selling a thickness sander https://www.ebay.co.uk/itm/186417418533?itmmeta=01HWG33Z91A44S3HKQM7B6RGG4&hash=item2b67581125:g:ASgAAOSwNRtmLKTK -
Nothing to do with me but I saw this on eBay so I hope it helps someone https://www.ebay.co.uk/itm/186416714352?_trkparms=amclksrc%3DITM%26aid%3D777008%26algo%3DPERSONAL.TOPIC%26ao%3D1%26asc%3D20240131095853%26meid%3D8def67556d804af1b662f9d2c097a3da%26pid%3D101949%26rk%3D1%26rkt%3D1%26itm%3D186416714352%26pmt%3D0%26noa%3D1%26pg%3D4375194%26algv%3DRecentlyViewedItemsV2Mobile&_trksid=p4375194.c101949.m162918&_trkparms=parentrq%3A202fce9818f0a8cd77bf80b9ffff20f6|pageci%3A5f064672-04ab-11ef-8221-ee1deb3fac2d|iid%3A1|vlpname%3Avlp_homepage
-
Thats really nice work it looks fantastic
-
Fantastic work and nice to see you back at it
-
So sorry to hear this Kevin and I would have done exactly the same thing as you.
- 443 replies
-
- 3
-
-
- Indefatigable
- Vanguard Models
- (and 1 more)
-
Tobias in hindsight I should have used your method as it's far more accurate than the way I made these parts. When it came for me to apply the planking to the dogs legs I had to thin them out to get the correct hull shape. This pretty much showed my errors in the way that I made them. I can see by the way that you have made yours you will not have the same experience as me. I shall be using your method on my next build and thanks for sharing how you did these difficult parts. Cheers Mark 😃
-
Nice Job Tobias they are tricky parts to make.
-
I have to say that your work is fantastic - Great joints and it's so symmetrical too. I found that making the fashion pieces correctly to fit the wing transom and filler pieces was particularly difficult and you have smashed it - top job!
- 90 replies
-
- 3
-
-
- ancre
- La Mahonesa
- (and 1 more)
-
Hi Nic and welcome - thanks for showing your grandfathers build that really is a lovely ship. If you would like to get into ship building get in touch with @chris watton as he supplies the most beautiful kits. He's based not far from you in Gloucester
-
To be honest I have liked all of the variations of this piece so I guess it purely comes down to personal taste - Looks great
-
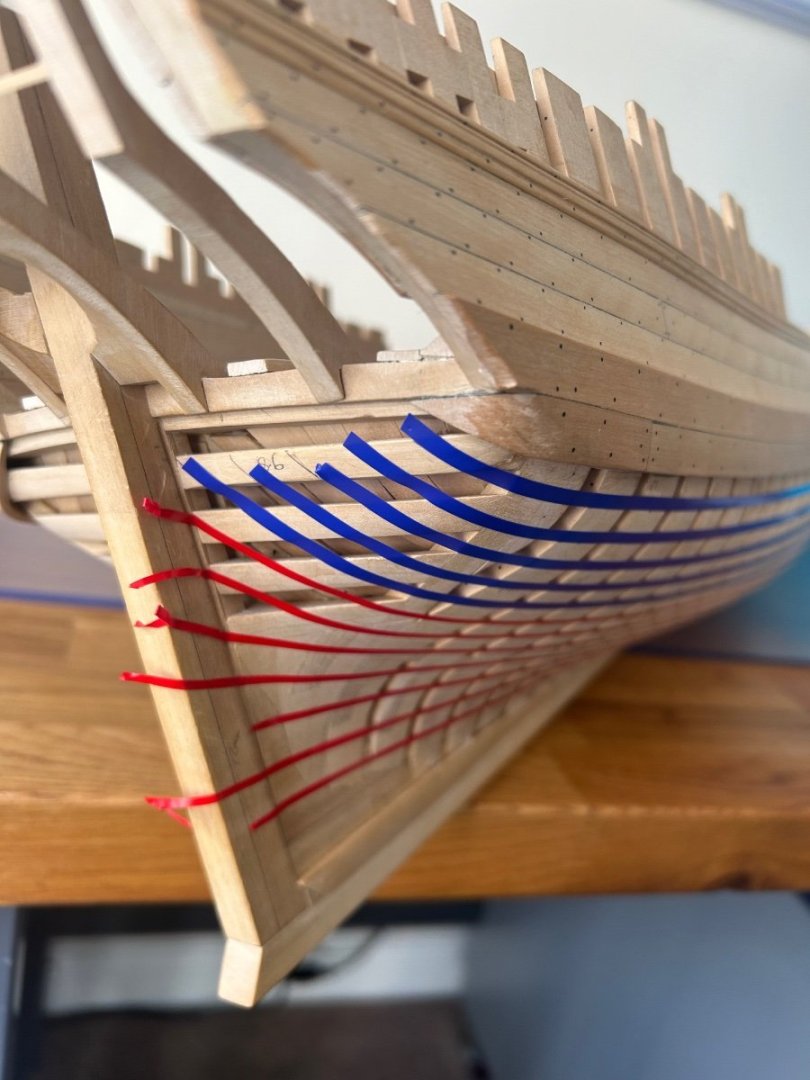
Hi Tobias and thanks mate - I like to draw every strake as I firmly believe that if I can draw them I can make them. Nothing worse than trying to make major changes half way through the planking. My marks are very much a guide but they do let me see if I'm roughly on track.
-
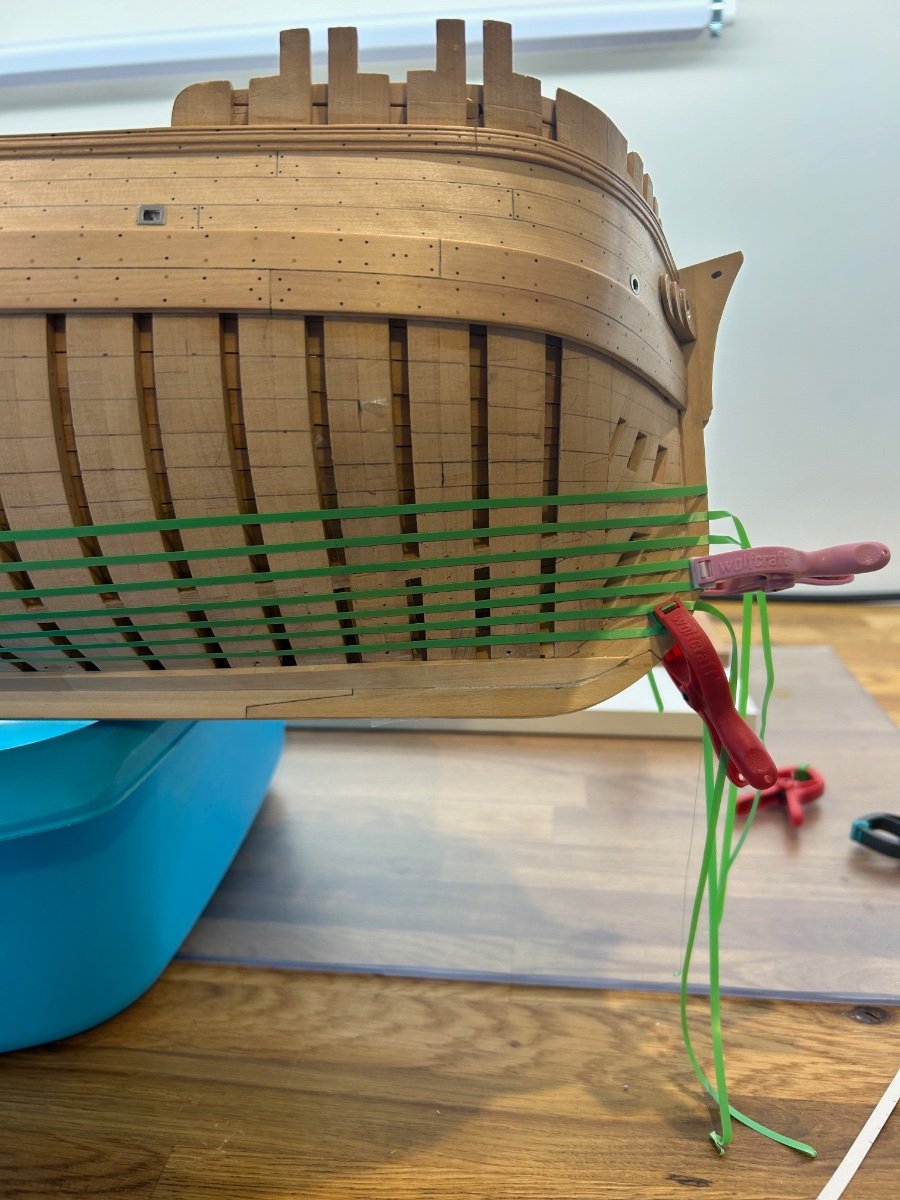
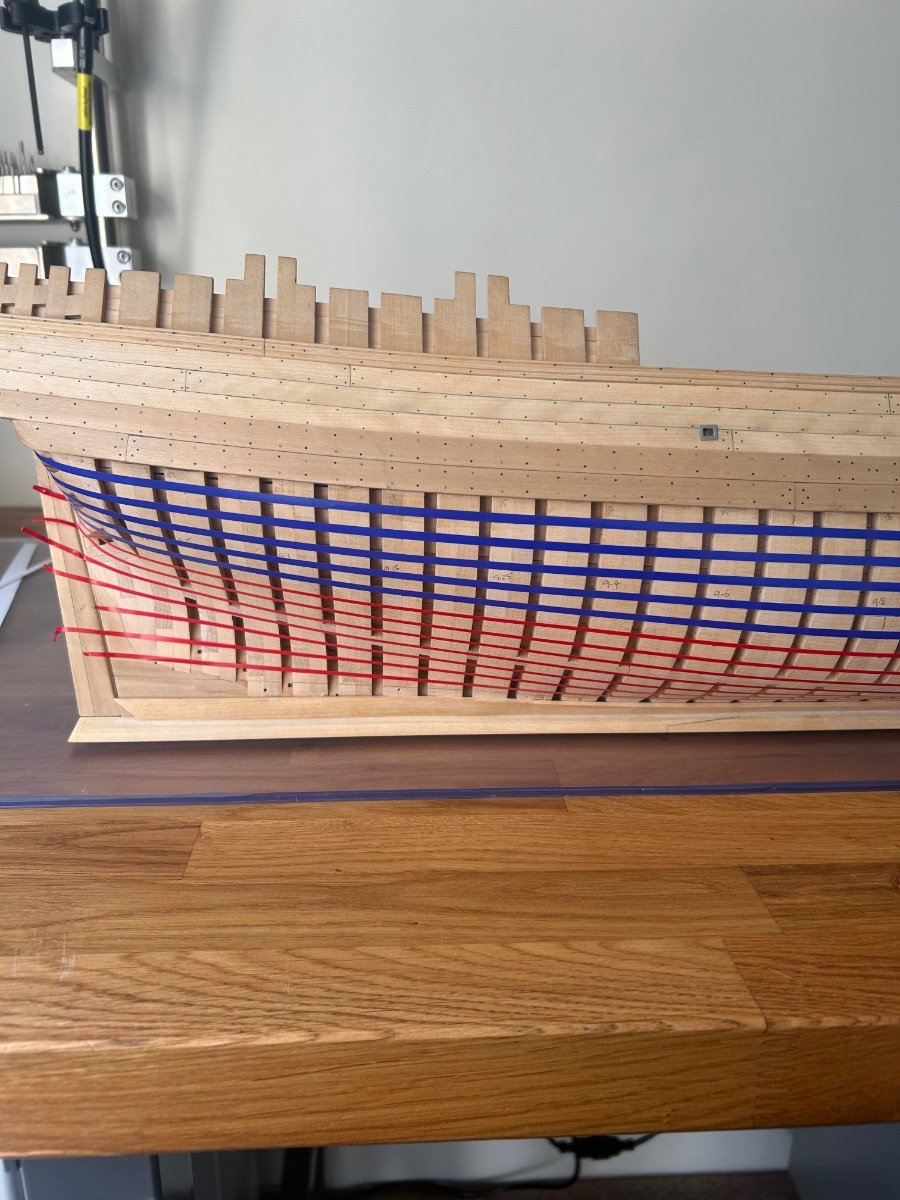
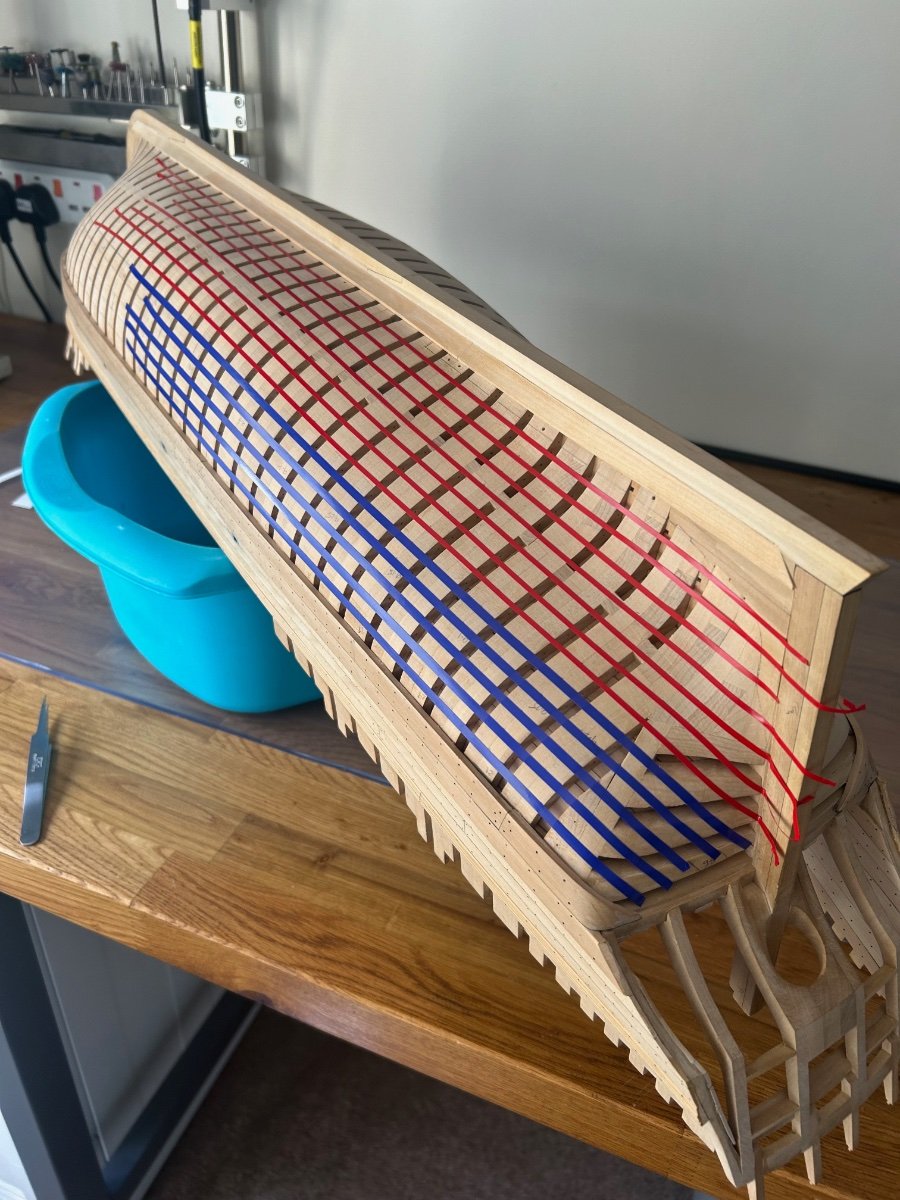
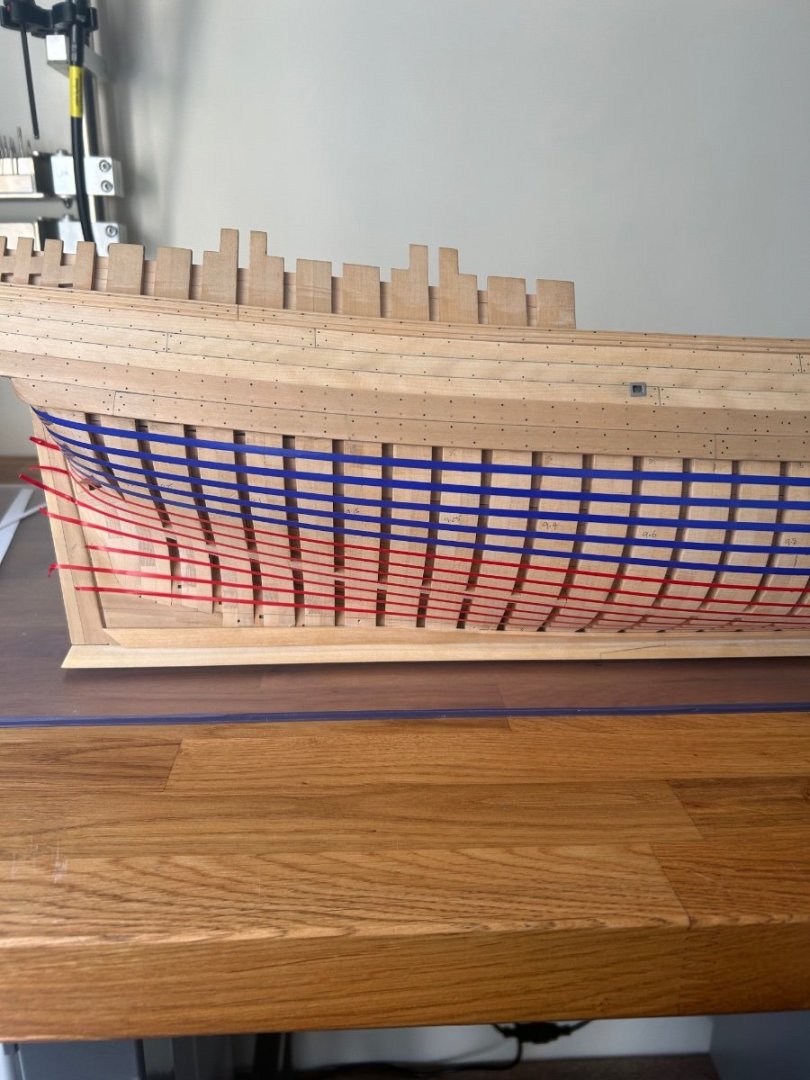
I've spent the last few days marking out the strakes which is pretty time consuming. I wanted to stay as close to the plans as possible and try and achieve a nice even look too. I like to use automotive lining tape as it's nice and flexible - the only issue with this sort of tape is that it doesn't stick very well to the wood. So after using tick tape and a planking fan to mark out the master frame I started the job. My planks work out to be 9.9mm wide on this frame so I'll cut them to 10mm as my measurements are probably out a bit. Lining the stern Then the Bow I have one stealer in the stern straight off of the garboard plank and one drop plank towards the bow. So it's just as the plans suggest. I had better start cutting some planks now and get on with the job Mark


-
Fantastic build Chris I'm going to follow along
-
Seriously Chuck they do look very very good.......mmm I might have to get some soon!
-
My build is out of square by roughly the same amount as yours. It won't notice as it doesn't on mine - keep going as your work looks great!
- 90 replies
-
- 2
-
-
- ancre
- La Mahonesa
- (and 1 more)
-
Hi Brian and thanks for your really nice comments. You're spot on about how people have no clue about how ships were made and they probably have no interest either nowadays. I too really like the frames of this ship but this little vessel has always been a learning curve for me. I need to know that I can plank the hull as it should have been and I would like one side finished so that my family can see the ship without having to imagine it. The port side however will stay bare from the whale down so that the frames will always be visible. Cheers Mark
-
Thanks both - purely a fluke on my part I'm only fully planking the starboard side and I'll clean up the port side as it is now. I think that this will give a nice perspective on the finished hull and the work underneath.