

Erebus and Terror
-
Posts
410 -
Joined
-
Last visited
Content Type
Profiles
Forums
Gallery
Events
Posts posted by Erebus and Terror
-
-
Hi Mike and Steve,
Thanks very much for the very nice comments. Yes, I agree, I am a very lucky fellow. If I had chosen a different subject for my project none of this would have happened. It was the right project, and the right forums/blogs, at the right time. And I had a lot of help and advice from wonderful people on the MSW forums. Without them, I'd be lost! I still can't believe that so many would take time from their busy schedules and lives to help with personal messages and advice. It's a special group of people, here.
Thanks again,
E&T
-
15 hours ago, capnharv2 said:
E&T,
If you haven't, it might be useful to mention your work on the Canadian Commemorative stamp, your exhibition at the NMM, and your work as a technical advisor on the AMC series. These are due to your excellent work, and may give you a little more leverage with Occre.
Just a thought. I hope things work out well for you.
Harvey
Great advice Harvey. Much appreciated.
-
Hello Everyone,
An encouraging update. OcCre just wrote and have admitted that they used my designs/research to create their model - and they are willing to acknowledge and recognize that in some way.
I think it's a good sign. The next step will be for me to request copies of their packaging, plans, and instructions that will go with the kit to see exactly what I'm dealing with. Recognition is good, though I admit this isn't the kit I would have made. It's actually a relatively decent kit for what it is, though.
I'll keep posting updates, but I admit I didn't expect this response, and I'm cautiously optimistic.
Cheers,
E&T -
-
-
-
Wel, I'm not sure quite what to do about this, but it is a direct copy of my model and plans...
http://www.occre.com/hms-terror.html
-
A short behind the scenes video outlining what you can expect from "The Terror". You even get to see me on set, next to a 1:1 recreation of the toughest ship ever to set sail. It was an honest privilege to work with these talented people.
-
-
Yes, agreed Druxey. It looks like he made a lot of accommodations to make a 3D structure from many flat 2D laser-cut parts. Also, I’d like to see some attempt to sand off those char marks. Still, one of the most interesting new kits lines I’ve seen in some time. I wonder how he’s been doing with them.
-
Hi everyone, in my online travels I came across a new model company that provides kits for fully framed structural models.
They are a new Japanese company. Their prices seem quite reasonable, and the quality looks very good.
https://translate.google.ca/translate?hl=en&sl=ja&u=https://ship-model.net/%3Fwovn%3Den&prev=search
Cheers, E&T
-
Thank you for the likes and comments. Antony, sorry for the link! I've heard that this one may work for those overseas!
https://twitter.com/myidsuckstoo/status/952373633770336256
- mtaylor and CaptainSteve
-
 2
2
-
I'm very happy to finally be able to introduce MSW community to an exciting new television series that I am a part of. Produced by AMC, "The Terror" is based on a novel of the same name by Dan Simmons. Last year, I was contacted by AMC and hired as a technical advisor on the show. I can’t say much about it yet, but I can confirm that they really did their homework.
The trailer has just been released. I hope you all tune in to watch!
-
-
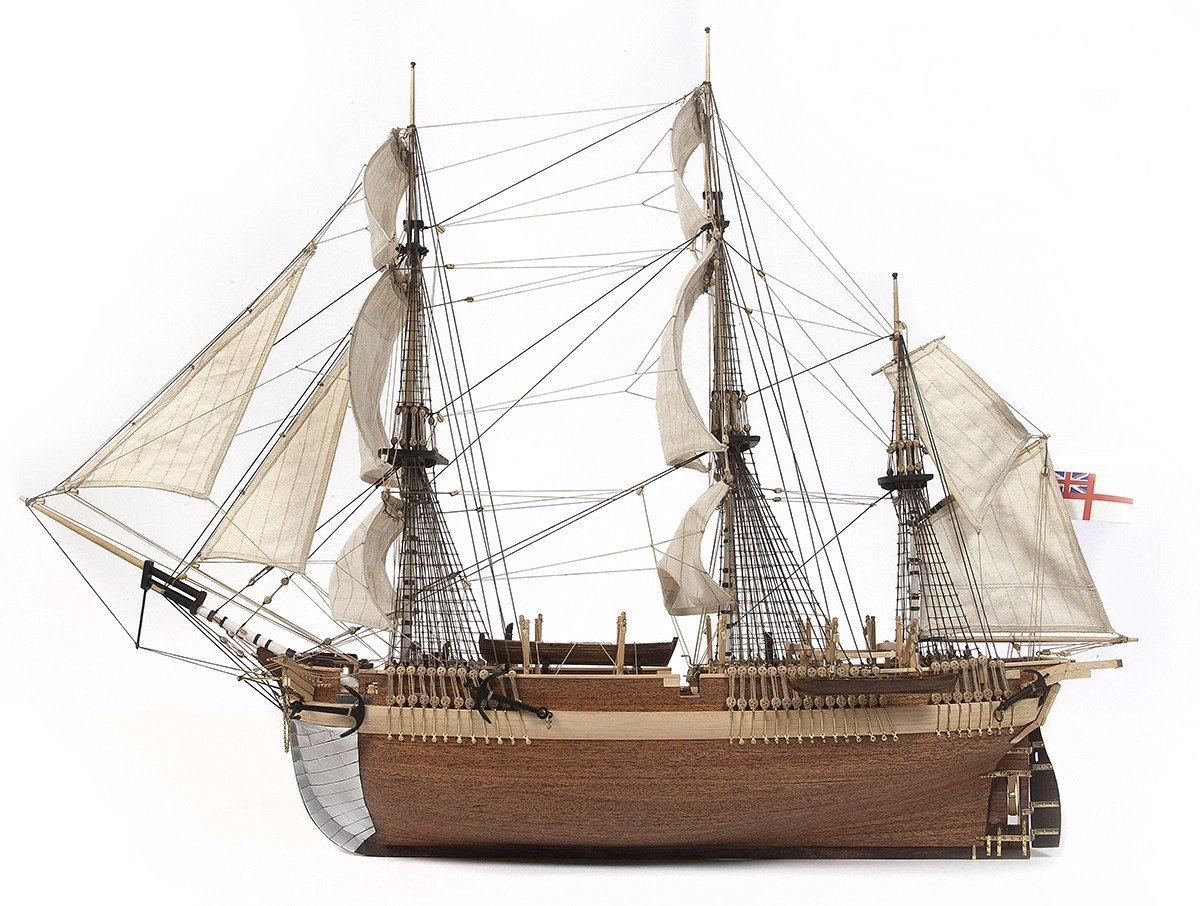
THE GREAT PLANKING OF 2017 (Part 2)
HMS Terror makes you work for the time you spend with her. Part 1 of this post detailed how the planking of my model became a race against the opening date of the Death in the Ice Exhibition, where it has been on display for the past six months. “Below decks,” in my small basement workshop, where I spent night after night fretting about the future of my little model, I admit to acquiring a dim simpatico with the men who lived and worked on HMS Terror. As I have described previously, the distinct and intricate nature of Terror’s hull planking was something I had intended to replicate from the very beginning of my build. However, duplicating its complexities to scale, which required a fully doubled-hull, with the second layer composed of unusually thick planks, and on an extreme deadline, was folly that ultimately led to an eight-month modeling marathon.
In Part 1, I described how I replicated Terror’s double-planked hull, where the vast majority of my effort was expended. In this post, I will outline the planking of her upper deck, the transom, and the ice channel that surrounded the ship.
The contract for Terror’s sister ship, Beelzebub, (1) describes that her original upper deck (1813) was clad with fore-aft laid planks three inches thick, while two and one-half inch planks covered her quarterdeck and forecastle. In 1836, Terror’s forecastle and quarterdeck were unified to create a new weather deck (upper deck), which was re-clad in new planks and then doubled to increase strength. Rice, the Master Shipwright who was so often associated with polar conversions of the era, described the unique qualities of this new deck (2).
“The central planks of the weather deck are six inches thick, laid fore and aft; the remainder of the deck is wrought double; the lower planks, three inches thick, are laid fore and aft; the upper planks, three inches thick, diagonally, having fearnaught dipped in hot tallow laid between the two surfaces”
.JPG.060f4934644125808997a36a1ec79586.JPG)
The first step in planking the upper deck involved adding the waterway, a plank which acted as a transition
plank between the horizontal deck planking and vertical bulwark planking. Luckily, on Erebus and Terror
this was simply a beveled affair. Note the interior view of the stern lights. You can see here how
I sanded the interior surface of the panes to simulate frost (and hide the interior).
.JPG.448e32a8576cc75c08f3ec993c0e306b.JPG)
Clamping the waterway at the bow - I always over clamp and over glue. Note the bow filling blocks.
As described by Rice, and as shown in the midship cross section plan (3), the upper deck of HMS Terror was very unusual. Eleven massive central strakes were laid fore and aft, providing significant rigidity. The central seven strakes were made from “fir”, likely Canadian pine, and were six inches thick and nine inches wide. These central stakes were flanked on each side by two strakes of six-inch oak, each ten inches wide. Contiguous with the central strakes were two layers of three-inch fir which covered the remaining deck area. As described by Rice, above, the lowermost layer was laid fore and aft, like traditional deck planking, but the uppermost layer was laid diagonally to increase strength. The width of these planks is not shown in any of the contemporary plans. Scribing marks on the 1839 HMS Erebus model indicate a width between ca. six and eight inches. Recently a pine plank fragment was discovered at the Canadian Museum of History which may be a deck plank; this measured three inches by seven inches. As a result, I have chosen seven-inch planks to represent the upper layer of deck planking.
.JPG.f61a6fc788fce33cd3eecb85828eb0ad.JPG)
Upper deck planking began by laying the "king plank", or the midline strake. Note here that the upper deck wasn't
double-planked. I had always intended to single-plank the upper deck. Here, the central strakes are
just three scale inches thick, instead of six.
After the careful spiling and slow progress on the hull, I looked forward to Terror’s upper deck, which was covered exclusively in straight, flat strakes. The central strakes, laid fore and aft, were a pleasure to complete. I expected the diagonal planking to proceed similarly, but soon realized that cutting the precise angles and lengths for each plank was not only meticulous, but extremely time consuming. Each plank had to be cut to a precise length, with angled butts that required very careful measurement..JPG.e4f129d1b19ba6e0cfb03bcc742221a2.JPG)
The completed central planking. The odd and unsightly shift of butts is explained below.
As I was laying out my planking plan, and comparing it to the contemporary sources, I gained some insight that could only be obtained through building a model. I had often puzzled why only a few butts (plank ends) are inscribed on the central strakes of the 1839 builder’s model of Erebus. This struck me as odd, because the model was carefully inscribed to show the details of the upper deck planking, and the butt ends of the central strakes were crucial to a strong design. I originally believed it must have been an oversight by the model maker, but in planking my model I came to understand that the 1839 model is very accurate. To put it simply, there were so many fittings on the upper deck of Terror and Erebus that the center-most strakes are constantly interrupted. Consequently, butts could fall naturally on hatches and companions, with no plank being greater than ca. 20 feet in length. Adding a shift pattern would have been unnecessary, and in fact would have weakened the vessels.
.JPG.2b92462f4ce48c7d9f2003f03ddaa0fe.JPG)
The diagonal planking began at the bow. Each plank had to be carefully measured and cut to fit precisely. I wasn't always
as successful as I would have liked. To simulate caulking, each plank edge was rubbed with a standard pencil. Sanding
removed the glue and pencil marks, leaving a crisp edge.
.JPG.82cd8de23841933978018e245d3e53cd.JPG) A closeup of the bow planking prior to sanding.
A closeup of the bow planking prior to sanding..JPG.d5238f72012dad575c0fe10be59bd34a.JPG) The completed upper deck planking with various cutouts underway. Some sanding is still required.
The completed upper deck planking with various cutouts underway. Some sanding is still required.My next task was to plank the continuous ice-channel, or “ice bumper,” perhaps the most identifiable feature on HMS Erebus and Terror. Since the time of Parry, polar discovery ships had chocked in and planked over their channels. The solid channels were necessary to prevent the chain plates, which anchored the mast shrouds, from being caught and destroyed on icebergs or by other ice conditions.
In 1835, Terror’s ice channels were simply six large, unglamorous protuberances at the position of the chains. In 1839, Rice filled in the spaces between the individual ice channels to form a sort of smooth tapering bumper that surrounded the weather deck of the ship. As Rice described (Ross 1847:328):
“…The ship is fortified externally by solid chock channels, the spaces between the channels being similarly fitted, tapering at the extremities, so as to form an easy curvature in a fore and aft direction…”
.JPG.9f85236b80e9ca4bb6f795cfd9fa3f5a.JPG)
Planking the ice channels began at the bow, which required soaking, heat bending, and crimping to create the proper shape.
After the first plank, I realized that sanding the upper strake down to the height of the chocks was easier, hence the
wider strake behind the first.
.JPG.9b679e95bb3117fb4eb96c8a84f40050.JPG)
Terror and Erebus had a white stripe painted along their ice channels. Here, I've simulated that colour shift with holly.
Holly provides a beautiful contrast to the Swiss pear of the hull. Note that the second planking below the wales
hasn't been installed in this photo.
.JPG.2957cd873251e3eff79f704f4c680eee.JPG)
Planking continues. The arrows remind me which end is up while I'm installing the planks. The upper surface of the
planks often had to be beveled to provide a close fit.
.JPG.50565fd8ea89d4405caa9560cf84e91d.JPG)
The completed ice channel at the bow. This image shows just how much the channel overhung the hull in this position.
Erebus and Terror had a third layer of planking at the bow which filled in this gap. The iron plating was attached to
the third layer of planking.
The planking over the chocks was massive; six inch planks covered both the upper surface and sides, creating a “bumper” that extended approximately two feet from the side of the ship. The bolts which held the chain plates in place penetrated through the planking, chocks, and frames and were anchored on the interior of the vessel. This created an unbelievably strong arrangement, making the chain plates, and thus the shrouds they anchored, very unlikely to be damaged.
.JPG.d1223bbf282507baefdc853d357594f9.JPG)
Adding the upper horizontal plank on the ice channel required careful measurement of the curves. Here I used a contour
duplication gauge to transfer the curve to card stock.
.JPG.330620b3d1f1b5f7df7060a0636ea6c4.JPG)
Checking the accuracy of the measurement.
.JPG.1164b963ddc74b392193404676f6185a.JPG)
Clamping the horizontal strakes in place. The midships section plan (3) shows that these were made from one extra
wide plank. More sanding is required here on the vertical surface to get the bow curvature just right.
.JPG.f9d975d609c9d6696a5254b62025b728.JPG)
Macro photo of the transition from the ice channel to the hull planking.
.JPG.efddf6fd28bcf8efe0db22735ee9b48a.JPG)
The completed ice channel. Note the "bumpy" lower edge hasn't been sanded yet, and will ultimately be hidden
by the bow plating.
Compared to the stern, planking the chock channels was a pleasure. The only tricky operation was the upper horizontal strake, which required special measurement to cut to the proper shape. Similarly, the large fashion piece, so prominent on Stanley’s contemporary images of Terror, was also challenging to implement as it had to be steamed and bent to accommodate the gentle curve from Terror’s topside planking to her wales.
.JPG.5b75083e75cf9b472a06e42385ef4538.JPG)
The fashion piece was a large vertical plank that protected the butts of the transom. It
was a particular feature of Erebus and Terror, visible on many of Owen Stanley's
period sketches and paintings. On Erebus and Terror it was painted white, so I
used holly to replicate it. This shot was taken prior to final sanding and finish.
.JPG.522b8e6dbf08bf949d74c1b30b19607e.JPG)
Terror's simplified transom. Without access to precise data on its arrangement, I kept it very simple. This picture was taken
before the double hull planking was completed. Note the doubled windows, which were characteristic of Polar discovery
ships since the time of Parry.
.thumb.JPG.f1a756ee2cd07f47b83ce96eaf8fa369.JPG)
Terror's final planking configuration. Mini-Crozier for scale.
With the fashion piece installed, I completed the great planking of 2017. How the master shipwrights sheathed HMS Terror's complex curves with oak planks eight inches thick is remarkable to me. Believing that I could replicate their skill, even at 1/48th the size, was simply an absurd folly on my part. To meet the deadline of the exhibition, it was necessary that I work every spare moment I possessed for nearly eight months. An added injury was the necessity to cut corners on the lower layer of planking that has left me somewhat dissatisfied with my model. While I believe the result is very acceptable, the trial is something I’ve yet to recover from (and in fact is one of the reasons my blog has been so quiet over the last few months).
While my endurance was tested, the ”great planking” imparted an appreciation for the complexities of Terror’s extreme construction, as well as for the skill of the master shipwrights and carpenters who designed and built her. Like all wooden sailing vessels, much of Terror’s strength came from her planking. That she survives intact today, after being subjected to perhaps the worst ice conditions ever suffered by a wooden sailing vessel, is a testament to the shipwright’s art.
My model will be part of the Death in the Ice exhibition until 2019. The exhibition's last day at the National Maritime Museum is January 7th, after which it moves to the Canadian Museum of History and then Mystic Seaport: The Museum of America and the Sea.
1) National Maritime Museum, ADT0010
2) Ross, Sir James Clark, 1847. A Voyage of Discovery and Research in the Southern and
Antarctic Regions, During the Years 1839-1843: Volume I. John Murray, London.
3) National Maritime Museum, ZAZ5678
- KeithAug, albert, Mirabell61 and 21 others
-
24
-
-
-
-
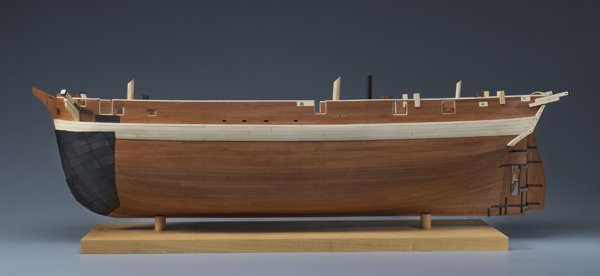
THE GREAT PLANKING OF 2017 (Part 1)
Special attention was paid to HMS Terror’s planking; originally, to protect her from the recoil of her massive mortars within, and later to protect her from the immense force of polar ice without. These combined pressures resulted in the construction of perhaps the toughest wooden sailing vessel the world has ever seen. She was, in her way, the pinnacle of the wooden shipwright’s art - embodied in a squat, slab-sided bomb, with the lines and dull sailing qualities of a merchantman. How can you not love HMS Terror?
.jpg.9528304933a31fe5222ea59bbdaf3a1e.jpg)
My reconstruction of Terror's 1845 planking plan.
Please visit my blog for the complete description of Terror's planking desgn and history.
I made two fundamental mistakes when planning to plank Terror’s hull in 2013. The first of these was deciding to double-plank her hull, just like the real ship. I began planking my model in the fall of 2016. In a previous post, I showed how I planked Terror’s topside weatherworks above the chocks. I followed a similar methodology for the hull, but rather than edge-bending planks, I had to carefully spile them, as this was necessary to plank the bluffer parts of Terror’s bow.
.JPG.7859664d89ce80db26cd8bbf78ffac14.JPG)
The first strake added to the hull. The white line was my first inadequate
attempt to line off the bottom of the wales. I fixed the run shortly after this picture was taken.
.JPG.fecba9401ca1953bd787ed7599d698e2.JPG)
The first strake at the bow. This image reveals how bluff Terror was just above the waterline.
Again, this was taken before I adjusted the reference line on the hull.
Spiling greatly slowed my progress, and I was only able to complete one or two strakes in an evening. With 120 strakes necessary for both layers of hull planking, not including the ice chocks, stern, and upper deck, I rapidly realized that I was facing a crisis. The deadline to deliver my model for the Death in the Ice exhibition was in June of 2017, and it quickly became apparent that I would not make that deadline if I did not increase my output. Thus, I began the great planking of 2017.
It began with a compromise. To speed up the first layer of planking, I decided to double the width of each of the lower hull strakes and to not follow the accurate plank shift pattern (which requires more cutting). While this layer will never be visible, I regret not having completed it to scale; in addition, not having a photograph of Terror’s original planking configuration remains a sincere source of dissatisfaction for me.
My second mistake was to plank the second layer of my model using accurate scale plank thicknesses. Some of the planks on Terror’s wales are 8 inches thick, representing a daunting task at 1:48th scale. While the three and four-inch scale planks could easily be bent with a crimping tool and some heat from a blow dryer, this technique simply would not work on planks thicker than five scale inches. Every thick plank had to be soaked in near-boiling water for 20 minutes, carefully crimped with a plank bender, and then pressed into shape using a bending iron and a curved jig. On top of that, each plank had to be carefully spiled before bending, and the distortion caused by swelling wood and heat treatment caused no end of difficulty. An added complication was that the thickest strakes, at the wales, had to be laid top and butt fashion, which further complicated the spiling process.
.JPG.d40b21d4a031b2bc943ddc33f85fc48f.JPG)
The second layer of planking in progress. You can see here where I made the decision to
widen each strake on the first layer (about January 2017).
.JPG.01cefa93e25b80dc5272f2bd1dee0e87.JPG)
Detail showing the transition to 8" strakes at wales. The upper two 8" stakes were sanded
to provide a smooth run to the 6" planks above them.
.JPG.cd8b26bde50603e4db678b18177ddce9.JPG)
The third strake of 8" top and butt planking at the bow. Notice the
drop strake below it in the first layer of planking.
.JPG.ae8295cef097942ad0b798f1bb9f90cb.JPG)
Top and butt planking in progress. The tape protects
the wood at the stern and bow during planking.
.JPG.b9a55988bdab62f56dfcb0cd5d866516.JPG)
Detail of the completed top and butt planking.
.JPG.0c3331f579eb8e4b362322aa405f8995.JPG)
Adding the absurdly wide garboard strake on the second layer.
.JPG.f19f8c869c839fc3fa440ca00347fd9f.JPG)
Close up of the garboard strake at midships. According to contemporary plans,
the garboard strake of the second layer was not rabbeted into the keel.
Interestingly, it was on later polar vessels, like HMS Investigator.
.JPG.60116f230d5f1b84651bb4ea10262c7d.JPG)
The final garboard planks at the stern, after bending them into shape.
.JPG.c7091e7476a2b9a34467a561adbc36a2.JPG)
Bottom planking in progress. This photo shows how I lined off the second layer of planking.
The most difficult part of the hull planking occurred with the stern. The first layer of planking was relatively simple as it abutted the rabbet on the original stern post (hence this layer was planked like every other ship). However, Lang’s 1845 conversion of Erebus and Terror to steam locomotion required that the second layer of planking form the walls of the propeller well. This meant that the second layer extended over the original stern post and propeller well and was rabbeted into the new rudder post. I’ve known for some time what shape this configuration would take, but implementing it required a lot of trial and error, despite Lang’s detailed plans and a block model for guidance. The most difficult chore was bending and spilling the planks into the proper shape, especially the strake forming the lower margin of the well. It also required the use of two “stealers” to accommodate the increased area of the stern. However, once installed, I’m convinced the model respects Lang’s design, the 1845 block model, and the practical reality faced by the shipwrights who had to plank this unusual ship.
.JPG.23c8be2dd67706f979cf9e1bced24500.JPG)
I use masking tape to make spiling templates. This shows the extreme shape of the
first stern plank above the propeller opening at the stern. Lang didn't make the
shipwright's task easy!
.JPG.343f1c5dfe1fa1f4da38caea858ef005.JPG)
The resulting pearwood plank.
.JPG.d14fbe572513d91b08d6dce5ecd9f77e.JPG)
To achieve the complex bend in the plank, I soaked it in hot
water, then clamped it in place until it dried.
.JPG.ff9127d92319973b71dd7eabdb29ec82.JPG)
One of the stealer planks in the stern, after it had been bent to shape.
.JPG.d19fb11e2f0d7153d3992ac88802f0ca.JPG)
Terror's unusual stern, prior to sanding and finish. Oliver Lang designed only one stealer
in this area , but I found it impossible to plank without a second. I'll discuss the
planking of the transom and chock channel in Part 2.
.JPG.dcf5f0c280f7b2aeb63a0a107dff38d1.JPG)
The completed second layer at the bow prior to sanding and finish. Note the drop planks below the wales.
On the finished model this is completely covered by a third layer of wood and "iron" plating.I didn't need to spend such care at the bow, but a modeler can only accept so much
compromise. I'll discuss the planking of the chock channel "ice bumper" in Part 2.
.JPG.5702f2d22eb2b17bfdcc5760d1f95404.JPG) The completed planking prior to sanding, bow plating, and finish. I'll discuss the planking of the chock
The completed planking prior to sanding, bow plating, and finish. I'll discuss the planking of the chock
channel "ice bumper" in Part 2 .
Part 2 of my post details the planking of Terror’s chock channels (or “ice bumper”), her transom, and her upper deck. Stay tuned!
-
-
22 hours ago, Beef Wellington said:
I keep coming back to admire the pictures and trying to get my head around those incredibly thick wales! I can only imagine how much time it took you to shape and fit these rather than a more typical planking process. Would be great to see how you did those when you get caught up, At the bow, I'm guessing you cut each from thicker sheets based on the hull profile? - just can't imagine how you could bend that thickness! Pictures look better each time I look.
Thanks very much for the comment! I'll post more on planking soon, but it it was very difficult. I spiled all the thickest planks, then soaked them in warm water for 30 minutes. Then I used a combination of a plank bending crimper and a bending iron to get just the right curvature. I broke quite a few in the process!
- mtaylor and CaptainSteve
-
2
-
Amazing. One can only hope to develop this level of skill.
- Tigersteve and mtaylor
-
2
-
-
Thank you, Druxey! I am very nervous to have it viewed by the Ship Model curator!
- druxey, zoly99sask and mtaylor
-
3
.JPG.39047d1ec78584e61d1227e32022ad20.JPG)
Queen Anne's Revenge 1710 by shipmodel - FINISHED - 1/36 scale
in - Build logs for subjects built 1501 - 1750
Posted
Wonderful job. You should be very proud of her.