


Bedford
-
Posts
1,297 -
Joined
-
Last visited
Content Type
Profiles
Forums
Gallery
Events
Posts posted by Bedford
-
-
Looking good, as expected!
Thanks for the Micro Kristal Klear tip, I'd never heard of it
-
On 12/15/2025 at 6:47 AM, Jim Lad said:
Keith, that cabin looks as though it would be very comfortable - until they turned the engine over!
John
Having crewed the 123 year old steam tug Waratah and having been below in the aft accommodation (nowhere near as grand as Cangardas) I can assure you that even in that old girl you could not hear the shaft spinning. I would imagine the only thing that might create a disturbance is the propeller when she goes astern or if it catches air, I imagine it would be very well balanced.
- Keith Black and KeithAug
-
 2
2
-
Thicknessers make excellent Christmas presents !
- druxey and Keith Black
-
2
-
John, my ex wife used to do family daycare so there were always kids in the house and one in particular saw my model of the schooner for Port Jackson and straight away commented how cool it was and "can we play with it"?
Thankfully it was up high and protected by glass. That particular little demon would have turned her into kindling in minutes.
- Keith Black, MAGIC's Craig, Jim Lad and 1 other
-
1
-
 3
3
-
I'm with Wefalk, just the other day thinking we haven't seen Michael for a while and suffering pilot cutter withdrawal.
Welcome back Michael
- Jack12477 and Keith Black
-
2
-
Yes, now that I've seen it I can't unsee it. I guess I was too focused on the details to see the whole properly.
- Keith Black and KeithAug
-
2
-
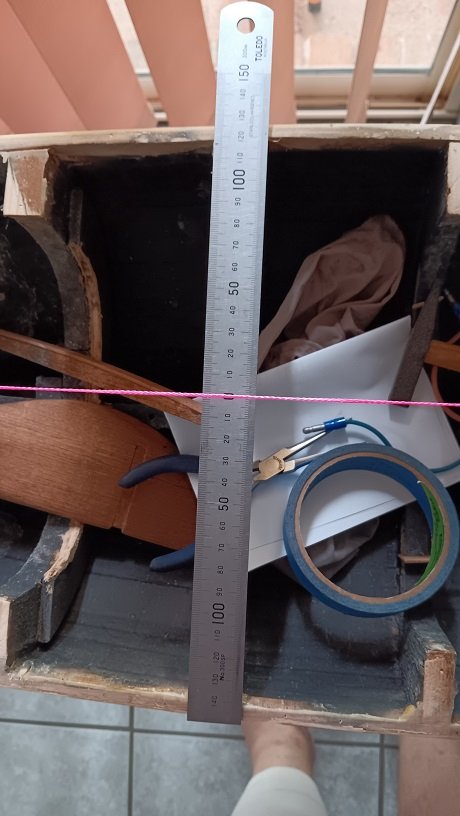
I just took some more measurements, mid ships, and she's actually out by 20mm!
No idea by looking at it without the string line but it's painfully obvious with it.
- GrandpaPhil and Jim Lad
-
 2
2
-
Well there's news on this one and it's all bad.
I've been laid up with a new knee so thinking a lot about this build and today I was well enough to set it up on a table and run a string line down the centre. This was important because if I'm going to put the effort into this then it's going to get a proper deck with the planks following the curve of the hull and joggled into a king plank and if she's not symmetrical that becomes very problematic.
I can shave planks here and there to fake it for minor discrepancies but although she looks pretty good to the eye the string line tells a very different story.
The hull isn't straight and there is as much as 9mm difference from one side to the other, it's also got a bit of a twist in it.
What does all that mean?
She'll be scrapped as I'm not interested in the nightmare that would be in trying to make a silk purse out of this particular sows ear.
If I decide I really want such a model in the future I have a set of plans for "Altair" and it will be a lot easier to build something straight from scratch than to fix this.
- Kenchington, ccoyle, GrandpaPhil and 2 others
-
1
-
4
-
Yes my friend, some details are better left unphotographed as that could make them look quite crude compared to your normal standard of work but rest assured the bigger picture will suffice as we know they will be very well built.
- wefalck, Keith Black and Paul Le Wol
-
2
-
1
-
I was going to say you need to get the cleaners in before handing over to the owner

That's come together beautifully Keith, well done.
- druxey, KeithAug and Keith Black
-
3
-
You're going all out Mark, really looking the goods.
- Jack12477 and Mark Pearse
-
2
-
-
Mate, my son works for such a contractor and hates it, always trying to convince him and the guys that the right way is generally quicker and gives a much better outcome.
On the subject of model boat interiors, I met one of Jim Lads compatriots ( a model maker at the Australian National Maritime Museum ) who had been to England and visited the NMM there just as they were using an endoscope to look inside the old admiralty models. These models, as many know, were used instead of drawings to show the admiralty what every deck would look like so they are fully detailed and had not been seen by anyone since the admiralty signed off deck by deck as they were closed up with the weather deck.
-
Valeriy, that's one I'll file away for future reference, very clever
- Keith Black, Canute, Tony Hunt and 2 others
-
5
-
Vaddoc, I get the need for these figures in the design phase and the fact that you're into them and sharing them is what this forum is all about and I know many will really appreciate your efforts.
The Ptarmigan I just built (full size 5mtr sail boat) will have no doubt been drafted similarly but the building of it required simple graph plotting for the shape of the frames and correct spacing of the frames. Everything flows from there bearing in mind the golden rule of boat building, a fair line supersedes any given measurement!
This might become apparent in the difference you have found in the width of the stem.
I include a picture of what I built without knowing such detail, just to show it's a tad better than the boat you demonstrated above
")

-
-
Yes, being stuck at home with Covid has some small advantages
- Keith Black and Jim Lad
-
2
-
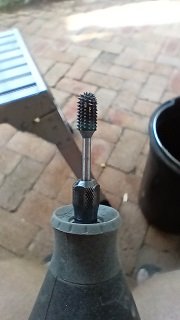
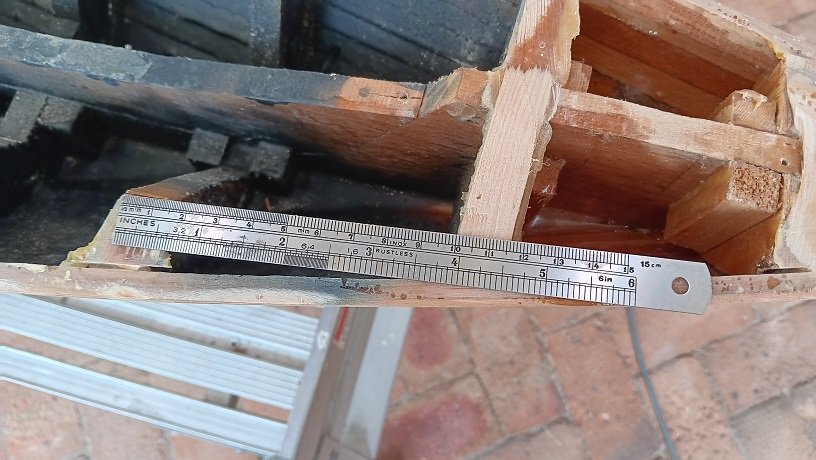
The overabundance of woodwork has been removed more easily than I had anticipated thanks largely to a new bit I found for the Dremel and the fact that a lot of it was just stuck in with silastic so a short crack with a small hammer broke them loose.
The Dremel bit
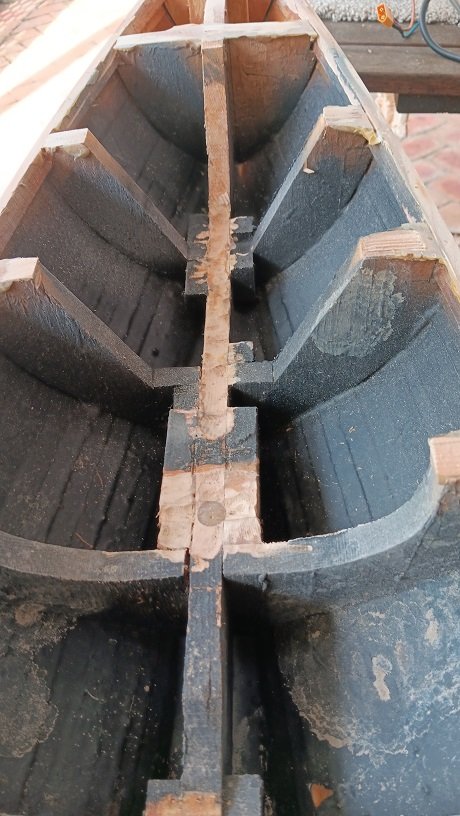
I took two sections of keel frame out to allow the installation of auxiliary drive so now I can fit up to a 540 can motor comfortably.

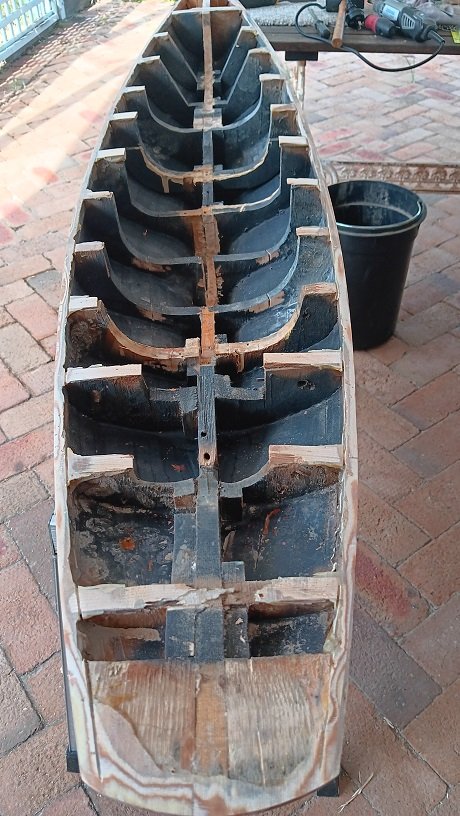
Interestingly this next pic shows an epoxy filled mast step in the keel just forward of the bottom frame which raises more questions about what this model has been through given it appears to have never been finished.
- Keith Black, Colin B and GrandpaPhil
-
3
-
Vaddock, I was wondering what you're up to and now I know.
I've watched several of Leos videos too. He really knows his craft doesn't he.
Funnily enough, as a builder of full sized sailing boats, I get lost in all the discussion about lines and often wonder just how important all those calculations are but I guess they must be because people use them.
So I'll just sit quietly on the sidelines until you start making sawdust
- Keith Black and Mark Pearse
-
2
-
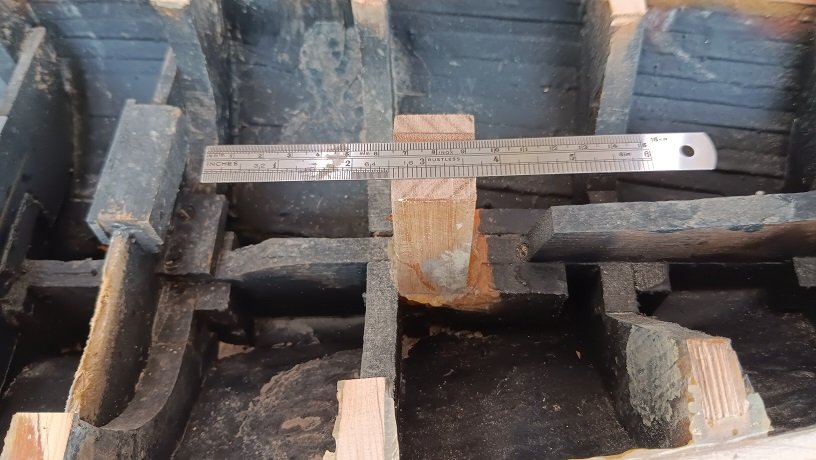
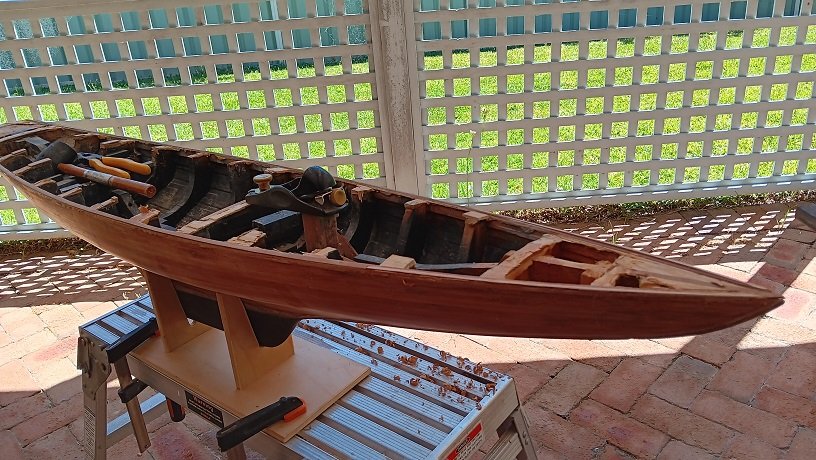
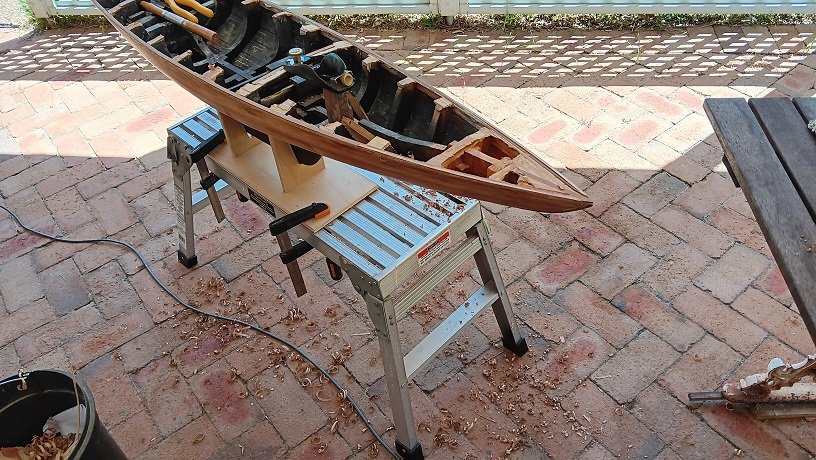
I've spent the day removing the last remnants of the gunwales and deck. There was an awful lot of sanding to get rid of thick glue in the bow and stern, no idea what the glue is but it's tough to get rid of.
Meanwhile I have no idea what sort of conditions the original builder thought this model might be subject to but it's built like an ice breaker. Huge oregon frames 15mm thick with a massive bow frame and the compression post is 1/4 the size of the one I put in my recent full size 17 foot build!
If she's to become an RC sailer I'll have to find a way to get rid of a lot of it.
- GrandpaPhil, Keith Black, Colin B and 2 others
-
3
-
 2
2
-
-
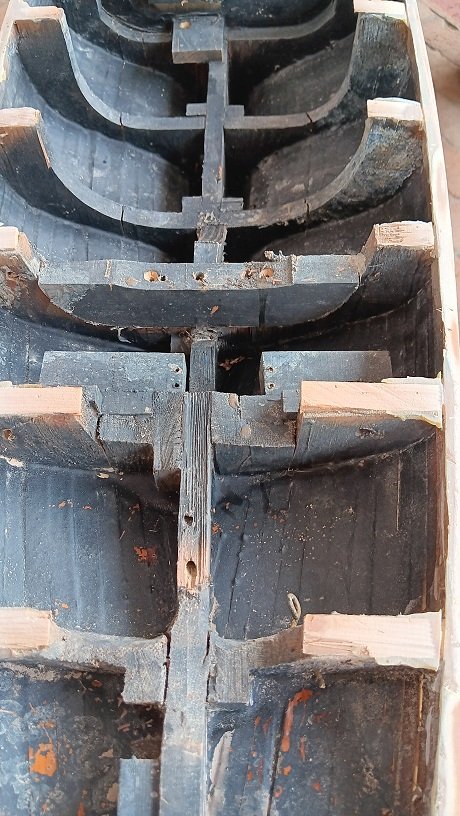
The more I dug into the deck situation the more I realised the only viable option was to remove the gunwale then the margin boards and bring the hull back to level with the top of the sheer strake. So I cut off the bulwarks at the bow which won't be reusable except for the cap rails and proceeded to remove the stbd gunwale. I was looking at ways to cut it off so I might reuse it but that wasn't viable so I planed it off. Spotted Gum is a very tough timber but it planes beautifully so it didn't take long to remove, port side next then finding a way to remove the remnants of the deck.
I didn't touch it today because after dodging it for 6 years I finally succumbed to covid and the energy levels just aren't there.
- GrandpaPhil, FreekS, Colin B and 3 others
-
6
-
John, that's always been on the cards, and I have the gear to do it, but since you can't scale the wind RC yachts tend to often sail in East Coast Low conditions so they have ballast bulbs well below the keel. This model has ballast weight built into the keel (see the black portion in the above pics) but I don't know what it is. It's fibreglassed over.
Is it heavy enough?
Can it be drilled to allow attachment of extra ballast while sailing?
Would I sail it much?
How long is a piece of string?
-
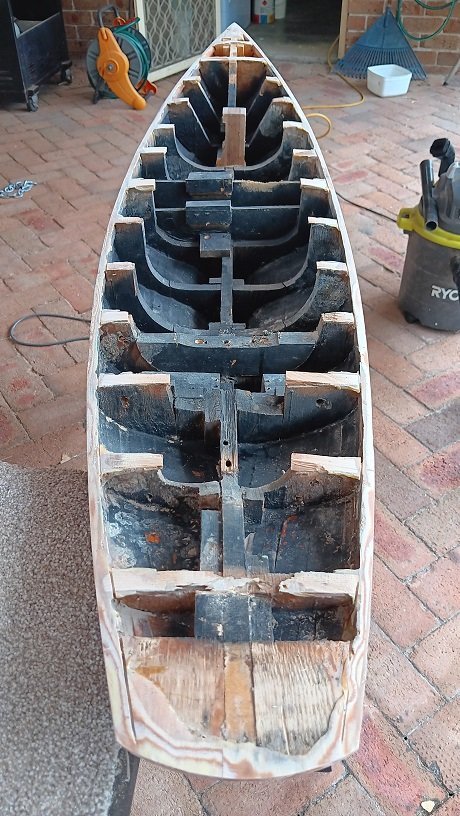
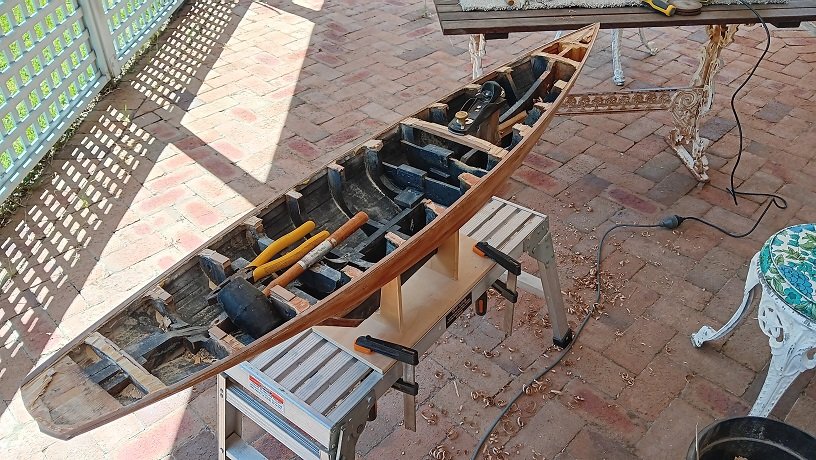
Well I've ripped the whole deck off because the planks were not glued down properly everywhere and the "tar" was just cheap wood filler putty which was falling out, I tried just removing the planks from the ply substrate but where it was glued well it was really glued on and the substrate ply is way too thin and flexes under the chisel so it's gone.
There will now be a lot of carving, cutting and sanding to get the frame tops even and ready for new beam shelves (of which there are none) and deck frames.
I'm also considering rigging options, as a Bermudan rig the mast will rise 1.9mtrs above the deck meaning she'd have to live on the floor which would hide the beautiful lines of the hull. As a gaffer the mast would rise 1.5mtrs which still leaves the boat itself pretty low on display. One option rattling around is to do it like an admiralty model with only about 250mm of mast so the hull is displayed at a much better height.
- KeithAug and Keith Black
-
2
Ranger type yacht by Mark Pearse - 1:12 - SMALL
in - Build logs for subjects built 1901 - Present Day
Posted
That metal work is looking brilliant Mark and it's a very good demonstration of the effect of tinning solutions