HOLIDAY DONATION DRIVE - SUPPORT MSW - DO YOUR PART TO KEEP THIS GREAT FORUM GOING! (Only 20 donations so far - C'mon guys!)
×


Beef Wellington
-
Posts
2,249 -
Joined
-
Last visited
Content Type
Profiles
Forums
Gallery
Events
Everything posted by Beef Wellington
-
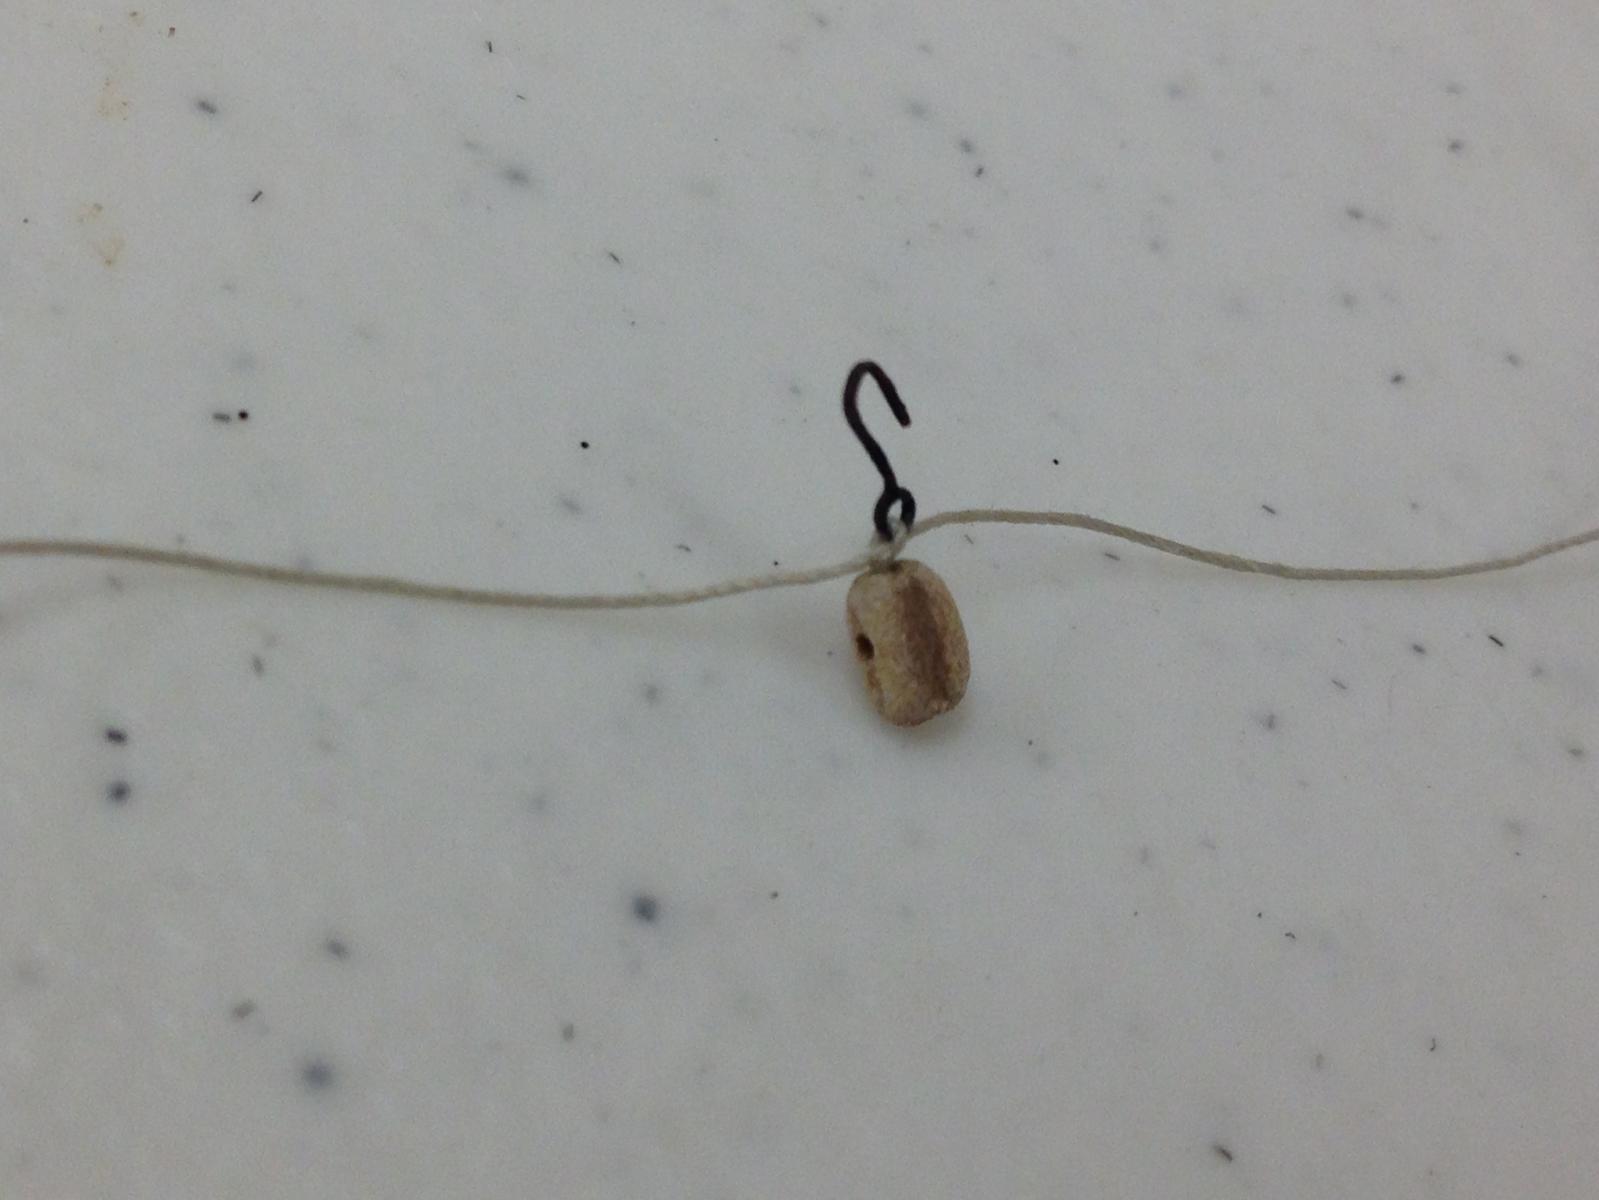
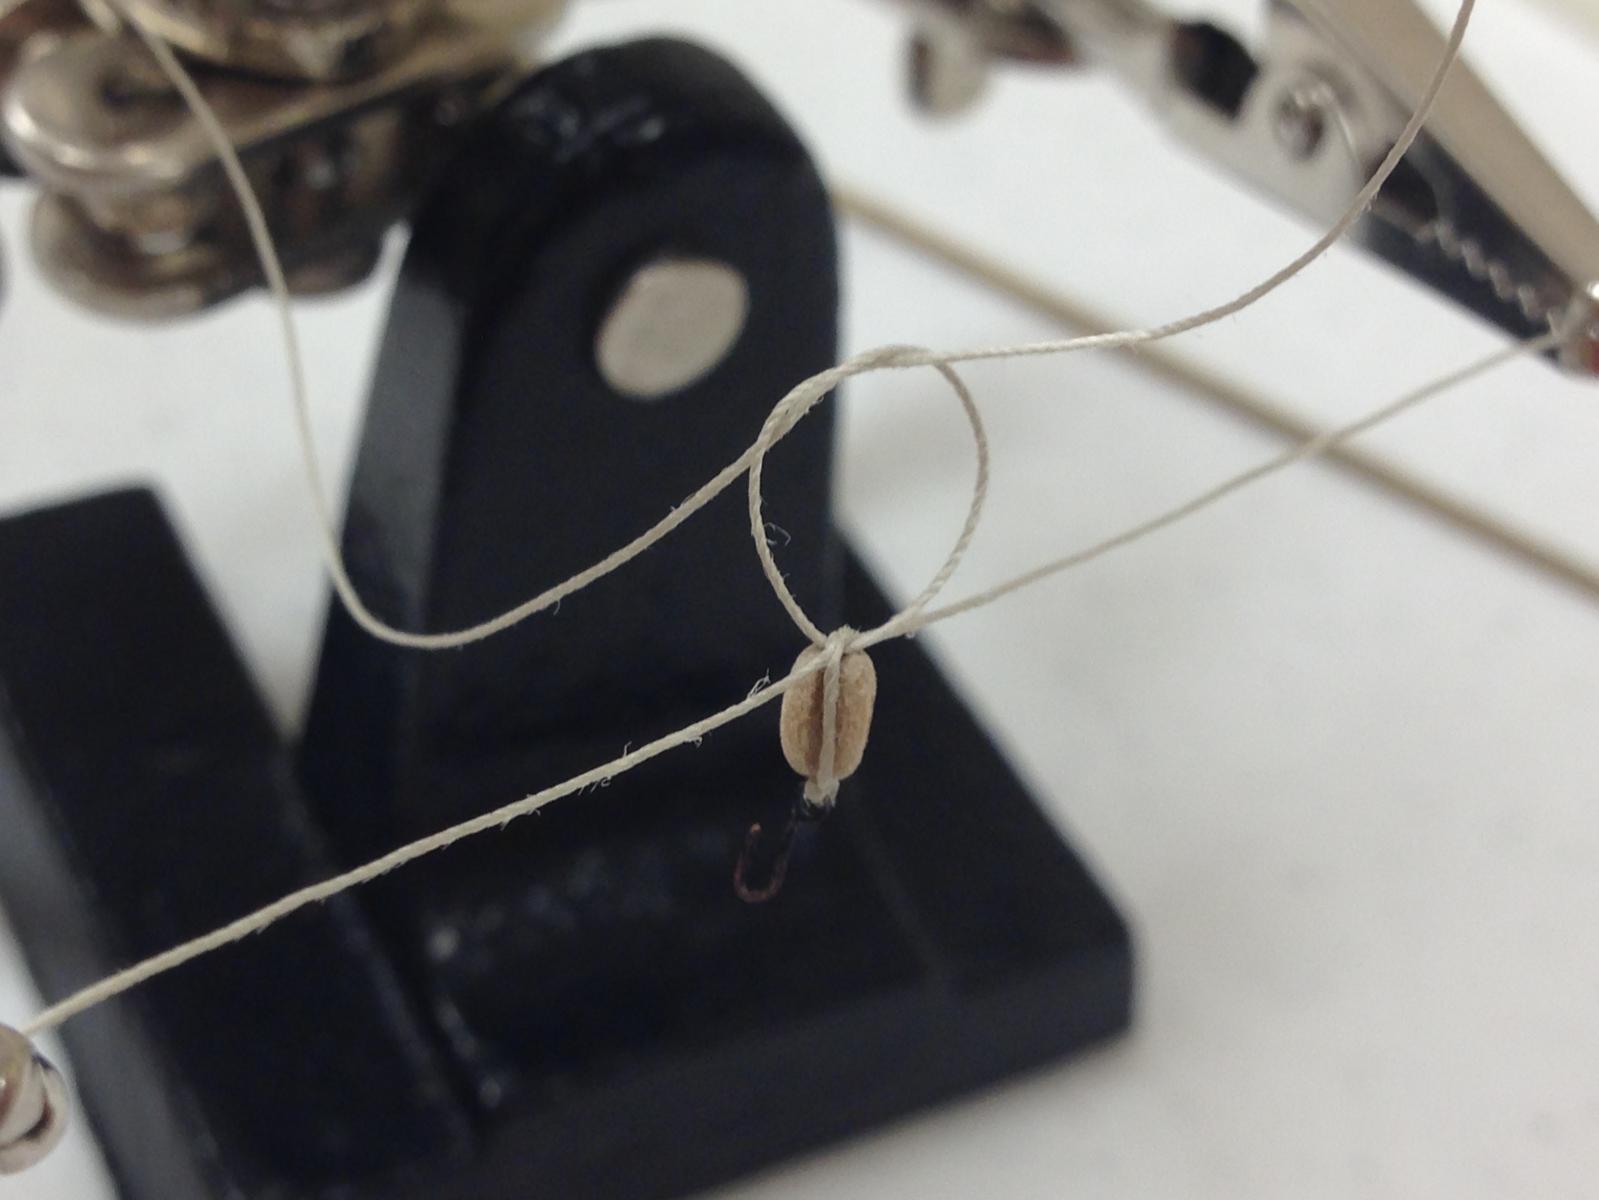
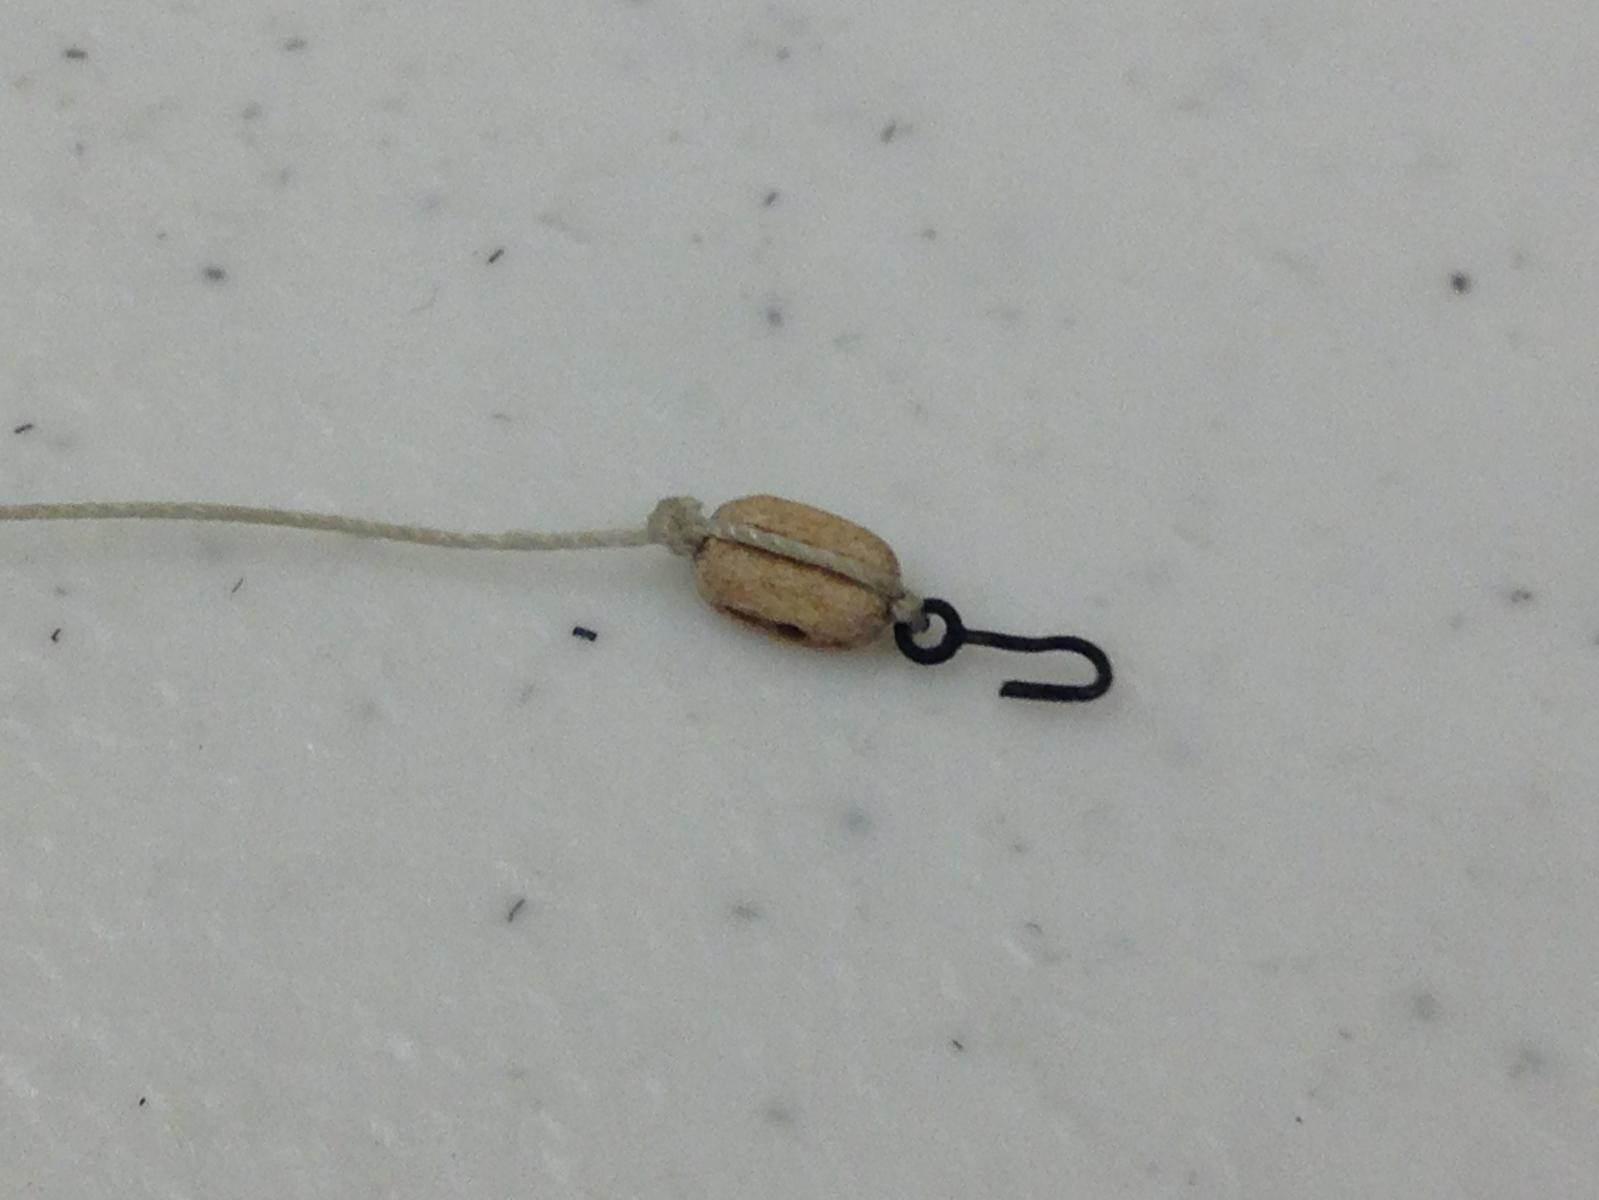
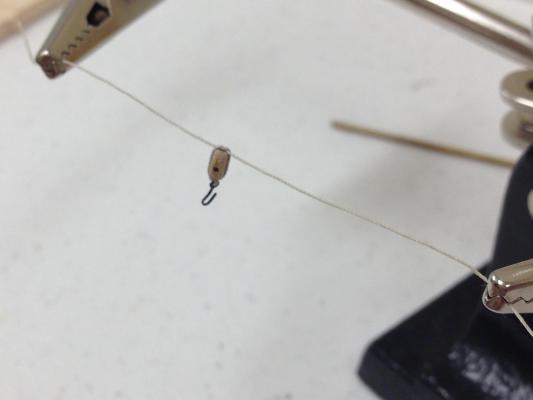
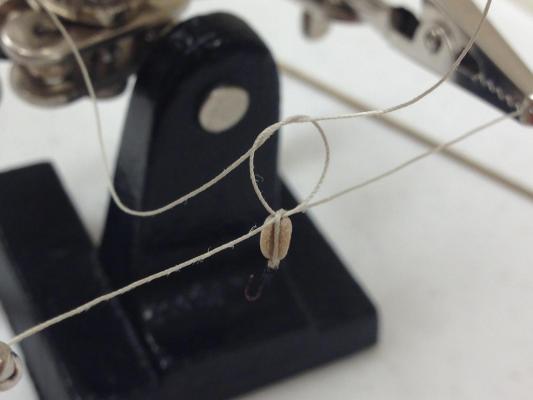
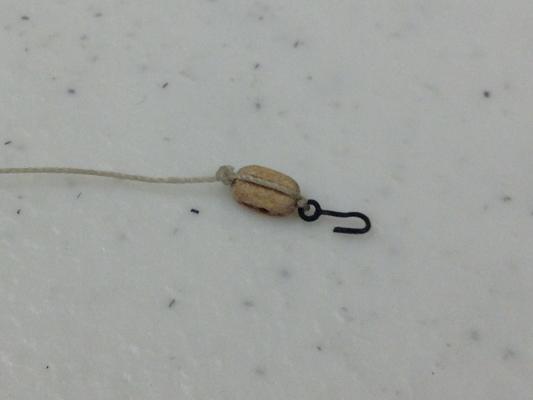
 Few pics before I forget on the approach taken for the single blocks for the carronade rigging, this seems to have worked best so far after many choice words on multiple failures. Finding this particularly fiddly dealing with the hooks and the blocks and keeping them aligned....at least the double blocks only need stropping. After simple overhand knot through the previously made hook, applied a bit of GS Hypo glue to the thread and attach the single block (very small amount of glue, this is just a temp at way to stop the block continually falling out Yet another overhand knot around the block for the stropping. "Helping hands" come in very handy here With the block still in the helping hands, pry open the stropping enough to insert a length of the line through and pull around so its at the bottom of the block (believe its the **** end?) and tie a double overhand knot Apply some dilute PVA glue and trim once dry...repeat
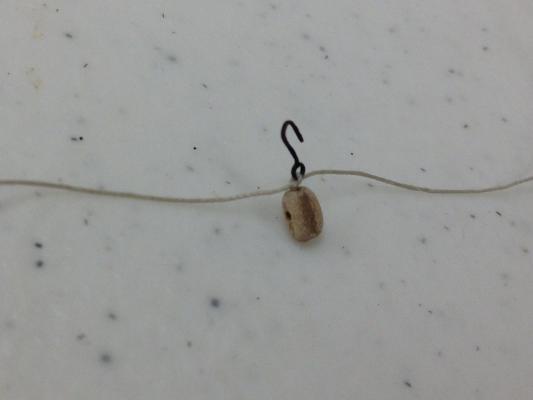
- 800 replies
-
- 8
-

-
- snake
- caldercraft
- (and 1 more)
-
Hi Ray, very nice fix. Pardon my ignorance, what the is difference in the armament from that supplied in the kit?
-
I used the .25mm line. On your question on the front patform, who am I to judge There really seems to be no guidance, I made the assumption that the deck would fit around the bowsprit, but there are still gaps. Maybe just see how it looks with the bowsprit in and you can decide if you like it or not?
- 1,144 replies
-
- 1
-
-
- snake
- caldercraft
- (and 1 more)
-
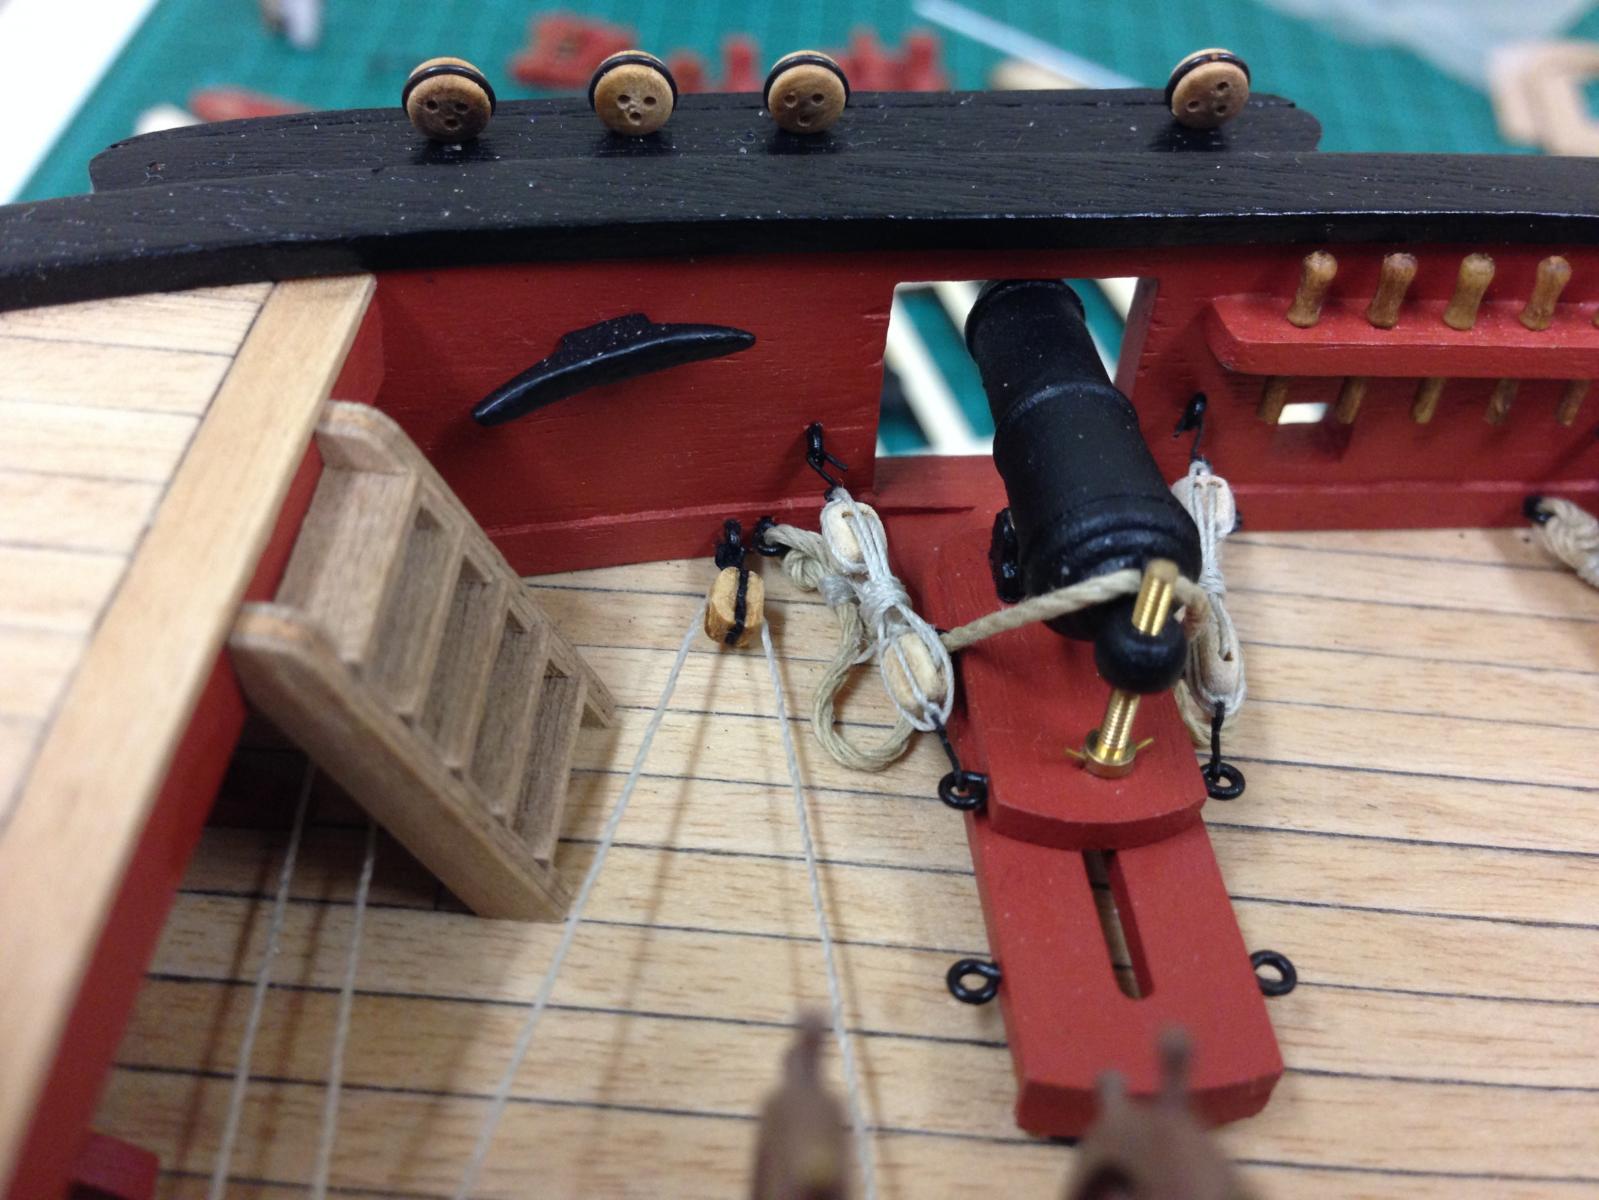
Looking good, big step to attach the wheel! Forgive me for posting a photo, but thought it might help show where the steering tackle and the carronade rigging ended up on mine....not much space at all and don't think there is much of an alternative! Looking forward to seeing some more updates.

- 1,144 replies
-
- 1
-
-
- snake
- caldercraft
- (and 1 more)
-
Another vote for the Leda class Chris if I may, I would have thought options for Shannon or Trincomalee would have wide interest (although I'd love to see a Unicorn option with the rounded stern, I suspect that would not be practical).
-
B.E. - thanks, that's a much appreciated compliment coming from you! Pete/Ferit - Believe capstans would have been painted in practice, don't think I've seen one unpainted. In terms of colours, I tired a couple of thinkgs before settling on the plain red which I like best. However, I'd agree with Ferit that if I had been building an model without paint I would probably have tried to scratch something as I really do not like the ply look. I can live with it on the ladders because it not too noticeable.
- 800 replies
-
- 1
-
-
- snake
- caldercraft
- (and 1 more)
-
Nice little arsenal you have there Stergios! I had much more fun with the cannons than the carronades. Bottom line, there is very little room on the deck at the stern, the plans are hopelessly out of scale, and you're right it does take some playing to get it all making sense. One thing that can buy you some room is to reduce the height of the ladders so they remain flush with the aft platform decking - there are some photos in my log which may help http://modelshipworld.com/index.php?/topic/509-hms-snake-by-beef-wellington-caldercraft-scale-1-64-first-wooden-ship-build/page-21#entry95246. Apart from being a bit more intuitive, this also has the benefit of giving you a bit more space. The tiller ropes do come very close to the ladders.
-
Japanese?
-
Thats an elegant solution Jim, I can't find much reference to this step in the instructions but this seems a lot better than trying to us the supplied strops.
-
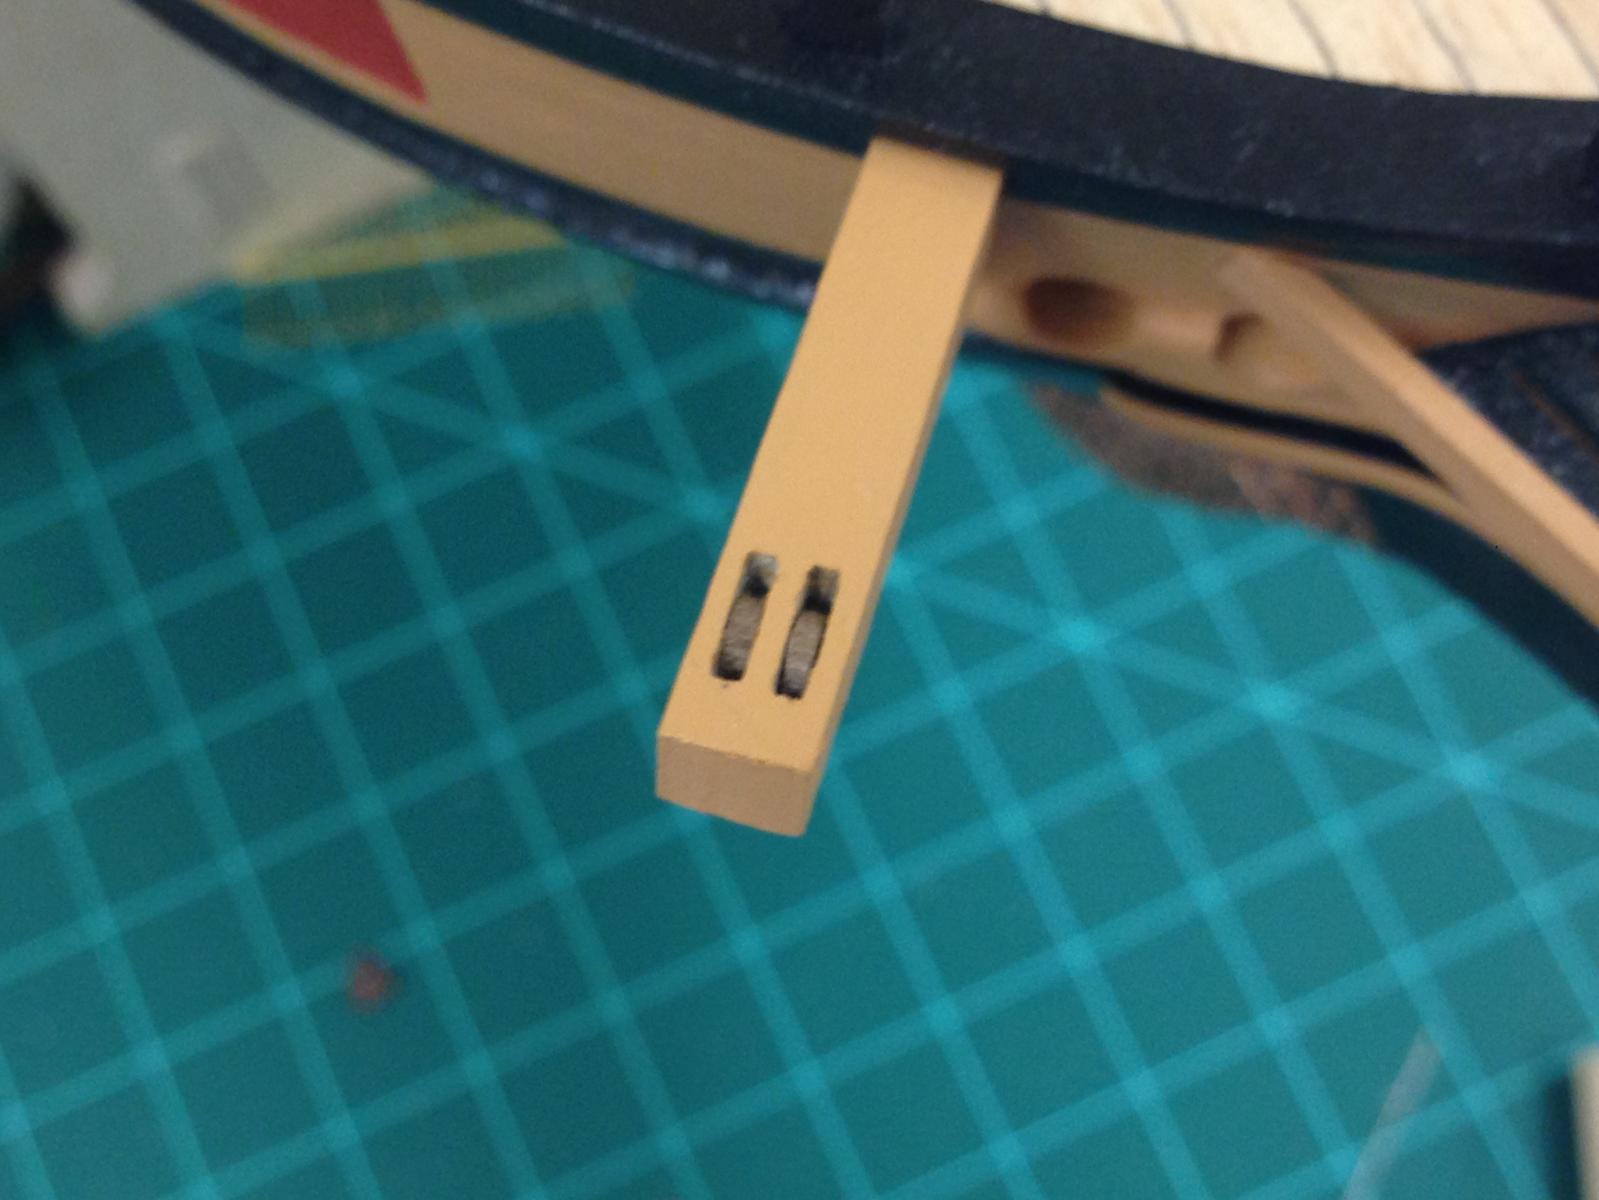
Not much of an update, but its all I have as I haven't had much time to spare recently. I've been staring at the holes I'd drilled in the cathead pretty much from when they were installed and I just couldn't get comfortable with the way they looked. Reaching a point where I would have no options I decided to try and improve these, took a while to convince myself fully recognizing that a mistake would probably make things a lot worse. Finally plucked up the courage to tackle them, and by drilling some more holes in between, and using a sharp knife, a very small file and some patience I was able to get proper slots rather than holes. I then simply cut small slices of dowel for the sheaves. Far from perfect but I'm much happier with how its looking now.


- 800 replies
-
- 10
-
-
- snake
- caldercraft
- (and 1 more)
-
Very nice job indeed on those catharpins Jim, nice to see the step by step and you seem to have managed to keep everything looking taught which I expect was not easy at all. Hard to see in the photos, how did you attach the deadeyes in the tops to the futtock shrouds? The instructions seem (again) very light, I can't quite see how this works. More recent kits seem to have nice brass etch futtock plates to attach to rather than the very simplistic wire strops that seem to have the joint in exactly the wrong place.
- 412 replies
-
- 1
-
-
- snake
- caldercraft
- (and 1 more)
-
I was relooking at the picture you had posted of the Morgan's wheel, it was only when I enlarged it that I saw that the wheel is actually sitting on the rudder tiller arm. I'm sure I would have noticed if that had been there, what a bizarre arrangement! I suppose it allows the sterring gear to be packed into as small an area as possible, but must be strange to operate - as you turn the wheel you have to follow it around(?)
-
Hi John, I've just been able to catch up on your wonderful CW Morgan build. I'm quite lucky living relatively close to her so have seen her in the various phases of restoration, the first time I saw her when we moved here a 3yrs ago I was caught a little off guard as I was expecting to see her majestically sitting in the river, instead she was on land on blocks and I honestly thought she was being broken up as she was pretty much stripped to her frames. We also had a chance to visit the Mayflower II, must confess I was a little disappointed but should have known what to expect. Clearly shes a modern rebuild along similar lines, but a lot of the dimensions have been changed (deck heights especially) to accommodate tourists, shes still fun to visit though, especially along with the Plymouth Plantation settlement recreation.
- 2,250 replies
-
- 1
-
-
- model shipways
- Charles W Morgan
- (and 1 more)
-
Those ratlines look great Sjors, must be very satisfying to have conquered them!
-
Looks fantastic Andy, the serving on your rigging elements really looks really looks great. I really want to give that go myself when I get to that stage but worried it will add another 6 months!
-
Hi Jim, you definitely seem to be on the downhill stretch now. Couple of items I've been pondering and couple of questions: Did you install any cleats for the various stays (Fore stay and preventer stay, and the main stay and preventer stay). These seem to be inconsistent between sets of plans and in some cases I'm not sure that they're not just smudges :-) I know you commented on the lack of 1.25mm black line which I think are needed for the fore and main stay, is the dyed natural line what you ultimately used in the photos above? I see CC produce a 1.3mm black line which may be an alternative to dying, but yours cam out looking pretty good, what did you use? How did you make your mouse? Keep up the great work, will be following your progress as you know...meanwhile back to page 5 of the instructions for me, although its more a measure of progress than actually being of assistance to the build
-
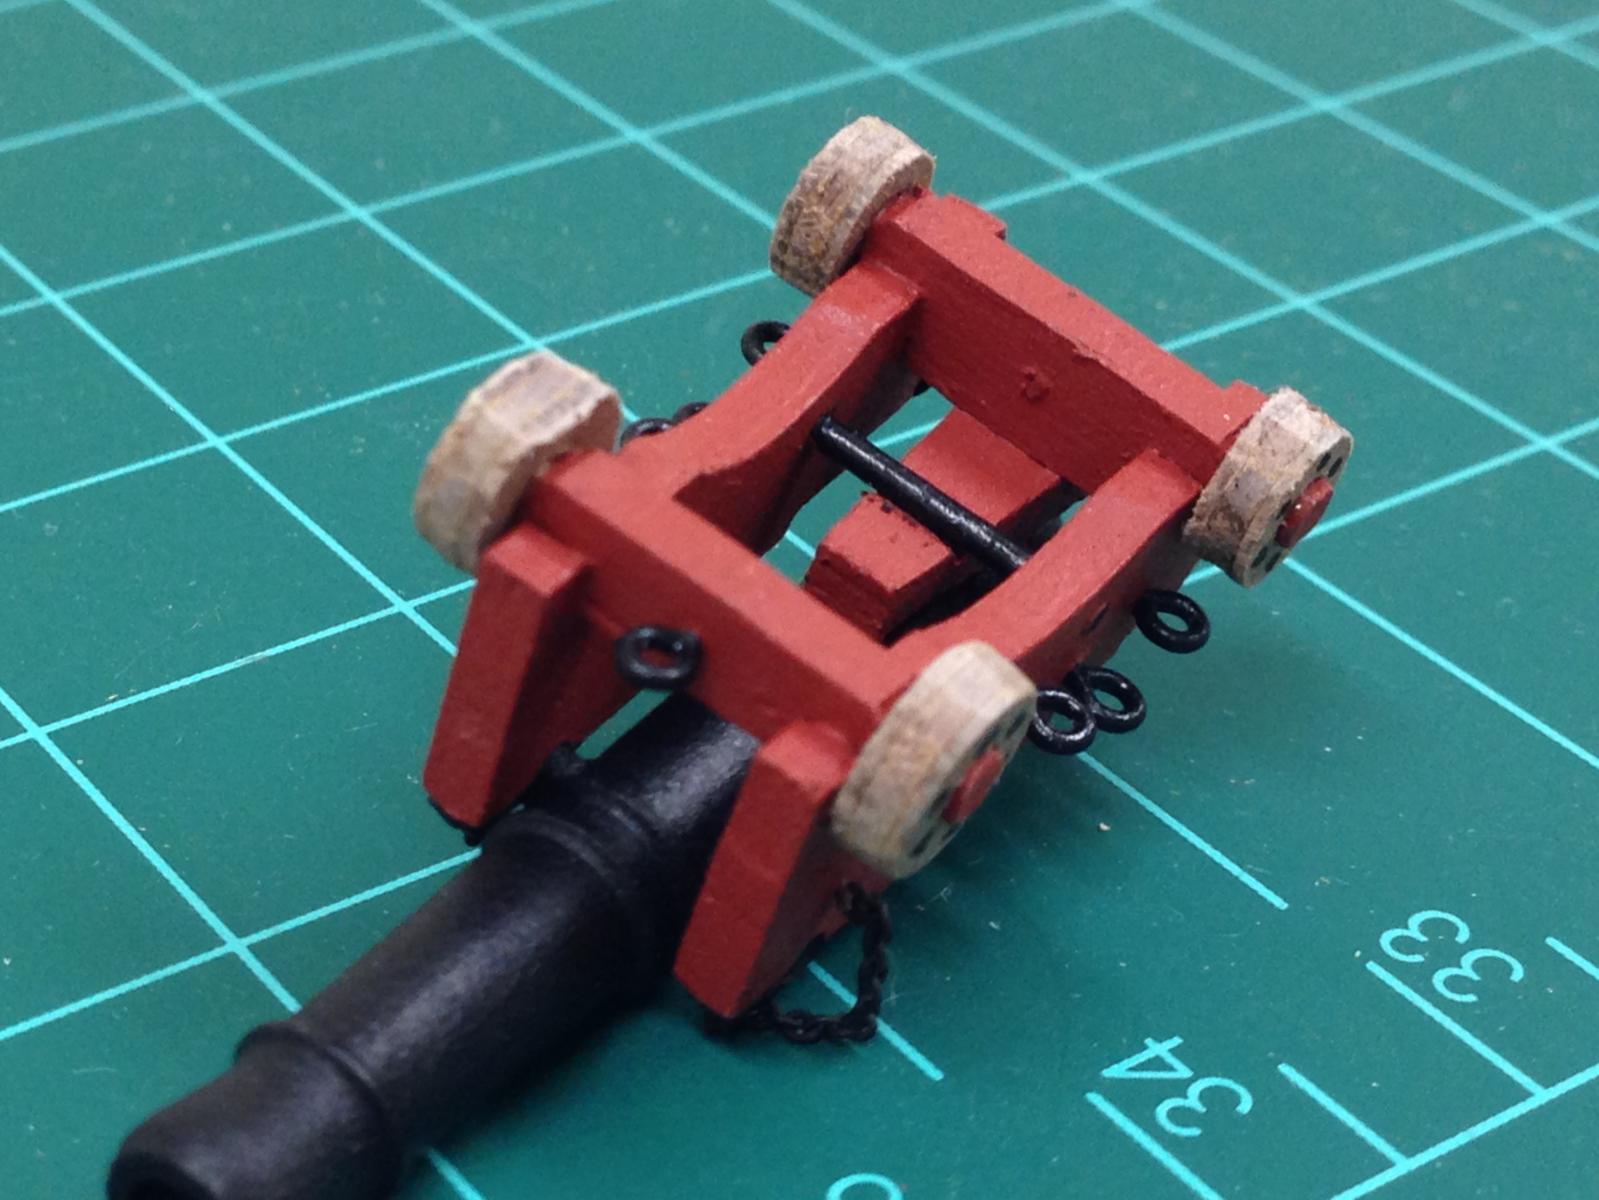
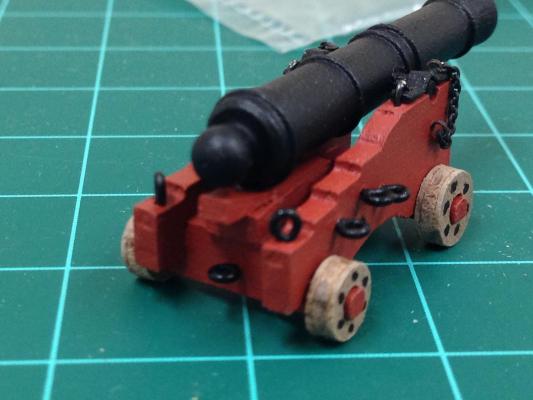
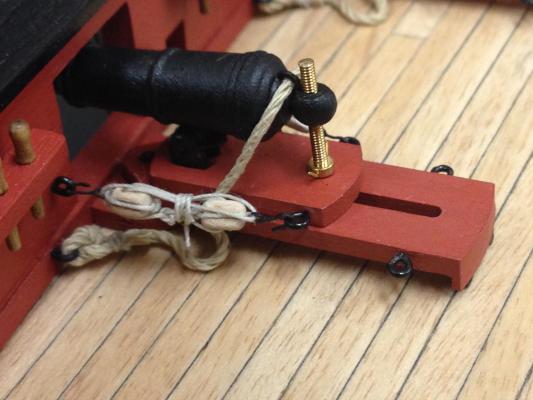
Hopefully these help, view from the top and bottom. Unfortunately these are assembled so its difficult to get a clear view. You can see in bottom picture how the bed sits on the cross bar and the axle frame so that the small slot sits on the bar. The quoin sits on top of the bed, see top picture. I shaped this a bit so it is a true wedge as it would have been, its important to get the quoin placed and shaped correctly to allow the barrel to align correctly. One thing to note, the hole in the cannon barrel that wire is inserted in to make the pommelions is not centred, which is historically accurate. Before gluing the cannon barrel into place, I'd play around with the quoin and the cannon barrel to make sure that you get the alignment you want on the ship.
- 1,144 replies
-
- 1
-
-
- snake
- caldercraft
- (and 1 more)
-
If I understand you correctly, think the 'lump' you are referring to is a mouse (?)
-
I also like the 32lb'ers better, interesting to see them side by side. You've done a great job building those up, looks like you've figured out the process.
- 1,144 replies
-
- 1
-
-
- snake
- caldercraft
- (and 1 more)
-
Stergios, the bed is the larger of the two wedges you have cut out, the smaller is the quoin. There should be a small groove at one end, that sits on top of the metal rod you've already fitted, the other sits on top of the rear axle frame. Hope that helps.
- 1,144 replies
-
- 1
-
-
- snake
- caldercraft
- (and 1 more)
-
Ferit, I've been holding back comments for fear of repetition, but she's going from strength to strength and looking fantastic. On your question, I think these would always been closed. If you do that, I bet you can still see some of the detail you've put into them.
-
Jim - I've also bought a copy of the Rigging period ship models, are you finding it any help at all? Everything looks very clear in the book, but I must confess I feel a little faint looking at the level of detail in there 'to do it right'. You're so right that the instructions are not clear in many places and some cases I think misleading. Trying not to worry about that yet though. Keep at it, will be following your progress and learning from you.
-
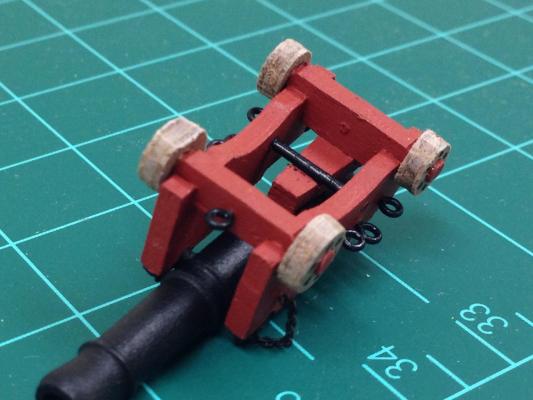
Timmo, Ferit - cheers! Pete - have done nothing at all to the pins Alistair - thanks for the detailed guidance, I love the suggestion, I think BE also took a similar approach to what you describe and now after re-reading its all making a bit more sense - learn by doing I suppose. Your picture is really tremendous, a work of art in of itself! What kind of line are you using, it looks so much better than anything I've seen elsewhere - on my next kit if I get that far I definitely want to upgrade the thread. I'm going to ponder the cannon rigging question for a bit, mainly because I'm not going to have time do anything in near future, but definitely think that your suggestion is the way to go. I've also been quietly checking out your Fly (that sounds bad!), you've got a wonderful build going there that I'm certainly learning from. Managed to finish off one of the carronades after much experimentation. Far from perfect, but pretty pleased with how it turned out compared to the look I was going for. Would have been nice to have had smaller blocks as they are definitely a little overscale, but I can live with it. No more updates until I'm done with carronade rigging!

- 800 replies
-
- 5
-
-
- snake
- caldercraft
- (and 1 more)
-
Or is it HMS Polychrest?