HOLIDAY DONATION DRIVE - SUPPORT MSW - DO YOUR PART TO KEEP THIS GREAT FORUM GOING! (Only 13 donations so far - C'mon guys!)
×


Beef Wellington
-
Posts
2,249 -
Joined
-
Last visited
Content Type
Profiles
Forums
Gallery
Events
Everything posted by Beef Wellington
-
 Hi Stergios, don't think you need to do anything drastic at all. They are a tight fit. I'd suggest just sanding down the timberhead pieces slightly, and then pushing them into place with a small amount of force (wiggling back and forth). The wood is pretty soft and I found it does respond to this well. The other benefit, you'll have a nice solid fit.
 -
Beautiful shots Ray, boy there's a lot of deck area! The colours and wood tone really look fantastic coupled with your really clean workmanship.
- 536 replies
-
- 1
-

-
- diana
- caldercraft
- (and 1 more)
-
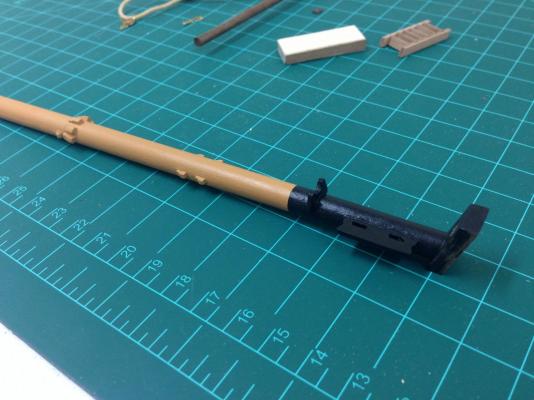
Mort - the flintlocks were supplied in the cannon kit and were photo etch Spyglass - I was thinking of the "with/against the sun" expression - insights into that?
-
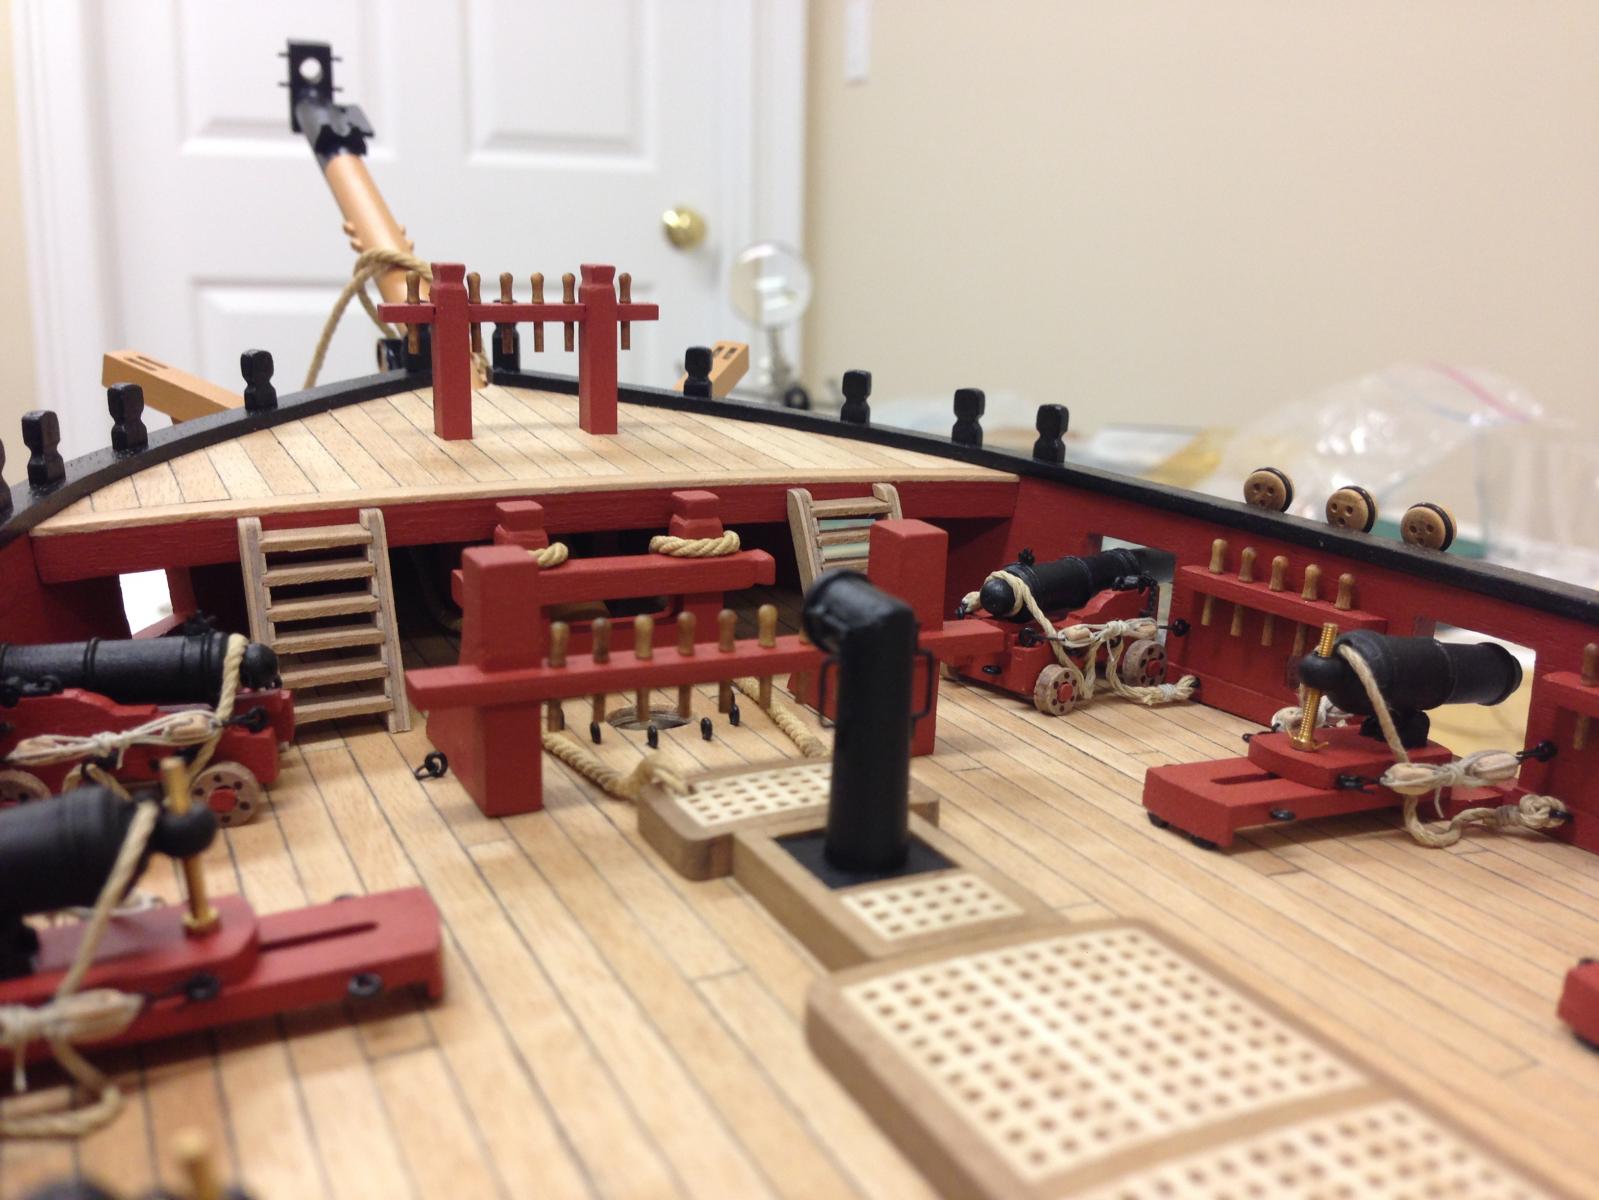
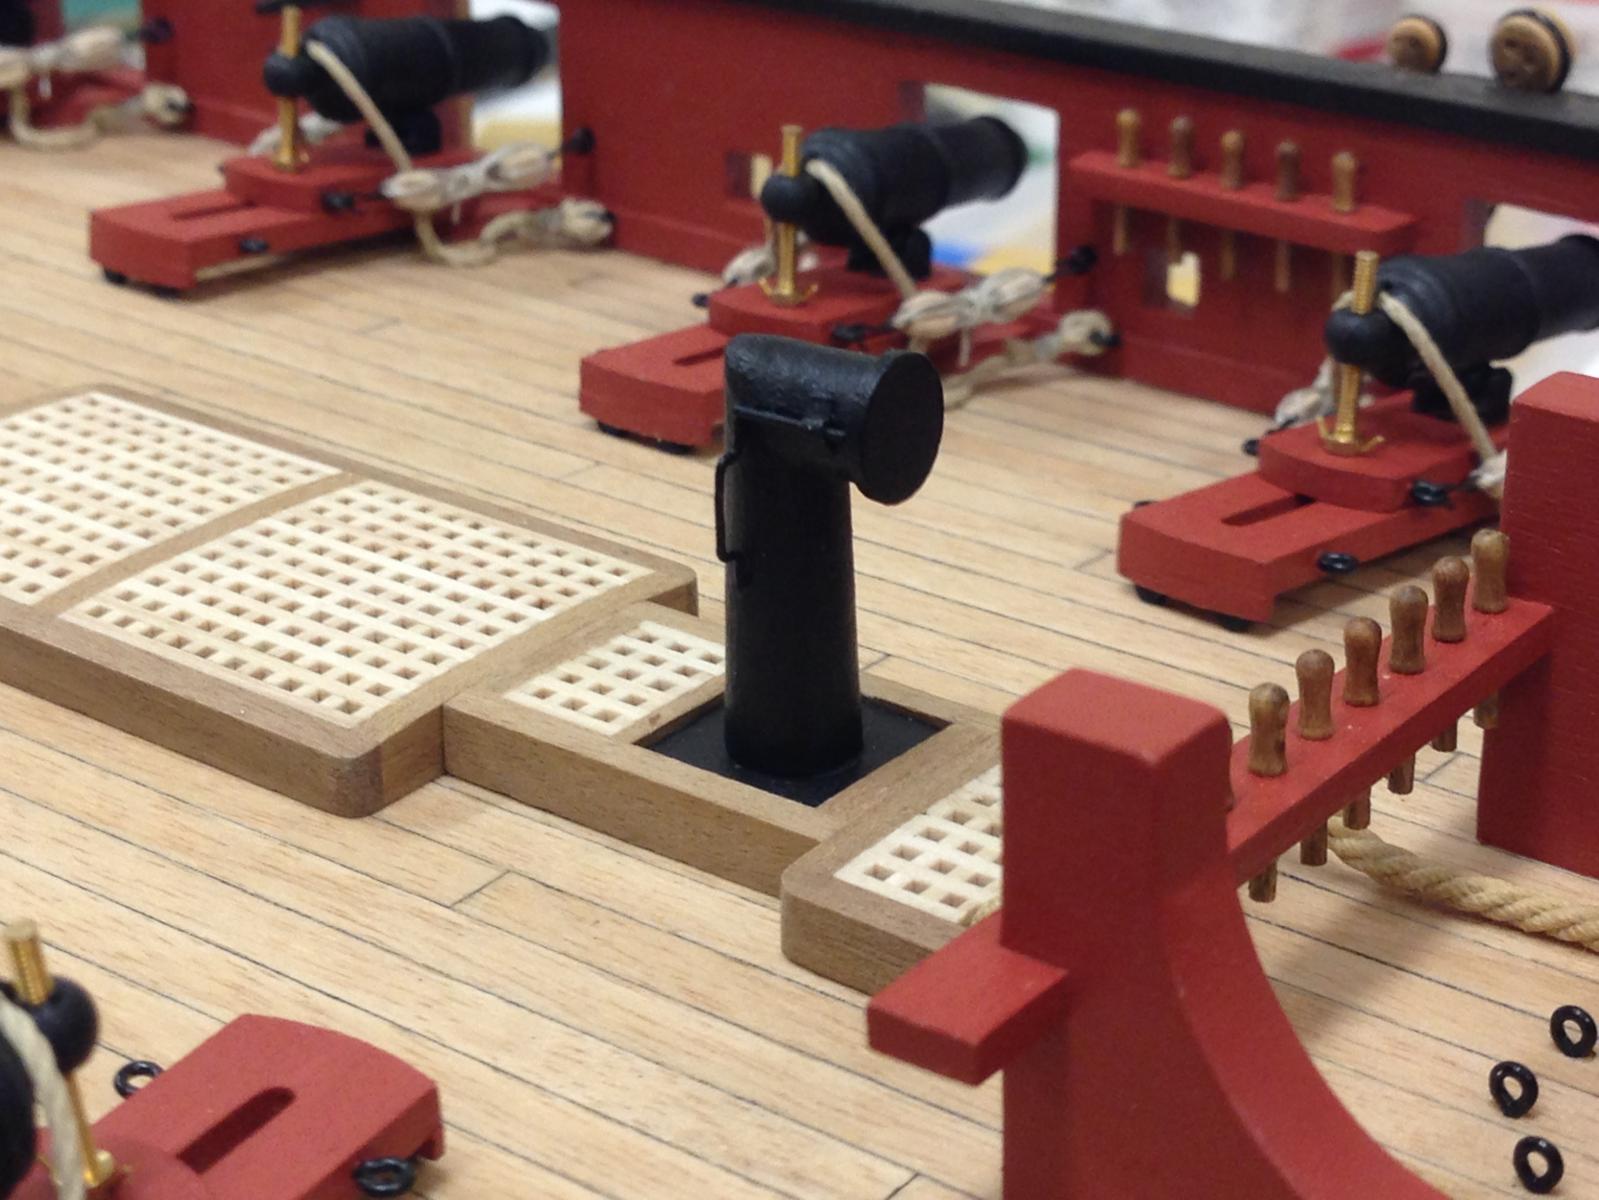
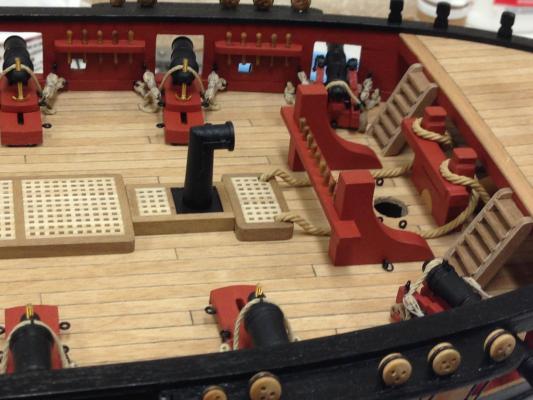
Hamilton, Richard, Mike, Daniel, Sjors, Jim - thanks as always for looking in. Apart from a few deck details, pumps (which I'm working on) and the shot garlands, pretty much ready to move onto the masts and spars, a step that will probably be a challenge. I'm sure it'll all work out fine when I get going, but definitely a bit apprehensive. Bow area complete (the gap behind the aft grating will be covered by a shot garland, I miscalculated the deck planking at the time)... Flintlocks are now attached to the two cannons... Added some detail to the chimney... Wrapped the anchor cables around the bits, thought it makes it a bit more interesting (starboard being 'with the sun' and larboard 'against the sun' - love to know how those descriptions came into being. Although this is how they would have been used while anchored, it makes sense to me that they would also be wound on the bits as a safety measure in case an anchor became loosed during sailing, last thing you want would be anchor heading to the seabed while under full sail. At least that's what I'd do if I were captain...


- 800 replies
-
- 10
-
-
- snake
- caldercraft
- (and 1 more)
-
Don't think anyone is suggesting that crews WANTED them to kick, quite the reverse, it was a simple adverse consequence of the limited technology at the time and the way they were required to be used. Put yourself in the shoes of a typical gun crew in the 18th century - likely illiterate, deafened, blinded by smoke, crews moving between port and starboard guns, shorthanded because of injuries to other gun crew members, being driven to keep up rates of fire etc. It has to be doubtful that the level of sophistication outlined was consistently possible. Ultimately, suspect the question was simply a matter of balancing the risk and cost of accidental casualties vs the risk of casualties imposed by the enemy - kill or be killed. Also pretty sure this equation changed significantly depending on the scenario, one on one ship vs strategic fleet action... ...equivalent tragedies continue to happen even in recent history...with highly educated crews and arguably much more luxury in the way of safety protocols and benefits of modern technology. http://en.wikipedia.org/wiki/USS_Iowa_turret_explosion
-
I suspect its a combination of things, as always. Two additional factors that I would have thought played into this quite significantly would be properties of the burning powder being significantly more violent in an above normal temperature chamber (likely more condensed in time period and hence a more sudden (violent) transfer of energy to the shot - powder being a "low" explosive meaning that it burns, rather than truly exploding like modern "high" explosives). I wonder also how the heat of the barrel would also affect the barrels metallurgic properties, expansion is a given. Would there also be a softening and distortion caused by the non-uniform shape of the barrel, some areas expanding more because they are thicker (assuming safely I think a pretty uniform heat transfer in metal). I would speculate that this phenomenon is also related to the catastrophic failure (exploding) of barrels after years and years of repeated heat stress (?)
-
Nice to see some pictures in your log Sjors! Shes quite the beauty. I honestly don't know how you manage two of these ships at the same time!
-
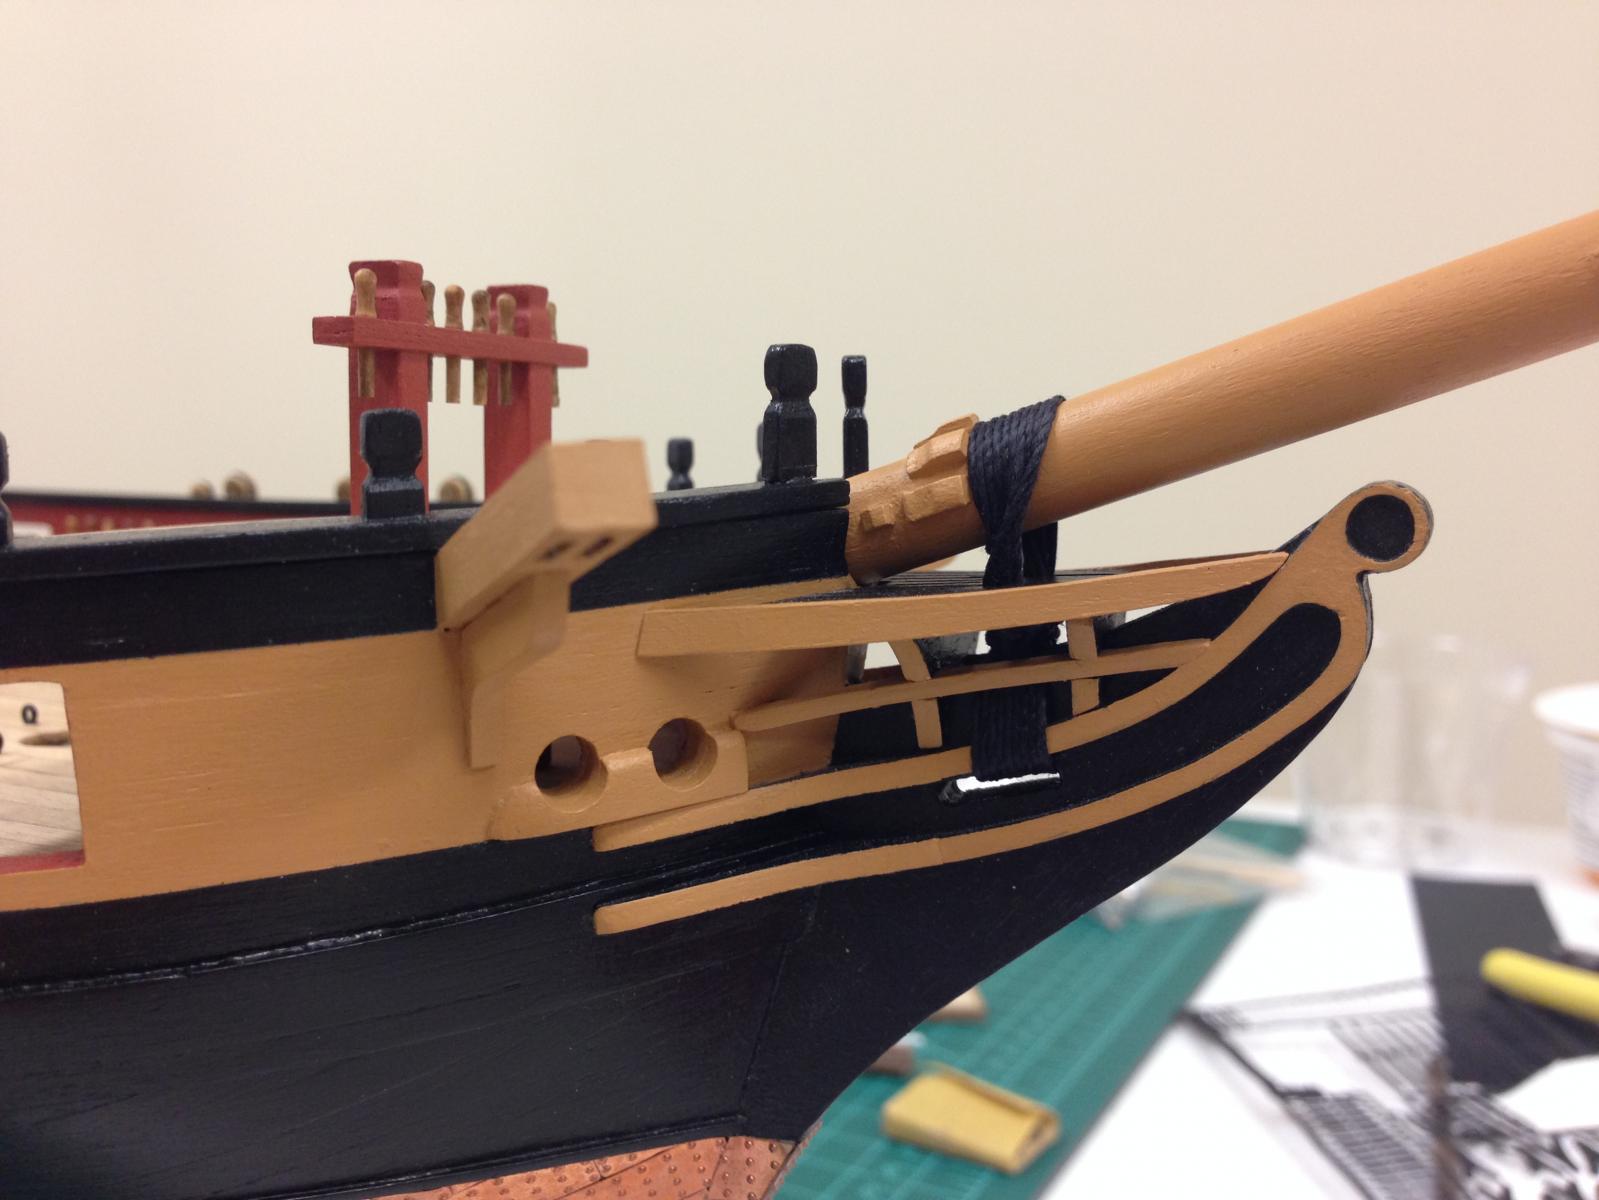
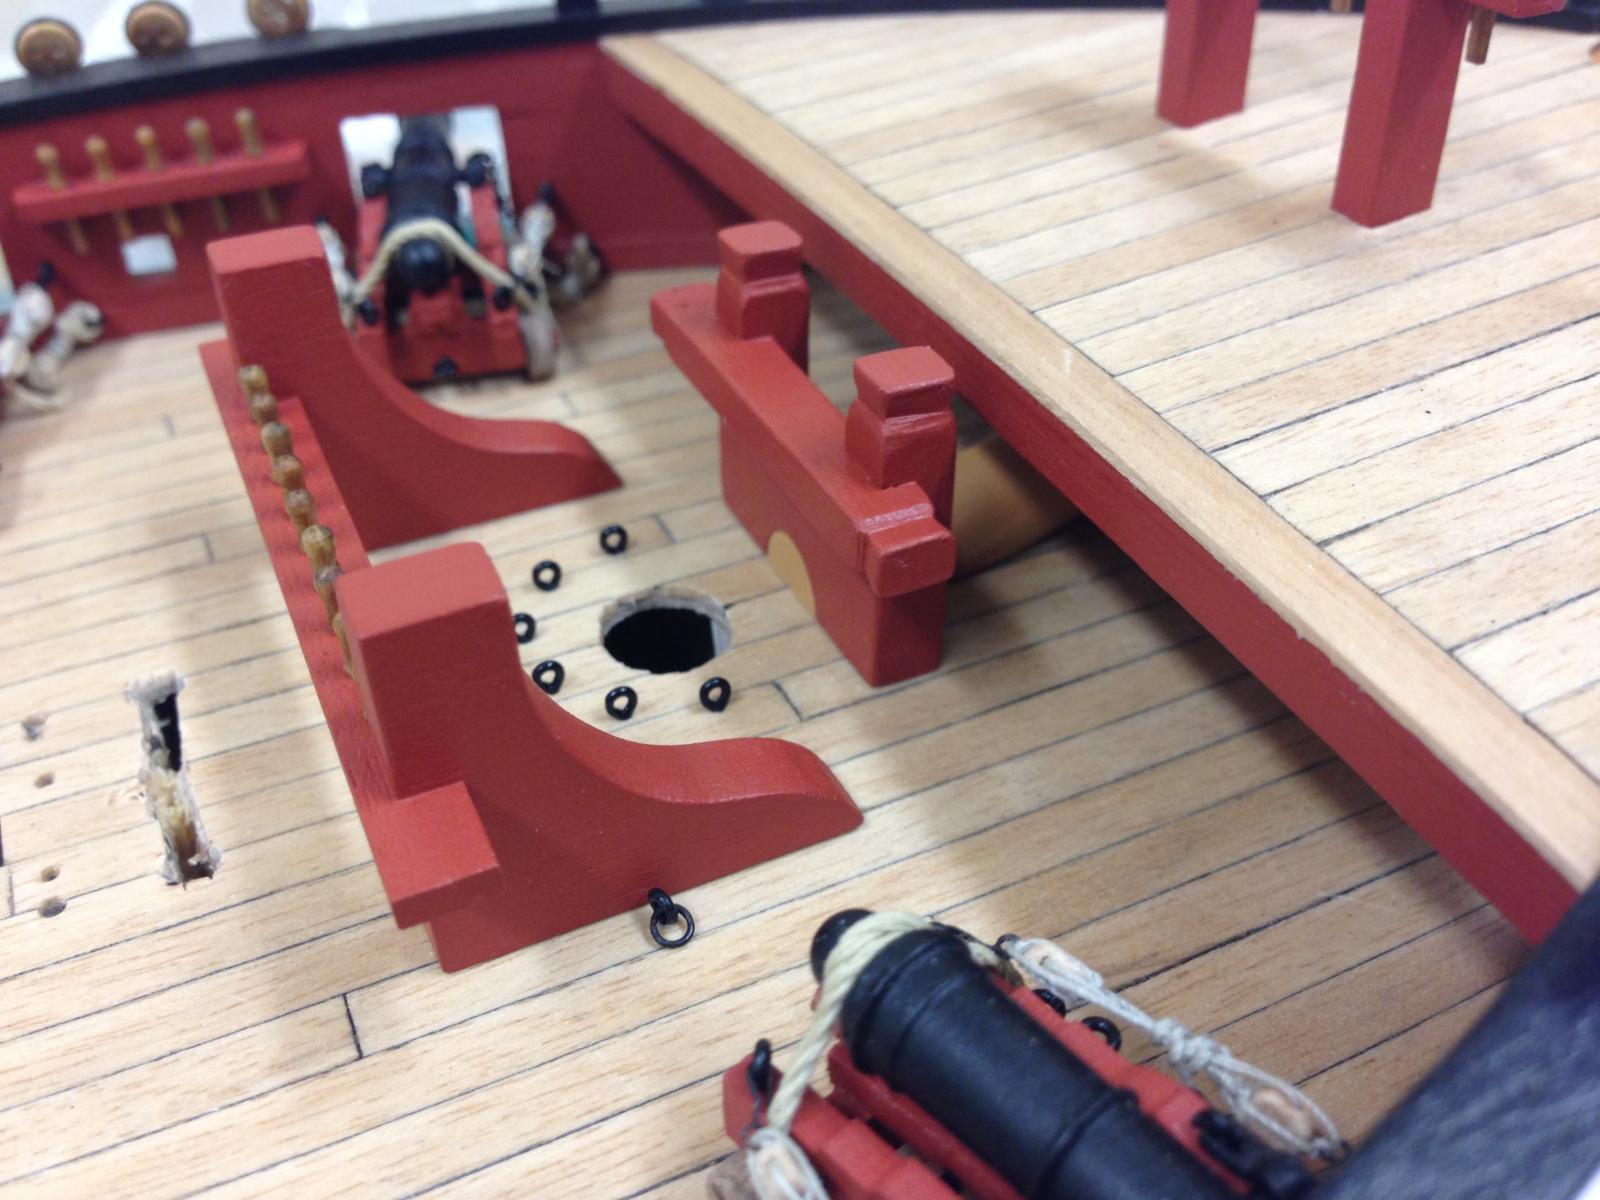
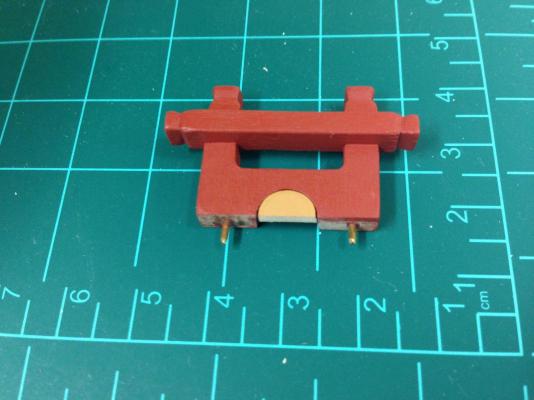
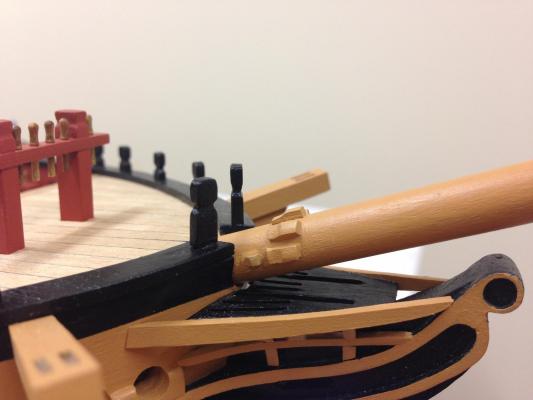
Glued bowsprit in and completed the gammoning.. Used the supplied .75mm line, however I'd estimate its closer to the 0.6mm as estimated per B.E.s recommendation. I like the way it turned out. Found an online reference to show how the gammoning would have been done in practice and just followed that. http://modelshipmaster.com/about/tech23--bowspritgammoning.htm Bowsprit pinned for extra security, to ensure it was fully square at the cap a little adjustment was needed at the deck, either the dowel is slightly warped, or the hole in the hull is not in right place. The forebits are supposed to clamp the bowsprit, but the precut hole I found to be a little large which resulted in a large gap. To tidy this up a bit more, I used a slice of dowel to simulate the end of the bowsprit... ...and installed. It's a cheap 'trompe l'oeil', but it works. You can also see the ringbolts installed for the two cannons, I'm guessing they should be there but as can be seen, there is very limited room here to manage a gun. Still need to figure out how the fore ladders can be installed in a way that feels right.


- 800 replies
-
- 10
-
-
- snake
- caldercraft
- (and 1 more)
-
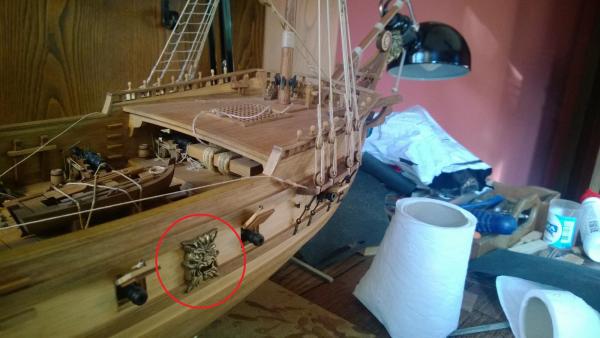
Its very impressive, looks like is some sort of decoration for the sheave. Never seen anything like that before. As for placement your choice was a good one! Thanks for sharing.
-
@ Jim - I'm sure you're right, however, I'm paranoid with some of the 'hobbitses' that tend to touch things they know they shouldn't, I've already had to make a fix on one of the channels, the circumstances behind which it seems will never be known.... @B.E. - thanks as always, very helpful. I've measured the supplied "0.75mm" line and it seems closer in size (though larger) to 0.5mm than .75mm, I don't have any means to get a more precise estimate, but could be why that looks better. The supplied 0.5mm looks to be smaller than .5mm by a tad. Can't be too critical I suppose given the mass produced nature of these items and cost of the kit. Next build I will definitely use Morope or similar from Chuck right from the start and plan the budget accordingly (not cheap but seems well worth it).
-
Lovely Hamilton, You've done a wonderful job the crows feet, well done, I'll add these to the list for a future build. I was contemplating putting them on my Snake as I really like the look, but they are not perhaps appropriate for the period and suspect I'll have plenty of other rigging 'learning opportunities'. Think I know how you feel, taking it one step at a time I'm sure you'll get through it - personally, I've found that putting extra effort into the seemingly endless tasks makes me enjoy them more even if it slows things down, the worst result for me is looking at something that I rushed or did half heartedly. Keep up the fantastic work!
-
@ Ferit, Alistair, Hamilton, Mort - as always, appreciate you looking over my shoulder and supporting @ Dafi - thanks for taking time to stop by, this is a very humble build compared to your wonderful Victory! @ Stergios - yes - the dust blower is the type used for computer keyboards, it works pretty well. The only material that you see is just solidified carbon dioxide which forms during the rapid pressure release/gas expansion when sprayed from the can. If you do see any, you're probably blowing too close with the nozzle, but even if you do, its harmless and evaporates (or more accurately sublimates) almost instantaneously. @ B.E. - thanks for confirming...next step, attach the bowsprit and complete the gammoning. Quick question - the instructions indicate to use 0.5mm thread for gammoning but not sure it looks right (too thin) and am tempted to go with 0.75mm. I couldn't find what you had used on your Pegasus but it looks spot on.
- 800 replies
-
- 1
-
-
- snake
- caldercraft
- (and 1 more)
-
My fault Ferit, I should have been clearer. This is what I was referring to...
-
Very nice build so far George, she really is huge compared to your Snake! Looking forward to seeing more.
- 83 replies
-
- 1
-
-
- agamemnon
- caldercraft
- (and 1 more)
-
Mike - love the approach, I too had been thinking of leaving of sails but your method could look very nice indeed - better (in my opinion) than having the sails unfurled because it seems to obscure so much of the ship. If you haven't already, could I suggest you add this as a topic in the masting/rigging/sails section so its not lost in your build log - this would be a very valuable resource to others and as you know its so hard to find build logs sometimes! You've definitely inspired me to try this (when I eventually get there!).
- 153 replies
-
- 1
-
-
- badger
- caldercraft
- (and 1 more)
-
Wow - I go away for a long weekend and come back to so many wonderful pictures of progress, very very nice indeed. One question if I may, and apologize if you've already answered this before, but what is the purpose of the large 'cathead' after the second cannon? Never seen anything like that before. Great clean work once again Ferit.
-
Great progress, looking very good. I love the colour of the wood in the second photo. I forgot to comment on your previous post, you are correct that I made the stern capping rail because the curvature wasn't quite right. It was as much for practice as anything, and I could have used the pre-cut piece and it would probably have looked OK. It easy to judge the curve by putting some card overhanging the stern and draw the profile with a pencil, that gives you the template to make your own or compare to the supplied piece and see if its close enough for you.
-
Don't think I expressed myself very well, I intend to 'finish' the bowsprit before fixing, the key thing is that because I would like to pin it to the deck, the forward bits can't be installed until that's done, which then means that other deck fittings probably need to wait as well. I'd like to get the bowsprit installed and then can finish the deck off.
-
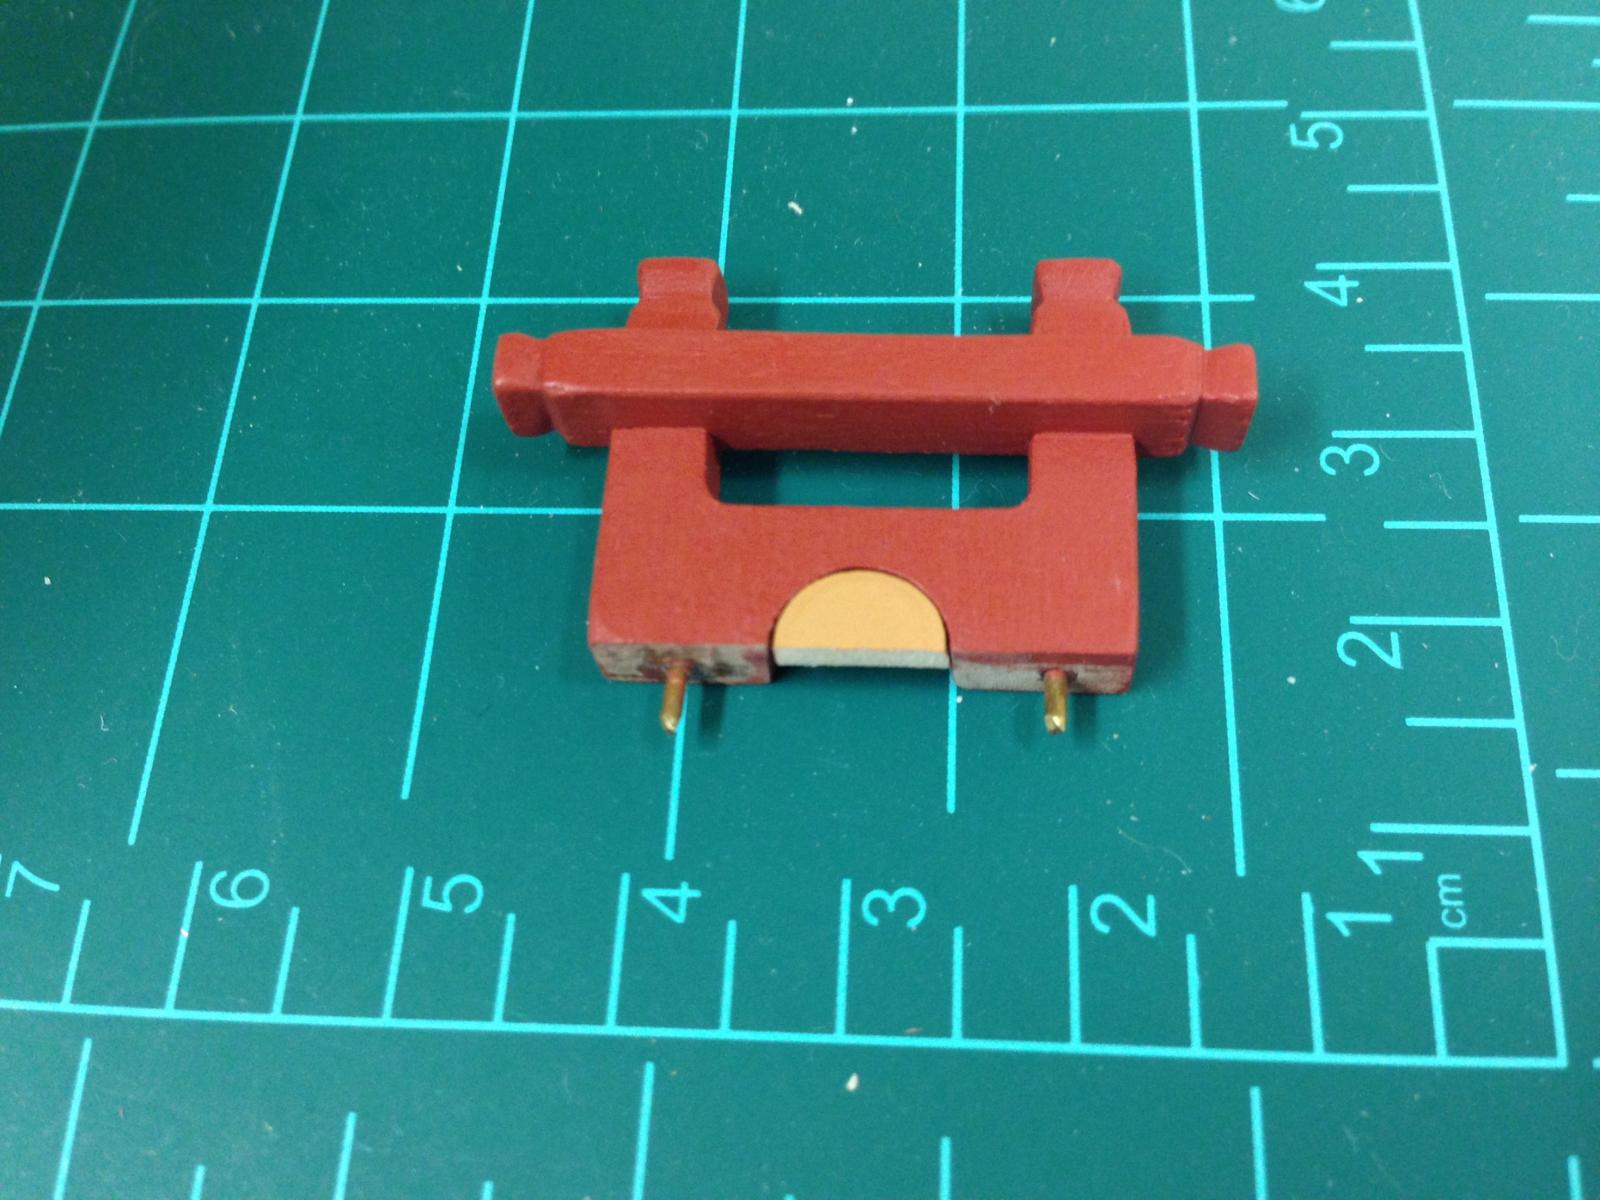
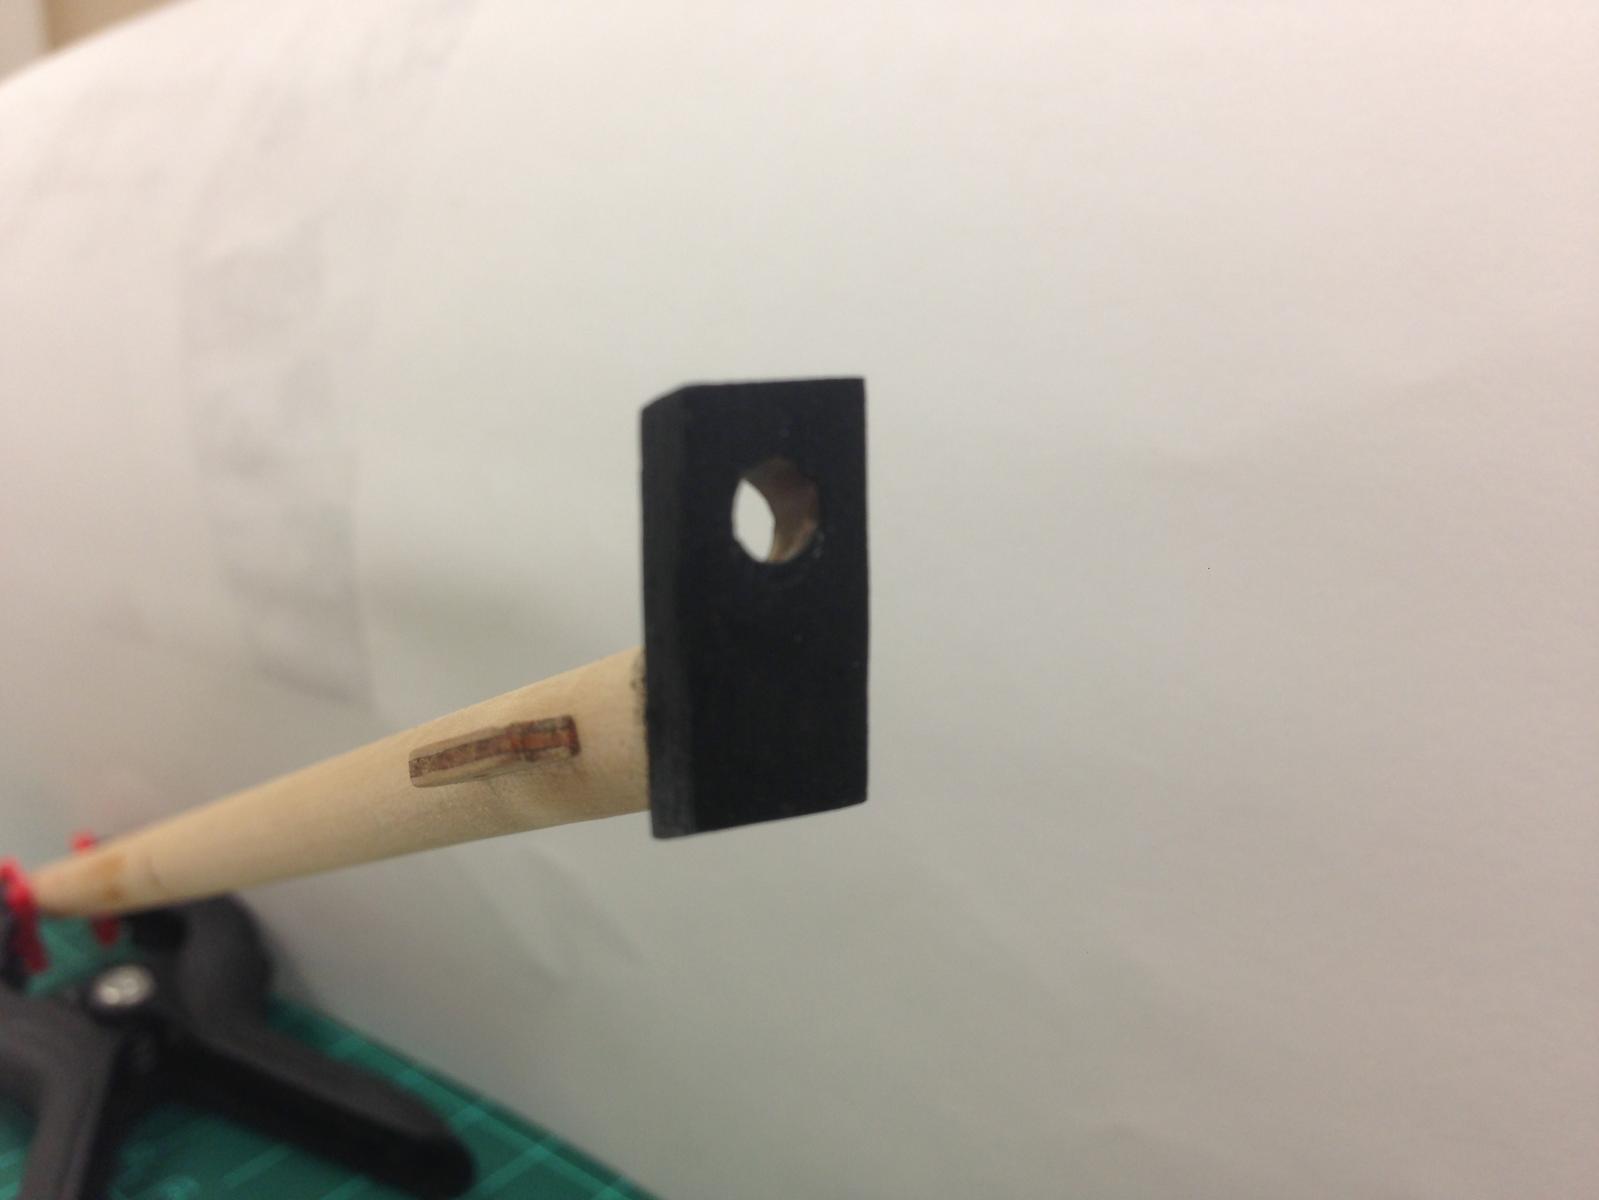
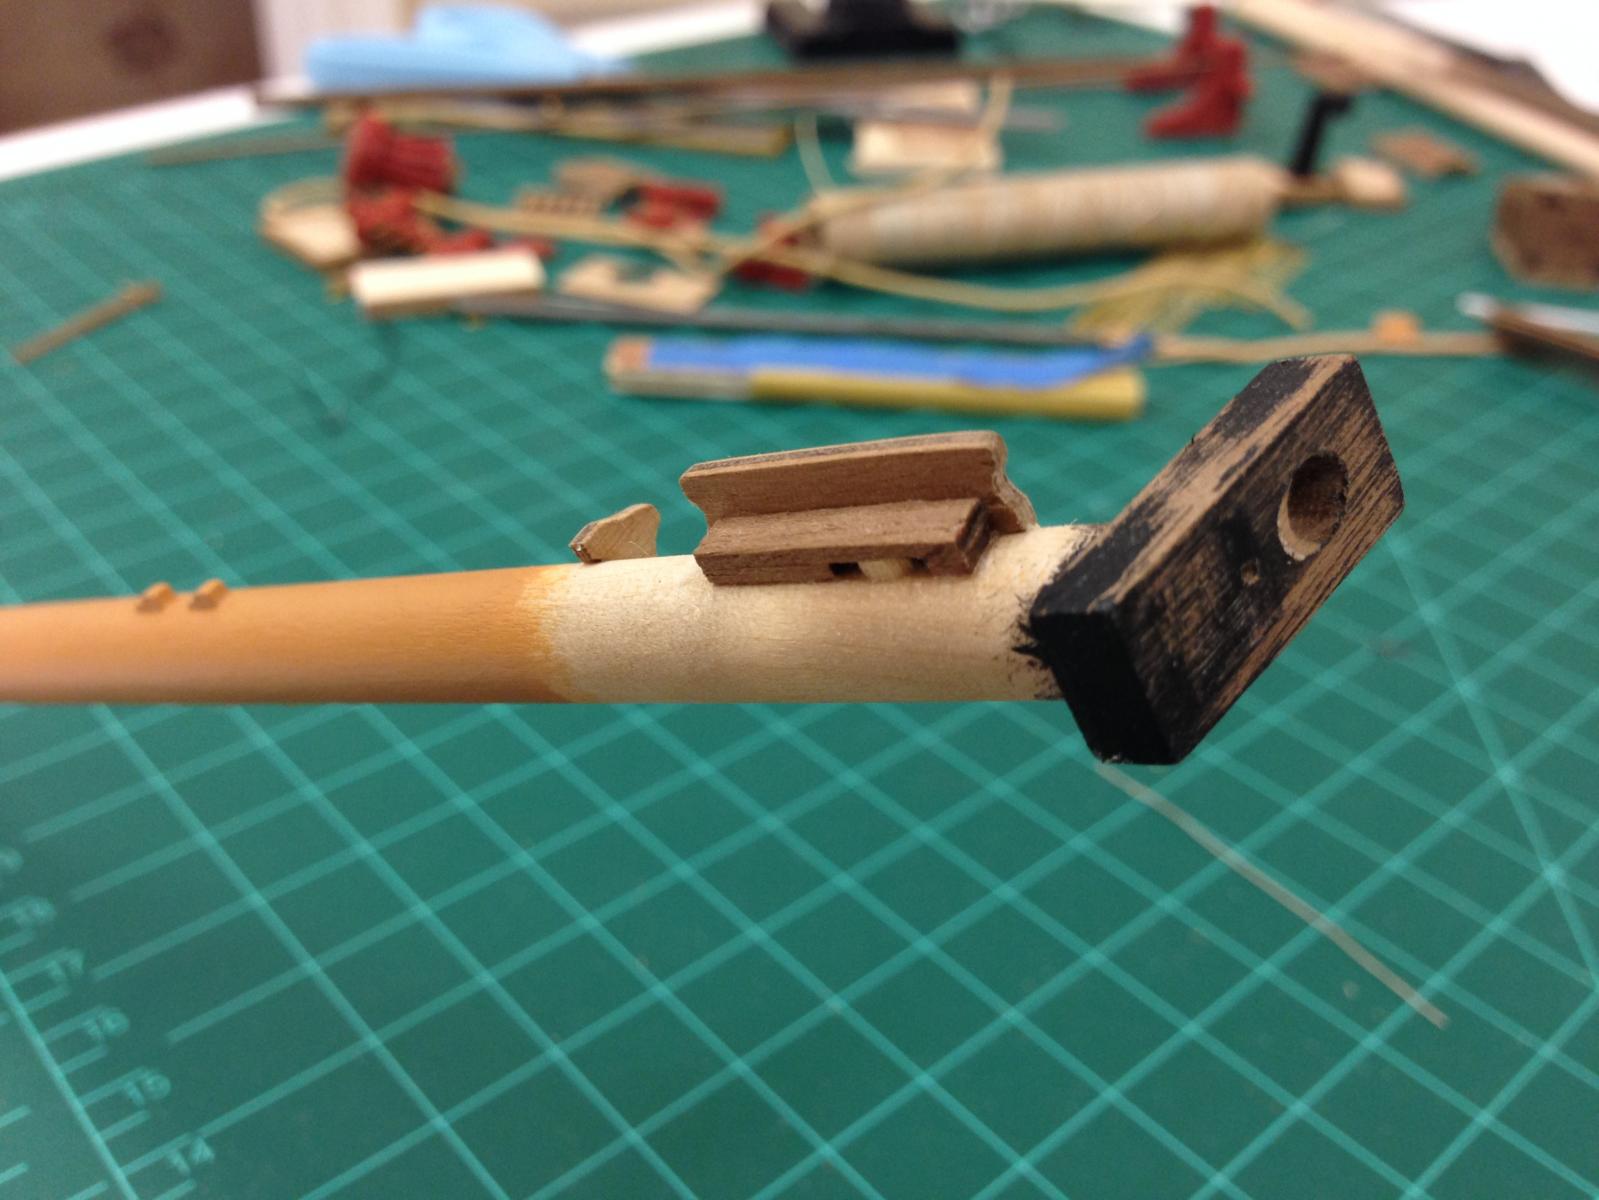
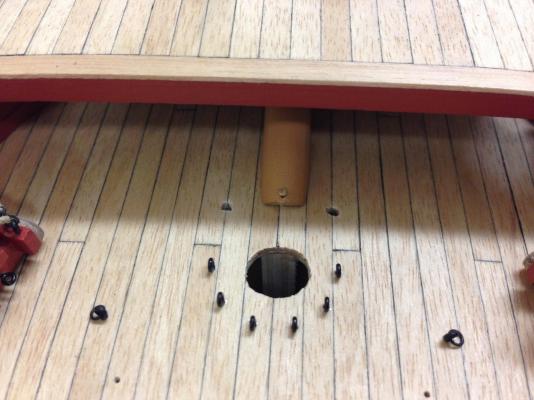
Have been struggling a bit more with the bowsprit. Realized that the kit supplied bee is nothing like it should be, so decided to try and build something a little more realistic and include a sheave by visually estimating from builds of others (esp. BEs - once again a big thankyou for that!). Also added in the various cleats as best interpreted from the plans - sadly, these are once again quite a bit out scale between plans which I'm not sure whether it will lead to to a problem or not, but did my best. Good news, I just found the online copy of Steele's masting references http://hnsa.org/doc/steel/, bad news I found it after I was finished. Good news, the measurements used seemed to be in line with Steele's. For reference (not trying to beat BE at his game here!), but this helped convince me that they (very luckily) were in right ballpark: Bee, per Steele length 18mm, breadth 5.3mm - vs 18mm, 5.5mm on mine Cleats, per Steel length 4mm, thickness 2.4mm - vs 3.5mm and 1.5mm for the collar cleats, and 4.5mm and 2mm for the gammoning cleats Original kit supplied bee... and the scratch replacement...this is giving me pause. Although luckily I estimated the sizes OK, the placement is possibly wrong. I positioned this trying to keep the same placement as the plans, but suspect that this should really be butted up against the cap (?). As is, its consistent with the plans.... Overall end result (needs more touchup, eyebolts and dolphin striker to be added) In position, highlighting another potential problem. There is next to no room to separate the main and preventer stays which need to sit behind the gammoning cleats as indicated in the plans - again these don't reconcile. Will just need to move forward as is I think as gammoning cleats seem to be appropriately positioned. Question: Would I be foolish attaching the bowsprit at this point? I want to secure this to the deck with a pin rather than just glue, and that will require the bowsprit to be attached before the forward bits. As always, any and all comments/suggestions welcome!


- 800 replies
-
- 3
-
-
- snake
- caldercraft
- (and 1 more)
-
Well done Nigel - The Leanders comprised twenty-six vessels and were among the most numerous and long-lived classes of frigate in the Royal Navy's modern history. The class was built in three batches between 1959 and 1973, and went through many upgrades and weapon system updates. The design, or derivatives of it, was used by the Royal New Zealand, Chilean, Royal Australian, Indian and Royal Netherlands Navies Not sure if anyone picked up on the rather heavy handed 'swift' clue - which in Greek is 'argo'. Unfortunately no Leanders were names Euphrates! Over to you Nigel.
-
Nigel - spot on on two of your guesses, but not the ship. Few distinguishing features give it away more externally, the following internal picture a few days later should 'swiftly' allow you to arrive at the actual ship...

-
Once again the setting holds some clues, this is taken when she participated in notable military operation. Although she is part of one of the most numerous and long lived class of these ships, that should allow you to narrow it down 'swiftly'.
-
Not HMS Brilliant
-
That will teach me to make wild guesses Here's an easy one...