HOLIDAY DONATION DRIVE - SUPPORT MSW - DO YOUR PART TO KEEP THIS GREAT FORUM GOING! (Only 20 donations so far - C'mon guys!)
×


Beef Wellington
-
Posts
2,249 -
Joined
-
Last visited
Content Type
Profiles
Forums
Gallery
Events
Everything posted by Beef Wellington
-
Euphrates?
-
 Jim, fantastic build you have going on here, amazing what you've accomplished! The round houses would have been used by the warrant officers and (possibly) other petty officers. Not sure I can answer the cathead question, but I'd probably determine how the deck fits first to confirm the cathead placement, probably a lot easier than trying to cut it out afterwards.
 -
Note the important wording in the description on the 1803 model - "Model also shows further modifications which were proposed after Trafalgar which were not carried out". Even contemporary models represent many different things, probably in a world before CAD design it was the most effective way to convey ideas for real world discussion rather than attempting to be a definitive reference manual for how the ships looked at a particular time. All this is speculation without definitive proof...which is why its so fun because no-one is wrong :-)
-
That coppering looks great RMC, I think the Amati copper plates are the best on the market in terms of authentic look and flat profile which allows the stealers to overlap (a look I like better as well). Looks to be an interesting option to be able to install them in strips, is that an approach you'd recommend again vs single tiles? I can imagine it would save a quite a bit of time and help with the alignment.
-
Jim - yes! Think I made the process a little harder than it needed to be, but pretty sure I would have spent a lot of time as well if I had to make a bunch of cheeses Ferit - trying to follow humbly in your footsteps... Sjors - I don't comment in your log(s) as there seem to be so many others who do , but I'm watching your progress closely as well, thanks for the kind words. As for next model, I'm going to leave the final decision until the very end of this one....I would love to try something a bit bigger (dare I say the Agamemnon), but also have the Diana or Pegasus on the list. I'm hoping the Caldercraft Surprise is available by then as well, but that could be a vain hope! Their 'new' 74 would also be on the cards, but I think there is no hope of seeing that anytime soon. Also like some of the newer Chris Watton kits that will hopefully be released in near future...so many options when you write them out, this is why I'm waiting to see what is available at the time, and also see where my 'skill level' is and how much I want to bite off.
-
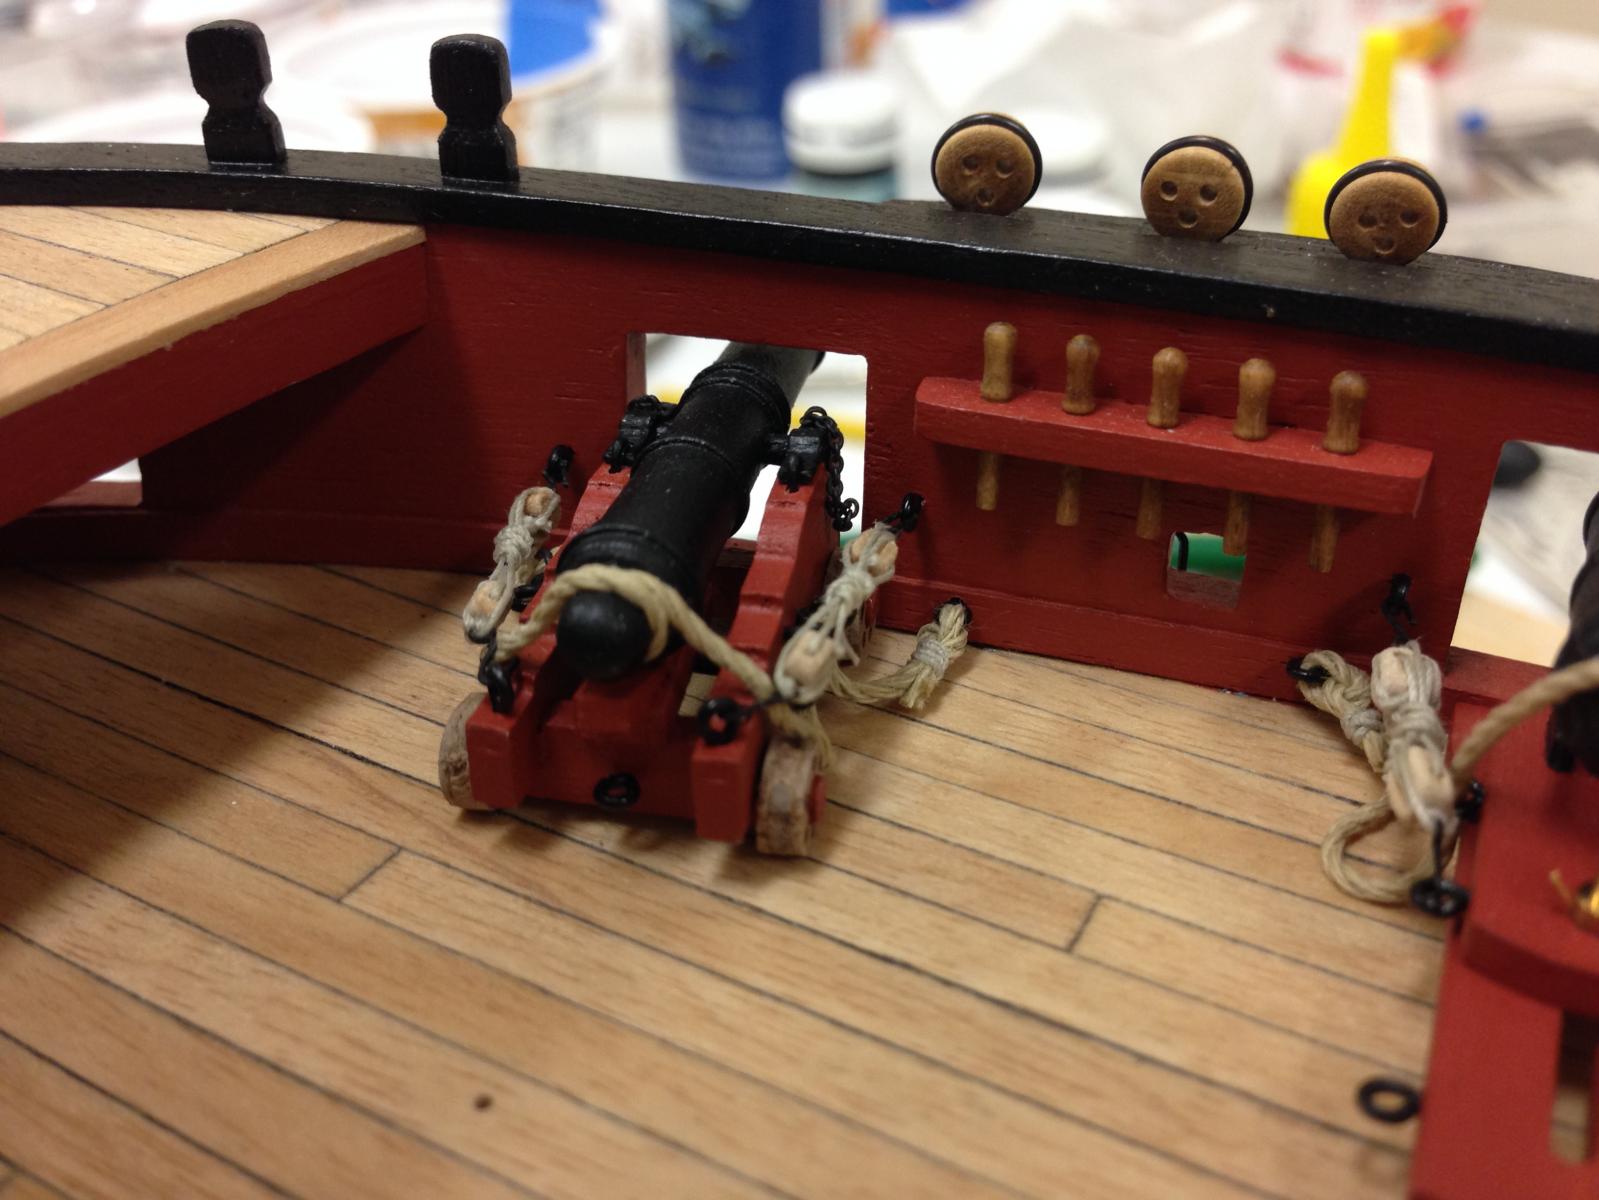
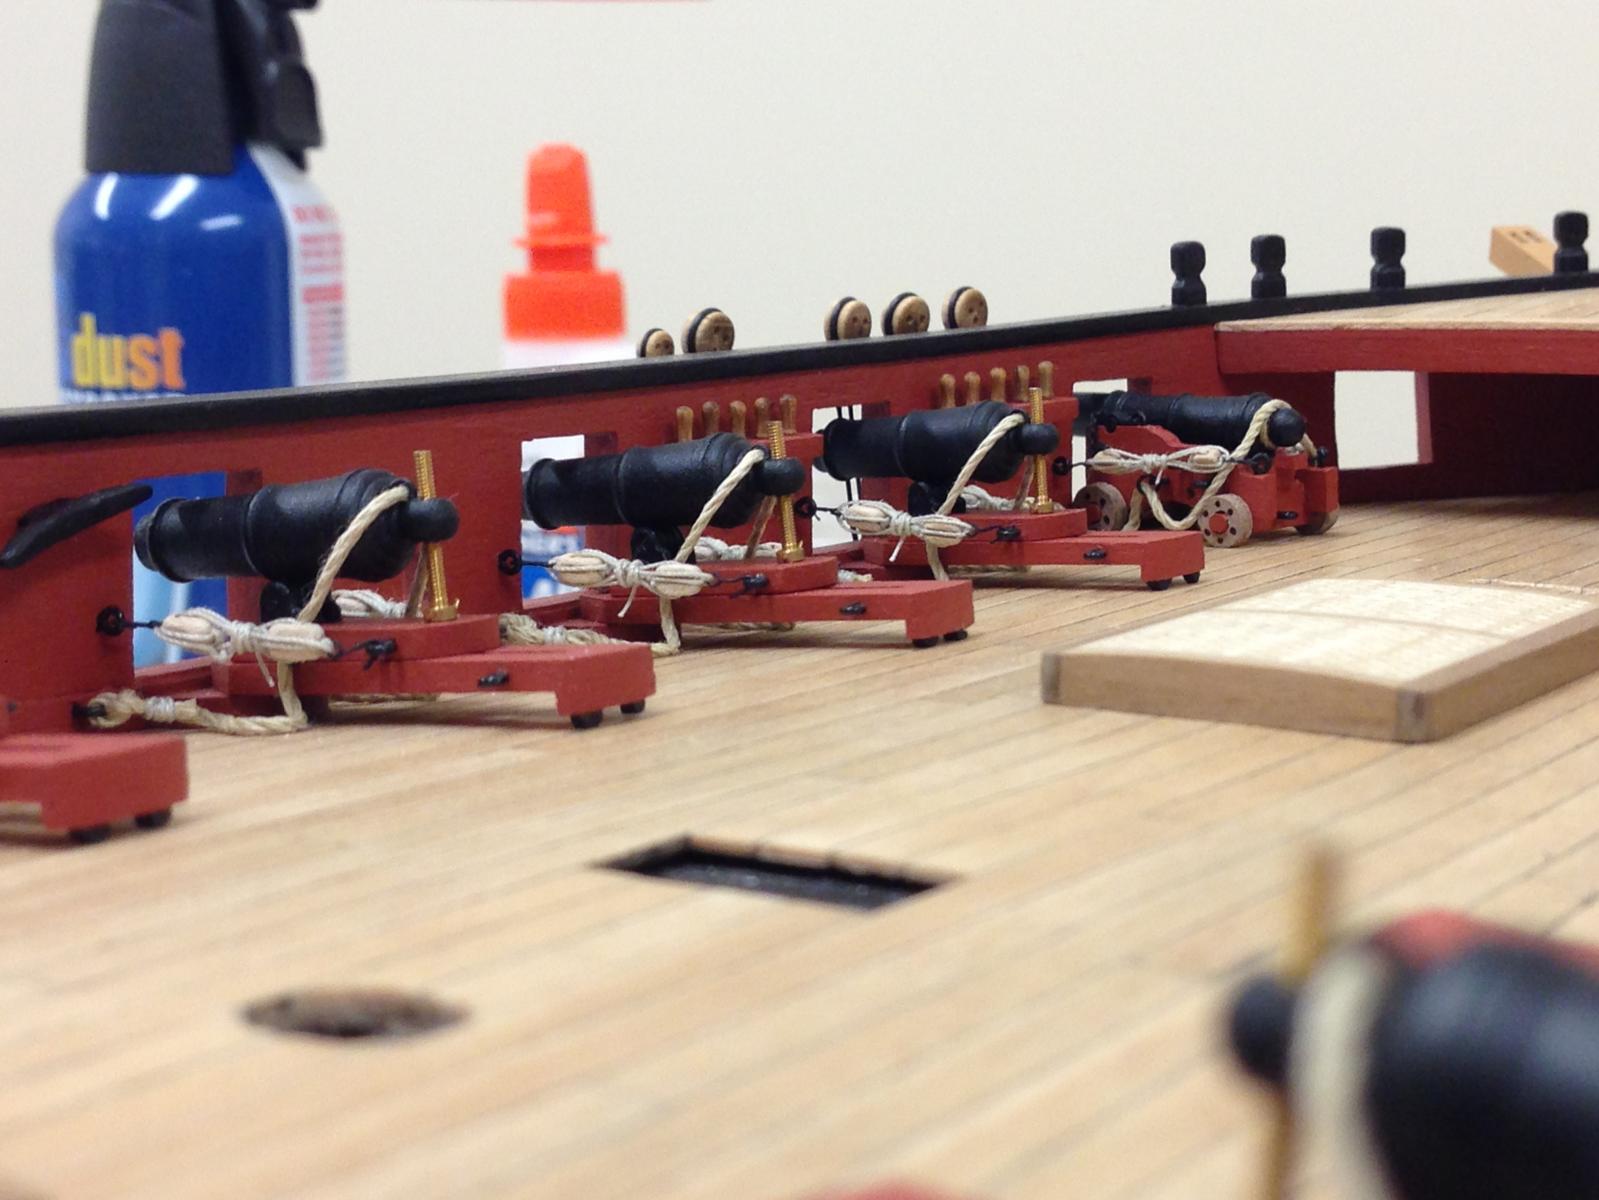
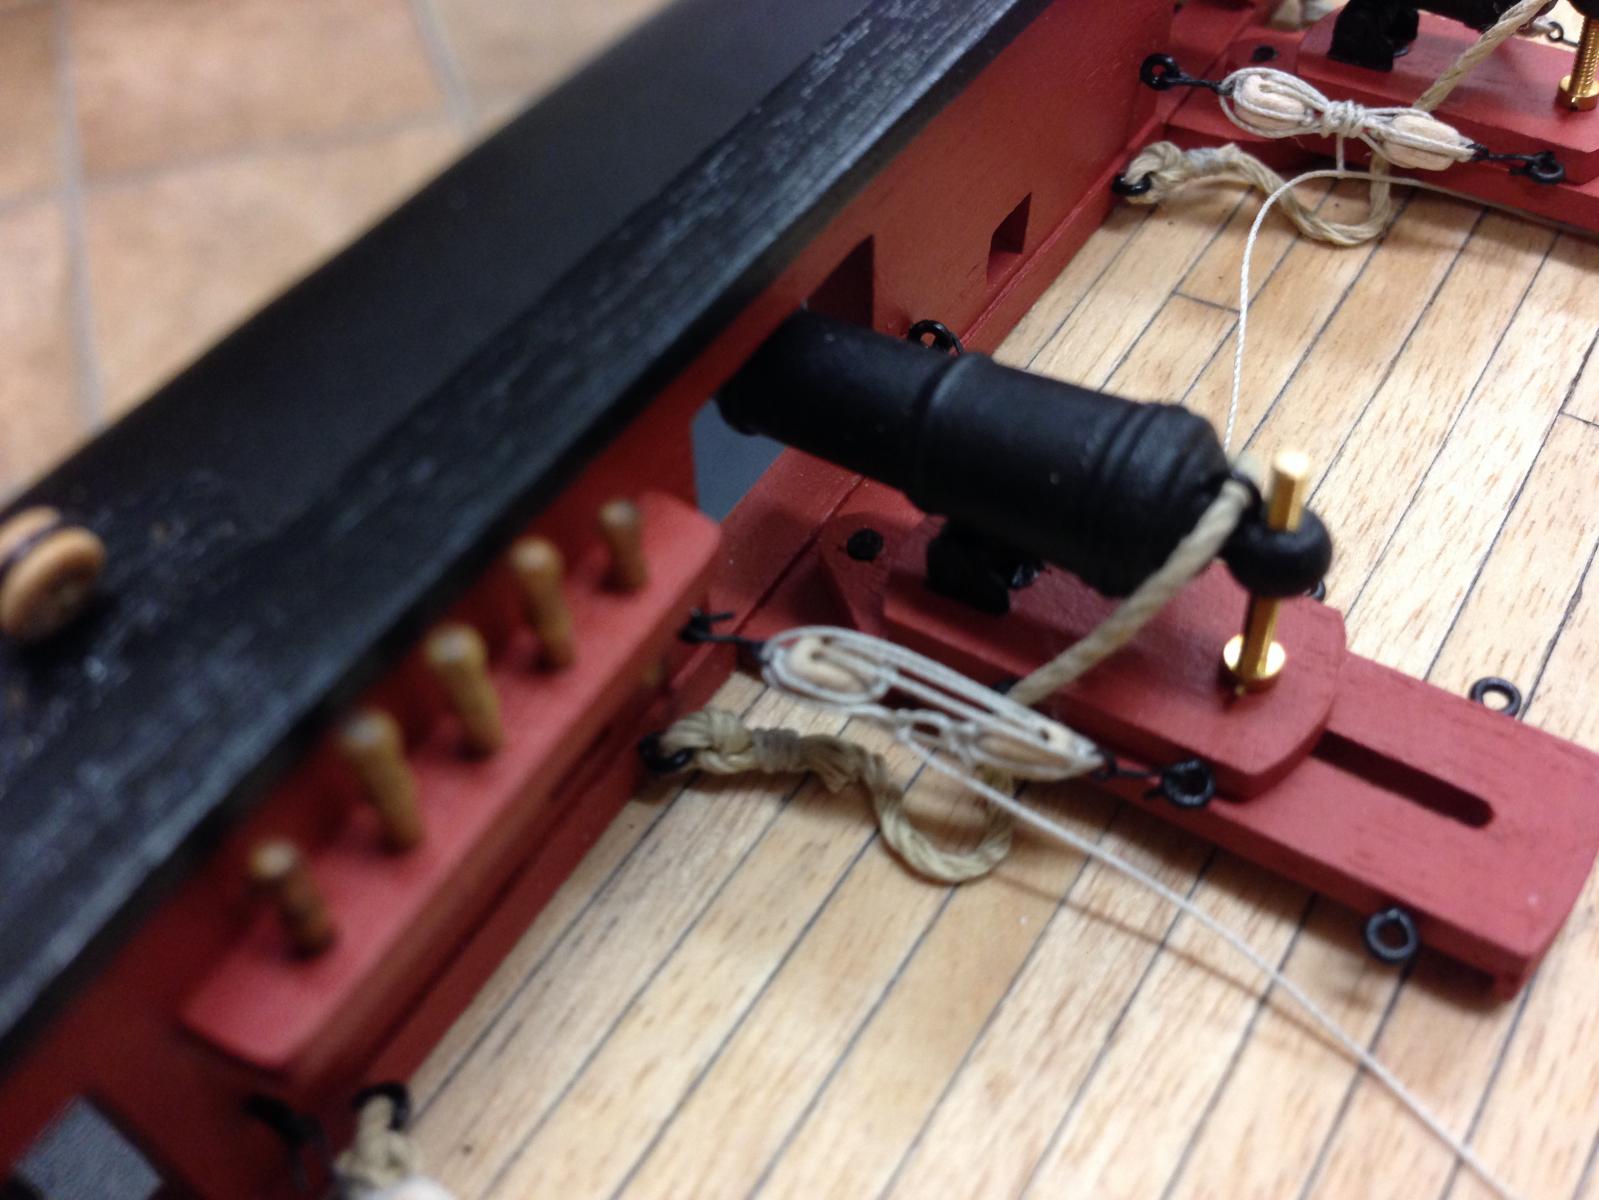
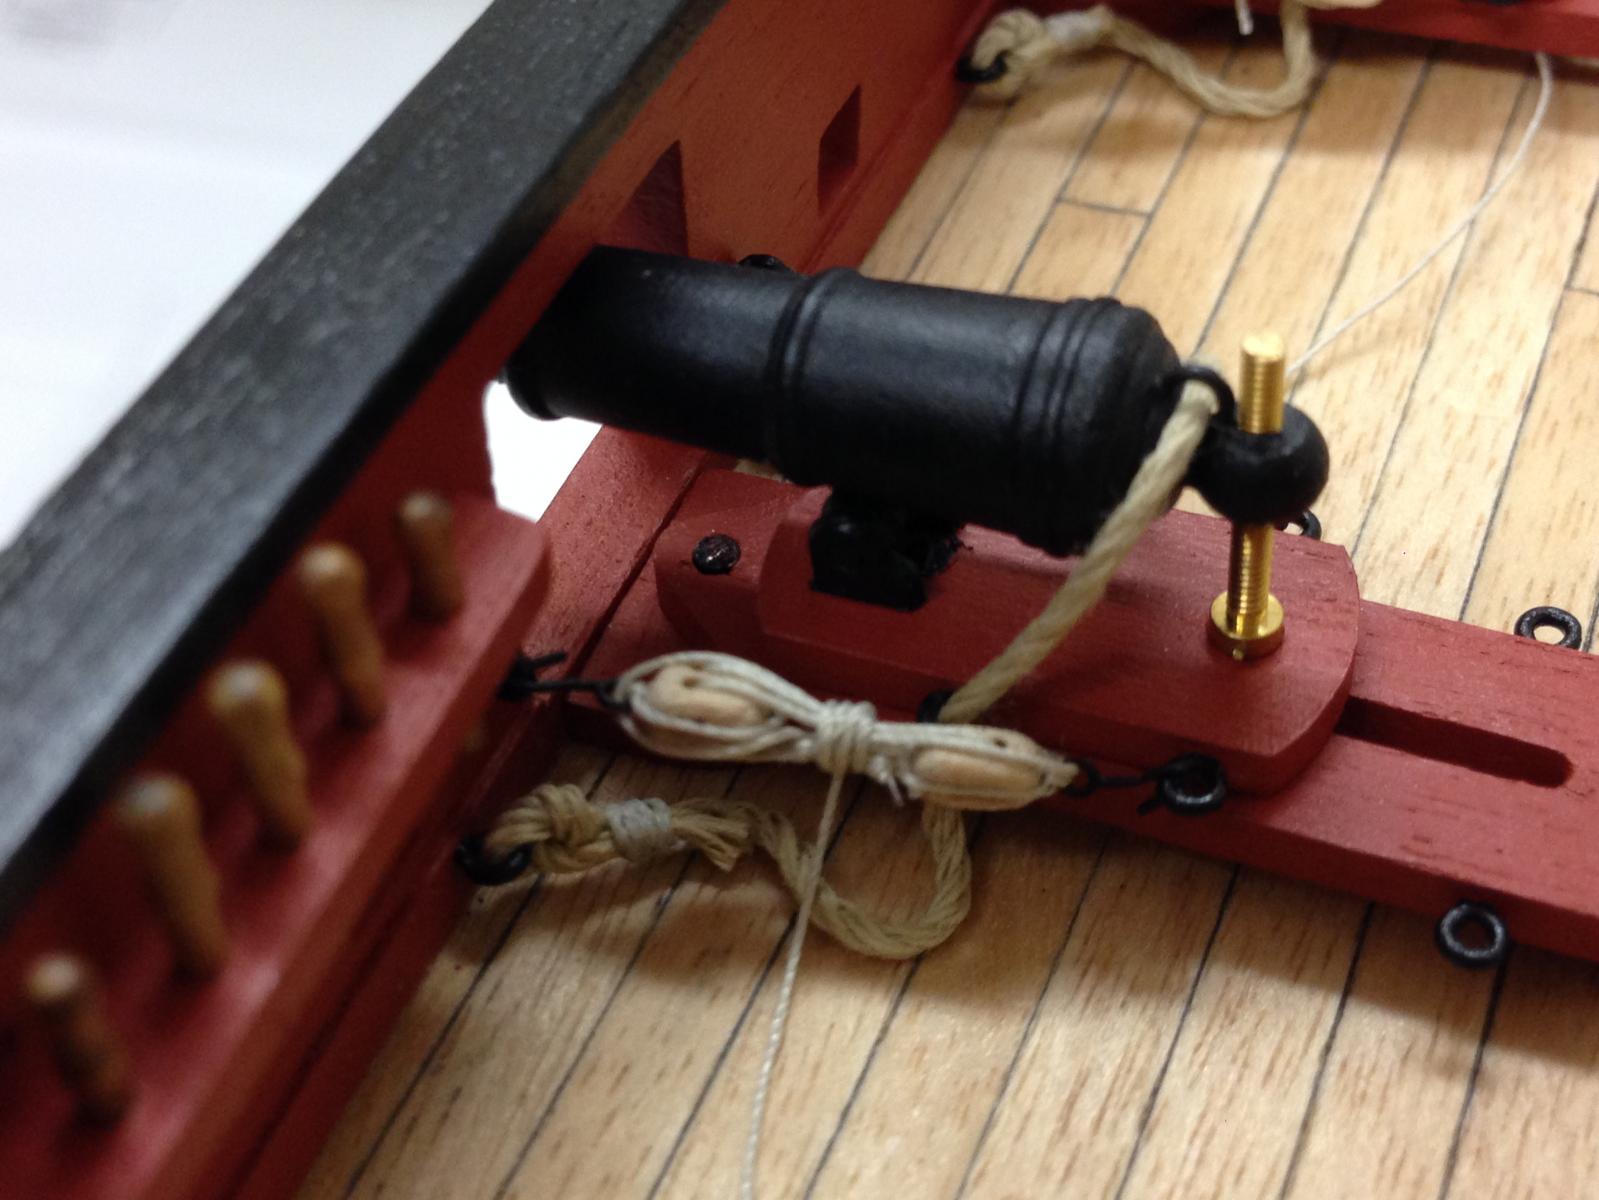
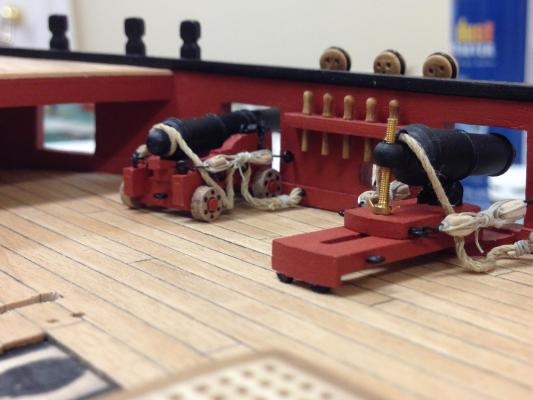
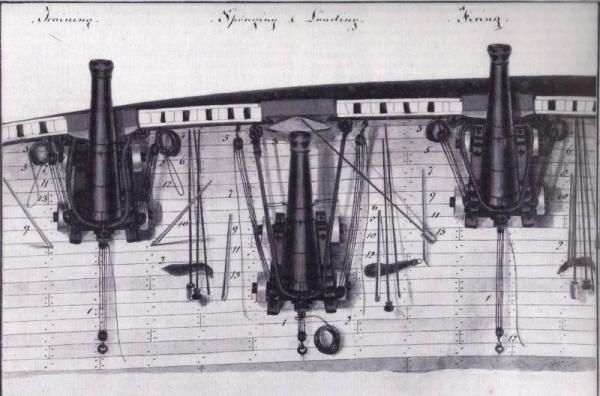
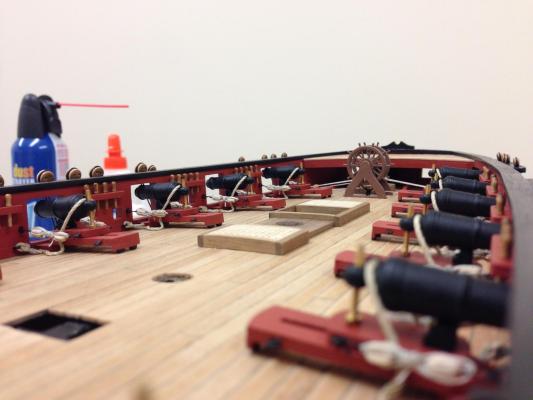
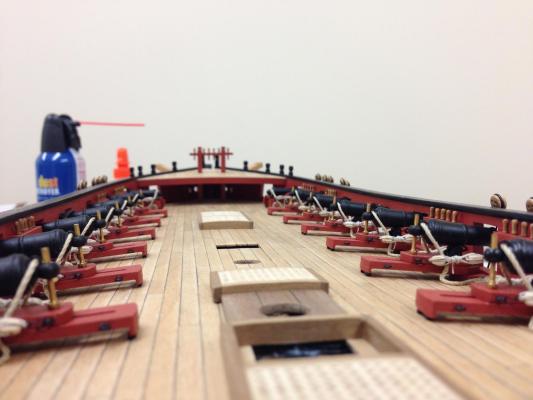
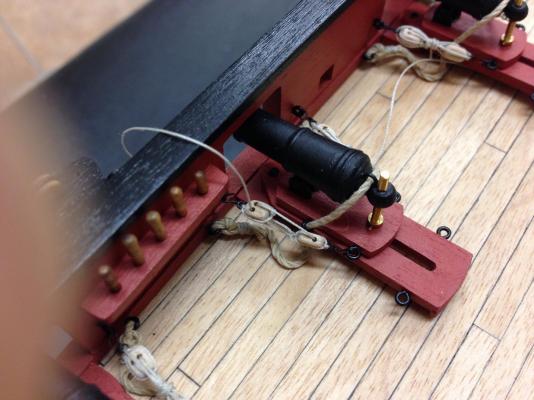
Finally completed the carronade/cannon rigging. Next time, I would definitely like to work with some better line, both for visual result and ease of use. On the cannons, I decided to stick with mounting the tackles to the aft most eye after trying a number of options. One thing that swayed me was looking at a picture of some cannon mounting which actually shows this method, there are examples in a few paintings as well, so I suspect it was done. This also allowed me to keep the hooks consistent across all armaments which I personally like. Overall pretty happy, so a few pics to celebrate before moving on.

- 800 replies
-
- 9
-

-
- snake
- caldercraft
- (and 1 more)
-
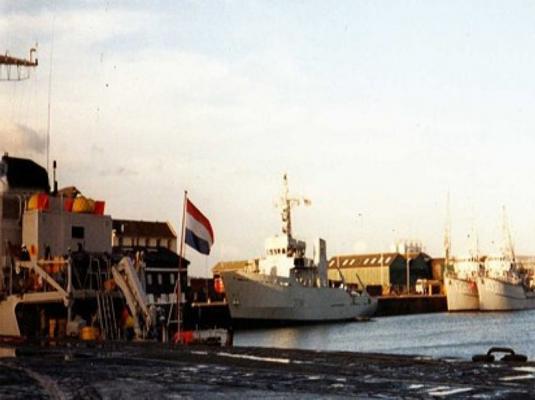
You got it,well done. Bad photo but I was glad you were able to see the other clues She was a RIver class minesweeper (one of twelve) and was attached to HMS Claverhouse, the now defunct RNR shore unit. She is now the Brazilian Taurus, a coastal research vessel. As an aside, I have a many a 'fond' memory of her going up and down the North Minch in her in some truly horrible weather... Over to you David.
-
I do - and for that the final clue, the ship is in her home port (at the time) - there is a more elderly ship in front of her that should give it all away
-
Jan - lots of Dutch ships in the photo, but location is not in the Netherlands...the presence of the Alkmaar klasse should give you a clue to the role of the ship in question.
-
Thanks Dave...I had a 'duh' moment as soon as I found her sister ships with the "river" highway theme and your previous selections. Ok, this is probably too easy...but maybe not. Sorry for the quality of the picture, there aren't that many out there, but looking for the name of the ship in the center. There's a big clue (and a red herring) in the picture...
-
Euphrates Highway?
-
Columbia Highway?
-
Just found your log Panagiotis, love the subject and very impressive execution, looks very nice indeed. Looking forward to more progress.
-
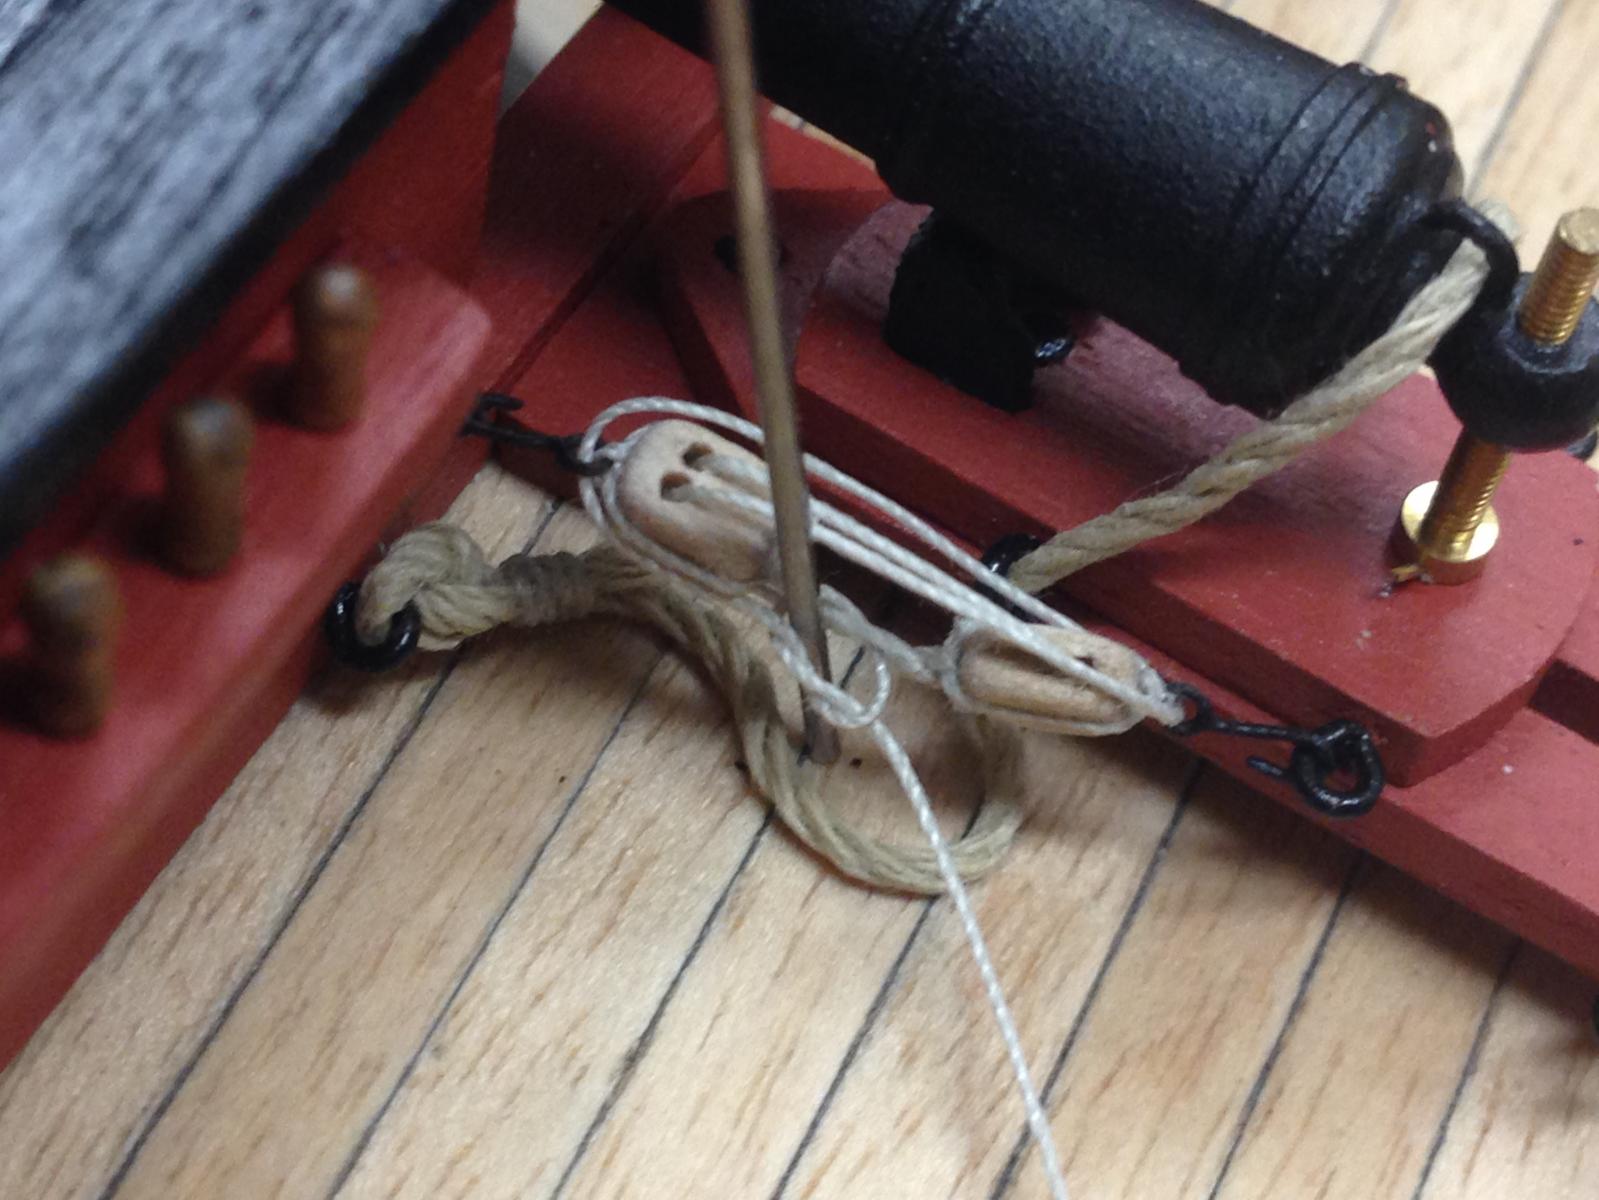
John, Hamilton, Ferit - appreciate the (overly) kind words! Stergios - here is a photo trying to show what I was trying to describe with the wire. Once the knot is tied around the 'central' line (although its all one line obviously), the wire helps one to position the knot where its needed by pulling the knot close around the wire, and then just pulling tight after removing wire. Much harder to describe than do, hope this makes at least some sense...
- 800 replies
-
- 5
-
-
- snake
- caldercraft
- (and 1 more)
-
Very nice indeed Andy, for one, I'd certainly welcome a tutorial on the rigging method - especially the serving on the more complex bits.
-
That looks typical Stergios, I wouldn't worry about it. Once you get the channels in place it will not be noticeable. I feel your pain on the capping rails, they are a tricky step to get right.
- 1,144 replies
-
- 1
-
-
- snake
- caldercraft
- (and 1 more)
-
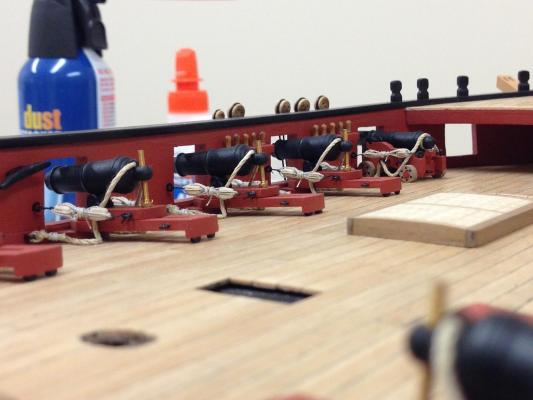
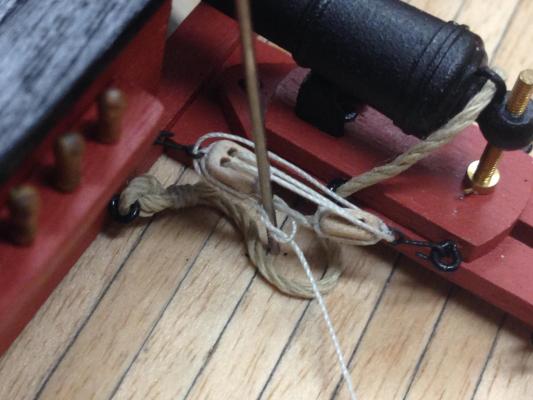
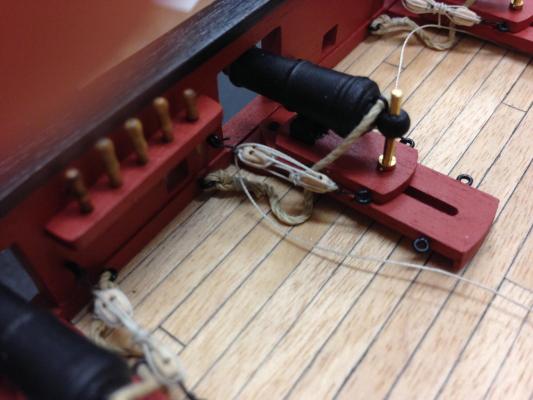
Promised no more updates until I was done with carronade rigging, still not done so this is a 'notation to self for the future' rather than an 'update'. One lesson I'm learning is that I'm going through a lot of rigging line, and each spool seems different to the last. The stuff supplied in the box was very nice to work with, new line bought separately, though allegedly the same is much springier and surface seems much rougher and prone to snagging so harder to work with. Not sure why there is a difference, whether I was lucky with the kit supplied stuff, or unlucky with the replacement line. These are far from consistent with the outcome, so I'm moving around the deck randomly to mix earlier and later efforts so I don't have a gradual transition from 'bad' to 'better' along one side. Apologies for the photos not quite being in focus, I didn't notice when I took them... Step 1: Simply rigged using the blocks prepared earlier.... Step 2: Rig as taught as possible and thread through the eyes of the hooks, aft first and then the bulwark hook... Step 3: Thread line around the line near where it is tied to the single block, care needs to be taken not to foul with any of the other lines. Simple overhand knot and piece of wire to help position the knot and keep everything taught seems to work best. Purpose of this is just to secure the line to allow the frapping to be positioned Step 4: Wrap around the tackle 4 times and secure the end through the last loop. Once complete, soak in dilute PVA to ensure everything stays positioned


- 800 replies
-
- 9
-
-
- snake
- caldercraft
- (and 1 more)
-
That's a very nice stand there Jim, really sets her off.
-
Can only speak for my experience, but I'd stick with woodfiller, I use the fast drying stuff which is very easy to use. Glue isn't really made to fill gaps in the way you need it to, so you'd probably still have indentations when its dry that need to be taken care of.
- 1,144 replies
-
- 1
-
-
- snake
- caldercraft
- (and 1 more)
-
Have to agree John, I think its really self defeating to keep these treasures hidden, may not be the intent, but is certainly the result in my opinion. I wish these marvelous resources can be made more available through cheap technology these days (imaging being able to access 360deg views of these models online for example), that way people can appreciate these works of art while appropriately protecting them. Its not just Mystic, seems to be a broad challenge and I'll be the first to criticize the NMM here as I think they could (and should) do a lot more in this area.
-
We all seem to be doing some fixes right now - looks like a happy end to this story. Hard to tell from the photos, but I would definitely agree with you that the gunports are something that has to be 'right' as I suspect that they would be very noticeable. Its funny how some 'errors' are not really noticeable, yet much smaller ones stick out like a sore thumb. One thing I'm continuing to learn is to not be afraid of the fix - although I haven't yet attempted anything as ambitious as you. Well done.