lambsbk
-
Posts
910 -
Joined
-
Last visited
Content Type
Profiles
Forums
Gallery
Events
Everything posted by lambsbk
-
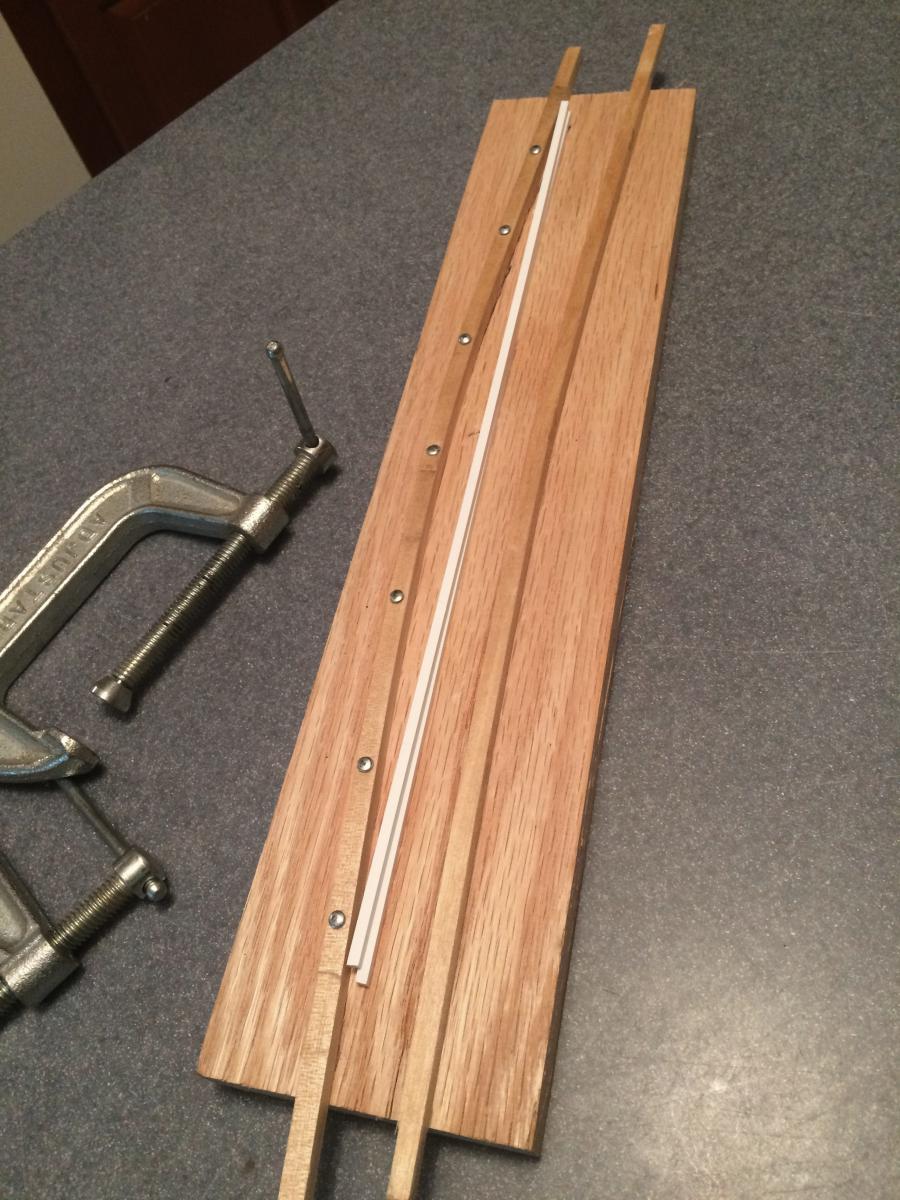
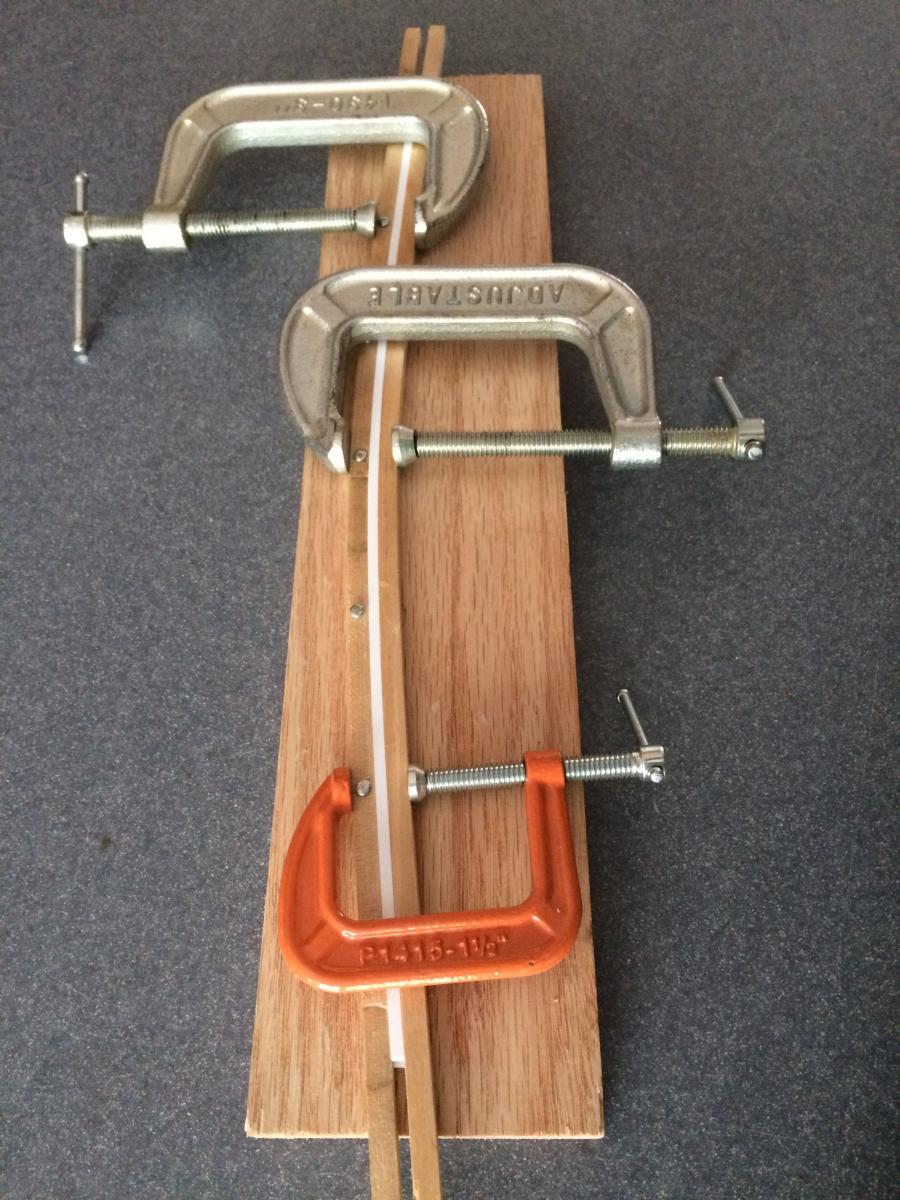
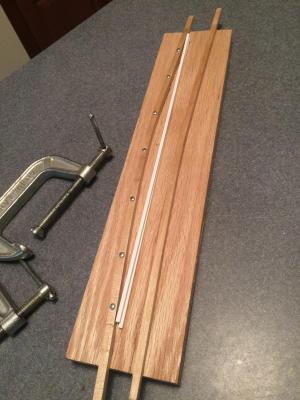
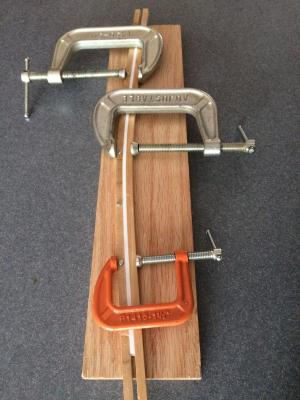
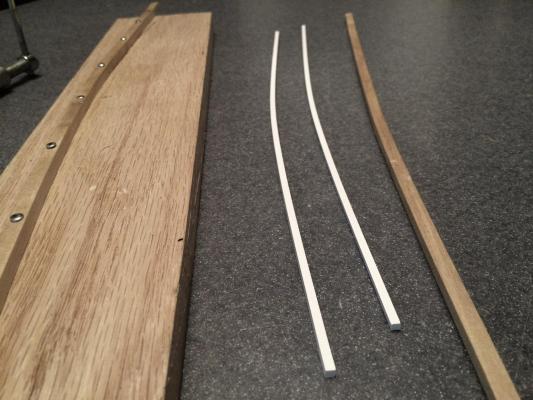
I built a mold to give the beams camber. I used the previous radius of an arc method to work out the curvature and secured it to a piece of oak. The straight 1/8" plastic was then clamped into the mold and heated in an oven (250 degrees) for 20-30 minutes and then allowed to cool in the mold. The center of the beams now have the correct camber. I do not like the way the camber tapers off toward the ends and will cut those pieces away using only the center. The method is reproducible and any number of parts can be made from the mold. Dave
- 601 replies
-
- 8
-

-
- constitution
- revell
- (and 1 more)
-
I am surprised to see how many openings there are that close to the waterline. Any wave action at all and it would be "man the pumps, boys".
-
From what I have been told the deadeye spacing distance is 3 times the diameter of the deadeye. Does that sound right?
-
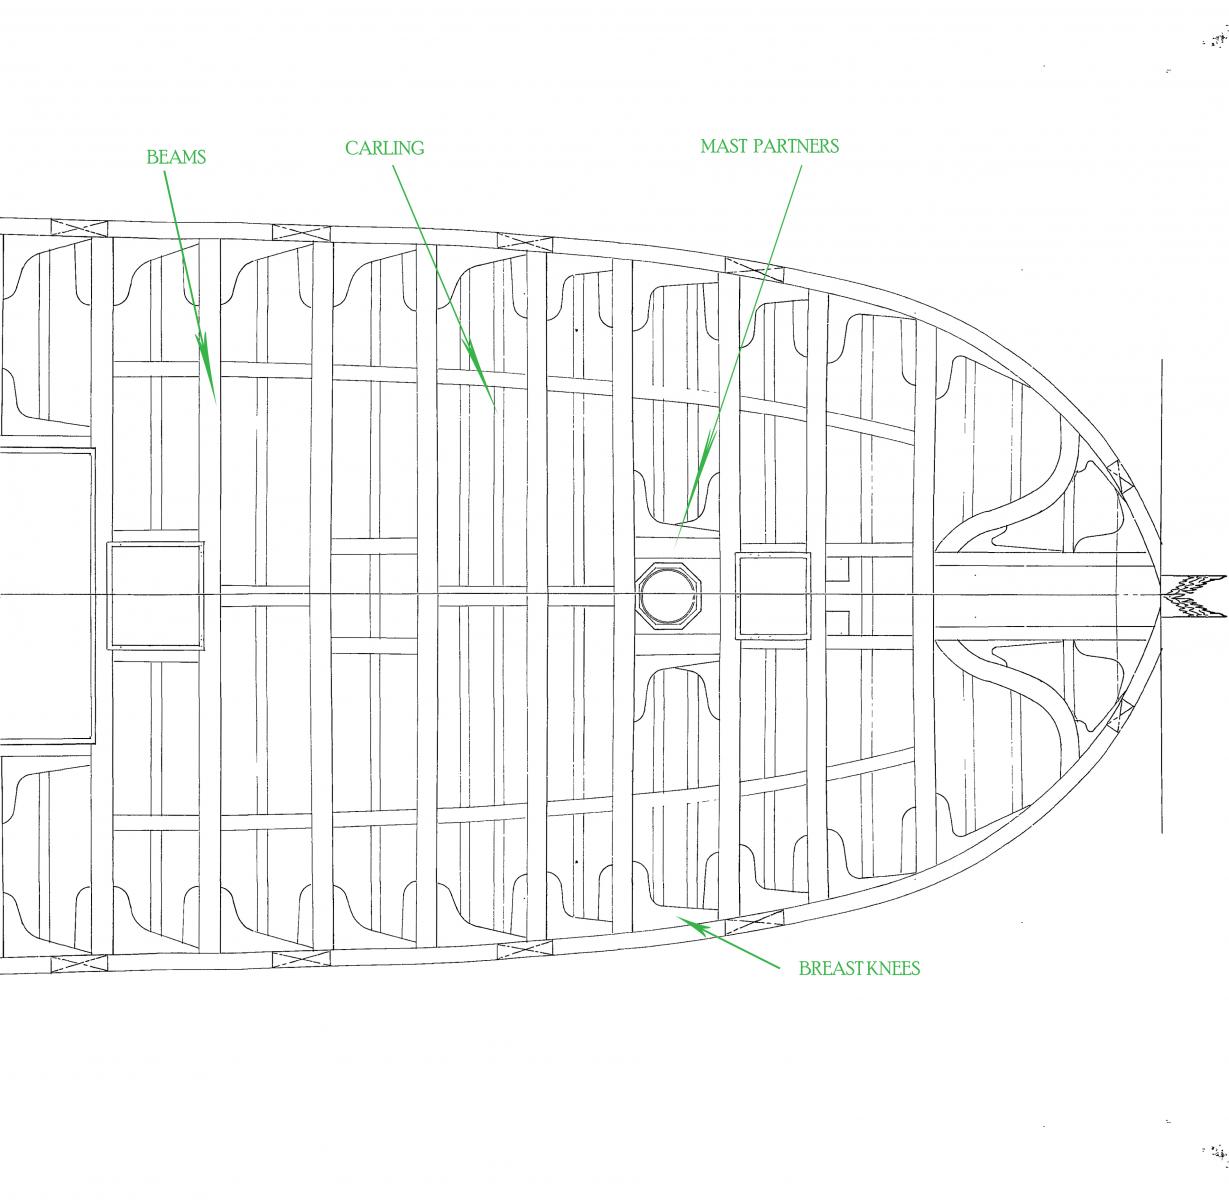
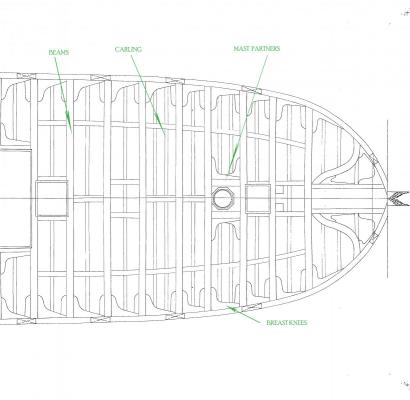
It has taken me a while to come up with a plan for the foredeck. I decided to follow the beam plan from the 1920's refit because it gave the most detail. The breast knees, carling, and mast partners should be straight forward. I still have some questions about the hanging knees and the dagger knees and will probably have to make them as I go so they fit structurally into the Revell kit. I will be making a mold for the beams to give the 1/8" square plastic the proper deck camber and will try to 'bake' the mold at 204 degrees to impart the shape. The gun lids will have to be re-rigged. I really don't like the current config anyway. I will also try to give the cross-cut middle deck planking a 'cut wood' look where they are exposed by this revision. The clear plexiglas probably won't work but the beams and carling may be all that is needed to support the deck furniture once the structure is secured to stanchions on the gun deck.
- 601 replies
-
- 8
-
-
- constitution
- revell
- (and 1 more)
-
Daniel I noticed the beams on the victory above and wonder how you gave them the camber needed? They look like they are plastic beams and I am trying to work out the best way to bend them (from straight stock) on my Connie for the foreward portion of the spar deck. ...hoping you can come to my rescue with advice. Dave
-
Nice detail work Henry. The wire does look like a tricky material to work with on the deadeyes. Thanks for the heads-up.
- 196 replies
-
- 3
-
-
- plastic
- soleil royal
- (and 2 more)
-
When complete, I can trim the excess and putty over the hole. Black paint should do the rest...
-
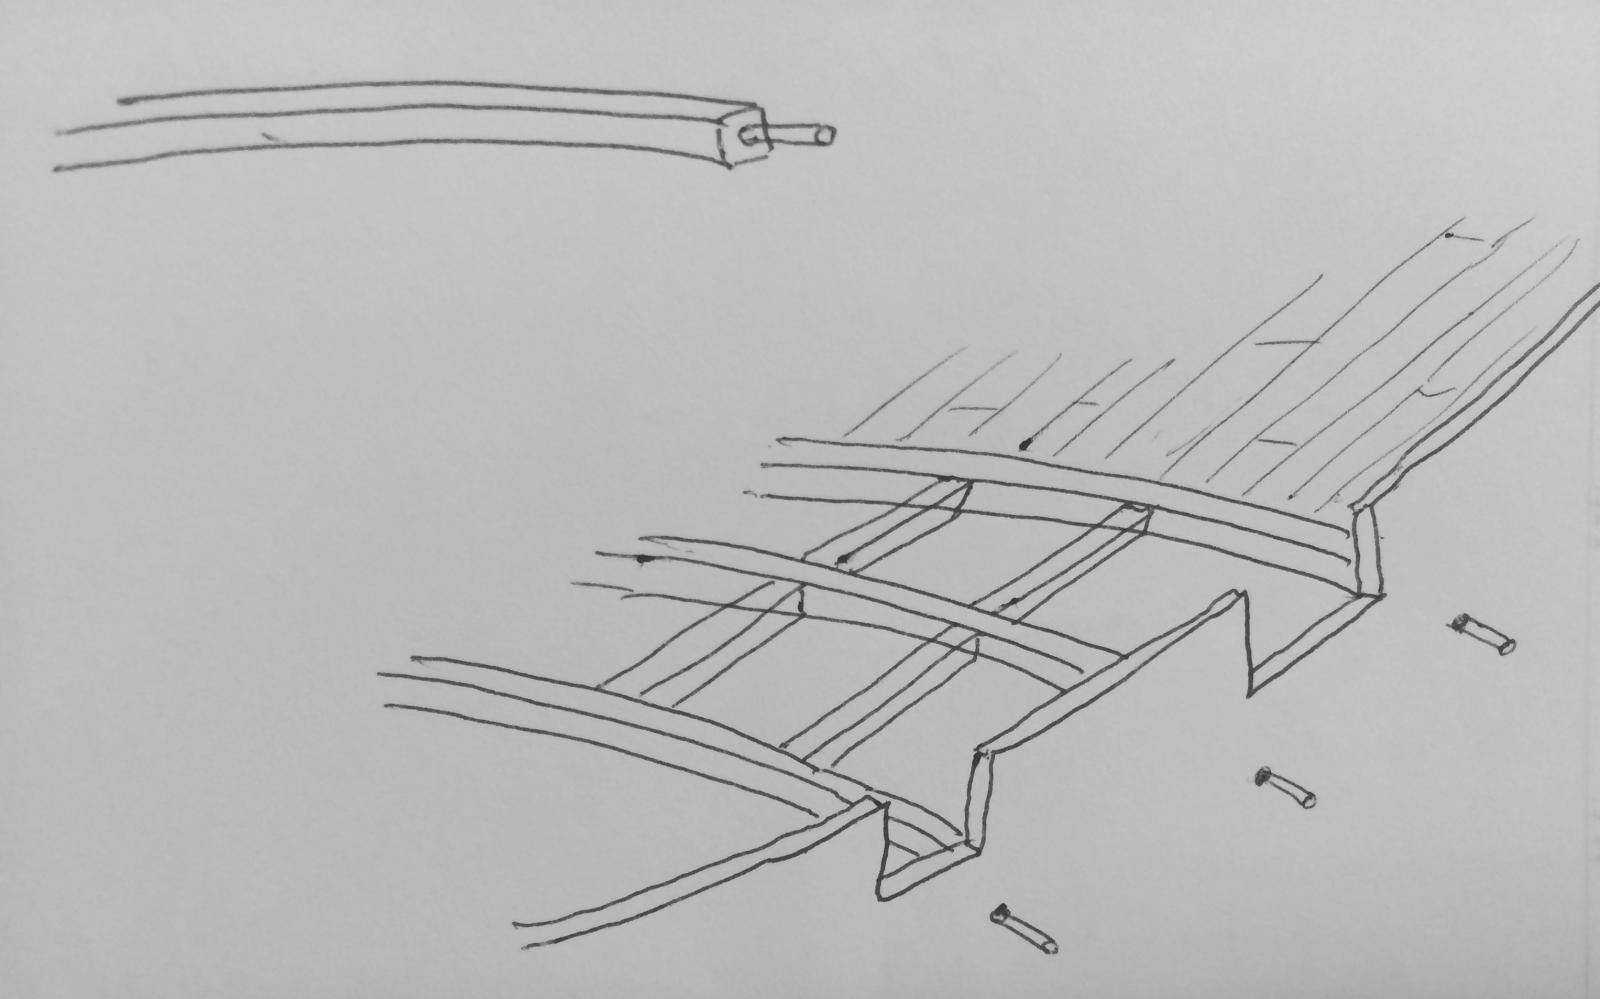
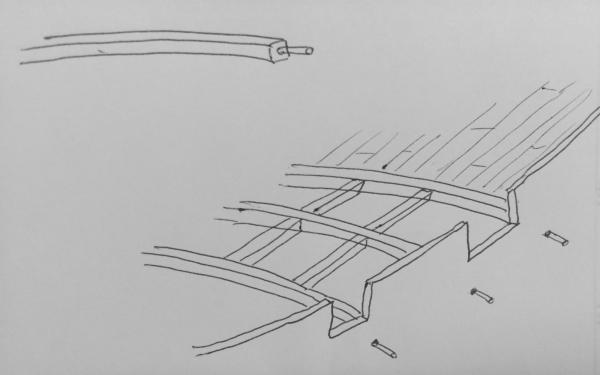
It has been a long time since I was able to think about my build. Life is finally slowing down a little again. I have been contemplating how to make the timbers or frames on the forward section of the spar deck. I have several issues: 1) the model is nowhere near finalizing the width of the deck - this width will change ever so slightly with the addition of the spar deck and rigging. Placing the timbers by glueing them will ruin the ability of the model to "reshape" as these elements are added. 2) the plexiglas depth is slightly more than the Revell deck so the frames will have to be a little lower than the model deck supports. Getting a strong bulwark to frame bond will be more difficult without the Revell supports. 3) Bonding the plexiglas to the frames without destroying the clarity will be a challenge. With these things in mind I am going to try to support the frames externally by wire or 1/16" plastic round. this will allow the fromes to float slightly. It doesn't have to be much (1 or 2/32") and still get the stronger support I need. I drew out a rough plan of this idea and the next step is to work out the frame widths. (The drawing is for displaying the idea about mounting the frames. The actual frame detail will be per available references.)
- 601 replies
-
- 6
-
-
- constitution
- revell
- (and 1 more)
-
Perfect display area - where you can see both sides of the ship and all its detail.
-
Don't worry Henry: it took several years and multiple craftsman to complete the ship. I would say you are way ahead of them.
- 196 replies
-
- 4
-
-
- plastic
- soleil royal
- (and 2 more)
-
Stunning photos John. I agree with Piet: the pics had me wondering for a brief bit "is it live or is it Memorex?" Dave
- 2,250 replies
-
- 3
-
-
- model shipways
- Charles W Morgan
- (and 1 more)
-
Ha. I would never accuse you of not loving whales - quite the opposite. Well done model John and, again, the diorama is an outstanding surprise "ending".
- 2,250 replies
-
- 4
-
-
- model shipways
- Charles W Morgan
- (and 1 more)
-
Would silicone offer a shield? It is flexible and good enough for oven mitts.
- 196 replies
-
- 3
-
-
- plastic
- soleil royal
- (and 2 more)
-
I agree John. Congratulations. I love the diorama. Dang, I almost feel sorry for the whale. What a beautiful finishing touch. Dave
- 2,250 replies
-
- 4
-
-
- model shipways
- Charles W Morgan
- (and 1 more)
-
I can never say it enough - stunningly beautiful. Dave
-
I heartily agree. I actually have an old vintage kit and the rope for this kit is better. It is still not scaled well with just 3 sizes. I have collected some other sizes from Chuck at his Syren store but may invest some time at learning the "walk" for the desired rope.
-
I am (eventually) going to try to copy them Geoff. Nice job.
-
Well deserved congratulations John. I'ld love to see her if I get out Texas way...or...you could pack her in and take her on your next tour and save me a trip (just kidding) Beautiful build John. Dave
- 2,250 replies
-
- 3
-
-
- model shipways
- Charles W Morgan
- (and 1 more)