vossiewulf
-
Posts
1,477 -
Joined
-
Last visited
Content Type
Profiles
Forums
Gallery
Events
Everything posted by vossiewulf
-

More tools - Luthier, jeweler, fly-tying
vossiewulf replied to vossiewulf's topic in Modeling tools and Workshop Equipment
That's a very good inexpensive idea, although I like stiff regular foam more than styrofoam- the latter collapses and doesn't spring back. What I have used is that stiff gray foam used for packing electronics. I have one for a bunch of those (bad) harbor freight micro carving tools where I made a quick little open-topped box out of 1/4" plywood with a piece of steel as a base, and then cut out a thick piece of that gray foam to fit inside. I can pull those little carving tools out and stab them back in repeatedly and they always hold well. -
More tools - Luthier, jeweler, fly-tying
vossiewulf replied to vossiewulf's topic in Modeling tools and Workshop Equipment
Please tell me you have a decent knife or two and don't just use scalpel blades? Because in woodworking terms scalpel blades aren't particularly sharp at all, and worse whatever edge they do have disappears almost immediately because they are made of comparatively very soft steel. Scalpels are meant to cut human flesh and to last doing that only for one surgery, are designed to use with a slicing motion, and are therefore sharpened so the actual edge has a micro-tooth pattern. Used on skin in a slicing motion this works extremely well. Pushed through wood it doesn't. Minimum woodcarver sharpness is the ability to cut basswood end grain at a 90 degree angle perfectly - every fiber cut, no tears or even bending visible. Go try that with a Xacto blade or a scalpel. And as mentioned, that's not even their worst characteristic for woodworking, it's the fact that the steel hovers around Rc 54 which is extremely soft for a blade that is intended to be sharp, so their edge wears away very quickly. Xacto blades are so soft that you can make their bevels mirror-smooth in just a couple of minutes using a STROP and nothing else, I've done it. There's no point however, it will cut a bit sharper for only a couple cuts before the edge fails. A good knife, either Japanese or made of western-standard quality O1 or A2 tool steels can be made to any hardness. As mentioned above because western knives are made of one homogenous steel and receive the same heat treatment throughout, they can't be made much harder than Rc61-62, but that is plenty hard enough to be able to easily pass the basswood engrain-cutting test. Ron Hock's knives are this hardness and are also cryogenically treated to increase edge wear resistance, and an edge on that type of blade will last several orders of magnitude longer than an edge on an Xacto or scalpel. Good Japanese knives will have Rc63-64 edges and therefore can be sharpened to an even finer edge than Hock knives (assuming same steel quality, lack of inclusions etc.), but the tradeoff is increased fragility- you're unlikely to ever snap off a piece of a Hock edge but it's pretty easy with a Japanese knife. Either type, properly sharpened, is much much sharper than brand-new Xacto and scalpel blades and can be kept that sharp for a couple of weeks of regular use with just a couple touch-ups with a strop. As such they're also orders of magnitude cheaper in the long run when you look at how many Xacto/scalpel blades you buy. And finally, knives that sharp produce much superior results to disposable blades and do so with much less effort. I always feel badly for modelers who have never used something better than a disposable blade and have not yet realized how much their work quality will improve through simply using really sharp tools. -
More tools - Luthier, jeweler, fly-tying
vossiewulf replied to vossiewulf's topic in Modeling tools and Workshop Equipment
Why? I'm enjoying the hell out of being an out-of-control tool collector. Besides kitchen, bedroom, and living room, all others are being or are fully converted into building facilities My woodworking area workbench you see above is in what was allegedly my dining room. The built-in cabinets were perfect for main storage for a woodworking and luthier-work area. Ex-wife #2 visits and stays for a month or two each year (complicated) and of course rolls her eyes and frowns but I just remind her that she's the one who left in the first place and as such abdicated the rights to input on this matter -
More tools - Luthier, jeweler, fly-tying
vossiewulf replied to vossiewulf's topic in Modeling tools and Workshop Equipment
Welcome. Obviously I am somebody who trolls the intertubes trying to find some new professional or industrial supply house that has cool tools that either fill gaps or do something better than the tools I have, and I count finding those things as victories at the end of trudging through dozens of useless sites selling crap. So I also really want to help people who have less time than me to search endlessly for new tools due to family responsibilities, cutting out all the legwork and fruitless searching by pointing them to the things I know they'd find useful. OTOH it can also be a frustrating thing of leading the horses to cool super-delicious vitamin-infused perfect water and they still won't drink. And then you have to watch them being disappointed with results when god himself couldn't do any better with the tools they're using. I actually am seriously considering producing a line of tools just for higher-end modelers, not just ship modelers but for all the people who are serious about their hobby. I have good designs that could be brought in at reasonable price points (considering they're intended for serious modelers, reasonable means $25 for a replacement Xacto knife with changeable blades from Ron Hock that are Rc62 and can be made much sharper than Xacto blades, and are fully intended to be resharpenable. And another design for combo small pliers/tweezers with changeable tips borrowing heavily from my experience with surgical tools, and several other hybrid tools. I think they're sell reasonably well but how I'm supposed to find time I don't know. We had another work crisis starting Thursday where something went seriously wrong for 24 days post-April release before anyone noticed and my team has been working 24 hours since, tag-teaming between the North America teams and the Bangalore group, I had four meetings yesterday with the SVPs to brief them on the latest status, I'm not only responsible for coordinating incident response and driving mitigation/resolution, but I'm also on point to translate the technical details and the response options into something the senior business execs can understand so they can make informed decisions. And I got paged at midnight for a different issue. So, it's a somewhat intense job (cough) and as such completely screws my ability to plan and execute something like getting a cottage manufacturing company off the ground. Even so I might still give it a run, I'd like to see people have good tool options WITHOUT having to peruse the entire catalogs of supply houses from 6 different industries. -
More tools - Luthier, jeweler, fly-tying
vossiewulf replied to vossiewulf's topic in Modeling tools and Workshop Equipment
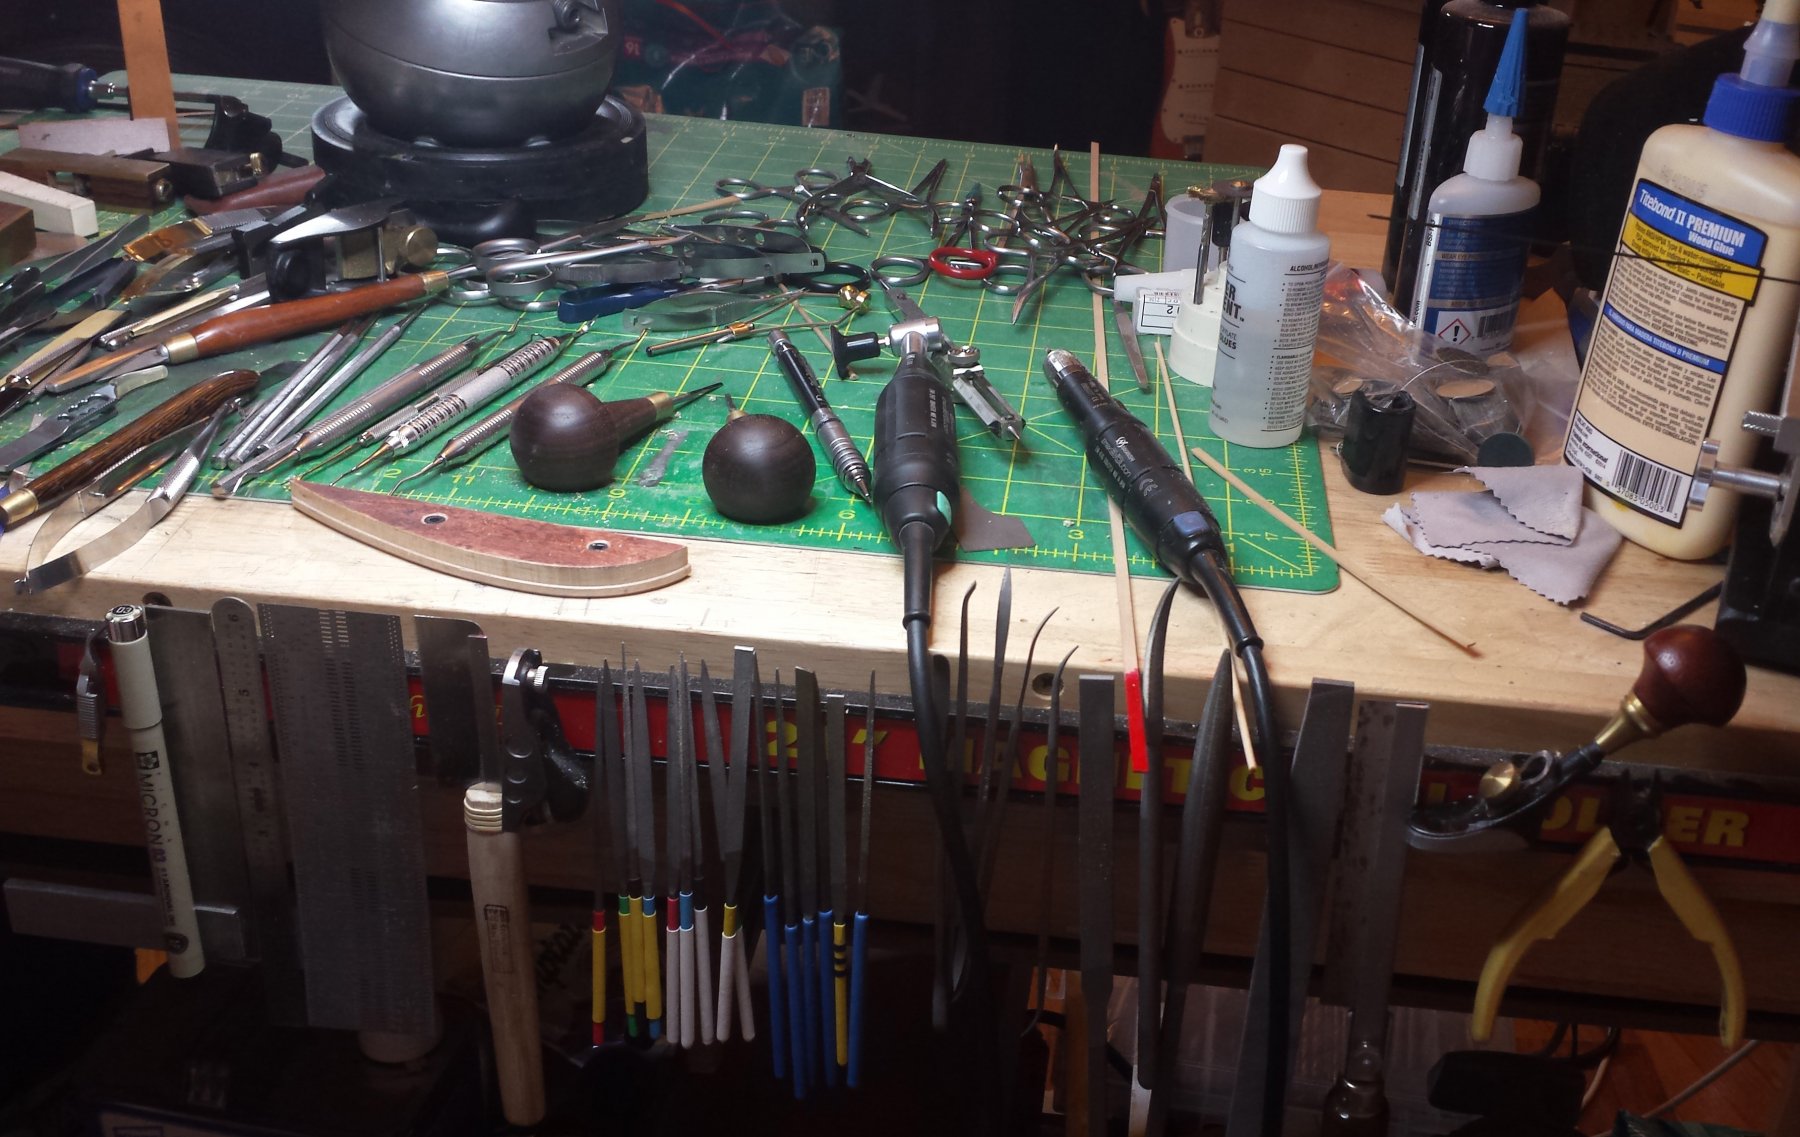
Jeremy: Otto Frei Lee Valley Stewart McDonald Woodcraft Artco Tools (professional rotary tools) DA Medical (where I've bought most surgical tools, EBay store- buy used German tools you'll be very happy) You want to look through pretty much everything each of them have, and as far as I know they all ship global. Probably 90% of my out-of-control tool collection comes from one of those. Here was my benchtop when I laid everything out to reorganize because my acquisitions had completely overwhelmed my existing tool holders. This is what happens when a tool nut is twice divorced and is left totally unmonitored: shrink-tube color-coded needle file arrays. And this is just the stuff ON my bench you're not seeing the 22 other drawers and the built-in cabinets etc. Little better now. Try not to notice there is yet ANOTHER needle file set in the holder.
-
More tools - Luthier, jeweler, fly-tying
vossiewulf replied to vossiewulf's topic in Modeling tools and Workshop Equipment
Thanks Ron, another good source. -
Some important general considerations for people thinking about this - There are two main classes of modeling programs, one is the CAD type the others are generically known as 3D modeling programs, and they are very different in their conception and functioning even though there is considerable overlap of visual appearance of the building process and some modeling tools. CAD programs are used to create plans and drawings that will be used to make tangible, real-world objects. Therefore absolute precision is at the core of their design, and you generally end up doing lots of typing while modeling because all sizes must be set exactly to the intended/required values. Their main strength is this precision that's built into every aspect of these programs; if you're making something like a house plan or a replacement part for your minibike engine, CAD is the right way to go. 3D modeling programs are used to build digital models where that digital model is the final product. And these are the programs that take those digital objects and turn them into the amazingly-realistic looking objects and textures and surfaces that you see in games and movie CGI. And it's gotten pretty amazingly easy (speaking as someone who started working with 3D modeling programs back in the stone knives and bearskins era) these days to generate beautiful and realistic images. There's a new Pandora build log and everyone is oohing and ahhing at his renderings, and I'm sure the guy is giggling to himself because all he's done is apply a default aged wood material and is rendering with a dirt-simple GI (Global Illumination) test scene. Different rendering engines do GI in various ways but they're all getting pretty accurate where there is an accurate simulation of the light energy emitted by the various lights (sun and sky count as lights) and how that energy is distributed through the scene through a series of bounces or by using what are called radiosity calculations. Whatever way they do it, they're all getting real accurate and you can set up a scene like his in five minutes with a default clear blue sky and a noon sun. Now in general since most people here using some modeling program is making something they want to be a real part you'd say they should use CAD, right? Not so simple. Reason I say this is I think that in general, 3D modeling programs like Blender and 3DS MAX are generally considerably more intuitive in their modeling flows, and the rendering systems are very powerful in helping you visualize what you've made- trust me it's very easy to get to a point of complexity where you're having a hard time understanding what you've made. Also modeling programs can work at the same level of precision of CAD and output the same files, just by default you don't usually type specific sizes. And finally, for something like Ron just made, CAD precision just isn't necessary - I could make the same thing in MAX that would be +/- a couple thousandths of an inch of his when printed, and I think in general that I could do so considerably faster. So if anyone wants to try printing objects, I recommend you try both Sketchup and Blender. Blender is a full-featured free 3D modeling program that's only somewhat less capable than MAX which costs $1000/year for a license. One or the other is likely to be easier for you to understand depending on how your brain works.
-
Fokker Dr.I by Torbogdan - FINISHED - Model Airways
vossiewulf replied to Torbogdan's topic in Non-ship/categorised builds
"Let he/she who hath never assembleth a model pieceth wrongly casteth the first CA bomb." Book of Vossie You know what's worse than assembling a piece incorrectly? It's thinking your piece is incorrect, tearing it off, and then realizing that the piece was fine and it's your brain with the problem, and now the piece (that you have only one of and/or took four hours to make) is destroyed. A... friend told me about that happening to him. Yes, a friend who... lives far away and has no email address. Yep, that's it. Yes indeedy. Speaking of the gear, are you going to do the bracing? There should be an X-brace crossing from forward gear/fuselage joint down to the lower forward gear struts. -
Fokker Dr.I by Torbogdan - FINISHED - Model Airways
vossiewulf replied to Torbogdan's topic in Non-ship/categorised builds
Ditto, I'm surprised you got it looking that good, still at a loss to understand why they use the worst casting material possible for such important castings. Anyway, that should look pretty good and I don't think anyone else is going to do better than that. I hope you have enough patience to order some of Uschi's metal powders, they really work well and you have three different metals at least there between the casing, the cylinders, and the exhausts that were copper. It's an Oberursel UR.II which is a license-built copy of the Le Rhone 9J, so pics of either will do fine for detail reference. -
More tools - Luthier, jeweler, fly-tying
vossiewulf replied to vossiewulf's topic in Modeling tools and Workshop Equipment
That is an Incra ruler, made by the same Incra company that started with miter gauges. I have a 6", a 12", a T-rule and protractor. So yes I like them too -
What he said. I know I already said it once but even if I'm not saying things here, I'm very happily watching Tom do a well-documented step by step guide to which I'm going to be closely adhering when I get there. It's good enough Tom that with some cleanup and organization it would make a really great addition to the MSW article database, titled "So You Want A Nice Connie" , god knows enough people have MS and other Constitutions hiding in their closets. Some build logs cross the line from here's some pics of where I am to really useful guides for others, this is one.
- 1,350 replies
-
- 2
-

-
- constitution
- model shipways
- (and 1 more)
-
Two or three for me! When Dennis gets going you best stay out of arm's reach, there's just a blur of knives, saws, little sawdust tornadoes and paint brushes.
- 453 replies
-
- 7
-
-
- thermopylae
- sergal
- (and 1 more)
-
More tools - Luthier, jeweler, fly-tying
vossiewulf replied to vossiewulf's topic in Modeling tools and Workshop Equipment
And while we're at it, if there are people who don't yet know how to sharpen edges, DO something about it I actually really enjoy sharpening, it can be a very meditative thing to do. And more importantly it's not hard to do, you just have to learn a few things and get the right sharpening tools. Use disposable blades for what they're for, jobs like cutting through glue and material you don't want to use your good knives on, and have super-sharp knives, much sharper than X-acto or even scalpels, waiting on your bench for where it does count. The difference between ok average sharp and really sharp is much more than people think in terms of the quality of the resulting work. This is the only book you need: The Perfect Edge by Ron Hock. Very clear and straightforward and I am very much an adherent of his no-secondary bevel philosophy. -
More tools - Luthier, jeweler, fly-tying
vossiewulf replied to vossiewulf's topic in Modeling tools and Workshop Equipment
I finally ended up estimating 325-400. But I think you're right, coarse is what we mostly need and I'm waiting on some coarse ones to be delivered. -
I can call that broken plank battle damage where a frog smuggler rammed it. BTW, see my post in my tools topic for a recommendation for a not-expensive but very good knife, one that can easily handle what I'm talking about above with plank-trimming. The default bevel it comes with is good, just grind out any double bevel they have so the two main side bevels meet at the edge. You'll have a knife that will melt through wood like a hot knife through styrofoam. Assuming you know how to sharpen edges, of course. If you do, this is a knife where you can hold a full newspaper up in the air and take a swing at it and cut all the way through and then slice off ribbons, I know as I did it testing once. I would have recommended it above but I couldn't find it and assumed Japan Woodworker no longer carried them. I was wrong, it was in the knife section not the carving tools section.
- 714 replies
-
- 1
-
-
- lady nelson
- victory models
- (and 1 more)
-
More tools - Luthier, jeweler, fly-tying
vossiewulf replied to vossiewulf's topic in Modeling tools and Workshop Equipment
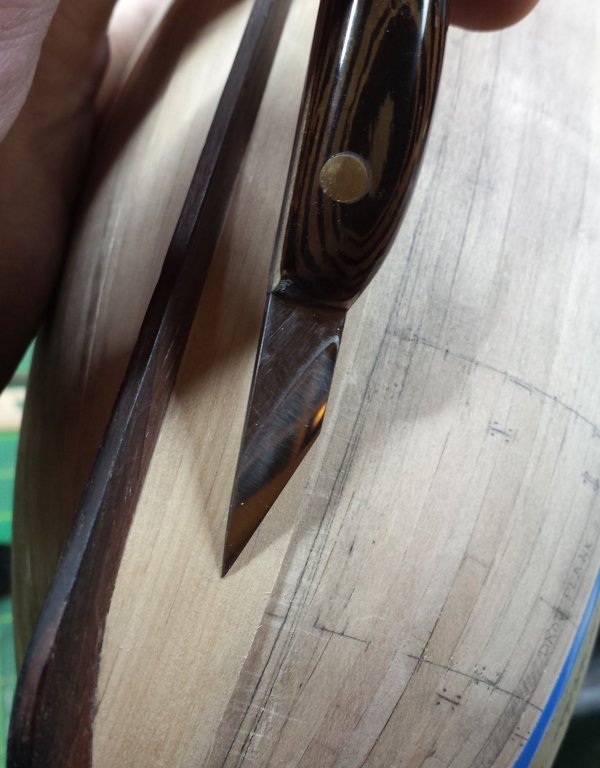
Anyone looking for a good reasonable-cost, general-purpose modeling knife, this is $25 from Japan Woodworker. I have two of them, one I reground pretty significantly into a curved edge, this basic knife can be ground into multiple useful knives if you're comfortable grinding heat-treated steel without burning the temper. This is a typical Japanese knife where a central piece of high-carbon steel is cladded by soft low-carbon steel, doing so allows them to have edge hardness much higher than is typical in western knives where the material and tempering are consistent throughout - they can't go much above Rc61 without the whole thing being too brittle. These edges are Rc63-64 and this knife can be sharpened well into holy **** that's sharp territory and that's a great tool to have. Only thing you want to avoid is twisting cuts, the edge may snap on an Rc63 knife if you do that and you have lots of grinding to get it back. I also ground off the little projections at the end of the blade, not sure why they're there but I am sure they get in the way, so I turned them into metal filings. -
Bending with steam easily
vossiewulf replied to a topic in Building, Framing, Planking and plating a ships hull and deck
The hot air station Nick pointed out doesn't ship to the US, here is one that is equivalent that is for sale in the US. As a tool type, they are called hot air rework stations and many come with soldering irons as well. -
Nice to see very good progress being made on an important subject, Hubac I hope you find a way to include the final plans you have in the MSW article DB for others to work with and hopefully further improve on if more information is found.
- 2,696 replies
-
- 2
-
-
- heller
- soleil royal
- (and 9 more)
-
Finally got a few minutes to catch up a bit. You're making great progress Dennis, wish I was moving that fast. She's going to look great, and I especially like the little creative solutions like the fancy toothpicks that make perfect railings.
- 453 replies
-
- 7
-
-
- thermopylae
- sergal
- (and 1 more)
-
I never did find a decent price on feeler gauges. You might want to get a few thicknesses somewhere around there. What I decided was that .012 was only good for delicate work and thinner than that was probably useless, and bigger than .20 or so and it might as well be a stick. But there's a fair amount of difference in bendiness between say .14 and .18, so if it's not too expensive get two or three thicknesses to make sure you find one you like.
- 714 replies
-
- 1
-
-
- lady nelson
- victory models
- (and 1 more)
-
BTW should have been clearer that knife of course isn't required. I think the correct sharp knife is the fastest and most accurate way to get yourself down to the minimal sanding point but there are lots of ways to do that including files and another piece of spring steel with 120 on it. So really in the end all you absolutely need using this method is a couple of sanding sticks and some CA glue. Well and a pencil too for marking the lines you sand down to. Speaking of that, for thoroughness you can see I marked everything out on the port side. When I'm ready to glue on a plank I mark the correct widths on the plank with a digital caliper and usually rough-taper it. I then write down the widths it needs to be at various stations, because as you see I level it down after gluing and that would remove any marks. That's an intentional decision, you can mark a nice leveled plank more clearly and it means on the knife work you're cutting through a thinner piece, and that's easier. So once it's glued on and leveled, I use a digital caliper to mark it and then draw the line as accurately as possible. You've seen the rest above. Then I just mirror whatever I did to the starboard side.
- 714 replies
-
- 1
-
-
- lady nelson
- victory models
- (and 1 more)
-
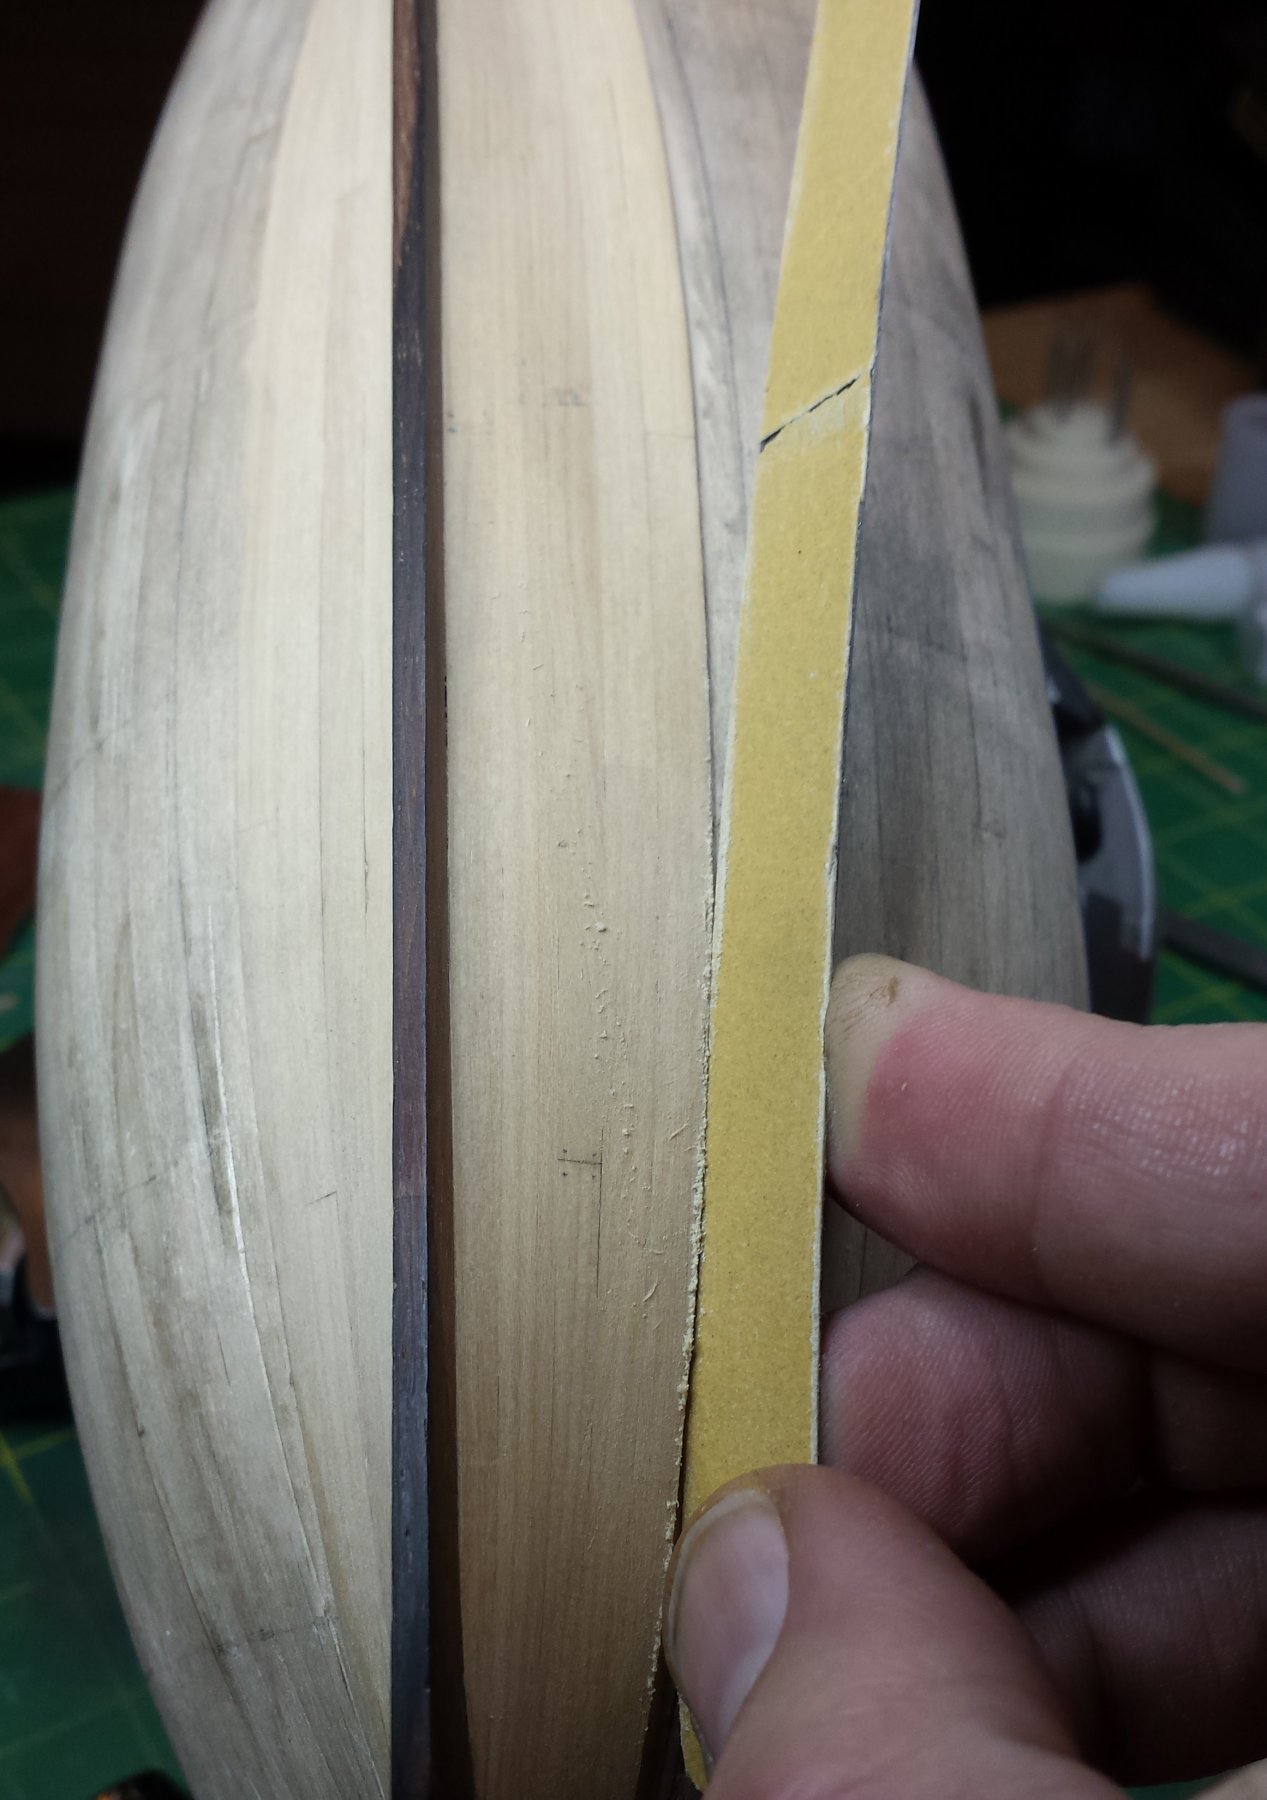
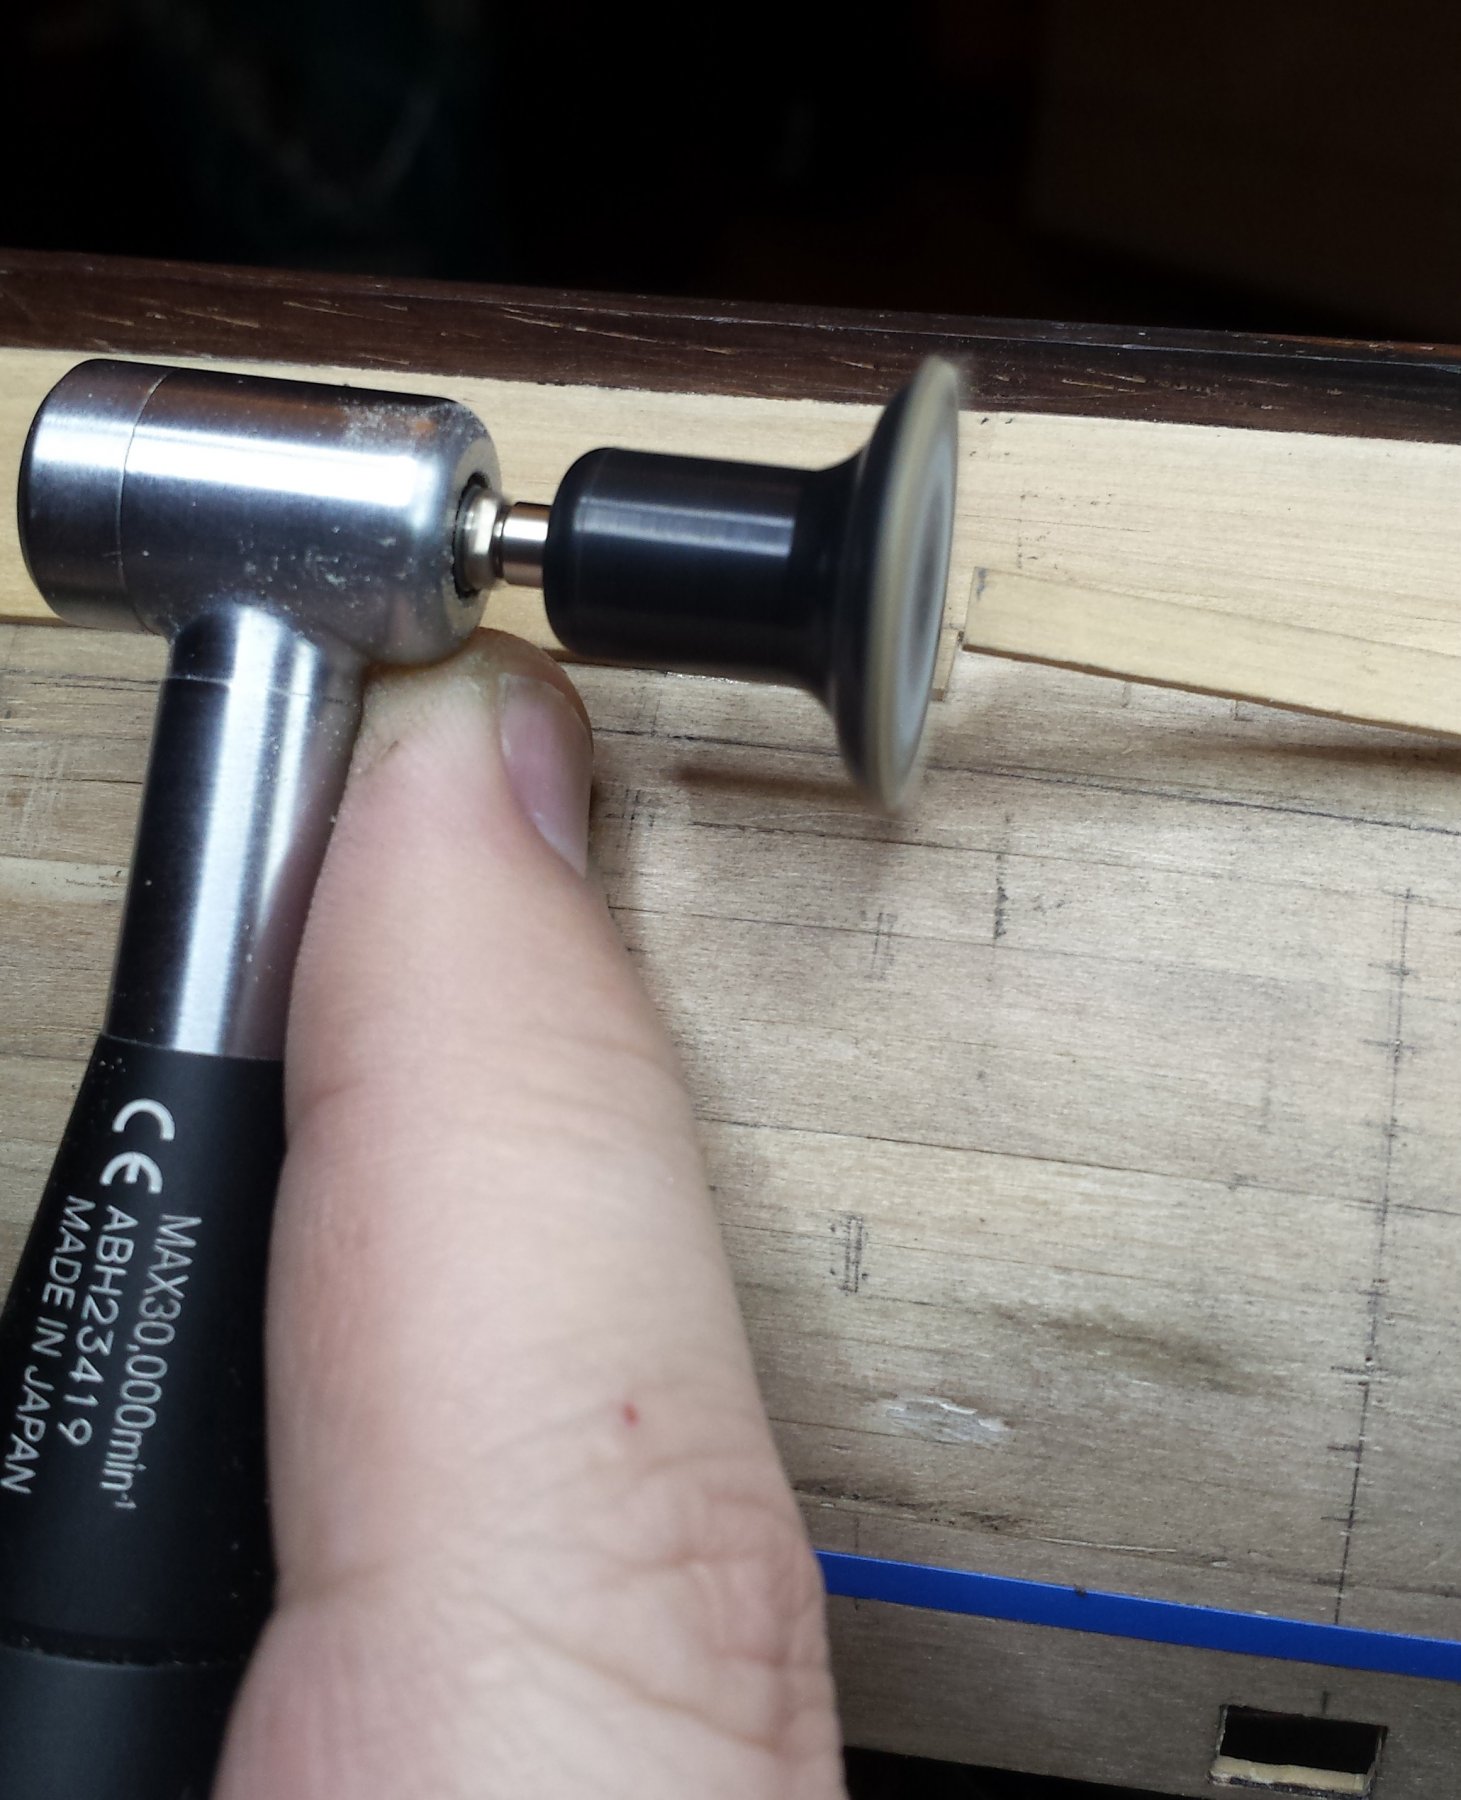
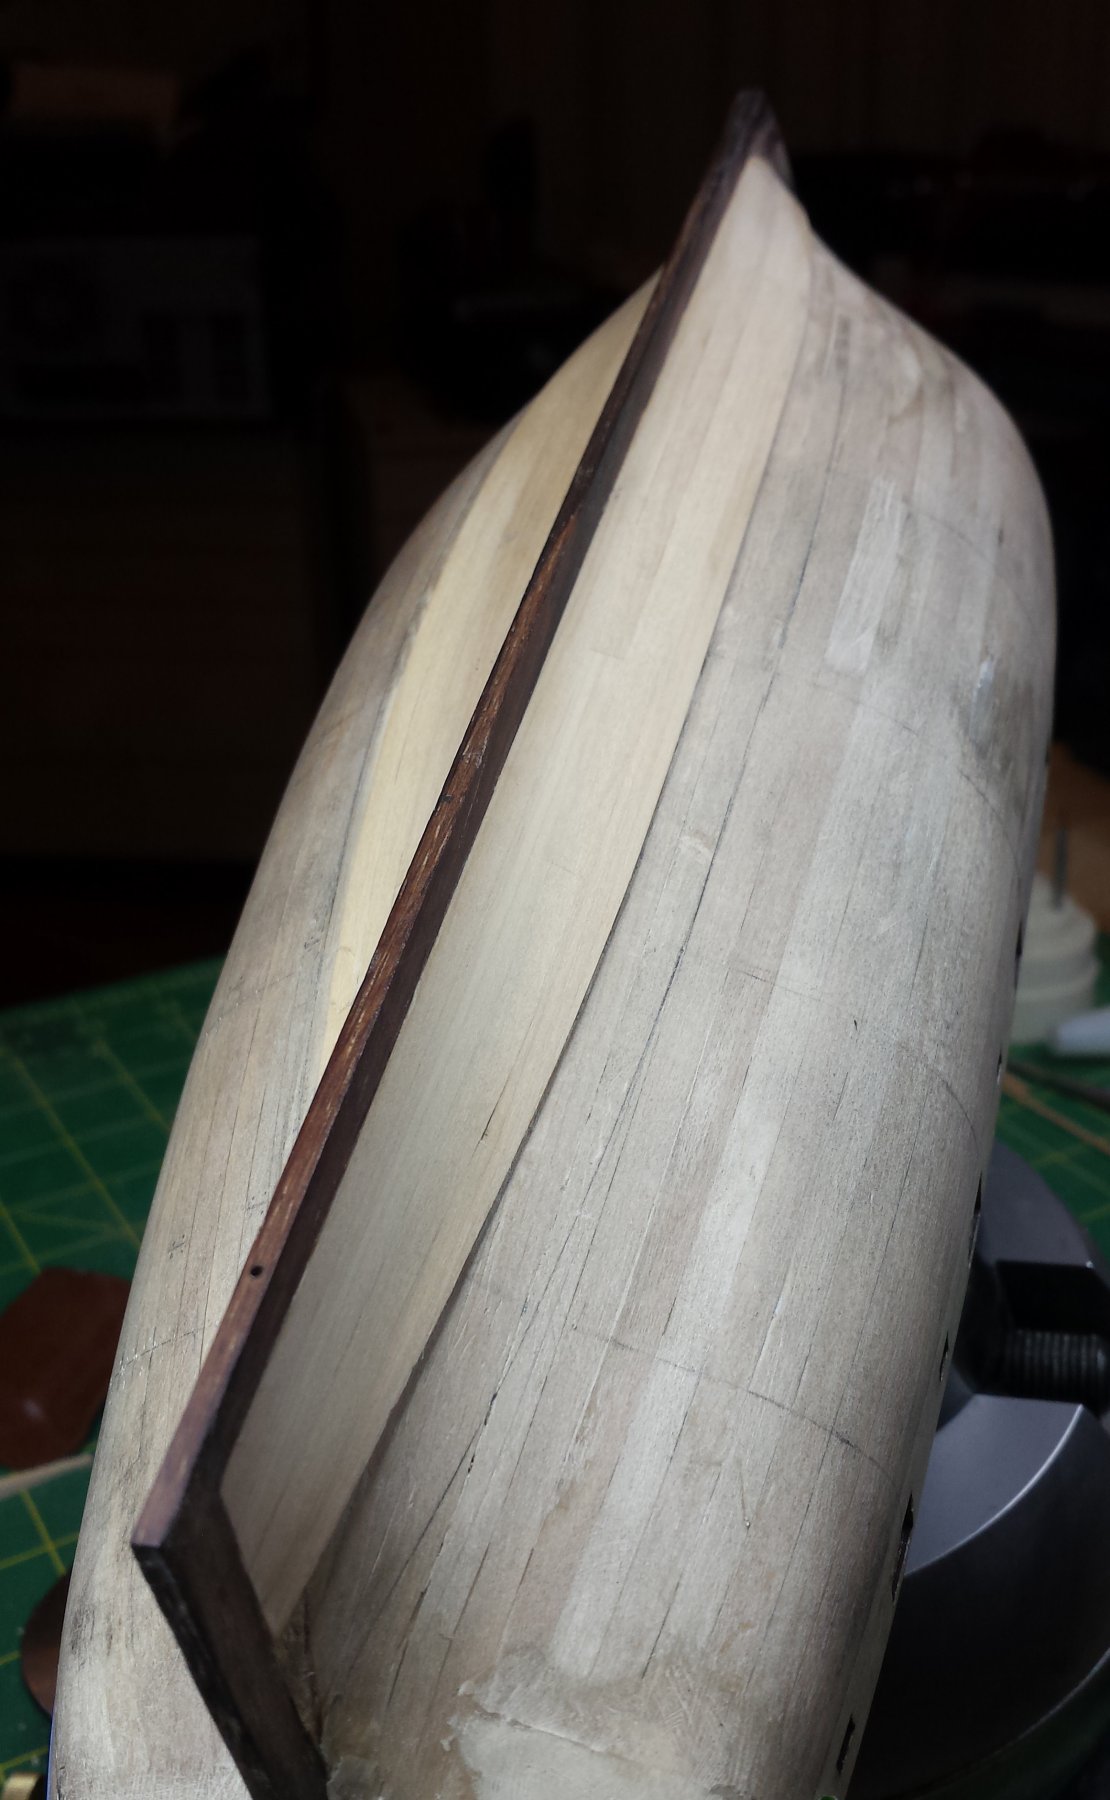
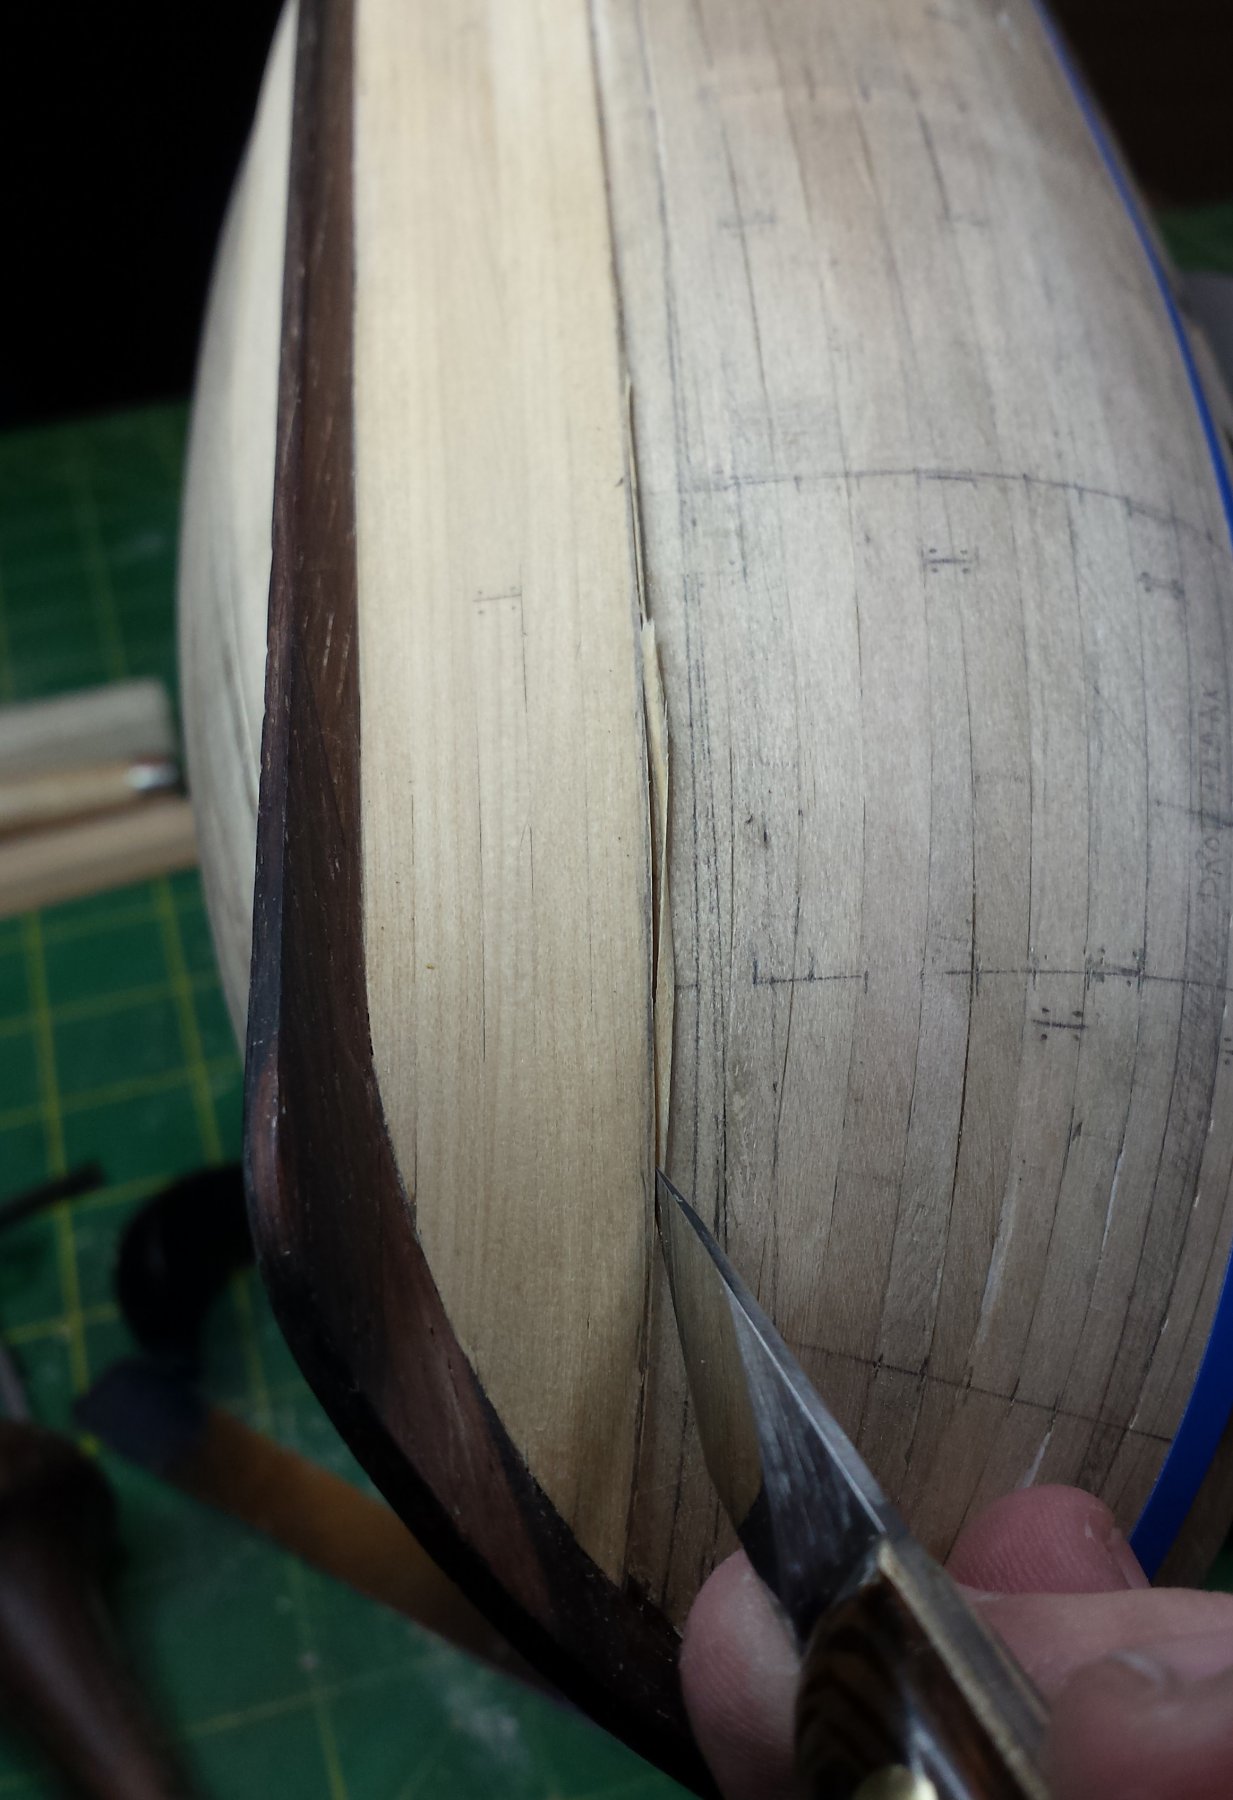
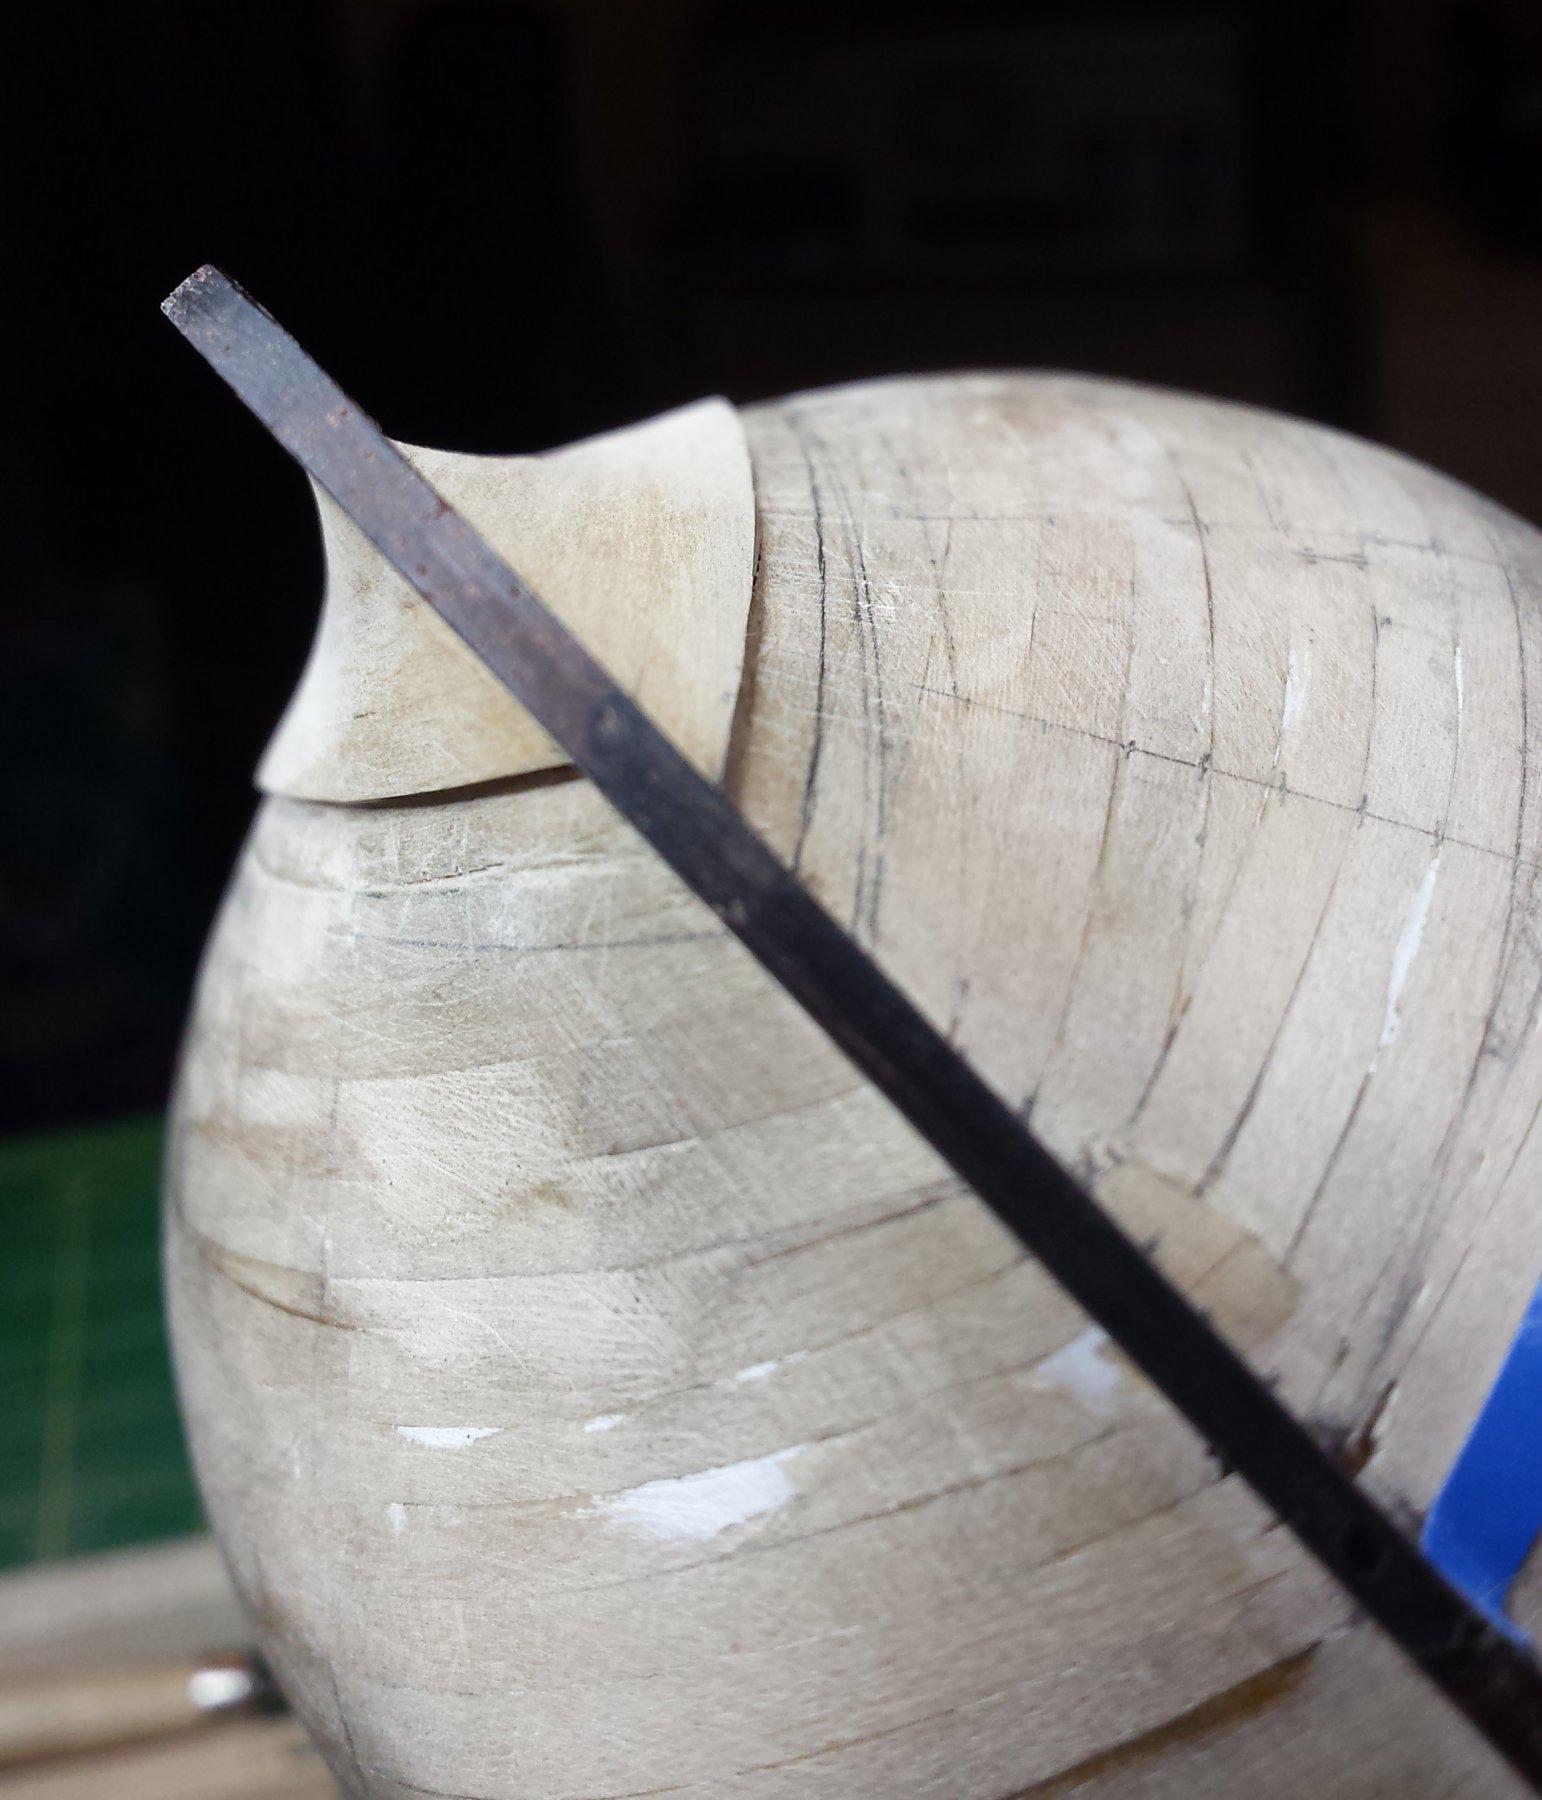
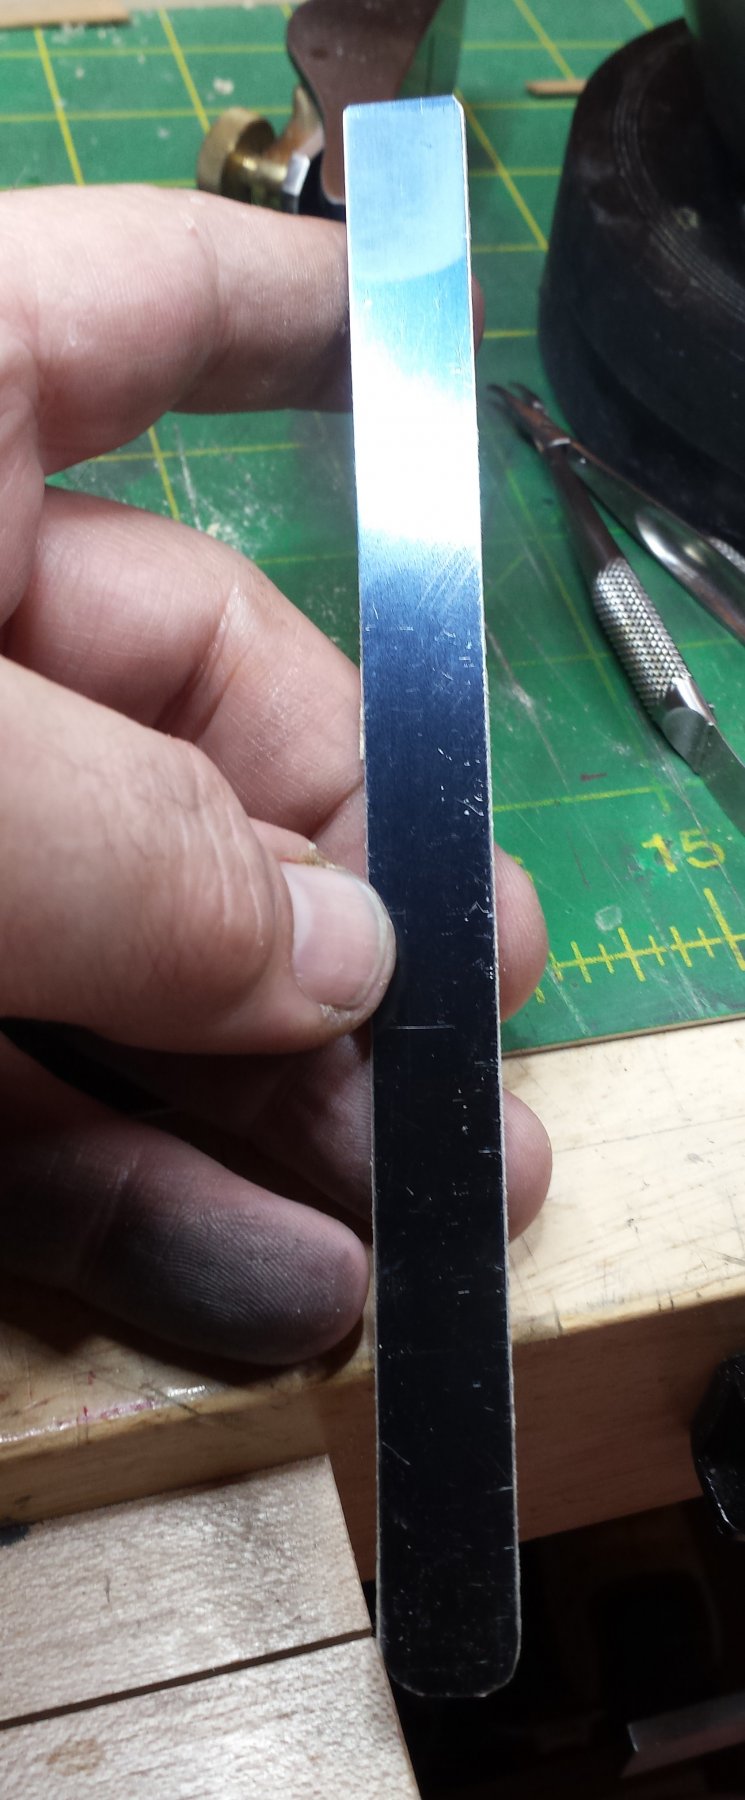
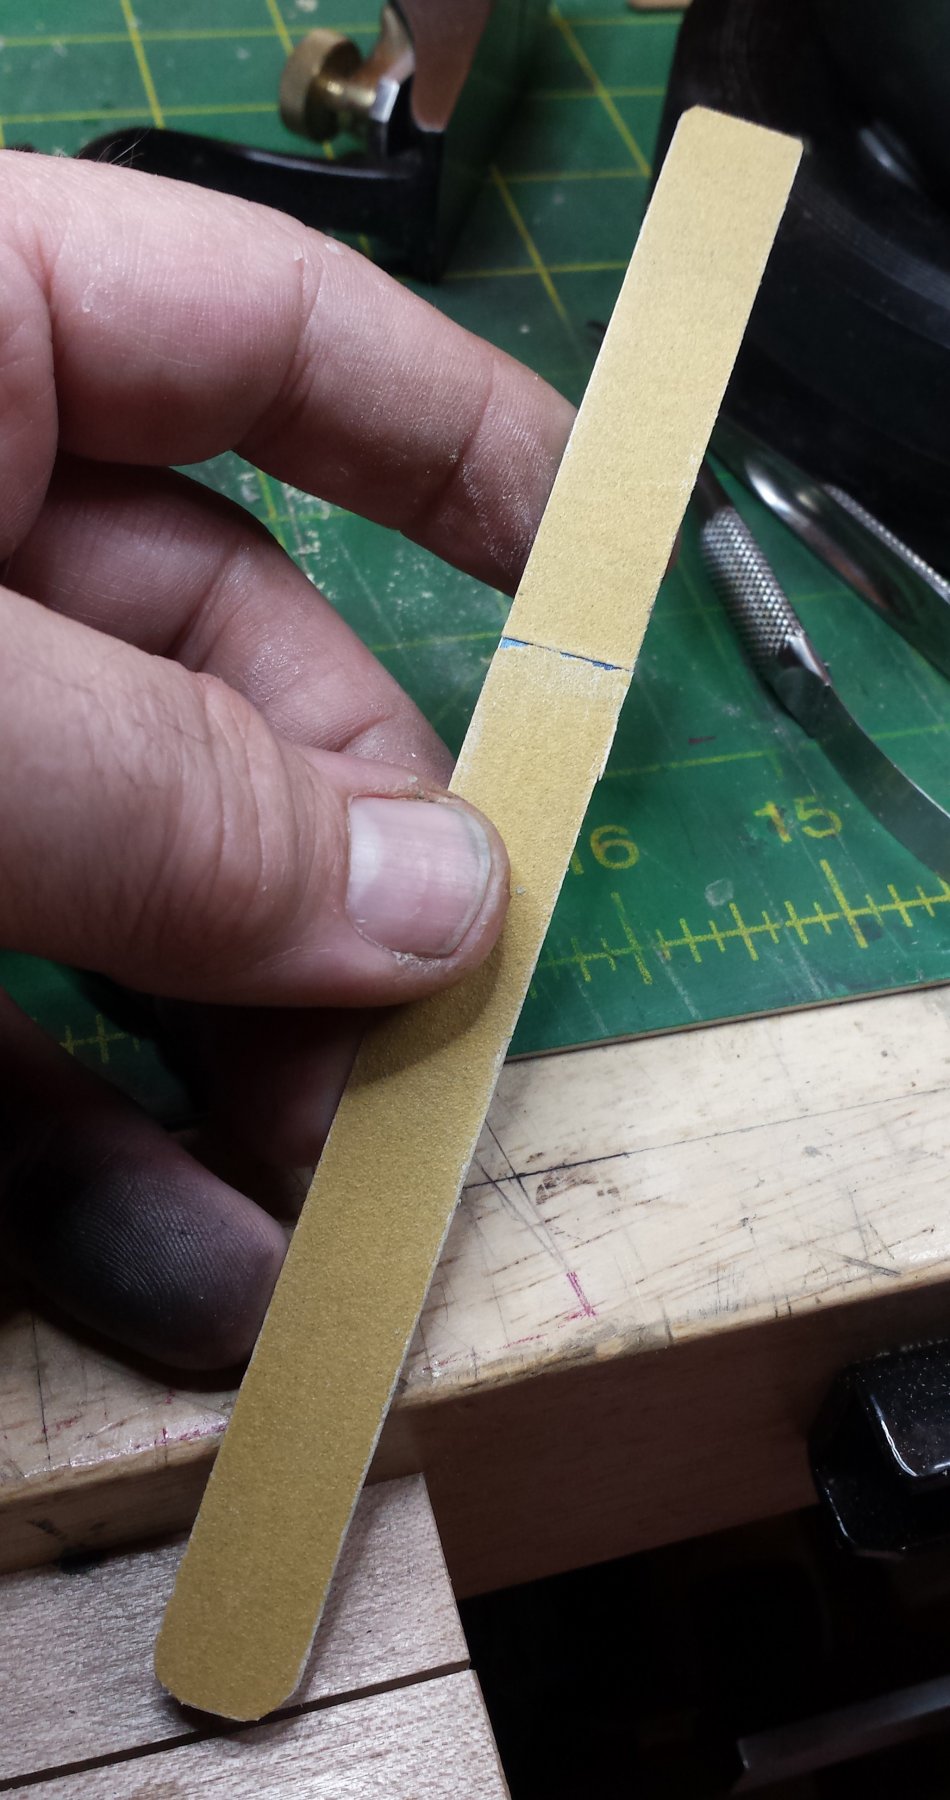
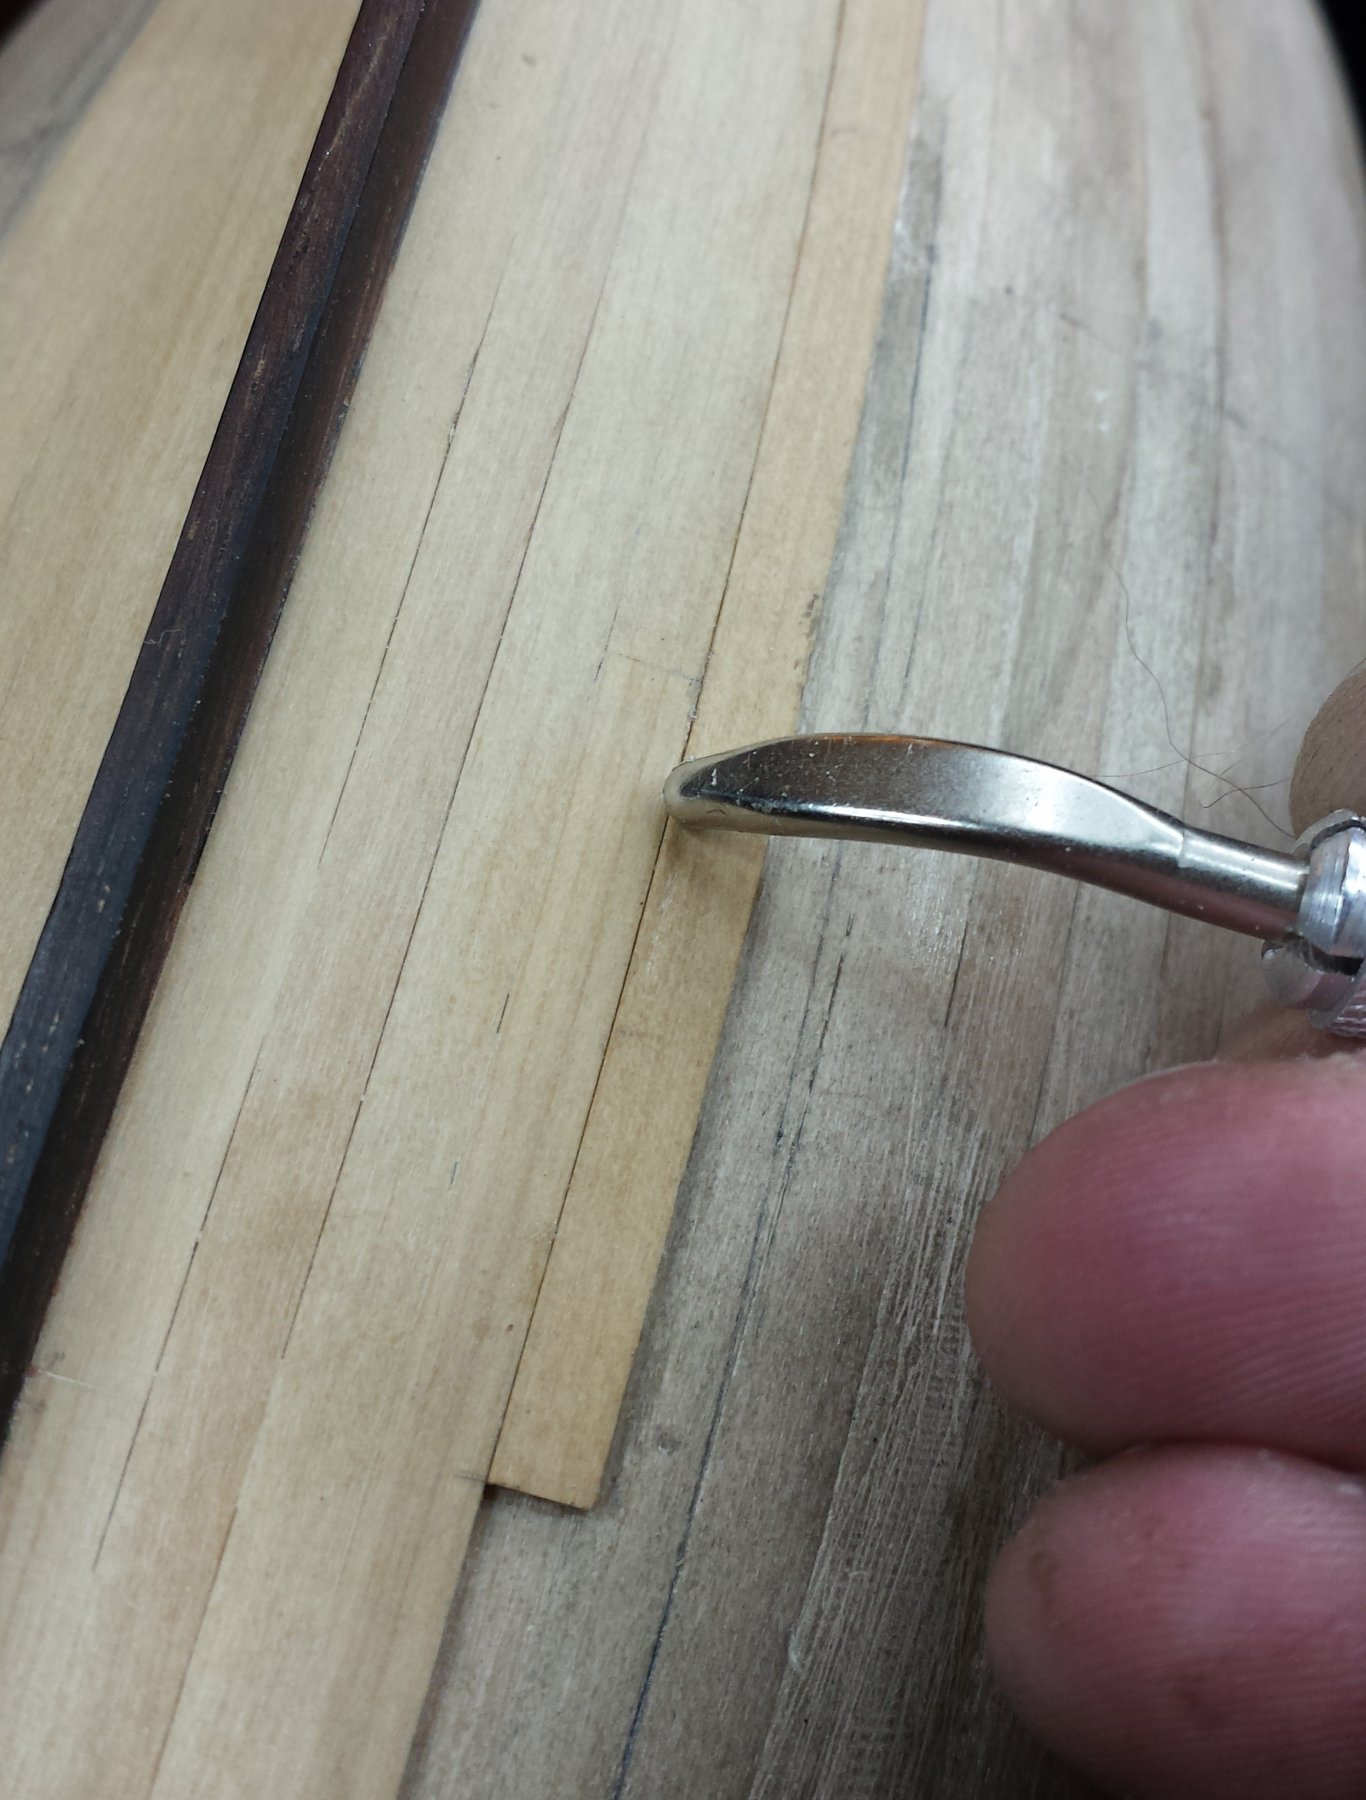
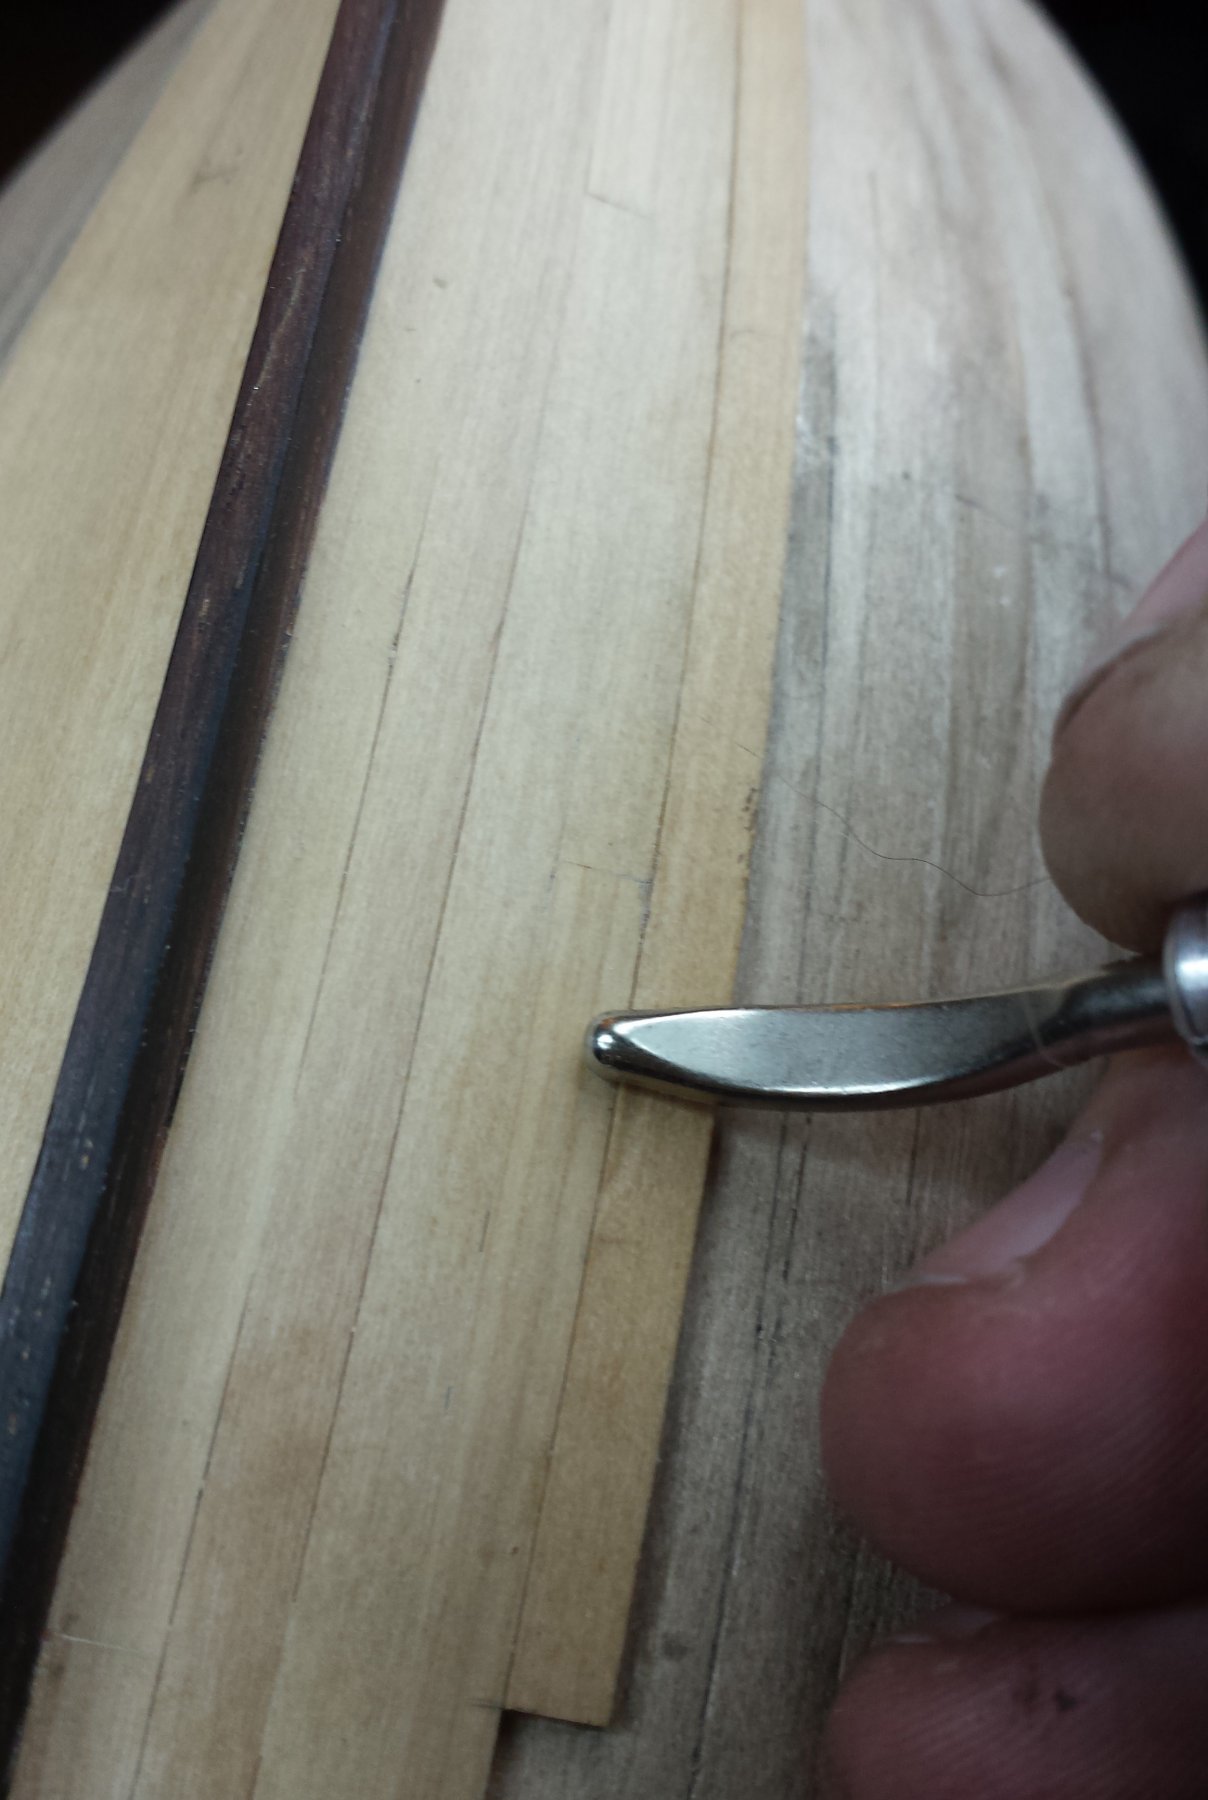
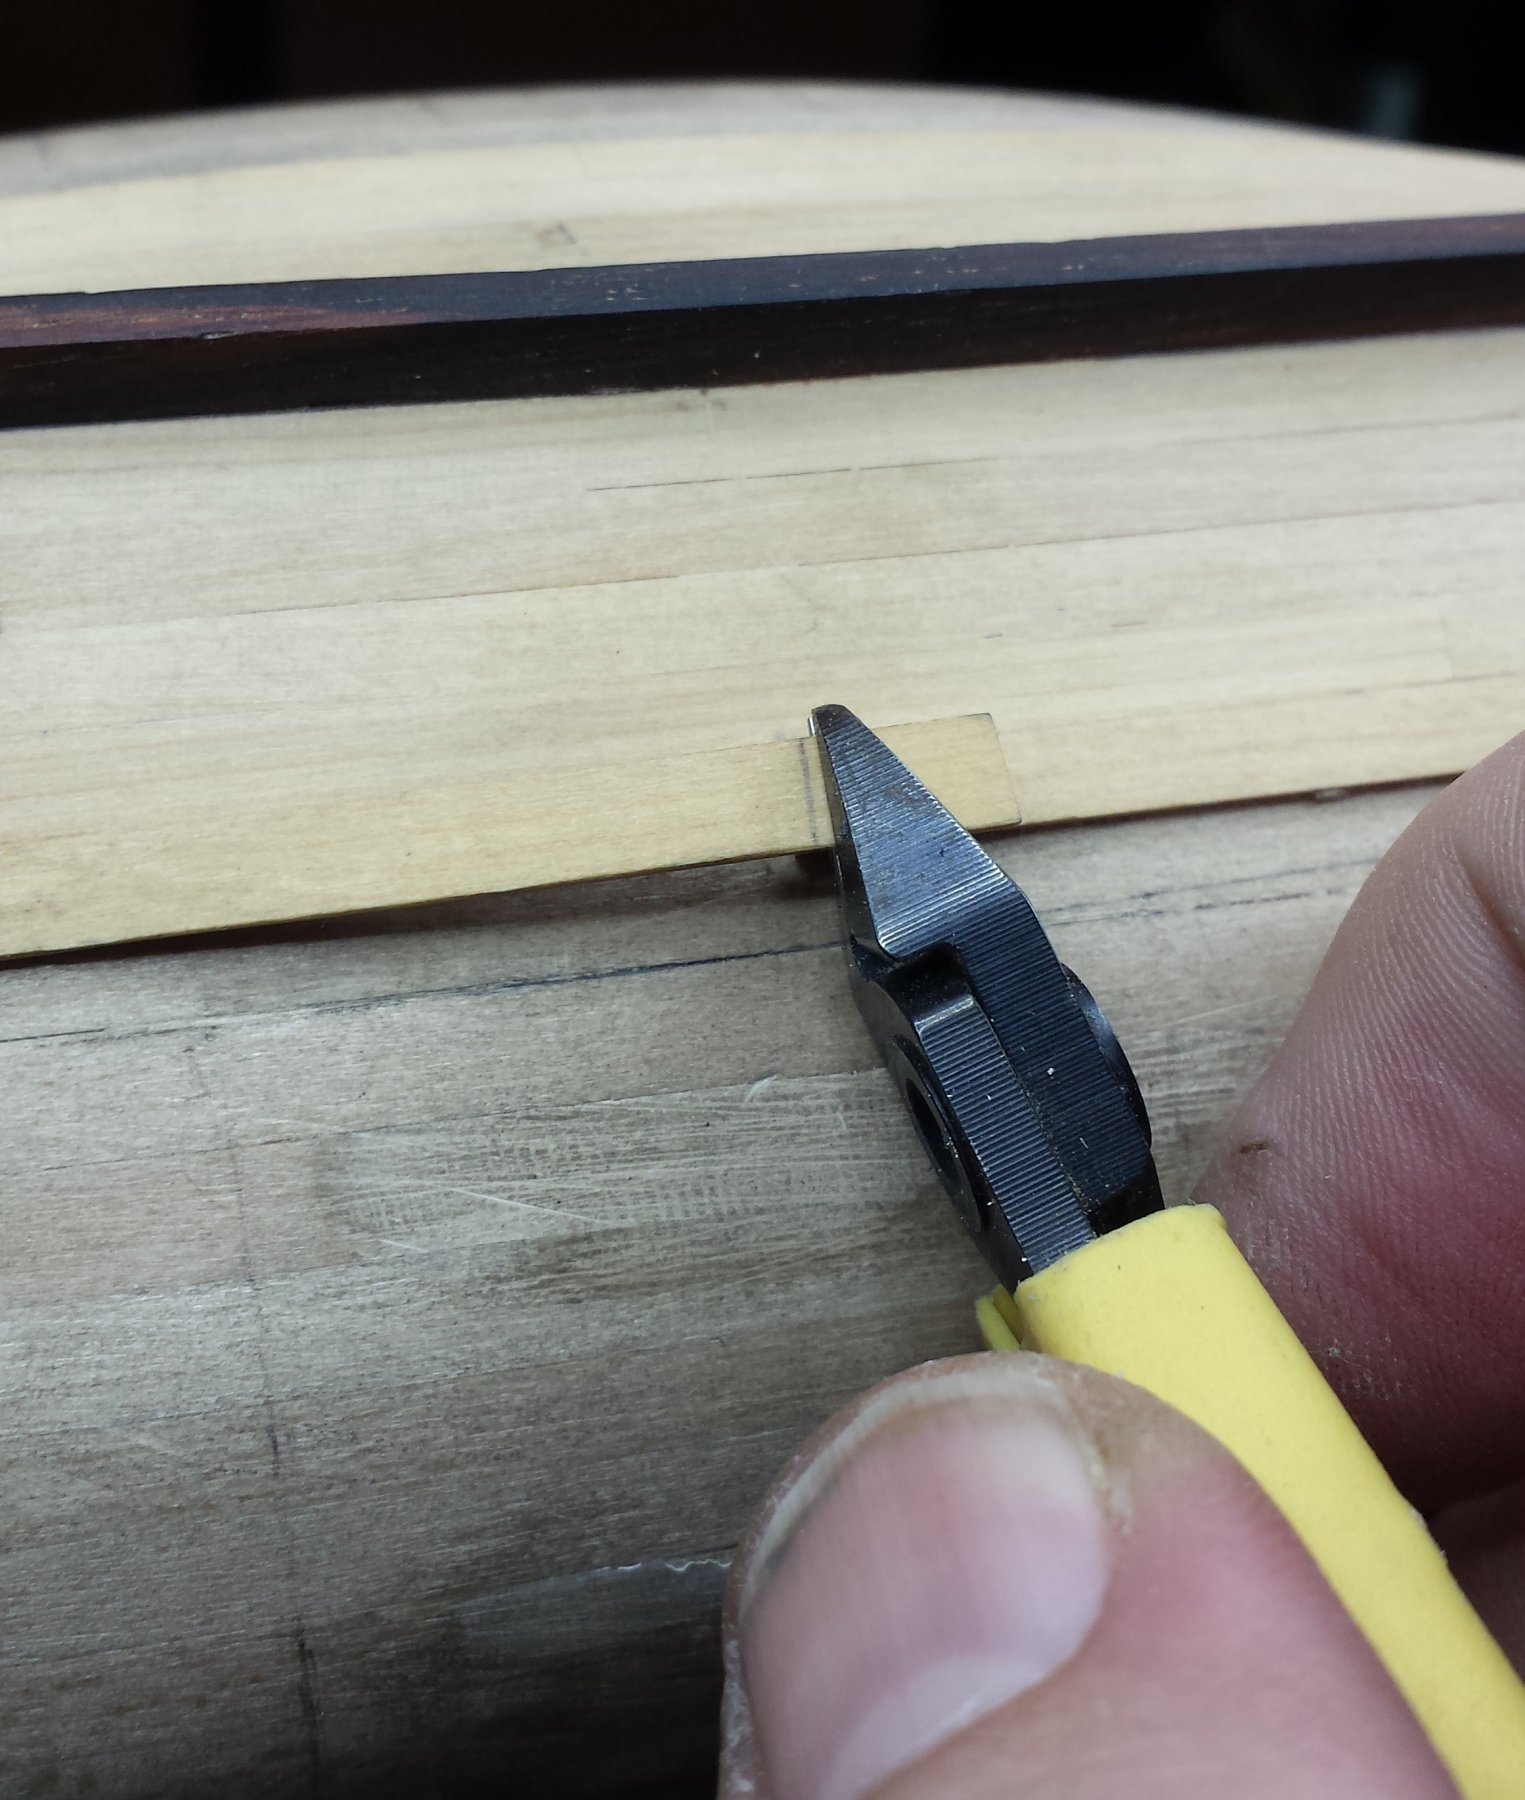
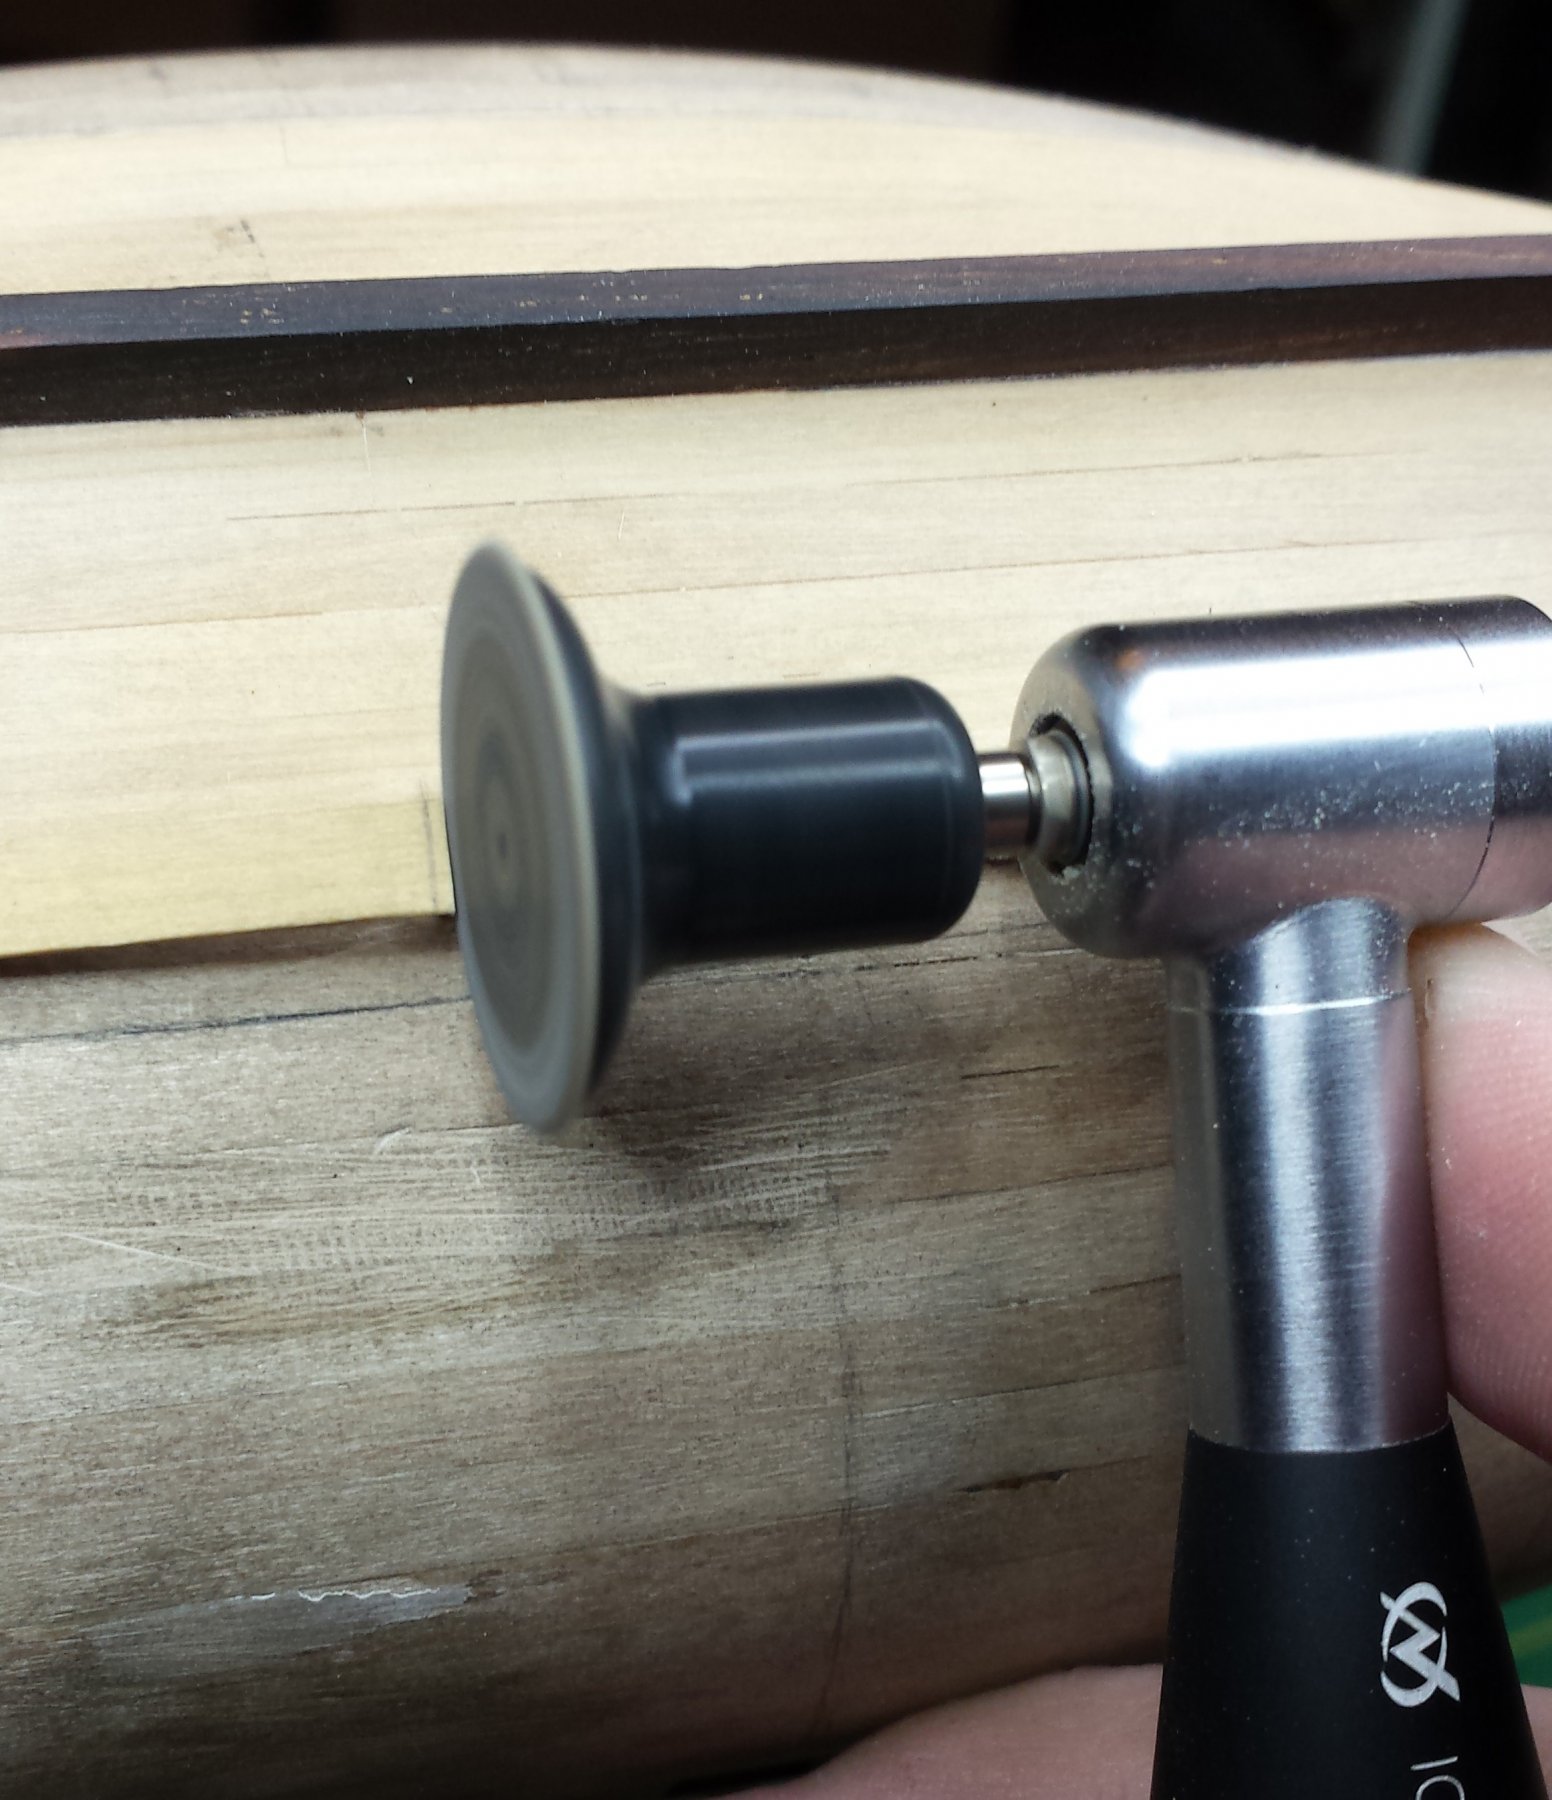
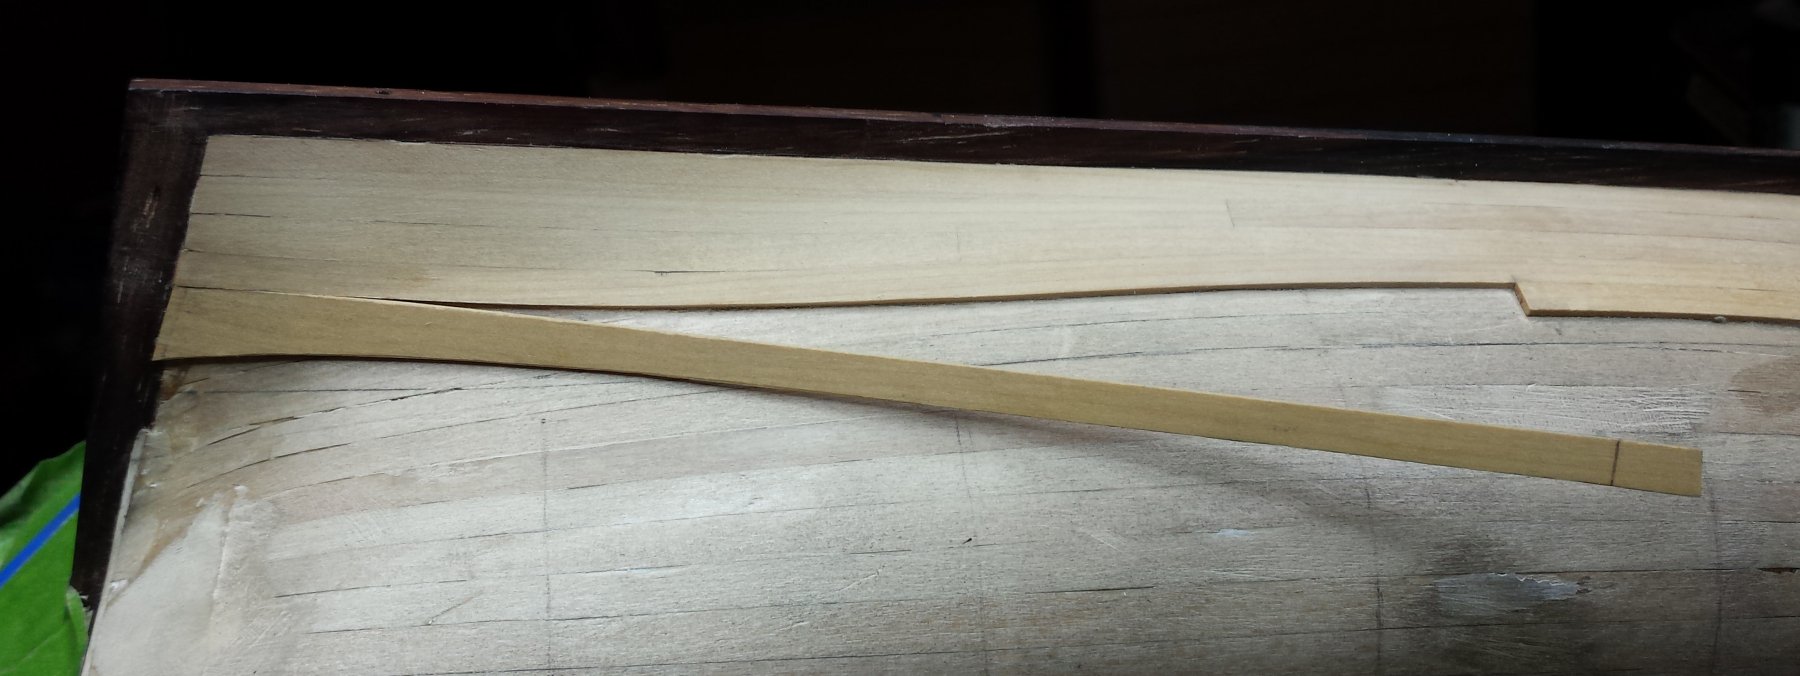
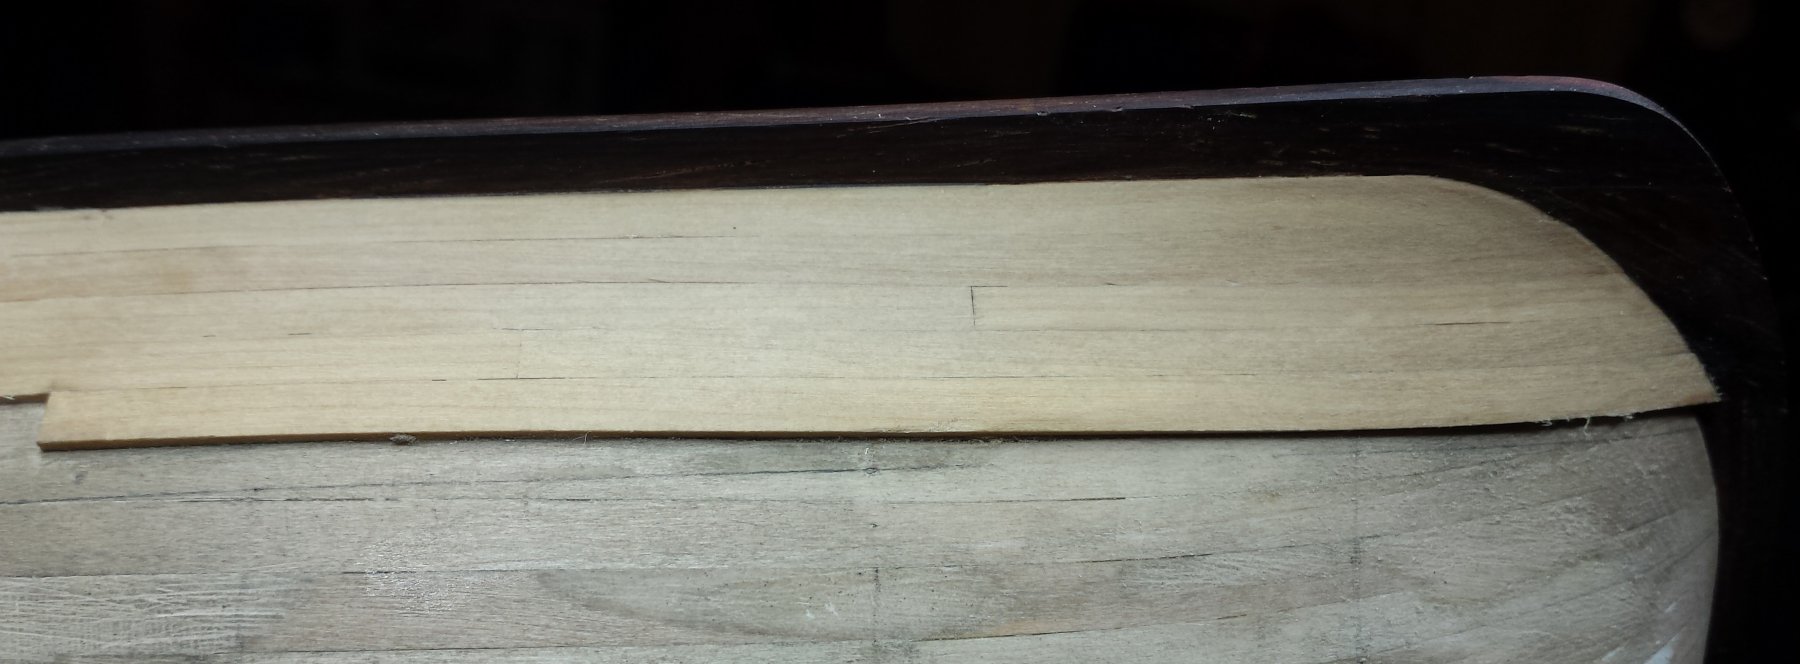
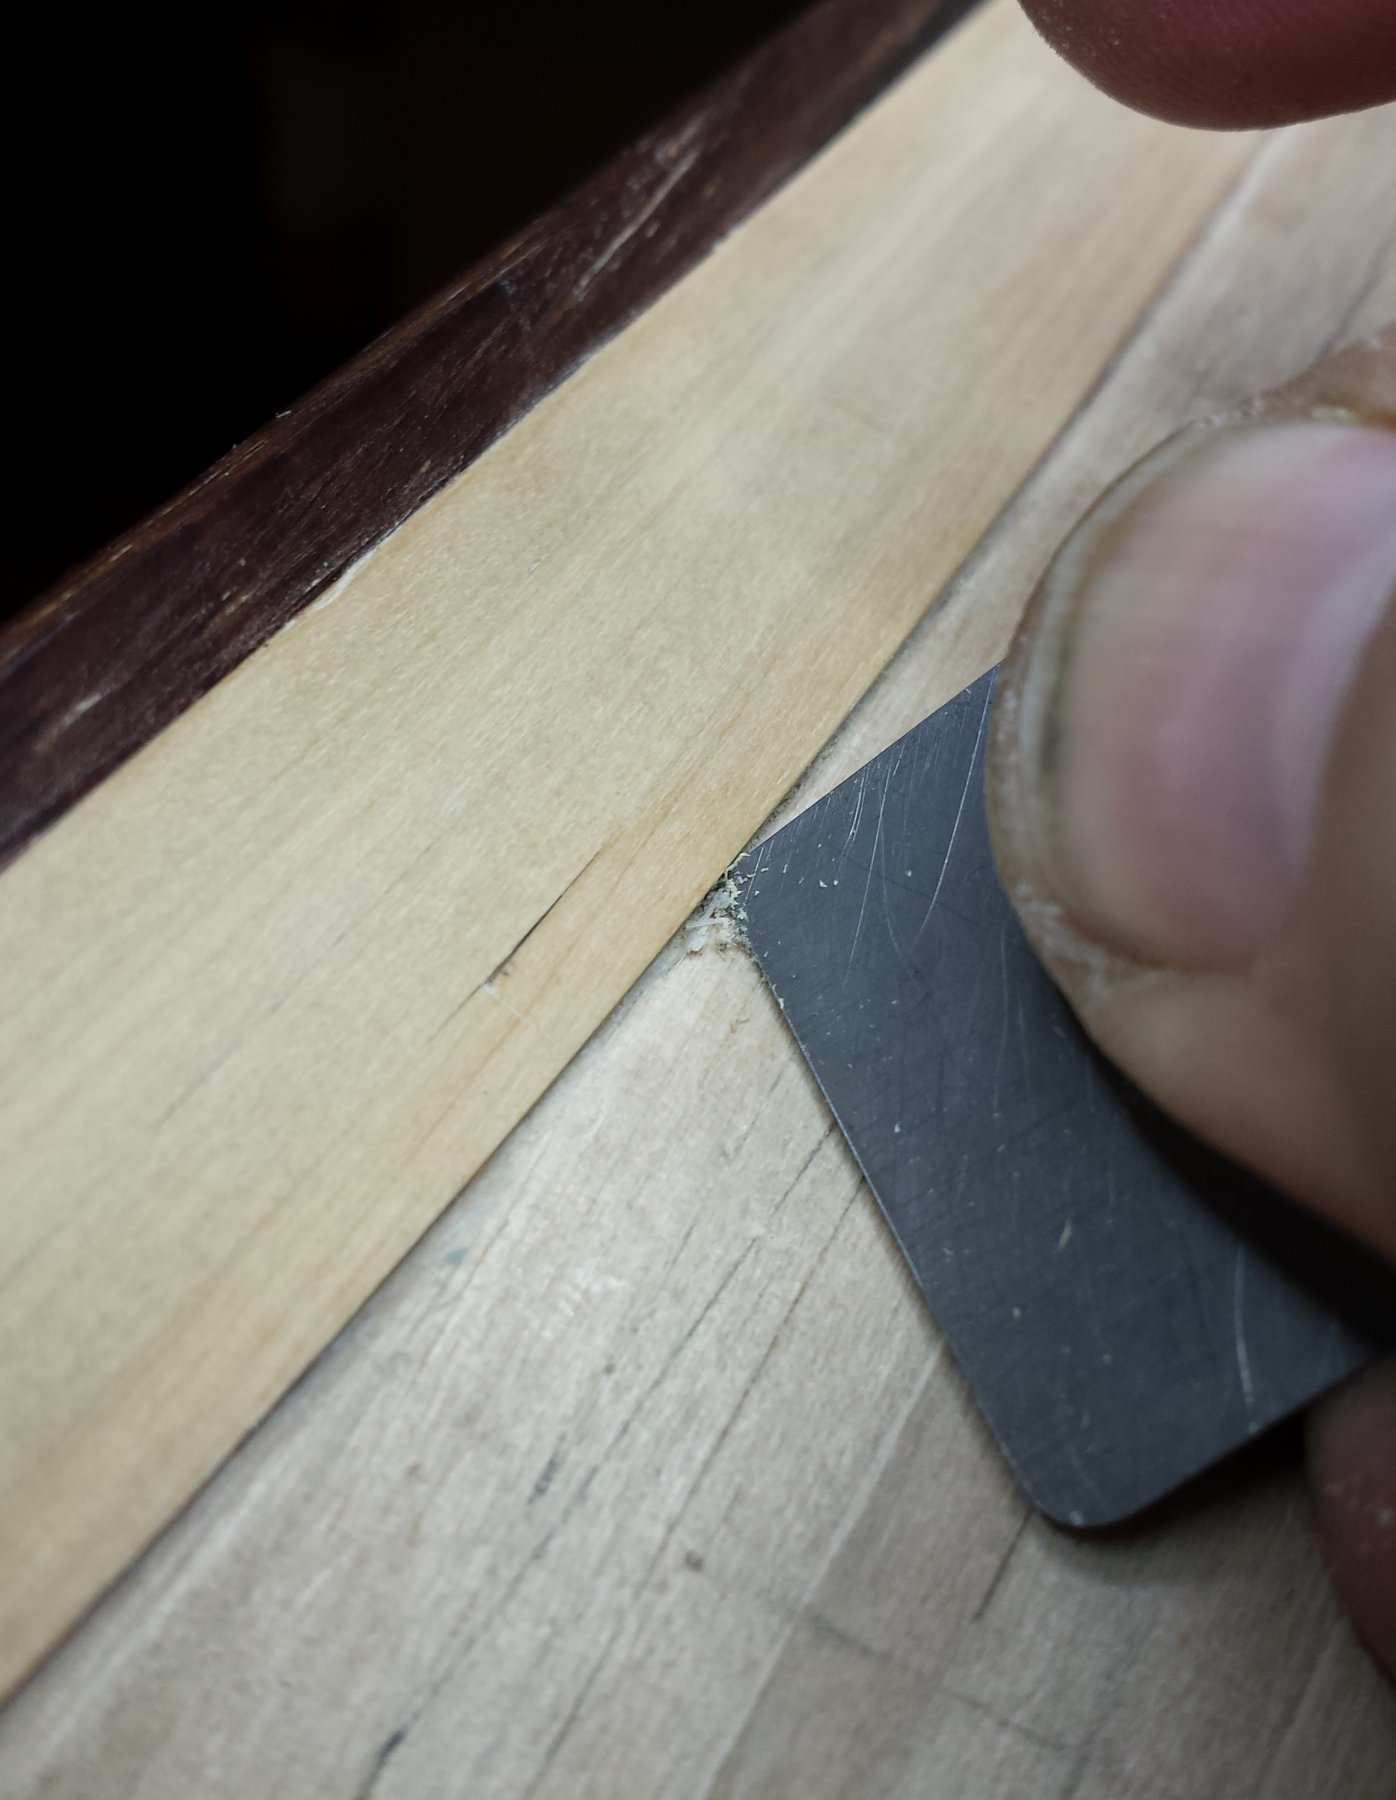
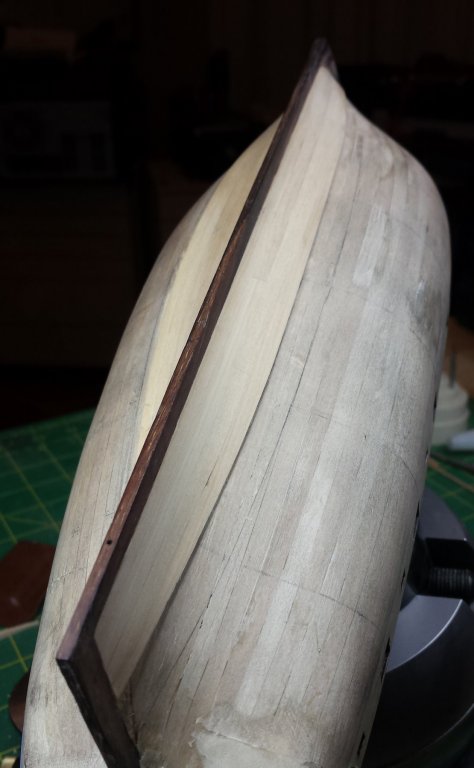
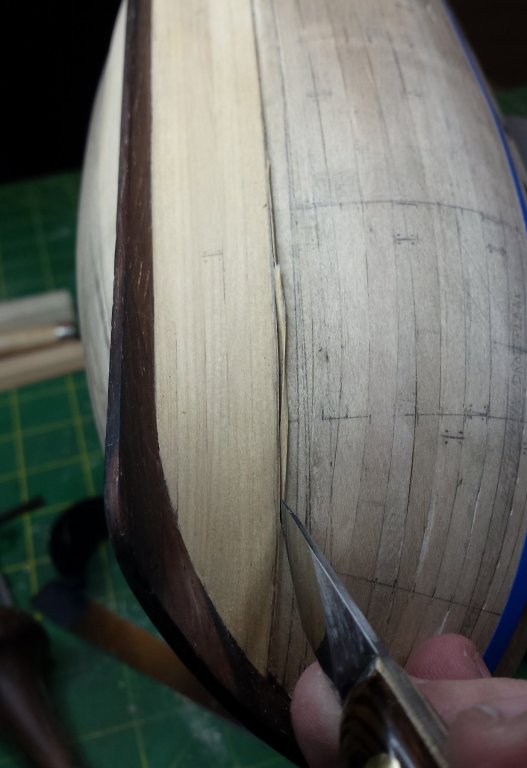
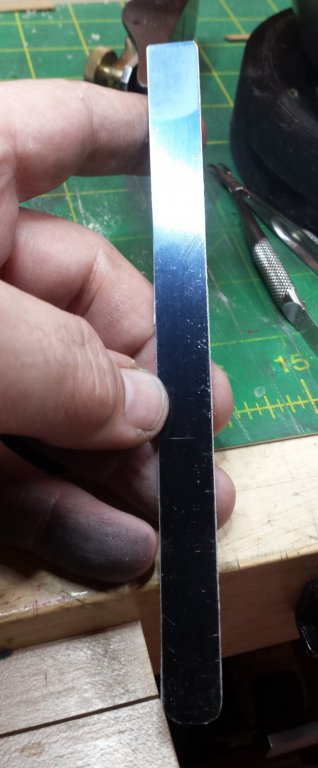
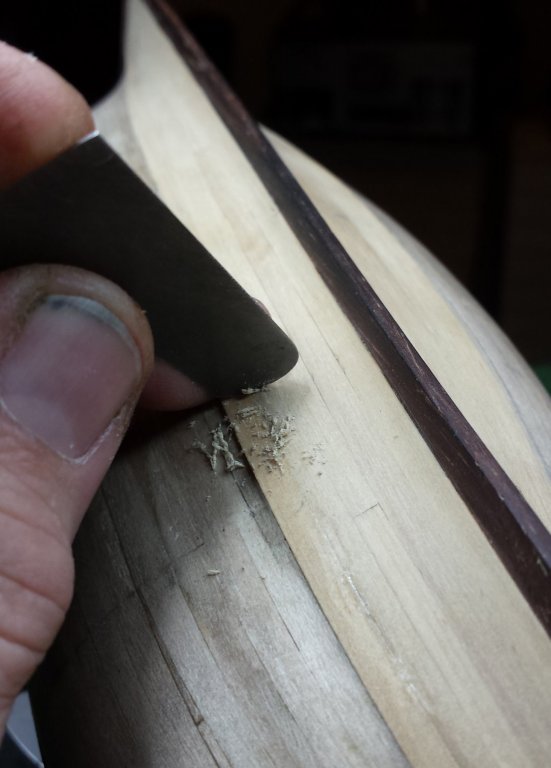
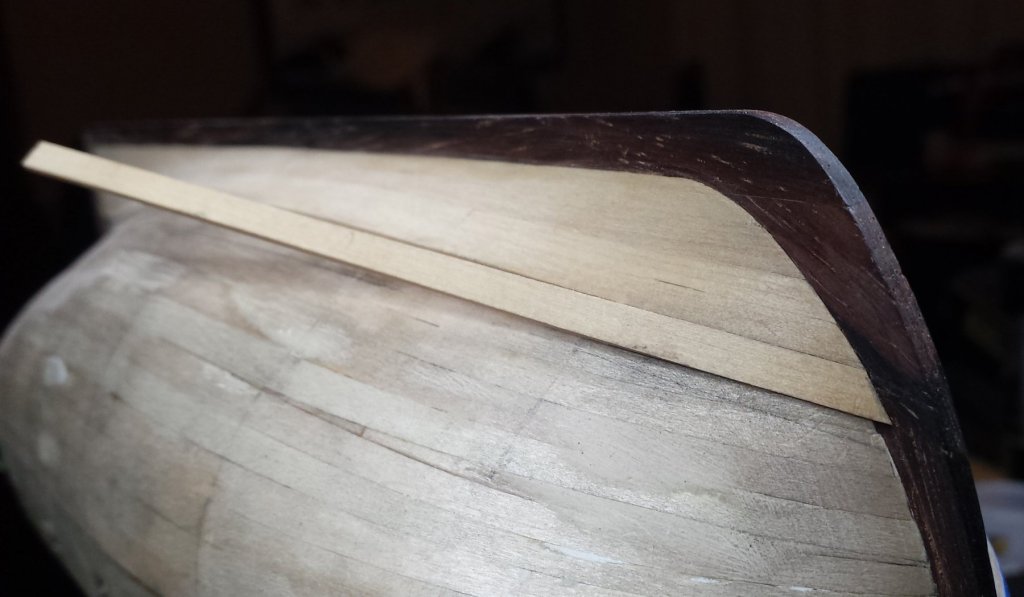
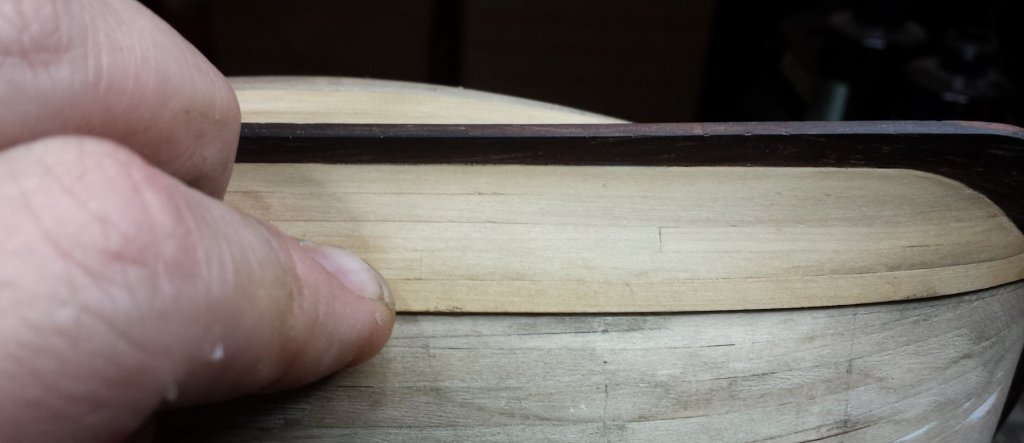
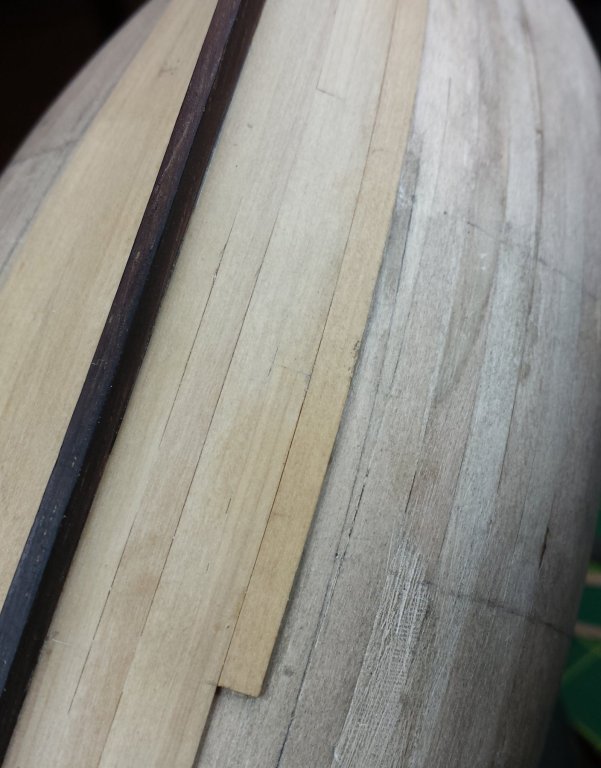
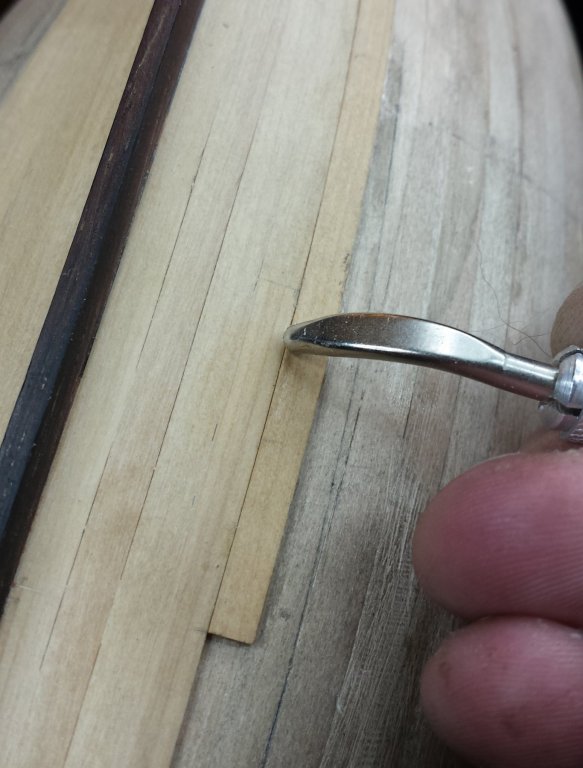
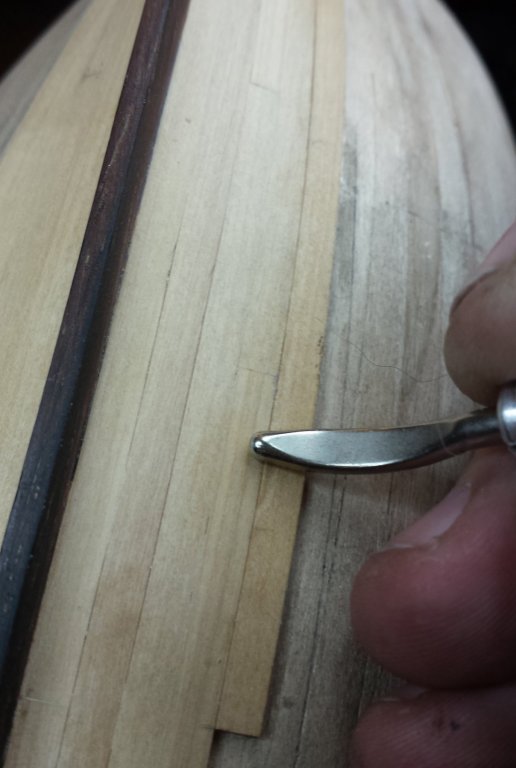
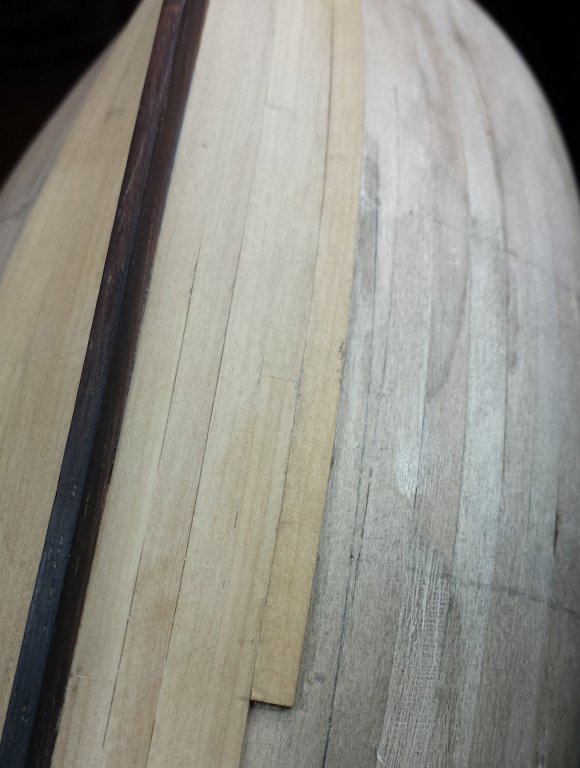
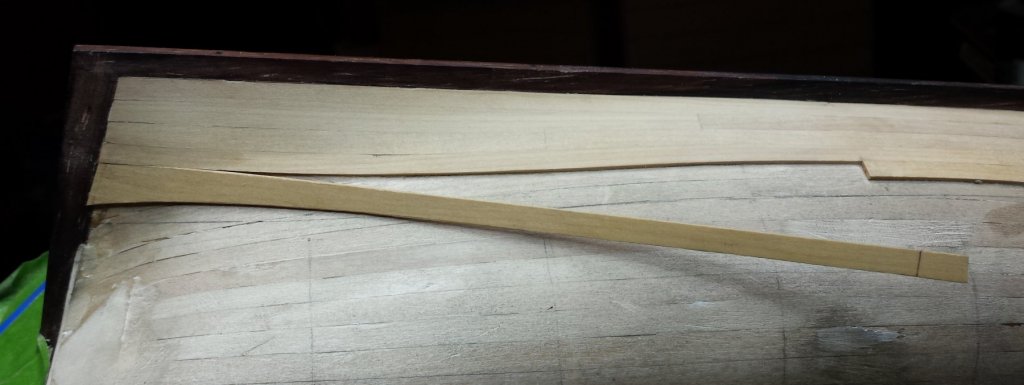
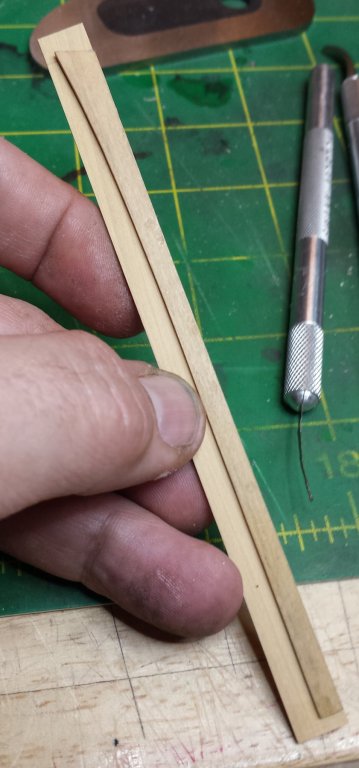
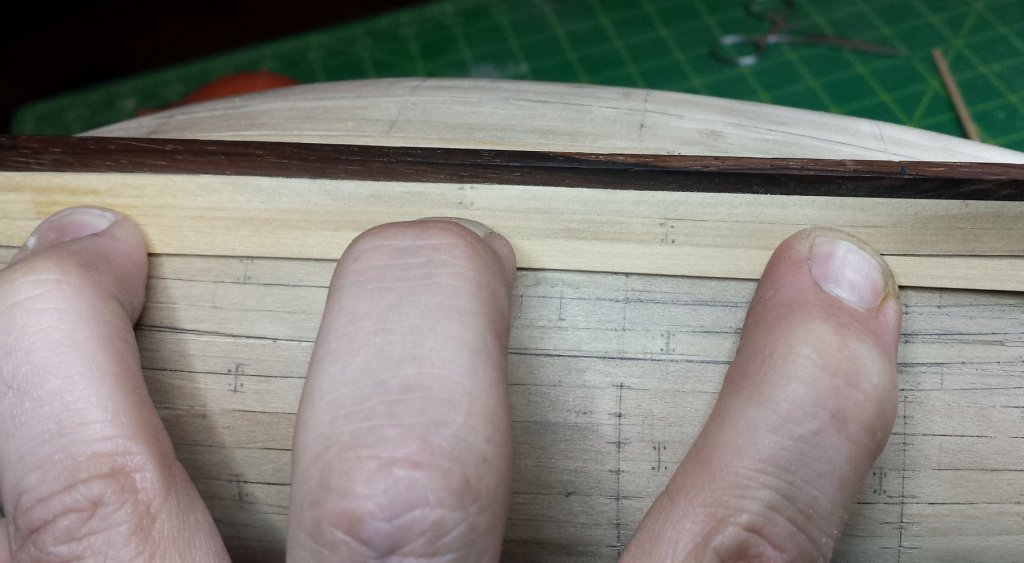
Ok so update on the relatively slow progress and going to take an opportunity to explain exactly what I'm doing on the second planking for the sake of anyone new reading. Although the progress has been slow, I'm pleased with the results so far and I have a pretty firm process now that requires just three tools (four if you count my fixit tool), none of which are expensive surgical, dental, or jewelry/watchmaking tools. First thing is you need a good knife with which you can trim plank edges easily and with consistency. This is something I know from my chip-carving experience, where I learned to cut lines with great consistency - And the ONLY way to do that is to use a Rc60+ hardness knife with a very fine bevel that is absolutely flat. Basically the finer the bevel, the closer the blade axis is to the cutting axis, and the closer it is the easier it is to cut where you want to. If you have a secondary bevel with an increased cutting angle, the blade tends to dive into the wood. If the bevel is even slightly rounded, the blade tends to climb out of the cut - there's a reason properly-sharpened straight razors have severely-rounded bevels. So to neither dive in nor climb out, the bevel has to be flat and it needs to be at a fine angle, and the fine angle also reduces cutting resistance. You can't do consistent lines straight or curved using anything but a light touch. Yes I made this knife myself but you can buy ones from Ron Hock or Northwood Bay or others for $25-$30 that are very good, the blade on my knife below is from Ron Hock. Some of the best cheap knives are from Japan woodworker, they have marking knives with central cutting steel that's Rc63-64. Here's one that's perfect and already ground with a very fine bevel, epoxy a handle on it if you like. Even better for this purpose would be single-bevel knives, blade and cutting axis exactly aligned. I have some single-bevel knives on order from Mikhail but I might get some from Japan woodworker also. In case anyone wonders, Japanese white and blue steel has nothing to do with the color of the metal, it has to do with the color of the wrappings they traditionally come from the foundry in. White steels are simple, nearly iron and carbon only and have all the advantages and disadvantages of the pure alloy. Blue steels are alloys that are more like our A2 or O1 steels, and can range all the way to what we'd call high speed steels. So generally speaking white steels might provide the best edges, while blue steels offer more edge durability. Back on track. Second tool is super-sophisticated, being a piece of .018" blue-temper spring steel with PSA 220 on one side. The hardest part about getting pieces of spring steel is finding someone who wants to sell you less than 25 feet of the stuff. I found a tattoo supplier on EBay selling short segments of various thicknesses for $7. I have no idea what tattoo artists do with it. Last is a small scraper that I've ground with convex and concave curves sorta French curvish that you'll see below. NO CLAMPS OR TAPE OR ANYTHING ELSE! So overall look at the results so far. All that said, this plank wasn't going so great I think it was Dan who pointed out that real ships often had flared planks to handle the stealer issue, and I decided to do that, just merge the stealers into the plank they were fitting into. It turned out I do have a boxwood sheet, however it's 1/16" so making workable planks requires cutting them roughly out and then planing down to thickness. This was the first one I was doing, and I learned I need to go a bit farther in planing them down, this guy just wasn't flexible enough. Obviously this would be a do-over higher up, but all of this is getting painted white so I went ahead with it. Also, the sharp-eyed might notice that I was able to minimize the up and down rollercoaster look of the first few planks with some judicious curve reduction, not sure how realistic this part is as the planks ended up varying in width slightly and subtly, something that might be trickier than a dockyard would want to do. One of my fancy tools helped here, because of the break the plank was no longer and no longer fit. This is the 90 degree attachment for my high-torque handset and it's like having a handheld Byrnes disc sander, with a fresh disc it can chew through boxwood without slowing down. With care it can be a precision joinery tool too, for example the bow rabbet fit of every plank is being done with this guy. It wasn't as bad as it looked, it's ok once cleaned up. So the process is that there are only two things I do to the planks I'm about to glue on: 1) Rough taper to 1/64" or so of intended line. 2) Relieve the top inner edge very slightly to minimize interference with glue or anything else I didn't notice right on the surface. No beveling, sanding, anything else. Of course this is also Crown Timber wood and that means it's surfaced very well with straight and square edges. If that wasn't the case I'd work the plank until that was the case. So basically ALL of the beveling and final taper and otherwise preparing the joints comes once the plank has been glued on. First step, as mentioned, is using knife to trim us down to very close. We're doing two parts here, one is trimming to the line, the other is trimming in the correct bevel. This is easy, just keep the knife exactly perpendicular to the surface as you go. What we're trying to produce is an edge that is always exactly perpendicular to the surface, and therefore the planks we're about to glue on with their perfect square 90 degree edge will fit perfectly top to bottom - no concern about it looking good now but having seams open as you sand down. Good sharp knife, you can get quite close. Then we have just a little bit of sanding to finalize those lines and make sure we have our good perpendicular edge everywhere. I purposely left my little sanding tool at this width even though it means 90% of it never gets touched for this purpose. Anyone guess why? Class? Bueller? BUELLER? Because it makes it much easier to see what angle you're sanding at. With this tool, it's not really hard at all to sand the edges to exactly what you want. The reason for the spring steel is you have a nice gentle curve that allows you to hit specific areas or you can straighten it out while holding it to cover longer distances. As noted, the resulting fit is very good. I'm holding this plank up to test with very little pressure, and nothing has been done to the plank at this point other than pulling it out of the bag. And one last step, remember I relieved the top inner edge of the to-be-glued-on plank to avoid surface interference, I further reduce chances of that by taking the corner of my little scraper and cutting a very small groove in the prepared plank right down on the surface. So that's the basic process, we can follow it with the fifth strake on the starboard side, that includes the first flared plank at the stern. Don't think you got it just yet, there are some things about how I am gluing and how I'm fixing issues that are important to note. Because of the good fit, the pressure required to glue is very minimal, and as such we're using CA, and we're going to do it in short segments so we don't stress about fast-setting CA and also so we can make extra sure of the fit. IMPORTANT POINT: we DON'T glue the plank edges AT ALL, except for plank edges and ends that fit into rabbets. The first reason is that any glue in there will create a line even when there didn't need to be. The second has to do with fixing issues, as you'll see below. And lastly, if you insist, once we have the plank fully glue in and leveled you can run some thin super glue over the edges, enough will wick in to lock the planks in place. This is the bow plank of the fifth strake, and we start by getting a very solid glue joint with the rabbet. I generally let this one sit for five minutes or so to make sure it's going nowhere. I'll add a pic here a bit later, but I add glue with a photoetched glue thing that fits into an XActo knife. It's .007" thick, which is very much required for this glue method. What I do is pry the plank up from the previously-glued segment (WITHOUT pulling up anything glued) and I then carefully paint the inner surface of the plank segment about to be glued with my thin XActo applicator - pick up a big drop, and then kinda squeegee it down the inner surface of the plank. IMPORTANT POINT: LESS IS MORE! We want NO squeezeout on either side. On the upper side, it gets into the edge joint and as previously discussed we don't want that. On the bottom it squeezes out where we're going to be fitting our next plank, which is unnecessary cleanup work to remove that we don't want to do. As mentioned, little pressure or fuss required gluing. I'm "clamping" this segment with one hand. I don't know about you but I like one-handed, 30 second gluing of plank segments with a very good fit. So far so good, but now we come to issue fixing, because just after this segment I got a little greedy and tried to glue the rest in one shot, when I really needed to do it in two segments and it didn't land quite right and grabbed so I couldn't adjust. It's hardly a nightmare, but it's definitely much more open around the butt joint in the planks just above, more so than the results we should have had here, so we want to fix it if we can. And we can. This is the semi-fourth tool required for this planking method - our burnisher/fixer. Good for holding down parts of planks while we glue in this method in general, but it's also perfect for fixing little openings like this. Now if we'd added glue to that edge, there would be nothing at all we could do about it since it would be filled with glue and the planks would be locked together. But because we didn't, we can take advantage of the fact that wood can be quite plastic if manipulated correctly. Step one to fixing an opening - with considerable pressure (at least on boxwood) we use the burnisher to press in a groove just short of joint. If you look closely you can see it here, particularly in the shadow of the burnisher. Step two - that leaves a raised edge right at the joint, exactly what we need. We flip the burnisher over, and now when we bear down on it and work it toward the joint, this edge will be squishing down and will go toward the only open space available. Step three - be pleased by the results. And as mentioned you can wick in thin superglue at this point to give you the traditional fully locked into place planking. Here's that plank all cleaned up. Same process for the stern plank, but we start by cutting out a piece matching the port side by using the same template as I used on the port side. As with the bow, gluing starts with the rabbet joint and we get that right before working toward the middle. Based on my experience of the port side, I decided to leave this plank long and cut the midships butt joint just before gluing it down. Although I think I had it right on the port side before I decided to break that plank, that plank is long enough and bends enough to make it tricky to get it exactly right and the disadvantages of cutting a joint on a piece already glued in was outweighed by the advantage of being unlikely to get it wildly wrong. Once we get to the other end, we cut it close with a good flush cutter. A good Lindstrom or Erem full-flush angled cutter like this is a very handy tool with lots of uses. Then back to the rotary tool to finalize the joint, but with care you could do this with just as good results with the spring-steel sander. And fit is good enough that I'll have to pry it back up to add glue. I didn't show it, the the scraper is also useful for removing stock when working down plank edges as part of the fitting process. You can see the plank we just put on will require some knife trimming and sanding, you can add the scraper to the tool choice there as long as you keep one corner perfectly square. But below is its primary use, quickly leveling down the planks as we glue them on. And here's that stern plank done and that strake is finished.


- 714 replies
-
- 15
-
-
- lady nelson
- victory models
- (and 1 more)
-
Bending with steam easily
vossiewulf replied to a topic in Building, Framing, Planking and plating a ships hull and deck
You can't do dry heat the same way you do steam, if you do you'd reach the conclusion that it doesn't work. First it's not a good idea for severe bends, if you have a severe bend to do and you don't use steam you need to soak the planks in water first, and then you'll use the heat mostly to set the bend. With no-water you heat and bend in steps, clamping as you go along, and you have to bend it past the final curve you want as it will spring back a bit. Chuck's planking videos show it in action pretty clearly. -
Bending with steam easily
vossiewulf replied to a topic in Building, Framing, Planking and plating a ships hull and deck
There's a reason every large-scale wood bending operation since the beginning of time has involved steam. The Egyptians were steaming the wood required to make their highly sophisticated and engineered chariots 4000 years ago, for example. It really is the best way to do it. However, it's not always the most convenient way to do it and dry bending at our scales generally works fine. So the recommendation should be to use steam if you can, if that's hard to do for some reason, use Chuck's dry bending with a hair dryer method, it should get the job done also. -
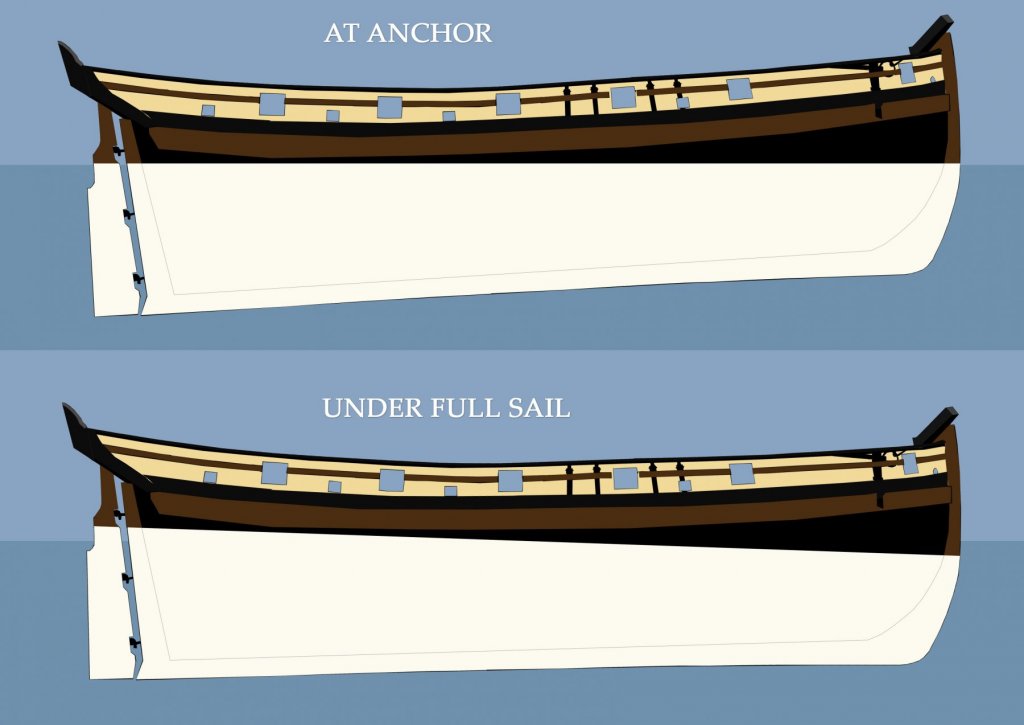
Blah the second one doesn't sound good, that would require careful timing in combat and that's not a good idea, besides the fact you'd have to fire a 6lb mass at about mach 34 to generate enough force to really bring the bow down. Your first idea though, is much much better and I think that's the winner. We're forgetting these ships were so over-canvassed that they likely would be pushed significantly bow-down under full sail, there just wasn't enough bow length forward of the mast to stop that from happening. In fact more I think about it, I'm sure that's the reason for the bizarre at-rest waterline, and that would be a very important point of note for anyone wanting to do a waterline model under sail. Edit - here we go, it all makes sense now Here's a guess at how she would trim under full sail, gunports now align reasonably well with the water. Well not all makes sense, as I still don't understand why the gunport heights follow the top of the rail and not the deck, but that's minor compared to the overall trim alignment.
- 714 replies
-
- 2
-
-
- lady nelson
- victory models
- (and 1 more)