KLarsen Posted January 30 Author Share #31 Posted January 30 Trying to get the rear frames perfectly aligned seems almost impossible; is there any secret trick to getting it done? The transom pieces have the correct angle, I've sanded and measured them plenty of times and they are fine. I can get the frames to sit almost correctly but there's still 1-2 mm misalignment between the port and starboard ones. I can probably sand that but still. And how do I make sure the upper part of the frames are sitting correctly? GrandpaPhil, davec, JacquesCousteau and 2 others 5 Quote Link to comment Share on other sites More sharing options...
No Idea Posted January 30 Share #32 Posted January 30 Hi mate I feel your pain 👍. I ended up making mine twice as getting the transom fillers to fit the fashion pieces is tricky. In the end I glued the transom pieces to the stern post. This kept them still and in alignment which allowed me to file a nice straight angled edge between them and only then did they sit nicely on the fashion pieces. Keep going and you’ll get there 👍👍 mtaylor, davec and KLarsen 3 Quote Link to comment Share on other sites More sharing options...
KLarsen Posted January 30 Author Share #33 Posted January 30 Yeah I did the same. It's necessary to fix some of the attachments points or it's like a multivariable function. 😄 Did you have any issues with the upper parts of the rear frames not aligning well when you installed the rest of the frames? davec and mtaylor 2 Quote Link to comment Share on other sites More sharing options...
KLarsen Posted February 1 Author Share #34 Posted February 1 Does anyone have any information on how the frames were bolted together at the end of the 18th century? From what I've found round headed bolts were used in the British navy, but I've seen others use square headed bolted on Spanish ship models. And were the bolts bronze or iron? I'd definitely be easier for me to make round headed bolts but if square headed were used, maybe I can make them somehow. mtaylor and davec 2 Quote Link to comment Share on other sites More sharing options...
druxey Posted February 1 Share #35 Posted February 1 You need a marked out building board so that you can drop perpendiculars from the frame (or whatever) to the plan on the baseboard. I don't think there is any other way to get the frames placed exactly and symmetrically. You can see the maximum breadth line on the baseboard in the photo below. CiscoH, KLarsen, mtaylor and 2 others 5 Quote Be sure to sign up for an epic Nelson/Trafalgar project if you would like to see it made into a TV series http://trafalgar.tv Link to comment Share on other sites More sharing options...
KLarsen Posted February 2 Author Share #36 Posted February 2 I'll make a building board for the rest of the frames, for this last one I used a template made from cardboard to check the correct angles. I've decided not to make bolts this time because the last frame has to be sanded a lot, and I simply don't know where to put the bolts so they don't get sanded down. I had this problem with my last build too (Santa Caterina), where the end frames were sanded almost diagonal. So I've gone ahead and glued the yoke and frame on, I hope I've been precise enough but it's really difficult to judge with all the angles. With this done I can start on the "normal" frames in front of the half frames. Those should be easier to do and can help with aligning the rest of the half frames. JpR62, marsalv, JacquesCousteau and 7 others 10 Quote Link to comment Share on other sites More sharing options...
No Idea Posted February 2 Share #37 Posted February 2 That really looks like a great job - as for the later frames being in line and perpendicular I agree with druxey you need a datum on the base of your building board or higher up. This will ensure that the frames are in the correct position. I have found that measuring constantly keeps things just about right. Great build 👍 mtaylor, davec and druxey 3 Quote Link to comment Share on other sites More sharing options...
KLarsen Posted February 2 Author Share #38 Posted February 2 59 minutes ago, No Idea said: That really looks like a great job - as for the later frames being in line and perpendicular I agree with druxey you need a datum on the base of your building board or higher up. This will ensure that the frames are in the correct position. I have found that measuring constantly keeps things just about right. Great build 👍 Thanks! My idea is to make a base plate with a copy of the frame plan on top, and another plate lifted to the height of the wales more or less, where I also trace the position of the frames. Basically as I did with my Santa Caterina build. Would that work? For now though, I'll prepare all the normal frames (just 5 for this cross section) and dry fit them. No Idea, mtaylor and davec 3 Quote Link to comment Share on other sites More sharing options...
Wintergreen Posted February 3 Share #39 Posted February 3 (edited) Yes, I think that will work. I did similar with the stern stanchions on my build. Altho that is a complete different kind of boat. Edited February 3 by Wintergreen KLarsen, mtaylor and davec 3 Quote Happy modelling! Håkan __________________________________________ Current build: Atlantica by Wintergreen Previous builds Kågen by Wintergreen Regina by Wintergreen Sea of Galilee boat, first century, sort of... Billing Boats Wasa Gallery: Kågen (Cog, kaeg) by Wintergreen - 1:30, Billing Boats Regina - 1:30, Billing Boats Dana, Link to comment Share on other sites More sharing options...
KLarsen Posted February 11 Author Share #40 Posted February 11 Starting on the full frames. For now they're just dryfitted, it'll be a long time until I can glue them in place. I'll make a building board when I get to that point. Sawing out the pieces by hand takes some effort but it can be done. I've no room for an electric saw where I currently live anyway. Someday hopefully I can have a full workshop for my hobby... CiscoH, KARAVOKIRIS, bdgiantman2 and 12 others 14 1 Quote Link to comment Share on other sites More sharing options...
Wintergreen Posted February 11 Share #41 Posted February 11 Yeah, space and tools... but on the other hand, learning to do it with less is beneficiary to the skill level in the long run 😉 Nice job so far. Keep it up! No Idea, native one, KLarsen and 2 others 5 Quote Happy modelling! Håkan __________________________________________ Current build: Atlantica by Wintergreen Previous builds Kågen by Wintergreen Regina by Wintergreen Sea of Galilee boat, first century, sort of... Billing Boats Wasa Gallery: Kågen (Cog, kaeg) by Wintergreen - 1:30, Billing Boats Regina - 1:30, Billing Boats Dana, Link to comment Share on other sites More sharing options...
native one Posted February 12 Share #42 Posted February 12 For the stern and bow my model never left the build board so I could retain my extreme breadth line which helped keep it at the width the frames needed to be set at,and by drawing the frame locations on the upper board made it easier to keep the cant frames evenly spaced. mtaylor, Stavanger, KARAVOKIRIS and 5 others 8 Quote Link to comment Share on other sites More sharing options...
druxey Posted February 12 Share #43 Posted February 12 Looking very good so far! KLarsen and mtaylor 2 Quote Be sure to sign up for an epic Nelson/Trafalgar project if you would like to see it made into a TV series http://trafalgar.tv Link to comment Share on other sites More sharing options...
KLarsen Posted February 12 Author Share #44 Posted February 12 1 hour ago, native one said: For the stern and bow my model never left the build board so I could retain my extreme breadth line which helped keep it at the width the frames needed to be set at,and by drawing the frame locations on the upper board made it easier to keep the cant frames evenly spaced. Looks great, I'll copy your building board, I just need to buy some plywood. 👍 mtaylor 1 Quote Link to comment Share on other sites More sharing options...
KLarsen Posted March 4 Author Share #45 Posted March 4 Not much progress lately, only that I built the cradle / building board to attach the frames. Unfortunately I didn't install the last cant frame perfectly well, it's about 1-2 mm off compared to the other side. Probably not much I can do about that now though. I'm using rubber bands to try and force it back a little, maybe when I install the rest of the frames and keep them together with the wales it'll stay in the correct position without warping the whole model. Or maybe not... Honestly I don't feel like starting all over so I'll have to accept it as it is. After all I chose this model to learn how to build plank-on-frame, and this is one of those lessons. Now I'm kind of scared to glue the 5 full frames in, in case I mess it up. 🙃 JpR62, native one, davyboy and 7 others 10 Quote Link to comment Share on other sites More sharing options...
No Idea Posted March 4 Share #46 Posted March 4 My build is out of square by roughly the same amount as yours. It won't notice as it doesn't on mine - keep going as your work looks great! KLarsen and mtaylor 2 Quote Link to comment Share on other sites More sharing options...
KLarsen Posted March 4 Author Share #47 Posted March 4 1 hour ago, No Idea said: My build is out of square by roughly the same amount as yours. It won't notice as it doesn't on mine - keep going as your work looks great! Thanks, that actually encourages me! druxey, No Idea and mtaylor 3 Quote Link to comment Share on other sites More sharing options...
Wintergreen Posted March 4 Share #48 Posted March 4 4 hours ago, KLarsen said: Now I'm kind of scared to glue the 5 full frames in, in case I mess it up Well, if so, it is a learning experience as you've already stated 😉 From what we can see of your photos you will be just fine. Don't rush it though, that's never a good idea. Keep it up! KLarsen, druxey and mtaylor 3 Quote Happy modelling! Håkan __________________________________________ Current build: Atlantica by Wintergreen Previous builds Kågen by Wintergreen Regina by Wintergreen Sea of Galilee boat, first century, sort of... Billing Boats Wasa Gallery: Kågen (Cog, kaeg) by Wintergreen - 1:30, Billing Boats Regina - 1:30, Billing Boats Dana, Link to comment Share on other sites More sharing options...
KLarsen Posted March 22 Author Share #49 Posted March 22 Well that turned out much better than I'd hoped! The hardest part of the frames were sawing all the pieces out by hand, but I eventually got it done (with a sore arm!) and the installation went very well. It definetely helped having a disc sander with a tilting table which allowed me to sand the angle at the foot of the frames with great precision. MEDDO, mtaylor, No Idea and 12 others 15 Quote Link to comment Share on other sites More sharing options...
No Idea Posted March 22 Share #50 Posted March 22 I have to say that your work is fantastic - Great joints and it's so symmetrical too. I found that making the fashion pieces correctly to fit the wing transom and filler pieces was particularly difficult and you have smashed it - top job! mtaylor, VTHokiEE and KLarsen 3 Quote Link to comment Share on other sites More sharing options...
KLarsen Posted March 22 Author Share #51 Posted March 22 17 minutes ago, No Idea said: I have to say that your work is fantastic - Great joints and it's so symmetrical too. I found that making the fashion pieces correctly to fit the wing transom and filler pieces was particularly difficult and you have smashed it - top job! Thank you!!! 😊 I wouldn't say it was easy though! native one, VTHokiEE, mtaylor and 1 other 4 Quote Link to comment Share on other sites More sharing options...
Wintergreen Posted March 24 Share #52 Posted March 24 Looks really good, well done! Keep it up! KLarsen and mtaylor 2 Quote Happy modelling! Håkan __________________________________________ Current build: Atlantica by Wintergreen Previous builds Kågen by Wintergreen Regina by Wintergreen Sea of Galilee boat, first century, sort of... Billing Boats Wasa Gallery: Kågen (Cog, kaeg) by Wintergreen - 1:30, Billing Boats Regina - 1:30, Billing Boats Dana, Link to comment Share on other sites More sharing options...
KLarsen Posted April 8 Author Share #53 Posted April 8 Continuing with the rear frames that will make up the stern gallery. Those stern pieces were a bit tricky to make, I ended up cutting them a few millimeters thicker and sanding them down to shape with the rest of the frames. I think it turned out pretty well! Most of the rough sanding is done, but there's still a lot to be sanded. Sadly I just gouged the yoke a bit this afternoon when sanding the stern, not much I can do about that now though. Also I need to fill out that triangular area below the wing transoms and then sand it all flush. dvm27, druxey, Freebird and 12 others 11 4 Quote Link to comment Share on other sites More sharing options...
KLarsen Posted April 19 Author Share #54 Posted April 19 Continuing work on the stern gallery. jpalmer1970, VTHokiEE, ccoyle and 11 others 13 1 Quote Link to comment Share on other sites More sharing options...
druxey Posted April 20 Share #55 Posted April 20 Very neat work on the heels of the cant frames where they sit on the bearding line. Not an easy trick to accomplish with the compound bevels! mtaylor and KLarsen 2 Quote Be sure to sign up for an epic Nelson/Trafalgar project if you would like to see it made into a TV series http://trafalgar.tv Link to comment Share on other sites More sharing options...
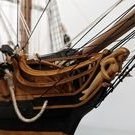
KLarsen Posted Monday at 05:42 PM Author Share #56 Posted Monday at 05:42 PM Some more progress. I've installed the wales, the lower one was difficult to bend at the stern but I got it done. I've also gone ahead and trimmed the frames to their (almost) correct height and made the cutouts for the upper gun emplacements (not shown on the first photo which is from a week ago). I'm now turning my attention to the interior, I installed the keelson and will start on the strakes on which the deck beams are resting. yvesvidal, Siggi52, Freebird and 7 others 8 2 Quote Link to comment Share on other sites More sharing options...

Recommended Posts
Join the conversation
You can post now and register later. If you have an account, sign in now to post with your account.