


dvm27
-
Posts
2,296 -
Joined
-
Last visited
Content Type
Profiles
Forums
Gallery
Events
Everything posted by dvm27
-
 How many lines were fouled and spars snapped while Ed was signing this delightful "prop"?
 -
Lovely job on those fixed blocks Chuck. Cutting them in-situ would be stressful for most of us! Are the sills of the sweep ports to be left natural or painted red as well?
-
Love your approach to the swivel hardware. I hope your model ends up in one of the prestigious European competitions. It has Gold Medal written all over it.
-
We've all been there Johann! At least, hopefully, you can reuse all the fittings you've made. I'll wager these took a lot longer than fabricating the yard.
-
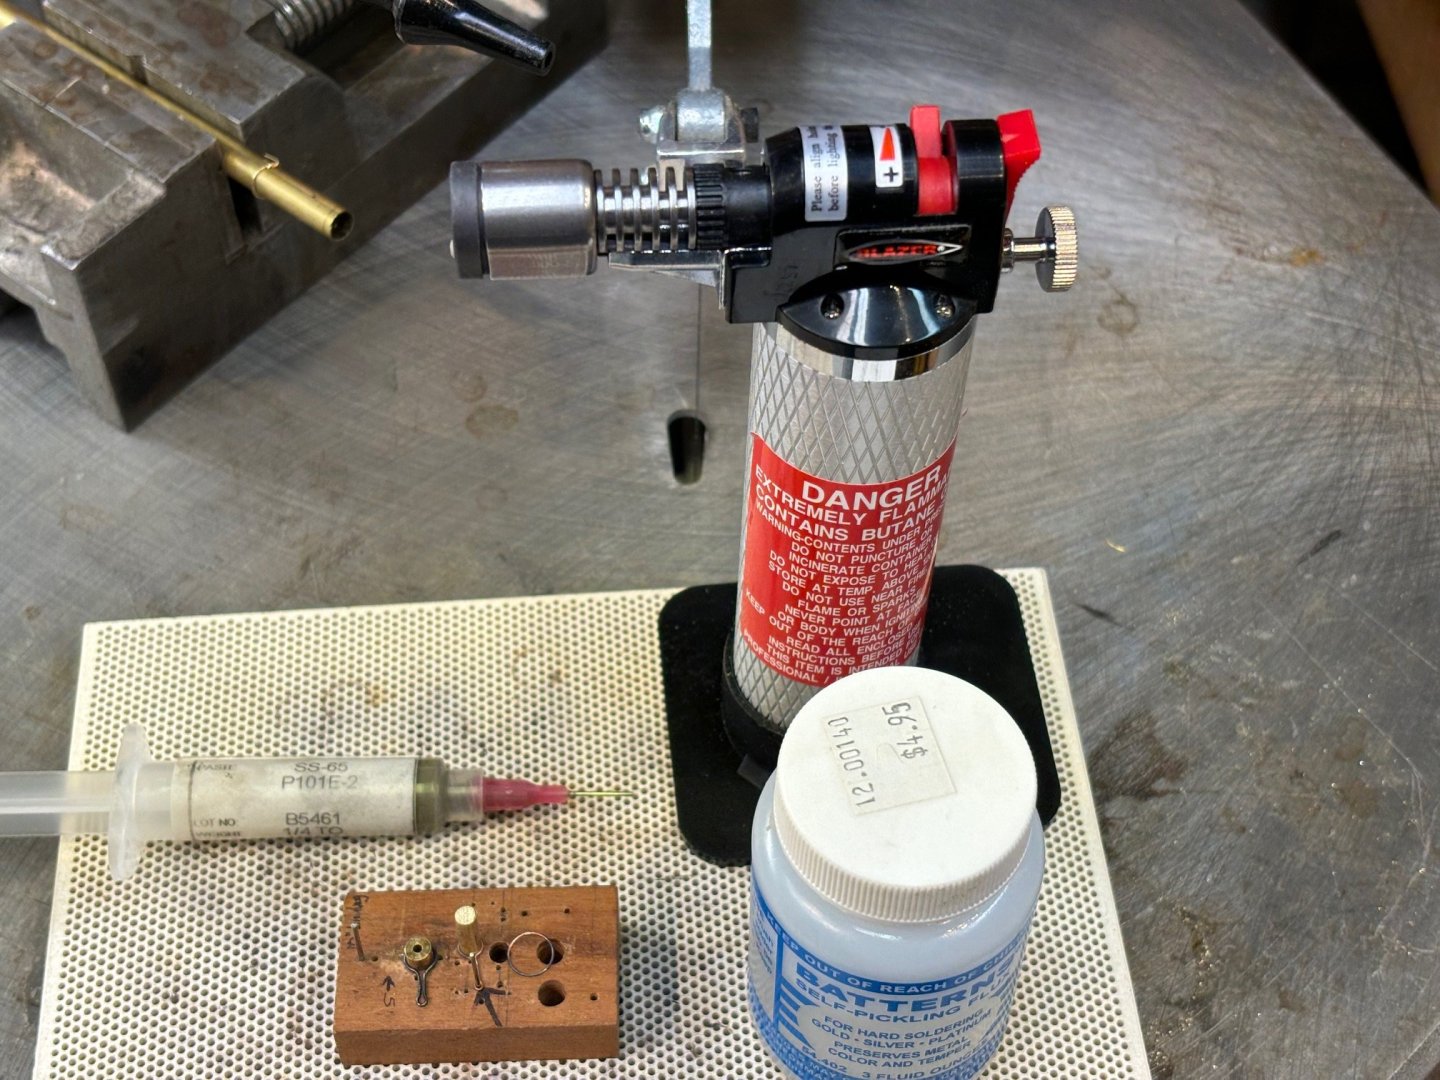
I struggled with silver soldering for some time until I found a system that works for me virtually every time. First off, the mini torch I was using did not generate enough heat for silver soldering. I have since had excellent success with the Blazer Torch https://www.amazon.com/dp/B017Z8KD3S?psc=1&ref=ppx_pop_dt_b_product_details. More importantly I switched to silver solder paste from Euro Tools. It comes as soft, medium and hard so you can solder adjacent pieces. Otherwise I use the medium https://beaducation.com/products/silver-solder-paste-medium. I also use Battens Flux on the joint prior to soldering but I'm not sure if you need it with the paste. You only need a speck of the solder on the joint and you have to move the torch the second it flashes. At any rate if you're having unsuccessful solder joints more than 10% of the time maybe give this a try. Also, as Druxey has pointed out, it's best to place the joint on a linear plane.

- 2,444 replies
-
- 9
-

-

-
- heller
- soleil royal
- (and 9 more)
-
I use 6-32 threaded rod and 6/32 Acorn nut or knurled knob. The rod comes in 12" lengths so it can be trimmed to a custom size. I thread the acorn nut onto one end. You will drill two hoes in the building board that correspond with the holes in the keel. make them slightly larger than the keel holes to allow for adjustments on the building board. Do not tap these holes. Now insert the threaded rods with the acorn nut on the end through a washer, then building board and thread into the keel. continue until the acorn nut snugs against the washer. Mark the exit of the threaded rod where atop the heel and cut flush. I don't glue mine into place as it us helpful to remove the hull sometimes (especially when fairing). I do glue the acorn nut onto the threaded rod once the final position of the threaded rod is determined (using Loctite).
-
Terrific start. If you haven't downloaded the instructions from our website http://chrome-extension://efaidnbmnnnibpcajpcglclefindmkaj/https://admiraltymodels.homestead.com/Echo_cross-section_framing_instructions.pdf please do so. They're free but not sure how long the website will remain there.
-
Instead of using fillers to repair the errant scores make a small patch using the same wood to fill in the defect. Make sure that the grain matches the direction of the carling (don't use end grain). Once glued in place and sanded flush the defect should be barely perceptible. I have corrected several errant mortises this way.
-
The officer gets a spoon and cup (great details by the way) but no light in the filling room? I think OSHA would level a fine for that.
-
Scratch building is chock full of learning experiences. Hopefully you are using PVA glue which is easily debonded with isopropyl alcohol. May I suggest you prepare a test scarph joint with your tissue paper then debond it with PVA. I'm suggesting this because some papers I tried actually created a black mess during the debonding process and ruined the piece. Of course if you are planning to build a perfect, error free model this is not a concern but I buy my alcohol by the gallons. Also test the finish you propose to use to make sure it doesn't make the tissue paper bleed. Finally, I have found that using thicker tissue paper results in a weaker joint. Perforating the tissue paper prior to gluing the mating segment seems to help this. As well make sure to use treenails or brass fastening to reinforce these joints. You're off to a great start!
-
What a pleasure it must be to be able to design and laser cut your own custom cabin partitions. You may not like kitchen sinking but I guarantee yours is the only model with the correct three nail pattern on the cabin planking. Would you like to borrow Gus, our office cat, to take care of your rat problem?
-
I was fortunate enough to have visited the Museum just before it closed. I felt it was one of the best museums I have ever visited. Had the same thought about the Science Museum in England in the late 70's. At least I am fortunate to be so close to the Annapolis Museum where ship models take center stage thanks to a generous grant from an earlier class.
-
I didn't actually notice that the swivel stocks were not on the original model Chuck. But the swivels ("ten 1/2 pounder swivel guns") are clearly noted in Winfield's British Warships in the Age of Sail 1714-1792 as specified for the Cruiser class. Of interest to us modelers is that only enough swivel guns to fit out one side was required. As they were so light they could be carried to the other side as needed.
-
I use small pieces of index card held together with white glue. Just keep building them using small pieces of card. On some patterns like the mast step I'll have assembled 7 or 8 pieces of card. The unplanked side is a bit tricky. You can either extend the bulkhead all the way to the frame or stop where the planking would have been (leaving a gap). See Chuck's Speedwell below. As you'll find, it is much easier to leave a gap then achieve a perfect mating with the planking! https://modelshipworld.com/uploads/monthly_2024_03/forecastlebulkhead5.jpg.9ce18fb61c7a32f2595493a29fab12d3.jpg
- 887 replies
-
- 3
-
-
- hahn
- oliver cromwell
- (and 1 more)
-
You should cut as close to the line as you are comfortable doing without cutting into the line. I used to leave about 1/16" using my scroll saw then sanded to the lines on my disk sander or oscillating spindle sander. After some practice I'm able to cut to within a whisker of the line and that is sufficient. Fairing after the hull is assembled will blend everything together. As well, I don't bevel the frames (except the hawse and cant frames) prior to installing as over-bevelling even one futtock will affect several frames before and after it.
-
Lovely work. Anyone who completes one of those Marine Models (was it Bliss marine Co?) with their "pre-carved" hulls has my utmost respect. Give me plank on frame any day!
- 44 replies
-
- 1
-
-
- Red Jacket
- Marine Model Company
- (and 2 more)
-
One of my employees was awakened by the noise of the crash and actually witnessed the collapse. She lives less than a mile away and felt her house shake. I believe Andy is correct in that abutments would have deflected the ship and probably prevented this disaster. I believe they are discussing dredging the channel to make it more compatible with today's modern ships. The Port of Baltimore is seriously outdated and they will hopefully use this tragic opportunity to not only rebuild the bridge but better accommodate deep water ships.
-
Those small details are lots of fun to add but you'll never see them on the final model, especially when encased. But some future observer will be delighted when they use their home Target brand home endoscope.
-
I ordered from the website two weeks ago and the order was promptly dispatched. But the order was for accessories/sanding paper. With regards to the actual hard goods I believe the family is still working on a plan to maintain the business but this will take awhile.
- 42 replies
-
- 10
-
-
Laser cannon bracket
dvm27 replied to mediocremodeler's topic in CAD and 3D Modelling/Drafting Plans with Software
Good looking rope! Keep in mind that your model rope is cable laid (left twist) vs the actual cannon depicted which has right hand laid rope. Just a technical point but one that's fun to know because on every ship you now visit you'll be looking for the lay of the rope! -
Very innovative approach to the deadwood. I will follow with interest!
-
NRG Rigging Project by tlevine
dvm27 replied to tlevine's topic in - Kit build logs for subjects built from 1751 - 1800
What a wonderful teaching project Toni! I look forward to your takes on splices, rigging the blocks, etc.- 37 replies
-
- 9
-
-
- rigging/masts
- NRG
- (and 1 more)
-
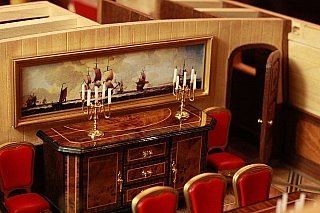
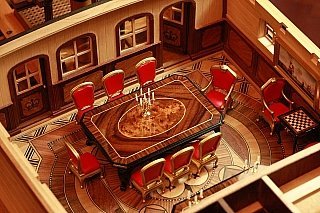
Why not really commit Chuck? Our Speedwell was based in part on the Royal Caroline design. I'm sure your daughter would apperciate these furnishings.
-
Don't forget guys, you can always rig Speedwell as well. Full rigging instructions are included in volume 2 of the Speedwell book.
-
Nice job on the cupola Chuck. I like the dulled copper version and it suits your approach well (making a model of the NMM model).


