
HOLIDAY DONATION DRIVE - SUPPORT MSW - DO YOUR PART TO KEEP THIS GREAT FORUM GOING! (83 donations so far out of 49,000 members - C'mon guys!)
×


TBlack
-
Posts
1,308 -
Joined
-
Last visited
Content Type
Profiles
Forums
Gallery
Events
Everything posted by TBlack
-
 I've been making a little progress, albeit fits and starts. The difficult part of the companionway hatch is behind me, and the rudder need staining. But the challenging parts, I think, are done. Although, in the bow is a winch which requires a gear and pawl. I know that the gear feature has been done many times, so I'll just copy if I can remember where they are on this site (?).
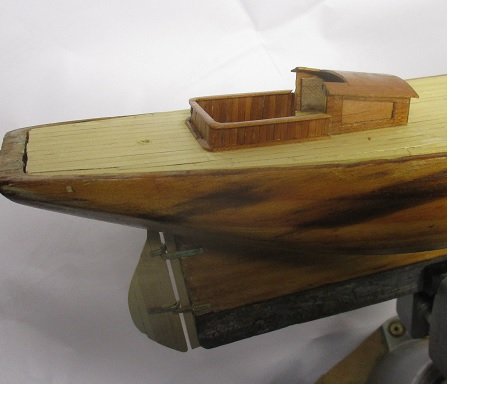
-
Michael, Now I get it. A lot of careful, exact filing comes next! TB
-
USF Essex by mtbediz - FINISHED - 1:50
TBlack replied to mtbediz's topic in - Build logs for subjects built 1801 - 1850
Mustafa, OK, I got it. What kind of wood do you use for the wheel? Tom, -
USF Essex by mtbediz - FINISHED - 1:50
TBlack replied to mtbediz's topic in - Build logs for subjects built 1801 - 1850
Mustafa, Recognizing the language barrier, I'll try to be brief. Your pictures of the wheel construction (post 49) start with the wheel (ring) already made. I'dlike to know how you made the wheel (ring). Tom Black -
I'll second the previous 2 posts in admiration of your skills. But more importantly, you show us how it's done. Tom
-
Takes a remarkably steady hand with the jeweler's saw and the #4 file to get crisp straight edges. Incredible! Tom
-
USF Essex by mtbediz - FINISHED - 1:50
TBlack replied to mtbediz's topic in - Build logs for subjects built 1801 - 1850
For me, the critical part is being able to make the wheel. Out of a solid piece of wood there will be cross grain, and no stability. So, dear Mustafa, how did you manage to deal with that? Tom -
Are there any decent clamps?
TBlack replied to bigcreekdad's topic in Modeling tools and Workshop Equipment
So you need downward pressure against the wale and inward pressure against the frame/bulkhead. I use those alligator clips for the downward and elastic bands for the inward. Cheap and plentiful. Tom -
Are there any decent clamps?
TBlack replied to bigcreekdad's topic in Modeling tools and Workshop Equipment
How deep does the throat have to be for your needs? I use alligator clamps with the teeth filed down for detail clamping. -
OK, now I get it. But the real trick is the filing into round. Sounds tedious! TB
-
Michael, Thanks for sharing. I can't quite visualize how you slip the wood off the bent metal, but obviously you did. Also, that you can still put your finger on a photo that is 40 years old is remarkable. Tom
-
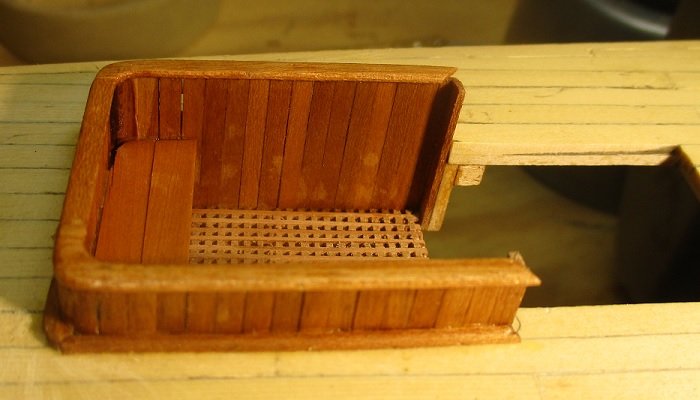
Completed cockpit minus varnish. The delay is due to that quarter round moulding on the deck. 6 tries to get it to go round the corner. And another thing, Ed Tosti and I have all the same tools (Preac saw, Sherline mill, Unimat SL1000), so why don't my models turn out looking like his?
-
From Downer's question and the above picture I'm understanding that there is no special trick to doing those rails. You just have to be really good at it. Let's me out! Tom
-
I, too, have felt the loss of a treasured pet. But 20 years, not bad. Tyra was obviously loved and well cared for. God gave us these pets to love and who love us, and then their life span is so short that we have to watch them die. Life can be tough sometimes. TB
-
After all this effort, I hope these cushions are visible in the final product. But they do look classy! Tom
-
Michael, taking the interior cabinetry out of the boat and reassembling it must take a good part of the day! I'd go with all pigskin, better at sea. Tom
-
"There is something intrinsically satisfying about being able to prepare ones own materials from the raw tree" This is a fabulous story. Thanks for sharing! Tom
-
This may be a little late, but instead of tracing out the lines. Take the page you tore out. Scan it to your computer; open the paint app; open the file that has the scan; paint lets you flip the picture 180 degrees; save that. Now print out half as many copies as you have station lines of each file. Take each copy and slice down the middle and match it up with its corresponding copy. Now you have the station lines for each bulkhead at each station. No tracing! Tom
- 10 replies
-
- 4
-

-
- Packet Ship
- William Webb
- (and 1 more)
-
I'm hoping that when this is done, you'll invite all of us out for a sail. I'll bring the sextant. Tom
-
I've noticed, pretty consistently, that boat lovers also love trains (realworkingsailor). How ever are you going to get all that wonderful work down below, and why would you want to do that anyway? Tom
-
CA residue problem
TBlack replied to Doc James's topic in Painting, finishing and weathering products and techniques
I use Testors dullcote which provides a flat finish and will take care of your problem. Tom
