

Mark Pearse
-
Posts
701 -
Joined
-
Last visited
Content Type
Profiles
Forums
Gallery
Events
Posts posted by Mark Pearse
-
-
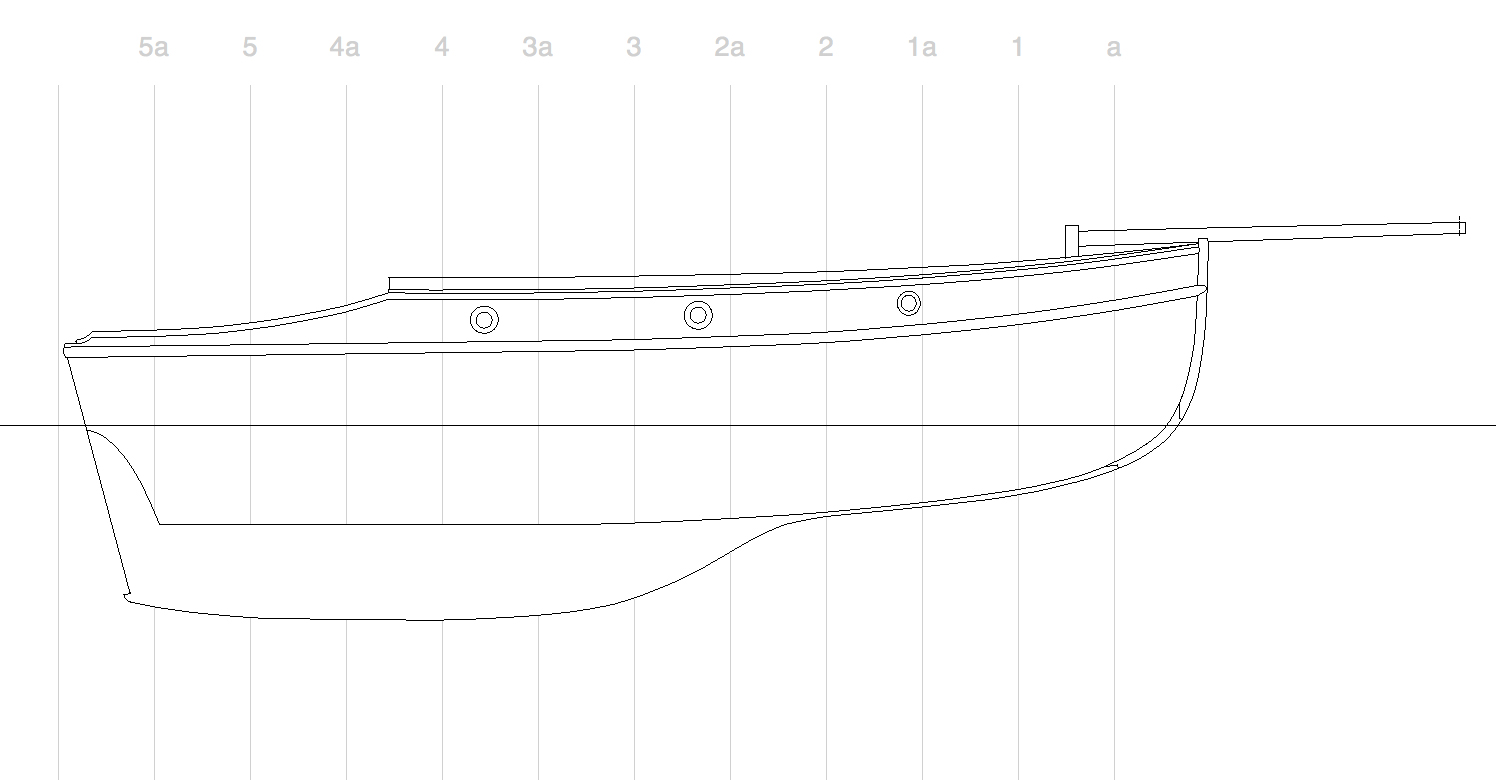
The garboard plank is on, & I can now set out the rest of the planking. To set out the garboard I used the example of the 24' Ranger garboard plank, which goes forward about as far as the forefoot.

The reference

The notches are to take ribs, the rib spacing won't be to scale, my estimate of enough to help hold the hull together.

-
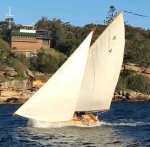
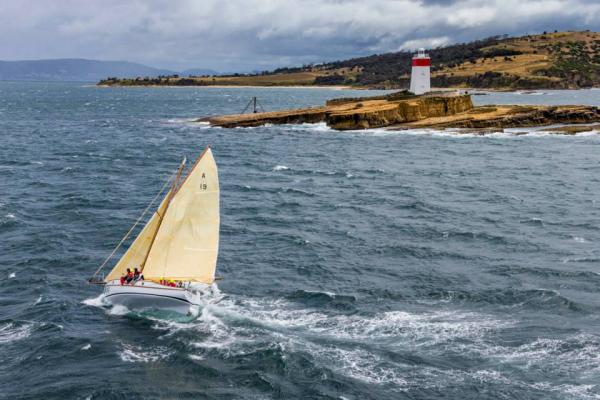
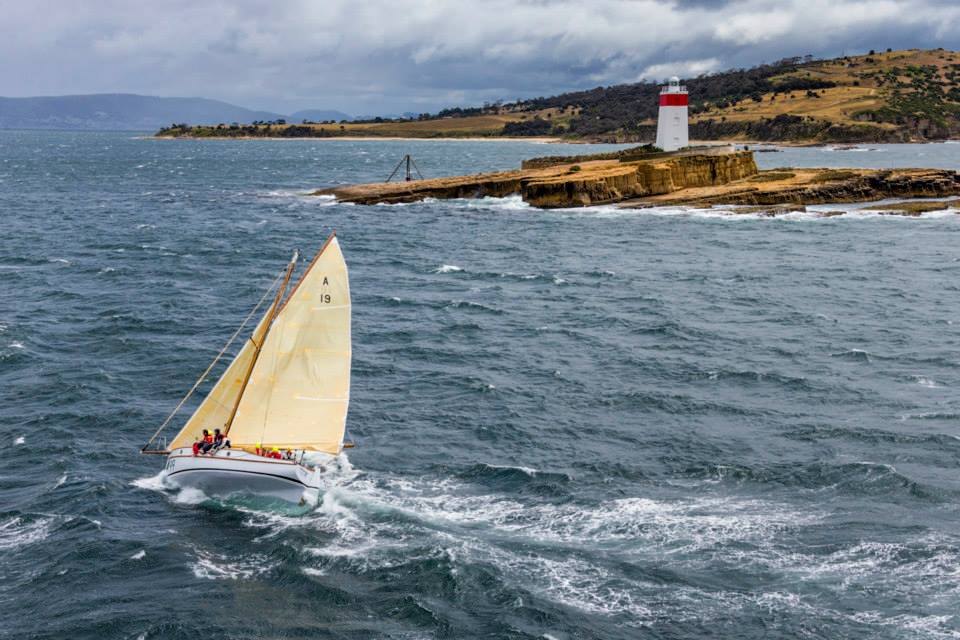
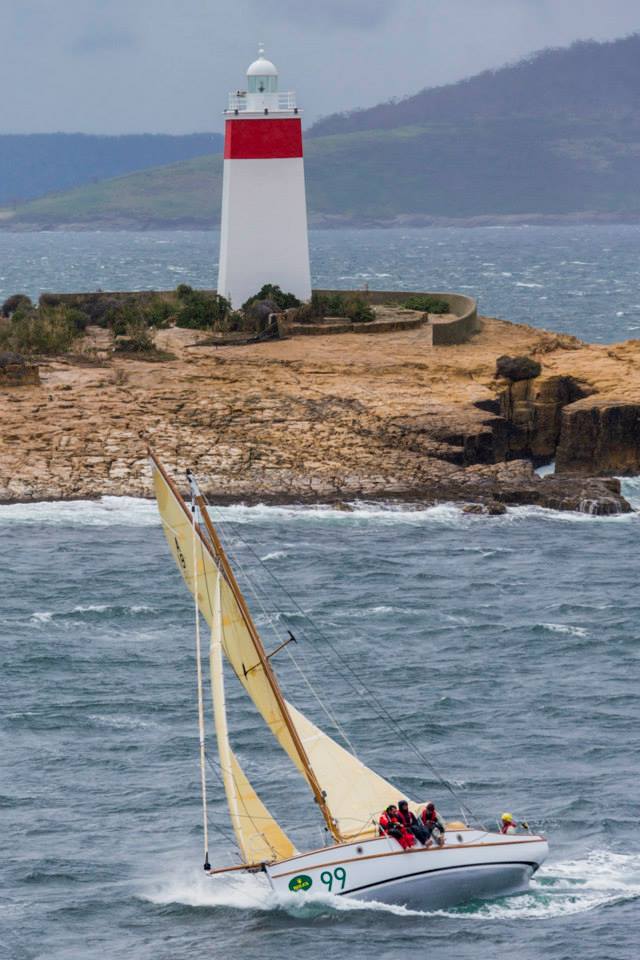
some photos of a similar yacht to the one I'm building, designed also by Cliff Gale : Maluka, photos from the last Sydney-Hobart, seen here on a close reach in 25-30 knots rounding the Iron Pot entering the River Derwent at Hobart
nice footwear, too

- mtaylor, mikegerber, cog and 10 others
-
 13
13
-
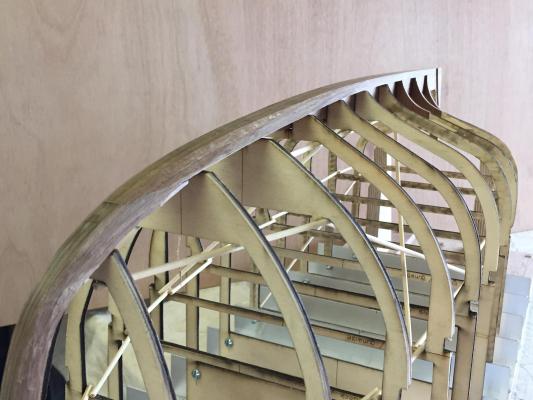
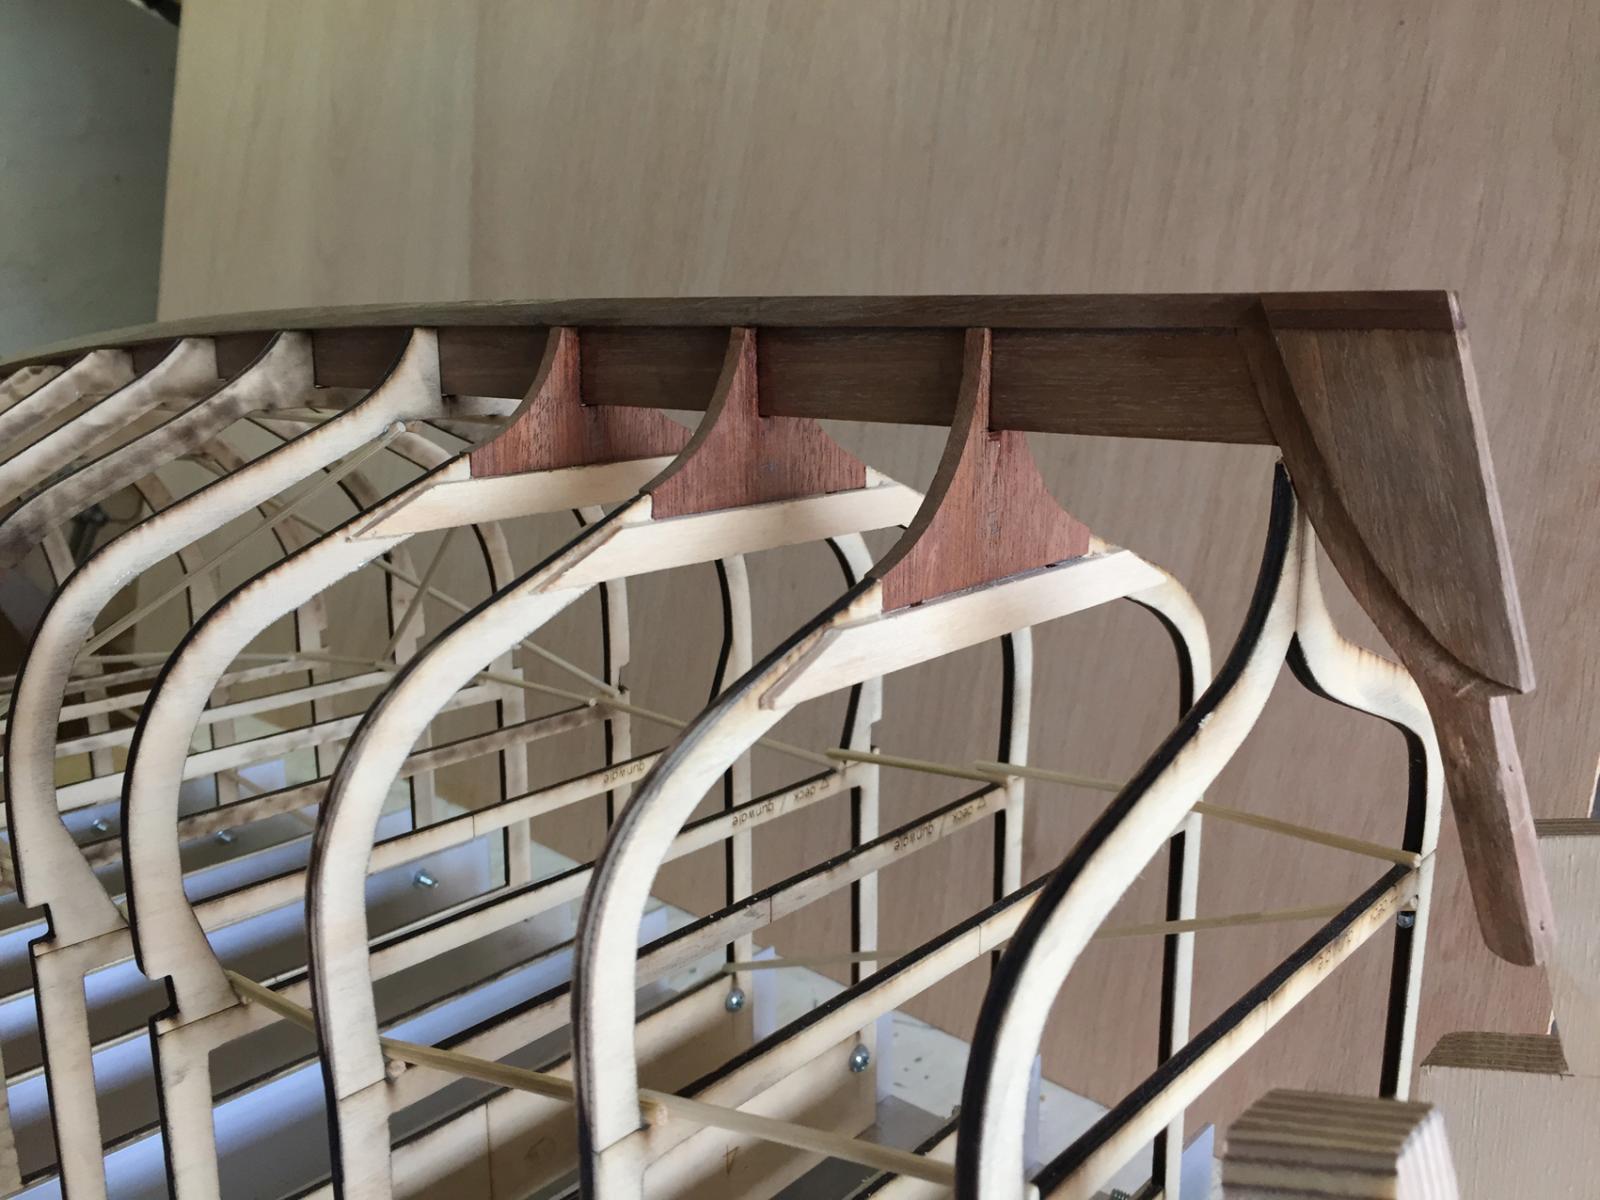
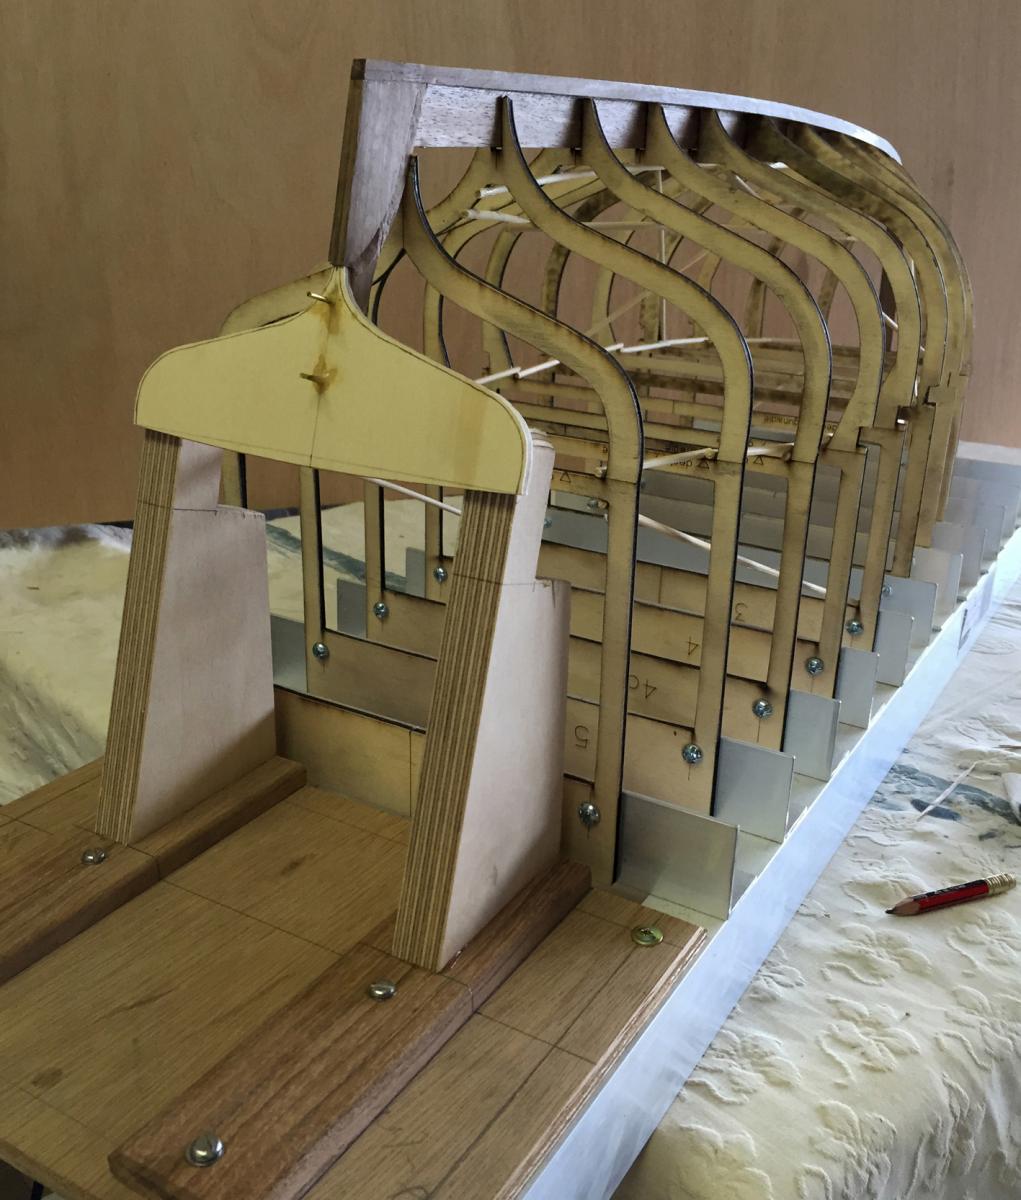
I am currently fairing the moulds & anything else that needs it - work now to be easier later hopefully.
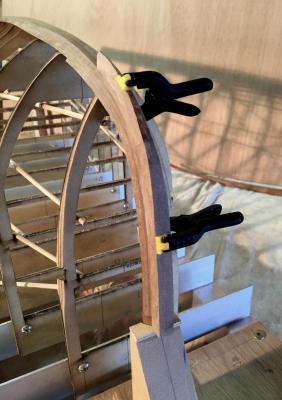
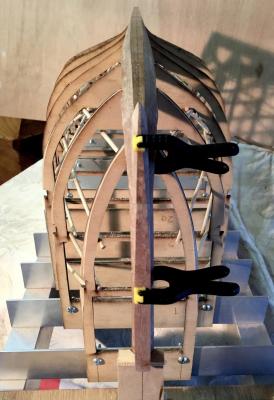
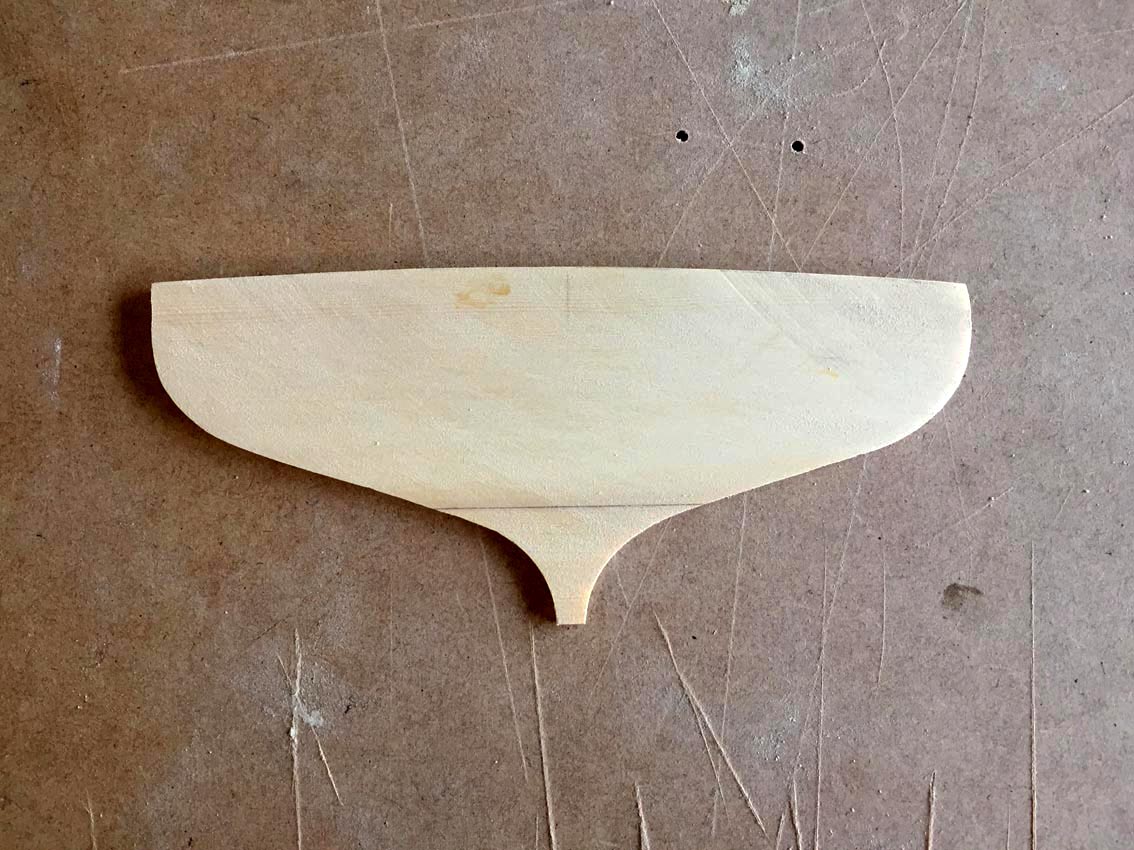
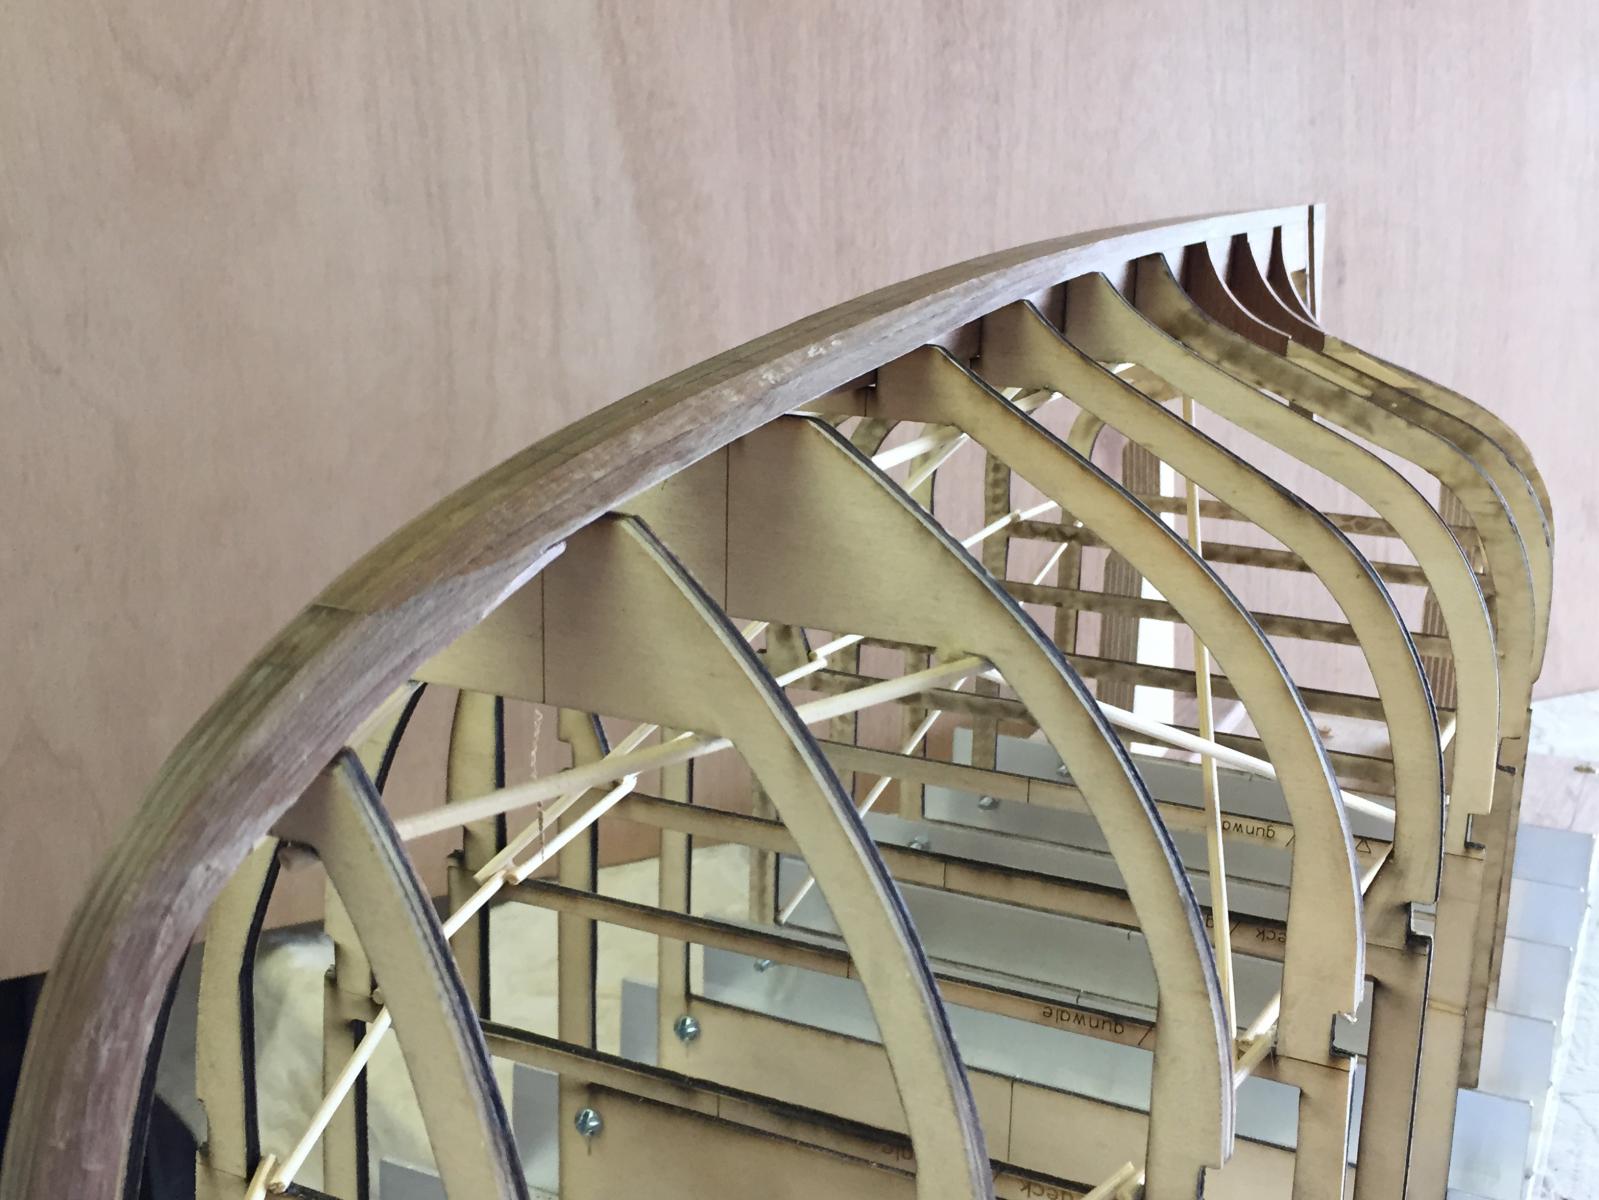
The shape of the temporary plywood transom was ok - so I cut the actual transom from the 3mm Huon Pine. In this photo it still needs to be faired, so the will be a bit finer again. Also, you can see slight asymmetry, the fairing & planking will reshape it enough that I don't need to worry about that now. To me, the transom shape of a boat is absolutely crucial to a good looking boat - like the final chords in a piece of music - & it's good to see that this one is looking right for this boat. The shape is soft & gentle, but with the suggestion of the amount of volume that the hull will have - she is a day boat designed to carry reasonable loads, not a racing yacht.

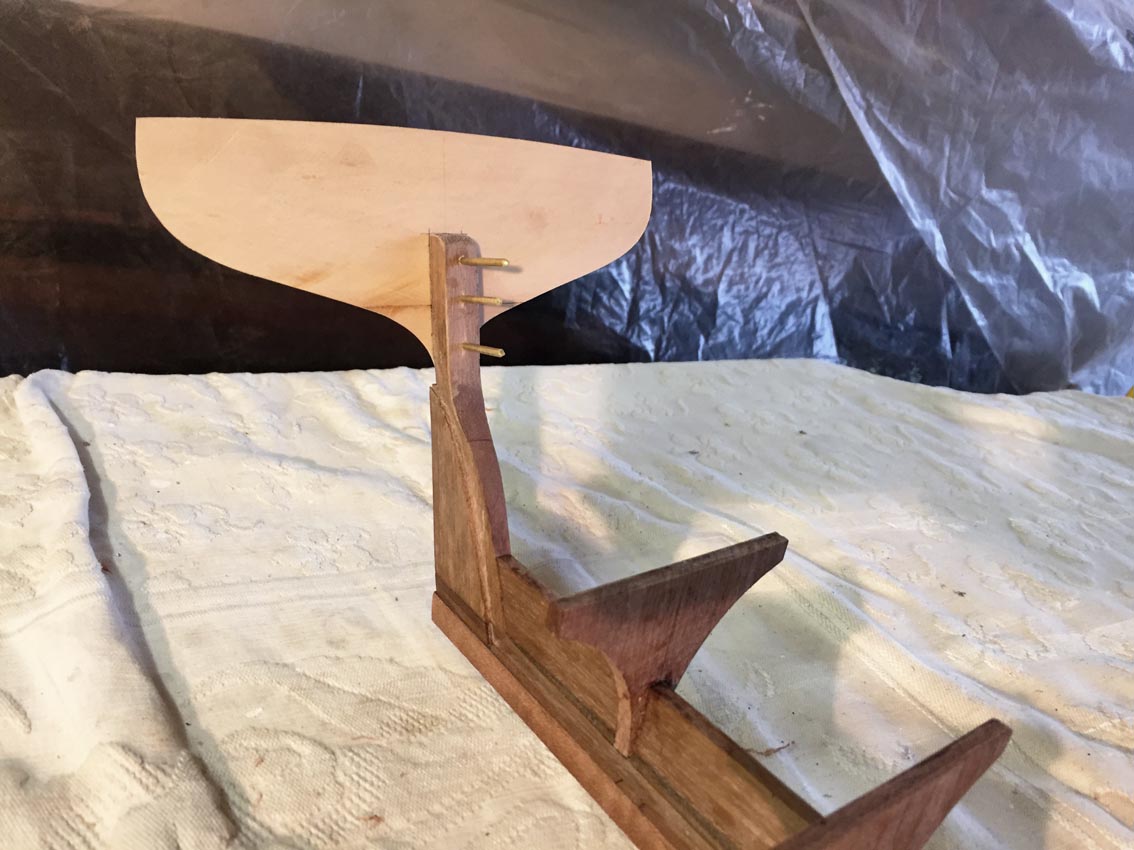
The transom was pinned & glued.


thanks for the interest, MP
-
goodness how time flies...
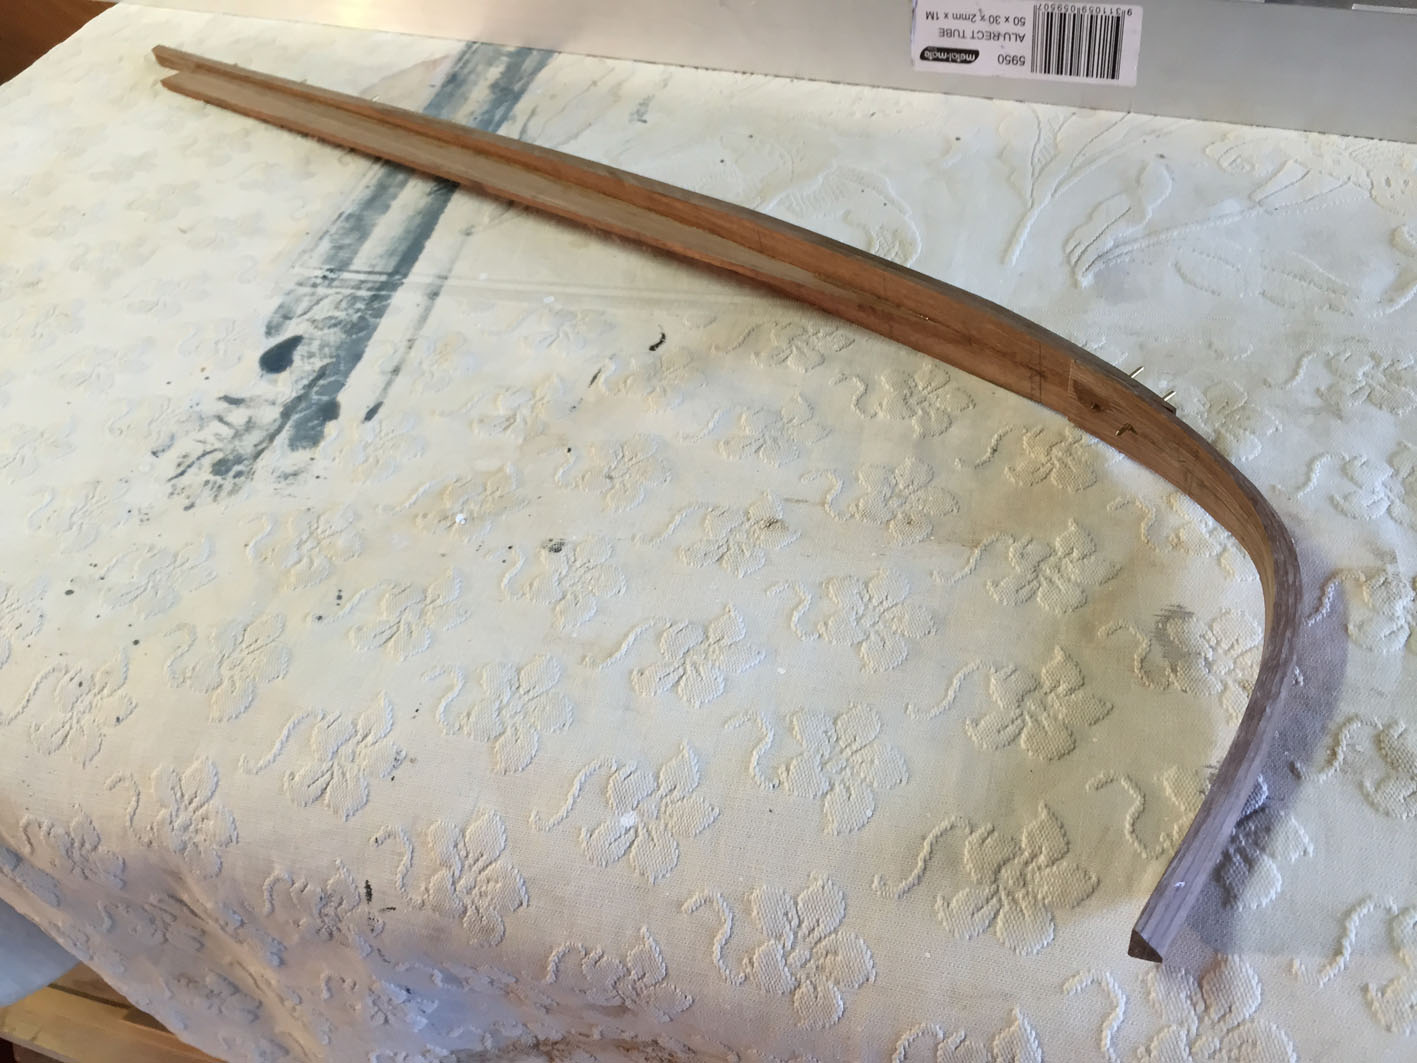
Well I have done some more this week: final fairing of the keelson & inner stem; making the outer stem & the strip below the keelson. I have separated the stem & keel into parts at the planking rebate line, & I'm now making the outer pieces.
The keel piece will be screwed & glued to the keelson, & I put some of the screw holes right on top of previous brass pins, so I had to do some new ones - but I'll justify the extra holes by using them to pin down into the keel. I will need to pin the outer stem, for the same reason, that I'm always concerned that the pieces stay exactly where they are supposed to be during glueing. Also, these pieces have some twists etc that need to be taken out & the screws & pins help to remove the twist.
The keel piece is Queensland Maple, really nice quality timber from bunk support pieces from our boat. The timber is nice, fairly light but still quite resistant to dents. It curved quite well too, I used a heat gun to put some curve into it, so that I doesn't want to pull the existing structure up & out of shape.
I have shaped the underside edges of these strips to be perpendicular to the planking.


The scarfed joints between the pieces are not sound in themselves, but are more or less the correct joint scaled up - the actual stem forefoot piece would have been a grown Tea Tree (Melaleuca) knee piece, but there is no issue with strength here & it will be painted so I'm not going to try & replicate the curved knee in this case.
thanks, more soon I hope, MP
-
Hello Mike
Well done, she is looking amazing; I am enjoying this & learning a lot. Archer was remarkable & is a hero of mine.
MP
- Omega1234, IgorSky, Dimitris71 and 1 other
-
4
-
Hello Jim, lovely. Really enjoyable to look at.
I was in Pittwater a few weekends ago & there is a boat in Careel Bay that looked very much like a Pearling Lugger, I would guess that the hull was 42 or so feet. Do you know of this boat? Sorry, if I had any wits I would have taken a photo.
Mark
-
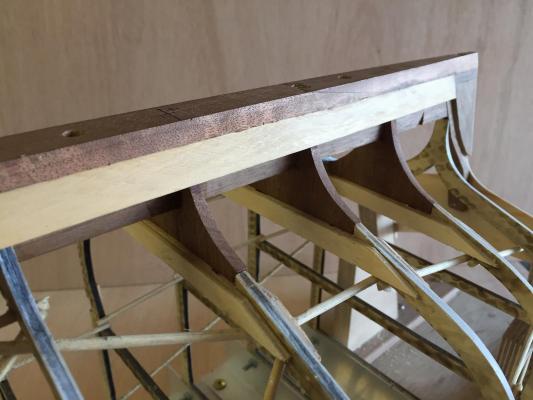
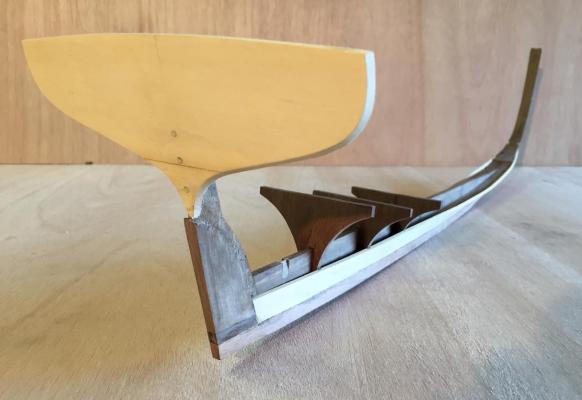
I've done a bit more: the solid lower bulkheads aft have been cut & glued in, & the inner part of the keel has been faired. I'm satisfied that these solid pieces will help, perhaps if I'd planked a model boat before I would know if this shape would work without them or not, but for a small amount of work I'm making it a bit easier to get that important part right. To me, the most important part of the hull shape in these boats is the water exit lines. It's not an accurate scale version of the way the hull would be constructed, but the main objective is to end up with the right hull shape externally. Internally, if I'm happy with the logic, that's enough.
The solid bulkheads still need to be stabilised so that they stay in the same plane as their plywood bulkheads during the fairing process, & yet are able to be separated - for when I remove the ply later.
Next steps are:
- checking the temporary transom, & fitting pieces to stabilise it also for the fairing process.
- glue in more bamboo skewers generally, the brace the moulds & hold them rigidly in place
- temporary pin for the inner stem, same reason
Then I can fair the hull. I might also do a profile of the outer face of the stem & inner keel, I could do a fairly accurate template now while it's still removable. This would give the inner shape of the keel & outer stem for later.
In the photos, the inner keel is sitting up a bit - it does actually sit down flush on to the tops of the stations.

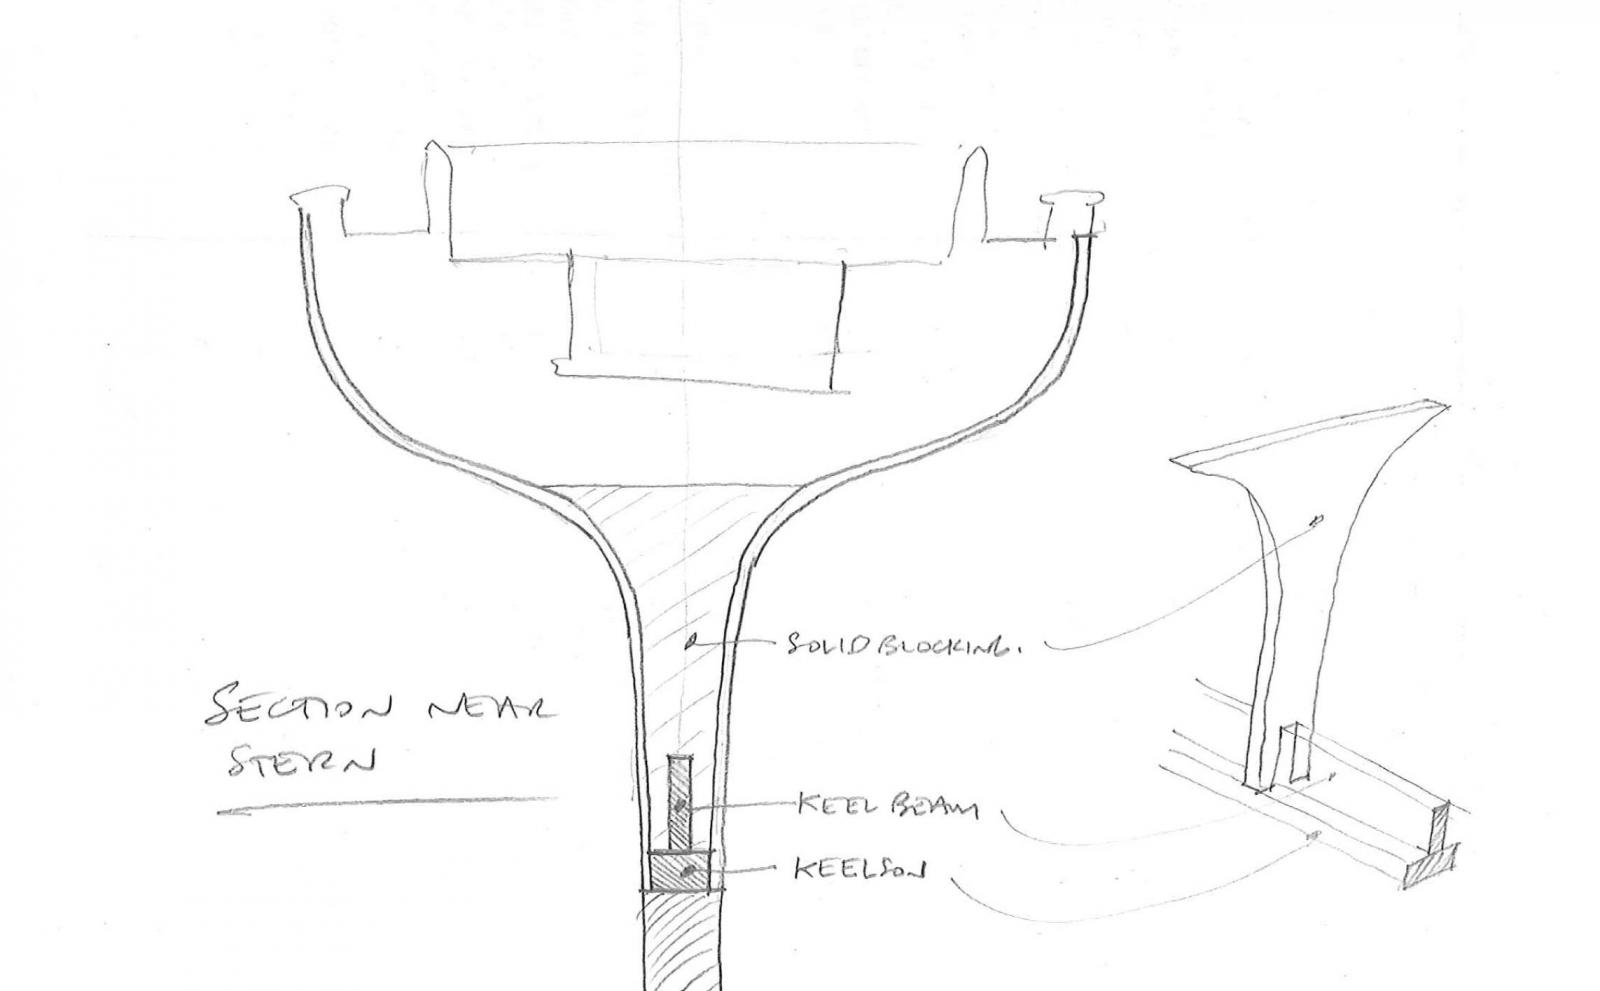
As an aside: I asked a boatbuilding friend about the piece I'd been calling a stern knee - he says this is the correct term. But he also said that my use of keelson isn't correct, there is such a thing, but apparently it sits above the ribs. So I'll call it "inner keel" for the same reason I call the stem piece the "inner stem", for practical model making reasons I've separated the stem & keel into pieces, divided along the rabbet line.
thanks, until next time
- mikegerber, KORTES, Krelis and 9 others
-
12
-
Hello Dan
Could the metal eye at the lower end of the lateen spar be to haul the spar around behind the mast, when tacking? I imagine that it would require a fair bit of pull, perhaps coordinating with loosening the halyard, so maybe there was a loose tackle that fixed aft somewhere & when hauled it pulled the lower tip aft & around its mast.
Could be completely wrong of course
-
-
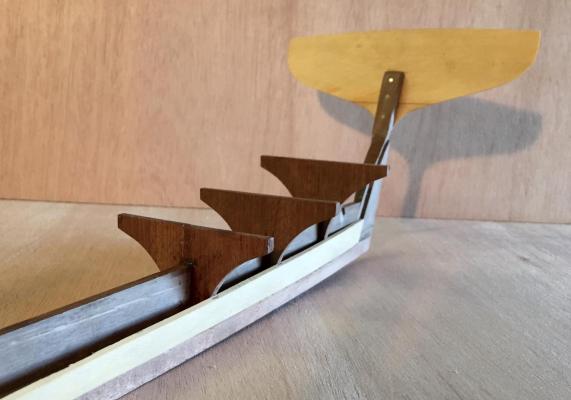
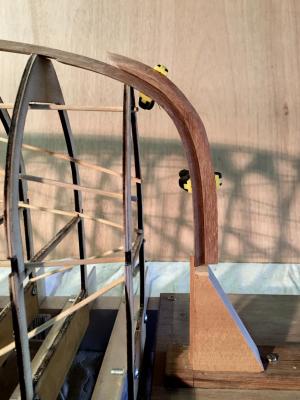
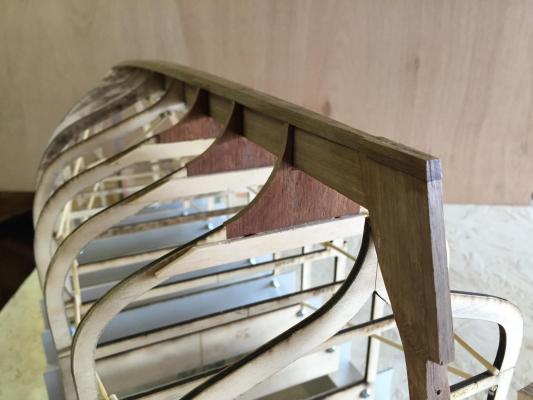
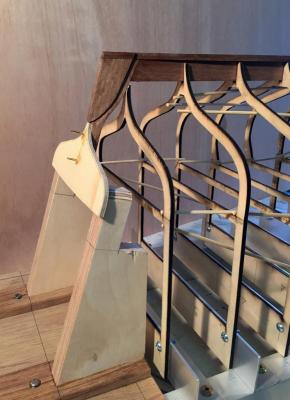
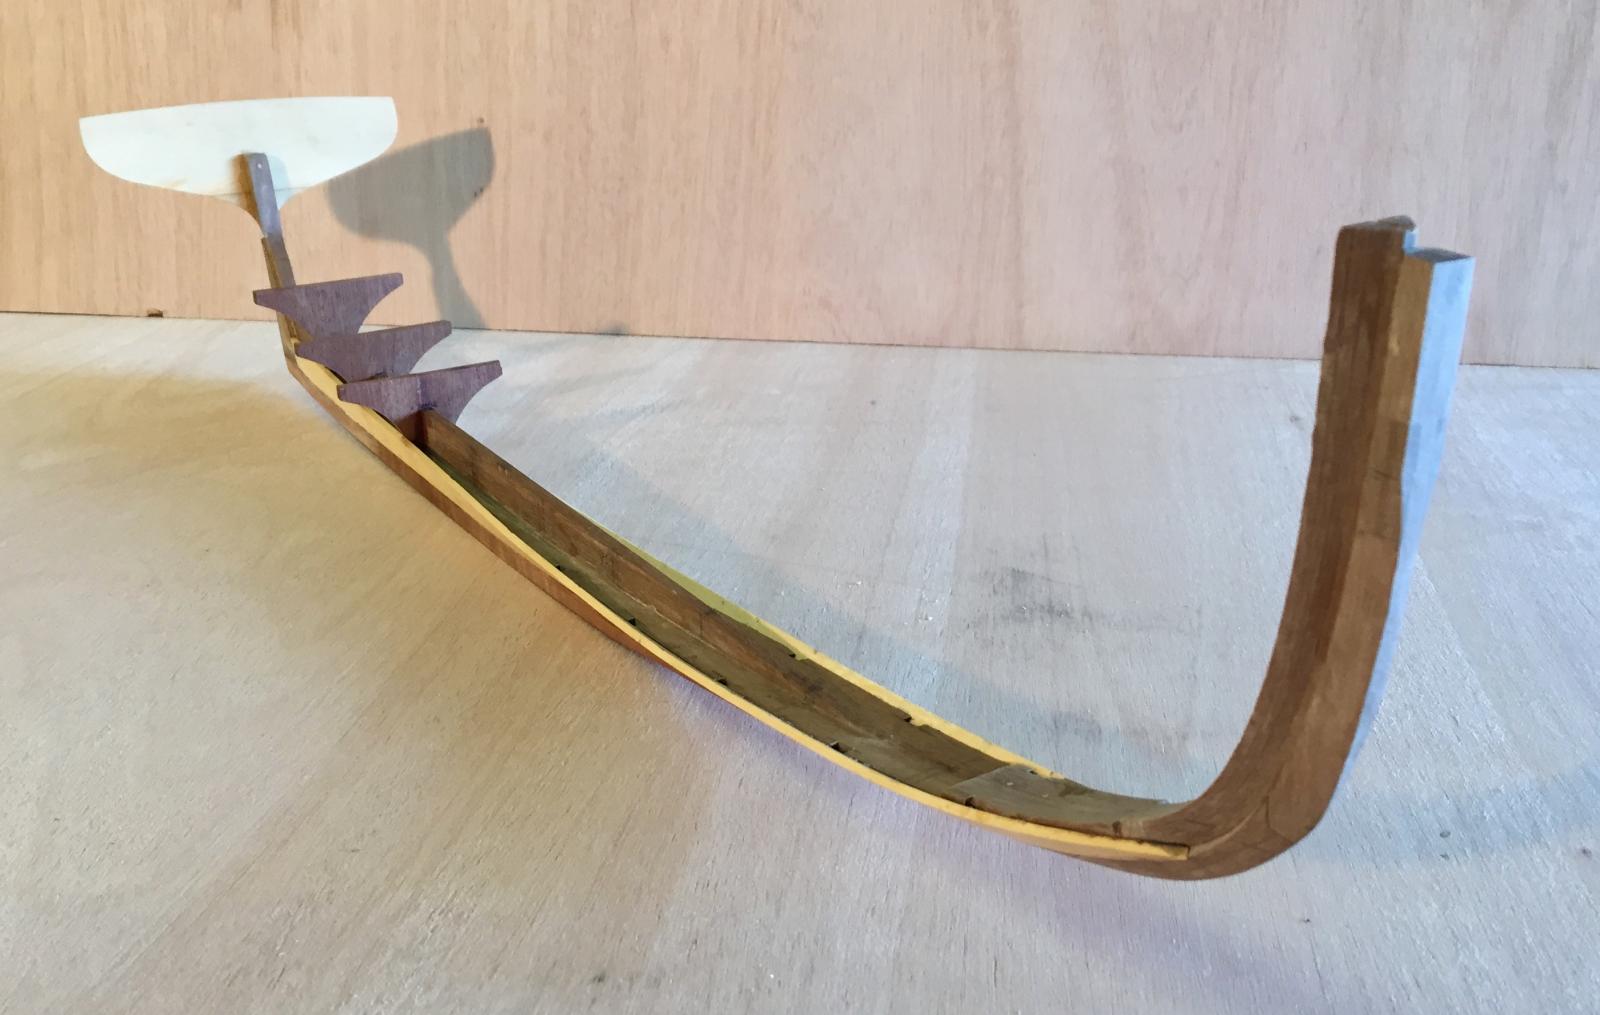
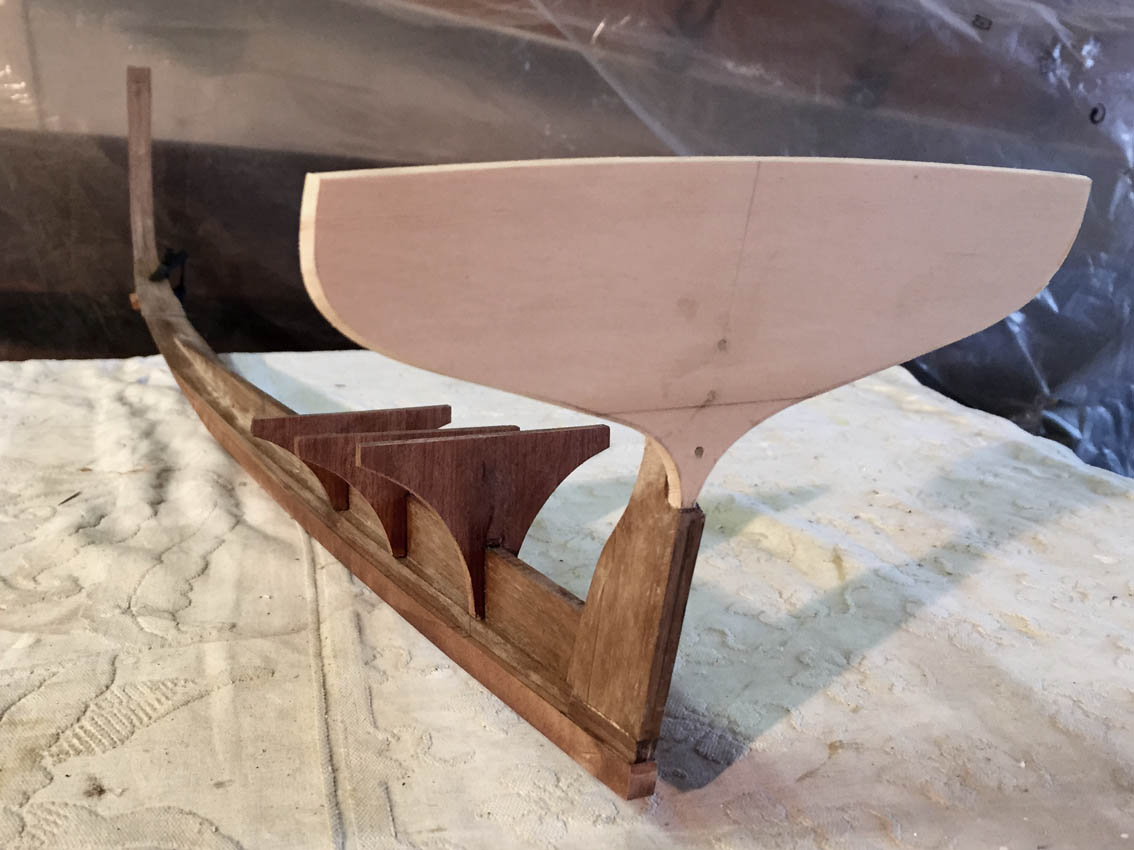
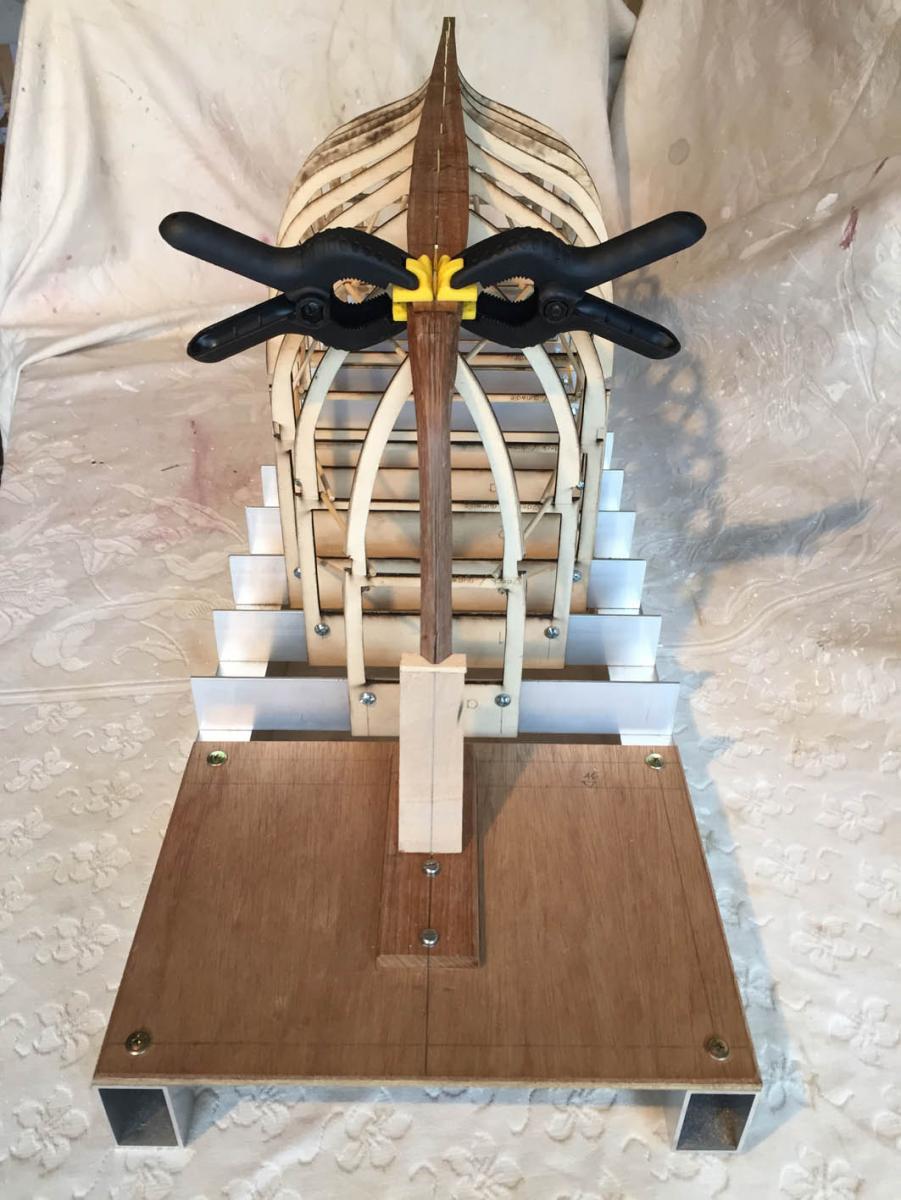
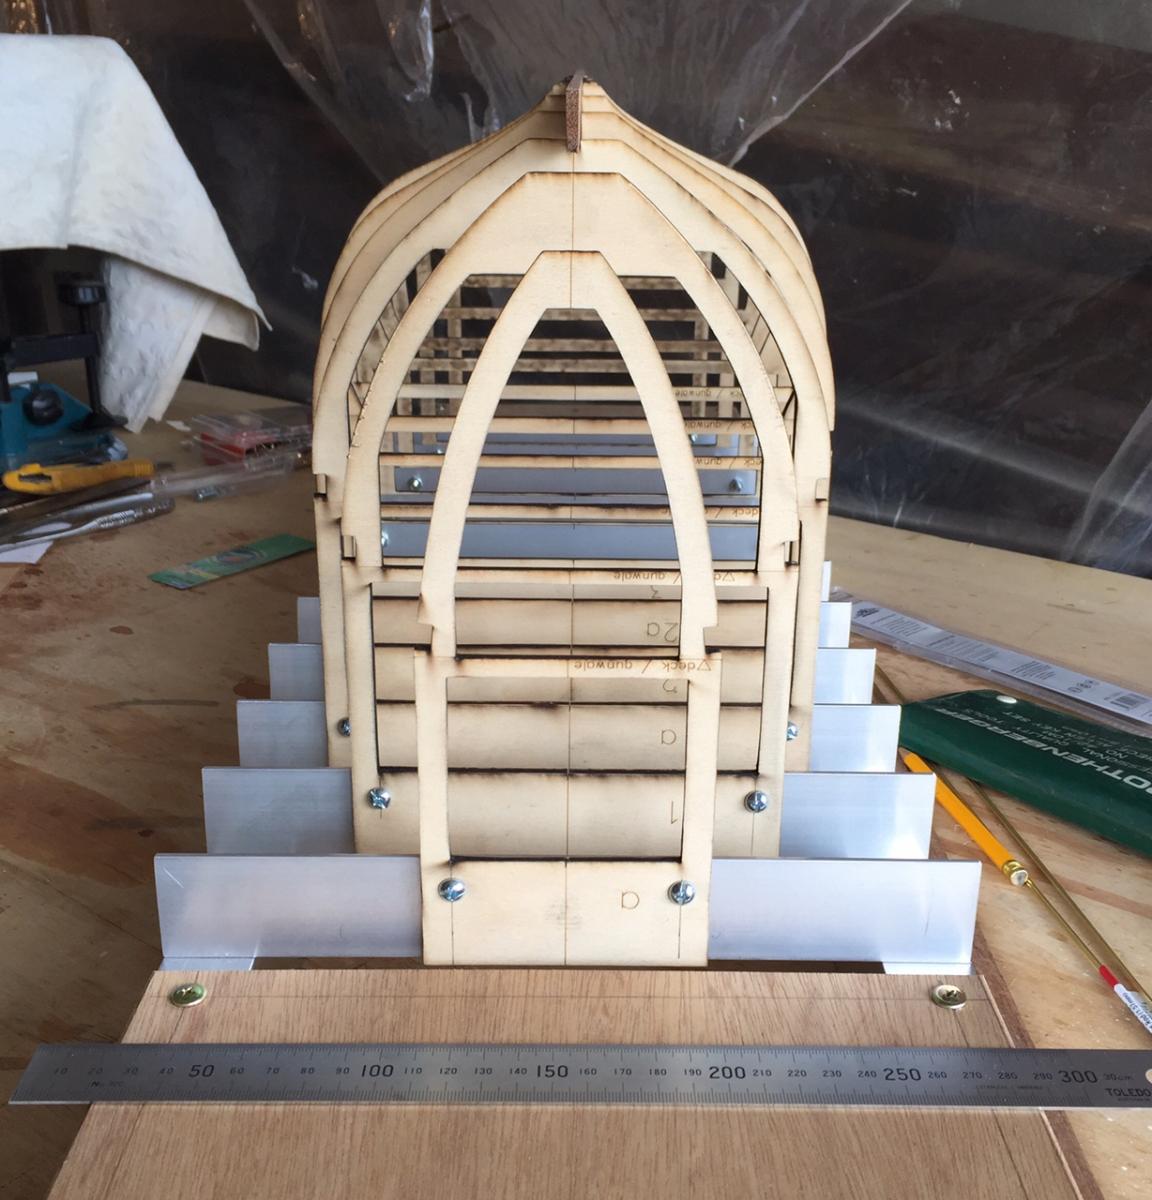
A little more progress - I shaped & fitted the stern knee (sorry, not sure what it's called), & fitted a removable temporary transom.
The stern knee has been roughly shaped & the rabbet approximately cut, a bit more shaping required but after the fairing has been done. The lower edge of the garboard plank will lie along the underside face of the keelson. The knee was, as before, pinned with brass rods & glued with epoxy, I find that this technique allows a good cleanup as there's no clamps in the way, & it will all stay where it's supposed to be while you do it. The pins are clipped off & sanded flush afterwards.

The transom is removable & temporary because I sense that I will need to adjust it a little, it has to look good - sort of like the final chord in a great piece of music. A good solid structure to hold the transom was made, which will have some pieces fitted to hold the transom accurately in place.
thanks for watching, bye for now
MP
- Mfelinger, michael mott, dj.bobo and 6 others
-
9
-
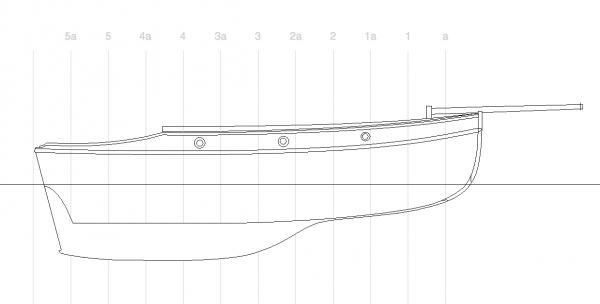
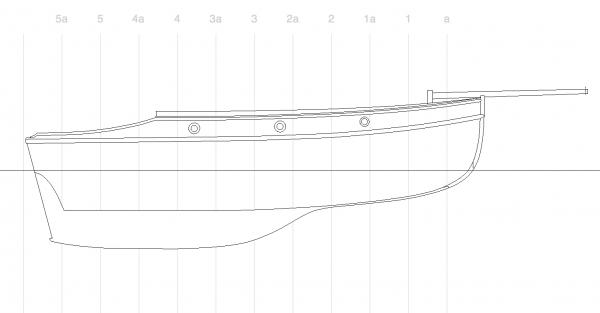
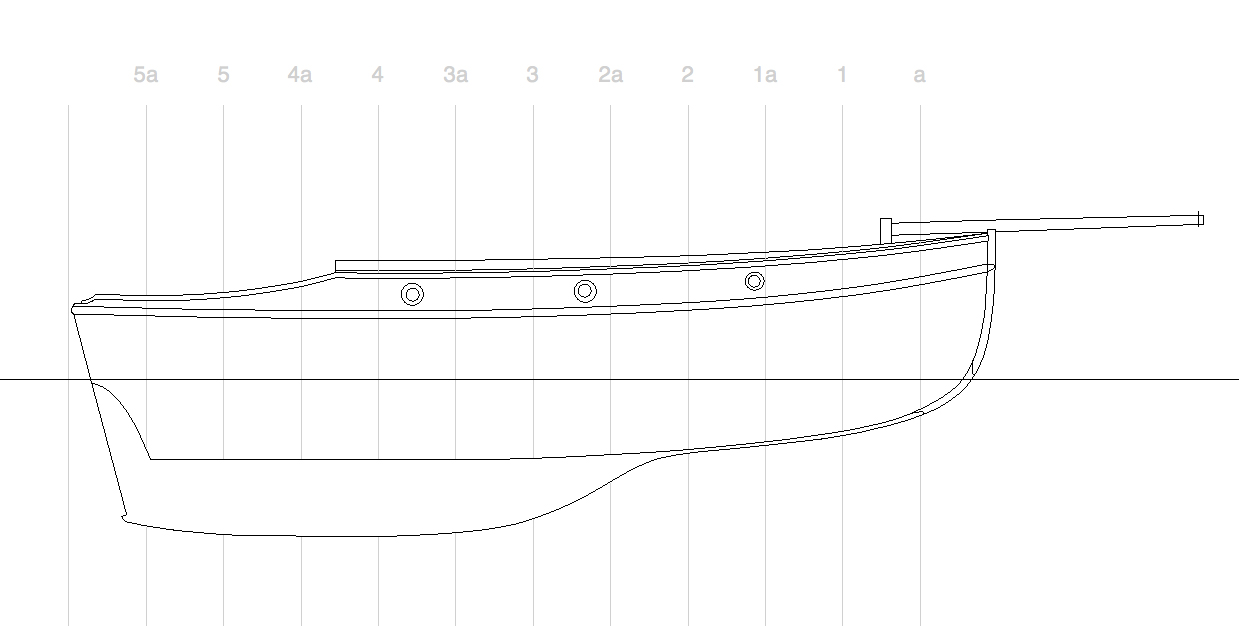
I checked & the transom height that I used previously was wrong, & with the correct height the lines are much better. They will be done by eye on the model, but I need to know that the height of the transom/gunwale intersection is good.
Much better, I am going to proceed with this
-
ditto, & the photos are also a very high standard - I guess you aren't using the phone with a cracked screen….
-
thanks all, it's very helpful to get the comments
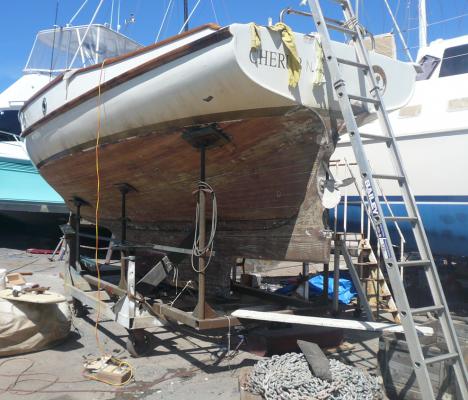
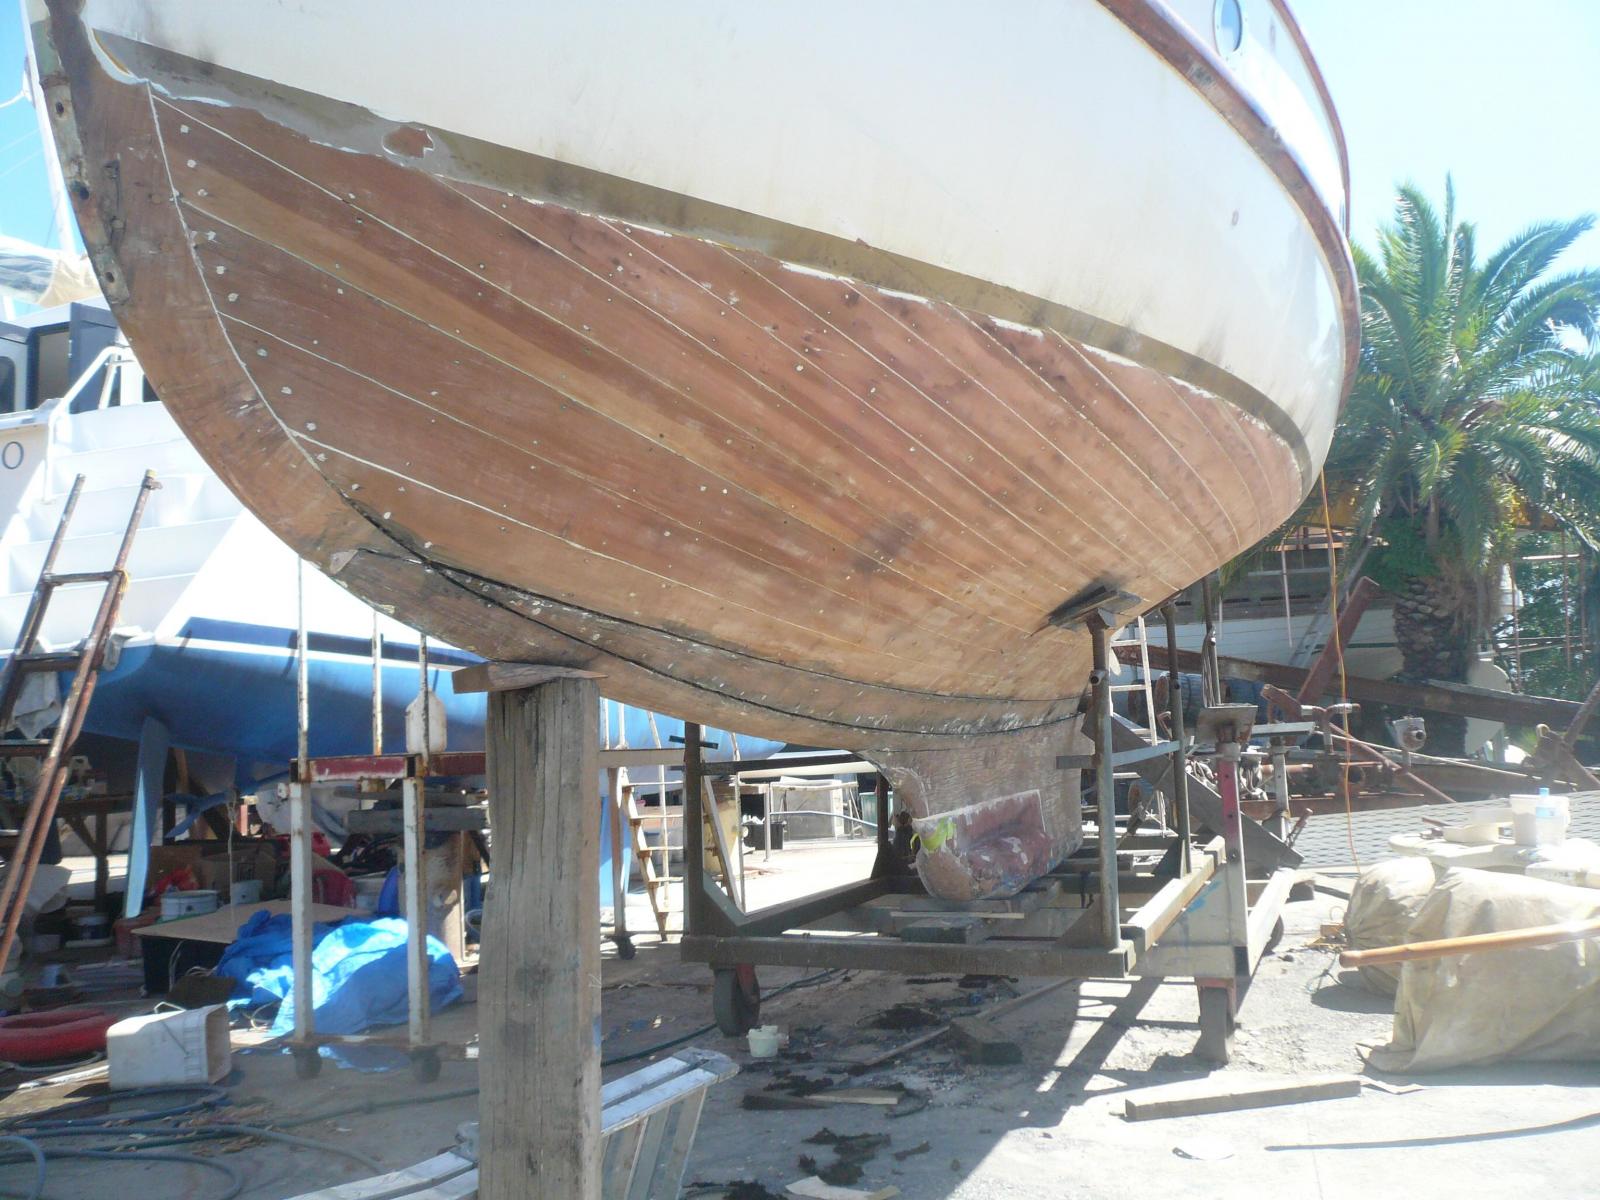
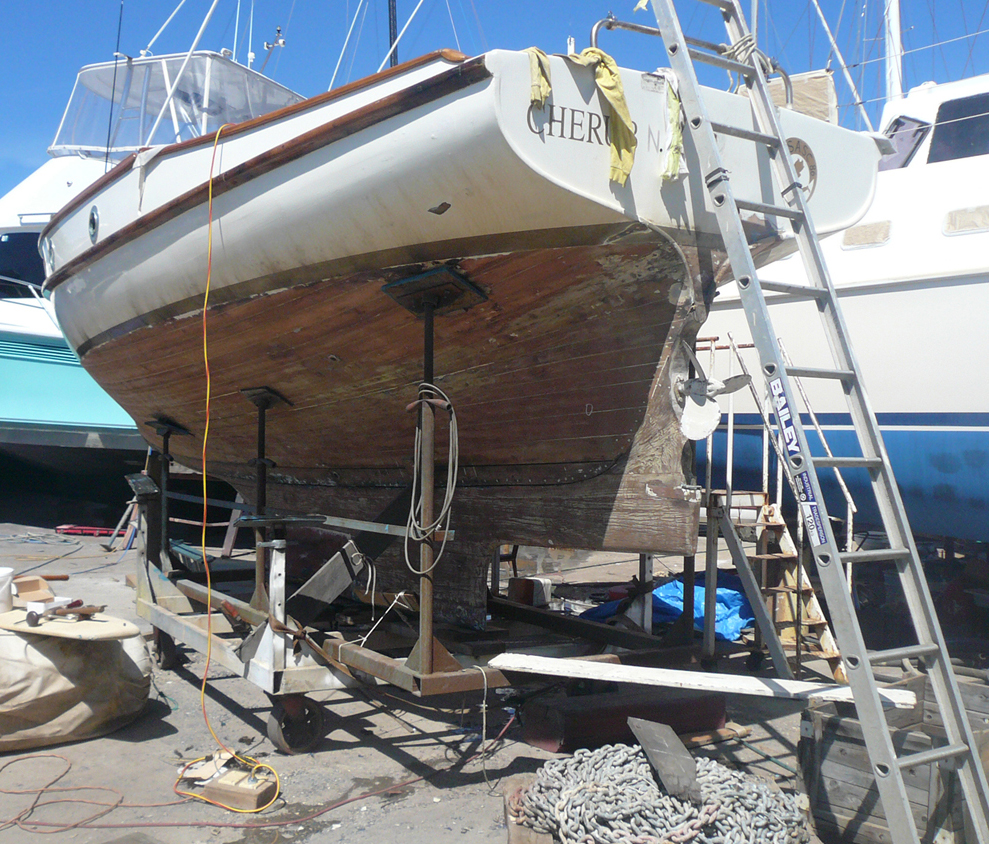
Row, yes the stern part of the keel was cut away, Ben Lexcen (designer of Australia II) was a mate of the original owner, & when Cherub was converted to Bermudan rig she initially didn't perform well, Ben had a go & added some more lead & did the cutaway. She tacks faster but probably has a heavier helm as a result. The garboard plank is hardwood & had been leaking pretty badly - we glued hardwood strips on to the edges of the plank to bring the seam back down to a sensible size for caulking. We were converting her back to gaff rig & improved the balance with a longer bowsprit rather than by adding lateral resistance aft.
I have realised that I need to work up a drawing of the boat to get the lines right - I can't confirm if the transom shape is good without checking the lines. My first go is below, but the stern section is definitely a bit flat, it needs to kick up a wee bit at the stern lines.
I'll work on this a bit more before finalising the transom on the model.
bye for now, MP
-
Hi Row
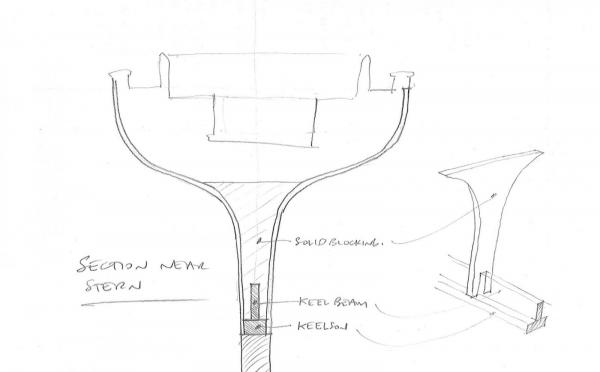
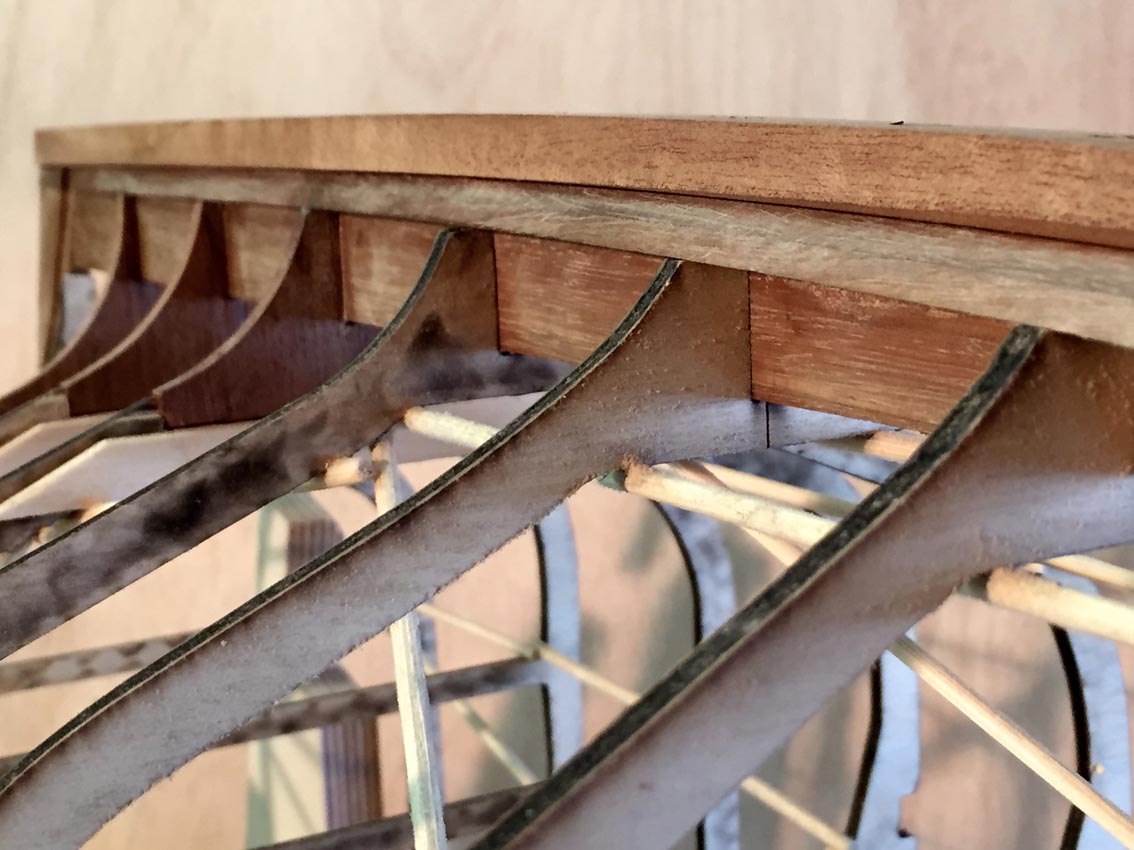
my thinking is for 2 reasons: to help stabilise the hull shape, & also to make the planking process easier in a part of the hull that might be difficult. The lower part of the hull is full forwards & slims out aft to an extension of the keel, so the planks that have to do this transition will probably have a fair bit of tension. The area I'm concerned about is the stern, up to about the top of the turn of the bilges.
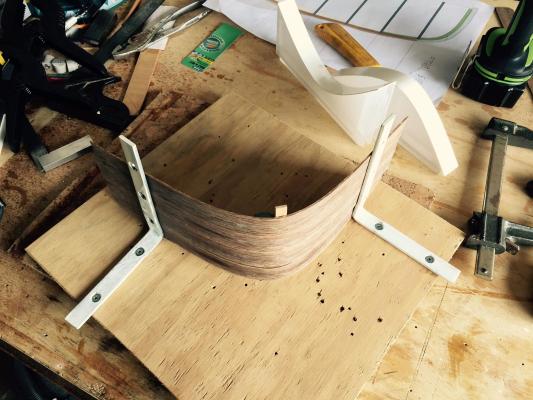
If, for say the last 4 or 5 moulds, I cut away the lower part of the plywood & insert of 4mm thick solid piece of timber to the same profile, the planking can be permanently fixed to the timber & I will know that it won't distort. It's not much work to do it, & I suspect it will make the planking much easier as I can face fix the planks to the blocking pieces.
Here is a sketch to show the idea more clearly than I have described, plus a photo of our own boat Cherub - a similar hull shape - that shows the relevant area, where the lower planks at the stern are close together, below the turn of the bilges.
- JerryTodd, avsjerome2003, mtaylor and 3 others
-
6
-
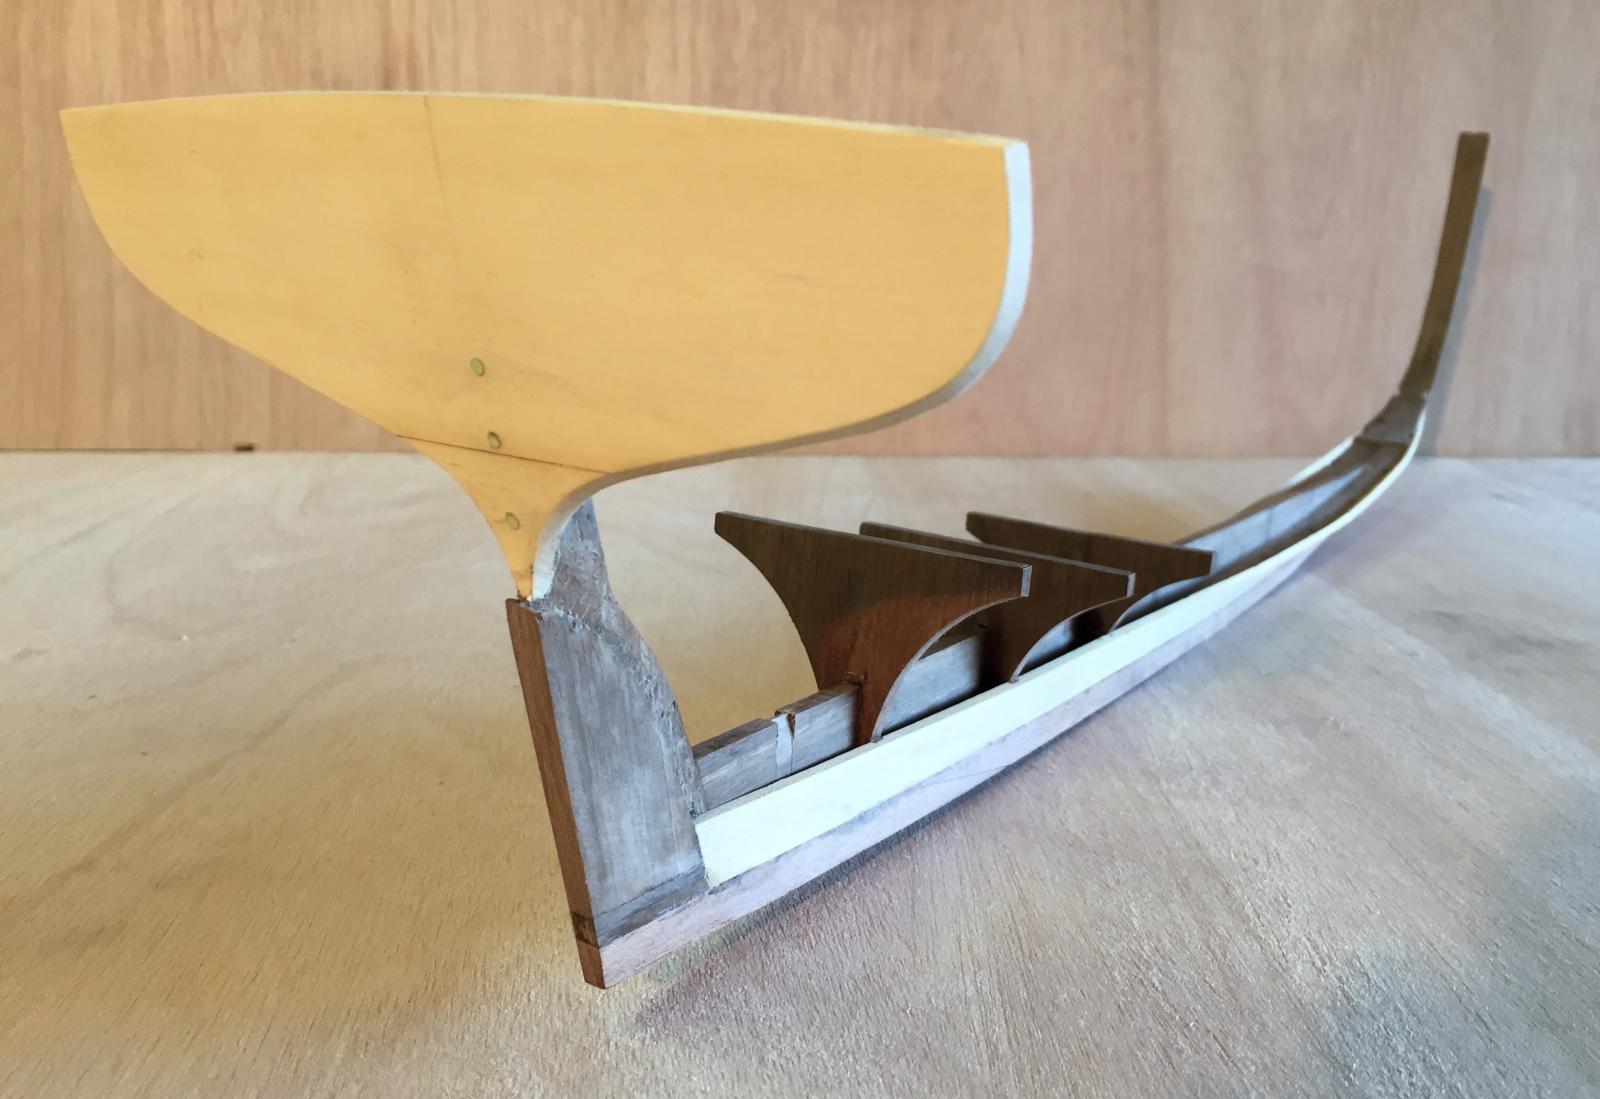
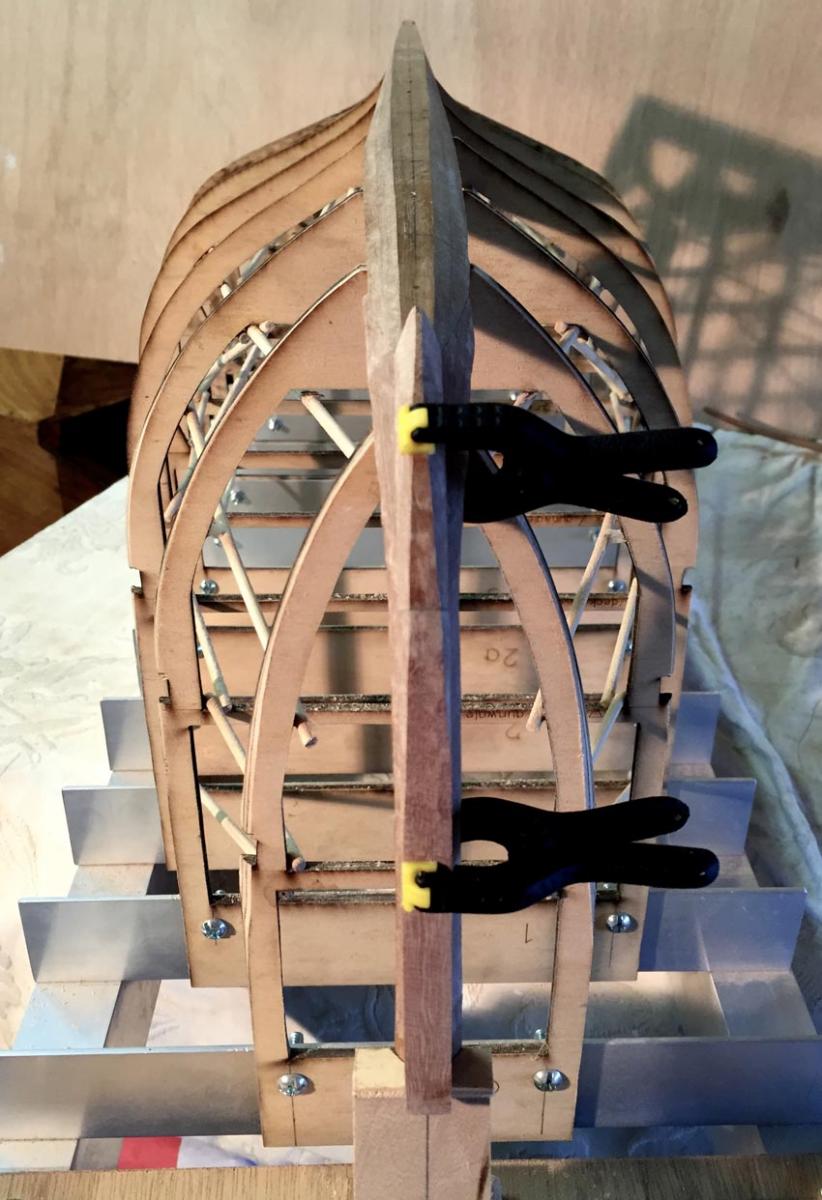
The glue-laminated keelson & inner stem were roughly shaped, & their joint was worked out & shaped.
The keelson beam was shaped (not a member that would exist on a real yacht construction, but I put it there to help hold the keelson curve to the correct shape), & the aft end was trimmed to suit the shape that stern knee will be (not sure if stern knee is the correct name, but the the end piece that brings the keel structure up to the transom).
For the main hull members I want to use epoxy for its strength & durability, but I don't like the way it tends to make things slippery - clamping can be really difficult. So to hold it accurately while the glue sets, I drilled the timbers for 1/16" brass rod, using a 1.6mm drill bit which gave a good amount of friction - they aren't nails, but for holding it all in place & will also give some extra strength overall. The rod ends will be clipped & sanded smooth.
The keelson/inner stem joint was clamped to ensure good contact between the glued faces - the brass rods hold the two members in alignment
the aft end of the keel beam has been trimmed for profile of the stern knee
With the glue set, it is now quite strong.

Next will be making & fitting the stern knee. Then I'll make a temporary plywood transom for final shaping & fairing, so that I don't spoil the actual one. It has been made from two 3mm thick pieces of Huon Pine, which were edge-glued with a couple of brass pins inside for strength.
When the temporary transom is set up in position I can fair the moulds & transom; after that I'll fit the sheer clamp & possibly another stringer or two - I'll just see how it seems at the time.
I may also replace the lower parts of some of the moulds with solid ti,her members of the same shape, to be built in as permanent parts of the hull - the aft moulds particularly.
thanks, MP
- Julie Mo, Bedford, mikegerber and 9 others
-
12
-
Thanks Bedford, I'll sit on it for a while.
-
Row, that's good to know. Sounds interesting, & I have a couple of questions - what glue did you use, & how did you set up the clamping on the planks? Epoxy is great glue but it's hard to clamp (as you know - I looked at your J boat log), as it's quite slippery for a while. I'm tempted to use a cross-linked PVA or one of the Titebond glues, & rely on paint to keep the water out of the glue. Your thoughts would be appreciated.
Ta, MP
-
Thanks Row, you're welcome.
I'm starting to wonder if the ribbing after planking is such a good idea - my concern is that the planks may not want to stay exactly in the right curve without being fixed as they go to ribs or bulkheads.....mmm
I haven't seen a build log for a scale boat where the hull is fully planked & then ribbed afterwards, it might need some testing to trial it.
MP
-
thank you Nils, Michael & John - & also the people who liked - or just looked in
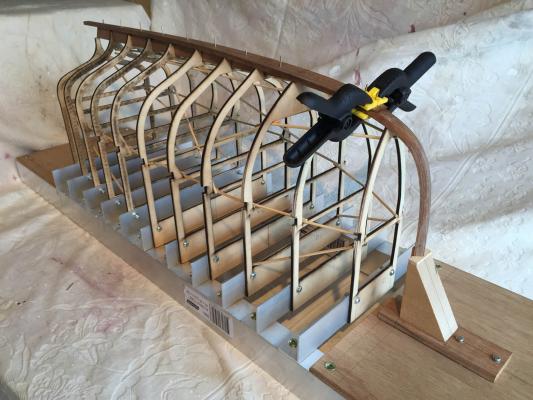
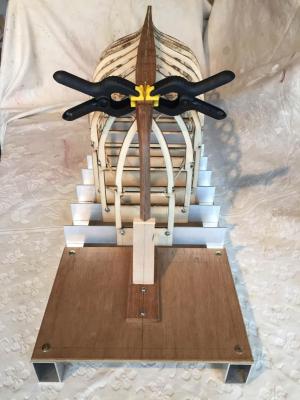
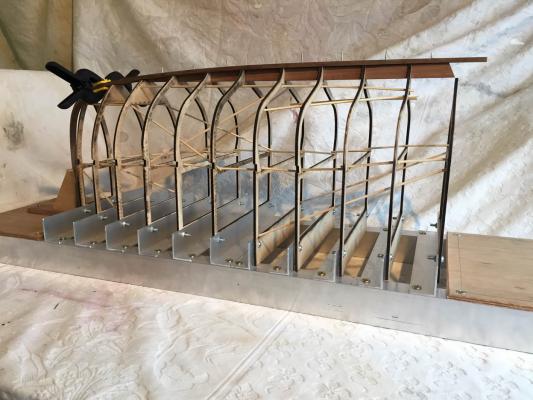
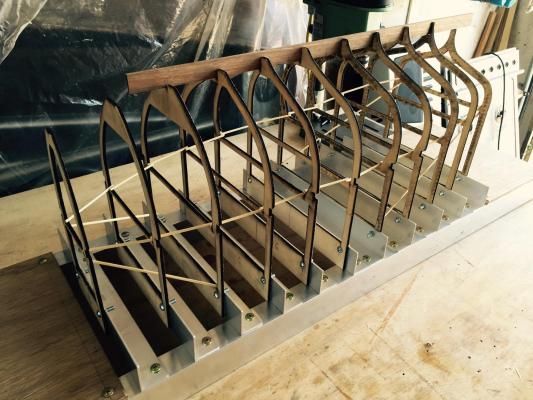
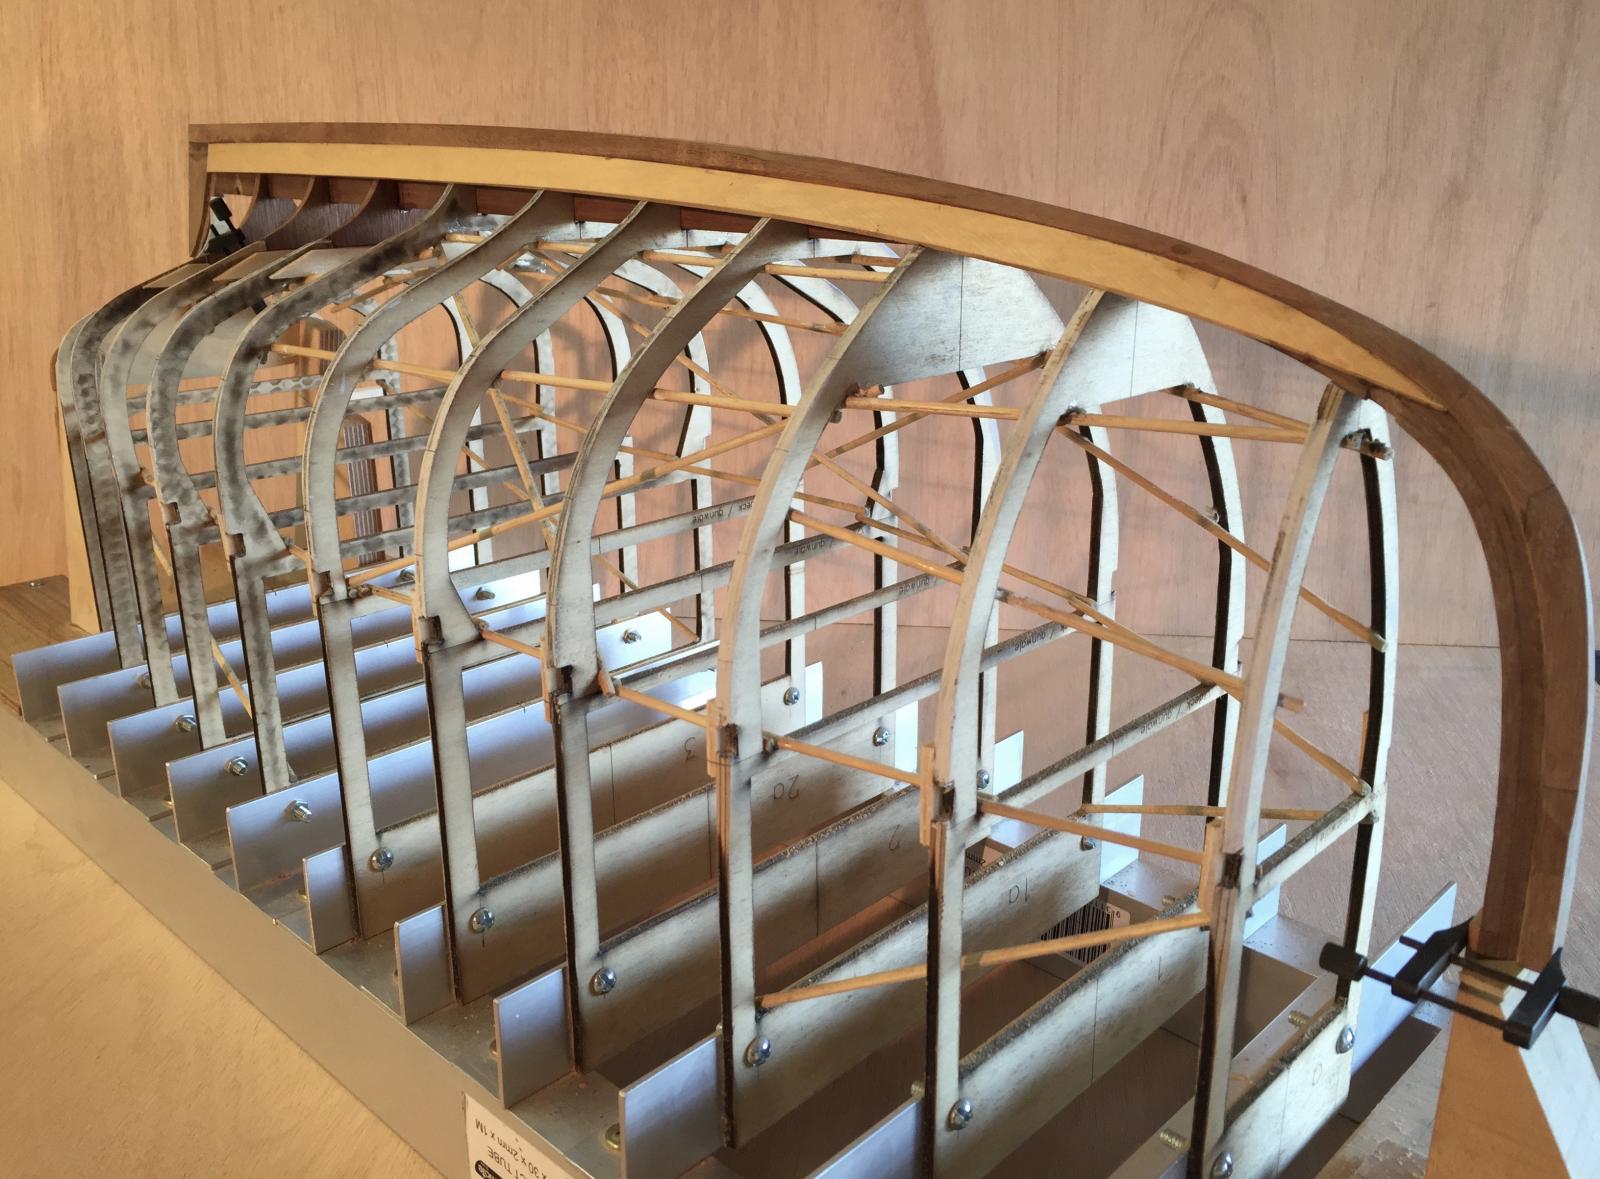
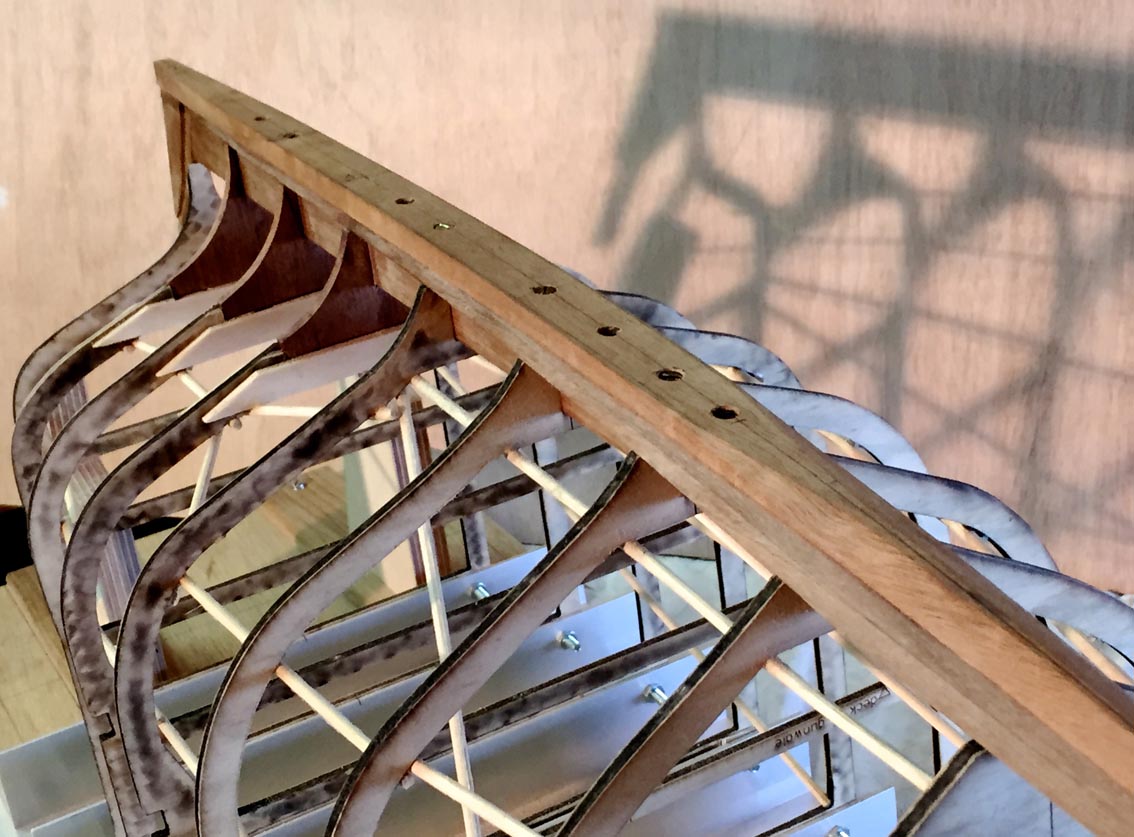
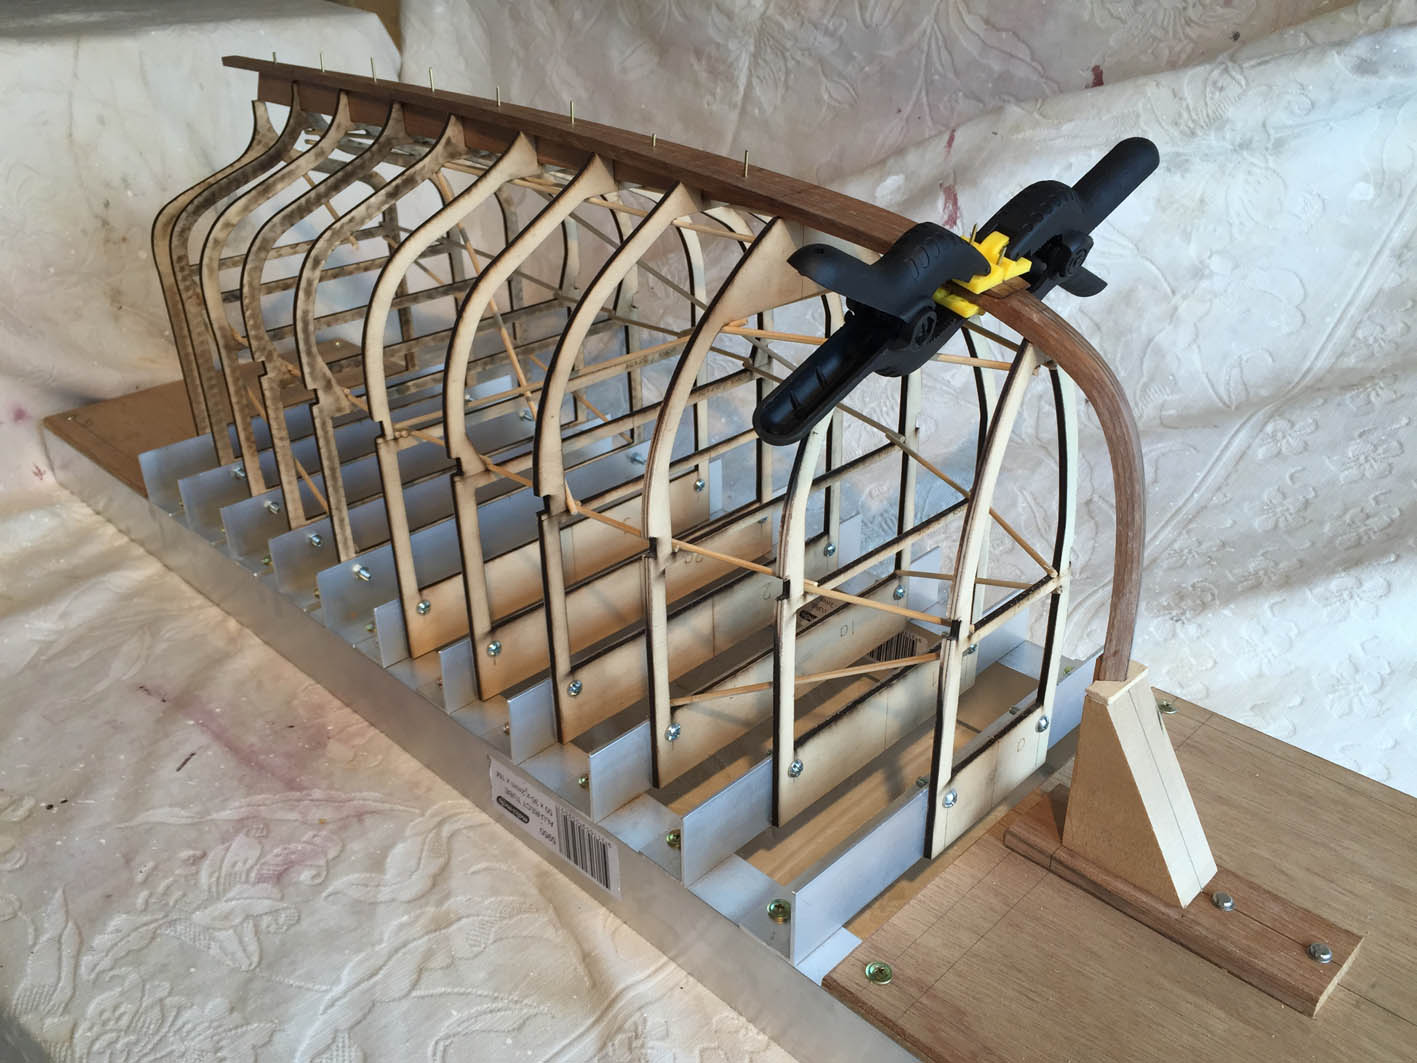
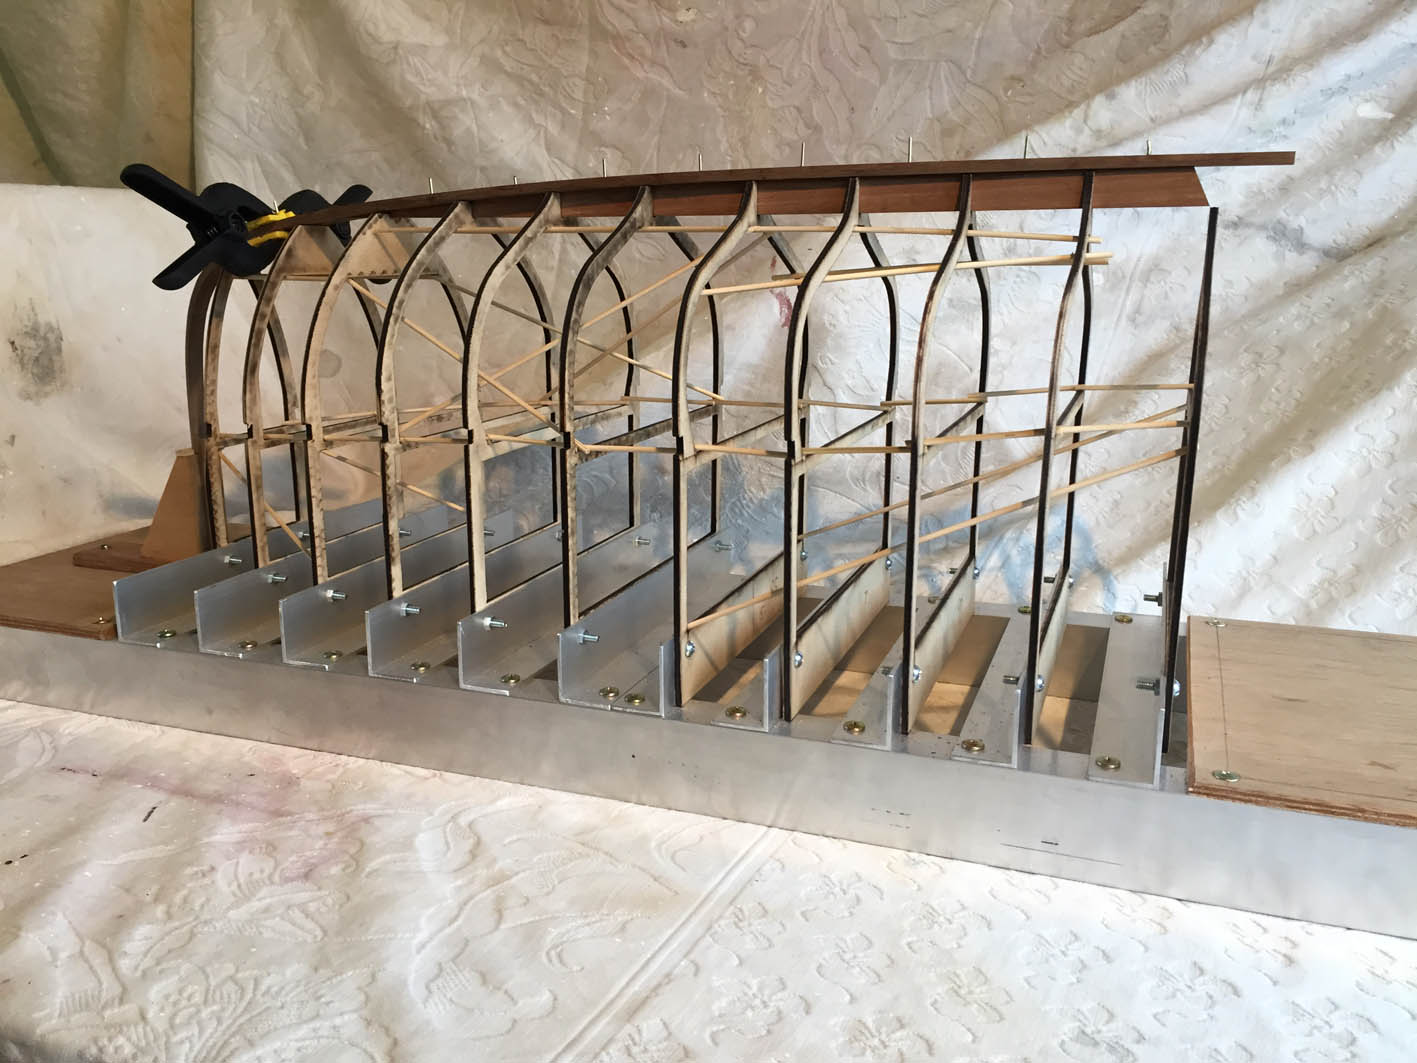
The inner stem was glued up & I've been bracing the moulds using bamboo skewers; the skewers look rough but they are effective; the material is quite rigid in short lengths & it is cheap & easy as well.
Next will be the slow & careful work of shaping the laminated keelson & inner stem, then fixing them to each other; then I'll work on the stern pieces & the transom. After that I can fair the moulds.
MP

-
Sorry about the photos being out of place & unrotated, I'm using an unfamiliar computer.
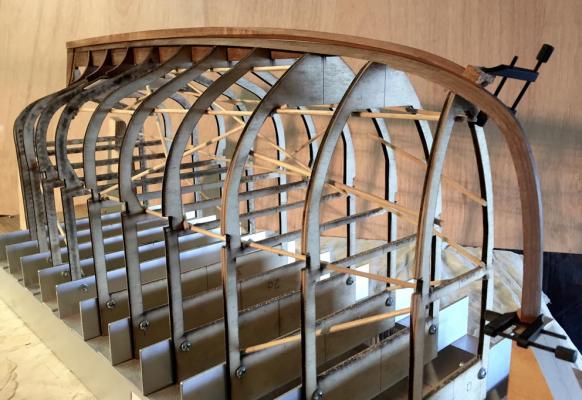
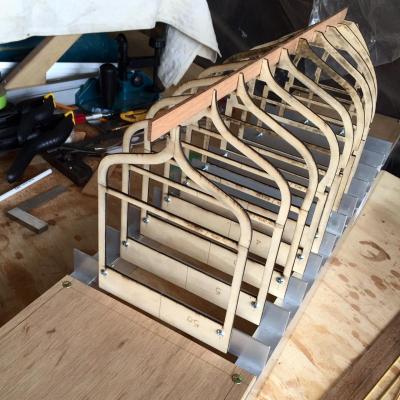
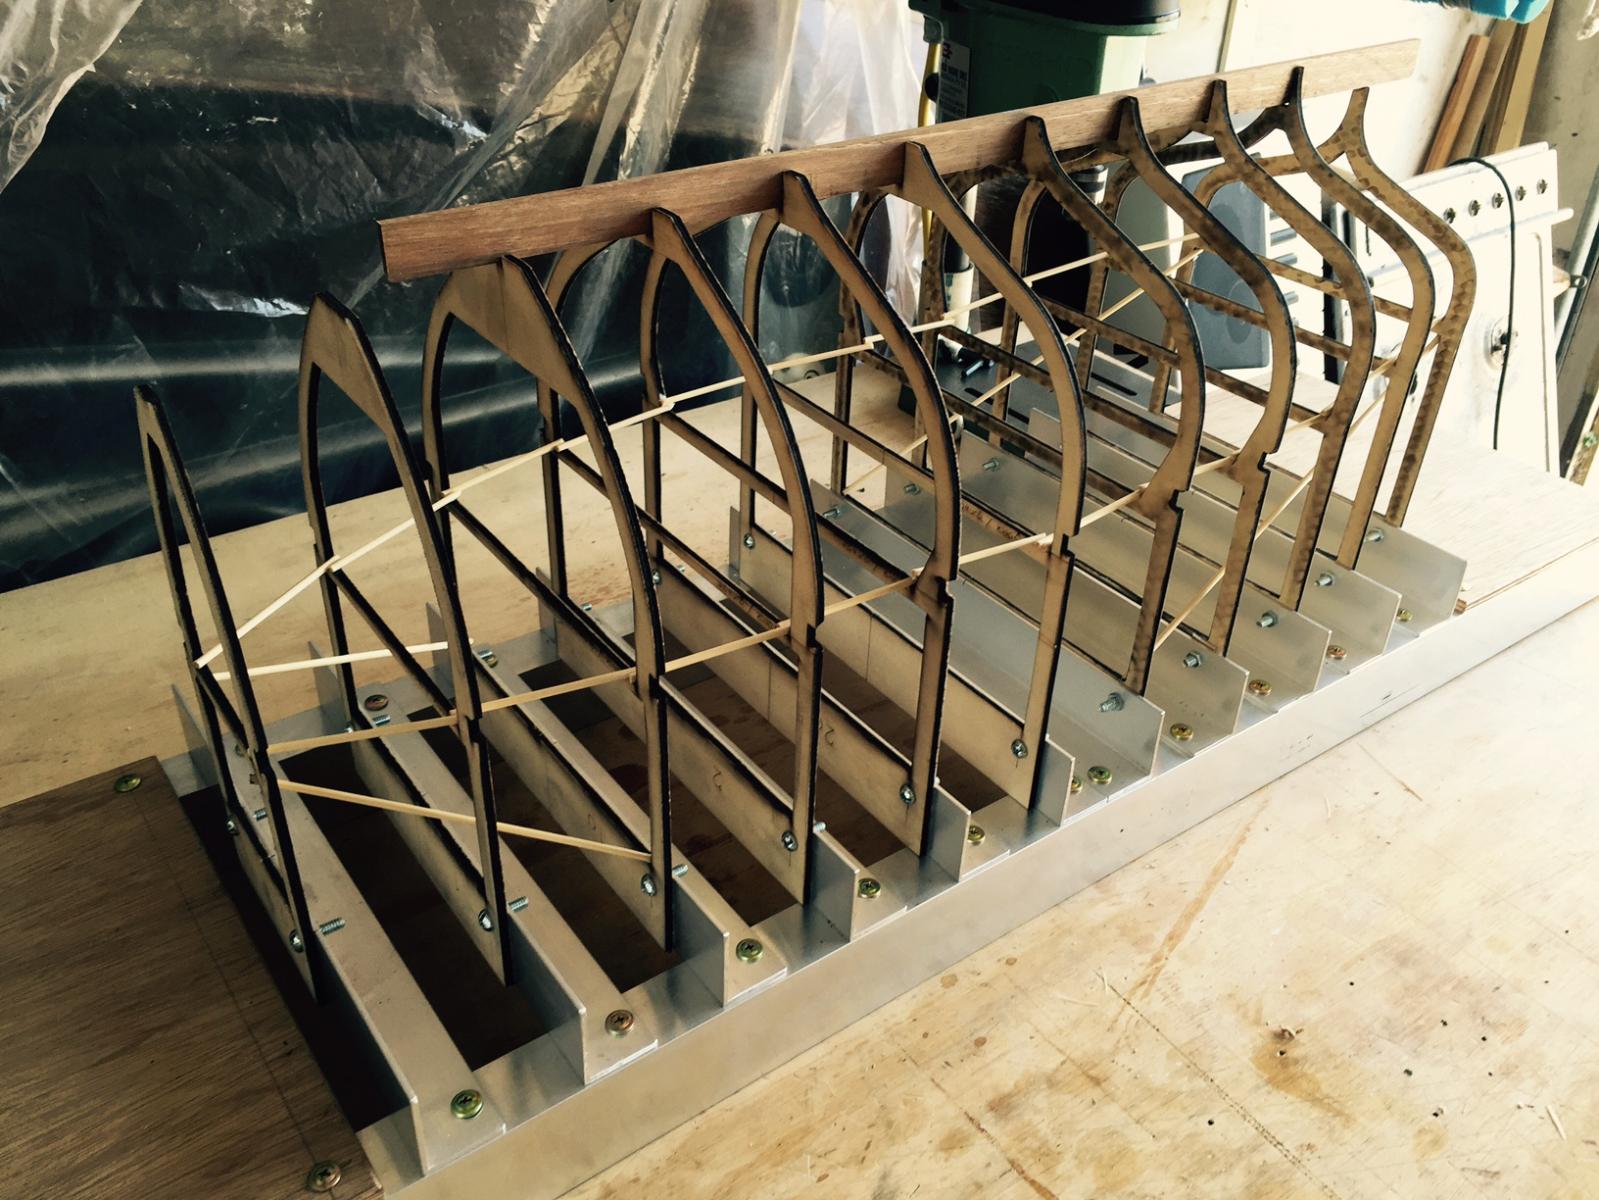
The moulds have been assembled on the framework (2 photos). In assembling it all, holes were drilled slightly oversized to give a little wriggle room in the alignment. I have put in the keel beam, it looks nice to have the beam in, as it helps to show off the shape. The beam is there to help hold the curve of the keelson to the right shape. The moulds are quite light & flexible, so bracing will be required to give it all enough rigidity to take the loads of planking. I'm thinking of using bamboo BBQ skewers for the bracing, as they are strong enough & can be removed easily with side cutters. I imagine having to remove some of them as the work progresses. Each end of the frame on top of the rails I've screwed ply panels, to brace the thing & they will be surfaces that the stem & transom will be supported off, in time.
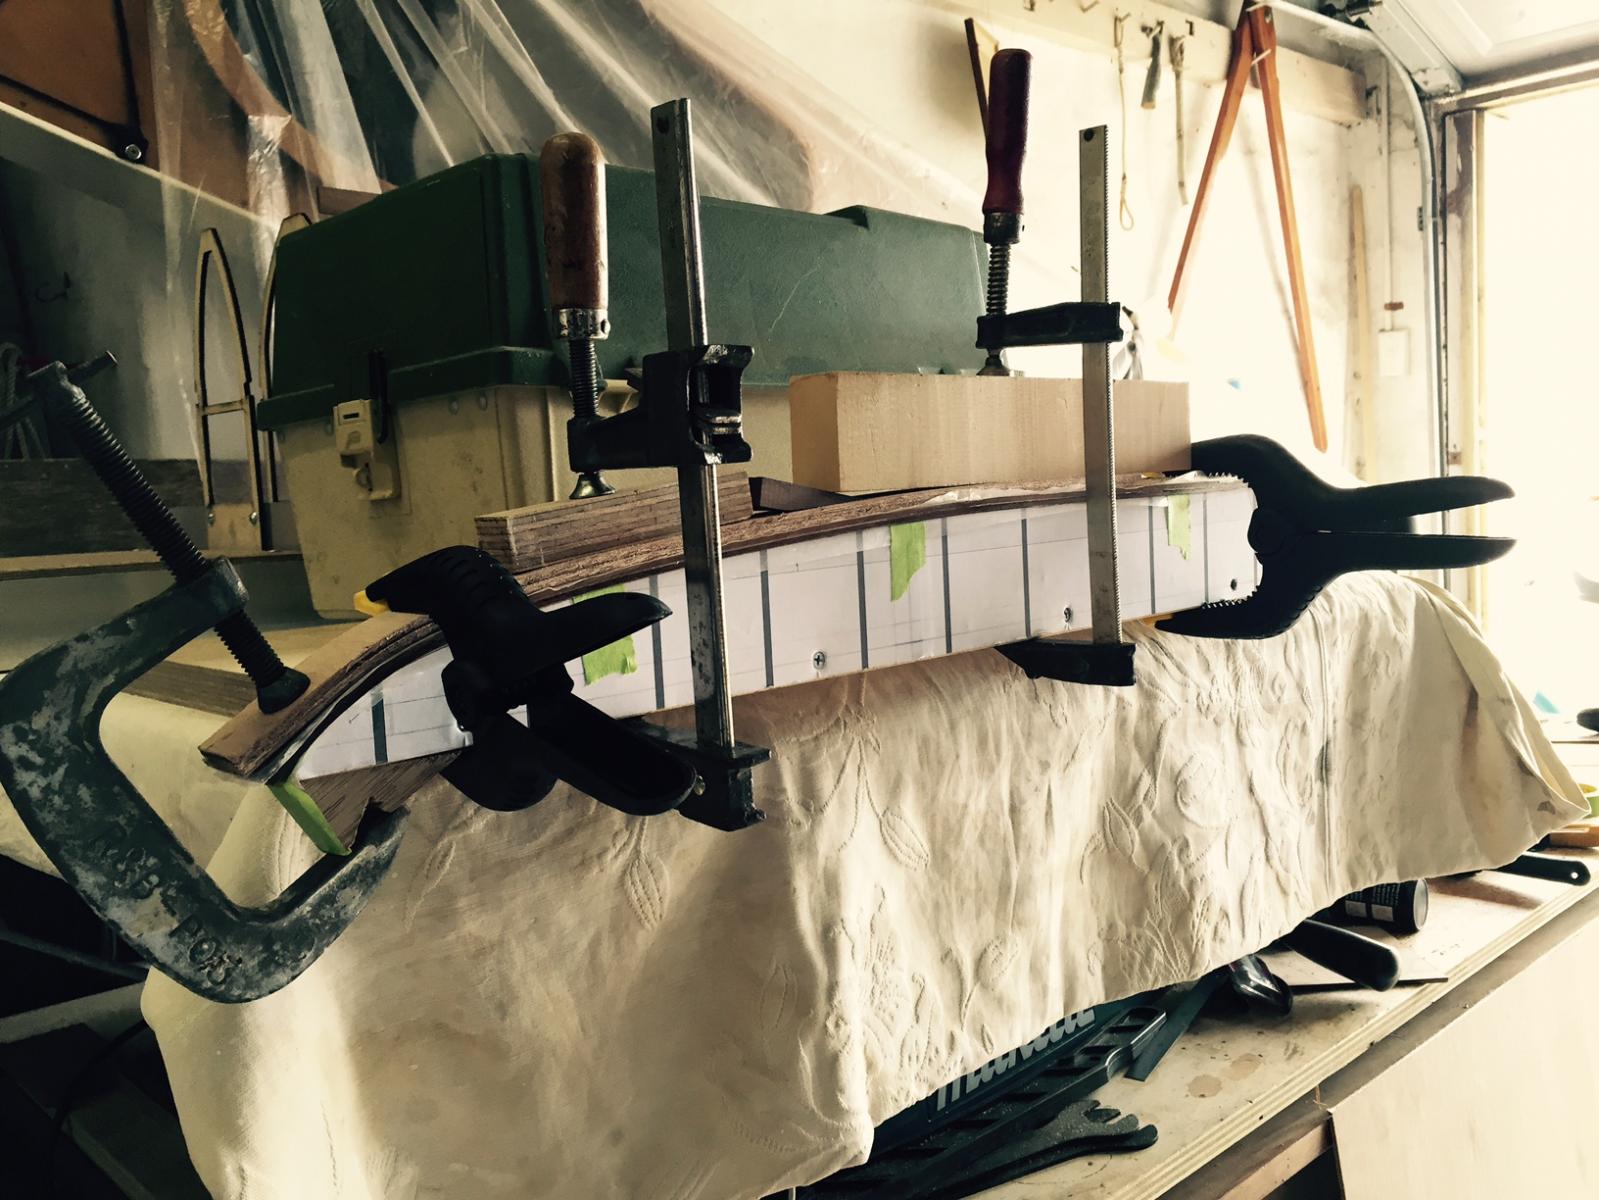
The keelson was glued today (photo) after curving the 2 laminations using a heat gun & then clamping them until they cooled. I will then shape the keel beam & glue & pin them together, the pins will be brass rods of around 1.5mm diameter, pushed into drilled holes & then sanded flush. The glue used is epoxy.
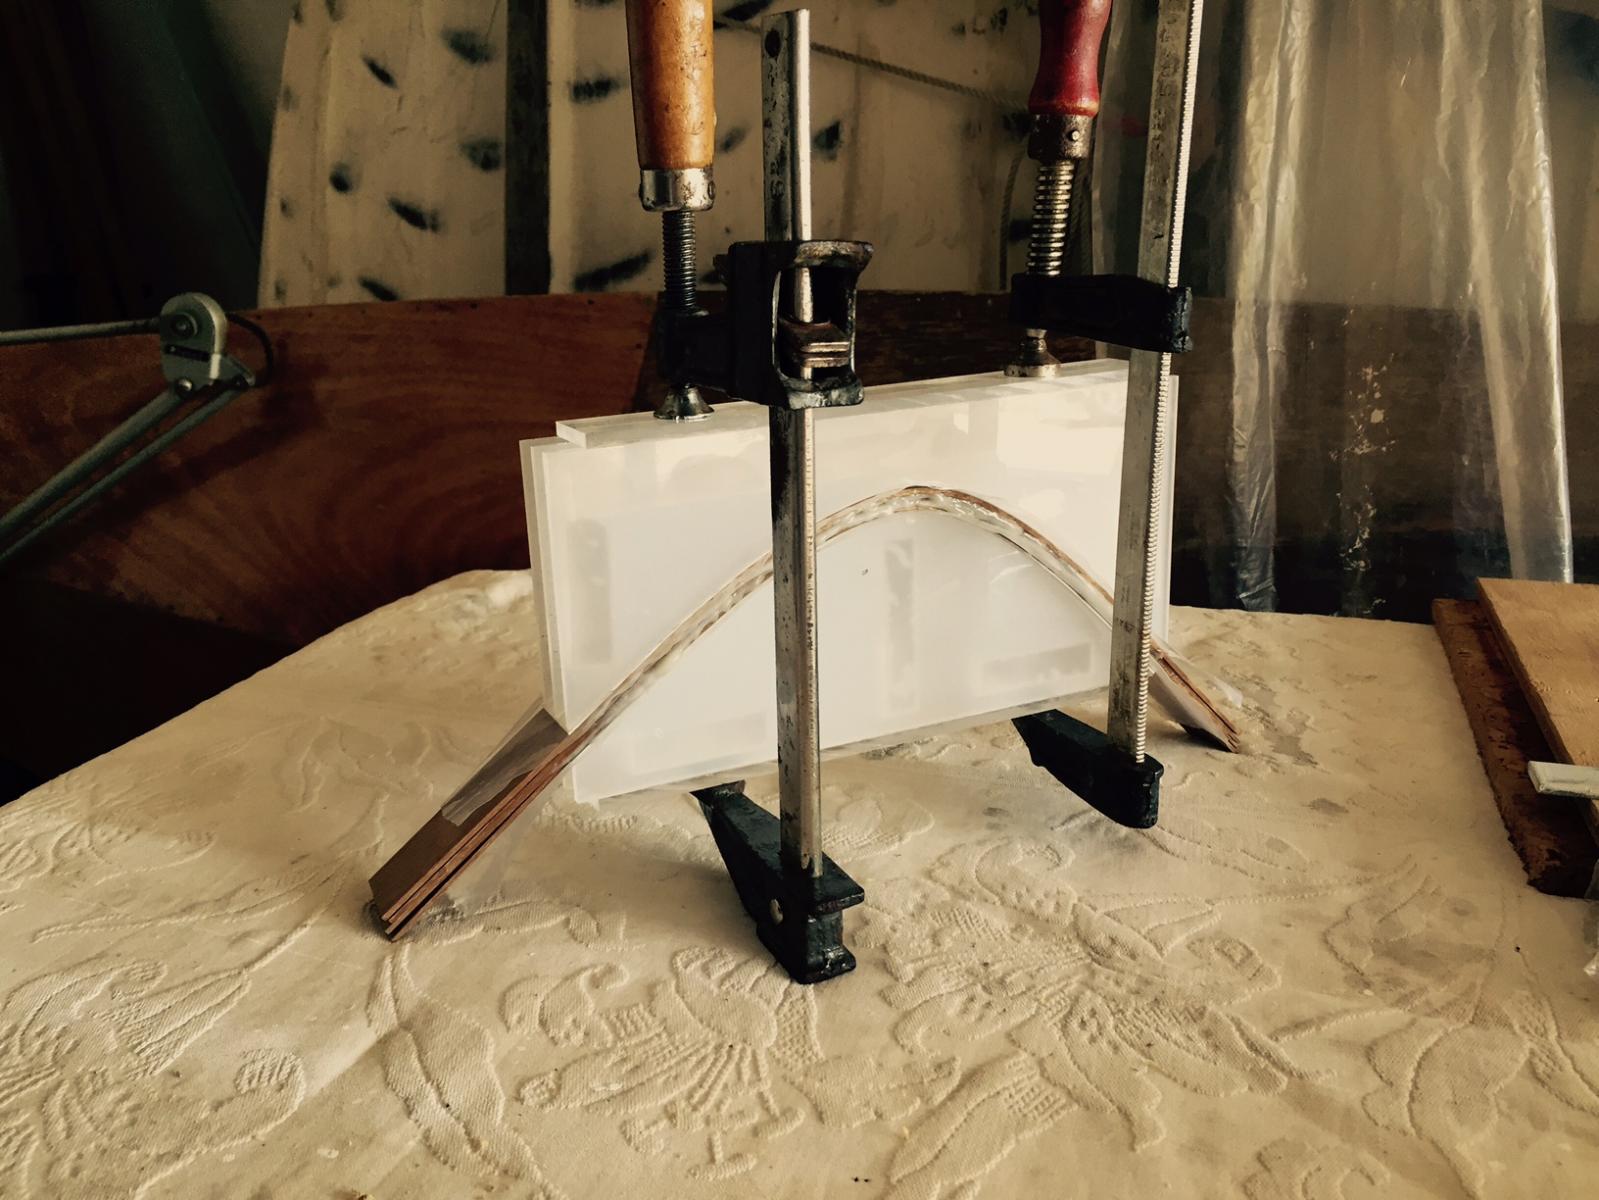
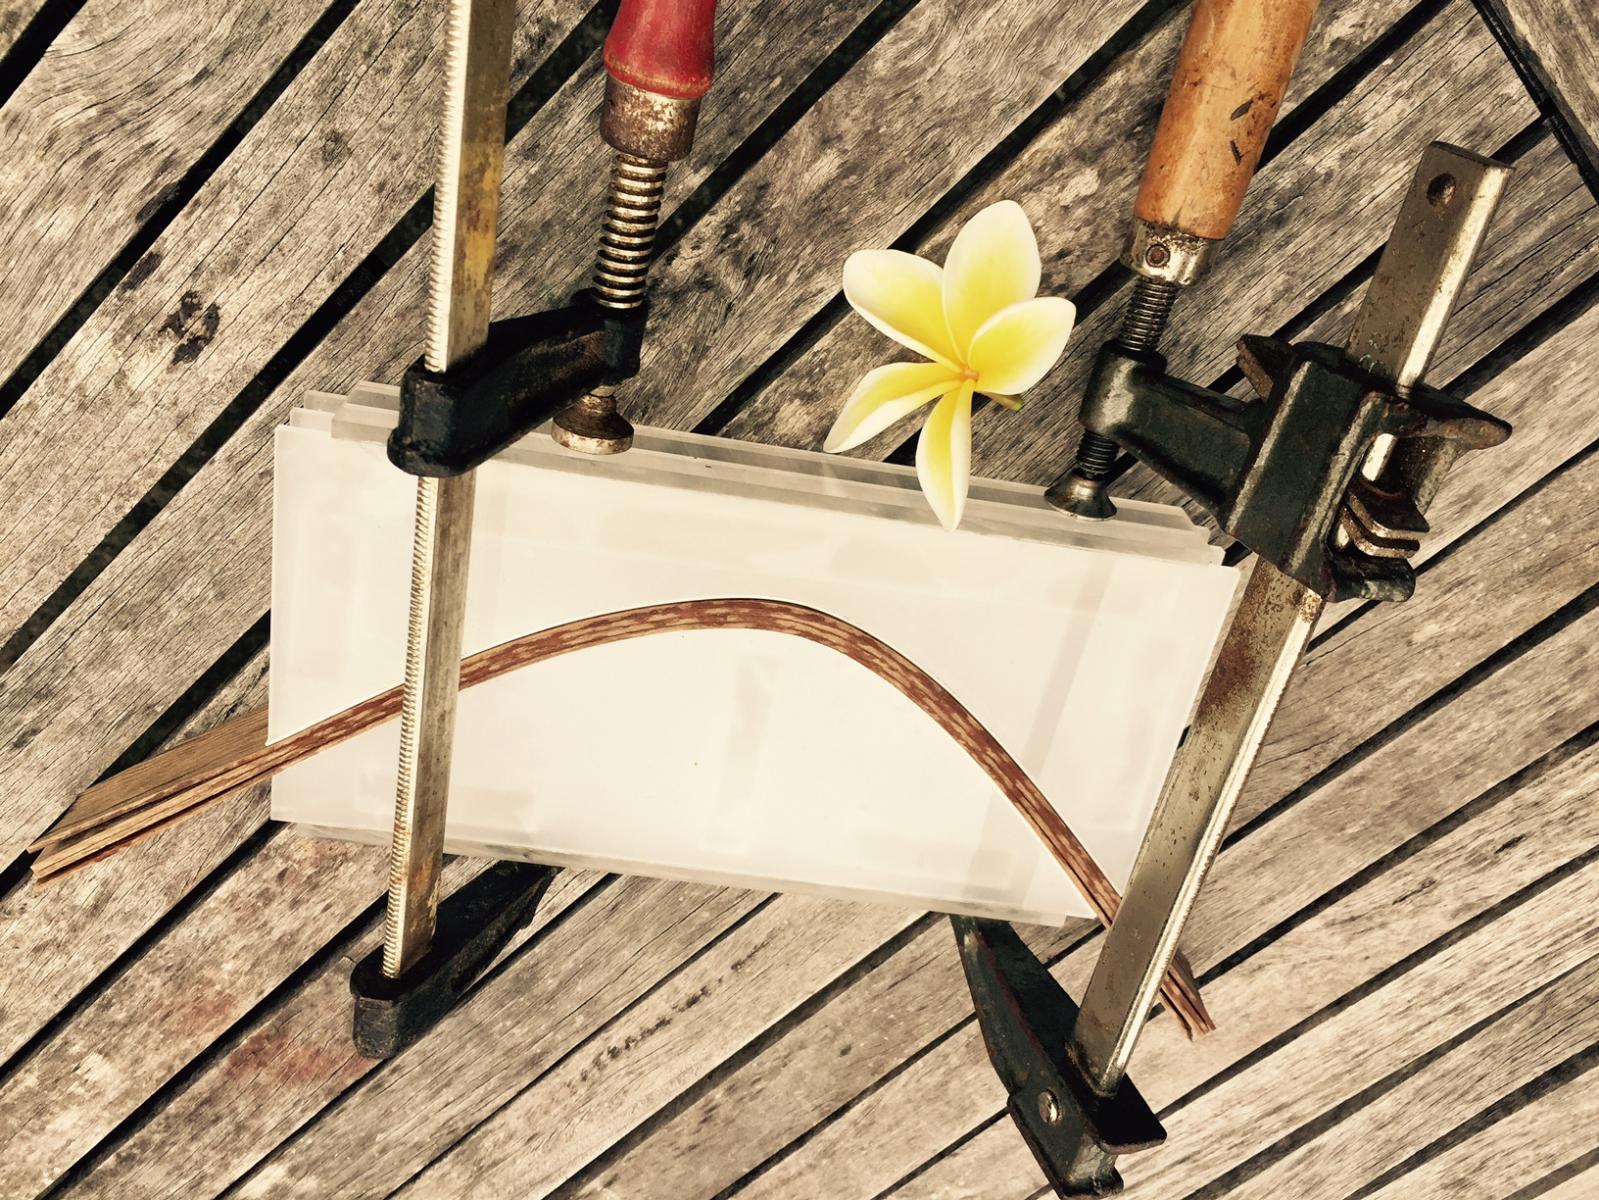
The inner stem laminations were soaked in cold water for 4 hours, which didn't seem to make them any more pliable, so I boiled them for 20 minutes & clamped them up in the jig (photo), then after a few hours put them in a drying jig, separated so that they will dry (photo). They will be glued up with epoxy tomorrow, & reclamped in the acrylic jig.
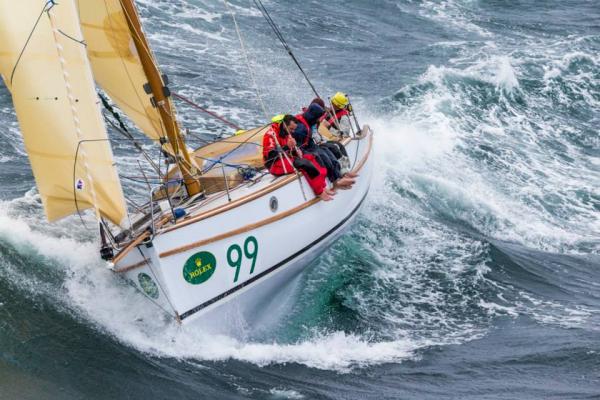
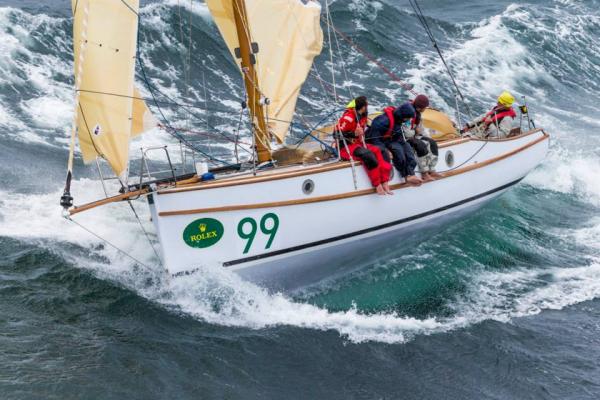
On a slightly separate note, the yacht Maluka mentioned earlier (an ocean-going version of this yacht) is currently competing in the Sydney-Hobart race, & as of tonight is 1st on handicap in all of the 4 divisions that she is eligible for, including the main one, IRC. That's pretty good for a small fat, heavy old boat with a gaff mainsail.
bye for now, MP


- Julie Mo, Mfelinger, Mirabell61 and 4 others
-
7
-
Thanks John, yes I have been following Maluka - I asked if there was a crew spot available on her, & for my sins I was nearly "lucky" enough to get the spot. If they are still outside come Tuesday afternoon they'll be in for a dusting ....
More photos soon
-
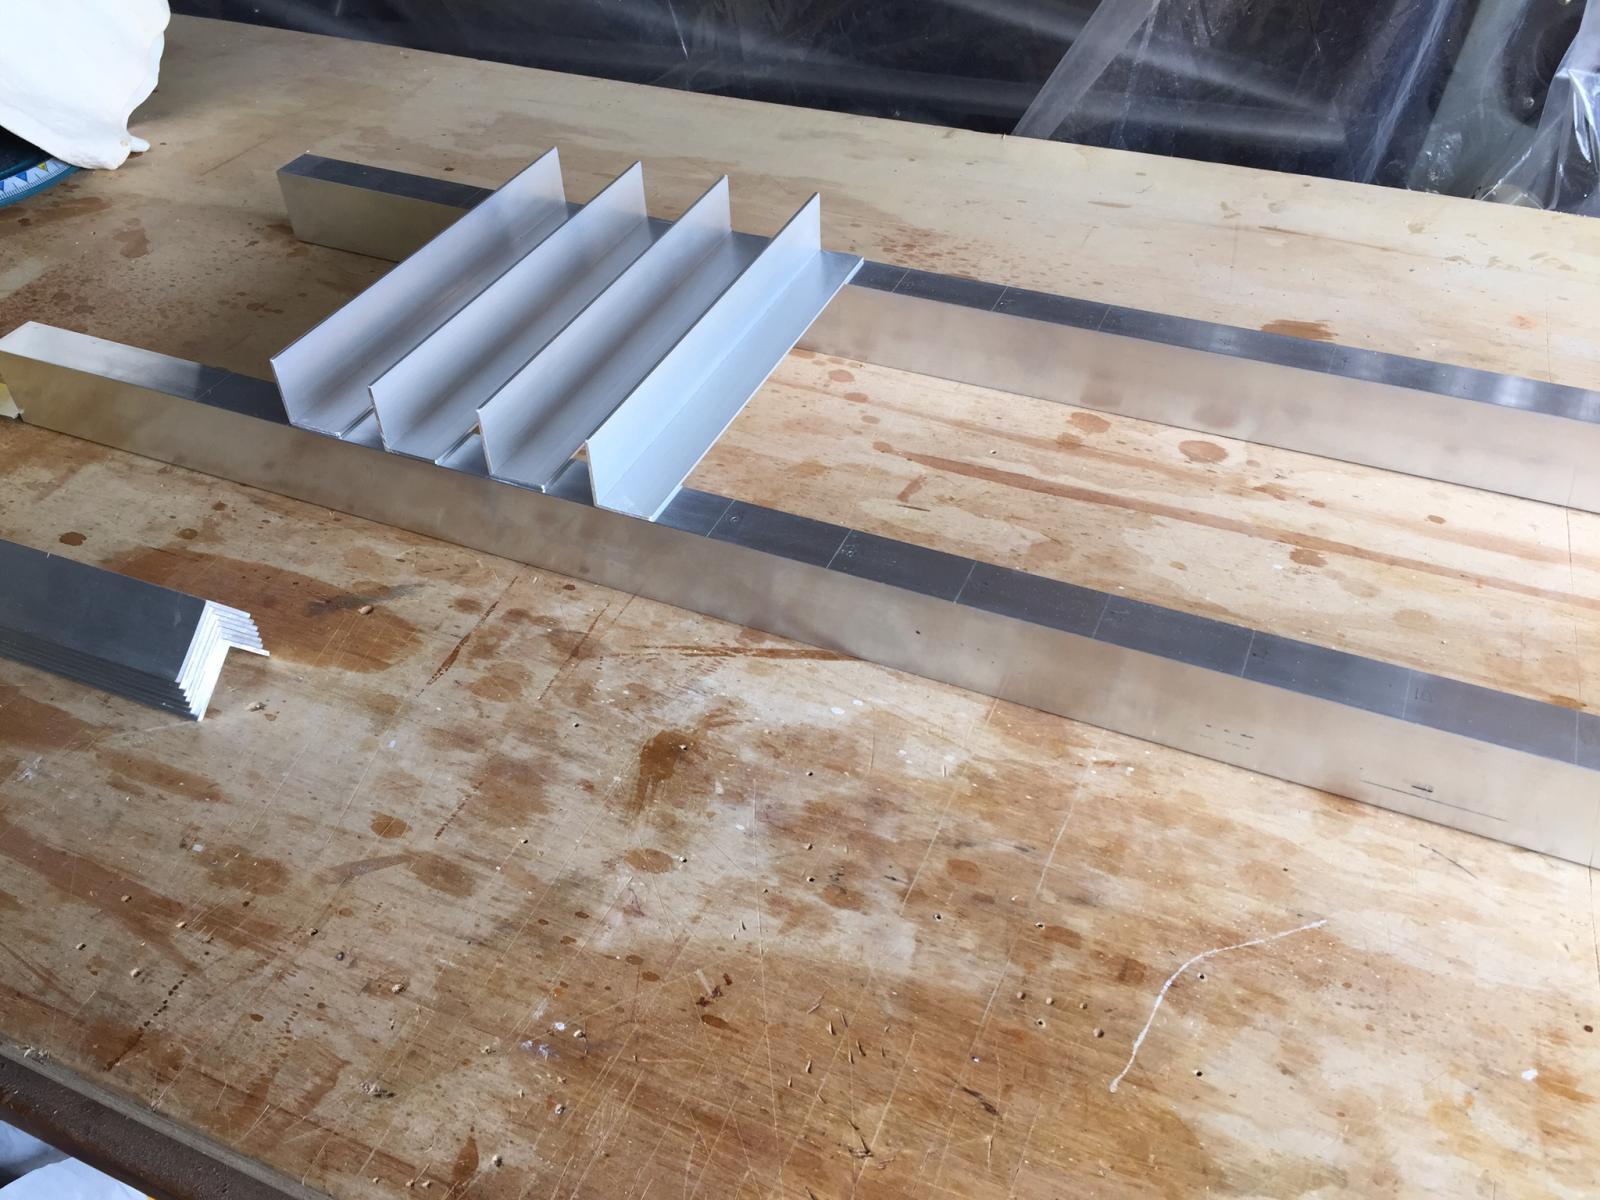
I started the building frame, & liked the idea of using aluminium as it is straight & accurate off the shelf, so I'm going to use RHS sections as rails with angles to hold the moulds. I like the way you can set out using a knife to accurately mark distances.
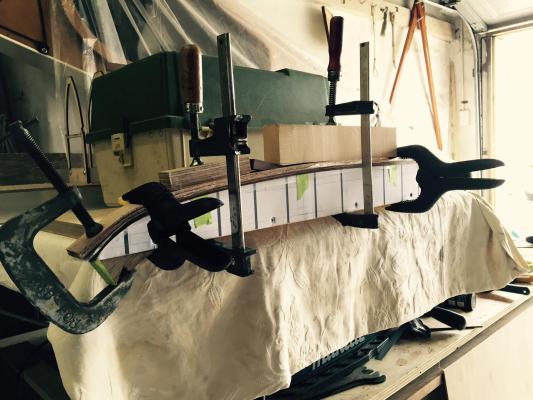
For the laminated keelson I made a laminating form by tacking a print of the profile on to a piece of wood & bandsawing it to shape. The timber strips are still too rigid at 3mm thick to want to do this shape so I'll try the heat gun to soften them.
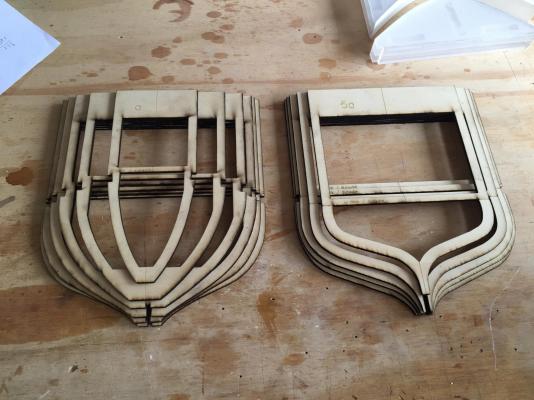
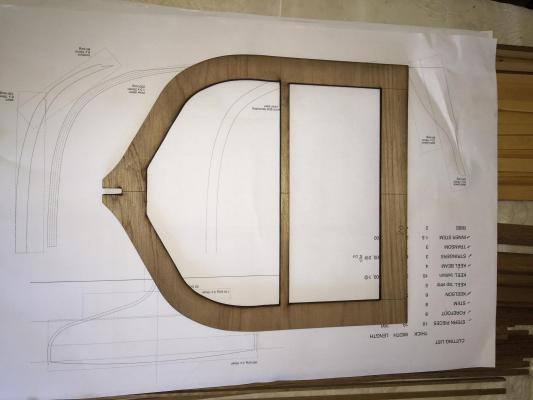
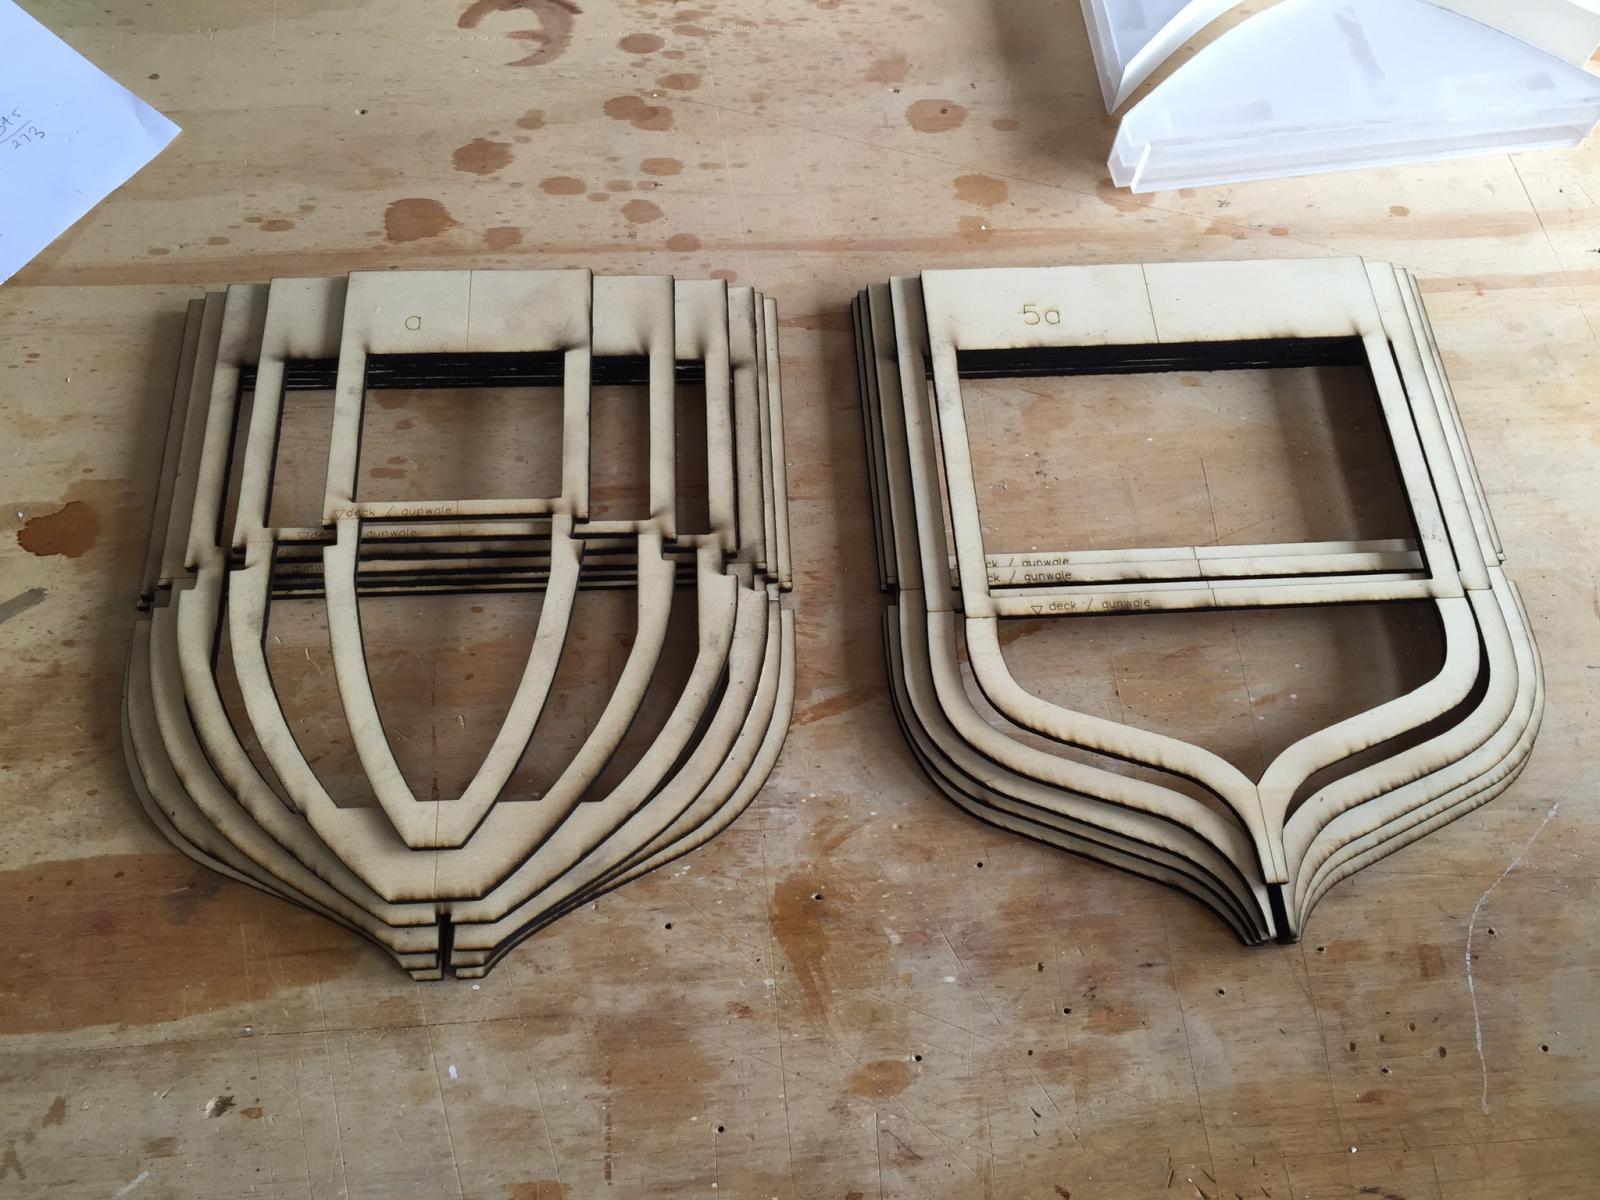
The moulds were all cut.
I also made a double piece laminating jig from acrylic & styrene, to glue laminate the inner stem piece. The acrylic is laser cut from 3mm sheet, 3 pieces each part of the jig. They were stacked with double 4.5mm strips between the sheets to achieve a total thickness of 27mm, & the meeting faces lined with 1mm styrene. The outer faces are parallel so that they can be clamped up. I will probably soak the timber, boil & clamp it, then let it cool, dry them & then glue laminate with epoxy.
I've been discussing the build with a boatbuilding friend, who advised against the method I was planning to use - he commented that to build the moulds to the inner faces of the ribs was used as a boatbuilding method but because it was less accurate in achieving the intended final shape, it was usually used for cheaper boats (2 layers before the outer face of the planking - ribs plus planking - instead of just one - the planking itself). He strongly recommended doing the mould shape to the inside of the planking for the sake of accuracy to the designed shape. So, this is the revised method: to plank straight on to the moulds & then fit the ribs to the hull. Originally I was going to lay the ribs on to the moulds, but now they will fit at whatever spacing in between the moulds & can lie in their own best-fit angles, I just need to provide notches in the keelson to push them into. For the most difficult ribs near the stern I might do some solid knees up to the turn of the bilge. The planks will just have to be well glued to each other to hold their shape, then fit ribs, some deck beams.
thanks, bye for now
MP

-
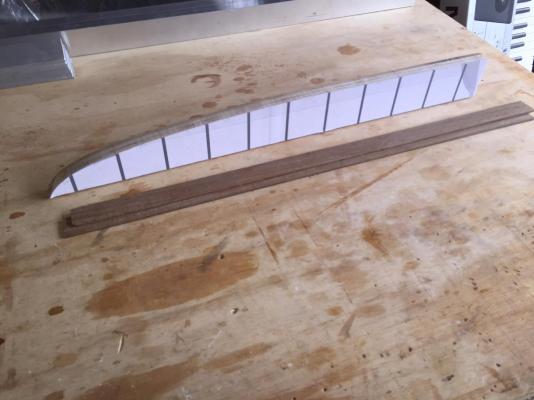
some more progress: a test mould in plywood & some timber cutting
test mould - the cut removed some timber so I'll adjust them to allow for the 0.5mm loss
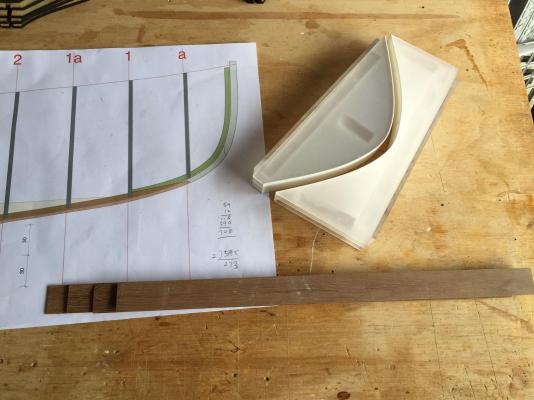
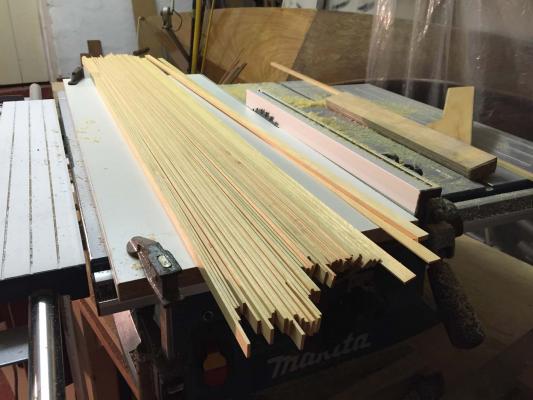
timber strips L to R: stringers (Spotted Gum & Blackbutt); transom (Huon Pine); strips for stern knee, stem & forefoot, keelson beam (Spotted Gum); keelson laminations (2 @ 3mm, Spotted Gum); Inner stem laminations (4 @1.5mm, Spotted Gum)

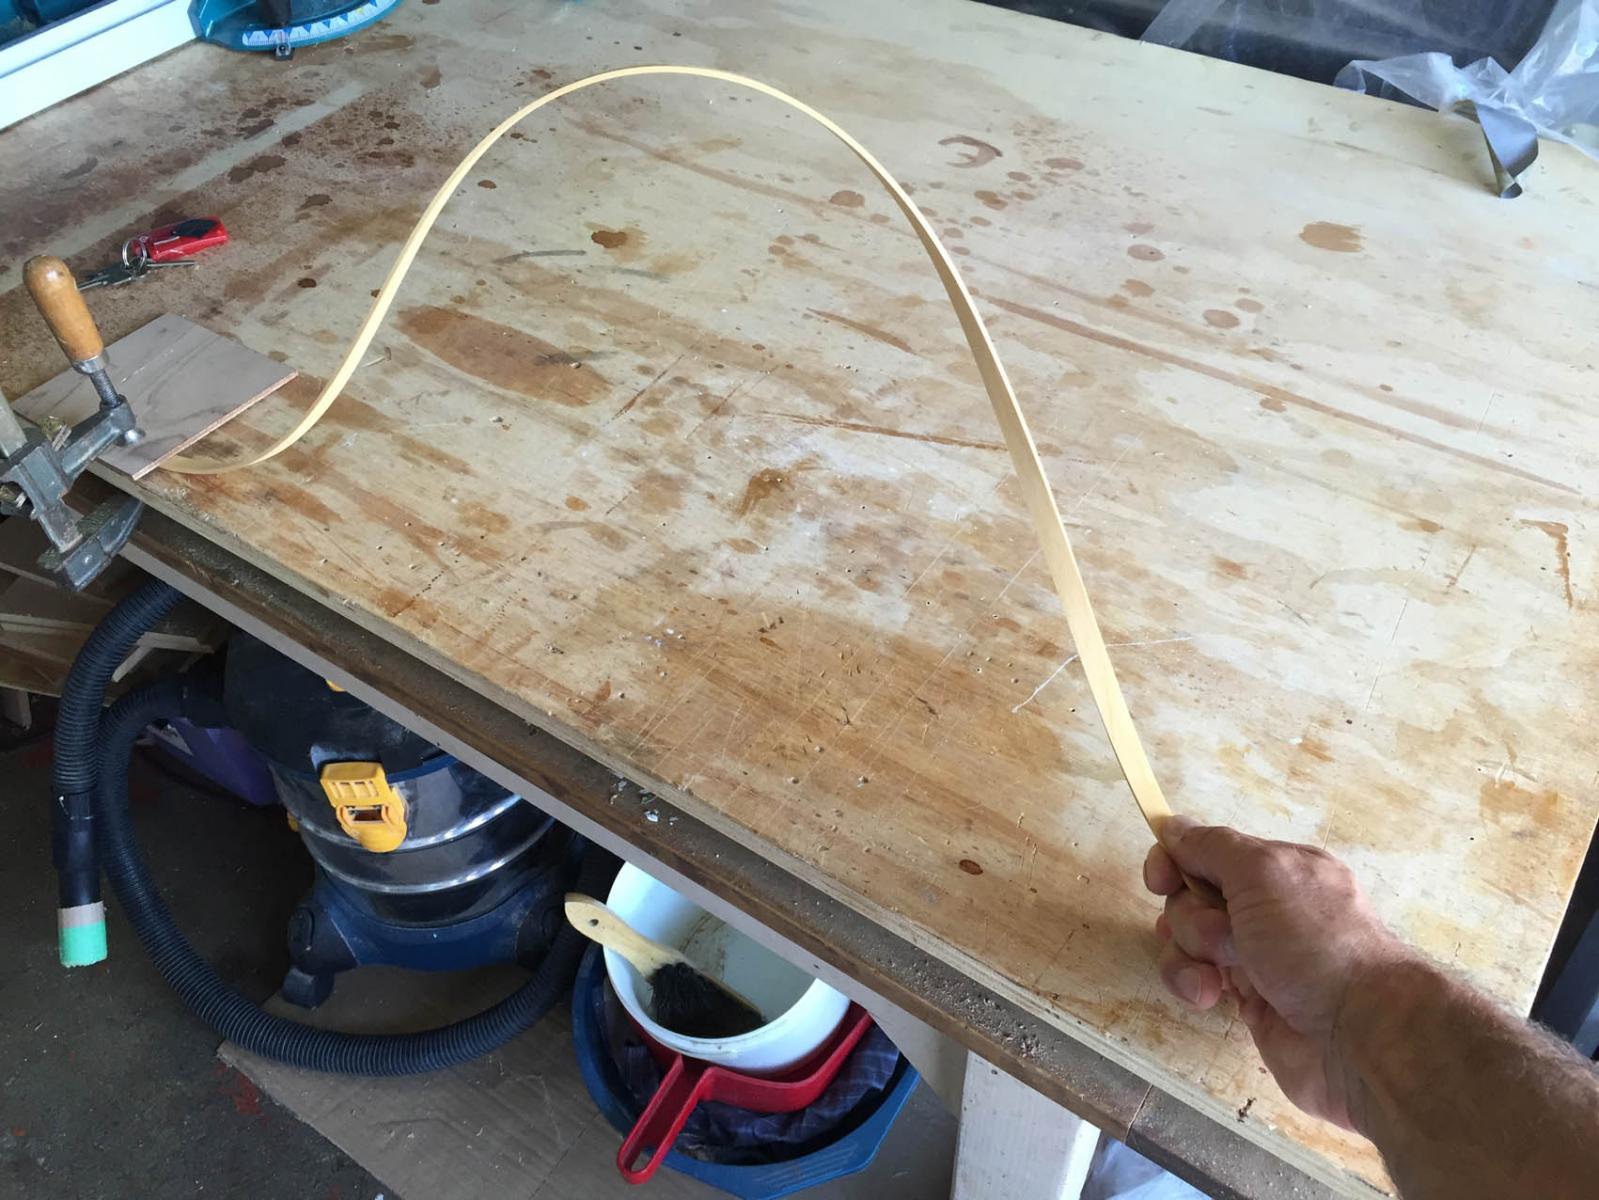
Planking, (Huon Pine 2 x 12ish)
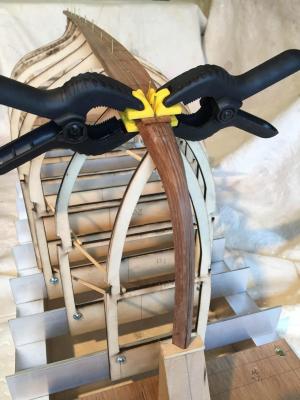
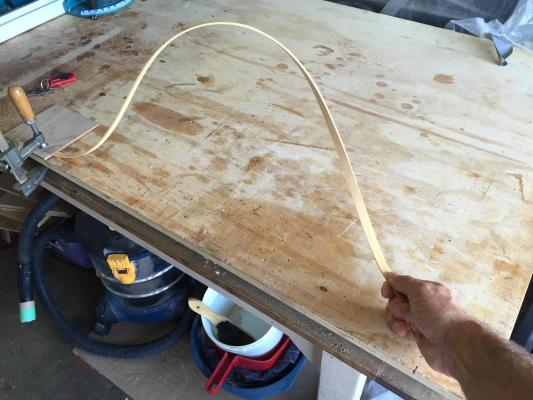
Huon Pine is a famous timber for planking boats, its durability is highly respected, but what is probably not well recognised is its amazing suppleness, the ability to happily take curves & twists. This is a strip of the future planking 2 x 12mm.
thanks, bye for now
MP
- Twister, avsjerome2003, yvesvidal and 9 others
-
12
-
Thank you all, it really does give a burst of energy to hear that others are interested also. To me, the whole Cliff Gale story is one of our great local yachting tales, & to be able to build an unbuilt design of this intuitive designer is extra special. As an aside, his son Bill retired earlier this year after 70 seasons of racing, excluding the war years, the last 50 or so seasons on his beloved Ranger.


Propitious (FR-927) by kees de mol - FINISHED - 1/26 Scale - 10 m Fishing Trawler
in - Build logs for subjects built 1901 - Present Day
Posted
sensational work,
MP